html css - webdevelopment.mit.eduwebdevelopment.mit.edu/2017/pages/lectures/webday2_htmlcss.pdf ·...
TRANSCRIPT

HTML & CSS
6.148Yolanda Zhou
go.6148.io/uiux

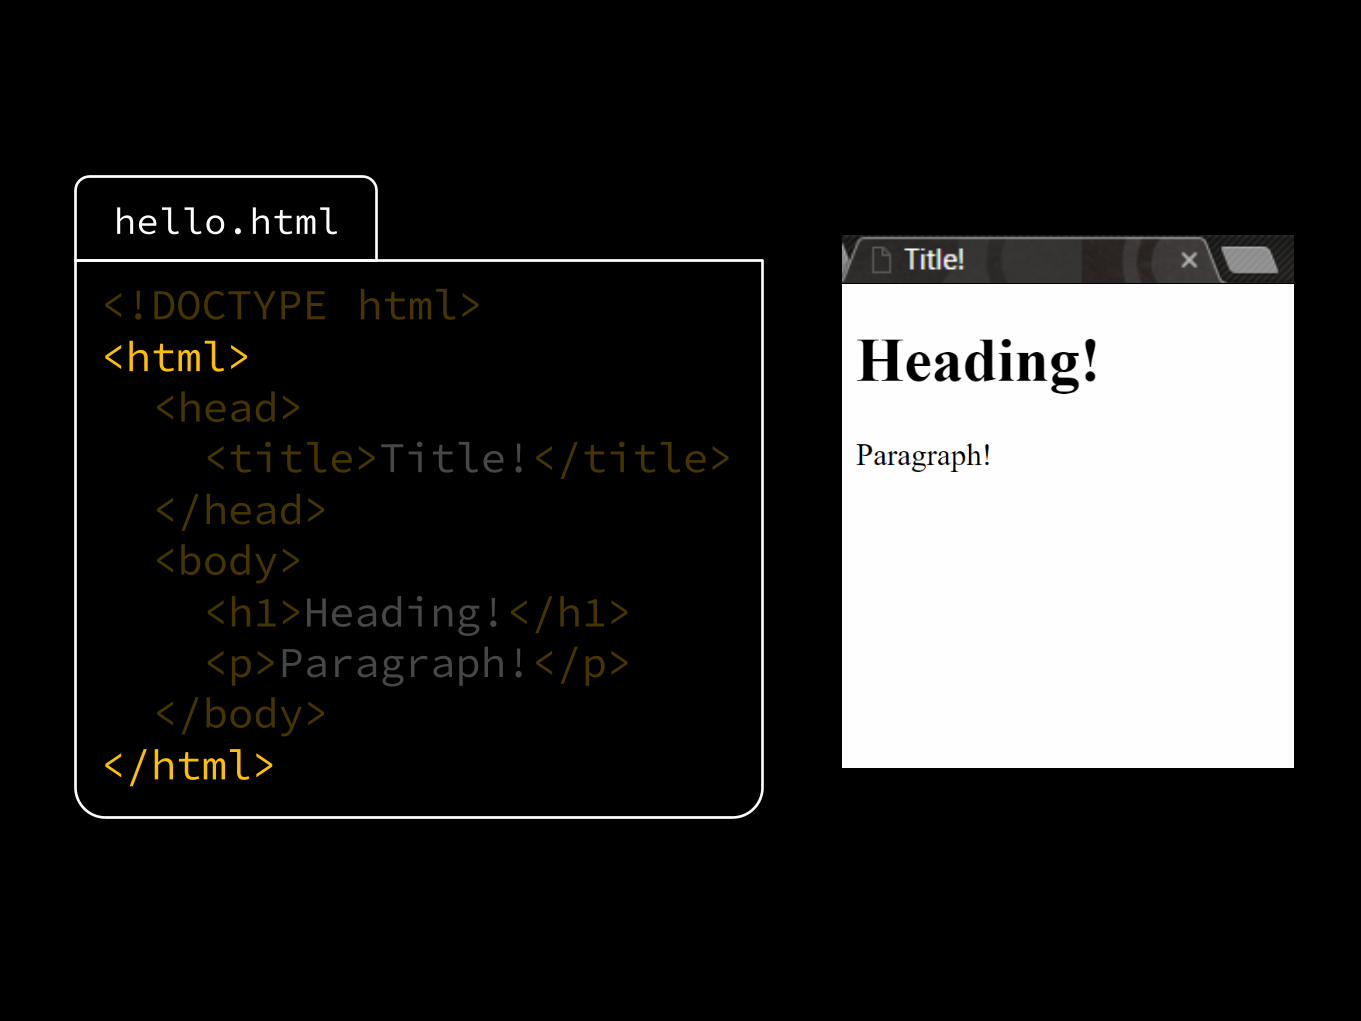
HTMLHypertext Markup Language
The language your web browser uses to describe the content and structure on web pages

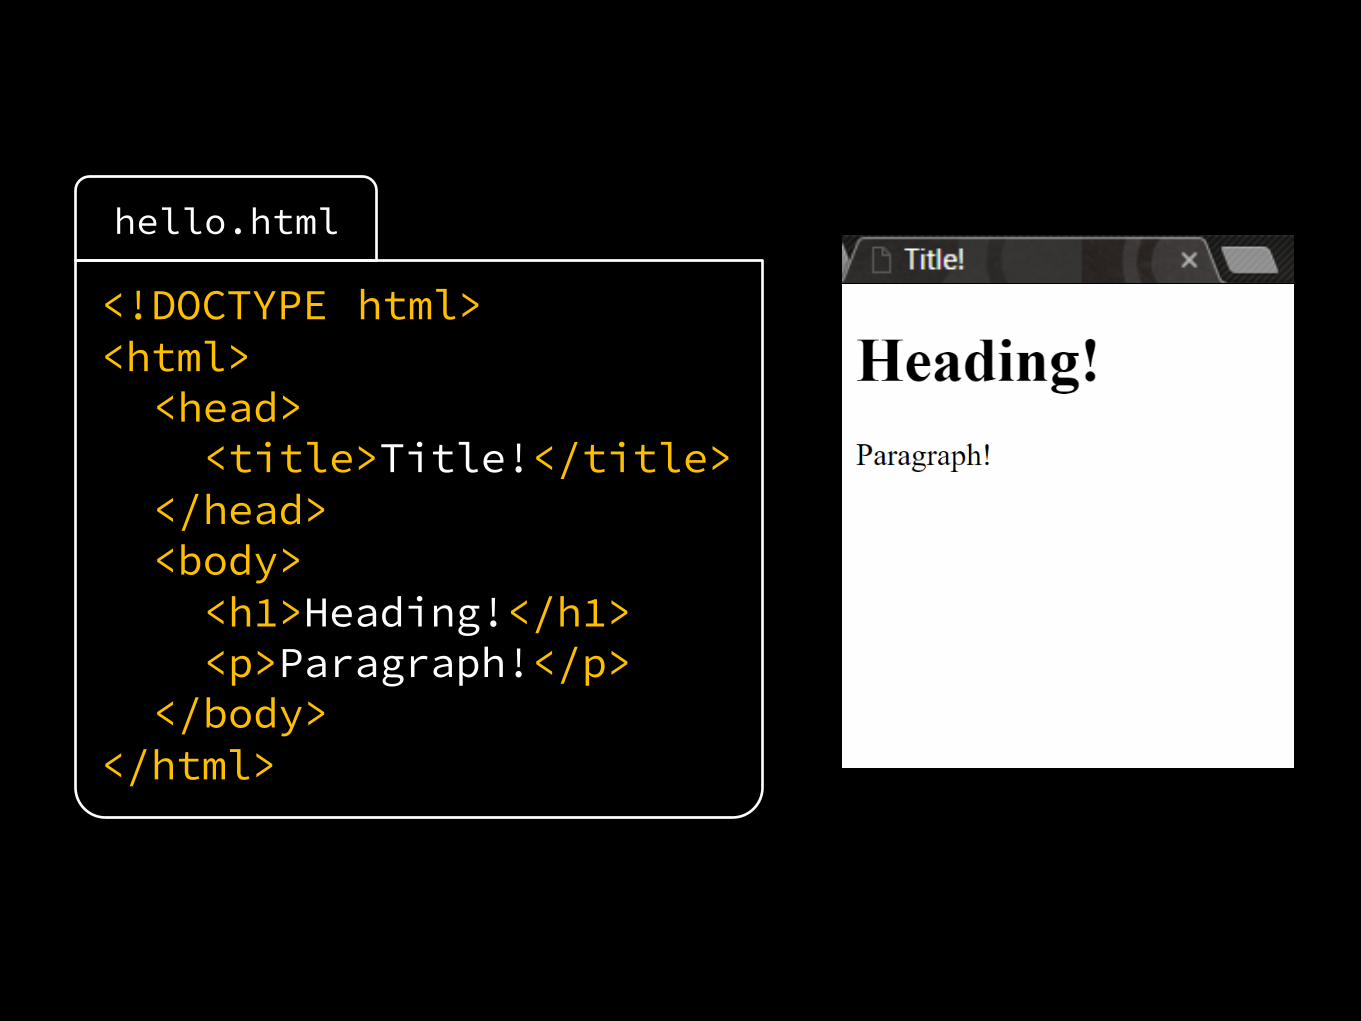
<!DOCTYPE html><html>
<head><title>Title!</title>
</head><body>
<h1>Heading!</h1><p>Paragraph!</p>
</body></html>
hello.html

<!DOCTYPE html><html>
<head><title>Title!</title>
</head><body><h1>Heading!</h1><p>Paragraph!</p>
</body></html>
hello.html

<!DOCTYPE html><html>
<head><title>Title!</title>
</head><body><h1>Heading!</h1><p>Paragraph!</p>
</body></html>
hello.html
<!DOCTYPE html><html>
<head><title>Title!</title>
</head><body><h1>Heading!</h1><p>Paragraph!</p>
</body></html>
hello.html
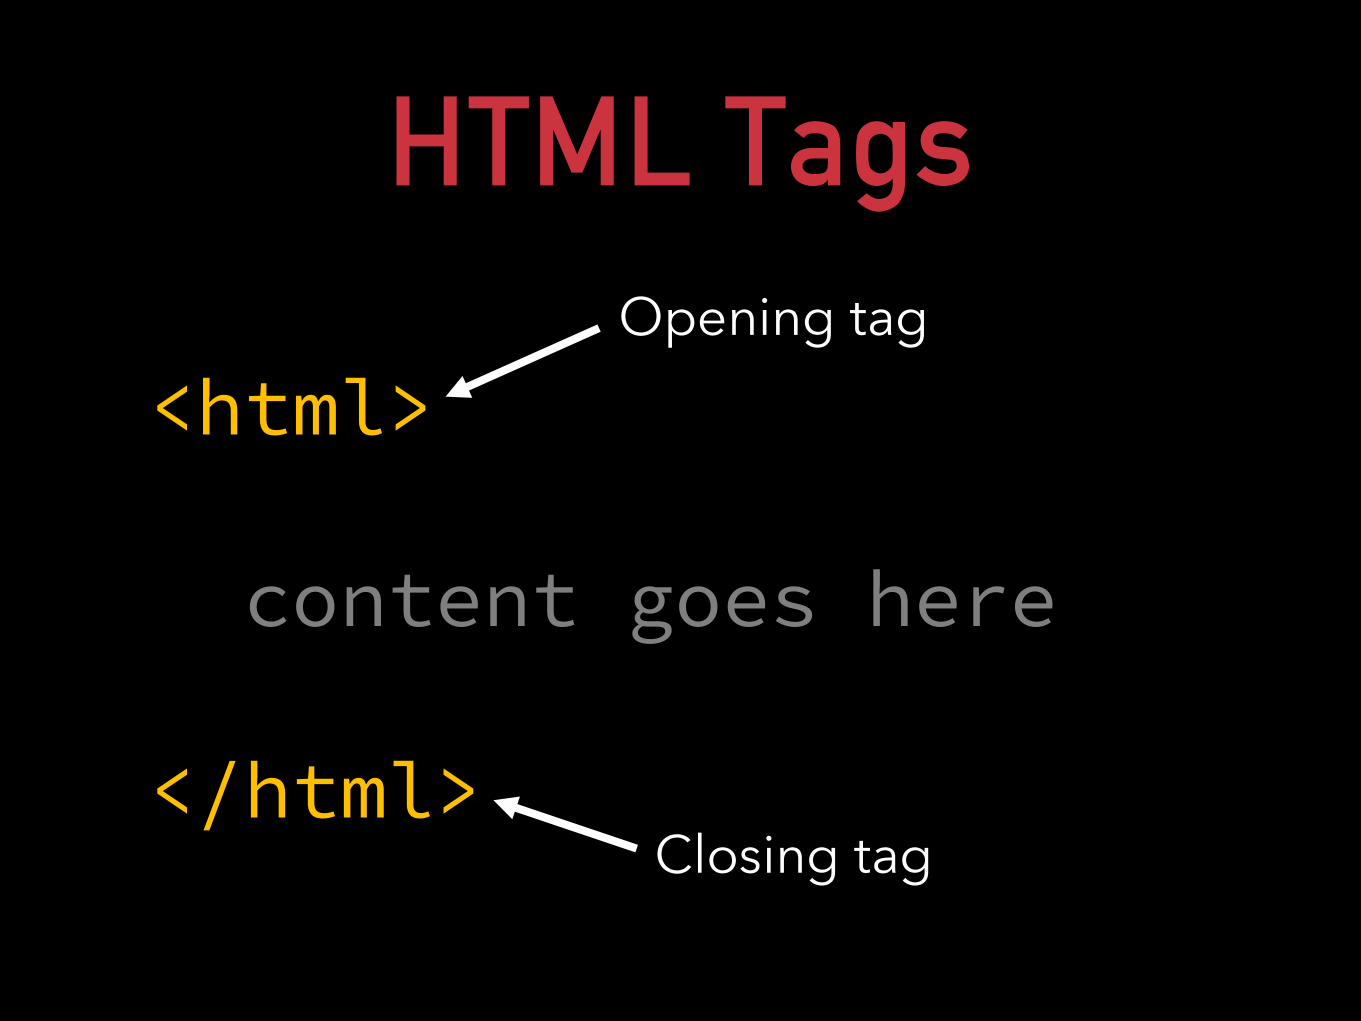
HTML Tags
<html>
content goes here
</html>
Opening tag
Closing tag
<!DOCTYPE html><html>
<head><title>Title!</title>
</head><body><h1>Heading!</h1><p>Paragraph!</p>
</body></html>
hello.html

HTML Tags
<a><b></a></b>

<!DOCTYPE html><html>
<head><title>Title!</title>
</head><body><h1>Heading!</h1><p>Paragraph!</p>
</body></html>
hello.html

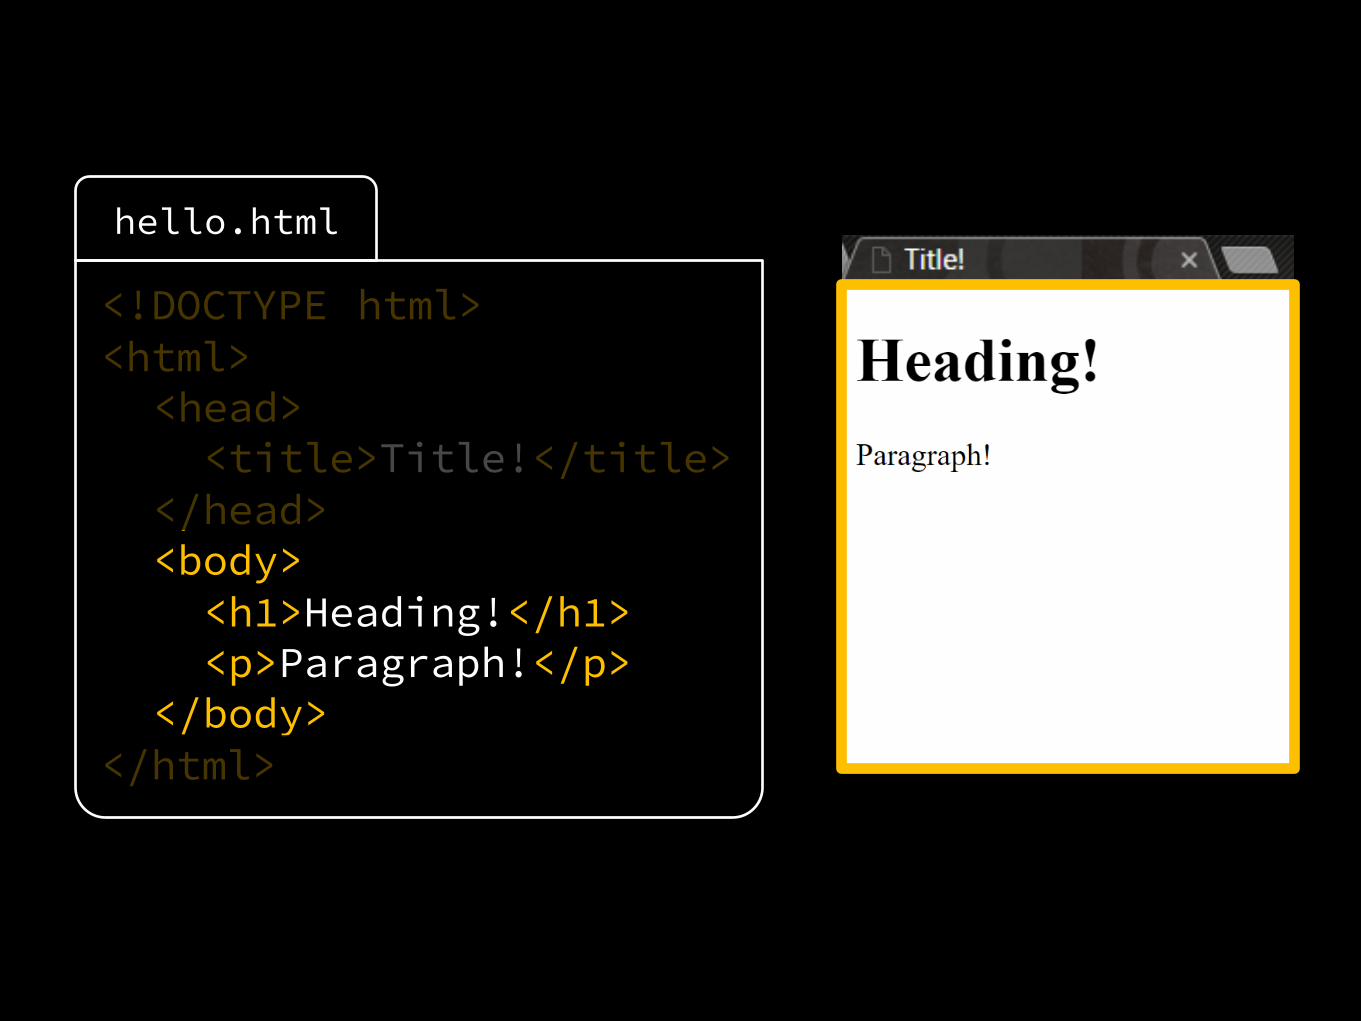
<!DOCTYPE html><html>
<head><title>Title!</title>
</head><body><h1>Heading!</h1><p>Paragraph!</p>
</body></html>
hello.html

<!DOCTYPE html><html>
<head><title>Title!</title>
</head><body><h1>Heading!</h1><p>Paragraph!</p>
</body></html>
hello.html
<!DOCTYPE html><html>
<head><title>Title!</title>
</head><body><h1>Heading!</h1><p>Paragraph!</p>
</body></html>
hello.html

<!DOCTYPE html><html>
<head><title>Title!</title>
</head><body><h1>Heading!</h1><p>Paragraph!</p>
</body></html>
hello.html

<!DOCTYPE html><html>
<head><title>Title!</title>
</head><body><h1>Heading!</h1><p>Paragraph!</p>
</body></html>
hello.html

<!DOCTYPE html><html>
<head><title>Title!</title>
</head><body><h1>Heading!</h1><p>Paragraph!</p>
</body></html>
hello.html

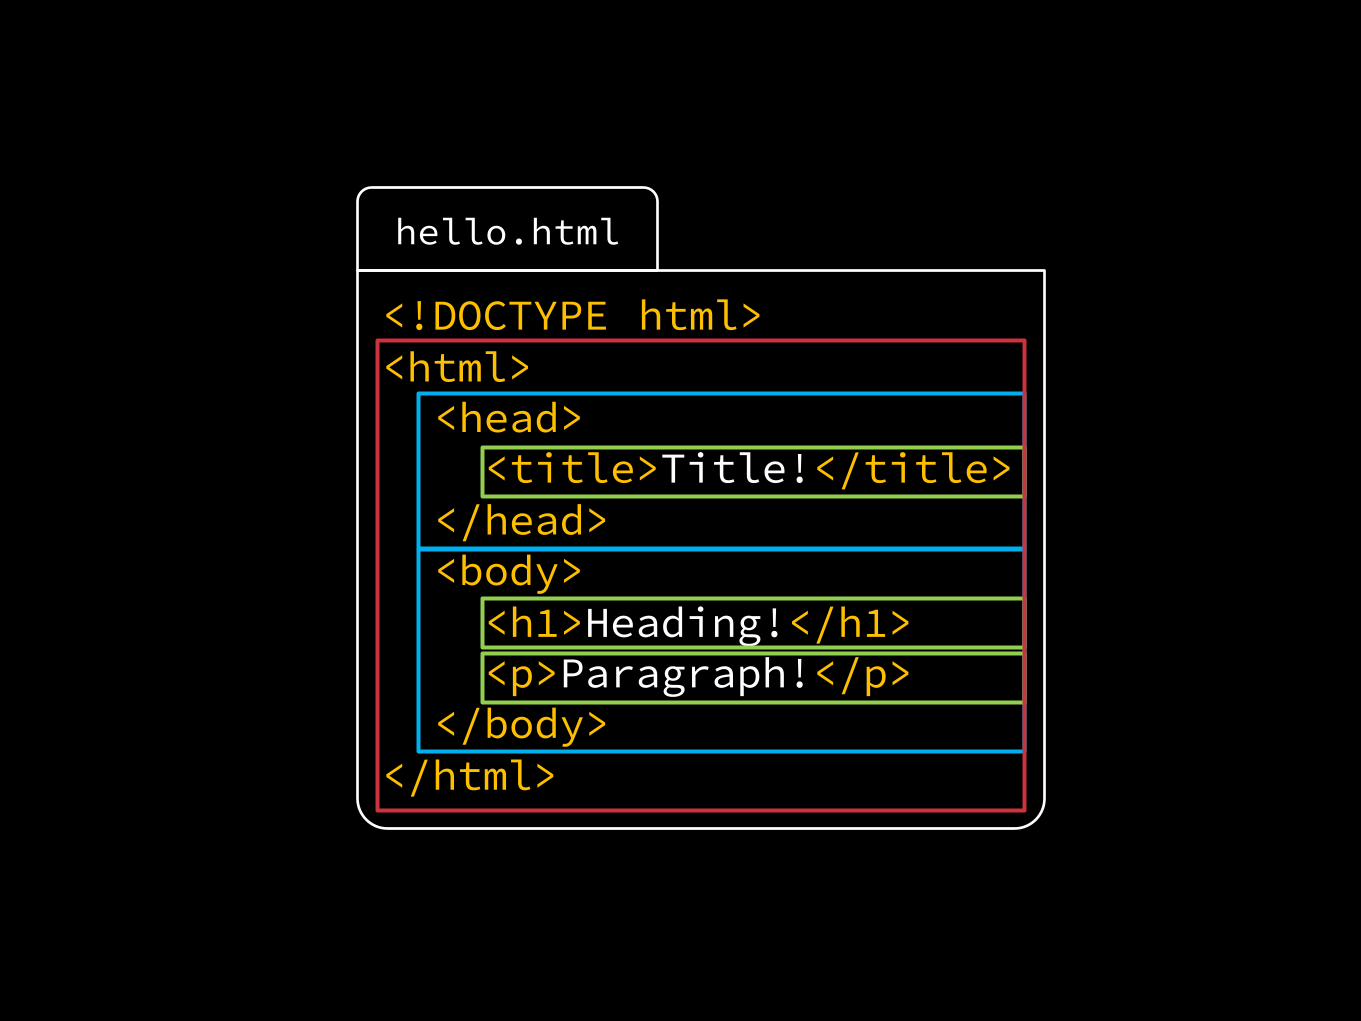
Basic HTML ElementsRoot of HTML DocumentInfo about DocumentDocument BodyHeader tagsParagraph tags
<html><head><body><h1>, <h2>, <h3>, …<p>

Inserting LinksLink<a>
Link to 6.148!

HTML Attributes
<a href="link here">
content goes here
</a>
Opening tag
Closing tag
attribute value
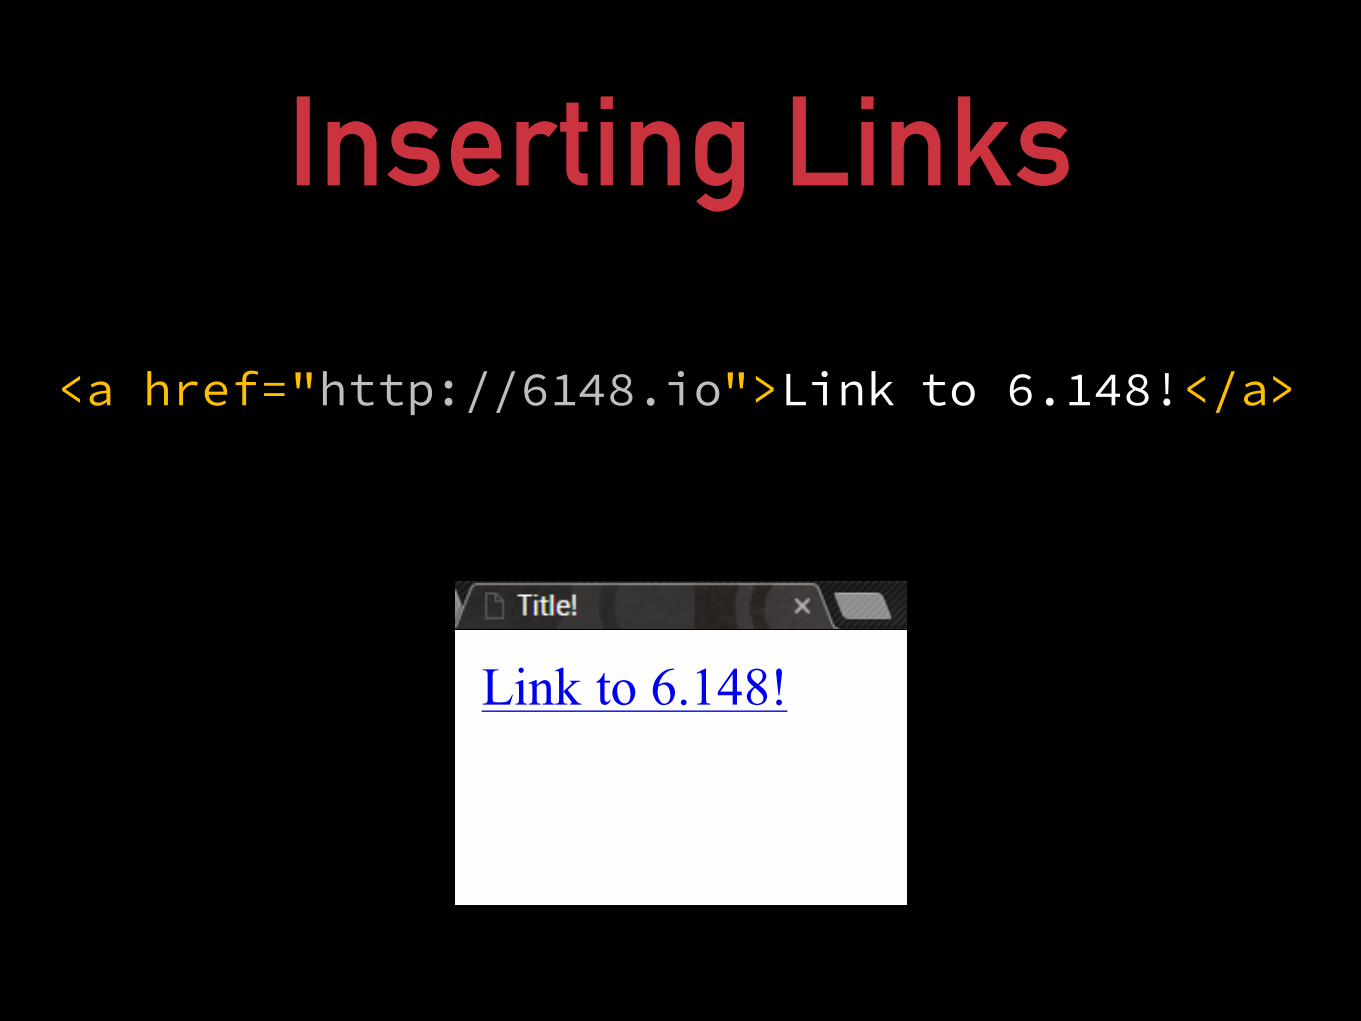
Inserting Links
<a href="http://6148.io">Link to 6.148!</a>
Link to 6.148!

Inserting Links
<a href="home.html">Link to home!</a>
Link to home!

Inserting ImagesImage<img>

Inserting Images<img src="pusheen.gif"></img>

Inserting Images<img src="pusheen.gif">

Inserting Images<img src="pusheen.gif">
app/hello.htmlpusheen.gif

Inserting Images
app/hello.htmlimages/
pusheen.gif
<img src="pusheen.gif"><img src="images/pusheen.gif">

ListsOrdered List (1, 2, 3…)Unordered List (bullets)
List Item
<ol><ul>
<li>

<!DOCTYPE html><html>
<head><title>Title!</title>
</head><body><ul></ul>
</body></html>
hello.html

<!DOCTYPE html><html>
<head><title>Title!</title>
</head><body><ul>
<li>Item 1</li></ul>
</body></html>
hello.html
• Item 1

<!DOCTYPE html><html>
<head><title>Title!</title>
</head><body><ul>
<li>Item 1</li><li>Item 2</li>
</ul></body>
</html>
hello.html
• Item 1• Item 2

div & spanBlock Section in DocumentInline Section in Document
<div><span>
<!DOCTYPE html><html>
<head><title>Title!</title>
</head><body><h1>Heading!</h1><p>Paragraph!</p>
</body></html>
hello.html

<!DOCTYPE html><html>
<head><title>Title!</title>
</head><body><div>
<h1>Heading!</h1><p>Paragraph!</p>
</div> </body>
</html>
hello.html

<!DOCTYPE html><html>
<head><title>Title!</title>
</head><body><div>
<h1>Heading!</h1><p>Paragraph!</p>
</div> </body>
</html>
hello.html


CSSCascading Style Sheets
The rules that tell your web browser how stuff looks


p {color: red;font-family: Arial;font-size: 24pt;
}

p {color: red;font-family: Arial;font-size: 24pt;
}
selector

p {color: red;font-family: Arial;font-size: 24pt;
}
selector
property

p {color: red;font-family: Arial;font-size: 24pt;
}
selector
propertyvalue

<!DOCTYPE html><html>
<head><title>Title!</title>
</head><body><h1>Heading!</h1><p>Paragraph!</p>
</body></html>
hello.html
HeadingParagraph!

<h1>Heading!</h1><p>Paragraph!</p>
hello.html HeadingParagraph!

HeadingParagraph!
Info
<h1>Heading!</h1><p>Paragraph!</p><p>Info</p>
hello.html

HeadingParagraph!
Info
<h1>Heading!</h1><p>Paragraph!</p><p>Info</p>
hello.html
p {color: red;font-family: Arial;font-size: 24pt;
}
style.css

HeadingParagraph!
Info
<h1>Heading!</h1><p>Paragraph!</p><p class="info">Info</p>
hello.html
p {color: red;font-family: Arial;font-size: 24pt;
}
style.css

HeadingParagraph!
Info
.info {color: red;font-family: Arial;font-size: 24pt;
}
style.css
<h1>Heading!</h1><p>Paragraph!</p><p class="info">Info</p>
hello.html

HeadingParagraph!
Info
#unique {color: red;font-family: Arial;font-size: 24pt;
}
style.css
<h1>Heading!</h1><p>Paragraph!</p><p id="unique">Info</p>
hello.html

ClassCan use the same class on multiple elementsCan use multiple classes on the same element
Class vs IDIDEach element can have only one IDEach page can have only one element with that ID

Combining HTML & CSS

<!DOCTYPE html><html>
<head><title>Title!</title>
</head><body><h1>Heading!</h1><p>Paragraph!</p>
</body></html>
hello.html

<!DOCTYPE html><html>
<head><title>Title!</title><link rel="stylesheet"
type="text/css"href="style.css">
</head><body><h1>Heading!</h1><p>Paragraph!</p>
</body></html>
hello.html

CSS Workshop
Workshop: go.6148.io/cssSlides: go.6148.io/html

Exercise 1Open packing_list.htmlin your text editor
Add an unordered list with some items you might need to embark on your journey of finding Sonde.

CSS Time!!Don’t edit your HTML file anymore.
Open styles.css.

CSS Time!!Don’t edit your HTML file anymore.
Open styles.css.

Exercise 2CSS Warmup:
Change the color of the packing list to your favorite color

Exercise 2CSS Warmup:
Change the color of the packing list to your favorite color
Change it to #777

displayThe display property specifies how an element is displayed.
display: none
display: block
display: inline
display: inline-block

display: blockBlock level elements always start on a new line and take the full width available by default. You can set width and height of block elements.
Examples of block level elements:
<div><h1>…<h6><p>

style.css
<h1>Heading!</h1><p>Paragraph!</p>
hello.html
Heading!Paragraph!
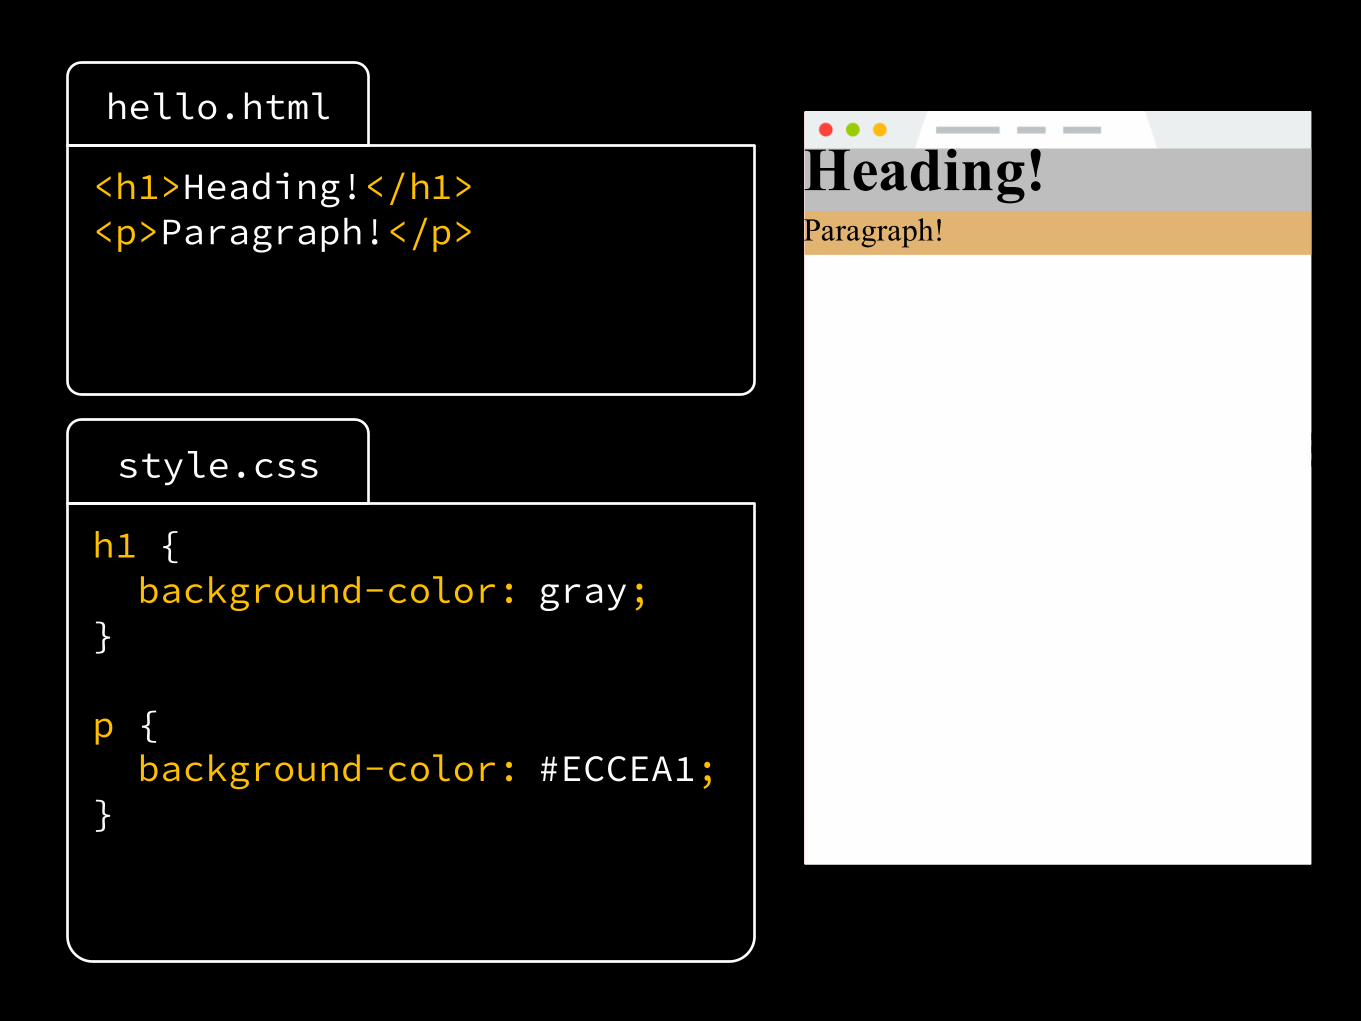
h1 {background-color: gray;
}
p {background-color: #ECCEA1;
}
style.css
<h1>Heading!</h1><p>Paragraph!</p>
hello.html
Heading!Paragraph!

display: inlineInline elements do not start on a new line and only takes up as much width as necessary
Examples of inline elements:
<a><img><span>

display: inline-blockInline-block elements do not start on a new line but also have a width and a height
img {display: inline-block;
}

Exercise 3Change the display of the list items to be block and then inline-block.

Exercise 4Give the area surrounding the list items a border and a background color. Try making it red, or dashed, or very thick.
div {border: solid black 1px;
}style color width
Exercise 4Give the area surrounding the list items a border and a background color. Try making it red, or dashed, or very thick.
Google how to round the corners of an element and give it a background color.
Make a solid border 1px thick with color #e7e7e7. Make the background color #f8f8f8 and the corners radius 4px.

Exercise 5When the user hovers over a list item, change the color of the background and the text.

Exercise 5When the user hovers over a list item, change the color of the background and the text.
The color of the background should become #e7e7e7 and the color of the text should become #555.

Exercise 6Make the area around the list areas bigger, keeping the background color on hover like this:

CSS Box ModelMARGIN
BORDER
PADDING
CONTENT

Exercise 6Make the area around the list areas bigger, keeping the background color on hover filling up the entire menu.
MARGINBORDER
PADDING
CONTENT

Exercise 7Get rid of the extra space at the end of the menu and then center the menu in the window.

Position, float, z-index
Advanced Topics

Position, float, z-index
Advanced Topics

Position, float, z-index
Advanced Topics

Cascading and specificity
Advanced Topics
#unique {color: red;
}.info {
color: blue;}p {
color: purple;}
style.css
<p id="unique"class="info">
Info</p>
hello.html

Flexbox
Advanced Topics

Media Queries
Advanced Topics
@media (min-width: 900px) {p {
color: red;}
}

CSS frameworks/libraries (Bootstrap, Foundation, Semantic UI)
Advanced Topics

LUNCH!
JavaScript workshop
jQuery Workshop
Up Next...