ht100 haccp touch manual - cole-parmer wifi hints and tips 1 ht100 haccp touch manual page section...
TRANSCRIPT

Diligence WiFi Hints and Tips 1
HT100 HACCP Touch Manual
Page Section Title
2 Section 1.0 Introduction and Set Up3 Section 1.1 Running the Software4 Section 2.0 Database Management7 Section 3.0 Supplier Management9 Section 4.0 Products10 Section 5.0 Equipment11 Section 6.0 HACCP Plan Actions22 Section 7.0 Programming23 Section 8.0 HT100 Initial Operation27 Section 8.1 HT100 Daily Operation31 Section 9.0 Specification
Contents
Part No. 20309/2

HACCP Touch Manual 2
Section 1.0 Introduction & Set Up
Introduction
System Set-Up
Download and install the free HACCP Touch software fromwww.comarkinstruments.com/software or www.comarkusa.com/software.
Navigate using Windows Explorer to the downloaded file, and double click the Setup file to install the software. Follow the on-screen instructions to complete the installation.
Important! Before running the software for the first time, connect the HT100 Instrument using the provided USB lead and allow Windows to install the USB drivers.
Please note that the software is designed for Windows™ 7, 8, or 8.1 only.
When you have installed the software an icon will be placed on your desktop.
1
2
3
4
Ensure that you have the following:
Learn how to use and operate the HT100 HACCP Touch and set-up HACCP programs to record and report on your HACCP data.
HT100 HACCP Touch Micro USB Cable PC or Laptop(Must have Windows 7
or 8 installed)
Section 1.1 Running the Software
HACCP Touch Manual 3
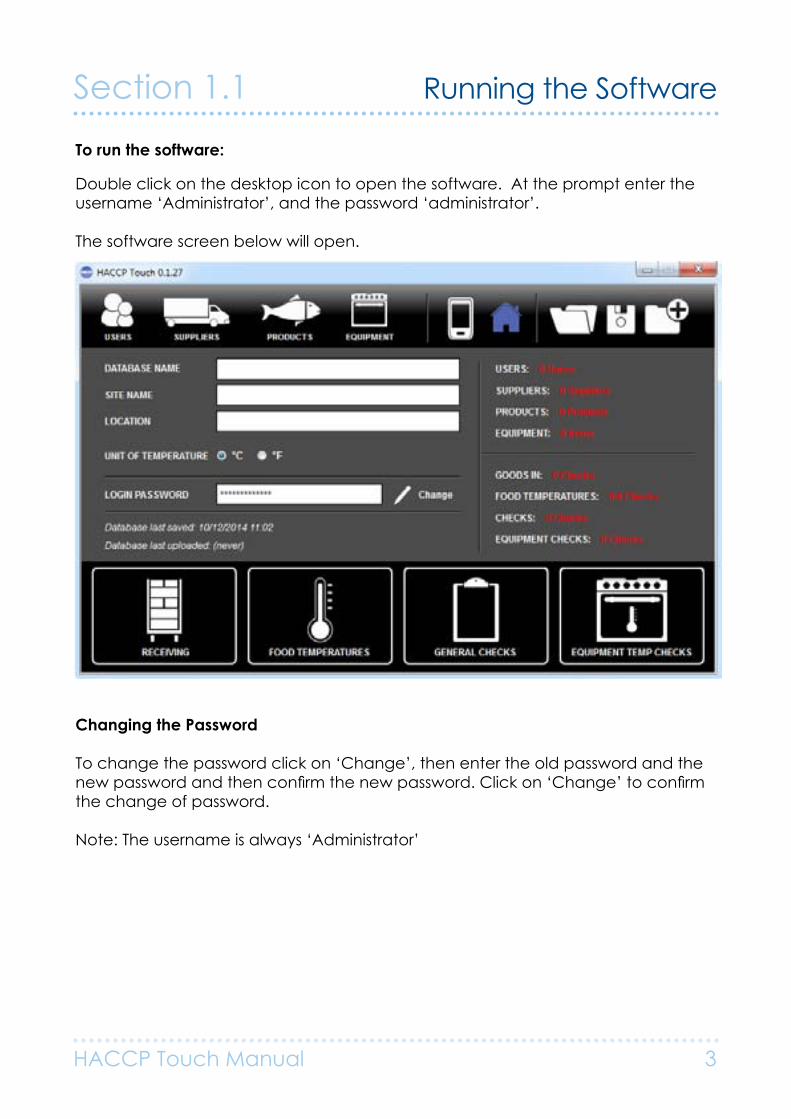
To run the software:
Changing the Password
To change the password click on ‘Change’, then enter the old password and the new password and then confirm the new password. Click on ‘Change’ to confirm the change of password.
Note: The username is always ‘Administrator’
Double click on the desktop icon to open the software. At the prompt enter the username ‘Administrator’, and the password ‘administrator’.
The software screen below will open.

Section 2.0 Database Management
HACCP Touch Manual 4
To create a new Database
Click on the Database icon and accept the warning message that will appear.
1
2
Note: The programming instructions for your HACCP Plan are referred to as databases. The Software allows you to create multiple Databases which can be also be edited.
HINT: It will appear that nothing has happened but the software will have cleared the trace of any previous database. As long as you have previously saved existing databases they will remain on your PC.
Database Name
Enter a name for the Database in the field ‘Database Name’.
If required, enter a Site Name in the field ‘Site Name’.
And if required, enter a Location name in the field ‘Location’.
HINT: Choose this data carefully. The name should indicate a name and date, while the other data can identify the facility and its location. Units of Measurement
Select the appropriate units of measurement, either °C or °F. This will set the units for all temperature measurements for this Database. The thermocouple type is set later on the HT100 itself.
Save your Database (PC)
You need to save your database to the PC regularly to ensure that changes are not lost/accidentally discarded.
TIP: You should save your Database to the PC regularly to ensure that the changes are not lost or accidently discarded.
Click to save the Database.
A warning message will appear if there are un-completed items. Click OK to continue to save.
3
4

Section 2.0 Database Management
HACCP Touch Manual 5
5 Upload Your Database
To upload your database to the HT100, first make sure that you have connected the HT100 to the PC using the USB cable provided.
Click on the Upload icon.
To save the database to the HT100 select the Upload to Handset icon.
Saving will take a few seconds. Once saved the program is ready to use. It is now safe to remove the HT100 from the USB Lead.
To learn how to use the handset, see HT100 Operation.
Users
The HT100 HACCP Touch has provision for many users to be installed. The USER function allows you to manage who is using the device, and ensure that all users have their own password entry to the program.
To manage users, click on Users icon.
The set up page will open.
6

Section 2.0 Database Management
HACCP Touch Manual 6
7 Add New Users (Edit/Delete)
To add a new User, click Add New icon . The screen below will open.
Enter the new user name and selected 4-digit password. Click to confirm. To cancel the action and start over click .
Repeat the procedure to add all the users you need.
You can return to this page to edit or delete users in the future.
To return to the main HT100 screen, click on the Home icon.
TIP: It is important to keep track of the people who will be using the HT100 and to delete those who no longer will be using it.
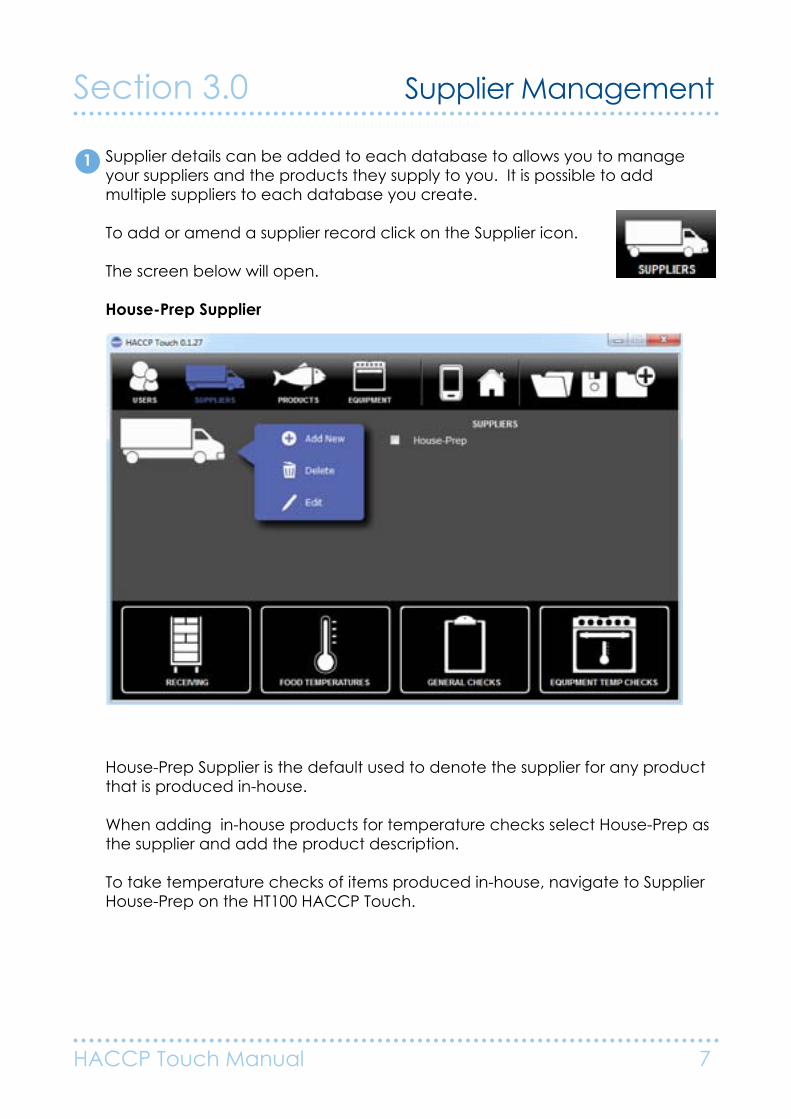
House-Prep Supplier is the default used to denote the supplier for any product that is produced in-house.
When adding in-house products for temperature checks select House-Prep as the supplier and add the product description.
To take temperature checks of items produced in-house, navigate to Supplier House-Prep on the HT100 HACCP Touch.
Section 3.0 Supplier Management
HACCP Touch Manual 7
1 Supplier details can be added to each database to allows you to manage your suppliers and the products they supply to you. It is possible to add multiple suppliers to each database you create.
To add or amend a supplier record click on the Supplier icon.
The screen below will open.
House-Prep Supplier

Enter the new user supplier details and click to confirm. To cancel the action and start over click .
Click the Add New icon and repeat the process to add details of all the suppliers you require.
Suppliers can be added or deleted from this page as required.
To return to the main HT100 screen, click on the Home icon.
Tip: Add all the suppliers first before adding the food items they deliver.
Remember to save the database as you go, to avoid losing information by clicking on the Save icon.
Section 3.0 Supplier Management
HACCP Touch Manual 8
2 Add New Supplier (Edit/Delete)
Click the Add New icon, and the screen below will open.

Add New Product (Edit/Delete)
Click the Add New icon to add a new product item.
Enter the name of the product to be added and then select the correct Supplier from the drop down, see above
Enter the new product details and click to confirm. To cancel the action and start over click . Repeat to add all products.
TIP: It is important to add all items that require temperature records. Remember this may be in Receiving, Cooking, Storage or Reheating.
Section 4.0 Products
HACCP Touch Manual 9
1 Products can be added to the database per supplier so you can manage your suppliers and the products they supply.
To add or amend a product record click on the Product icon.
The screen below will open.
Add New Equipment (Edit/Delete)
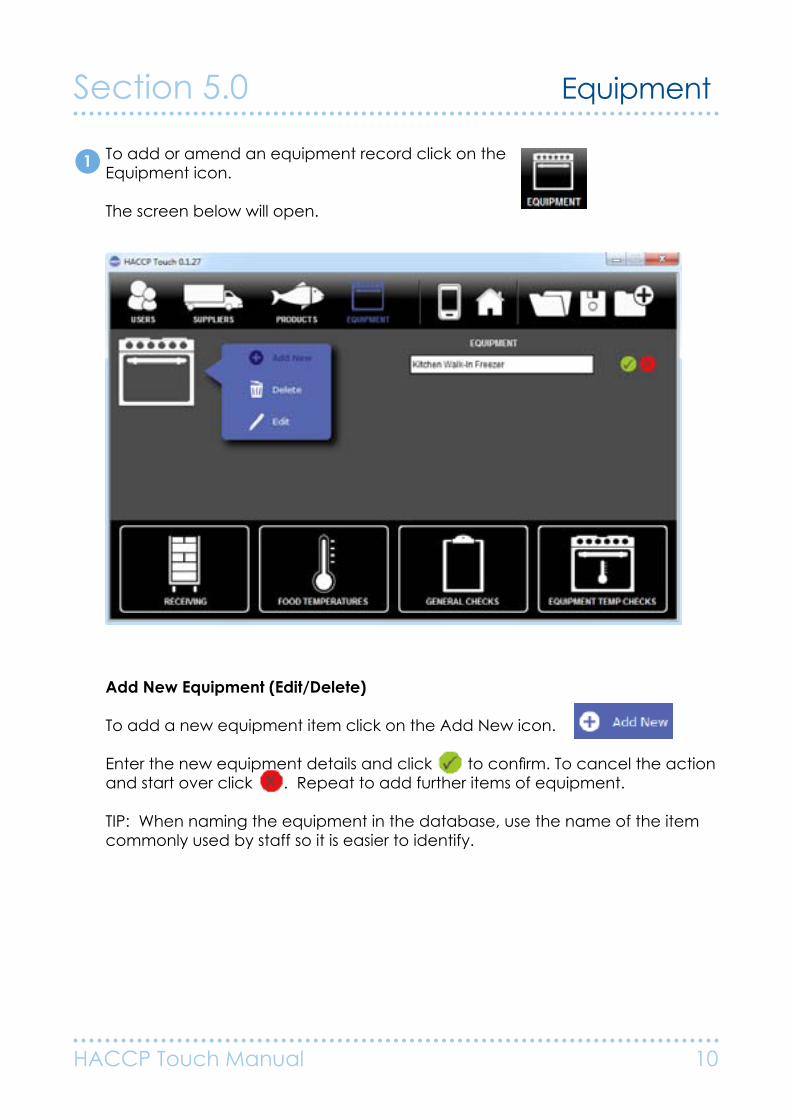
To add a new equipment item click on the Add New icon.
Enter the new equipment details and click to confirm. To cancel the action and start over click . Repeat to add further items of equipment.
TIP: When naming the equipment in the database, use the name of the item commonly used by staff so it is easier to identify.
Section 5.0 Equipment
HACCP Touch Manual 10
1 To add or amend an equipment record click on the Equipment icon.
The screen below will open.
Section 6.0 HACCP Plan Actions
HACCP Touch Manual 11
1 With the sections for users, suppliers, products and equipment set up, the information can be linked to the tasks in your HACCP Plan.
For example, to check the temperature of a product when received, through to cooking or while in storage.
Instructions to set up tasks and actions associated with your HACCP plan are below.
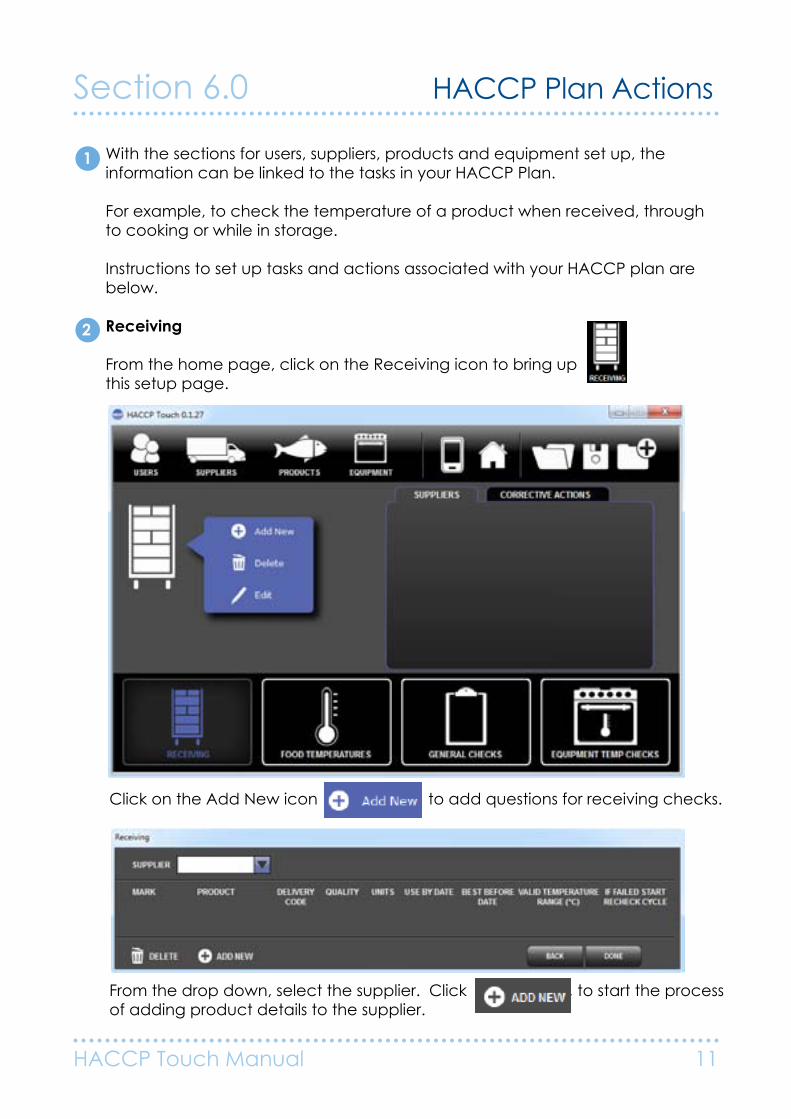
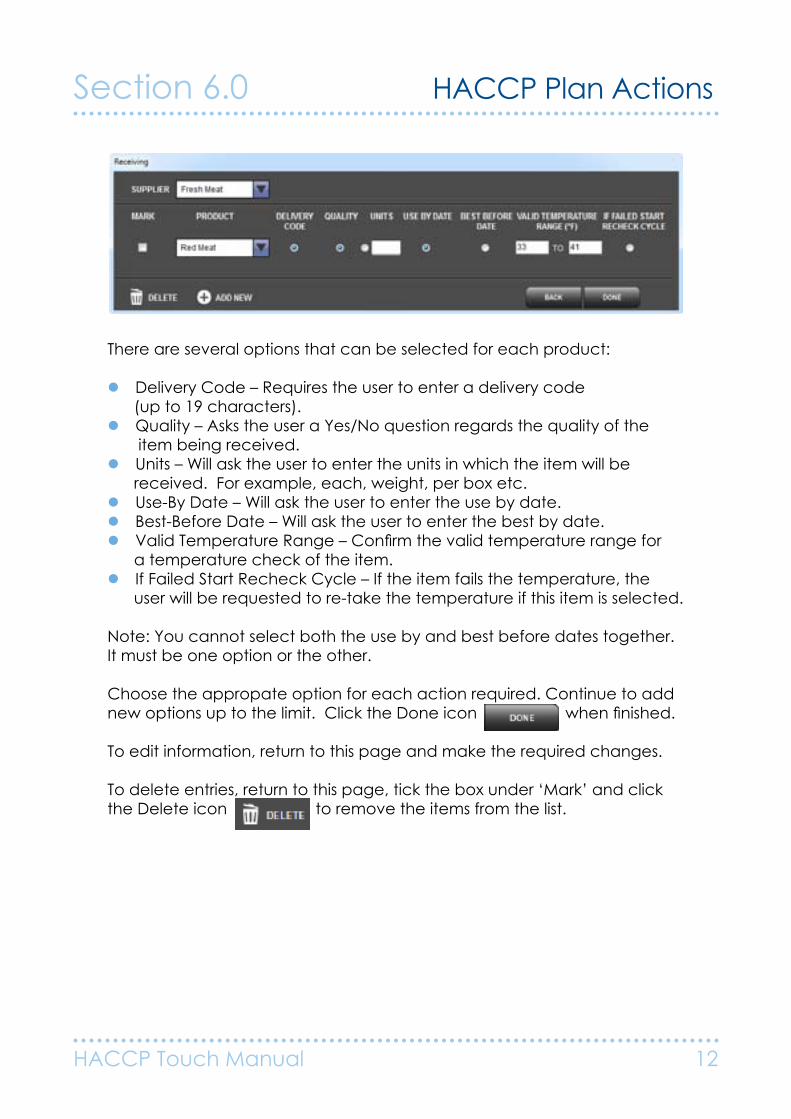
Receiving
From the home page, click on the Receiving icon to bring up this setup page.
Click on the Add New icon to add questions for receiving checks.
From the drop down, select the supplier. Click , to start the process of adding product details to the supplier.
2
Section 6.0 HACCP Plan Actions
HACCP Touch Manual 12
There are several options that can be selected for each product:
l Delivery Code – Requires the user to enter a delivery code (up to 19 characters).l Quality – Asks the user a Yes/No question regards the quality of the item being received.l Units – Will ask the user to enter the units in which the item will be received. For example, each, weight, per box etc.l Use-By Date – Will ask the user to enter the use by date.l Best-Before Date – Will ask the user to enter the best by date. l Valid Temperature Range – Confirm the valid temperature range for a temperature check of the item.l If Failed Start Recheck Cycle – If the item fails the temperature, the user will be requested to re-take the temperature if this item is selected.
Note: You cannot select both the use by and best before dates together. It must be one option or the other.
Choose the appropate option for each action required. Continue to add new options up to the limit. Click the Done icon when finished.
To edit information, return to this page and make the required changes.
To delete entries, return to this page, tick the box under ‘Mark’ and click the Delete icon to remove the items from the list.

Section 6.0 HACCP Plan Actions
HACCP Touch Manual 13
3 Receiving - Corrective Actions
From the receiving screen, select the corrective actions tab, to bring up the corrective action screen.
Enter the corrective actions recommended in your HACCP plan for receiving products. Up to the 5 instructions may be added.
TIP: Make the corrective actions simple to follow. Try not to over complicate.
When finished click on the home page icon to return to the main screen.

Section 6.0 HACCP Plan Actions
HACCP Touch Manual 14
4 Food Temperatures
This section explains how to set up “Food/Products” that you have to record the temperatures of in four separate areas of your business.
From the home page, click on the food temperatures icon to open the set up screen below.
There are 5 areas that can be configured for taking food temperatures.
• Storage• Hot / Cold Holding• Cooking• Reheat
To edit an area, click on the check box and select the edit icon.
NOTE: In this section the Food/Products will be listed by the location you give them. For example in Storage... Freezer 1 or Cooler 1, in Hot/Cold Holding... Hot Holding Tray 1 or Cold Holding Tray 2
It is important to put in the correct location so that staff can find the Food/Product.

Section 6.0 HACCP Plan Actions
HACCP Touch Manual 15
4a Storage
Select storage and then click the edit icon to bring up thefollowing screen.
Click to add a new temperature check. Use the drop down list to select one of your product items and manually enter the location, e.g. Fridge. Select from the accept if between, reject if above and reject if below sections. Repeat this process for all stored food items. Click done to finish.
TIP: The storage location should be entered using the name used when entering your equipment.
Storage - Corrective Actions
To add corrective actions for storage, click the corrective actions tab and enter the corrective actions as required. Note that at least one corrective action must be selected.
4b

Section 6.0 HACCP Plan Actions
HACCP Touch Manual 16
4c Hot/Cold Holding Temperature Check
Select hot/cold holding and then click the edit icon to bring up the following screen.
Click to add a new Hot/Cold Holding Temperature Check. Use the drop down list to select one of your product items, and then manually enter its location, e.g. Kitchen, Hot Holding Tray, Cold Holding Tray. Select from the accept if between, the reject if above and reject if below sections. Repeat this process for all hot/cold holding food items. Click the done icon to finish.
Hot/Cold Holding Temperature Check - Corrective Actions
To add corrective actions for hot/cold holding temperature checks, click the corrective actions tab and enter the corrective actions as required. Note that at least one corrective action must be selected.
4d

Section 6.0 HACCP Plan Actions
HACCP Touch Manual 17
4e Cooking Temperature Check
Select Cooking and then click the edit icon to bring up the cooking temperature check screen.
Click to add a new cooking temperature check. Use the drop down list to select one of your product items, and then manually enter its location, e.g. Kitchen. Select from the accept if between or reject if below options. Repeat this process for all cooking temperature check items. Click the done icon to finish.
Cooking Temperature Check - Corrective Actions
To add corrective actions for cooking temperature checks, click the corrective actions tab and enter the corrective actions as required. Note that at least one corrective action must be selected.
4f

Section 6.0 HACCP Plan Actions
HACCP Touch Manual 18
4g Reheated Food Temperature Check
Select reheated food temperature check and then click the edit icon to bring up the following screen.
Click to add a new reheated food temperature Check. Use the drop down list to select one of your product items, and then manually enter its location, e.g. Kitchen. Select from the accept if between or reject if below options. Repeat this process for all reheated food temperature check items. Click the done icon to finish.
Reheated Food Temperature Check - Corrective Actions
To add corrective actions for reheated food temperature checks, click the corrective actions tab and enter the corrective actions as required. Note that at least one corrective action must be selected.
4h
Section 6.0 HACCP Plan Actions
HACCP Touch Manual 19
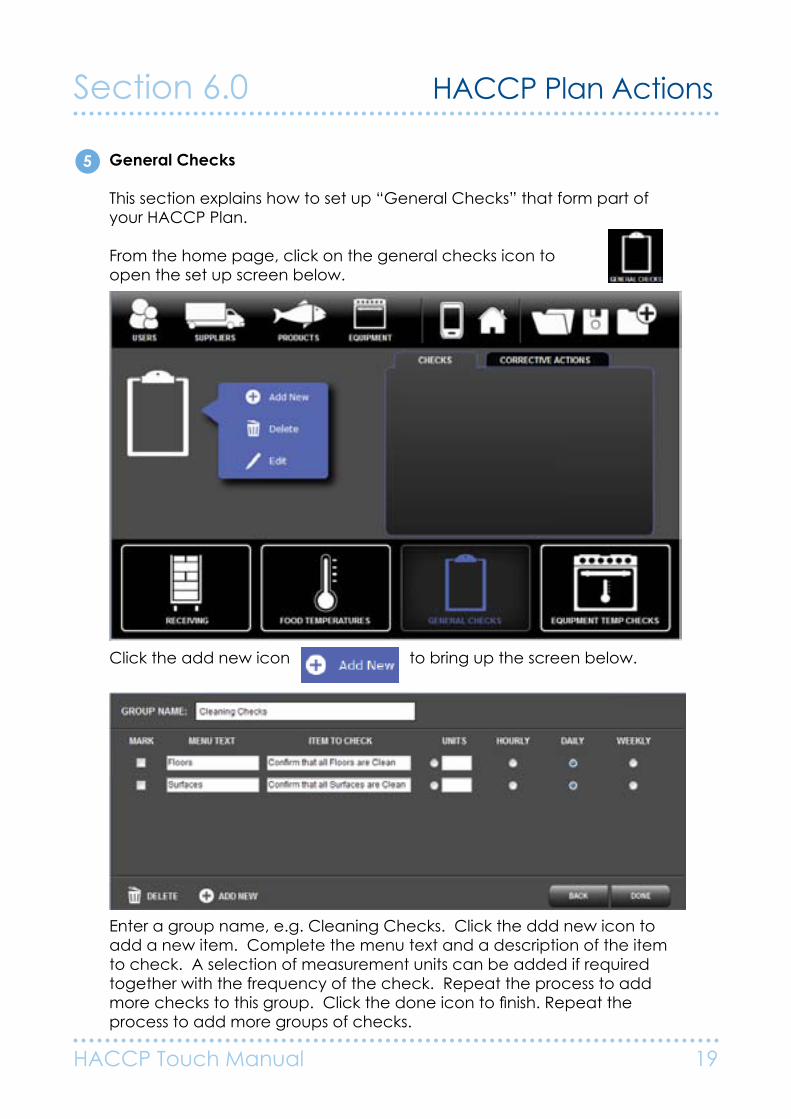
5 General Checks
This section explains how to set up “General Checks” that form part of your HACCP Plan.
From the home page, click on the general checks icon to open the set up screen below.
Click the add new icon to bring up the screen below.
Enter a group name, e.g. Cleaning Checks. Click the ddd new icon to add a new item. Complete the menu text and a description of the item to check. A selection of measurement units can be added if required together with the frequency of the check. Repeat the process to add more checks to this group. Click the done icon to finish. Repeat the process to add more groups of checks.

Section 6.0 HACCP Plan Actions
HACCP Touch Manual 20
6 Equipment Temperature Checks
This section explains how to set up ‘Equipment Temperature Checks’ that form part of your HACCP Plan.
From the home page, click on the equipment temperature checks icon to open the set up screen below.
The list of equipment previously programmed is shown in the list.To edit the equipment temperature checks, select the item in the list, and click on the edit icon to open the screen below.
Click the add new icon to add a new item. Make the selection as required for the temperature check and click the done icon finish. Repeat the process to add more equipment as required.
Section 6.0 HACCP Plan Actions
HACCP Touch Manual 21
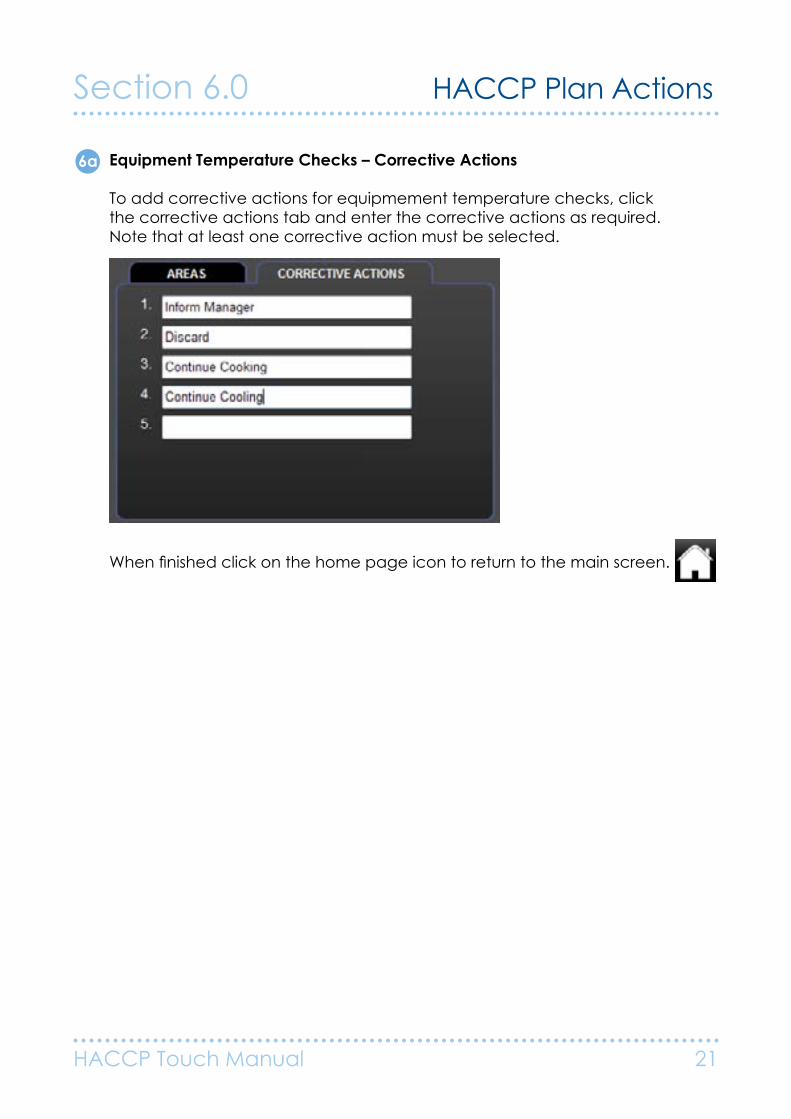
6a Equipment Temperature Checks – Corrective Actions
To add corrective actions for equipmement temperature checks, click the corrective actions tab and enter the corrective actions as required. Note that at least one corrective action must be selected.
When finished click on the home page icon to return to the main screen.
Section 7.0 Programming
HACCP Touch Manual 22
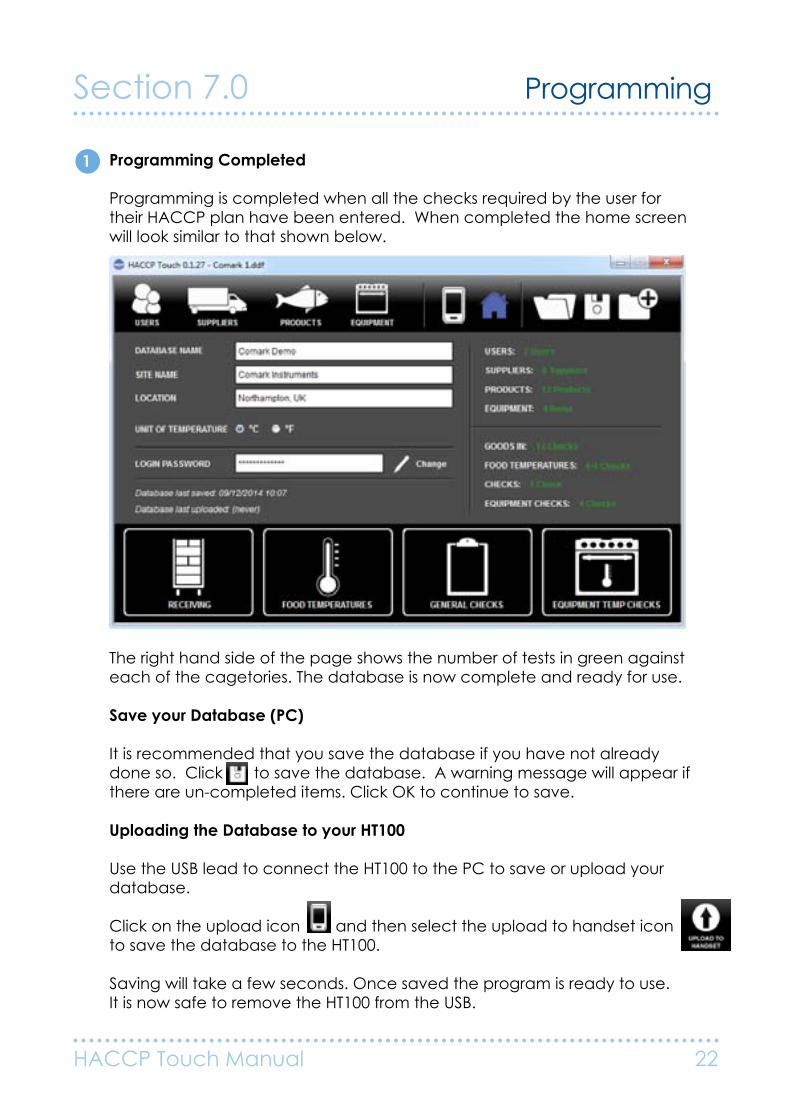
1 Programming Completed
Programming is completed when all the checks required by the user for their HACCP plan have been entered. When completed the home screen will look similar to that shown below.
The right hand side of the page shows the number of tests in green against each of the cagetories. The database is now complete and ready for use.
Save your Database (PC)
It is recommended that you save the database if you have not already done so. Click to save the database. A warning message will appear if there are un-completed items. Click OK to continue to save.
Uploading the Database to your HT100
Use the USB lead to connect the HT100 to the PC to save or upload your database.
Click on the upload icon and then select the upload to handset icon to save the database to the HT100.
Saving will take a few seconds. Once saved the program is ready to use. It is now safe to remove the HT100 from the USB.
Section 8.0 HT100 Initial Operation
HACCP Touch Manual 23
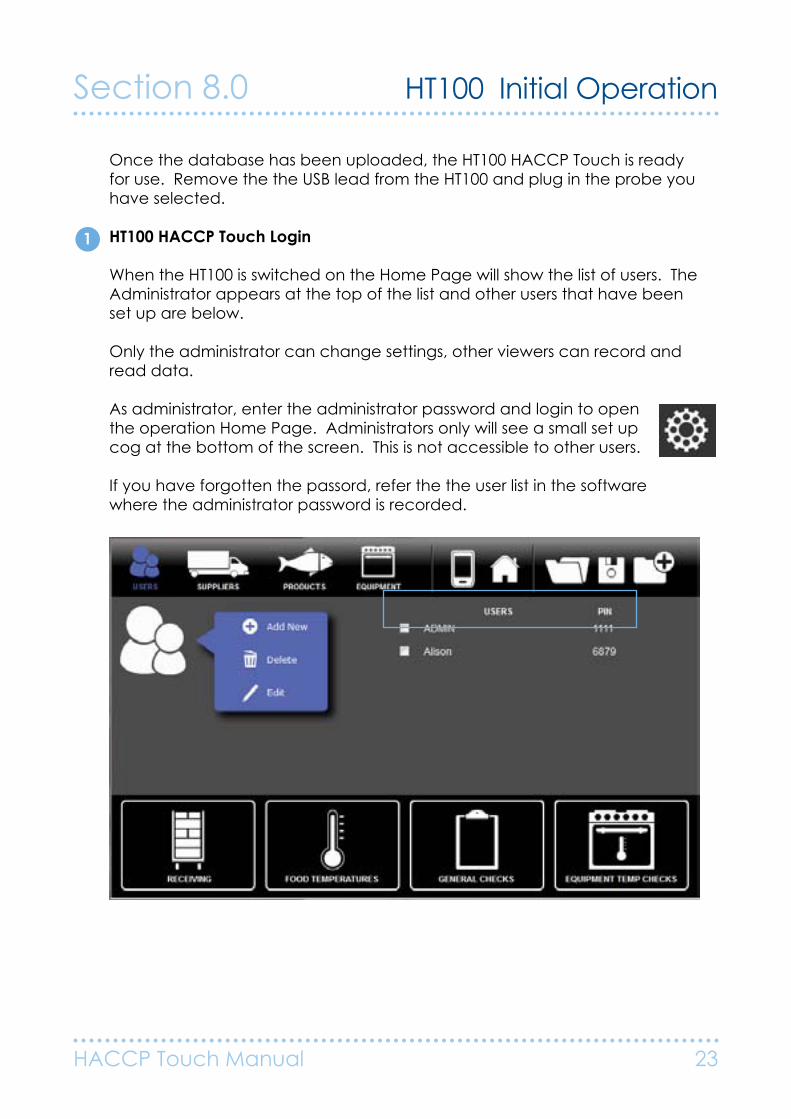
1
Once the database has been uploaded, the HT100 HACCP Touch is ready for use. Remove the the USB lead from the HT100 and plug in the probe you have selected.
HT100 HACCP Touch Login
When the HT100 is switched on the Home Page will show the list of users. The Administrator appears at the top of the list and other users that have been set up are below.
Only the administrator can change settings, other viewers can record and read data.
As administrator, enter the administrator password and login to open the operation Home Page. Administrators only will see a small set up cog at the bottom of the screen. This is not accessible to other users.
If you have forgotten the passord, refer the the user list in the software where the administrator password is recorded.
Section 8.0 HT100 Initial Operation
HACCP Touch Manual 24
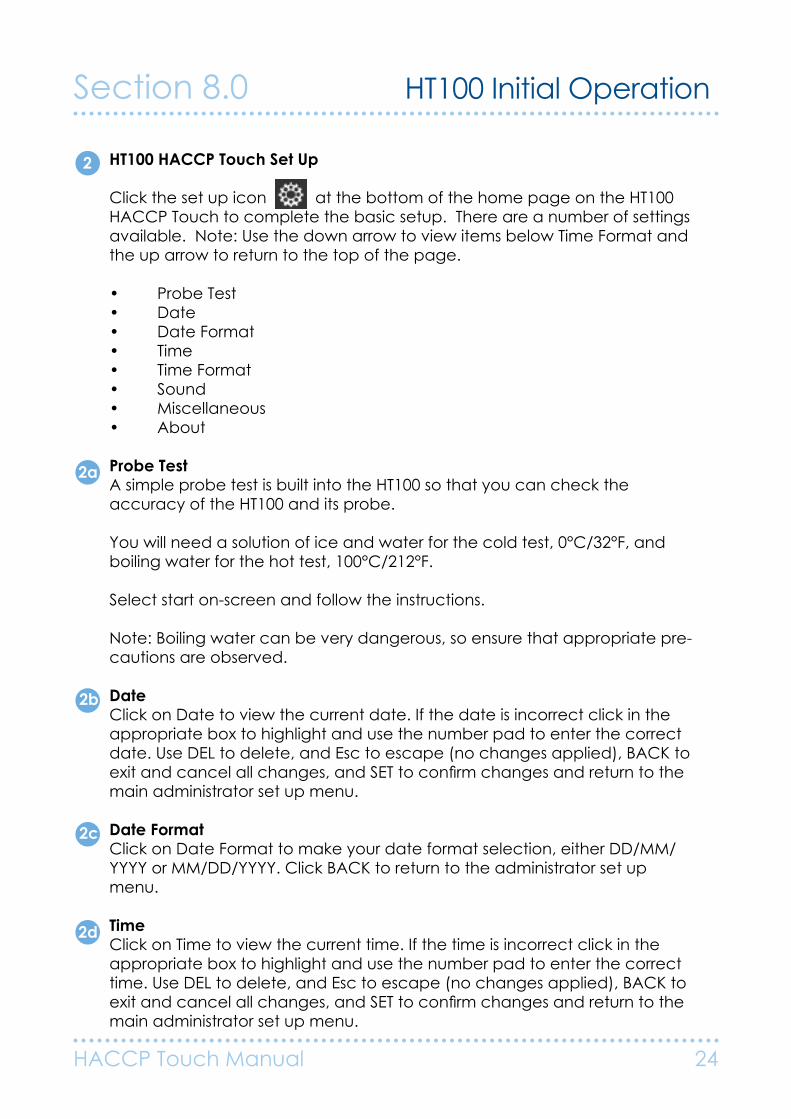
HT100 HACCP Touch Set Up
Click the set up icon at the bottom of the home page on the HT100 HACCP Touch to complete the basic setup. There are a number of settings available. Note: Use the down arrow to view items below Time Format and the up arrow to return to the top of the page.
• Probe Test• Date• Date Format• Time• Time Format• Sound• Miscellaneous• About
Probe TestA simple probe test is built into the HT100 so that you can check the accuracy of the HT100 and its probe.
You will need a solution of ice and water for the cold test, 0°C/32°F, and boiling water for the hot test, 100°C/212°F.
Select start on-screen and follow the instructions.
Note: Boiling water can be very dangerous, so ensure that appropriate pre-cautions are observed.
DateClick on Date to view the current date. If the date is incorrect click in the appropriate box to highlight and use the number pad to enter the correct date. Use DEL to delete, and Esc to escape (no changes applied), BACK to exit and cancel all changes, and SET to confirm changes and return to the main administrator set up menu.
Date FormatClick on Date Format to make your date format selection, either DD/MM/YYYY or MM/DD/YYYY. Click BACK to return to the administrator set up menu.
TimeClick on Time to view the current time. If the time is incorrect click in the appropriate box to highlight and use the number pad to enter the correct time. Use DEL to delete, and Esc to escape (no changes applied), BACK to exit and cancel all changes, and SET to confirm changes and return to the main administrator set up menu.
2a
2b
2c
2d
2

Section 8.0 HT100 Operation
HACCP Touch Manual 25
Time FormatClick on Time Format to make your Time Format Selection, either 12 or 24 Hour. Simply make the selection and Click BACK to return to the Administrator Setup Menu.
Click on to see the rest of the Menu.
SoundClick on Sound to make your selection of the 4 options for sounds on you HT100.
• SOUND OFF• SOUND LOW• SOUND HIGH• SOUND TEST
Click BACK to return to the Administrator Setup Menu.
Click on to see the rest of the Menu.
Miscellaneous Click on Miscellaneous for:
• Timers Set – sets the item to not checked and sets the time for the next check as the current time (essentially forces a check to have been missed).• Timers Reset – sets the item as checked and sets the time for the next check to current time plus the interval (essentially clears a missed check).• Thermocouple Type – Click to see the 4 thermocouple choices.
Thermocouple Type Select the appropraiteyour choice and click back to return.
• Type K – Usually Red or Green Cable • Type J – Usually Black or Brown Cable• Type N – Usually Brown or Pink• Type T – Usually Blue or Brown
Note: It is important you know the thermocouple type for your probe as selection of the incorrect thermocouple type could result in inaccurate readings.
Click on BACK to exit the Miscellaneous Menu and click on to see the rest of the Menu.
2f
2g
2e

Section 8.0 HT100 Initial Operation
HACCP Touch Manual 26
AboutClicking on About will confirm the current database version.
At the bottom of the page there are details of the Firmware version and Boot version which is useful for Technical Diagnosis in the event of a problem with your HT100 HACCP Touch.
2h

Section 8.1 HT100 Daily Operation
HACCP Touch Manual 27
HT100 LoginSwitch on the HT100, and select your name from the list of users.Enter your 4 digit password to log in.
HT100 MenuAfter successful login you will be presented with the Menu List, consisting of the 4 main items.
• Food Checks • Equipment Checks• Receiving• General Checks Click on the required menu item to select from the associated list for that item, then follow the on-screen instructions to complete the task.
If a corrective action is required for any item select from the options available. There is the option to enter free form text using the on-screen touch keypad. Click on Finish to complete and proceed to the next task if required.
Download the results back to the SoftwareIt is recommended that the HT100 is downloaded regularly, but certainly once per day/shift.
Connect the HT100 to a PC using the USB lead and start HACCP Touch software on PC.
From the software home page, click on the Upload/Download icon.
Select the View & Export Data icon and the software willautomatically download the records to the PC. You have the option to clear the handset or leave the data for the next download.
2
3
1

Section 8.1 HT100 Daily Operation
HACCP Touch Manual 28
Make your selection and then choose the folder where you would like to save the data.
Click View & Export Data to complete the process.
The HT100 is now ready to take more records, and can be safely removed from the PC.
Review Downloaded Data
Downloaded data is shown in tabular format, see below.
Records are divided by category.
3
Section 8.1 HT100 Daily Operation
HACCP Touch Manual 29
To export data to a PDF file clickand follow the on-screen instructions.
To export to a CSV file, clickand follow the on-screen instructions.
Click Done to finish and close.
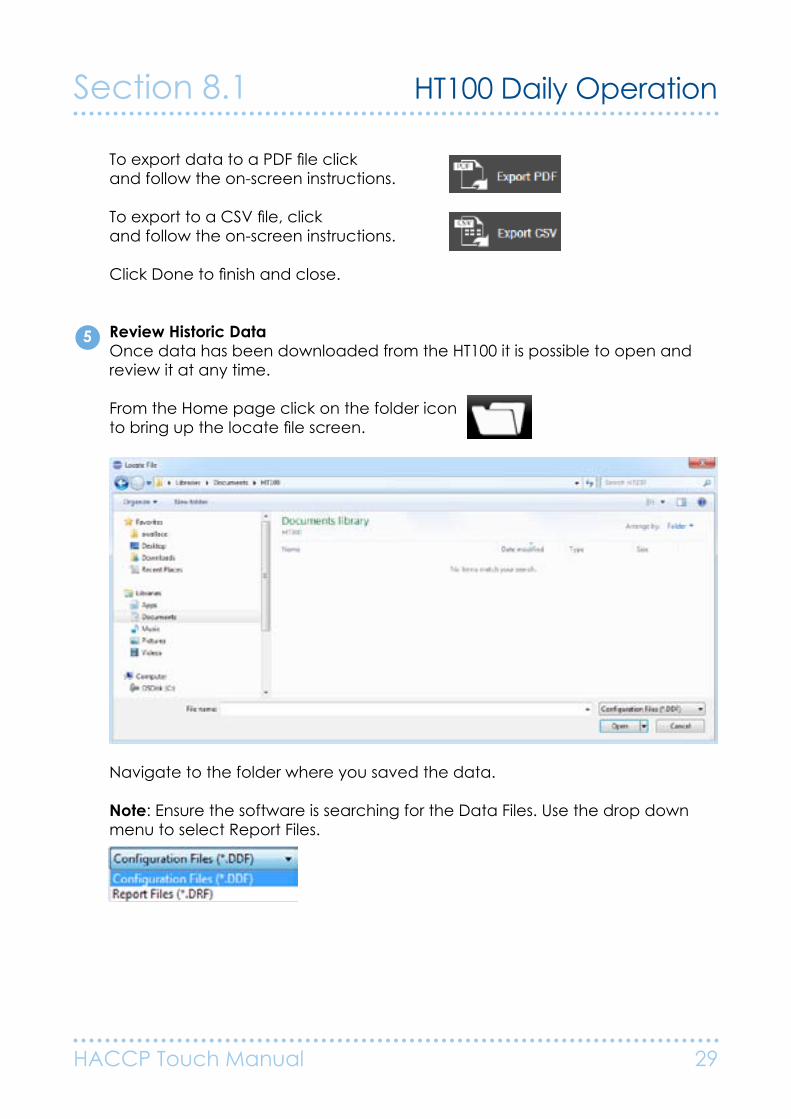
Review Historic DataOnce data has been downloaded from the HT100 it is possible to open and review it at any time.
From the Home page click on the folder iconto bring up the locate file screen.
Navigate to the folder where you saved the data.
Note: Ensure the software is searching for the Data Files. Use the drop down menu to select Report Files.
5

Section 8.1 HT100 Daily Operation
HACCP Touch Manual 30
Your data will appear in the folder.
Select the appropriate file, and click to Open to open the selected data file.
Note: The data is read only, unless you export to CSV, where you can add comments if you wish to the records.
Managing Multiple Databases/HT100 HACCP Touch DevicesIf you have more than one database or HT100 Touch Screen devices that might be running multiple database programs it is recommended that database names are clearly referenced to the serial number of the HT100 unit that it is programmed to.
Data files when created get given an automatic name to avoid duplicates. Comark strongly advises that these data files should be re-named once downloaded to reference the HT100 unit that they were downloaded from. However, do not change the file type as the software will not recognise the file afterwards.
Care of the HT100 HACCP Touch
Never attempt to repair or modify HACCP Touch products. Dismantling HACCP Touch products, including the removal of external screws, may cause damage that is not covered under the warranty. Servicing of the instrument and replacement of the rechargeable battery should only be undertaken by an authorised supplier.
The instrument can be wiped clean with a damp cloth. Do not place under running water.
6
7

Section 9 Specification
HACCP Touch Manual 31
Specification Minimum Typical Maximum Unit Battery life 8 HoursTemperature measurement range
-73 °C(-99°F) +537°C (+999°F)
°C (°F)
Internal resolution 0.1° Temperature accuracy (Instrument Only)
±0.5 °C (0.9°F) °C (°F)
Data recording capacity (per recording)
65000 Readings
Storage capacity 100 FilesOperating temperature range
0°C (32°F) +50°C (+122°F)
°C (°F)