hrsa electronic handbook
TRANSCRIPT

Look-Alike Renewal of Designation Application 1 User Guide
HRSA Electronic Handbook
Look-Alike Renewal of Designation Application User Guide Last updated on: July 13, 2017

Look-Alike Renewal of Designation Application 2 User Guide
Table of Contents 1. Starting the Look-Alike Renewal of Designation Application .......................................................................... 4
2. Completing the Look-Alike Cover Page section of the application ........................................................ 5
3. Completing the Appendices Form .............................................................................................................. 5
4. Completing the Program Specific Forms .......................................................................................................... 7
4.1 Form 1A – General Information Worksheet ............................................................................................... 7
4.1.1 Completing the Applicant Information section ........................................................................................... 9
4.1.2 Completing the Proposed Service Area section ........................................................................................ 9
4.2 Form 4 - Community Characteristics ....................................................................................................... 12
4.2.1 Completing the Form 4 sections .............................................................................................................. 14 4.2.2 Completing the Special Populations and Select Population Characteristics section .............................. 14
4.3 Form 2 – Staffing Profile ........................................................................................................................... 15
4.3.1 Completing the Staffing Positions by Major Service Category sections .................................................. 18
4.3.2 Completing the Total FTEs section ......................................................................................................... 18
4.4 F o r m 3 - Income Analysis .......................................................................................................................... 19 4.4.1 Completing the Payer Categories section ............................................................................................... 19
4.4.2 Completing the Comments/Explanatory Notes section ........................................................................... 20
4.5 Form 3A – Budget Information ................................................................................................................. 20
4.5.1 Completing the Expenses section ........................................................................................................... 21
4.5.2 Completing the Revenue section ............................................................................................................ 21
4.6 Form 5A – Services Provided ................................................................................................................... 22 4.6.1 Completing the Required, Additional & Specialty Services Section ........................................................ 23
4.7 Form 5B – Service Sites ............................................................................................................................ 23
4.8 Form 5C – Other Activities/Locations ...................................................................................................... 24
4.9 Scope Certification .................................................................................................................................... 25
4.10 Form 6A – Current Board Member Characteristics ................................................................................. 25
4.11 Form 6B - Request for Waiver of Governance Requirements ............................................................... 27 4.11.1 Completing Form 6B when it is not applicable ................................................................................ 27
4.11.2 Completing Form 6B when it is applicable ...................................................................................... 28

Look-Alike Renewal of Designation Application 3 User Guide
4.12 Form 8 - Health Center Agreements ......................................................................................................... 29
4.12.1 Completing Part I of Form 8 ............................................................................................................ 30
4.12.2 Completing Part II of Form 8 ........................................................................................................... 30
4.13 Form 10 – Emergency Preparedness Report .......................................................................................... 31
4.14 Form 12 – Organization Contacts ............................................................................................................. 32
4.15 Clinical Performance Measures ................................................................................................................ 33
4.15.1 Completing the Required Clinical Performance Measures ............................................................. 34
4.15.2 Adding Additional Clinical Performance Measures ......................................................................... 37
4.16 Financial Performance Measures ............................................................................................................. 38
4.16.1 Completing the Required Financial Performance Measures .......................................................... 38
4.16.2 Adding Additional Financial Performance Measures ...................................................................... 41
5. Reviewing and Submitting the Look-Alike Renewal of Designation Application to HRSA ................. 41

Look-Alike Renewal of Designation Application 4 User Guide
This user guide describes the steps you need to follow to submit a Look-Alike Renewal of Designation (RD) application to the Health Resources and Services Administration (HRSA).
1. Starting the Look-Alike Renewal of Designation Application You must have an EHB user account to create a Look-Alike application (also known as a Renewal of Designation or RD). After logging into EHB, click the Tasks tab on the EHB Home page to navigate to the Pending Tasks – List page.
IMPORTANT NOTE: If you do not have a username, you must register in EHB. Do not create duplicate accounts. If you experience log in issues or forget your password, contact the HRSA Contact Center at (877) 464-4772.
1. Locate the Look-Alike RD application using the EHB Application tracking number received in an email
and click the Start link to begin working on the application in EHB (if you have previously accessed the application, the Start link will be replaced with Edit). The system opens the Renewal of Designation Application - Status Overview page of the
application (Figure 1).
Figure 1: Application - Status Overview Page
The application consists of the Cover Page, Appendices, and Program Specific Information sections. You must complete these sections in order to submit your application to HRSA.

Look-Alike Renewal of Designation Application 5 User Guide
2. Completing the Look-Alike Cover Page section of the application
The Cover Page (Figure 2) requires the following information, as indicated by the red asterisks to the left of these fields:
• Select Target Population(s) (Figure 2, 1) – select the target population type(s) served by the applicant health center: Community Health Centers (CHC), Health Care for the Homeless (HCH), Migrant Health Centers (MHC), and/or Public Housing (PHPC).
• Person to be contacted on matters involving this application (Figure 2, 2) – enter the point of contact for the look-alike Renewal of Designation application.
• Authorized Representative (Figure 2, 3) – enter the person who is authorized by the board of directors to submit the look-alike Renewal of Designation application.
Figure 2: Cover Page of FQHC-LAL Application
Once completed, click the Save and Continue button to proceed to the Appendices form.
3. Completing the Appendices Form 1. Expand the left navigation menu if not already expanded by clicking the double arrows displayed near
the form name at the top of the page (Figure 3, 1). Click on the Appendices link (Figure 3, 2) to navigate to the Appendices form.

Look-Alike Renewal of Designation Application 6 User Guide
Figure 3: Left Navigation Menu
2. Upload the following attachments by clicking the associated Attach File buttons: • Project Abstract (required) • Project Narrative (required) • Attachment 1—Service Area Map and Table (required) • Attachment 2—Corporate Bylaws (required) • Attachment 3—Organizational Chart (required) • Attachment 4—Position Descriptions for Key Personnel (required) • Attachment 5—Biographical Sketches for Key Personnel (required) • Attachment 6—Co-Applicant Agreement for Public Centers (as applicable) • Attachment 7—Summary of Contracts and Agreements (as applicable) • Attachment 8— Letters of Support (required) • Attachment 9— Sliding Fee Discount Schedule/ Schedule of Charges (required) • Attachment 10— Most Recent Independent Financial Audit (required) • Attachment 11—Budget Justification Narrative (required) • Attachment 12—Other Relevant Documents (as applicable)
Provide up to 5 attachments in Attachment 12 of the Appendices section if applicable.
3. After completing the Appendices form, click the Save and Continue button to proceed to the Program Specific Information – Status Overview page.

Look-Alike Renewal of Designation Application 7 User Guide
4. Completing the Program Specific Forms 1. Click the Update link to edit each form. Once completed, click on the Save and Continue button to
proceed to the next listed form.
Figure 4: Status Overview Page for Program Specific Forms
4.1 Form 1A – General Information Worksheet Form 1A - General Information Worksheet provides information related to the applicant, proposed service area, population, and patient and visit projections. This form has the following sections:
1. Applicant Information (Figure 5, 1) 2. Proposed Service Area (Figure 5, 2)

Look-Alike Renewal of Designation Application 8 User Guide
Figure 5: Form 1A – General Information Worksheet

Look-Alike Renewal of Designation Application 9 User Guide
4.1.1 Completing the Applicant Information section The Applicant Information section is pre-populated with the applicant name and application type. Complete this section by providing information in the required fields (Figure 6).
1. Select the applicant organization’s fiscal year end date (e.g., June 30) from the drop-down menu. 2. Select one option in the Business Entity section. An applicant that is a Tribal or Urban Indian entity
and meets the definition for a public or private entity should select the Tribal or Urban Indian category.
3. Select one or more categories for the Organization Type section. You must specify the organization type if you select ‘Other’ (Figure 6, 1).
Figure 6: Applicant Information section
4.1.2 Completing the Proposed Service Area section The Proposed Service Area section is divided into the following sub-sections:
• 2a. Service Area Designation • 2b. Service Area Type • 2c. Patients and Visits
o Unduplicated Patients and Visits by Population Type o Patients and Visits by Service Type

Look-Alike Renewal of Designation Application 10 User Guide
4.1.2.1 Completing 2a. Service Area Designation In the Select MUA/MUP field (Figure 7, 1), select the option(s) that best describe the designated service area you propose to serve. Enter ID number(s) for the MUA and/or MUP in the proposed service area.
IMPORTANT NOTE: For inquiries regarding MUAs or MUPs, visit the Shortage Designation web site or call 1-888-275-4772 (option 1 then option 2), or contact the Shortage Designation Branch at [email protected] or 301-594-0816.
Figure 7: Proposed Service Area section
4.1.2.2 Completing 2b. Service Area Type section In the Service Area Type field (Figure 7, 2), indicate whether the service area is urban, rural, or sparsely populated. If sparsely populated is selected, specify the population density by providing the number of people per square mile (values must range from .01 to 7).
IMPORTANT NOTE: For information about rural populations, visit the Office of Rural Health Policy’s web site.
4.1.2.3 Completing 2c. Patients and Visits
4.1.2.3.1 Unduplicated Patients and Visits by Population Type To complete this section, follow these steps:
1. Answer the question, ‘How many unduplicated patients are projected to be served by End of Designation Period’ (Figure 8, 1).
2. The system will auto-populate the number in the Total row of the Patients column under the Projected by End of Designation Period heading (Figure 8, 2) when the user clicks on the Save or Save and Continue button.
3. Patient data under the Current Number heading (Figure 8, 3) is pre-populated from the Uniform Data System (UDS) for the Total and for the Population Types corresponding to the sub programs selected in Cover page - Select Target Population(s) section of this application.
4. The Total Visits under the Current Number heading (Figure 8, 4) is pre-populated from the Uniform Data System (UDS). You must enter the number of visits for Population Types

Look-Alike Renewal of Designation Application 11 User Guide
corresponding to the sub programs selected in the Cover page - Select Target Population(s) section of this application (Figure 8, 5). For the remaining Population Types, you may provide zeros if there are no projections. You may also provide data for the Population Types beyond those selected in the Cover page.
5. The number of patients and visits under the Projected by End of Designation Period heading for each Population Type that corresponds to the sub programs selected in the Cover page - Select Target Population(s) section of this application, should be greater than zero. For the remaining Population Types, you may provide zeros if there are no projections. You may also provide data for the Population Types beyond those selected in the Cover page.
Figure 8: Unduplicated Patients and Visits by Population Type
IMPORTANT NOTES:
• The General Underserved Community row should include all patients/visits not captured in other Population Types
• Across all Population Type categories, an individual can only be counted once as a patient.
4.1.2.3.2 Patients and Visits by Service Type To complete this section, follow these steps: 1. Patients and Visits under the Current Number heading (Figure 9, 1) is pre-populated from the
Uniform Data System (UDS) for each Service type. 2. Provide the number of patients and visits under the Projected by End of Designation Period heading
for each Service Type (Figure 9, 2).
Figure 9: Patients and Visits by Service Type

Look-Alike Renewal of Designation Application 12 User Guide
IMPORTANT NOTE:
• ‘UDS/Baseline Value’ refers to the number of patients and visits for the proposed service area at the time of application.
• Projected Patients and Visits for Medical Services must be greater than 0.
• In the Patients and Visits by Service Type section, Projected Medical Patients (by end of designation
period) must be greater than the projected number of patients for each of the other service types. • Project the number of patients and visits anticipated within each Service Type category by the end of
the designation period. • To maintain consistency with the patients and visits reported in UDS, do not report patients and visits
for vision or pharmacy services, or services outside the proposed scope of project. Refer to the Scope of Project (http://bphc.hrsa.gov/about/requirements/scope) policy documents.
• The Patients and Visits by Service Type section does not display total values, since an individual patient may be included in multiple Service Type categories.
• Providing numbers for all the Service Types is required. Zeros are acceptable, except Total Medical Services.
3. After completing all sections of Form 1A: General Information Worksheet, click the Save and Continue button to save your work and proceed to the next form.
4.2 Form 4 - Community Characteristics Form 4 – Community Characteristics reports current service area population and target population data for the entire scope of the project (i.e. all sites). This form has the following sections:
1. Race and Ethnicity (Figure 10, 1) 2. Hispanic or Latino Ethnicity (Figure 10, 2) 3. Income as a Percent of Poverty Level (Figure 10, 3)

Look-Alike Renewal of Designation Application 13 User Guide
4. Primary Third Party Payment Source (Figure 10, 4) 5. Special Populations and Select Population Characteristics (Figure 10, 5)
Figure 10: Form 4 – Community Characteristics

Look-Alike Renewal of Designation Application 14 User Guide
4.2.1 Completing the Form 4 sections To complete the Race and Ethnicity, Hispanic or Latino Ethnicity, Income as a Percent of Poverty Level, and Primary Third Party Payment Source sections (Figure 10, 1, 2, 3, 4), enter the Service Area Number (Figure 10, 6) and Target Population Number for each of the respective categories (Figure 10, 7).
IMPORTANT NOTES:
• Target Population data is a subset of Service Area data, and in most cases is a greater than the number of patients projected on Form 1A. Patient data should not be used to report target population data since patients are typically a subset of all individuals targeted for service.
• The ‘Service Area Percentage’ and ‘Target Population Percentage’ are auto-populated. • If information for the service area is not available, extrapolate data from the U.S. Census
Bureau, local planning agencies, health departments, and other local, state, and national data sources. Estimates are acceptable.
• Information provided regarding race and/or ethnicity will be used only to ensure compliance with statutory and regulatory Governing Board requirements. Data on race and/or ethnicity collected on this form will not be used as a designating factor.
• When entering data, the total Service Area Numbers for the Race and Ethnicity, Hispanic or Latino Ethnicity, Income as a Percent of Poverty Level, and Primary Third Party Payment Source sections should be equal. Likewise, the total Target Population Numbers for each of these categories should be equal.
• In order to automatically calculate the Total Service Area Numbers and Total Target Population Numbers for all four sections, click on the Save and Calculate Total button (Figure 10, 8) under any of the sections.
4.2.2 Completing the Special Populations and Select Population
Characteristics section 1. Under the Special Populations and Select Population Characteristics section (Figure 11), enter the
Service Area Number and Target Population Number for each special population group listed.
2. If you select the target population related to special populations (i.e., MHC, HCH and/or PHPC) in the Cover Page form of this application, you must provide a Service Area Number and Target Population Number that is greater than 0 for the following line items under the Special Populations section on Form 4 as applicable: Migratory/Seasonal Agricultural Workers and Families, People Experiencing Homelessness, and Residents of Public Housing.
3. In the ‘Other’ row (Figure 11, 1), specify a population group that is not listed (if desired), and enter the Service Area Number and the Target Population Number for the specified population group.
4. Individuals may be counted in multiple special population groups, so the numbers in this section do not have to match those in the other sections of this form.

Look-Alike Renewal of Designation Application 15 User Guide
Figure 11: Special Populations section
5. After completing all sections of Form 4, click the Save and Continue button to save your work and proceed to the next form.
4.3 Form 2 – Staffing Profile Form 2 – Staffing Profile reports current and prospective staffing for the look-alike. Report personnel for the first certification year of the proposed project. Include only staff for sites included on Form 5B: Service Sites. This form has the following sections:
1. Staffing Positions by Major Service Category sections
• Key Management Staff/Administration (Figure 12, 1) • Facility and Non-Clinical Support Staff (Figure 12, 2) • Physicians (Figure 12, 3) • Nurse Practitioners, Physician Assistants, and Certified Nurse Midwives (Figure 12, 4) • Medical (Figure 12, 5) • Dental Services (Figure 12, 6) • Behavioral Health (Mental Health and Substance Abuse) (Figure 13, 7) • Professional Services (Figure 13, 8) • Vision Services (Figure 13, 9) • Pharmacy Personnel (Figure 13, 10) • Enabling Services (Figure 13, 11) • Other Programs and Services (Figure 13, 12)
2. Total FTEs (Figure 13, 13)

Look-Alike Renewal of Designation Application 16 User Guide
Figure 12: Form 2 – Staffing Profile

Look-Alike Renewal of Designation Application 17 User Guide
Figure 13: Form 2- Staffing Profile continued…

Look-Alike Renewal of Designation Application 18 User Guide
4.3.1 Completing the Staffing Positions by Major Service Category sections 1. In the Direct Hire FTEs column, provide only the number of Full Time Employees (FTEs) directly hired by
the health center for each staffing position. Enter 0 if not applicable (Figure 14, 1).
2. In Contract/Agreement FTEs column, indicate whether contracts are used for each staffing position (Figure 14, 2). Contracted staff should be summarized in Attachment 7: Summary of Contracts and Agreements and/or included in contracts uploaded to Form 8: Health Center Agreements, as applicable.
IMPORTANT NOTES:
• Allocate staff time in the Direct Hire FTE column by function among the staff positions listed. An individual’s FTE should not be duplicated across positions. For example, a provider serving as a part- time family physician and a part-time Clinical Director should be listed in each respective category with the FTE allocated to each position (e.g., CMO 0.3 FTE and family physician 0.7 FTE). Do not exceed 1.0 FTE for any individual. For position descriptions, refer to the UDS Reporting Manual (http://bphc.hrsa.gov/datareporting/reporting/index.html).
• If a staffing position is not listed, you may specify in the Other section up to 40 characters.
• Volunteers should be recorded in the Direct Hire FTEs column.
Figure 14: Direct Hire and Contract/Agreement FTEs columns
4.3.2 Completing the Total FTEs section This row displays the sum of Direct Hire FTEs for the Staffing Positions by Major Service Categories.
1. To calculate the totals, click the Calculate button (Figure 15).

Look-Alike Renewal of Designation Application 19 User Guide
Figure 15: Total FTEs
2. Click the Save and Continue button to save your work and proceed to the next form.
4.4 Form 3 - Income Analysis Form 3 – Income Analysis projects program income, by source, for Year 1 of the proposed designation period. This form has the following sections:
1. Payer Categories (Figure 16, 1) 2. Comments/Explanatory Notes (Figure 16, 2)
Figure 16: Form 3 – Income Analysis
4.4.1 Completing the Payer Categories section

Look-Alike Renewal of Designation Application 20 User Guide
The Payer Categories section is divided into the following sub-sections:
• Part 1: Patient Service Revenue - Program Income • Part 2: Other Income - Other Federal, State, Local and Other Income • Total Income (Program Income Plus Other)
To complete the Payer Categories section, follow these steps:
1. In column (a), provide the number of Patients by Primary Medical Insurance for each of the Payer Categories in Part 1 (Figure 16, 3). Enter 0 if not applicable.
2. In column (b), provide the number of Billable Visits for each of the Payer Categories in Part 1 (Figure 16, 4). Visits must be greater than or equal to the number of Patients by Primary Medical Insurance (i.e., column (a)). Enter 0 if not applicable.
3. In column (c), provide the amount of Income per Visit for each of the Payer Categories in Part 1 (Figure 16, 5). Enter 0 if not applicable.
4. In column (d), provide the amount of Projected Income for each of the Payer Categories in Parts 1 and 2. (Figure 16, 6). Enter 0 if not applicable.
5. In Prior FY Income column (e), provide the amount of income from the prior fiscal year for each of the Payer Categories in Parts 1 and 2 (Figure 16, 7). Enter 0 if not applicable.
6. Click the Calculate Total and Save button to calculate and save the values for each of the Payer Categories in Part 1. (Figure 16, 8).
IMPORTANT NOTES:
• The number of Billable Visits in column (b) should be Zero if the number of Patients by Primary Medical Insurance in column (a) for a Payer Categories is Zero.
• The value for the Total Program Income (line 6, column (d)) should equal the value for the Total Program Income on Form 3A, line (f) under section 2. Revenue.
• The Patients By Primary Medical Insurance (a), Billable Visits (b) and Income Per Visit (c) columns in Part 2 are disabled and set to N/A.
7. Click the Calculate Total and Save button in the Total Income (Program Income Plus Other) section to calculate and save the values for each of the Payer Categories in Parts 1 and 2. (Figure 16, 9).
4.4.2 Completing the Comments/Explanatory Notes section In this section, enter any comments/explanations related to this form.
1. For each of the Payer Categories in Part 1, the value in the Projected Income (d) column should equal the value obtained by multiplying Billable Visits (b) and Income per Visit (c). If these values are not equal, provide an explanation in this section. If these numbers are equal for all the Payer Categories, providing comments in this section is optional.
2. Click the Save and Continue button to save your work and proceed to the next form.
4.5 Form 3A – Budget Information Form 3A: Budget Information shows the program budget, by category, for Year 1 of the proposed designation period. This form has the following sections:

Look-Alike Renewal of Designation Application 21 User Guide
• Expenses (Figure 17, 1) • Revenue (Figure 17, 2)
4.5.1 Completing the Expenses section In the Expenses section, enter the projected first year of expenses for each Health Center Program type for which designation is requested (i.e., CHC, MHC, HCH, PHPC). Click the Calculate Total and Save button to calculate and save the values for each of the Budget Categories in Part 1. (Figure 17, 3 & 4).
Figure 17 – Form 3A – Budget Information
4.5.2 Completing the Revenue section In the Revenue section, enter the projected first year of revenue by funding source for each Health Center Program type for which designation is requested (i.e., CHC, MHC, HCH, PHPC). Click the Calculate Total and Save button to calculate and save the values for each of the Budget Categories in Part 2. (Figure 17, 5).
IMPORTANT NOTE: The value for the Total Program Income in the Revenue section (line (f)) should equal the value for the Total Program Income on Form 3, line 6, column (d).

Look-Alike Renewal of Designation Application 22 User Guide
Click the Save and Continue button to save your work and proceed to the next form.
4.6 Form 5A – Services Provided Form 5A – Services Provided identifies the services to be provided, and how they will be provided by the applicant organization. For Renewal of Designation applications, Form 5A – Services Provided has the following sections:
• Required Services (Figure 18, 1) • Additional Services (Figure 18, 2) • Specialty Services (Figure 18, 3)
Figure 18: Form 5A – Services Provided (Required Services)
HRSA permits organizations to provide required services directly, by contracting with another provider, or by referral to another provider. These modes of service provision differ according to the service provider and the payment source (Table 1). See the Form 5A Column Descriptors at

Look-Alike Renewal of Designation Application 23 User Guide
http://bphc.hrsa.gov/programrequirements/scope.html for descriptions and requirements for using each of the three service delivery modes.
Table 1: Modes of Service Provision Service Delivery Methods Your Organization Provides
the Service Your Organization Pays for
the Service
Service provided directly by health center Yes Yes
Service provided by formal written contract/agreement
No Yes
Service provided by formal written referral arrangement
No No
4.6.1 Completing the Required, Additional & Specialty Services Section The Form 5A: Service Provided is pre-populated with the services in the current Health Center Program scope that HRSA has on file for your organization and is not editable.
If the pre-populated data on Form 5A does not reflect any recent approved scope changes, click the Refresh from Scope button (Figure 18, 4) to refresh the data and display the approved changes
You will be required to visit the Required Services, Additional Services, and Specialty Services sections (Figure 18, 1, 2 & 3) at least once by clicking the Continue button on each section in order to change the status of the form to Complete.
Form 5A: Services Provided will be complete when each of the Required Services, Additional Services and Specialty Services sections are complete, indicated with a green tick mark in the section tabs (Figure 19).
Figure 19: Completed Form 5A
After completing all the sections on Form 5A, click the Save and Continue button to save your work and proceed to Form 5B.
4.7 Form 5B – Service Sites Form 5B – Service Sites identifies the sites in your scope of project. Form 5B is pre-populated with the sites in the current Health Center Program scope that HRSA has on file for your organization.

Look-Alike Renewal of Designation Application 24 User Guide
Form 5B is not editable. You will be required to visit the form at least once in order to change the status of the form to Complete.
Figure 20: Form 5B Service Sites
If the pre-populated data on Form 5B does not reflect any recent approved scope changes, click the Refresh from Scope button to refresh the data and display the approved changes (Figure 20, 1).
After providing complete information on Form 5B – Edit page, click the Save and Continue button.
4.8 Form 5C – Other Activities/Locations The Form 5C - Other Activities/Locations is pre-populated with the activities/locations Information in the current Health Center Program scope that HRSA has on file for your organization and is not editable. You will be required to visit this form at least once to change the status of the form to Complete
Figure 21: Form 5C – Other Activities/Locations
After completing Form 5C, click Continue button to save your work and proceed to the next form.
Look-Alike Renewal of Designation Application 25 User Guide
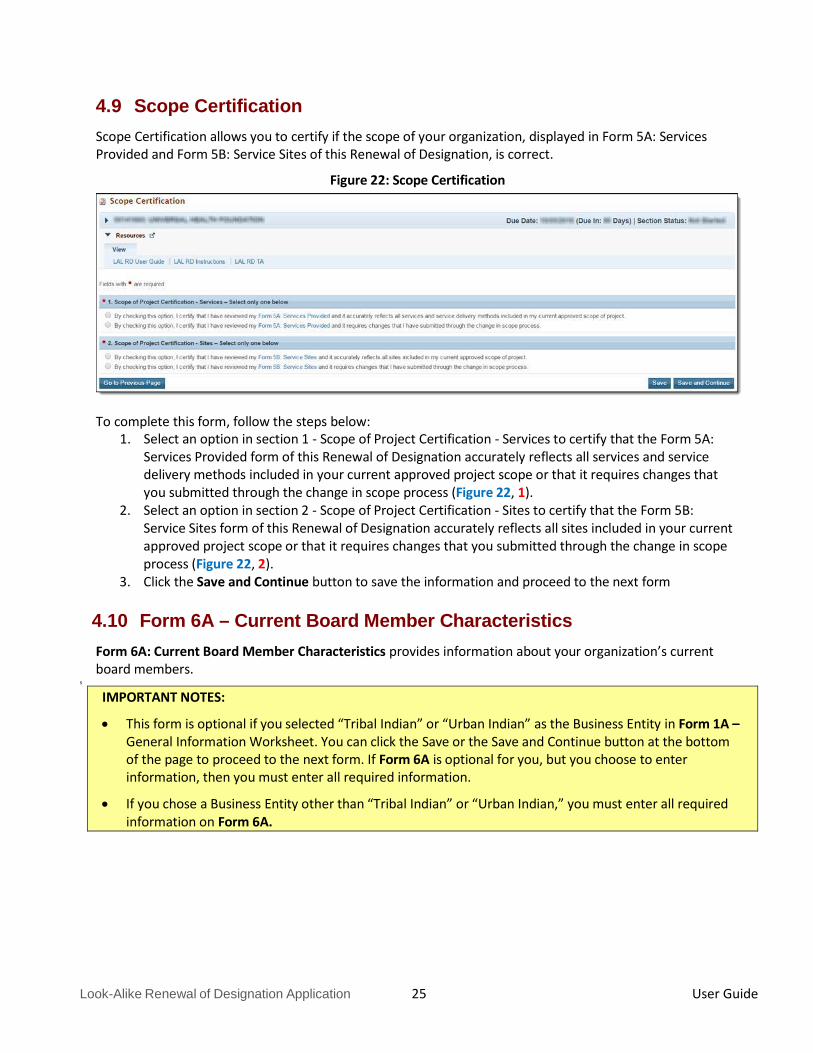
4.9 Scope Certification Scope Certification allows you to certify if the scope of your organization, displayed in Form 5A: Services Provided and Form 5B: Service Sites of this Renewal of Designation, is correct.
Figure 22: Scope Certification
To complete this form, follow the steps below: 1. Select an option in section 1 - Scope of Project Certification - Services to certify that the Form 5A:
Services Provided form of this Renewal of Designation accurately reflects all services and service delivery methods included in your current approved project scope or that it requires changes that you submitted through the change in scope process (Figure 22, 1).
2. Select an option in section 2 - Scope of Project Certification - Sites to certify that the Form 5B: Service Sites form of this Renewal of Designation accurately reflects all sites included in your current approved project scope or that it requires changes that you submitted through the change in scope process (Figure 22, 2).
3. Click the Save and Continue button to save the information and proceed to the next form
4.10 Form 6A – Current Board Member Characteristics Form 6A: Current Board Member Characteristics provides information about your organization’s current board members.
s
IMPORTANT NOTES:
• This form is optional if you selected “Tribal Indian” or “Urban Indian” as the Business Entity in Form 1A – General Information Worksheet. You can click the Save or the Save and Continue button at the bottom of the page to proceed to the next form. If Form 6A is optional for you, but you choose to enter information, then you must enter all required information.
• If you chose a Business Entity other than “Tribal Indian” or “Urban Indian,” you must enter all required information on Form 6A.

Look-Alike Renewal of Designation Application 26 User Guide
Figure 23: Form 6A – Current Board Member Characteristics
1. To add the board member information, click the Add Board Member button (Figure 23, 1). You must provide a minimum of 9 and maximum of 25 board members. The system navigates to the Current Board Member – Add page (Figure 24).
2. Provide the required board member information on this page. Click the Save and Continue button to save the information and navigate back to the Form 6A list page (Figure 24, 1), or the Save and Add New button to save the information and add a new board member (Figure 24, 2).
3. To update or to delete information for any board member, click on Update or Delete link under the options column in the List of All Board Members section (Figure 23, 2).
4. Enter the gender, ethnicity and race of board members who are patients of the health center in the Number of Patient Board Members sections (Figure 23, 3).
5. If you selected Public (non-Tribal or Urban Indian) as the business entity in Form 1A of this application, then select ‘Yes’ or ‘No’ for the public organization/center related question. If you selected a different

Look-Alike Renewal of Designation Application 27 User Guide
business entity in Form 1A, then select ‘N/A’ for this question. If you answer ‘Yes’ to this question, ensure that the co-applicant agreement is included as Attachment 6 in the Appendices form of this application.
Figure 24: Current Board Member – Add Page
IMPORTANT NOTES:
• The totals of each Patient Board Member Classification sections should be equal.
• The total number of patient board members under each classification section should be less than or equal to the total number of board members added in the List of All Board Members section.
6. After providing complete information on Form 6A, click the Save and Continue button to save the information and proceed to the next form.
4.11 Form 6B - Request for Waiver of Governance Requirements If you are proposing to serve only Migrant Health Center, Health Care for the Homeless, and/or Public Housing Primary Care, Form 6B is used to request a waiver of the patient majority governance requirement. HRSA will not grant a waiver request if your organization is applying to serve the general underserved community (Community Health Center (CHC)).
4.11.1 Completing Form 6B when it is not applicable Form 6B will not be applicable in the following cases:

Look-Alike Renewal of Designation Application 28 User Guide
• You have selected Community Health Centers (CHC) as the Target Population in the Cover Page form of this application.
• You selected “Tribal” or “Urban Indian” as the Business Entity in Form 1A.
Click on the Continue button provided at the bottom of the form to complete and proceed to the next form (Figure 25).
Figure 25: Form 6B when Not Applicable
4.11.2 Completing Form 6B when it is applicable To complete Form 6B when it is applicable and necessary for your organization, follow these steps:
1. Indicate whether you are requesting a new waiver of the 51% patient majority governance requirement
under the New Waiver Request section (Figure 26, 1). If you answer “Yes”, you must then complete the Demonstration of Good Cause for Waiver section (Figure 26, 2) and the Alternative Mechanism for Addressing Patient Representation section (Figure 26, 3).

Look-Alike Renewal of Designation Application 29 User Guide
Figure 26: Form 6B when Applicable
2. Answer the remaining questions on the form as applicable.
IMPORTANT NOTE: Questions 2a, 2b, and 3 are required if you answered 'Yes' to question 1.
After completing Form 6B, click the Save and Continue button to save your work and proceed to the next form.
4.12 Form 8 - Health Center Agreements Form 8 indicates whether you have 1) any agreements with a parent, affiliate, or subsidiary organization; and/or 2) any agreements that will constitute a substantial portion of the proposed scope of project, including a proposed site operated by a contractor, as identified in Form 5B: Service Sites. This form has the following sections:
1. Part I: Health Center Agreements (Figure 27, 1) 2. Part II: Attachments (Figure 27, 2)

Look-Alike Renewal of Designation Application 30 User Guide
Figure 27: Form 8 – Health Center Agreements
4.12.1 Completing Part I of Form 8 To complete Part I: Health Center Agreements, follow these steps:
3. In Part I, question 1 (Figure 27, 3), answer if your organization has a parent, affiliate, or subsidiary
organization.
4. Select ‘Yes’ in question 2 (Figure 27, 4), if any current or proposed agreements exist with another organization to carry out a substantial portion of your organization’s approved scope of project. If ‘Yes’ is selected, complete 2a (Figure 27, 5).
IMPORTANT NOTE: If any of the sites proposed in Form 5B: Service Sites are operated by a contractor, the system will auto select ‘Yes’ for question 2 and make it non-editable.
4.12.2 Completing Part II of Form 8 If you answered ‘Yes’ to questions 1 or 2, provide each agreement with external organizations as noted in Part I. The agreements will be organized by organization. To add agreements, follow these steps:
1. Click on Add Organization Agreement (Figure 27, 6) to open the Organization Agreement – Add page (Figure 28).

Look-Alike Renewal of Designation Application 31 User Guide
Figure 28: Organization Agreement – Add page
2. Provide the required information for the agreement in the Organization Agreement Detail (Figure 28,1) section on this page (Upload at least one document related to the agreement in the Attachments section at the bottom of this page by clicking the Attach File button.
IMPORTANT NOTE:
• Before uploading a document for Form 8, rename the file to include the affiliated organization’s name (e.g., ‘CincinnatiHospital_MOA.doc’).
• Part II will accept a maximum of five document uploads for 10 organizations. Additional documentation that exceeds this limit should be included in Attachment 12: Other Relevant Documents.
• Attachments to Form 8 will not count toward the application page limit of 160 pages.
3. Click Save and Continue to return to Form 8 – Health Center Agreements page. Following the steps described above, enter additional organizations and corresponding agreements as referenced in Part I.
4. After completing Form 8, click the Save and Continue button to save your work and proceed to the next form.
4.13 Form 10 – Emergency Preparedness Report The Emergency Preparedness Report assesses your organization’s overall emergency readiness.
1. Complete the sections of this form by selecting a ‘Yes’ or ‘No’ response for the required questions (Figure 29).
2. After providing complete information on Form 10, click the Save and Continue to save the information and proceed to the next form.

Look-Alike Renewal of Designation Application 32 User Guide
Figure 29: Form 10 – Emergency Preparedness Report
4.14 Form 12 – Organization Contacts The Contact information shall be pre-populated on this form, if you wish to update or Delete any of the contact information, follow the following steps:

Look-Alike Renewal of Designation Application 33 User Guide
Figure 30: Form 12 – Organization Contacts
The system directs you to the data entry page for the corresponding contact.
1. To update the contact information provided, click on the Update link under the options column (Figure 30, 1).
2. To delete the contact information already provided, click on the Delete link under the options column (Figure 30, 2).
3. After providing complete information on Form 12, click the Save and Continue button to save the information and proceed to the next form (Figure 30, 3).
4.15 Clinical Performance Measures Use this form to provide information about Clinical Performance Measures.
IMPORTANT NOTE: Refer to the Look-Alike Renewal of Designation instructions for more information on completing the Clinical Performance Measures form.
The Clinical Performance Measures form displays Required and Additional Measures. The Required Measures are pre-defined measures; applicants are required to provide requested information for all the required measures. If desired, applicants may enter Additional Measures. These measures are optional.
IMPORTANT NOTE:
• Refer to Appendix B in the RD instructions for more information on completing the Clinical Performance Measures form.
• The system will pre-populate baseline data for fourteen of the Clinical Performance Measures from the 2016 Uniform Data System (UDS) report. Baseline data must be entered for the other two.

Look-Alike Renewal of Designation Application 34 User Guide
4.15.1 Completing the Required Clinical Performance Measures Figure 31: Clinical Performance Measures page
1. Click on the Update link to start working on a performance measure (Figure 31, 2).
The system navigates to the Clinical Performance Measure – Update page (Figure 32).
IMPORTANT NOTES:
• All HRSA-defined Clinical Performance Measures are required.
• The Clinical Performance Measures form will become ‘Complete’ when the statuses of all required performance measures and additional performance measures are ‘Complete’.

Look-Alike Renewal of Designation Application 35 User Guide
Figure 32: Clinical Performance Measure - Update page
2. Provide a Target Goal Description for each performance measure (Figure 32, 1). For all required measures, the Numerator and Denominator descriptions are pre-populated (Figure 32, 2).
3. For Baseline Data, enter the year of the data provided and the numerator and denominator values based on the descriptions given. Click the Calculate Baseline button to show the baseline percentage (Figure 32, 4).
4. Enter the projected goal by the end of the designation period as a percentage (Figure 32, 3).
Look-Alike Renewal of Designation Application 36 User Guide
5. Select an appropriate response in the Data Sources & Methodology field. If ‘Other’ is selected, specify a name and description.
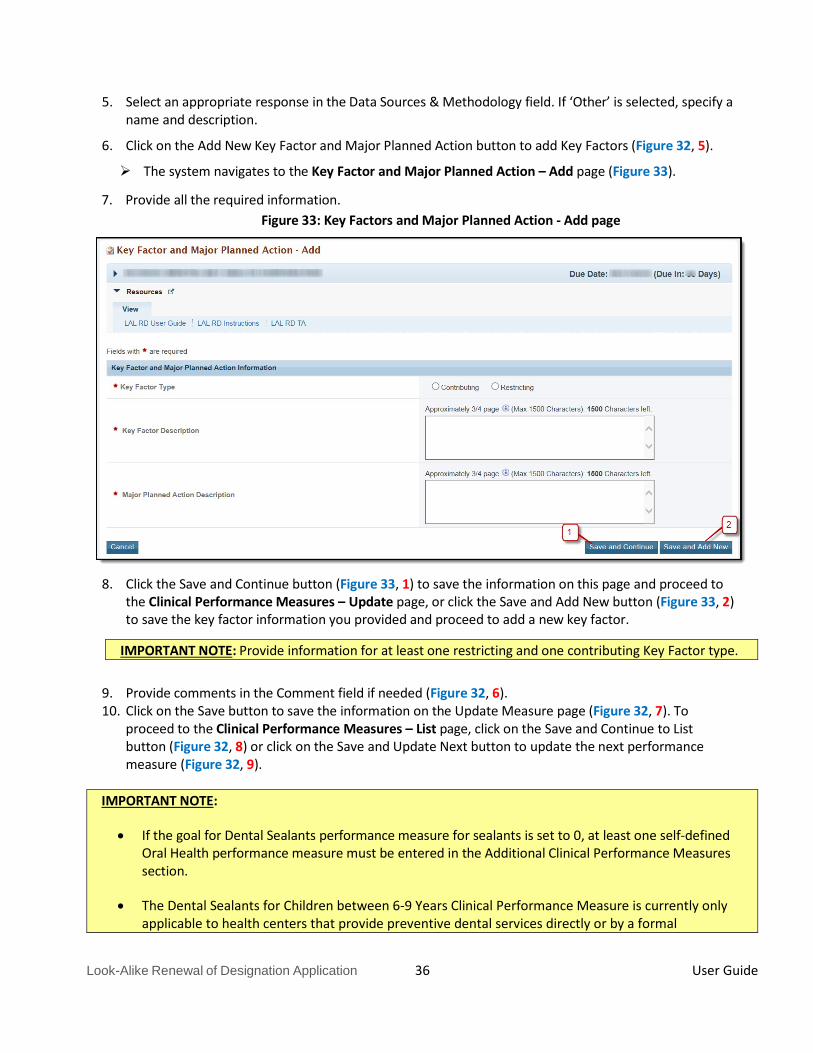
6. Click on the Add New Key Factor and Major Planned Action button to add Key Factors (Figure 32, 5).
The system navigates to the Key Factor and Major Planned Action – Add page (Figure 33).
7. Provide all the required information. Figure 33: Key Factors and Major Planned Action - Add page
8. Click the Save and Continue button (Figure 33, 1) to save the information on this page and proceed to the Clinical Performance Measures – Update page, or click the Save and Add New button (Figure 33, 2) to save the key factor information you provided and proceed to add a new key factor.
IMPORTANT NOTE: Provide information for at least one restricting and one contributing Key Factor type.
9. Provide comments in the Comment field if needed (Figure 32, 6). 10. Click on the Save button to save the information on the Update Measure page (Figure 32, 7). To
proceed to the Clinical Performance Measures – List page, click on the Save and Continue to List button (Figure 32, 8) or click on the Save and Update Next button to update the next performance measure (Figure 32, 9).
IMPORTANT NOTE:
• If the goal for Dental Sealants performance measure for sealants is set to 0, at least one self-defined Oral Health performance measure must be entered in the Additional Clinical Performance Measures section.
• The Dental Sealants for Children between 6-9 Years Clinical Performance Measure is currently only applicable to health centers that provide preventive dental services directly or by a formal

Look-Alike Renewal of Designation Application 37 User Guide
arrangement in which the health center pays for the service (Form 5A, Columns I and/or II). A health center that only provides preventive dental services via a formal referral (Form 5A, Column III) may set the goal for this performance measure as zero. If the goal for the Dental Sealants for Children between 6-9 Years performance measure will be set to 0, at least one self-defined Oral Health performance measure must be tracked under the Additional Clinical Performance Measures section.
• Baselines for performance measures should be developed from data that are valid, reliable, and
whenever possible, derived from currently established information management systems. If baselines are not yet available, enter 0 and provide a date by which baseline data will be available.
• If you are applying for designation to serve special populations (i.e., migratory and seasonal
agricultural workers, people experiencing homelessness, and/or residents of public housing), you must include additional clinical performance measures that address the health care needs of these populations. Additional performance measures specific to special populations may not replace the required measures listed above. In providing additional performance measures specific to a special population, you must reference the target group in the performance measure. For example, if you are seeking designation to serve people experiencing homelessness, then you must propose to measure “the percentage of people experiencing homelessness who…” rather than simply “the percentage of patients who…”
• If you have identified unique issues (e.g., populations, age groups, health issues, risk management
efforts) in the NEED section of the Project Narrative, you are encouraged to include additional related performance measures.
• Pre-populated baseline data will be sourced from the most recent UDS report for measures that have
not significantly changed.
4.15.2 Adding Additional Clinical Performance Measures If there were previously defined Additional Clinical Performance Measures the system shall display them here. To add an Additional Clinical Performance Measure to your application, follow these steps:
1. Click the Add Additional Performance Measure button on the Clinical Performance Measures – List page (Figure 31, 2).
The Add Clinical Performance Measure page opens.

Look-Alike Renewal of Designation Application 38 User Guide
Figure 34: Add Clinical Performance Measure
2. Select a focus area from the drop-down menu (Figure 34, 1).
3. If you select Oral Health or Behavioral Health as the focus area, click on the Load Performance Measure Category button (Figure 34, 2) to load the performance measure categories and then select one or more, as applicable.
4. If you select Other as the focus area, you must specify the performance measure focus area.
5. Provide the required information on this page.
6. Click on the Add New Key Factor and Major Planned Action button to add Key Factors. Provide information for at least one restricting and one contributing Key Factor type.
7. Click on the Save button to save the information on the Update Measure page. To proceed to the Clinical Performance Measures – List page, click the Save and Continue button. The newly added measure will be listed under the Additional Measures section.
8. Additional measures can be updated and/or deleted by using the Update and/or Delete links provided as options.
4.16 Financial Performance Measures The Financial Performance Measures form displays Required and Additional Measures. The Required Measures are pre-defined measures and the system will pre-populate Baseline Data from the 2016 Uniform Data System (UDS) report, applicants may enter Additional Measures. These measures are optional.
IMPORTANT NOTE: Refer to the Look-Alike Renewal of Designation instructions for more information on completing the Financial Performance Measures form.
4.16.1 Completing the Required Financial Performance Measures There are two required performance measures listed in this form. To complete this form:
1. Click on the Update link to start working on a performance measure (Figure 35, 1).
The system navigates to the Financial Performance Measure – Update page (Figure 36).

Look-Alike Renewal of Designation Application 39 User Guide
Figure 35: Financial Performance Measures – List page

Look-Alike Renewal of Designation Application 40 User Guide
Figure 36: Financial Performance Measure – Update Page
2. Provide a Target Goal Description for each performance measure (Figure 36, 1).
3. For Baseline Data, the Calculate Baseline button will calculate the baseline data based on the numerator and denominator values entered. The Baseline data will be pre-populated from the 2016 Uniform Data System (UDS) report (Figure 36, 2).
4. Provide the progress on the performance measure (Figure 36, 3). State if progress cannot be reported due to the measure being revised.
5. Enter the projected data by the end of the designation period.
6. Enter the Data Sources & Methodology used for the measure.
Look-Alike Renewal of Designation Application 41 User Guide
7. Click on the Add New Key Factor and Major Planned Action button to add Key Factors. Provide information for at least one restricting and one contributing Key Factor type.
8. Click the Save and Continue button to save the information on the Key Factor and Major Planned Action – Add page and proceed to the Financial Performance Measures – Update page, or click the Save and Add New button to save the key factor information and proceed to add a new key factor.
9. The Comments field is optional: If you would like to report more current baseline data, the information should be included in Comments field
10. Click on the Save button to save the information on this page. To proceed to the Financial Performance Measures – List page, click on the Save and Continue to List button or click on the Save and Update Next button to update the next performance measure.
4.16.2 Adding Additional Financial Performance Measures If there were previously defined Additional Financial Performance Measures the system shall display them here. To add an Additional Financial Performance Measure to your application, follow these steps:
1. Click the Add Additional Performance Measure button on the Financial Performance Measures – List page.
The Add Financial Performance Measures page opens.
2. Provide the required information on this page.
3. If you select Other as the focus area, you must specify the performance measure focus area.
4. To add the key factors, click on the Add New Key Factor and Major Planned Action button. Provide information for at least one restricting and one contributing Key Factor type.
5. Click on the Save button to save the information on the Update Measure page. To proceed to the performance measure list page, click on the Save and Continue button. The newly added measure will be listed in the Additional Measures section on the Financial Performance Measures – List page.
6. Additional measures can be updated and/or deleted by using the Update and/or Delete links provided as options.
5. Reviewing and Submitting the Look-Alike Renewal of Designation Application to HRSA
To review your application, follow these steps: 1. Click on the Status link on the left side menu.

Look-Alike Renewal of Designation Application 42 User Guide
Figure 37: Left menu – Review and Submit
2. On the Application – Status Overview page, click the Review link in the Review and Submit section of the left menu. The system navigates to the Review page (Figure 38).
Figure 38: Review page

Look-Alike Renewal of Designation Application 43 User Guide
3. Verify the information displayed on the Review page. 4. If you are ready to submit the application to HRSA, click the Proceed to Submit button at the bottom of
the Review page (Figure 38, 1). The system navigates to the Submit page (Figure 39).
5. Click the Submit to HRSA button at the bottom of the Submit page (Figure 39, 1). The system navigates to a confirmation page.
Figure 39: Submit to HRSA
6. Check the Application Certification to electronically sign the application and click the Submit to HRSA
button. 7. If you experience any problems with submitting the application in EHB, contact the BPHC Helpline at 1-
877-974-2742, ext. 3 or http://www.hrsa.gov/about/contact/bphc.aspx.