hps simulations user manual - wargame · point of attack-2 hps simulations user manual for the...
TRANSCRIPT

Point of Attack-2 HPS Simulations
USER MANUAL For the latest program upgrades, please visit the HPS web site:
www.hpssims.com If you have questions, or are having problems, please email the HPS Simulations Technical Support Department: [email protected]. If you have a saved game file that exhibits the problem, please keep it handy as we may request that you send it to us to help recreate and identify the issue.
Point of Attack-2 was developed in partnership with the United States Air Force Office of Scientific Research (AFOSR). Government users with questions regarding the development process or objectives should contact AFOSR directly: http://www.afosr.af.mil/. The point of contact is Dr. Robert Barker. The complete Point of Attack-2 software package and documentation are Copyright © 2003 by HPS Simulations. All rights reserved. HPS Simulations and the HPS logo are trademarks of HPS Simulations. All other trademarks and registered trademarks are the property of their respective owners. DISCLAIMER: The Energy/Advanced Weapon information contained herein was gathered by the game author through personal research in open-literature/internet sources. The Air Force Office of Scientific Research neither confirms nor denies any particulars of that information. No Nonsense License Agreement: By installing the software, you are agreeing to these license terms. You have a personal license that allows you to install the software on any computer you own, or on another computer as long as you are an active participant in ALL games being played using the software installed on that machine. In cases where the software is installed temporarily on a computer you do not own, it must be completely removed from the computer at the conclusion of any active games being played. If the software is installed on a network, at least one bona-fide owner of the software must be an active participant in all games being played. Players may create and freely distribute maps and scenarios they create for the main program. However, these modules may not be sold, or made available for sale in any manner without the written consent of HPS Simulations. Primary Credits: Design and Programming: Scott Hamilton, Jeff Lapkoff Databases: John Kincaid, Wendy Kincaid, Nick Bell, and Greg Smith Terrain Analysis/Development: Nick Bell Artwork/Graphics: Nick Bell, Joe Amoral, and Jeff Lapkoff Maps: Nick Bell Scenario Design: Greg Smith

Table of Contents Part 1: Getting Started
Section 1-1: Introduction Section 1-2: About This Manual Section 1-3: Quick Overview Section 1-4: The Turn Sequence Section 1-5: Units and Firing Groups
1-5.1 Multi-Part Units 1-5.2 Firing Groups 1-5.3 Coaxial Weapons
Section 1-6: Formations and The Chain of Command 1-6.1 Headquarters (HQ) Units 1-6.2 Subordinate Units 1-6.3 Nominal vs. Acting HQ’s 1-6.4 Command/Report Delays
Section 1-7: En-Route Units Section 1-8: Fog of War (FOW)
1-8.1 Battlefield Objects 1-8.2 Enemy Units 1-8.3 Friendly Units 1-8.4 Objects/Terrain 1-8.5 SITREP Messages
Section 1-9: Play By Email (PbeM) Section 1-10: Definitions/Abbreviations
Part Two The Interface Section 2-1: The Main Screen
2-1.2 Main Menu Display Options Section 2-2: The Location Information Form Section 2-3: The Off-map Display Section 2-4: Staff Officer Screens
2-4.1 General Characteristics of Staff Officer Screens 2-4.2 Individual Staff Officer Screens
Section 2-5: Preference Settings Section 2-6: Right Clicking (<RBM>) on the Map
2-6.1 <RMB> Pop-up: Unit Info 2-6.2 <RMB> Pop-up: Give Orders to Units 2-6.3 <RMB> Pop-up: Target this Location 2-6.4 <RMB> Pop-up: Place/Edit Objects 2-6.5 <RMB> Pop-up: Place/Edit Preplanned 2-6.6 <RMB> Pop-up: Engineering 2-6.7 <RMB> Pop-up: Bridge Demolition 2-6.7 <RMB> Pop-up: Map Notes 2-6.7 <RMB> Pop-up: Quit Operation
Section 2-7: Orders Mode (Targeting and Movement) Section 2-8: LOS Mode (Line of Sight) Section 2-9: Turn Controls Section 2-10: Keyboard Shortcut Keys
Part Three: Modeling and Simulation Section 3-1: The Turn/Pulse Sequence
3-1.1 The Turn Sequence 3-1.2 The Combat Pulse Sequence 3-1.3 The Movement Phase
Section 3-2: Firing Weapons 3-2.1 Direct Fire (DF) 3-2.2 Indirect Fire (IF) 3-2.3 Anti-Aircraft Fire (AA) 3-2.4 Opportunity Fire 3-2.5 Flight paths
3-2.5.1 Ballistic (un-powered) Projectile Flight Paths 3-2.5.2 Powered/En-route Object Flight Paths 3-2.5.3 Firing Angles
3-2.6 Actions at Firing/Launch 3-2.7 Weapon/Round Accuracy
3-2.7.1 General 3-2.7.2 En-route Unit (Missile) Initial Accuracy 3-2.7.3 Guided Munitions
3-2.7.3.1 Internal 3-2.7.3.2 Controlling Unit 3-2.7.3.3 Painting Unit 3-2.7.3.4 Guidance System Damage 3-2.7.3.5 GPS (Global Positioning System) 3-2.7.3.6 Homing 3-2.7.3.7 Jamming 3-2.7.3.8 Decoys 3-2.7.3.9 Summary of Guided Munition Characteristics 3-2.7.3.10 Seeking
3-2.7.4 Target Size 3-2.7.5 Firing Unit Movement 3-2.7.6 Target Apparent Movement 3-2.7.7 Other Non-guided Accuracy Modifiers
3-2.8 Weapon/Round Effects 3-2.8.1 Effective Target Armor Thickness 3-2.8.2 Kinetic/Impact Effects
3-2.8.2.1 Projectile Air Drag and Impact Angle 3-2.8.2.2 Projectile Fracture and Deformation 3-2.8.2.3 Petalling/Plugging 3-2.8.2.4 Spall 3-2.8.2.5 Target Damage/Destruction
3-2.8.3 HE/HESH 3-2.8.3.1 HE: Blast Effects 3.2.8.3.2 HE: Shrapnel Creation/Damage 3-2.8.3.3 HE: Spall Creation 3-2.8.3.4 HE: Cratering 3-2.8.3.5 HE: Rubble Creation 3-2.8.3.6 HE: Minefield/Sensorfield Damage
3-2.8.4 APHE 3-2.8.5 HEAT 3-2.8.6 Flame/Incendiary
3-2.8.6.1 Flame: Wide-Area Flammables 3-2.8.6.2 Flame: Terrain Fires 3-2.8.6.3 Flame: Igniting Objects
3-2.8.7 Chemical Weapons 3-2.8.7.1 MOPP (Protection)
3-2.8.8 Energy/Advanced Weapons 3-2.8.8.1 Coupling 3-2.8.8.2 Physical Destruction 3-2.8.8.3 Degradation
3-2.9 Ammunition/Weapon System Lethality Adjustments
3-2.9.1 Ammunition Values 3-2.9.2 Weapons System Survivability 3-2.9.3 Special Non-Lethal Ammunition Types 3-2.9.4 Specific Optical System Damage
3-2.10 Suppression 3-2.10.1 Calculating Suppression Amounts

3-2.10.2 Buttoning-up From Suppression 3-2.10.3 Suppression Dissipation
3-2.11 Secondary Explosions/Collateral Effects 3-2.12 High Smoke/Flash/Noise/Backblast 3.2.13 Creating a new unit by “Firing” a Gun/Launcher
Section 3-3: Close Combat 3-3.1 Initiating Close Combat 3-3.2 Resolving Close Combat
Section 3-4: Improved Positions 3-4.1 Setting Up IP Types 3-4.2 Constructing IP’s 3-4.3 IP Effects 3-4.4 Sample Improved Position Diagrams
Section 3.5: Point Missile Defense Systems 3-5.1 PMD Detection Systems 3-5.2 PMD Damage Routines
Anti-Missile Rockets 3-5.3 PMD Ammunition Depletion 3-5.4 PMD Vulnerability
Section 3-6: Fog Of War (FOW) 3-6.1 Unit-specific FOW 3-6.2 Known vs. Sighted Object Information 3-6.3 Messages 3-6.4 Enemy Units 3-6.5 Friendly Units 3-6.6 Flank Forces 3-6.7 Terrain/Objects 3-6.8 Bridges 3-6.9 Minefields 3-6.10 “Friendly Fire”
Section 3-7: Detection of Units/Objects 3-7.1 Visual 3-7.1.1 Illumination 3-7.2 IR (Infrared) Detection 3-7.3 Noise 3-7.4 Light 3-7.5 Radio Transmissions 3-7.6 Radar 3-7.7 Remote Sensors 3-7.8 Start of Scenario Detection
3-7.8.1 Signal Intercept 3-7.8.2 Satellite Monitoring 3-7.8.3 Aerial Reconnaissance 3-7.8.4 HUMINT 3-7.8.5 Patrols
Section 3-8: Movement 3-8.1 Time Required to Move Between Locations 3-8.2 Obstacles 3-8.3 Stacking 3-8.4 Chemical Contamination Areas 3-8.5 Bridges 3-8.6 Mines 3-8.7 Dust Generation 3-8.8 Camouflage Level Adjustments 3-8.9 Join Units/Create Detachment 3-8.10 Mechanical Breakdowns 3-8.11 Transporting Passenger Units
3-8.11.1 Loading/Unloading Time 3-8.11.2 Loading 3-8.11.3 Unloading
3-8.12 Emplacing Units 3-8.13 Aircraft
3-8-13.1 Fixed Wing vs. Hover-capable Aircraft 3-8-13.2 Giving Aircraft Units Movement Orders 3-8-13.3 Special Aircraft Missions
Section 3-9: Morale 3-9.1 Morale Adjustments
Section 3-10: Force Levels 3-10.1 Training 3-10.2 Discipline Ratings 3-10.3 Camouflage 3-10.4 Communications (Orders Delay) 3-10.5 Friction 3-10.5 Air Superiority 3-10.6 Electronic Warfare (EW) 3-10.7 Supply and Strength
Section 3-11: Command and Control 3-11.1 The Chain of Command
3-11.1.1 “Acting” HQ units 3-11.1.2 Command Radius 3-11.1.3 Internal Friction
3-11.2 Messages/SITREP’s 3-11.3 TRP’s and DF Targets
3-11.3.1 TRP’s 3-11.3.2 DF Targets 3-11.3.3 Opportunity Fire
Section 3-12: Terrain Effects 3-12.1 The Terrain Effects Chart (TEC) 3-12.2 Elevation 3-12.3 The LOS (Line of Sight) 3-12.4 Movement 3-12.5 Bridges
3.12.5.1 The Effects of Bridges 3.12.5.2 Bridge Restrictions 3.12.5.3 Damaging and Destroying Bridges
3-12.6 Cover/Concealment 3-12.7 Combat Effects on Terrain
3-12.7.1 Terrain Fires 3-12.7.2 Craters 3-12.7.3 Rubble
3-12.8 Off-map Areas Section 3-13: Repairing Combat Damage Section 3-14: Weather
3-14.1 Ground Conditions 3-14.2 Atmospheric Conditions 3-14.3 Variable Weather
Section 3-15: Illumination 3-15.1 Illumination Level
Section 3-16: Smoke and Dust 3-16.1 Smoke Generation 3-16.2 Dust Generation 3-16.3 Dissipation and Drift
Section 3-17: NBC (Nuclear, Biological, Chemical) Operations
3-17.1 Nuclear Bursts 3-17.2 Chemical Agents
3-17.2.1 Lethality of Chemical Agents 3-17.2.2 Initial Chemical Attacks/Applications 3-17.2.3 Units Moving Through Contaminated Areas
3-17.3 MOPP Protective Levels

3-17.3.1 MOPP Protection Values 3-17.3.2 MOPP Degradation 3-17.3.3 MOPP Level Changing Time
3-17.4 Changing MOPP Levels 3-17.4.1 AI-Issued MOPP Change Orders 3-17.4.2 Player-Issued MOPP Change Orders
Section 3-18: Radar 3-18.1 Radar Detection 3-18.2 Blocking and Over the Horizon (OTH) Capabilities 3-18.3 ECM/ECCM Effects on Radar 3-18.4 Radar/EW Bands: Frequency Reference
Section 3-19: Combat Engineering 3-19.1 Mobility Operations 3-19.2 Counter-Mobility Operations 3-19.3 Survivability Operations 3-19.4 Adding In-place Engineering Items to the Map 3-19.5 Mines and Minefields
3-19.5.1 Types of Mines 3-19.5.2 Types of Minefields 3-19.5.3 Minefield Combat Results 3-19.5.4 Clearing Minefields
Section 3-20: Leaders 3-20.1 Assigning Leaders to Units 3-20.2 Leader Effects 3-20.3 Leader Casualties
Section 3-21: Air Operations 3-21.1 AI-Generated Aircraft Movement
3-21.1.1 Aircraft Turn Rates 3-21.1.2 Orbiting 3-21.1.3 Aircraft Flight Path to Target
3-21.2 Close Air Support (CAS) Missions 3-21.2.1 The CAS Flight Path 3-21.2.2 CAS Altitude Restrictions 3-21.2.3 SEAD (Suppression of Enemy Air Defenses) 3-21.2.4 Executing the CAS Mission
3-21.3 Paradrop Operations 3-21.3.1 Preparing for the Drop 3-21.3.2 Executing the Drop 3-21.3.3 Dropping the Sticks 3-21.3.4 Units “In the Air” 3-21.3.5 Dispersion 3-21.3.6 Landing: Losses and Disorganization
Section 3-22: Civilians 3-22.1 Civilians Placed at the Start of a Scenario 3-22.2 Civilians Placed During a Scenario 3-22.3 Civilian Actions 3-22.4 Attacking Civilians
A Few Final Notes Appendix A: Primary References Appendix B: Using Aide De Camp 2 to Create Maps
Part 1: Getting Started Section 1-1: Introduction Point of Attack 2 (POA-2) is a tactical level combat simulation set in the modern day. It is the most detailed, accurate, and overall realistic combat simulation ever produced for the commercial market, and probably for the professional military one as well. It was developed under a contract from the US Air Force Office of Scientific Research (USAFOSR). While it is certainly an exacting simulation, POA-2 is a game as well. Each player, be they human or computer (known as AI for Artificial Intelligence), commands one of the two opposing forces. The forces can be of any size, but are generally intended to be between a battalion and a brigade in strength. Human players assume the position of the Task Force Commander of one of the forces, and by default issue orders and receive information based on that position in the chain-of-command, rather than as someone on the “front line”. In other words, the player is the colonel, not the gunner in a tank. POA-2 is a complex game, but playing it doesn’t have to be. It includes many extensive AI functions that can perform almost any task that a player doesn’t want to do, from determining movement paths, to targeting, to calling for fire support missions. Let the computer do as much as it can at the beginning, especially by using auto-targeting (the default) and movement by formation until the system becomes comfortable. POA-2 uses a very straightforward system for issuing orders, as evidenced by the lack of buttons and menu choices on the main form. In fact, most of the buttons and menu choices are for “housekeeping” functions, loading and saving games, and changing the display. To give orders or perform an action either <Right Click> on the map or bring up the Staff Officer screen.
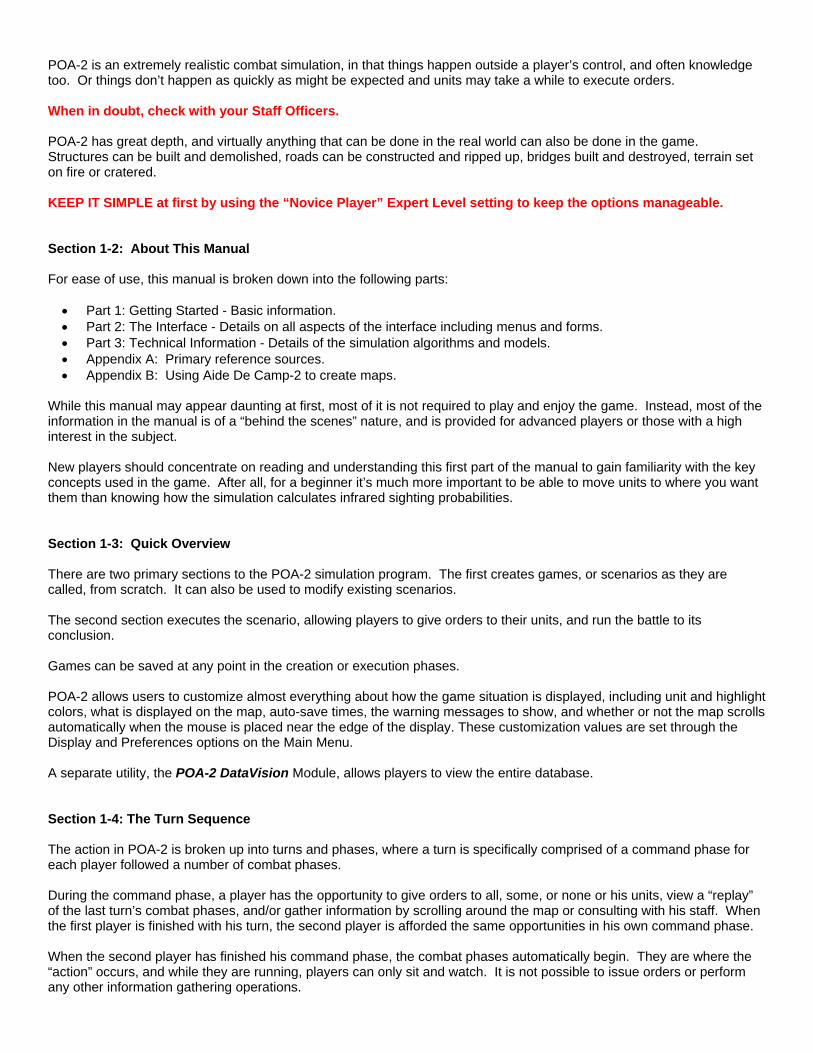
POA-2 is an extremely realistic combat simulation, in that things happen outside a player’s control, and often knowledge too. Or things don’t happen as quickly as might be expected and units may take a while to execute orders. When in doubt, check with your Staff Officers. POA-2 has great depth, and virtually anything that can be done in the real world can also be done in the game. Structures can be built and demolished, roads can be constructed and ripped up, bridges built and destroyed, terrain set on fire or cratered. KEEP IT SIMPLE at first by using the “Novice Player” Expert Level setting to keep the options manageable.
Section 1-2: About This Manual For ease of use, this manual is broken down into the following parts: • Part 1: Getting Started - Basic information. • Part 2: The Interface - Details on all aspects of the interface including menus and forms. • Part 3: Technical Information - Details of the simulation algorithms and models. • Appendix A: Primary reference sources. • Appendix B: Using Aide De Camp-2 to create maps.
While this manual may appear daunting at first, most of it is not required to play and enjoy the game. Instead, most of the information in the manual is of a “behind the scenes” nature, and is provided for advanced players or those with a high interest in the subject. New players should concentrate on reading and understanding this first part of the manual to gain familiarity with the key concepts used in the game. After all, for a beginner it’s much more important to be able to move units to where you want them than knowing how the simulation calculates infrared sighting probabilities. Section 1-3: Quick Overview There are two primary sections to the POA-2 simulation program. The first creates games, or scenarios as they are called, from scratch. It can also be used to modify existing scenarios. The second section executes the scenario, allowing players to give orders to their units, and run the battle to its conclusion. Games can be saved at any point in the creation or execution phases. POA-2 allows users to customize almost everything about how the game situation is displayed, including unit and highlight colors, what is displayed on the map, auto-save times, the warning messages to show, and whether or not the map scrolls automatically when the mouse is placed near the edge of the display. These customization values are set through the Display and Preferences options on the Main Menu. A separate utility, the POA-2 DataVision Module, allows players to view the entire database. Section 1-4: The Turn Sequence The action in POA-2 is broken up into turns and phases, where a turn is specifically comprised of a command phase for each player followed a number of combat phases. During the command phase, a player has the opportunity to give orders to all, some, or none or his units, view a “replay” of the last turn’s combat phases, and/or gather information by scrolling around the map or consulting with his staff. When the first player is finished with his turn, the second player is afforded the same opportunities in his own command phase. When the second player has finished his command phase, the combat phases automatically begin. They are where the “action” occurs, and while they are running, players can only sit and watch. It is not possible to issue orders or perform any other information gathering operations.

Section 1-5: Units and Firing Groups For most purposes in the simulation, the unit is the basic maneuver and control element. As used in this context, a unit is a collection of one of more weapons systems under a unified command. Units can range in size from a single vehicle or a squad or section, to a platoon, company or an even larger formation. The situation being simulated, the map scale, and other factors will determine the general “default” size of the units. Also, during an engagement, unit sizes will usually change, due to losses, temporary detachments, breakdowns, and other actions.
1-5.1 Multi-Part Units Strictly speaking, a unit can have only one weapons system assigned. However, units may often be comprised of more than one weapons system model, as in the case of infantry units comprised of a rifle section, a machine gun section, a grenadier section, and perhaps even a transport vehicle section. For ease of use in these cases, the simulation creates what are known as multi-part units. A multi-part unit is simply several units that are treated as a single entity in all ways for command and control purposes (principally movement and targeting). When playing at lower expert levels, Multi-part units are always used for simplicity. At the higher expert levels, however, the use of Multi-Part units is at the player’s discretion, and can be toggled on and off at will at any time during the game.
1-5.2 Firing Groups Using an indivisible unit for maneuver and command purposes is well in line with real world conditions. However, using a unit for sighting and target engagement does not allow for the flexibility and “all around” protection at the lower levels as practiced by most ground forces. Thus, the simulation allows for a unit to be broken down into a number of smaller “firing groups”, each of which may face and sight in a different direction and engage its own target. A unit may be broken down into a maximum of THREE firing groups, although the number of firing groups can never exceed the unit quantity. Each firing group may contain any number of weapons systems, although, obviously, the total number of weapons systems in all the firing groups cannot exceed the unit quantity. Example: A platoon of 4 tanks is broken down into 3 firing groups. Group #1 has 2 tanks and faces East, Group # 2 has 1 tank and faces northeast, and Group #3 has 1 tank and faces southeast. Each firing group can engage up to 3 different targets, so long as all those targets are within the firing arc and capability of the weapons systems. However, all of the firing systems within the firing group must use the same gun/launcher at the same target. For example, a firing group of 3 tanks could engage up to 3 different enemy targets using their main gun, hull machine gun, and roof machine gun. However, all 3 tanks would have to fire their main gun at the same target, hull machine gun at the same target, and so on. One tank couldn’t fire its main gun at one target, while another fired its main gun against something else. Firing groups can also use multiple weapons to fire at the same target. In the above example, the three tanks could fire both their main gun and hull machine gun at one target, and their roof machine gun at another.
1-5.3 Coaxial Weapons In practice, however, it is often not possible for a system to fire all of its weapons at the same time. As an example, it is very common with armored vehicles that a turret machine gun is mounted “coaxial” with the main gun; The machine gun moves as part of the main gun, and can not be aimed separately, which, given the different flight characteristics between the machine gun bullet and main gun round, means they can rarely be used at the same time against the same target. Or, in another case, a tank main gun loader may also be responsible for firing the turret machine gun. Obviously, he can’t do both at the same time. He’s either loading the main gun, or firing the machine gun. Therefore, only one of these two weapons can fire at a time. In the simulation, these firing limits are set for each weapons system in the database editor by marking the appropriate weapons as “Coaxial”. In this case, the term “coaxial” is used in a much broader sense than its strict definition, and denotes a group of guns/launchers located in the hull or turret of which only one can be fired at a time. The “coaxial” limit is always applied separately to the hull and turret, so firing a “coaxial” hull machine gun wouldn’t prevent the “coaxial” main gun from firing too. Looking at the above example, both the turret machine gun and the main gun should be marked as “coaxial”. This will prevent both of them from firing at the same time. Whether or not the turret roof machine gun should be marked as “coaxial” depends on the situation. If it could still be fired while either of the other turret weapons is firing, it should not. If, however, it can’t, it should be flagged as “coaxial”.

Section 1-6: Formations and The Chain of Command The chain of command is a critical concept in POA-2, and represents the path that orders and reports take between HQ’s and their subordinate units. Normally orders travel “down the chain”, that is from higher HQ’s to lower subordinate units, while reports (SITREPS) travel both up and down the chain.
1-6.1 Headquarters (HQ) Units Headquarters units contain the formation commander (of whatever rank), and any number of ancillary personnel and weapons. They may also be multi-part units (see above), although in that case the commander is always assumed to be with the “first” unit as given and displayed in the force structure.
1-6.2 Subordinate Units All of the units that report to a particular HQ unit are considered directly subordinate to that HQ. If a directly subordinate unit is also a HQ, any units that report to it are also indirectly subordinate to the first HQ. For example, a platoon is directly subordinate to a company, and the company is directly subordinate to the battalion, which means the platoon is indirectly subordinate to the battalion.
1-6.3 Nominal vs. Acting HQ’s A Nominal HQ is defined as a subordinate unit’s HQ before any losses or degradation have occurred. The Acting HQ, in contrast, is the HQ unit that a subordinate actually reports to at any given moment, taking into account the present combat situation. By default, a subordinate unit’s Nominal HQ is also its Acting HQ. However, if for some reason the Nominal HQ is not able to perform its command functions properly it will be replaced by a unit that can, and the “replacement” will become the subordinate’s Acting HQ. The replacement functions as a normal headquarters in all ways, although with less efficiency than the Nominal HQ. The computer automatically determines the unit that “moves up” to become the replacement Acting HQ, using the standard military hierarchy and current situation. The most common reasons that a unit would not be able to perform as a headquarters are that it has been destroyed or has surrendered, it is in a broken morale state of some type, or it has suffered damage or destruction of its communications capabilities. A unit’s Nominal HQ never changes. As soon as a Nominal HQ that has been “replaced” is able to perform its command functions, it will assume command over its subordinate units as before. Acting HQ’s may be replaced and restored in this way any number of times, so long as the units themselves are not destroyed. Destroyed units are gone for good, and cannot perform any game functions.
1-6.4 Command/Report Delays The chain of command is vitally important to the accuracy of the simulation, since as in real-life it is the path by which all orders and reports are passed between units. Given that the player as the Task Force Commander occupies the top “rung” of the chain, almost every report he receives will have to travel at least some way up the chain, and every order he gives will have to be transmitted down the chain to the line units that will perform them. Information transmission is not instantaneous, and time is required to transmit it between units. This time is defined as the command delay. The delay depends on the communications capabilities of the units in the chain of command, the unit’s condition, the relationship of the units and distances involved, as well as the general circumstances. Therefore, units do not immediately act on orders the player gives them because the orders are not even received by the unit until the command delay has passed. Likewise, the human player will not know what his forward units “see” until those reports can be passed up the chain of command, subject to the same command delay. NOTE: At the start of a scenario the command delay for a force can be set to “instantaneous” transmissions, if desired. Section 1-7: En-Route Units En-route units are used to model objects such as missiles, which have long flight times to their target or can be intercepted en route. By turning these objects into units, it becomes easier for both the program and human players to manage them, since they use all of the standard routines including those for movement, sighting and damage.

In most ways, En-route units are “real” units. For example, they are comprised of a weapons system, have a specific position, heading, altitude and speed, and can be detected by enemy forces. They can also be damaged or destroyed by combat action. There are a few significant differences between “real” and En-route units however. The most important is that En-route units are always computer controlled, and cannot be accessed in any way by the human player. En-route units also do not sight and/or report on the enemy, do not follow SOP directives, and are not affected by any kind of morale considerations. They simply follow a path to their target, as determined by the computer, based on the missile’s guidance capabilities, at which point they detonate. Due to this limited life span, En-route units created are also known as “temporary” units, and they are always removed from the game once the missile reaches its target (or is destroyed though some other combat action). Whether or not a missile or projectile becomes an En-route unit is set as part of the Ammunition Data Table entry for the object. Whereas En-route units make take any amount of time to travel to their target, other projectiles are assumed to hit their target in the same pulse they are fired. Additionally, non En-route projectiles cannot be intercepted except by their target’s organic Point Missile Defense systems, if so equipped. Section 1-8: Fog of War (FOW) Fog of War is a general term that describes a lack of precise knowledge of the battlefield situation. Specifically, it includes things such as uncertainty as to exact unit positions and status values, both friendly and enemy, unknown or erroneous maps, changing weather, and the actual effects of combat activities. In the simulation, the implementation of FOW results in players often receiving incomplete or even incorrect map displays, and other information. The degree of inaccuracy is variable, and depends on many different factors such as the terrain and weather, as well as a force’s various competence levels and reconnaissance efforts and capabilities and simply the amount of time it has spent on the battlefield. The FOW fidelity is a user-selected value. It ranges from Off (everything is always known, or in other words FOW is not used at all) to Level 3, which includes uncertainty about both enemy and friendly forces and is the most realistic. The paragraphs below will be based on a scenario using Level 3 (the highest) FOW.
1-8.1 Battlefield Objects The majority of FOW effects are applied to battlefield objects displayed on the map. These objects include units, bridges, obstacles, Improved Positions (IP’s), roads, buildings, minefields, sensorfields, and terrain. At the beginning of the game a force may have some knowledge of these objects, based on its various reconnaissance levels and what it has placed itself. Only rarely, however, will they all be known completely, and in many cases, more will remain unknown than known.
1-8.2 Enemy Units In order to be shown on the map, an enemy unit must first be detected. The most common form of detection is by visual sighting, but units can also be discovered by the noise or light they generate, by radar, or by sensors among other things. Once an enemy unit has been detected, the simulation will show its last known position, based on friendly situation reports (SITREP’s) the HQ has received (see below), until a friendly unit can confirm that the enemy unit is no longer in the reported location. However, because it is difficult if not impossible to tell individual enemy units of the same type apart, they are consolidated when submitting a SITREP. For example, there may be two 5-tank enemy platoons in a location, but the reporting unit would have no way of knowing that for certain, so the report would likely be either “10 enemy tanks”, or “approximately 2-3 platoons of enemy tanks”. Enemy units are often not fully known, especially if they are in terrain that offers concealment and are being sighted visually. The simulation uses a number of “levels” to model this, ranging upwards from knowing only the general type of enemy unit there (personnel, vehicle, etc.), to knowing the approximate size (approximately a squad, platoon, etc.), to knowing the type of unit (tank, APC, infantry, etc.), to knowing the exact quantity (five tanks), to knowing the exact quantity and model (five M1A1 tanks). Enemy units may be “lost” during the scenario, if no friendly units can see or otherwise detect them. When this happens the enemy’s last known position will be shown, along with the time at which the information was “known” to be valid. In

some cases the enemy unit might have moved, while in others it will still be at that same location. But the friendly commander wouldn’t know for certain. Because SITREP messages must be disseminated within the force, and because it takes time to transmit the messages, each unit will have its own unique knowledge of the battlefield. For example, a front line unit may know an enemy unit is located in a particular location, but its HQ may not have received the SITREP yet and will be unaware of the enemy. Likewise the HQ may have received information from one of its subordinate units that it hasn’t had the time to pass down yet, so the others wouldn’t be aware of it.
1-8.3 Friendly Units In general, friendly units are always known. While this is not entirely realistic, it is something imposed upon the simulation by the necessity of allowing a human player to issue commands to any and all of his subordinate units directly. In particular, when a human player selects a subordinate unit, the map needs to be updated for that particular unit’s perspective; otherwise the action would likely be arbitrarily limited and completely unrealistic. For example, it would be unrealistic for a human player to click on a unit to give it explicit targeting orders, without showing on the map what that unit “knows” and can see (and thus target). Of course, once that line is crossed it is absurd to hide the friendly unit from the human player, even though in real life it’s status might be unknown to the overall TF Commander. However, the simulation does use one facet of friendly FOW, which is that the position of moving units may not be known exactly. The error in positioning is based on the command delay to the unit, the speed at which it is traveling, and the time since it’s last precisely known position. The greater any of these values are, the greater the chance for an incorrect display of the unit’s actual position, and the greater the amount of the error. For example, the displayed position of a fast moving tank unit with a command delay of a minute or more could be 500 meters or more, while that for a infantry unit on foot with a command delay of 30 seconds will be less than 50 meters.
1-8.4 Objects/Terrain Manmade objects (such as Improved Positions, obstacles, minefields, bridges, etc.) are treated in a fashion similar to units. At the start of the scenario, a player will be aware of all the objects created by his force, along with some of those emplaced by the enemy. As the game progresses, unknown objects can be revealed though the normal detection routines. With the exception of bridges, objects are either known completely or not at all; unlike units they are not “partially” known. Bridge information, however, such as weight class, damage, and whether or not it is primed for demo can be known in varying degrees based on the scenario situation. Certain types of terrain, particularly buildings and roads, can also be unknown or incorrectly known to a player. For example, the player’s map may show open space when, in fact, the location has a building in it. Or, a building may have been turned to rubble without the change being reported to the player. In cases such as these, the terrain is treated as an object, and needs to be detected using the standard sighting routines before it is shown correctly to the player. The bottom line is to always remember the map shows the best information you have at the time, but its accuracy will depend on your force’s capabilities, the actions it has taken, and the overall scenario situation and terrain.
1-8.5 SITREP Messages Once an enemy unit or object has been detected in some way, the information is disseminated to other units via SITREP reports. These reports are first sent by the detecting unit up to its HQ unit, which then disseminates the information of other units in the formation. If the detecting unit is a HQ, it will also disseminate the report to its subordinate units. The transmission of SITREP’s requires an amount of time determined by the force’s communications levels, adjusted for the sending and receiving units’ capabilities and conditions. Additionally, a unit is limited in the number of reports it can send concurrently, based on its communications capabilities, so it will take time for information to “percolate” back to you as the TF Commander and throughout the force. If a unit is interrupted in the middle of sending a SITREP by enemy action or some loss of communications, the message is also lost and will need to be started from scratch if the communications situation improves. SITREP’s are sent whenever a unit discovers new information, be it a newly found enemy unit, or an object, or a combat report. In some cases the unit receiving the SITREP will already know the information, in which case the report is ignored. However, it is still sent nevertheless, because the sending unit may not know the higher unit already has the information from another source.

Section 1-9: Play By Email (PbeM) Point of Attack-2 is designed to make Play by email (PbeM) easy. All that is required is that players set their passwords when prompted at the start of the game, and that the second player email the game file to the first player at the completion of the combat phase (select “Save and Exit”). By default, games are stored in the “Saved Games” folder. However, players can select another location as desired. The saved game files will always have (and must have) the extension “.OPS”. Other than that, players may name them anything they like. If you are starting a PBeM game from scratch, the first player will need to set up the basic scenario information such as the map to use, starting locations, force nationalities, weather and civilian involvement. Once that has been accomplished, the first player will select his force, and assign leaders. At that point, he will save the game and send the file to his opponent. The second player then selects his force, and proceeds through the steps up to and including placing his force on the map. At that point, he saves the game, and sends it back to the first player, who sets up his force and issues orders for the first turn. From there the game proceeds as outlined above. The game files can get relatively large, so the use of a compression program such as WinZip is strongly recommended, although not required. One final note on PbeM games is that both players must have the same map and database tables on their computer. If you are using the default maps and table this will not be an issue, but advanced users who create their own maps will need to insure that their opponent is given a copy before the game begins. Section 1-10: Definitions/Abbreviations • Above Ground Level (AGL): The height of an object above the ground. • Acting Headquarters Unit: The headquarters unit a subordinate currently reports to, taking into account any
substitutions made necessary from combat actions. • Acquisition: The amount of time a firing unit has been engaging a specific target with the same weapons (or
coaxial ones). • Aggressiveness Level: A measure of how “risky” the computer player will be in making decisions (including for a
force owned by a human player). The more aggressive, the more risky, and vice versa. • Ambient Illumination: The amount of light in a location from natural sources. • Ambush: An attack planned to surprise the enemy. • Ammunition: Any munition fired or launched from a weapons system. • Anti-Aircraft (AA): Fire from the ground directed at enemy aircraft targets (surface to air). • Anti-Personnel (AP): Munitions designed to damage personnel targets (i.e., troops). • Anti-Tank (AT): Munitions designed to damage armored targets (i.e., tanks, APC’s). • Armor: Any substance used to provide protection against physical projectiles, chemicals, or destructive energy
including metals, composites, concrete, wood, and earth. • Armored: A weapons system that includes full all-around protection by more than a trivial amount of armor. • Armored Fighting Vehicle (AFV): An armed armored vehicle. • Artificial Intelligence (AI): Computer decision-making ability, used as an aide to a human player, as a small unit
leader (for units not under direct control), or as an opponent. • Avenue of Advance (or Approach): A specific route used by an attacking force. • Airborne Warning and Control System (AWACS): Aircraft specially designed and equipped to detect enemy
units and objects and control friendly responses to them. • Backblast: The exhaust created by a missile or rocket engine on firing. • Basic Load: The amount of ammunition normally carried by a fully stocked unit. • Beginning of Morning Nautical Twilight (BMNT): The time when the sun has risen to a point 12 degrees below
the horizon. Objects are visible to a distance of about 350 meters. • Block Points: The percentage degradation in a Line of Sight calculation (100% = 100 blocks points = completely
blocked: the spotter can not see the target visually). • Breakdown: A mechanical malfunction, either in the movement system (i.e., immobilization), or in a gun/launcher
(i.e., jam). • Buttoned-Up: The condition when a fully armored system closes all of the hatches and openings to provide
maximum protection from enemy fire. • Caliber: The size (diameter) of a projectile. In POA-2 calibers are specified in millimeters.

• Calling Unit: The unit actually requesting some sort of support, such as artillery fire or an airstrike. • Camouflage: Synthetic attempts to disguise weapons and personnel by reducing distinguishing characteristics
and/or to make them appear more like the surrounding terrain. • Chaff: Physical material, usually metal strips, used to reduce the effectiveness of radar detection and guidance
systems. • Chain of Command: The unit reporting hierarchy structure. The superior unit is designated as the subordinate
unit’s headquarters. The Task Force HQ is the highest accessible HQ in a player’s force. • Close Air Support (CAS): Aircraft bombing or other missions designed to support nearby friendly ground forces. • Close Combat: Combat involving personnel at essentially zero range. Also known as “hand to hand” or “melee”. • Cluster Munition: A munition containing a number of smaller sub-munitions, which is designed to cover wide
areas. • Command Delay: The amount of time it takes for an order to travel down the chain of command to a destination
unit. • Concealment: Camouflage or other objects present in a location, which make a unit occupying that location harder
to spot (e.g., trees, shrubs, crops, buildings). • Controlling Unit: The unit adjusting and controlling the flight path of a guided missile/projectile. • Cover: Objects and other items in a location that provide physical protection from enemy fire (e.g., walls, trees,
buildings, berms). • Cratering: The effect of explosive detonations on or below the ground surface to create craters. • Directed Energy (DE): Energy of any frequency created or intended primarily to incapacitate, kill or destroy enemy
equipment and weapons systems. • Decoy: A protective measure which confuses guided missiles by creating secondary targets that are perceived by
the guidance system as equally valid as the original. • Detachment: A portion of a parent unit that is split off and operates independently. • Direct Fire (DF): Fire that is aimed at a target. • Direct Fire Targets: Fire control measures that are assigned to individual units in the defense. They are intended
to prevent overlap of fires or zones not covered by fire. Targets are often either primary or secondary based on importance.
• Direct Support (DS or D/S): Units temporarily assigned to a different HQ for a specific duration or mission. • Electronic Counter Measures (ECM): Active signals emitted in order to confuse radar detection and guidance
systems. • Electronic Counter Counter Measures (ECCM): Active filtering and processing equipment used to reduce the
effects of ECM and chaff on degrading radar detection and guidance systems. • Emplaced: A weapons system is in a configuration that allows it to fire (e.g., a towed gun is unlimbered and set
up). • En-route Unit: A “temporary” unit that is created for munitions that require significant time to reach their targets, or
that can be intercepted or destroyed while en-route. The flag for a munition to create an en-route unit, and which specific unit to use is specified in the Ammunition Data Table. Also sometimes known as “In-route” for missiles.
• End of Evening Nautical Twilight (EENT): The time when the sun has fallen to a point 12 degrees below the horizon. Objects are visible to a distance of about 350 meters.
• Facing: The direction a unit, weapons system, gun, launcher or turret is facing. • Fatigue: A measure of the physical exhaustion level of a unit, primarily from sleep deprivation and physical activity. • Fire Direction Center (FDC): The central coordinating agency for artillery support on the battlefield. The FDC
manages all pending and in-progress support missions and coordinates IF fire with friendly airstrikes. • Fire For Effect (FFE): When artillery rounds are fired with the intent of saturating the target as opposed to using
individual spotting rounds to achieve greater accuracy. • Firing Arc: The width of the arc, in degrees, through which a weapon or unit in an Improved Position can fire
without requiring to be rotated (Fixed IP’s cannot rotate). • Firing Group: A portion of a unit that faces in a specific direction and fires at a given target. • Flank: The areas on either side of the Task Force’s zone of operations. Flank force units are under computer
control, and may fire on friendly units that stray into the flank and out of the Task Force’s zone. • Flight Path: The path through space traced by a missile, rocket or un-powered projectile. • Forward Air Controller (FAC): A friendly unit which calls for and often guides/adjusts friendly airstrikes on ground
targets. • Global Positioning System (GPS): An extremely accurate location system based on orbiting satellites. GPS can
be used by units, as well as guided munitions, but can also be potentially jammed. • Guided Munition: A munition with the capability of adjusting its course while in flight, using information and
commands from internal and/or external sources.

• Guidance Link: The manner in which a guided munition receives course adjustment commands (e.g., radio, beam, laser, wire).
• Guidance Type: The specific information gathering or guidance method used by a guided munition, either passive or active (e.g., radar, thermal, optical).
• Gun/Launcher: A component of a weapons system that actually “fires” a munition of some type. • High Explosive Anti-Tank (HEAT): A warhead type designed specifically to penetrate armor plate by creating a
jet of high velocity plasma from an explosive detonation. Also known as “Shaped Charge”. • High Powered Microwave (HPM): A specific type of energy pulse in the microwave band that can cause damage
to a wide variety of electronic systems. • Headquarters (HQ): The unit in overall command of a formation of subordinate units. The Task Force HQ is the
highest-level unit accessible in the game, and controls all of the units in a player’s force. • Illumination: Flares and other munitions that produce high levels of synthetic light. • Improved Position (IP): A man-made protective structure, including an excavation, earthwork or other
construction such as a building, bunker or pillbox. • Incendiary: A munition intended to ignite flammable materials within an area around itself. • Indirect Fire (IF): Fire that is not directly aimed, and which does not require that the firing unit see the target. • In-route Unit: See “En-route Unit”, above. • Infrared (IR): Light in the wavelength just below the visible spectrum in the red direction. IR is emitted by objects
based on their temperature, and is used to detect objects warmer or colder than their surroundings. • Interdiction: Missions behind the enemy’s main line intended to disrupt the flow of reinforcements, materials and
supplies forward. • Internal Unit Friction: A measure of how long it takes a specific unit to react to new commands or situations. This
is separate from the command delay, which is based on the chain of command. • Jammer: A device used to disrupt radio or other electromagnetic signals. • Leader: A specific individual assigned to a unit who affects that’s unit’s performance in various ways, either good
or bad. • Line of Sight (LOS): A three-dimensional straight-line path that extends from a spotter to a target. It corresponds
to the path that would be followed by light. The LOS can be degraded or blocked by the surface of the earth, terrain, smoke and many other things.
• Location: A location is the smallest discrete amount of area, either on-map or off, which can be accessed by the simulation for any purpose. In board games, as well as most other computer games, it is known as a “hex”. A unit is always assumed to “fit” completely within a location, although the position of its “center of mass” is calculated to the nearest meter within that location. Terrain, other than linear features, is also considered evenly distributed throughout a location.
• Marking Unit: A unit that marks a target location in some way, usually though smoke or flares, to help an attacking support unit recognize it. Marking, as opposed to “Painting”, merely identifies a general location, not a specific object target.
• Maximum Sighting Range: The maximum extent of an LOS under any circumstances. This value is used to reflect general degradation from atmospheric dust, precipitation, or other similar conditions.
• Mission Oriented Protective Posture (MOPP): A measure of a unit’s level of protection against NBC threats. Generally, the higher the MOPP level, the higher the protection but also the higher the degradation to the unit’s performance.
• Morale: A measure of a unit’s willingness to accept orders and continue active combat operations in the face of the enemy.
• Multi-Part Unit: A construct used by the simulation that groups several individual units with different weapons systems into a single unit for ease of use. Multi-part units are commonly used for infantry units, where several different types of sub-units are combined into a single maneuver unit.
• Non-armored: A weapons system without any appreciable level of armor protection, such as troops. • Non-Persistent Agent: A chemical agent that disperses quickly after being placed, normally in gaseous or aerosol
form. • Nuclear/Biological/Chemical (NBC): Unconventional warfare and weapons of mass destruction using these
forms of munitions. • Obstacles: Any man-made construction intended to slow an enemy force though a location. Also known as
“Countermobility”. • Objectives: Locations on or off the map that must be occupied, and if possible, consolidated with units nearby, for
a player to successfully complete a mission and achieve victory. • Off-map: A location off one of the edges of the visible map that can only be accessed through the Off-Map display. • On-map: A location on the main map playing area.
• Opportunity Fire: Direct Fire against a moving enemy unit in a DF Target area. Opportunity Fire occurs at the instant the enemy unit moves into the target area, instead of during the normal Direct Fire combat phase.
• Overwatch Movement Mode: Movement spacing where a portion of a unit lags behind the lead element to provide fire support in case the point is ambushed or engaged.
• Paradrop: Delivery from aircraft by parachute of units or supplies. • Painting Unit: A unit that uses a device (often a laser) to mark specific target objects for guided munitions, which
guide-in on the marked spot. • Persistent Agent: A chemical agent that does not disperse quickly after being placed, normally in a liquid or
powder form. • Petalling: A result of an impact on solid armor where the armor is “bent back” on the interior surface away from the
point of penetration due to internal failure. A good representation of it in common circumstances is pushing a pencil through a piece of paper or thin cardboard.
• Point Missile Defense System: A defensive measure mounted on a weapons system intended to provide standoff (i.e., before it hits) protection against incoming missiles.
• Powered Munition: Any munition that uses appreciable amount of thrust along its flight path so that the course is not ballistic, such as rockets and missiles.
• Pulse: A segment of a game turn that encompasses a certain amount of simulated combat time. • Pre-Planned IF Targets (PPD): Locations that are designated as artillery/IF targets in advance of the combat
engagement. They can be fired more quickly and accurately that non-preplanned targets, and are often pre-ranged and “test fired” for greater accuracy.
• Rate of Fire (ROF): The number of rounds a weapons system can fire in a given time (usually per minute). • Recon By Fire (RBF): A technique used to detect hidden enemy units by firing “blindly” into an area to see if they
fire back (and are thus “detected”). • Reliability: A measure of how often a system breaks down mechanically. • Road March Mode: A unit configuration in which all weapons systems are on a road, trail, or other linear feature
as opposed to being spread out. • Rubble: Debris created when certain buildings and other objects are destroyed (as set in the TEC). • Scenario: A single combat action or situation. • Semi-Armored: A weapons system that is partially armored (as with “open top” vehicles). • Sensors: Remote devices that are used to detect the presence of enemy forces, usually though sound but also
though vibration or motion. • Shaped Charge (SC): See High Explosive Anti-Tank. • Shift Fire: A control measure used to shift a fire support mission target to a different location. Can be used to
“walk” fire across an area. • Shoot & Scoot: A technique used to minimize enemy exposure when firing by having a unit shoot a few rounds,
and then move to a different location nearby. • SITREP: Situation report. A standard message format used by one unit to send information to another concerning
detected enemy units, objects, or other combat conditions. • Spall: Flakes of metal that fly off on the interior armor surface from an impact. • Spotting Fire: A procedure using single rounds, fired one at a time, which insures the target is being hit before
beginning to Fire For Effect. • Spotting Unit: A unit that adjusts the accuracy of spotting rounds (see spotting fire). • Stacking: The maximum number of weapons systems that can occupy a location at the same time. • Standing Operating Procedures (SOP): Control measures consisting of a set of standard responses or postures
a unit will follow in specified circumstances. • Standoff: The distance between a firing unit or exploding HEAT warhead and its target. • Stick: Personnel or equipment delivered by parachute in one pass over the drop zone or in one helicopter lift. • Suppression: An effect of incoming fire which causes target units to take cover and/or lose concentration of the
battlefield situation. • Suppression of Enemy Air Defenses (SEAD): Friendly fire directed at known or suspected AA sites near the
location of an intended airstrike that is intended to provide protection for the attacking aircraft. • Survivability: The relative amount of damage a weapons system suffers after taking a hit, or engineering
operations designed to protect friendly forces from enemy fire. • Table of Organization & Equipment (TO&E): A list of the number and types of weapons systems and personnel
that comprise a full-strength unit and/or formation. • Tactical Aircraft (TACAIR): Aircraft or air missions used to provide support to friendly ground forces. • Tactical March Mode: A unit configuration in which all weapons systems are spread out within a location, as
opposed to being on a linear road or trail.
• Task Force (TF): A group of units organized to complete a mission. In the simulation, each force is under a Task Force Headquarters, which is where the human or AI commander is located.
• Terrain Effects Chart (TEC): A list of all of the effects terrain features have in the simulation, including movement effects, LOS blocking, cover and concealment.
• Terrain Fire: A situation where the terrain in a location catches fire, as in the case of dry grass or trees. • Thermal Sight: An electronic sighting device that uses IR energy to detect objects warmer or colder than their
surroundings. • Turn: A game construct used to regulate the segments of orders and combat resolution. • Victory Points: Relative “point” values given to each weapon system type, as well as for scenario objectives to
determine which player “wins”, and by what level. • Weapons System: A Weapons System represents a single, indivisible, battlefield entity that can be controlled and
given orders by the owning player. Examples of Weapons Systems include single tanks, guns, aircraft, missile launchers and infantrymen.
• Wreck: Remnants of destroyed vehicles, aircraft and other large objects that can affect movement rates or other simulation functions.
Part Two The Interface Section 2-1: The Main Screen When Point of Attack-2 starts up, by default it will search and load the most current (by creation date) game file it can find in your POA directory. Initially, this should be the tutorial or “Getting Started” game, but as you create and play games these will be loaded instead. This feature can be toggled with the ”Auto Load Most Current Game Found” setting from the Main Menu | Preferences | General box. Once the game loads, you should see a screen similar to this:

Figure 1: The main screen showing major functional areas/items.
The map/playing area occupies the majority of the screen, with the main menu and command button panel on the top, and the information panel with force structure (tree) and location information on the right. By using the buttons at the bottom of the information panel, its size can be adjusted using the “<<” and “>>” buttons, or clicking the “X” button will remove it entirely. Friendly units may be selected from this screen in two ways. The first is to click on the unit on map; the second is to select the unit from the force tree. When a unit is selected from the force tree, the map will scroll to its location and the unit will be highlighted. If one of the Command Mode buttons is depressed (targeting or movement), the unit will be automatically “opened up” for the appropriate orders to be given. If the map does not completely fit in the display area, use the scroll bars to move the display in the desired direction. Or, if the auto-scroll feature is on (Main Menu | Preferences | Display), move your mouse close to the edge of the map in the direction you want to go and hold it for a moment. The currently selected unit or location will be indicated on the map by a hollow colored square. The color of the square can be set for each zoom level in Main Menu | Preferences | Map Colors as to best show up on the scenario’s map.
2-1.1 Map Display Control Buttons

The map display control buttons are located at the top of the form: They are used to perform basic viewing functions, such as zooming in and out of the map, redrawing the screen in case of a mis-draw of some type, and bringing up the off-map area display. There are three “zoom levels” available, with zoom level 1 having the lowest magnification, and zoom level 3 the highest. To zoom in, click the “Zoom In” button, and position the map cursor (which will have changed shape) over the center of the area you wish to see enlarged. To zoom out, click the “Zoom Out” button. The lower magnified map will be centered on the same location as the current screen.
2-1.2 Main Menu Display Options
Because it is often difficult to discern information at a glance from topographical or other 2 dimensional maps, POA has a wide range of display toggles to enhance or limit the information shown. These toggles are set from Main Menu | Display.

Figure 2: Display Toggles.
The first two options assist players with basic reference features. The first is a “grid” display, which overlays a hexagonal or square grid on the map (based on what the map designer decided to use) to show the individual locations. The second option “shades” map locations based on their relative elevations (1-20). The effects appears as:

Figure 3: Map samples showing grid and elevation shading (top), and normal (bottom).
The map objects section is self-explanatory, and allows individual object types to be displayed or hidden. Map overlays use colored dots or squares of various shades to show location information relative to the rest of the map. The overlay below shows relative movement rates. The legend is at the top of the screen, to the right of the buttons (9 is fastest, 0 is the slowest).

Figure 4: Sample map overlay (speed). Note the roads are the fastest (9), and the woods are the slowest (2).
The overlay toggles can also be accessed from the floating Location Information form, discussed below. The Force Structure Toggle allows the force tree to be turned off without minimizing the Information panel. Toggle reporting controls whether or not the combat report is shown when the combat phase is executed. Scenario Description displays whatever text description accompanies the game. Normally this would include the player’s OPORDER (mission), and any notes the scenario designer wanted to add. PBEM Messaging/Scenario Notes displays any notes or comments added by a player during his turn once the scenario is under way. Many of these display toggles have associated “Hot Keys”, which are shown on the drop-down menus. A full list is also included at the end of this section. Section 2-2: The Location Information Form The location information form provides detailed information about map locations, and the units and terrain features in them. It is updated as the mouse moves across the screen.
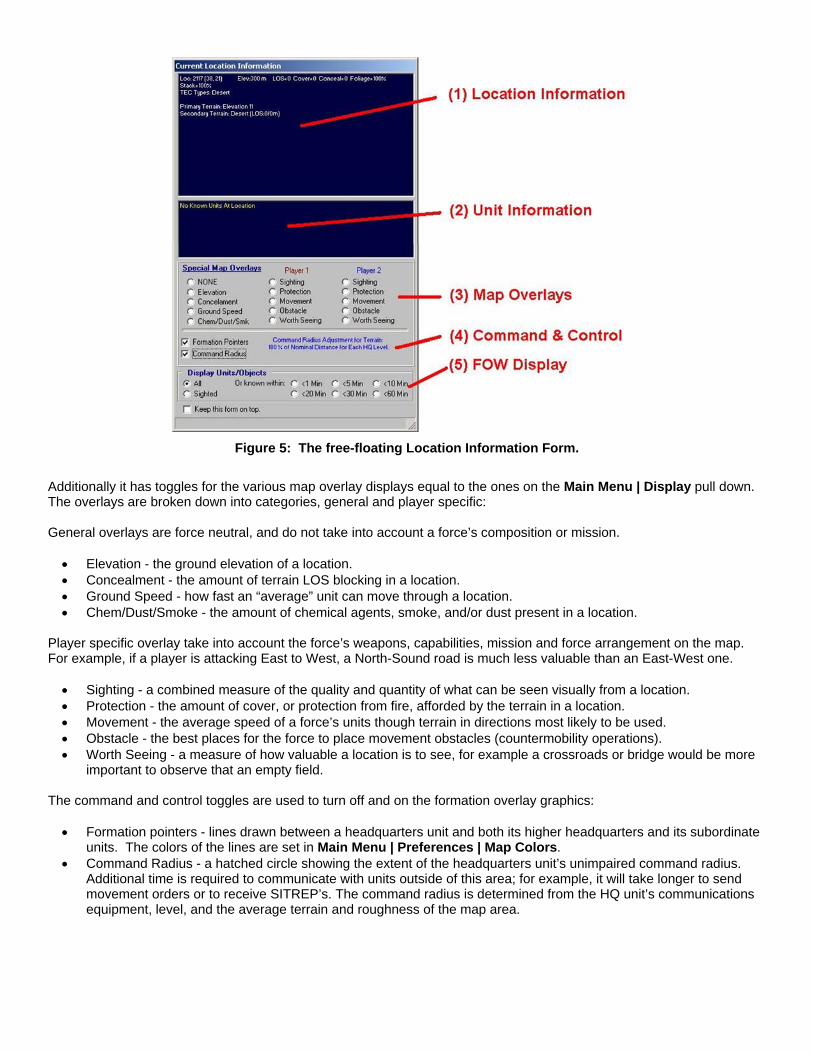
Figure 5: The free-floating Location Information Form.
Additionally it has toggles for the various map overlay displays equal to the ones on the Main Menu | Display pull down. The overlays are broken down into categories, general and player specific: General overlays are force neutral, and do not take into account a force’s composition or mission. • Elevation - the ground elevation of a location. • Concealment - the amount of terrain LOS blocking in a location. • Ground Speed - how fast an “average” unit can move through a location. • Chem/Dust/Smoke - the amount of chemical agents, smoke, and/or dust present in a location.
Player specific overlay take into account the force’s weapons, capabilities, mission and force arrangement on the map. For example, if a player is attacking East to West, a North-Sound road is much less valuable than an East-West one. • Sighting - a combined measure of the quality and quantity of what can be seen visually from a location. • Protection - the amount of cover, or protection from fire, afforded by the terrain in a location. • Movement - the average speed of a force’s units though terrain in directions most likely to be used. • Obstacle - the best places for the force to place movement obstacles (countermobility operations). • Worth Seeing - a measure of how valuable a location is to see, for example a crossroads or bridge would be more
important to observe that an empty field. The command and control toggles are used to turn off and on the formation overlay graphics: • Formation pointers - lines drawn between a headquarters unit and both its higher headquarters and its subordinate
units. The colors of the lines are set in Main Menu | Preferences | Map Colors. • Command Radius - a hatched circle showing the extent of the headquarters unit’s unimpaired command radius.
Additional time is required to communicate with units outside of this area; for example, it will take longer to send movement orders or to receive SITREP’s. The command radius is determined from the HQ unit’s communications equipment, level, and the average terrain and roughness of the map area.

Figure 6: The command radius and formation pointers for the A US Tank Company HQ.
The Display Units/Objects settings are used to parse though the effects of FOW (fog of war). Specifically, they limit the units and objects displayed by how long ago they were last sighted. The longer that time period, the more likely it is that the unit may have moved or changed its situation. • Sighted - show only units and objects currently sighted (friendly and enemy) • n Min - show only units and objects that were sighted within the last n minutes, and, if sighted by other units, that
have been reported via SITREP. Section 2-3: The Off-map Display The available playing area for POA-2 measures approximately 6500 Km x 6500 Km, with the map’s upper left corner centered within the total area. While it is not impossible for the playing map to take up this entire area, it is extremely unlikely, and most maps will only occupy a small percentage of the available playing area. The rest of the playing area is known as “off-map”. The Off-map Display is used to access off-map areas, which cannot be shown or selected from the Main Screen map. At minimum zoom, the display covers the entire playing area, using labeled distance “rings” to show the range from the “center” point (the upper left corner of the visible map). All active units must be located within this area (or be on the main map).

Figure 7: The Long-Range (off-map) display (at maximum magnification). The Main Screen map is the gray
rectangle near the center. The blue dots are friendly units.
Locations and units can be selected from the off-map just as for the main map, by right or left clicking on them. Likewise, “hot” units and off-map locations are identified by the colored square. Off-map locations are similar to on-map ones, in that they can be occupied by units, and those units can perform most of the combat activities that they can on map such as moving, firing, and sighting. However, there are some differences: • All off-map locations are all the same elevation - the average of the visible map. • Off-map locations have only a single terrain - they use the first one defined in the TEC. • Off-map locations have no hexlines or hexsides, or bridges. • Obstacles have no effect in off-map locations, although IP’s do (dug-in artillery, for example).
Section 2-4: Staff Officer Screens To help players sift through the available information and make good decisions, POA-2 makes available a full set of Staff Officer assistance screens. The staff is the equivalent of what you would find in a standard US Army combat unit, and each staff officer provides the player with information and critical notices for a specific functional area.
2-4.1 General Characteristics of Staff Officer Screens

Figure 8: The functional areas common to all staff officer screens.
Each staff officer screen contains 4 major functional areas. The first is the Unit Information Window, which shows either friendly or enemy units, limited by the staff officer’s specialty. For example, the S-1 (Personnel) Officer shows all friendly units in play, the S-2 (Intelligence Officer) shows only enemy units, while the ALO (Air Liaison Officer) display is limited to friendly air units. Units in the Unit Information Window are sorted and color-coded according to criteria set by the player in the Sort Criteria and Status Indicator areas. This makes it easy to see the general condition of the force, and also to identify individual units that are in a critical condition, and to take timely and appropriate actions. Left clicking on units in the Unit Information Window will scroll the map to their current location, and highlight them. Right clicking on units in the Unit Information Window will bring up the detailed Unit Information screen (friendly units only). The Sort Criteria allows players to pick some relevant unit condition, and have the units appear sorted by that criterion. For example, units could be sorted by morale, so that the best and the worst would be easily identified. Selecting “Formation” means the units will appear in the same order as the Force Tree. Status Indicators are used to color-code the unit entries based on their current level of some relevant factor. The available colors are red, yellow and green, and the user can set the “levels” for each. For example, the user could set red for units with morale less than 50, yellow for morale levels between 50 and 75, and use green for all others. Staff officers also provide relevant comments and suggestions, and will point out areas they feel need extra attention from the player. Some staff officers have the ability to issue orders to a player’s force or perform some function automatically. If so, an action button will appear at the bottom of the screen.
2-4.2 Individual Staff Officer Screens

Figure 9: The S-1 (Personnel) Officer screen.
The S-1 officer provides information on friendly unit strength, morale, and leaders. As units lose strength and morale, they are less able to accomplish their mission.
Figure 10: The S-2 (Intelligence) Officer screen.
The S-2 officer provides information on the known and estimate enemy force, as well as the current weather. As the scenario progresses and more of the enemy force becomes known, the estimates of the enemy’s force will become more accurate.

Figure 11: The S-3 (Operations) Officer screen.
The S-3 (Operations) officer provides information on friendly unit movement objectives, and comments on whether they seem sufficient to accomplish the force’s mission in light of the known and estimated enemy forces. The S-3 will also issue move orders to a player’s force, if desired.
Figure 12: The S-4 (Supply) Officer screen.
The S-4 (Supply) officer provides information on the amount of ammunition units have on hand, and will assess the overall force supply level. The S-4 will also issue orders for units low on ammunition to reduce their ROF (rate of fire) to minimum levels, if desired.

Figure 13: The XO (Targeting) Officer screen.
The XO is concerned with the DF (direct fire) targeting of enemy units, and the effectiveness of friendly fire. The XO will issue DF targeting orders to all friendly units, if desired.
Figure 14: The Engineering Officer screen.
The Engineering officer monitors all combat engineering operations undertaken by the force, whether specialized engineer units are performing them or not. The Engineer also makes assessments of the most valuable types of engineering operations within the force’s mission and the enemy situation.

Figure 15: The FSO (Fire Support Officer) screen.
The FSO handles IF (Indirect Fire) support missions fired by artillery, mortars, and rockets. The FSO will call for (i.e., “establish”) IF missions for the entire force based on the current situation, if so desired (or the FSO may determine that no additional IF missions are warranted).
Figure 16: The ALO (Air Liaison Officer) screen.
The ALO is concerned with CAS (close air support) missions being flown in support of the ground forces. The ALO will call for (i.e., “establish”) CAS missions for the entire force based on the current situation, if so desired (or the ALO may determine that no additional missions are warranted).
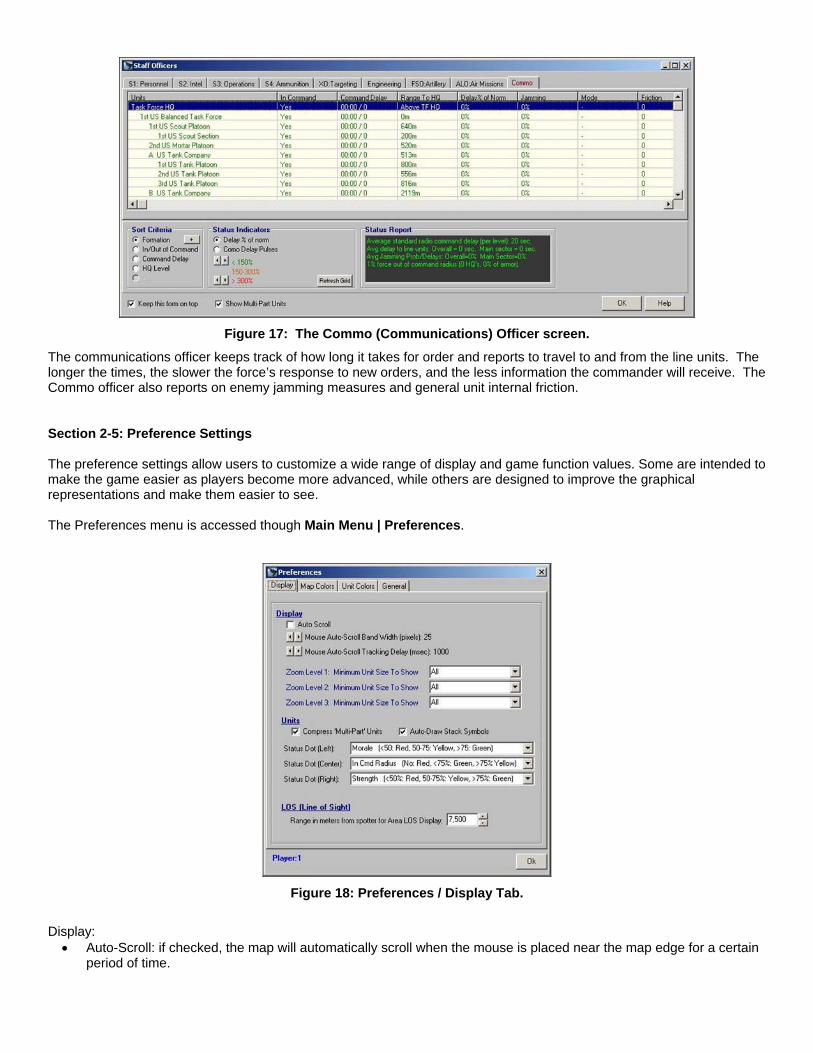
Figure 17: The Commo (Communications) Officer screen.
The communications officer keeps track of how long it takes for order and reports to travel to and from the line units. The longer the times, the slower the force’s response to new orders, and the less information the commander will receive. The Commo officer also reports on enemy jamming measures and general unit internal friction. Section 2-5: Preference Settings The preference settings allow users to customize a wide range of display and game function values. Some are intended to make the game easier as players become more advanced, while others are designed to improve the graphical representations and make them easier to see. The Preferences menu is accessed though Main Menu | Preferences.
Figure 18: Preferences / Display Tab.
Display: • Auto-Scroll: if checked, the map will automatically scroll when the mouse is placed near the map edge for a certain
period of time.

• Auto-Scroll Band: the distance from the map edge the mouse must be placed to begin an auto-scroll operation (in pixels).
• Tracking Delay: the time that the mouse must remain in the Auto-Scroll band to begin an auto-scroll operation (in milliseconds).
• Minimum Size to Show (per zoom level): only units of this size or larger will be displayed on the map when viewed at the zoom level specified. For example, if this is set to “Platoon”, any unit lower than that, such as squads and sections, will not be shown on the map.
Units: • Compress Multi-Part: if checked, units comprised of separate sections of the same level will be displayed and
listed as a single unit for sections of the same type and in the same location. For example, an infantry squad comprised of 4 sections of personnel types will appear as a single entity if all 4 sections are in the same location.
• Auto-Draw Stack Symbols: if checked, the program will draw a “stack” symbol when multiple units are in the same location. Otherwise, up to 4 discrete symbols will be drawn per location, overlapping as necessary.
• Status Dots: up to three status dots can be drawn on friendly unit symbols at zoom level 3 to reflect the unit’s status in various areas.
LOS (Line of Sight): • When using the Area LOS check, this is the maximum range from the spotting location at which Lines of Sight will
be checked. By setting this value to something less than the maximum LOS range, but reasonable for the force’s weapons and situation, the time required to run the Area LOS can be greatly reduced.
Figure 19: Preferences / Map Colors Tab.
Map Colors: • Selected Colors: these colors are used to identify the currently selected unit and/or location on the map (known as
the “hot” unit or “hot” location). The colors should be selected for good contrast with the underlying map and other graphics. These colors are also used on the Off-map Display.
• Formation Pointers: pointers are the lines drawn between a unit and its parent headquarters and subordinates. The lines have two parts, the primary color identifies what the line is pointing to, while the secondary part is a thin line drawn inside the primary one, and shows whether the link is within the command range or not.
• Movement Path: this color will be used to draw the movement path of the selected (hot) unit on the map. • Map Unit Information Text: these are the colors that will be used in the unit and object information “pop-up boxes“
that appear on the map as the mouse is scrolled. The background of these boxes is always black. Map notes are text strings and colored dots that can be placed on the map by players for reference purposes only.

Figure 20: Preferences / Unit Colors
Unit Colors: • Player: select the player to which to assign the current unit color scheme. A player’s force, mission, and starting
edge are set when creating a new scenario. • Example Sym: one of the unit symbols from those available in the symbol set is shown as an example of how the
currently selected color scheme will look on the map. To see a different symbol, click “Show Prev Sym In List” or “Show Next Sym In List”.
• Color 1: click on the color swatch to select the “outside” color. • Color 2: click on the color swatch to select the “inside” color. • Color 3: click on the swatch to select the “line” color. • Set to High-Contrast Default: clicking this button will reset the symbol color scheme to the default values of
magenta, white and black. • Rest: clicking this button returns the color scheme to its original value before any changes were made.
Figure 21: Preferences / General
General:

• Expert Setting: the expert setting makes games easier for less-experienced players by performing many command functions automatically, as well as simplifying some of the more advanced aspects of the game system, such as FOW (fog of war).
• Auto Load/Save: these settings enable the computer to automatically save the current game at set intervals for easy recovery in case of a program crash or system failure, as well as asking if the user would like to load the most current game found in the POA directory when POA-2 initially starts up.
• Game message delay: this setting determines how long most of the “pop-up” type messages will be displayed before disappearing.
• Use sounds: this toggles the game sound on and off. • Warning Alerts: these selections allow users to customize which error messages appear. These messages
contain a “Do not show me this message again” type check box when they appear on the screen, but even if a user “checks” the box, the setting can be reset from this form.
• Fog Of War Settings: this allows users to change the scenario’s current FOW level, as long as it hasn’t been “locked” (once locked, the FOW setting can’t be changed).
Section 2-6: Right Clicking (<RBM>) on the Map
The Right Click (<RBM>) is the principal and most complete interface with anything having to do with the map and the objects on it. It works on both the Main Map and the Off-map Display. Depending on the stage of the scenario and/or the situation, not all of the options may be available for selection.
2-6.1 <RMB> Pop-up: Unit Info If one or more friendly units are in the location, “Unit Detail Info” may be selected. It brings up the detailed Unit Information screen for every friendly unit in the location, cycling though them in “formation order” if there is more than one present. To quit cycling though multiple units, click the “Cancel” button on the bottom of the currently displayed Unit Information screen.
2-6.2 <RMB> Pop-up: Give Orders to Units
If one or more friendly units are in the location, this option may be selected. From it, units may be given all of the standard combat orders, or at least the ones they are capable of performing.

The orders are: • Set DF Targets: if the unit(s) is/are capable of firing DF at enemy targets or objects, clicking this option will allow
the user to click on another map location containing the desired target, and will then automatically bring up the DF fire selection box. The DF fire selection box allows players to set the ammunition, ROF and other characteristics, and is described later in this section.
• Movement Orders: clicking this brings up the Unit Movement box, and allows the unit(s) to be given movement orders. The Unit Movement box allows for either individual or formation movement, and is described later in this section.
• Engineering Ops: if the unit(s) is/are capable of performing any engineering ops, clicking this will allow the user to click on the location for the engineering operation, and then bring up the Unit Engineering box. The Unit Engineering box allows the user to decide what engineering operations to conduct in the location as well as assign extra units to speed up the completion time, and is described later in this section.
• Create a detachment: If the selected unit quantity is greater than 1, clicking this will allow a detachment to be created in this location. Once created, detachments are normal units in all respects, and their original parent unit is their headquarters.
• Airstrike Missions: if the unit is an aircraft unit capable of flying CAS missions, clicking this will allow a target location to be selected, and then will automatically bring up the CAS Missions box. The CAS Missions box enables players to set all aspects of the CAS mission, including SEAD (suppression of enemy air defense), flight path characteristics, ordinance to use, and the number of passes. The CAS Missions box is described later in this section.
• Join Units: the units in this location may be given order to join with other units, either in the same location or not. If the other unit is in a different location, it will be given movement commands to join with the selected unit.
• Load Units: this command allows the selected unit to be loaded onto a carrier unit. If the carrier unit is in a different location, movement orders will be issued to bring the units to the same location.
• Unload units: if any units in the location are currently loaded, clicking this will enable the passengers to be given the command to unload. Passengers always unload in their carrier unit’s current location at the time of unloading.
2-6.3 <RMB> Pop-up: Target this Location
All on and off map locations may be targeted, subject to the force having units capable of firing into them. Other than airstrikes, units without a direct LOS (line of sight) must use IF (indirect fire). Otherwise, DF (direct fire) is used. Depending on which selection is made from this menu: IF, DF or Airstrike, the appropriate targeting box will appear allowing players to set the firing units and mission characteristics.
2-6.4 <RMB> Pop-up: Place/Edit Objects

Objects are physical entities, other than combat units, that occupy locations on the map. They can all suffer from combat actions, and most can be deliberately targeted, at least if their presence is known. In the set-up phase, this menu allows players to either place objects on the map or to edit the information of objects already placed. Otherwise it will show whatever information in known about the selected objects in a location.
2-6.5 <RMB> Pop-up: Place/Edit Preplanned
This selection is only available during the set-up phase. It allows players to place pre-planned DF TRP’s (target reference points), and IF PPD’s (pre-planned targets) in selected locations, which are control measures that regulate and increase the effectiveness of friendly fire. Essentially TRP’s act as a unit’s primary DF firing locations, and take precedence over targets in other places. PPD targets are locations mapped out in advance by the artillery unit so the coordinates and firing values are known and do not need to be calculated in the “heat of the moment” when a fire mission is requested. They may also be pre-ranged, in which case one or more actual “test” rounds have been fired to fine tune the calculated gun positioning values. A location may be selected as a TRP and/or PPD target for any number of friendly units, although in practice, locations will normally only have one preplanned item in them. The number and types of TRP and PPD targets available to units is set as a part of the nation/force characteristic values, and may be edited at the very start of a scenario when the forces are first selected.
2-6.6 <RMB> Pop-up: Engineering Clicking this command will bring up the Engineering Operations box for the currently selected location. The box lists all in-progress operations in the current location, as well as allowing the player to begin new ones and assign units to perform them.
2-6.7 <RMB> Pop-up: Bridge Demolition This command brings up the Bridge Demolition box. It shows all the bridges in the location that can be blown up, and allows the player to give commands to do so. To be eligible for demolition, a bridge must be primed, i.e., have explosives placed and wired, and an unbroken friendly unit must be nearby. Attempts at bridge demolition are not always successful. Sometimes the explosives detonate but the bridge is not destroyed, or the explosives may fail to go off entirely. In the latter case, nearby units will attempt to re-prime the bridge, and if successful, another attempt can be made at demolition.

IMPORTANT NOTE: Once a demolition order is given (the “OK” button clicked), it may not be rescinded.
2-6.7 <RMB> Pop-up: Map Notes
Map Notes are essentially cosmetic objects that a player may place on the map for reference. The have two components. The first is a dot, the color set by the user, which appears on the map. The second is a user defined text string that will appear in the pop-up info box when the mouse is moved over the location.
2-6.7 <RMB> Pop-up: Quit Operation This cancels the current orders mode or operation. Section 2-7: Orders Mode (Targeting and Movement)
The Orders Mode is used to allow players to easily issue targeting or movement orders to a number of units in succession. In orders mode players do not have to go through the “Right Click” procedures outlined above, but instead just have to click on eligible units and then they “pop” right into the appropriate mode automatically. When in the targeting orders mode, the player only has to click on a friendly unit, and then a target location. The DF targeting box will pop-up automatically allowing the player to set the targeting values. Section 2-8: LOS Mode (Line of Sight)
The “Point to point” LOS is determined between a single spotting location, and a single target location. After clicking the button, left click on the spotting location, followed by a left click to select the target location. The results are shown in the LOS Cross-section display:

Figure 22: The LOS Cross-section Display showing blockage, ground elevations and aboveground terrain.
The area LOS shows the LOS blocking to all of the locations within a certain radius of the selected spotting location. Shades of white/gray/black are used to show the results, where white is completely open (less than 10% blocking) and black is completely blocked (100% blocking). A legend is shown at the top of the map, and the screen will appear similar to this:
Figure 23: The area LOS display. The spotting location is red, gray shades show the percent blocked.

Section 2-9: Turn Controls
“Replay Entire Turn” brings up a complete visual replay of the last combat phase, as if watching it in “real time”. “Show Combat Phase Summary” is much less detailed (and time consuming), and will show only a general summary of the combat actions in the last combat pulse. “End Turn” ends the current player’s turn, and either switches control to the other player or moves to the combat phase execution. Players are always given the option to save the game at the end of their turn. Section 2-10: Keyboard Shortcut Keys
Operational ActionsCtrl - D Target location with Direct Fire. Ctrl - M Toggle Movement Orders mode. Ctrl - I Target location with Indirect file. Ctrl - T End Turn.
Map Display ActionsCtrl - E Toggle Elevation map shading. Ctrl - G Toggle map Grid on/off. Ctrl - F Toggle Force structure display. Ctrl - O Toggle Off-map display. Ctrl - + Zoom in on the current unit/location. Ctrl - (minus) Zoom out one level.
Game/File ActionsCtrl - A Save file As. Ctrl - P Load pre-made Scenario. Ctrl - L Load a game file. Ctrl - S Save current game. Ctrl - N New game from scratch. Ctrl - X Exit. Ctrl - 1 Load the “last loaded” file. Ctrl - 2,3,4,5 Load the “last loaded” files 2-5.
Staff OfficersF1 S-1 (Personnel). F6 Engineer F2 S-2 (Intelligence). F7 Fire Support Officer (artillery). F3 S-3 (Operations). F8 Air Liaison Officer (airstrikes). F4 S-4 (Supply). F9 Communications F5 XO (Targeting).

Part Three: Modeling and Simulation This part of the manual will describe the technical details incorporated into the simulation and modeling system. Some of these topics may be referenced elsewhere in the manual; but they are presented here in greater detail. If you want to know how or why something is working the way it is, this is the part to read. Ed note: I’ve tried to keep the equations and formulae to a minimum and focus on how the routines operate in general. On occasion, however, I’ve included them just to illustrate the depth of the simulation. Section 3-1: The Turn/Pulse Sequence Within the simulation, actual time is broken down into a series of turns, each of which is comprised of a number of combat pulses. Turns are used to control how often users are given the opportunity to issue orders to their force, while combat pulses (or just pulses) are used to determine the time between situational “snapshots” in which combat and movement take place. These divisions allow the user to set a balance between the level of realism and accuracy and the length of time the simulation needs to run to produce these results and how much effort is required of the player. The relationships are: Short Turn: (Pro) Better player control over force actions
(Con) Longer games with more player interaction required. Short Pulse: (Pro) Higher resolution and accuracy
(Con) Increased scenario execution time.
Long Turn: (Pro) Shorter games with less player effort required. (Con) Reduced player control. Long Pulse: (Pro) Quicker combat processing time. (Con) Reduced accuracy.
For example, if a turn is set to 2 pulses, the control over the force will be much greater than if a turn was set to 4 pulses. But the shorter turn setting will require twice as much player effort to complete the scenario. Likewise, if the pulse duration is set to 5 seconds, the combat accuracy and resolution will be very high, but the scenario will take much longer for the user to complete than if the pulse duration were set to 30 seconds. However, it is worth noting that the simulation keeps track of things down to the second when determining rounds fired, distance traveled, command delay elapsed or any of the other time-determined game functions, no matter what the turn or pulse settings are.
3-1.1 The Turn Sequence Each turn is comprised of a command phase for each force, followed by a number of combat pulses. The number of pulses per turn is set at the start of the scenario, and is normally roughly based on the game scale. During the command phase, a player (either human or AI) can view the known actions from the last turn (subject to Fog of War), consult with his staff, and/or issue orders to units within his force. There is no set sequence for these activities; they can be done at any time, as well as multiple times or not at all. Thus a player could view the combat replay, issue some orders, and then go back to the replay again and then end the command phase without checking with his staff. The staff is used primarily to present information on the status of friendly and enemy forces, and provide an easy way to select critical items such as fire missions or units for action. The staff also provides a basic level of commentary, and may sometimes offer suggestions.

Orders are commands given to units to perform some combat task or reconfiguration. Examples include giving movement objectives, assigning DF targets, calling for fire support, or changing any part of a unit’s combat posture such as facing, speed, or NBC protective level. In some cases, a command delay will be imposed before the order is executed; this represents the time it takes in real life to transmit the order down the chain of command and to complete it. Additionally, at the start and end of each turn, the computer performs certain “housekeeping” operations such as assigning DF targets and IF missions when applicable, and updating the weather conditions. These routines are not run in each pulse due to the substantial length of time they often take to execute. The actual sequence is as follows:
1. Player #1 command phase. 2. Player #2 command phase. 3. AI sets DF targets as applicable for both players. 4. AI sets IF missions as applicable for both player. 5. Combat Pulses (variable number determined at start of scenario) 6. Turn replay saved for later viewing by either player. 7. Weather conditions are adjusted. 8. A check is made to determine if the scenario is over, and if so, the results are shown.
3-1.2 The Combat Pulse Sequence During the combat pulse, the computer takes complete control of the scenario and executes the movement and combat actions that are determined to occur during the “real-time” duration of the pulse. The combat actions and activities within a pulse occur as follows:
1. IF/artillery missions are fired. 2. Radar detection is attempted against enemy aircraft and en-route units. 3. DF is fired. 4. The movement phase is executed, including engineering work and Opportunity Fire. 5. Standard detection (visual/IR/acoustic) is performed for all enemy (and friendly) units. 6. The effects of repair efforts against damaged radars and gun systems is judged and applied. 7. Terrain fires are adjusted and spread. 8. Illumination is adjusted (from flares, ambient illumination, terrain fires, etc.) 9. Smoke is produced from wrecks and fires, and existing smoke drifts/dissipates. 10. Chemical contamination is adjusted for location and conditions. 11. Units are assigned as “acting” HQ’s when necessary to cover combat losses or other conditions.
3-1.3 The Movement Phase
The movement phase is broken down into several steps, which determine when and in what order units move or perform other tasks.
1. All units not En-route move first. This includes just about everything except missiles of one sort or another, and this is also when these units will perform other operations such as engineering actions and MOPP level changes.
2. All En-route units that are not attempting to intercept another En-route unit move next. En-route units attempting to intercept a normal unit, such as a SAM trying to intercept an aircraft, move during this step.
3. Lastly, En-route units trying to intercept other En-route units move. 4. If an En-route unit moving in either step #2 or # 3 reaches its destination, or narrows the range to its target to near
zero, the missile will stop moving and attack. Attacks are made using the standard procedures for accuracy and damage based on the “ammunition” values for the En-route unit.
Section 3-2: Firing Weapons Weapon firing is dividing into two general categories, based on whether or not the firing unit can see its target. If the target can be seen and aimed at, it is classified as “Direct Fire” (DF), otherwise it is known as “Indirect Fire” (IF).
3-2.1 Direct Fire (DF) Direct Fire is used when the firing unit can directly aim at its intended target. As an example, a rifleman aiming and firing at an enemy target uses DF. Usually, a unit using DF will be able to visually see its target. However, there are times when this will not be the case. An example would be engaging a target several hundred meters away in a dense fog. The

target will not be visible to the naked eye, but it could show up clearly with a thermal sight. Thus, the thermal sight allows the fire to be directly aimed, and thus DF. DF can be used against any target type, including area/point locations, enemy units or weapons systems, or objects such as buildings and obstacles. It can also be used as “area fire” against a general location, which may or may not contain other “unknown” targets. DF can be used by all munition types, powered or not, guided or not, or even physical or not (e.g., energy weapons). All Gun/Launcher systems have the capability of using DF; no specific data settings are required. DF is resolved in four basic steps: • The firing parameters are calculated and checked to be both physically possible and within the firing unit’s
limitations. • The total number of rounds to be fired is determined, and the rounds are fired one at a time. • The round either impacts immediately (as in the case of a tank main-gun round) or a temporary en-route unit is
created (as in the case of a missile). • If an impact or detonation is achieved, the results are assessed against all applicable targets.
The first step in the DF process is to determine the firing parameters. If any step in this sequence cannot be successfully achieved, the firing is aborted. The steps are: • The firing unit is checked to determine if it must be emplaced (the requirement and time to be emplaced are part of
the Weapons System Data). • The target is checked to make certain it exists and is valid. • The firing weapons are checked for damage, including the firing control and target acquisition systems. In some
cases the weapon may still fire, even with damage, but at reduced capabilities. • The firing unit is checked for correct ammunition on-hand and it is available to fire. • The range to the target is checked to be within the minimum and maximum values for the ammunition type (these
ranges are part of the Ammunition Data). • The firing unit is checked to make sure that the weapon, or one mounted coaxially with it, hasn’t already fired at
another target (coax weapons are set as part of the Weapons System Data). • The weapon is checked for capability to engage either surface or air targets (capability is part of the Weapons
System Data). • If the firing unit is in an IP (or building), the firing weapon is checked for back-blast production, and if so, that the IP
allows for safe back-blast dissipation. Additionally, the open firing arc of the IP is checked to insure that it covers the target’s location (back-blast is part of the Ammunition Data, safe back-blast dissipation and firing arcs are part of the IP Data).
• If the target occupies an IP, it cannot be engaged unless there is an opening in the IP wall in the direction of the firing unit. However, the IP itself can still be engaged (and the unit inside can suffer collateral damage).
• The LOS (Line of Sight) between the firing unit and the target is checked to be valid. If the LOS is completely blocked (by hitting the ground, terrain, etc.), the target cannot be engaged and the procedure is aborted. For long-range LOS determinations, the curvature of the earth may also block the LOS.
• The hull/turret facing is checked against the direction to the target. The target must be within the gun’s Firing Arc (part of the Weapon Systems Data), otherwise the hull or turret will require rotation before the weapon can be fired. Should rotation be required, however, a reduction will be made in the number of rounds actually fired to compensate for the rotation action.
• If the object being fired is a physical entity, a Flight Path to the target is determined. The flight path must not hit the ground, and must be free of all terrain obstacles (the height of terrain and obstacles is part of the TEC Data). Flight paths are discussed in a separate section, but are calculated differently for ballistic (non-powered) projectiles, and those with a means of propulsion (powered). Flight paths are not used for non-physical “ammunition” such as lasers and energy weapons.
• If the object being fired is guided, the firing unit is checked for potential command limits to make sure it never has more in the air than it can control (command limits are part of the Gun/Missile Launcher Data).
Once the firing parameters have been determined, and all aspects are acceptable, the rounds are fired. The exact number of rounds that will be fired in a combat pulse depends on a number of factors: • The capabilities of the gun/launcher system (the maximum ROF in rounds per minute for each gun/launcher is part
of the Weapons System Data). • The firing unit’s SOP setting (part of Unit Data).

• The number of rounds remaining on-hand. • If the firing unit must turn to face the target before firing, the number of rounds will be reduced to account for the
time used to make the facing change. • If a CAS mission is in progress near the firing unit, the ROF will be reduced, even if the firing unit is not the target of
the airstrike. • If the firing unit has a firing-control system and it is destroyed, the number of rounds fired is decreased by 75-95%.
If it is damaged, the number of rounds fired is decreased by 25-75%. • If the firing unit is not an aircraft, the amount of acquisition (number of seconds this particular target has been
engaged by this gun/launcher) is compared to the firing unit’s internal friction time. If the ratio is less than 2.0, the number of rounds fired is reduced exponentially (i.e., the loss is much greater at smaller ratios than those closer to 2.0) by up to 90%. Leaders assigned to the unit modify its friction time.
• The LOS blocking points reduce the number of rounds fired proportionally (i.e., 60% LOS blocking reduces the number of rounds fired by 60%).
• If the firing weapons system is co-located (“stacked”) with other weapons systems, its fire may be “masked”, which has the effect of lowering the ROF. The ROF decrease is proportional to the percentage “over stack” in the location. So, for example, if the normal stacking limit is 24 vehicles, and there are 30 in the location, ROF values will be reduced 25% (6 extra divided by the base of 24). The base “limits” based on 100 meters per location, are shown below. These limits are modified by the stacking factor for the terrain in the location as defined in the TEC.
o Personnel: 120 o Guns: 20 o Vehicles: 24 o Aircraft: 4 o Ships/Naval craft: 2
En-route and impact effects are described separately below.
3-2.2 Indirect Fire (IF) Indirect Fire is similar to Direct Fire (DF), but is used when the firing unit cannot see its intended target, and/or cannot directly aim at it. As an example, artillery firing at a target out of sight behind a ridgeline uses IF. Indirect Fire can be used against any target type, including area/point locations, enemy units or weapons systems, or objects such as buildings or obstacles. It can also be utilized by all munition types, be they powered or not, or guided or not, or even physical or not (e.g., energy weapons). However, in order to fire IF a gun/launcher system must specifically be given that capability as part of the Gun/Launcher Data. IF is resolved almost exactly like DF, with the exception that LOS considerations are ignored. The firing unit does not need to see its target, although accuracy may be increased if it does, but because of that, the firing is directed rather than aimed.
3-2.3 Anti-Aircraft Fire (AA) Anti-Aircraft Fire is fire directed from ground units against air targets such as aircraft, or En-route missiles and rockets. While AA fire is not a fundamental type, within the simulation it is handled in a separate phase, and has distinguishing characteristics from simple DF or IF. AA fire can only be directed against targets “known” to the firing unit. However, the target does not have to be in the LOS, or currently spotted by the firing unit. Instead, it is enough that the firing unit’s radar may have detected the target (which may be possible even if the target is over the horizon or behind an object that would block the LOS), or that information on the target has been reported to the firing unit by some other friendly unit using the report dissemination procedure. Additionally, AA fire may be either DF or IF, subject to the capabilities of the firing weapons and the situation at the time of firing. In some cases, a guided weapon may require a controller unit with a visual or radar “lock” on the target, and/or a painting unit that can illuminate the target using a laser or similar device. AA fire can occur either during the movement phase of the turn as aircraft units move from location to location, or as part of the normal firing phase if the target aircraft unit is hovering/stationary. When AA fire occurs in the movement phase, all aspects of the targeting procedure are computer controlled, although the unit’s SOP will be used if applicable. The number of rounds to fire is generally set at 30% of the weapon maximum, so that the weapon can either engage this or other targets again in the same movement phase.

Additionally, when a unit fires AA fire as part of the movement phase, the firing gun/weapon system will be unavailable during the normal firing phase.
3-2.4 Opportunity Fire Opportunity Fire is a term used to describe a special situation where DF is used against a moving ground unit in the movement phase. It is used to prevent target units from “skirting through” defensive fire zones by being able to move completely though them in one movement pulse. For example, Opportunity Fire can be used to engage a unit crossing a road cut through a forest, where the moving unit will only be visible for a brief time. Without Opportunity Fire, the moving unit might well be able to move into the road location, then also into the woods on the other side within one pulse. Thus, it would not be able to be engaged in the open road location by the defending forces, even if they were placed to fire down the length of the road. With Opportunity Fire, however, the unit can be engaged in “mid-move” as it enters the road, without the cover and concealment benefits provided by the forest. The use of Opportunity Fire is restricted, though, since it represents the situation where the defending unit is already set to fire on a specific location, and thus is watching and waiting for the enemy to first appear. The conditions are as follows:
1. The target unit must be moving between locations on the map, since Opportunity Fire is determined at the instant a unit moves into a new location. Units moving within the same map location are not subject to Opportunity Fire. Units moving offmap are also never subject to Opportunity Fire.
2. The firing unit must have an assigned DF Target that includes the moving unit’s location. DF Targets are fire control measures assigned at the beginning of the scenario to applicable forces and units.
3. The specific firing guns/launchers must not have been fired in the preceding IF, DF, or AA phases. 4. The moving unit must be detectable and able to be engaged by DF by the firing unit. The detection does not have
to be by visual means, but a valid LOS must exist between the firing unit and target. 5. All of the normal conditions applying to DF must be met.
3-2.5 Flight paths
The flight path is a course (through the air) traced out by a moving object. In the case of DF or IF, it refers specifically to the path along which a projectile or missile moves. The flight path begins at the instant of firing/launch, and ends when the projectile’s movement stops at an impact or detonation point. The flight path characteristics are calculated every 1/1000th of a second, and provide the projectile’s velocity vector (speed plus direction) and 3-dimensional position. The flight path calculations depend primarily on whether the projectile is powered, and to a lesser extent, whether it is guided.

Figure 24: Basic flight paths.
3-2.5.1 Ballistic (un-powered) Projectile Flight Paths This classification includes all projectiles that do not receive significant thrust after the initial launch sequence. Examples would be small arms, most tank gun rounds, ballistic rockets and even rocket-assisted artillery. For the purposes of this classification, relatively small thrust amounts used only to guide the projectile are ignored. After being fired, un-powered projectiles follow a standard ballistic trajectory; their path is determined from the constant effects of air drag and gravity. Note that there are often two unique firing elevation angles that will hit the target. When deciding which one to use, the simulation first checks to see if they are within the firing weapon’s limits. If one of them is too high or low, the other is used by default. Otherwise, if both angles are valid and the resulting flight paths are clear, the higher angle is normally used for IF and the lower for DF.
3-2.5.2 Powered/En-route Object Flight Paths Powered projectiles generate their own thrust for a majority of their flight path. As a result, they do not have to follow a ballistic path, and in fact, rarely do. In most cases, powered projectiles are also guided. Examples of powered projectiles include most missiles, some rockets, and special systems like RPV’s or cruise missiles that are used to carry a payload. Powered projectiles follow an “optimal” flight path, which is determined initially at the time of firing based on the projectile’s current position, the location of the target, and the weapon maximum/minimum firing elevation (up/down angle). If the projectile is guided, the path is constantly reevaluated while it is in the air so it will attempt to compensate for target

movement, or otherwise changed conditions. The amount of compensation is based on the effectiveness of the projectile’s guidance system under the conditions at the start of the movement phase.
Figure 25: Powered En-route units follow simple flight paths. If the En-route muntion is guided, the flight path is
periodically adjusted to account for target movement.

Figure 26: Simple single leg flight paths for powered munitions (missiles) and gun/launcher minimum and
maximum firing angle requirements.
Note that initially the flight path is calculated as one or two straight lines. This path represents the optimal combination of the missile’s climb and dive capabilities, which determines if the missile will be able to avoid obstacles. Should an obstacle block this initial (best) flight path, the target cannot be engaged. In the case of a flight path with both up and down segments, the high altitude achieved at the “peak” also provides added flexibility to respond to changed conditions. As the missile actually moves, however, it may level off at a reduced cruise altitude (the cruise altitude is part of the missile data).
3-2.5.3 Firing Angles For both powered and un-powered projectiles, the firing angle of the gun or launcher determines the initial flight path. The angle must be set to a value that allows the target to be hit but which is also within the limits of the firing weapon. In order to determine this angle, the program takes into account several factors: • The absolute elevations of the firing unit and the target. • The physical characteristics of the projectile (velocity, thrust, guidance, etc.). • The type of flight path (ballistic, non-ballistic). • The incline of the firing platform (from the ground only). • Clearance of obstacles (hills, terrain, buildings, etc.). • The maximum depression and elevation angles of the gun or launcher.

• At long ranges, the curvature of the Earth. Based on these factors, the program calculates the “best” possible firing angle and subsequent flight path. If the flight path cannot reach the target, or intersects the ground or an obstacle, the launch will be aborted.
Figure 27: Firing angle considerations for non-powered ballistic projectiles.
The firing angle will also take into account elevation differences between the firing unit and the target, as well as any obstacles between them.

Figure 28: Simple and complex ballistic paths for un-powered projectiles.
3-2.6 Actions at Firing/Launch
At the instant a projectile is fired or launched, the following sequence of events is executed: • A check is made for a malfunction in the gun or launcher. The probability of this occurring is the “reliability” value in
the gun launcher data. If a malfunction occurs, the firing is aborted at that point before the round is expended or any further results are applied. Gun/launcher reliability is part of the Gun/Launcher Data.
• Otherwise, firing occurs and the round (or burst) is subtracted from the on-hand ammunition quantity of the firing unit.
• If the munition creates an en-route unit, that temporary unit is created in the firing unit’s location. The en-route unit’s speed will be equal to the ammunition muzzle velocity, its facing set to the facing of the firing weapons system, and its elevation to that of the firing unit plus one meter. At the moment the en-route unit is created, all enemy radars get a special chance to detect it using the standard radar detection sequence. En-route units then use the normal movement routines (with the computer controlling altitude and course), until they reach their intended target.
• If the projectile does not create an en-route unit, it is assumed to arrive at its target in the same pulse as it is fired.

3-2.7 Weapon/Round Accuracy Accuracy is the probability that a munition will hit its intended target. As described in this section, accuracy is meant as the hit probability determined at the time the round will impact or otherwise affect its intended target. Thus, it is different and separate from “accuracy” as used to determine how effective an En-route unit is in flying along a pre-determined flight path, or homing in on its target. That aspect for guided munitions is covered later in its own section.
3-2.7.1 General All non en-route munitions are assigned an “accuracy curve”, which gives the absolute accuracy of hitting a standard sized target (5 square meters) at various ranges (expressed as a percent of the maximum range). An example of an accuracy curve is shown below.
Figure 29: An example of a typical ammunition accuracy curve (accuracy vs. range)
Based on the range to the target, the initial accuracy value is determined from the graph plot. In the example above, if the target were at 55% of the ammunition’s maximum range, the initial accuracy would be 40 - meaning 40 rounds out of 100 fired would hit a standard target, defined as measuring 5 square meters at a range of 1000 meters.
3-2.7.2 En-route Unit (Missile) Initial Accuracy The initial accuracy of an En-route unit (at the time of launch) is determined as for a standard round, using the ammunition accuracy curve. This value is then modified for the gun/launcher and weapons system accuracies. Guided En-route units can also use their accuracy rating during the movement pulse to determine how successful they are at tracking on a moving target. In these cases the accuracy value will usually also change over time, as conditions change. For example, the accuracy will be greatly lowered if a radar homing missile is jammed, or if the missile’s guidance system becomes damaged. Conversely, the missile’s accuracy will likely increase as the range to the target drops. This will be discussed further in the sections on guided munitions, below.
3-2.7.3 Guided Munitions
Guided munitions are capable of making course corrections to improve their accuracy against either stationary or moving targets. The guidance may be completely internal (e.g., a heat-seeking missile), completely external (e.g., an optically tracked wire guided missile), or a combination of both (e.g., a missile that sends video pictures back to a controlling unit).

If the guidance system has an external component, it will also have at least one link back to a remote controller of some type. Links are often radio or wire, and are used to transmit commands and other information between the missile and the controlling unit. If the link is broken, disrupted or jammed the missile will lose its guidance capability. The loss may be permanent or not depending on the system, but it will always last at least until the link is restored. Additionally the guidance may be passive or active. Passive types detect something emitted by the target and home in on the signal (e.g., an “anti-radiation” missile that homes in on active radars). Active systems generate their own signals of some type, and use them to detect and guide in on the target (e.g., a “fire & forget” radar guided missile). Guided munitions can change course along their flight path to track and home in on moving targets, and to make general corrections. If a guided munition has several guidance systems available, the computer will automatically pick the best one based on the current situation and conditions.
3-2.7.3.1 Internal Internal guidance systems are contained completely within the munition itself, and do not require any form of communication link to an external controller. As a result, these systems are often known as “fire and forget”, since once the munition are launched the firing units do not need to further interact with them in any way.
3-2.7.3.2 Controlling Unit If the en-route munition requires any type of external guidance, the unit that provides it is known as the controlling unit. Often times the controlling unit will be the firing unit, but that is not a requirement. For example, a fighter could fire a long-range missile that could then be guided by a friendly AWACS aircraft, in which case the AWACS is the controlling unit - not the fighter. However, the controlling unit must have a valid communications link to the munition, or the guidance will suffer. Additionally, if the controlling has a guidance command limit it will not be able to control more than that number of munitions at the same time. The controlling unit must also be in a normal morale state (i.e., not running for cover, wavering, broken or berserk). In some cases, the communications link for a particular munition is vulnerable to jamming. This will be specified in the Ammunition Types Data Table. The computer automatically assigns the controller unit for an en-route munitions at launch, and may “pass off” control as necessary to other eligible units, or to improve accuracy.
3-2.7.3.3 Painting Unit A painting unit uses some form of marking device, usually laser, to specifically identify the target to the incoming guided munition. The sensor in the munition “sees” the marking, and homes in on it. A common example of this type of weapon is a laser-guided bomb, but many other munitions are guided this way including missiles and artillery rounds. If a munition requires the target to be painting but no unit is available with painting capability, the accuracy of the munition becomes almost zero and it will impact randomly within some distance of the intended target. The maximum distance away it can land, or offset radius, depends on how much painting the target received before impact, and when that painting occurred. For example, if the target was well painted until only a few seconds before impact, the offset radius will be low, and the munition will still have a good chance of hitting the target or at least landing very close. However, if the painting was sporadic and ended 30 seconds before impact, the offset radius will be a lot larger, and the chances of landing on or near the target are much less, although they are never zero. Painting units must have a valid LOS (line of Sight) to the target, as must the incoming munitions. Additionally, the effectiveness of laser painting is decreased for degradation along those LOS’s, for example from smoke, foliage, or atmospheric conditions such as clouds (based on the cloud base height and coverage percent) or fog. Additionally, painting units must be in a normal morale state (i.e., not running for cover, wavering, broken or berserk).
3-2.7.3.4 Guidance System Damage Guidance system components can be damaged in several ways: • Damage/malfunction at launch. The probability of malfunction/damage is determined by the reliability rating of
gun/launcher firing the munition. The damage may be either temporary or permanent.

• Physical command-link (wire) breakage. Wire guided missiles stand a chance of having their wire break or “short out” while in flight. The probability of this happening depends primarily on the terrain the missile has passed over, where rougher types and/or the terrain being “on fire” increase the breaking chances. The probability is also increased for precipitation, and high humidity levels. The damage is permanent.
• Damage to the controlling unit’s fire control system as from normal combat actions (if a controlling unit is required). The damage may be temporary or permanent.
• Energy damage to the munition’s internal systems while En-route. Energy-induced damage is covered in detail later in the manual, but essentially induced currents “burn out” the internal electronics causing them to fail. The damage is permanent, and the missile is always immediately destroyed.
The results of guidance system damage will depend on the munition’s specific characteristics, and if it can use alternate guidance methods. For example, if the command link wire breaks, can the missile switch to another form of guidance? If it can, it will. Otherwise, it will be come “unguided”. In some cases, this will effectively destroy the munition, as in the case of a wire guided missile with a broken wire. In others, the missile may continue En-route for a time in case it can reestablish guidance, as with a long range air-to-air missile that can be guided by any friendly aircraft within range but who’s controlling unit suffered system damage. Munitions that are destroyed as a result of guidance loss may be determined to detonate in their current location or at a location further along their flight path, depending on the munition’s current altitude, speed, and distance from the target. When this occurs, units and objects nearby are subject to normal combat losses from random impacts. For example, a guided bomb may lose guidance to its intended target, but it will still hit and explode somewhere, possibly even on its originally intended target.
3-2.7.3.5 GPS (Global Positioning System) GPS is based upon a series of radio transmitting satellites in geo-synchronous earth orbit. Appropriate receivers on the earth’s surface can detect these signals, and use them to determine their location within a few meters. This exact position information can also be useful for guided munitions, as long as the position of the target is also known, and it is relatively stationary. In that case, the guidance system of the munition can continually monitor its progress, and make course corrections as necessary to arrive at the target location. It also enables the munition to “fly” a predetermined flight path exactly, without relying exclusively on less accurate dead-reckoning methods. While GPS can be used as a sole guidance source, it is often used in conjunction with other guidance methods so that compensation can be made for moving targets, or imprecise original target position information. In these cases, the GPS is used to get the munition “close” to the target, where other, more accurate/appropriate guidance types take over. By their very nature, however, GPS systems are more than moderately vulnerable to potential disruption. Current GPS signals are limited to a single frequency, but even if this were expanded the number of discrete operating frequencies would still be limited. Further, accurate results depend on the receiving equipment being correctly calibrated and able to receive a strong enough signal. Thus, a GPS system’s efficiency can be reduced by deliberate enemy action or natural conditions including terrain and atmospheric disturbances. Then, there are the satellites themselves. Their owner could decide to deny their use to another nation, or they could be taken out of service by anti-satellite operations. In either case, the GPS systems would be useless. In the simulation, each force is given a “GPS Rating”. It is a measure of how “available” GPS signals are to that force across the entire battlefield. It is an aggregate of global factors such as base access to GPS satellites and signals, atmospheric conditions over the battlefield at the time of the scenario, and the general efficiency of the force’s devices. Additionally, jamming equipment can be used to disrupt the enemy’s use of GPS signals, as will be discussed in the next section.
3-2.7.3.6 Homing Homing munitions require their target to emit some form of energy. The munition detects the energy, and aims for the center of the source. The most common forms of energy used for homing are radar signals, heat (IR), radio, light, and sound. Homing munitions can often successfully tolerate interruptions in the energy source, especially if the target is stationary or if the interruptions are short enough that the munition doesn’t lose the target from its field of vision. A prime example is a HARM missile that guides in on energy pulses emitted by enemy radar stations. The station does not emit energy

continuously, but because it is stationary or slow moving, the missile can home in on the last known pulse location with relatively good results. The “pulse rate” for radar transmitters is set to a default value when a scenario starts, but can be adjusted by the owning player for each radar unit in his force. It is worth remembering, however, that the pulse rate setting is a balance between effectiveness and protection. On the one hand, a low pulse rate will protect the radar from HARM missiles, but on the other, it will also mean that the radar is less effective at detecting enemy aircraft. Interruptions in energy emission/detection have the greatest effects on accuracy when they happen as the munition nears the target, although the simulation makes checks every second over the flight path, and adjusts the accuracy accordingly. The longer the interruption continues, or the faster the target is moving across the munition’s field of vision, the greater the accuracy loss. If the loss is great enough the target will be lost altogether, and the missile will cease operation. NOTE: Target “movement” as used by these routines is not absolute. Rather, it is relative to the munition’s field of vision, or in other words, how fast the target “appears” to be moving. For example, a truck in the distance does not appear to be moving very quickly, while one moving at the same speed a few meters away seems to “flash” by. Likewise, the relative direction of movement is important. A truck driving directly towards or away from an observer hardly appears to move at all, especially compared to one moving directly from right to left.
3-2.7.3.7 Jamming Jamming is the deliberate interruption or degradation of communications by the enemy. In terms of guidance systems, the intent is to break the command link so that the missile misses its intended target. Jamming takes many forms. The most common type involves disrupting radio transmissions by simply overwhelming them with a stronger signal. But jamming can (and is) also used against other forms of communications. In fact, there are methods to jam virtually every form of communications used on the battlefield. Radio interference has already been mentioned, but other examples are laser defeating smoke screens and lasers that emit “fake” pulses, energy pulses that can short out wire-guidance systems. However, while it is true every communications method can potentially be jammed, some methods are much more secure than others and, within the operational limits of the battlefield, can be virtually “jam-proof”. The simulation allows for this with a “Not Jammable” flag in the Guidance System portion of the Ammunition Classes Data Table. In the simulation, jamming is accomplished at two levels. At the force level, the force’s EW Rating is used to measure jamming capabilities across the entire battlefield. It represents equipment and personnel possessed by the combat formations and units that are not specifically represented in the Data Tables, including laser jammers/decoys, smoke, and otherwise undefined radio jammers. It also includes unconventional interference capabilities such as “home-grown” jammers made from modified radar detectors, or even otherwise non-EW units breaking into/overriding enemy radio transmissions on their own. The second level involves specific pieces of jamming equipment, known appropriately enough, as “jammers”. The ability of a jammer against a particular form of communications signal is defined in the Jammer Data Table, along with its range, power, and other capabilities. Jammers may be assigned to special EW units, carried by a weapons system, or even deployed remotely, by artillery or dropped by air. All systems that move within an appropriate jammer’s range will be subjected to disruption, based on the standard jamming procedures covered later in the manual.
3-2.7.3.8 Decoys Decoys are used to “confuse” guided munitions by effectively creating alternate targets that the munition must distinguish between. They range from “dummies” that are released by a parent system, to flares and chaff (strips of metal foil). Each decoy will only be effective against certain types of guidance systems. For example, chaff is effective only against radar-guided munitions. It will have no effect on an incoming heat-seeking (IR guided) missile. Likewise, flares may disrupt an incoming heat-seeking missile, but they will not affect ammunition homing in on sound. The simulation breaks decoy effectiveness down into the categories: heat/IR defeating (flares), radar defeating (chaff) , radar defeating ECM (the decoy provides an “electronic signature”, rather than a physical one as with chaff), and noise defeating. The computer uses decoys automatically whenever a missile is about to hit a target equipped with them. Each decoy system is given an effectiveness rating, which is compared to the incoming missile’s electronics rating (based on the force EW and Commo ratings) and accuracy. A determination is then made if the decoy “distracts” the missile, and if so, by how much. A “distracted” missile may still detonate near enough to its target to cause damage, especially if the decoy is only marginally effective, or a “last possible” second measure.

Decoys are defined in the Decoy Data Table, and assigned to weapons systems as “special systems” in the Weapons System Data Table. Decoys may also be consumed with use, and if so, the parent system may eventually run out over a period of time. The consumption rates and amount of decoys on-hand are also set as part of the weapons system data.
3-2.7.3.9 Summary of Guided Munition Characteristics
Guidance Link Guidance Type General (applies to
all situations) * Wire * Radio * Beam * Internal
(F&F) Firing Unit External GPS Jamming
Video Camera is always assumed to be in the missile. Accuracy degraded by the LOS between missile and target.
Accuracy reduced if controller doesn’t have a LOS to the target at any time
Accuracy reduced if spotter doesn’t have a LOS to the target at firing
Accuracy reduced if spotter doesn’t have a LOS to the target at firing
Missile must maintain a LOS throughout flight, unless GPS present.
No additional specific effects.
No additional specific effects.
GPS low (0.5) but also offsets accy losses from degraded LOS (1/2 norm).
Jamming harder than avg (0.5).
IR IR cameras always assumed to be in the missile. Accuracy is degraded for LOS between missile and target (2/3 normal degradation).
Accuracy reduced if controller doesn’t have a LOS to the target at any time.
Accuracy reduced if controller doesn’t have a LOS to the target at firing
Accuracy reduced if controller doesn’t have a LOS to the target at firing
Missile must maintain a LOS throughout flight unless GPS present.
No additional specific effects.
No additional specific effects.
GPS low (0.5), but also offsets accy losses from degraded LOS (1/3 norm).
Jamming harder than avg (0.5).
Radar RADAR in either the missile or controlling unit. RADAR must maintain lock throughout flight.
No additional specific effects.
No additional specific effects.
No additional specific effects.
Radar in missile (missile must maintain lock)
Radar in firing unit (unit must maintain lock)
Radar in external unit (air or ground depending on launch location)
GPS avg (1.0).
Jamming easier than avg (1.5).
Laser Detector in the missile. Laser “spot” from firing unit or another unit (needs an LOS to the target). Missile needs LOS at any point within last 200m of flight path.
Not available Not available
Not available Always Yes Not available
Not available
GPS much higher than avg (1.75).
Jamming little easier than avg (1.25).
Visual Firing unit’s sights (IR, thermal, etc.) are used to “spot” target. Controller must have valid LOS to both the missile and target at all times.
No additional specific effects
No additional specific effects
No additional specific effects
Cannot select.
The firing unit is the default controller, and cannot later switch control to another unit.
At firing, an external control can take over for the duration of the missile’s flight.
GPS negligible (0.0).
Jamming much harder than avg (.25).
Radiation Radiation detector can be in either the missile or the controlling unit. Detector must maintain an LOS to target throughout the flight. If the target’s radar is “off” at the time of impact, the accy is lowered.
No additional specific effects
No additional specific effects
No additional specific effects
Detector in missile (missile must maintain lock)
Detector in firing unit (unit must maintain lock)
Detector in external unit (air or ground depending on launch location)
GPS avg (1.0).
Jamming a little easier than avg (1.25).
General - If a unit controls the missile, that unit’s status (morale, suppression, training, etc.) affects accuracy. Broken units cannot control guided missiles.
- Always controlled by firing unit. Can not be controlled by an external source. - The wire link can be broken by terrain, fire, etc. - GPS lower than avg (0.5). - Jamming
- If controller unit does not have a LOS to the missile, accuracy is decreased a little. - GPS avg (1.0). - Jamming easier than avg (1.5).
- Controlling unit must always have a LOS to the missile. - GPS avg (1.0). - Jamming much harder than avg (0.1).
- No other links: completely “Fire & Forget”. - GPS much higher than avg (2.0). - No Jamming (0.0). (ECM will still apply).
-If missile control can’t be shifted to an external unit, it is affected by combat actions against the firing unit. -Must have a guidance link other than Internal. - GPS avg
- An External controller is used whenever possible. - Must have a non-internal guidance link. - GPS little higher than avg (1.25). - Jamming little easier
- If GPS is not available, or degraded, the accuracy is lowered for missiles that use it. - Jamming is slightly easier than avg if GPS used (0.9).
- Jamming capabilities depend on a force’s EW rating, as well as specific jamming systems possessed by the target.

much harder than avg (0.25).
(1.0). - Jamming avg (1.0).
than avg (1.25).
* = Only one primary guidance link can be selected for each missile system. For Internal (F&F) guided systems, Firing Unit and Extern have no effect, even if selected
3-2.7.3.10 Seeking
Seeking is a capability of a munition to search an area and identify targets within that area and attack them. For example, a primary munition may be fired by an artillery piece to a certain location, where it deploys by parachute some distance above the ground. While descending, it uses a camera or other senor to detect targets nearby, and if it finds one, aims and directs a secondary munition at that target. The seek radius and effectiveness for ammunition models is specified in the Ammunition Data Table. Once fired, the computer handles the seeking and targeting functions automatically. If it finds one or more targets, they are engaged using the normal routines.
3-2.7.4 Target Size Targets sizes are determined from the perspective of the unit or missile viewing them, and reflect how big the object appears - not necessarily how big it is in reality. As such, objects appear smaller as they get further away and a small object close by may look larger (and be easier to hit) than a much larger target at a greater range. Target sizes are measured in square arc seconds. There are 3600 arc seconds in a degree, and for comparison the full moon measures approximately 1800 arc seconds across, or 5650 square arc seconds in total size. The size determination routine initially builds a representation of the target object out of “blocks” based on the target’s length, width and height values that are defined in the Data Tables. If the target has a turret, it is superimposed on the hull, in a centered position, and the facing set accordingly in relation to the hull. The object is then rotated in 3 dimensions to match the perspective of the viewer, and the silhouette values are applied to reduce the “blocks” to approximately the actual contours. The actual dimensions are then adjusted for the range between the object and the viewer, giving the nominal apparent size of each side, and the total object, in square arc seconds.

Figure 30: Target apparent size calculation, and he effects of intervening objects.
If the target is behind an opaque object such as a wall or berm, its total apparent size will be reduced for the portion hidden by the intervening object. The apparent size of the specific side(s) blocked by the object will also be reduced. So, for example, the apparent size of a tank target’s hull might be very small if it moves behind a wall while the turret size is not affected. Initial weapon accuracy values are entered in the Data Tables as the probability of hitting a standard 5 square meter target at a range of 1000 meters (2.1 x 10⁸ sq. arc sec). The difference between this and the apparent target size is applied to the accuracy determination proportionally, i.e., if the target appears twice the standard size the accuracy will be twice normal, if it appears half the standard size the accuracy will be halved. A secondary factor is how “square” the target appears. The more “un-square” the appearance, the harder it is to hit. For example, a target 10 meters (~30 ft) long but only 0.25 meters high (~10 inches) is harder to hit than one 1.6 meters (~5

ft) square. The reduction in accuracy for “non-square” orientation is applied exponentially; with the effects becoming significant only when one dimension is several times greater than the other.
3-2.7.5 Firing Unit Movement
As weapons systems move, they often experience vibration changes in attitude and other conditions that detract from optimal firing conditions. As such, movement normally decreases the accuracy of unguided rounds being fired by its weapons. The amount of reduction depends on several factors, including what sorts of stabilization equipment the firing unit has, the “roughness” of the terrain being traversed and how fast the firing unit is moving. Each gun/launcher within a weapons system is given a base “movement accuracy” rating, which represents how effective the stabilization equipment is under normal operating conditions. This rating is then modified by the conditions of the movement. The first determination is simply what kind of terrain the unit is moving over. If the terrain’s maximum speed is 50 Kph or more it is considered a smooth road. If it is between 25 and 50 Kph, it is considered a trail or smooth cross-country. Otherwise, it is rough. The terrain type determines how the accuracy is reduced. On rough terrain, the relative accuracy falls off much more quickly at low speeds than it does on smoother surfaces. The following graphs show the relationship between relative accuracy reduction and relative speed (actual speed as a percent of the weapon system’s maximum speed) for each of the general terrain types: Smooth Roads Trails/Smooth Terrain Rough Terrain 50 <= MAXSPEED 25 <= MAXSPEED < 50 MAXSPEED < 25 y = 2(val)(x2) y = 2(val)(x) y = 2 (val) (√x) 100 | x | x | x | x | x | x Rel | x | x | x Accy | x | x | x Redtn | x | x | x % | x | x | x | x | x |x 0 |x___x_______________ |x_______________ |x__________________ 0 1 0 1 0 1 Speed Ratio (actual speed/terrain MAXSPEED) Firing unit movement affects only the accuracy of unguided rounds. It has no additional effect on guided munitions.
3-2.7.6 Target Apparent Movement
Target movement may also affect unguided fire accuracy. There are two components to target movement. The first is the apparent velocity, or how fast the target appears to be moving across the firing unit’s field of vision (apparent movement was described in the section on missile “Homing”, above). This component forces the firing unit to track the target, rotating the firing weapon to always point in the correct direction, potentially causing a decrease in both the rate of fire (ROF) and accuracy since the weapon can not remain “set”. The second component is the physical offset caused by the target’s velocity and direction of movement as compared to the flight path of the projectile. Specifically, it measures how much adjustment must be made to the firing conditions to anticipate where the target will be when the round impacts, and the amount of uncertainty in that prediction. Greater target speeds and/or slower projectile velocities (longer flight times) result in higher accuracy loss. Likewise, lateral movement (side to side rather than straight towards or away from the spotter) will result in more accuracy loss that non-lateral. Accuracy is reduced proportionally for apparent movement (as a ratio of the apparent movement to the turret or system rotation rate), and exponentially for target movement (the effects become more pronounced with higher actual speeds). Target unit movement affects only the accuracy of un-guided rounds. It has no additional effect on guided munitions.
3-2.7.7 Other Non-guided Accuracy Modifiers
The accuracy of non-guided projectiles is also affected by a number of other factors:

• How well the firing unit “knows” and can see the target. If the unit is not sighted completely, i.e., if the model and quantity are not correctly known, the accuracy is reduced based on how much information is known. “Known” levels are covered in more detail in the manual section on FOW (fog of war), but the accuracy decrease applies even if the player is not using FOW for his display and force information.
• Firing unit suppression lowers accuracy exponentially. • Accuracy is increased for target acquisition, which is measured as the length of time the target has been
continuously engaged by the firing unit. The benefits of acquisition are maximized after about 30 seconds of engagement. The amount of accuracy improvement varies betweens systems and guns, but is usually 45% or less.
• If the firing unit is using “shoot & scoot” tactics, target acquisition (above) is ignored, and the accuracy may be decreased by up to 20% since set-up/preparation time is limited.
• The firing unit’s training level may decrease the accuracy by up to 25%. • The firing unit’s fatigue level may decrease the accuracy by up to 20%.
3-2.8 Weapon/Round Effects
This section discusses the various major destruction methods, and how various target types modify their effects. Weapon effects are classified by their final result on the target, either a “kill”, “damage”, or “no effect”. A “kill” means the target is damaged to a degree where it is unable to perform any of its intended combat functions, or affect combat operations in any meaningful way, and has no chance to be repaired within the scope of the scenario. For example, a tank that has been almost completely wrecked, or an obstacle pulverized to dust would both be considered “killed”. “Killed” targets are considered permanently destroyed and removed from the scenario. “Damaged” targets suffer some form of debilitating loss, but it is limited in scope and they retain at least some combat functions. An example would be a tank that loses its radio, or an obstacle that has only been partially demolished. Damage is normally permanent, but occasionally it may be judged as potentially repairable. The best example is a tank that is judged to take a moderate hit to its treads. It immediately suffers mobility damage from the hit and loses the ability to move. However, the tread can potentially be replaced and mobility restored, so the damage could be judged repairable as long as the damage was limited to the treads.
3-2.8.1 Effective Target Armor Thickness With the exception of personnel, virtually all weapons systems and other objects in the simulation are either made of, or include as protection, some form of physical armor material. This includes the obvious things like armored vehicles, but also objects made of concrete or earth such as bridges, IP’s, and aboveground obstacles. To destroy or damage the object, the armor must be damaged or destroyed first. Armor will affect the results of every weapon and ammunition type fired in some way. It may block energy, prevent penetration, or keep out heat and poisonous chemicals. In all but a few cases, such as with chemical or flammable weapons, the armor needing to be overcome by the weapon or round will not be the same as the nominal armor thickness (which is measured from face to face by the shortest possible distance). Instead, it must penetrate a distance equal to what is known as the effective armor thickness. This value is defined as the distance the projectile or other weapon will traverse between the armor faces along its current flight path. The effective thickness is calculated as the nominal armor thickness, adjusted for the composite (3 dimensional) impact angle. The composite angle is a comprehensive value. It takes into account the flight path of the projectile or weapon, the angles/slope of the armor, as well as the orientation of the target. Many damage routines and relationships are based on a target comprised of standard steel plate. When needed, the effective thickness of a non-steel armor material can be normalized to steel by using density, strength, and hardness comparisons.
3-2.8.2 Kinetic/Impact Effects

Figure 31: Penetration curve for a kinetic projectile, along with fracture and deformation probabilies (from POA-2
DataView Module - Ammo Data Table).
All physical projectiles that impact a target with a velocity greater than zero have kinetic energy, and thus the potential to penetrate the material and/or create spall. This includes specialized rounds designed for maximum kinetic penetration such as AP, HVAP, and APDS, as well as straight HE or even smoke rounds. Shrapnel, which consists of flying pieces of metal or other debris, can also kinetically penetrate materials, and cause damage to any number of targets and objects. The simulation models all of these situations, and in the discussion that follows, the terms projectile, penetrator, and round are all used to describe the moving object that strikes the target. Kinetic penetration of materials of normal armor-type composition and thickness occur principally through localized structural failure. This leads to the loss of cohesive strength in the armor structure and material displacement. Depending on the properties and thickness of the target, other processes can occur, including plugging (where the armor “snaps” almost at once throughout it’s entire depth - ejecting a “plug” in front of the penetrator), petalling (where the armor fails along the axis of penetration and “bends back” similar to a pencil pushed though a piece of paper), melting, and vaporization of the armor or pentrator material. The kinetic penetration of a projectile can be modeled based on the physical properties and conditions of the projectile and the armor target at the instant of impact. The simulation uses a modified version of an equation initially developed by Poncelet (Recht, 1983):
x Ax M / 2Ap V02 + pd / (Cαρ)
⎯ dx = ⎯⎯⎯⎯ ln ⎯⎯⎯⎯⎯⎯⎯ ∫ 0 Ap Cαρ V2 + pd / (Cαρ) Where: Ax = presented area of immersed portion of pentrator Ax = presented area of penetrator
M = mass of penetrator pd = constant medium deformation pressure ρ = mass density of medium V0 = initial velocity of penetrator V = velocity of penetrator at penetration distance x = penetration distance
Cα = empirical dimensionless constant (value is a function of the nose cone shape) Solving this equation for V=0 gives the maximum penetration distance, or xmax. This value is then compared to the actual armor thickness to determine if the armor is breached, and if so, how much of the penetrator remains to cause damage to the target interior.
3-2.8.2.1 Projectile Air Drag and Impact Angle In order to effectively use the Poncelet equation, the exact impact velocity must be known. Additionally, the actual impact angle is required to calculate skip probabilities, as well as the total thickness of the armor to be penetrated.

Since the projectile’s initial muzzle velocity, size, ogive angle, and air drag coefficient are known, this is accomplished by applying basic air drag calculations to the projectile every one-hundredth of a second it is in flight. The drag calculations take into account the current velocity, the surface area of the projectile, as well as the air temperature and precipitation. Once the air drag is known for each hundredth second interval, the projectile’s actual velocity and flight vector (path) is determined using the initial firing angle, the initial velocity, and the effects of gravity. Because of their conical shape, projectiles in flight tend to “line up” on their path vector. In other words, the projectile “points” along the flight path as it traces out the standard ballistic arc. This is especially true for “long-rod” type pentrator and/or those with stabilizing fins (which can be visualized as high speed “darts”). The flight path is traced up to the point at which the projectile impacts the target surface, and the final values are used by the other equations.
3-2.8.2.2 Projectile Fracture and Deformation Whenever a projectile impacts with a solid target, there is a chance it will fracture or deform. The cause is the sudden stress generated by the rapid deceleration upon encountering the target material. Fracturing occurs when the projectile suffers a large degree of internal cracking, breaks apart into pieces, or even shatters completely. Deformation, on the other hand, is when the projectile bends or changes shape, or breaks into two pieces. The base fracture probability is determined by the projectile’s impact velocity and by comparing the hardness ratio of the projectile to the target material. The greater the ratio, the lower the base probability (i.e., the fracture probability drops as the projectile hardness value increases). The base probability is then lowered for the impact angle (maximum fracture probability is achieved at 90 degrees), and finally for “Td ratios” of less than 10, where the in this case “Td ratio” is the ratio of the thickness of the armor to the projectile diameter. The deformation probability is primarily based on the impact velocity, the “Td” ratio, the “Ld ratio”, and the relative strengths of the projectile and target materials. The “Td ratio” is as described above, and the “Ld ratio” is the ratio of the projectile length divided by the projectile diameter. The deformation probability increases with velocity, Td ratio and Ld ratio. It decreases with higher impact angles and higher relative projectile strengths. In cases where fracture or deformation is determined to occur, the penetration of the projectile will be reduced. The amount of the reduction will depend on the extent of the cracking or bending and in some cases it may become effectively zero, as for complete shatter.
3-2.8.2.3 Petalling/Plugging Petalling is a situation where the target material suffers a point catastrophic failure at the point of impact, followed by radial tearing produced by the pressure stress of the impact but otherwise remains intact. A common example is pushing a pencil through a piece of paper. Plugging is when the target material suffers catastrophic failure in a pattern corresponding to the shape of the incoming projectile, but otherwise remains intact. The distinguishing feature is that the target material is ejected as a single “plug” on the interior side. In both cases, the primary value of consideration is the Td ratio. Petalling and plugging rarely occur above Td ratios of 1.5. The probability is also dependant on a ratio of the target material’s strength vs. hardness. When petalling or plugging is determined to occur, the energy required for the projectile to penetrate the target is lowered by up to 75%. Which, in other words, has the effect of raising the effective penetration by up to 400%.
3-2.8.2.4 Spall Spall is comprised of flakes, droplets or small pieces of armor material that are ejected at speed from the armor’s interior surface. It is produced principally by shock waves, which in the case of penetrating projectiles are created by the original impact and travel though the armor. The amount of spall is proportional to the penetration and mass density factor of the projectile, and inversely proportional to the armor strength and anti-spall rating values. Additionally, each ammunition type is rated for the amount of spall it creates. The creation of spall will sometimes absorb some of the projectile’s energy that otherwise would have gone into penetration. In these cases, the penetration of the projectile may be reduced by some amount to compensate. The

actual amount depends on the initial energy of the projectile, and the amount of penetration as compared to the armor’s effective thickness. The effects of spall are greatly reduced if the armor has an anti-spall liner.
3-2.8.2.5 Target Damage/Destruction The damage from penetrating-type rounds is caused by the destructive effects of fragments of armor and whatever remains of the projectile after penetrating the armor. These fragments and pieces are sprayed out from the point of impact, and tear into crew and relatively unprotected equipment causing physical damage and destruction. Additionally, the spray elements are also often very hot, sometimes even molten, which enables them to burn into things and ignite flammable or combustible items such as fuel, ammunition, and wood. Damage from penetrating projectiles is initially based on the “excess penetration”, and the amount of spall. Spall creation was described above. The damage probability from spall is directly proportional to the amount of spall created.
3-2.8.3 HE/HESH High Explosive detonations cause damage through blast effects, which include shock waves, overpressure, and heat. Additionally, HE explosions almost always create shrapnel, consisting of flying pieces of debris from the ammunition casing and whatever material is near the explosive charge when it detonates. HESH (High Explosive Squash Head) type rounds are designed to create maximum amounts of spall on the interior of hardened armor surfaces. They use a plastic type of explosive that “spreads out” on the armor surface from the force of impact before detonating. The “spreading” increases the surface area of the explosive compound in contact with the armor, and thus the energy imparted into the armor by the explosion. Since spall creation depends on the energy, the HESH produces significantly more spall than a normal HE type round.
3-2.8.3.1 HE: Blast Effects The primary effects of an HE explosion are normally caused by blast. The program uses a standard calculation based on 1% of kill probability at 1 dm for 10 g of TNT equivalent though 1 mm of steel-strength armor. For ranges other than 1 dm, the probability is adjusted by the square of the difference in distance. For materials other than steel, the probability is adjusted based on the relative material strength. The damage probabilities against unarmored targets are approximately 3 times that for armored. Against non-unit object types, such as obstacles, bridges, or IP’s (improved positions), the program uses the cratering routines, described below, to determine how much material is displaced from the object, and thus the percent damage inflicted. Objects can be damaged independently of whether or not they are occupied by a unit or a unit is nearby.
3.2.8.3.2 HE: Shrapnel Creation/Damage Shrapnel is effectively a number of secondary kinetic projectiles created by an explosion. The ammunition AP Radius rating, amount of explosive material, and target composition determine the relative number and velocity distribution of the individual shrapnel pieces. Because shrapnel pieces are irregularly shaped, they have large air drag coefficients. This causes their velocity, and thus potential to cause damage, to drop off relatively quickly with distance. The simulation treats shrapnel as random kinetic projectiles with initially high velocities (based on material densities and strengths, but usually greater than 200 m/sec), large drag coefficients (greater than 100,000) with the properties of either soft steel (the shell casing) and/or the target material. Some rounds are specifically designed to produce shrapnel, as with anti-personnel munitions filled with ball bearings. These types of warheads are not handled separately, but rather are assigned high AP Radius values and Personnel Kill percentages in the Ammunition Table.
3-2.8.3.3 HE: Spall Creation All explosions impart energy into the target, and thus have the potential to create spall. The amount of spall created is proportional to the amount of energy imparted into the armor, based on the amount of explosive being detonated, and also the armor properties. HESH rounds impart approximately 400% as much energy as non-HESH rounds of the same mass.

3-2.8.3.4 HE: Cratering HE rounds are capable of cratering roads, terrain and bridges. Additionally, “craters”, i.e., displaced material, causes other objects such as obstacles and IP’s to suffer damage and degradation in their effectiveness. The amount of damage is proportional to the amount of material displaced and is determined by the strength and density properties of material making up the object, and the amount of explosive. Most HE rounds will penetrate into the target for some distance before exploding, based on the kinetic penetration principals already described.. The amount of penetration can greatly increase the effect of the blast though the effects of “tamping”, or constraining the explosion so the energy is not expended into empty space. By default craters proper are created only in terrain, roads and bridges. The detonation depth (penetration) and amount of material displaced determined the crater diameter. The exact position of a crater is determined though the accuracy routines, where aimed fire is directed at the center of the road or bridge. Craters against terrain are always random. As a single map location becomes cratered, designated “crater” terrain types will be added to the location for Low, Medium, and High crater area percentages. The crater terrains will normally reduce movement rates significantly, as well as reduce stacking, along with other potential effects.
Figure 32: Some possible road/bridge cratering orientations from an impact.
Roads and bridges suffer incremental reductions in their effectiveness based on cumulative crater effects. However, a “crater” terrain type is not used. Instead, the effect of each crater is determined by the crater diameter and its position on the road or bridge. In the example above, the crater in the center of the bridge would have the greatest effect on the bridge, followed by the one slightly off center and finally the one on the edge. The individual crater damage percent is then added to the cumulative total. An adjustment is made for “overlap”, based on accuracy, crater size, and how damaged the target already is to determine if the new crater is partially (or fully) in an existing one. Once the cumulative damage total reaches 75%, the bridge or road is effectively destroyed. Bridges are discussed more fully, including how they are damaged and the effects of the damage, in the section on Movement later in the manual.
3-2.8.3.5 HE: Rubble Creation Terrain types may create rubble as they are damaged or destroyed by HE bursts. This tendency is set in the TEC (Terrain Effects Chart), and consists of two parts. The first is the relative ease of rubble creation, and the second is the relative total amount of rubble that can be created when the structure is fully destroyed. Rubble creation is based on the crater size created by an HE round, as described above, modified by the terrain type’s relative ease of rubble creation value. The larger the crater, the more rubble it creates. However, as with bridges, once a location has rubble in it, the crater may be determined to hit in an spot already turned to rubble, in which case it will have less, or even no, additional effect. The total amount of rubble created by fully destroying a structure is equal to the volume of the structure (length x width x height), modified for its relative rubble creation amount.
3-2.8.3.6 HE: Minefield/Sensorfield Damage HE explosions have the ability to destroy emplaced mines and sensors if they land nearby. The initial destruction probability is 10% for every 0.5 Kg of explosive detonated at a range of 1 m, which is modified for the range the round is determined to land from the mine or sensor. Single HE burst may destroy multiple mines or sensors, especially if very large explosions are involved, or the field is densely packed. Mines that are destroyed are assumed to detonate, which means they may damage units in their location. In this case, the standard mine attack routines are used for damage assessment.

3-2.8.4 APHE
Figure 33: APHE (Armor Piercing High Explosive) projectile fundamentals.
APHE rounds blend the best characteristics of both AP (armor-piercing) and HE (explosive) rounds into a single projectile. In a standard-use scenario, as pictured above, they penetrate a reasonable amount of armor before detonating, which then constrains the explosion and increases its applied energy - and damage capacity. Or the projectile may even completely penetrate the armor, in which case the energy of the explosion is applied completely to the vulnerable interior of the target. In the simulation, the effects of an APHE round are computed in two steps. The first is to determine the penetration before detonation. This is done using the standard penetration routines. The second step is to calculate the effects of the explosion. If the projectile only partially penetrated the armor (or if the target is very thick like a road or the ground), the effects of the explosion are increased. The amount of the increase in is proportional to the ratio of penetration to the round diameter, up to about 4 times the normal (unconstrained) energy. If the round completely penetrates the armor, the damage calculations for the HE portion treat the target as completely unarmored.
3-2.8.5 HEAT

Figure 34: Shaped charge/HEAT warhead fundamentals.
HEAT (High Explosive Anti-Tank) or “shaped charge” rounds use a narrow, high-speed jet of gas and molten metal to penetrate armor. The jet is created by the complex interactions of the shock waves produced by the conical shape of the explosive charge, and a thin metal liner that is melted and vaporized. The jet requires a certain distance to organize itself, stays coherent for a certain distance more, and then begins to deteriorate. Along this path, the maximum penetration work is done in the middle segment, where the jet is coherent. The distance at which this path begins (where the jet becomes organized) is known as the “standoff” distance. If the jet is just encountering the armor surface at this point, it will achieve maximum penetration. If the armor is encountered sooner it will break up the jet formation before it becomes fully coherent. Or, if the armor is encountered later the jet will already have begun to break up. Both of which will result in less penetration. This situation is represented graphically in the diagram above. HEAT rounds are given a standard penetration amount in the Ammunition Data Table. This penetration is in millimeters of standard steel armor. When a HEAT round impacts a target, this is the value that will be compared to the effective thickness of the armor to see if the armor is breached. There are no shock wave effects or associated spall creation, although the round may have some blast effects on relatively unprotected objects near the detonation point. The penetration value is reduced if the anti-HEAT rating of the armor type, which represents skirts and other measures designed to prevent the detonation from occurring at the optimal standoff distance, as shown in the bottom of the diagram above. However, if the HEAT round is a “tandem warhead” configuration, the effectiveness of the anti-HEAT rating is

reduced. In a tandem- warhead, there are two charges; the first blasts away the skirt, so the second can detonate at the proper standoff. The kill and damage probability of HEAT type rounds depends exponentially on the excess penetration (which represents the amount of material that blasts though the armor), and the original warhead weight.
3-2.8.6 Flame/Incendiary Flame and incendiary rounds are treated the same by the simulation because they cause damage by heat and oxygen loss. As such, the primary factor in calculating damage is the amount of burning material. The damage may be reduced for armor, but the relationship of additional armor thickness to additional protection provided is an inverse exponential. This means that the effects of each additional millimeter of armor provides less protection ((about 0.7 as much) than the millimeter added before it. The protection from armor is reduced for high levels of burning material, approximately 1% for each 2.5 Kg of incendiary (or about 2 liters of a liquid flammable). Semi-armored (open-topped) targets receive protection from their armor, but only about 1/6th as much as if they were fully armored. Targets with reasonably large openings, such as some IP’s, may not receive any armor benefit at all on some portion of the flammable material applied if it is determined the flammable can enter the interior though the openings. The determination of how much flammable would get through the opening is based on the size of the opening, what direction the flammable material is placed on the target, and the quantity of flammable.
3-2.8.6.1 Flame: Wide-Area Flammables “Wide-area” flammables (as set in the Ammunition Data Table) containing over 50 Kg of material have the added effect of removing a large amount of oxygen from the atmosphere in their localized location. This has no effect on inanimate objects but can cause asphyxiation and death to personnel. The basic death rate is about 1% per each person for each 5Kg of wide-area flammable material.
3-2.8.6.2 Flame: Terrain Fires Flammables and incendiaries may ignite terrain in the location in which they are used. Terrain flammability is defined in the TEC, and is characterized as High, Medium, Low, or Not Flammable. Additionally, flammable terrain has a maximum fire level, which represents how much of the terrain type is flammable and approximately how hot it will burn. Certain objects, such as wooden bridges and obstacles, may also be set as flammable in the TEC. In these cases they are treated exactly as any other flammable terrain. Terrain flammability is modified globally by the flammability setting set as part of the scenario weather. It is used to account for the effects of rain or drought specific to the scenario being played. The probability that a terrain type will ignite is proportional to the amount of flammable material being used, and the terrain’s fire rating. Wrecks and exploding ammunition may also start terrain fires.
3-2.8.6.3 Flame: Igniting Objects Man-made objects such as obstacles and IP’s can also be weakened or destroyed by flame or incendiary weapons. Additionally, objects constructed of wood or other flammable materials, may be set alight, resulting in illumination, smoke, and other effects. Users define the relative flammability of obstacles in the Obstacle Data Table. Flame weapons cannot damage excavations, such as ditches, and pure earthworks, such as berms.
The base damage probability for igniting/damaging obstacles is:
Wood (log hurdles): Pdmg = 10.0 Concrete (dragon’s teeth): Pdmg = 1.0 Steel (tetrahedrons): Pdmg = 0.25 Earth/Wood (log cribs): Pdmg = 2.0 Wire (concertina): Pdmg = 1.0 Pdmg = Pdmg x (M / 7.0) x 1000 [increase for amount of flammable material]

If F > 0, then: [obstacle is flammable to some degree]
Pignite = (M / 14) F
Where: Pdmg = Damage Probability in % Pignite = Probability of Ignition in % M = Mass of flammable material in Kg F = Flammability Value (Obstacle Data Table)
The corresponding equation for IP’s is:
Fdmg = 10000 x Mf / ρ x L Actual damage is assessed in a semi-random fashion based on the IP Wall Damage Factor. On average, however, the damage (in percent) will be equal to approximately the square of the IP Wall Damage Factor. Example: 1 gallon of napalm placed on a 20 inch thick concrete wall results in an Fdmg of 7. This means there is, on average, approximately a 7 percent chance of causing 7 percent damage, but the actual damage will be determined randomly using a loop structure.
Where: ρ = Density of the wall material in Kg / m 3
Fdmg = IP Wall Damage Factor Mf = Napalm-equivalent Mass of flammable material on wall in grams T = Thickness of the IP wall in mm
3-2.8.7 Chemical Weapons Chemical weapons are of two general types, persistent and non-persistent. Persistent types are commonly powders or liquids, and stay potent and localized after the initial application. They are also resistant to environmental breakdown. In the simulation, persistent chemicals remain in their initial location for the remainder of the scenario. However, exposure to sunlight/high temperatures and precipitation will reduce their concentration level over time. Non-persistent agents, on the other hand, disperse or decompose relatively quickly after they are placed. Examples are aerosols, gasses/vapors, and quick-evaporating liquids. In the simulation, they are treated much like smoke or dust - they are blown and dispersed by the wind. Chemical weapons are only effective against human beings, be they civilians, ground troops, or crews. To suffer the effects of chemicals, personnel must be exposed to the agent for a period of time. The exposure time and the concentration level together determine the absorbed dose. Based on the absorbed dose, the person will have a chance of being either temporarily or permanently incapacitated, or killed. The flag for chemical munitions and the persistence type is in the Ammunition Type Data Table.
3-2.8.7.1 MOPP (Protection) MOPP stands for “Mission Oriented Protective Posture”, and represents varying levels of protection in NBC (nuclear, biological, chemical) environments. Because most NBC protective measures reduce effectiveness and degrade performance, they are entered into only when necessary. The MOPP system is simply a number of discrete “steps”, leading from no protection to full protection, that allow a unit to tailor its protection level to the threat at hand without overly reducing effectiveness. For example, the US military uses 5 incremental MOPP levels for troops and personnel: • Level 0: All gear is ready for use, but none is actually worn. • Level 1: Over-garment and helmet cover worn. • Level 2: Rubber over-boots worn. • Level 3: Protective masks and hoods worn. • Level 4: Rubber gloves are worn.

MOPP systems and levels are defined in the MOPP System Data Table, and are then assigned to weapons systems in the Weapons Systems Data Table.
3-2.8.8 Energy/Advanced Weapons POA-2 models the effects of a wide range of energy and advanced weapons, including beam and dispersed electromagnetic energy, as well as plasma and particle beams. Each of these weapons has unique propagation and damage characteristics, as summarized in the table below:
Microwave Beam Laser Beam EM/HPM Area
Pulse Plasma
(Plasmoid) Beam
Charged Particle Beam
Neutral Particle Beam
Degrades over range
No No Yes - Depends on type.
Yes Low Low
Degrades in the atmosphere
Potentially degraded by liquid water and water vapor (including foliage).
Yes - more for moisture, clouds, thermal gradients, etc. CW power at high levels is reduced for the breakdown of air surrounding the impact site. Effects less at high frequencies.
Potentially degraded by liquid water and water vapor (including foliage).
Yes Low High (due to turbulence as the beam becomes ionized)
Accuracy High at all ranges High at all ranges N/A Medium High, but bent by magnetic field - low accy at long ranges
Medium
Target Single object target.
Single object target.
Affects all targets in range/area.
Single object target.
Single object target.
Single object target
LOS Required LOS not required, but energy reduced.
Yes LOS not required, but energy reduced.
Yes Yes Yes
Blinds Personnel No Possibly No No No No
Incapacitates Personnel (non-lethal)
Depends on frequency, energy.
Depends on energy.
Depends on frequency, energy.
No No No
Kills Personnel Depends on frequency, energy.
Depends on energy.
No Yes Depends on energy/beam density.
Depends on energy/beam density.
Penetrates physical armor
Based on frequency and armor characteristics.
No Based on frequency and armor characteristics.
% based on armor density & thickness
% based on armor density & thickness
% based on armor density & thickness
Damages physical armor
No CW - thermal. Pulse - thermal plus impulse. Adjustments made for reflectivity, incidence angle
No No Yes, at the same time it damages the rest of the system.
Yes, at the same time it damages the rest of the system.
Can explode ammunition
Yes Yes Yes No Yes Yes
Selectively damages electronics (requires coupling)
Yes No Yes No Yes (creates an ionized zone around beam)
No
Countermeasures Shielding Reflective surfaces, blocking screens.
Shielding, circuit isolation equipment
High density non-metallic shielding
Magnetic field, High-density shielding
High density shielding
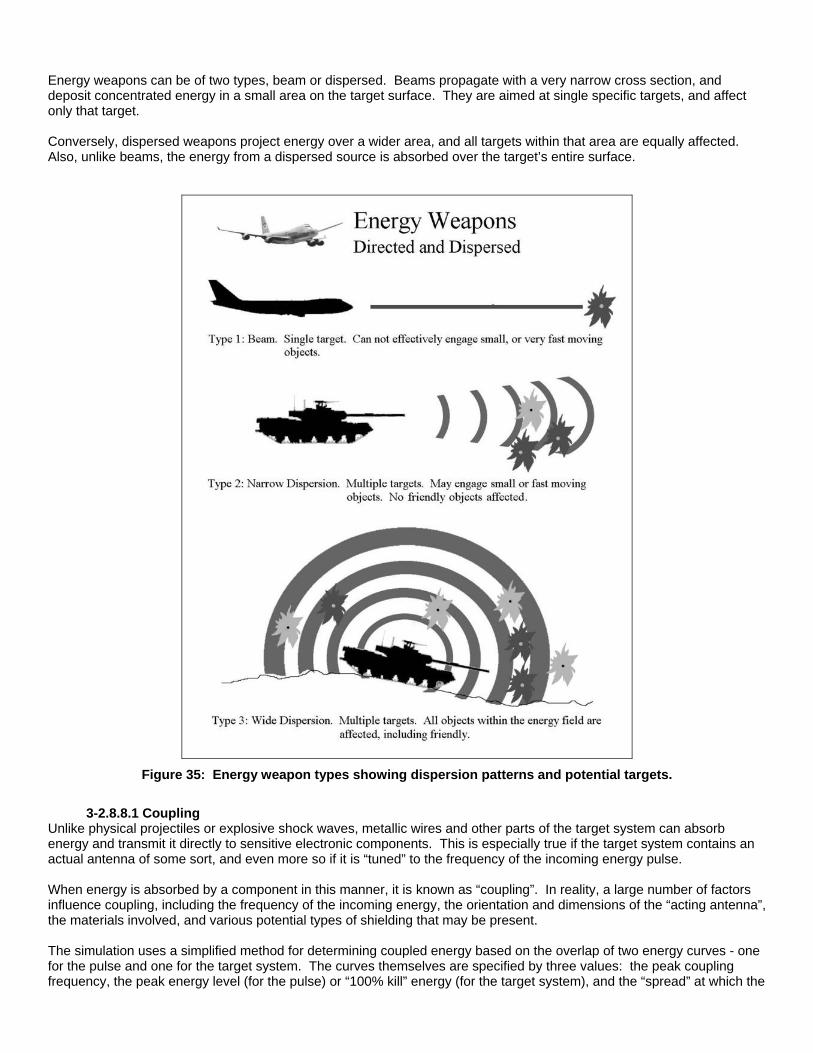
Energy weapons can be of two types, beam or dispersed. Beams propagate with a very narrow cross section, and deposit concentrated energy in a small area on the target surface. They are aimed at single specific targets, and affect only that target. Conversely, dispersed weapons project energy over a wider area, and all targets within that area are equally affected. Also, unlike beams, the energy from a dispersed source is absorbed over the target’s entire surface.
Figure 35: Energy weapon types showing dispersion patterns and potential targets.
3-2.8.8.1 Coupling
Unlike physical projectiles or explosive shock waves, metallic wires and other parts of the target system can absorb energy and transmit it directly to sensitive electronic components. This is especially true if the target system contains an actual antenna of some sort, and even more so if it is “tuned” to the frequency of the incoming energy pulse. When energy is absorbed by a component in this manner, it is known as “coupling”. In reality, a large number of factors influence coupling, including the frequency of the incoming energy, the orientation and dimensions of the “acting antenna”, the materials involved, and various potential types of shielding that may be present. The simulation uses a simplified method for determining coupled energy based on the overlap of two energy curves - one for the pulse and one for the target system. The curves themselves are specified by three values: the peak coupling frequency, the peak energy level (for the pulse) or “100% kill” energy (for the target system), and the “spread” at which the

coupled energy drops to half the peak value. The energy at the point where the curves intersect is the coupled energy that will be absorbed by the target system.
= Absorption curve of target sub-system = Pulse energy curve = Intercept point – Power absorbed (Pa)
P Pa
Frequency
Absorption Peak Freq Pulse Peak Freq (Fa) Intercept (Fb) (Fi)
Figure 36: Coupling calculation of energy transferred between an incoming energy pulse and a target system.
Pow
er
The probability of destroying the target system is determined by comparing the absorbed energy to the amount required for a “100%” kill (the peak of the target system’s susceptibility curve). In the above example, by looking at the graph the absorbed energy (Pa) is about 25% of the peak value (P) so the kill probability is also about 25%. If the system is not killed outright, it may be damaged. The difference is that damaged systems can potentially be repaired. The curve values for the energy pulse are set in the Advanced/Energy Weapons Data Table. Susceptibility curve values for individual target systems are set in the Weapons System Data Table, the Ammunition Data Table, the Radar Systems Data Table, and the Gun/Launcher Data Table, all of which can potentially suffer damage from coupling, as shown in the drawing below:

Figure 37: Sample energy pulse effects against weapons system target types.
What types of targets the weapons can affect are set in the Energy/Advanced Weapons Data Table, along with the pulse energy, duration, and recharge time.
3-2.8.8.1.1 Standard Target System Sizes For Coupling The energy flow (or flux) from an energy weapon is in Joules per square centimeter, per “pulse” where the pulse duration is in milliseconds. Thus, the total amount of energy absorbed by the target system will depend on the size of the system and the amount of time it is exposed to the energy. The time is a simple calculation, since the pulse duration is specified for the energy weapon, along with the recharge time and total pulses available (anywhere from one for a single-shot weapon such as a bomb, to continuous for a CW laser). However, the area for most of these systems must also be known. Rather than adding additional fields to the data tables, the program uses standard sizes based on the system involved. These sizes are:
System Effective Size in Sq. Centimeters
Weapons Systems (personnel, vehicles, aircraft, etc.)
(L + W) /2 x H (Dimensions from the Weapons System Data Table)
Missile guidance systems 1,000 HE Warheads Actual caliber / 10 Gun/Launcher electronics 1,000 Radar 10,000 Propulsion/Engine 800 Special Systems (decoys, 1,000

PMD, lasers, etc.) Communications 800 Fire Control 1,200 Remote Sensors 300 Mines 200
Note that these sizes are not intended to equal the “complete” size of the system involved. Instead, they represent a generalized area that is acting as an antenna to absorb and transmit the incoming energy.
3-2.8.8.2 Physical Destruction For energy weapons that cause physical destruction to solid matter, the program calculates the mass vaporized based on the absorption percent. The actual calculation is based on a simple method proposed by Wilson (1987), where the energy to vaporize a mass m of solid material at initial temperature T is: Ev = m(CS(Tm-T)+CL(Tv-Tm)+Lf+Lv) - or- Ev m = --------------------------------------------- (the mass vaporized if the energy is known) CS(Tm-T) + CL(Tv-Tm) + Lf + Lv Where: CS = solid specific heat capacity CL = liquid specific heat capacity (J/Kg K) Tm = melting point Tv = boiling point (K) Lf = latent heat of fusion Lv = latent heat of vaporization (J/Kg) Usually, however, Lf << Lv and T << Tv , and Cs >> CL = C. We then have the simple form Ev = m(CLTv+Lv), or Ev m = --------------- (C*Tv) + Lv
Sample amounts of mass (in grams) vaporized for 1 Joule of power: - Aluminum = 7.7 E-5 (C=903 Tv=2270 Lv=10,900,000) - Silicon = 8.0 E-5 (C=707 Tv=2628 Lv=10,600,000) - Iron = 13.1 E-5 (C=449 Tv=3160 Lv=6,800,000) - Steel = 12.5 E-5 (C=460 Tv=3280 Lv=6,500,000) A final transformation based on the Strength/Hardness ratio is applied to account for actual armor material as defined in the Armor Data Table. Once the amount of vaporized material is known, the result can be used to determine how deeply the borehole goes (if penetrating armor), or how much of the target system has been destroyed.
3-2.8.8.3 Degradation Energy/advanced weapons are subject to several types of potential degradation, including being blocked/absorbed by armor materials, atmospheric effects, magnetic fields, reflection, and dispersion (if not a beam with zero degree dispersion width). Additionally, the Earth’s surface blocks transmissions, although wide area energy can propagate on the “back” side of ground obstacles (such as hills), but with reduced effectiveness due to the effects of diffraction wave cancellation. For ease of use, many of the calculation use 3 standard “bands” to group energy/advanced weapons with similar characteristics. These bands are:
1) Long Wave Radio: 1 to 1 x 10 6 Hz 2) AM Radio: 1 x 10 6 to 1 x 10 7 Hz

3) Short Wave Radio: 1 x 10 7 to 2.9 x 10 9 Hz 4) Microwave Low: 2.9 x 10 9 to 1 x 10 10 Hz 5) Microwave Medium: 1 x 10 10 to 7 x 10 10 Hz 6) Microwave High: 7 x 10 10 to 3 x 10 11 Hz 7) Infra-red: 3 x 10 11 to 4 x 10 15 Hz 8) Visible Light: 4 x 10 15 to 8 x 10 15 Hz 9) Ultra-Violet: 8 x 10 15 to 3 x 10 17 Hz 10) X-Ray: 3 x 10 17 to 1 x 10 21 Hz 11) Gamma-Ray: 1 x 10 21 and above Hz 12) Plasma: Directed beam of ionized atoms. 13) Particle: Directed beam of particles (normally electrons if charged, atoms if neutral).
3-2.8.8.3.1 Standard Dispersion Degradation Radiation that propagates over a wide area, as opposed to a concentrated beam, is subject to standard degradation based on range. The degradation function is based on the inverse square of the distance, so as the range doubles, the power is reduced to 1/4th its original value. This degradation is automatically applied to all non-beam energy weapons. Beams may also be reduced in power as they propagate, based on the beam width value. The beam width value is in hundredths of a degree, and measures how much the beam “spreads out” as it travels through space. It determines the beam’s impact area, which is then compared to the beam’s width at a range of 1 meter (where full power is assumed). The ratio is then used to calculate the final energy density at the target. Beams with a width of 0 are not affected by this degradation.
3-2.8.8.3.2 Range Degradation The simulation allows for degradation for range, above the standard range degradation, above. This degradation can apply to any form of energy, including beams. In fact, this type of degradation is probably most significant with particle beams, which tend to lose coherence as the range increases. The type (log or straight-line) and amount of degradation is set in the Energy/Advanced Weapons Data Table.
3-2.8.8.3.3 Weapon-Specific LOS/Block Point Degradation Some types of weapons, most notably beams such as lasers, require an LOS to their target. However, in some cases all that is required is that the LOS not intercept the ground; visible light-blocking terrain may have little or no effect on the beam strength. For example, foliage would have only a minimal impact of a particle beam, while it might completely block a laser. Both of these characteristics are defined in the Energy/Advanced Weapons Data Table.
3-2.8.8.3.4 Terrain-Specific LOS/Block Point Degradation Each terrain/object type can be given blocking properties in any or all of the 13 general “bands” of energy/advanced weapons. The blocking is expressed in millionths of a percent per 100 meters, assuming a “standard” distribution of the terrain type in that space. Any weapon of an appropriate band that requires a LOS and passes though that terrain will be degraded by the specified percentage. The degradation percentage for each band is specified in the Terrain Effects Chart.
3-2.8.8.3.5 Weapon-Specific Atmospheric Degradation Interaction with the gas molecules and other particles in the atmosphere may affect some energy weapons; most notably laser beams that are bent from thermal or other density gradients, and neutral particle beams that tend to lose coherence in the turbulence an ionization of collisions. This effect is in addition to any applicable range or LOS degradations, as noted above. The type (log or straight-line) and amount of degradation is set in the Energy/Advanced Weapons Data Table.
3-2.8.8.3.6 Weather-Specific Atmospheric Degradation As with the LOS, the atmospheric conditions (weather) selected for the scenario can also affect energy/advanced weapon propagation based on the general band of the propagating energy. The blocking is expressed in millionths of a percent per Kilometer, assuming a completely homogenous atmospheric composition over all distances. All weapons of the appropriate band will be degraded based on their range to the target. The weather-specific band degradation values are set in the Weather Data Table, and can also be adjusted at the start of a scenario.
3-2.8.8.3.7 Cloud Degradation Clouds may diffract or reduce the effectiveness of certain types of energy, such as lasers. This effect is in addition to any applicable range, LOS, or atmospheric degradations, as noted above. The amount of degradation is set in the Energy/Advanced Weapons Data Table, and is based on a one-to-one relationship between the cloud cover the energy passes though (taking into account the cloud base and height) and the degradation multiplier.

3-2.8.8.3.8 Incidence Angle Degradation
The incidence angle is the orientation of a beam impacting on the target surface, and is applicable only to beams. The incidence angle of a beam hitting “straight on” is zero, and is said to be “normal” to the surface. A beam that just barely grazes the surface would have an incidence angle of close to 90 degrees, and one with 90 exactly would miss the surface completely - the beam would be exactly parallel to it. As with solid projectiles, the armor’s effective thickness is increased to account for the angle of the beam though it. However, some beams suffer additional degradation depending on the incidence angle. The effect is almost always the result of reflection or the beam interfering with itself in some way. The incidence angle degradation value is Yes/No, and set in the Energy/Advanced Weapons Data Table. If it is set to yes, the energy will be degraded 1.1% for each degree of difference from normal (100% at 90 degrees).
3-2.8.8.3.9 Armor/Protective Material Degradation Armor and other protective materials may block incoming energy using user-defined degradation multipliers in each of the 13 standard bands. The values are in millionths of a percent, per millimeter of armor. For beam weapons, the straight line path though the armor is used, taking into account the relative angles of the beam and armor. For non-beam weapons, the thickness is equal to the weapon system’s minimum nominal thickness; no adjustments are made for angles. Where weapons systems are concerned, only some systems are protected by armor. Others are considered “outside” the armor, and thus fully exposed. Units insides IP’s (Improved Positions) are always protected by the IP armor.
Internal (Protected By Armor) External (no armor protection) • Communications • Fire control • Gun/Launcher electronics • Internally stored ammunition - both
guidance systems and HE warheads. • Propulsion systems • Physical system destruction
• PMD systems • Radar systems • Externally stored ammunition (principally
on aircraft - bombs, rockets, etc.) - both guidance systems and HE warheads.
• Optical systems • Mines/sensors
Because an armor type is applied as a single item to a weapons system, it effectively “surrounds” the entire weapons system. Therefore, care must be taken to look at the complete system when defining the armor values. For example, a solid plate of steel armor may completely block microwaves. However, when steel plate is used in a “real” tank, it includes vision ports and other openings that allow them to pass through unimpeded. Therefore the armor degradation values should not be set very high - otherwise the tank will be unrealistically impregnable. If the openings are “sealed” on a certain model of tank with the same armor, the weapons system values should be modified, instead, as described below. Additionally, coupling can take place through any holes or gaps in the metallic envelope of a target, even if the hole is "plugged" by a nonmetallic solid. The "goodness" of such coupling depends upon the size of the hole relative to the wavelength of the radiation, which must be reflected in the armor’s protective values. Specific energy/advanced weapons may be designated to ignore armor. This is set in the Advanced/Energy Data Table. These weapons completely ignore all physical armor types.
3-2.8.8.3.9 Weapons-System Specific Degradation Weapons systems can be assigned a unique susceptibility profile against advanced/energy weapons. The profile is divided into 5 general energy “bands” and 7 general beam-weapon types. These bands and types are different than the standard 13 bands used in the previous sections in order to more exactly model specific defensive measures and weaknesses. They are:
Energy Bands Beam Types • Long wave • Radio • Microwave • Visible • X-ray
• Pulsed Laser • CW Laser (continuous) • Pulsed Maser • CW Maser (continuous) • Plasma
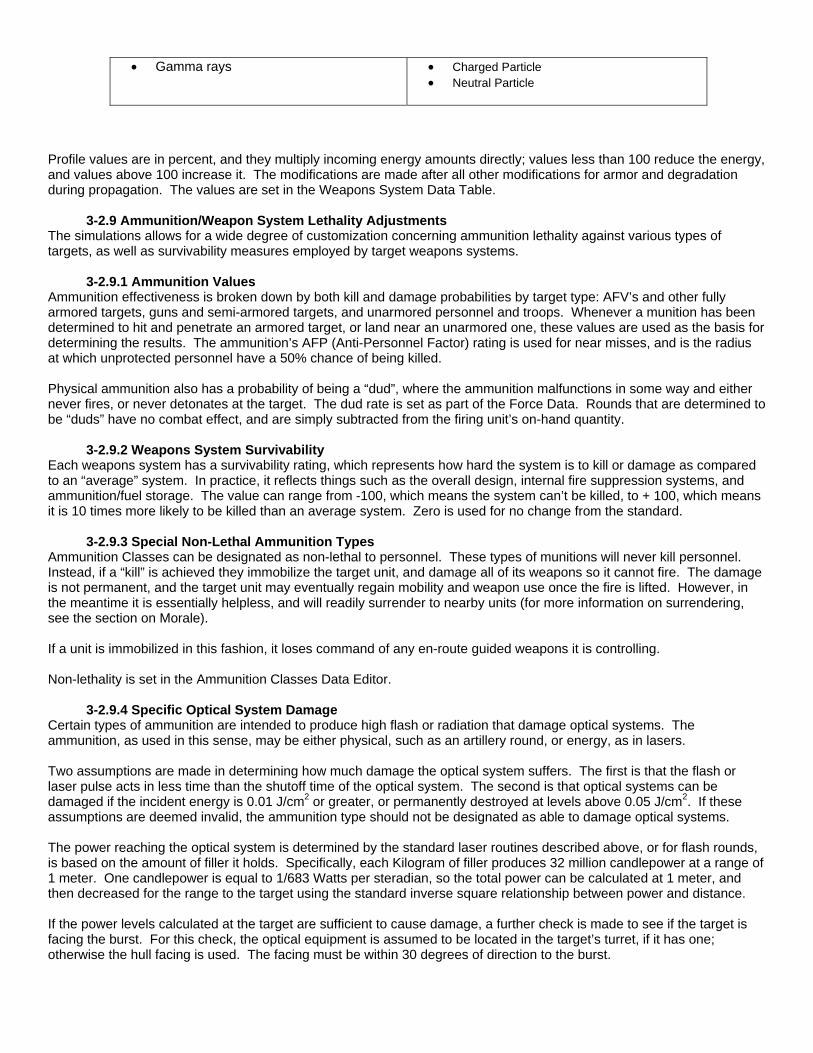
• Gamma rays • Charged Particle • Neutral Particle
Profile values are in percent, and they multiply incoming energy amounts directly; values less than 100 reduce the energy, and values above 100 increase it. The modifications are made after all other modifications for armor and degradation during propagation. The values are set in the Weapons System Data Table.
3-2.9 Ammunition/Weapon System Lethality Adjustments The simulations allows for a wide degree of customization concerning ammunition lethality against various types of targets, as well as survivability measures employed by target weapons systems.
3-2.9.1 Ammunition Values Ammunition effectiveness is broken down by both kill and damage probabilities by target type: AFV’s and other fully armored targets, guns and semi-armored targets, and unarmored personnel and troops. Whenever a munition has been determined to hit and penetrate an armored target, or land near an unarmored one, these values are used as the basis for determining the results. The ammunition’s AFP (Anti-Personnel Factor) rating is used for near misses, and is the radius at which unprotected personnel have a 50% chance of being killed. Physical ammunition also has a probability of being a “dud”, where the ammunition malfunctions in some way and either never fires, or never detonates at the target. The dud rate is set as part of the Force Data. Rounds that are determined to be “duds” have no combat effect, and are simply subtracted from the firing unit’s on-hand quantity.
3-2.9.2 Weapons System Survivability Each weapons system has a survivability rating, which represents how hard the system is to kill or damage as compared to an “average” system. In practice, it reflects things such as the overall design, internal fire suppression systems, and ammunition/fuel storage. The value can range from -100, which means the system can’t be killed, to + 100, which means it is 10 times more likely to be killed than an average system. Zero is used for no change from the standard.
3-2.9.3 Special Non-Lethal Ammunition Types Ammunition Classes can be designated as non-lethal to personnel. These types of munitions will never kill personnel. Instead, if a “kill” is achieved they immobilize the target unit, and damage all of its weapons so it cannot fire. The damage is not permanent, and the target unit may eventually regain mobility and weapon use once the fire is lifted. However, in the meantime it is essentially helpless, and will readily surrender to nearby units (for more information on surrendering, see the section on Morale). If a unit is immobilized in this fashion, it loses command of any en-route guided weapons it is controlling. Non-lethality is set in the Ammunition Classes Data Editor.
3-2.9.4 Specific Optical System Damage Certain types of ammunition are intended to produce high flash or radiation that damage optical systems. The ammunition, as used in this sense, may be either physical, such as an artillery round, or energy, as in lasers. Two assumptions are made in determining how much damage the optical system suffers. The first is that the flash or laser pulse acts in less time than the shutoff time of the optical system. The second is that optical systems can be damaged if the incident energy is 0.01 J/cm2 or greater, or permanently destroyed at levels above 0.05 J/cm2. If these assumptions are deemed invalid, the ammunition type should not be designated as able to damage optical systems. The power reaching the optical system is determined by the standard laser routines described above, or for flash rounds, is based on the amount of filler it holds. Specifically, each Kilogram of filler produces 32 million candlepower at a range of 1 meter. One candlepower is equal to 1/683 Watts per steradian, so the total power can be calculated at 1 meter, and then decreased for the range to the target using the standard inverse square relationship between power and distance. If the power levels calculated at the target are sufficient to cause damage, a further check is made to see if the target is facing the burst. For this check, the optical equipment is assumed to be located in the target’s turret, if it has one; otherwise the hull facing is used. The facing must be within 30 degrees of direction to the burst.

If the facing check is passed, the probability of damage being inflicted on the system is determined using the incident power level: Damage Probability (0-100) = 0.2 x Power (J/cm2).
3-2.10 Suppression Suppression is an effect of fire on troops in or near the target area that distracts and forces them to take cover. It is most pronounced against troops in the open, but also affects armored vehicles and other systems by forcing their crews to remain inside the vehicle with the hatches closed. This is known as being “buttoned-up”. Suppression can prevent units from optimally sighting and engaging enemy units, and may also keep units from moving (pinned-down). The exact effects are dependant on the weapon system type, the amount of suppression, and the source. Suppression is allocated in “points”, where generally speaking 100 points of suppression will prevent a unit from sighting or firing at all. Units can be assessed a maximum of 200 suppression points. Additional points to be added above this level are ignored.
3-2.10.1 Calculating Suppression Amounts The base amount of suppression added from a specific ammunition type is based on the ammunition’s APF rating, which is defined as the distance at which unprotected personnel have a 50% chance of being killed measured from the point of impact/detonation. The maximum suppression radius is 5 times this distance, meaning that there will be no suppression effects on units farther away than this. The APF rating is always at least 1 cm, although most ammunition types will have values greater than this. The APF is then modified for the size damage type: • APF = APF 1.15. • APF = APF x 1.25 if the ammunition contains HE. • APF = APF x 2.0 if the ammunition is a FRAG (fragmentation) type. • APF = APF x 0.75 if the ammunition is solid.
The modified APF value is then used to calculate the suppression to all target units within range (5 times the base APF radius). The amount of suppression depends on the following factors: 100% |* | * | * Supn | * as a | * % of | * Max | * | * | * 0% ---------------------------* 0 Max Range (5 x APF) • Range. Suppression is reduced exponentially with increasing distance as shown in the diagram above. • Cover in the location. Suppression is reduced by 25% of the cover amount, i.e. a cover level of 40% will reduce
suppression 10%. • In an IP. If the unit is in an IP (Improved Position), suppression is reduced 0.95% for each percent of protected arc
of the IP (suppression reduced 95% at 100% protected arc). • If the unit is armored and already buttoned-up, additional suppression is reduced by 95%. • If the unit is fully armored, the suppression is reduced 10 to 15 points (not percent). • If the unit is semi-armored, suppression is reduced 5 to 10 points (not percent). • If the unit is not armored, suppression is increased by 50%.
3-2.10.2 Buttoning-up From Suppression
Armored and semi-armored units will button-up from incoming fire based on the suppression level. The probability is determined as the suppression level to the 1.5th power (which gives 100% probability at about 20 suppression points). Un-armored units can never button-up. On average, units will un-button approximately 2 minutes after the firing ceases, if the force SOP dictates they should remain unbuttoned whenever possible. Otherwise, they will un-button approximately 5 minutes after firing ceases. Units

running for cover will not unbutton until they reach it and return to a normal morale state. Broken, wavering, or berserk units un-button normally.
3-2.10.3 Suppression Dissipation Once assessed, suppression takes time to dissipate even after incoming fire ceases. The reason is that it takes time to realize the fire has ceased, and that another barrage isn’t about to begin. The heavier the preceding fire, the longer it takes for units to realize the coast is clear and return to an unsuppressed posture with hatches open and heads up. The suppression reduction per combat pulse is based on the unit’s current suppression level, and whether or not it just received enemy fire (of any type). In general, a unit not under fire will “lose” 1/2 of its suppression points per minute, with a minimum of reduction of 5 points per minute and a maximum reduction of 50 points per minute. Units under fire can still lose suppression points, but only if the incoming fire is fairly light and ineffective compared to what the unit experienced in its recent past. In this case a unit will “lose” 1/5th of it’s suppression points per minute, with no minimum and a maximum of 25 points per minute. Heavily suppressed units, with suppression levels above 100 points, “lose” points at half the standard rates specified above.
3-2.11 Secondary Explosions/Collateral Effects When a weapons system is destroyed, the ammunition and fuel it is carrying have the potential to explode and cause damage to nearby objects. The probability and ultimate damage is based on the amount of ammo on hand, the weapon systems’ size and weight (for fuel) and the type of the destroyed weapon system: • Personnel - no secondary effects. • Guns - ammo may explode (shrapnel, blast, fire). Guns do not create wrecks. Usually only 25-50% of the
ammunition on-hand is at risk for detonation. • Vehicles - ammo and fuel may explode (shrapnel, blast, smoke, fire). The probability of creating a wreck is based
primarily on the vehicle’s size, its armor level, and if it is deemed to explode. If a wreck is created, the effects may linger for some time. If a vehicle is deemed to explode, all of the ammunition and fuel also detonates. Otherwise, it may “cook off” over time as part of the wreck.
• Aircraft - ammo and fuel may explode (shrapnel, blast, smoke, fire). The destroyed craft will land some distance from its current location based on heading, altitude and speed. Wrecks are always created, and effects will linger for some time afterwards. All on-hand ammunition and fuel detonates either along the flight path or in the final crash location.
Destroyed weapons systems are rated in terms of their ability to create blast, shrapnel, smoke, and fire. The ratings are based on the explosive weight and types of the ammunition on-hand, corresponding explosive propellant charges, and any amount of liquid fuel or incendiary material. The effects of these secondary explosions are calculated as random explosions within the location (e.g., exactly as if they were unguided artillery). As such they can damage or kill other units nearby (friendly or enemy), set the terrain on fire, cause suppression and morale losses, and even set off “chain reactions” of secondary explosions in the weapons they destroy.
3-2.12 High Smoke/Flash/Noise/Backblast Smoke, flash, noise and backblast are characteristics of many gun/launcher systems that affect how easy they are for the enemy to spot, and potentially limit how and where they are used. These values are set in the Gun/Launcher Data Table. The effects can be summarized as follows: • Smoke: If a gun produces high smoke, it is easier to visually spot in the daytime, and may add several smoke levels
to its map location when fired. Actual increases: +5% at night, +10% at twilight, +15% low sun angle, +25% daytime.
• Flash: Flash is categorized as high, or very high. Flash makes the gun easier for the enemy to visually spot in either the day or especially night. Actual increases (high/very high): +150%/+250% at night, +100%/200% at twilight, +25%/+35% low sun angle, +50%/+100% daytime.
• Noise: Noise is also either high or very high. It improves the enemy’s chances of detecting the firing unit by sound, both at night and during the day. Actual increases (high/very high): +100%/+150% at night, +75%/100% at twilight, +50%/+75% low sun angle, +50%/+75% daytime.
• Backblast: Gun/launchers that produce backblast cannot be fired in enclosed areas without potentially killing their crew or nearby units. Enclosed areas are defined as any IP (including buildings), where the “backblast OK” flag is

set to No. Additionally, backblast produces smoke and flash making the firing unit easier to spot. Actual increases: +25% at night, +10% at twilight, +20% low sun angle, +25% daytime.
3.2.13 Creating a new unit by “Firing” a Gun/Launcher It is possible to create a new maneuver unit when a gun/launcher is fired. This capability is especially useful for situations such as launching aircraft from a carrier, or RPV’s (remotely piloted vehicles) from a parent craft. The unit created from this “firing” is a “real” and permanent unit, as opposed to an en-route unit, which is temporary. The new unit can be given orders, will move and fire normally, and is indistinguishable from any other unit in the player’s force. When it is created, the unit will have a quantity of one, and the firing unit will be assigned as its headquarters. It will be assigned the default force competence levels (training, morale, etc.), the standard ammunition basic load for the weapons system, and will be facing in the direction of the parent unit that fired it. The location of the firing unit’s “target” will be set as the new unit’s movement objective, and the computer will automatically determine the best movement path to that location, as well as setting the speed and altitude (if the new unit is an aircraft) as appropriate. New units are subject to the standard command delays from the moment they are created. The link to create a new unit, and what weapon system to assign to it, are set in the Ammunition Data Table (Weapons System). Section 3-3: Close Combat Close combat occurs when opposing ground units occupy the same location. It represents a wide variety of combat actions that happen at very close range and are outside the scope of the database values, such as vehicles colliding with and running over troops and other vehicles, bayonet actions, clubbing, stabbing, shoving objects into tank tracks, and hand to hand combat, to name a few.
3-3.1 Initiating Close Combat A close combat situation is initiated when a unit moves into a location containing one or more enemy units. When this occurs, all ground units in the location immediately cease movement. They retain any movement orders they might have, but they will stay in the location until the close combat situation is removed, e.g., until only one force or the other occupies the location. Close combat is resolved at the end of the movement phase, so additional units from either side may move into the location during the current movement phase. As soon as they do, however, they will be involved in the close combat and will not be able to move out of the location until it is completely resolved. The same applies if the close combat lasts more than one turn. Units that move into a location already containing a close combat will join in, and will cease moving.
3-3.2 Resolving Close Combat The units involved in close combat are broken down into attackers and defenders. A unit is considered to be attacking if it moved into the location in the current phase. Otherwise, it is a defender. Note that this means it is possible for all of the units to be attackers or defenders, or for a force to have units in both categories. The close combat is resolved in steps:
1. The defending units are lumped together by owning force into aggregate numbers of personnel, vehicles, guns, naval craft, and miscellaneous.
2. The attacking units are “aligned” against the combined defenders by force and type. Defending personnel are attacked first, then vehicles, then guns, then naval craft, then whatever is left.
3. The attacker must achieve a ratio of at least 1.5:1 before being able to attack the next type. For example, against 10 personnel and a tank, an attacker would need to have at least 15 personnel before being allowed to attack the tank. For this calculation, vehicles count as 5 personnel. Attacking units are aligned as a single entity - they are not broken down between types.
4. The attacking force inflicts losses on the defenders. Losses are either immediate or deferred until the end of the close combat round (e.g., after the defender has a chance to inflict losses back on the attackers). • Attacking units that are wavering or broken are removed from the attack.

• Attacking units with low morale (less than 30, or less than 75 with a random factor) are removed from the attack.
• The standard Weapon System Close Combat Attack Factor (CCAF) is added for each attacking unit. Close Combat factors are set in the Weapons System Data Table and are broken down against armored and non-armored targets, depending on what type of targets the attacking unit is aligned against.
• The value is adjusted by multiplying it by the defending units’ Weapons System Close Combat Defense Factor (CCDF).
• The value is multiplied by the strength ratio strength. • The value is multiplied by the average morale ratio (attacker over defender). • The number of actual kills is a random amount up to the value. The number of immediate kills is determined
by the difference between the attacker’s average morale and the defender’s. • Immediate kills are deducted from the defender’s force, and the morale reduction from these losses is
assessed. Units are also checked to see if they change morale states, e.g., break or go berserk. The defending units then become the attackers and vice-versa, and steps 1-4 are run through again. After the original defending units have attacked, the deferred losses are assessed to both sides - including morale effects. Section 3-4: Improved Positions Improved Positions (IP’s) are structures or excavations intended to protect friendly forces from the effects of enemy fire. There are many different types of IP’s, each of which is constructed to be occupied by specific types of friendly units and provide protection against certain enemy threats. IP’s can be further segregated by the degree of freedom with which they allow friendly forces to fire their weapons at enemy targets. Most Improved Positions involve at least some form of excavation, as the earth provides one of the most effective forms of protection available. This is especially true for rifle or crew served weapons, since the digging can be done by hand under most conditions. For larger weapons and vehicles, or in frozen or hard ground, excavation often requires heavy equipment or explosives. Normally, positions are dug only to a depth that will still allow the weapon to fire out of the position. Soil removed by the excavation (called the “spoil”) is often used to construct aboveground berms and walls or to fill sandbags for added protection outside of the firing arc. In some cases, overhead cover (a roof) is added to the position to protect against airbursts.
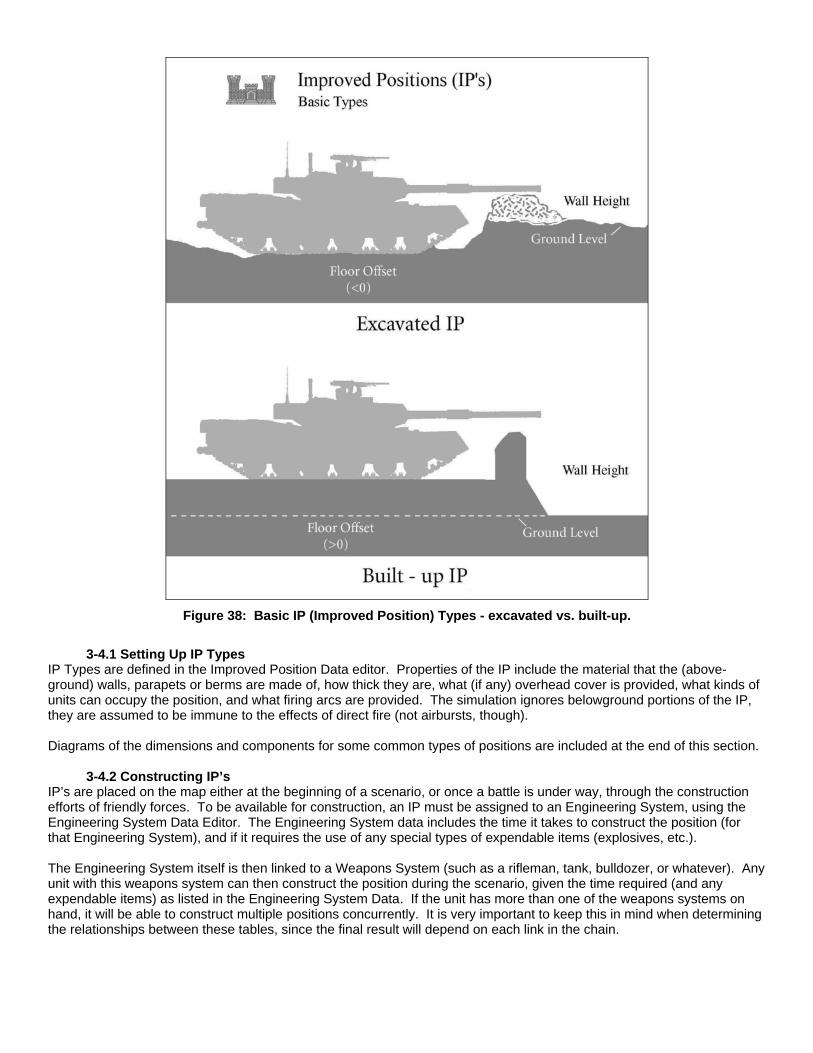
Figure 38: Basic IP (Improved Position) Types - excavated vs. built-up.
3-4.1 Setting Up IP Types
IP Types are defined in the Improved Position Data editor. Properties of the IP include the material that the (above- ground) walls, parapets or berms are made of, how thick they are, what (if any) overhead cover is provided, what kinds of units can occupy the position, and what firing arcs are provided. The simulation ignores belowground portions of the IP, they are assumed to be immune to the effects of direct fire (not airbursts, though). Diagrams of the dimensions and components for some common types of positions are included at the end of this section.
3-4.2 Constructing IP’s IP’s are placed on the map either at the beginning of a scenario, or once a battle is under way, through the construction efforts of friendly forces. To be available for construction, an IP must be assigned to an Engineering System, using the Engineering System Data Editor. The Engineering System data includes the time it takes to construct the position (for that Engineering System), and if it requires the use of any special types of expendable items (explosives, etc.). The Engineering System itself is then linked to a Weapons System (such as a rifleman, tank, bulldozer, or whatever). Any unit with this weapons system can then construct the position during the scenario, given the time required (and any expendable items) as listed in the Engineering System Data. If the unit has more than one of the weapons systems on hand, it will be able to construct multiple positions concurrently. It is very important to keep this in mind when determining the relationships between these tables, since the final result will depend on each link in the chain.

3-4.3 IP Effects Improved Positions have three primary effects in the simulation. First, they are treated as a type of armor that protects the occupants from the effects of combat actions. Second, they affect the sighting routines by adjusting the effective size of the occupying target unit and also making it more difficult to tell exactly what type of weapon it is. Lastly, IP’s limit the fields of fire and/or sighting ability for friendly units. IP walls are treated exactly as any other type of armor. The walls will slow or stop penetrating projectiles, and will have all the normal effects on other ammunition types. Once the incoming round has achieved a hit on the weapon inside the IP, either by penetrating the IP wall (in which case the velocity and other characteristics are recalculated), or by hitting an exposed part of the weapon, the damage is calculated normally. The determination of how much of the weapons system is exposed is discussed below. For sighting purposes, weapons occupying IP’s can be partially or completely hidden. The determination is based primarily on whether or not the IP has a firing arc and overhead cover. If an IP has a firing arc, general approximations can be made about the positioning of the occupying weapons system to allow it to fire. If the firing arc is zero, the weapon is assumed to be completely surrounded by walls or excavation and thus is always fully hidden. The only way the weapon can be sighted is from above, and then only if the IP lacks overhead cover. Likewise, if the IP wall height exceeds the weapon height, the wall will completely block sighting of the weapon from that direction (and also will prevent the weapon from firing in that direction). In cases where the wall height is less than the weapon height, the following generalizations are made in determining how much of the weapon can be seen “above” the wall, or though the firing arc. These ratios apply even if the wall height is zero, in which case the protection is provided completely by excavation:
Firing Arc = 0 w/Overhead Cover No Overhead Cover Personnel Hidden Size = 10% normal Size = 20% normal Gun (missile, mortars)
Hidden Size = 25% normal Size = 50% normal
Vehicles Hidden Size = 20% normal Size = 30% normal Aircraft Hidden Hidden Hidden
Once a weapon system is discovered, the same percentages are applied to the probability the weapon type will be ascertained. This reduction is applied after all other modifications have been accounted for. For more information, see the manual section on Sighting. Under direct fire, the size adjustments are also used to determine if the round impacts into an IP wall or berm or against the target. If the round path enters the IP through the firing arc, the change of hitting the target is adjusted by the Arc Open percentage. As an example: • A tank with a height of 3 meters and width of 4 meters is in an open-topped IP with a front wall height of 2 meters, a
width of 5 meters and an open arc percentage of 50. For simplicity, the projectile is coming from the exact front of the tank (0 degrees).
• The nominal tank area is the vehicle’s width times the height = 12 sq. meters (3 meters x 4 meters). 30% of this height (0.9 meters) is assumed to be above the wall (from the chart above). In this case, this also means 2 meters of vehicle height is behind the wall (2 meters = the wall height), and 0.1 meters below the ground surface.
• Without taking into account any “cut-outs” in the wall for the firing arc, the area of the tank “sticking up” over the IP wall is 3.6 sq. meters (0.9 meters (from step #2) x 4 meters (the tank width) ). The area of the wall in front of the tank is 8 sq. meters (2 meters (the height of the wall) x 4 meters (the width of the tank) )
• If the projectile was entering outside of the firing arc, these two values would be used in determining how the round impacts, and whether or not it hits the IP wall.
• However, in this case the projectile path is in the firing arc, and the arc openness is 50%. This reduces the wall area to 4 sq. meters (50% x 8 sq. meters (the nominal wall area) ). The difference in area is added to that of the tank, which becomes 7.6 sq. meters (3.6 meters (the nominal tank area) + 4 sq. meters (the difference) ).
Finally, IP’s limit the ability of units occupying them to see and fire out. In all cases units can see and fire only in the firing arc. However, in cases where a unit of one type occupies an IP meant for another type, it can’t see or fire out very well. An example of this is when an infantry (personnel) unit occupies an IP meant for a tank (vehicle). However, the

advantage is that the personnel unit can’t be seen or hit by enemy direct fire very well either (except by air-bursts if the position is open-topped). In this regard, “smaller” weapon types can always occupy vacant IP’s designed for “larger” types. However, an IP can only be occupied up to its normal capacity using the following cost equivalents:
Improved Position Type Personnel Gun Vehicle Aircraft Personnel 1 1/ 5 1/ 10 1 /20 Gun - 1 1 / 2 1 /4 Vehicle - - 1 1 /2 Aircraft - - - 1
Small units in larger positions have their ROF, and spotting probabilities reduced by 30-60%, depending on circumstances and weapon size (personnel suffer the lowest degradation, guns and vehicles the most.
3-4.4 Sample Improved Position Diagrams The following diagrams are provided for reference. Emplacements for specific weapons systems or special situations will often vary from these basic designs.


Section 3.5: Point Missile Defense Systems Point Missile Defense (PMD) Systems interdict incoming enemy missiles as they near their target. Currently in the simulation, intended targets “fire” the PMD only in their own defense. They will not try to intercept missiles aimed at other targets. However, to provide flexibility, the simulation will allow Directed Energy weapons (PMD or not) to be used against enemy missiles, even if the firing unit is not the target of the attack. PMD weapons are designed to destroy or at least deflect the incoming missile before it impacts. PMD systems use a number of methods to accomplish this, depending on their sophistication level. Smoke, anti-missile rockets and guided missiles, un-aimed “canister” type fragmentation charges, and aimed directed energy beams are the most common options. Whenever a unit with a PMD system comes under attack from a projectile moving at less than 500 meters per second, the simulation automatically checks to see if the round can be detected by the PMD system. These checks are made at least twice, when the missile is launched/fired, and just before it impacts. In the second case, the detection probability is “averaged” over the flight of the projectile from the maximum detection range (or the actual range, if less) and a point about 10-25 meters from the target. The longer the time the missile spends in the detection area, the better its chances of being detected. If the PMD system has a long-range weapon, it may engage the target out to the weapon’s maximum range, once the incoming missile has been detected.

Once an incoming missile has been engaged by a PMD system, it may still cause damage to the target, or to other targets nearby. This is true even if the PMD scores a “direct hit”. The reason is that the incoming missile is often either thrown off course, in which case it still explodes on impact, or the “kill” from the PMD detonates the warhead anyway. The simulation will determine when these conditions occur, and apply any secondary effects as applicable. Normally, unprotected troops are at the greatest risk from these effects; however, other vehicles (or even the original target) may also be damaged or destroyed. In general, PMD systems are grouped along the following divisions: • Detection System: The detector determines what targets the PMD system can see and track, as well as how
vulnerable it may be to countermeasures or conditions. Most PMD systems can defend against one or more types of relatively slow-flying missiles, including rocket-propelled grenades. However, advanced technology is required to be able to intercept very fast missiles, or small targets like artillery rounds. The best all-around detection system is probably Active Radar since it has the potential to detect any solid object. However, in practice, radar systems also require filters and other sophisticated controls to separate out “clutter” (i.e. flying debris, chunks of earth, etc.) from actual threats. Most other detection systems are threat specific, in that they detect only one type of incoming missile. The detection system also often determines how far out the incoming missile can be engaged, which determines potential secondary effects on the target and/or nearby units.
• Damage Routine: This is how the PDM system disables the incoming threat. These methods range from a simple throwing up of smoke, to advanced guided interceptor missiles and directed energy beams. The method of damage has two important effects in the simulation. It determines how far out the incoming missile can be engaged, and what secondary affects the PMD system may produce on nearby units. For example, a system that uses canister rounds containing several hundred ball bearings will almost certainly cause casualties among any unprotected troops in it’s firing arc.
3-5.1 PMD Detection Systems
In the simulation, detection systems are rated for the types of targets they can pick up (slow missiles, fast missiles, RPG’s, artillery, etc.), the method they use to detect those threats (Radar, IR, sound, Laser, etc.), how far out they can detect targets, and how long they take to verify the flight path and engage the target. Individual detectors types are only effective against specific targets. If the target is not of the appropriate type, it can not be detected or engaged by the PMD system. The basic target types are broken down as follows: Slow missiles (<200 m/sec); fast missiles (>=200 m/sec); rocket propelled grenades (RPG’s); small artillery/mortar rounds (<105mm); and large artillery rounds (>=105mm). These categories can be set for each PMD system. There are two varieties of detectors: Passive and Active. Passive detectors register energy produced from external sources, as when a LASER beam is shone on a target to “illuminate” it. In the absence of an energy source, the detector remains quiescent Active detectors, on the other hand, produce their own energy, and actively seek out targets. Within these bounds, there are a few additional restrictions:
1) Passive Laser detectors are only effective against laser-guided missiles (which home in on laser light reflected from the target). Likewise, Passive Radar detectors are only effective against radar-homing missiles. 2) Passive Acoustic detectors can only detect incoming rounds that move at low sub-sonic speeds and generate noise during either firing and/or flight. They cannot detect artillery rounds fired from a distance of greater than 5 Km and fast missiles (>200 m/sec). 3) Passive Visual/IR detectors key in on launch backblast and heat produced during flight. Only missiles produce these signatures, and can thus be detected.
Each PMD system is given a “detection rating” which is a measure of its effectiveness. The detection rating is based on a benchmark of detecting the “average” incoming round at a range of 500 meters (or the maximum detection range, if less than 500 meters). The “average” is taken to be a projectile with the size and speed comparable to a US TOW-2 (speed ~120 m/sec, diameter ~150mm). The actual detection probability is than adjusted for the relative missile/projectile characteristics. Larger and slower rounds are easier to detect than small fast ones. In the simulation, this is also true for acoustical detection systems, since it is assumed that faster and larger rounds are also louder. The more time the incoming round spends in the “detection zone”, the better its chance of being detected. One it is detected, the PMD will engage at the earliest opportunity within its maximum range.
3-5.2 PMD Damage Routines Damage by PMD systems is not resolved in the same way as other combat situations, since the conditions are very different. Instead, the PMD system is given an effectiveness rating which represents the maximum average chance it has to deflect or destroy the round once it is engaged. In most cases, a target will only be engaged a single time by the PMD

system, so this rating effectively represents the lethality of the system. However, long range or directed energy systems may get multiple engagement opportunities, which will improve their overall performance. Whether or not a PMD system gets to engage multiple times is a function of how fast the target missile is moving, as opposed to how long it stays in the detection zone and how fast the PMD system takes to react. Like the detection probability, the effectiveness rating is based on an “average’ projectile, again the US Tow-2. The actual probability adjustment depends on both the type of target and the damage method used:
Target Type Damage Type Slow Missile Fast Missile RPG’s Small Arty Large Arty
Anti-Missile Rockets
Normal Much Less Less - -
Guided Missile
Normal Less Normal Much Less Less
Smoke (*) Normal Less - - - Canister Normal Less Normal - - Screen (**) Normal Normal - - - Dir. Energy Normal Normal Less Less Normal
(*) - Smoke is effective only against laser-, IR- or visual-guided missiles. (**) - Multi-spectrum screen is effective against laser-, IR-, visual-, or radar-guided missiles.
In general, the effect of faster missiles is to decrease the reaction time of the PMD system. This most heavily affects smoke, which may take several seconds to deploy, and unguided rockets, which have less of a “window” in which they can damage the incoming missile.
Incoming Target Type PMD System Damage
Type Smaller Larger Slower Faster More Filler
Anti-Missile Rockets
Much Less Much More Less Much Less More
Guided Missile
Less More Normal Less More
Smoke (*) Normal Normal Normal Much Less Normal Canister Less Slightly More Normal Normal Normal Screen (**) Normal Normal Normal Much Less Normal Dir. Energy Less Much More More Less Normal
(*) - Smoke is effective only against laser-, IR- or visual-guided missiles. (**) - Multi-spectrum screen is effective against laser-, IR-, visual-, or radar-guided missiles.
In comparing the actual size, speed, and filler weight (warhead size) to the TOW-2 average, in general most systems do better against larger and slower targets. In particular, the systems that send out a shower of shrapnel or ball-bearings (rockets and canister) are given more opportunity against these targets than those with single projectiles/warheads. Smoke types are once again heavily penalized against very fast moving targets. Secondary effects may also be caused by the action of a PMD system. Shrapnel from rockets and canister will affect unprotected troops and other soft targets within their radius of action (35 meters for canister, 15 meters for rockets). Likewise, if the incoming missile detonates, it may create additional damage within a radius based on its filler weight (from the point it is determined to have detonated). Deflected missiles can also produce casualties either by hitting another target in the same location, or less likely, another location along the flight path. The simulation takes all of these factors into consideration, and calculates the damage accordingly.
3-5.3 PMD Ammunition Depletion One special topic concerns the way in which PMD ammunition depletion affects the efficiency of the system. In some cases, this will be straightforward, as in the case of rockets or missiles with 360-degree traverse. Once a missile is fired, one missile is removed from the available ammunition pool. Likewise, a burst of smoke or directed energy drains one unit from those available. As long as this type of system has at least one round remaining, it can engage any incoming missile (within the system’s covered arc). However, in other situations, things are more complicated. Because the simulation does not keep track of how many rounds remain for each area (or arc) of coverage, but instead lumps them all together, it might be unreasonable to subtract exactly one round every time. For example, lets say a tank has 12 canister rounds spaced evenly around its 360-degree arc. Each canister covers an incoming arc of 30 degrees, and once a round has been expended in that arc any missile that enters from that direction will be unopposed. If the driver can’t swivel the tank fast enough to bring an unexpended round to bear, the simulation needs to calculate the probability that the missile is coming in along a protected vs. unprotected arc. The equation used is: Prob. of protected = (rounds remaining) x (depletion factor) For the first case, the depletion factor should be 100. As long as at least one round remains, any incoming missile will have a 100% probability of entering through a protected arc. In the second case, the probability should be about 8 or 9 percent. That way, once a few rounds are expended, the probability of a missile coming in a protected arc also decreases.
3-5.4 PMD Vulnerability Another consideration is the relative vulnerability of the detection system itself to damage and destruction. For example, most active radar systems include antenna arrays that are easily damaged, even by small arms fire. Thus, there is a chance these systems may be damaged by the explosion (or impact) of the incoming missile even though it has been detonated or knocked off course by the PMD system itself. Because there are so many components and potential weakness in the PMD system, damage is assessed in the normal way (using burst radius values, penetration, and the like) and then adjusted for the vulnerability factor. Section 3-6: Fog Of War (FOW) FOW of war is a terms used to describe the lack of precise information commands posses on the battlefield once the action starts. It applies to lack of precise information on enemy positions and strengths, as well as the friendly situation. The better a force’s communications, and the more concentrated its units are, the better the information and the less FOW the commander will experience. The simulation models FOW as it applies to both friendly and enemy forces, although the level of each can be set by the human player(s) as follows:
Effects FOW Level
Friendly Units Enemy Units OFF All fully known. All fully known, even if not sighted.
1 All fully known. Units that are sighted are fully known (e.g., the exact size and weapon system are known). Unsighted units remain hidden, or shown with the best “last known” information.
2 All fully known. Units may be sighted to degrees, from barely sighted to fully sighted, and the information presented corresponds to the level. Unsighted units remain hidden, or shown with the best “last known” information.
3 Fully known if sighted or stationary. Otherwise, the latest SITREP and best
Units may be sighted to degrees, from barely sighted to fully sighted, and the information presented corresponds to the

estimate of the unit’s position are shown. level. Unsighted units remain hidden, or shown with the best “last known” information.
3-6.1 Unit-specific FOW Information is specific to each unit in the game. In other words, each unit “sees” and “knows of “ a unique set of friendly and enemy units. This includes information about the unit itself; a unit always knows it own situation completely even though its HQ or sister units might not. Additionally, units can only act using the information they posses at the time. For example, units can only fire at targets that they can see themselves, regardless if other friendly units can see it - even if they are in the same location. Likewise, if a unit doesn’t know an enemy unit is waiting at a certain location, it might get ambushed, even if other friendly units know the enemy is there. The game is intended to be played principally though the “eyes” of the Task Force (TF) Commander, as if the human player were present in the TF Headquarters unit. With one exception, all of the staff reports and map displays will be limited to the information the player would know in that position. The single exception is direct fire (DF) targeting. If the player selects individual units in order to give them explicit DF targets (and thus bypasses his AI-subordinates), the map will display what that unit knows. Otherwise, it would be impossible to give any kind of meaningful orders. Players wishing to preserve complete FOW, therefore, should never select units for targeting orders. Instead, they should avoid “micro-management”, and rely on the AI controllers to select targets for the individual units, as would occur in real life.
3-6.2 Known vs. Sighted Object Information All units and objects that are not hidden are either sighted (the unit can actually “see” it in some way, including though radar or other sensors), or they are “known”. Known objects are not currently sighted, but a position and situation is “known” for them in some way - either though a past sighting, or from reports sent by other friendly units (see below). Information from direct sighting, while not always complete, is always current. On the other hand, information that is “known” is often neither current nor accurate, and is instead simply the “best” or “last known” position and condition of the object. In reality, the object may have moved or changed its condition in any number of ways, and thus “known” information should be used with care when making plans. Information is always displayed with the “as-of” time at which it was gained. Information from direct sighting will always be shown as “[Current]”, while “known” information can be “[Current]” or any duration since the start of the scenario, such as “[2 minutes Ago]”.
3-6.3 Messages SITREP (Situation Report) messages are used to transmit information between units, so that target sightings and other reports can be disseminated throughout the force as applicable. SITREP’s travel though the normal chain of command, both up and down. For more information, see the section on the Chain of Command, below. As SITREP messages are received, information on the object of the message is updated, if it is more current that what the unit already knows. Otherwise, the SIPREP report is ignored. The SITREP is then always forwarded to the unit’s higher HQ. It may also be sent down to the unit’s subordinates, depending on how pertinent the AI determines it is. Therefore, while SITREP’s are not always disseminated to all of the line units, they are always sent up the complete chain of command to the TF HQ. SITREP’s can cover any aspect of what a unit knows, including the condition of friendly and enemy units, objects such as obstacles and bridges, and unknown or “wrongly” known terrain.
3-6.4 Enemy Units Using all but the lowest level of FOW, enemy units begin the game completely unknown to the friendly player. During the start of game set-up phase, a number of enemy units may be revealed as described in that section, below. After that, they will only become known if a friendly unit detects them. Detection can be by any method, such as visual, light, noise, radar, or other sensor. Depending on the level of FOW in force, detection is rated by its quality, which in turn determines how much information it reveals. For example, a detecting unit will know a lot more about an enemy unit it sees in the clear a hundred meters

away than it will about one it hears making noise at night in the woods. The quality of detection is known as the “known level”. There are five levels, which provide the following information about the target:
Level 1 Level 2 Level 3 Level 4 Level 5
Exact Quantity (Ex: 5 x M106A2) No No No No Yes
Model (Ex: M1A1 Abrams)
No No No Yes Yes
General Type (Ex: Tank, APC) No No Yes Yes Yes
Appropriate Unit Symbol (Ex. Tank Unit)
No No Yes Yes Yes
Facing (Ex: Facing East) No No Yes Yes Yes
Unit Size (Ex: Platoon, Squad) No No Yes Yes Yes
Movement (Ex: All Moving, None Moving) Yes Yes Yes Yes Yes
Stacking Type (Ex: Vehicle, Personnel) Yes Yes Yes Yes Yes
Enemy units are always reported in aggregate. In other words, individual units are not reported. If multiple enemy units of the same type are in the same location (and have the same known level), they will be reported as a single entity. So, for example, a report would say “10 x M1A2 Bradley”, or “Company of Vehicles” rather than something like “3 Platoons of Tanks”. In order to be aggregated together, enemy units must be known at the same level. They must also be of the same type, based on the known level. For example, if the units are known at level 1, they only have to be of the same general stacking type in order to be aggregated together, so a tank unit and a truck unit would be put together since they are both vehicles. If the units were both known at level 5, however, they would have to be the exact same model in order to be aggregated. Aggregate enemy forces known at less than level 3 will only have a generic unit symbol displayed on the map. At level 3 and above, a symbol appropriate to the weapon system type will be shown, along with a size indicator (based on the aggregate size).
3-6.5 Friendly Units At all but the highest FOW level, friendly units are not subject to FOW. The owning player will always know their current status and location. While this may not be very realistic, it is the easiest way to play the game. At the highest FOW level, friendly units become subject to information uncertainly. However, the uncertainty is minimal, especially compared to that for enemy units. Friendly unit quantities are always known, as well as the exact positions of stationary units. Moving units, however, will have their positions shown where they “should be” given their last known speed and movement path.
3-6.6 Flank Forces Flanks are areas on either side of the player’s zone of advance that are occupied by friendly forces that are not under the player’s command. The existence and width of the flanks is set in the initial game set up. Friendly flank forces are on the same “side” as the player, and have the same general mission, but are completely under the command of the AI, which represents the flank commander. In a manner of speaking, players should consider that the flanks belong to other players. Flank forces will generally not enter or fire into the main sector, and they don’t expect a player’s units to venture into theirs. Otherwise, there is a high potential for “friendly fire” to occur, where friendly units shoot at units on their own side (see below).

Flank forces can contain fixed-wing aircraft. Because of the speed and characteristics of these air units, they often trace out long flight paths as part of their standard orbit or CAS mission. As such, the program makes an exception for them so they may essentially ignore sector boundaries while moving and do not trigger friendly fire like ground units or helicopters do. However, if a fixed-wing aircraft conducts a mission of any type across a flank sector boundary, it is subject to fire from friendly units in that sector.
3-6.7 Terrain/Objects Players always fully know terrain and other objects, such as obstacles and IP’s on their side of the start line. However, at the start of a scenario, terrain on the other side is sometimes unknown, and IP’s and obstacles are always unknown. Like enemy units, they will remain unknown until detected by friendly units.
Figure 39: A partially identified enemy improved position as displayed on the map. The symbol indicates it is a
rudimentary (level 1) infantry position of some type.
Unlike enemy units, however, once terrain types and objects are detected, they are fully known. Concerning terrain, roads and towns are the most likely to be reported incorrectly.
3-6.8 Bridges
Figure 40: Bridge Information Form (can only be accessed during the scenario if the bridge is fully known)
Bridges have three unique FOW components as compared to other objects. Even if they are “known” to be present in a location, their type, damage level and whether or not they are primed for demolition are not also automatically known.

Like units, these characteristics must are revealed step-by-step based on the “quality” of the detection or the player’s situation. Players always have complete information for bridges on their side of the start line. They also have complete information on bridges once a friendly unit has moved across or next to, or that they have primed for demolition. Otherwise, bridges must be detected as for other objects. Bridge types and damage are relatively easy to determine through aerial reconnaissance and medium to long range ground spotting. Whether or not a bridge is primed for demolition, however, requires closer inspection. Once a player knows a bridge characteristic, it remains known for the remainder of the scenario, even if the spotting/detecting units move away from the bridge or lose a LOS to it.
Figure 41: Fully known bridge displayed on the map, including the weight class (150).
Figure 42: Partially known bridge displayed on the map. The weight class is not shown since the damage/type is
not currently known.

3-6.9 Minefields Minefields may be detected the same as other objects, although short of having a unit explode a mine, they are often much harder to see since mines are normally buried or camouflaged. Deliberate minefields are easier to detect than hasty ones because they are usually marked to protect friendly forces from inadvertently entering them.
Figure 43: Initial minefield placement screen. Only the owning player will be shown the quantity and type once
the scenario is in progress.
Owning player always know the number of mines and types in a minefield they placed. The other player will never know the number of mines placed, although he may get general information on the size of the minefield and the types (AP/AT) placed. Unfortunately, this information often only comes after a unit or two has moved into a minefield and detonated some.
Figure 44: A "discovered" enemy minefield as shown on the map. Note the size and type are not shown.
3-6.10 “Friendly Fire”
Friendly fire is the term used to describe when units of the same force fire on each other. The units involved can be part of ground, air, or naval forces, or any combination. POA-2 does not allow players to voluntarily target friendly units. However, the AI routines do allow for mistakes and other errors that cause friendly units to engage other friendly units. The most common instances of this are when units stray across flank boundaries, or during unguided airstrikes. The single biggest factor in determining if friendly fire occurs is how well the firing unit can see the friendly target. This is determined using the standard sighting procedures discussed below, and takes into account the environment, the unit’s particular situations, and the training and other levels. Only extremely rarely will units fire on friendly units sighted at level 4 or above, and only if the unit has strayed across a flank. At sighted levels lower than this, the units will be readily engaged if they strayed across a flank, or if they are a long way from where they are “supposed to be”, as determined by the computer. Generally, units will not find themselves in this situation unless they have broken or are running for cover, or a “mistake” has been introduced into the unit’s movement path due to fatigue, inexperience, or plain bad luck.

Section 3-7: Detection of Units/Objects Units and objects must be detected before they can be targeted or shown on the map. Detection can take many forms, including visual sighting, hearing noises, seeing lights at night, radar, or pick-up by a remote sensor. During each combat pulse, friendly forces attempt to detect unknown units (both enemy and friendly) or objects such as obstacles, IP’s and bridges. They also attempt to improve their information level on objects that have already been detected to some extent. When new objects are detected, or the information level improves, the friendly unit involved creates a SITREP message, and sends it to other units via the chain of command, as described both previously and in the manual section on the Chain of Command. SITREP’s disseminate the information throughout the force, or at least to units that are closely “related” by the chain of command.
3-7.1 Visual Visual detection is the most common, and most accurate detection method. It is simply being able to “see” something, either with the naked eye, or some form of optical aid such as binoculars. Every unit in the game is capable of visual sighting, and in fact constantly tries to sight objects within its field of vision. Visual sighting requires that the spotter have a valid LOS to the target. For this determination, the LOS goes from the top of the spotting weapons system to the top of the target object. For example, if the spotter is a tank 2 meters high, and the target is a 3 meter-high building, the LOS goes from a point 2 meters above (AGL) the center of the spotting location to a point 2 meters above (AGL) the center of the target location. If the spotting unit is in an IP, the IP configuration must allow the unit to see the target location. IP’s are spotted independently of any units that may occupy them, although in most cases the IP will be spotted first given it is usually much larger than a unit inside. In situations like this, where the target is a unit inside a larger IP, the effective size will be limited by the amount of blocking the IP provides. For example, a unit in a pillbox with only small firing ports will have its effective size set to that of the ports when a unit outside the IP tries to “see” it. The visual sighting probability is based on apparent size, measured in square seconds of arc, as described in the prior section on targeting. The baseline value is that a “truck sized” object has a 50% chance of being spotted at a range of 700 meters (an apparent size of 2.5 million square arc seconds) in 15 seconds. The baseline value is modified as follows: • The probability is reduced proportionally for the LOS blocking value. • If the range is greater than 700 m, the probability is multiplied by the 700/actual range. • If the target is silhouetted, the probability is increased 300-500%. • The probability is reduced proportionally for the concealment level in the target location. • If the sun is low and behind the target (i.e., the spotter is looking into the rising or setting sun), the probability is
reduced. The reduction depends on the angle of the sun above the horizon, the cloud cover, the sun position relative to the LOS, and ambient illumination level.
• The probability is reduced by 10%-20% for twilight conditions. • If the spotter or target is an aircraft, the clouds will reduce the probability is the LOS passes through the cloud layer.
The reduction is proportional to the cloud cover percent. • If the target is an aircraft, and the spotter is at a lower elevation (AGL), the probability will be reduced somewhat if
the cloud deck is not in the LOS, but “in the background”, i.e., higher than the target aircraft. • If the illumination level in the location (ambient + artificial) is less than 20 points, the probability is reduced inverse
exponentially (small losses near 20, much larger losses if under 10). • If the target is already sighted to some level, the probability is increased by 150% - 500%, depending on the level.
If the target is not sighted, but is known, the probability is increased 125%. • If the target fired one or more of its weapons last turn, the probability is increased, depending on the weapon(s).
The minimum increase is 20%, but it is especially increased for weapons that create flash and smoke, as indicated in the Gun Data Table. Flash is more relevant at lower light levels, while smoke is the opposite and requires illumination of some type to be seen.
• If the target is broken or berserk, it is 4 times more likely to be spotted. • If the target unit’s morale is less than 50, the spotting probability is increased by up to 20% • If the target unit’s training level is less than 60, the probability is increased by up to 20%. If it is greater than 85, it is
reduced by up to 10%.

• The probability is reduced for a ground target unit’s camouflage level - 0.2% per camouflage level for personnel, and 0.1% per level for all other target types. Naval and air units are not affected.
• If the target is moving, the probability is increased for the apparent speed. The adjustment is up to 250% of normal. However, the probability is reduced for very fast targets with a relative velocity above 800 degrees per minute (13 degrees per second).
• If the target unit is moving, and generating dust clouds, the probability is increased as long as the dust clouds appear “behind” the target to the spotter.
• If the spotting unit is moving, the probability is reduced based on the actual speed as a percent of the maximum weapon speed. The value is then adjusted for the best gun stabilization value. The maximum reduction is 50%.
• The probability is adjusted (plus or minus) for the weapons system visibility rating. The rating values are set in the Weapons System Data editor.
• The probability is adjusted proportionally for the spotting and target unit quantities. • If the range is greater than 500 meters, the probability is increased for spotted enemy units near the target (within
300 meters). • If the spotting unit is an aircraft, the probability is adjusted based on the aircraft’s altitude (AGL). Below 100
meters, the probability is adjusted anywhere from 75%-200% of normal. Above 100 meters, the probability is increased 200%-400%.
• If the spotting unit and/or target unit are currently engaging in “shoot & scoot” techniques, and the range to the target is 500 meters or more, the probability is reduced up to 60% for each (firing unit/target unit), based on the terrain in the location.
• If the spotting unit is suppressed, the probability is decreased 1.5% for each suppression point, unless the unit is armored and buttoned-up. In that case, the probability is reduced by the weapon system buttoned-up visibility factor, which is specified in the Weapons System Data Table.
• If the spotting unit has thermal sights that are “pointed” towards the target, the probability may be increased based on the ambient temperature and illumination levels. Thermal sights are most effective at lower light levels and colder temperatures with minimal wind.
• If the spotting unit has thermal sights that are “pointed” towards the target, the probability may be increased depending on the current conditions and the type of IR system (active vs. passive). The technical level of the IR is also used, as well as the anti-IR rating of the target weapons system. Passive IR sensors require an active IR source, which in addition to illuminating the area for friendly forces, will be easily detected by enemy IR sensors.
• If the unknown unit is friendly, the probability is increased greatly if the unit is “known” at all (but not spotted). Additionally, the probability is increased based on how close the units are in the “chain of command”, and how many levels up the chain of command the first “shared” HQ is.
3-7.1.1 Illumination
Illumination is a measure of the light intensity at any given location. It is composed of two parts: the ambient illumination from the sun or moon, and artificial light produced from any other source such as forest/terrain fires, flares, or burning wrecks. Ambient illumination is applied equally to all locations based on the current ambient illumination level. Artificial illumination is applied to locations individually, based primarily on a their distance and LOS from the illumination source. Artificial illumination is calculated in “points”, where 2 million candlepower equals approximately 5 points at a range of 400 meters. As with other forms of radiated energy discussed in a previous section, the light from an artificial source is assumed to radiate equally in all directions, and thus the intensity decreases as the square of the distance. Artificial light levels are calculated as follows:
Source Illumination Generated (at 100 meters) Wrecks: • Light Vehicles • Medium Vehicles • Heavy Vehicles • Light Aircraft • Medium Aircraft • Heavy Aircraft • Other
3 points per wreck 6 points per wreck 10 points per wreck 5 points per wreck 15 points per wreck 25 points per wreck 1 points per wreck
Flares:

• Flares drop at a rate set they burn out at a height (AGL) of 30 meters based on their burn time and initial ignition altitude.
One gram of incendiary filler produces approximately 32,000 candles of light. The burn time is set in the Ammunition Types Data Table. The ignition altitude is set in the Ammunition Data table.
Terrain Fires: • The maximum fire level for
a terrain type is the Terrain flammability as designated in the TEC.
Each fire point is approximately 30 million candles, or the equivalent of 9000 grams (2.5 gallons) of flammable liquid (napalm).
As outlined above, illumination improves general visual sighting during periods of darkness or limited visibility. It may also cause units to become blinded, if trying to sight, or silhouetted, if being sighted.
3-7.2 IR (Infrared) Detection Infrared radiation, or IR, is energy at a wavelength just outside the visual range of humans (just below red). It is emitted by all objects with a temperature above absolute zero (-273K), and is sensed as heat. At relatively cool temperatures, objects will emit energy essentially only in the IR wavelengths. As they get hotter, however, the peak emitted energy distribution moves towards (shorter) wavelengths in the visible band. This is why hot metal glows red, then yellow, then blue-white in addition to the IR “heat” felt on the skin. Thermal sensors use the relationship between temperature and the emitted energy wavelength to “see” objects in the absence of visible light. Because warmer object glow “brighter” at shorter wavelengths, they can be detected against a cooler background by selectively filtering those wavelengths. The greater the temperature difference between the ambient and the object, the easier it is to see. That is why thermal sensors are most effective in detecting high temperature objects (engines that have been running for a while, for example), and at lower ambient temperatures where humans can show up by virtue of being much warmer than the environment surrounding them. While human eyes can’t see it, IR is a type of light, and it behaves very much like light in the visible part of the spectrum. In particular, it reflects from objects irrespective of their temperature, based on the object’s surface properties. As such, it can be used just like visible light to illuminate objects, although with somewhat less resolution than visible light due to the relative monotone spectrum. There are two types of IR devices, although both use reflected IR light to “see” object. The first type is “active”, so designated because it produces it’s own IR light, which it then uses to illuminate the target area. It’s just as if it had a searchlight, except the light produced by the searchlight is in the IR range and thus can’t be seen by humans. When an IR sensitive device views the IR-illuminated area, it produces a picture humans can see. The second type of IR system is “passive”, and it is simply a detector. It does not have an IR source. Instead, it relies on either an active system somewhere else emitting IR light, or on the ambient IR radiation (which, remember, is produced by any object above absolute zero - which is essentially everything on the Earth). The simulation models both types of IR systems, and allows for higher resolutions based on the IR illumination level in the target location, along with the technology level of the detector (which is based on the Communications level as set in the Force/Nations Table). Additionally, units that use active IR are much easier for other IR systems to detect, subject to the normal LOS and facing conditions that apply to visible light.
3-7.3 Noise Units may also be detected by the noise they make. For example, it is possible to detect a column of enemy tanks moving up a road by the sound of their engines and treads, even though they can’t be seen directly. The probability of detecting a unit by the noise it makes is based on the apparent sound level heard by the “spotting” unit. This is calculated based on the following: • The base amount is based on the general type and weight. Personnel make the least noise, then vehicles, then
ships and aircraft. • Vehicles with no movement orders are assumed to have their engines shut off, and are treated as personnel. • Helicopters make relatively more noise than their weight would otherwise generate, and slow fixed wing aircraft
less.
• Jet aircraft moving at high speeds (>0.75 Mach) generate additional noise over what their weight would otherwise generate. Any object moving above Mach 1 generates a sonic boom, which increases the noise level dramatically.
• The probability is increased if the unit is moving, based on both the absolute and relative speed. This means a tank moving up a slope as fast as it can, will still make a lot of noise, even though it has a low actual speed.
• The unit’s noise discipline can affect the level under certain conditions. • The noise level is decreased 1% for each degree the ambient temperature exceeds 25°C. It is increased 1% for
each degree under 5°C. • The noise level is reduced 3% for each Kph of wind speed. • The sound level is reduced for distance using an inverse square relationship.
It is much more difficult to get “high quality” information (such as the exact model of the enemy equipment) from noise as compared to visual detection. However, noise can often alert friendly units to the enemy’s presence, which in addition to allowing them to be targeted with supporting fires, also makes them more liable to be seen visually.
3-7.4 Light Units can also be detected from the light they generate. For example, it’s easy to see a column of vehicles moving down a road with their headlights on, especially from the air. The computer determines whether vehicular units are using headlights or not based on their speed. If the unit is moving at the headlight threshold speed or above, it is assumed to be using headlights. At speeds slower than that, units are using their blackout lights exclusively. The threshold speed is 15 Kph in total darkness and is increased 3 Kph for each degree of illumination, up to 20. Headlights are not needed if the illumination is greater than 20. The speed is also adjusted for the force’s night vision devices, 1/2 Kph for each point in the average of the force’s photoreconnaissance and satellite ratings. Only vehicles use headlights. Stationary or non-vehicular units can also generate light. Aside from jet aircraft however, the amounts are very small. The nominal generated light levels are adjusted as follows: • The LOS must not be completely blocked, and the light level is proportionally decreased for any LOS blocking
points. • The light level is reduced 1% for each level of illumination in the target location. • Stealth technology reduces the signature from aircraft movement (jet exhaust). The stealth level is set in the
Weapons Systems Data Table. • The light from non-aircraft units is adjusted for the unit’s noise discipline rating, which can modify the level +/- 50%.
Like noise, light detection does not usually generate top-level information on weapon models. However, it does assist in further visual and other detection efforts.
3-7.5 Radio Transmissions Units can be detected by the radio transmissions they send, at least if the enemy force possess any level of radio finding equipment. In the simulation, radio detection devices are defined as sensors, in the Sensor Data Table, and assigned to weapons system in the Weapons System Data Table. The more transmissions and the longer the message durations, the better the chance of being detected. The detection probability is based on: • The transmitter’s power output, based on the command radius of the unit, or if it is an AWACS or naval craft. • The signal strength is decremented for the range between the transmitting and detecting unit, using the inverse
square of the distance. • The received power must be greater than the minimum power level (sensitivity) of the receiver. • The average message duration is calculated. Message duration is based on the transmission method (data,
radio/voice, satellite), and the message type (SITREP, moment orders, targeting orders, etc.). • If the transmission method is anything but data, the transmission time is adjusted for the both sending and receiving
units’ communications level (and also the leaders’, if any is present). • For durations less than 5 seconds, the probability is reduced to 1/3rd normal. For durations over 10 seconds, the
probability is increased 200% plus 5% per additional second. • The probability is adjusted proportionally for the detecting unit’s training level, and the force SIGINT level.

Units detected from signal intercept are never known beyond level 1, or that “something” is in a certain location. However, given that larger HQ are often found though this method, that is often enough to call in air or artillery. But beware, if the HQ is stationary and has been for a while, and the force has a relatively high communications level, it is likely that the antenna is located away from the actual HQ itself. In this case, the reported position will not be the HQ’s actual position, but rather an “offset” location that represents the antenna’s location.
3-7.6 Radar There are many types of radars, and each can detect a set number of target types. Virtually anything that has an elevation above the ground level can be detected, including aircraft, missiles, and artillery and mortar rounds. Because radar has such a wide range of detection and identification functions, as well as guidance capabilities, it is covered in a comprehensive special section below.
3-7.7 Remote Sensors
Remote sensors are devices that detect enemy ground units and send that information to friendly forces without the requirement of having a friendly unit present in their locations. In a simple form they might be something as basic as a microphone attached to a small transmitter. Friendly units could then simply “listen” for any noises that would indicate enemy movement - vehicle engines for example. The simulation allows for a range of sensors, using sound, vibration, light, and radio as the detection medium. Each sensor also has a sensitivity rating for personnel, vehicle, and radio energy, which is the range at which an “average” unit of that type can be detected. Sensors use the standard detection routines for their medium as described above, with a few exceptions. The first is that the adjustments for the “spotting unit” (morale, fatigue, etc.) are always completely ignored since sensors are not units. In addition, the following adjustments for each type are: • AFV (Vehicles): The average is based on an M113 APC moving at 25 Kph.
1. Sound: Adjusted proportionally for the weight and speed value. Reduced 50% for non-tracked vehicles. 2. Vibration: Adjusted proportionally for the weight and speed value. Reduced 90% for non-tracked vehicles. 3. Light: Headlights must be on (see section above for headlight discussion). 4. Radio: Sender’s radio power is based on the command radius of target vehicle. 5. Radar: Probability adjusted proportionally for actual size, and reduced for the weapons system stealth rating
and the terrain in unit’s location. • Personnel: The average is a group of 4 troops walking in the clear.
1. Sound: Reduced 50% if not moving, and 25% if moving less than 5 Kph. 2. Vibration: The unit must be moving, but there are no other adjustments. 3. Light: Reduced 75% if the unit is not moving. 4. Radio: Sender’s radio power is based on the command radius of the target unit. 5. Radar: Probability adjusted for terrain (cover/concealment) in location.
If a unit is detected, the sensor accuracy is used to determine how much information the sensor is able to gain, and how accurate it is. For example, sensors with low accuracy might report only that “something” is there, while those with high accuracy might be able to report an approximate number, movement direction and speed, and even the likely model of the unit detected. Aside from sensors that detect EM emissions, only surface units (less than 10 meters AGL) can be detected. When a remote sensor detects a unit, it must transmit that information back to friendly forces. Specifically, the information must be sent to either a friendly HQ or EW (electronic warfare) unit. Each sensor type has a maximum transmission range. If there is no friendly HQ or EW unit within that range, the detection will not be reported. Remote sensor reports may also be degraded by enemy EW efforts, which may delay the report or cause the accuracy to be reduced. Integral sensors are assigned to a weapons system and are considered fully “part” of it, such as FLIR (forward-looking infrared) equipment mounted on a helicopter. They use the same basic detection routines and probabilities as remote sensors, but have no need to transmit information back to friendly forces. The owning unit always knows of the detection immediately and without degradation.
3-7.8 Start of Scenario Detection At the start of the game, players “know” only what units and terrain are on the friendly side of the start line. However, in almost all cases, additional information will be provided based on friendly reconnaissance efforts, including signal

intercepts, satellite monitoring, aerial reconnaissance, HUMINT, and patrols. The amount of information provided by each of these techniques is determined by the force levels in each of the areas (which can be adjusted when a scenario is created), as well as the situation on the ground. In some cases, more than one type of detection system may detect an enemy unit or object. In that case, the second detection usually adds to the “known level” of the item, although sometimes it might not. So the number of items shown on the map will not always match the total number of items reported found at the beginning of the game. The base probability of detecting an object for any method is equal to the force level in that area. For example, if the satellite level is 100, then the base probability of detecting an “average” object is 100%. However, these values are adjusted depending on the type of object being detected, and also sometimes for conditions. Unlike detection during an in-progress scenario, information found during this phase is known equally by all of the units in the force. SITREP’s are only used once the scenario has started.
Figure 45: The results screen for "Start of Scenario" detection of enemy units and other objects.
3-7.8.1 Signal Intercept Signal intercept detection is the result of friendly radio detection and triangulation efforts prior to the start of the scenario. Units outside of your task force conduct these efforts, based on the force SIGINT level, and the results are completely independent of the size of composition of your task force. Signal intercept can detect enemy units anywhere on the map, and is multiplied for the target object as follows: • Bridges: 1%. • Minefields: 1%. • Obstacles: 1%. • IP’s: 0% (they can not be detected). • Units: 30% (50% if HQ).
3-7.8.2 Satellite Monitoring
Satellite monitoring represents satellite pictures and video taken of the battle area from space. The pictures are sent to a processing center, and the deciphered intelligence is sent down the chain of command to the task force. The satellite coverage area is centered on the center of the map, and it has a radius of 100 meters for each point of the force’s satellite level. Because the satellite data was obtained prior to the start of the scenario, the current weather is not used. Instead, the computer determines what the weather was like up to 48 hours in the past, and uses that in the routines. Cloud cover and precipitation decrease satellite effectiveness. The base detection probability is multiplied for the type of object being detected as follows: • Bridges: 50% (hard to tell if they are primed for demolition). • Minefields: 10%. • Obstacles: 30%. • IP’s: 40%. • Units: 35%.

3-7.8.3 Aerial Reconnaissance Aerial reconnaissance includes photography and other sighting activities performed by friendly aircraft, including very high altitude flights, and those by drones/UAV’s (unmanned aerial vehicles). The aircraft performing these flights are not part of the player’s task force, or even the echelon above the task force, but represent high-level assets owned by the combined joint task force. Reconnaissance over-flights cover the entire are of the map. As with satellites, the current weather is not used, and instead the average weather over the last 12-24 hours is used. The base detection probability is multiplied for the type of object being detected as follows: • Bridges: 35% (hard to tell if they are mildly damaged or primed for demolition). • Minefields: 10% of normal. • Obstacles: 30%. • IP’s: 30%. • Units: 30%.
3-7.8.4 HUMINT
HUMINT, or “human intelligence”, is information gleaned principally from the interrogation of enemy soldiers who surrendered or defected, or were captured. It also includes information provided by civilians coming from the enemy areas. HUMINT covers the entire map area, and the base detection probability is multiplied for the type of object being detected as follows: • Bridges: 40% (may be able to disclose if primed for demolition). • Minefields: 30%. • Obstacles: 35%. • IP’s: 35%. • Units: 25%.
3-7.8.5 Patrols
Patrols operate differently from the other reconnaissance activities, in that the computer actually sets a portion of a player’s force on the map to represent units that have been in place before the force moved into the line, and these units run actual patrols across the front line. The number of units the computer places on the map, and where they are placed depends on the situation. More units are placed for defending forces than attacking forces, and also for the greater “urgency” of the mission (e.g., more units are placed for “defend at all costs” or “major attack” missions than for “delay” or “feint” ones). Patrols are much more effective when performed by normally dismounted troops (infantry). On average, each company sends out four patrols, each to an objective at a depth between 1- 3 Km (although they can go deeper if enemy forces are light). Once at their objective location, a patrol searches out to a distance of 300 meters. Only objects in this area, or within 100 meters of the patrol’s march route, or that can be seen form any location the patrol occupies, can potentially be detected. The base detection probability of patrols is determined using the standard detection routines for dismounted infantry, multiplied by the following: • Bridges: 50% (may be able to disclose if primed for demolition). • Minefields: 20%. • Obstacles: 40%. • IP’s: 40%. • Units: 50%.
Section 3-8: Movement During the movement portion of the combat phase, units will move according to their current orders. Movement always occurs between adjacent locations, whether the locations are on the map or not.

Unit positions are represented by their hypothetical center of mass. This point is defined as the location around which the unit’s equipment and personnel are “ equally spaced”, either linearly (if in road march mode) or concentrically (if in tactical mode). The center of mass is determined to the nearest meter, and always lies within a single location. For stationary units, the unit’s center point is the center of the location. Moving units, however, will have their position updated exactly as they move between locations. So, while the unit may appear to be in the center of that location, in reality it may be “off center” en route to its destination. For example, a unit that started moving due east 15 seconds ago at a speed of 10 Kph, will be positioned 41 meters to the east of its current location center. This is because as a stationary unit it was located in the center of the location, and 41 meters is the distance it will travel in 15 seconds at its current speed. If a location measures 100 meters in size, it means the unit is almost to the next location, but not quite. It must travel half the location size (100 x 1/2=50 meters) to reach the next location (so it has 9 more meters to go, or about 3 more seconds).
3-8.1 Time Required to Move Between Locations For those familiar with standard wargames, POA-2 does not use the concept of “movement points”. Instead, it uses a system based on terrain having certain maximum speed limits or delay times based on the movement type. The reason is simple; a tank unit ordered to move forward with the infantry at 5 Kph does not slow to 2 Kph just because it hits some light brush. Instead, the light brush only affects the tank if it is moving faster than some “maximum speed” through the brush, say 40 Kph. Another example is infantry crawling to combat at 1 Kph. It really doesn’t matter if they are crawling down a road, though the grass, or even in a forest. At 1 Kph, the terrain has no discernable effect on their movement rate. The system also allows for better and more realistic control of combined arms movements. Because disparate units can be ordered to move at constant (and equal) speeds, the group will stay together along the march, rather than having the faster units (such as the vehicles), speed off ahead and leave the slower units behind.
Figure 46: A portion of the TEC (Terrain Effects Chart) showing movement effects for ‘Clear’ ground conditions.
The same values are used for terrain as well as obstacles, hexlines (roads), and hexsides (rivers).
The time required for a unit to move between two locations is calculated in 3 steps. First, the unit must move to the edge of its current location. Then, it must cross any terrain feature between the locations (hexsides). Finally, it must move to the center of the destination location. Each step in the process follows a similar procedure: • A check is made to determine if the portion of terrain the unit must traverse is prohibited. The check includes
terrain and other permanent map features, as well as for wrecks, fires, and other combat related conditions. If the portion is prohibited, the unit cannot move into the location as ordered, and will automatically attempt to find another path to its final destination.
• A check is made to see if road march-mode is either required or “called for” by the SOP. Road march-mode puts the unit in a linear formation, so that it can move along a road or bridge. Otherwise, it is in “tactical” mode and moves cross-country completely ignoring roads and other linear features. If a march-mode change is necessary,

the orders will be automatically issued to the unit so they can be executed (and the time required accounted for) before the movement proceeds.
• If the unit is moving into a different location, the stacking limits are checked. If an “over-stack” condition will occur, the unit will either be assessed a delay, or if the location is crowded enough, will either be broken up into “detachments” or prevented from entering it completely. Stacking is discussed in more detail below, but is set for each terrain type by general weapon category (personnel, gun, vehicle, air, and naval).
• The “cost” of the movement segment is determined based on the terrain types in the location, as well as the unit’s march mode. Terrain affects movement in one of two ways: It can either impose a maximum speed on the unit, or it can add a discrete delay, in seconds. In cases where several terrain types are present with different maximum speeds, the “slowest” one is used for the entire segment. If more then one type of terrain is present that adds a discrete delay, however, the combined sum of the delays is used. For example, if a location contains the following terrain, the maximum speed will be 30 Kph, with a delay of 180 seconds:
o Woods with a max speed of 30 Kph. o Clear with a max speed of 70 Kph. o Earth berm obstacles that add 120 seconds. o Concertina wire that adds 60 seconds.
• The slope to be traversed by the unit is determined using the ground elevations of the starting and ending locations. If this slope exceeds the maximum grade of the weapons system, it will likely be prohibited from completing the move. Otherwise, the speed may be reduced based on the ratio of the actual grade to the maximum grade applied to the maximum weapons data speed.
• A check is made to see if the unit suffers any mechanical breakdowns, and if so, an immobile detachment is created.
• If the terrain is on fire, the unit is checked for damage, based on how long it had been contact with the fire, how strong the fire was, and the basic unit characteristics.
• If the unit is in contact with chemical agents, the effects are assessed, along with any automatic MOPP (protective measures) adjustments.
• If the unit moves into a location containing enemy units a check is made to determine if a close combat situation exists. If so, the unit will stop moving until the close combat situation is resolved (or it suffers some adverse combat result). Close combat was discussed previously in the manual.
• If the moving unit is in the same location as a minefield (whether enemy or friendly, known or unknown), the computer will determine if it hits a mine, and if so, assess the results. Mines are discussed in more detail below.
Disorganized units (from airdrops) with movement orders will not begin moving until they become organized. Wavering units (from morale effects) may or may not move if they have orders to do so, depending on their situation. Units that must emplace before firing, such as artillery, will automatically be given orders to do so whenever they complete executing their existing movement orders. Likewise, if an emplaced unit is given movement commands, it will automatically un-emplace before executing them since emplaced units cannot move. Units with SOP orders to “wishbone” will automatically arrange themselves in that configuration whenever they pause. There is no time delay for this maneuver, which merely entails breaking the unit into three firing groups and pointing each in different direction for better protection. When units in a “wishbone” formation begin moving again, there is also no time delay to resume the normal march configuration.
3-8.2 Obstacles Obstacles are man-made objects designed to impede or even stop the movement of enemy units. They include such things as log hurdles, log cribs, barbed/razor wire, ditches, and abatis. They are used to provide what are known as “counter-mobility” operations. In the simulation, obstacles are defined as terrain types and are included in the TEC. As such, they act as any other type of terrain, and can either limit the maximum speed of a unit moving though them, or they can impose a discrete delay. They can also “break” a road, e.g., force units to go into tactical march-mode to get around them. Obstacles can either be placed at the start of the scenario, or emplaced by appropriately equipped units once the scenario is underway. Likewise, they can be destroyed from engineer or combat operations during the scenario. Partial obstacles (either in the process of being built, or partly destroyed), may have either reduced effect or none at all, depending on the obstacle type, the amount of obstacle in place, the terrain, and the moving unit’s type.

3-8.3 Stacking Stacking refers to the quantity of units and weapons systems present in the same location at the same time. Several stacking values apply to movement:
System “Stacking Type” Deployed Limit * Transient Limit * Road Limit *
Personnel 120 300 40 Gun 20 30 6 Vehicle 24 48 8 Naval 2 2 - Aircraft 4 4 - * - Based on a scale of 100 meters per location. The limit is adjusted proportionally for other scales.
In addition, each terrain type has a “stacking factor” specified in the TEC. This value proportionally affects all of the stacking limits in the location, so terrain with a value of 50% reduces the stacking limits to half the base values. The deployed limit represents all of the units in a location that are not moving in the current pulse. The transient limit reflects all units in the location, moving or not. The road limit encompasses all of the units in the location currently moving on a road (hexline). Under no circumstances can these limits be voluntarily violated, with the exception of emergency situations, as when passengers bail out of a destroyed carrier. If a moving unit would violate the transient (or road) stacking limit, one of two things will happen. If the unit can break up into smaller “pieces” and move through the location under the limits, it will do so. The “pieces” will then join back together once the unit is clear of the stacking restriction, with a delay imposed. This is a representation of the “accordion effect” that will be familiar to anyone who has ever lead a substantial convoy. Otherwise, the unit will hold its position until it can enter the location without violating the limits. If the delay goes on long enough, or if the AI acting as the unit commander “thinks it will”, the unit will attempt to find an alternate route around the blockage.
3-8.4 Chemical Contamination Areas Ground units may suffer in several ways from moving through chemically contaminated areas. The first is that the chemicals may kill or disable personnel that come into contact with the substances. The second is that units will likely be forced into a high MOPP level, if it not in one already, which drastically reduces effectiveness and fatigue. Lastly, the mere fact that chemicals are present tends to make troops more cautious, and focuses their attention on the contamination rather than other events, further reducing effectiveness.
Figure 47: Chemical contamination areas as shown on the map.

Units that have orders to move into known contamination areas will automatically assume a MOPP level the AI controlled unit commander deems adequate, unless the human player has already issued specific MOPP orders. Once they are past the area, they will return to their original level. Units that enter an area that was not previously known to contain chemical agents, will take immediate MOPP protective measures, and will move out of the area on their own orders. The destructive (kill and incapacitation) effects of chemical agents was discussed in detail previously, but essentially the lethality and other effects depend on the concentration of the agent in the area, the MOPP level of the exposed units, and the time the units remain exposed. The higher the concentrations of agent that are absorbed into the body, the higher the casualty/incapacitation rate.
3-8.5 Bridges
Bridges as objects are discussed in more detail in a later section of the manual pertaining to terrain. However, bridges have two important considerations as they pertain to unit movement. First, units must be in road-march mode to cross a bridge. Secondly, the bridge must be able to support the unit in terms of weight capability and minimum width, both taking into account damage the bridge may have sustained. Both of these conditions must be met, or the unit cannot cross the bridge. A further effect of bridges is that they limit traffic flow across them. The computer takes into account each unit as it crosses, including whether two-way traffic is possible based on the bridge width (accounting for damage), and the width of the weapons systems crossing. It also limits the number of weapons systems on the bridge based on each unit’s speed and the distance between weapons systems. It is worth noting that bridges can, and often will, become choke points if they are being used by a large number of units and that significant delays can result. The stacking type of a weapons system is set in the Weapons Systems Data Table.
3-8.6 Mines Moving units may detonate mines, if their current location contains a minefield of any type. Only moving units will detonate mines; stationary units, even if in a minefield, will not. The probability that a moving unit will detonate a mine is determined principally by the density of mines of the appropriate type in the location. There are three broad classifications of mines based on the types of targets that will cause them to detonate: anti-tank (AT), anti-personnel (AP), and anti-ship (AS). Mines are further classified by how they detect enemy units. Passive mines are stationary and relatively inert, and require that the moving unit directly “trip” them, either though direct pressure, magnetic flux, or some other stimulus. Active mines, on the other hand, have the capability to search for targets and also usually a method of engaging them more effectively than a random detonation. These measures include the ability to directly target an enemy unit, and/or the ability to move to a more favorable engagement location. The result of a mine detonation depends on its filler material. By default, mines are filled with high explosive, and cause damage though the effects of blast, shrapnel, or armor penetration. They can also contain lethal chemicals. In either of these cases, they use the standard combat results routines discussed previously. Mines can also be a type that produces illumination, a common example of which is a “trip flare”. In these cases the mine itself doesn’t cause any damage, but it both alerts friendly forces of the enemy’s presence, and illuminates the area so the enemy can be engaged with direct and/or supporting fire. Units moving though a cleared lane may still detonate a mine. However, the odds are much less than if moving outside the lane. Mines are discussed in more detail later in the manual as part of the section on Engineering.
3-8.7 Dust Generation Ground units may create dust as they move across the map. The amount of dust they generate is determined by the unit’s speed, the size of the weapons system, the terrain dust creation factor, and the ground condition dust level. The larger and faster the weapons system, the more dust created. Dust can be reduced or increased for the type of terrain the unit is moving though (if there are multiple terrain types in a location, they are averaged together). It is also adjusted for the ground condition value, which is a universal adjustment applied to every location on the map. It is designed to simulate widespread conditions, such as reduced dust after heavy rains, for example. It can also be used to model snow “dust clouds”, which are usually much smaller than their counterparts made of soil.

Once placed, dust behaves like smoke and is subject to normal drift and dispersion. It will also degrade visual LOS’s, and may both hide friendly units and mask their fires. Dust is only placed in locations on the map. It is never created in locations off-map.
3-8.8 Camouflage Level Adjustments Moving units lose camouflage levels that they might have built up while remaining stationary. Guns, aircraft, and ships lose all of their camouflage once they start moving. Personnel and vehicles may retain some of camouflage; at least if they are not moving too fast since their camouflage levels are based on their current speed. Generally, their best camouflage level will be approximately 1/8th of the level while stationary, minus 1 point for each 5 Kph of speed. Camouflage, which makes the unit harder to spot visually, is only applicable if the unit is in a location containing terrain with a concealment value greater than 10.
3-8.9 Join Units/Create Detachment Units represent a group of weapons system under a single command. For combat and most other purposes, they are treated as single, and indivisible, entities. However, any unit larger than one weapons system can create a detachment, which is simply a part of the unit that is detached and operates on its own (and is shown as a separate unit). The detachment can be as large as the initial unit size, minus one, since otherwise there would be no point in creating the detachment. Detachments are treated as normal units in all ways, and their initial parent unit is also their HQ. Detachments may be created voluntarily by a player for operational purposes, for example, small detachments can be placed forward of the main unit to act as LP/OP’s (Listening Post/Observation Posts. They may also be created by the computer to account for situations such as a unit having a weapons system sustain damage of some type, or to prevent over-stack situations when moving. Units may also be joined together, at the discretion of the owning player. However, in order to join, the units must be of the same weapons system type, must have similar damage values, and be in a normal morale state. The units must be in the same location, and the combined unit must not be so large as to violate the stacking limit for its current location. If the parent unit is in an IP, the combined unit must fit in the IP, and if the parent unit is loaded, the combined unit must fit on the carrier. When units join together they pool their ammunition. However, the combined unit’s morale and other levels are based on a weighted average of the levels of the two units joining together. If either unit contains a leader, that leader takes over the combined unit. If both units have leaders, the leader of the subordinate unit is effectively removed from the scenario. Joining units requires a certain amount of time, depending primarily on how large the units are, the communications rating of the force, any leaders present, and if either of the units is moving or suppressed. The computer will only join units after they were broken up during movement to avoid an over-stack. All other joining actions will be from orders issued by a human player. The larger unit is automatically the parent, unless they are of roughly equal size, in which case the human player can specify the parent.
3-8.10 Mechanical Breakdowns Units may suffer mechanical breakdowns from movement. The breakdowns can be caused by any number of things including flat tires, thrown treads, engine failures, or even leg muscle sprains or joint twists for troops on foot. Weapons systems are given breakdown rates in the Weapons Data Table, or zero if the system never breaks down within the expected time frame of a standard scenario. The breakdown rating is in Kilometers, and is the “Mean Distance Between Failures”, e.g., the distance that the system will travel, on average, before experiencing a breakdown of some sort. Breakdowns occur randomly, however, so it is possible that one system will break down right away, while another may go many times the breakdown distance without a problem. The probability of breakdown for moving ground units is also modified for the terrain they are traversing. Each terrain type, including obstacles, has a breakdown adjustment in the TEC - which can range from 4 times to one half as likely to cause breakdowns as “standard”. These adjustments are applied only for the terrain the unit is actually moving over, not all of the terrain types in a location. For example, a unit moving down a road will ignore the other terrain types in the location, while a unit moving tactically will ignore the road. If an obstacle breaks a road and a moving unit is forced to go around it tactically, a portion of each (road and the other terrain) will be used.

When one or more breakdowns have been determined to occur in a ground unit, the number is compared to the quantity of the moving unit. If the two quantities are equal, the unit is immobilized in its entirety. Otherwise, an immobilized detachment is created. The immobilization is also judged to be temporary, or permanent. The probability of the breakdown being temporary and thus potentially repairable is about 4 times that of being permanent. Air units that suffer breakdowns have their quantity reduced. They do not create detachments, and the stricken aircraft are assumed to either have crash landed, or attempted to return to their base.
3-8.11 Transporting Passenger Units For portage purposes, weapons systems are classified as either “personnel”, or “other”. The personnel classification represents rather small objects, such as troops and light guns and missile systems that are stowed internally. “Other” includes larger things such as guns, vehicles, and aircraft that are towed, slung, or mounted on some sort of flat bed (which can be internal). Each weapons system is rated by a cargo cost, which is the number of “Cargo Points” the system occupies when loaded. Cargo “Points” represent limiting factors besides weight, such as volume, size, or awkwardness. Most systems take up one point, such as one infantryman, one AT gun, etc. However, crew-served weapons often have costs equal to the number of men in the crew, so that a mortar may have a cost of 5 points (3 for the crew, one for the mortar itself, and one for the ammunition). If the weapons system can potentially transport another unit, its transport capacities are also specified in “Cargo Points”, broken down for each type. For example, a truck might have 25 personnel “Cargo Points”, and 1 other “Cargo Point”. Thus, the truck could carry some number of troops (up to 25 “personnel Cargo Points”) plus tow another weapons system with a cost of 1 “other Cargo Point”. These capacities are ultimate limits, and under no circumstances can a weapon system exceed its Cargo Point capacity. Transport-capable systems also have a maximum loaded weight. The total weight of its passengers, both personnel and other, can never exceed this limit. If a unit is both loading and unloading passengers at the same time, unloading takes precedence over loading. Only after the unloading is complete will loading begin.
3-8.11.1 Loading/Unloading Time Loading and unloading is not usually instantaneous, even for troops. The time required depends primarily on what is being loaded, and is different for each carrier system. These delays are specified in the Weapons System Data Table for each carrier system, for bother personnel and other types. The delays are for a “full compliment”, and are adjusted for lower quantities. They are also adjusted for: • Low morale - using the best value between the passenger and carrier. • High fatigue - using the worst value between the passenger and carrier. • Low training - using the best value between the passenger and carrier. • Suppression - using the highest value between the passenger and carrier.
3-8.11.2 Loading In order for one unit to load on another, several conditions must be met: • The units must be in the same location. • The carrier unit must be stationary. • The carrier must have enough spare Cargo Points of the appropriate type to accommodate the unit being loaded,
after accounting for any other passengers already loaded. • The weight of the passenger unit is added to that of any other passengers already loaded, and the total must not
exceed the weight limit of the carrier. If these conditions are met, the passenger unit will load onto the carrier. There will be a time delay before it is accomplished, based on the carrier’s loading time value, the quantity of weapons systems being loaded, and if any other units are loading/unloading at the same time. Passengers are assumed to be loaded equally on all available weapons systems if the carrier unit is comprised of more than one system. For example, if a platoon of 30 troops is loaded on a unit of 5 trucks, each truck will hold 6 troops. If there are more carriers than passengers, for example 5 trucks towing 2 guns, the passengers are assigned to the carriers randomly.

NOTE: During the player’s order phase, units may be given orders to load on each other even if they are not currently in the same location. However, the AI will check to see if their current orders will eventually place them in the same location, and if not, will automatically issue orders to one or both units to accomplish this. In some situations, however, the carrier unit may be delayed or destroyed en-route to the meeting point. In this case, the AI takes over as the leader of the potential passenger unit, and after waiting for a time past the expected meeting time, may decide the carrier is not coming and issue orders based on that realization.
3-8.11.3 Unloading In order for a unit to unload, several conditions must be met: • When unloaded, the passenger unit must not cause an over-stack condition in the current location. The only
exception is if the unloading is occurring from a combat action that damages or destroys the carrier, in which case stacking is ignored. This is known as involuntary unloading.
• The carrier unit must be stationary (except for paradrops), unless it has been damaged or destroyed from a combat action of some type.
If these conditions are met, the passenger will unload from the carrier. There will be a time delay before it is accomplished, based on the carrier’s loading time value, the quantity of weapons systems being loaded, and also if any other units are loading/unloading at the same time. The unloaded unit will initially face in the same direction as the carrier, and if the carrier is at all suppressed, will be assigned an equal or greater number of suppression points. The unloaded unit will initially have no speed; however, if it has movement orders it will begin to execute them once the unloading delay has been accounted for. If the unloading has been involuntary, e.g., a result of combat action destroying the carrier, the computer will check if the portion of the passenger unit unloaded could “fit” on the remaining systems in the carrier unit. If they can, they will normally be loaded automatically. Otherwise, a detachment will be created for the newly unloaded passengers. If the unit does not have movement orders, and caused an over-stack condition in the location by unloading, the computer will automatically issue special movement orders to the unit out of the location to relieve the over-stack. In most cases that will mean moving no farther than an adjacent location. However, the computer will issue orders as necessary until the unit reaches a location where it does not cause an over-stack.
3-8.12 Emplacing Units
Some weapons systems have significantly different configurations between movement and their other combat operations. For example, towed guns cannot be fired in their normal travel mode; they must be set up first. This procedure might include such things as opening the rails, positioning the gun, adjusting sights, setting up range stakes, and insuring the area around the gun is flat and clear of objects to handle the recoil. These procedures are collectively known as “emplacing” the weapon, and the time required to perform them is known as the “emplacement time”. This time is set for each weapons system, and can be zero, which indicates the system does not need to be emplaced in order to fire. This is appropriate for systems such as infantry. Weapons systems that require emplacement cannot fire until they are emplaced. The base emplacement time is modified as follows: • Low morale. • Low training. • Suppression. • Leaders present with the unit.
3-8.13 Aircraft Compared to ground units, aircraft have unique movement and operational capabilities. These characteristics are reflected in the movement routines, as well as in the way they attack and can transport other units to the battlefield. The biggest difference with air units is that they completely ignore the terrain over which they are flying. Essentially they can fly over any location on or off the map, at their current speed, without being effected by maximum speeds, time delays, or even LOS considerations.
3-8-13.1 Fixed Wing vs. Hover-capable Aircraft The simulation makes a distinction between “fixed wing” aircraft, which must maintain a certain minimum speed, and hover-capable aircraft that can reduce their speed to zero. The determination is based on the data entered for the

maximum road and cross-country speeds in the Weapons System Data table. Aircraft with a maximum cross-country speed greater than zero are considered fixed wing, and those with a value of zero are considered hover-capable. One point to note is that the term “fixed wing” is used in this context only for simplicity, and in reality means “any non-hover capable aircraft”. Note: Also for simplicity, the database uses only two speed values: maximum cross country speed, and maximum road speed. For aircraft, the maximum road speed is the aircraft’s actual maximum speed, while the maximum cross-country speed is actually the minimum speed. Because fixed wing aircraft cannot reduce their speed to zero, they must be constantly moving. Any air unit without specific movement orders will be given orders by the computer. In most cases, the air unit will be ordered to orbit parallel to the front line, at a depth based upon its current location. However, if the air unit is performing a mission of some type, the computer will issue appropriate orders. Hover-capable aircraft are not under this restriction. If they find themselves without movement orders, they will simply stay in their current location. The current version of the simulation does not model fuel consumption, on the assumption that in real life air units will exhaust their ordinance before they run out of fuel, or that battles on the scale modeled by the simulation will end before then. As such, air units may circle or hover indefinitely.
3-8-13.2 Giving Aircraft Units Movement Orders Air units with current mission orders (to provide CAS or an airdrop) cannot be given movement orders by the human player without first canceling the mission orders. Air units without mission orders, including those that are orbiting, may be given orders freely. The procedure is the same as for ground units, with the exception that if the unit is a fixed-wing aircraft, the speed may not be set lower than the minimum value (the maximum cross country speed value in the database).
3-8-13.3 Special Aircraft Missions
Depending on its capabilities, an aircraft may have the ability to perform Close Air Support (CAS) or Paradrop missions. CAS missions engage enemy ground targets, and may be flown by any aircraft unit armed with the appropriate weapons and with ammunition remaining. Paradrop missions are used to transport ground units to the battlefield, where they are dropped from the transport aircraft by parachute. Any aircraft with transport capabilities may fly paradrop missions as long as it has at least one passenger on board. Passengers are normally loaded at the start of the game, although hover-capable aircraft may load units during the scenario. Both of these mission types are controlled by the computer, once the player has selected the appropriate target or drop location, and the general mission parameters. Because of the way these missions are set and executed is fairly detailed, they will be discussed in their own section later in the manual.
Section 3-9: Morale Morale represents the willingness of a unit to engage the enemy, and to continue to perform its assigned combat missions. In the simulation, there are 5 unit morale states:
• Normal: the unit takes orders normally, and continues to perform assigned combat tasks. • Wavering: The unit stops and holds its present position. It will continue to engage enemy forces, but will not
accept further orders. • Run to Cover: The unit will retreat to the nearest cover that will protect it from enemy fire. It will continue to fire,
and will continue to execute its current orders once it reaches cover or returns to normal morale status. • Broken: The unit will no longer actively engage the enemy, and it will retreat as best it can some distance away
from nearby enemy units. The exact distance of the retreat varies, and depends on the situation, but can be anywhere from a few hundred meters, to more than a 2 or 3 Kilometers.
• Berserk: The unit will rush the nearest enemy unit. It will not accept new orders, and will ignore any orders it was given before going berserk.
Each unit has a morale level, which is a value between 0 (Very low) and 99 (Very high) points. Units begin the scenario with morale level point values in line with the overall force morale value, which is user adjustable. For average forces, the morale would be around 70 points. Highly motivated forces, such as Special Forces, Rangers, or Marines might have morale values of 95 points or more.

Force morale values can never be less than 60 points. A unit with a morale level of 100 will ignore morale considerations completely. If the force level is 100, all of the units in the force will also initially have a level of 100 without any random variation. At the start of a scenario, the morale level of a unit can be adjusted from the Unit Data screen (accessed by a <right click>).
3-9.1 Morale Adjustments Morale is adjusted during the scenario from a number of combat activities.
Morale is Increased by: Morale is Decreased by:
• Destroying an enemy target. Aircraft and other high value targets increase morale more than personnel and small vehicle targets.
• Resting in place. As units remain stationary out of effective enemy fire, they gain morale points.
• Taking effective enemy fire. If the unit suffers losses or damage, more morale is lost than if it only takes fire.
• Seeing friendly targets destroyed. If the unit is in a position where it can observe other units taking kills it loses morale.
• Having a friendly HQ destroyed: If a friendly HQ is destroyed, all of its subordinate units lose morale.
Whenever a morale adjustment is made, the unit is also checked to see if it undergoes a status change. If the unit gains morale points, and is currently in a non-normal morale state, it is checked to return to normal. Otherwise, the unit is checked to see which, if any, of the other than normal states it enters. The check takes into account both the current morale level of the unit, as well as how many points it lost or gained in the current turn. Berserk units never have their morale affected by combat actions, either up or down. They revert to either Wavering or Normal status only after they have attacked and destroyed one or more enemy units. The following table summarizes potential morale state changes, based on the unit’s current morale state:

Current Morale State
Potential New State Considerations in Determining if the Change Occurs
Wavering Does not need to be taking fire. Morale must be less than 40 points. Most likely in the morale point range 30-40.
Run to cover Unit must be taking fire. Morale must be less than 80 points. The unit must not already be under reasonable cover or in an IP.
Broken Unit must be taking fire. Morale must be less than 30 points. Higher probability if base force morale is low (<70 points). Most likely in the morale point range 0-20.
Normal
Berserk Unit must be taking fire. Morale must be less than 35 points. Higher probability if base force morale is high (>80). Most likely in the morale point range 30-35.
Normal Must not be under fire. Morale must be above 45 points. The higher the morale level, the higher the probability.
Run to Cover Unit must be under fire. Morale must be less than 85 points. The unit must not already be under reasonable cover or in an IP. The morale loss during the turn must be relatively small, otherwise the unit may become Broken, instead (below).
Broken The unit must be under fire. Morale must be less than 40 points. The higher the morale loss in the turn, the greater the probability of becoming Broken. Higher probability if base force morale is low (<80 points). Most likely in the morale point range 10-30.
Wavering
Berserk Wavering units cannot become Berserk. Normal Must not be under effective fire.
Morale must be above 40 points. The higher the morale level, the higher the probability.
Wavering Must be taking fire. Morale must be less than 45 points. Most likely in the morale point range 30-40.
Broken Must be under fire. Morale must be less than 35 points. The higher the morale loss in the turn, the greater the probability of becoming Broken. Higher probability if base force morale is low (<80 points). Most likely in the morale point range 10-25.
Run to Cover
Berserk Units Running to Cover cannot become Berserk. Normal Must not be under fire.
Morale must be above 50 points. The higher the morale level, the higher the probability. The greater the cover in the location, the greater the probability.
Wavering Must not be under effective fire. Morale must be above 40 points. The higher the morale level, the higher the probability.
Run to Cover Broken Units cannot convert to Run to Cover.
Broken
Berserk Broken Units cannot become Berserk. Normal Cannot be under effective enemy fire.
Must have just destroyed an enemy unit within 150 meters. Wavering Can be under fire.
Must have just destroyed an enemy weapons system, at any range. Run to Cover Berserk units can not covert to Run to Cover
Berserk
Broken Berserk units can not covert to Broken

Section 3-10: Force Levels The force levels are used to quantify the capabilities of a force in the important aspects of combat operations. Some values, such as air superiority, are applicable only to the force as a whole. Others, such as morale, apply to each unit within the force. By default, the appropriate force levels are reflected closely in its component units, within a few percent to model random variation. However, at the start of a scenario, the values for individual units may be modified manually using the Unit Information form.
3-10.1 Training Training affects a wide range of combat functions in the simulation, including weapon accuracy, rate of fire, target acquisition times, the amount of target overlap, and the ability to not “get lost” during long movements. Units with higher training levels perform these tasks better, and thus should achieve better results than poorly trained forces. The force Training Level is set at the beginning of the scenario, and is applied equally to all units within the force. However, at the same time, users can adjust the Training Level for individual units, so that differences between various units or branches can be modeled correctly.
3-10.2 Discipline Ratings A force has three discipline ratings: light, noise, and communications. Each represents how effective units in the force are at preventing the enemy from detecting them by the specific method named. For example, at night, units with low light discipline ratings are more likely to allow stray light to escape their area, which might be seen by enemy forces. The same applies to noise, while the communications rating measures how quickly a unit can transmit information so that the signal doesn’t last long enough for the enemy to get an accurate bearing on it.
3-10.3 Camouflage Each ground unit is rated for its ability to camouflage itself, in order to be more difficult for the enemy to spot. Normally, camouflage is most effective when a unit is stationary, and in some kind of terrain that offers cover and concealment. However, very high camouflage levels can also afford some benefit to units in other situations. Like the Training Level, above, the Camouflage Level is set at the beginning of the scenario for each unit based on the force level, and can be edited for each unit individually.
3-10.4 Communications (Orders Delay) The Communications/Orders Delay time determines how long it takes an HQ or any other unit to receive, transmit, and disseminate information. In the simulation, under normal circumstances, orders are issued by a higher HQ and then transmitted down to its subordinate line units. In cases where the Force Commander (either a human or computer player) issues orders, these orders begin at the Task Force (highest level) HQ. It is also possible that the computer AI (Artificial Intelligence) will issue its own orders, either in the absence of orders from the Task Force Commander, or under the “stress” of combat. These orders will often be issued by HQ units, but sometimes line units will decided “on their own” to perform some maneuver or targeting operation. In the same vein, reports of enemy sightings and engagement results/damage must be transmitted up the chain of command before the Force Commander knows of them. In the simulation, orders and information flow through the normal chain of command, from the origination point up or down through subordinate HQ’s to their destination – either the line units or the Task Force HQ. The Communications Level determines how fast the orders are processed by each HQ in the chain, and how fast the order is absorbed and disseminated. In essence, The Communications Level determines how “flexible” the force will be, how fast it can adapt to changing situations, and in the final measure, how much it is under the control of the Task Force Commander. Communications are discussed in more detail in the section on Command and Control, below.
3-10.5 Friction Friction is a measure of how long it takes units to process information internally, and begin an action on them. It is discussed in more detail in the section on Command and Control below.
3-10.5 Air Superiority The air superiority level is used at the start of a new scenario as a measure of how effective friendly forces are at interdicting enemy air units en route to the battle area. The actual air engagements are abstracted, in that the computer makes a simple determination of losses and aborted aircraft, and applies those losses to enemy air units.

As a rough estimate, every 10 points of air superiority will cause the enemy to suffer 8% aircraft losses. Therefore, players should be careful when setting the level too high, since they may inadvertently wipe out all of the enemy’s air assets. At the start of a scenario, the air superiority level for a force is set from the Player Information form (click the “Change/Edit Defaults” in the Nation section of the main set-up form).
3-10.6 Electronic Warfare (EW) The force EW level represents the level of sophistication a force possesses in terms of electronic/radio equipment and training. It is used in the following ways: • The ECCM rating of all radars in the force is set to 1.25 times the EW rating. • The EW rating determines the time it takes to fix a damaged, but repairable, guided missile launcher. • The EW rating determines how effective the force is at jamming and intercepting enemy communications.
3-10.7 Supply and Strength
The supply and strength levels of the force are used only at the beginning of the game, and they provide a quick way to adjust a force to reflect degraded conditions. These levels are straight percentages that are applied to the starting strength of a force’s units, and the basic load of ammunition they receive. The nominal strength of a force’s units are set in the TO&E, while ammunition basic loads are set in the Weapons Systems Data Table. Section 3-11: Command and Control Command and control is a key concept in the simulation, because no matter how superior a force’s weapons, their effectiveness will be much reduced if they can’t be brought to bear against the enemy in a timely and coordinated manner. Within the simulation, command and control encompasses the transmission of orders and messages, as well as fire control measures such as targets and preplanned fires.
3-11.1 The Chain of Command To model command and control issues, the simulation uses a standard military chain of command, where a higher headquarters unit controls each unit in the force. The human or computer player is assumed to be the Task Force commander, and therefore “present” in the Task Force HQ unit. Units receive orders from higher HQ and transmit reports to higher HQ using the chain of command, with a delay imposed at each level. The delay represents the time it takes the unit to receive, process, and if not the ultimate recipient, re-transmit the message to and from other units in the chain. The relationships are shown for a simple situation below:

TF HQ
Delay for information
being reported to
higher.
Delay for
orders relayed to
lower.
HQ HQ
Delay for information
being reported to
higher.
Delay for
orders relayed to
lower.
Unit Unit Unit Unit
The delay at each step in the chain is determined by the situation and capabilities of that unit. In summary, these are: • The unit will always use the fastest form of communication available to it. In order, these are:
o Data (1/20th force communications delay time) o Radio (normal force communication delay time) o Visual (120 seconds or more, and requires an open LOS) o Messenger (variable - depends on the distance, terrain, etc.)
• Radio and data transmissions may be affected by enemy jamming. • Radio, visual, and messenger times are affected by the unit’s morale level. • If not data, and the sending unit did not start the scenario as an HQ (e.g., is an “acting HQ”), the time is increased
up to 150%. • The transmission time is adjusted for leaders in the sending and receiving unit. • If the recipient unit is an aircraft, the time is reduced by 50%. ‘ • If either the sending or receiving unit is an AWACS, the time is reduced 50% • Non-satellite based transmissions are adjusted for LOS, range and other conditions using the command radius of
the sending and receiving units (discussed below).
3-11.1.1 “Acting” HQ units If a normal Headquarters unit is destroyed or incapacitated by combat, it will be replaced in the chain of command by another unit. The new unit will then become the “acting” headquarters of the formation, and orders to and from the other units will go through it just as did they did the actual HQ. The sequence in which units take over command functions is specified in advance by military doctrine. The simulation uses a standard sequence where command passes to the highest-level unit directly under the HQ. If there are two or more units at the same level directly under the impaired HQ, the first one shown when viewing the force tree takes over. Should that unit also become impaired, the second in line will take its place and so on, down each level until the last unit in the formation is reached. For example, in a standard infantry company the chain of command would pass down from the company HQ to the 1st Platoon HQ, followed by the 2nd Platoon and so on. If all the platoon HQ’s are impaired, command would pass down to the next level - the 1st Squad of the 1st Platoon, then the 2nd Squad of the 1st Platoon, and so on. If a nominal (or “starting”) HQ unit that has been impaired and replaced in the chain of command regains the ability to command, it will return to its former position in the chain of command.
3-11.1.2 Command Radius The command radius is the maximum distance at which a particular headquarters can control its subordinate units without any loss in efficiency. The nominal radius is based on the level of the unit (generally higher level headquarters have larger command radii), and the weapons system type (to differentiate between man-portable radio and those mounted in vehicles or aircraft). Users can specify these values for the force when clicking the “Set Defaults” button under nations, and then “Edit Command Radii” on the Force Information form button when setting up a new scenario.

Command radii are also adjusted for the relative “roughness” of the map. In this case, roughness is measured by the variability of ground elevation over the map area. Relatively flat areas will have low roughness, while mountain ranges will be very rough. Roughness also factors in aboveground LOS-blocking terrain, but with much less weight. The command radius is used primarily to determine command and message delays between units.
3-11.1.3 Internal Friction Friction describes the time required to disseminate information and orders internally within a single unit. For example, within a company it may take several minutes for the orders to be passed down from the commander, though the platoons and squads until the troops are ready to move. Friction also results in lower ROF’s and less coordinated return fire when the unit is first engaged by the enemy, resulting in a building of fires until the friction period is overcome. A complete list of friction effects is: • Friction delays the start of movement orders, and is effectively added to the command delay. • Friction is applied to the disorganization period experienced by units after an airdrop. • Friction lowers the initial ROF of units for new targets when those targets have not been previously spotted or
engaged. • Friction lowers the effectiveness of fire against new targets that have not been previously spotted or engaged, and
results in more target overlap (where a single target object is engaged multiple times while others might not be targeted at all).
The friction level is measured in seconds per weapons system equivalent. A weapon system equivalent is equal to 7 personnel, or one of anything else (vehicle, gun, aircraft, ship). Actual total unit friction times are determined by multiplying the size of the unit in weapon system equivalents by the friction level, and adjusting for suppression, fatigue, training, morale, and the capabilities of any leader present. Friction is applied only to single maneuver units, and if the unit is a HQ, does not include its subordinate units or affect its order transmissions time. For example, if a company HQ is a unit comprised of 3 tanks, the HQ units’ friction is based only on those 3 tanks. It does not include any of the company’s subordinate units, which will have friction times of their own, and it does not affect the command delay when issuing orders to those subordinate units.
3-11.2 Messages/SITREP’s Messages are used to transmit information on friendly and enemy forces up the chain of command. They are also called SITREP’s, for “Situation Reports”. Because each unit in the scenario only knows what it can either see directly, or what has been reported to it, information transfer within the force is critical to duplicating what unit’s would know in real life. SITREP’s are what the units use for that information transfer. SITREP’s can be used to report information on either friendly or enemy units, or objects such as IP’s, terrain, obstacles, minefields, etc. The general format of a SITREP is: • The item being reported. • The unit making the report. • The information (the “known” level). • The time the information was gained.
When a unit receives a SITREP from a subordinate unit, it checks the information and time of the report against what it already knows. If the report is more current, or more accurate that the existing information, the SITREP is accepted. Otherwise, it is discarded. If the SITREP is accepted, the receiving unit updates its information on the subject of the report. It also passes the SITREP up the chain of command to its HQ unit. Depending on the level of the unit making the initial report, its relationship to the unit receiving the report, and the nature of the object being reported on, the unit receiving the SITREP may also pass it down the chain of command to its subordinates. However, the AI makes the determination of when a SITREP is passed down, and players have no control over the dissemination action.
3-11.3 TRP’s and DF Targets TRP’s and DF Targets are measures used to control the fires of the friendly force. While TRP’s apply to Indirect Fire, as opposed to Direct Fire Targets, they are both designed to provide fast and effective fire when and where it is needed, and with a minimum of waste and risk.

3-11.3.1 TRP’s
For simplicity, the simulation uses a very liberal definition for TRP’s, or Target Reference Points. Whereas in real life they are points of reference for which the firing data is known to the artillery units, in the simulation TRP’s represent specific locations that have been designated in advance as likely spots on which the force will either definitely or probably want artillery fire. As such, they have the following characteristics: • An identifier/name. • A specific location on the map. • A priority, either primary or secondary. Primary missions are normally fired faster, since the tubes are pointed at
that TRP when the unit is not engaged firing another mission. • A priority calling unit or formation. Only this unit, or a unit in the designated formation, can legally call in fire on the
TRP. • A type - either “on call” or “preplanned”. If a TRP is “on call”, it means that there are no actual missions scheduled
for it at the beginning of the game, and missions may be called in when and as needed. Preplanned missions, on the other hand, are complete missions in place at the start of the game, which will be fired at a predetermined time. Preplanned missions also include the following information:
o Area to cover, measured in meters from the central impact point. The impacting rounds will be evenly dispersed though this area.
o Ammunition type to use. o Number of rounds to fire. o Rate of fire (rounds per minute per tube). o Time to commence firing.
Missions fired using a TRP have several advantages over non-TRP missions. If not preplanned to fire at a certain time, they take less time than ordinary missions to be called in and begin. They are also more accurate from the beginning, and do not require spotting rounds. TRP’s and DF Targets are placed on the map at the beginning of a scenario. The number of TRP’s and DF Targets, and to which units they are available, is set in the Force Information form.
3-11.3.2 DF Targets
DF targets are used to control the fires of friendly units to insure that sensitive areas are always covered and that target overlap is minimized. Like IF TRP’s, they are often ranged and increase the initial accuracy and ROF of a firing unit when an enemy unit in the DF Target area is engaged. They are also used for opportunity fire, described below. The primary characteristics of DF Targets are as follows: • They are assigned to specific firing units. • Targets may be either primary or secondary. Enemy units in a primary target area will be engaged before those in
a secondary area. The number of primary and secondary targets per unit is set as part of the Force Data. Like TRP’s, targets in primary areas may be engaged faster if the unit is not firing at another target, since units automatically train their weapons on the primary target when not otherwise engaged.
• The target area may be specified as either circular or rectangular, and the radius/side lengths set.
3-11.3.3 Opportunity Fire Opportunity fire is a mechanism used by the program to minimize the effects of having a discrete combat pulse. Specifically, opportunity fire prevents fast enemy units from “skirting” completely through a kill zone in a single pulse, before they can be engaged by friendly forces during the regular DF fire phase. Opportunity fire occurs in the movement phase, when an enemy unit moves into the DF target area (either primary or secondary) of a friendly unit. If the friendly unit has not already fired in the normal DF phase, it will attempt to engage the enemy unit “on the fly”. The fire follows all of the normal DF firing routines and procedures, so it is more likely that enemy units in primary target areas will be engaged than those in secondary ones, since the friendly unit’s guns are normally trained on the primary are and won’t require as much rotational adjustment. The results of opportunity fire are assessed immediately, and once the fire has been completed, the enemy unit may continue moving (assuming it is still intact and capable of doing so after absorbing the combat results). Section 3-12: Terrain Effects

Terrain includes all natural and man-made objects on the map that affect the simulation in some way. Examples include trees, streams, roads, and buildings. Each map location must contain at least one type of terrain (known as the primary terrain), and may contain many more (collectively known as secondary terrain). The Map Editor module is used to assign terrain, both primary and secondary, to the individual map locations. Note: this section uses the term “hex” for a single location on the map, since that is the term used in the map editor - HPS Simulations’ program Aide De Camp - 2 (ADC-2). However, the terms “hex” and “location” are equivalent, and represent the minimum indivisible area that can be accessed on the map. For information on how to create maps using that program, please see the Appendix. There are three types of terrain: hex (location), hexside, and hexline: • Hex terrain is assumed to fill a hex uniformly, and it’s movement and LOS (Line of Sight) affects generally apply to
anything that is either already in the hex, or that is trying to move into that hex (from any direction). Hex terrain can be specified (in the TEC editor) to contain multiple levels, or floors, which can be occupied by combat units.
• Hexside terrain is a linear feature located along the edge of a hex boundary “between” two adjacent hexes. Its affects apply only when a unit or LOS “crosses” it.
• Hexline terrain is a linear feature completely inside the hex. Hexlines generally affect only movement - they never affect a LOS.
Hexsides and hexlines often “connect” though multiple hexes, as when a road or river runs for a distance across the map.
3-12.1 The Terrain Effects Chart (TEC) The Terrain Effects Chart (TEC) is used to “tell” the program what the effects of each terrain type should be. It includes information such as each terrain’s effects on the LOS, the movement cost, and whether or not the terrain can become craters or rubble, or be set on fire. The specific values saved for each type of active terrain (as opposed to terrain symbols that are purely cosmetic) are: • Type: hex, hex multi-floor, hexline, hexside, IP, or permanent IP (buildings). Hexline and hexside types also have a
size specified - either narrow or wide. • Movement effects: either a maximum speed or a discrete delay in seconds for each movement type). • A flag if the terrain is placed from destructive combat actions. The standard created terrain types are:
o Craters - road plus high, medium and low hex. o Rubble - high, medium and low hex.
• LOS blocking points, and the color to use for the terrain on the LOS cross-section display. • Height of the terrain above ground (AGL). • Cover and concealment values. • Probability of creating craters and rubble from HE explosions in the hex, either none, high, medium or low. • Flammability of the hex, either none, high, medium or low. • Relative “ground softness”, either firm, medium, or soft. • Mechanical breakdown multiplier. • Relative amount of dust generated by moving ground units, 0-10. • NBC multipliers, for persistent and non-persistent chemicals, and radiation. • Stacking modifiers. • If the terrain breaks any roads in the hex, such as for log crib obstacles. • If the terrain is a foliage (deciduous) type. If so, it is affected by the relative foliage level of the game (which is used
to easily model bare vegetation in fall or winter vs. leafy in summer). Because they do not seasonally lose their leaves, evergreens should generally not be made a foliage type.
• Advanced/Energy Weapons blocking effects. Terrain type symbols (“Map/board symbols” as they are called in ADC-2) used in the map must be defined in the TEC in order to have any effect in the simulation. Otherwise, the symbol will be treated as purely cosmetic terrain - added simply to make the map more attractive.
3-12.2 Elevation Every location both on and off the map has an elevation. This elevation is the height of the ground surface above mean sea level, in meters. On map location elevations are entered as part of the map. Off-map locations are all set to the average elevation of the on-map area. Elevation is used in all of the following routines: • LOS determinations

• Flight paths • Radio reception • Movement
Units may also have a relative elevation above the ground, known as AGL (above ground level). Aircraft almost always have an elevation AGL, but it also applies to units on the upper level of multi-story structures. In those cases, each story in the building is 3 meters high.
3-12.3 The LOS (Line of Sight) The LOS is defined as the straight-line path between two points that would be traveled by a single beam of light. As such, it is used to determine what a unit can see, and conversely, what can see that unit in return. Aside from visual sighting, it is also applicable to certain kinds of communications transmissions, as well as radar detection and the engagement potential of certain types of weapons. The LOS is determined in 3 dimensions, using the exact map position and elevations of each the two end points - the spotter and the target. The ground always completely blocks the LOS. Otherwise, each terrain type it passes through may degrade the LOS to some extent based on the LOS value for the terrain in the TEC. Terrain blocking is specified in percent, or “blocking points”. If the LOS reaches 100% blockage (100 blocking points), it is completely blocked even if it does not hit the ground. Terrain blocking points are specified in the TEC, but may be adjusted based on the current conditions. If the terrain has been designated as a foliage type, the nominal LOS blocking points will be adjusted for the game foliage level (set in Scenario Weather). Additionally, the points will be adjusted for the actual distance the LOS passes through the terrain. LOS blocking points are based on the average amount of blocking present in 100 meters. If the actual distance is less, the LOS blocking points will be reduced accordingly. Terrain blocking points are also adjusted if they are in the spotting or target unit locations. This models the tendency for units to position themselves to “see out” of a location, relative to the terrain in it. The reduction is 65% in the spotter’s location, and 30% in the target’s. Blocking points may also be added to the visual LOS based on the maximum allowable sighting range. The number of points added is proportional to the actual LOS range as a percent of the maximum range. At the maximum sighting range, the LOS will have 100 blocking points, even if it didn’t pass though any terrain. While not terrain per se, clouds may also affect any LOS passing though them based on the cloud base elevation, the cloud height, and the cloud cover percentage. The computer determines the actual effects at the instant the LOS is run. For long range LOS’s, more than 10 Km or so, the curvature of the Earth must be taken into account. In this regard, LOS’s are always completely blocked if they go beneath the horizon, after taking into account the height (AGL) of the spotter and target objects.
3-12.4 Movement Terrain can have a significant impact on the movement of ground units by limiting speeds and adding delays, as well as creating slopes. The effects were discussed in detail in the section on movement, previously.
3-12.5 Bridges Bridges are physical structures that allow units to “pass over” terrain features or obstacles that would otherwise slow or prohibit their movement. Bridges are classified according to their capacity, length, and construction material. These values determine the types of units that can use the bridge (based on the unit’s weight, size, and other units crossing the bridge concurrently), what types of terrain features the bridge can cross (narrow hexsides, wide hexsides, or full hexes), and how the bridge is damaged due to demolition or combat action. Bridges are not part of the map. Because bridges can be damaged, destroyed, or erected during a scenario, they cannot be part of the static map. Instead, they are part of the game file, and must be placed individually for each new game/battle. This is true even if the battle will be fought on an existing map. At the start of each new scenario, the computer will automatically place bridges at locations where hexlines (roads, trails, etc.) cross hexsides (rivers, streams, etc.). The type of bridge placed will be the first “match” in the bridge type table between the hexline type and the hexside width. For more information on setting up default bridge types, see the Bridge Types Editor. Once default bridges are placed, the first human player has the option of changing or removing the bridges placed by the computer, as well as adding additional bridges.
Bridge types must be defined in the Bridge Types Editor before they can be used in a scenario. To reduce confusion and maximize flexibility, all of the appropriate bridge types should be created prior to starting the new scenario. Although, it is possible to add new bridge types once a game is in progress; but in this case it may not be available when needed Special bridge types that can be constructed during the battle, such as pontoon bridges, “Bailey” bridges, and the AVLB must be defined in the bridge table and then linked to the Engineering Data table. The Engineering Data table also includes the emplacement time and other values pertaining to the construction of the bridge. When construction is completed, the computer will use these links to automatically place the bridge.
3.12.5.1 The Effects of Bridges Bridges are used to assist units moving though degrading terrain or obstacles. However, the bridge must be of the appropriate type and capacity for the given situation, or it’s beneficial effects will be degraded (or lost completely). The basic bridge concepts are: 1) Hexside features (rivers, roads, etc.) ALWAYS break hexlines (roads, trails, etc.). This is true even if the hexline
appears to span the hexside on the map. 2) Bridges are the only feature that can cross a hexside. 3) “Full-hex” type bridges (those that go from one edge of a hex to the other) take priority over any hexlines or terrain
that are “underneath” them. Short-span bridges (which cross only a single hexside) have no effect on hex features on either side.
4) “Full Hex” bridges not only cross all terrain in the hex, they also cross all hexsides that may be present at either end. 5) “Short-span” bridges can only cross hexsides that are smaller than they are. For example, a bridge type that can
cross only “Narrow” hexsides will only be able to cross a hexside defined in the TEC as “Narrow”. A bridge type defined to cross “Wide” hexsides can cross all hexsides (both “Narrow” and “Wide”). For more information, see the TEC Editor.
6) When moving on a bridge, units will use the bridge’s maximum speed and delay rating as they cross the span. The values are applied only for the period the unit is actually on the bridge, which depends on the bridge’s length (narrow, wide, or full hex).
Bridge movement can be restricted or degraded by the physical characteristics of the bridge (maximum load, width, etc.), and the situation at the time the unit attempts to cross (damage, multiple units trying to use the bridge at the same time, etc.).
3.12.5.2 Bridge Restrictions Each bridge on the map has a number of physical values that determine what kinds of units are able to cross the bridge and how fast they can do it. These values are stored for each general class of bridge in the Bridge Types data table. Each bridge on the map must be linked to a valid entry in the Bridge Types data table when initially placed. The values are edited in the Bridge Types Editor. Based on these values, bridge use is subject to the following restrictions: 1) A unit may never move across a bridge if it is heavier than the bridge’s maximum load rating. The bridge load rating
can be reduced from normal by damage (see below). 2) A unit may never move across a bridge if the hull width value of any of the unit’s weapon systems exceeds the bridge
width. The effective bridge width may be reduced by damage (see below). 3) If two or more units try to cross the same bridge at the same time (usually this occurs when different types of units are
crossing, such as infantry and tanks, or the units are moving in opposite directions), their weight and widths are added together and cannot exceed the bridge maximums. If any of the combination values exceeds the bridge limit, some of the units will be prevented from crossing the bridge so the limits can be met.
4) Bridges are considered hexlines for movement purposes. To cross a bridge a unit must be in road-march mode. If a unit moving in tactical mode encounters a situation in which its standing orders dictate it should cross a bridge, the computer will automatically switch the unit to road march mode to cross the bridge and back to tactical mode on the other side. Changing between movement modes incurs a time delay, which depends on the unit type, the terrain on each end of the bridge, and other factors (for more information, see the Using Movement section).
3.12.5.3 Damaging and Destroying Bridges
Bridges can be damaged and destroyed through deliberate demolition or though combat action. The calculations of damage suffered by the bridge depend on the type of explosive/munition used, the action type (deliberate demolition vs. impact), and the bridge construction/material. Deliberate demolition, except in the case of misfires, are assumed to be accomplished by trained engineers with the necessary amounts of explosives and thus always completely destroy the target bridge. Misfires are malfunctions in the

priming or detonation system, or in the explosive charges themselves, which prevent the explosives from detonating. The probability of a misfire in any given situation depends on the force training level, and varies from a minimum of 5% to a maximum of 40%. If a demolition does misfire, the engineer unit on location can often attempt to re-prime the charges, and once that has been successfully accomplished, try the demolition again. Re-primed demolition actions have triple the normal misfire rate. The probability of a total failure (with no further re-priming attempts allowed) is determined randomly after each misfire, and depends primarily on the force supply level. Normally, however, at least one re-priming attempt will be allowed. A random time delay is imposed on all re-priming action, as the engineers work on completing the corrective repairs. Damage by actions other than demolition (bombing, artillery, etc.) is assessed as a number of “damage points” based primarily on the size (diameter) of the crater created by the munition on impact. Single craters deemed to exceed 75% of the track width (or the cumulative number of damage points required to destroy the bridge) automatically destroy the bridge. Damage points from smaller craters are otherwise accumulated from multiple impacts. Bridges damaged above certain thresholds have their carrying capacity is reduced. Beyond that, once the number of damage points reaches the destruction level of the bridge, it is completely destroyed. In addition to the nominal crater size determination (which is calculated by the standard routines), the simulation makes a determination of the actual impact spot to calculate the effective crater size to apply. For example, if the impact is on the bridge centerline, the full crater diameter will be used. If, however, the round just barely clips the bridge along its edge, the crater will be much reduced. This effect is demonstrated in the figure below, where the gray area represents the track surface of the bridge. The crater on the left, which impacts near the center, has maximum effect. The other craters, being closer to the edge, cause less damage.
Figure 48: Relative crater damage vs. impact position.
When adding the damage from multiple hits, the total is not strictly cumulative. For example, using the example above, assume the craters (going from left to right) cause 10, 8, and 5 damage points respectively and that the bridge will be destroyed at 15 damage points. If the damage points were simply added together, the bridge would have accumulated 22 points and would be considered destroyed. In fact, it would be considered destroyed even if the middle impact were eliminated and only the left and right craters were considered. In reality, however, the biggest crater causes most of the damage with only a minor addition from the others. So, the actual damage total would only be 11 or 12 points, and the bridge would still be usable (although at a much reduced capacity). Damage has the following effects on movement across bridges:
Threshold (%) Above Threshold Effects
Max Speed 30 % Reduced 2% for each additional 1% of damage.
Delay 50 % 20 seconds, plus 10 seconds for each additional 10% of damage.
Max Weight 35 % Reduced 15% for each additional 10% of damage.
Width 20 % Reduced 1% for each 1% of damage.
Note: The threshold is based on the total damage points required to destroy the bridge.
3-12.6 Cover/Concealment
Terrain can provide both cover and concealment for units. Cover is defined as protection from enemy fire, including direct fire, shrapnel, over spray, and secondary explosions. In practice, this is implemented by reducing the effective size of the target by the cover value when determining the hit probability and by reducing suppression amounts by one quarter of the value. For

example, in terrain with 60% cover the effective target size will be 60% of normal and suppression will be reduced by 15% (1/4 of 60%). Concealment is shielding that degrades visual sighting. Concealment is separate from the LOS blocking points, in that it applies only to units in the target location. It does not apply to an LOS that merely passes through the location. Concealment, which is specified in percent, reduces the size of the target unit that is visible to the enemy by that amount.
3-12.7 Combat Effects on Terrain Terrain may be affected by combat operations in several ways: • It can be set alight, for example brush, forest, or building fires. • It can be turned into rubble, as in building and other man-made structures. • It can be cratered.
The susceptibility to these effects is specified in the TEC for each type of terrain.
3-12.7.1 Terrain Fires Flammable terrain and other flammable objects, such as wood bridges or obstacles, may be ignited during the scenario. The initial ignition can come from several sources, including impacting incendiary/flame/illumination and HE rounds, secondary ammunition and fuel explosions from destroyed weapons systems, and from other terrain already on fire. The probability of setting the terrain on fire is based on the flammability rating of the terrain (high, medium, or low), and the level of flame it is exposed to. Terrain fires are rated based on the amount of material burning in the location, and the flame level. These levels are calculated using the flammability and maximum fire levels in the TEC, which represent the “burn ability” and total amount of “burnable” material, respectively. Fires usually start at a relatively low level, unless subjected to a large ignition initiation, either from a single or multiple sources. From that point they may go out completely, or they may smolder, maintain their current level, or increase. The probability of these outcomes is based on the current fire level, the ground and weather conditions, the temperature, and the flammability levels of all the terrain types present in the location. Fires tend to grow more rapidly when: • The terrain has a high flammability and maximum fire level. • The wind speed is above 10 Kph • The temperature is above 30° C. • The dust level is high (indicating dry conditions). • The terrain is a foliage type, and the foliage level is high. • The fire is young. • The fire starts from multiple locations, or additional fire amounts arrive from other sources/locations.
The reverse conditions tend to make fires grow slowly, or go out. Because the fuel available in a location is limited, it will eventually get completely used up. Based on the fuel availability considerations, then, terrain fires will generally tend to increase in strength to a certain maximum, burn there for a while, and then taper off until they go out. However, fires may smolder or burn at a low level for quite a while, and then suddenly flare up. Likewise, fires may burn hot for a long time and then quickly die out. The exact nature of any fire is unpredictable. Terrain fires may spread to adjacent locations. If the terrain is not already on fire, the standard ignition routines are used, based on the fire level in the current location and the amount of fire spread to the new location. If the location is already alight, the newly arrived fire will increase the fire level if the fuel is available. Otherwise it will have no additional effect. The amount of fire spread, and to what locations, is based primarily on the fire level in the current location and the wind speed and direction. However, the other weather conditions that affect fire are also taken in to consideration. Terrain fires will produce smoke. The amount of smoke is based on the current flame level in the location. Fires may also cause damage to units occupying their location. Personnel and other unarmored units are particularly susceptible to the effects of fires, but they can damage or kill other units as well. Terrain fires cannot be put out.

3-12.7.2 Craters Craters are produced by the detonations of high explosive, or the equivalent, at or under ground level in the appropriate types of terrain. They can be produced from the detonation of HE type rounds and bombs, land mines, and secondary weapons system explosions for unit “kills” and crashes. The susceptibility of terrain to cratering is set in the TEC. Craters are added to the scenario based on their diameter, which is calculated using the equivalent HE weight, the depth in the ground (or height above it), and the “softness” of the terrain as set in the TEC. Larger craters are created by higher amounts of HE, having optimum penetration distance into the ground, and softer terrain. If the crater is on a road, the diameter is used to determine if the road is blocked. In open terrain, the diameter determines the cratering “level” of the location. Cratering is cumulative; however, allowances are made for overlap, which is usually more common as more craters are added.
3-12.7.3 Rubble
Rubble is comprised of chunks of concrete, wood and other materials created from blast effects on buildings and susceptible terrain. The total amount of rubble a terrain type can create in a location is based upon the size of the feature. The higher and larger the structure is, the more rubble it will ultimately create when it is totally destroyed. The amount of rubble created from a single blast event is based on the calculations used to determine crater size. Essentially, the volume of the crater is multiplied by 155 to 500 percent, based on the material involved. The base amount of rubble created is modified for destruction already present, so it becomes harder to create more rubble as the structure is destroyed.
3-12.8 Off-map Areas In most scenarios, the map area represents the main area of action, and most of the units will be located there. However, the simulation allows for units to occupy locations off the edges of the map, up to 63,000 “locations” in any direction from the top left corner of the visible map. If the scale is 100 meters per location, the total available playing area, including both on and off-map areas, will be 12,600 Km x 12,600 Km. Off-map locations for the most part are identical to on-map ones. They may be occupied and moved through by units as they would on the map, and they may be targeted with DF, IF, and airstrikes. They are also treated the same for sighting, and LOS’s can go between on-map and off-map locations without any special effects. Units may also move freely between on-map and off map locations. However, off map locations are different in the following respects: • Off map location elevations are all set to the average elevation of the visible map. • The terrain in off-map locations is set to the first one entered in the TEC. Off-map locations never have any type of
secondary terrain, including hexlines (roads) or hexsides. • Obstacles and other engineering projects cannot be built in off-map locations. • Off-map locations cannot be selected as DF Targets or IF TRP’s. • Off-map locations are referenced only by their offset distance from the upper left corner of the map in terms of X
and Y coordinates, instead of having a location number. Off-map areas are accessed using the Long Range display. The circular bands indicate distance (in Km) from the upper left hand corner of the map. Section 3-13: Repairing Combat Damage Many combat actions can result in systems being damaged, including the results of enemy fire, mechanical breakdowns from movement, and other equipment malfunctions when firing or being used. In some cases the damage will be permanent, and cannot be field expediently repaired within the scope of the scenario. In others, the damage will be determined to be of a type that can potentially be repaired. When repaired, the damaged subsystem will return to completely normal function. Until then, it cannot be used. In some cases, temporary damage may become permanent. When that happens, repair work on the subsystem ceases, and it cannot be repaired within the time frame of the scenario. The following repair routines are used for the various subsystems: • Radar and Special Systems:
o The base probability is based on 50% of the unit’s training level.

o It is adjusted downwards for the range and detection characteristics of the radar (in order to model more complex systems).
o Leaders may have a small influence. • Guns/Launchers:
o On average, aircraft systems will be repaired in 35-45 seconds, or they will be permanently disabled. Approximately 35-50% of damaged systems can be repaired.
o The expected repair time depends on the caliber of the weapon/launcher: 10-30 seconds for a small caliber weapons, 30-60 sec for a MMG/HMG (10-20mm), 1 - 1.5 min for a light automatic cannon (20mm-40mm), 1.5 - 2 min for light gun (40mm - 75mm), 2 - 3 min for medium gun (75mm - 120mm), 4 - 5 min for heavy gun (155mm-203mm), 5+ min for a super heavy gun. Guided missiles can be expected to take about 2 minutes longer.
o The time is adjusted for unit suppression. o The probability of fixing the system is based on the unit’s training level. o The probability is adjusted for any leaders present. o The probability is increased for fatigue.
• Mobility Systems: o Aircraft mobility damage cannot be repaired. Instead, the weapons system is removed from the game. o The probability and time required to repair the damage is determined at the time the damage is assessed.
If not permanent, mobility damage is always repairable, but the more significant the damage is judged, the longer it will take.
Due to accessibility considerations, damage to aircraft is much more often permanent than that to ground units. Section 3-14: Weather Weather, which includes both atmospheric and ground conditions, affects many aspects of the simulation. It affects sighting, weapon accuracy, movement, fatigue, the availability of support, the effects of toxic agents, and the spreading of fires, among others. “Standard” atmospheric and ground conditions are defined in the appropriate Data tables. Weather is set when a scenario is created. Users can enter the desired ground and atmospheric conditions, using either a “standard” set, or customized values. If desired, the simulation can model variable weather; again based on values the user enters, including how frequently the weather will “change”. When using variable weather, users specify the conditions at intervals of their choosing.
3-14.1 Ground Conditions Movement rates are based upon the “standard” ground condition currently in force in the scenario, which is linked to the TEC. Users cannot change any of these values within the scenario module; making effective modifications requires editing the TEC or creating a new ground condition (including movement values) in the TEC. However, users can customize the following values: • Maximum sighting range (used for visual sighting). • Foliage percent. • Dust generation level.
3-14.2 Atmospheric Conditions
Unlike the ground conditions, users can effectively edit all of the atmospheric values: • Temperature. • Wind speed and direction. • Precipitation. • Cloud cover, bottom elevation, and height.
3-14.3 Variable Weather
If variable weather is used, the computer will automatically adjust the actual scenario weather. To accomplish this, users enter a series of specific conditions that will be “in effect” at certain times based on a pattern of regular “change intervals”. For example, if the change interval is 6 hours, and the scenario starts at 12:00 hours, the user would enter the desired specific conditions for 12:00, 18:00, 24:00, 0600, and so on through the time period covered by the scenario. If the

scenario lasts longer than the weather periods entered, the conditions last entered will remain in force for the remainder of the battle. Users can also select the “change interval”, which can range from 30 minutes to 12 hours. The change interval is constant for the scenario. When using variable weather, conditions do not usually proceed directly from one state to another suddenly, e.g., in large “steps”. Instead, most conditions change gradually over the interval. However, if the change between two conditions is large, it may come on relatively suddenly if the computer decides it is best modeled as something akin to the passage of a fast-moving weather front. This is especially true for shorter interval times. As an example, if one interval calls for warm and sunny temperatures, and the next has rain and drops 10° C degrees, the computer will likely compress the change into a short period, and the conditions will change very rapidly, perhaps even in a matter of minutes. The weather is constant over the entire scenario area, including both on-map and off-map areas. Section 3-15: Illumination Illumination is a critical factor in visual sighting and observation activities. It affects the detection of units and objects, the accuracy of weapons systems, and even the effectiveness of non-visual light based optical systems. Illumination can be provided from several sources. Ambient illumination is present in every location in the playing area, both on and off map. It most often represents light from the sun or the moon, but may also be from other sources such as light reflected off clouds from a lit urban area. Spot illumination, on the other hand, affects only discrete area around the source. It is produced by artificial sources, for example flares, terrain fires or burning wrecks.
3-15.1 Illumination Level The simulation uses light “levels” to measure the illumination level in a location, where the points include the ambient level plus any spot illumination that might be present. The ambient illumination is determined at the start of each turn. It is based the following factors: • The time of day:
o 100 for a clear day at noon. o 80-100 for normal clear daytime conditions (minimum=50). o 30-80 sunset/sunrise (minimum=20). o 15-30 twilight (minimum=15). o 0-15 night (depending on the moon percentage).
• Cloud cover percentage • The cloud thickness (multiplier = actual cloud thickness/3000m).
Ambient illumination values may never go below the minimum specified for the time of day, even after accounting for clouds and other factors. Sport illumination is determined for each location based on the sources nearby. The light level received in the actual location is adjusted for the LOS to the light source, and is also degraded using an inverse square relationship, so as the distance doubles, its intensity is quartered. The spot sources of illumination, and their characteristics are: • Flares:
o The current height AGL of the flare is used for the LOS and range determination. o The flare illumination level is based on the amount of material it “burns” per second. o Flares complete their burns at a height of 30m AGL.
• Terrain Fires: o Terrain fires have a height AGL of 3 meters. o The illumination generated at a distance of 100meters by a terrain fire is equal to the fire level.
• Wrecks: o Wrecks have a height of 1 meter AGL. o The level per wreck depends on the type:
Light vehicle: 3 Medium vehicle: 6 Heavy vehicle: 10 Light aircraft: 5 Medium aircraft: 15 Heavy aircraft: 25 All others: 1
A location may be illuminated from any number of spot sources, in addition to any ambient light, and the illumination levels are added together to arrive at the final value. However, the light level may never exceed 100. Section 3-16: Smoke and Dust Smoke and dust clouds are comprised of particles suspended in the air. Their primary effect in the simulation is to block visual and other types of lines of sight that pass through them. However, they can also pinpoint the location of moving forces, or unknown terrain fires and wrecks.
3-16.1 Smoke Generation Smoke is generated from three sources: terrain/object fires, wrecks, and ammunition/smoke equipment. The smoke produced from each is determined as follows: • Terrain Fires:
o Each fire level produces 2 levels of smoke. o The base level is adjusted for the terrain flammability, and a random factor (up to +/- 20%).
• Wrecks: o The base level (per wreck) is set by the wreck type:
Light vehicle: 5. Medium vehicle:10. Heavy vehicle: 15. Light aircraft: 10. Medium aircraft: 25. Heavy aircraft: 35.
o The level is adjusted for the amount of time the wreck has been “burning”, to see if it is merely smoldering. The average burning and smoldering times are set by wreck type:
Light vehicle: 15 min burn, 25 min smolder, Medium vehicle: 20 min burn, 25 min smolder. Heavy vehicle: 25 min burn, 30 min smolder. Light aircraft: 10 min burn, 30 min smolder. Medium aircraft: 20 min burn, 30 min smolder. Heavy aircraft: 25 min burn, 30 min smolder.
o The level is adjusted for a random factor (up to +/- 10%). • Ammunition:
o The smoke is based on weight of filler in the ammunition round, so that 1 Kg of material adds 10 smoke levels to a 100m x 100m area.
o The base level is adjusted for the map scale.
3-16.2 Dust Generation Dust is generated from moving vehicles and other ground units. The amount (per weapons system) is determined by: • The base amount is calculated using the vehicle weight. The relationship is an inverse power function; as the
weight increases, relatively less dust is added for each increment. • The base level is adjusted for the moving unit’s actual speed. The relationship is a power function; as the speed
increases, relatively more dust is added for each increment. • The level is adjusted for the current ground condition dust factor. • The level is adjusted for the dust modifiers for the terrain the unit is moving over. Modifier values are set in the
TEC. • The level is adjusted for the map scale.
The total amount of dust generated by a unit is calculated by multiplying the level per system by the unit quantity.

3-16.3 Dissipation and Drift At the end of each pulse in the combat phase, smoke and dust on the map will dissipate and may also drift, the exact amounts depending on the conditions and initial amount of smoke or dust present. Dissipation is determined as follows: • The base dissipation factor is based on the temperature, where higher temperatures result in greater dissipation:
o Above 32° C (~90° F), factor=0.7. o Above 15° C (~80° F), factor=0.5. o Above 15° C (~60° F), factor=0.3. o Below 0° C (~30° F), factor= -0.1. o Below -10° C (~15° F), factor= -0.3. o Below -20° C (~ -5° F), factor= -0.5. o Below -30° C (~ -20° F), factor= -0.7.
• The base dissipation factor is adjusted for the wind speed, where higher speed result in greater dissipation: o Above 65 Kph (~40 mph), factor + 0.8. o Above 40 Kph (~25 mph), factor + 0.6. o Above 15 Kph (~10 mph), factor + 0.4. o Above 10 Kph (~5 mph), factor + 0.2. o Below 10 Kph (~5 mph), factor - 0.2.
• The dissipation factor is adjusted for the precipitation level. Heavier precipitation results in greater dissipation. The smoke or dust level in the location is multiplied by the dissipation factor (which can never be less than 0 or greater than 1.0) to arrive at the new level. Drift is caused by the wind blowing the existing smoke or dust clouds into new locations. Drift is determined using essentially the same procedure as for dissipation to determine the percentage of levels that will leave the current location for the new one. When drift is determined to occur, the calculated number of smoke or dust levels are subtracted from the initial location and added to the destination. The destination locations are based on the wind direction and speed. The stronger the winds, the more “in line” with the wind direction the drift will be. Otherwise, in light wind conditions, the drift can be in almost any direction, although there will always be a least a slight favoritism in the general direction of the wind. Drift can also move smoke and dust long distances, which can equate to more the one “location” on the map (especially if the map scale is small). In those cases the maximum drift distance is determined by the wind speed, and the amount of smoke or dust “left” in each location will be determined using a series of calculations as described above. Dissipation is always calculated before drift. Section 3-17: NBC (Nuclear, Biological, Chemical) Operations NBC operations include the effects of nuclear, biological and chemical weapons, and the protective measures used to mitigate these effects. Because of the relatively short time scale of the default scenarios, results within the simulation are limited to those that would be expected to occur immediately, or very soon after exposure. For example, biological weapons other than fast-acting toxins are not modeled, since noticeable effects are not usually seen until a day or more after the initial exposure to the contaminant.
3-17.1 Nuclear Bursts There are three primary immediate effects of nuclear detonations: blast, EMP (electro-magnetic pulse) and radiation. The simulation models all of these effects. Blast is handled with the standard damage routines, based on the “TNT” equivalent tonnage of the device and the other factors entered in the Ammunition Data Table. The EMP and radiation effects are handled by also making the weapon produce radiation damage in the Ammunition Class Data Table, and linking the nuclear round to an Advanced/Energy Weapon of the appropriate type and power. Radiation also has longer-term effects on living things. However, these effects are not modeled.
3-17.2 Chemical Agents The simulation uses two general classes of chemical weapons, persistent and non-persistent. The major difference between the two is that persistent agents stay viable and in the location where they were placed for a period of time, while

non-persistent agents degrade or dissipate relatively quickly. Persistent agents are normally in liquid or powder form, while non-persistent agents are aerosols or vapors. Chemical agents affect units at two times: when the chemicals are initially placed, or when the unit moves through a contaminated location.
3-17.2.1 Lethality of Chemical Agents The simulation uses the nerve agent “Sarin” (NATO: “GB”) as the “base” for the lethality determinations. The lethality of the actual agent is accounted for by adjusting the quantity of the agent present. For example, if the agent were twice as lethal as Sarin, the amount per round or bomb would be doubled to reflect the “effective Sarin weight”. Some of the more common agents and their approximate lethality ratios as compared to Sarin (less than 1.0 is less lethal, greater than 1.0 is more lethal) are: • Tabun (GA): 0.5 • Soman (GD): 1.3 • Cyclosarin: 1.7 • VX: 20.0 • Lewisite: 0.05 • Phosgene: 0.125 • Mustards (H/HD): 0.03 • Botulinum A: 0.0125 • Ricin, crystalline: 0.10 • Ricin, amorphous: 0.0067
The lethality of Sarin against unprotected personnel is set as: • Persistent Agents:
o 100% kill probability at 500 mg dose o 100% incapacitation probability at 375 mg dose. o Assume 1/2 sq. meter per person, if not moving. If moving, multiply by the distance moved.
• Non-Persistent Agents: o 100% kill probability at a dosage of 300 mg/min. o 100% incapacitation probability at a dosage of 200 mg/min. o Assume 1/2 sq. meter per person, and use the actual time of exposure whether moving or not.
3-17.2.2 Initial Chemical Attacks/Applications
Initial chemical attacks are resolved as follows: • The chemicals affect all units in the target area, friendly and enemy, with the exception of aircraft. Air units in flight
are never affected by chemical attacks. • The density of the agent is calculated in kilograms per square meter. • The lethality against unprotected personnel is determined using the calculations above, based on the agent type,
exposure time, and unit characteristics. • If the unit is in an IP, the lethality is adjusted for whatever protection the IP provides. • The lethality is adjusted for the unit’s MOPP protective level (see below). • The portion of the unit in the area of chemical impact is determined based on the quantity and initial radius of the
rounds, bombs, or other delivery system being used. • The kill and incapacitation probabilities are used to determine casualties in the portion of the unit in the impact area.
o Incapacitation normally results in either a temporary or permanent immobilization, but might sometimes also result in a “kill” result. The actual result is based on the dosage. The higher the dosage, the more likely a kill or permanent immobilization will result.
o If the agent is flagged to be “non-lethal” kills are converted to incapacitation.
3-17.2.3 Units Moving Through Contaminated Areas Units moving through contaminated areas may also suffer losses. The results are resolved using the same sequence as the initial attack, with several modifications: • The entire unit is exposed to the agent, not just a potion. • The calculations use the actual movement times and “footprint” area of the affected unit. • The lethality is adjusted for the protective values of the terrain in the location, as set in the TEC.

3-17.3 MOPP Protective Levels MOPP, or “Mission Oriented Protective Posture”, represents a series of increasingly effective measures units can take to protect themselves from NBC attacks. Each measure, however, also entails a reduction in the unit’s efficiency and capability, as well as increasing fatigue, so they are entered into only when the risk is sufficient to warrant the degradation in combat effectiveness. MOPP levels are designated in the MOPP Level Table, and assigned to weapons systems in the Weapons System Data Table. As such, different MOPP sequences can be used for different types of units, for example, infantry and vehicles.
3-17.3.1 MOPP Protection Values Each MOPP level is rated to the protection it provides against persistent agents, non-persistent agents, and fallout. The values are in percent, and represent how much the MOPP level will reduce the dosage from that received by an unprotected person in the open.
3-17.3.2 MOPP Degradation In addition to protection, each MOPP level is rate for the effects it has on unit performance. The effects are broken down as follows: • Passive fatigue is added based on the “Fatigue per 10 minute” value in the MOPP System Table. Passive fatigue
is added based only on the time the unit has been in the MOPP level, and is irrespective of fatigue from other activities. Passive fatigue is added exponentially, so that after 20 minutes the fatigue added will be more than twice the value at 10 minutes (at 10 minutes, the fatigue will always equal the standard value from the table).
• Active fatigue is fatigue generated from other activities, such as moving or engaging in combat. Each MOPP level has an associated active fatigue value, which directly adjusts the fatigue generated. For example, if the MOPP level has an active fatigue rating of 150%, and an activity would generate 10 fatigue points if the unit were not in a MOPP level, it will add 15 points to account for the MOPP factor.
• Visual sighting probabilities are adjusted directly for the MOPP level sighting reduction percent. • The maximum Rates of Fire (ROF) for all of the unit’s weapons are reduced directly for the MOPP level ROF
reduction percent. • The communications delay for any radio transmission emanating from, or passing though, the unit is adjusted
directly for the MOPP level communications time percent increase. • The general MOPP efficiency factor increases the time required to accomplish repairs to damaged systems. • The MOPP maximum speed percent reduces the unit’s maximum road and cross-country speeds.
3-17.3.3 MOPP Level Changing Time
Each MOPP level normally requires a certain amount of time to enter into, or exit. For example, it may take several minutes for troops to enter a MOPP level that requires them to put on (or take off) over-boots, but only a few seconds to put on (or take off) their masks. The time required for each level is specified in the MOPP System Data table. In order to assume a new MOPP level, the unit must not be firing or moving (unless it is a passenger) for the required amount of time. When that time has elapsed, the unit will automatically assume the new MOPP level.
3-17.4 Changing MOPP Levels Units can change MOPP levels any number of times during the scenario, based only upon the time required to effect each change. There is no additional fatigue or other penalties.
3-17.4.1 AI-Issued MOPP Change Orders In order to model the actions of the individual unit leaders and commanders with regards to MOPP level actions, the AI constantly monitors units during the movement and combat phases. If the AI sees that a unit is going to enter a known contaminated area, it will insure the unit is at an appropriate MOPP level, and will issue orders to the unit as necessary. If the unit inadvertently enters a previously unknown contamination area, the AI will either issue orders to increase the MOPP level (if necessary) or insure that the unit moves out of the area as quickly as possible. The AI will make a similar determination when units come under an initial chemical attack. They will either assume an appropriate MOPP level, or they will vacate the area. In either case, once the unit is clear of the contamination, the AI will issue orders for the unit to resume its original MOPP level.

Units executing AI MOPP change orders must still follow the normal MOPP changing routines, and must spend the required amount of time in order to effect the change.
3-17.4.2 Player-Issued MOPP Change Orders Players may also issue MOPP level change orders directly to units. However, the commands will use the standard communication procedure for orders, and thus will incur a delay before they are received and acted on by the unit. MOPP level change orders are movement commands, and are issued using the movement order routines and the Movement Orders form. Section 3-18: Radar In the simulation, radar, an instrument that measures reflected radio waves, is used primarily for two purposes. The first is to locate and track enemy objects such as aircraft, ships, vehicles, and artillery. The second is as a guidance mechanism for certain classes of missiles. Before the simulation can use a radar system, it must be assigned to a weapons system using the Weapons System Data Editor. This is true even if the weapons system itself is nothing more than a radar transceiver, in which case it would have no weapons or equipment other than the radar system. In general, the primary radar effects are: • Detection: When used as a detection system, radar systems track and potentially identify enemy objects. In the
simulation, this has several effects: o If the enemy object was previously unknown, it is identified. Normally, however, the identification is of a
general nature, and the exact enemy weapons system is not disclosed. For example, radar disclosure would provide information such as “Two Enemy Fighters” instead of “Two US F-15C”. Radar, will however, generally be able to provide heading and speed data (depending on ECM and ECCM, see below). These reporting characteristics are true for all radar contacts, be they against air, ground or naval objects.
o If the object is an en-route artillery shell or ballistic rocket (and the radar can detect such objects), in addition to general information on the projectile, the firing location is identified. For example, the report might look like, “Heavy artillery firing detected at location: HH123456”. No additional information will be provided for the firing unit, including if is still in the launch location.
o Detection capabilities vary among radar systems. These abilities are set for each system by limiting the types of targets it can detect. In general, only specialized systems should be given the ability to “see” ground targets. Anti-aircraft and aircraft radar systems should generally be limited to High, and Medium Air targets; Low Air abilities should be limited to advanced systems that can detect very low altitude targets (helicopters) through ground clutter.
• Guidance: Radar systems can provide the guidance mechanism for missile types so designated. Missile guidance
methods are set in the Ammunition Class Data for the missile. o If a missile’s guidance type is set to “Firing Unit”, and the parent unit firing the missile has a radar
guidance system, this system is then used to guide the missile. If the parent does not have a radar system, and an external controller is not present or applicable (see below), by default the missile is given ”generic” radar. The “generic” radar values are an average of all the radar systems defined for the country that makes the missile, reduced by about 25%.
o If the missile type allows for an external controller, the computer will check if an AWACS is present (it is currently the only valid external controller). If it is, the radar characteristics of the AWACS are compared to those of the system presently being used by the missile. If the AWACS is superior, it takes control of the missile and guides it to the target. If not, the missile continues to use its current guidance system. For missiles that remain on their parent guidance radar, control may switch to an applicable AWACS if the parent is taken under fire, damaged, or destroyed.
o Radar guidance may be used against any valid target object for the radar system. For example, if the radar can detect ground targets, it may also be used to guide missiles against those targets. This can be a crucial benefit to an AWACS, since it’s radar can often detect a wider range of targets than either the parent weapons system or the missile. Bearing this in mind, it is still almost impossible to achieve direct hits against small or very fast moving targets such as missiles or artillery shells, even if the radar can detect them.

3-18.1 Radar Detection In the simulation, the computer automatically handles radar detection during the movement and combat phases. Every time a weapon or missile moves or is fired, enemy radar systems are given an opportunity to detect it. Whether or not it is revealed depends on a number of factors, including the type, range and effectiveness of the radar, and the target characteristics. These procedures are followed: • An initial check is made to see if the radar is capable of detecting the target. The target must be within the
maximum range of the radar and within its covered arc, and also of a type that it can detect. The height of aircraft (helicopter and fixed wing) is determined based on their current conditions. Fixed-wing aircraft making ground strikes follow a glide path determined by the computer based on their actual speed (the faster the speed, the shallower the dive), and the flight path to the target location. Otherwise, height is determined by the aircraft’s current orders (which can be set by the owning player). Normally, observation aircraft are at Medium altitude while level bombers, fighter air cover, and all other aircraft are at High. Helicopters are almost always Low (<150 meters) unless they are engaging a target for which the Line Of Sight requires them to be higher. The target object types that may be detected are:
o Low altitude aircraft (25 - 149 meters AGL) o Medium altitude aircraft (150 - 1000 meters AGL) o High altitude aircraft (over 1000 meters AGL) o Ground units/objects o Artillery/mortar rounds (in flight) o Missiles (in flight)
• If the object is of an acceptable type and within range, a check is made to see if the radar is engaged. For this determination, continuous radar is considered always active and looking. Pulse radar systems, on the other hand, have varying probabilities of being active, depending on their type (ground, air, etc.). In general, pulse radar is active only every few minutes. While this may seem like a great disadvantage, it does prevent the radar itself from being detected and destroyed by radiation seeking missiles (like the US HARM).
• If the radar is engaged, the base detection probability is determined, based on the radar’s resolution value (the resolution values is the probability of detecting an average-sized target at maximum range, and is set in the Radar Data Table). An adjustment is made for the actual range to the target, so the closer it is, the better the detection probability. Normally, about 10% is added for each increment of 5% of the maximum range. For example, if the resolution is 30%, and the target is at about half the maximum range, the detection probability will be increased to 60% (10% x 10 increments of 5% =100% x 30% = 30% added). For very long-range radar systems, the increase may be slightly greater.
• The probability is then adjusted for the size and speed of the target as compared to “average” targets. Size is the most important of these characteristics, and affects the probability as a hyperbolic (cube) function. This makes very small targets (relative to the average) very hard to find, while having the opposite effect for larger ones. The average objects are defined as:
o Aircraft target: US F-15C o Ground Target: US M-2 Bradley APC o Artillery: 105mm Standard HE projectile o Missiles: US HAWK (AA); US AAMRAM (Air to Air); US TOW-2 (Ground) o Note that because the average object size may be small itself (as in the case of artillery detection radar),
this does not preclude small objects from being readily detected by the appropriate types of radar. Speed has less of an effect than size, but works in an opposite manner - the faster the object is moving (relative to the radar range), the harder it is for the radar to locate and track effectively.
• If the target is a weapons system (aircraft, vehicle, etc.) and has a stealth rating, this reduction is applied to the probability directly. For example, if the current detection probability is 80%, and the target stealth rating is 40%, the final probability is reduced to 32% (80% x 40%).
• Ground clutter is factored in for all targets at a height of less than 150 meters (AGL). The base amount of clutter is determined from the “roughness” of the map near the target, and adjusted for the height of the target relative to the ground heights nearby and if the unit is moving. If the radar has a ground clutter filter, the effects of the ground clutter are much less than radars without it. The general effect of ground clutter is determined by the height of the target relative to the area around it:
o If the radar does not have a ground clutter filter: Ground clutter loss is 100% at the average ground elevation minus 10 meters. Ground clutter loss is 90% at the average ground elevation. Ground clutter loss is 75% at the average terrain height (ground elevations plus above-ground
terrain such as trees, buildings, etc). Ground clutter loss is 50% at the maximum terrain height (ground elevations plus above-ground
terrain such as trees, buildings, etc). Ground clutter loss is 0 at 150m above the maximum terrain elevation.

If the target speed is 10 Kph or more, the clutter loss is reduced by 30% plus 1% for each additional 5 Kph of speed.
If the target speed is greater than zero, but less than 10 Kph, the clutter loss is reduced 10% plus 2% for each Kph of speed.
o If the radar has a ground clutter filter: Ground clutter loss is 65% at the average ground elevation minus 50 meters or more. Ground clutter loss is 40% at the average ground elevation. Ground clutter loss is 15% at the average terrain height (ground elevations plus above-ground
terrain such as trees, buildings, etc). Ground clutter loss is 0% at the maximum terrain height (ground elevations plus above-ground
terrain such as trees, buildings, etc). If the target speed is 10 Kph or more, the clutter loss is reduced by 60% plus 1% for each
additional 5 Kph of speed. If the target speed is greater than zero, but less than 10 Kph, the clutter loss is reduced 20% plus
2% for each Kph of speed. • A random determination based on the final probability from step 6 is made to see if the target is detected. • If it is, a further adjustment is made for ECM and ECCM (see below) to arrive at the information level. The higher
this level is, the more accurate and complete the information on the contact will be.
3-18.2 Blocking and Over the Horizon (OTH) Capabilities By default, radar is blocked by the ground. As such, hills and mountains will prevent radar from detecting targeted behind them. To determine if terrain blocks the radar, a simple LOS is run between the radar and the target, taking into account their heights above the ground. If the ground (NOT INCLUDING TERRAIN) blocks the LOS, the radar cannot detect the target.
Figure 49: The effects of elevated terrain on radar detection.
Terrain features, such as woods, buildings, or other structures are not included in the LOS determination, since they are taken into account in the ground clutter adjustment routines. The horizon of the earth also blocks radar without OTH (over the horizon) capabilities. If the radar is OTH-capable, the range “past the horizon” is extended by 50% of the maximum range at which the radar could detect a target at the same height taking into account the horizon. For example, if an OTH capable radar is attempting to detect an aircraft flying at 10,000 meters but the direct LOS is blocked by the horizon, the routines will determine the maximum range at which an aircraft flying at 10,000 meters can be detected with the LOS just “grazing” the surface of the Earth. To model the OTH capability, 50% will be added to the calculated range and if the intended target aircraft is this distance or less from the radar, it can be detected.

Figure 50: The Earth's horizon blocks radar. Radars without OTH capabilities would only be able to detect
Target 1. Those with OTH capability would be able to detect both. The horizon calculations include the radar and target heights above ground level (AGL).
3-18.3 ECM/ECCM Effects on Radar ECM (Electronic Counter Measures) and ECCM (Electronic Counter-Counter Measures) are used primarily in the routines dealing with radar guided missiles. However, they also determine the amount and accuracy of detection information. ECM are signals produced by the target to confuse or disable the tracking radar. ECCM are measures taken by the radar to eliminate the extraneous ECM signals produced by the target (and usually consist of computerized signal filters and sophisticated digital analysis systems). The target’s ECM rating is determined by its Decoy System. The radar ECCM rating is set as part of the radar’s characteristic values. Once an enemy object has been detected, the computer checks if it has a decoy system that can produce ECM. If it does, the ECCM rating of the radar is subtracted from the ECM rating of the target. If the value is equal to or less than zero, the ECM has no effect. Otherwise, the amount is subtracted from the detection probability to arrive at the information level. The higher the level, the better the information gained by the contact. Even at 100%, though, the exact weapons system model of the contact will never be specified, only the type will be given (i.e. “Fighter Aircraft” not “US F-15E”). The same basic procedure is used to modify the hit probability of radar guided missiles. The ECCM rating of the guidance radar is subtracted from the target’s ECM, and if the resulting value is greater than zero, it is subtracted from the hit probability.
3-18.4 Radar/EW Bands: Frequency Reference The default radar systems in the Radar Data Table and the Advanced Energy Weapons Systems are pattered on the standard NATO radar bands. These bands are labeled a to M and are defined as:
Band Frequency Range (GHz) A 0.03 - 0.25 B 0.25 - 0.5 C 0.5 - 1.0 D 1.0 - 2.0 E 2.0 - 3.0 F 3.0 - 4.0 G 4.0 - 6.0
H 6.0 - 8.0 I 8.0 - 10 J 10 - 20 K 20 - 40 L 40 - 60 M 60 - 100
Section 3-19: Combat Engineering Combat Engineering Systems allow units to perform a wide range of mobility, counter-mobility, and survivability operations. In all cases, these operations end up changing the map and terrain in some way, even if the changes are not immediately revealed to the enemy player. To account for the on-map changes, engineering operations must be linked to a terrain type defined in the TEC (Terrain Effects Chart). The TEC values include changes in the movement point cost and breakdown probability of the hex (from obstacles), any LOS or other height effects (from walls or berms), and the symbol to display on the map. Work times of engineering operations are set based upon one squad (10 troops) or one vehicle. Once the scenario is under way, if additional troops or vehicles are assigned to work on a project, the time will be reduced using a formula of diminishing returns (each additional squad or vehicle added to a project is less effective than the previous, as they tend to get in each other’s way, etc.). This means the time reduction by adding a fifth or sixth squad / vehicle is usually small.
3-19.1 Mobility Operations Mobility operations improve the ability of friendly forces to move across the battlefield. Common tasks included in mobility operations include obstacle clearance, breaching minefields, and the construction of roads, trails and bridges. The simulation can model all of these activities, although the time required for the construction of roads and permanent bridges may extend beyond the length of a standard scenario. Mobility operations are defined and conducted as: • Obstacle Clearance: This is the ability to destroy or create a lane though various obstacles that renders them
ineffective. These obstacles include items specifically constructed as impediments to movement such as abatis, concrete obstructions (“dragon’s teeth”), steel obstructions (“tetrahedrons”), anti-tank ditches, log hurdles, log cribs, and barbed wire. Additionally, common terrain features such as walls, berms (including “bocage”), or thick hedges can also act as obstacles. Finally, obstacles can be created as a result of combat actions, as in the case of rubble and craters.
Once a scenario is underway, moving units with an appropriate engineering system will automatically try to clear any obstacles they encounter, unless given specific orders to the contrary. When the work is completed (based on the size of the work party and the work time specified in the Engineering System table), the obstacle is removed from the map and has no further effects on movement or combat.
• Breaching Minefields: Because of the time required, minefields are not normally completely cleared during initial
active combat operations. Instead, relatively narrow lanes are created through the minefields that allow for the passage of friendly forces. Later, when time permits, additional sweeps are made to remove mines outside of the lanes. For clearance purposes, all mine models are treated equally in the simulation. This means it takes the same amount of time to clear a lane though a hand-placed anti-tank minefield as it does a scattered anti-personnel one delivered by artillery.
Once a scenario is underway, moving units with an appropriate engineering system will automatically try to breach any minefields they encounter, unless given specific orders to the contrary. When the work is completed (based on the size of the work party and the work time specified in the Engineering System table), the lane is placed in the hex. From that point, any moving unit (friendly or enemy) can use it to negotiate the minefield with a much-reduced chance of hitting a mine. Note that undetected and/or viable mines will remain in the hex and can be encountered by units moving outside of the cleared lane. Additionally, a few may even remain in the lane itself, depending on the original mine density, the force training levels and other factors.
• Road, Trail and Bridge Construction: Most large-scale operations of this type are outside the scope of the
simulation, as they take many hours or even days to complete. However, small-scale repairs and bridging can be accomplished in relatively short periods.

Once a scenario is underway, units (with an appropriate engineering system) must be given specific orders for road, trail and bridge repair or construction. Depending on the type, work begins when the unit moves adjacent to the hexside (if it is placing a “bridge” feature) or into the hex (if it is placing a “hex” feature). The unit must be able to move into the appropriate work hex in order to start the job. If the starting hex is prohibited to the unit, the construction mission will be abandoned. At the start of work, the orientation (facing) of the feature is determined, and cannot be changed once work is under way. When the work is completed (based on the size of the work party, the work time specified in the Engineering System table, and the relative movement cost of the hex), the feature is placed on the map, in the orientation specified at the beginning of the job. From that point, any moving unit (friendly or enemy) can use the feature as if it were a standard road or bridge.
3-19.2 Counter-Mobility Operations
Counter-Mobility operations reduce the ability of enemy forces to move on the battlefield. They are also often used to “channel” the enemy into pre-determined killing zones. Common counter-mobility tasks include obstacle construction, placing minefields, and the destruction/blockage of roads, trails and bridges. The simulation can model all of these activities. Counter-mobility operations are defined and conducted as: • Obstacle Construction: This is the ability to create one or more physical obstacles in a hex to slow or stop
moving units. Common obstacles include abatis (trees felled in a “herringbone” pattern across a road or trail), concrete obstructions (“dragon’s teeth”), steel obstructions (such as “tetrahedrons”), anti-tank ditches, log hurdles, log cribs, and barbed wire. Additional terrain types can also act as obstacles, including common terrain features like walls, berms (including “bocage”), and thick hedges. Obstacles can also be created by combat results as with rubble and craters. If desired, these types of terrain can also be “constructed” by engineering systems, with the same effect as those occurring by other means.
Once a scenario is underway, units (with an appropriate engineering system) must be given specific orders to construct obstacles. If the obstacle is of a “Hexline” or “Hexside” type, the exact placement is determined when work starts. When the work is completed (based on the size of the work party and the work time specified in the Engineering System table), the obstacle is placed on the map and its effects on movement and combat applied as appropriate to both friendly and enemy forces.
• Placing Minefields: In the simulation, minefields are placed in two different ways, depending on whether the
minefield is marked or not. If the minefield is not marked, it should be defined using the Ammunition Data tables. Otherwise, it is defined as an Engineering System. “Scatterable” type mines are normally placed by artillery or aircraft cluster-type rounds, and as they are unmarked, are defined in the Ammunition Data table, not the Engineering Systems Data table. Mines placed by systems mounted on trailers or vehicles, which also create a random scatter pattern of placement, can be of either type. If the resulting minefield is not marked, the system should be treated like a cluster munition, and defined in the Ammunition Data table. If the minefield is marked, it should be defined as an Engineer System. Mines placed by hand are always assumed to be marked, and are defined as Engineering Systems.
Once a scenario is underway, units (with an appropriate engineering system) must be given specific orders to place minefields. When the work is completed (based on the size of the work party and the work time specified in the Engineering System table), the mines are added to the hex in the quantity and type specified, and the TEC symbol (if any) is shown. From that point, any moving unit (friendly or enemy) must contend with the minefield when moving through the hex. The higher the mine density, the greater the chance the moving unit has of hitting one (or more).
• Road, Trail and Bridge Destruction: As with construction, most large-scale operations of this type are outside the
scope of the simulation. However, small-scale demolition can be accomplished in a relatively short period.
Once a scenario is underway, units (with an appropriate engineering system) must be given specific orders for road, trail and bridge demolition. Depending on the type, work begins when the unit moves adjacent to the hexside (if it is a bridge demolition) or into the hex (if it is cratering a road or trail). The unit must be able to move into the appropriate work hex in order to start the job. If the starting hex is prohibited to the unit, the demolition mission will be abandoned. When the work is completed, the road or bridge is considered primed for demolition. The explosives can then be set off at any time (including immediately) as long as the owning player has a unit adjacent to the hex (or hexside in the case of a bridge). In some cases, the explosives may not detonate, or the damage may not be sufficient to block the roadway. In the first case, the charges can be “re-primed” and the demolition

attempt retried. In the second, the explosives will need to be placed from scratch. Primed hexes are “un-primed” whenever an enemy unit stops for at least one turn in their hex and there is no friendly unit adjacent.
3-19.3 Survivability Operations
Survivability operations protect friendly forces from the effects of enemy actions. Trenches, bunkers, fighting positions, pillboxes and casemates are all examples of these types of constructions. In the simulation, the characteristics of the individual fortification types are contained in the Improved Position Data table. However, the Engineer Systems Data table is used when determining what types of equipment systems can construct which types of positions, and how long it takes. Once a scenario is under way, units must be given specific orders to construct IP’s. When work begins, if the IP has a firing arc of less than 360 degrees, the owning player must specify the IP facing. Once work has begun, the facing cannot be changed. When the work is completed, the IP is placed on the map, and may be occupied by friendly forces. Multiple IP’s can be placed in the same hex, as long as the total capacity does not violate the absolute stacking limit.
3-19.4 Adding In-place Engineering Items to the Map At the start of a scenario, players may be given the opportunity to place engineering items “in-place” on the map. Normally, the placement and quantity of engineering items is determined by the force’s “engineering level”, and is limited to the defending force. Engineering items placed at the beginning of the scenario add to the opposing player’s Victory Point total. Those placed during the game do not.
3-19.5 Mines and Minefields Mines are munitions intended to provide sudden and surprise damage to an unsuspecting enemy force, and to provide a projection of combat power to areas not covered by friendly forces. Unlike most other forms of munitions, mines lie immobile and dormant until they are activated and detonated by nearby enemy activities. Activation and detonation can be accomplished in a number of different ways. The most common methods for AP (anti-personnel) and Chemical type mines are through direct pressure (a soldier steps on one), or by a tripwire. AT (anti-tank) mines are more commonly detonated by direct pressure (greater than that produced by a soldier), sound (engine and other noises), magnetic flux (produced by the large amount of metal in a vehicle), or “tilt-rods” (which stick up in the air like grass or saplings, and articulate when a vehicle brushes against them). Naval mines, while often more complicated than those found on land, also normally key in on magnetic flux or sound to activate and find their targets. The simulation keeps track of the individual quantities of each type of mine for each minefield.
3-19.5.1 Types of Mines There are six primary types of mines:
• AP (Anti-Personnel): Anti-personnel mines come in a variety of sizes and configurations. Some explode in-place,
while others fly (or “bound”) a meter or so into the air before exploding. In most cases, these types of mines send out shrapnel, ball bearings or other flying debris intended to kill or seriously injure unprotected personnel. AP type mines are often set up with tripwires to increase the probability of their being detonated by troops moving through the area.
• AT (Anti-Tank): Anti-Tank mines are intended to destroy vehicles, especially those that are heavy and/or armored. In many cases, these mines use selective fuses that let light vehicles pass untouched, as they wait for more lucrative targets. AT type mines generally use either a shaped charge explosive, or a system that “fires” a dense metal plug directly upwards. However, simple mines of pure explosive are also widely used and they can damage or overturn a vehicle even if they can’t penetrate its armor. Active AT mines always lie above ground and are armed with rockets having HEAT warheads.
• Chemical Persistent: These types of mines are generally filled with 4-10 liters (1-2 gal) of high viscosity/low vapor pressure liquid chemical agent. A small “burster” charge disperses the liquid upon detonation. Depending on climate conditions (wind, temperature, etc.) the chemical agent droplets can cover an area with a radius of up to 20-30 meters from the detonation point (depending on drift).
• Chemical Aerosol: These types of mines are generally filled with 4-10 liters (1-2 gal) of low viscosity/high vapor pressure liquid chemical agent. A small “burster” charge disperses the liquid upon detonation. The chemical agent forms a cloud that will drift across the area before dispersing. The actual rate of dispersion depends primarily on the wind and temperature, and whether precipitation is falling.
• Naval: Naval mines are intended to destroy ships and other large naval vessels. However, when placed close offshore, they will also attack smaller amphibious and landing craft. Normally, these types of mines are anchored to the sea bottom with an adjustable tether, which enables them to float at various depths (which controls to some extent what targets they will attack and how much damage they cause). Active naval mines with self-propulsion guide themselves to the target before detonating, while stationary ones fire a guided torpedo.

• Illumination: Illumination type mines provide artificial light to help identify and locate enemy units visually at night. These mines are also used for early warning, in that they alert friendly forces to the presence of the enemy, even during the day when the illumination effects are pointless. Illumination mines, often called “trip flares” are normally attached to trip wires to increase their early warning effectiveness.
• Command Detonated: While a not a specific mine type, command detonation allows friendly units to remotely explode the mine when an enemy target is closely or most vulnerable. The link to the mine may be a wire if the distance is relatively short, or by radio. Command detonated mines require that the friendly unit initiating the detonation have an LOS to the target location, and be within the command range of the mine.
3-19.5.2 Types of Minefields
The simulation recognizes three general types of minefields: Deliberate, Hasty and Scattered. Each type has slightly different properties and characteristics in the simulation. Note: these minefield types do not specifically correspond to the doctrinal procedures or nomenclature of any armed forces - they are used only to help identify common minefield characteristics. • Deliberate minefields are placed by hand according to a pattern, and the location of each mine known and/or
recorded for reference. These types of minefields are placed by hand, and include defensive mines distributed around a perimeter, as well as large barriers comprised of rows and clusters that stretch for several hundred meters or more. Significant deliberate minefields are normally marked, and the mines themselves buried and well camouflaged.
• Hasty minefields are placed within a known and well-defined area, and at a specific mine density, but the location of each individual mine is not usually known exactly or recorded. The minefield boundary is usually marked, depending on the situation and if time permits. The most common example of this type of minefield is one placed by rapid mechanical means (“mine-throwers”). The mines in hasty minefields are not buried, but may be slightly camouflaged.
• Scattered minefields are placed by remote means in areas not normally closely observed by friendly forces. The exact area and placement of each mine is not known, and the area is not marked unless it is readily accessible to available friendly forces. These types of minefields are placed though artillery or aircraft scattering, and the mines themselves lie on the surface, without any deliberate camouflage.
With a few exceptions, mines are always evenly spaced throughout a location. The exceptions apply only to deliberate minefields, and only when they are placed in hexes with roads or obstacles. In the first case, when a deliberate minefield is placed in a hex including a road or trail, the mines may be laid preferentially on the road. The result is units moving along the road have a much greater chance of hitting a mine than if they were moving off to the side. The other exception is when a deliberate minefield is placed in a hex also containing an obstacle, such as a tank ditch or abatis. In this situation, all of the mines are assumed to be entirely on the obstacle, and are not detonated until a unit tries to breach it.
3-19.5.3 Minefield Combat Results The simulation uses several different routines to determine if moving units detonate mines in a hex through which they are moving. However, all of the routines are based on determinations of the mine density in the location (of the appropriate type) and the equipment density of the moving unit (number of vehicles, personnel, ships, etc.). As each of these density values increase, so does the chance the unit will hit a mine. The density values can also be adjusted for roads, if the minefield is deliberate and the unit is currently in a road march mode, or if a unit is trying to breach an obstacle (see above). By default, AT mines can be detonated only by vehicles; vehicles and personnel can detonate AP, Illumination and Chemical mines; Naval mines can be detonated by ships and amphibious vehicles. Each mine is given a “radius of action” which represents how closely the target must come to the mine in order to detonate it. Mines in scattered or hasty minefields, as well as all Anti-Tank mines, have a radius of action of 1 meter or less. AP and Chemical mines in deliberate minefields have a radius of action of 5 meters, and illumination mines 15 meters (the increase in distance represents tripwires and other proximity triggers). Naval mines have a radius of action of 7 meters against non-ship targets and 15 meters against ships (to account for the greater mass and other signatures of ships). Active AT mines have a radius of action of 50 meters while active naval mines 100 meters due to their sensors and other relatively advanced detection equipment. Mines may also be “command detonated” in situations where a dismounted personnel type unit is in a location adjacent to the friendly minefield. This represents mines that are placed with electrical wires running back to friendly positions. Compared to the random detonations caused by simple unit movement, the command detonation situation causes a higher number of mines to be detonated, and also increases the damage probabilities. Command detonations can also occur against stationary enemy units in the minefield. Command detonation does not apply to Illumination or naval type mines.

Units moving through an unknown minefield may spot the mines before they are detonated. The probability is based on the level of cover in the location (using the terrain TEC values), and adjusted upwards slightly for hasty minefields, and significantly for deliberate ones. If the unit is moving down a road, the cover is always zero, meaning that randomly placed mines are almost always spotted, and hasty mines usually spotted. Deliberate mines, however, are still harder to see since they are usually buried or installed just off the edge of the road with trip wires. Mine detonations in unknown minefields usually cause the moving unit to pause and disrupt its normal flow of operations (which in the simulation causes a temporary additional delay in issuing commands to the unit). The probability of these occurrences is based on three determinations: First, did the unit realize a mine was detonated, second, what threat it poses, and third, does the current situation require it to keep moving? Concerning the first condition, recognition of a mine detonation is based primarily on the target conditions at the time, the size of the mine, and what damage it causes. For example, dismounted infantry will always know when a mine detonates, whereas the crew of a buttoned up tank roaring down the highway may never know they detonated a small trip-wired antipersonnel mine 2 meters off it’s side. Similarly, units under heavy explosive fire may not recognize mine detonations amid the confusion and noise. However, when a mine destroys a tank, normally everyone is going to know about it. Naval mines are also almost always recognized immediately, due to the prominent water plume they create. Illumination flares are always recognized. In any case, once an unknown minefield has been identified by a detonation (other than an illumination type), the moving unit will suffer at least some degradation in receiving new commands during the current turn, as it is assumed to be reporting the minefield location and other information to higher HQ. The second condition is checked only after it is determined that the moving unit recognized the mine detonation. In general, units will normally pause to sort things out whenever a mine goes off. This is true even if the mine that detonated was harmless, because the minefield may contain deadlier mines as well (AP and AT mines are usually placed together). The final determination looks at the current situation of the unit, and any orders it has to “press on at all costs”. If the unit cannot safely stop in the minefield location (due to enemy fire, or if the mine dispersed chemicals), it will usually keep moving. Dismounted personnel, and other slow moving types, are less likely than vehicles to keep moving, and may try to retreat out of the hex instead. Mine damage is applied using either the penetration (against an armored target) or the burst radius (against personnel). When non-active AP mines are determined to explode under their target, the bottom armor value is used to determine damage. Otherwise, the mine effects may be applied against the tires, tracks or sides of the vehicle (at a much reduced effect). Active AT mines always hit either the front, side, or rear surfaces of their targets. Shrapnel effects from AP mines are always adjusted for the terrain in the hex.
3-19.5.4 Clearing Minefields Minefields may be cleared though direct actions, combat actions, or depletion and attrition. Direct actions include clearing by hand (sweeping or prodding), clearing by mechanized equipment (bulldozers or flails) and clearing by specialized explosive charges (“bangalore torpedo” or line charges). In all cases, these actions create a lane though the minefield though which friendly units can pass safely. However, (non-active) mines usually still remain in the rest of the hex, and there is always a probability a few may still remain undetected in the lane as well. Active mines, because they rise above the ground and can be spotted easier, are always considered completely cleared. The simulation recognizes two types of lanes, personnel (1.5 -2 meters wide) and vehicle (4-5 meters wide). Each deliberate clearing action has a work duration based on the clearing method and the type of lane created. Some types of clearing can create only one type of lane, as in the case of a flail that always clears a vehicle lane. The clearance effort duration times are entered in the Engineering Duration Table. Mines can also be cleared though combat actions which create pressure, ground shock waves, or high temperatures in the minefield’s location. Pressure waves are created by above ground explosions, such as artillery airbursts and fuel air explosives. Ground shock waves are caused by actual impacts. In both cases, the force on the mines is determined by the power of the explosion (based on the projectile’s filler weight), and the distance between the explosion and the mine (based on random impact and mine placement within the hex). However, in general, the more explosive power impacting into a hex, the greater the probability a mine will be detonated. Likewise, the greater the number of mines in a hex, the more likely an explosion will detonate at least one of them. High temperatures caused by forest fires can also cause mines to detonate. The number of mines in the hex and the terrain fire level (which is a measure of how hot and widespread the fire is) are used to determine the average detonation probability. Active mines, because they rise above the ground and also because of the vulnerability of their control and acquisition systems, have a much higher probability of being destroyed by all methods.

Each mine detonated by a moving unit is removed from the minefield, a process known as depletion. Mines can also be lost through planned attrition, which is when the mines themselves self-destruct (a feature found primarily in scatterable mines). While self-destruct times are classified, at least for US mines, in the simulation all scattered mines self-destruct after 6 hours. Section 3-20: Leaders Leaders are individuals occupying command positions within the force. When a leader is assigned directly to a base (indivisible) maneuver unit, such as a platoon, the leader affects only that unit. If, instead, the leader is assigned to a formation headquarters, the leader also affects all of the units assigned to that formation (in addition to directly affecting the HQ unit itself). This would be the situation for a company commander, who would exert leadership over the constituent platoons. The actual effectiveness values of leaders are never revealed with complete accuracy to the human commander. In fact, the values are normally adjusted on an on-going basis while the battle is in progress. However, the longer the leader serves with the force (in terms of the number of battles), the better the leader will be known, and the more accurate the reported information will be.
3-20.1 Assigning Leaders to Units The unit to which a leader is assigned can be of any size, including a single tank, gun or soldier. Likewise, any number of units (or even all the units) in the game can be given a leader. However, in order to prevent an unmanageable proliferation of leaders, for the most part they should be limited to the first two sub-echelons of the force. For example, if the force is a battalion, leaders should generally be assigned only to the company and platoon levels. However, a few leaders can always be “sprinkled” among the squads or a few platoons left without an assigned leader to get a better “playing” game. An example of company leadership assignments, including the constituent platoons and squads, might look like this:
A Co
CPT Bell
1st Plt 2nd Plt 3rd Plt
1LT Brown
2LT Brett
_
1 Sqd 2 Sqd 3 Sqd 1 Sqd 2 Sqd 3 Sqd 1 Sqd 2 Sqd 3 Sqd
SSG Holms
_ SSG Ray
_ CPL Marks
_ SGT Glass
SSG Clark
_
Note that this chart demonstrates that not every unit needs a leader, and that leaders can be assigned to units in any echelon without restriction (including ranks: a captain could be assigned to a squad or a sergeant to a company HQ). Leaders are assigned to units at the beginning of a battle. In campaign situations, leaders not killed or wounded in the pervious engagement automatically begin the battle as part of the force. New replacement leaders may also be assigned by the computer to offset losses (this is not a certainty, however). Otherwise, for non-campaign scenarios leaders can be selected from any defined in the leader table. A leader may only be assigned to a single unit in the force. Units without live, unwounded leaders, either assigned directly or in their immediate chain of command, ignore the leader routines and use only the basic routines and force values.

3-20.2 Leader Effects Leadership effects can be positive, negative, or neutral depending on the leader’s characteristics and the current situation. For example, a certain leader could be very good at rallying troops, but poor at targeting. In this case, under the leader’s command the unit would be steady under fire and hard to break, but would also fire at sub-standard rates. Leaders that are wounded or killed cease to have further effect in the current battle. In campaign games, wounded leaders may “recover” and reappear as a replacement in a later battle. In a single battle scenario, killed and wounded leaders “heal” automatically at the conclusion of the battle and may be selected for all future battles, although killed leaders will have their leadership values reset to a default level (see Leader Experience, below). Most leadership values have a range of between 0 and 200. In general, these values produce the following results: 0 -----------------> 50 ------------------> 100 --------------> 150 --------------- > 200 Very Bad Bad Neutral Good Very Good (Up to -100%) (Normal, + or - a little) (Up to + 100%) The actual modification is always determined randomly, based on the maximum amount allowed. Values below 75 always have negative effects, while values above 125 always have positive effects. Values between 75 and 125 can have either positive or negative effects, although the farther the value is from 100, the greater the tendency will be to produce an effect in line with that side of the graph. For example, a value of 80 has the potential to cause a good effect, but most of the time it will produce a negative one instead. The effects are calculated by: • If the value is greater than 125, the value will be modified by a percentage up to an amount equal to the (value -
100). For example, a value of 200 will decrease the normal morale loss by up to 100%. The change will always be to the benefit of the unit.
• A value of between 75 and 125 may either add to or decrease the actual amount. The probability of positive effects is equal to: 2 x (value -75). So, using the example above, a value of 80 has only a 10% chance of causing a positive action. The remaining 90% of the time, it will cause a shift in a negative direction. The actual percentage amount will be a maximum of the absolute value of (value -100).
• If the value is less than 75, the morale loss will be modified by a percentage up to an amount equal to (100 - value). For example, a value of 200 will increase the normal morale loss by up to 100%. The change will always be to the detriment of the unit.
Leaders are rated in the following areas: • Morale: This leader value affects morale losses taken as a result of enemy fire. Eventually, morale losses cause
units to break, waver, surrender, or go berserk. • Communications: This leader value adjusts the time required to transmit an order or request fire support via the
radio. The shorter the transmission times, the less likely it is the enemy will home in on the source of the signal, and the quicker the unit can begin executing those orders. Leaders with high communication skill also reduce the internal friction of the unit, and the time it takes to join units together.
• Targeting: This leader value applies to how effective a unit will be at achieving optimum target selection by reducing target “overlap”. “Overlap” is when one or more friendly weapons systems engage the same enemy target, but the additional fire has little or no effect. Leaders with a high rating in this area can better judge how effective their fire is, and potentially assign fire to other targets accordingly.
• Competence: This is how often the leader will mis-interpret orders, both movement and targeting. In most cases, even when the orders are misinterpreted, the effects will be minor (the speed may be a little off, or an adjacent unit targeted). However, for very bad ratings (75 or less), the leader may change the unit’s movement objective or path, or even decide not to move (in which case the orders will have to be re-issued). Leaders with higher competence levels will also reduce the internal friction level of the unit.
• Initiative: This is a measure of how effective the leader is at operating in the absence of orders. While “good” and “bad” are relative in this case, leaders with higher ratings are more likely to discern the force commander’s intentions and move in promising directions. Higher initiative leaders also speed up unit emplacement times
• Aggressiveness: This value is taken into account when a unit undergoes a morale check to see if it goes out of control in some way, either by wavering, breaking, surrendering, or going berserk. These checks also include running for cover. Like the Initiative rating, what is “good” and “bad” in this regard depend on the exact circumstances. However, for purposes of the calculations, bad is considered failing the check. Highly aggressive leaders also speed repair efforts, and will move out more quickly if a failed carrier unit fails to make the planned rendezvous.

3-20.3 Leader Casualties Whenever a unit with a leader takes casualties, either killed or wounded/disabled, there is a chance the leader will suffer the loss. The aggressiveness of the leader, and the level of the unit are used to determine the probability of this occurring. The more aggressive the leader, and the lower the unit level, the more likely the leader will become a casualty. In cases where a detachment is created to model the effects of some type of damage or immobilization, the leader will remain with the main unit unless the leader is deemed a casualty. Section 3-21: Air Operations Air operations include close air support (CAS) and paradrop missions. Once issued by the human player, the AI takes over and issues the necessary orders to the aircraft to accomplish the mission. The aircraft involved can not be given any other orders, and their movement paths cannot be edited or changed by the human player until the mission is over without first canceling the mission.
3-21.1 AI-Generated Aircraft Movement There are two types of AI-generated movement: orbiting and flight path to target. Orbiting is an oval shaped pattern flown by fixed-wing aircraft without other orders, e.g., they are essentially “on-call” waiting to be given a mission. The flight path to target is used when the aircraft has a specific destination, which normally is specified as part of a mission although it can just be repositioning.
3-21.1.1 Aircraft Turn Rates Aircraft are limited in how fast they can turn by the stresses the turns generate through centripetal acceleration (commonly referred to as centrifugal force). These forces are usually measured as compared to the acceleration of gravity, hence the term “G-force”, or “G’s”, where one G equals the acceleration force of gravity at the Earth’s surface. Aircraft are rated for the maximum G-force they can sustain based on some of their general weapons system values. Specifically, the routine works like this: • If the aircraft weight is over 100,000 Kg, the turn rate is 3 degrees per second • Otherwise, the weight of the ammo being carried (bombs, missiles, etc.) is added to the base aircraft weight. • The speed to total weight ratio is determined using the maximum (road) speed value from the Weapons System
Data table. • if the ratio is greater than 1.0, the maximum G force is set to 9.0. • Otherwise, the maximum G force = [10 (ratio)0.6 ] - 0.5. • The turn radius is determined using the equation for centripetal force: r = v2 / 9.8 Gmax • The turn rate is calculated using the unit speed.
The maximum turn rate for all aircraft, including those hover-capable, is 90 degrees per second.
3-21.1.2 Orbiting Fixed-wing aircraft cannot stop and occupy a stationary position; they must maintain a constant air speed to remain aloft. Rather than forcing players to constantly give air units movement orders, the AI will automatically issue orbiting orders to all fixed-wing aircraft that do not have orders and are not moving to a specific objective. The orbits will be ovals, where the straight segments (“legs”) are 120 seconds of flight time, and the turn segments are based on the standard aircraft turn rate and speed.
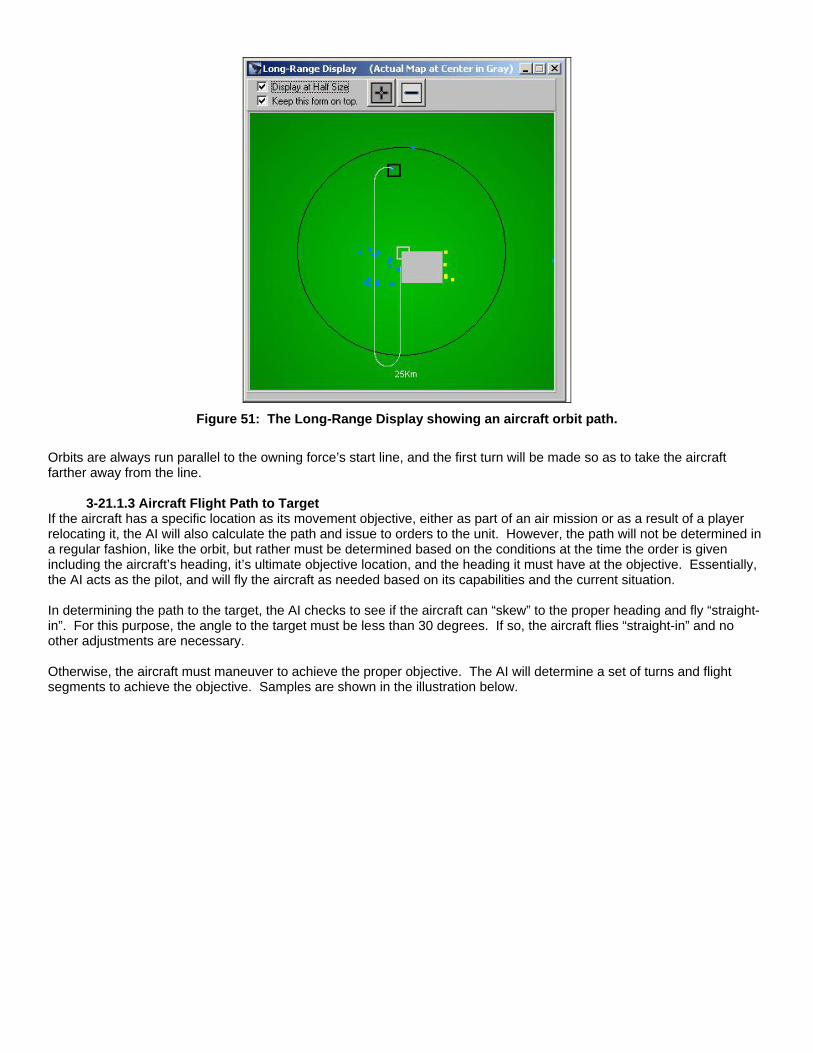
Figure 51: The Long-Range Display showing an aircraft orbit path.
Orbits are always run parallel to the owning force’s start line, and the first turn will be made so as to take the aircraft farther away from the line.
3-21.1.3 Aircraft Flight Path to Target If the aircraft has a specific location as its movement objective, either as part of an air mission or as a result of a player relocating it, the AI will also calculate the path and issue to orders to the unit. However, the path will not be determined in a regular fashion, like the orbit, but rather must be determined based on the conditions at the time the order is given including the aircraft’s heading, it’s ultimate objective location, and the heading it must have at the objective. Essentially, the AI acts as the pilot, and will fly the aircraft as needed based on its capabilities and the current situation. In determining the path to the target, the AI checks to see if the aircraft can “skew” to the proper heading and fly “straight-in”. For this purpose, the angle to the target must be less than 30 degrees. If so, the aircraft flies “straight-in” and no other adjustments are necessary. Otherwise, the aircraft must maneuver to achieve the proper objective. The AI will determine a set of turns and flight segments to achieve the objective. Samples are shown in the illustration below.

Figure 52: Aircraft flight paths as set by the AI based on the relative target location and final heading required.
3-21.2 Close Air Support (CAS) Missions
Close Air Support missions are attacks by aircraft on ground targets in support of friendly land forces. In all but the most isolated situations, they are relatively complicated affairs, since mistakes and miscommunications can endanger both friendly ground forces and the aircraft itself. The complete CAS mission is broken into three major sections: the aircraft flight path, the SEAD (suppression of enemy air defenses) support, and support friendly ground or air units will provide in terms of marking, target designation and/or weapon control.
3-21.2.1 The CAS Flight Path The CAS flight path is broken into segments, determined in the following order: • The weapon release point is determined based on the target location, the direction chosen for the mission by the
force commander, and the standoff range of the munitions being used. • The weapon drop run is determined. This leg is a straight and level path flown by the aircraft during which the
target is acquired, verified, and preparations made for the weapon drop/launch. Up to a point, the longer the straight-line path is, the better the accuracy will be. However, the maximum accuracy is reached at a distance determined as follows:

o Guided munitions: 25 seconds flight time. Five seconds are subtracted each for a marking unit, painting unit, and/or FAC. One half second is added for each Kilometer of munition standoff distance. The minimum distance is 2 seconds of flight time, the maximum 25.
o Un-guided munitions: 30 seconds flight time. Five seconds is subtracted each for a marking unit and/or FAC. Two seconds are added for each Kilometer of munition standoff distance. The minimum distance is 6 seconds of flight time, the maximum 60.
• The maneuver path from the aircraft’s current position to the start of the drop run is determined using the routines described in the previous section.
• The egress turn is added, using the egress turn direction set by the force commander. • If the aircraft will make multiple passes, the aircraft will fly “mini-orbits”, returning to the start of the weapon drop run
each time until the mission is complete. • Otherwise, the aircraft will either return to its starting “on-call” location or if completely out of ammunition, will exit
the operational area.
Figure 53: Standard CAS flight paths. The weapon drop run distance depends on the weapons being used.

Force commanders may specify many of these conditions, including the airstrike weapon drop direction and leg length, the egress turn direction, and the number of passes (ammunition permitting). However, the AI will “fly” the mission on its own, based on these values, without allowing for adjustment by the human player.
3-21.2.2 CAS Altitude Restrictions In order to prevent friendly fire from accidentally hitting aircraft on strike missions, altitude restrictions are placed on the aircraft to keep it out of harm’s way. These restrictions are based on the target distance from the FEBA (forward edge of the battle area). In the simulation, the FEBA is set as the player’s initial start line for the duration of the scenario.
Figure 54: Altitude limits AGL (above ground level) for close air support missions.
There are four minimum altitude restriction zones. Whether or not they are in force depends on the current scenario situation at the time the CAS mission is called. The zones are: • Zone A: the area behind and up to 7.5 Km in front of the FEBA. If any friendly unit is using direct or indirect fire at a
target within 1000 meters of the intended CAS target or CAS flight path, or another CAS mission is being flown in the same area, the minimum altitude is set at 1500m for heavy weapons (60mm and above) or 950m for all others.
• Zone B: the area 7.5 Km to 18 Km in front of the FEBA. If long-range friendly direct fire or another CAS mission is being used against a target within 1000m of the intended CAS target or the CAS flight path, the minimum altitude is 300m.
• Zone C: the area 7.5 Km to 18 Km in front of the FEBA. If friendly indirect fire is being used against a target within 1000m of the intended CAS target or the CAS flight path, the minimum altitude is 950m.
• Zone D: the area 18 Km to 30 Km in front of the FEBA. If friendly indirect fire is being used against a target within 1000m of the intended CAS target or the CAS flight path, the minimum altitude is 950m.
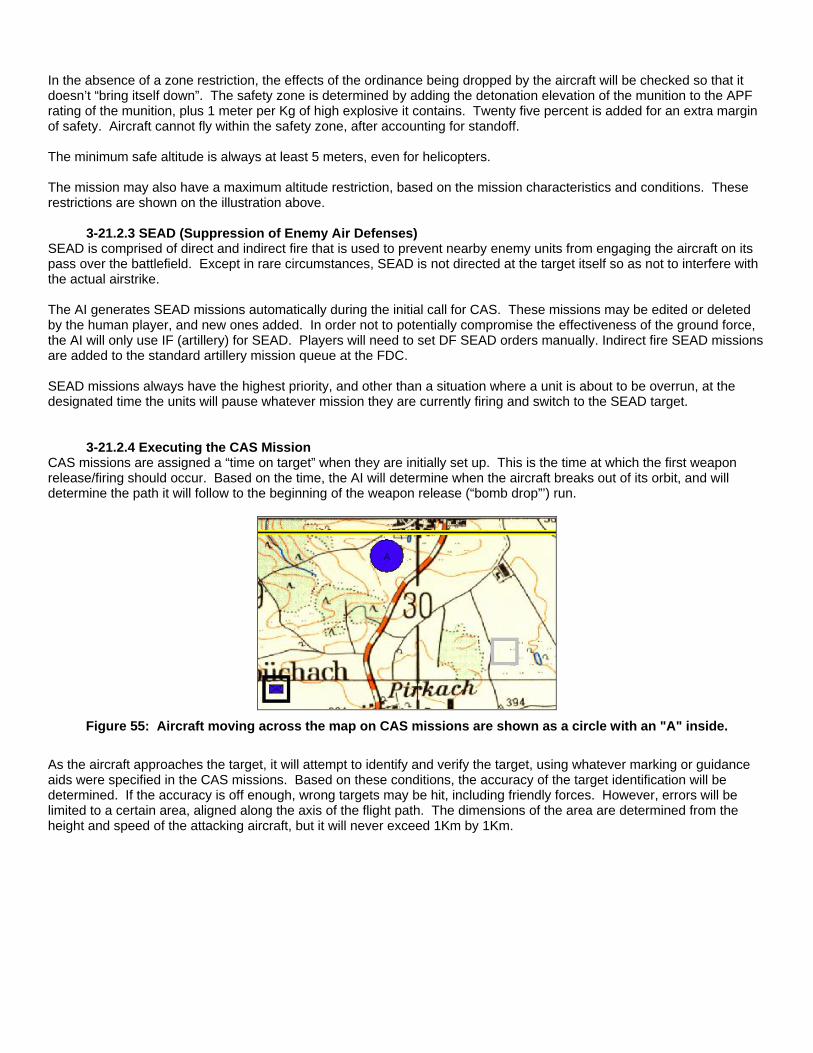
In the absence of a zone restriction, the effects of the ordinance being dropped by the aircraft will be checked so that it doesn’t “bring itself down”. The safety zone is determined by adding the detonation elevation of the munition to the APF rating of the munition, plus 1 meter per Kg of high explosive it contains. Twenty five percent is added for an extra margin of safety. Aircraft cannot fly within the safety zone, after accounting for standoff. The minimum safe altitude is always at least 5 meters, even for helicopters. The mission may also have a maximum altitude restriction, based on the mission characteristics and conditions. These restrictions are shown on the illustration above.
3-21.2.3 SEAD (Suppression of Enemy Air Defenses) SEAD is comprised of direct and indirect fire that is used to prevent nearby enemy units from engaging the aircraft on its pass over the battlefield. Except in rare circumstances, SEAD is not directed at the target itself so as not to interfere with the actual airstrike. The AI generates SEAD missions automatically during the initial call for CAS. These missions may be edited or deleted by the human player, and new ones added. In order not to potentially compromise the effectiveness of the ground force, the AI will only use IF (artillery) for SEAD. Players will need to set DF SEAD orders manually. Indirect fire SEAD missions are added to the standard artillery mission queue at the FDC. SEAD missions always have the highest priority, and other than a situation where a unit is about to be overrun, at the designated time the units will pause whatever mission they are currently firing and switch to the SEAD target.
3-21.2.4 Executing the CAS Mission CAS missions are assigned a “time on target” when they are initially set up. This is the time at which the first weapon release/firing should occur. Based on the time, the AI will determine when the aircraft breaks out of its orbit, and will determine the path it will follow to the beginning of the weapon release (“bomb drop”’) run.
Figure 55: Aircraft moving across the map on CAS missions are shown as a circle with an "A" inside.
As the aircraft approaches the target, it will attempt to identify and verify the target, using whatever marking or guidance aids were specified in the CAS missions. Based on these conditions, the accuracy of the target identification will be determined. If the accuracy is off enough, wrong targets may be hit, including friendly forces. However, errors will be limited to a certain area, aligned along the axis of the flight path. The dimensions of the area are determined from the height and speed of the attacking aircraft, but it will never exceed 1Km by 1Km.

Figure 56: The potential target area for an airstrike is centered on the intended target. The airstrike will hit a
target within this area, or will be aborted. The area allows for pilot error, and/or for better targets of opportunity to be attacked if found.
If the target is an area (as opposed to a unit or object), the probability of error goes up for lower visibility and the range of the drop point from the target. Otherwise, the probability of correctly hitting a unit (or object) target is determined as follows: • If the target is painted (with a laser), the painting unit may make an error. If not, the correct target will be identified
as long as the LOS meets the minimum requirements. The factors involved with the painting unit misidentifying the target are:
o Suppression. o LOS quality. o Number of similar enemy units in the same area. o Range. o Priority DF firing.
• If the munition is radiation homing, the time since the target last emitted a radiation pulse is used as the primary consideration. The longer the time, the less accurate the identification (and subsequent guidance) will be. If the radiation-homing munition has a low lock-on probability, the pilot may switch to another type, if one is available. Otherwise, the aircraft will either make another pass or abort the mission.
• For other munitions, the error probability is determined as follows: o The base probability is determined from the aircraft unit’s training and fatigue levels. o The error probability is reduced if a FAC is present. o The error probability is reduced is the target is marked. o The error probability is reduced if the TF HQ can visually see the target. o The error probability is reduced if the aircraft unit can visually see the target. o The error probability is adjusted for the aircraft speed; the faster it is going the more the higher error
probability.

o The error probability is increased for fires and smoke near the target area, as well as a high level of direct and indirect fire.
If the target is misidentified, the aircraft’s actual target will likely be of the same general type. For example, if the intended target was a group of tanks, it is likely that the incorrect, but actually engaged, target would also be of a tank type, or at the very least, vehicular.
3-21.3 Paradrop Operations Paradrop operations transport ground units onto the battlefield via fixed-wing aircraft using parachute delivery. As with normal transporting operations, the paradrop capable units are loaded onto the aircraft carrier units, and “unload” over the drop zone. But the nature of the aircraft and delivery method are very different. Any type of aircraft with a cargo capacity can fly a paradrop mission, including helicopters. However, paradrop is required for fixed-wing aircraft because they cannot stop moving to unload passenger units. Helicopters, on the other hand, have the ability stop and either hover or land in a location to unload without the attendant risks and initial disorganization that is part of an airdrop. Helicopters are rarely used for paradrop operations, and therefore the rest of this section will focus on fixed-wing aircraft.
3-21.3.1 Preparing for the Drop The first step in setting up a paradrop is to load the cargo aircraft. The units being loaded must be paradrop-capable, which is set in the Weapons System Data Table. All of the normal loading restrictions are in force, including “loading point” and maximum loaded weight limits. Fixed-wing cargo aircraft must be loaded at the start of the scenario during the set-up phase. There is no mechanism that will allow the aircraft to be loaded once the scenario is under way. The second step is to identify the drop zone (DZ), and set the mission profile characteristics. The DZ is the area in which the dropped units will land. It should be generally free of terrain and other obstacles that could cause injury and damage to the landing force. It should also be large enough to accommodate the force to be dropped in a minimum number of passes. The standard USAF drop zone sizes are set as follows: • GMRS (ground marking release system): Minimum 275m by 275m. • CARP (computed air release point): 550m by 550m for a single parachutist, plus 70 meters per additional
parachutist. However, these are peacetime standards, and areas of this size may not be available in wartime. As such, a rule of thumb is to use a minimum of 300 meters plus 50 meters per person or 500 meters per vehicle along the drop axis, per pass. Approximately 800 meters is the absolute minimum DZ length required for an infantry squad, and 1800m for a platoon. The DZ width is based upon the expected dispersion, which is principally a function of the wind and drop altitude. However, 300 meters is probably the bare minimum under good conditions. Once the DZ has been selected (based on the player setting the center point), the following mission profile values are set: • Time the drop should begin • Drop speed (normally the minimum aircraft speed) • Drop altitude (between 150-300meters) • Drop heading (this will become the LZ axis). • Number of passes/units to jump per pass. • The location to which the aircraft should return after the mission is complete.
3-21.3.2 Executing the Drop
As with airstrikes, the AI will determine when the aircraft will begin the execution of the mission, based upon the set start time. The AI will also determine and fly a flight path to arrive at the beginning of the “run-in” leg on the correct heading, altitude, and airspeed. The initial “run-in” leg is 60 seconds of flight time, during which time the pilots detect the DZ and line up on the proper markings. By this time the troops and other items to be dropped are hooked up to the static lines, and awaiting the jump command.

As the aircraft begins the run-in, the pilots will attempt to use the drop altitude specified for the mission. However, this altitude may be modified by any or all of the following conditions: • Personnel require 20/25 seconds (day/night) in the air. Cargo requires 15 seconds (day or night). Time in the air is
based upon the descent rate, which is set for each type of item being dropped: o Personnel: 6.0 m/sec o Guns: 7.5 m/sec o Vehicles: 8.5 m/sec o Aircraft: 7.0 m/sec o Other: 9.0 m/sec
• Additionally, personnel can never be dropped below 250m, cargo from under 350m. • The altitude can never be less than 150m above the highest obstacle along the flight path for 5Km in either
direction of the DZ (fixed-wing only). • The altitude is lowered for the wind speed, if above 5 Kph (and not over the maximum - see below). • The altitude is also lowered if known enemy units are in the area, so friendly units reduce their time in the air where
they are helpless targets. Conditions on the DZ may cause the mission to abort. These conditions are: • Visibility of less than 1000m (maximum sighting range). • Cloud cover 50% or more with a cloud base below 500m. • Personnel drop with wind speed above 32 Kph, cargo drop with winds above 40 Kph.
Figure 57: The basic paradrop flight path and stick locations relative to the intended drop zone. Note the sticks
belonging to unit 1 jump first, followed by the sticks from the other units, even if the sticks are on different aircraft or jump on different passes. The result is all of the jumpers from unit 1 will eventually land at the near
end of the DZ, those from unit 2 in the middle, and those from unit 3 at the far end.

3-21.3.3 Dropping the Sticks
In order to control the jump, the jumping units are broken up into “sticks” of relatively equal size. The number of sticks is either equal to, or an even multiple of, the number of aircraft flying the mission. Stick sizes are based on the maximum number of jumpers that can exit the aircraft in a single pass, divided equally among all of the units to be dropped. Longer passes (in terms of time) result in larger sticks, since more jumpers can exit the aircraft before reaching the end of the DZ. By default, the sticks will be as large as possible, up to the unit quantity divided by the number of aircraft available. The reason for using sticks is so that all of the elements in a single unit will jump essentially over the same point in the DZ, rather than being spread out over the flight path and intermingled with other units dropping from other aircraft or in subsequent passes. The reasoning is illustrated in the previous diagram, where all of the sticks belonging to unit 1 jump over the near end of the LZ, those from unit 2 in the middle, and those from unit 3 at the far end. Without the use of sticks, the units would be completely intermingled and confusion would reign. Based on the stick lengths, the AI determines the start of the drop run. This is the point at which the first sticks begin exiting the aircraft. The start point is determined such that the center of the DZ (which is specified by the player) is spaced equally between when the first and last jumpers exit the aircraft. The determination is based on the time required for each jumper or object to exit the aircraft, the stick lengths, and the aircraft’s speed. The default jumping/exiting times are determined as follows: • Personnel: 0.5 seconds each. • Guns: 10 seconds each • Vehicles: 20 seconds each. • Other: 45 seconds each.
There is no additional time delay between sticks. As soon as one stick finishes exiting the aircraft, the next immediately starts jumping, followed by the next and so on until all sticks scheduled to jump on that pass have exited the aircraft.
3-21.3.4 Units “In the Air” Once a stick has jumped from an aircraft it is considered “in the air” until it lands on the ground. The time required for a unit to land is based upon the drop altitude, and the descent rate for its type. The descent rates are: • Personnel: 6.0 m/sec • Guns: 7.5 m/sec • Vehicles: 8.5 m/sec • Aircraft: 7.0 m/sec • Other: 9.0 m/sec
While a unit is in the air, it may not be given orders, fire, or perform any action at all including sighting. It may be sighted and fired at by enemy units, however, in which case it will suffer losses. Damage (as opposed to kills) to a unit while it is in the air will be converted to immobilization once it hits the ground. Units in the air may be subjected to drift, based on the wind speed and direction. When this occurs, the unit position will be adjusted accordingly.
3-21.3.5 Dispersion After jumping, personnel and other objects will be subject to drift and dispersion by the wind. Under relatively calm conditions, personnel can compensate somewhat for the wind by “steering” their parachutes. However, other items such as guns and vehicles do not have that ability, and will drift completely with the wind. The longer the jumpers remain in the air, the longer the wind affects them, and greater the chance for drift. Unit dispersion is also caused from differences in the speed of individual aircraft, or even the same aircraft on separate passes, and the fact that the aircraft paths over the DZ axis (relative to the ground) will not be exactly the same each time.

Figure 58: Jump unit landing area.
The minimum dispersion length per unit along the DZ axis is determined by the minimum time in seconds that all of the sticks can exit the aircraft times the aircraft speed in meters per second. This is then adjusted upwards by the number of sticks in the unit0.35 to model inefficiency and the fact that the correlation between the initial stick jump points will not be perfect between passes and aircraft. The minimum dispersion area width is based on the number of passes required to drop all of the unit’s components. Initially each additional pass adds between 50 and 200 meters of dispersion, based on the force training level. However, as more and more passes are made, the additional dispersion tapers off as the aircraft passes more frequently lie within the area already traversed on previous passes.
3-21.3.6 Landing: Losses and Disorganization The actual dispersion area is known as the “landing area”. The center of the landing area will be directly under the center of the unit position, after being adjusted for drift during its time in the air. Upon landing, the unit will be distributed evenly throughout the landing area. At that time, the program checks for landing losses based on the following sequence: • The base “kill” probability is based exponentially on the time in the air, and ranges from 28% at 10 seconds to 2%
at 20 seconds. • The probability is adjusted exponentially for the wind, if greater than 5 Kph, increasing by 100% at 15 Kph and
400% at 40 Kph. • The probability is increased exponentially if the ambient illumination level is 20 or less, increasing by 500% at an
illumination level of 5, and 65% at an illumination level of 20. • The average of the terrain cover and concealment values for the landing area are applied directly, after reducing it
by 25% to account for personnel steering clear of objects. • The incapacitation probability is equal to 3 times the kill probability.
• A special determination is made to see if any jumpers land in terrain that they are prohibited from moving though, for example water or cliffs. If so, those jumpers are automatically killed.
Landing units also experience a period of disorganization after landing, while they assess the situation and get grouped together. In general, the larger the landing area as compared to the unit, and the more terrain in it, the longer it will take units to get organized. The disorganization time is determined as follows: • The base time is set based on the unit type:
o Personnel: 240 seconds plus 12 seconds per soldier. o Guns: 360 seconds plus 30 seconds per gun. o Vehicles: 300 seconds plus 20 seconds per vehicle. o Aircraft: 1200 seconds. o Naval: 600 seconds.
• The time is adjusted proportionally for the unit’s fatigue and training levels. • The time is increased for the average cover and concealment levels in the area. • The time is increased 10% for each 10 Kph of wind speed. • The time is increased if the ambient illumination level is less than 20. • If the area is larger than the “standard” area based on the “vehicle equivalent” size of the unit, the time is increased
proportionally. The “vehicle equivalent” size of personnel type units is the actual quantity divided by 6. The standard area size is the equivalent quantity times 50 meters, squared.
• The time is increased if the landing area overlaps that of another unit, which is also disorganized. • If the landing unit creates an over-stack condition, the time is increased by 150% of the over-stacking percent. • The unit’s standard internal friction time is added.
Disorganized units suffer significant combat degradation. They may sight and fire, but at much reduced ROF’s and accuracy. They may also be given orders. However, they will not move or execute them until them they get organized. Units and sticks that land in a location occupied by an enemy unit will immediately engage that unit in close combat. However, the unit just landed will suffer significant detrimental effects from disorganization, as well as a likely lack of strength. Section 3-22: Civilians Civilians may often be present in battle areas, either hiding until the action passes, or trying to escape. When they are, civilians hamper combat operations both by clogging roads and other avenues of movement, and by dampening outgoing fires so as to avoid casualties to them. The simulation uses the weapons systems type of “Civilian” to tell if a unit is a civilian or not, instead of “Tank” or “APC”, etc. Only units with the type set to “Civilian” will be considered civilian, even if the unit otherwise uses a civilian symbol or has “Civilian” in the name. Civilian units are treated as normal units for all of the standard game functions, including movement, sighting, and morale. Although they cannot fire, when fired upon their losses are determined using the standard combat routines. Civilian units, although neutral, will always appear as “enemy” units on the map display. A word of caution is in order on this point, because if FOW in regards to enemy units is being used, civilians may also appear as “unknown” enemy units until they are sufficiently sighted. Based on the scenario set-up settings, Civilian units are automatically created by the computer at the start of the scenario, and/or during the battle.
3-22.1 Civilians Placed at the Start of a Scenario At the start, a civilian rating of 100 will result in approximately one “family-group sized” unit placed every square Kilometer. However, this will be adjusted based on the level of urbanization in the area. The size of a family-group varies, but is generally 5-25 personnel, or 2-4 vehicles. Civilian units placed during the set-up phase are created on either a road (hexline) or in a location with buildings (permanent IP’s).

3-22.2 Civilians Placed During a Scenario Civilians may also be created during the scenario, based upon the level set when the scenario was created. The quantity is based on creating a certain number of civilians every hour. The number of civilians is approximately 1 family-group sized unit per Km, reduced for the civilian level. Civilian units placed during the scenario are always created on a road (hexline), with a preference for locations containing buildings (permanent IP’s).
3-22.3 Civilian Actions Civilian units are completely controlled by the AI. However, their actions can usually be predicted to some degree in that they tend to move towards the defender’s side of the map. However, if they are close to the attacker’s edge, they may decide to move that way instead. Only rarely will they move towards a “flank edge”, unless following a major highway or other significant movement route. Civilians will normally stick to roads and other relatively fast movement routes. When moving though a location containing civilians, the civilian units will be treated as if they are friendly units, with very low training and morale levels. They will be counted against the stacking limits, and will have the same effect “jamming up” movement produced by a normal unit. Because they normally travel by road, they can cause significant traffic jams, especially at bottlenecks such as bridges and in towns and villages.
3-22.4 Attacking Civilians Military forces may attack civilians with DF or IF, either deliberately or by accident. In these cases the civilian units are sighted, targeted, and affected just like military units. They can create wrecks, and may also run for cover. They never go berserk, or suffer any other morale effects. However, if the fire results in any civilian casualties, the attacking force will pay a heavy price in victory points, even if the attack was unintentional. Civilian units are never attacked with close combat. A Few Final Notes Point of Attack -2 was many years in the making, and involved the efforts and dedication of a large number of people. It has always been a dream of mine to be able to design and program something such as this, and I am grateful that I was given the opportunity to do so. As with any undertaking of this magnitude, there are a lot of people that contribute to it, even if in small ways they may never realize. As such I want to thank everyone in, and associated with, HPS for their patience and understanding with me during the period this project was in development. There are also a few specific people I want to single out for thanks: I want to thank my dad for his efforts in proofreading, as well as all the free advice and support he’s given me over the years to make it happen. I want to thank my cat-dog Norman for guarding the FAX machine. I want to thank John and Wendy Kincaid for their painstaking work on the databases, and their obsessive dedication to getting things right, no matter what it took. I want to thank Nick Bell for the maps, especially the Albuquerque masterpiece. His attention to detail and perseverance is amazing. I want to thank Dr. Robert Barker for hanging with me, though thick and thin, and having faith that it would work out in the end.
I want to thank John Kincaid, Nick Bell, and Greg Smith for providing unstinted friendship, feedback ... and free counseling. :-) I want to thank Jeff Lapkoff for believing in the dream, even in the darkest moments, and helping me make it happen. I want to thank Fluffy, for without her I never would have gotten this far. And, finally, I want to thank my wife. I don’t know how she managed to put up with it all. I hope you enjoy this program. -Scott Hamilton November 2003 Appendix A: Primary References “A Review of the Scientific Literature As it Pertains to Gulf War Illnesses”. RAND, 1991. “Air Force 2025 Study Final Report” - United States Air Force Air University 1996. Armor Magazine. U.S. Army Armor Center, periodical. ARRL Handbook for Radio Amateurs. American Radio Relay League, 2002. ATSDR Fact Sheets: Nerve Agents. ATSDR, 2000. “Beam Weapons Revolution”, Hewish, Marie, Jane’s International Defense Review, August 2000. “Directed Energy Weapons”. Ghosh, C.N, IDSA, 2001. “Directed Energy Weapons”. Thompson, Loren, Lexington Institute, 2003. EP 1110-3-2 Electromagnetic Pulse Protection for Facilities. Department of the Army, 1990. FM 3-3 Chemical and Biological Contamination Avoidance. Department of the Army, 1992. FM 3-3-1 Nuclear Contamination Avoidance. Department of the Army, 1994. FM 3-6 Field Behavior of NBC Agents (Including Smoke and Incendiaries). Department of the Army, 1986. FM 5-33 Terrain Analysis. Department of the Army, 1990. FM 5-34 Engineer Field Data. Department of the Army, 1987. FM 6-20 Fire Support in the Airland Battle. Department of the Army, 1988. FM 7-20 The Infantry Battalion. Department of the Army, 1992. FM 57-220 Static Line Parachuting Techniques and Training. Department of the Army, 1996. FM 71-2 The Tank and Mechanized Infantry Battalion Task Force. Department of the Army, 1988. FM 100-500-1 Airdrop Support Operations in a Theater of Operations. Department of the Army, 1991. FM 101-5-1 Operational Terms and Graphics. Department of the Army, 1997. Handbook of Chemistry and Physics. Weast, Robert C. (ed.), CRC Press, periodical. High Velocity Impact Dynamics. Zukas, Jonas A. (ed.), John Wiley & Sons, 1990. “Introducing the Particle Beam Weapon”. Roberds, Richard M., Air University Review, July 1984. Jane’s Handbooks. Multiple. Jane’s Information Group Ltd, 1997-999. Manual for Tigers On the Prowl 2. Hamilton, Scott S., HPS Simulations, 1997. Manual for Point of Attack. Hamilton, Scott S., HPS Simulations, 1991. Mechanics. Den Hartog, J.P., Dover Publications, 1961. “Technologies Underlying Weapons of Mass Destruction”. Office of Technology Assessment, 1993. “The Electromagnetic Bomb, a Weapon of Electrical Mass Destruction”. Kopp, Carlo. Vehicle Disabling Weapon Proposal, HSV Technologies, 2002.

Appendix B: Using Aide De Camp 2 to Create Maps The maps used by POA-2 are created with HPS Simulations’ Aide De Camp. Aide De Camp or ADC is a separate, stand-alone program that was designed to allow board games to be converted into a format that can be played on the computer. This section assumes that the user owns the program, and is familiar with its operation. It is not something that is recommended for novice ADC users. Using “Base Bitmaps” (for Topographic, Aerial, or Other Maps) The maps for POA-2 are created as any other ADC map. If you want to use a topographic map, or other bitmap (or series of bitmaps), they can be set up as: • a base map (limited to a single bitmap) • “scanned in mapsheets” (there can be any number of these).
Each of these is displayed as a separate “layer”. Therefore if a map uses both a base map and scanned-in mapsheets, it is possible for the user to elect to show either one or the other, or both. If a bitmap is large, it is strongly suggested that it be broken down into smaller sections, and added as a series of “scanned in mapsheets”. It makes the set faster to load and to run, and it is also necessary if an Windows XP user might load the set. Widows XP is not nearly as robust as NT or Win2000 where large bitmaps are concerned, and bitmaps much over 1000 x 2000 pixels can produce a blank or “gray” screen. Adding Terrain to the Map While all three types of terrain are placed on the map in the Map Editor, the methods of doing so are different. Hex: Before placing a hex terrain type, you must first create a symbol for that terrain type in the Symbol Editor module (or it must already be part of an existing symbol set). The terrain is then assigned using either the Place Primary, Place Secondary, or Place Placename routines. Hexside: Hexside types are defined in the map editor using the “New | Hexline Types” routine. Once defined, they are placed on the map using the “New | Hexsides” routine. Hexline: Hexline types are defined in the map editor using the “New | Hexline Types” routine. Once defined, they are placed on the map using the “New | Hexlines” routine. One trick to making attractive maps is to use actual hex/terrain symbols for hexlines and hexsides. For example, you could draw a series of symbols each with a road going from the center to a different edge and then place these on the map to avoid the “straight line” effect of the default hexlines. However, these symbols are cosmetic and the program will not be able to equate these symbols with “real” hexlines and hexsides. It will ignore them. So you will still always need to place hexlines and hexsides normally, because these are what the POA program “keys in” on (see the section on “Linking”, below). However, if you want them to be hidden so only the “hex” symbol shows, set the line width to 0. If you create a new map, and are using an existing ECX file (see below) the Hexline Definitions must be in this exact order to avoid error messages, and except for the lines highlighted with width values in brackets [ ... ], should probably have widths set to zero for each zoom level unless you don’t use symbols for them, or have a reason for doing otherwise:
1. River 2. Stream 3. Ditch 4. High Speed Road 5. Low Speed Road 6. Trail 7. Rail Line 8. Ford 9. Hedge 10. Hedgerow 11. Fence
12. Low Wall 13. High Wall 14. Low Embankment 15. High Embankment 16. Small Stream 17. Tree Line 18. Deep Water Barrier [1, 2, 3] 19. Shallow Draft Water Barrier [1, 2, 3] 20. Shallow Draft Barrier [1, 2, 3] 21. Anti-Tank Ditch [1, 2, 3] 22. Wire (Concertina) [1, 2, 3]

23. Wire (Apron) [1, 2, 3] 24. Large Ditch
25. Steep Embankment 26. Cliff
The reason that some of the lines have widths greater than zero is so they can be drawn on the map to represent linear obstacles that can be created during the game. Otherwise, there would be no way to show the features, since they are not kinked to a symbol in the TEC and symbols for them can’t be placed on the map by the creator to show them. You should pick colors for these line types that “make sense”. For example, brown or orange shades are the default for the AT ditch, and dark gray or black for the wire obstacles. Primary, Secondary and Attributes Terrain and Setting the Draw Order: The “elevation shading” should ALWAYS be placed o the map as PRIMARY terrain. The “elevation shading” toggle in POA-2 simply turns on and off the display of primary terrain, so if you have something lese set as the primary terrain, it will get turned off instead and the user is not going to know what’s going on. Everything else should be placed as secondary terrain or attributes. It is recommended that the “BASE” terrain be entered as SECONDARY, for example “Clear”, or “Water”. Everything else is entered as an attribute, for example “Light woods”, “Village”, or “Rocky”. Normally, you’ll want the elevation shading to show on top of everything except the grid overlay and maybe the hexsides/lines. Therefore the drawing order should be set as (where 1 is the “First Drawn” and 8 is “Last Drawn”):
1. Attributes 2. Secondary Terrain 3. Placename/City Symbols 4. Primary Terrain 5. Grid Overlay 6. Hexsides 7. Hexlines 8. Text
POA-2 users can toggle the display of:
• The grid overlay • Primary terrain • Secondary terrain and attributes (together - not separately).
However, they will not be able to reset the drawing order. So they can only see the map the way it is designed. Don’t Forget the Elevations! Equal with non-cosmetic terrain, elevations are the most important part of the map. Don’t forget to enter them; otherwise you’ll be playing on a perfectly flat surface. Linking the Symbols Set to the POA-2 TEC For the POA-2 program to apply the terrain effects, each terrain type found on the map must be linked to a line in the TEC. In some cases this may be a one-to-one correlation, as in cases where there is a single symbol for each terrain type (i.e. one symbol for Clear, one symbol for Woods, one symbol for Crops, etc.). Or, conversely, several symbols may share a line in the TEC, as when the set contains multiple symbols for Clear terrain, multiple symbols for Woods, multiple symbols for Crops, etc. In reality, this second situation is the more common (and is used by the default maps), in order to show elevations with different tints, or just to keep the map from becoming repetitive. The TEC-Terrain Linker screen is used to establish and edit the connection between each terrain type and the line of the TEC that represents it. The TEC is stored in a file with the extension “.TEC” (the default is “Standard.TEC” in the “POA2\Data Tables” folder).

The “links” between the map and the symbol set used by that map and the TEC are stored in a file in the same folder as the map, and with the same name as the map with the extension “.ECX” (for example, “Bluefields.ECX” in the “POA2\Maps\Bluefields” folder). If you create a new map using an existing, unmodified symbol set and define the hexline types in the order as shown above, you can simply copy the ECX file from another map that uses the same symbol set. For example, if you use the standard summer horizontal hex symbol set that comes with POA-2, and create a new map with it, you can copy the ECX file from any of the other maps that also use that symbol set. If you’re not sure which maps these are, merely open them in the map editor, and go to “Change Symbol Set” under the Tools menu. In this case the Bluefields map uses that set, so simply copy “Bluefields.ECX” to “Your-map-name.ECX”, and put the new ECX file in the same folder as your map. Editing the Symbol Set ADC users can also edit the symbol sets used by the POA-2 maps. Symbols can be edited, or added. They can even be deleted, but only with caution and only by experienced users. If you delete a terrain type in a set that is still on a map used by POA-2, it will likely cause the program to crash, or at the very least, operate incorrectly. Once a symbol set has been changed, it will need to be re-linked to the TEC. In order to do that, a map using that set must be created. Then, the POA-2 DataView module must be brought up, and the “Terrain Effects Chart Data Table” displayed. Select “Link this TEC” from the main menu, and then select the map. A table will appear where every symbol and hexline definition used in the map can be linked to a TEC entry. Enter the relationships as necessary, and then save the new links to the properly named ECX file. When in Doubt... ... check an existing map and see how it was created. There are lots of ways to create a map with ADC and get the exact look you want. The key is to check out what somebody else has done, and then experiment. You’ll probably be surprised at the results.