hp network node manager i software upgrade reference
TRANSCRIPT

HP Network Node Manager i Software
For the Windows® and Linux operating systems
Software Version: NNMi 10.00
Upgrade Reference
Document Release Date: May 2014Software Release Date: May 2014

NNMi 10.00
Legal Notices
Warranty
The only warranties for HP products and services are set forth in the express warranty statements accompanying such products and services. Nothing herein should be construed as constituting an additional warranty. HP shall not be liable for technical or editorial errors or omissions contained herein.
The information contained herein is subject to change without notice.
Restricted Rights Legend
Confidential computer software. Valid license from HP required for possession, use or copying. Consistent with FAR 12.211 and 12.212, Commercial Computer Software, Computer Software Documentation, and Technical Data for Commercial Items are licensed to the U.S. Government under vendor's standard commercial license.
Copyright Notice
© Copyright 2008–2014 Hewlett-Packard Development Company, L.P.
Trademark Notices
Adobe® is a trademark of Adobe Systems Incorporated.
HP-UX Release 10.20 and later and HP-UX Release 11.00 and later (in both 32 and 64-bit configurations) on all HP 9000 computers are Open Group UNIX 95 branded products.
Intel® is a trademark of Intel Corporation in the U.S. and other countries.
Microsoft® and Windows® are U.S. registered trademarks of Microsoft Corporation.
Oracle and Java are registered trademarks of Oracle and/or its affiliates.
Red Hat® Enterprise Linux Certified is a registered trademark of Red Hat, Inc. in the United States and other countries.
UNIX® is a registered trademark of The Open Group.
Oracle Technology — Notice of Restricted Rights
Programs delivered subject to the DOD FAR Supplement are 'commercial computer software' and use, duplication, and disclosure of the programs, including documentation, shall be subject to the licensing restrictions set forth in the applicable Oracle license agreement. Otherwise, programs delivered subject to the Federal Acquisition Regulations are 'restricted computer software' and use, duplication, and disclosure of the programs, including documentation, shall be subject to the restrictions in FAR 52.227-19, Commercial Computer Software-Restricted Rights (June 1987). Oracle America, Inc., 500 Oracle Parkway, Redwood City, CA 94065.
For the full Oracle license text, see the license-agreements directory on the NNMi product DVD.
Acknowledgements
This product includes software developed by the Apache Software Foundation. (http://www.apache.org)
This product includes software developed by the Indiana University Extreme! Lab. (http://www.extreme.indiana.edu)
2
May 2014
Available Product Documentation
In addition to this guide, the following documentation is available for NNMi:
• HP Network Node Manager i Software Documentation List—Available on the HP manuals web site. Use this file to track additions to and revisions within the NNMi documentation set for this version of NNMi. Click a link to access a document on the HP manuals web site.
• HP Network Node Manager i Software Installation Guide—Available for each supported operating system on the product media and the NNMi management server.
• HP Network Node Manager i Software Deployment Reference—Available on the HP manuals web site.
• HP Network Node Manager i Software Release Notes—Available on the product media and the NNMi management server.
• HP Network Node Manager i Software System and Device Support Matrix—Available on the product media and the NNMi management server.
• HP Network Node Manager iSPI Network Engineering Toolset Planning and Installation Guide—Available on the NNM iSPI NET diagnostics server product media.
To check for recent updates or to verify that you are using the most recent edition of a document, go to:
http://h20230.www2.hp.com/selfsolve/manuals
This site requires that you register for an HP Passport and sign in. To register for an HP Passport ID, go to:
http://h20229.www2.hp.com/passport-registration.html
Or click the New users - please register link on the HP Passport login page.
You will also receive updated or new editions if you subscribe to the appropriate product support service. Contact your HP sales representative for details.
3

NNMi 10.00
Support
Visit the HP Software Support Online web site at:
www.hp.com/go/hpsoftwaresupport
This web site provides contact information and details about the products, services, and support that HP Software offers.
HP Software online support provides customer self-solve capabilities. It provides a fast and efficient way to access interactive technical support tools needed to manage your business. As a valued support customer, you can benefit by using the support web site to:
• Search for knowledge documents of interest
• Submit and track support cases and enhancement requests
• Download software patches
• Manage support contracts
• Look up HP support contacts
• Review information about available services
• Enter into discussions with other software customers
• Research and register for software training
Most of the support areas require that you register as an HP Passport user and sign in. Many also require a support contract. To register for an HP Passport user ID, go to:
http://h20229.www2.hp.com/passport-registration.html
To find more information about access levels, go to:
http://h20230.www2.hp.com/new_access_levels.jsp
4

May 2014
Contents
About This Guide . . . . . . . . . . . . . . . . . . . . . . . . . . . . . . . . . . . . . . . . . . . . . . . . . . . . . . . . . . 9What Is in This Guide? . . . . . . . . . . . . . . . . . . . . . . . . . . . . . . . . . . . . . . . . . . . . . . . . . . . . . . . . . . . . . . . . . . 9Path Conventions Used in This Document. . . . . . . . . . . . . . . . . . . . . . . . . . . . . . . . . . . . . . . . . . . . . . . . . . 11Revision History. . . . . . . . . . . . . . . . . . . . . . . . . . . . . . . . . . . . . . . . . . . . . . . . . . . . . . . . . . . . . . . . . . . . . . . 11
Upgrading from NNMi 8.0x or 8.1x 13
Upgrading the NNMi Management Server in Place from 8.0x or 8.1x . . . . . . . . . . . . . . . . . . . . 15Start from NNMi 8.0x . . . . . . . . . . . . . . . . . . . . . . . . . . . . . . . . . . . . . . . . . . . . . . . . . . . . . . . . . . . . . . . . . . 15Upgrade an Existing NNMi Management Server to NNMi 9.1x . . . . . . . . . . . . . . . . . . . . . . . . . . . . . . . . 15
Upgrading to a Different NNMi Management Server from 8.0x or 8.1x . . . . . . . . . . . . . . . . . . . 17Start from NNMi 8.0x . . . . . . . . . . . . . . . . . . . . . . . . . . . . . . . . . . . . . . . . . . . . . . . . . . . . . . . . . . . . . . . . . . 17Upgrade to a Different NNMi Management Server. . . . . . . . . . . . . . . . . . . . . . . . . . . . . . . . . . . . . . . . . . . 17
Moving NNMi from Red Hat Linux 4.6 to 5.2 or 5.3 . . . . . . . . . . . . . . . . . . . . . . . . . . . . . . . . .19Changing NNMi from Red Hat Linux 4.6 to Red Hat Linux 5.2 or 5.3 . . . . . . . . . . . . . . . . . . . . . . . . . . . 19
Migrating NNMi Oracle Data . . . . . . . . . . . . . . . . . . . . . . . . . . . . . . . . . . . . . . . . . . . . . . . . .23Migrating NNMi Oracle Data . . . . . . . . . . . . . . . . . . . . . . . . . . . . . . . . . . . . . . . . . . . . . . . . . . . . . . . . . . . . 23
Additional Upgrade Information . . . . . . . . . . . . . . . . . . . . . . . . . . . . . . . . . . . . . . . . . . . . . . .25Configuration Differences . . . . . . . . . . . . . . . . . . . . . . . . . . . . . . . . . . . . . . . . . . . . . . . . . . . . . . . . . . . . . . . 25Functionality Differences . . . . . . . . . . . . . . . . . . . . . . . . . . . . . . . . . . . . . . . . . . . . . . . . . . . . . . . . . . . . . . . 26
Application Failover and Upgrading from NNMi 8.x to NNMi 9.0x. . . . . . . . . . . . . . . . . . . . . .29Application Failover and Upgrading to NNMi 9.00 . . . . . . . . . . . . . . . . . . . . . . . . . . . . . . . . . . . . . . . . 29Application Failover and NNMi Patches . . . . . . . . . . . . . . . . . . . . . . . . . . . . . . . . . . . . . . . . . . . . . . . . . 31
High Availability and Upgrading from NNMi 8.1x to NNMi 9.0x . . . . . . . . . . . . . . . . . . . . . . .33Upgrading NNMi under HA from NNMi 8.1x to NNMi 9.01 . . . . . . . . . . . . . . . . . . . . . . . . . . . . . . . . . . . 33Unconfiguring NNMi from an HA Cluster . . . . . . . . . . . . . . . . . . . . . . . . . . . . . . . . . . . . . . . . . . . . . . . . . . 36
Unconfiguring NNMi from an HA Cluster . . . . . . . . . . . . . . . . . . . . . . . . . . . . . . . . . . . . . . . . . . . . . . . 36Running NNMi with the Existing Database Outside HA . . . . . . . . . . . . . . . . . . . . . . . . . . . . . . . . . . . 39
Patching NNMi under HA . . . . . . . . . . . . . . . . . . . . . . . . . . . . . . . . . . . . . . . . . . . . . . . . . . . . . . . . . . . . . . . 40
Upgrading from NNMi 9.0x to NNMi 9.1x 43
Upgrading the NNMi Management Server in Place. . . . . . . . . . . . . . . . . . . . . . . . . . . . . . . . . .45Upgrade an Existing NNMi 9.0x Management Server to NNMi 9.1x . . . . . . . . . . . . . . . . . . . . . . . . . . . . 45
Contents 5
NNMi 10.00
Upgrading to a Different NNMi Management Server . . . . . . . . . . . . . . . . . . . . . . . . . . . . . . . .47Upgrade to a Different NNMi Management Server. . . . . . . . . . . . . . . . . . . . . . . . . . . . . . . . . . . . . . . . . . . 47
Moving NNMi from Windows 2003 to Windows 2008. . . . . . . . . . . . . . . . . . . . . . . . . . . . . . .49Changing NNMi from Windows 2003 to Windows 2008 . . . . . . . . . . . . . . . . . . . . . . . . . . . . . . . . . . . . . . . 49
Migrating NNMi Oracle Data . . . . . . . . . . . . . . . . . . . . . . . . . . . . . . . . . . . . . . . . . . . . . . . . .53Migrating NNMi Oracle Data . . . . . . . . . . . . . . . . . . . . . . . . . . . . . . . . . . . . . . . . . . . . . . . . . . . . . . . . . . . . 53
Additional Upgrade Information . . . . . . . . . . . . . . . . . . . . . . . . . . . . . . . . . . . . . . . . . . . . . . .55Configuration Differences . . . . . . . . . . . . . . . . . . . . . . . . . . . . . . . . . . . . . . . . . . . . . . . . . . . . . . . . . . . . . . . 55
Application Failover . . . . . . . . . . . . . . . . . . . . . . . . . . . . . . . . . . . . . . . . . . . . . . . . . . . . . . . . . . . . . . . . . 56MIBs . . . . . . . . . . . . . . . . . . . . . . . . . . . . . . . . . . . . . . . . . . . . . . . . . . . . . . . . . . . . . . . . . . . . . . . . . . . . . 57
Functionality Differences . . . . . . . . . . . . . . . . . . . . . . . . . . . . . . . . . . . . . . . . . . . . . . . . . . . . . . . . . . . . . . . 57
Application Failover and Upgrading to NNMi 9.1x . . . . . . . . . . . . . . . . . . . . . . . . . . . . . . . . .59Application Failover and NNMi Patches . . . . . . . . . . . . . . . . . . . . . . . . . . . . . . . . . . . . . . . . . . . . . . . . . . . 62
Applying Patches for Application Failover (Shut Down Both Active and Standby) . . . . . . . . . . . . . . . 62Applying Patches for Application Failover (Keep One Active NNMi Management Server). . . . . . . . . 64
Application Failover and Restarting the NNMi Management Servers. . . . . . . . . . . . . . . . . . . . . . . . . . . . 66Application Failover Control after a Communication Failure . . . . . . . . . . . . . . . . . . . . . . . . . . . . . . . . 66Application Failover and Recovery from a Previous Database Backup (Embedded Database Only) . 66
Upgrading NNMi under HA from NNMi 9.0x to NNMi 9.10 . . . . . . . . . . . . . . . . . . . . . . . . . .69Upgrade NNMi with the Embedded Database on the Windows, Linux, or Solaris Operating System 69Upgrade NNMi with the Embedded Database on the HP-UX Operating System . . . . . . . . . . . . . . . . 72Upgrade NNMi with Oracle on All Supported Operating Systems . . . . . . . . . . . . . . . . . . . . . . . . . . . . 73
Upgrading from NNMi 9.0x to NNMi 9.10 (Global Network Management) . . . . . . . . . . . . . . . .75NNMi Versions Supported by Global Network Management . . . . . . . . . . . . . . . . . . . . . . . . . . . . . . . . 75Global Network Management Upgrade Steps. . . . . . . . . . . . . . . . . . . . . . . . . . . . . . . . . . . . . . . . . . . . . 75
Upgrading from NNMi 9.0x or 9.1x to NNMi 9.2x 77Important Prerequisite Steps for Upgrading with an Oracle Database . . . . . . . . . . . . . . . . . . . . . . . . . . . 80
Upgrading the NNMi Management Server in Place. . . . . . . . . . . . . . . . . . . . . . . . . . . . . . . . . . 81Upgrade an Existing NNMi Management Server to NNMi 9.2x . . . . . . . . . . . . . . . . . . . . . . . . . . . . . . . . 81
Upgrading to a Different NNMi Management Server . . . . . . . . . . . . . . . . . . . . . . . . . . . . . . . .83Upgrade to a Different NNMi Management Server. . . . . . . . . . . . . . . . . . . . . . . . . . . . . . . . . . . . . . . . . . . 83
Moving NNMi from Windows 2003 to Windows 2008. . . . . . . . . . . . . . . . . . . . . . . . . . . . . . .85Changing NNMi from Windows 2003 to Windows 2008 . . . . . . . . . . . . . . . . . . . . . . . . . . . . . . . . . . . . . . . 85
Moving NNMi to RHEL 5.4 or Later . . . . . . . . . . . . . . . . . . . . . . . . . . . . . . . . . . . . . . . . . . . . .89Moving NNMi to RHEL Version 5.4 or Later . . . . . . . . . . . . . . . . . . . . . . . . . . . . . . . . . . . . . . . . . . . . . . . . 89
Migrating NNMi Oracle Data . . . . . . . . . . . . . . . . . . . . . . . . . . . . . . . . . . . . . . . . . . . . . . . . .93Migrating NNMi Oracle Data . . . . . . . . . . . . . . . . . . . . . . . . . . . . . . . . . . . . . . . . . . . . . . . . . . . . . . . . . . . . 93
6 NNMi Upgrade Reference
May 2014
Additional Upgrade Information . . . . . . . . . . . . . . . . . . . . . . . . . . . . . . . . . . . . . . . . . . . . . . .95Configuration Differences . . . . . . . . . . . . . . . . . . . . . . . . . . . . . . . . . . . . . . . . . . . . . . . . . . . . . . . . . . . . . . . 95
Application Failover . . . . . . . . . . . . . . . . . . . . . . . . . . . . . . . . . . . . . . . . . . . . . . . . . . . . . . . . . . . . . . . . . 97MIBs . . . . . . . . . . . . . . . . . . . . . . . . . . . . . . . . . . . . . . . . . . . . . . . . . . . . . . . . . . . . . . . . . . . . . . . . . . . . . 97
Functionality Differences . . . . . . . . . . . . . . . . . . . . . . . . . . . . . . . . . . . . . . . . . . . . . . . . . . . . . . . . . . . . . . . 97
Application Failover and Upgrading to NNMi 9.20 . . . . . . . . . . . . . . . . . . . . . . . . . . . . . . . . .99Application Failover and Upgrading from NNMi 9.0x or 9.1x . . . . . . . . . . . . . . . . . . . . . . . . . . . . . . . . . . 99
Embedded Database . . . . . . . . . . . . . . . . . . . . . . . . . . . . . . . . . . . . . . . . . . . . . . . . . . . . . . . . . . . . . . . . . 99Oracle Database . . . . . . . . . . . . . . . . . . . . . . . . . . . . . . . . . . . . . . . . . . . . . . . . . . . . . . . . . . . . . . . . . . . 102Application Failover and NNMi Patches . . . . . . . . . . . . . . . . . . . . . . . . . . . . . . . . . . . . . . . . . . . . . . . . 104
Applying Patches for Application Failover (Shut Down Both Active and Standby) . . . . . . . . . . . 104Applying Patches for Application Failover (Keep One Active NNMi Management Server) . . . . . 106
High Availability and Upgrading from NNMi 9.0x or NNMi 9.1x to NNMi 9.20 . . . . . . . . . . .109Upgrade NNMi with the Embedded Database on all Supported Operating Systems . . . . . . . . . . . . 109Upgrade NNMi with Oracle on all Supported Operating Systems . . . . . . . . . . . . . . . . . . . . . . . . . . . 112
Unconfiguring NNMi from an HA Cluster . . . . . . . . . . . . . . . . . . . . . . . . . . . . . . . . . . . . . . . . . . . . . . . . . 112Running NNMi Outside HA with the Existing Database . . . . . . . . . . . . . . . . . . . . . . . . . . . . . . . . . . 115
Patching NNMi under HA . . . . . . . . . . . . . . . . . . . . . . . . . . . . . . . . . . . . . . . . . . . . . . . . . . . . . . . . . . . . . . 116
Upgrading Global and Regional Managers to NNMi 9.2x . . . . . . . . . . . . . . . . . . . . . . . . . . . 119NNMi Versions Supported by Global Network Management . . . . . . . . . . . . . . . . . . . . . . . . . . . . . . . . . . 119Global Network Management Upgrade Steps . . . . . . . . . . . . . . . . . . . . . . . . . . . . . . . . . . . . . . . . . . . . . . 119
Upgrading from NNMi 9.1x or 9.2x to NNMi 10.00 121
Upgrading the NNMi Management Server in Place. . . . . . . . . . . . . . . . . . . . . . . . . . . . . . . . . 127Upgrade an Existing NNMi Management Server to NNMi 10.00 . . . . . . . . . . . . . . . . . . . . . . . . . . . . . . 127
Upgrading to a Different NNMi Management Server . . . . . . . . . . . . . . . . . . . . . . . . . . . . . . . 129Upgrade to a Different NNMi Management Server. . . . . . . . . . . . . . . . . . . . . . . . . . . . . . . . . . . . . . . . . . 129
Moving NNMi from the HP-UX or Solaris Operating System . . . . . . . . . . . . . . . . . . . . . . . . . . 131Changing NNMi from HP-UX or Solaris to Linux . . . . . . . . . . . . . . . . . . . . . . . . . . . . . . . . . . . . . . . . . . . 131
Moving NNMi to RHEL 6.4 or Later . . . . . . . . . . . . . . . . . . . . . . . . . . . . . . . . . . . . . . . . . . . . 135Changing NNMi to RHEL Version 6.4 or Later . . . . . . . . . . . . . . . . . . . . . . . . . . . . . . . . . . . . . . . . . . . . . 135
Migrating NNMi Oracle Data . . . . . . . . . . . . . . . . . . . . . . . . . . . . . . . . . . . . . . . . . . . . . . . . 139Migrating NNMi Oracle Data . . . . . . . . . . . . . . . . . . . . . . . . . . . . . . . . . . . . . . . . . . . . . . . . . . . . . . . . . . . 139
Application Failover and Upgrading to NNMi 10.00 . . . . . . . . . . . . . . . . . . . . . . . . . . . . . . . 141Application Failover and Upgrading from NNMi 9.1x or NNMi 9.2x . . . . . . . . . . . . . . . . . . . . . . . . . . . . 141
Embedded Database . . . . . . . . . . . . . . . . . . . . . . . . . . . . . . . . . . . . . . . . . . . . . . . . . . . . . . . . . . . . . . . . 141Oracle Database . . . . . . . . . . . . . . . . . . . . . . . . . . . . . . . . . . . . . . . . . . . . . . . . . . . . . . . . . . . . . . . . . . . 144Application Failover and NNMi Patches . . . . . . . . . . . . . . . . . . . . . . . . . . . . . . . . . . . . . . . . . . . . . . . . 146
Applying Patches for Application Failover (Shut Down Both Active and Standby) . . . . . . . . . . . 147Applying Patches for Application Failover (Keep One Active NNMi Management Server) . . . . . 148
Contents 7

NNMi 10.00
Upgrading Global and Regional Managers from NNMi 9.1x or NNMi 9.2x . . . . . . . . . . . . . . 151NNMi Versions Supported by Global Network Management . . . . . . . . . . . . . . . . . . . . . . . . . . . . . . . . . . 151Global Network Management Upgrade Steps . . . . . . . . . . . . . . . . . . . . . . . . . . . . . . . . . . . . . . . . . . . . . . 151
Upgrading from NNMi 9.1x to NNMi 10.00. . . . . . . . . . . . . . . . . . . . . . . . . . . . . . . . . . . . . . . . . . . 151Upgrading from NNMi 9.2x to NNMi 10.00. . . . . . . . . . . . . . . . . . . . . . . . . . . . . . . . . . . . . . . . . . . 152
High Availability and Upgrading from NNMi 9.1x or NNMi 9.2x to NNMi 10.00 . . . . . . . . . . 153Upgrade NNMi with the Embedded Database on all Supported Operating Systems . . . . . . . . . . . . 153Upgrade NNMi with Oracle on all Supported Operating Systems . . . . . . . . . . . . . . . . . . . . . . . . . . . 156
Unconfiguring NNMi from an HA Cluster . . . . . . . . . . . . . . . . . . . . . . . . . . . . . . . . . . . . . . . . . . . . . . . . . 157Running NNMi Outside HA with the Existing Database . . . . . . . . . . . . . . . . . . . . . . . . . . . . . . . . . . 159
Patching NNMi under HA . . . . . . . . . . . . . . . . . . . . . . . . . . . . . . . . . . . . . . . . . . . . . . . . . . . . . . . . . . . . . . 160
We appreciate your feedback! . . . . . . . . . . . . . . . . . . . . . . . . . . . . . . . . . . . . . . . . . . . . . . . . 163
8 NNMi Upgrade Reference
About T
May 2014
About This Guide
his Guide
This chapter contains the following topics:
• What Is in This Guide?
• Path Conventions Used in This Document
• Revision History
What Is in This Guide?
This guide contains information for upgrading from the following HP Network Node Manager i Software (NNMi) versions to NNMi 10.00:
• Upgrading from NNMi 8.0x or 8.1x on page 13
• Upgrading from NNMi 9.0x to NNMi 9.1x on page 43
• Upgrading from NNMi 9.0x or 9.1x to NNMi 9.2x on page 77
• Upgrading from NNMi 9.1x or 9.2x to NNMi 10.00 on page 121
This guide is for an expert system administrator, network engineer, or HP support engineer with experience deploying and managing networks in large installations.
Note that NNMi refers to HP Network Node Manager i Software (including all 8.x and all 9.x releases of NNMi and NNMi Advanced).
Before using this guide, make sure you have completed the following tasks:
• You have installed the version of NNMi from which you are upgrading using either of the following:— HP Network Node Manager Installation Guide— HP Network Node Manager i Software Installation Guide— HP Network Node Manager i Software Interactive Installation Guide
Also see NNMi 10.00 Upgrade Path Requirements available at: http://h20230.www2.hp.com/selfsolve/manuals
9

NNMi 10.00
• You have reviewed the concepts described in the NNMi help and the deployment information in the NNMi Deployment Reference for a general understanding of NNMi functions.
• You understand how to use the NNMi console.
For up-to-date, downloadable copies of NNMi documentation, go to:
http://h20230.www2.hp.com/selfsolve/manuals
The information in this guide was formerly published in the NNMi Deployment Reference.
HP updates this guide between product releases, as new information becomes available. For information about retrieving an updated version of this document, see Available Product Documentation on page 3.
10 NNMi Upgrade Reference

May 2014
Path Conventions Used in This Document
For commands located in the NNMi bin directory, this document does not include the command path. The NNMi bin directory is located as follows:
• Windows Server 2008: <drive>\Program Files\HP\HP BTO Software\bin
• Linux: /opt/OV/bin
This document primarily uses the following two NNMi environment variables to reference file and directory locations. This list shows the default values. Actual values depend on the selections that you made during NNMi installation.
• Windows Server 2008:
— %NnmInstallDir%: <drive>\Program Files\HP\HP BTO Software
— %NnmDataDir%: <drive>\ProgramData\HP\HP BTO Software
• Linux:
— $NnmInstallDir: /opt/OV
— $NnmDataDir: /var/opt/OV
Additionally, this document references some of the NNMi environment variables that you can source as part of your user log-on configuration on the NNMi management server. These variables are of the form NNM_*. For information about this extended list of NNMi environment variables, see “Other Available Environment Variables” in the NNMi Deployment Reference.
Revision History
The following table lists the major changes for each new release of this document.
On Windows systems, the NNMi installation process creates these system environment variables, so they are always available to all users.
On Linux systems, you must manually create these environment variables if you want to use them.
Document Release Date Description of Major Changes
May 2014 (10.00) Initial release
About This Guide 11

NNMi 10.00
12 NNMi Upgrade Reference

May 2014
Upgrading from NNMi 8.0x or 8.1x
To upgrade from NNMi 8.0x to NNMi 9.20, you must first upgrade to NNMi 8.1x.
To upgrade from NNMi 8.1x to NNMi 10.00, you must first upgrade to NNMi 9.0x, and then upgrade to either NNMi 9.1x or NNMi 9.2x, before upgrading to NNMi 10.00.
You can upgrade NNMi according to the information shown in Table 1. For best results, upgrade to NNMi 8.1x patch 8 or newer before upgrading to NNMi 9.0x. The information shown in Table 1 assumes you have NNMi 8.10 or newer installed on the NNMi management server.
If you plan to upgrade an earlier version of NNMi 8.1x that is running in an NNMi application failover or HA (High Availability) configuration, the supported upgrade path is to temporarily unconfigure HA or application failover, upgrade the NNMi management server to NNMi 9.00, then reconfigure HA or application failover. For detailed information, see the Upgrading NNMi under HA from NNMi 8.1x to NNMi 9.01 on page 33.
See Table 2 to view the supported upgrade paths to NNMi 8.10.
Table 1 Supported NNMi Upgrades
NNMi Version Upgrade to NNMi 9.0x
8.10 Supported
8.1x Patch 1 or newer Supported
Table 2 Supported NNMi Upgrades (to NNMi 8.10)
Current Version
Upgrade to NNMi 8.02
Upgrade to NNMi 8.03 or higher *
Upgrade to NNMi 8.10
NNMi 8.01 Supported Supported Install NNMi version 8.10.
NNMi 8.02 NA Supported Install NNMi version 8.10.
NNMi 8.03 or higher * NA NA Install NNMi version 8.10.
* Excluding NNMi 8.1x. To install NNMi patches, see the patch installation instructions.
Upgrading from NNMi 8.0x or 8.1x 13

There are several upgrade scenarios you could encounter. This section contains the following chapters:
• Upgrading the NNMi Management Server in Place from 8.0x or 8.1x, which describes the following upgrade scenario:
— Upgrading from NNMi 8.0x to NNMi 8.1x or NNMi 8.1x to NNMi 9.00 on the same hardware and operating system.
• Upgrading to a Different NNMi Management Server from 8.0x or 8.1x, which describes the following upgrade scenario:
— Upgrading from NNMi 8.0x to NNMi 8.1x or NNMi 8.1x to NNMi 9.00 on the same version operating system.
• Moving NNMi from Red Hat Linux 4.6 to 5.2 or 5.3. NNMi 9.00 does not support Red Hat Linux 4.6. You must change the operating system to Red Hat Linux 5.2 or 5.3 before migrating to NNMi 9.00.
• Migrating NNMi Oracle Data. Explains the steps to take to move the Oracle data used by your NNMi management server from one Oracle database instance to another.
• Additional Upgrade Information. Explains some areas that NNMi 9.0x differs from earlier versions of NNMi.
For information about moving an NNMi management server, see the NNMi Deployment Reference.
14 NNMi Upgrade Reference
Upgrad
May 2014
Upgrading the NNMi
Management Server in Place
from 8.0x or 8.1x
ing the NNMi Management Server in Place from 8.0x o
This chapter describes the process for upgrading an existing NNMi management server to NNMi 9.0x.
This chapter contains the following topics:
• Start from NNMi 8.0x
• Upgrade an Existing NNMi Management Server to NNMi 9.1x
Start from NNMi 8.0x
Upgrade the NNMi management server to version 8.10 or later. Continue with the instructions shown in Upgrade an Existing NNMi Management Server to NNMi 9.1x on page 15.
Upgrade an Existing NNMi Management Server to NNMi 9.1x
Read the Preinstallation Checklist chapter in the HP Network Node Manager i Software Installation Guide and Additional Upgrade Information on page 25 before continuing. There are notable changes to the HP Network Node Manager i Software Interactive Installation Guide. For example, if you use an Oracle database instance instead of the embedded database, you should set the FLASHBACK ANY TABLE permission, as this enables NNMi to create restore points during migration.
The following steps explain how to upgrade an NNMi management server to NNMi 9.1x. The following steps assume you have NNMi 8.10 or later running on the NNMi management server.
1 Backup the NNMi management server using the nnmbackup.ovpl script. Do this as a precaution, as you would only use this backup in the unlikely event oa failed migration. For more information, see the nnmbackup.ovpl reference page, or the UNIX manpage.
r 8.1x 15

Upgrading from NNMi 8.0x or 8.1x
2 Oracle Database Only: If the NNMi management server uses an Oracle database, have your Oracle database administrator back up the NNMi data. As mentioned earlier, have your Oracle database administrator set the FLASHBACK ANY TABLE permission, as this enables NNMi to create restore points during migration
3 Oracle Database Only: Use the nnmconfigexport.ovpl script to back up configuration information from the NNMi management server. Do this as a precaution, as you would only use this backup in the unlikely event of a failed migration. For more information, see the nmconfigexport.ovpl or nnmconfigimport.ovpl reference pages, or the UNIX manpages.
4 Install NNMi 9.0 on the NNMi management server using instructions from the HP Network Node Manager i Software Interactive Installation Guide.
5 Verify that the information from the NNMi management server migrated successfully.
Never edit a file exported with the nnmconfigexport.ovpl script before using the nnmconfigimport.ovpl script to import the file.
Oracle Database Only: If your Oracle database administrator does not set the FLASHBACK ANY TABLE permission, you will see a warning about that missing permission after the install completes. You can ignore this warning.
16 NNMi Upgrade Reference

Upgrad
May 2014
Upgrading to a Different NNMi Management
Server from 8.0x or 8.1x
ing to a Different NNMi Management Server from 8.0x
This chapter describes the process for upgrading to NNMi version 9.0x on a new system while maintaining the configuration of the existing NNMi management server.
This chapter contains the following topics:
• Start from NNMi 8.0x
• Upgrade to a Different NNMi Management Server
Start from NNMi 8.0x
Upgrade the NNMi management server to version 8.10 or later. Continue with the instructions shown in Upgrade to a Different NNMi Management Server on page 17.
Upgrade to a Different NNMi Management Server
Read the NNMi 8.1x Preinstallation Checklist chapter in the HP Network Node Manager i Software Installation Guide and Additional Upgrade Information on page 25 before continuing. There are notable changes to the HP Network Node Manager i Software Interactive Installation Guide. For example, if you use an Oracle database instance instead of the embedded database, you should set the FLASHBACK ANY TABLE permission, as this enables NNMi to create restore points during migration.
The following steps explain how to copy data from an existing NNMi management server to a target NNMi management server. The following steps assume you have NNMi 8.10 or higher running on the existing NNMi management server.
If you want to change the Oracle database server, complete that process before or after the upgrade to NNMi 8.1x. For information, see Migrating NNMi Oracle Data on page 23.
or 8.1x 17

Upgrading from NNMi 8.0x or 8.1x
1 As a precaution, back up the existing (source) NNMi 8.1x management server using the nnmbackup.ovpl script. Label this backup for 8.1x. For more information, see the nnmbackup.ovpl reference page, or the UNIX manpage for NNMi 8.1x.
2 If the existing (source) NNMi management server uses an Oracle database, have your Oracle database administrator back up the NNMi 8.1x data. As mentioned earlier, have your Oracle database administrator set the FLASHBACK ANY TABLE permission, as this enables NNMi to create restore points during migration.
3 Install NNMi 9.00 and the latest consolidated patch (if any) on the source NNMi management server using instructions from the HP Network Node Manager i Software Installation Guide.
4 Verify that NNMi 9.1x is working correctly on the source NNMi management server.
5 Back up NNMi 9.1x on the source NNMi management server using the nnmbackup.ovpl script. Label this backup for NNMi 9.1x. You will need it to copy data to the target NNMi management server. For more information, see the nnmbackup.ovpl reference page, or the UNIX manpage for NNMi 9.1x.
6 Install NNMi 9.20 and the latest consolidated patch (if any) on the target NNMi management server using instructions from the HP Network Node Manager i Software Interactive Installation Guide. To migrate the data from step 5, the target NNMi management server must be running the same operating system version. NNMi does not support data migration to an NNMi management server running on a different operating system.
7 Use the nnmrestore.ovpl script to copy NNMi database information to the target server. For more information, see the nnmrestore.ovpl reference page, or the UNIX manpage.
8 Obtain and install a new license on the target NNMi management server.
9 Verify that the information from the target NNMi management server migrated successfully from the existing NNMi management server.
Oracle Database Only: If your Oracle database administrator does not set the FLASHBACK ANY TABLE permission, you will see a warning about that missing permission after the install completes. You can ignore this warning.
18 NNMi Upgrade Reference

Moving
May 2014
Moving NNMi from Red Hat Linux 4.6 to 5.2 or 5.3
NNMi from Red Hat Linux 4.6 to 5.2 or 5.3
NNMi 9.00 does not support Red Hat Linux 4.6. You must change the operating system to Red Hat Linux 5.2 or 5.3 before migrating to NNMi 9.00.
Use the information in this chapter if you have NNMi 8.1x patch 6 or later running on a Red Hat Linux 4.6 server, and need to change the operating system to Red Hat Linux 5.2 or 5.3.
This chapter contains the following topic:
Changing NNMi from Red Hat Linux 4.6 to Red Hat Linux 5.2 or 5.3
Changing NNMi from Red Hat Linux 4.6 to Red Hat Linux 5.2 or 5.3
To complete the following steps, you must have NNMi 8.1x patch 6 or later running on a Linux Red Hat 4.6 server. To check the NNMi version number, note the current patch level in the About Network Node Manager i-series window. Verify that the version is 8.13.006 or later. If the version is earlier than that, do not proceed. You need to install NNMi 8.1x patch 6 or later before proceeding.
To change an NNMi management server running NNMi 8.1x patch 6 or later from Red Hat Linux 4.6 to Red Hat Linux 5.2 or 5.3, follow these steps:
1 Identify three servers that you will use during this procedure:
• Server A is the current NNMi management server running Linux Red Hat 4.6.
• Server B will hold the NNMi backup files.
• Server C will become the new NNMi management server running Linux Red Hat 5.2 or 5.3. This NNMi management server can be the same hardware as the current Server A.
Make sure the /etc/hosts file on the new NNMi management server contains the following entry:
127.0.0.1 localhost
19

Upgrading from NNMi 8.0x or 8.1x
2 On Server A, run the nnmbackup.ovpl -type online -scope all -target /tmp/bak/all command to complete a full NNMi backup.
For more information about which command options to use, see “NNMi Backup and Restore Tools” in the NNMi Deployment Reference and the nnmbackup.ovpl reference page, or the UNIX manpage.
3 On Server A, copy the backup you completed in step 2 to Server B.
4 On Server C, install Red Hat Linux 5.2 or 5.3.
5 On Server C, install NNMi 8.10.
See Installing NNMi 8.10 on Red Hat 5.2 in the NNMi 8.1x Patch 4 Installation Guide for Linux for information about completing this step.
6 On Server C, install 8.1x patch 6 or later. You must install the same patch level that NNMi Server A was at during the backup you completed in step 2.
7 On Server B, copy the NNMi backup to Server C.
8 On Server C, run the nnmrestore.ovpl -force -source /tmp/bak/all command to complete a full NNMi restore.
For more information about which command options to use, see “NNMi Backup and Restore Tools” in the NNMi Deployment Reference and the nnmrestore.ovpl reference page, or the UNIX manpage.
As an alternative to using Server C, reformat the disk on Server A and install Red Hat Linux 5.2 or 5.3. If you do that, substitute Server A for Server C for the remaining steps.
Use the command options that match the backup you completed in step 2
20 NNMi Upgrade Reference

May 2014
9 NNMi associates its license keys with a server’s IP address. If the IP address for Server C is different from the IP address of Server A, obtain and install new NNMi license keys. See “Changing the IP Address of a Standalone NNMi Management Server” in the NNMi Deployment Reference.
Moving NNMi from Red Hat Linux 4.6 to 5.2 or 5.3 21

Upgrading from NNMi 8.0x or 8.1x
22 NNMi Upgrade Reference
Migrati
May 2014
Migrating NNMi Oracle Data
ng NNMi Oracle Data
Suppose you must move the Oracle data used by your NNMi management server from one Oracle database instance to another. One example of this is to move NNMi data from an Oracle 10g database to an Oracle 11g database. The information in this chapter explains the steps to take to complete this work.
Migrating NNMi Oracle Data
Suppose you have NNMi running in one of the following configurations:
• NNMi 8.1x with the latest patch connected to an Oracle 10g database and you must upgrade to NNMi 9.0x.
• NNMi 9.1x connected to an Oracle 10G or Oracle 11G database.
The Oracle database instance migration you must complete could include combinations of the following requirements:
• The existing Oracle instance can be running Oracle 10G or 11G.
• The new Oracle instance can be running Oracle 10G or 11G. You cannot move an existing Oracle 11G instance back to Oracle 10G.
• The new Oracle instance can be located on the original server or on a different server and hostname.
To complete the migration of the NNMi Oracle data, complete the following steps:
1 As root or administrator, run the following command to stop NNMi: ovstop –c.
2 Use Oracle tools to move or copy the NNMi data from the existing Oracle server to the new server. Refer to Oracle documentation for additional information.
NNMi 8.1x cannot connect to an Oracle 11G server.
This Oracle data migration can be an in-place upgrade from Oracle 10 to Oracle 11 on the same server. Oracle provides database migration tools for converting Oracle 10 data into the Oracle 11 format.
23

Upgrading from NNMi 8.0x or 8.1x
3 Only complete this step if the new Oracle server has a different hostname than the previous Oracle server. On the NNMi management server, reconfigure NNMi to point to the new Oracle server by completing the following steps:
a Edit the datasource configuration file shown :
— Windows: %NNM_JBOSS%\server\nms\deploy\nms-ds.xml
— UNIX: $NNM_JBOSS/server/nms/deploy/nms-ds.xml
b Change the following attribute to reflect your new server
OLD: <connection-url>jdbc:oracle:thin:@EXISTING_FQDN:EXISTING_ORACLE_PORT:EXISTING_SID </connection-url>
NEW: <connection-url>jdbc:oracle:thin:@NEW_FQDN:NEW_PORT:NEW_SID</connection-url>
4 Complete one of the following actions:
If you are upgrading from NNMi 8.1x to NNMi 9.0x, perform that migration now, following the installation instructions in the HP Network Node Manager i Software Installation Guide.
If you are already using NNMi 9.0x, follow these steps to restart NNMi and complete the Oracle database move/migration:
a Run the following command on the NNMi management server to restart NNMi: ovstart -c
b Run the following command on the NNMi management server to check if all of the services are started and operating correctly: ovstatus -v
It is important that you complete the following steps accurately, or jboss will not correctly connect to the Oracle 11G database.
24 NNMi Upgrade Reference
Additio
May 2014
Additional Upgrade
Information
nal Upgrade Information
This chapter describes some changes between NNMi 9.00 and earlier NNMi versions. This chapter contains the following topics:
• Configuration Differences
• Functionality Differences
Configuration Differences
After upgrading, you can find many of the configuration files from earlier version of NNMi in new locations.
• After upgrading, you can find most properties files that influence NNMi 9.00 behavior at the following locations:
— Windows: %NNM_DATA%\shared\nnm\conf\props
— Windows: %NNM_DATA%\conf\nnm\props
— UNIX: $NNM_DATA/shared/nnm/conf/props
— UNIX: $NNM_DATA/conf/nnm/props/
• To modify the ovjboss process startup JVM options, such as heap size, edit the following file:
— Windows: %NNM_DATA%\shared\nnm\conf\props\ovjboss.jvmargs
— UNIX: $NNM_DATA%/shared/nnm/conf/props/ovjboss.jvmargs
• To modify trap server properties, edit the following file:
— Windows: %NNM_DATA%\shared\nnm\conf\props\nnmtrapserver.properties
— UNIX: $NNM_DATA/shared/nnm/conf/props/nnmtrapserver.properties
25
Upgrading from NNMi 8.0x or 8.1x
• During an upgrade to NNMi 9.00, NNMi preserves the nms-jboss.properties file contents. The ovjboss.jvm.properties file has a new location:
— Windows: %NNM_DATA%\shared\nnm\conf\props\nms-jboss.properties
— UNIX: $NNM_DATA/shared/nnm/conf/props/nms-jboss.properties
• To modify application failover properties, edit the following file:
— Windows: %NNM_DATA%\shared\nnm\conf\props\nms-jboss.properties
— UNIX: $NNM_DATA/shared/nnm/conf/props/nms-jboss.properties
• To modify port properties that were located in the port.properties file, edit the following file:
— Windows: %NNM_DATA%\conf\nnm\props\nms-local.properties
— UNIX: $NNM_DATA/conf/nnm/props/nms-local.properties
• You now select node group status using a check box on the Node Group configuration form. After you upgrade an NNMi management server, NNMi retains the existing node groups the way they were before the upgrade.
Functionality Differences
• Many commands and scripts now require a username and password to run. For more information, see the reference page or the UNIX manpage for the command or script you want to run.
• NNMi does not start the nmsdbmgr process if it is using an Oracle database.
• Dampening settings are no longer disabled out-of-the-box.
— Dampening is turned on for most management events.
• You can use the nnmsetdampenedinterval.ovpl script to adjust the dampening interval. This script sets the dampening interval for all management event configurations. See the nnmsetdampenedinterval.ovpl reference page or the UNIX manpage for more information.
— After upgrading, the nnmsetdampenedinterval.ovpl script is most useful for any of the integrations that use the NNMi northbound interface:
– NNMi northbound interface
– NNMi Integration Module for Netcool Software
– HPOM agent implementation of the HP NNMi-HPOM integration
For dampening, write down the value of the Holding Period parameter for the integration configuration before installing NNMi 9.00. After upgrading, run the nnmsetdampenedinterval.ovpl script to apply this value across NNMi.
— If you upgrade to NNMi 9.00, and have a different dampening period set (something other than 6 minutes), you can globally reset all dampened intervals to a different value using the nnmsetdampenedinterval.ovpl script.
This is a manual step. It does not happen automatically during an upgrade.
26 NNMi Upgrade Reference

May 2014
• NNMi 9.00 does not include the NodeUp management event incident. The upgrade to NNMi 9.00 retains the incident configuration, but the NNMi root cause analysis no longer triggers the NodeUp incident.
— If you need notification that a node is up, associate a lifecycle transition action with the CLOSED lifecycle state of the NodeDown incident. In most cases, you can transfer the action for the NodeUp incident REGISTERED state to the NodeDown incident CLOSED state with little or no change.
— Integrations that use the NNMi northbound interface (including the NNMi Integration Module for Netcool Software), can receive traps that indicate when a NodeDown incident has been closed.
• NNMi 9.00 adds the Calculate Status setting to the Node Group configuration form. Upgrading to NNMi 9.00 selects the Calculate Status check box for all existing node groups.
— Consider disabling the Calculate Status setting for large node groups, particularly the Network Infrastructure Devices node group, as node group status calculation can be expensive resource-wise for large environments.
— See Check Status Details for a Node Group in the NNMi help for information about checking status for a node group.
• After upgrading to NNMi 9.00, NNMi uses ICMP (ping) of management addresses.
• You can configure State Poller data collection to be based on an ICMP (ping) response, or to be based on SNMP data.
• Device profile configuration upgrades from NNMi 8.x can modify some settings. If you do not want these values modified during an upgrade, change the Author field to some value different from HP Network Node Manager.
• URL action configuration upgrades from NNMi 8.x can modify some settings. If you do not want these values to be modified during an upgrade, change the Author field to some value different from HP Network Node Manager.
• NNMi 9.00 adds a configuration form for the HPOM agent implementation of the HP NNMi-HPOM integration. For long-term maintenance purposes, it is recommended that you transfer the integration configuration from the HP NNMi–Northbound Interface Destination form to the HP NNMi–HPOM Agent Destination form. After transferring the configuration, delete the destination from the HP NNMi–Northbound Interface Destination form.
• Most processes now log messages to the nnm.0.0.log file, instead of to separate log files for each component. For more information, see “NNMi Logging” in the NNMi Deployment Reference.
Additional Upgrade Information 27

Upgrading from NNMi 8.0x or 8.1x
28 NNMi Upgrade Reference

Applica
May 2014
Application Failover and
Upgrading from NNMi 8.x to NNMi 9.0x
tion Failover and Upgrading from NNMi 8.x to NNMi
Application Failover and Upgrading to NNMi 9.00
If you plan to upgrade an earlier version of NNMi 8.1x that is running in an NNMi application failover configuration, the supported upgrade path is to temporarily unconfigure application failover, upgrade the NNMi management server to NNMi 9.00, then reconfigure application failover.
To upgrade NNMi management servers configured for application failover, follow these steps:
1 As a precaution, run the nnmconfigexport.ovpl script on both the active and standby NNMi management servers before proceeding. For information, see “Best Practice: Save the Existing Configuration” in the NNMi Deployment Reference.
2 As a precaution, back up your NNMi data on both the active and standby NNMi management servers before proceeding. For information, see “Backup Scope” in the NNMi Deployment Reference.
3 As a precaution, on the active NNMi management server, complete the following steps:
a Run the nnmcluster command.
b Embedded database only: After NNMi prompts you, type dbsync, then press Enter. Review the displayed information to make sure it includes the following messages:
ACTIVE_DB_BACKUP: This means that the active NNMi management server is performing a new backup.ACTIVE_NNM_RUNNING: This means that the active NNMi management server completed the backup referred to by the previous message.STANDBY_READY: This shows the previous status of the standby NNMi management server.STANDBY_RECV_DBZIP: This means that the standby NNMi management server is receiving a new backup from the active NNMi management server. STANDBY_READY: This means that the standby NNMi management server is ready to perform if the active NNMi management server fails.
9.0x 29

Upgrading from NNMi 8.0x or 8.1x
4 Run the nnmcluster -halt command on the active NNMi management server. This shuts down all nnmcluster processes on both the active and standby NNMi management servers.
5 To verify there are no nnmcluster nodes running on either server, complete the following steps on both the active and standby NNMi management servers.
a Run the nnmcluster command.
b Verify that there are no nnmcluster nodes present except the one marked (SELF).
c Run exit or quit to stop the interactive nnmcluster process you started in step a.
6 Complete the following steps on both the active and standby NNMi management servers to disable application failover:
a Edit the following file:
• Windows: %NNM_SHARED_CONF%\ov.conf
• UNIX: $NNM_SHARED_CONF/ov.conf
b Comment out the com.hp.ov.nms.cluster.name parameter.
c Write down the value of the com.hp.ov.nms.cluster.name parameter. You need that value in a later step.
d Save your changes.
7 Upgrade the active NNMi management server using the instructions located in the HP Network Node Manager i Software Interactive Installation Guide.
8 Run the ovstart command on the active NNMi management server.
9 Upgrade the standby NNMi management server by following the instructions in the HP Network Node Manager i Software Interactive Installation Guide.
10 Run the ovstart command on the standby NNMi management server.
11 Complete the following steps on both the active and standby NNMi management servers:
a Run the ovstop command.
b Edit the following file:
• Windows: %NNM_SHARED_CONF%\props\nms-cluster.properties
• UNIX: $NNM_SHARED_CONF/props/nms-cluster.properties
c Type in the value of the com.hp.ov.nms.cluster.name parameter you wrote down in step c on page 30.
d Uncomment the com.hp.ov.nms.cluster.name parameter.
e Save your changes.
12 Run the ovstart command on the active NNMi management server only. To verify that this step is complete, run the nnmcluster -display command o the active NNMi management server and look for an ACTIVE_NNM_RUNNING message.
13 After you complete step 12 on the active NNMi management server, run the ovstart command on the standby NNMi management server to finish enabling application failover.
30 NNMi Upgrade Reference

May 2014
14 If you installed the NNM iSPI Performance for QA, the NNM iSPI Performance for Metrics, or the NNM iSPI Performance for Traffic; are using the application failover feature; and completed the upgrade process shown above, run the NNM iSPI enablement script for each NNM iSPI on both the active and standby NNMi management servers.
15 If you are using Linux NNMi management servers, run the following command on both the active and standby NNMi management servers:chmod 777 /var/opt/OV/shared/perfSpi/datafiles/nnm_details.xml
Application Failover and NNMi Patches
To apply patches to the NNMi management servers configured for application failover, follow these steps:
1 As a precaution, run the nnmconfigexport.ovpl script on both the active and standby NNMi management servers before proceeding. For information, see “Best Practice: Save the Existing Configuration” in the NNMi Deployment Reference.
2 As a precaution, back up your NNMi data on both the active and standby NNMi management servers before proceeding. For information, see “Backup Scope” in the NNMi Deployment Reference.
3 As a precaution, on the active NNMi management server, do the following steps:
a Run the nnmcluster command.
b Embedded database only: After NNMi prompts you, type dbsync, then press Enter. Review the displayed information to make sure it includes the following messages:
ACTIVE_DB_BACKUP: This means that the active NNMi management server is performing a new backup.ACTIVE_NNM_RUNNING: This means that the active NNMi management server completed the backup referred to by the previous message.STANDBY_READY: This shows the previous status of the standby NNMi management server.STANDBY_RECV_DBZIP: This means that the standby NNMi management server is receiving a new backup from the active NNMi management server. STANDBY_READY: This means that the standby NNMi management server is ready to perform if the active NNMi management server fails.
4 Run the nnmcluster -halt command on the active NNMi management server. This shuts down all nnmcluster processes on both the active and standby NNMi management servers.
5 To verify there are no nnmcluster nodes running on either server, complete the following steps on both the active and standby NNMi management servers.
a Run the nnmcluster command.
b Verify that there are no nnmcluster nodes present except the one marked (SELF).
c Run exit or quit to stop the interactive nnmcluster process you started in step a.
6 On the active NNMi management server, comment out the com.hp.ov.nms.cluster.name parameter in the nms-cluster.properties file.
a Edit the following file:
Application Failover and Upgrading from NNMi 8.x to NNMi 9.0x 31

Upgrading from NNMi 8.0x or 8.1x
— Windows: %NNM_SHARED_CONF%\props\nms-cluster.properties
— UNIX: $NNM_SHARED_CONF/props/nms-cluster.properties
b Comment out the com.hp.ov.nms.cluster.name parameter.
c Save your changes.
7 Apply the NNMi patch to the active NNMi management server using the instructions provided with the patch.
8 On the active NNMi management server, uncomment the com.hp.ov.nms.cluster.name parameter in the nms-cluster.properties file.
a Edit the following file:
— Windows: %NNM_SHARED_CONF%\props\nms-cluster.properties
— UNIX: $NNM_SHARED_CONF/props/nms-cluster.properties
b Uncomment the com.hp.ov.nms.cluster.name parameter.
c Save your changes.
9 Run the ovstart command on the active NNMi management server.
10 Verify that the patch installed correctly on the active NNMi management server by viewing information on the Product tab of the Help > System Information window in the NNMi console.
11 Run the nnmcluster -dbsync command to create a new backup.
12 On the standby NNMi management server, comment out the com.hp.ov.nms.cluster.name parameter in the nms-cluster.properties file as shown in step a on page 31 through step c on page 32.
13 Apply the NNMi patch to the standby NNMi management server.
14 On the standby NNMi management server, uncomment the com.hp.ov.nms.cluster.name parameter in the nms-cluster.properties file as shown instep a on page 32 through step c on page 32.
15 Run the ovstart command on the standby NNMi management server.
16 If you installed the NNM iSPI Performance for QA, the NNM iSPI Performance for Metrics, or the NNM iSPI Performance for Traffic; are using the application failover feature; and completed the patch process shown above, run the NNM iSPI enablement script for each NNM iSPI on both the active and standby NNMi management servers.
17 If you are using Linux NNMi management servers, run the following command on both the active and standby NNMi management servers:chmod 777 /var/opt/OV/shared/perfSpi/datafiles/nnm_details.xml
32 NNMi Upgrade Reference

High Av
May 2014
High Availability and Upgrading
from NNMi 8.1x to NNMi 9.0x
ailability and Upgrading from NNMi 8.1x to NNMi 9.
Upgrading NNMi under HA from NNMi 8.1x to NNMi 9.01
To upgrade from NNMi 8.1x under HA to NNMi 9.01 under HA, upgrade the active node, fail over from the active node to the passive node, and then upgrade the second node. Follow these steps:
1 Ensure that the fully-qualified domain name is correctly set on each NNMi management server in the NNMi HA resource group. On each NNMi management server, run the following command:
nnmofficialfqdn.ovpl -t
• If the returned value is the virtual hostname of the NNMi HA resource group, continue with step 2 of this procedure.
• If the returned value is not the virtual hostname of the NNMi HA resource group, update the configuration of each NNMi management server in the HA cluster as described in the NNMi Deployment Guide for NNMi 9.2x. (See “Changing the Hostname or Domain Name of an NNMi Management Server” in the “Changing the NNMi Management Server” chapter.)
2 Use the nnmbackup.ovpl command, or another database command, to back up all NNMi data. For example:
nnmbackup.ovpl -type offline -scope all -target nnmi_backups
For more information about this command, see the nnmbackup.ovpl reference page, or the UNIX manpage.
This procedure references the NNMi 8.1x version of this document for making changes to the NNMi management server before upgrading NNMi. The NNMi Deployment Guide for NNMi 8.1x is available from http://h20230.www2.hp.com/selfsolve/manuals. See Available Product Documentation on page 3 for more information.
In the referenced procedure, do not rename or reboot the NNMi management server.
0x 33
Upgrading from NNMi 8.0x or 8.1x
3 Ensure that the NNMi 8.1x configuration is consistent across all HA nodes by forcing a failover, in turn, to each of the passive nodes.
4 Ensure that all nodes in the NNMi 8.1x HA cluster are running NNMi 8.1x Patch 8 or a higher version of NNMi 8.1x.
If necessary, upgrade each system to the latest NNMi 8.1x consolidated patch. Follow the instructions in the “Patching NNMi under HA” section of the “Configuring NNM i-series Software in a High Availability Cluster” chapter in the most recent NNMi 8.1x version of the NNMi Deployment Guide.
5 Determine which node in the NNMi 8.1x HA resource group is active:
• Windows:
%NnmInstallDir%\misc\nnm\ha\nnmhaclusterinfo.ovpl \-group <resource_group> -activeNode
• UNIX:
$NnmInstallDir/misc/nnm/ha/nnmhaclusterinfo.ovpl \-group <resource_group> -activeNode
The remainder of this procedure refers to the currently active node (the node identified by the nnmhaclusterinfo.ovpl command) as server X and the currently passive node as server Y.
6 On server X (which is the original active node), disable NNMi HA resource group monitoring by creating the following maintenance file:
• Windows: %NnmDataDir%\hacluster\<resource_group>\maintenance
• UNIX: $NnmDataDir/hacluster/<resource_group>/maintenance
7 On server X, upgrade NNMi:
a Stop NNMi:
ovstop -c
b Install NNMi 9.00 as described in Upgrading from NNMi 8.0x or 8.1x on page 13.
The NNMi database on the shared disk is upgraded to the format of the new NNMi product version at this time.
c Apply the latest consolidated NNMi patch as described in the patch installation instructions.
d Upgrade all add-on NNM iSPIs to version 9.00 as described in the installation guide or the deployment guide for each NNM iSPI.
e Apply the latest consolidated patch for each installed NNM iSPI as described in the patch installation instructions.
The first line of the maintenance file must contain only the single word:NORESTART
If your environment includes standalone NNM iSPIs, you must also upgrade those products to version 9.00 for correct functionality. You can complete those upgrades after completing this procedure.
34 NNMi Upgrade Reference

May 2014
8 On server Y (which is still operating as the passive node), disable HA resource group monitoring by creating the following maintenance file:
• Windows: %NnmDataDir%\hacluster\<resource_group>\maintenance
• UNIX: $NnmDataDir/hacluster/<resource_group>/maintenance
9 Move control of the NNMi HA resource group to server Y:
• MSFC or MSCS:
— On server X, take the NNMi HA resource group offline.
— On server X, move the NNMi HA resource group to server Y.
— On server Y, bring online all resources except the resource group application.
• VCS:
— On server X, take the NNMi HA resource group offline.
— On server X, move the NNMi HA resource group to server Y.
— On server Y, bring online all resources except the resource group application.
10 On server Y (which is now the active node), upgrade NNMi:
a Install NNMi 9.00 as described in Upgrading from NNMi 8.0x or 8.1x on page 13.
b Apply the latest consolidated NNMi patch as described in the patch installation instructions.
c Upgrade all add-on NNM iSPIs to version 9.00 as described in the installation guide or the deployment guide for each NNM iSPI.
d Apply the latest consolidated patch for each installed NNM iSPI as described in the patch installation instructions.
11 If the HA cluster includes multiple passive nodes, repeat step 8 through step 10 for each passive node.
12 Optional. Force a failover from server Y to server X so that the node that was active before the upgrade process is again the active node.
13 Start NNMi:
ovstart
14 Verify that NNMi started correctly:
ovstatus -c
All NNMi services should show the state RUNNING.
15 On all servers, delete the maintenance file:
• Windows: %NnmDataDir%\hacluster\<resource_group>\maintenance
• UNIX: $NnmDataDir/hacluster/<resource_group>/maintenance
The first line of the maintenance file must contain only the single word:NORESTART
High Availability and Upgrading from NNMi 8.1x to NNMi 9.0x 35
Upgrading from NNMi 8.0x or 8.1x
Unconfiguring NNMi from an HA Cluster
Unconfiguring NNMi from an HA Cluster
The process of removing an NNMi node from an HA cluster involves undoing the HA configuration for that instance of NNMi. You can then run that instance of NNMi as a standalone management server, or you can uninstall NNMi from that node.
If you want to keep NNMi configured for high availability, the HA cluster must contain one node that is actively running NNMi and at least one passive NNMi node. If you want to completely remove NNMi from the HA cluster, unconfigure the HA functionality on all nodes in the cluster.
To completely unconfigure NNMi from an HA cluster, follow these steps:
1 Determine which node in the HA cluster is active. On any node, run the following command:
• Windows:
%NnmInstallDir%\misc\nnm\ha\nnmhaclusterinfo.ovpl \-group <resource_group> -activeNode
• UNIX:
$NnmInstallDir/misc/nnm/ha/nnmhaclusterinfo.ovpl \-group <resource_group> -activeNode
2 On each passive node, unconfigure any add-on NNM iSPIs from the HA cluster.
For information, see the documentation for each NNM iSPI.
36 NNMi Upgrade Reference

May 2014
3 On any node in the HA cluster, verify that the add-on NNM iSPIs on all passive nodes have been unconfigured from the HA cluster:
• Windows:
%NnmInstallDir%\misc\nnm\ha\nnmhaclusterinfo.ovpl \-config NNM -get NNM_ADD_ON_PRODUCTS
• UNIX:
$NnmInstallDir/misc/nnm/ha/nnmhaclusterinfo.ovpl \-config NNM -get NNM_ADD_ON_PRODUCTS
The command output lists the add-on iSPI configurations in the format <iSPI_PM_Name>[hostname_list]. For example:
PerfSPIHA[hostname1, hostname2]
At this time, only the active node hostname should appear in the output. If a passive node hostname appears in the output, repeat step 2 until this command output includes only the active node hostname.
4 On each passive node, unconfigure NNMi from the HA cluster:
• Windows:
%NnmInstallDir%\misc\nnm\ha\nnmhaunconfigure.ovpl NNM \<resource_group>
• UNIX:
$NnmInstallDir/misc/nnm/ha/nnmhaunconfigure.ovpl NNM \<resource_group>
This command removes access to the shared disk but does not unconfigure the disk group or the volume group.
5 On each passive node, move the NNMi HA resource group-specific files to a separate location for safe-keeping:
• MSFC or MSCS: In Windows Explorer, delete the %NnmDataDir%\hacluster\<resource_group>\ folder.
• VCS:
rm -rf /var/opt/OV/hacluster/<resource_group>
If you do not plan to reconfigure the NNMi HA resource group, you do not need to save a copy of these files, and you can delete them at this time.
High Availability and Upgrading from NNMi 8.1x to NNMi 9.0x 37

Upgrading from NNMi 8.0x or 8.1x
6 On the active node, unconfigure any add-on NNM iSPIs from the HA cluster.
For information, see the documentation for each NNM iSPI.On any node in the HA cluster, verify that the add-on NNM iSPIs on all nodes have been unconfigured from the HA cluster:
• Windows:
%NnmInstallDir%\misc\nnm\ha\nnmhaclusterinfo.ovpl \-config NNM -get NNM_ADD_ON_PRODUCTS
• UNIX:
$NnmInstallDir/misc/nnm/ha/nnmhaclusterinfo.ovpl \-config NNM -get NNM_ADD_ON_PRODUCTS
If any hostname appears in the output, repeat step 6 until this command output indicates that no iSPIs are configured.
7 On the active node, stop the NNMi HA resource group:
• Windows:
%NnmInstallDir%\misc\nnm\ha\nnmhastoprg.ovpl NNM \<resource_group>
• UNIX:
$NnmInstallDir/misc/nnm/ha/nnmhastoprg.ovpl NNM \<resource_group>
This command does not remove access to the shared disk. Nor does it unconfigure the disk group or the volume group.
8 On the active node, unconfigure NNMi from the HA cluster:
• Windows:
%NnmInstallDir%\misc\nnm\ha\nnmhaunconfigure.ovpl NNM \<resource_group>
• UNIX:
$NnmInstallDir/misc/nnm/ha/nnmhaunconfigure.ovpl NNM \<resource_group>
This command removes access to the shared disk but does not unconfigure the disk group or the volume group.
9 On the active node, move the NNMi HA resource group-specific files to a separate location for safe-keeping:
• MSFC or MSCS: In Windows Explorer, delete the %NnmDataDir%\hacluster\<resource_group>\ folder.
• VCS:
rm -rf /var/opt/OV/hacluster/<resource_group>
10 Unmount the shared disk.
• If you want to reconfigure the NNMi HA cluster at some point, you can keep the disk in its current state.
If you do not plan to reconfigure the NNMi HA resource group, you do not need to save a copy of these files, and you can delete them at this time.
38 NNMi Upgrade Reference

May 2014
• If you want to use the shared disk for another purpose, copy all data that you want to keep (as described in Running NNMi with the Existing Database Outside HA on page 39), and then use the HA product commands to unconfigure the disk group and volume group.
Running NNMi with the Existing Database Outside HA
If you want to run NNMi outside HA on any node with the existing database, follow these steps:
1 On the active node (if one still exists), ensure that NNMi is not running:
ovstop
Alternatively, check the status of the ovspmd process by using Task Manager (Windows) or the ps command (UNIX).
2 On the current node (where you want to run NNMi outside HA), verify that NNMi is not running:
ovstop
3 (UNIX only) Activate the disk group:
vgchange -a e <disk_group>
4 Use the appropriate operating system commands to mount the shared disk. For example:
• Windows: Use Windows Explorer.
• UNIX: mount /dev/vgnnm/lvnnm /nnmmount
5 Copy the NNMi files from the shared disk to the node:
• Windows:
%NnmInstallDir%\misc\nnm\ha\nnmhadisk.ovpl NNM \-from <HA_mount_point>
• UNIX:
$NnmInstallDir/misc/nnm/ha/nnmhadisk.ovpl NNM \-from <HA_mount_point>
To prevent data corruption, make sure that no instance of NNMi is running and accessing the shared disk.
High Availability and Upgrading from NNMi 8.1x to NNMi 9.0x 39

Upgrading from NNMi 8.0x or 8.1x
6 Use the appropriate operating system commands to unmount the shared disk. For example:
• Windows: Use Windows Explorer.
• UNIX: umount /nnmmount
7 (UNIX only) Deactivate the disk group:
vgchange -a n <disk_group>
8 Obtain and install the permanent production license keys for the physical IP address of this NNMi management server.
9 Start NNMi:
ovstart -c
NNMi is now running with a copy of the database that was formerly used by the NNMi HA resource group. Manually remove from the NNMi configuration any nodes that you do not want to manage from this NNMi management server.
Patching NNMi under HA
To apply a patch for NNMi, work in HA maintenance mode. Follow these steps:
1 Determine which node in the HA cluster is active:
• Windows:
%NnmInstallDir%\misc\nnm\ha\nnmhaclusterinfo.ovpl \-group <resource_group> -activeNode
• UNIX:
$NnmInstallDir/misc/nnm/ha/nnmhaclusterinfo.ovpl \-group <resource_group> -activeNode
2 On the active node, put the NNMi HA resource group into maintenance mode as described in “Putting an HA Resource Group into Maintenance Mode” in the NNMi Deployment Reference.
Include the NORESTART keyword.
3 On all passive nodes, put the NNMi HA resource group into maintenance mode as described in “Putting an HA Resource Group into Maintenance Mode” in the NNMi Deployment Reference.
Include the NORESTART keyword.
4 On the active node, follow these steps:
a Stop NNMi:
ovstop -c
b Back up the shared disk by performing a disk copy.
c Optional. Use the nnmbackup.ovpl command, or another database command, to back up all NNMi data. For example:
nnmbackup.ovpl -type offline -scope all -target nnmi_backups
For more information about this command, see “NNMi Backup and Restore Tools” in the NNMi Deployment Reference.
40 NNMi Upgrade Reference

May 2014
d Apply the appropriate NNMi and NNM iSPI patches to the system.
e Start NNMi:
ovstart -c
f Verify that NNMi started correctly:
ovstatus -c
All NNMi services should show the state RUNNING.
5 On each passive node, apply the appropriate patches to the system.
6 On all passive nodes, take the NNMi HA resource group out of maintenance mode as described in “Removing an HA Resource Group from Maintenance Mode” in the NNMi Deployment Reference.
7 On the active node, take the NNMi HA resource group out of maintenance mode as described in “Removing an HA Resource Group from Maintenance Mode” in the NNMi Deployment Reference.
Never run the ovstart or ovstop commands on a secondary (backup) cluster node.
High Availability and Upgrading from NNMi 8.1x to NNMi 9.0x 41

Upgrading from NNMi 8.0x or 8.1x
42 NNMi Upgrade Reference
May 2014
Upgrading from NNMi 9.0x to NNMi 9.1x
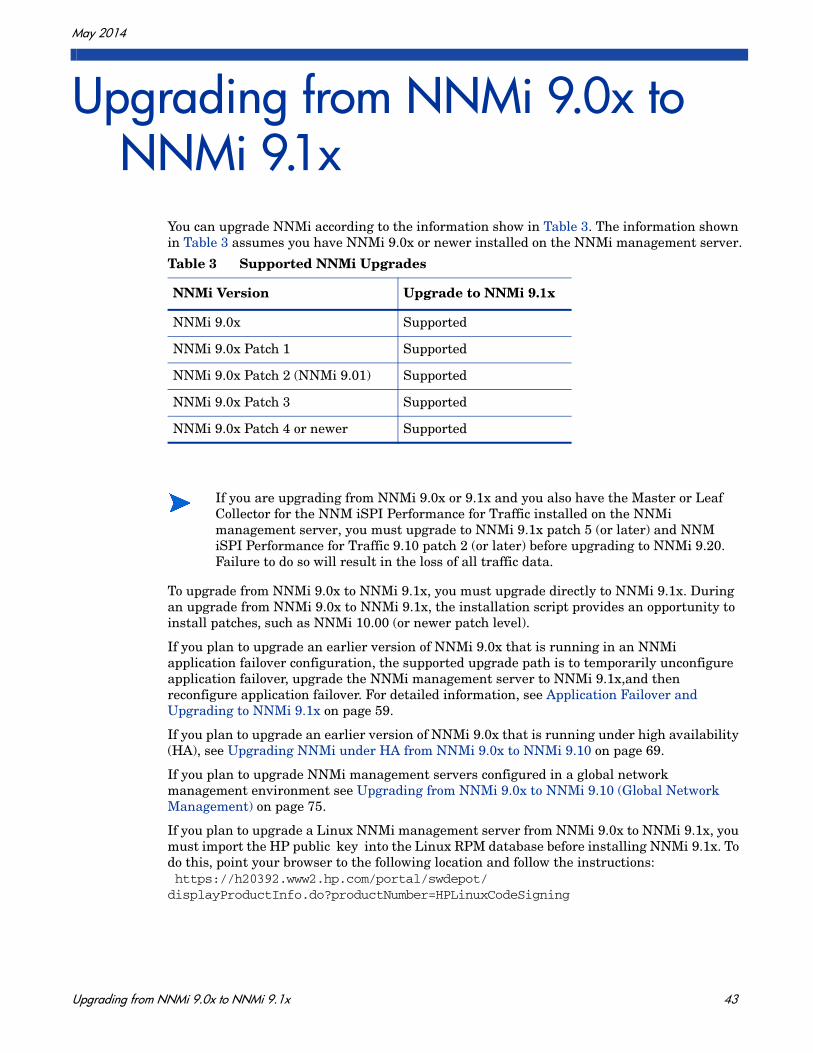
You can upgrade NNMi according to the information show in Table 3. The information shown in Table 3 assumes you have NNMi 9.0x or newer installed on the NNMi management server.
To upgrade from NNMi 9.0x to NNMi 9.1x, you must upgrade directly to NNMi 9.1x. During an upgrade from NNMi 9.0x to NNMi 9.1x, the installation script provides an opportunity to install patches, such as NNMi 10.00 (or newer patch level).
If you plan to upgrade an earlier version of NNMi 9.0x that is running in an NNMi application failover configuration, the supported upgrade path is to temporarily unconfigure application failover, upgrade the NNMi management server to NNMi 9.1x,and then reconfigure application failover. For detailed information, see Application Failover and Upgrading to NNMi 9.1x on page 59.
If you plan to upgrade an earlier version of NNMi 9.0x that is running under high availability (HA), see Upgrading NNMi under HA from NNMi 9.0x to NNMi 9.10 on page 69.
If you plan to upgrade NNMi management servers configured in a global network management environment see Upgrading from NNMi 9.0x to NNMi 9.10 (Global Network Management) on page 75.
If you plan to upgrade a Linux NNMi management server from NNMi 9.0x to NNMi 9.1x, you must import the HP public key into the Linux RPM database before installing NNMi 9.1x. To do this, point your browser to the following location and follow the instructions: https://h20392.www2.hp.com/portal/swdepot/displayProductInfo.do?productNumber=HPLinuxCodeSigning
Table 3 Supported NNMi Upgrades
NNMi Version Upgrade to NNMi 9.1x
NNMi 9.0x Supported
NNMi 9.0x Patch 1 Supported
NNMi 9.0x Patch 2 (NNMi 9.01) Supported
NNMi 9.0x Patch 3 Supported
NNMi 9.0x Patch 4 or newer Supported
If you are upgrading from NNMi 9.0x or 9.1x and you also have the Master or Leaf Collector for the NNM iSPI Performance for Traffic installed on the NNMi management server, you must upgrade to NNMi 9.1x patch 5 (or later) and NNM iSPI Performance for Traffic 9.10 patch 2 (or later) before upgrading to NNMi 9.20. Failure to do so will result in the loss of all traffic data.
Upgrading from NNMi 9.0x to NNMi 9.1x 43

Upgrading from NNMi 9.0x to NNMi 9.1x
There are several upgrade scenarios you could encounter. This section contains the following topics:
• Upgrading the NNMi Management Server in Place, which describes the following upgrade scenario:
— Upgrading from NNMi 9.0x to NNMi 9.1x on the same hardware and operating system.
• Upgrading to a Different NNMi Management Server, which describes the following upgrade scenario:
— Upgrading from NNMi 9.0x to NNMi 9.1x on the same version operating system.
• Moving NNMi from Windows 2003 to Windows 2008. NNMi 9.10 does not support Windows 2003. You must change the operating system to Windows 2008 before upgrading to NNMi 9.10.
• Migrating NNMi Oracle Data. Explains the steps to take to move the Oracle data used by your NNMi management server from one Oracle database instance to another.
• Additional Upgrade Information. Explains some areas that NNMi 9.1x differs from earlier versions of NNMi.
44 NNMi Upgrade Reference

Upgrad
May 2014
Upgrading the NNMi
Management Server in Place
ing the NNMi Management Server in Place
This chapter describes the process for upgrading an existing NNMi 9.0x management server to NNMi 9.1x.
This chapter contains the following topic:
• Upgrade an Existing NNMi 9.0x Management Server to NNMi 9.1x
Upgrade an Existing NNMi 9.0x Management Server to NNMi 9.1x
Read the NNMi 9.1x Preinstallation Checklist chapter in the HP Network Node Manager i Software Interactive Installation Guide and Additional Upgrade Information on page 55 before continuing. There are notable changes to the HP Network Node Manager i Software Interactive Installation Guide. For example, if you use an Oracle database instance instead of the embedded database, you should set the FLASHBACK ANY TABLE permission, as this enables NNMi to create restore points during migration.
Read the HP Network Node Manager i Software System and Device Support Matrix for the NNMi software you are upgrading to before continuing. You can obtain a copy of this document at http://h20230.www2.hp.com/selfsolve/manuals. You must have an HP Passport User ID to access this web site.
The following steps explain how to upgrade an NNMi management server to NNMi 9.1x. The following steps assume you have NNMi 9.0x running on the NNMi management server.
1 Back up the NNMi management server using the nnmbackup.ovpl script. Do this as a precaution, as you would only use this backup in the unlikely event of a failed migration. For more information, see the nnmbackup.ovpl reference page, or the UNIX manpage.
45

Upgrading from NNMi 9.0x to NNMi 9.1x
2 Oracle Database Only: If the NNMi management server uses an Oracle database, have your Oracle database administrator back up the NNMi data. As mentioned earlier, have your Oracle database administrator set the FLASHBACK ANY TABLE permission, as this enables NNMi to create restore points during migration
3 Oracle Database Only: Use the nnmconfigexport.ovpl script to back up configuration information from the NNMi management server. Do this as a precaution, as you would only use this backup in the unlikely event of a failed migration. For more information, see the nmconfigexport.ovpl or nnmconfigimport.ovpl reference pages, or the UNIX manpages.
4 Install NNMi 9.1x on the NNMi management server using instructions from the HP Network Node Manager i Software Interactive Installation Guide.
5 Verify that the information from the NNMi management server migrated successfully.
Never edit a file exported with the nnmconfigexport.ovpl script before using the nnmconfigimport.ovpl script to import the file.
Oracle Database Only: If your Oracle database administrator does not set the FLASHBACK ANY TABLE permission, you will see a warning about that missing permission after the install completes. You can ignore this warning.
46 NNMi Upgrade Reference

Upgrad
May 2014
Upgrading to a Different NNMi Management
Server
ing to a Different NNMi Management Server
This chapter describes the process for upgrading to NNMi 9.1x on a new system while maintaining the configuration of the existing NNMi management server.
This chapter contains the following topic:
• Upgrade to a Different NNMi Management Server
Upgrade to a Different NNMi Management Server
Read the NNMi 9.1x Preinstallation Checklist chapter in the HP Network Node Manager i Software Interactive Installation Guide and Additional Upgrade Information on page 55 before continuing. There are notable changes to the HP Network Node Manager i Software Interactive Installation Guide. For example, if you use an Oracle database instance instead of the embedded database, you should set the FLASHBACK ANY TABLE permission, as this enables NNMi to create restore points during migration.
The following steps explain how to copy data from an existing NNMi management server to a target NNMi management server. The following steps assume you have NNMi 9.0x running on the existing NNMi management server.
1 As a precaution, back up the existing (source) NNMi 9.0x management server using the nnmbackup.ovpl script. Label this backup for NNMi 9.0x. For more information, see the nnmbackup.ovpl reference page, or the UNIX manpage for NNMi 9.0x.
2 If the existing (source) NNMi management server uses an Oracle database, have your Oracle database administrator back up the NNMi 9.0x data. As mentioned earlier, have your Oracle database administrator set the FLASHBACK ANY TABLE permission, as this enables NNMi to create restore points during migration.
If you want to change the Oracle database server, complete that process before or after the upgrade to NNMi 10.00. For information, see Migrating NNMi Oracle Data on page 53.
47

Upgrading from NNMi 9.0x to NNMi 9.1x
3 Install NNMi 9.1x and the latest consolidated patch (if any) on the source NNMi management server using instructions from the HP Network Node Manager i Software Interactive Installation Guide.
4 Verify that NNMi 9.1x is working correctly on the source NNMi management server.
5 Back up NNMi 9.1x on the source NNMi management server using the nnmbackup.ovpl script. Label this backup for NNMi 9.1x. You will need it to copy data to the target NNMi management server. For more information, see the nnmbackup.ovpl reference page, or the UNIX manpage for NNMi 9.1x.
6 Install NNMi 9.1x and the latest consolidated patch (if any) on the target NNMi management server using instructions from the HP Network Node Manager i Software Interactive Installation Guide. To migrate the data from step 5, the target NNMi management server must be running the same operating system version. NNMi does not support data migration to an NNMi management server running on a different operating system.
7 Use the nnmrestore.ovpl script to copy NNMi database information to the target server. For more information, see the nnmrestore.ovpl reference page, or the UNIX manpage.
8 Obtain and install a new license on the target NNMi management server.
For information, see “Licensing NNMi” in the NNMi Deployment Reference.
9 Verify that the information from the target NNMi management server migrated successfully from the existing NNMi management server.
Oracle Database Only: If your Oracle database administrator does not set the FLASHBACK ANY TABLE permission, you will see a warning about that missing permission after the install completes. You can ignore this warning.
48 NNMi Upgrade Reference

Moving
May 2014
Moving NNMi from Windows
2003 to Windows 2008
NNMi from Windows 2003 to Windows 2008
NNMi 9.10 does not support Windows 2003. You must change the operating system to Windows 2008 before migrating to NNMi 9.10.
Use the information in this chapter if you have NNMi 9.0x patch 3 or later running on a Windows 2003 server, and need to change the operating system to Windows 2008.
This chapter contains the following topic:
Changing NNMi from Windows 2003 to Windows 2008
Changing NNMi from Windows 2003 to Windows 2008
To complete the following steps, you must have NNMi 9.0x patch 3 or later running on a Windows 2003 server. To check the NNMi version number, note the current patch level in the Help->About HP Network Node Manager i Software window. Verify that the version is 9.01.003 or later. If the version is earlier than that, do not proceed. Install NNMi 9.0x patch 3 or later before proceeding.
To change an NNMi management server running NNMi 9.0x patch 3 or later from Windows 2003 to Windows 2008, follow these steps:
1 Identify three servers that you will use during this procedure:
• Server A is the current NNMi management server running Windows 2003.
• Server B will hold the NNMi backup files.
• Server C will become the new NNMi management server running Windows 2008. This NNMi management server can be the same hardware as the current Server A.
Make sure the hosts file on the new NNMi management server contains the following entry: 127.0.0.1 localhost
49

Upgrading from NNMi 9.0x to NNMi 9.1x
2 On Server A, run the nnmbackup.ovpl -type online -scope all -target temporary_location command to complete a full NNMi backup.
For more information about which command options to use, see “NNMi Backup and Restore Tools” in the NNMi Deployment Reference and the nnmbackup.ovpl reference page, or the UNIX manpage.
3 On Server A, copy the backup you completed in step 2 to Server B.
4 On Server C, install Windows 2008.
5 On Server C, install NNMi 9.0x patch 3 or later. You must install the same patch level that NNMi Server A was at during the backup you completed in step 2.
6 During the NNMi installation on server C, the installation script might assign ports that differ from the server B configuration. During the configuration restore on Server C, this might create port conflicts. To remedy this, do the following:
a On Server C, navigate to the following directory: %$NNM_CONF%\nnm\props\
b On Server C, copy the nms-local.properties file to nms-local.properties.save in a temporary location.
c On Server B, copy the NNMi backup to Server C.
d On Server C, run the nnmrestore.ovpl -force -source temporary_location command to complete a full NNMi restore.
For more information about which command options to use, see “NNMi Backup and Restore Tools” in the NNMi Deployment Reference and the nnmrestore.ovpl reference page, or the UNIX manpage.
As an alternative to using Server C, reformat the disk on Server A and install Windows 2008. If you do that, substitute Server A for Server C for the remaining steps.
Use the command options that match the backup you completed in step 2
50 NNMi Upgrade Reference

May 2014
e On Server C, compare the nms-local.properties.save file from the temporary location to the nms-local.properties file located in the following directory: %NNM_CONF%\nnm\props\
Resolve any port conflicts, making changes to the nms-local.properties located in the above directory. Make sure to keep the jboss.http.port (NNMi web server port) and jboss.https.port (NNMi HTTPS web server port) values that were chosen during the NNMi installation on Server C.
f Restart NNMi:
ovstop
ovstart
7 NNMi associates its license keys with a server’s IP address. If the IP address for Server C is different from the IP address of Server A, obtain and install new NNMi license keys. See “Changing the IP Address of a Standalone NNMi Management Server” in the NNMi Deployment Reference.
8 On Server C, install NNMi 9.10.
Moving NNMi from Windows 2003 to Windows 2008 51

Upgrading from NNMi 9.0x to NNMi 9.1x
52 NNMi Upgrade Reference
Migrati
May 2014
Migrating NNMi Oracle Data
ng NNMi Oracle Data
If you plan to move the Oracle data in NNMi to Oracle 11G. The information in this chapter explains the steps to take to complete this work.
Migrating NNMi Oracle Data
Suppose you have NNMi running in one of the following configurations:
• NNMi 9.0x with the latest patch connected to an Oracle 10G database and you must upgrade to NNMi 9.10.
• NNMi 9.0x with the latest patch connected to an Oracle 11G database and you must upgrade to NNMi 9.10.
The Oracle database instance migration you must complete could include combinations of the following requirements:
• The existing Oracle instance running on NNMi 10.00 can be running Oracle 10G or 11G.
• The new Oracle instance running on NNMi 9.10 must be running Oracle 11G.
• The new Oracle instance can be located on the original server or on a different server and hostname.
To complete the migration of the NNMi Oracle data, complete the following steps:
1 As root or administrator, run the following command to stop NNMi: ovstop –c.
2 Use Oracle tools to move or copy the NNMi data from the existing Oracle server to the new server. See your Oracle documentation for additional information.
3 Only complete this step if the new Oracle server has a different hostname than the previous Oracle server. On the NNMi management server, reconfigure NNMi to point to the new Oracle server by completing the following steps:
This Oracle data migration can be an in-place upgrade from Oracle 10 to Oracle 11 on the same server. Oracle provides database migration tools for converting Oracle 10 data into the Oracle 11 format.
53

Upgrading from NNMi 9.0x to NNMi 9.1x
a Edit the datasource configuration file shown :
— Windows: %NNM_JBOSS%\server\nms\deploy\nms-ds.xml
— UNIX: $NNM_JBOSS/server/nms/deploy/nms-ds.xml
b Change the following attribute to reflect your new server
OLD: <connection-url>jdbc:oracle:thin:@EXISTING_FQDN:EXISTING_ORACLE_PORT:EXISTING_SID </connection-url>
NEW: <connection-url>jdbc:oracle:thin:@NEW_FQDN:NEW_PORT:NEW_SID</connection-url>
4 Complete one of the following actions:
If you are upgrading from NNMi 9.2x to NNMi 9.10, perform that migration now, following the installation instructions in the HP Network Node Manager i Software Installation Guide.
If you are already using NNMi 9.10, follow these steps to restart NNMi and complete the Oracle database move/migration:
a Run the following command on the NNMi management server to restart NNMi: ovstart -c
b Run the following command on the NNMi management server to check if all of the services are started and operating correctly: ovstatus -v
It is important that you complete the following steps accurately, or jboss will not correctly connect to the Oracle 11G database.
54 NNMi Upgrade Reference
Additio
May 2014
Additional Upgrade
Information
nal Upgrade Information
This chapter describes some changes between NNMi 9.10 and earlier NNMi versions. This chapter contains the following topics:
• Configuration Differences
• MIBs
• Functionality Differences
Configuration Differences
• User groups replace NNMi roles for limiting user access within the NNMi console. User accounts can be mapped to multiple user groups.
— For signing in to the NNMi console, each user account must be mapped to at least one of the NNMi-provided user groups. These groups are equivalent to the function of the NNMi role in previous releases.
— In a multi-tenancy environment, each user account can be mapped to one or more custom user groups that provide access to a subset of the topology objects.
For more information, see “NNMi Security and Multi-Tenancy” in the NNMi Deployment Reference.
• The NNMi integration for retrieving user information from a directory service can now retrieve multiple group names per user.
— For configuration option 2 (only user names and passwords in the directory service), existing integrations with a directory service continue to work without modification to the ldap.properties configuration file.
— For configuration option 3 (all user information in the directory service), the following information applies:
– In a single tenant environment (all NNMi console users can access all topology objects), existing integrations with a directory service continue to work without modification to the ldap.properties configuration file.
55

Upgrading from NNMi 9.0x to NNMi 9.1x
If you add any new NNMi user groups in the directory service, you must update the ldap.properties configuration file to the new model for retrieving user information from a directory service.
– In a multi-tenancy environment, update the ldap.properties configuration file to the new model for retrieving user information from a directory service.
– For information about updating the ldap.properties configuration file, see “Changing the Directory Service Access Configuration to Support the NNMi Security Model” in the NNMi Deployment Reference.
— NNMi 10.00 deprecates the following ldap.properties configuration file parameters. They will become unsupported in a future release:
– roleAttributeID
– roleAttributeIsDN
– roleNameAttributeID
• After upgrading to NNMi 10.00, the following security and multi-tenancy configuration applies:
— All nodes are assigned to the Default Tenant and the Default Security Group.
— All users can access all nodes in the NNMi topology and all incidents.
This default configuration matches the object access available in NNMi 9.2x. For information about customizing object access, see “NNMi Security and Multi-Tenancy” in the NNMi Deployment Reference.
• If the HP NNMi—HP NA integration was configured on a NNMi 9.0x management server, the process of upgrading to NNMi 10.00 disables the configuration. For more information, see “Integration Configuration Upgraded from NNMi 9.0x” in the NNMi Deployment Reference.
Application Failover
NNMi 9.0x supported either a UDP or a TCP solution for the application failover feature. NNMi 10.00 only supports the TCP solution. If you used the UDP application failover solution for NNMi 9.0x, and are upgrading to NNMi 10.00, the upgrade script converts your application failover configuration to the TCP solution. You must add the hostnames of all nodes in the cluster to the com.hp.ov.nms.cluster.member.hostnames parameter in the nms-cluster.properties file. For more information see “Configuring NNMi for Application Failover” in the NNMi Deployment Reference.
For the application failover feature to function correctly, the active and standby servers must have unrestricted network access to each other. NNMi 10.00 includes some port changes, so you might need to modify your firewall configuration. For more information see “NNMi 9.10 and Well-Known Ports” in the NNMi Deployment Reference.
56 NNMi Upgrade Reference

May 2014
MIBs
If you loaded additional MIBs into earlier versions of NNMi that are not standards compliant or have dependencies on other MIB files, they might not migrate successfully. If a MIB does not migrate successfully, the trap configurations continue to work, however you might not be able to browse that MIB as you could before the migration.
If you suspect that some MIBs did not migrate, check the following directory for a failed subdirectory that contains the MIB file or files, failure details, and a log file with a name that associates it with the MIB file or files:
• Windows: %NNM_DATA%\tmp\nnm9xMibMigrate
• UNIX: $NNM_DATA/tmp/nnm9xMibMigrate
Use the files contained in the above directories to determine why the MIBs did not migrate, then reload those MIBs.
Functionality Differences
To review information about new features included in NNMi 10.00, see the What’s New In This Version section of the NNMi Release Notes.
Additional Upgrade Information 57

Upgrading from NNMi 9.0x to NNMi 9.1x
58 NNMi Upgrade Reference

Applica
May 2014
Application Failover and Upgrading to NNMi 9.1x
tion Failover and Upgrading to NNMi 9.1x
If you plan to upgrade an earlier version of NNMi 9.0x that is running in an NNMi application failover configuration, the supported upgrade path is to temporarily unconfigure application failover, upgrade each of the NNMi management servers to NNMi 9.1x, then reconfigure application failover.
To upgrade NNMi management servers configured for application failover, follow these steps:
1 As a precaution, run the nnmconfigexport.ovpl script on both the active and standby NNMi management servers before proceeding. For information, see “Best Practice: Save the Existing Configuration” in the NNMi Deployment Reference.
2 As a precaution, back up your NNMi data on both the active and standby NNMi management servers before proceeding. For information, see “Backup Scope” in the NNMi Deployment Reference.
3 Embedded database only: Complete the following steps on the active NNMi management server. Completing these steps will speed up the standby NNMi management server startup shown in step 7 on page 60:
a Run the nnmcluster command.
b After NNMi prompts you, type dbsync, then press Enter. Review the displayed information to make sure it includes the following messages:
ACTIVE_DB_BACKUP: This means that the active NNMi management server is performing a new backup.ACTIVE_NNM_RUNNING: This means that the active NNMi management server completed the backup referred to by the previous message.STANDBY_RECV_DBZIP: This means that the standby NNMi management server is receiving a new backup from the active NNMi management server. STANDBY_READY: This means that the standby NNMi management server is ready to perform if the active NNMi management server fails.
4 Run the nnmcluster -shutdown command on the standby NNMi management server. This shuts down all nnmcluster processes on the standby NNMi management server.
5 To verify there are no nnmcluster nodes running on the standby NNMi management server, complete the following steps on the standby NNMi management server.
59
Upgrading from NNMi 9.0x to NNMi 9.1x
a Run the nnmcluster command.
b Verify that there are no (LOCAL) nnmcluster nodes present except the one marked (SELF). There might be one or more (REMOTE) nodes present.
c Run exit or quit to stop the interactive nnmcluster process you started in step a.
6 Complete the following steps on the standby NNMi management server to temporarily disable application failover:
a Edit the following file:
• Windows: %NNM_SHARED_CONF%\props\nms-cluster.properties
• UNIX: $NNM_SHARED_CONF/props/nms-cluster.properties
b Comment out the com.hp.ov.nms.cluster.name parameter.
c Save your changes.
7 Start, then stop processes on the standby NNMi management server.
a Run the ovstart command on the standby NNMi management server. Running the ovstart command causes the standby NNMi management server to import the transaction logs from the active NNMi management server.
b After the ovstart command completes, run the ovstatus -v command. All NNMi services should show the state RUNNING.
c Run the ovstop command on the standby NNMi management server.
8 Upgrade the standby NNMi management server to NNMi 10.00 using the instructions located in the HP Network Node Manager i Software Interactive Installation Guide.
You now have the former active NNMi management server running NNMi 9.0x and the former standby NNMi management server running NNMi 9.1x. You have both of these NNMi management servers running independently with no database synchronization. That means you have both NNMi management servers monitoring the network in parallel. Do not leave these NNMi management servers in this configuration for more than a few hours, as this configuration is a violation of the non-production license installed on the former standby node.
To complete the upgrade, and remedy this situation, select a time to upgrade the former active node to NNMi 10.00. Have the operators temporarily use the former standby node to monitor the network while you complete the upgrade.
The remainder of this procedure assumes you plan to retain the database information from the former active node and discard the database information from the former standby node.
9 Run the nnmcluster -halt command on the former active NNMi management server.
10 To verify there are no nnmcluster nodes running on the former active NNMi management server, complete the following steps on the former active NNMi management server.
a Run the nnmcluster command.
You must upgrade all of the iSPIs that you have installed on the standby NNMi management server to iSPI versions that support NNMi 10.00.
60 NNMi Upgrade Reference
May 2014
b Verify that there are no (LOCAL) nnmcluster nodes present except the one marked (SELF). There might be one or more (REMOTE) nodes present.
c Run exit or quit to stop the interactive nnmcluster process you started in step a.
11 Complete the following steps on the former active NNMi management server to temporarily disable application failover:
a Edit the following file:
• Windows: %NNM_SHARED_CONF%\props\nms-cluster.properties
• UNIX: $NNM_SHARED_CONF/props/nms-cluster.properties
b Comment out the com.hp.ov.nms.cluster.name parameter.
Upgrade the former active NNMi management server to NNMi 10.00 using the instructions located in the HP Network Node Manager i Software Interactive Installation Guide.
Now you have two servers running NNMi 9.1x, but they are still independent since the databases are not synchronized.
12 Complete the following steps on the former active NNMi management server:
a Run the ovstop command.
b Edit the following file:
— Windows: %NNM_SHARED_CONF%\props\nms-cluster.properties
— UNIX: $NNM_SHARED_CONF/props/nms-cluster.properties
c Type in the value of the com.hp.ov.nms.cluster.name parameter.
d Uncomment the com.hp.ov.nms.cluster.name parameter.
e Save your changes.
13 Run either the ovstart or nnmcluster -daemon command on the former active NNMi management server. It is now the active node.
14 Instruct the operators to begin using the active node to monitor the network.
15 Complete the following steps on the former standby NNMi management server:
a Run the ovstop command.
b Edit the following file:
— Windows: %NNM_SHARED_CONF%\props\nms-cluster.properties
— UNIX: $NNM_SHARED_CONF/props/nms-cluster.properties
c Uncomment the com.hp.ov.nms.cluster.name parameter.
d Save your changes.
You must upgrade all of the iSPIs that you have installed on the former active NNMi management server to iSPI versions that support NNMi 10.00.
The former standby NNMi management server discards all of the database activity occurring during the maintenance window, from step step 9 on page 60 through step 13 on page 61
Application Failover and Upgrading to NNMi 9.1x 61

Upgrading from NNMi 9.0x to NNMi 9.1x
16 Run either the ovstart or nnmcluster -daemon command on the former standby NNMi management server.
This NNMi management server becomes the standby node, and receives a copy of the database from the active node.
17 If you installed the NNM iSPI Performance for QA, the NNM iSPI Performance for Metrics, or the NNM iSPI Performance for Traffic; are using the application failover feature; and completed the ugrade process shown above, run the NNM iSPI enablement script for each NNM iSPI on both the active and standby NNMi management servers.
18 If you are using UNIX NNMi management servers, run the following command on both the active and standby NNMi management servers:chmod 777 /var/opt/OV/shared/perfSpi/datafiles/nnm_details.xml
Application Failover and NNMi Patches
Both NNMi management servers must be running the same NNMi version and patch level. To add patches to the active and standby NNMi management servers, use one of the following procedures:
• Applying Patches for Application Failover (Shut Down Both Active and Standby)Use this procedure when you are not concerned with an interruption in network monitoring.
• Applying Patches for Application Failover (Keep One Active NNMi Management Server)Use this procedure when you must avoid any interruptions in network monitoring.
Applying Patches for Application Failover (Shut Down Both Active and Standby)
This procedure results in both NNMi management servers being non-active for some period of time during the patch process. To apply patches to the NNMi management servers configured for application failover, follow these steps:
1 As a precaution, run the nnmconfigexport.ovpl script on both the active and standby NNMi management servers before proceeding. For information, see “Best Practice: Save the Existing Configuration” in the NNMi Deployment Reference.
2 As a precaution, back up your NNMi data on both the active and standby NNMi management servers before proceeding. For information, see “Backup Scope” in the NNMi Deployment Reference.
3 As a precaution, on the active NNMi management server, do the following steps:
a Run the nnmcluster command.
b Embedded database only: After NNMi prompts you, type dbsync, then press Enter. Review the displayed information to make sure it includes the following messages:
62 NNMi Upgrade Reference
May 2014
ACTIVE_DB_BACKUP: This means that the active NNMi management server is performing a new backup.ACTIVE_NNM_RUNNING: This means that the active NNMi management server completed the backup referred to by the previous message.STANDBY_READY: This shows the previous status of the standby NNMi management server.STANDBY_RECV_DBZIP: This means that the standby NNMi management server is receiving a new backup from the active NNMi management server. STANDBY_READY: This means that the standby NNMi management server is ready to perform if the active NNMi management server fails.
4 Run the nnmcluster -halt command on the active NNMi management server. This shuts down all nnmcluster processes on both the active and standby NNMi management servers.
5 To verify there are no nnmcluster nodes running on either server, complete the following steps on both the active and standby NNMi management servers.
a Run the nnmcluster command.
b Verify that there are no nnmcluster nodes present except the one marked (SELF).
c Run exit or quit to stop the interactive nnmcluster process you started in step a.
6 On the active NNMi management server, comment out the com.hp.ov.nms.cluster.name parameter in the nms-cluster.properties file.
a Edit the following file:
— Windows: %NNM_SHARED_CONF%\props\nms-cluster.properties
— UNIX: $NNM_SHARED_CONF/props/nms-cluster.properties
b Comment out the com.hp.ov.nms.cluster.name parameter.
c Save your changes.
7 Apply the NNMi patch to the active NNMi management server using the instructions provided with the patch.
8 On the active NNMi management server, uncomment the com.hp.ov.nms.cluster.name parameter in the nms-cluster.properties file.
a Edit the following file:
— Windows: %NNM_SHARED_CONF%\props\nms-cluster.properties
— UNIX: $NNM_SHARED_CONF/props/nms-cluster.properties
b Uncomment the com.hp.ov.nms.cluster.name parameter.
c Save your changes.
9 Run the ovstart command on the active NNMi management server.
10 Verify that the patch installed correctly on the active NNMi management server by viewing information on the Product tab of the Help > System Information window in the NNMi console.
11 Run the nnmcluster -dbsync command to create a new backup.
12 On the standby NNMi management server, comment out the com.hp.ov.nms.cluster.name parameter in the nms-cluster.properties file as shown in step a on page 63 through step c on page 63
Application Failover and Upgrading to NNMi 9.1x 63
Upgrading from NNMi 9.0x to NNMi 9.1x
13 Apply the NNMi patch to the standby NNMi management server.
14 On the standby NNMi management server, uncomment the com.hp.ov.nms.cluster.name parameter in the nms-cluster.properties file as shown in step a on page 63 through step c on page 63.
15 Run the ovstart command on the standby NNMi management server.
16 If you installed the NNM iSPI Performance for QA, the NNM iSPI Performance for Metrics, or the NNM iSPI Performance for Traffic; are using the application failover feature; and completed the patch process shown above, run the NNM iSPI enablement script for each NNM iSPI on both the active and standby NNMi management servers.
17 If you are using UNIX NNMi management servers, run the following command on both the active and standby NNMi management servers:chmod 777 /var/opt/OV/shared/perfSpi/datafiles/nnm_details.xml
Applying Patches for Application Failover (Keep One Active NNMi Management Server)
This procedure results in one NNMi management server always being active during the patch process.
To apply NNMi patches to the NNMi management servers configured for application failover, follow these steps:
1 As a precaution, run the nnmconfigexport.ovpl script on both the active and standby NNMi management servers before proceeding. For information, see “Best Practice: Save the Existing Configuration” in the NNMi Deployment Reference.
2 As a precaution, back up your NNMi data on both the active and standby NNMi management servers before proceeding. For information, see “Backup Scope” in the NNMi Deployment Reference.
3 To synchronize the two databases, run the following command on either of the NNMi management servers:nnmcluster -dbsync
4 To monitor the progress, run the following command on both the active and standby NNMi management servers:nnmcluster -displayWait until the active NNMi management server reverts to ACTIVE_NNM_RUNNING and the standby NNMi management server reverts to STANDBY_READY. before continuing.
5 To disable the cluster, run the following command on the active NNMi management server:nnmcluster -disable
6 Stop the cluster on the standby NNMi management server by running the following command on the standby NNMi management server:nnmcluster -shutdown
This process results in continuous monitoring of the network, however NNMi loses the transaction logs occurring during this patch process.
The dbsync option works on an NNMi management server using the embedded database. Do not use the dbsync option on an NNMi management server configured to use an Oracle database.
64 NNMi Upgrade Reference
May 2014
7 Make sure the following processes and services terminate before continuing:
— postgres
— ovjboss
8 Make sure the nnmcluster process terminates before continuing. If the nnmcluster process will not terminate, manually kill the nnmcluster process only as a last resort.
9 Edit the following file on the standby NNMi management server:
Windows: %nnmDataDir%\shared\nnm\conf\props\nms-cluster.properties
UNIX: $nnmDataDir/shared/nnm/conf/props/nms-cluster.properties
10 Comment out the cluster name by placing a # at the front of the line, then save your changes:#com.hp.ov.nms.cluster.name = NNMicluster
11 Install the NNMi patch on the standby NNMi management server.
12 Shut down the cluster on the active NNMi management server by running the following command on the activeNNMi management server:nnmcluster -halt
13 Make sure the nnmcluster process terminates. If it does not terminate within a few minutes, manually kill the nnmcluster process.
14 On the standby NNMi management server, uncomment the cluster name from the nms-cluster.properties file.
15 Start the cluster on the standby NNMi management server by running the following command on the standby NNMi management server:nnmcluster -daemon
16 Install the NNMi patch on the active NNMi management server.
17 Uncomment the entry in the nms-cluster.properties file on the active NNMi management server.
18 Start the active NNMi management server using the following command:nnmcluster -daemon
19 To enable the cluster, run the following command on the active NNMi management server:nnmcluster -enable
20 To monitor the progress, run the following command on both the active and standby NNMi management servers:nnmcluster -displayWait until the active NNMi management server finishes retrieving the database from the standby NNMi management server.
21 After the active NNMi management server opens STANDBY_READY, run the following command on the active NNMi management server:nnmcluster -acquire
22 If you installed the NNM iSPI Performance for QA, the NNM iSPI Performance for Metrics, or the NNM iSPI Performance for Traffic; are using the application failover feature; and completed the patch process shown above, run the NNM iSPI enablement script for each NNM iSPI on both the active and standby NNMi management servers.
Application Failover and Upgrading to NNMi 9.1x 65

Upgrading from NNMi 9.0x to NNMi 9.1x
23 If you are using UNIX NNMi management servers, run the following command on both the active and standby NNMi management servers:chmod 777 /var/opt/OV/shared/perfSpi/datafiles/nnm_details.xml
Application Failover and Restarting the NNMi Management Servers
You can restart the standby NNMi management server at any time with no special instructions. If you restart both the standby and active NNMi management servers, restart the active NNMi management server first.
To restart either the active or the standby NNMi management server, do the following.
1 Run the nnmcluster -disable command on the NNMi management server to disable the application failover feature.
2 Restart the NNMi management server.
a Run the ovstop command on the NNMi management server.
b Run the ovstart command on the NNMi management server.
3 Run the nnmcluster -enable command on the NNMi management server to enable the application failover feature.
Application Failover Control after a Communication Failure
When there is a communication failure between the two nodes, both nodes will become an active node and, therefore, a controller of its new group. After a communication failure between two remote nodes is resolved, JGroups determines which member of the new single cluster becomes the controller based on the lowest IP address. The controller determines which node is the Active member (this node is always the node on which the controller is running). NNMi starts on the Active member. This functionality is subject to change in future releases.
Application Failover and Recovery from a Previous Database Backup (Embedded Database Only)
To restore your NNMi database from an original backup when active and standby NNMi management servers are configured for application failover, follow these steps:
1 Run the nnmcluster -halt command on the active NNMi management server.
2 Delete or move the following directory on both the active and standby NNMi management servers:
• Windows: %NnmDataDir%\shared\nnm\databases\Postgres_standby
• UNIX: $NnmDataDir/shared/nnm/databases/Postgres_standby
3 Restore the database on the active NNMi management server:
a Modify the following file to comment out the cluster name:
— Windows: %NnmDataDir%\shared\nnm\conf\props\nms-cluster.properties
66 NNMi Upgrade Reference

May 2014
— UNIX: $NnmDataDir/shared/nnm/conf/props\nms-cluster.properties
b Restore the database as normal. See “Same System Restore” in the NNMi Deployment Reference.
c Run the ovstop command on the active NNMi management server.
Application Failover and Upgrading to NNMi 9.1x 67

Upgrading from NNMi 9.0x to NNMi 9.1x
d Modify the following file to uncomment the cluster name:
— Windows: %NnmDataDir%\shared\nnm\conf\props\nms-cluster.properties
— UNIX: $NnmDataDir/shared/nnm/conf/props/nms-cluster.properties
4 Run the ovstart command on the active NNMi management server.
5 Wait until the active NNMi management server generates a new backup. To verify that this step is complete, run the nnmcluster -display command and look for an ACTIVE_NNM_RUNNING message.
6 Run the ovstart command on the standby NNMi management server. The standby NNMi management server copies and extracts the new backup. To verify that this step is complete, run the nnmcluster -display command and look for a STANDBY_READY message.
68 NNMi Upgrade Reference

Upgrad
May 2014
Upgrading NNMi under HA from NNMi 9.0x to
NNMi 9.10
ing NNMi under HA from NNMi 9.0x to NNMi 9.10
Follow the appropriate procedure for your environment:
• Upgrade NNMi with the Embedded Database on the Windows, Linux, or Solaris Operating System on page 69
• Upgrade NNMi with the Embedded Database on the HP-UX Operating System on page 72
• Upgrade NNMi with Oracle on All Supported Operating Systems on page 73
Upgrade NNMi with the Embedded Database on the Windows, Linux, or Solaris Operating System
On the Windows, Linux, or Solaris operating system, to upgrade from NNMi 9.0x under HA to NNMi 9.1x under HA, upgrade the passive node, fail over from the active node to the passive node, and then upgrade the second node. Follow these steps:
1 Ensure that the NNMi 9.0x configuration is consistent across all HA nodes by forcing a failover, in turn, to each of the passive nodes.
2 Determine which node in the NNMi 9.0x HA cluster is active:
• Windows:
%NnmInstallDir%\misc\nnm\ha\nnmhaclusterinfo.ovpl \-group <resource_group> -activeNode
• UNIX:
As of NNMi 9.10, Serviceguard is no longer supported on the UNIX operating system. If NNMi is currently running under Serviceguard HA, you cannot follow the procedure in this section. Instead, unconfigure NNMi from HA as described in “Unconfiguring NNMi from an HA Cluster” in the NNMi Deployment Reference, upgrade NNMi on all nodes, and then configure NNMi to run under a supported HA product as described in “Configure NNMi for HA” in the NNMi Deployment Reference. Alternatively, you can configure NNMi for NNMi application failover as described in “Configuring NNMi for Application Failover” in the NNMi Deployment Reference.
69
Upgrading from NNMi 9.0x to NNMi 9.1x
$NnmInstallDir/misc/nnm/ha/nnmhaclusterinfo.ovpl \-group <resource_group> -activeNode
The remainder of this procedure refers to the currently active node as server X and the currently passive node as server Y.
Each resource shown in the cluster manager must use a separate resource monitor:
a Using the cluster manager, right-click each service displayed beneath Services and applications.
b Select Properties.
c Select Advanced Policies.
d Select Run this resource in a separate Resource Monitor.
e Click OK to save your work.
3 On server Y, upgrade NNMi:
a Disable HA resource group monitoring by creating the following maintenance file:
— Windows: %NnmDataDir%\hacluster\<resource_group>\maintenance
— UNIX: $NnmDataDir/hacluster/<resource_group>/maintenance
The file can be empty.
b Upgrade NNMi to the current version as described in Upgrading from NNMi 9.0x to NNMi 9.1x on page 43.
c Verify that the upgrade completed without error.
d Upgrade all add-on NNM iSPIs to version 9.10.
To complete an offline upgrade on Network Performance Server (NPS) or NNM iSPI Performance for Metrics HA nodes, unconfigure the node from the HA cluster.
In addon mode (where the NNMi management server and the NNM iSPI operate in the same HA cluster), run the following command: $NnmInstallDir/misc/nnm/ha/nnmhaunconfigure.ovpl NNM -addon PerfSPIHA
In standalone mode, run the following command$NnmInstallDir/misc/nnm/ha/nnmhaunconfigure.ovpl PerfSPIHAAfter this script completes, follow the instructions for upgrading the NPS or NNM iSPI Performance for Metrics in a non-HA environment.
After completing the upgrade, stop all NPS processes; from a newly opened command shell, run the following script:$NnmInstallDir/opt/OV/NNMPerformanceSPI/bin/stopALL.ovpl
For more information, see the documentation for each NNM iSPI.
When completing step d, do NOT reconfigure HA until after you finish upgrading the primary node.
If your environment includes standalone NNM iSPIs, you must also upgrade those products to version 9.10 for correct functionality. You can complete those upgrades after completing this procedure.
70 NNMi Upgrade Reference

May 2014
4 If the HA cluster includes multiple passive nodes, repeat step 3 for each passive node.
5 On server X, upgrade NNMi:
a If you are upgrading NPS or NNM iSPI Performance for Metrics HA nodes, do the following:
– Disable resource group monitoring by creating the following maintenance file:Windows: %NnmDataDir%\hacluster\<resource_group>\maintenanceLinux: $NnmDataDir/hacluster/<resource_group>/maintenanceThe file can be empty.
– Complete the NPS upgrade
– Enable resource group monitoring by removing the maintenance file.
b Force a failover to server Y.
The NNMi database on the shared disk is upgraded to the format of the new NNMi product version at this time.
c Run the following command and view the displayed results. Check that all of the displayed NNMi and ovjboss processes are running without error.
– ovstatus -c
– ovstatus -v ovjboss
d Disable HA resource group monitoring by creating the following maintenance file on server X:
— Windows: %NnmDataDir%\hacluster\<resource_group>\maintenance
— UNIX: $NnmDataDir/hacluster/<resource_group>/maintenance
The file can be empty.
e Upgrade NNMi to the current version as described in Upgrading from NNMi 9.0x to NNMi 9.1x on page 43.
f Verify that the upgrade completed without error.
g Upgrade all add-on NNM iSPIs to version 9.10. This step does not apply to NNM iSPI Performance for Metrics, as you completed that upgrade in step a on page 71.
For information, see the documentation for each NNM iSPI.
h Delete the maintenance file on server Y:
NNMi will be unavailable for approximately 20 to 60 minutes while the database is upgraded during the failover to server Y. You can schedule this step to occur at a convenient time for system maintenance.
NNMi might not be fully up since the maintenance file will report the resource <resource group>-APP as being online. To verify that the startup completed successfully, make sure that the ovstart process is no longer running. To do this, use Task Manager on Windows NNMi management servers or run the ps -ef | grep ovstart command on UNIX NNMi management servers.
If the displayed NNMi and ovjboss processes show errors, check the latest additions to the Release Notes at sg-pro-ovweb.austin.hp.com/nnm/NNM9.10/releasenotesupdate.htm for possible solutions.
Upgrading NNMi under HA from NNMi 9.0x to NNMi 9.10 71
Upgrading from NNMi 9.0x to NNMi 9.1x
— Windows: %NnmDataDir%\hacluster\<resource_group>\maintenance
– UNIX: $NnmDataDir/hacluster/<resource_group>/maintenance
6 Optional. Complete step b and step c on server X to force a failover from server Y to server X so that the node that was active before the upgrade process is again the active node.
7 Delete the maintenance file on server X:
— Windows: %NnmDataDir%\hacluster\<resource_group>\maintenance
– UNIX: $NnmDataDir/hacluster/<resource_group>/maintenance
Upgrade NNMi with the Embedded Database on the HP-UX Operating System
On the HP-UX operating system, upgrading NNMi includes migrating the Postgres database from the 32-bit version to the 64-bit version. For this reason, NNMi must be taken out of operation for the duration of the upgrade process.
On the HP-UX operating system, to upgrade from NNMi 9.0x under HA to NNMi 9.1x under HA, upgrade the active node to update the embedded database, and then upgrade the passive node while NNMi is still in maintenance mode. Follow these steps:
1 Ensure that the NNMi 9.0x configuration is consistent across all HA nodes by forcing a failover, in turn, to each of the passive nodes.
2 Ensure that all nodes are running NNMi 9.0x Patch 2 (9.01) or a higher version of NNMi 9.0x.
If necessary, upgrade each system to the latest NNMi 9.0x consolidated patch. Follow the instructions in the “Upgrading NNMi under HA from NNMi 8.1x to NNMi 9.01” section of the “Configuring NNMi in a High Availability Cluster” chapter in the most recent NNMi 9.0x version of the NNMi Deployment Reference.
3 Determine which node in the NNMi 9.0x HA cluster is active:
$NnmInstallDir/misc/nnm/ha/nnmhaclusterinfo.ovpl \-group <resource_group> -activeNode
The remainder of this procedure refers to the currently active node as server X and the currently passive node as server Y.
4 On server X, disable HA resource group monitoring by creating the following maintenance file:
$NnmDataDir/hacluster/<resource_group>/maintenance
The file can be empty.
5 On server X, upgrade NNMi:
a Upgrade NNMi to the current version as described in Upgrading NNMi under HA from NNMi 9.0x to NNMi 9.10 on page 69.
The database upgrade occurs during this step.
b To verify that the upgrade completed correctly, enter the following command:
NNMi will be unavailable for approximately 30 to 60 minutes during this upgrade procedure.
72 NNMi Upgrade Reference

May 2014
ovstart
All NNMi services should show the state RUNNING.
c Upgrade all add-on NNM iSPIs to version 9.10.
For information, see the documentation for each NNM iSPI.
6 On server Y, upgrade NNMi:
a Upgrade NNMi to the current version as described in Upgrading from NNMi 9.0x to NNMi 9.1x on page 43.
b Verify that the upgrade completed without error.
c Upgrade all add-on NNM iSPIs to version 9.10.
For information, see the documentation for each NNM iSPI.
7 If the HA cluster includes multiple passive nodes, repeat step 6 for each passive node.
8 On server X, delete the maintenance file:
$NnmDataDir/hacluster/<resource_group>/maintenance
Upgrade NNMi with Oracle on All Supported Operating Systems
To upgrade NNMi for HA in an Oracle environment, follow the procedure described in Upgrade NNMi with the Embedded Database on the Windows, Linux, or Solaris Operating System on page 69.
If your environment includes standalone NNM iSPIs, you must also upgrade those products to version 9.10 for correct functionality. You can complete those upgrades after completing this procedure.
Upgrading NNMi under HA from NNMi 9.0x to NNMi 9.10 73

Upgrading from NNMi 9.0x to NNMi 9.1x
74 NNMi Upgrade Reference

Upgrad
May 2014
Upgrading from NNMi 9.0x to
NNMi 9.10 (Global Network
Management)
ing from NNMi 9.0x to NNMi 9.10 (Global Network M
NNMi Versions Supported by Global Network Management
If a global manager is connected to a regional manager running NNMi 9.0x patch 2 or earlier, SNMP queries between the global and regional manager do not work. To remedy this, upgrade the regional manager to NNMi 9.0x patch 3 or later. To achieve the best results, the global manager should be the same version and NNMi patch level as the regional manager. HP supports an NNMi 9.1x global manager connected to an NNMi 9.0x regional manager.
Global Network Management Upgrade Steps
To upgrade NNMi management servers configured in a global network management environment, upgrade the NNMi management servers in the following order:
1 Upgrade the global manager from NNMi 9.0x to NNMi 9.1x.
2 Upgrade the regional managers from NNMi 9.0x to NNMi 9.1x.
The global network management feature continues to function while you complete the upgrades, but some of the new NNMi 9.1x features might not work on the global NNMi management server until you complete the upgrades on the regional NNMi management servers.
anagement) 75

Upgrading from NNMi 9.0x to NNMi 9.1x
76 NNMi Upgrade Reference

May 2014
Upgrading from NNMi 9.0x or 9.1x to NNMi 9.2x
You can upgrade NNMi according to the information shown in Table 4. The information shown in Table 4 assumes you have NNMi 9.0x Patch 5 or newer installed on the NNMi management server.
To upgrade from NNMi 9.0x or 9.1x to NNMi 9.2x, you must upgrade directly to NNMi 9.2x. During an upgrade from NNMi 9.0x or 9.1x to NNMi 9.20, the installation script provides an opportunity to install patches for NNMi 9.20, as applicable.
For information about upgrading from NNMi 8.1x to NNMi 9.2x, see Upgrading from NNMi 8.0x or 8.1x on page 13.
If you are upgrading from NNMi 9.0x or 9.1x to NNMi 9.2x and you are using an Oracle database, see Important Prerequisite Steps for Upgrading with an Oracle Database on page 80.
Table 4 Supported NNMi Upgrades
NNMi Version Upgrade to NNMi 9.2x
NNMi 9.0x Patch 5 or newer Supported
NNMi 9.1x Patch 3 or newer Supported
If you are upgrading from NNMi 9.0x or 9.1x and you also have the Master or Leaf Collector for the NNM iSPI Performance for Traffic installed on the NNMi management server, you must upgrade to NNMi 9.10 patch 3 (or later) and NNM iSPI Performance for Traffic 9.10 patch 2 (or later) before upgrading to NNMi 9.20. Failure to do so will result in the loss of all traffic data.
If you plan to upgrade an earlier version of NNMi 9.0x or NNMi 9.1x to NNMi 9.20, and if that same system had been running NNMi 8.1x at some time in the past, the upgrade might incorrectly set the HostNameMatchManagementIP property to false. The HostNameMatchManagementIP property exists in the nms-disco.properties file. In most cases, you will prefer the value of this property to be true. If you want it to remain true, check this file after the upgrade completes, and correct the value if necessary. The nms-disco.properties file is located in the %nnmdatadir%\shared\nnm\conf\props folder (Windows) or $NnmDataDir/shared/nnm/conf/props directory (UNIX).
Upgrading from NNMi 9.0x or 9.1x to NNMi 9.2x 77

Upgrading from NNMi 9.0x or 9.1x to NNMi 9.2x
If you plan to upgrade an earlier version of NNMi that is running in an NNMi application failover configuration, the supported upgrade path is to temporarily unconfigure application failover, upgrade the NNMi management server to NNMi 9.2x,and then reconfigure application failover. For detailed information, see Application Failover and Upgrading to NNMi 9.20 on page 99.
If you added com.sun.management.jmxremote.* properties to any of the properties files in the following directories, NNMi does not retain these values during an upgrade to NNMi 9.2x:
• Windows: %NNM_DATA%\shared\nnm\conf\props
• UNIX: $NNM_DATA/shared/nnm/conf/props
If you plan to upgrade an earlier version of NNMi that is running under high availability (HA), see High Availability and Upgrading from NNMi 9.0x or NNMi 9.1x to NNMi 9.20 on page 109.
If you plan to upgrade NNMi management servers configured in a global network management environment see Upgrading Global and Regional Managers to NNMi 9.2x on page 119.
If you plan to upgrade a Linux NNMi management server from NNMi 9.0x or 9.1x to NNMi 9.2x, you must import the HP public key into the Linux RPM database before installing NNMi 9.2x. To do this, point your browser to the following location and follow the instructions: https://h20392.www2.hp.com/portal/swdepot/displayProductInfo.do?productNumber=HPLinuxCodeSigning
If you have NNMi 9.0x integrated with NA 9.00 and plan to upgrade NNMi from NNMi 9.0x to NNMi 9.10, you must disable the NNMi-NA integration and uninstall the NNMi connector before upgrading. To do this, follow the instructions shown in “Integration Configuration Upgraded from NNMi 9.0x” in the NNMi—Network Automation Integration Guide.
NNMi 9.2x ignores any com.sun.management.jmxremote.* properties you add to the properties files in these directories.
If you created a User Group in NNMi 9.1x called globalops, then that group, in NNMi 9.2x, will now have access to all topology objects. If that behavior is not what you desire, then you should rename that User Group before upgrading to NNMi 9.2x.
Note the following:
• NNMi automatically resynchronizes topology, state, and status following an upgrade.
• Avoid stopping NNMi during the resynchronization. To help ensure resynchronization has completed, NNMi should remain running for several hours following the upgrade. The actual time required depends on the number of nodes and the volume of state changes and trap data received while performing the resynchronization.
If NNMi must be stopped before the resynchronization is finished, the resynchronization should be run again and allowed to complete.
To perform a manual resynchronization of the entire management server, run: nnmnoderediscover.ovpl –all –fullsync
78 NNMi Upgrade Reference
April 2014
There are several upgrade scenarios you could encounter. This section contains the following chapters:
• Upgrading the NNMi Management Server in Place on page 81, which describes the following upgrade scenario:
— Upgrading from NNMi 9.1x or NNMi 9.1x to NNMi 9.2x on the same hardware and operating system.
• Upgrading to a Different NNMi Management Server on page 83, which describes the following upgrade scenario:
— Upgrading from NNMi 9.1x or NNMi 9.1x to NNMi 9.2x on the same version operating system.
• Moving NNMi from Windows 2003 to Windows 2008. NNMi 9.20 does not support Windows 2003. You must change the operating system to Windows 2008 before upgrading to NNMi 9.20.
• Migrating NNMi Oracle Data. Explains the steps to take to move the Oracle data used by your NNMi management server from one Oracle database instance to another.
• Upgrading Global and Regional Managers to NNMi 9.2x. Explains the requirements for upgrading in Global Network Management environments.
• High Availability and Upgrading from NNMi 9.0x or NNMi 9.1x to NNMi 9.20. Explains the requirements for upgrading in High Availability environments.
• Application Failover and Upgrading to NNMi 9.20 on page 99. Explains the requirements for upgrading in Application Failover environments.
• Additional Upgrade Information. Explains some areas that NNMi 9.2x differs from earlier versions of NNMi.
A non-SNMP node that is not reachable generates a Node Down or a Node or Connection Down incident. The Non-SNMP Node Unresponsive incident is no longer generated.
NNMi uses tenancy to support networks with overlapping address domains that may exist within static Network Address Translation (NAT), dynamic Network Address Translation (NAT), or Port Address Translation (PAT) areas of your network management domain. If you have such networks, note the following with regard to upgrading:
• L2 connections that previously existed for nodes between tenants will be removed.
• Subnets that previously spanned multiple tenants will be split into two (or more) subnets.
• Router Redundancy Groups that previously spanned multiple tenants will be split.
• Any connections between tenants other than the Default Tenant are deleted on upgrade.
• Nodes that were previously considered duplicates across tenants may no longer be considered duplicates.
Upgrading from NNMi 9.0x or 9.1x to NNMi 9.2x 79
Upgrading from NNMi 9.0x or 9.1x to NNMi 9.2x
Important Prerequisite Steps for Upgrading with an Oracle Database
To prevent a failure when upgrading from NNMi 9.0x or 9.1x to NNMi 9.2x using an Oracle database, follow the steps in this section before performing the upgrade.
1 On the NNMi management server, run the following command: ovstop
2 Log on to Oracle as the NNMi database user and run the following SQL statements:
ALTER TABLE nms_region_comm_string ADD (ordering NUMBER(10));DECLARE
CURSOR region_cur ISSELECT DISTINCT region, COUNT(1) num_regsFROM nms_region_comm_stringGROUP BY region;
v_ordering NUMBER(10);BEGIN
FOR region_rec IN region_curLOOP
IF region_rec.num_regs > 1 THENv_ordering := 5;FOR order_rec IN
(SELECT id FROM nms_region_comm_stringWHERE region = region_rec.region
)LOOP
UPDATE nms_region_comm_stringSET ordering = v_orderingWHERE id = order_rec.id;v_ordering := v_ordering + 5;
END LOOP;END IF;
END LOOP;COMMIT;
END;
3 Upgrade to NNMi 9.2x, following the upgrade procedures in this document.
4 After the upgrade, verify your communication configuration settings. The product adds its own ordering values to SNMP community strings for regions. Change these values to something suitable for your environment and settings.
Before running the following pre-upgrade steps, perform a database backup of the NNMi schema. For more information, see “NNMi Backup and Restore Tools” in the NNMi Deployment Reference.
80 NNMi Upgrade Reference
Upgrad
May 2014
Upgrading the NNMi
Management Server in Place
ing the NNMi Management Server in Place
This chapter describes the process for upgrading an existing NNMi management server to NNMi 9.2x.
This chapter contains the following topic:
• Upgrade an Existing NNMi Management Server to NNMi 9.2x
Upgrade an Existing NNMi Management Server to NNMi 9.2x
Read the NNMi 9.2x Preinstallation Checklist chapter in the HP Network Node Manager i Software Interactive Installation Guide and Additional Upgrade Information on page 95 before continuing. There are notable changes to the HP Network Node Manager i Software Interactive Installation Guide. For example, if you use an Oracle database instance instead of the embedded database, you should set the FLASHBACK ANY TABLE permission, as this enables NNMi to create restore points during migration.
Read the HP Network Node Manager i Software System and Device Support Matrix for the NNMi software you are upgrading to before continuing. You can obtain a copy of this document at http://h20230.www2.hp.com/selfsolve/manuals. You must have an HP Passport User ID to access this web site.
The following steps explain how to upgrade an NNMi management server to NNMi 9.2x. The following steps assume you have NNMi 9.0 patch 5 or NNMi 9.1 patch 3, or later, running on the NNMi management server.
1 Back up the NNMi management server using the nnmbackup.ovpl script. Do this as a precaution, as you would only use this backup in the unlikely event of a failed migration. For more information, see the nnmbackup.ovpl reference page, or the UNIX manpage.
2 Oracle Database Only: If the NNMi management server uses an Oracle database, have your Oracle database administrator back up the NNMi data. As mentioned earlier, have your Oracle database administrator set the FLASHBACK ANY TABLE permission, as this enables NNMi to create restore points during migration
81

Upgrading from NNMi 9.0x or 9.1x to NNMi 9.2x
3 Oracle Database Only: Use the nnmconfigexport.ovpl script to back up configuration information from the NNMi management server. Do this as a precaution, as you would only use this backup in the unlikely event of a failed migration. For more information, see the nmconfigexport.ovpl or nnmconfigimport.ovpl reference pages, or the UNIX manpages.
4 Install NNMi 9.2x on the NNMi management server using instructions from the HP Network Node Manager i Software Interactive Installation Guide.
5 Verify that the information from the NNMi management server migrated successfully.
Never edit a file exported with the nnmconfigexport.ovpl script before using the nnmconfigimport.ovpl script to import the file.
Oracle Database Only: If your Oracle database administrator does not set the FLASHBACK ANY TABLE permission, you will see a warning about that missing permission after the install completes. You can ignore this warning.
After upgrading NNMi with the embedded database, and ensuring that the upgrade was successful, check for the existence of the following directory on the NNMi management server:
• Windows: %NnmDataDir%\shared\nnm\databases\Postgres.9.0
• UNIX: $NnmDataDir/shared/nnm/databases/Postgres.9.0
If the Postgres.9.0 directory exists on the NNMi management server, you can delete it to free up disk space. Note that this directory might be present even if you are upgrading from a version of NNMi that is newer than NNMi 9.0.
82 NNMi Upgrade Reference

Upgrad
May 2014
Upgrading to a Different NNMi Management
Server
ing to a Different NNMi Management Server
This chapter describes the process for upgrading to NNMi 9.2x on a new system while maintaining the configuration of the existing NNMi management server.
This chapter contains the following topic:
• Upgrade to a Different NNMi Management Server
Upgrade to a Different NNMi Management Server
Read the NNMi 9.2x Preinstallation Checklist chapter in the HP Network Node Manager i Software Interactive Installation Guide and Additional Upgrade Information on page 95 before continuing. There are notable changes to the HP Network Node Manager i Software Interactive Installation Guide. For example, if you use an Oracle database instance instead of the embedded database, you should set the FLASHBACK ANY TABLE permission, as this enables NNMi to create restore points during migration.
The following steps explain how to copy data from an existing NNMi management server to a target NNMi management server. The following steps assume you have NNMi 9.0 patch 5 or NNMi 9.1 patch 3, or later, running on the existing NNMi management server.
1 As a precaution, back up the existing (source) NNMi 9.0x or 9.1x management server using the nnmbackup.ovpl script. Label this backup for NNMi 9.0x or 9.1x. For more information, see the nnmbackup.ovpl reference page, or the UNIX manpage for NNMi 9.0x or 9.1x.
If you want to change the Oracle database server, complete that process before or after the upgrade to NNMi 10.00. For information, see Migrating NNMi Oracle Data on page 93.
83

Upgrading from NNMi 9.0x or 9.1x to NNMi 9.2x
2 If the existing (source) NNMi management server uses an Oracle database, have your Oracle database administrator back up the NNMi 9.0x or 9.1x data. As mentioned earlier, have your Oracle database administrator set the FLASHBACK ANY TABLE permission, as this enables NNMi to create restore points during migration.
3 Install NNMi 9.2x and the latest consolidated patch (if any) on the source NNMi management server using instructions from the HP Network Node Manager i Software Interactive Installation Guide.
4 Verify that NNMi 9.2x is working correctly on the source NNMi management server.
5 Back up NNMi 9.2x on the source NNMi management server using the nnmbackup.ovpl script. Label this backup for NNMi 9.2x. You will need it to copy data to the target NNMi management server. For more information, see the nnmbackup.ovpl reference page, or the UNIX manpage for NNMi 9.2x.
6 Install NNMi 9.2x and the latest consolidated patch (if any) on the target NNMi management server using instructions from the HP Network Node Manager i Software Interactive Installation Guide. To migrate the data from step 5, the target NNMi management server must be running the same operating system version. NNMi does not support data migration to an NNMi management server running on a different operating system.
7 Use the nnmrestore.ovpl script to copy NNMi database information to the target server. For more information, see the nnmrestore.ovpl reference page, or the UNIX manpage.
8 Obtain and install a new license on the target NNMi management server.
For information, see “Licensing NNMi” in the NNMi Deployment Reference.
9 Verify that the information from the target NNMi management server migrated successfully from the existing NNMi management server.
Oracle Database Only: If your Oracle database administrator does not set the FLASHBACK ANY TABLE permission, you will see a warning about that missing permission after the install completes. You can ignore this warning.
84 NNMi Upgrade Reference
Moving
May 2014
Moving NNMi from Windows
2003 to Windows 2008
NNMi from Windows 2003 to Windows 2008
NNMi 9.2x does not support Windows 2003. You must change the operating system to Windows 2008 or Windows 2008 R2 before migrating to NNMi 9.2x.
Use the information in this chapter if you have NNMi 9.0x or NNMi 9.1x running on a Windows 2003 server, and need to change the operating system to Windows 2008.
This chapter contains the following topic:
Changing NNMi from Windows 2003 to Windows 2008
Changing NNMi from Windows 2003 to Windows 2008
To complete the following steps, you must have NNMi 9.0x or NNMi 9.1x running on a Windows 2003 server. To check the NNMi version number, note the current patch level in the Help->About HP Network Node Manager i Software window. Verify that the version is 9.01.005 or later. If the version is earlier than that, do not proceed. You need to install NNMi 9.0x (latest patch) before proceeding.
To change an NNMi management server running NNMi 9.0x or NNMi 9.1x from Windows 2003 to Windows 2008, follow these steps:
1 Identify three servers that you will use during this procedure:
• Server A is the current NNMi management server running Windows 2003.
• Server B will hold the NNMi backup files.
• Server C will become the new NNMi management server running Windows 2008. This NNMi management server can be the same hardware as the current Server A.
Make sure the hosts file on the new NNMi management server contains the following entry: 127.0.0.1 localhost
85

Upgrading from NNMi 9.0x or 9.1x to NNMi 9.2x
2 On Server A, run the nnmbackup.ovpl -type online -scope all -target temporary_location command to complete a full NNMi backup.
For more information about which command options to use, see “NNMi Backup and Restore Tools” in the NNMi Deployment Reference and the nnmbackup.ovpl reference page, or the UNIX manpage.
3 On Server A, copy the backup you completed in step 2 to Server B.
4 On Server C, install Windows 2008.
5 On Server C, install NNMi 9.0x patch 5 or later. You must install the same patch level that NNMi Server A was at during the backup you completed in step 2.
6 During the NNMi installation on server C, the installation script might assign ports that differ from the server B configuration. During the configuration restore on Server C, this might create port conflicts. To remedy this, do the following:
a On Server C, navigate to the following directory: %$NNM_CONF%\nnm\props\
b On Server C, copy the nms-local.properties file to nms-local.properties.save in a temporary location.
c On Server B, copy the NNMi backup to Server C.
d On Server C, run the nnmrestore.ovpl -force -source temporary_location command to complete a full NNMi restore.
For more information about which command options to use, see “NNMi Backup and Restore Tools” in the NNMi Deployment Reference and the nnmrestore.ovpl reference page, or the UNIX manpage.
As an alternative to using Server C, reformat the disk on Server A and install Windows 2008. If you do that, substitute Server A for Server C for the remaining steps.
Use the command options that match the backup you completed in step 2
86 NNMi Upgrade Reference

May 2014
e On Server C, compare the nms-local.properties.save file from the temporary location to the nms-local.properties file located in the following directory: %NNM_CONF%\nnm\props\
Resolve any port conflicts, making changes to the nms-local.properties located in the above directory. Make sure to keep the nmsas.server.port.web.http (NNMi web server port) and nmsas.server.port.web.https (NNMi HTTPS web server port) values that were chosen during the NNMi installation on Server C.
f Restart NNMi:
ovstop
ovstart
7 NNMi associates its license keys with a server’s IP address. If the IP address for Server C is different from the IP address of Server A, obtain and install new NNMi license keys. See “Changing the IP Address of a Standalone NNMi Management Server” in the NNMi Deployment Reference.
8 On Server C, install NNMi 9.2x.
Moving NNMi from Windows 2003 to Windows 2008 87

Upgrading from NNMi 9.0x or 9.1x to NNMi 9.2x
88 NNMi Upgrade Reference

Moving
May 2014
Moving NNMi to RHEL 5.4 or Later
NNMi to RHEL 5.4 or Later
NNMi 9.2x does not support Red Hat Enterprise Linux (RHEL) versions earlier than version 5.4. You must change the operating system to RHEL version 5.4 or later before migrating to NNMi 9.2x.
Use the information in this chapter if you have NNMi 9.0x or NNMi 9.1x (latest patch) running on a RHEL server (version 4.x), and need to change the operating system to RHEL version 5.4 or later.
This chapter contains the following topic:
Moving NNMi to RHEL 5.4 or Later
Moving NNMi to RHEL Version 5.4 or Later
To complete the following steps, you must have NNMi 9.0x or NNMi 9.1x (latest patch) running on a RHEL server (versions earlier than 5.4). To check the NNMi version number, note the current patch level in the Help->About HP Network Node Manager i Software window. Verify that the version is 9.01.005 or later, or 9.11.003 or later. If the version is earlier than that, do not proceed. You need to install NNMi 9.0x or NNMi 9.1x (latest patch) before proceeding. See Upgrading from NNMi 9.0x or 9.1x to NNMi 9.2x on page 77 for the latest supported patch numbers.
To change an NNMi management server running NNMi 9.0x or NNMi 9.1x (latest patch) from RHEL (version 4.x) to RHEL version 5.4 or later follow these steps:
1 Identify three servers that you will use during this procedure:
• Server A is the current NNMi management server running RHEL (version earlier than 5.4).
• Server B will hold the NNMi backup files.
• Server C will become the new NNMi management server running RHEL 5.4 or later. This NNMi management server can be the same hardware as the current Server A.
If you have a version of RHEL that is 5.x, but earlier than 5.4, use the yum update command to update RHEL to version 5.4 or later.
89
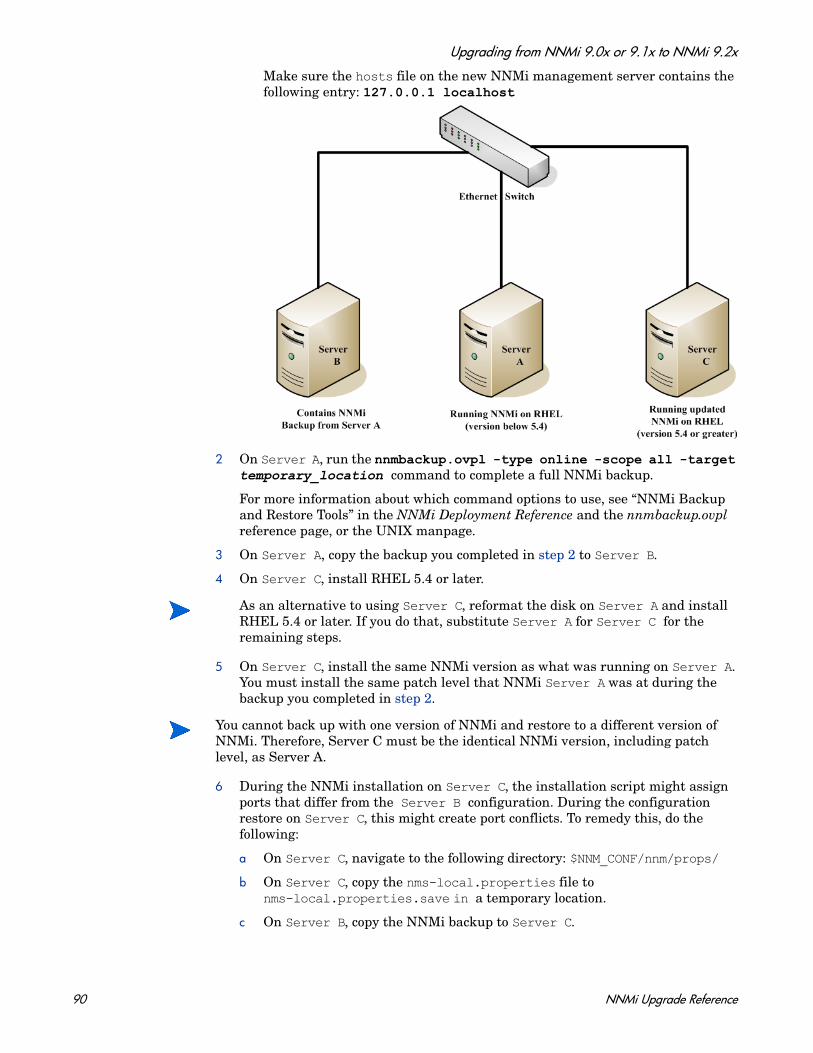
Upgrading from NNMi 9.0x or 9.1x to NNMi 9.2x
Make sure the hosts file on the new NNMi management server contains the following entry: 127.0.0.1 localhost
2 On Server A, run the nnmbackup.ovpl -type online -scope all -target temporary_location command to complete a full NNMi backup.
For more information about which command options to use, see “NNMi Backup and Restore Tools” in the NNMi Deployment Reference and the nnmbackup.ovpl reference page, or the UNIX manpage.
3 On Server A, copy the backup you completed in step 2 to Server B.
4 On Server C, install RHEL 5.4 or later.
5 On Server C, install the same NNMi version as what was running on Server A. You must install the same patch level that NNMi Server A was at during the backup you completed in step 2.
6 During the NNMi installation on Server C, the installation script might assign ports that differ from the Server B configuration. During the configuration restore on Server C, this might create port conflicts. To remedy this, do the following:
a On Server C, navigate to the following directory: $NNM_CONF/nnm/props/
b On Server C, copy the nms-local.properties file to nms-local.properties.save in a temporary location.
c On Server B, copy the NNMi backup to Server C.
As an alternative to using Server C, reformat the disk on Server A and install RHEL 5.4 or later. If you do that, substitute Server A for Server C for the remaining steps.
You cannot back up with one version of NNMi and restore to a different version of NNMi. Therefore, Server C must be the identical NNMi version, including patch level, as Server A.
90 NNMi Upgrade Reference

May 2014
d On Server C, run the nnmrestore.ovpl -force -source temporary_location command to complete a full NNMi restore.
For more information about which command options to use, see “NNMi Backup and Restore Tools” in the NNMi Deployment Reference and the nnmrestore.ovpl reference page, or the UNIX manpage.
e On Server C, compare the nms-local.properties.save file from the temporary location to the nms-local.properties file located in the following directory: $NNM_CONF/nnm/props/
Resolve any port conflicts, making changes to the nms-local.properties located in the above directory. Make sure to keep the jboss.http.port (NNMi web server port) and jboss.https.port (NNMi HTTPS web server port) values that were chosen during the NNMi installation on Server C.
f Restart NNMi:
ovstop
ovstart
7 NNMi associates its license keys with a server’s IP address. If the IP address for Server C is different from the IP address of Server A, obtain and install new NNMi license keys. See “Changing the IP Address of a Standalone NNMi Management Server” in the NNMi Deployment Reference.
8 On Server C, install NNMi 9.2x.
Use the command options that match the backup you completed in step 2.
Moving NNMi to RHEL 5.4 or Later 91

Upgrading from NNMi 9.0x or 9.1x to NNMi 9.2x
92 NNMi Upgrade Reference
Migrati
May 2014
Migrating NNMi Oracle Data
ng NNMi Oracle Data
If you plan to move the Oracle data in NNMi to Oracle 11G. The information in this chapter explains the steps to take to complete this work.
Migrating NNMi Oracle Data
Suppose you have NNMi running in one of the following configurations:
• NNMi 9.0x or NNMi 9.1x with the latest patch connected to an Oracle 10G database and you need to upgrade to NNMi 9.2x.
• NNMi 9.0x or NNMi 9.1x with the latest patch connected to an Oracle 11G database and you need to upgrade to NNMi 9.2x.
The Oracle database instance migration you need to complete could include combinations of the following requirements:
• The existing Oracle instance running on NNMi 9.2x can be running Oracle 10G or 11G.
• The new Oracle instance running on NNMi 9.2x must be running Oracle 11G.
• The new Oracle instance can be located on the original server or on a different server and hostname.
To complete the migration of the NNMi Oracle data, complete the following steps:
1 As root or administrator, run the following command to stop NNMi: ovstop –c.
2 Use Oracle tools to move or copy the NNMi data from the existing Oracle server to the new server. Refer to Oracle documentation for additional information.
3 Only complete this step if the new Oracle server has a different hostname than the previous Oracle server. On the NNMi management server, reconfigure NNMi to point to the new Oracle server by completing the following steps:
This Oracle data migration can be an in-place upgrade from Oracle 10 to Oracle 11 on the same server. Oracle provides database migration tools for converting Oracle 10 data into the Oracle 11 format.
93
Upgrading from NNMi 9.0x or 9.1x to NNMi 9.2x
a Edit the datasource configuration file shown :
— Windows: %NNM_JBOSS%\server\nms\deploy\nms-ds.xml
— UNIX: $NNM_JBOSS/server/nms/deploy/nms-ds.xml
b Change the following attribute to reflect your new server
OLD: <connection-url>jdbc:oracle:thin:@EXISTING_FQDN:EXISTING_ORACLE_PORT:EXISTING_SID </connection-url>
NEW: <connection-url>jdbc:oracle:thin:@NEW_FQDN:NEW_PORT:NEW_SID</connection-url>
4 Complete one of the following actions:
If you are upgrading from NNMi 9.0x or NNMi 9.1x to NNMi 9.2x, perform that migration now, following the installation instructions in the HP Network Node Manager i Software Installation Guide.
If you are already using NNMi 9.2x, follow these steps to restart NNMi and complete the Oracle database move/migration:
a Run the following command on the NNMi management server to restart NNMi: ovstart -c
b Run the following command on the NNMi management server to check if all of the services are started and operating correctly: ovstatus -v
It is important that you complete the following steps accurately, or jboss will not correctly connect to the Oracle 11G database.
After upgrading to NNMi 9.2x, if you want to change your Oracle server, do the following:
1 Stop the NNMi management server using the following command: ovstop
2 Edit the following file:
• Windows: %nnmdatadir%\shared\nnm\conf\props\nnm-server.properties
• UNIX: $NnmDataDir/shared/nnm/conf/props/nnm-server.properties
3 Look for three lines that resemble the following:
com.hp.ov.nms.oracle.host = <Oracle server hostname>
com.hp.ov.nms.oracle.port = <Oracle port >
com.hp.ov.nms.oracle.sid = <Oracle SID >
4 Edit the three values to include the values associated with the new Oracle server.
5 Use the nnmchangedbpw.ovpl command to set the Oracle name and password.
6 Start the NNMi management server using the following command: ovstart
94 NNMi Upgrade Reference

Additio
May 2014
Additional Upgrade
Information
nal Upgrade Information
This chapter describes some changes between NNMi 9.20 and earlier NNMi versions. This chapter contains the following topics:
• Configuration Differences
• MIBs
• Functionality Differences
Configuration Differences
• User groups replace NNMi roles for limiting user access within the NNMi console. User accounts can be mapped to multiple user groups.
— For signing in to the NNMi console, each user account must be mapped to at least one of the NNMi-provided user groups. These groups are equivalent to the function of the NNMi role in previous releases.
— In a multi-tenancy environment, each user account can be mapped to one or more custom user groups that provide access to a subset of the topology objects.
For more information, see “NNMi Security and Multi-Tenancy” in the NNMi Deployment Reference.
• The NNMi integration for retrieving user information from a directory service can now retrieve multiple group names per user.
— For configuration option 2 (only user names and passwords in the directory service), existing integrations with a directory service continue to work without modification to the ldap.properties configuration file.
— For configuration option 3 (all user information in the directory service), the following information applies:
– In a single tenant environment (all NNMi console users can access all topology objects), existing integrations with a directory service continue to work without modification to the ldap.properties configuration file.
95
Upgrading from NNMi 9.0x or 9.1x to NNMi 9.2x
If you add any new NNMi user groups in the directory service, you must update the ldap.properties configuration file to the new model for retrieving user information from a directory service.
– In a multi-tenancy environment, update the ldap.properties configuration file to the new model for retrieving user information from a directory service.
– For information about updating the ldap.properties configuration file, see “Changing the Directory Service Access Configuration to Support the NNMi Security Model” in the NNMi Deployment Reference.
— NNMi 9.2x deprecates the following ldap.properties configuration file parameters. They will become unsupported in a future release:
– roleAttributeID
– roleAttributeIsDN
– roleNameAttributeID
• After upgrading to NNMi 9.2x, the following security and multi-tenancy configuration applies:
— All nodes are assigned to the Default Tenant and the Default Security Group.
— All users have access to all nodes in the NNMi topology and to all incidents.
This default configuration matches the object access available in NNMi 9.1x. For information on customizing object access, see “NNMi Security and Multi-Tenancy” in the NNMi Deployment Reference.
• If the HP NNMi—HP NA integration was configured on a NNMi 9.0x management server, the process of upgrading to NNMi 9.2x disables the configuration. For more information, see the NNMi—Network Automation Integration Guide.
• Upgrading from NNMi 9.0x or NNMi 9.1x to NNMi 9.2x might incorrectly set the HostNameMatchManagementIP property to false.
If you plan to upgrade an earlier version of NNMi 9.0x or NNMi 9.1x to NNMi 9.20, the upgrade might incorrectly set the HostNameMatchManagementIP property to false. The HostNameMatchManagementIP property exists in the nms-disco.properties file.
In most cases, you will prefer the value of this property to be true. If you want it to remain true, check this file after the upgrade completes, and correct the value if necessary. The nms-disco.properties file is located in the %NnmDataDir%\shared\nnm\conf\props folder (Windows) or the $NnmDataDir/shared/nnm/conf/props (UNIX) directory.
If you change the value of the HostNameMatchManagementIP property, for the changes to take effect, you must restart the NNMi management server as follows:
a Run the ovstop command on the NNMi management server.
b Run the ovstart command on the NNMi management server..
When making file changes under HA, you must make the changes on both nodes in the cluster. For NNMi using HA configurations, if the change requires you to stop and restart the NNMi management server, you must put the nodes in maintenance mode before running the ovstop and ovstart commands.
96 NNMi Upgrade Reference

May 2014
Application Failover
NNMi 9.0x supported either a UDP or a TCP solution for the application failover feature. NNMi 10.00 only supports the TCP solution. If you used the UDP application failover solution for NNMi 9.0x, and are upgrading to NNMi 9.2x, the upgrade script converts your application failover configuration to the TCP solution. You must add the hostnames of all nodes in the cluster to the com.hp.ov.nms.cluster.member.hostnames parameter in the nms-cluster.properties file. For more information see “Configuring NNMi for Application Failover” in the NNMi Deployment Reference.
For the application failover feature to function correctly, the active and standby servers must have unrestricted network access to each other. NNMi 9.2x includes some port changes, so you might need to modify your firewall configuration. For more information see “NNMi 9.20 and Well-Known Ports” in the NNMi Deployment Reference.
MIBs
If you loaded additional MIBs into earlier versions of NNMi that are not standards compliant or have dependencies on other MIB files, they might not migrate successfully. If a MIB does not migrate successfully, the trap configurations continue to work, however you might not be able to browse that MIB as you could prior to the migration.
If you suspect that some MIBs did not migrate, check the following directory for a failed subdirectory that contains the MIB file or files, failure details, and a log file with a name that associates it with the MIB file or files:
• Windows: %NNM_DATA%\tmp\nnm9xMibMigrate
• UNIX: $NNM_DATA/tmp/nnm9xMibMigrate
Use the files contained in the above directories to determine why the MIBs did not migrate, then reload those MIBs.
Functionality Differences
To review information about new features included in NNMi 9.2x, see the “What’s New In This Version” section of the NNMi Release Notes.
Additional Upgrade Information 97

Upgrading from NNMi 9.0x or 9.1x to NNMi 9.2x
98 NNMi Upgrade Reference
Applica
May 2014
Application Failover and Upgrading to NNMi 9.20
tion Failover and Upgrading to NNMi 9.20
Application Failover and Upgrading from NNMi 9.0x or 9.1x
If you plan to upgrade an earlier version of NNMi that is running in an NNMi application failover configuration, follow the steps in the appropriate section below based on the database you are using.
Embedded Database
To upgrade NNMi management servers configured for application failover and using the embedded database, follow these steps:
1 As a precaution, run the nnmconfigexport.ovpl script on both the active and standby NNMi management servers before proceeding. For information, see “Best Practice: Save the Existing Configuration” in the NNMi Deployment Reference.
As a precaution, back up your NNMi data on both the active and standby NNMi management servers before proceeding. For information, see “Backup Scope” in the NNMi Deployment Reference.
2 Complete the following steps on the active NNMi management server. Note that NNMi must be running for the following nnmcluster steps to work. Completing these steps will speed up the standby NNMi management server startup shown in step 6 on page 100:
a Run the nnmcluster command.
b After NNMi prompts you, type dbsync, then press Enter. Review the displayed information to make sure it includes the following messages:
ACTIVE_DB_BACKUP: This means that the active NNMi management server is performing a new backup.ACTIVE_NNM_RUNNING: This means that the active NNMi management server completed the backup referred to by the previous message.STANDBY_RECV_DBZIP: This means that the standby NNMi management server is receiving a new backup from the active NNMi management server. STANDBY_READY: This means that the standby NNMi management server is ready to perform if the active NNMi management server fails.
99

Upgrading from NNMi 9.0x or 9.1x to NNMi 9.2x
c Run exit or quit to stop the interactive nnmcluster process you started in step a.
3 Run the nnmcluster -shutdown command on the standby NNMi management server. This shuts down all nnmcluster processes on the standby NNMi management server.
4 To verify there are no nnmcluster nodes running on the standby NNMi management server, complete the following steps on the standby NNMi management server.
a Run the nnmcluster command.
b Verify that there are no (LOCAL) nnmcluster nodes present except the one marked (SELF). There might be one or more (REMOTE) nodes present.
c Run exit or quit to stop the interactive nnmcluster process you started in step a.
5 Complete the following steps on the standby NNMi management server to temporarily disable application failover:
a Edit the following file:
– Windows: %NNM_SHARED_CONF%\props\nms-cluster.properties
– UNIX: $NNM_SHARED_CONF/props/nms-cluster.properties
b Comment out the com.hp.ov.nms.cluster.name parameter.
c Save your changes.
6 Create the NnmDataDir/tmp/postgresTriggerFile.
7 Start, then stop processes on the standby NNMi management server.
a Run the ovstart command on the standby NNMi management server. Running the ovstart command causes the standby NNMi management server to import the transaction logs from the active NNMi management server.
b After the ovstart command completes, run the ovstatus -v command. All NNMi services should show the state RUNNING.
c Run the ovstop command on the standby NNMi management server.
8 Upgrade the standby NNMi management server to NNMi 9.20 using the instructions located in the HP Network Node Manager i Software Interactive Installation Guide.
You now have the former active NNMi management server running NNMi 9.0x or NNMi 9.0x and the former standby NNMi management server running NNMi 9.20. You have both of these NNMi management servers running independently with no database synchronization. That means you have both NNMi management servers monitoring the network in parallel. Do not leave these NNMi management servers in this configuration for more than a few hours, as this configuration is a violation of the non-production license installed on the
Note the following:
— The file you create must not have a .txt extension.
— This file is empty and removed by Postgres when it starts.
You must upgrade all of the iSPIs that you have installed on the standby NNMi management server to iSPI versions that support NNMi 9.20.
100 NNMi Upgrade Reference
May 2014
former standby node.
To complete the upgrade, and remedy this situation, select a time to upgrade the former active node to NNMi 9.20. Have the operators temporarily use the former standby node to monitor the network while you complete the upgrade.
The remainder of this procedure assumes you plan to retain the database information from the former active node and discard the database information from the former standby node.
9 Run the nnmcluster -halt command on the former active NNMi management server.
10 To verify there are no nnmcluster nodes running on the former active NNMi management server, complete the following steps on the former active NNMi management server.
a Run the nnmcluster command.
b Verify that there are no (LOCAL) nnmcluster nodes present except the one marked (SELF). There might be one or more (REMOTE) nodes present.
c Run exit or quit to stop the interactive nnmcluster process you started in step a.
11 Complete the following steps on the former active NNMi management server to temporarily disable application failover:
a Edit the following file:
— Windows: %NNM_SHARED_CONF%\props\nms-cluster.properties
— UNIX: $NNM_SHARED_CONF/props/nms-cluster.properties
b Comment out the com.hp.ov.nms.cluster.name parameter.
Upgrade the former active NNMi management server to NNMi 9.2x using the instructions located in the HP Network Node Manager i Software Interactive Installation Guide.
Now you have two servers running NNMi 9.2x, but they are still independent since the databases are not synchronized.
12 Complete the following steps on the former active NNMi management server:
a Run the ovstop command.
b Edit the following file:
— Windows: %NNM_SHARED_CONF%\props\nms-cluster.properties
— UNIX: $NNM_SHARED_CONF/props/nms-cluster.properties
c Type in the value of the com.hp.ov.nms.cluster.name parameter.
d Uncomment the com.hp.ov.nms.cluster.name parameter.
e Save your changes.
You must upgrade all of the iSPIs that you have installed on the former active NNMi management server to iSPI versions that support NNMi 9.20.
The NNMi upgrade procedure does not preserve commented-out properties. Therefore, you must retype the cluster name.
Application Failover and Upgrading to NNMi 9.20 101
Upgrading from NNMi 9.0x or 9.1x to NNMi 9.2x
13 Run either the ovstart or nnmcluster -daemon command on the former active NNMi management server. It is now the active node.
14 Instruct the operators to begin using the active node to monitor the network.
15 Complete the following steps on the former standby NNMi management server:
a Run the ovstop command.
b Edit the following file:
— Windows: %NNM_SHARED_CONF%\props\nms-cluster.properties
— UNIX: $NNM_SHARED_CONF/props/nms-cluster.properties
c Type in the value of the com.hp.ov.nms.cluster.name parameter.
d Uncomment the com.hp.ov.nms.cluster.name parameter.
e Save your changes.
16 Run either the ovstart or nnmcluster -daemon command on the former standby NNMi management server.
This NNMi management server becomes the standby node, and receives a copy of the database from the active node.
17 If you installed the NNM iSPI Performance for QA, the NNM iSPI Performance for Metrics, or the NNM iSPI Performance for Traffic; are using the application failover feature; and completed the upgrade process shown above, run the NNM iSPI enablement script for each NNM iSPI on both the active and standby NNMi management servers.
Oracle Database
To upgrade NNMi management servers configured for application failover and using an Oracle database, follow these steps:
1 As a precaution, run the nnmconfigexport.ovpl script on both the active and standby NNMi management servers before proceeding. For information, see ”Best Practice: Save the Existing Configuration” in the NNMi Deployment Reference.
2 As a precaution, back up your NNMi data on both the active and standby NNMi management servers before proceeding. For information, see ”Backup Scope” in the NNMi Deployment Reference.
3 Run the nnmcluster -halt command on the standby NNMi management server. This shuts down all nnmcluster processes on both the active and standby NNMi management server.
4 To verify there are no nnmcluster nodes running on either the active or standby NNMi management server, complete the following steps on the standby NNMi management server.
a Run the nnmcluster command.
The former standby NNMi management server discards all of the database activity occurring during the maintenance window, from step 9 on page 101 through step 13 on page 102.
You must upgrade NNMi management servers separately because two NNMi management servers cannot be simultaneously connected to the same Oracle database.
102 NNMi Upgrade Reference
May 2014
b Verify that the only nnmcluster node present is one marked (SELF).
c Run exit or quit to stop the interactive nnmcluster process you started in step a.
5 Complete the following steps on the standby NNMi management server to temporarily disable application failover:
a Edit the following file:
• Windows: %NNM_SHARED_CONF%\props\nms-cluster.properties
• UNIX: $NNM_SHARED_CONF/props/nms-cluster.properties
b Comment out the com.hp.ov.nms.cluster.name parameter.
c Save your changes.
6 Upgrade the standby NNMi management server to NNMi 9.2x using the instructions located in the HP Network Node Manager i Software Interactive Installation Guide.
You now have the former standby NNMi management server with NNMi 9.20 installed, and the former active NNMi management server with NNMi 9.0x or NNMi 9.0x installed.
7 Run the ovstop command on the former standby NNMi management server to disconnect the NNMi management server from the Oracle database.
8 Complete the following steps on the former active NNMi management server to temporarily disable application failover:
a Edit the following file:
— Windows: %NNM_SHARED_CONF%\props\nms-cluster.properties
— UNIX: $NNM_SHARED_CONF/props/nms-cluster.properties
b Comment out the com.hp.ov.nms.cluster.name parameter.
9 Upgrade the former active NNMi management server to NNMi 9.20 using the instructions located in the HP Network Node Manager i Software Interactive Installation Guide.
Now you have two servers with NNMi 9.20 installed.
10 Complete the following steps on the former active NNMi management server:
a Run the ovstop command.
b Edit the following file:
— Windows: %NNM_SHARED_CONF%\props\nms-cluster.properties
— UNIX: $NNM_SHARED_CONF/props/nms-cluster.properties
c Type in the value of the com.hp.ov.nms.cluster.name parameter.
d Uncomment the com.hp.ov.nms.cluster.name parameter.
You must upgrade all of the iSPIs that you have installed on the standby NNMi management server to iSPI versions that support NNMi 9.2x.
You must upgrade all of the iSPIs that you have installed on the former active NNMi management server to iSPI versions that support NNMi 9.2x.
The NNMi upgrade procedure does not preserve commented-out properties. Therefore, you must retype the cluster name.
Application Failover and Upgrading to NNMi 9.20 103

Upgrading from NNMi 9.0x or 9.1x to NNMi 9.2x
e Save your changes.
11 Run the ovstart or nnmcluster -daemon command on the former active NNMi management server. It is now the active node.
12 Complete the following steps on the former standby NNMi management server:
f Edit the following file:
— Windows: %NNM_SHARED_CONF%\props\nms-cluster.properties
— UNIX: $NNM_SHARED_CONF/props/nms-cluster.properties
g Type in the value of the com.hp.ov.nms.cluster.name parameter.
h Uncomment the com.hp.ov.nms.cluster.name parameter.
i Save your changes.
13 Run either the ovstart or nnmcluster -daemon command on the former standby NNMi management server.
This NNMi management server becomes the standby node.
14 If you installed the NNM iSPI Performance for QA, the NNM iSPI Performance for Metrics, or the NNM iSPI Performance for Traffic; are using the application failover feature; and completed the upgrade process shown above, run the NNM iSPI enablement script for each NNM iSPI on both the active and standby NNMi management servers.
Application Failover and NNMi Patches
Both NNMi management servers must be running the same NNMi version and patch level. To add patches to the active and standby NNMi management servers, use one of the following procedures:
• Applying Patches for Application Failover (Shut Down Both Active and Standby)Use this procedure when you are not concerned with an interruption in network monitoring.
• Applying Patches for Application Failover (Keep One Active NNMi Management Server)Use this procedure when must avoid any interruptions in network monitoring.
Applying Patches for Application Failover (Shut Down Both Active and Standby)
This procedure results in both NNMi management servers being non-active for some period of time during the patch process. To apply patches to the NNMi management servers configured for application failover, follow these steps:
1 As a precaution, run the nnmconfigexport.ovpl script on both the active and standby NNMi management servers before proceeding. For information, see ”Best Practice: Save the Existing Configuration” in the NNMi Deployment Reference.
2 As a precaution, back up your NNMi data on both the active and standby NNMi management servers before proceeding. For information, see ”Backup Scope” in the NNMi Deployment Reference.
3 As a precaution, on the active NNMi management server, do the following steps:
a Run the nnmcluster command.
104 NNMi Upgrade Reference
May 2014
b Embedded database only: After NNMi prompts you, type dbsync, then press Enter. Review the displayed information to make sure it includes the following messages:
ACTIVE_DB_BACKUP: This means that the active NNMi management server is performing a new backup.ACTIVE_NNM_RUNNING: This means that the active NNMi management server completed the backup referred to by the previous message.STANDBY_READY: This shows the previous status of the standby NNMi management server.STANDBY_RECV_DBZIP: This means that the standby NNMi management server is receiving a new backup from the active NNMi management server. STANDBY_READY: This means that the standby NNMi management server is ready to perform if the active NNMi management server fails.
4 Run the nnmcluster -halt command on the active NNMi management server. This shuts down all nnmcluster processes on both the active and standby NNMi management servers.
5 To verify there are no nnmcluster nodes running on either server, complete the following steps on both the active and standby NNMi management servers.
a Run the nnmcluster command.
b Verify that there are no nnmcluster nodes present except the one marked (SELF).
c Run exit or quit to stop the interactive nnmcluster process you started in step a.
6 On the active NNMi management server, comment out the com.hp.ov.nms.cluster.name parameter in the nms-cluster.properties file.
a Edit the following file:
— Windows: %NNM_SHARED_CONF%\props\nms-cluster.properties
— UNIX: $NNM_SHARED_CONF/props/nms-cluster.properties
b Comment out the com.hp.ov.nms.cluster.name parameter.
c Save your changes.
7 Apply the NNMi patch to the active NNMi management server using the instructions provided with the patch.
8 On the active NNMi management server, uncomment the com.hp.ov.nms.cluster.name parameter in the nms-cluster.properties file.
a Edit the following file:
— Windows: %NNM_SHARED_CONF%\props\nms-cluster.properties
— UNIX: $NNM_SHARED_CONF/props/nms-cluster.properties
b Uncomment the com.hp.ov.nms.cluster.name parameter.
c Save your changes.
9 Run the ovstart command on the active NNMi management server.
10 Verify that the patch installed correctly on the active NNMi management server by viewing information on the Product tab of the Help > System Information window in the NNMi console.
11 Run the nnmcluster -dbsync command to create a new backup.
Application Failover and Upgrading to NNMi 9.20 105

Upgrading from NNMi 9.0x or 9.1x to NNMi 9.2x
12 On the standby NNMi management server, comment out the com.hp.ov.nms.cluster.name parameter in the nms-cluster.properties file as shown in step a on page 105 through step c on page 105.
13 Apply the NNMi patch to the standby NNMi management server.
14 On the standby NNMi management server, uncomment the com.hp.ov.nms.cluster.name parameter in the nms-cluster.properties file as shown in step a on page 105 through step c on page 105.
15 Run the ovstart command on the standby NNMi management server.
16 If you installed the NNM iSPI Performance for QA, the NNM iSPI Performance for Metrics, or the NNM iSPI Performance for Traffic; are using the application failover feature; and completed the patch process shown above, run the NNM iSPI enablement script for each NNM iSPI on both the active and standby NNMi management servers.
Applying Patches for Application Failover (Keep One Active NNMi Management Server)
This procedure results in one NNMi management server always being active during the patch process.
To apply NNMi patches to the NNMi management servers configured for application failover, follow these steps:
1 As a precaution, run the nnmconfigexport.ovpl script on both the active and standby NNMi management servers before proceeding. For information, see ”Best Practice: Save the Existing Configuration” in the NNMi Deployment Reference.
2 As a precaution, back up your NNMi data on both the active and standby NNMi management servers before proceeding. For information, see ”Backup Scope” in the NNMi Deployment Reference.
3 Run nnmcluster on one of the nodes.
4 Enter dbsync on the NNMi management server used in the previous step to synchronize the two databases.
5 Wait until the active NNMi management server reverts to ACTIVE_NNM_RUNNING and the standby NNMi management server reverts to STANDBY_READY. before continuing.
6 Exit or quit from the nnmcluster command.
7 Stop the cluster on the standby NNMi management server by running the following command on the standby NNMi management server:nnmcluster -shutdown
8 Make sure the following processes and services terminate before continuing:
— postgres
— ovjboss
This process results in continuous monitoring of the network, however NNMi loses the transaction logs occurring during this patch process.
The dbsync option works on an NNMi management server using the embedded database. Do not use the dbsync option on an NNMi management server configured to use an Oracle database.
106 NNMi Upgrade Reference

May 2014
9 Make sure the nnmcluster process terminates before continuing. If the nnmcluster process will not terminate, manually kill the nnmcluster process only as a last resort.
10 Edit the following file on the standby NNMi management server:
Windows: %nnmDataDir%\shared\nnm\conf\props\nms-cluster.properties
UNIX: $nnmDataDir/shared/nnm/conf/props/nms-cluster.properties
11 Comment out the cluster name by placing a # at the front of the line, then save your changes:#com.hp.ov.nms.cluster.name = NNMicluster
12 Install the NNMi patch on the standby NNMi management server.
13 At this point, the standby NNMi management server is patched but stopped, and the active NNMi management server is unpatched but running. Stop the active NNMi management server and immediately bring the standby NNMi management server online to monitor your network.
14 Shut down the cluster on the active NNMi management server by running the following command on the activeNNMi management server:nnmcluster -halt
15 Make sure the nnmcluster process terminates. If it does not terminate within a few minutes, manually kill the nnmcluster process.
16 On the standby NNMi management server, uncomment the cluster name from the nms-cluster.properties file.
17 Create the NnmDataDir/tmp/postgresTriggerFile.
18 Start the cluster on the standby NNMi management server by running the following command on the standby NNMi management server:nnmcluster -daemon
19 Install the NNMi patch on the active NNMi management server.
20 At this point, the previous active NNMi management server is patched but offline. Bring it back into the cluster (as the standby NNMi management server) by performing the following:
a Uncomment the entry in the nms-cluster.properties file on the active NNMi management server.
b Start the active NNMi management server using the following command:nnmcluster -daemon
21 To monitor the progress, run the following command on both the active and standby NNMi management servers:nnmcluster
Wait until the previous active NNMi management server finishes retrieving the database from the previous standby NNMi management server.
22 After the previous active NNMi management server displays STANDBY_READY, run the following command on the previous active NNMi management server:nnmcluster -acquire
Note the following:
— The file you create must not have a .txt extension.
— This file is empty and removed by Postgres when it starts.
Application Failover and Upgrading to NNMi 9.20 107

Upgrading from NNMi 9.0x or 9.1x to NNMi 9.2x
23 If you installed the NNM iSPI Performance for QA, the NNM iSPI Performance for Metrics, or the NNM iSPI Performance for Traffic; are using the application failover feature; and completed the patch process shown above, run the NNM iSPI enablement script for each NNM iSPI on both the active and standby NNMi management servers.
108 NNMi Upgrade Reference
High A
May 2014
High Availability and Upgrading from NNMi 9.0x or NNMi 9.1x to
NNMi 9.20
vailability and Upgrading from NNMi 9.0x or NNMi 9.
Follow the appropriate procedure for your environment:
• Upgrade NNMi with the Embedded Database on all Supported Operating Systems on page 109
• Upgrade NNMi with Oracle on all Supported Operating Systems on page 112
Upgrade NNMi with the Embedded Database on all Supported Operating Systems
Upgrading NNMi includes upgrading the Postgres database software to a newer version. For this reason, NNMi must be taken out of operation for the duration of the upgrade process.
To upgrade from NNMi 9.0x or NNMi 9.1x under HA to NNMi 9.2x under HA, upgrade the active node to update the embedded database, and then upgrade the passive node while NNMi is still in maintenance mode. Follow these steps:
1 Ensure that the NNMi 9.0x or NNMi 9.1x configuration is consistent across all HA nodes by forcing a failover, in turn, to each of the passive nodes.
2 For NNMi 9.0x, ensure that all nodes are running NNMi 9.0x Patch 5 or a higher version. For NNMi 9.1x, use patch 3 or higher.
If necessary, upgrade each system to the appropriate consolidated patch.
3 Check the ov.conf files on both systems to ensure that they have the correct values. The ov.conf file is available in the following location:
• Windows: %NnmDataDir%\shared\nnm\conf
• UNIX: $NnmDataDir/shared/nnm/conf
4 Determine which node in the NNMi 9.0x or NNMi 9.1x HA cluster is active:
• Windows:
NNMi will be unavailable for approximately 30 to 60 minutes during this upgrade procedure.
1x to NNMi 9.20 109
Upgrading from NNMi 9.0x or 9.1x to NNMi 9.2x
%NnmInstallDir%\misc\nnm\ha\nnmhaclusterinfo.ovpl \-group <resource_group> -activeNode
• UNIX:
$NnmInstallDir/misc/nnm/ha/nnmhaclusterinfo.ovpl \-group <resource_group> -activeNode
The remainder of this procedure refers to the currently active node as server X and the currently passive node as server Y.
5 For Windows systems, perform the following:
a On server X, stop the <resource group>-app resource.
b Check the Access Control Lists (ACLs) on the file %NnmDataDir%\hacluster\<resource group>\hamscs.vbs (be sure to remember these).
c Save the hamscs.vbs file.
d Copy the %NnmInstallDir%\misc\nnm\ha\nnmhamscs.vbs script to a temporary directory where you can edit the file.
e Open the copy of the nnmhamscs.vbs file and change all references for product_name to be NNM. You can reference the original script for the value. Save the nnmhamscs.vbs file.
f As Administrator, copy the updated nnmhamscs.vbs script to %NnmDataDir%\hacluster\<resource group>\hamscs.vbs.
g Check the ACLs again to ensure that they are the same as before.
h Start the <resource group>-app resource.
i Verify that the resource comes online. If not, check the cluster logs to see if there are any syntax errors. (You can use the following command to generate a cluster log: cluster log /gen. If you must specify a folder, you can do so using the following syntax: cluster log /gen /copy:<my folder>.)
6 On server X, disable HA resource group monitoring by creating the following maintenance file:
• Windows:
%NnmDataDir%\hacluster\<resource_group>\maintenance
• UNIX:
$NnmDataDir/hacluster/<resource_group>/maintenance
The file can be empty.
7 On server X, upgrade NNMi:
a Upgrade NNMi to the current version as described in this manual.
The database upgrade occurs during this step.
b To verify that the upgrade completed correctly, enter the following command:
ovstatus
All NNMi services should show the state RUNNING.
c Upgrade all add-on NNM iSPIs to version 9.20.
Ensure that the maintenance file does not have a .txt extension, which can occur if the file has been edited with a text editor, such as Notepad.
110 NNMi Upgrade Reference
May 2014
For information, see the documentation for each NNM iSPI.
8 For Windows systems, do the following:
a Copy the updated nnmhamscs.vbs script (see step f within step 5) from Server X to %NnmDataDir%\hacluster\<resource group>\hamscs.vbs on Server Y.
b Check the ACLs to ensure that they are the same as before.
9 On server X, run the following command: nnmhadisk.ovpl NNM -replicate <HA_mount_point>
10 On server Y, disable HA resource group monitoring by creating the following maintenance file:
• Windows:
%NnmDataDir%\hacluster\<resource_group>\maintenance
• UNIX:
$NnmDataDir/hacluster/<resource_group>/maintenance
The file can be empty.
11 On server Y, upgrade NNMi:
a Upgrade NNMi to the current version as described in this manual.
b Verify that the upgrade completed without error.
c Upgrade all add-on NNM iSPIs to version 9.20.
For information, see the documentation for each NNM iSPI.
12 If the HA cluster includes multiple passive nodes, repeat step 11 for each passive node.
13 On server X, delete the maintenance file:
• Windows:
%NnmDataDir%\hacluster\<resource_group>\maintenance
• UNIX:
$NnmDataDir/hacluster/<resource_group>/maintenance
14 Perform the following post-installation steps:
a Verify that the following variables are set:
NNM_INTERFACE
HA_MOUNT_POINT
NNM_ADD_ON_PRODUCTS
HA_LOCALE (not required if running in C)
These variables are defined in the following locations:
Veritas:
If your environment includes standalone NNM iSPIs, you must also upgrade those products to version 9.20 for correct functionality. You can complete those upgrades after completing this procedure.
Ensure that the maintenance file does not have a .txt extension, which can occur if the file has been edited with a text editor, such as Notepad.
High Availability and Upgrading from NNMi 9.0x or NNMi 9.1x to NNMi 9.20 111
Upgrading from NNMi 9.0x or 9.1x to NNMi 9.2x
/opt/VRTSvcs/bin/hagrp -display | grep UserStrGlobal
Windows: Using regedit, the values are in the following location:
HKEY_LOCAL_MACHINE\Cluster\Groups\<group>\Parameters
b If the variables are not set, you can run the following commands for each missing value:
/opt/OV/misc/nnm/ha/nnmhaclusterinfo.ovpl -config NNM -set NNM_INTERFACE <value for NNM_INTERFACE>
/opt/OV/misc/nnm/ha/nnmhaclusterinfo.ovpl -config NNM -set HA_MOUNT_POINT <value for HA_MOUNT_POINT>
/opt/OV/misc/nnm/ha/nnmhaclusterinfo.ovpl -config NNM -set NNM_ADD_ON_PRODUCTS <value for NNM_ADD_ON_PRODUCTS>
/opt/OV/misc/nnm/ha/nnmhaclusterinfo.ovpl -config NNM -set HA_LOCALE <value for HA_LOCALE>
15 For all Linux HA upgrades, run the following sets of commands, as applicable for your system:
— RHEL:
rm /etc/rc.d/rc*.d/S98netmgt
rm /etc/rc.d/rc*.d/K01netmgt
— SuSE:
rm /etc/init.d/rc*.d/S98netmgt
rm /etc/init.d/rc*.d/K01netmgt
Upgrade NNMi with Oracle on all Supported Operating Systems
To upgrade NNMi for HA in an Oracle environment, follow the procedure described in Upgrade NNMi with the Embedded Database on all Supported Operating Systems on page 109.
Unconfiguring NNMi from an HA Cluster
The process of removing an NNMi node from an HA cluster involves undoing the HA configuration for that instance of NNMi. You can then run that instance of NNMi as a standalone management server, or you can uninstall NNMi from that node.
HA_LOCALE is only needed if you are attempting to use a localized language.
When using Windows Server 2008 R2, the Network Name resource may have the name "Network Name". This name should be the short name for the virtual IP address. If applicable, change the name as follows:
1 Using Failover Cluster Management, select the Network Name resource.
2 Right-click and select Properties.
3 Change the name.
112 NNMi Upgrade Reference

May 2014
If you want to keep NNMi configured for high availability, the HA cluster must contain one node that is actively running NNMi and at least one passive NNMi node. If you want to completely remove NNMi from the HA cluster, unconfigure the HA functionality on all nodes in the cluster.
To completely unconfigure NNMi from an HA cluster, follow these steps:
1 Determine which node in the HA cluster is active. On any node, run the following command:
• Windows:
%NnmInstallDir%\misc\nnm\ha\nnmhaclusterinfo.ovpl \-group <resource_group> -activeNode
• UNIX:
$NnmInstallDir/misc/nnm/ha/nnmhaclusterinfo.ovpl \-group <resource_group> -activeNode
2 On each passive node, unconfigure any add-on NNM iSPIs from the HA cluster.
For information, see the documentation for each NNM iSPI.
3 On any node in the HA cluster, verify that the add-on NNM iSPIs on all passive nodes have been unconfigured from the HA cluster:
• Windows:
%NnmInstallDir%\misc\nnm\ha\nnmhaclusterinfo.ovpl \-config NNM -get NNM_ADD_ON_PRODUCTS
• UNIX:
$NnmInstallDir/misc/nnm/ha/nnmhaclusterinfo.ovpl \-config NNM -get NNM_ADD_ON_PRODUCTS
The command output lists the add-on iSPI configurations in the format <iSPI_PM_Name>[hostname_list]. For example:
PerfSPIHA[hostname1, hostname2]
At this time, only the active node hostname should appear in the output. If a passive node hostname appears in the output, repeat step 2 until this command output includes only the active node hostname.
4 On each passive node, unconfigure NNMi from the HA cluster:
• Windows:
%NnmInstallDir%\misc\nnm\ha\nnmhaunconfigure.ovpl NNM \<resource_group>
• UNIX:
$NnmInstallDir/misc/nnm/ha/nnmhaunconfigure.ovpl NNM \<resource_group>
This command removes access to the shared disk but does not unconfigure the disk group or the volume group.
5 On each passive node, move the NNMi HA resource group-specific files to a separate location for safe-keeping:
If you do not plan to reconfigure the NNMi HA resource group, you do not need to save a copy of these files, and you can delete them at this time.
High Availability and Upgrading from NNMi 9.0x or NNMi 9.1x to NNMi 9.20 113

Upgrading from NNMi 9.0x or 9.1x to NNMi 9.2x
• MSFC: In Windows Explorer, delete the %NnmDataDir%\hacluster\<resource_group>\ folder.
• VCS:
rm -rf /var/opt/OV/hacluster/<resource_group>
• RHCS:
rm -rf /var/opt/OV/hacluster/<resource_group>
6 On the active node, unconfigure any add-on NNM iSPIs from the HA cluster.
For information, see the documentation for each NNM iSPI. On any node in the HA cluster, verify that the add-on NNM iSPIs on all nodes have been unconfigured from the HA cluster:
• Windows:
%NnmInstallDir%\misc\nnm\ha\nnmhaclusterinfo.ovpl \-config NNM -get NNM_ADD_ON_PRODUCTS
• UNIX:
$NnmInstallDir/misc/nnm/ha/nnmhaclusterinfo.ovpl \-config NNM -get NNM_ADD_ON_PRODUCTS
If any hostname appears in the output, repeat step 6 until this command output indicates that no iSPIs are configured.
7 On the active node, stop the NNMi HA resource group:
• Windows:
%NnmInstallDir%\misc\nnm\ha\nnmhastoprg.ovpl NNM \<resource_group>
• UNIX:
$NnmInstallDir/misc/nnm/ha/nnmhastoprg.ovpl NNM \<resource_group>
This command does not remove access to the shared disk. Nor does it unconfigure the disk group or the volume group.
8 On the active node, unconfigure NNMi from the HA cluster:
• Windows:
%NnmInstallDir%\misc\nnm\ha\nnmhaunconfigure.ovpl NNM \<resource_group>
• UNIX:
$NnmInstallDir/misc/nnm/ha/nnmhaunconfigure.ovpl NNM \<resource_group>
This command removes access to the shared disk but does not unconfigure the disk group or the volume group.
9 On the active node, move the NNMi HA resource group-specific files to a separate location for safe-keeping:
• MSFC: In Windows Explorer, delete the %NnmDataDir%\hacluster\<resource_group>\ folder.
If you do not plan to reconfigure the NNMi HA resource group, you do not need to save a copy of these files, and you can delete them at this time.
114 NNMi Upgrade Reference

May 2014
• VCS:
rm -rf /var/opt/OV/hacluster/<resource_group>
• RHCS:
rm -rf /var/opt/OV/hacluster/<resource_group>
10 Unmount the shared disk.
• If you want to reconfigure the NNMi HA cluster at some point, you can keep the disk in its current state.
• If you want to use the shared disk for another purpose, copy all data that you want to keep (as described in Running NNMi Outside HA with the Existing Database on page 115), and then use the HA product commands to unconfigure the disk group and volume group.
Running NNMi Outside HA with the Existing Database
If you want to run NNMi outside HA on any node with the existing database, follow these steps:
1 On the active node (if one still exists), ensure that NNMi is not running:
ovstop
Alternatively, check the status of the ovspmd process by using Task Manager (Windows) or the ps command (UNIX).
2 On the current node (where you want to run NNMi outside HA), verify that NNMi is not running:
ovstop
3 (UNIX only) Activate the disk group, for example:
vxdg import <disk_group>
4 Use the appropriate operating system commands to mount the shared disk. For example:
• Windows: Use Server Manager—>Disk Management.
• UNIX: mount /dev/vgnnm/lvnnm /nnmmount
5 Copy the NNMi files from the shared disk to the local disk:
• Windows:
%NnmInstallDir%\misc\nnm\ha\nnmhadisk.ovpl NNM \-from <HA_mount_point>
• UNIX:
$NnmInstallDir/misc/nnm/ha/nnmhadisk.ovpl NNM \-from <HA_mount_point>
6 Use the appropriate operating system commands to unmount the shared disk. For example:
• Windows: Use Windows Explorer.
• UNIX: umount /nnmmount
To prevent data corruption, make sure that no instance of NNMi is running and accessing the shared disk.
High Availability and Upgrading from NNMi 9.0x or NNMi 9.1x to NNMi 9.20 115

Upgrading from NNMi 9.0x or 9.1x to NNMi 9.2x
7 (UNIX only) Deactivate the disk group, for example:
vxdg deport <disk_group>
8 Obtain and install the permanent production license keys for the physical IP address of this NNMi management server as described in the "Licensing NNMi" chapter in the NNMi Deployment Reference.
9 Start NNMi:
ovstart -c
NNMi is now running with a copy of the database that was formerly used by the NNMi HA resource group. Manually remove from the NNMi configuration any nodes that you do not want to manage from this NNMi management server.
Patching NNMi under HA
To apply a patch for NNMi, work in HA maintenance mode. Follow these steps:
1 Determine which node in the HA cluster is active:
• Windows:
%NnmInstallDir%\misc\nnm\ha\nnmhaclusterinfo.ovpl \-group <resource_group> -activeNode
• UNIX:
$NnmInstallDir/misc/nnm/ha/nnmhaclusterinfo.ovpl \-group <resource_group> -activeNode
2 On the active node, put the NNMi HA resource group into maintenance mode as described in “Putting an HA Resource Group into Maintenance Mode” in the NNMi Deployment Reference.
Include the NORESTART keyword.
3 On all passive nodes, put the NNMi HA resource group into maintenance mode as described in “Putting an HA Resource Group into Maintenance Mode” in the NNMi Deployment Reference.
Include the NORESTART keyword.
4 On the active node, follow these steps:
a Stop NNMi:
ovstop -c
b Back up the shared disk by performing a disk copy.
c Optional. Use the nnmbackup.ovpl command, or another database command, to back up all NNMi data. For example:
nnmbackup.ovpl -type offline -scope all -target nnmi_backups
For more information about this command, see “NNMi Backup and Restore Tools” in the NNMi Deployment Reference.
d Apply the appropriate NNMi and NNM iSPI patches to the system.
e Start NNMi:
ovstart -c
116 NNMi Upgrade Reference

May 2014
f Verify that NNMi started correctly:
ovstatus -c
All NNMi services should show the state RUNNING.
5 On each passive node, apply the appropriate patches to the system.
6 On all passive nodes, take the NNMi HA resource group out of maintenance mode as described in “Removing an HA Resource Group from Maintenance Mode” in the NNMi Deployment Reference.
7 On the active node, take the NNMi HA resource group out of maintenance mode as described in “Removing an HA Resource Group from Maintenance Mode” in the NNMi Deployment Reference.
Never run the ovstart or ovstop commands on a secondary (backup) cluster node.
High Availability and Upgrading from NNMi 9.0x or NNMi 9.1x to NNMi 9.20 117

Upgrading from NNMi 9.0x or 9.1x to NNMi 9.2x
118 NNMi Upgrade Reference
Upgrad
May 2014
Upgrading Global and Regional Managers to NNMi 9.2x
ing Global and Regional Managers to NNMi 9.2x
NNMi Versions Supported by Global Network Management
If a global manager is connected to a regional manager running NNMi 9.0x patch 2 or earlier, SNMP queries between the global and regional manager do not work. To remedy this, upgrade the regional manager to NNMi 9.0x patch 3 or later. To achieve the best results, the global manager must be the same version and NNMi patch level as the regional manager.
Global Network Management Upgrade Steps
When upgrading NNMi management servers configured in a global network management environment to NNMi 9.2x, the connections between the global manager and regional managers will drop until both the global and regional managers are upgraded to NNMi 9.2x. For this reason, HP recommends you upgrade all of the servers at approximately the same time to minimize the total downtime.
For example, you might upgrade the NNMi management servers using the following steps:
1 Upgrade the regional managers to NNMi 9.2x and ensure proper operation. The global manager stays disconnected during the regional upgrades.
2 Upgrade the global manager to NNMi 9.2x. The global manager performs a full resynchronization to obtain all events that occurred while the connection between the global manager and the regional managers was down. The effect is the same
HP does not support a regional manager running NNMi 9.0x or 9.1x connected to a global manager running NNMi 9.20. The global manager and regional managers must be running the same NNMi version.
119

Upgrading from NNMi 9.0x or 9.1x to NNMi 9.2x
as if the administrator were to issue nnmnoderediscover.ovpl -all -fullsync from the global manager. See the nnmnoderediscover.ovpl reference page or the UNIX manpage for more information.
Note the following:
• NNMi automatically resynchronizes topology, state, and status following an upgrade.
• Avoid stopping NNMi during the resynchronization. To help ensure resynchronization has completed, NNMi should remain running for several hours following the upgrade. The actual time required depends on the number of nodes and the volume of state changes and trap data received while performing the resynchronization.
If NNMi must be stopped before the resynchronization is finished, the resynchronization should be run again and allowed to complete.
To perform a manual resynchronization of the entire management server, run: nnmnoderediscover.ovpl –all –fullsync
120 NNMi Upgrade Reference

May 2014
Upgrading from NNMi 9.1x or 9.2x to NNMi 10.00
You can upgrade NNMi according to the information shown in Table 5. The information shown in Table 5 assumes you have NNMi 9.10 patch 6 or newer installed on the NNMi management server.
To upgrade from NNMi 9.1x or NNMi 9.2x to NNMi 10.00, you must upgrade directly to NNMi 10.00. During an upgrade from NNMi 9.1x or 9.2x to NNMi 10.00, the installation script provides an opportunity to install patches for NNMi 10.00, as applicable.
If you plan to upgrade an earlier version of NNMi that is running in an NNMi application failover configuration, the supported upgrade path is to temporarily unconfigure application failover, upgrade the NNMi management server to NNMi 10.00, and then reconfigure application failover. For detailed information, see Application Failover and Upgrading to NNMi 10.00 on page 141.
Table 5 Supported NNMi Upgrades
NNMi Version Upgrade to NNMi 10.00
NNMi 9.10 patch 6 or newer Supported
NNMi 9.20 patch 4 or newer Supported
If you are upgrading to NNMi 10.00, you must obtain new license keys from the HP Password Delivery Center. If you do not have the required 10.00 license keys installed before running the NNMi installer or you do not enter the required 10.00 license keys during NNMi installation, the NNMi 10.00 installation does not allow you to proceed. See “Licensing NNMi” in the NNMi 10.00 Interactive Installation Guide for more information about obtaining new license keys.
If you are upgrading from NNMi 9.10 or 9.20 to NNMi 10.00 and you also have the Master or Leaf Collector for the NNM iSPI Performance for Traffic installed on the NNMi management server, you must upgrade to NNMi 9.10 patch 6 (or later) and NNM iSPI Performance for Traffic 9.10 patch 2 (or later) before upgrading to NNMi 10.00. Failure to do so will result in the loss of all traffic data.
If you plan to upgrade an earlier version of NNMi 9.1x to NNMi 10.00, and if that same system had been running NNMi 8.1x at some time in the past, the upgrade might incorrectly set the HostNameMatchManagementIP property to false. The HostNameMatchManagementIP property exists in the nms-disco.properties file. In most cases, you will prefer the value of this property to be true. If you want it to remain true, check this file after the upgrade completes, and correct the value if necessary. The nms-disco.properties file is located in the %nnmdatadir%\shared\nnm\conf\props folder (Windows) or $NnmDataDir/shared/nnm/conf/props directory (UNIX).
Upgrading from NNMi 9.1x or 9.2x to NNMi 10.00 121
Upgrading from NNMi 9.1x or 9.2x to NNMi 10.00
If you added com.sun.management.jmxremote.* properties to any of the properties files in the following directories, NNMi does not retain these values during an upgrade to NNMi 10.00:
• Windows: %NNM_DATA%\shared\nnm\conf\props
• UNIX: $NNM_DATA/shared/nnm/conf/props
If you plan to upgrade an earlier version of NNMi that is running HP-UX or Solaris, see Changing NNMi from HP-UX or Solaris to Linux on page 131.
If you plan to upgrade an earlier version of NNMi that is running under high availability (HA), see High Availability and Upgrading from NNMi 9.1x or NNMi 9.2x to NNMi 10.00 on page 153.
If you plan to upgrade NNMi management servers configured in a global network management environment see Upgrading Global and Regional Managers from NNMi 9.1x or NNMi 9.2x on page 151.
If you plan to upgrade a Linux NNMi management server from NNMi 9.10 patch 6 or NNMi 9.20 patch 4 to NNMi 10.00, you must import the HP public key into the Linux RPM database before installing NNMi 10.00. To do this, point your browser to the following location and follow the instructions: https://h20392.www2.hp.com/portal/swdepot/displayProductInfo.do?productNumber=HPLinuxCodeSigning
If you have NNMi 9.0x integrated with NA 9.00 and plan to upgrade NNMi from NNMi 9.0x to NNMi 9.10, you must disable the NNMi-NA integration and uninstall the NNMi connector before upgrading. To do this, follow the instructions shown in “Integration Configuration Upgraded from NNMi 9.0x” in the NNMi—Network Automation Integration Guide.
NNMi 10.00 ignores any com.sun.management.jmxremote.* properties you add to the properties files in these directories.
If you created a User Group in NNMi 9.2x called globalops, then that group, in NNMi 10.00, will now have access to all topology objects. If that behavior is not what you desire, then you should rename that User Group before upgrading to NNMi 10.00.
Note the following:
• NNMi automatically resynchronizes topology, state, and status following an upgrade.
• Avoid stopping NNMi during the resynchronization. To help ensure resynchronization has completed, NNMi should remain running for several hours following the upgrade. The actual time required depends on the number of nodes and the volume of state changes and trap data received while performing the resynchronization.
If NNMi must be stopped before the resynchronization is finished, the resynchronization should be run again and allowed to complete.
To perform a manual resynchronization of the entire management server, run: nnmnoderediscover.ovpl –all –fullsync
122 NNMi Upgrade Reference

May 2014
If you have edited the java.properties file to change the default behavior of whether the status of existing node components (now called sensors) propagates to the node, you will need to update the java.properties file as described in the following table.
A non-SNMP node that is not reachable generates a Node Down or a Node or Connnection Down incident. The Non-SNMP Node Unresponsive incident is no longer generated.
NNMi uses tenancy to support networks with overlapping address domains that may exist within static Network Address Translation (NAT), dynamic Network Address Translation (NAT), or Port Address Translation (PAT) areas of your network management domain. If you have such networks, note the following with regard to upgrading:
• L2 connections that previously existed for nodes between tenants will be removed.
• Subnets that previously spanned multiple tenants will be split into two (or more) subnets.
• Router Redundancy Groups that previously spanned multiple tenants will be split.
• Any connections between tenants other than the Default Tenant are deleted on upgrade.
• Nodes that were previously considered duplicates across tenants may no longer be considered duplicates.
If you are upgrading from an earlier version of NNMi, note that existing “node components” will be migrated into two different categories of sensors:
• Node Sensors:— CPU— MEMORY— BUFFERS— DISK_SPACE
• Physical Sensors:— FAN— POWER_SUPPLY— TEMPERATURE— VOLTAGE— BACK_PLANE
Upgrading from NNMi 9.1x or 9.2x to NNMi 10.00 123

Upgrading from NNMi 9.1x or 9.2x to NNMi 10.00
There are several upgrade scenarios you could encounter. This section contains the following chapters:
• Upgrading the NNMi Management Server in Place on page 127, which describes the following upgrade scenario:
— Upgrading from NNMi 9.1x or NNMi 9.2x to NNMi 10.00 on the same hardware and operating system.
• Upgrading to a Different NNMi Management Server on page 129, which describes the following upgrade scenario:
— Upgrading from NNMi 9.1x or NNMi 9.2x to NNMi 10.00 on the same version operating system.
• Changing NNMi from HP-UX or Solaris to Linux on page 131. NNMi 10.00 does not support the HP-UX or Solaris operating systems. You must change the operating system to RHEL 6.4 or later before upgrading to NNMi 10.00.
• Moving NNMi to RHEL 6.4 or Later on page 135. Explains how to move from a version of RHEL that is no longer supported to RHEL 6.4 or later.
• Migrating NNMi Oracle Data on page 139. Explains the steps to take to move the Oracle data used by your NNMi management server from one Oracle database instance to another.
• Upgrading Global and Regional Managers from NNMi 9.1x or NNMi 9.2x on page 151. Explains the requirements for upgrading in Global Network Management environments.
Table 1 Update java.properties
9.1x and 9.2x Property Name 10.00 Property Name
com.hp.ov.nms.apa.NodeComponentNoPropagateToNodeStatus_FAN
com.hp.ov.nms.apa.PhysSensorNoPropagateToPhysicalComponentStatus_FAN
NodeComponentNoPropagateToNodeStatus_POWER_SUPPLY
com.hp.ov.nms.apa.PhysSensorNoPropagateToPhysicalComponentStatus_POWER_SUPPLY
com.hp.ov.nms.apa.NodeComponentNoPropagateToNodeStatus_BACKPLANE
com.hp.ov.nms.apa.PhysSensorNoPropagateToPhysicalComponentStatus_BACKPLANE
com.hp.ov.nms.apa.NodeComponentNoPropagateToNodeStatus_MEMORY
com.hp.ov.nms.apa.NodeSensorNoPropagateToNodeStatus_MEMORY
com.hp.ov.nms.apa.NodeComponentPropagateToNodeStatus_VOLTAGE
com.hp.ov.nms.apa.PhysSensorPropagateToPhysicalComponentStatus_VOLTAGE
com.hp.ov.nms.apa.NodeComponentPropagateToNodeStatus_CPU
com.hp.ov.nms.apa.NodeSensorPropagateToNodeStatus_CPU
com.hp.ov.nms.apa.NodeComponentPropagateToNodeStatus_TEMPERATURE
com.hp.ov.nms.apa.PhysSensorPropagateToPhysicalComponentStatus_TEMPERATURE
com.hp.ov.nms.apa.NodeComponentPropagateToNodeStatus_BUFFERS
com.hp.ov.nms.apa.NodeSensorPropagateToNodeStatus_BUFFERS
com.hp.ov.nms.apa.NodeComponentPropagateToNodeStatus_DISK
com.hp.ov.nms.apa.NodeSensorPropagateToNodeStatus_DISK
124 NNMi Upgrade Reference

May 2014
• High Availability and Upgrading from NNMi 9.1x or NNMi 9.2x to NNMi 10.00 on page 153. Explains the requirements for upgrading in High Availability environments.
• Application Failover and Upgrading to NNMi 10.00 on page 141. Explains the requirements for upgrading in Application Failover environments.
• Additional Upgrade Information on page 163. Explains some areas that NNMi 10.00 differs from earlier versions of NNMi.
Upgrading from NNMi 9.1x or 9.2x to NNMi 10.00 125

Upgrading from NNMi 9.1x or 9.2x to NNMi 10.00
126 NNMi Upgrade Reference
Upgrad
May 2014
Upgrading the NNMi
Management Server in Place
ing the NNMi Management Server in Place
This chapter describes the process for upgrading an existing NNMi 9.1x or NNMi 9.2x to NNMi 10.00.
This chapter contains the following topic:
• Upgrade an Existing NNMi Management Server to NNMi 10.00
If your NNMi management server is running Solaris or UNIX operating system, see Changing NNMi from HP-UX or Solaris to Linux.
If your NNMi management server is running an RHEL version earlier than 6.4, see Changing NNMi to RHEL Version 6.4 or Later.
If you plan to move the Oracle data in NNMi to Oracle 11G, see Migrating NNMi Oracle Data
If your NNMi management server is running in an NNMi application failover configuration, see Application Failover and Upgrading from NNMi 9.1x or NNMi 9.2x.
If your NNMi management server is running in a High Availability environment, see. High Availability and Upgrading from NNMi 9.1x or NNMi 9.2x to NNMi 10.00.
If your NNMi management server is running in a Global Network Management environment, see Upgrading Global and Regional Managers from NNMi 9.1x or NNMi 9.2x.
Upgrade an Existing NNMi Management Server to NNMi 10.00
Read the NNMi 10.00 Preinstallation Checklist chapter in the HP Network Node Manager i Software Interactive Installation Guide and Additional Upgrade Information on page 163 before continuing. There are notable changes to the HP Network Node Manager i Software Interactive Installation Guide. For example, if you use an Oracle database instance instead of the embedded database, you should set the FLASHBACK ANY TABLE permission, as this enables NNMi to create restore points during migration.
127

Upgrading from NNMi 9.1x or 9.2x to NNMi 10.00
Read the HP Network Node Manager i Software System and Device Support Matrix for the NNMi software you are upgrading to before continuing. You can obtain a copy of this document at http://h20230.www2.hp.com/selfsolve/manuals. You must have an HP Passport User ID to access this web site.
The following steps explain how to upgrade an NNMi management server to NNMi 10.00. The following steps assume you have NNMi 9.1x patch 6 or NNMi 9.2x patch 4, or later, running on the NNMi management server.
1 Back up the NNMi management server using the nnmbackup.ovpl script. Do this as a precaution, as you would only use this backup in the unlikely event of a failed migration. For more information, see the nnmbackup.ovpl reference page, or the UNIX manpage.
2 Oracle Database Only: If the NNMi management server uses an Oracle database, have your Oracle database administrator back up the NNMi data. As mentioned earlier, have your Oracle database administrator set the FLASHBACK ANY TABLE permission, as this enables NNMi to create restore points during migration
3 Oracle Database Only: Use the nnmconfigexport.ovpl script to back up configuration information from the NNMi management server. Do this as a precaution, as you would only use this backup in the unlikely event of a failed migration. For more information, see the nmconfigexport.ovpl or nnmconfigimport.ovpl reference pages, or the UNIX manpages.
4 Install NNMi 10.00 on the NNMi management server using instructions from the HP Network Node Manager i Software Interactive Installation Guide.
5 Verify that the information from the NNMi management server migrated successfully.
Never edit a file exported with the nnmconfigexport.ovpl script before using the nnmconfigimport.ovpl script to import the file.
Oracle Database Only: If your Oracle database administrator does not set the FLASHBACK ANY TABLE permission, you will see a warning about that missing permission after the install completes. You can ignore this warning.
After upgrading NNMi with the embedded database, and ensuring that the upgrade was successful, check for the existence of the following directory on the NNMi management server:
• Windows: %NnmDataDir%\shared\nnm\databases\Postgres.9.0
• Linux: $NnmDataDir/shared/nnm/databases/Postgres.9.0
If the Postgres.9.0 directory exists on the NNMi management server, you can delete it to free up disk space. Note that this directory might be present even if you are upgrading from a version of NNMi that is newer than NNMi 9.0.
128 NNMi Upgrade Reference

Upgrad
May 2014
Upgrading to a Different NNMi Management
Server
ing to a Different NNMi Management Server
This chapter describes the process for upgrading to NNMi 10.00 on a new system while maintaining the configuration of the existing NNMi management server.
This chapter contains the following topic:
• Upgrade to a Different NNMi Management Server
If your NNMi management server is running the Solaris or UNIX operating system, see Changing NNMi from HP-UX or Solaris to Linux.
If your NNMi management server is running an RHEL version earlier than 6.4, see Changing NNMi to RHEL Version 6.4 or Later.
If you plan to move the Oracle data in NNMi to Oracle 11G, see Migrating NNMi Oracle Data
If your NNMi management server is running in an NNMi application failover configuration, see Application Failover and Upgrading from NNMi 9.1x or NNMi 9.2x.
If your NNMi management server is running in a High Availability environment, see. High Availability and Upgrading from NNMi 9.1x or NNMi 9.2x to NNMi 10.00.
If your NNMi management server is running in a Global Network Management environment, see Upgrading Global and Regional Managers from NNMi 9.1x or NNMi 9.2x.
Upgrade to a Different NNMi Management Server
Read the NNMi 10.00 Preinstallation Checklist chapter in the HP Network Node Manager i Software Interactive Installation Guide and Additional Upgrade Information on page 163 before continuing. There are notable changes to the HP Network Node Manager i Software Interactive Installation Guide. For example, if you use an Oracle database instance instead of the embedded database, you should set the FLASHBACK ANY TABLE permission, as this enables NNMi to create restore points during migration.
129
Upgrading from NNMi 9.1x or 9.2x to NNMi 10.00
The following steps explain how to copy data from an existing NNMi management server to a target NNMi management server. The following steps assume you have NNMi 9.10 patch 6 or NNMi 9.20 patch 4, or later, running on the existing NNMi management server.
1 As a precaution, back up the existing (source) NNMi 9.1x or NNMi 9.2x management server using the nnmbackup.ovpl script. Label this backup for NNMi 9.1x or NNMi 9.2x. For more information, see the nnmbackup.ovpl reference page, or the UNIX manpage for NNMi 9.1x or NNMi 9.2x.
2 If the existing (source) NNMi management server uses an Oracle database, have your Oracle database administrator back up the NNMi 9.1x or NNMi 9.2x data. As mentioned earlier, have your Oracle database administrator set the FLASHBACK ANY TABLE permission, as this enables NNMi to create restore points during migration.
3 Install NNMi 10.00 and the latest consolidated patch (if any) on the source NNMi management server using instructions from the HP Network Node Manager i Software Interactive Installation Guide.
4 Verify that NNMi 10.00 is working correctly on the source NNMi management server.
5 Back up NNMi 10.00 on the source NNMi management server using the nnmbackup.ovpl script. Label this backup for NNMi 10.00. You will need it to copy data to the target NNMi management server. For more information, see the nnmbackup.ovpl reference page, or the UNIX manpage for NNMi 10.00.
6 Install NNMi 10.00 and the latest consolidated patch (if any) on the target NNMi management server using instructions from the HP Network Node Manager i Software Interactive Installation Guide. To migrate the data from step 5, the target NNMi management server must be running the same operating system version. NNMi does not support data migration to an NNMi management server running on a different operating system.
7 Use the nnmrestore.ovpl script to copy NNMi database information to the target server. For more information, see the nnmrestore.ovpl reference page, or the UNIX manpage.
8 Obtain and install a new license on the target NNMi management server.
For information, see “Licensing NNMi” in the NNMi Deployment Reference.
9 Verify that the information from the target NNMi management server migrated successfully from the existing NNMi management server.
If you want to change the Oracle database server, complete that process before or after the upgrade to NNMi 10.00. For information, see Migrating NNMi Oracle Data on page 139.
Oracle Database Only: If your Oracle database administrator does not set the FLASHBACK ANY TABLE permission, you will see a warning about that missing permission after the install completes. You can ignore this warning.
130 NNMi Upgrade Reference

Moving
May 2014
Moving NNMi from the HP-UX or Solaris Operating
System
NNMi from the HP-UX or Solaris Operating System
Use the information in this chapter if you have NNMi 9.10 patch 6 or NNMi 9.20 patch 4 running on an HP-UX or Solaris operating system.
NNMi 10.00 does not support the HP-UX or Solaris operating systems. You must change the operating system to a supported Linux operating system (for example, RHEL 6.4 or SuSE 11sp3) before migrating to NNMi 10.00. See the Read the HP Network Node Manager i Software System and Device Support Matrix for information about the supported operating systems. You can obtain a copy of this document at http://h20230.www2.hp.com/selfsolve/manuals. You must have an HP Passport User ID to access this web site.
This chapter contains the following topic:
Changing NNMi from HP-UX or Solaris to Linux
Changing NNMi from HP-UX or Solaris to Linux
To complete the following steps, you must have NNMi 9.10 patch 6 or NNMi 9.20 patch 4 running on an HP-UX or Solaris server.
To check the NNMi version number, note the current patch level in the Help->About HP Network Node Manager i Software window. Verify that the version is 9.1x, or 9.2x. If the version is earlier than that, do not proceed. You need to install NNMi 9.1x or NNMi 9.2x (latest patch) before proceeding. See Upgrading from NNMi 9.1x or 9.2x to NNMi 10.00 on page 121 for the latest supported patch numbers.
To change an NNMi management server running NNMi 9.1x or NNMi 9.2x (latest patch) from the HP-UX or Solaris operating system, follow these steps:
1 Identify three servers that you will use during this procedure:
• Server A is the current NNMi management server running HP-UX or Solaris.
• Server B will hold the NNMi backup files.
• Server C will become the new NNMi management server running RHEL 6.4 or later.
This NNMi management server CANNOT be the same hardware as the current Server A..
131
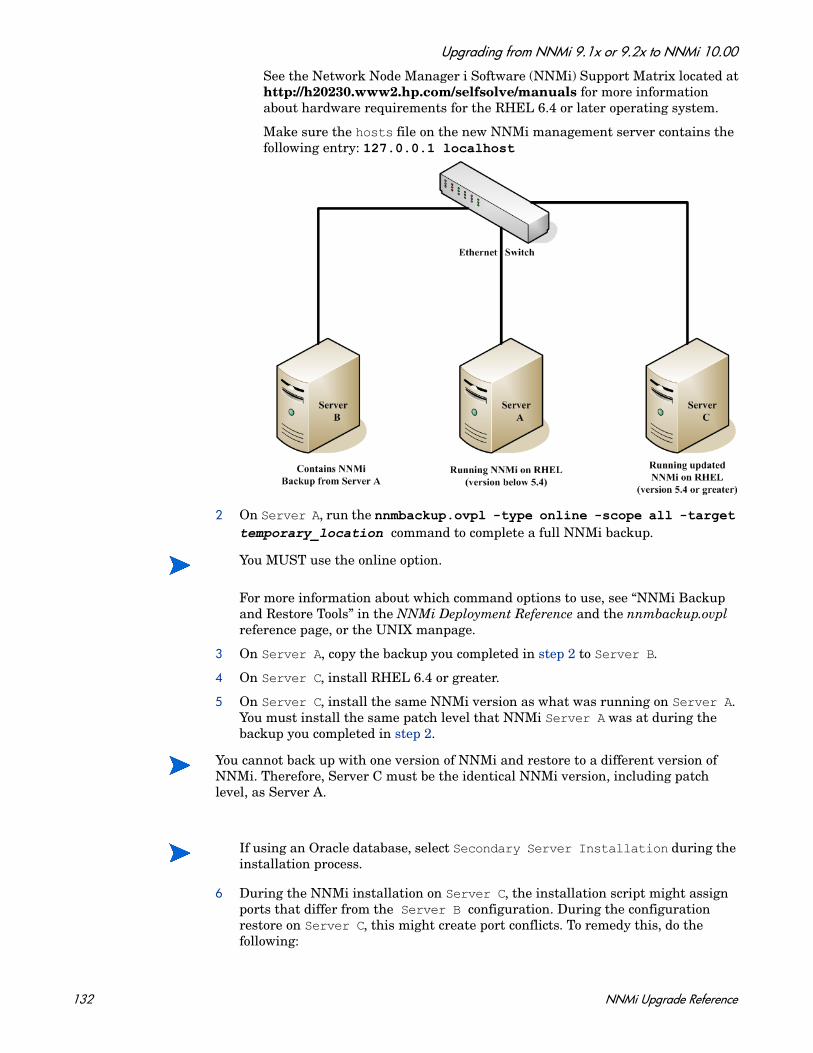
Upgrading from NNMi 9.1x or 9.2x to NNMi 10.00
See the Network Node Manager i Software (NNMi) Support Matrix located at http://h20230.www2.hp.com/selfsolve/manuals for more information about hardware requirements for the RHEL 6.4 or later operating system.
Make sure the hosts file on the new NNMi management server contains the following entry: 127.0.0.1 localhost
2 On Server A, run the nnmbackup.ovpl -type online -scope all -target temporary_location command to complete a full NNMi backup.
For more information about which command options to use, see “NNMi Backup and Restore Tools” in the NNMi Deployment Reference and the nnmbackup.ovpl reference page, or the UNIX manpage.
3 On Server A, copy the backup you completed in step 2 to Server B.
4 On Server C, install RHEL 6.4 or greater.
5 On Server C, install the same NNMi version as what was running on Server A. You must install the same patch level that NNMi Server A was at during the backup you completed in step 2.
6 During the NNMi installation on Server C, the installation script might assign ports that differ from the Server B configuration. During the configuration restore on Server C, this might create port conflicts. To remedy this, do the following:
You MUST use the online option.
You cannot back up with one version of NNMi and restore to a different version of NNMi. Therefore, Server C must be the identical NNMi version, including patch level, as Server A.
If using an Oracle database, select Secondary Server Installation during the installation process.
132 NNMi Upgrade Reference
May 2014
a On Server C, navigate to the following directory: $NNM_CONF/nnm/props/
On Server C, copy the nms-local.properties file to nms-local.properties.save in a temporary location.
b On Server B, copy the NNMi backup to Server C.
c On Server C, run the nnmrestore.ovpl -force -source temporary_location command to complete a full NNMi restore.
For more information about which command options to use, see “NNMi Backup and Restore Tools” in the NNMi Deployment Reference and the nnmrestore.ovpl reference page, or the UNIX manpage.
d On Server C, compare the nms-local.properties.save file from the temporary location to the nms-local.properties file located in the following directory: $NNM_CONF/nnm/props/
Resolve any port conflicts, making changes to the nms-local.properties located in the above directory. Make sure to keep the jboss.http.port (NNMi web server port) and jboss.https.port (NNMi HTTPS web server port) values that were chosen during the NNMi installation on Server C.
e Restart the NNMi management server:
Run the ovstop command on the NNMi management server.
Run the ovstart command on the NNMi management server.
7 NNMi associates its license keys with a server’s IP address. If the IP address for Server C is different from the IP address of Server A, obtain and install new NNMi license keys. See “Changing the IP Address of a Standalone NNMi Management Server” in the NNMi Deployment Reference.
8 On Server C, install NNMi 10.00.
To install NNMi 10.00, see the NNMi 10.00 Interactive Installation Guide available at http://h20230.www2.hp.com/selfsolve/manuals.
If you have NNM iSPIs installed, see the 10.00 installation documentation for each NNM iSPI.
If you have NNM iSPIs installed, you must also re-install the correct version and patch for each NNM iSPI. For more information, see the 9.x installation documentation for each NNM iSPI.
Use the command options that match the backup you completed in step 2.
Before you install NNMi 10.00, you need to obtain 10.00 license keys. See “Licensing NNMi” in the NNMi 10.00 Interactive Installation Guide for more information.
Moving NNMi from the HP-UX or Solaris Operating System 133

Upgrading from NNMi 9.1x or 9.2x to NNMi 10.00
134 NNMi Upgrade Reference

Moving
May 2014
Moving NNMi to RHEL 6.4 or Later
NNMi to RHEL 6.4 or Later
NNMi 10.00 does not support Red Hat Enterprise Linux (RHEL) versions earlier than version 6.4. You must change the operating system to RHEL version 6.4 or later before migrating to NNMi 10.00.
Use the information in this chapter if you have NNMi 9.1x patch 6 or NNMi 9.2x patch 4 running on a RHEL server (5.x), and need to change the operating system to RHEL version 6.4 or later.
This chapter contains the following topic:
Changing NNMi to RHEL Version 6.4 or Later
Changing NNMi to RHEL Version 6.4 or Later
To change an NNMi management server running NNMi 9.1x patch 6 or NNMi 9.2x patch 4 from RHEL (5.x) to RHEL version 6.4 or later, follow these steps:
1 Identify three servers that you will use during this procedure:
• Server A is the current NNMi management server running RHEL (version 5.x).
• Server B will hold the NNMi backup files.
• Server C will become the new NNMi management server running RHEL 6.4 or later. This NNMi management server can be the same hardware as the current Server A.
If you have a version of RHEL that is 6.x, but earlier than 6.4, use the yum update command to update RHEL to version 6.4.
If you are planning to install any of the NNM iSPIs, see the upgrade documentation for each NNM iSPI before proceeding with the NNMi upgrade.
To check the NNMi version number, note the current patch level in the Help->About HP Network Node Manager i Software window.
135

Upgrading from NNMi 9.1x or 9.2x to NNMi 10.00
Make sure the hosts file on the new NNMi management server contains the following entry: 127.0.0.1 localhost
2 On Server A, run the nnmbackup.ovpl -type online -scope all -target temporary_location command to complete a full NNMi backup.
For more information about which command options to use, see “NNMi Backup and Restore Tools” in the NNMi Deployment Reference and the nnmbackup.ovpl reference page, or the Linux manpage.
3 On Server A, copy the backup you completed in step 2 to Server B.
4 On Server C, install RHEL 6.4 or later.
5 On Server C, install the same NNMi version as what was running on Server A. You must install the same patch level that NNMi Server A was at during the backup you completed in step 2.
6 During the NNMi installation on Server C, the installation script might assign ports that differ from the Server B configuration. During the configuration restore on Server C, this might create port conflicts. To remedy this, do the following:
a On Server C, navigate to the following directory: $NNM_CONF/nnm/props/
As an alternative to using Server C, reformat the disk on Server A and install RHEL 6.4 or later. If you do that, substitute Server A for Server C for the remaining steps.
You cannot back up with one version of NNMi and restore to a different version of NNMi. Therefore, Server C must be the identical NNMi version, including patch level, as Server A.
If using an Oracle database, select Secondary Server Installation during the installation process.
136 NNMi Upgrade Reference

May 2014
b On Server C, copy the nms-local.properties file to nms-local.properties.save in a temporary location.
7 On Server B, copy the NNMi backup to Server C.
c On Server C, run the nnmrestore.ovpl -force -source temporary_location command to complete a full NNMi restore.
For more information about which command options to use, see “NNMi Backup and Restore Tools” in the NNMi Deployment Reference and the nnmrestore.ovpl reference page, or the Linux manpage.
d On Server C, compare the nms-local.properties.save file from the temporary location to the nms-local.properties file located in the following directory: $NNM_CONF/nnm/props/
Resolve any port conflicts, making changes to the nms-local.properties located in the above directory. Make sure to keep the jboss.http.port (NNMi web server port) and jboss.https.port (NNMi HTTPS web server port) values that were chosen during the NNMi installation on Server C.
e Restart the NNMi management server:
Run the ovstop command on the NNMi management server.
Run the ovstart command on the NNMi management server.
8 NNMi associates its license keys with a server’s IP address. If the IP address for Server C is different from the IP address of Server A, obtain and install new NNMi license keys. See “Changing the IP Address of a Standalone NNMi Management Server” in the NNMi Deployment Reference.
9 On Server C, install NNMi 10.00.
To install NNMi 10.00, see the NNMi 10.00 Interactive Installation Guide available at http://h20230.www2.hp.com/selfsolve/manuals.
If you have NNM iSPIs installed, see the 10.00 installation documentation for each NNM iSPI.
If you have NNM iSPIs installed, you must also re-install the correct version and patch for each NNM iSPI. For more information, see the 9.x installation documentation for each NNM iSPI.
Use the command options that match the backup you completed in step 2.
Before you install NNMi 10.00, you need to obtain NNMi 10.00 license keys. See “Licensing NNMi” in the NNMi 10.00 Interactive Installation Guide for more information.
Moving NNMi to RHEL 6.4 or Later 137

Upgrading from NNMi 9.1x or 9.2x to NNMi 10.00
138 NNMi Upgrade Reference

Migrati
May 2014
Migrating NNMi Oracle Data
ng NNMi Oracle Data
If you plan to move the Oracle data in NNMi to Oracle 11G. The information in this chapter explains the steps to take to complete this work.
Migrating NNMi Oracle Data
Suppose you have NNMi running in one of the following configurations:
• NNMi 9.1x with the latest patch connected to an Oracle 10G database and you need to upgrade to NNMi 10.00.
• NNMi 9.1x with the latest patch connected to an Oracle 11G database and you need to upgrade to NNMi 10.00.
The Oracle database instance migration you need to complete could include combinations of the following requirements:
• The existing Oracle instance running on NNMi 9.1x can be running Oracle 10G or 11G.
• The new Oracle instance running on NNMi 10.00 must be running Oracle 11G.
• The new Oracle instance can be located on the original server or on a different server and hostname.
To complete the migration of the NNMi Oracle data, complete the following steps:
1 As root or administrator, run the following command to stop NNMi: ovstop –c.
2 Use Oracle tools to move or copy the NNMi data from the existing Oracle server to the new server. Refer to Oracle documentation for additional information.
3 Only complete this step if the new Oracle server has a different hostname than the previous Oracle server. On the NNMi management server, reconfigure NNMi to point to the new Oracle server by completing the following steps:
This Oracle data migration can be an in-place upgrade from Oracle 10 to Oracle 11 on the same server. Oracle provides database migration tools for converting Oracle 10 data into the Oracle 11 format.
139

Upgrading from NNMi 9.1x or 9.2x to NNMi 10.00
a Edit the datasource configuration file shown :
— Windows: %NNM_JBOSS%\server\nms\deploy\nms-ds.xml
— Linux: $NNM_JBOSS/server/nms/deploy/nms-ds.xml
b Change the following attribute to reflect your new server
OLD: <connection-url>jdbc:oracle:thin:@EXISTING_FQDN:EXISTING_ORACLE_PORT:EXISTING_SID </connection-url>
NEW: <connection-url>jdbc:oracle:thin:@NEW_FQDN:NEW_PORT:NEW_SID</connection-url>
4 Complete one of the following actions:
If you are upgrading from NNMi 9.1x or NNMi 9.2x to NNMi 10.00, perform that migration now, following the installation instructions in the HP Network Node Manager i Software Installation Guide.
If you are already using NNMi 10.00, follow these steps to restart NNMi and complete the Oracle database move/migration:
a Run the following command on the NNMi management server to restart NNMi: ovstart -c
b Run the following command on the NNMi management server to check if all of the services are started and operating correctly: ovstatus -v
It is important that you complete the following steps accurately, or jboss will not correctly connect to the Oracle 11G database.
After upgrading to NNMi 10.00, if you want to change your Oracle server, do the following:
1 Stop the NNMi management server using the following command: ovstop
2 Edit the following file:
• Windows: %nnmdatadir%\shared\nnm\conf\props\nnm-server.properties
• Linux: $NnmDataDir/shared/nnm/conf/props/nnm-server.properties
3 Look for three lines that resemble the following:
com.hp.ov.nms.oracle.host = <Oracle server hostname>
com.hp.ov.nms.oracle.port = <Oracle port >
com.hp.ov.nms.oracle.sid = <Oracle SID >
4 Edit the three values to include the values associated with the new Oracle server.
5 Use the nnmchangedbpw.ovpl command to set the Oracle name and password.
6 Start the NNMi management server using the following command: ovstart
140 NNMi Upgrade Reference
Applica
May 2014
Application Failover and Upgrading to NNMi 10.00
tion Failover and Upgrading to NNMi 10.00
Application Failover and Upgrading from NNMi 9.1x or NNMi 9.2x
If you plan to upgrade an earlier version of NNMi that is running in an NNMi application failover configuration, follow the steps in the appropriate section below based on the database you are using.
Embedded Database
To upgrade NNMi management servers configured for application failover and using the embedded database, follow these steps:
1 As a precaution, run the nnmconfigexport.ovpl script on both the active and standby NNMi management servers before proceeding. For information, see “Best Practice: Save the Existing Configuration” in the NNMi Deployment Reference.
As a precaution, back up your NNMi data on both the active and standby NNMi management servers before proceeding. For information, see “Backup Scope” in the NNMi Deployment Reference.
2 Complete the following steps on the active NNMi management server. Note that NNMi must be running for the following nnmcluster steps to work. Completing these steps will speed up the standby NNMi management server startup shown in step 6 on page 142:
a Run the nnmcluster command.
b After NNMi prompts you, type dbsync, then press Enter. Review the displayed information to make sure it includes the following messages:
ACTIVE_DB_BACKUP: This means that the active NNMi management server is performing a new backup.ACTIVE_NNM_RUNNING: This means that the active NNMi management server completed the backup referred to by the previous message.STANDBY_RECV_DBZIP: This means that the standby NNMi management
141

Upgrading from NNMi 9.1x or 9.2x to NNMi 10.00
server is receiving a new backup from the active NNMi management server. STANDBY_READY: This means that the standby NNMi management server is ready to perform if the active NNMi management server fails.
c Run exit or quit to stop the interactive nnmcluster process you started in step a.
3 Run the nnmcluster -shutdown command on the standby NNMi management server. This shuts down all nnmcluster processes on the standby NNMi management server.
4 To verify there are no nnmcluster nodes running on the standby NNMi management server, complete the following steps on the standby NNMi management server.
a Run the nnmcluster command.
b Verify that there are no (LOCAL) nnmcluster nodes present except the one marked (SELF). There might be one or more (REMOTE) nodes present.
c Run exit or quit to stop the interactive nnmcluster process you started in step a.
5 Complete the following steps on the standby NNMi management server to temporarily disable application failover:
a Edit the following file:
– Windows: %NNM_SHARED_CONF%\props\nms-cluster.properties
– Linux: $NNM_SHARED_CONF/props/nms-cluster.properties
b Comment out the com.hp.ov.nms.cluster.name parameter.
c Save your changes.
6 If you are upgrading from 9.2x to 10.00, create the following file:
Windows: %nnmDataDir%/tmp/postgresTriggerFile
Linux: $nnmDataDir/tmp/postgresTriggerFile
7 Start, then stop processes on the standby NNMi management server.
a Run the ovstart command on the standby NNMi management server. Running the ovstart command causes the standby NNMi management server to import the transaction logs from the active NNMi management server.
b After the ovstart command completes, run the ovstatus -v command. All NNMi services should show the state RUNNING.
c Run the ovstop command on the standby NNMi management server.
8 Upgrade the standby NNMi management server to NNMi 10.00 using the instructions located in the HP Network Node Manager i Software Interactive Installation Guide.
Note the following:
— The file must not have a .txt extension.
— The file is empty and removed by Postgres when it starts.
You must upgrade all of the iSPIs that you have installed on the standby NNMi management server to iSPI versions that support NNMi 10.00.
142 NNMi Upgrade Reference

May 2014
You now have the former active NNMi management server running NNMi 9.1x or NNMi 9.2x and the former standby NNMi management server running NNMi 10.00. You have both of these NNMi management servers running independently with no database synchronization. That means you have both NNMi management servers monitoring the network in parallel. Do not leave these NNMi management servers in this configuration for more than a few hours, as this configuration is a violation of the non-production license installed on the former standby node.
To complete the upgrade, and remedy this situation, select a time to upgrade the former active node to NNMi 10.00. Have the operators temporarily use the former standby node to monitor the network while you complete the upgrade.
The remainder of this procedure assumes you plan to retain the database information from the former active node and discard the database information from the former standby node.
9 Run the nnmcluster -halt command on the former active NNMi management server.
10 To verify there are no nnmcluster nodes running on the former active NNMi management server, complete the following steps on the former active NNMi management server.
a Run the nnmcluster command.
b Verify that there are no (LOCAL) nnmcluster nodes present except the one marked (SELF). There might be one or more (REMOTE) nodes present.
c Run exit or quit to stop the interactive nnmcluster process you started in step a.
11 Complete the following steps on the former active NNMi management server to temporarily disable application failover:
a Edit the following file:
— Windows: %NNM_SHARED_CONF%\props\nms-cluster.properties
— Linux: $NNM_SHARED_CONF/props/nms-cluster.properties
b Comment out the com.hp.ov.nms.cluster.name parameter.
Upgrade the former active NNMi management server to NNMi 10.00 using the instructions located in the HP Network Node Manager i Software Interactive Installation Guide.
Now you have two servers running NNMi 10.00, but they are still independent since the databases are not synchronized.
12 Complete the following steps on the former active NNMi management server:
a Run the ovstop command.
b Edit the following file:
— Windows: %NNM_SHARED_CONF%\props\nms-cluster.properties
— Linux: $NNM_SHARED_CONF/props/nms-cluster.properties
You must upgrade all of the iSPIs that you have installed on the former active NNMi management server to iSPI versions that support NNMi 10.00.
Application Failover and Upgrading to NNMi 10.00 143

Upgrading from NNMi 9.1x or 9.2x to NNMi 10.00
c Type in the value of the com.hp.ov.nms.cluster.name parameter.
d Uncomment the com.hp.ov.nms.cluster.name parameter.
e Save your changes.
13 Run either the ovstart or nnmcluster -daemon command on the former active NNMi management server. It is now the active node.
14 Instruct the operators to begin using the active node to monitor the network.
15 Complete the following steps on the former standby NNMi management server:
a Run the ovstop command.
b Edit the following file:
— Windows: %NNM_SHARED_CONF%\props\nms-cluster.properties
— Linux: $NNM_SHARED_CONF/props/nms-cluster.properties
c Type in the value of the com.hp.ov.nms.cluster.name parameter.
d Uncomment the com.hp.ov.nms.cluster.name parameter.
e Save your changes.
16 Run either the ovstart or nnmcluster -daemon command on the former standby NNMi management server.
This NNMi management server becomes the standby node, and receives a copy of the database from the active node.
17 If you installed the NNM iSPI Performance for QA, the NNM iSPI Performance for Metrics, or the NNM iSPI Performance for Traffic; are using the application failover feature; and completed the upgrade process shown above, run the NNM iSPI enablement script for each NNM iSPI on both the active and standby NNMi management servers.
Oracle Database
To upgrade NNMi management servers configured for application failover and using an Oracle database, follow these steps:
1 As a precaution, run the nnmconfigexport.ovpl script on both the active and standby NNMi management servers before proceeding. For information, see ”Best Practice: Save the Existing Configuration” in the NNMi Deployment Reference.
2 As a precaution, back up your NNMi data on both the active and standby NNMi management servers before proceeding. For information, see ”Backup Scope” in the NNMi Deployment Reference.
The NNMi upgrade procedure does not preserve commented-out properties. Therefore, you must retype the cluster name.
The former standby NNMi management server discards all of the database activity occurring during the maintenance window, from step 9 on page 143 through step 13 on page 144.
You must upgrade NNMi management servers separately because two NNMi management servers cannot be simultaneously connected to the same Oracle database.
144 NNMi Upgrade Reference
May 2014
3 Run the nnmcluster -halt command on the standby NNMi management server. This shuts down all nnmcluster processes on both the active and standby NNMi management server.
4 To verify there are no nnmcluster nodes running on either the active or standby NNMi management server, complete the following steps on the standby NNMi management server.
a Run the nnmcluster command.
b Verify that the only nnmcluster node present is one marked (SELF).
c Run exit or quit to stop the interactive nnmcluster process you started in step a.
5 Complete the following steps on the standby NNMi management server to temporarily disable application failover:
a Edit the following file:
• Windows: %NNM_SHARED_CONF%\props\nms-cluster.properties
• Linux: $NNM_SHARED_CONF/props/nms-cluster.properties
b Comment out the com.hp.ov.nms.cluster.name parameter.
c Save your changes.
6 Upgrade the standby NNMi management server to NNMi 10.00 using the instructions located in the HP Network Node Manager i Software Interactive Installation Guide.
You now have the former standby NNMi management server with NNMi 10.00 installed, and the former active NNMi management server with NNMi 9.1x or NNMi 9.2x installed.
7 Run the ovstop command on the former standby NNMi management server to disconnect the NNMi management server from the Oracle database.
8 Complete the following steps on the former active NNMi management server to temporarily disable application failover:
a Edit the following file:
— Windows: %NNM_SHARED_CONF%\props\nms-cluster.properties
— Linux: $NNM_SHARED_CONF/props/nms-cluster.properties
b Comment out the com.hp.ov.nms.cluster.name parameter.
9 Upgrade the former active NNMi management server to NNMi 10.00 using the instructions located in the HP Network Node Manager i Software Interactive Installation Guide.
Now you have two servers with NNMi 10.00 installed.
10 Complete the following steps on the former active NNMi management server:
a Run the ovstop command.
b Edit the following file:
You must upgrade all of the iSPIs that you have installed on the standby NNMi management server to iSPI versions that support NNMi 10.00.
You must upgrade all of the iSPIs that you have installed on the former active NNMi management server to iSPI versions that support NNMi 10.00.
Application Failover and Upgrading to NNMi 10.00 145
Upgrading from NNMi 9.1x or 9.2x to NNMi 10.00
— Windows: %NNM_SHARED_CONF%\props\nms-cluster.properties
— Linux: $NNM_SHARED_CONF/props/nms-cluster.properties
c Type in the value of the com.hp.ov.nms.cluster.name parameter.
d Uncomment the com.hp.ov.nms.cluster.name parameter.
e Save your changes.
11 Run the ovstart or nnmcluster -daemon command on the former active NNMi management server. It is now the active node.
12 Complete the following steps on the former standby NNMi management server:
f Edit the following file:
— Windows: %NNM_SHARED_CONF%\props\nms-cluster.properties
— Linux: $NNM_SHARED_CONF/props/nms-cluster.properties
g Type in the value of the com.hp.ov.nms.cluster.name parameter.
h Uncomment the com.hp.ov.nms.cluster.name parameter.
i Save your changes.
13 Run either the ovstart or nnmcluster -daemon command on the former standby NNMi management server.
This NNMi management server becomes the standby node.
14 If you installed the NNM iSPI Performance for QA, the NNM iSPI Performance for Metrics, or the NNM iSPI Performance for Traffic; are using the application failover feature; and completed the upgrade process shown above, run the NNM iSPI enablement script for each NNM iSPI on both the active and standby NNMi management servers.
Application Failover and NNMi Patches
Both NNMi management servers must be running the same NNMi version and patch level. To add patches to the active and standby NNMi management servers, use one of the following procedures:
• Applying Patches for Application Failover (Shut Down Both Active and Standby)Use this procedure when you are not concerned with an interruption in network monitoring.
• Applying Patches for Application Failover (Keep One Active NNMi Management Server)Use this procedure when must avoid any interruptions in network monitoring.
The NNMi upgrade procedure does not preserve commented-out properties. Therefore, you must retype the cluster name.
146 NNMi Upgrade Reference

May 2014
Applying Patches for Application Failover (Shut Down Both Active and Standby)
This procedure results in both NNMi management servers being non-active for some period of time during the patch process. To apply patches to the NNMi management servers configured for application failover, follow these steps:
1 As a precaution, run the nnmconfigexport.ovpl script on both the active and standby NNMi management servers before proceeding. For information, see ”Best Practice: Save the Existing Configuration” in the NNMi Deployment Reference.
2 As a precaution, back up your NNMi data on both the active and standby NNMi management servers before proceeding. For information, see ”Backup Scope” in the NNMi Deployment Reference.
3 As a precaution, on the active NNMi management server, do the following steps:
a Run the nnmcluster command.
b Embedded database only: After NNMi prompts you, type dbsync, then press Enter. Review the displayed information to make sure it includes the following messages:
ACTIVE_DB_BACKUP: This means that the active NNMi management server is performing a new backup.ACTIVE_NNM_RUNNING: This means that the active NNMi management server completed the backup referred to by the previous message.STANDBY_READY: This shows the previous status of the standby NNMi management server.STANDBY_RECV_DBZIP: This means that the standby NNMi management server is receiving a new backup from the active NNMi management server. STANDBY_READY: This means that the standby NNMi management server is ready to perform if the active NNMi management server fails.
4 Run the nnmcluster -halt command on the active NNMi management server. This shuts down all nnmcluster processes on both the active and standby NNMi management servers.
5 To verify there are no nnmcluster nodes running on either server, complete the following steps on both the active and standby NNMi management servers.
a Run the nnmcluster command.
b Verify that there are no nnmcluster nodes present except the one marked (SELF).
c Run exit or quit to stop the interactive nnmcluster process you started in step a.
6 On the active NNMi management server, comment out the com.hp.ov.nms.cluster.name parameter in the nms-cluster.properties file.
a Edit the following file:
— Windows: %NNM_SHARED_CONF%\props\nms-cluster.properties
— Linux: $NNM_SHARED_CONF/props/nms-cluster.properties
b Comment out the com.hp.ov.nms.cluster.name parameter.
c Save your changes.
7 Apply the NNMi patch to the active NNMi management server using the instructions provided with the patch.
Application Failover and Upgrading to NNMi 10.00 147

Upgrading from NNMi 9.1x or 9.2x to NNMi 10.00
8 On the active NNMi management server, uncomment the com.hp.ov.nms.cluster.name parameter in the nms-cluster.properties file.
a Edit the following file:
— Windows: %NNM_SHARED_CONF%\props\nms-cluster.properties
— Linux: $NNM_SHARED_CONF/props/nms-cluster.properties
b Uncomment the com.hp.ov.nms.cluster.name parameter.
c Save your changes.
9 Run the ovstart command on the active NNMi management server.
10 Verify that the patch installed correctly on the active NNMi management server by viewing information on the Product tab of the Help > System Information window in the NNMi console.
11 Run the nnmcluster -dbsync command to create a new backup.
12 On the standby NNMi management server, comment out the com.hp.ov.nms.cluster.name parameter in the nms-cluster.properties file as shown in step a on page 147 through step c on page 147.
13 Apply the NNMi patch to the standby NNMi management server.
14 On the standby NNMi management server, uncomment the com.hp.ov.nms.cluster.name parameter in the nms-cluster.properties file as shown in step a on page 148 through step c on page 148.
15 Run the ovstart command on the standby NNMi management server.
16 If you installed the NNM iSPI Performance for QA, the NNM iSPI Performance for Metrics, or the NNM iSPI Performance for Traffic; are using the application failover feature; and completed the patch process shown above, run the NNM iSPI enablement script for each NNM iSPI on both the active and standby NNMi management servers.
Applying Patches for Application Failover (Keep One Active NNMi Management Server)
This procedure results in one NNMi management server always being active during the patch process.
To apply NNMi patches to the NNMi management servers configured for application failover, follow these steps:
1 As a precaution, run the nnmconfigexport.ovpl script on both the active and standby NNMi management servers before proceeding. For information, see ”Best Practice: Save the Existing Configuration” in the NNMi Deployment Reference.
2 As a precaution, back up your NNMi data on both the active and standby NNMi management servers before proceeding. For information, see ”Backup Scope” in the NNMi Deployment Reference.
3 Run nnmcluster on one of the nodes.
This process results in continuous monitoring of the network, however NNMi loses the transaction logs occurring during this patch process.
148 NNMi Upgrade Reference
May 2014
4 Enter dbsync on the NNMi management server used in the previous step to synchronize the two databases.
5 Wait until the active NNMi management server reverts to ACTIVE_NNM_RUNNING and the standby NNMi management server reverts to STANDBY_READY. before continuing.
6 Exit or quit from the nnmcluster command.
7 Stop the cluster on the standby NNMi management server by running the following command on the standby NNMi management server:nnmcluster -shutdown
8 Make sure the following processes and services terminate before continuing:
— postgres
— ovjboss
9 Make sure the nnmcluster process terminates before continuing. If the nnmcluster process will not terminate, manually kill the nnmcluster process only as a last resort.
10 Edit the following file on the standby NNMi management server:
Windows: %nnmDataDir%\shared\nnm\conf\props\nms-cluster.properties
Linux: $nnmDataDir/shared/nnm/conf/props/nms-cluster.properties
11 Comment out the cluster name by placing a # at the front of the line, then save your changes:#com.hp.ov.nms.cluster.name = NNMicluster
12 Install the NNMi patch on the standby NNMi management server.
13 At this point, the standby NNMi management server is patched but stopped, and the active NNMi management server is unpatched but running. Stop the active NNMi management server and immediately bring the standby NNMi management server online to monitor your network.
14 Shut down the cluster on the active NNMi management server by running the following command on the activeNNMi management server:nnmcluster -halt
15 Make sure the nnmcluster process terminates. If it does not terminate within a few minutes, manually kill the nnmcluster process.
16 On the standby NNMi management server, uncomment the cluster name from the nms-cluster.properties file.
17 If you are upgrading from 9.2x to 10.00, create the following file:
Windows: %nnmDataDir%/tmp/postgresTriggerFile
Linux: $nnmDataDir/tmp/postgresTriggerFile
The dbsync option works on an NNMi management server using the embedded database. Do not use the dbsync option on an NNMi management server configured to use an Oracle database.
Note the following:
— The file must not have a .txt extension.
— The file is empty and removed by Postgres when it starts.
Application Failover and Upgrading to NNMi 10.00 149

Upgrading from NNMi 9.1x or 9.2x to NNMi 10.00
18 Start the cluster on the standby NNMi management server by running the following command on the standby NNMi management server:nnmcluster -daemon
19 Install the NNMi patch on the active NNMi management server.
20 At this point, the previous active NNMi management server is patched but offline. Bring it back into the cluster (as the standby NNMi management server) by performing the following:
a Uncomment the entry in the nms-cluster.properties file on the active NNMi management server.
b Start the active NNMi management server using the following command:nnmcluster -daemon
21 To monitor the progress, run the following command on both the active and standby NNMi management servers:nnmcluster
Wait until the previous active NNMi management server finishes retrieving the database from the previous standby NNMi management server.
22 After the previous active NNMi management server displays STANDBY_READY, run the following command on the previous active NNMi management server:nnmcluster -acquire
23 If you installed the NNM iSPI Performance for QA, the NNM iSPI Performance for Metrics, or the NNM iSPI Performance for Traffic; are using the application failover feature; and completed the patch process shown above, run the NNM iSPI enablement script for each NNM iSPI on both the active and standby NNMi management servers.
150 NNMi Upgrade Reference

Upgrad
May 2014
Upgrading Global and Regional
Managers from NNMi 9.1x or NNMi 9.2x
ing Global and Regional Managers from NNMi 9.1x o
NNMi Versions Supported by Global Network Management
To achieve the best results, the global manager must be the same NNMi version and patch level as the regional manager.
Global Network Management Upgrade Steps
The procedure for upgrading to NNMi 10.00 in a global network management environment depends on whether you are upgrading from NNMi 9.1x or NNMi 9.2x. See the following procedures, based on your particular upgrade scenario:
Upgrading from NNMi 9.1x to NNMi 10.00
1 Upgrade the regional managers to NNMi 10.00 and ensure proper operation. The global manager stays disconnected during the regional upgrades.
2 Upgrade the global manager to NNMi 10.00.
3 After the global manager and regional managers are upgraded, the global manager performs a full resynchronization to obtain all events that occurred while the connection between the global manager and the regional managers was down. The effect is the same as if the administrator were to issue nnmnoderediscover.ovpl -all -fullsync from the global manager. See the nnmnoderediscover.ovpl reference page or the UNIX manpage for more information.
HP does not support a regional manager running NNMi 9.1x or NNMi 9.2x connected to a global manager running NNMi 10.00. The global manager and regional managers must be running the same NNMi version.
r NNMi 9.2x 151

Upgrading from NNMi 9.1x or 9.2x to NNMi 10.00
Upgrading from NNMi 9.2x to NNMi 10.00
1 Upgrade the global manager to NNMi 10.00.
2 Upgrade the regional managers to NNMi 10.00 and ensure proper operation. The global manager stays connected during the regional upgrades; however, for some objects (for example, cards and node components), the global manager will not receive any changes from the regional manager until the regional manager is upgraded.
Note the following:
• NNMi automatically resynchronizes topology, state, and status following an upgrade.
• Avoid stopping NNMi during the resynchronization. To help ensure resynchronization has completed, NNMi should remain running for several hours following the upgrade. The actual time required depends on the number of nodes and the volume of state changes and trap data received while performing the resynchronization.
If NNMi must be stopped before the resynchronization is finished, the resynchronization should be run again and allowed to complete.
To perform a manual resynchronization of the entire management server, run: nnmnoderediscover.ovpl –all –fullsync
If you are upgrading from NNMi 9.1x or NNMi 9.2x, any existing configurations for layer 2 connectivity of unnumbered interfaces will be migrated automatically.
152 NNMi Upgrade Reference

High Av
May 2014
High Availability and Upgrading
from NNMi 9.1x or NNMi 9.2x to NNMi 10.00
ailability and Upgrading from NNMi 9.1x or NNMi 9.
Follow the appropriate procedure for your environment:
• Upgrade NNMi with the Embedded Database on all Supported Operating Systems on page 153
• Upgrade NNMi with Oracle on all Supported Operating Systems on page 156
Upgrade NNMi with the Embedded Database on all Supported Operating Systems
Upgrading NNMi includes upgrading the Postgres database software to a newer version. For this reason, NNMi must be taken out of operation for the duration of the upgrade process.
To upgrade from NNMi 9.1x or NNMi 9.2x under HA to NNMi 10.00 under HA, upgrade the active node to update the embedded database, and then upgrade the passive node while NNMi is still in maintenance mode. Follow these steps:
1 Ensure that the NNMi 9.1x or NNMi 9.2x configuration is consistent across all HA nodes by forcing a failover, in turn, to each of the passive nodes.
2 For NNMi 9.1x, ensure that all nodes are running NNMi 9.10 patch 6 or a higher version. For NNMi 9.20, use patch 4 or higher.
If necessary, upgrade each system to the appropriate consolidated patch.
3 Check the ov.conf files on both systems to ensure that they have the correct values. The ov.conf file is available in the following location:
• Windows: %NnmDataDir%\shared\nnm\conf
• Linux: $NnmDataDir/shared/nnm/conf
4 Determine which node in the NNMi 9.1x or NNMi 9.2x HA cluster is active:
• Windows:
NNMi will be unavailable for approximately 30 to 60 minutes during this upgrade procedure.
2x to NNMi 10.00 153

Upgrading from NNMi 9.1x or 9.2x to NNMi 10.00
%NnmInstallDir%\misc\nnm\ha\nnmhaclusterinfo.ovpl \-group <resource_group> -activeNode
• Linux:
$NnmInstallDir/misc/nnm/ha/nnmhaclusterinfo.ovpl \-group <resource_group> -activeNode
The remainder of this procedure refers to the currently active node as server X and the currently passive node as server Y.
5 For Windows systems, perform the following:
a On server X, stop the <resource group>-app resource.
b Check the Access Control Lists (ACLs) on the file %NnmDataDir%\hacluster\<resource group>\hamscs.vbs (be sure to remember these).
c Save the hamscs.vbs file.
d Copy the %NnmInstallDir%\misc\nnm\ha\nnmhamscs.vbs script to a temporary directory where you can edit the file.
e Open the copy of the nnmhamscs.vbs file and change all references for product_name to be NNM. You can reference the original script for the value. Save the nnmhamscs.vbs file.
f As Administrator, copy the updated nnmhamscs.vbs script to %NnmDataDir%\hacluster\<resource group>\hamscs.vbs.
g Check the ACLs again to ensure that they are the same as before.
h Start the <resource group>-app resource.
i Verify that the resource comes online. If not, check the cluster logs to see if there are any syntax errors. (You can use the following command to generate a cluster log: cluster log /gen. If you must specify a folder, you can do so using the following syntax: cluster log /gen /copy:<my folder>.)
6 On server X, disable HA resource group monitoring by creating the following maintenance file:
• Windows:
%NnmDataDir%\hacluster\<resource_group>\maintenance
• Linux:
$NnmDataDir/hacluster/<resource_group>/maintenance
The file can be empty.
7 On server X, to stop NNMi processes, enter the following command:
ovstop
8 On server X, upgrade NNMi:
a Run the NNMi installer as described in the HP Network Node Manager i Software Interactive Installation Guide.
The database upgrade occurs during this step.
b To verify that the upgrade completed correctly, enter the following command:
Ensure that the maintenance file does not have a .txt extension, which can occur if the file has been edited with a text editor, such as Notepad.
154 NNMi Upgrade Reference

May 2014
ovstatus
All NNMi services should show the state RUNNING.
c Upgrade all add-on NNM iSPIs to version 10.00.
For information, see the documentation for each NNM iSPI.
9 For Windows systems, do the following:
a Copy the updated nnmhamscs.vbs script (see step f within step 5) from Server X to %NnmDataDir%\hacluster\<resource group>\hamscs.vbs on Server Y.
b Check the ACLs to ensure that they are the same as before.
10 On server X, run the following command: nnmhadisk.ovpl NNM -replicate <HA_mount_point>.
11 On server Y, disable HA resource group monitoring by creating the following maintenance file:
• Windows:
%NnmDataDir%\hacluster\<resource_group>\maintenance
• Linux:
$NnmDataDir/hacluster/<resource_group>/maintenance
The file can be empty.
12 On server Y, upgrade NNMi:
a Run the NNMi installer as described in the HP Network Node Manager i Software Interactive Installation Guide.
b To verify that the upgrade completed correctly, enter the following command:
ovstatus
All NNMi services should show the state RUNNING.
c Upgrade all add-on NNM iSPIs to version 10.00.
For information, see the documentation for each NNM iSPI.
13 If the HA cluster includes multiple passive nodes, repeat step 12 for each passive node.
14 On server X, delete the maintenance file:
• Windows:
%NnmDataDir%\hacluster\<resource_group>\maintenance
• Linux:
$NnmDataDir/hacluster/<resource_group>/maintenance
15 Perform the following post-installation steps:
a Verify that the following variables are set:
If your environment includes standalone NNM iSPIs, you must also upgrade those products to version 10.00 for correct functionality. You can complete those upgrades after completing this procedure.
Ensure that the maintenance file does not have a .txt extension, which can occur if the file has been edited with a text editor, such as Notepad.
High Availability and Upgrading from NNMi 9.1x or NNMi 9.2x to NNMi 10.00 155

Upgrading from NNMi 9.1x or 9.2x to NNMi 10.00
NNM_INTERFACE
HA_MOUNT_POINT
NNM_ADD_ON_PRODUCTS
HA_LOCALE (not required if running in C)
These variables are defined in the following locations:
Veritas:
/opt/VRTSvcs/bin/hagrp -display | grep UserStrGlobal
Windows: Using regedit, the values are in the following location:
HKEY_LOCAL_MACHINE\Cluster\Groups\<group>\Parameters
b If the variables are not set, you can run the following commands for each missing value:
/opt/OV/misc/nnm/ha/nnmhaclusterinfo.ovpl -config NNM -set NNM_INTERFACE <value for NNM_INTERFACE>
/opt/OV/misc/nnm/ha/nnmhaclusterinfo.ovpl -config NNM -set HA_MOUNT_POINT <value for HA_MOUNT_POINT>
/opt/OV/misc/nnm/ha/nnmhaclusterinfo.ovpl -config NNM -set NNM_ADD_ON_PRODUCTS <value for NNM_ADD_ON_PRODUCTS>
/opt/OV/misc/nnm/ha/nnmhaclusterinfo.ovpl -config NNM -set HA_LOCALE <value for HA_LOCALE>
16 For all Linux HA upgrades, run the following sets of commands, as applicable for your system:
— RHEL:
rm /etc/rc.d/rc*.d/S98netmgt
rm /etc/rc.d/rc*.d/K01netmgt
— SuSE:
rm /etc/init.d/rc*.d/S98netmgt
rm /etc/init.d/rc*.d/K01netmgt
Upgrade NNMi with Oracle on all Supported Operating Systems
To upgrade NNMi for HA in an Oracle environment, follow the procedure described in Upgrade NNMi with the Embedded Database on all Supported Operating Systems on page 153.
HA_LOCALE is only needed if you are attempting to use a localized language.
When using Windows Server 2008 R2, the Network Name resource may have the name "Network Name". This name should be the short name for the virtual IP address. If applicable, change the name as follows:
1 Using Failover Cluster Management, select the Network Name resource.
2 Right-click and select Properties.
3 Change the name.
156 NNMi Upgrade Reference

May 2014
Unconfiguring NNMi from an HA Cluster
The process of removing an NNMi node from an HA cluster involves undoing the HA configuration for that instance of NNMi. You can then run that instance of NNMi as a standalone management server, or you can uninstall NNMi from that node.
If you want to keep NNMi configured for high availability, the HA cluster must contain one node that is actively running NNMi and at least one passive NNMi node. If you want to completely remove NNMi from the HA cluster, unconfigure the HA functionality on all nodes in the cluster.
To completely unconfigure NNMi from an HA cluster, follow these steps:
1 Determine which node in the HA cluster is active. On any node, run the following command:
• Windows:
%NnmInstallDir%\misc\nnm\ha\nnmhaclusterinfo.ovpl \-group <resource_group> -activeNode
• UNIX:
$NnmInstallDir/misc/nnm/ha/nnmhaclusterinfo.ovpl \-group <resource_group> -activeNode
2 On each passive node, unconfigure any add-on NNM iSPIs from the HA cluster.
For information, see the documentation for each NNM iSPI.
3 On any node in the HA cluster, verify that the add-on NNM iSPIs on all passive nodes have been unconfigured from the HA cluster:
• Windows:
%NnmInstallDir%\misc\nnm\ha\nnmhaclusterinfo.ovpl \-config NNM -get NNM_ADD_ON_PRODUCTS
• UNIX:
$NnmInstallDir/misc/nnm/ha/nnmhaclusterinfo.ovpl \-config NNM -get NNM_ADD_ON_PRODUCTS
The command output lists the add-on iSPI configurations in the format <iSPI_PM_Name>[hostname_list]. For example:
PerfSPIHA[hostname1, hostname2]
At this time, only the active node hostname should appear in the output. If a passive node hostname appears in the output, repeat step 2 until this command output includes only the active node hostname.
4 On each passive node, unconfigure NNMi from the HA cluster:
• Windows:
%NnmInstallDir%\misc\nnm\ha\nnmhaunconfigure.ovpl NNM \<resource_group>
• UNIX:
$NnmInstallDir/misc/nnm/ha/nnmhaunconfigure.ovpl NNM \<resource_group>
This command removes access to the shared disk but does not unconfigure the disk group or the volume group.
High Availability and Upgrading from NNMi 9.1x or NNMi 9.2x to NNMi 10.00 157

Upgrading from NNMi 9.1x or 9.2x to NNMi 10.00
5 On each passive node, move the NNMi HA resource group-specific files to a separate location for safe-keeping:
• MSFC: In Windows Explorer, delete the %NnmDataDir%\hacluster\<resource_group>\ folder.
• VCS:
rm -rf /var/opt/OV/hacluster/<resource_group>
• RHCS:
rm -rf /var/opt/OV/hacluster/<resource_group>
6 On the active node, unconfigure any add-on NNM iSPIs from the HA cluster.
For information, see the documentation for each NNM iSPI. On any node in the HA cluster, verify that the add-on NNM iSPIs on all nodes have been unconfigured from the HA cluster:
• Windows:
%NnmInstallDir%\misc\nnm\ha\nnmhaclusterinfo.ovpl \-config NNM -get NNM_ADD_ON_PRODUCTS
• UNIX:
$NnmInstallDir/misc/nnm/ha/nnmhaclusterinfo.ovpl \-config NNM -get NNM_ADD_ON_PRODUCTS
If any hostname appears in the output, repeat step 6 until this command output indicates that no iSPIs are configured.
7 On the active node, stop the NNMi HA resource group:
• Windows:
%NnmInstallDir%\misc\nnm\ha\nnmhastoprg.ovpl NNM \<resource_group>
• UNIX:
$NnmInstallDir/misc/nnm/ha/nnmhastoprg.ovpl NNM \<resource_group>
This command does not remove access to the shared disk. Nor does it unconfigure the disk group or the volume group.
8 On the active node, unconfigure NNMi from the HA cluster:
• Windows:
%NnmInstallDir%\misc\nnm\ha\nnmhaunconfigure.ovpl NNM \<resource_group>
• UNIX:
$NnmInstallDir/misc/nnm/ha/nnmhaunconfigure.ovpl NNM \<resource_group>
This command removes access to the shared disk but does not unconfigure the disk group or the volume group.
If you do not plan to reconfigure the NNMi HA resource group, you do not need to save a copy of these files, and you can delete them at this time.
158 NNMi Upgrade Reference

May 2014
9 On the active node, move the NNMi HA resource group-specific files to a separate location for safe-keeping:
• MSFC: In Windows Explorer, delete the %NnmDataDir%\hacluster\<resource_group>\ folder.
• VCS:
rm -rf /var/opt/OV/hacluster/<resource_group>
• RHCS:
rm -rf /var/opt/OV/hacluster/<resource_group>
10 Unmount the shared disk.
• If you want to reconfigure the NNMi HA cluster at some point, you can keep the disk in its current state.
• If you want to use the shared disk for another purpose, copy all data that you want to keep (as described in Running NNMi Outside HA with the Existing Database on page 159), and then use the HA product commands to unconfigure the disk group and volume group.
Running NNMi Outside HA with the Existing Database
If you want to run NNMi outside HA on any node with the existing database, follow these steps:
1 On the active node (if one still exists), ensure that NNMi is not running:
ovstop
Alternatively, check the status of the ovspmd process by using Task Manager (Windows) or the ps command (UNIX).
2 On the current node (where you want to run NNMi outside HA), verify that NNMi is not running:
ovstop
3 (UNIX only) Activate the disk group, for example:
vxdg import <disk_group>
4 Use the appropriate operating system commands to mount the shared disk. For example:
• Windows: Use Server Manager—>Disk Management.
• UNIX: mount /dev/vgnnm/lvnnm /nnmmount
5 Copy the NNMi files from the shared disk to the local disk:
• Windows:
%NnmInstallDir%\misc\nnm\ha\nnmhadisk.ovpl NNM \-from <HA_mount_point>
• UNIX:
If you do not plan to reconfigure the NNMi HA resource group, you do not need to save a copy of these files, and you can delete them at this time.
To prevent data corruption, make sure that no instance of NNMi is running and accessing the shared disk.
High Availability and Upgrading from NNMi 9.1x or NNMi 9.2x to NNMi 10.00 159

Upgrading from NNMi 9.1x or 9.2x to NNMi 10.00
$NnmInstallDir/misc/nnm/ha/nnmhadisk.ovpl NNM \-from <HA_mount_point>
6 Use the appropriate operating system commands to unmount the shared disk. For example:
• Windows: Use Windows Explorer.
• UNIX: umount /nnmmount
7 (UNIX only) Deactivate the disk group, for example:
vxdg deport <disk_group>
8 Obtain and install the permanent production license keys for the physical IP address of this NNMi management server as described in the "Licensing NNMi" chapter in the NNMi Deployment Reference.
9 Start NNMi:
ovstart -c
NNMi is now running with a copy of the database that was formerly used by the NNMi HA resource group. Manually remove from the NNMi configuration any nodes that you do not want to manage from this NNMi management server.
Patching NNMi under HA
To apply a patch for NNMi, work in HA maintenance mode. Follow these steps:
1 Determine which node in the HA cluster is active:
• Windows:
%NnmInstallDir%\misc\nnm\ha\nnmhaclusterinfo.ovpl \-group <resource_group> -activeNode
• Linux:
$NnmInstallDir/misc/nnm/ha/nnmhaclusterinfo.ovpl \-group <resource_group> -activeNode
2 On the active node, put the NNMi HA resource group into maintenance mode as described in “Putting an HA Resource Group into Maintenance Mode” in the NNMi Deployment Reference.
Include the NORESTART keyword.
3 On all passive nodes, put the NNMi HA resource group into maintenance mode as described in “Putting an HA Resource Group into Maintenance Mode” in the NNMi Deployment Reference.
Include the NORESTART keyword.
4 On the active node, follow these steps:
a Stop NNMi:
ovstop -c
b Back up the shared disk by performing a disk copy.
c Optional. Use the nnmbackup.ovpl command, or another database command, to back up all NNMi data. For example:
160 NNMi Upgrade Reference
May 2014
nnmbackup.ovpl -type offline -scope all -target nnmi_backups
For more information about this command, see “NNMi Backup and Restore Tools” in the NNMi Deployment Reference.
d Apply the appropriate NNMi and NNM iSPI patches to the system.
e Start NNMi:
ovstart -c
f Verify that NNMi started correctly:
ovstatus -c
All NNMi services should show the state RUNNING.
5 On each passive node, apply the appropriate patches to the system.
6 On all passive nodes, take the NNMi HA resource group out of maintenance mode as described in “Removing an HA Resource Group from Maintenance Mode” in the NNMi Deployment Reference.
7 On the active node, take the NNMi HA resource group out of maintenance mode as described in “Removing an HA Resource Group from Maintenance Mode” in the NNMi Deployment Reference.
Never run the ovstart or ovstop commands on a secondary (backup) cluster node.
High Availability and Upgrading from NNMi 9.1x or NNMi 9.2x to NNMi 10.00 161

Upgrading from NNMi 9.1x or 9.2x to NNMi 10.00
162 NNMi Upgrade Reference

We appreciate your feedback!
If an email client is configured on this system, by default an email window opens when you click here.
If no email client is available, copy the information to a new message in a web mail client, and then send this message to [email protected].
Product name and version: NNMi 10.00
Document title: NNMi Upgrade Reference
Feedback: