hp intelligent provisioning user guide for hp proliant ...h20628. · 2....
TRANSCRIPT

HP Intelligent Provisioning User Guide forHP ProLiant Gen9 Servers
AbstractThis document details how to access and use the HP Intelligent Provisioning software, including tasks such as installing OSs,updating firmware, software, and drivers, and to performing some diagnostic tests. Intelligent Provisioning is included in theoptimized HP ProLiant server support software from the HP Service Pack for ProLiant (SPP). This document is intended foradministrators experienced in HP ProLiant server configuration.
HP Part Number: 794362-005Published: October 2015Edition: 1

© Copyright 2012, 2015 Hewlett-Packard Development Company, L.P.
Confidential computer software. Valid license from HP required for possession, use or copying. Consistent with FAR 12.211 and 12.212, CommercialComputer Software, Computer Software Documentation, and Technical Data for Commercial Items are licensed to the U.S. Government undervendor's standard commercial license.
The information contained herein is subject to change without notice. The only warranties for HP products and services are set forth in the expresswarranty statements accompanying such products and services. Nothing herein should be construed as constituting an additional warranty. HP shallnot be liable for technical or editorial errors or omissions contained herein.
Acknowledgments
Linux® is the registered trademark of Linus Torvalds in the U.S. and other countries.
Intel® and the Intel Inside logo are trademarks or registered trademarks of Intel Corporation or its subsidiaries in the United States and other countries.
Microsoft®, Windows®, Hyper-V Server®, and Windows Server® are trademarks of the Microsoft group of companies.
UNIX® is a registered trademark of The Open Group.

Contents1 Introduction...............................................................................................5
Overview................................................................................................................................5Navigating Intelligent Provisioning.........................................................................................7
2 Completing initial configuration and registration tasks.....................................8Step 1: Setting Intelligent Provisioning preferences.........................................................................8Step 2: Activating Intelligent Provisioning...................................................................................10Step 3: Registering for Insight Remote Support............................................................................11
HP remote support.............................................................................................................11Data collected by Insight Remote Support..............................................................................12Using Insight Remote Support with HP Proactive Care service...................................................13Prerequisites......................................................................................................................13Registering for Insight Online direct connect..........................................................................14Registering for Insight Remote Support central connect............................................................16Registering for Insight Remote Support after the initial configuration and registration tasks...........18
Reinstalling Intelligent Provisioning............................................................................................183 Configuring the server and installing an OS.................................................20
Available install methods, source media types, and formats supported for each OS family...............20Using an HP SD card as a boot device.................................................................................21
Step 1: Hardware Settings.......................................................................................................21Step 2: OS Selection...............................................................................................................23Step 3: OS Information............................................................................................................27
OS information required for recommended installations..........................................................28HP StoreVirtual VSA (Virtual Storage Appliance) software........................................................28Deploying HP StoreVirtual VSA............................................................................................29Entering VSA contact information.........................................................................................30Completing VSA deployment...............................................................................................30OS information required for customized installations...............................................................30
Step 4: Review.......................................................................................................................32Checking installation parameters..............................................................................................32Enabling the VID....................................................................................................................33
4 Performing maintenance............................................................................34Downloading Active Health System data....................................................................................34Updating firmware..................................................................................................................36
Determining the installed Intelligent Provisioning version..........................................................36Updating Intelligent Provisioning and component firmware......................................................36
Setting Intelligent Provisioning Preferences..................................................................................37Using Deployment Settings.......................................................................................................38
Creating a Deployment Settings package..............................................................................39Using a Deployment Settings package to configure a single server...........................................39Performing Deployment Settings package-level actions............................................................40Entering or changing individual settings for a Deployment Settings package..............................41
Entering version information............................................................................................42Entering firmware update settings....................................................................................42Entering array configuration settings................................................................................42Entering operating system information..............................................................................42Entering Remote Support information...............................................................................43Entering ROM settings...................................................................................................44Entering system options..................................................................................................44
Using HP Smart Storage Administrator (HP SSA).........................................................................44Configuration....................................................................................................................46
Contents 3
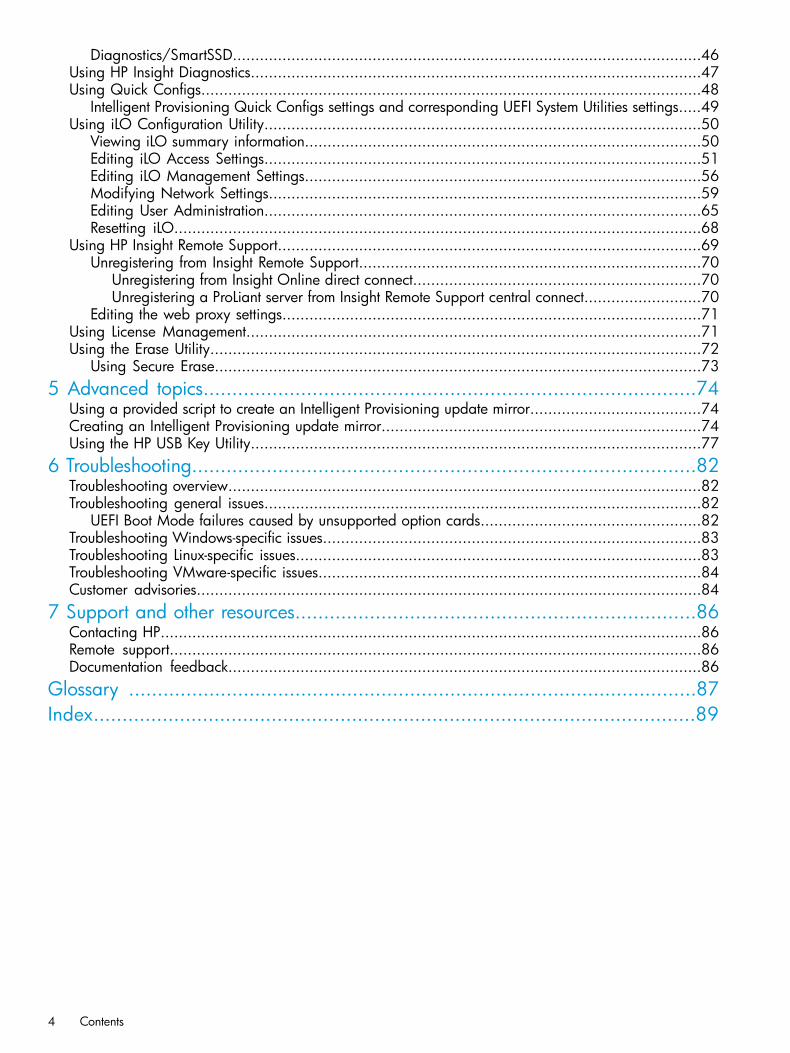
Diagnostics/SmartSSD........................................................................................................46Using HP Insight Diagnostics....................................................................................................47Using Quick Configs...............................................................................................................48
Intelligent Provisioning Quick Configs settings and corresponding UEFI System Utilities settings.....49Using iLO Configuration Utility.................................................................................................50
Viewing iLO summary information........................................................................................50Editing iLO Access Settings.................................................................................................51Editing iLO Management Settings........................................................................................56Modifying Network Settings................................................................................................59Editing User Administration.................................................................................................65Resetting iLO.....................................................................................................................68
Using HP Insight Remote Support..............................................................................................69Unregistering from Insight Remote Support............................................................................70
Unregistering from Insight Online direct connect................................................................70Unregistering a ProLiant server from Insight Remote Support central connect..........................70
Editing the web proxy settings.............................................................................................71Using License Management.....................................................................................................71Using the Erase Utility.............................................................................................................72
Using Secure Erase............................................................................................................735 Advanced topics......................................................................................74
Using a provided script to create an Intelligent Provisioning update mirror......................................74Creating an Intelligent Provisioning update mirror.......................................................................74Using the HP USB Key Utility....................................................................................................77
6 Troubleshooting........................................................................................82Troubleshooting overview.........................................................................................................82Troubleshooting general issues.................................................................................................82
UEFI Boot Mode failures caused by unsupported option cards.................................................82Troubleshooting Windows-specific issues....................................................................................83Troubleshooting Linux-specific issues..........................................................................................83Troubleshooting VMware-specific issues.....................................................................................84Customer advisories................................................................................................................84
7 Support and other resources......................................................................86Contacting HP........................................................................................................................86Remote support......................................................................................................................86Documentation feedback.........................................................................................................86
Glossary ...................................................................................................87Index.........................................................................................................89
4 Contents

1 IntroductionIntelligent Provisioning is a single-server deployment tool embedded in HP ProLiant Gen8 andGen9 servers that replaces the SmartStart CDs and Smart Update Firmware DVD used with previousgenerations of HP ProLiant servers. Intelligent Provisioning simplifies HP ProLiant server setup,providing a reliable and consistent way to deploy HP ProLiant servers.
TIP: The information in this guide is for using Intelligent Provisioning with HP ProLiant Gen9Servers. For information on using Intelligent Provisioning with HP ProLiant Gen8 Servers, see theHP Intelligent Provisioning User Guide for HP ProLiant Gen8 Servers available on the HP EnterpriseInformation Library (http://www.hp.com/go/intelligentprovisioning/docs).
Intelligent Provisioning assists with the OS installation process by preparing the system for installing"off-the-shelf" and HP-branded versions of OS software and integrating optimized HP ProLiantserver support software from the HP Service Pack for ProLiant (SPP). SPP is a comprehensive systemssoftware and firmware solution for HP ProLiant servers and server blades and their enclosures. HPProLiant Gen9 servers are preloaded with a basic set of firmware and OS components, which areinstalled along with Intelligent Provisioning 2.xx. After the server is running, use the IntelligentProvisioning Firmware Update utility to install additional components and update any componentsthat have been outdated since the server was manufactured.Intelligent Provisioning for HP ProLiant Gen9 Servers includes the following components:
• Critical boot drivers for ProLiant servers
• HP Active Health System (AHS)
• HP StoreVirtual Virtual Storage Appliance (VSA)
IMPORTANT:• Although HP ProLiant Gen9 servers are pre-loaded with firmware and drivers, use Firmware
Update upon initial setup to ensure you have the latest versions. Using Firmware Update alsoensures you have the latest version of Intelligent Provisioning for the latest supported features,such as Microsoft Windows 2012 installations.
• Do not update firmware if the version you are currently running is required for compatibility.
NOTE: HP Intelligent Provisioning does not function within multihomed configurations. Amultihomed host is one that is connected to two or more networks or has two or more IP addresses.
Intelligent Provisioning provides installation help for the following operating systems:
• Microsoft Windows 2012, Windows 2012 R2, and Windows Server 2008 R2 SP1
• Red Hat Enterprise Linux
• SUSE Linux Enterprise Server
• VMware ESXi Custom Image
• VMware ESXi/vSphere Custom ImageNot all versions of an OS are supported. For more information about supported OSs for HP ProLiantservers, see the HP Operating Systems and Virtualization Software Support for ProLiant Serverswebsite (http://www.hp.com/go/ossupport).
OverviewTo access Intelligent Provisioning, power on or reboot the server and press F10 when promptedduring the server POST.
Overview 5

When accessing Intelligent Provisioning, one of the following happens:
• If this is your first time using Intelligent Provisioning, on-screen prompts guide you throughinitial configuration and registration tasks. (“Completing initial configuration and registrationtasks” (page 8).)
• If Intelligent Provisioning was previously accessed and the initial configuration and registrationtasks are complete, the Intelligent Provisioning home page is displayed. In the home screen,select one of the following menus to use Intelligent Provisioning:
◦ Configure and Install menu (“Configuring the server and installing an OS” (page 20))
NOTE: The Configure and Install option is not available for HP ProLiant SL, SE, and XLServers.
◦ Perform Maintenance menu (“Performing maintenance” (page 34))
To exit Intelligent Provisioning, reboot the server by clicking the power icon at the top right of thepage.
6 Introduction

Navigating Intelligent ProvisioningTo navigate through and modify settings in this menu-driven interface, use the navigation iconsdisplayed at the top right-hand corner and bottom left- and right-hand corners of the IntelligentProvisioning window.These navigation icons are screen sensitive and are not displayed on all screens.
FunctionIcon nameItem
Returns to the Intelligent Provisioning home page, with the Configureand Install and Perform Maintenance menus. This icon is available
Home1
only after completing the initial configuration and registration tasks.For more information, see “Completing initial configuration andregistration tasks” (page 8).
Opens the online help to the section about the current screen.Help2
Displays system information, including the Intelligent Provisioningversion.
System Information3
Powers down or reboots the server.Power4
Returns you to the previous screen after validating and saving yourchoices.
Previous
5
Takes you forward to the next screen after validating and saving yourchoices.
Continue
6
Overview 7

2 Completing initial configuration and registration tasksWhen using Intelligent Provisioning for the first time, follow the on-screen prompts to perform thefollowing tasks:1. Setting Preferences (“Step 1: Setting Intelligent Provisioning preferences” (page 8))2. Activating Intelligent Provisioning (“Step 2: Activating Intelligent Provisioning” (page 10))3. Registering for Insight Remote Support (“Step 3: Registering for Insight Remote Support” (page
11))
NOTE:• Storage controller information is not displayed in System Information in these initial three
configuration pages.• On a Windows system with Internet access, all the software applications will be downloaded
and installed automatically when installing Intelligent Provisioning. On other operating systemsor on a Windows system without Internet access, the following applications are not installedautomatically with Intelligent Provisioning. They can be installed by running the SPP.
◦ HP ProLiant Agentless Management Service
◦ HP Network Configuration Utility for Windows
◦ HP Smart Storage Administrator (HP SSA)
◦ HP Lights-Out Online Configuration Utility
◦ HP Insight Diagnostics
Step 1: Setting Intelligent Provisioning preferencesThe Set Preferences screen appears automatically the first time Intelligent Provisioning runs on aserver.
1. Choose your interface language and keyboard language.
8 Completing initial configuration and registration tasks

2. Confirm that the system date and time are accurate.To change the date or time, click the displayed date or time and use the displayed calendaror clock to select the new values.
3. Read the End User License Agreement (EULA).• To continue using Intelligent Provisioning, click Accept.
Included in the EULA is a link for ancillary software, which contains a list of open sourceand proprietary software developed or obtained through third parties. This link and allother links in the EULA are not enabled, but can be accessed if entered into a browser.
• To cancel using Intelligent Provisioning, click Reboot to exit the utility and reboot theserver. Intelligent Provisioning remains accessible.
4. Enter network settings.Select the active NIC from the list, and then choose from one of the following IP addressingschemes:
• DHCP Auto-Configuration—HP recommends selecting DHCP to have IP addresses assignedautomatically to your server.
• IPv4 Static—Selecting IPv4 adds four new fields: the static IPv4 address, network mask,gateway address, and DNS address.
• IPv6 Static—Selecting IPv6 adds two fields: the static IP address and the Gateway address.5. Specify whether you are using a proxy. If you have a proxy on your network, you might need
to configure it for use with features that communicate across the network. If you choose UseProxy, enter a Proxy Address and Port.
6. Enter iLO network settings.Select one of the following iLO network IP addressing schemes:
• DHCP Auto-Configuration—HP recommends selecting DHCP to have IP addresses assignedautomatically to your server.
• IPv4 Static—Selecting IPv4 adds four new fields: the static IPv4 address, network mask,gateway address, and DNS address.
• Off—Selecting Off makes this server unavailable through iLO.For more information about using iLO, see the HP iLO 4 User Guide on the HP website (http://www.hp.com/go/ilo/docs).
7. Select a delivery option for System Software Updates for Intelligent Provisioning.• HP website—HP recommends selecting this option to be prompted when updates are
available and download all software updates for your server from hp.com.• HTTP/FTP—When prompted, enter an address in the URL field.
• Disable—Select this to disable automatic updates if you plan to update your systemsoftware manually.
8. Select the correct Time Zone.9. Select the desired System Boot Mode.
NOTE: Changes to the system boot mode are implemented during the OS installation processor in the next POST.
10. Click the Continue right arrow to proceed automatically to “Step 2: Activating IntelligentProvisioning” (page 10).
Step 1: Setting Intelligent Provisioning preferences 9

NOTE: To access this screen change preferences at a later time, open the Perform Maintenancemenus, and then click Intelligent Provisioning Preferences (“Setting Intelligent ProvisioningPreferences” (page 37)).
Step 2: Activating Intelligent ProvisioningWhen logging on to Intelligent Provisioning for the first time, the Activation screen is viewable afterthe Setting Preferences screen.
To activate Intelligent Provisioning and make it available during server POST:1. Select Activate (Recommended).2. Click the Continue right arrow to proceed automatically to “Step 3: Registering for Insight
Remote Support” (page 11).To disable Intelligent Provisioning:1. Select Disable (Not Recommended).2. Click the Continue right arrow. The server reboots. During POST, F10 is in red text on the
screen, indicating that the F10 key is disabled and Intelligent Provisioning is no longeraccessible.
To re-enable Intelligent Provisioning:1. Reboot the server and, when prompted, press F9 to access the UEFI System Utilities.2. From the System Utilities screen, select System Configuration→BIOS/Platform Configuration
(RBSU)→Server Security→Intelligent Provisioning (F10 Prompt) and press Enter.3. Select Enabled.For more information on UEFI System Utilities, see the HP UEFI System Utilities User Guide.
10 Completing initial configuration and registration tasks

Step 3: Registering for Insight Remote SupportHP Insight Remote Support provides automatic submission of hardware events to HP to preventdowntime and enable faster issue resolution. You can register directly to HP or through an InsightRS Hosting Device.
HP remote supportHP has developed a service and support solution that integrates the following:
• An online, personalized dashboard (HP Insight Online)
• 24x7 remote support with HP Insight Remote Support software and Insight Online directconnect capability
Intelligent Provisioning includes the embedded Remote Support feature, which allows you to registersupported servers for HP remote support.When you use the embedded Remote Support feature, choose from the following configurationoptions: Insight Online direct connect and Insight Remote Support central connect.
Insight Online direct connectRegister a server to communicate directly with Insight Online without the need to set up an InsightRemote Support centralized Hosting Device in your local environment. Insight Online will be yourprimary interface for remote support information.Insight Online is an HP Support Center feature that enables you to view your remotely monitoreddevices anywhere, anytime. It provides a personalized dashboard for simplified tracking of IToperations and support information, including a mobile dashboard for monitoring when you areon the go.Figure 1 (page 11) shows the direct connect configuration with a ProLiant server.
Figure 1 Insight Online direct connect
ProLiant Firewall
Insight Remote Support central connectRegister a server to communicate with HP through an Insight Remote Support centralized HostingDevice in your local environment. All configuration and service event information is routed throughthe Hosting Device. This information can be viewed using the local Insight RS Console or theweb-based view in Insight Online (if it is enabled in Insight RS).Figure 2 (page 12) shows the central connect configuration with a ProLiant server.
Step 3: Registering for Insight Remote Support 11

Figure 2 Insight Remote Support central connect
ProLiantserver
FirewallInsight RSHosting Device
Data collected by Insight Remote SupportBy registering for Insight Remote Support, you agree to send registration, service events,configuration, and Active Health System data to HP. All data collected and sent to HP will be usedto provide remote support and quality improvement. The collected data is managed according tothe HP privacy statement, available at http://www.hp.com/go/privacy.When a server is registered for Insight Remote Support, iLO or the Insight RS Hosting Device sendsActive Health System information to HP every 7 days, and sends configuration information every30 days. The following information is sent to HP:
• Registration—During server registration, iLO collects data to uniquely identify the serverhardware. This data is sent to the Insight RS Hosting Device (Insight Remote Support centralconnect) or directly to HP (Insight Online direct connect).Registration data includes the following:
◦ Server model
◦ Serial number
◦ iLO NIC address
• Service events—When service events are recorded, iLO collects data to uniquely identify therelevant hardware component. This data is sent to the Insight RS Hosting Device (Insight RemoteSupport central connect) or directly to HP (Insight Online direct connect).Service event data includes the following:
◦ Server model
◦ Serial number
◦ Part number of the hardware component
◦ Description, location, and other identifying characteristics of the hardware component
• Configuration—During data collection, iLO collects data to enable proactive advice andconsulting. This data is sent to the Insight RS Hosting Device (Insight Remote Support centralconnect) or directly to HP (Insight Online direct connect).Configuration data includes the following:
◦ Server model
◦ Serial number
◦ Processor model, speed, and utilization
12 Completing initial configuration and registration tasks

◦ Storage capacity, speed, and utilization
◦ Memory capacity, speed, and utilization
◦ Firmware/BIOS
◦ Installed drivers, services, and applications (if AMS is installed)
• Active Health System—During data collection, iLO collects data about the health, configuration,and runtime telemetry of the server. This information is used for troubleshooting issues andclosed-loop quality analysis.For information about the data that is collected, see the iLO user guide.
Using Insight Remote Support with HP Proactive Care serviceHP Proactive Care service customers must register their ProLiant Gen8 and Gen9 servers for InsightRemote Support central connect or Insight Online direct connect in order to receive the followingProactive Care services features: Proactive Scan and Firmware/Software Version Report andrecommendations.
• The direct connect option requires the installation of AMS.
• The central connect option requires the installation of AMS or the SNMP/WBEM agents.For more information about the Proactive Care service, see the following website: http://www.hp.com/services/proactivecarecentral.
PrerequisitesBefore registering, verify that the following prerequisites are met:
• A supported version of Intelligent Provisioning is installed.Version 2.01 or later is required for Insight Online direct connect and Insight Remote Supportcentral connect registration.For information about updating Intelligent Provisioning, see “Updating firmware” (page 36).
• iLO is configured as follows:
A supported version of the iLO firmware is installed.To address third-party software vulnerabilities, HP recommends using iLO 4 2.03 or later.
◦
Version 2.00 or later is required for Insight Online direct connect and Insight RemoteSupport central connect registration.
◦ The time zone is set in iLO.
◦ For Insight Online direct connect only: A DNS server is configured in iLO.This is required for communication between iLO and Insight Online.
For information about configuring iLO, see the HP iLO 4 User Guide.
• For Insight Remote Support central connect only: Insight RS version 7.1 or later is installedand configured on the Insight RS Hosting Device.For Insight RS device support information, see the following website: http://h17007.www1.hp.com/us/en/enterprise/servers/supportmatrix/insight_rs.aspx.
• For Insight Remote Support central connect only: The RIBCL protocol credentials for the HPProLiant server are configured in the Insight RS Console.For more information about the RIBCL protocol credentials, see the HP Insight Remote SupportInstallation and Configuration Guide.
Step 3: Registering for Insight Remote Support 13

Registering for Insight Online direct connectUse this procedure to register an HP ProLiant server for Insight Online direct connect remote support.When you register for Insight Online direct connect, you must complete steps in both IntelligentProvisioning and the Insight Online portal.1. Verify that the server meets the prerequisites for using the Insight Remote Support solution.
For more information, see “Prerequisites” (page 13).2. Select Register this server directly to HP.
The page refreshes to show the Insight Online direct connect registration options.
3. Enter your HP Passport credentials in the HP Passport User ID and HP Passport Passwordboxes.
IMPORTANT: In most cases, your HP Passport user ID is the same as the email address youused during the HP Passport registration process. If you changed your user ID in the HP SupportCenter, be sure to enter your user ID and not your email address.
4. Optional: Enter the following information if the HP ProLiant server uses a web proxy server toaccess the Internet:• Web Proxy Server
• Web Proxy Port
• Web Proxy Username
• Web Proxy Password5. Click Register.
Clicking Register is Step 1 of a two-step registration process. Step 2 is completed in InsightOnline.By registering, you agree to send registration, service events, configuration, and Active HealthSystem data to HP. For more information about the type of data collected, see “Data collectedby Insight Remote Support” (page 12). All data collected and sent to HP will be managed
14 Completing initial configuration and registration tasks

according to the HP Privacy Statement, which you can review at the following website: http://www.hp.com/go/privacy.When Step 1 is completed, the following message appears:Step 1 of 2: Completed using HP Passport Credentials: <HP PassportUser ID>.Step 2 of 2: Complete Registration in HP Insight Online(www.hp.com/go/InsightOnline).Please confirm that you have completed the registration process inHP Insight Online.
Allow up to 5 minutes for your registration request to be fully processed.6. Navigate to the Insight Online website at http://www.hp.com/go/InsightOnline, and then
log in with your HP Passport credentials.7. Follow the onscreen instructions in Insight Online, and provide your site, contact, and partner
information so that HP can deliver service for your HP ProLiant server.
TIP: To streamline the process when you have multiple servers to register, complete Step 1for all of the servers, and then complete Step 2 for all of the servers during one Insight Onlinesession.
For detailed instructions, see the HP Insight Remote Support and Insight Online Setup Guidefor HP ProLiant Servers and HP BladeSystem c-Class Enclosures.
8. Return to the Insight Remote Support page in Intelligent Provisioning, and then click Confirm.
A message similar to the following appears:Successfully registered!
HP Passport User ID used to register this server: <HP Passport UserID>.
Step 3: Registering for Insight Remote Support 15

9. Click the Continue right arrow to proceed to the Intelligent Provisioning home page (“Overview”(page 5)).
10. To ensure successful Insight Remote Support operation, verify the following after you installthe system software:• Optional: AMS is installed on the server and the server operating system is running.
HP recommends installing AMS. For more information, see the HP iLO 4 User Guide.AMS is installed automatically if you use the Intelligent Provisioning Recommendedinstallation method for Windows installation.HP Proactive Care services customers only: AMS installation is required in order to receivethe following HP Proactive Care services features: Proactive Scan and Firmware/SoftwareVersion Report and recommendations.
• If you did not install AMS, ensure that the server name is displayed correctly in InsightOnline and Insight RS.AMS is one way in which iLO can obtain the server name. If iLO cannot obtain the servername, the displayed server name in Insight Online and Insight RS is derived from theserver serial number.Do one of the following:
◦ For Windows systems only, start the operating system. Insight Online and Insight RSwill use the Windows computer name to identify the server.
◦ Configure the Server Name on the Administration→Access Settings page in the iLOweb interface.The server name is displayed in Insight Online and Insight RS, and can be viewedby HP Support and your authorized service provider, reseller/distributor, and installer.To protect your privacy, do not use sensitive information in the name of an HP ProLiantserver.
• The HP ProLiant iLO 3/4 Channel Interface Driver is installed.This driver is installed automatically if you use the Intelligent Provisioning Recommendedinstallation method for Windows installation.This driver is standard for SUSE Linux Enterprise Server 11 and 12 and Red Hat 6 and7.For more information, see the HP iLO 4 User Guide.
11. Optional: If you want to receive email alerts about system events, configure AlertMail on theAdministration→Management→AlertMail page in iLO.For more information, see the HP iLO 4 User Guide.
Registering for Insight Remote Support central connectUse this procedure to register an HP ProLiant server for Insight Remote Support central connect.1. Verify that the server meets the prerequisites for using Insight Remote Support.
For more information, see “Prerequisites” (page 13).2. Select Register this server through an HP Insight Remote Support centralized hosting device.
The page refreshes to show the Insight Remote Support central connect registration options.
16 Completing initial configuration and registration tasks

3. Enter the Insight RS Hosting Device host name or IP address and port number.The default port is 7906.
4. Click Register.By registering, you agree to send registration, service events, configuration, and Active HealthSystem data to HP. For more information about the type of data collected, see “Data collectedby Insight Remote Support” (page 12). All data collected and sent to HP will be managedaccording to the HP Privacy Statement, which you can review at the following website: http://www.hp.com/go/privacy.A message similar to the following appears:Successfully registered! Insight Remote Support hosting server:<cms.mycompany.com>.
where <cms.mycompany.com> is the Insight RS Hosting Device host name or IP address.
5. Click the Continue right arrow to proceed to the Intelligent Provisioning home page (“Overview”(page 5)).
Step 3: Registering for Insight Remote Support 17

6. To ensure successful Insight Remote Support operation, verify the following after you installthe system software:• Optional: AMS is installed on the server and the server operating system is running.
HP recommends installing AMS. For more information, see the HP iLO 4 User Guide.AMS is installed automatically if you use the Intelligent Provisioning Recommendedinstallation method for Windows installation.HP Proactive Care services customers only: AMS installation is required in order to receivethe following HP Proactive Care services features: Proactive Scan and Firmware/SoftwareVersion Report and recommendations.
• If you did not install AMS, ensure that the server name is displayed correctly in InsightOnline and Insight RS.AMS is one way in which iLO can obtain the server name. If iLO cannot obtain the servername, the displayed server name in Insight Online and Insight RS is derived from theserver serial number.Do one of the following:
◦ For Windows systems only, start the operating system. Insight Online and Insight RSwill use the Windows computer name to identify the server.
◦ Configure the Server Name on the Administration→Access Settings page in the iLOweb interface.The server name is displayed in Insight Online and Insight RS, and can be viewedby HP Support and your authorized service provider, reseller/distributor, and installer.To protect your privacy, do not use sensitive information in the name of an HP ProLiantserver.
• The HP ProLiant iLO 3/4 Channel Interface Driver is installed.This driver is installed automatically if you use the Intelligent Provisioning Recommendedinstallation method for Windows installation.This driver is standard for SUSE Linux Enterprise Server 11 and 12 and Red Hat 6 and7.For more information, see the HP iLO 4 User Guide.
Registering for Insight Remote Support after the initial configuration and registrationtasks
If you want to register this server for Insight Remote Support after the initial configuration andregistration tasks:1. Select Register Later on the registration page.2. Click the Continue right arrow.
When you are ready to register this server for Insight Remote Support, navigate to the PerformMaintenance screen and select HP Insight Remote Support.For registration instructions, see “Registering for Insight Online direct connect” (page 14) and“Registering for Insight Remote Support central connect” (page 16).
Reinstalling Intelligent ProvisioningYou can reinstall Intelligent Provisioning instead of using the Firmware Update Utility to ensure youhave the latest version. To reinstall Intelligent Provisioning:
18 Completing initial configuration and registration tasks

1. Download the latest Intelligent Provisioning ISO from the HP Intelligent Provisioning website(http://www.hp.com/go/intelligentprovisioning).
2. Boot to the Intelligent Provisioning recovery media. The installation automatically begins.3. When the update is complete, the server automatically reboots.
Reinstalling Intelligent Provisioning 19
3 Configuring the server and installing an OSTo use Intelligent Provisioning to configure the hardware and install an OS on your HP ProLiantserver, follow the on-screen prompts in the Configure and Install menu to complete the tasks in thefollowing four screens:
• “Step 1: Hardware Settings” (page 21)
• “Step 2: OS Selection” (page 23)
• “Step 3: OS Information” (page 27)
• “Step 4: Review” (page 32)
IMPORTANT:• The HP ProLiant ML10 v2 Server does not support Intelligent Provisioning. For information on
installing an OS on this server, see the HP ProLiant ML10 v2 Server documentation.• HP ProLiant SL, SE, and XL Servers (except the HP ProLiant XL420 Gen9 Server) do not support
operating system installations with Intelligent Provisioning. These servers do support themaintenance features described in “Performing maintenance” (page 34).
• Special characters can be used in passwords only. Do not use special characters in any otherdata fields.
Available install methods, source media types, and formats supported foreach OS family
Each Configure and Install screen provides a guided method of configuring the server, installingan OS, and updating the system software. The following table shows the install methods, sourcemedia types, and formats supported for each OS family.
IMPORTANT: Intelligent Provisioning only supports original, licensed vendor media or HP-Brandedversions. Demo or developer versions of the OS, or media which has been modified to slipstreamcustom software or service packs, are not supported and may not be correctly identified by theinstallation process.
ManualCustomized install methodRecommended install method
DiscUSBFTPNetworkShare
DiscUSBFTPNetworkShare
Disc
ISO VMISO
Flat ISO—Flat ISOISO VMISO
Flat ISO—Flat ISOISO VMISO
MicrosoftWindows(64–bit)
ISO VMISO
Flat ISOFlatFlat ISOISO VMISO
Flat ISOFlatFlat ISOISO VMISO
VMwareESXi
ISO VMISO
——————Flat ISOISO VMISO
SUSELinuxEnterpriseServer
ISO VMISO
—————Flat—ISO VMISO
Red HatEnterpriseLinux
20 Configuring the server and installing an OS
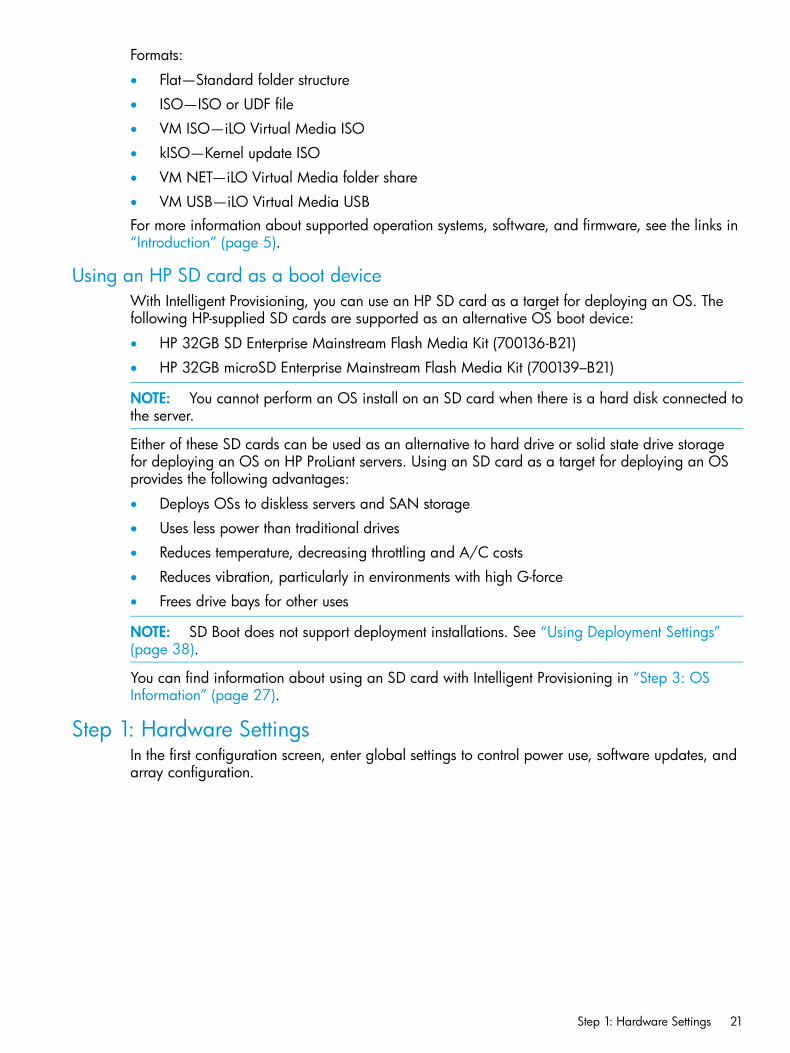
Formats:
• Flat—Standard folder structure
• ISO—ISO or UDF file
• VM ISO—iLO Virtual Media ISO
• kISO—Kernel update ISO
• VM NET—iLO Virtual Media folder share
• VM USB—iLO Virtual Media USBFor more information about supported operation systems, software, and firmware, see the links in“Introduction” (page 5).
Using an HP SD card as a boot deviceWith Intelligent Provisioning, you can use an HP SD card as a target for deploying an OS. Thefollowing HP-supplied SD cards are supported as an alternative OS boot device:
• HP 32GB SD Enterprise Mainstream Flash Media Kit (700136-B21)
• HP 32GB microSD Enterprise Mainstream Flash Media Kit (700139–B21)
NOTE: You cannot perform an OS install on an SD card when there is a hard disk connected tothe server.
Either of these SD cards can be used as an alternative to hard drive or solid state drive storagefor deploying an OS on HP ProLiant servers. Using an SD card as a target for deploying an OSprovides the following advantages:
• Deploys OSs to diskless servers and SAN storage
• Uses less power than traditional drives
• Reduces temperature, decreasing throttling and A/C costs
• Reduces vibration, particularly in environments with high G-force
• Frees drive bays for other uses
NOTE: SD Boot does not support deployment installations. See “Using Deployment Settings”(page 38).
You can find information about using an SD card with Intelligent Provisioning in “Step 3: OSInformation” (page 27).
Step 1: Hardware SettingsIn the first configuration screen, enter global settings to control power use, software updates, andarray configuration.
Step 1: Hardware Settings 21

IMPORTANT: If unsupported media devices are connected at this point, an error appears. Toresolve the issue, remove the unsupported media device, and make sure you have network shareinformation available, or a disk or ISO, or USB drive installed when prompted.
1. Select the power management System Profile to use. These profiles set a basic policy forperformance versus power usage without having to configure individual settings through theUEFI System Utilities menus.The current (or a recommended) profile is displayed, but to change the settings, the optionsinclude:
• No Change
• Balanced Power and Performance
• Minimum Power Usage
• Maximum PerformanceThe suggested default varies. If Intelligent Provisioning detects existing settings on the serverthat match one of these profiles, that profile is displayed in the System Profiles field. If IntelligentProvisioning detects settings that do not match one of the profiles, No Change is displayed inthis field.For more information about these options, see “Using Quick Configs” (page 48).
2. Select whether to perform a software update before the OS is installed.3. Enter array configuration specifications for the server's storage subsystem.
Options include:
• Keep Current Setting—Uses existing settings to maintain any previously constructed arrays.Use this option when reprovisioning a server. This option is displayed only when validlogical drives are present on the server. For new server installations, this option is notdisplayed.
22 Configuring the server and installing an OS

NOTE: Secure Boot is only supported on UEFI-based servers in UEFI Boot Mode runningWindows 2012 and Windows 2012 R2.
• Recommended Settings—The HP Smart Storage Administrator polls any drives that arepresent and builds an appropriate array for those drives. For example, if two drives areconnected to the Smart Array card, the setup defaults to RAID 1. HP recommends selectingthis option when initially provisioning a server.
CAUTION: Selecting this choice resets all disks (and arrays, if any are present). Becauseno arrays or disk data are present during a first-time setup, this does not affect your server.However, if you choose this option when reprovisioning your server, you can lose yourdata and any disk arrays. For more information about the HP Smart Storage Administrator,see the HP Smart Storage Administrator User Guide (http://www.hp.com/support/SSA_UG_en).
• Customize—Opens the HP Smart Storage Administrator (after clicking the Continue rightarrow) and enables you to choose array settings. For more information about using theHP SSA, see “Using HP Smart Storage Administrator (HP SSA)” (page 44).
NOTE: Some controllers other than HP Smart Array controllers can be configured throughHP Smart Storage Administrator.
4. Select the Target Controller you want to use from the drop-down menu if more than one isavailable.
5. Confirm Fibre Channel and iSCSI configuration settings.If discovered, the Fibre Channel and iSCSI information is displayed at the bottom of the screen.Intelligent Provisioning supports installation to iSCSI targets and to shared storage devices.Before starting an installation, the devices need to be set up outside of Intelligent Provisioning,using options that appear during POST, or through their setup applications. In addition, theboot controller order needs to be set correctly in the UEFI System Utilities before installation.
6. Confirm SD Card Configuration settings. If a supported SD card is installed, the device detailsappear.
7. Click the Continue right arrow.
Step 2: OS SelectionIn this screen, specify the OS family to install and the installation method.
Step 2: OS Selection 23

IMPORTANT: If unsupported media devices are connected at this point, the following errorappears: There are no physical disks attached. To resolve the issue, remove theunsupported media device, and make sure you have network share information available, or adisk or ISO, or USB drive installed when prompted.
24 Configuring the server and installing an OS

1. Select an OS family.Available supported OS families include:
• Microsoft Windows
• VMware ESXi/vSphere Custom Image
• SUSE Linux Enterprise Server
• Red Hat Linux
NOTE: A software license must be accepted when installing Microsoft Windows or Red HatLinux 7.X.
If the OS you want to install is not listed, it might not be supported for use with your controllermodel, or you might need to update HP ProLiant firmware. For information about supportedOSs and OS drivers, see the HP Operating Systems and Virtualization Software Supportwebsite (http://www.hp.com/go/supportos).
NOTE: If updates are available, a message appears on the screen directing you to theproper steps for incorporating them into Intelligent Provisioning.
IMPORTANT:• When installing VMware, download an HP Custom ISO before the installation from the
HP website (http://www.hp.com/go/esxidownload). Ethernet port 0 must be active.
2. Select an installation method.Depending on the OS family selected, installation choices vary, including the suggested default.For more information, see “Available install methods, source media types, and formatssupported for each OS family” (page 20).Options may include:
• Recommended—Uses HP-defined defaults to configure the server software and firmware,partition storage, and install the OS with HP drivers. HP recommends selecting this optionfor first-time server setup. For more information about recommended installation options,see “OS information required for recommended installations” (page 28).
NOTE: AMS and the HP ProLiant iLO 3/4 Channel Interface Driver are installedautomatically if you use the Recommended installation method for Windows installation.The HP ProLiant iLO 3/4 Channel Interface Driver is standard for SUSE Linux EnterpriseServer 11 and 12 and Red Hat 6 and 7.
• Customized—Enables you to individually configure the options for server software andfirmware updates, storage partitioning, and OS installation with HP drivers. Select thisoption if you have specific parameters that differ from the recommended settings, suchas for storage partitioning. For more information about customized installation options,see “OS information required for customized installations” (page 30).
• Manual—Installs the OS from a custom OS CD/DVD. After selecting this option, insertthe provided CD/DVD so that the server can reboot from the OS CD/DVD.When using the Manual Installation method, the Virtual Install Disk (VID) is disabled bydefault. If you enable VID, a USB mass-storage device appears with the name of the VIDduring the OS installation process. The VID contains a limited set of storage and networkingdrivers, so any required SAS/iSCSI/FCoE adapter can be loaded in the event that theOS disc does not have the appropriate drivers. Because the VID and the custom CD/DVDmight not contain all of the needed drivers, you might need to create a driver CD/DVDto ensure that all required drivers are installed and that the OS can install successfully.
Step 2: OS Selection 25

For information about creating a driver disk, see the OS installation guide. For informationon enabling the VID, see “Enabling the VID” (page 33).In all Linux environments, add dd (Red Hat Enterprise Linux 6), inst.dd (Red HatEnterprise Linux 7), dud=1 (SUSE Linux Enterprise Server 11 and 12) on the commandline to provide a driver location only when installing the OS in special storage devicessuch as iSCSI and FC LUNs.In Red Hat Enterprise Linux 6 installations with a SATA controller, the selected InstallTarget Device must be a drive connected to the lowest bay number.The following table contains information about Linux boot driver parameters.
ExampleSolutionIssueLinux edition
updatedir=
/linux/suse/i386–sles11.2
To access the SP2drivers in the VID,include the
Because of a namingconvention conflictbetween SUSE Linux
SUSE LinuxEnterprise Server
broken_modules=ahci forsles11, sles12
updatedir kernelparameter for theappropriate OS.
Enterprise Server 11SP1 and SP2, theSP2 drivers arelocated in a directorythat the SUSEinstaller does notsee.
blacklist=ahci for rhel6modprobe.blacklist=ahci for rhel7
Enter the followingboot parameters toprevent the driver fromtaking over thecontroller.
Because the AHCIdriver attachesbefore the HPDynamic Smart ArrayB140i Controller
Red Hat EnterpriseLinux 6
drivers, the logicaldriver is notrecognized.
3. Select the source media from which you are installing the OS.Media types include:
• Physical DVD or iLO virtual media (default)—A standard bootable OS DVD/CD-ROMmedia, and virtual media through iLO.
NOTE: Select this option when using a DVD drive connected to a USB port.
• Microsoft Windows or Samba Network Share—The network share that contains the OSinstallation files.
• FTP—The FTP server that contains OS installation files.
NOTE: The FTP media option is supported for VMware and Red Hat Enterprise Linuxonly.
• USB Key—The USB flash drive that contains the OS installation files
NOTE: Only FAT-formatted USB drives are supported. For OS image files that cannotcopy to the USB unless it is NTFS-formatted, use a different source media, such as a DVD,network share, or FTP server.
4. If you are installing from a CD/DVD disk or USB drive, insert the media.
26 Configuring the server and installing an OS
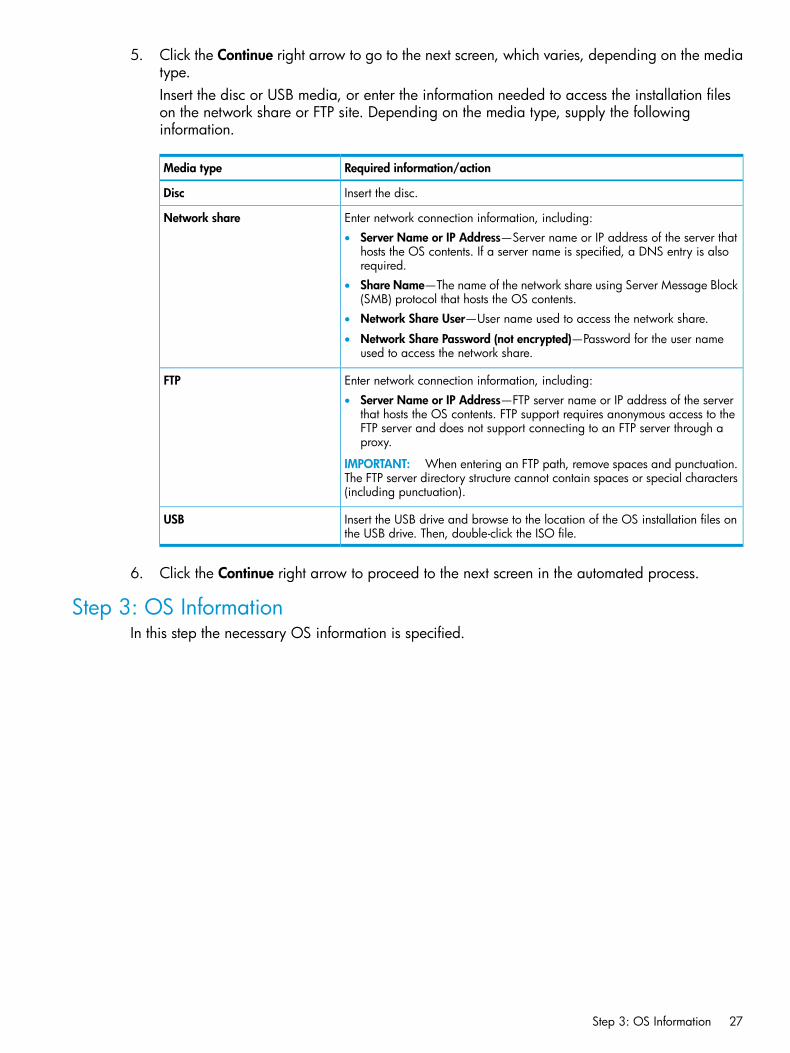
5. Click the Continue right arrow to go to the next screen, which varies, depending on the mediatype.Insert the disc or USB media, or enter the information needed to access the installation fileson the network share or FTP site. Depending on the media type, supply the followinginformation.
Required information/actionMedia type
Insert the disc.Disc
Enter network connection information, including:Network share• Server Name or IP Address—Server name or IP address of the server that
hosts the OS contents. If a server name is specified, a DNS entry is alsorequired.
• Share Name—The name of the network share using Server Message Block(SMB) protocol that hosts the OS contents.
• Network Share User—User name used to access the network share.
• Network Share Password (not encrypted)—Password for the user nameused to access the network share.
Enter network connection information, including:• Server Name or IP Address—FTP server name or IP address of the server
that hosts the OS contents. FTP support requires anonymous access to theFTP server and does not support connecting to an FTP server through aproxy.
IMPORTANT: When entering an FTP path, remove spaces and punctuation.The FTP server directory structure cannot contain spaces or special characters(including punctuation).
FTP
Insert the USB drive and browse to the location of the OS installation files onthe USB drive. Then, double-click the ISO file.
USB
6. Click the Continue right arrow to proceed to the next screen in the automated process.
Step 3: OS InformationIn this step the necessary OS information is specified.
Step 3: OS Information 27
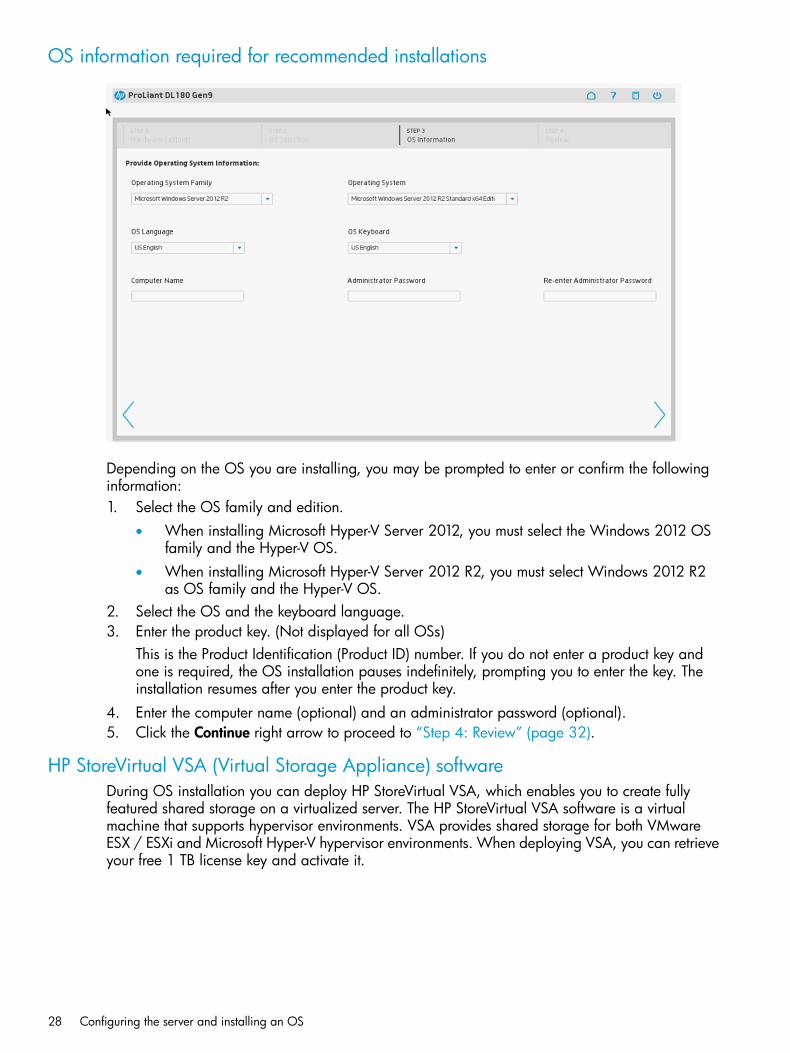
OS information required for recommended installations
Depending on the OS you are installing, you may be prompted to enter or confirm the followinginformation:1. Select the OS family and edition.
• When installing Microsoft Hyper-V Server 2012, you must select the Windows 2012 OSfamily and the Hyper-V OS.
• When installing Microsoft Hyper-V Server 2012 R2, you must select Windows 2012 R2as OS family and the Hyper-V OS.
2. Select the OS and the keyboard language.3. Enter the product key. (Not displayed for all OSs)
This is the Product Identification (Product ID) number. If you do not enter a product key andone is required, the OS installation pauses indefinitely, prompting you to enter the key. Theinstallation resumes after you enter the product key.
4. Enter the computer name (optional) and an administrator password (optional).5. Click the Continue right arrow to proceed to “Step 4: Review” (page 32).
HP StoreVirtual VSA (Virtual Storage Appliance) softwareDuring OS installation you can deploy HP StoreVirtual VSA, which enables you to create fullyfeatured shared storage on a virtualized server. The HP StoreVirtual VSA software is a virtualmachine that supports hypervisor environments. VSA provides shared storage for both VMwareESX / ESXi and Microsoft Hyper-V hypervisor environments. When deploying VSA, you can retrieveyour free 1 TB license key and activate it.
28 Configuring the server and installing an OS

NOTE:• The deployment of HP StoreVirtual VSA is supported only during recommended and custom
installations for Windows, and only during custom installations for VMware. It is not supportedduring manual installation.
• The server must be connected to a network to deploy HP StoreVirtual VSA.
HP StoreVirtual VSA is supported with vSphere or Microsoft Hyper-V on the following operatingsystems:
• VMware ESXi 5.5 Update 3, ESXi 5.1 Update 3, vSphere 6.0
• Microsoft Windows Server 2012
• Microsoft Windows Server 2012 R2For more information on HP StoreVirtual VSA, including instructional videos and free consolemanagement software, see the HP website at http://www.hp.com/go/vsa1TB.
Deploying HP StoreVirtual VSAFrom the HP Software-Defined Storage page you can deploy HP StoreVirtual VSA.
1. Select a VSA type.If you do not want to deploy the HP StoreVirtual VSA software, select Continue withoutdeploying VSA and click the Continue right arrow. A screen is displayed indicating VSA willnot be installed. Click the Continue right arrow to continue.VSA validation begins. If VSA is not available, click the Continue right arrow to confirm OSselections.
2. Enter an optional VSA Host Name.3. Select the VSA Network type (DHCP or Static).4. If Static is selected, enter the associated network parameters.5. Click the Continue right arrow.
Step 3: OS Information 29

Entering VSA contact informationYou must provide all required contact information to deploy HP StoreVirtual VSA. If you do notwish to provide contact information, it will be necessary to select Continue without deploying VSA.
NOTE: The collected contact data is managed according to the HP privacy statement, availableat http://www.hp.com/go/privacy. You may be contacted by HP.
1. Enter the appropriate contact information. All required fields must be entered.The contact information is validated and if any fields are not valid you are prompted to enterthem.
2. If you want to receive new product information, select the Sign me up... option.3. Click the Continue right arrow.
Completing VSA deploymentBefore you can begin using VSA you must perform the following tasks. The VSA instructional videosat the HP website http://www.hp.com/go/vsa1TB will guide you through these tasks.1. Select the appropriate HP StoreVirtual Centralized Management Console, download and
install it2. Retrieve your free 1 TB license key and activate it.3. Configure the Centralized Management Console.If you do not want to deploy VSA, you can do so at a later time.
OS information required for customized installationsIf you selected a Windows-based OS and a Customized installation method on the OS Selectionscreen (“Step 2: OS Selection” (page 23)), additional screens are displayed for you to enter customoperating installation and monitoring management protocol information.
Microsoft Windows configuration information for a customized installation
Depending on the type of Microsoft OS you are installing, you may be prompted to enter thefollowing information:
30 Configuring the server and installing an OS

1. Select the OS family and edition.When installing Microsoft Hyper-V Server 2012, you must select the Windows 2012 OSfamily and the Hyper-V OS. If a different OS family is selected, the installation will fail,generating the following error message: Unattended settings error.
NOTE: When installing Windows 2012 R2, you must select Windows 2012 R2 as the OSfamily and an appropriate OS must be selected.
2. Select the OS and keyboard language.3. Select a partition size.
This is the size of the partition to create as the C: drive and in which to install the OS.By default, the value is set to the maximum-allowed size (the size of the logical drive.) Theminimum-allowed size varies and is determined by the selected OS.
• To change the size of the partition from the default, slide the bar above the field left orright to reduce or increase size. This option is not available when installing MicrosoftWindows Essentials OSs, because custom partitioning is not supported in the EssentialsOSs.)
• To create a partition size based on the provided default, but reducing it by the amountset aside for the swap space (pagefile), select Disallow swap space (not recommended).Select this option only when the pagefile is located elsewhere.
4. Enter the product key.This is the Microsoft Product Identification (Product ID) number. (Not displayed for all OSs).
5. Enter the computer name and an administrator password (optional).HP recommends entering a personalized name instead of using the suggested default. Wheninstalling Microsoft Smart Business Server, HP recommends entering the final system nameduring the installation.To protect your privacy, do not use sensitive information for the computer name. This nameis visible in HP Insight RS and HP Insight Online, and can be viewed by HP support and yourauthorized service provider, reseller/distributor, and installer.If an administrator password is not entered at this time, you are prompted for a passwordduring the first login. (Not displayed for all OSs.)
6. Select a time zone.The time zone is used by the OS to perform daylight saving time updates and other time-relatedfunctions.
7. Enter organization and owner names (optional).
VMware configuration information for customized InstallationIf you selected a VMware OS and a Customized installation method on the OS Selection screen(“Step 2: OS Selection” (page 23)), additional screens are displayed for you enter custom operatinginstallation and monitoring management protocol information.1. Enter a host name (optional).
This name must be a minimum of three characters.2. Enter a root password.
For VMware, the initial password defaults to “password”.3. Specify the network type.
Select DHCP or Static.
Step 3: OS Information 31
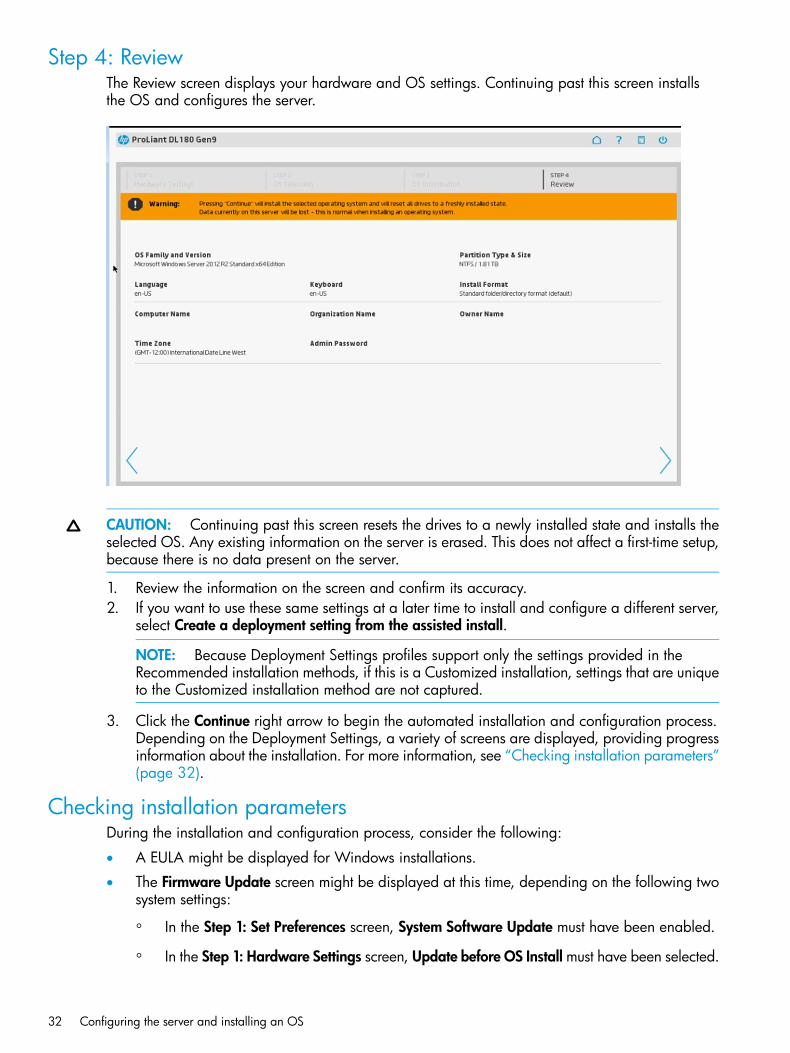
Step 4: ReviewThe Review screen displays your hardware and OS settings. Continuing past this screen installsthe OS and configures the server.
CAUTION: Continuing past this screen resets the drives to a newly installed state and installs theselected OS. Any existing information on the server is erased. This does not affect a first-time setup,because there is no data present on the server.
1. Review the information on the screen and confirm its accuracy.2. If you want to use these same settings at a later time to install and configure a different server,
select Create a deployment setting from the assisted install.
NOTE: Because Deployment Settings profiles support only the settings provided in theRecommended installation methods, if this is a Customized installation, settings that are uniqueto the Customized installation method are not captured.
3. Click the Continue right arrow to begin the automated installation and configuration process.Depending on the Deployment Settings, a variety of screens are displayed, providing progressinformation about the installation. For more information, see “Checking installation parameters”(page 32).
Checking installation parametersDuring the installation and configuration process, consider the following:
• A EULA might be displayed for Windows installations.
• The Firmware Update screen might be displayed at this time, depending on the following twosystem settings:
◦ In the Step 1: Set Preferences screen, System Software Update must have been enabled.
◦ In the Step 1: Hardware Settings screen, Update before OS Install must have been selected.
32 Configuring the server and installing an OS

If the Firmware Update screen is displayed, follow the on-screen prompts to obtain and installthe latest firmware on server components. When the updates are complete, the Installing OSpage is displayed, ready to begin the OS installation.For more information about updating firmware, see the following sections:
◦ “Step 1: Setting Intelligent Provisioning preferences” (page 8)
◦ “Step 1: Hardware Settings” (page 21)
◦ “Updating firmware” (page 36)
• If you attempt to deploy an OS on a server with no installed drives, the server reboots and,after POST, a page is displayed indicating that the settings are being applied. The deploymentdoes not proceed, but messages are written to the IML.
• For Windows installations, messages about an untested Windows version and hpkeyclickmessages might be displayed while the drivers are installed. This is expected behavior. Noaction is required.
Enabling the VIDIf you want to enable the VID, perform the following steps:1. Reboot the server and press F9 during POST to access the UEFI System Utilities.2. Select System Configuration→BIOS/Platform Configuration (RBSU)→System Options→USB
Options→Virtual Install Disk.
TIP: You can use the same procedure to disable the VID if necessary.
Enabling the VID 33

4 Performing maintenanceThe Perform Maintenance window contains the following maintenance-related tasks:
• “Downloading Active Health System data” (page 34)
• “Updating firmware” (page 36)
• “Setting Intelligent Provisioning Preferences” (page 37)
• “Using Deployment Settings” (page 38)
• “Using HP Smart Storage Administrator (HP SSA)” (page 44)
• “Using HP Insight Diagnostics” (page 47)
• “Using Quick Configs” (page 48)
• “Using iLO Configuration Utility” (page 50)
• “Using HP Insight Remote Support” (page 69)
• “Using License Management” (page 71)
• “Using the Erase Utility” (page 72)
Downloading Active Health System dataHP support uses the Active Health System log file for problem resolution. To download ActiveHealth System data:1. On the Intelligent Provisioning home screen, click Perform Maintenance.2. Select Active Health System download from the maintenance options.
The Active Health System download window is displayed.
34 Performing maintenance

Use the Active Health System download screen to download Active Health System telemetry datafrom the server onto a USB key in the form of an Active Health System log file(hp_serial#_date.ahs). Use this screen to select the duration for which data needs to beextracted and the USB key as destination media. You can select a specific start and end date tolimit the duration of data extraction. A sample of the Active Health System telemetry is displayedon the Active Health System download screen.If connected through iLO, locally connected USB keys shared through virtual devices can also beused for saving Active Health System log information.To download Active Health System telemetry data using the Active Health System download feature:1. Insert a USB key into the server.2. Press the F10 key to boot to Intelligent Provisioning during server boot.3. Click Active Health System download from the Intelligent Provisioning Maintenance screen.4. In the Active Health System download screen, select the USB key from the drop down list.
NOTE: If you inserted the USB key after launching Active Health System Download, clickRescan.
5. Select the duration of data retrieval from the menu. HP recommends retrieving seven days ofdata, which creates a 10 to 15 MB file.
6. Enter contact information (optional) in the form provided. The contact information helps HPcustomer services to provide better assistance.
7. Click Download to save the data to the USB key.To submit the file to HP Support (Contacting HP):1. Compress the AHS log to facilitate emailing the file. (Compressing the AHS log manually
might reduce the file size by 50% or more.)2. Contact HP Support, with the log file available for email submission.3. After getting a Case ID from HP Support, email the log file to [email protected],
with the case ID in the subject. For example, <CASE:123456789>.4. Be sure to attach your AHS log file to your open HP support case.For more information about using AHS, see the How to Generate the Active Health System (AHS)Log website (http://www.hp.com/go/AHSlog).
Downloading Active Health System data 35
Updating firmwareHP servers and their installed hardware options are pre-loaded with the latest firmware, but updatedfirmware might be available. Use the Firmware Update utility to find and apply the latest firmwarefor your HP server and installed options. Intelligent Provisioning updates can be performed whenan SPP update is available.To update firmware:1. On the Intelligent Provisioning home screen, click Perform Maintenance.2. Select Firmware Update from the maintenance options.
The Firmware Update window is displayed.
Determining the installed Intelligent Provisioning versionTo check the Intelligent Provisioning version, click the System Information icon in the IntelligentProvisioning window. The Intelligent Provisioning Image version is listed.
Updating Intelligent Provisioning and component firmware
NOTE: Firmware Update reflects the latest updates available as per the baseline defined in thelatest HP Service Pack for ProLiant (SPP). Newer updates that were added outside of the latest SPPbaseline do not appear on the updates list.
To update Intelligent Provisioning and component firmware:1. Select Firmware Update in the Perform Maintenance window.
Immediately after selecting this option, the system searches for firmware on the sourceconfigured in the System Software Update settings (“Setting Intelligent Provisioning Preferences”(page 37)). This might take a few minutes; wait for the display to generate the results.While the system is retrieving the data, click More or Less to show or hide search details.If preferred, download and copy the SPP ISO to a DVD or USB key. To download SPP, seethe HP website (http://hp.com/go/spp/download). For instructions on using the ISO, see theHP Service Pack for ProLiant Quick Start Guide on the HP website (http://www.hp.com/support/SPP_UG_en).
2. After the system retrieves the firmware data, it checks the installed hardware components tosuggest items to update. Depending on the search, you might be prompted to click Continueto begin the hardware components check.This might take a few minutes; wait for the display to generate the results.
36 Performing maintenance

NOTE: If no new firmware is available, the current version is displayed in the FirmwareUpdate screen.
3. Select the items to update, and then click Install.The table is redisplayed, with only the selected items listed.
4. To install all of the listed components, click Continue.5. If you are ready to perform the installation, click Continue at the warning.
After each component is installed, a green check automatically appears in the left column nextto the component name.
6. After all components are installed, click Exit to return to the Perform Maintenance screen.Restart the OS.
Setting Intelligent Provisioning PreferencesUse Intelligent Provisioning Preferences to change basic preferences, including the interface andkeyboard languages, network and share setting, system date and time, and software updatesettings. In addition, the EULA is accessible from this screen.To set Intelligent Provisioning Preferences:1. On the Intelligent Provisioning home screen, click Perform Maintenance.2. Select Intelligent Provisioning Preferences from the maintenance options.
The Intelligent Provisioning Preferences window is displayed.
Setting Intelligent Provisioning Preferences 37

When Intelligent Provisioning is run for the first time on a server, this is the first screen that isdisplayed within Intelligent Provisioning. For more information about the fields in this screen, see“Step 1: Setting Intelligent Provisioning preferences” (page 8).
Using Deployment SettingsDeployment Settings enable you to create a server configuration package that you can deploy toone or more HP ProLiant Gen9 servers and server blades using a USB key and HP iLO Scripting.Using Deployment Settings is an alternative to using the HP Scripting Toolkit.To use Deployment Settings:1. On the Intelligent Provisioning home screen, click Perform Maintenance.2. Select Deployment Settings from the maintenance options.
The Deployment Settings window is displayed.
38 Performing maintenance
NOTE: Creating a deployment setting from the Assisted Installation option is only supported forWindows installs.
When you open Deployment Settings, you can choose to manage an existing Deployment Settingsprofile or create a new one.
Creating a Deployment Settings packageTo create a Deployment Settings package:1. From the Deployment Settings window, select one of the following:
• To create a new, custom Deployment Settings profile or modify an existing DeploymentSettings profile, click Manage.
• To create a new Deployment Settings profile based on one of the provided default profiles,select one of the templates at the bottom of the page.
2. Navigate through the options in the Deployment Settings windows, entering the appropriateinformation.
3. Click Save. When prompted, enter a name and navigate to a USB key on which to save theDeployment Settings.
IMPORTANT: Deployment Settings package names cannot include spaces.
Using a Deployment Settings package to configure a single server
IMPORTANT:• Before using a deployment to install an OS, be sure that the drives and arrays are configured.
• Do not interrupt the configuration process.
• Deployment Settings are not compatible with an SD card OS installation.
To use a Deployment Settings package to configure a single server:1. If you want to use the deployment you just created on the server, click Deploy.
If you want to use a previously created deployment, insert the USB key containing thedeployment:a. Save the deployment from the USB key to the local server.b. In the Select a Deployment window, select the deployment from the list and click Deploy.
If the USB key and their stored deployments are not displayed, click Rescan.
Using Deployment Settings 39

2. As the deployment runs, a validation screen applies settings for the following elements:• ROM Settings
• Array Settings
• System Options
• Firmware Update
• ERS Settings
The validation screen indicates the results of the settings, using icons described in the followingtable.
ResultIcon
Status unknownQuestion mark
ErrorRed box
Element not neededGray box
Element successfully appliedGreen check
Click for additional informationInformation icon
Performing Deployment Settings package-level actionsPackage-level actions manipulate the Deployment Settings package, not individual settings withina deployment.After making a selection in the initial page, the Select a Deployment window opens.In Select a Deployment window, existing Deployment Settings packages that are stored on theserver are displayed in the left pane, existing Deployment Settings packages that are stored on aninstalled USB drive are displayed in the right pane, and package-level action icons are displayedin the center of the window. If a USB drive is installed, its name is displayed near the top of thewindow in the Target USB Key field.
• To perform a package-level action on a Deployment Settings package, select one of thedisplayed packages, and then select an action icon in the middle pane.
• To open a specific Deployment Settings package to change individual settings, double-clickone of the displayed packages.
40 Performing maintenance

The following table defines the available actions.
DescriptionTask
Click the Copy to local server icon to copy a selected deployment from theattached USB key to a local server.Copy a deployment to a local
server
Click the Copy to USB key icon to copy a selected deployment from the serverto the attached USB key.Copy a deployment to a USB key
Click the Create new deployment icon to create a new deployment on the localserver.Create a new deployment
Click the Rename icon to rename the selected deployment. Use onlyalphanumeric characters and underscores in the deployment name. Do notinclude spaces in the name.
Rename a deployment
Click the Duplicate icon to duplicate the selected deployment or template.Duplicate a deployment
Click the Delete icon to delete the selected deployment.Delete a deployment
Entering or changing individual settings for a Deployment Settings packageAfter double-clicking a displayed Deployment Settings package, the Deployment Settings page isredisplayed, with setting categories listed on the left side of the page, and the Deployment Settingspackage you are modifying near the top of the page. To switch to a different Deployment Settingspackage, expand the drop-down menu.Clicking a category displays the associated data fields. The fields are optional and can be leftblank or unchanged.
Using Deployment Settings 41

• To record new values, click Save.
• To execute the Deployment Settings package on the server, click Deploy.
• To go back to the previous page, click Manage.
• To exit Deployment Settings screens, click Exit.The following sections define the available Deployment Settings categories.
Entering version informationUse the Version Information screen to enter any type of user-defined identifying information thatyou want to assign to the deployment.
Entering firmware update settingsUse the Firmware Update screen to enter information about performing firmware updates as partof the deployment installation process.Options include:
• No Update—System firmware is not updated during the deployment installation process.
• hp.com—During the deployment installation process, the system uses the server's Internetconnections to obtain the latest firmware from the HP website and install it on the server.
• Local Repository—The URL of the local repository where the firmware has previously beenuploaded.
Entering array configuration settingsUse the Array Configuration screen to enter RAID settings.1. Select a RAID Level.2. Select a Stripe Size.3. Select Read and Write Cache ratios. Make sure that these values total 100%.
Entering operating system informationUse the Operating System screens to enter OS information and installation settings. The includedfields are the same as those in the Recommended installation method.Not all source media types are supported for every OS.
42 Performing maintenance

1. Select an OS family.2. Enter the OS media path, which can be a Windows Share or an FTP site on the local network.
Installation of Windows from an FTP site is not supported.Based on this setting, the system automatically pulls the ISO from the specified location toinstall it.
• For a Windows share location, enter the following network connection settings:
◦ Server Name or IP Address—Server name or IP address of the server that hosts theOS contents. If a server name is specified, a DNS entry is also required.
◦ Share Name—The name of the network share using Server Message Block (SMB)protocol that hosts the OS contents.
◦ Network Share User—User name used to access the network share.
◦ Network Share Password—Password for the user name used to access the networkshare.
• For an FTP site, enter the following network connection settings:
◦ Server Name or IP Address—FTP server name or IP address of the server that hoststhe OS contents. FTP support requires anonymous access to the FTP server and doesnot support connecting to an FTP server through a proxy.
IMPORTANT:
◦ When entering an FTP path, do not include spaces and punctuation. The FTP serverdirectory structure cannot contain spaces or special characters (including punctuation).
◦ Installation of Windows from an FTP site is not supported.
3. Enter the user name and password for the Deployment Settings package to use to access thenetwork share.This password is not encrypted. For a more secure access method, use FTP.
4. Select the OS and the keyboard language.5. Enter the product key.
If you do not enter a product key and one is required, the OS installation pauses indefinitely,prompting you to enter the key. The installation resumes after you enter the product key.
6. After clicking Deploy, verify that you are ready to create the new OS. Click Apply to installthe OS.
NOTE: When the command is sent to iLO, the system will reboot. Disc drives that you hadpreviously deployed may be erased.
Entering Remote Support informationUse the Remote Support screen to enable or disable Insight Remote Support central connect. InsightOnline direct connect is not supported with the Deployment Settings feature.If you enable Remote Support, enter the following settings:
• Local Remote Support Server—The hostname or IP address of the Insight RS server. In theInsight RS software, the Insight RS server is called the hosting device.
• Local Remote Support Server Port—The port number to use. The default port number for InsightRS is 7906.
For more information about the Insight Remote Support central connect requirements, see “Step 3:Registering for Insight Remote Support” (page 11).
Using Deployment Settings 43

Entering ROM settingsUse the ROM Settings screen to enter ROM-level settings.1. If this Deployment Settings package might be used to reprovision a server already in use,
consider whether to reset the server to its default settings before applying the settings in theDeployment Settings package. For stability reasons, the Standard Boot Order and the PCIDevice enable/disable settings are not cleared.If you choose to keep the existing settings, the settings in the Deployment Settings packagethat differ from the existing settings are used to modify the existing settings.
2. Select the power management package to use. These packages set a basic policy forperformance versus power usage without having to configure individual settings through theUEFI System Utilities menus.A recommended package is displayed, but to change the settings, the options include:
• Balanced Power and Performance
• Minimum Power Usage
• Maximum PerformanceFor more information about these options, see “Using Quick Configs” (page 48).
3. Select the boot order.4. Choose whether to enable SATA devices when they are available.5. Choose whether to install a Virtual Install Disk (VID) that contains drivers from HP.
When VID is enabled, during the OS installation process, a USB mass-storage device appearswith the name of VID. This drive contains a limited set of storage and networking drivers, soany required SAS/iSCSI/FCoE adapter can be loaded, in the event that the OS disc doesnot have the appropriate drivers. For more information about how to load additional drivers,see the OS installation guide.To disable VID at a later time,a. Reboot the server and press F9 during POST to access the UEFI System Utilities.b. Select System Configuration→BIOS/Platform Configuration (RBSU)→Advanced
Options→Advanced System ROM Options→Virtual Install Disk.
Entering system optionsUse the System Options screen to enter basic system settings.1. Select the user interface and keyboard language.2. Accept the Intelligent Provisioning EULA.3. Choose whether to enable or disable Intelligent Provisioning on the server being configured
with the Deployment Settings package.If Intelligent Provisioning is disabled, it cannot be accessed on the server. During POST, F10is in red text on the screen, indicating that the F10 key is disabled and Intelligent Provisioningis no longer accessible. For information on re-enabling Intelligent Provisioning, see “Step 2:Activating Intelligent Provisioning” (page 10).
Using HP Smart Storage Administrator (HP SSA)These utilities provide high-availability configuration, management, and diagnostic capabilities forall HP Smart Array products.To use HP SSA:1. On the Intelligent Provisioning home screen, click Perform Maintenance.2. Select HP Smart Storage Administrator (SSA) from the maintenance options.
The Smart Storage Administrator window is displayed.
44 Performing maintenance

HP SSA is a browser-based utility that runs in either offline or online mode. HP SSA:
• Supports online array capacity expansion, logical drive extension, assignment of online spares,and RAID or stripe size migration
• Suggests the optimum configuration for an unconfigured system
• Provides different operating modes, enabling faster configuration or greater control over theconfiguration options
• Displays on-screen tips for individual steps of a configuration procedureIn HP SSA, you can select a controller from the menu at the top left-hand side of the screen, or youcan choose to configure or diagnose an available controller from the same menu.
Using HP Smart Storage Administrator (HP SSA) 45

ConfigurationUnder Actions click Configure to access the configuration tasks which include the following:
• Controller settings—Configures the supported controller settings. Depending on the controller,these can include setting the array accelerator cache ratio, transform and rebuild priorities,and surface scan delay.
• Caching settings—Configures the supported caching settings which can help increaseperformance by taking advantage of cache memory. Caching also helps protect data integritywhen used with a battery or capacitor.
• Clear configuration—Resets the controller's configuration to its default state. Existing arraysor logical drives are deleted, and data on the logical drives is lost. Confirm this is the preferredaction before proceeding.
• Physical drive write cache settings—Enables or disables the write cache on physical drivesattached to a controller. This feature can improve performance but precautions must be takento ensure data integrity.
• Modify spare activation mode—Switches the spare activation mode from the default behavior(activate on failure only) to predictive spare activation and back.
• Set Bootable Logical Drive/Volume—Sets the primary and secondary boot logical drives andvolumes. Local logical drives as well as remote logical drives and volumes are listed forselection.
• Manage License Keys—Enables the user to add or remove license keys. Depending on thekeys entered or removed, various features can be enabled or disabled.
• More information — Provides an in-depth display of available information for the currentlyselected device and all of its child devices, when applicable.
Diagnostics/SmartSSDUnder Actions click Diagnose to access the diagnostic reporting tools.
46 Performing maintenance

• Array Diagnostics Report—Run reports on selected controllers to display available diagnostictasks. Reports include SmartSSD Wear Gauge information for supported solid state drives.
◦ View Diagnostic Report—Generate and display a diagnostic report for the selecteddevices. The report includes SmartSSD Wear Gauge information for supported SolidState Drives, and usage and estimated lifetime information.
◦ Save Diagnostic Report —Generate a diagnostic report for the selected devices for exportwithout presenting a graphical display.
• SmartSSD Wear Gauge Report—View or generate a report:
View SmartSSD Wear Gauge Report—Display SSD usage and estimated lifetimeinformation.
◦
◦ Save SmartSSD Wear Gauge Report—Generate a report for export, without presentinga graphical display.
Using HP Insight DiagnosticsHP Insight Diagnostics provides a comprehensive suite of offline system and component tests,providing in-depth testing of critical hardware components for devices such as processors, memory,and hard drives. HP Insight Diagnostics captures system configuration information and providesdetailed diagnostic testing capabilities.Insight Diagnostics simplifies the process of effectively identifying, diagnosing, and isolatinghardware issues. System availability is maintained through the following key features:
• Surveying the current configuration, with various levels and categories
• Testing and diagnosing apparent hardware failures
• Documenting system configurations for upgrade planning, standardization, inventory tracking,disaster recovery, and maintenance
Using HP Insight Diagnostics 47

• Sending configuration information to another location for more in-depth analysis
• Managing the Integrated Management Log (IML)In addition to system management tools, service tools can resolve system problems quickly. Tostreamline the service process and resolve problems quickly, you must have the right informationavailable at the time that a service call is placed. This combination of features simplifies the serviceprocess and minimizes downtime.
NOTE: If you accidentally double-click the HP Insight Diagnostics icon, a message is displayed,notifying you that you attempted to have two sessions of Insight Diagnostics open at the same time.To correct the situation, follow the instructions provided in the message.
To access HP Insight Diagnostics:1. On the Intelligent Provisioning home screen, click Perform Maintenance.2. Select Insight Diagnostics from the maintenance options.
The HP Insight Diagnostics window is displayed.
During offline testing, the user-installed OS is not running. Therefore, software information fromthe system is not reported. Insight Diagnostics (Offline Edition) runs when the computer is startedwith one of the following products:
• Intelligent Provisioning on HP servers
• HP Service Pack for ProLiant (SPP)Clicking Exit Diagnostics exits the Insight Diagnostics application and returns to IntelligentProvisioning. Insight Diagnostics is also available online as a web-based application. For moreinformation, see the HP Insight Diagnostics User Guide on the HP website (http://www.hp.com/go/intelligentprovisioning/docs).
Using Quick ConfigsUse this feature to set a power management policy through Intelligent Provisioning without havingto configure individual settings through the UEFI System Utilities.To use Quick Configs:1. On the Intelligent Provisioning home screen, click Perform Maintenance.
48 Performing maintenance

2. Select Quick Configs from the maintenance options.The Quick Configs window is displayed.
When initially configuring and provisioning a server through Intelligent Provisioning, this QuickConfigs screen is presented in the “Step 1: Hardware Settings” (page 21) screen.If the server does not have HP DIMMs installed, the following Power Profiles might not all beavailable:• Balanced Power and Performance—Optimum settings to maximize power savings with minimal
impact to performance for most OSs and applications.• Minimum Power Usage—Enables power reduction mechanisms that might negatively affect
performance. This mode guarantees a lower maximum power usage by the system.• Maximum Performance—Disables all power management options that might negatively affect
performance.After selecting and applying a profile, a confirmation message appears.To customize the individual settings, press the F9 key during server reboot to go to the UEFI SystemUtilities.
Intelligent Provisioning Quick Configs settings and corresponding UEFI System Utilitiessettings
The Quick Configs options provide the capability to select a basic policy for performance versuspower usage, without having to configure individual settings through the UEFI System Utilitiesmenus.The following table shows the three Intelligent Provisioning Quick Configs profiles and theircorresponding UEFI System Utilities settings.
Using Quick Configs 49

NOTE: Not all of the options in this table are adjustable on all servers. However, even if you donot have the option of adjusting some of these settings, they will default to the values shown here.
Quick Configs settings (Intel-based servers)
Power management optionsMaximum performanceMinimum power usageBalanced power and
performance
Maximum PerformanceMinimum Power UsageBalanced Power andPerformance
HP Power Profile
HP Static High PerformanceMode
HP Static Low Power ModeHP Dynamic Power SavingsMode
HP Power Regulator
DisabledEnabledEnabledIntel QPI Link PowerManagement
No C-statesC6 StateC6 StateMinimum Processor IdlePower Core State
No Package StatePackage C6 (retention) StatePackage C6 (retention) StateMinimum Processor IdlePower Package State
Maximum PerformancePower Savings ModeBalanced PerformanceEnergy/Performance Bias
Auto1333 MHzAutoMaximum Memory BusFrequency
EnabledDisabledEnabledChannel Interleaving
Maximum SupportedPCIe Generation 1Maximum SupportedMaximum PCI ExpressSpeed
AutoMinimum QPI SpeedAutoIntel QPI Frequency
Using iLO Configuration UtilityUse the iLO Configuration Utility to view and change iLO settings through Intelligent Provisioning,instead of through the iLO web interface. For more information about iLO, see the HP iLO 4 UserGuide.You must configure iLO network settings to register the server with the HP Insight Remote Supportregistration process.When changing iLO settings, if the display is not as expected or an undefined error message isdisplayed, press F5 to refresh the screen display. It is possible that the change was being madeat the same time through the iLO web interface.To use iLO Configuration Utility:1. On the Intelligent Provisioning home screen, click Perform Maintenance.2. Select iLO Configuration from the maintenance options.
The iLO Configuration Utility window is displayed.
Viewing iLO summary informationTo view iLO summary information:
50 Performing maintenance

1. In the Maintenance window, click iLO.The iLO Configuration Utility window appears.
2. Click Summary. The following information is displayed:• iLO Hostname—The DNS name of the iLO subsystem, for example, ilo instead of
ilo.example.com. This name can be used only if DHCP and DNS are configured to connectto the iLO subsystem name instead of the IP address.
• iLO Firmware Version—The version and date of the installed iLO firmware.
• iLO IP Address—The network IP address of the iLO subsystem
• Server Model—The type of system in which this iLO processor is integrated
• System ROM—The family and version of the active system ROMYou can also view this information on the Overview screen in the iLO web interface. For moreinformation, see the HP iLO 4 User Guide on the HP website (http://www.hp.com/go/ilo/docs).
NOTE: The rest of the procedures in this section are written with the assumption that you haveselected iLO from the Maintenance window.
Editing iLO Access SettingsVarious iLO access settings can be edited from the three tabs on the Access Settings window:Access Options, Service and IPMI/DCMI.To edit access settings on the Access Options tab:
Using iLO Configuration Utility 51

1. In the iLO Configuration Utility window, click Access Settings.The Access Options tab data appears:
2. Edit the option(s) as necessary. Click Apply.
Access Settings–Access Options
• Idle Connection Timeout (minutes)—Specifies how long a user can be inactive before the iLOweb interface or Remote Console session ends automatically. The iLO web interface and theRemote Console track idle time separately because each connection is a separate session.Remote Console sessions are not affected by this value if a virtual media device is connected.The following settings are valid:
◦ 15, 30, 60, or 120 minutes—The default value is 30 minutes.
◦ Infinite—Inactive users are not logged out.
Failure to log out of iLO by either browsing to a different site or closing the browser also resultsin an idle connection. The iLO firmware supports a finite number of iLO connections. Misuseof the Infinite timeout option might make iLO inaccessible to other users. Idle connections arerecycled after they time out.This setting applies to local and directory users. Directory server timeouts might preempt theiLO setting.Changes to the setting might not take effect immediately in current user sessions, but will beenforced immediately in all new sessions.
• iLO Functionality—Specifies whether iLO functionality is available. The following settings arevalid:
◦ Enabled (default)—The iLO network is available and communications with operatingsystem drivers are active.
◦ Disabled—The iLO network and communications with operating system drivers areterminated when iLO Functionality is disabled.
To re-enable iLO functionality, use the iLO 4 Configuration Utility (in the UEFI System Utilities)to set iLO Functionality to Enabled. For more information see the HP UEFI System Utilities UserGuide.
52 Performing maintenance

iLO functionality cannot be disabled on server blades.
• iLO ROM-Based Setup Utility—Enables or disables the iLO 4 Configuration Utility. The followingsettings are valid:
◦ Enabled (default)—On servers that support UEFI, the iLO 4 Configuration Utility is availablewhen you access the UEFI System Utilities.
◦ Disabled—On servers that support UEFI, the iLO 4 Configuration Utility is not availablewhen you access the UEFI System Utilities.
• Require Login for iLO RBSU—Determines whether a user-credential prompt is displayed whenaccessing the iLO 4 Configuration Utility. The following settings are valid:
◦ Enabled—A login dialog box opens when a accessing the iLO 4 Configuration Utility.
◦ Disabled (default)—No login is required when accessing the iLO 4 Configuration Utility.
• Show iLO IP during POST—This setting enables the display of the iLO network IP addressduring host server POST.
• Serial Command Line Interface Status—Enables you to change the login model of the CLIfeature through the serial port. The following settings are valid:
◦ Enabled-Authentication Required (default)—Enables access to the SMASH CLP commandline from a terminal connected to the host serial port. Valid iLO user credentials arerequired.
◦ Enabled-No Authentication—Enables access to the SMASH CLP command line from aterminal connected to the host serial port. iLO user credentials are not required.
◦ Disabled—Disables access to the SMASH CLP command line from the host serial port.Use this option if you are planning to use physical serial devices.
• Serial Command Line Interface Speed—Enables you to change the speed of the serial port forthe CLI feature. The following speeds (in bits per second) are valid:
◦ 9600 (default)
◦ 19200
◦ 38400—This value is not supported by the iLO 4 Configuration Utility.
◦ 57600
◦ 115200
The serial port configuration must be set to no parity, 8 data bits, and 1 stop bit (N/8/1) forcorrect operation.The serial port speed set by this option should match the serial port speed configured in theiLO 4 Configuration Utility.
• Virtual Serial Port Log—Enables or disables logging of the Virtual Serial Port.The following settings are valid:
◦ Enabled—When enabled, Virtual Serial Port activity is logged to a 150-page circularbuffer in the iLO memory, and can be viewed using the CLI command vsp log. TheVirtual Serial Port buffer size is 128 KB.
◦ Disabled (default)—Virtual Serial Port activity is not logged.
This feature is part of an iLO licensing package. For more information, see the followingwebsite: http://www.hp.com/go/ilo/licensing.
Using iLO Configuration Utility 53

• Minimum Password Length—Specifies the minimum number of characters allowed when auser password is set or changed. The character length must be a value from 0 to 39 characterslong. The default value is 8.
• Server Name—Enables you to specify the host server name. You can assign this value manually,but it might be overwritten by the host software when the operating system loads.
◦ You can enter a server name that is up to 49 bytes.
◦ To force the browser to refresh and display the new value, save this setting, and thenpress F5.
• Server FQDN/IP Address—Enables you to specify the server FQDN or IP address. You canassign this value manually, but it might be overwritten by the host software when the operatingsystem loads.
◦ You can enter an FQDN or IP address that is up to 255 bytes.
◦ To force the browser to refresh and display the new value, save this setting, and thenpress F5.
• Authentication Failure Logging—Enables you to configure logging criteria for failedauthentications. All login types are supported; each login type works independently. Thefollowing are valid settings:
◦ Enabled-Every Failure—A failed login log entry is recorded after every failed login attempt.
◦ Enabled-Every 2nd Failure—A failed login log entry is recorded after every second failedlogin attempt.
◦ Enabled-Every 3rd Failure (default)—A failed login log entry is recorded after every thirdfailed login attempt.
◦ Enabled-Every 5th Failure—A failed login log entry is recorded after every fifth failedlogin attempt.
◦ Disabled—No failed login log entry is recorded.
Access Settings–Service
• Secure Shell (SSH) Access—Allows you to enable or disable the SSH feature.SSH provides encrypted access to the iLO CLP. The default value is Enabled.
• Secure Shell (SSH) Port—The default value is 22.
• Remote Console Port—The default value is 17990.
• Web Server Non-SSL Port (HTTP)—The default value is 80.
• Web Server SSL Port (HTTPS)—The default value is 443.
• Virtual Media Port—The default value is 17988.
• SNMP Access—Specifies whether iLO should respond to external SNMP requests. The defaultvalue is Enabled.If you set SNMP Access to Disabled, iLO continues to operate, and the information displayedin the iLO web interface is updated, but no alerts are generated and SNMP access is notpermitted. When SNMP Access is set to Disabled, most of the boxes on theAdministration→Management→SNMP Settings page are unavailable and will not acceptinput.
54 Performing maintenance

• SNMP Port—The industry-standard (default) SNMP port is 161 for SNMP access.If you customize the SNMP Port value, some SNMP clients might not work correctly with iLOunless those clients support the use of a nonstandard SNMP port.
• SNMP Trap Port—The industry-standard (default) SNMP trap port is 162 for SNMP alerts (ortraps).If you customize the SNMP Trap Port value, some SNMP monitoring applications (such as HPSIM) might not work correctly with iLO unless those applications support the use of anonstandard SNMP trap port.
To edit access settings on the Service tab:1. In the iLO Configuration Utility window, click Access Settings.
The Access Options tab data appears:
2. Click the Service tab. The Service tab data appears.3. Edit the option(s) as necessary. Click Apply.
Access Settings–IPMI/DCMIiLO enables you to send industry-standard IPMI and DCMI commands over the LAN. The IPMI/DCMIport is set to 623 and is not configurable.To edit access settings on the IPMI/DCMI tab:1. In the iLO Configuration Utility window, click Access Settings. The Access Options tab data is
displayed.2. Click the IPMI/DCMI tab.
The IPMI/DCMI tab data appears:
Using iLO Configuration Utility 55

3. Select the check box to enable IPMI/DCMI, or clear the box to disable it. Click Apply.
Editing iLO Management Settings
Management–SNMP Settings
NOTE: Read Community supports the following formats: A community string (for example, public).A community string followed by an IP address or fully qualified domain name (for example, public192.168.0.1). Use this option to specify that SNMP access will be allowed from the specified IPaddress or fully qualified domain name. For iLO 4 1.10 or later, you can enter an IPv4 addressor a fully qualified domain name.
• System Location (Agentless Management only)—A string of up to 49 characters that specifiesthe physical location of the server.
• System Contact (Agentless Management only)—A string of up to 49 characters that specifiesthe system administrator or server owner. The string can include a name, email address, orphone number.
• System Role (Agentless Management only)—A string of up to 64 characters that describes theserver role or function.
• System Role Detail (Agentless Management only)—A string of up to 512 characters thatdescribes specific tasks that the server might perform.
• Read Community (Agentless Management only)—The configured SNMP read-only communitystring.
• Trap Community—The configured SNMP trap community string.
• SNMP Alert Destination(s)—The IP addresses or fully qualified domain names of up to threeremote management systems that will receive SNMP alerts from iLO.
• SNMP Port—The port used for SNMP communications. This value is read-only, but can bemodified on the Access Settings→ Service page. Navigate to the Access Settings→ Servicepage in the iLO Management utility to edit the SNMP port. For more information, see “EditingiLO Access Settings” (page 51).
Various iLO management settings can be edited from the three tabs on the Management window:SNMP Settings, SNMP Alerts and Insight Management Integration.
56 Performing maintenance

To edit management settings on the SNMP Settings tab:1. In the iLO Configuration Utility window, click Management.
The SNMP Settings tab data appears:
2. Click Agentless Management or SNMP Pass-Thru.3. Enter data in the fields as necessary. Click Apply.
Management — SNMP Alerts
• Trap Source Identifier—This setting determines the host name that is used in the SNMP-definedsysName variable when iLO generates SNMP traps. The default setting is iLO Hostname.
• iLO SNMP Alerts—Alert conditions that iLO detects independently of the host OS can be sentto specified SNMP alert destinations, such as HP SIM.
• Forward Insight Management Agent SNMP Alerts—Alert conditions detected by the hostmanagement agents can be forwarded to SNMP alert destinations through iLO. These alertsare generated by the Insight Management Agents, which are available for each supportedOS. Insight Management Agents must be installed on the host server to receive these alerts.
• Cold Start Trap Broadcast—Cold Start Trap is broadcast to a subnet broadcast address if thereare no trap destinations configured in the SNMP Alert Destination(s) boxes. The subnetbroadcast address for an IPv4 host is obtained by performing a bitwise logical OR operationbetween the bit complement of the subnet mask and the host IP address. For example, the host192.168.1.1, which has the subnet mask 255.255.252.0, has the broadcast address192.168.1.1 | 0.0.3.255 = 192.168.3.255.
• SNMPv1 Traps—When enabled, SNMPv1 traps are sent to the remote management systemsconfigured in the SNMP Alert Destination(s) boxes.
To edit the settings on the SNMP Alerts tab:1. In the iLO Configuration Utility window, click Management. The SNMP Settings tab data
appears.2. Click the SNMP Alerts tab.
The SNMP Alerts data appears.
Using iLO Configuration Utility 57

3. Click the radio button to select the Trap Source Identifier.4. Click the drop-down list by each setting to select to enable or disable the setting.5. If you choose to send an alert, click Send Test Alert.6. Click Apply.
Management — Insight Management Integration
• HP System Management Homepage (HP SMH) FQDN/IP Address—This value sets the browserdestination of the Insight Agent link on iLO pages. Enter the fully qualified domain name orIP address of the host server. The protocol (https://) and port number (:2381) areadded automatically to the IP address or DNS name to enable access from iLO. If the URL isset through another method (for example, CPQLOCFG), click the browser refresh button todisplay the updated URL.
• Level of Data Returned—This setting controls the content of an anonymous discovery messagereceived by iLO. The information returned is used for HP SIM HTTP identification requests. Thefollowing options are available:
◦ Enabled (iLO+Server Association Data) (default)—Enables HP SIM to associate themanagement processor with the host server, and provides sufficient data to enableintegration with HP SIM.
◦ Disabled (No Response to Request)—Prevents iLO from responding to HP SIM requests.
To edit the settings on the Insight Management Integration tab:1. In the iLO Configuration Utility window, click Management. The SNMP Settings tab data
appears.2. Click the Insight Management Integration tab.
The Insight Management Integration tab data appears.
58 Performing maintenance

3. Edit the setting(s) that you want. Click Apply.
Modifying Network Settings
Network Settings — Summary
• NIC in use—The current NIC configuration you are using (for example, iLO Dedicated NetworkPort, or Shared Network Port.
• iLO Host Name—The DNS name of the iLO subsystem (for example, iLO instead ofilo.example.com). This name can be used only if DHCP and DNS are configured to connectto the iLO subsystem name instead of the IP address. For more information, see the HP iLO 4User Guide.
• MAC Address—The NIC MAC address.
• Link State—The current link state (iLO Dedicated Network Port only).
• Duplex Option—The current duplex option (Full Duplex or Half Duplex).
• DHCPv4 Status—Enabled or Disabled.
• IPv6 Stateless Address Auto-Configuration (SLAAC)—Enabled or Disabled.
• SLAAC Address—Physical address of IPv6 created by iLO.
Using iLO Configuration Utility 59

Network Settings–General
• iLO Hostname Settings
iLO Hostname—The DNS name of the iLO subsystem (for example, ilo instead ofilo.example.com). This name can be used only if DHCP and DNS are configured to
◦
connect to the iLO subsystem name instead of the IP address. For more information, seethe HP iLO 4 User Guide.
◦ Domain Name—The iLO domain name. If DHCP is not used, enter a domain name.
• NIC Settings
◦ Use iLO Dedicated Network Port—If the check box is selected, you are indicating thatyour system uses a NIC with a connector on the back of the server. The NIC handles iLOtraffic only.If you leave the check box blank, you are indicating that your system is using a sharednetwork port. There are two types of shared network ports:
– LOM—Uses a NIC that is built into the server. The NIC handles server network trafficand can, if iLO is configured to do so, handle iLO traffic at the same time.
– FlexibleLOM—Uses an optional NIC that connects to a special connector on theserver. The NIC handles server network traffic and can, if iLO is configured to doso, handle iLO traffic at the same time. Not all servers support a FlexibleLOM. Forthe list of servers that support the Shared Network Port–FlexibleLOM option, see theHP iLO 4 User Guide.
• Link State (iLO Dedicated Network Port only).
Automatic (Default)—Enables iLO to negotiate the highest supported link speed and duplexsettings when connected to the network.
◦
◦ 1000Base T, Full-duplex—Forces a 1 Gb connection that uses full duplex (not supportedfor BL c-Class servers).
◦ 1000Base T, Half-duplex—Forces a 1 Gb connection that uses half duplex (not supportedfor BL c-Class servers).
◦ 100BaseT, Full-duplex—Forces a 100 Mb connection using full duplex.
60 Performing maintenance

◦ 100BaseT, Half-duplex—Forces a 100 Mb connection using half duplex.
◦ 10Base T, Full-duplex—Forces a 10 Mb connection using full duplex
◦ 10Base T, Half-duplex—Forces a 10 Mb connection using half duplex.
To edit the settings on the General tab:1. In the iLO Configuration Utility window, click Network Settings. The General tab data appears.
2. Edit the setting(s) as required. Click Apply.
Network Settings–IPv4
• Enable DHCPv4—Enables iLO to obtain its IP address (and many other settings) from a DHCPserver.
◦ Use DHCPv4 Supplied Gateway—Specifies whether iLO uses the DHCP server-suppliedgateway. If DHCP is not used, enter a gateway address in the Gateway IPv4 Addressbox.
◦ Use DHCPv4 Supplied Static Routes—Specifies whether iLO uses the DHCP server-suppliedstatic routes. If not, enter the static route destination, mask, and gateway addresses inthe Static Route #1, Static Route #2, and Static Route #3 boxes.
◦ Use DHCPv4 Supplied Domain Name—Specifies whether iLO uses the DHCP server-supplieddomain name. If DHCP is not used, enter a domain name in the Domain Name box onthe Shared Network Port page.
◦ Use DHCPv4 Supplied DNS Servers—Specifies whether iLO uses the DHCP server-suppliedDNS server list. If not, enter the DNS server addresses in the Primary DNS Server,Secondary DNS Server, and Tertiary DNS Server boxes.
Using iLO Configuration Utility 61

◦ Use DHCPv4 Supplied Time Settings—Specifies whether iLO uses the DHCPv4server-supplied time.
◦ Use DHCPv4 SuppliedWNS Servers—Specifies whether iLO uses the DHCP server-suppliedWINS server list. If not, enter the WINS server addresses in the Primary WINS Serverand Secondary WINS Server boxes.
• IPv4 Address—The iLO IP address. If DHCP is used, the iLO IP address is supplied automatically.If DHCP is not used, enter a static IP address.
• Subnet Mask—The subnet mask of the iLO IP network. If DHCP is used, the subnet mask issupplied automatically. If DHCP is not used, enter a subnet mask for the network.
• Gateway IPv4 Address—The iLO gateway IP address. If DHCP is used, the iLO gateway IPaddress is supplied automatically. If DHCP is not used, enter the iLO gateway IP address.
• Static Route #1, Static Route #2, and Static Route #3—The iLO static route destination, mask,and gateway addresses. If Use DHCPv4 Supplied Static Routes is used, these values are suppliedautomatically. If not, enter the static route values.
• Primary DNS Server—Enter the IPv4 address for the primary DNS service.
• Secondary DNS Server—Enter the IPv4 address for the secondary DNS service.
• Tertiary DNS Server—Enter the IPv4 address for the tertiary DNS service.
NOTE: When DNS server locations are configured in both IPv4 and IPv6, both sources are used,with preference given according to the iLO Client Applications use IPv6 first configuration option,primary sources, then secondary, and then tertiary.
• Enable DNS Server Registration—Select this option to enable iLO to register its IPv4 addressand name with a DNS server.
• Primary WINS Server—Enter the IPv4 address for the primary WINS server.
• Secondary WINS Server—Enter the IPv4 address for the secondary WINS server.
• Enable WINS Server Registration—Select this check box to enable iLO to register the IPv4address for the WINS server(s).
• Ping Gateway on Startup—Select this check box to have iLO send request packets to thegateway when iLO initializes.
To edit the settings on the IPv4 tab:1. In the iLO Configuration Utility window, click Network Settings. The General tab data appears.2. Click the IPv4 tab. The IPv4 tab data appears.
62 Performing maintenance

3. If you have enabled DHCPv4, clear the check box.4. Edit the setting(s) as necessary. Click Apply.
Network Settings–IPv6
• iLO Client Applications use IPv6 first—When both IPv4 and IPv6 service addresses areconfigured for iLO client applications, this option specifies which protocol iLO tries first whenaccessing a client application. This setting also applies to lists of addresses received from thename resolver when using FQDNs to configure NTP.
◦ Select this check box if you want iLO to use IPv6 first.
◦ Clear this check box if you want iLO to use IPv4 first.
If communication fails using the first protocol, iLO automatically tries the second protocol.
• Enable Stateless Address Auto Configuration (SLAAC)—Select this check box to enable iLO tocreate IPv6 addresses for itself from router advertisement messages.
NOTE: iLO will create its own link-local address even when this option is not selected.
• Primary DNS Server, Secondary DNS Server, Tertiary DNS Server—Enter the IPv6 addressesfor the DNS service.When DNS server locations are configured in both IPv4 and IPv6, both sources are used, withpreference given according to the iLO Client Applications use IPv6 first configuration option,primary sources, then secondary, and then tertiary.
• Use DHCPv6 Supplied NTP Servers—This option determines whether iLO uses the DHCPv6server-supplied time.
• Enable DDNS Server Registration—This option determines whether iLO registers its IPv6 addressand name with a DNS server.
• Static IPv6 Address 1–4—Enter up to four static IP addresses if they are not automaticallyassigned. You must specify the prefix length for the addresses.
Using iLO Configuration Utility 63

• Static Default Gateway—Enter a default IPv6 gateway address for cases in which no routeradvertisement messages are present in the network.
• Static Route #1 (Destination/Gateway), Static Route #2 (Destination), Static Route #3—Enterstatic IPv6 route destination prefix and gateway address pairs. You must specify the prefixlength for the destination. Link-local addresses are not allowed for the destination, but areallowed for the gateway.
To edit the settings on the IPv6 tab:1. In the iLO Configuration Utility window, click Network Settings. The General tab data appears.2. Click the IPv6 tab. The IPv6 tab data appears.
3. Edit the setting(s) as necessary. Click Apply.
Network Settings–SNTP
• Use DHCPv4 Supplied Time Settings—Specifies whether iLO uses the DHCP server-suppliedtime.
• Use DHCPv6 Supplied Time Settings—Specifies whether iLO uses version 6 of the DHCPserver-supplied time.
• Propagate NTP Time to Host—Specifies whether ILO uses NTP time instead of the DHCPserver-supplied time.
• Primary Time Server—If DHCPv4 or DHCPv6 SNTP is not used, enter a time server addressin the Primary Time Server box.
• Secondary Time Server—If DHCPv4 or DHCPv6 SNTP is not used, enter a secondary timeserver address in the Secondary Time Server box.
• Time Zone—A drop-down list of worldwide time zones.To edit the settings on the SNTP tab:1. In the iLO Configuration Utility window, click Network Settings. The General tab data appears.2. Click the SNTP tab. The SNTP tab data appears.
64 Performing maintenance

3. If you enabled DHCPv4 or DHCPv6 time settings, clear the appropriate check box.4. Edit the setting(s) as necessary. Click Apply.
Editing User Administration• User Accounts—Displays available users.
User Name—Appears in the user list on the User Administration page and on the iLOOverview page. It does not have to be the same as the Login Name. The maximum lengthfor a user name is 39 characters. The user name must use printable characters.
◦
◦ Login Name—Is the name that you must use when logging in to iLO. The maximum lengthfor a login name is 39 characters. The login name must use printable characters.
IMPORTANT: The Login Name cannot be modified, once it is set.
• Privileges—Select from the following permissions:
Administer User Accounts—Enables a user to add, edit, and delete local iLO user accounts.A user with this privilege can change privileges for all users. If you do not have thisprivilege, you can view your own settings and change your own password.
◦
◦ Configure iLO Settings—Enables a user to configure most iLO settings, including securitysettings, and to remotely update the iLO firmware. This privilege does not enable localuser account administration.
◦ Remote Console Access—Enables a user to remotely access the host system RemoteConsole, including video, keyboard, and mouse control.
◦ Virtual Media —Enables a user to use the Virtual Media feature on the host system.
◦ Virtual Power and Reset—Enables a user to power-cycle or reset the host system. Theseactivities interrupt the system availability. A user with this privilege can diagnose thesystem by using the button.
To add a new user:
Using iLO Configuration Utility 65

1. In the iLO Configuration Utility window, click User Administration. The User Administrationwindow appears.
2. Click New. The Add User window appears.
3. Enter the user name. The maximum length for a user name is 39 characters. The user namemust use printable characters.
4. Enter the login name. The maximum length for a login name is 39 characters. The login namemust use printable characters.
IMPORTANT: The Login Name cannot be modified, once it is set.
5. Enter the password. The minimum length for a password is set on the Access Settings page.The maximum length for a password is 39 characters.
6. Re-enter the password to confirm it.7. Select the appropriate user permission(s) for the user you are adding.
66 Performing maintenance

8. Click Add.To edit an existing user’s account:1. In the iLO Configuration Utility window, click User Administration. The User Administration
window appears.2. Click Edit. The Edit User window appears.
3. Enter the User Name for the user’s account you are editing.4. Enter the user’s password. Re-enter the password to confirm it.5. Select the check boxes to modify the user’s permissions.6. Click Update.To delete a user account:
Using iLO Configuration Utility 67
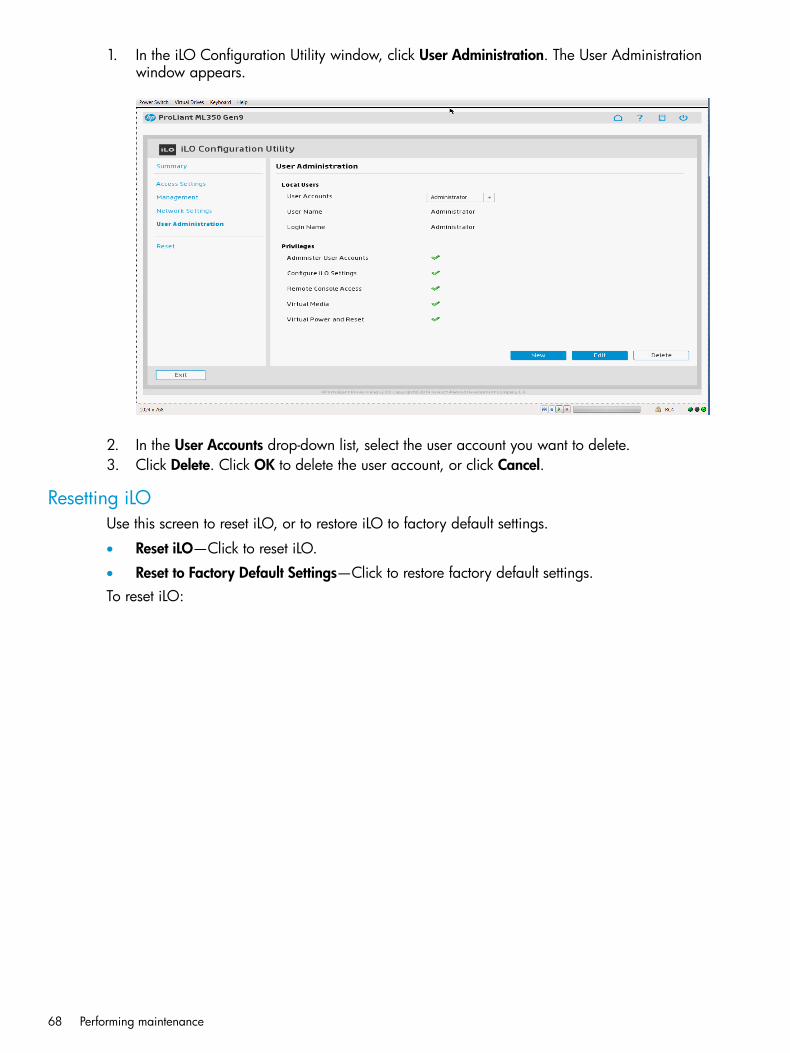
1. In the iLO Configuration Utility window, click User Administration. The User Administrationwindow appears.
2. In the User Accounts drop-down list, select the user account you want to delete.3. Click Delete. Click OK to delete the user account, or click Cancel.
Resetting iLOUse this screen to reset iLO, or to restore iLO to factory default settings.
• Reset iLO—Click to reset iLO.
• Reset to Factory Default Settings—Click to restore factory default settings.To reset iLO:
68 Performing maintenance

1. In the iLO Configuration Utility window, click Reset. The Reset iLO window appears.
2. Select the check box for the option you want. Click Reset. iLO will be reset. You will have tolog in again.
Using HP Insight Remote SupportHP Insight Remote Support provides automatic submission of hardware events to HP to preventdowntime and enable faster issue resolution. Use this screen to register or unregister for InsightRS.To use HP Insight Remote Support:1. On the Intelligent Provisioning home screen, click Perform Maintenance.2. Select HP Insight Remote Support from the maintenance options.
The Insight Remote Support window is displayed.
Using HP Insight Remote Support 69

When initially configuring Intelligent Provisioning for use, this screen is displayed in “Step 3:Registering for Insight Remote Support” (page 11).
Unregistering from Insight Remote SupportThe process to unregister from Insight Remote Support depends on whether you used the InsightOnline direct connect or Insight Remote Support central connect registration method.
Unregistering from Insight Online direct connectUse this procedure to discontinue monitoring of an HP ProLiant server that is registered for InsightOnline direct connect.1. Navigate to the Perform Maintenance page and select HP Insight Remote Support.2. Click Unregister.
The following message appears:This server is not registered.
Unregistering a ProLiant server from Insight Remote Support central connect1. Log in to the Insight RS Console.2. Do one of the following:
• To stop monitoring a server temporarily, select the server on the Devices→Device Summarytab in the Insight RS Console, and then select ACTIONS→DISABLE SELECTED.Unregistering the server directly from Intelligent Provisioning is the same as temporarilydisabling the server in the Insight RS Console.
• To stop monitoring a server permanently, delete the server from the Insight RS Console.To delete the server, select it on the Device Summary tab, and then selectACTIONS→DELETE SELECTED.
3. Navigate to the Perform Maintenance→HP Insight Remote Support page in IntelligentProvisioning.
4. Verify that the server is unregistered.
70 Performing maintenance

Editing the web proxy settingsProxy settings must be maintained to enable an HP ProLiant server to continue to send InsightRemote Support data to HP. If the proxy settings change, use the following procedure to edit them:1. Navigate to the Perform Maintenance page and select HP Insight Remote Support.
The HP Insight Remote Support page opens.2. Click the Update Proxy link.
The Update Web Proxy Settings dialog box opens.
3. Update the following settings, as needed:• Web Proxy Server
• Web Proxy Port
• Web Proxy Username
• Web Proxy Password4. Click Update Proxy.
Using License ManagementUse the License Management feature to activate the iLO License Pack and the HP SmartCacheLicense Pack.1. On the Intelligent Provisioning home screen, click Perform Maintenance.2. Select License Management from the maintenance options.
The License Management window is displayed which includes a list of licenses appropriatefor your server.
3. Enter the License Key for the iLO License Pack and/or the HP SmartCache License Pack.• The iLO License Pack enables remote media access and enhanced diagnostics and runtime
functions.• The HP SmartCache License Pack enables the Smart Array Controller to make use of solid
state devices to accelerate access to data residing on hard drives.• License Keys are available at: http://www.hp.com/go/proliantkeys
4. Click Apply to activate your licenses.
Using License Management 71

Using the Erase UtilityUse the Erase Utility to clear hard drives and the Active Health System logs, and to reset the RBSUsettings in the UEFI System Utilities.
CAUTION: Perform a backup before running the Erase Utility. The utility sets the system to itsoriginal factory state, deletes the current hardware configuration information, including array setupand disk partitioning, and erases all connected hard drives completely. Based on your selectionsin this utility, the Erase Utility erases data from the specified areas of the system. Existing data andsystem configuration settings are lost.
Secure Erase ModeResetDo Not Erase
Performs an overwritepattern erase, so no data isrecoverable. The VID is alsoerased. For moreinformation, see “UsingSecure Erase” (page 73).1
Erases the master bootrecord of the hard drives, sothey are no longer bootable
Does not erase any harddrive operations
All Hard Drives
Not an available optionMounts AHS partitions anderases all files in thepartition
Does not erase AHS logsActive Health System log
Not an available optionResets the RBSU settings todefault
Does not reset RBSU settingsRBSU
1 Hard Drive Secure Erases may take hours, or, for larger drives, days to complete. This is expected behavior for thisthorough erase procedure.
To use the Erase Utility:1. On the Intelligent Provisioning home screen, click Perform Maintenance.2. Select Erase Utility from the maintenance options.
The Erase Utility window is displayed.3. After making the appropriate selections, click Erase. A Confirm Erase window appears,
prompting you to click OK to initiate the Erase procedure, or click Cancel to cancel the Erase.
72 Performing maintenance

Using Secure EraseIntelligent Provisioning provides secure erase functionality for the internal system storage and harddisks following the guidelines outlined in DoD 5220.22-M. Secure erase overwrites all blockdevices attached to the system through applying random patterns in a three-pass process. Theseblock devices include hard disks, storage systems attached to the server, as well as the internalstorage used by iLO. Depending on the amount of storage installed on a system, the secure eraseprocess can take many hours or even days to complete.
CAUTION:• Secure Erase should be used with extreme caution and only when a system is being
decommissioned. The secure erase process will reset iLO and lose all licenses stored there,reset BIOS settings in many cases, and delete all AHS and warranty data stored on thesystem. iLO will reboot multiple times after the process is complete.
• Disconnect any FCoE, iSCSI, external SAS, and Fibre Channel storage before using secureerase, unless they should also be erased.
Using the Erase Utility 73

5 Advanced topicsUsing a provided script to create an Intelligent Provisioning update mirror
For Windows environments, HP provides a script that can populate the Intelligent Provisioningupdate mirror repository for you. When creating this mirror, you upload the software and firmwaredelivered through SPP to a server within your local network. Then, when updating servers in yournetwork, they can access the firmware and software on the local server instead of the HP website,and can therefore greatly increase the speed of updates to the servers.This script uses hp-ipcli to automate the process.1. Obtain the script from the HP FTP site: ftp://ftp.hp.com/pub/softlib2/software1/
pubsw-windows/p1031186752/v853902. If a Proxy server is required, enter the following command:
> set http_proxy=http://myproxyserver:myproxyport
3. Sync the files, to copy the files from the HP website to your web server> hp-ipcli.exe ipsync C:\inetpub\ftproot\ipupdates ftp://iisserver/ipupdates
4. When complete, access ftp://iisserver/ipupdates to access Intelligent ProvisioningPreferences.
Creating an Intelligent Provisioning update mirrorUse an Intelligent Provisioning update mirror to access software and firmware delivered throughSPP from a server within your local network, increasing the speed of updates.The mirror requires a web server running on a server with any OS capable of serving files overFTP or HTTP.To create an Intelligent Provisioning update mirror for an SPP:1. Download the SPP and copy the files to your web server:
a. Download the .iso file from the HP website:http://www.hp.com/go/spp/download
b. Mount the SPP ISO and copy the contents to your web server. The following exampleuses UNIX commands and assumes that the web server is serving the files from /srv/www/spp-version1. On Windows, you can use a utility to mount the ISO and thencopy the files with Windows Explorer.# mkdir -p sppmount# mount -o loop SPP2011.09.0.iso sppmount# mkdir -p /srv/www/spp-version1# cp -r ./sppmount/. /srv/www/spp-version1# umount sppmount# rmdir sppmount
74 Advanced topics

2. If you want to host the Intelligent Provisioning software on the mirror, download the latestversion of Intelligent Provisioning and copy the files to your web server:a. Navigate to the HP website:
ftp://ftp.hp.com/pub/softlib2/software1/pubsw-linux/p1048499843
b. From the newest folder, download the following files:• Gaius.img.gz
• Vid.img.gz
• Hp_manifest.zip
c. Copy the files to your web server.# cp gaius.img.gz /srv/www/ipupdate-1.00# cp vid.img.gz /srv/www/ipupdate-1.00# unzip -d /srv/www/ipupdate-1.00 hp_manifest.zip
3. Update the URLs in the SPP configuration files to address your web server:a. Create or modify the file spp-version1/hp_manifest/config.xml, adding rules
to rewrite the URLs to reference your web server. For example,<?xml version=”1.0” encoding=”UTF-8”?><hp_manifest schema_version=”1.0.0.0”><index> <config> <rewrite_url pattern=”file://\.” replace=”http://myserver/spp-version1” /> </config> </index></hp_manifest>
In the previous example, Intelligent Provisioning replaces each URL that starts withfile:// with a URL on your web server. For example, a request for file://./hp/swpackages/CP0012345.scexe is converted to http://myserver/spp-version1/hp/swpackages/CP0012345.scexe.
b. Update spp-version1/hp_manifest/index.xml to reference config.xml if itis not already listed.<?xml version=”1.0” encoding=”UTF-8”?><hp_manifest schema_version=”1.0.0.0”> <index> <include src=”meta.xml” type=”meta” lang=”en” /> <include src=”meta-ja.xml” type=”meta” lang=”ja” /> <include src=”os.xml” type=”operating_systems” /> <include src=”type.xml” type=”type” /> <include src=”system.xml” type=”systems” /> <include src=”device.xml” type=”devices” /> <include src=”category.xml” type=”categories” />
<include src=”config.xml” type=”config” /> </index></hp_manifest>
Creating an Intelligent Provisioning update mirror 75

4. If you are hosting the Intelligent Provisioning software on your mirror, update the URLs in theIntelligent Provisioning configuration files to address your web server:a. Create or modify the file ipupdate-1.00/hp_manifest/config.xml and add rules
to rewrite the URLs to reference your web server.<?xml version=”1.0” encoding=”UTF-8”?><hp_manifest schema_version=”1.0.0.0”><index> <config> <rewrite_url pattern=”file://\.” replace=”http://myserver/ipupdate-1.00 “ /> </config></index></hp_manifest>
In the previous example, the Intelligent Provisioning software replaces each URL that startswith file:// with a URL on your web server. For example, a request for file://./gaiusw.img.qz is converted to http://myserver/ipupdate-1.00/gaius.img.gz.
b. Update ipupdate-1.00/hp_manifest/index.xml to reference config.xml if itis not already listed.<?xml version=”1.0” encoding=”UTF-8”?><hp_manifest schema_version=”1.0.0.0”> <index> <include src=”meta.xml” type=”meta” lang=”en” /> <include src=”meta-ja.xml” type=”meta” lang=”ja” /> <include src=”os.xml” type=”operating_systems” /> <include src=”type.xml” type=”type” /> <include src=”system.xml” type=”systems” /> <include src=”device.xml” type=”devices” /> <include src=”category.xml” type=”categories” />
<include src=”config.xml” type=”config” /> </index></hp_manifest>
5. Create an index.xml file to redirect FTP or HTTP requests from the URL entered in theIntelligent Provisioning user interface to the locations of the update files.For example, to use the URL http://mywebserver/update-src/hp/proliant in theIntelligent Provisioning user interface, create the following index.xml file and place it in theupdate-src/hp/proliant directory relative to your web server's root directory.<?xml version=”1.0” encoding=”UTF-8”?><hp_manifest schema_version=”1.0.0.0”> <index> <include src=”http://myserver/spp-version1” type=”redirect” />
<include src=”http://myserver/ipupdate-1.00” type=”redirect” /> </index></hp_manifest>
Mirroring different SPPs to different serversYou can add regular expressions to the index.xml file so that the web server serves differentSPPs to different servers based on SMBIOS runtime attributes. If the regular expression matchesthe SMBIOS information, the file is included; otherwise it is ignored.
76 Advanced topics
Table 1 Regular expression attributes
SMBIOS attributeAttribute name
SMBIOS product name (dmidecode — string system-product-name)product_name
SMBIOS serial number (smidecode — string system-serial-number)product_serial
SMBIOS uuid (dmidecode — string system-id)product_uuid
ROM family (dmidecode — string bios-version)bios_family
For example, to configure a mirror that serves different SPPs for different types of servers, you canadd the product_name attribute to the redirect commands in the index.xml file. In the followingexample, the DL380 servers access spp-version1 while the DL580 servers access spp-version2.<?xml version=”1.0” encoding=”UTF-8”?><hp_manifest schema_version=”1.0.0.0”> <index> <include src=”http://myserver/spp-version1” type=”redirect”
product_name=”.*dl380.*” />
<include src=”http://myserver/spp-version2” type=”redirect”
product_name=”.*dl580.*” />
<include src=”http://myserver/ipupdate-1.00” type=”redirect” /> </index></hp_manifest>
Using the HP USB Key UtilityThe HP USB Key Utility is a Windows application that copies Intelligent Provisioning or HP SPPcontents, and other CD or DVD images to a USB flash drive. After copying data to the USB flashdrive, you can run Intelligent Provisioning or SPP from the USB flash drive instead of from a CD orDVD. This process is beneficial in headless-server operations. It also simplifies the storage,transportation, and usage of the contents by allowing you to retrieve their images from the weband customize them as needed.
FeaturesThe HP USB Key Utility supports:
• ISO files larger than 1 GB.
• Quick Formatting on USB flash drives.
• USB flash drives up to a maximum of 32 GB. USB flash drives larger than 32 GB are notdisplayed in the utility.
PrerequisitesInstalling applications onto a USB flash drive requires a supported source CD, DVD, or ISO, anda USB flash drive with adequate storage space for storing the source contents. The USB Key Utilityrequires a USB 2.0 flash drive with a storage size larger than the media or ISO image (2 GB orgreater).
Using the HP USB Key Utility 77

NOTE: Version 2.0 and later of the HP USB Key Utility does not support a 32-bit operatingsystem. Use version 1.8 of the utility in 32-bit environments.
AutoRun filesAutoRun files do not start automatically from the utility. To start an AutoRun file, double-click theautorun.exe file in the appropriate CD or DVD folder on the USB Key.
Creating a bootable USB keyInstalling the utility adds a shortcut in HP System Tools in the Programs Start menu folder.To create a bootable USB key:1. Double-click the HP USB Key Utility shortcut in the HP System Tools folder.
78 Advanced topics

2. Complete each step as presented by the application:a. Click Next at the splash screen.b. Read the End-User License Agreement, and then select Agree and click Next.c. Select Create a bootable USB key from CD/DVD, and then click Next.
d. Place the USB flash drive in an available USB port. Insert the media in the optical driveor mount the ISO image, and then click Next.
e. Choose the drive letter of the source, choose the drive letter of the target USB flash drive,and click Next.
TIP: Click Rescan Target if you don’t see your drive key or just inserted a new one.
Using the HP USB Key Utility 79

CAUTION: All data on the target USB key will be deleted.
f. Click Next on the warning message screen. The USB flash drive is formatted, and thesource contents are copied to the USB flash drive.
g. Click Finish to display the README.TXT file.
Adding additional content to a bootable USB keyHP USB Key Utility supports multiple images on a single USB flash drive if there is adequate spaceavailable on the USB flash drive and you are not loading content that works with a UEFI bootloader,which does not support multiple images due to security reasons.
NOTE: HP SUM 6.2.0, HP SPP 2014.02.0, or Intelligent Provisioning 1.60 and later does notsupport multiple-boot environments on a single device. HP SUM, SPP, and Intelligent Provisioningcontain signed parts to work with the UEFI bootloader. Use only single-image boot configurationswith the HP USB Key Utility.
1. Follow the instructions for creating a bootable USB key.2. Double-click the HP USB Key Utility shortcut in the HP System Tools folder.3. Complete each step presented by the application:
a. Click Next at the splash screen.b. Select Agree, and then click Next after reading the End-User License Agreement.c. Select Add an additional CD/DVD to a bootable USB key, and then click Next.d. Place the USB flash drive in an available USB port. Insert the media into the optical drive
or mount the ISO image, and then click Next.e. Choose the drive letter of the source, choose the drive letter of the target USB flash drive,
and then click Next.
80 Advanced topics

f. Click Next on the informational screen. The source contents are copied to the USB flashdrive.
g. Click Finish to display the README.TXT file.4. Repeat steps 2-3 for each source media or image to be transferred to the USB key.
Using the HP USB Key Utility 81

6 TroubleshootingTroubleshooting overview
This section includes common Intelligent Provisioning installation and operational issues, andprovides directions for corrective action, where possible.
Troubleshooting general issues• Issue: When a profile containing OS settings is deployed on a server that does not have disks
connected, the OS settings are applied and the installation is interrupted without displayinga There are no physical disks attached error message to indicate a problem hasoccurred.Suggested action: Attach the disks and retry.
• Issue: When selecting the Secure Erase option for Onboard NAND Flash, the Active HealthSystem (AHS) log option is also selected by default. However, the AHS secure erase processdoes not initiate with the Onboard NAND Flash option in the Erase Utility.Suggested action: The process is working as designed.
• Issue: While performing offline flashing with Service Pack for ProLiant (SPP), the SystemInformation page does not display information for InfiniBand cards.Suggested action: You can see system information by booting a full operating system andrunning HP Insight Diagnostics, which shows what hardware is connected.
• The Download button in the AHS Download Utility does not download the AHS logs.Suggested action: Retry the operation. The logs should be downloaded when the Downloadbutton is used a second time.
• Issue: The OS-recommended DVD is acting as a manual installation when the server is set upto be password protected.Suggested action: The Intelligent Provisioning installation process is working as designed.Because the system is password protected, no changes can be applied that will bypass thisissue.
• Issue: Cannot access HP SSA from systems supporting SATA RAID operating in Legacy BIOSBoot Mode.Suggested action: To access HP SSA in Legacy BIOS Boot Mode, switch the SATA Controller(in RBSU) to SATA AHCI mode from Dynamic Smart Array mode. Dynamic Smart Array (B140i)works only in UEFI Boot Mode.
UEFI Boot Mode failures caused by unsupported option cardsIssue: In UEFI Boot Mode, the system is unable to boot and complete the OS setup. The screendisplays a message that no available boot device can be found and reboots.Suggested action: This problem can occur when using an unsupported option card. Only supportedoption cards should be used as a boot controller on Gen9 ProLiant servers in UEFI Boot Mode. Ifthis occurs, replace the option card with a supported device that supports UEFI Boot Mode.The integrated SATA RAID controller (B120i) in ProLiant models is only supported in UEFI BootMode. When using Legacy Boot Mode, the B120i controller should be disabled. The B120icontroller can only be configured using Intelligent Provisioning and currently cannot be used inconjunction with other RAID controllers during assisted installation because of driver installationrestrictions. To install a system in this configuration, you must manually install the OS by providingthe correct driver at install time, and then install the SPP to enable the other devices.
82 Troubleshooting

Most supported iSCSI targets are fully supported by Intelligent Provisioning, including many FCoEtargets. There are issues involving HP 3Par targets using both Broadcom and Emulex-based devicesin Microsoft Windows. These devices might require set up in a non-scripted manner using a manualinstallation or an imaging-based solution.
Troubleshooting Windows-specific issues• Issue: After installing Windows, when viewing the Integrated Management Log (IML), the log
may not generate and the following error message may be displayed: No systemmanagement driver is loaded.
Suggested action: Use the Run as administrator option to launch the IML Viewer.
• Issue: No information is populated on the System Management Homepage after aRecommended installation on Windows.Suggested action: This is expected behavior because by default only AMS is installed. Topopulate the information in the SMH, install WBEM or SNMP agents.
• Issue: The Windows installation process fails because an unsupported language has beenselected.Suggested action: The installation media must support the OS Language selected. Ensure thelanguage selected is supported by the Windows installation media.
• Issue: When installing Microsoft Hyper-V Server 2012 R2 using an SD card, the installationfails.Suggested action: The Windows media may not support the high speed USB controllers onsome ProLiant servers and be unable to run from SD media. If the installation fails, installHyper-V Server 2012 R2 using the Microsoft install tools instead of using Intelligent Provisioning.
• Issue: When attempting to install Microsoft Hyper-V Server 2012, the installation fails and thefollowing error message is displayed: Unattended settings error.Suggested action: When installing Microsoft Hyper-V Server 2012, you must select the Windows2012 OS family and the Hyper-V OS.
Troubleshooting Linux-specific issues• Issue: When using the Recommended installation method in one of the following situations:
◦ Red Hat OS installation with FTP source media
One of the following problems might occur:
◦ The installation hangs during reboot and a The Red Hat Enterprise LinuxServer CD was not found error is displayed.
◦ The installation hangs and a Could not allocate requested partitions erroris displayed.
◦ The installation does not complete successfully, or
◦ The installation completes successfully even if there are missing flat files for the OSinstallation.
Suggested action: To remedy any of the situations above, obtain the DUD from the HP SupportCenter (HPSC) to perform the installation outside of Intelligent Provisioning.
• Issue: When installing Red Hat Enterprise Linux 6, you are unable to proceed with theRecommended installation with valid OS images through FTP source media.Suggested action: While performing Red Hat recommended installation using FTP sourcemedia, make sure that all the required Red Hat OS files are present in the OS flat file folder.
Troubleshooting Windows-specific issues 83

If files are missing or incorrectly placed, you might not be able to continue with installation.Also make sure that two TRANS.TBL files are present in the Red Hat OS flat files folder. Onefile should be present in the main OS file folder, and another should be present inside the“Server” folder inside the main OS file folder.
• Issue: When installing Red Hat Enterprise Linux 6, you are unable to browse Red Hat OS fileswhile saving the Deployment Setting profile.Suggested action: While selecting Red Hat OS flat files in Deployment Settings, if a “Thismedia does not match the selected OS. Missing:” message appears, either the wrong OSfamily is selected, or some of the OS files are missing from the OS flat file folder. Make sureall the required Red Hat OS files are present in the OS Flat file folder.
• Issue: When performing a Firmware Update, the process fails to update the HP BroadcomOnline Upgrade Utility for Linux x86_64.Suggested action: Update the firmware under the installed OS.
• Issue: Manual installation of SUSE Linux Enterprise Server 12 fails if the server is in LegacyBIOS Boot Mode.Suggested action: Switch the server to UEFI Boot Mode instead.
• Issue: When attempting to install SUSE Linux Enterprise Server 12, the installation processstops and the following message is displayed:Please make sure your installation medium is available. This canoccur if the installation involves a file server in a Windows domain.This can occur when using either Legacy BIOS or UEFI Boot Modes.
Suggested action: When performing the installation, make sure the file server is not part of aWindows domain. An alternative is to use disk installation to avoid this problem.
Troubleshooting VMware-specific issues• Only flat files are supported over FTP. ISO files are not supported.
• A standalone NIC card on the motherboard of the server takes the position of eth0 and eth1,pushing the embedded NIC to eth2 and eth3.
• Issue: VMware ESXi Custom Image requires a custom HP ISO.Suggested action: Download the ISO from the VMware website.
• Issue: On the OS Information screen for ESXi Custom installation, the Continue arrow is visible.If a host name is entered in the Host Name field, the Continue arrow disappears.Suggested action: Make sure the Host Name field contains at least three characters.
• Issue: When performing a VMware Recommended installation with DVD as source media,after copying the OS files the server displays the message Press Enter to reboot.Pressing Enter causes the server to begin loading the ESXi installer again rather than openingthe OS.Suggested action: Remove the USB device and the system should continue.
Customer advisoriesAdditional problem-solving information is available from the following sources:
• How to Install/Reinstall Intelligent Provisioning if It Does Not Launch After Pressing F10 DuringPOST: http://h20564.www2.hp.com/portal/site/hpsc/public/kb/docDisplay/?docId=c03693433
• Windows Installations May Fail on 3 TB Volumes In Some Configurations: http://h20564.www2.hp.com/portal/site/hpsc/public/kb/docDisplay/?docId=c03711970
84 Troubleshooting

• Unable to Launch Successfully if More Than 32 Logical Drives Are Created: http://h20564.www2.hp.com/portal/site/hpsc/public/kb/docDisplay/?docId=c03686831
• Installation of SUSE Linux Enterprise Server 12 Halts When Using HP Intelligent Provisioningon an HP ProLiant Server In Legacy Mode: http://h20564.www2.hp.com/portal/site/hpsc/public/kb/docDisplay/?docId=emr_na-c04565685
Customer advisories 85

7 Support and other resourcesContacting HP
For worldwide technical support information, see the HP support website:http://www.hp.com/go/HPSC
Be sure to have the following information available before you call HP:
• Active Health System log: Download and have available an Active Health System log forseven days before the failure was detected. For more information, see the “DownloadingActive Health System data” (page 34) section.
• Onboard Administrator SHOW ALL report (for HP BladeSystem products only) – moreinformation on obtaining the Onboard Administrator SHOW ALL report, see the HP website:http://www.hp.com/go/OAlog
• Technical Support registration number (if applicable)
• Product serial numbers
• Product model name and number
• Product identification number
• Applicable error messages
• Add-on boards or hardware
• Third-party hardware or software
• OS type and revision level
Remote supportRemote support is available with supported devices as part of your warranty, Care Pack Service,or contractual support agreement. It provides intelligent event diagnosis, and automatic, securesubmission of hardware event notifications to Hewlett Packard Enterprise, which will initiate a fastand accurate resolution based on your product’s service level. Hewlett Packard Enterprise stronglyrecommends that you register your device for remote support.For more information and device support details, go to the following website:www.hpe.com/info/insightremotesupport/docs
Documentation feedbackHewlett Packard Enterprise is committed to providing documentation that meets your needs. Tohelp us improve the documentation, send any errors, suggestions, or comments to DocumentationFeedback ([email protected]). When submitting your feedback, include the document title,part number, edition, and publication date located on the front cover of the document. For onlinehelp content, include the product name, product version, help edition, and publication date locatedon the legal notices page.
86 Support and other resources

GlossaryThis Glossary provides names and definitions for terms and acronyms commonly usedin this document.
Agent Software on managed servers used to make changes to the servers. Functions supported includesoftware installation and removal, software and hardware configuration, and server statusreporting.
AHS HP Active Health System is a technology that provides continuous, proactive health monitoringof over 1600 system parameters. It also logs configuration changes for more accurate problemresolution. All information collected by Active Health is logged securely, isolated from the operatingsystem and separate from any customer data.
AMS Agentless Management Service. AMS is a service that collects OS configuration informationabout events and provides this information to the iLO Active Health System log.
Captured image A data store containing all the information from a target server including the files, disk partitioninformation, and anything else needed to completely recreate the target server back to the sameserver, or perhaps a different one. The captured image does not include partitions, only file systemdata. See also image installation.
Configuration file The generic term for Windows and Linux unattended installation files. These files provide all theinformation required to install the operating system without user intervention. Also applies tohardware configuration utilities such as BIOS configuration and array controller configuration.Customers may create new configurations for their own purposes.
DDNS Dynamic DNSDHCP Dynamic Host Configuration ProtocolEnclosure A chassis that contains multiple blade servers and interconnect devices.HP InsightDiagnostics
HP Insight Diagnostics provides a comprehensive suite of offline system and component tests,providing in-depth testing of critical hardware components for devices such as processors, memory,and hard drives.
HP Insight Online HP Insight Online is a service that automatically aggregates device health, asset, and supportinformation from iLO with contract and warranty information, and then secures it in a single,personalized dashboard that is viewable from anywhere.
HP Insight RemoteSupport
HP Insight Remote Support enables intelligent event diagnosis and automatic, secure submissionof hardware event notifications to HP. These notifications prevent downtime and enable fasterissue resolution.
HP IntegratedLights-Out (iLO)
An independent microprocessor built into HP ProLiant servers that provides multiple ways toconfigure, update, and operate servers remotely. iLO can remotely perform most functions thatotherwise require a visit to the data center, computer room, or remote location. See http://www.hp.com/go/ilo.
HP IntelligentProvisioning
HP Intelligent Provisioning is a single-server deployment tool embedded in HP ProLiant Gen8 andGen9 servers that replaces the SmartStart CDs and Smart Update Firmware DVD used withprevious generations of HP ProLiant servers.
HP PSP HP ProLiant Support Pack.HP SPP The HP Service Pack for ProLiant has replaced the Windows and Linux ProLiant Support Pack
(PSPs). The SPP is a comprehensive package that includes firmware, drivers, and tools acrossProLiant Servers and infrastructure including a broad range of many generations of HP ProLiantBL/DL/ML/SL 100, 300, 500, 700, and 900 series servers. See http://www.hp.com/go/spp.
HP SSA HP Smart Storage Administrator. HP SSA consists of utilities that provide high-availabilityconfiguration, management, and diagnostic capabilities for all HP Smart Array products.
HP SUM HP Smart Update Manager. HP SUM is a technology that installs and updates firmware andsoftware on HP ProLiant servers.
HP USB Key Utility The HP USB Key Utility is a Windows application that enables you to copy Intelligent Provisioningcontents to a USB flash drive. After being copied to the USB flash drive, Intelligent Provisioningcan be started from the USB flash drive instead of from a CD or DVD.
87

iLO Virtual Media An HP Integrated Lights-Out (iLO) feature that enables you to attach a removable storage deviceor image file from a client machine to the server, and have that appear to the server as a localdevice. The server can boot from that virtual device or use it with a running operating system.
Image installation The process of installing a server using a previously captured image of the disk to make a duplicateof the original server. This is in contrast to a scripted installation.
Media Software which can include vendor-supplied OS distribution files, HP-provided OS distributionfiles, captured images, and firmware and driver updates such as the SPP.
Package A single compressed (zipped) file that can contain executables, configuration information, andscript files. An example of a package is a .zip file of Windows drivers to be used duringunattended installations.
POST Power on self test. POST is a process performed by firmware or software routines immediatelyafter a device is powered on. The routines are part of a device's pre-boot sequence. Once POSTcompletes successfully, bootstrap loader code is invoked.
Provisioned A server in this state has an operating system installed.Provisioning Installing an operating system on a target server using either scripted installation or captured
image deployment.RBSU ROM-Based Setup Utility. A configuration utility that is embedded in the system ROM and included
with the HP System Utilities. This configuration utility performs a wide range of configurationactivities that may include:
• Configuring system devices and installed options
• Displaying system information
• Selecting the primary boot controller
• Configuring online spare memory
SAN Storage Area Network. A dedicated network that provides access to consolidated, block-leveldata storage.
Scriptedinstallation
The OS provisioning method that uses configuration files and OS distribution files to deploy anOS to a target server as an unattended installation. This is the native way the operating systemis intended to be installed by the OS vendor but with the interactive installation process automated.This is in contrast to an image installation.
SNTP Simple Network Time ProtocolUEFI The Unified Extensible Firmware Interface (UEFI) is a specification that defines a software interface
between an operating system and platform firmware. UEFI is meant to replace the BasicInput/Output System (BIOS) firmware interface.
Unattendedinstallation
An automatic Windows or Linux OS installation that does not require user intervention.
Unprovisioned A server waiting to have an operating system installed.VID Virtual Install Disk.WBEM Web-based Enterprise Management. WBEM is a DMTF (Distributed Management Task Force)
standard based on the CIM (Common Information Management) model. WBEM enables customersto manage their systems consistently across multiple platforms and operating systems, providingintegrated solutions that optimize your infrastructure for greater operational efficiency. WBEMenables management applications to retrieve system information and request system operationswherever and whenever required.
WMI Windows Management Instrumentation (WMI) is the infrastructure for management data andoperations on Windows-based operating systems.
88 Glossary

Index
Aactivating Intelligent Provisioning, 10Active Health System
data collection, 12Active Health System data, downloading, 34Active Health System download, 35AMS
Proactive Care requirement, 13available OS install methods, 20
Bboot failures
unsupported option cards, 82
CCD, 78configuring
iLO, 50contacting HP, 86customer advisories, 84customized installation
VMware, 31Windows, 30
Ddata collection
Active Health System, 12privacy, 12Remote Support, 12system configuration, 12
Deployment Settings, 38documentation
providing feedback on, 86downloading Active Health System data, 34DVD, 78
Eenabling the VID, 33Erase Utility, 72
Secure Erase, 73
FFirmware Update utility, 36
Hhardware settings, 21help
obtaining, 86HP
technical support, 86HP Smart Storage Administrator (HP SSA)
configuring, 46diagnostics, 46using, 44
HP StoreVirtual VSA, deploying, 28
IiLO
configuring, 50rebooting, 68resetting, 68
initial configuration and registration tasks, 8Insight Diagnostics, 47Insight Remote Support see Remote Supportinstallation parameters, checking, 32installing an OS, 20
available install methods, 20checking installation parameters, 32hardware settings, 21OS information, 27OS selection, 23using an HP SD card as a boot device, 21
LLicense Management, 71
Mmaintenance tasks, 34
Nnavigating Intelligent Provisioning, 7
OOS information
HP StoreVirtual VSA, 28overview of Intelligent Provisioning, 5
Ppower settings
profiles, 49preferences, setting, 8, 37prerequisites
Remote Support, 13Proactive Care
requirements, 13profiles
power settings, 49
QQuick Configs, 48
Rreinstalling Intelligent Provisioning, 18Remote Support
central connect registration, 16configuring web proxy settings, 14data collection, 12direct connect registration, 14direct connect unregistration, 70editing the web proxy settings, 71overview, 11
89

prerequisites, 13registration, 11service events, 12system configuration, 12unregistration, 70
remote support, 86
SSecure Erase, 73selecting an OS, 23service events
Remote Support, 12setting Intelligent Provisioning preferences, 8, 37source media, 26
browse, 27disc, 26FTP, 26iLO virtual media, 26network share, 26USB Key, 26
SPP, 76
Ttechnical support
HP, 86troubleshooting
general issues, 82Linux-specific issues, 83VMware-specific issues, 84Windows-specific issues, 83
Uunsupported option cards
boot failures , 82update mirror, 74updating firmware, 36USB key
adding contents, 80creating bootable, 78
USB Key Utility, 77user account
editing, 65using an HP SD card as a boot device, 21
VVID, enabling, 33VSA, deploying, 28
90 Index