howtobuildanembeddedacousticinstrument from …eberdahl/eai/... · 4/27/2014...
TRANSCRIPT

4/27/2014 HowToBuildAnEmbeddedAcousticInstrument - ModernLutherie
http://192.168.1.12/mediawiki/index.php/HowToBuildAnEmbeddedAcousticInstrument 1/4
HowToBuildAnEmbeddedAcousticInstrumentFrom ModernLutherie
Contents1 LapBox2 Process3 Embedded Acoustic Instruments4 Parts
LapBoxConsider the design of the LapBox, which is an embedded acoustic instrument designed to sit in the lap of the performer:

4/27/2014 HowToBuildAnEmbeddedAcousticInstrument - ModernLutherie
http://192.168.1.12/mediawiki/index.php/HowToBuildAnEmbeddedAcousticInstrument 2/4
After experimenting with LapBoxes, you will quickly gain practical insight into prototyping embedded acoustic instruments that sound good. TheLapBox can be easily extended by adding custom sensors. Typically, this is done by mounting the sensors on the enclosure, wiring them to anArduino, and connecting the Arduino to the internal Linux computer. Revision 2 of the design assumes that the sensors will be mounted on thetop of the instrument. Revision 3 features the loudspeaker drivers on the front, allowing the sensors to be placed either on the top or on the ends,like the force-sensing resistors shown on the LapBox above.
ProcessFirst follow the instructions for building a powered loudspeaker HowToBuildAPoweredLoudspeaker.

4/27/2014 HowToBuildAnEmbeddedAcousticInstrument - ModernLutherie
http://192.168.1.12/mediawiki/index.php/HowToBuildAnEmbeddedAcousticInstrument 3/4
Then begin designing an embedded musical instrument using the techniques outlined on the Satellite CCRMA webpage(https://ccrma.stanford.edu/satellite) . This will involve connecting some sensors to a Raspberry Pi via an Arduino board.
Then begin adding all of the components to the embedded acoustic instrument. An acoustic test using a loud sinusoid to check forrattling should be used after adding each additional component.
Finally, have fun performing with your instrument!
Embedded Acoustic InstrumentsThe complete electrical circuit is given below.
4/27/2014 HowToBuildAnEmbeddedAcousticInstrument - ModernLutherie
http://192.168.1.12/mediawiki/index.php/HowToBuildAnEmbeddedAcousticInstrument 4/4
The components have been selected to make building the LapBox as simple as possible. In other words, the design should be accessible not onlyto engineers but also to artists. The circuit requires only a 12V power supply input. In practice, it was determined that a ground loop between thepower supply and the audio connection from the Raspberry Pi to the audio amplifier could reduce the quality of the sound. Therefore, it issuggested to use an 1/8-inch (2.54mm) audio cable with inserted ground loop isolating transformer to break the potential ground loop.
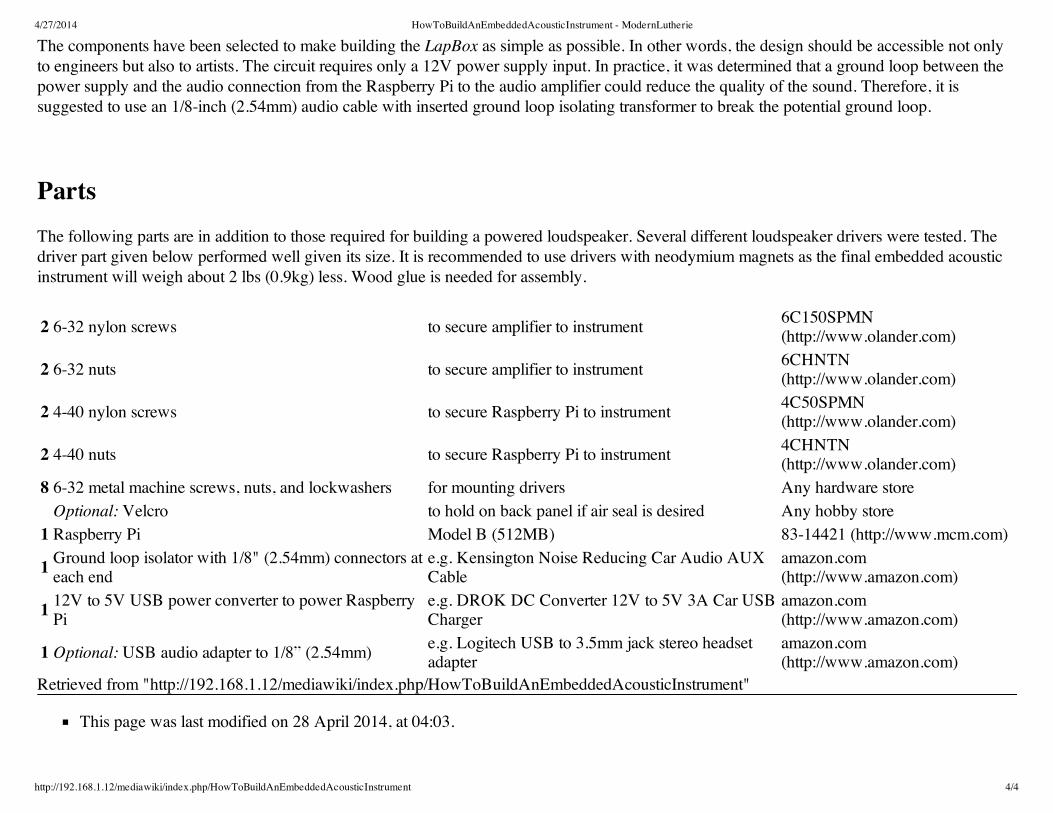
PartsThe following parts are in addition to those required for building a powered loudspeaker. Several different loudspeaker drivers were tested. Thedriver part given below performed well given its size. It is recommended to use drivers with neodymium magnets as the final embedded acousticinstrument will weigh about 2 lbs (0.9kg) less. Wood glue is needed for assembly.
2 6-32 nylon screws to secure amplifier to instrument 6C150SPMN(http://www.olander.com)
2 6-32 nuts to secure amplifier to instrument 6CHNTN(http://www.olander.com)
2 4-40 nylon screws to secure Raspberry Pi to instrument 4C50SPMN(http://www.olander.com)
2 4-40 nuts to secure Raspberry Pi to instrument 4CHNTN(http://www.olander.com)
8 6-32 metal machine screws, nuts, and lockwashers for mounting drivers Any hardware storeOptional: Velcro to hold on back panel if air seal is desired Any hobby store
1 Raspberry Pi Model B (512MB) 83-14421 (http://www.mcm.com)
1 Ground loop isolator with 1/8" (2.54mm) connectors ateach end
e.g. Kensington Noise Reducing Car Audio AUXCable
amazon.com(http://www.amazon.com)
1 12V to 5V USB power converter to power RaspberryPi
e.g. DROK DC Converter 12V to 5V 3A Car USBCharger
amazon.com(http://www.amazon.com)
1 Optional: USB audio adapter to 1/8” (2.54mm) e.g. Logitech USB to 3.5mm jack stereo headsetadapter
amazon.com(http://www.amazon.com)
Retrieved from "http://192.168.1.12/mediawiki/index.php/HowToBuildAnEmbeddedAcousticInstrument"
This page was last modified on 28 April 2014, at 04:03.