how will it move? (ps3) - teacher edition
DESCRIPTION
Teacher Edition of the How Will It Move? (PS3) unit for IQWST curriculum, courtesy of Sangari Active ScienceTRANSCRIPT

Second Edition
How Will It Move?
Teacher’s Edition
Physical Science
I WST

H ow w i l l i t M ov e?
Force and Motion

IQWST LeaderShIp and deveLopmenT Team
Joseph S. Krajcik, Ph.D., Michigan State UniversityBrian J. Reiser, Ph.D., Northwestern University
LeeAnn M. Sutherland, Ph.D., University of MichiganDavid Fortus, Ph.D., Weizmann Institute of Science
Unit Leaders
Strand Leader: David Fortus, Ph.D., Weizmann Institute of ScienceDana Vedder Weiss, Weizmann Institute of Science
Unit Contributors
Roni Mualem, Ph.D., Weizmann Institute of ScienceLeeAnn M. Sutherland, Ph.D., University of Michigan
Unit Pilot Teachers
Kristie Hannon, Highlander Way Middle School, Howell, MIMarisa Fisher, Highlander Way Middle School, Howell, MI
Unit Reviewer
Sofia Kesidou, Ph.D., Project 2061, American Association for the Advancement of Science

Investigating and Questioning Our World through Science
and Technology(IQWST)
HOW WILL IT MOVE?
Force and Motion
Teacher’s EditionPhysical Science 3 (PS3)
PS3 Move TE 2.0.1ISBN-13: 978-1-937846-81-7

Physical Science 3 (PS3)How Will It Move?Force and Motion
ISBN- 13: 978- 1- 937846- 81- 7
Copyright © 2013 by SASC LLC. All rights reserved. No part of this book may be reproduced, by any means, without permission from the publisher. Requests for permission or information should be addressed to SASC LLC, 50 Washington Street, 12th floor, Norwalk, CT 06854
about the publisher
Sangari Active Science Corporation is a mission- driven company that is passionate about STEM education. We make it easy for teachers to teach with quality, investigation- centered science curriculum, tools, and technology. For more information about what we do, please visit our website at http://www.sangariglobaled.com.
IQWST (Investigating and Questioning Our World through Science and Technology) was developed with funding from the National Science Foundation grants 0101780 and 0439352 awarded to the University of Michigan, and 0439493 awarded to Northwestern University. The ideas expressed herein are those of members of the development team
and not necessarily those of NSF.

PS3 ContentS
IQWST Overview vii
Unit Overview 1
Unit Calendar 3
PS3 Scientific Principles 5
learning Set 1: What Makes It Start and Stop?
Lesson 1 – Anchoring Activity and Driving Question Board 7
Lesson 2 – Which Forces Act on an Object? 13
Lesson 3 – Why Does an Object Start Moving? 37
Lesson 4 – How Strong Is That Force? 53
Lesson 5 – Why Does an Object Stop Moving? 69
learning Set 2: What Makes It Change Its Motion?
Lesson 6 – How Can We Describe How an Object Moves? 79
Lesson 7 – Why Do Things Change Their Speed or Direction? 93
learning Set 3: Forces and energy: What Is the Difference?
Lesson 8 – Using Forces and Energy to Understand the Magnetic Cannon 107

ART
Every effort has been made to secure permission and provide appropriate credit for the photographic materials in this program. The publisher will correct any omission
called to our attention in subsequent editions. We acknowledge the following people and institutions for the images in this book.
Lesson 6Dying Star – ESA/Hubble & NASA
Tycho Brahe – Wikipedia, The Free Encyclopedia
Lesson 7Video 7.1 – Dave G. Alciatore, Chicago State University, Department of Mechanical EngineeringVideo 7.2 – Dave G. Alciatore, Chicago State University, Department of Mechanical EngineeringVideo 7.3 – Dave G. Alciatore, Chicago State University, Department of Mechanical Engineering

IQWST OvervIeW
IQWST is a carefully sequenced, 12- unit middle school science curriculum, developed with support from the National Science Foundation. As designed, each academic year includes four units, one in each discipline: Physics, Chemistry, Life Science, and Earth Science. IQWST’s foundation is the latest research on how students learn and how they learn science in particu-lar; therefore, IQWST’s content, pedagogies, and practices embody the very principles that undergird the National Research Council’s Framework for K-12ScienceEducation (2011) and the Next Generation Science Standards (NGSS) (2013). At its core, IQWST engages students in scientific practices as they experience, investigate, and explain phenomena while learn-ing core ideas of science. Rather than memorizing facts, students build understanding by connecting ideas across disciplines and across the middle grades. The following are the key components of the Framework, of NGSS, and of IQWST.
Core Ideas: Focus on a limited number of core science ideas, aiming for depth of un-derstanding rather than the superficial coverage inherent when aiming for breadth.
Scientific Practices: Engage meaningfully in science and the work of scientists through eight practices, used singly or in combination to explore and learn core ideas in each lesson.
Crosscutting Concepts: Thread throughout the curriculum the seven cross- disciplinary concepts, repeatedly revisited such that students construct deep understanding of the ideas as they apply to each science discipline.
Coherence: Build understanding through a progression within each grade level and across grade levels. Learning critical concepts and practices across content areas and grades provides students with opportunities to develop, reinforce, and use their under-standings on an on going basis throughout their middle school years.
Performance Expectations: Identify how students engage with a specific practice in order to learn a specific core idea and to build increasing understanding of a broader crosscutting concept.
In addition to these ideas, IQWST integrates the Common Core for English Language Arts, focusing on those elements delineated for middle school science education. IQWST’s close alignment with the core principles of the Framework, NGSS, and the Common Core is addressed in greater depth elsewhere in this Overview.

vIII IQWST OVERVIEW
THE IQWST UNIT SEQUENCE: BUILDING COHERENCE
Although IQWST units can be enacted in a manner that meets district needs, they are designed based on research that shows the importance of coherent curriculum, structured such that students build understanding as they revisit ideas across disciplinary strands, content, and grade levels and deepen their understanding across time. The Framework indi-cates, “Standards should be organized as progressions that support students’ learning over multiple grades. They should take into account how students’ command of concepts, core ideas, and practices becomes more sophisticated over time with appropriate instructional experiences” (NRC 2011).
The role of coherence in materials and instruction is well documented: Most science programs (textbooks and instruction) do not support deep, integrated student learning because they lack coherence (Kesidou & Roseman, 2002; National Research Council, 2007). Yet present-ing interrelated ideas and making connections between and among them explicit (Roseman, Linn, & Koppal, 2008) was found to be the strongest predictor of student outcomes in the Trends in International Mathematics and Science Study (TIMSS) (Schmidt, Wang, & McKnight, 2005).
Curricular coherence is best accomplished through teaching the ideas in IQWST units in a recommended sequence. That sequence aligns with NGSS, which treats a core idea such as “energy,” for example, as both a Crosscutting Concept and a Core Idea. In IQWST, students engage with ideas about energy in the first physical science unit of the sequence and then revisit energy concepts in life science, chemistry, and Earth science— and in later physical science units— so that as students apply energy ideas to new content and contexts, their understanding of one of the most challenging concepts in science education deepens across middle school.
The following chart illustrates the recommended sequence for optimum curriculum coher-ence, enabling students to build on and revise their understanding of core content and to strengthen their ability to successfully engage in scientific practices over multiple years.

IQWST OVERVIEW Ix
IQWST MIDDLE SCHOOL CURRICULUM
Level 1 Physical Science Introduction to Chemistry
Life Science Earth Science
Can I Believe My Eyes?Light Waves, Their Role in Sight, and Interaction with Matter
How Can I Smell Things from a Distance?Particle Nature of Matter, Phase Changes
Where Have All the Creatures Gone?Organisms and Ecosystems
How Does Water Shape Our World?Water and Rock Cycles
Level 2 Introduction to Chemistry
Physical Science Earth Science Life Science
How Can I Make New Stuff from Old Stuff?Chemical Reactions, Conservation of Matter
Why Do Some Things Stop While Others Keep Going?Transformation and Conservation of Energy
What Makes the Weather Change?Atmospheric Processes in Weather and Climate
WhatIsGoingonInsideMe?Body Systems and Cellular Processes
Level 3 Earth Science Life Science Physical Science Introduction to Chemistry
How Is the Earth Changing?Geological Processes, Plate Tectonics
Why Do Organisms LooktheWayTheyDo?Heredity and Natural Selection
How Will It Move?Force and Motion
How Does Food Provide My Body with Energy?Chemical Reactions in Living Things

x IQWST OVERVIEW
UNIT STRUCTURE
Driving QuestionsEach IQWST unit focuses on a Driving Question, which is also the unit’s title. A Driving Question is a rich, open- ended question that uses everyday language to situate science content in con-texts that are meaningful to middle school students. As each unit progresses, the phenomena, investigations, discussions, readings, and writing activities support students in learning content that moves them closer to being able to answer the Driving Question in a grade- appropriate manner.
Learning SetsIQWST lessons are grouped into three to five learning sets per unit, each guided by a sub-question that addresses content essential to answer the Driving Question. This structure unifies lessons and enables students to meet larger learning goals by first addressing con-stituent pieces of which they are comprised.
IQWST lessons support research- based instructional routines with several components designed and structured to meet teacher needs. Each lesson comprises multiple activities (i.e., Activity 1.1, Activity 1.2) that altogether address one to four Performance Expectations (as described in NGSS). Each lesson is preceded by lesson preparation pages, Preparing the Lesson, as described in the following Lesson Structure section.

IQWST OVERVIEW xI
LESSON STRUCTURE
Each IQWST lesson contains common components to support teachers as they progress through the unit’s activities.
Preparing the LessonThe information on the first pages of each lesson supports the teacher in previewing and preparing for the lesson.
Teacher Background Knowledge
This section describes content to be addressed in the lesson, specifics about use of lan-guage or measurement tools, and prerequisite knowledge students are expected to have. If IQWST units are taught in the designed sequence, prerequisite knowledge is that which is expected from elementary school. If IQWST units are taught in an alternative sequence, this section alerts teachers about what students will need to understand in order to make sense of activities in a unit and to achieve its learning goals. This section also addresses content that may lie outside of teacher expertise in order to support teachers in working with content with which they are less familiar.
Sometimes, a Common Student Ideas heading describes ideas from research on miscon-ceptions or describes other difficulties students have been shown to have with the content of a particular lesson. The section may describe prior knowledge that does not align with accepted science and that may be a stumbling block to understanding.
Setup
Setup is noted on the preparation page when the teacher needs to prepare materials ahead of time, such as mixing solutions, pre measuring materials for student groups, or setting up stations.
Safety Guidelines
A section on safety is included in the IQWST Overview. Within units, safety guidelines spe-cific to a lesson are sometimes described separately so as to call attention to them. Examples include how chemicals should be handled and disposed of or when wafting is necessary rather than inhaling substances.
Differentiation Opportunities
Differentiation ideas highlighted prior to a lesson specify ways to either go beyond the per-formance expectations for the lesson or to support students who need additional help with content. Differentiation strategies that can be applied across lessons are described else-where in this Overview.

xII IQWST OVERVIEW
Building Coherence
This section briefly situates the lesson in those that precede and follow it and often refer-ences content students will have encountered in previous IQWST units, if units have been enacted in the recommended sequence.
Timeframe (Pacing)
This note estimates the number of class periods the lesson will take to complete based on widespread classroom experience. Richer discussions, more time spent on reading or writing skills, enacting demonstrations as group activities or vice versa, and other teacher- chosen adaptations require adjusting the timeframe. Most lessons require two or more class periods, as most are composed of multiple activities. Pacing is based on 50- minute class periods. Longer or shorter periods, or block schedules, require adjustment so that each class session is a coherent whole. Suggested pacing is also noted on the Unit Calendar located in the front matter.
Overview
A succinct list provides a snapshot of primary activities within a lesson, identified by activity number (i.e., Activity 1.1, Activity 1.2).
Performance Expectations
As specified by NGSS, Performance Expectations describe what students should know and beabletodo in a given lesson. Performance expectations describe one or more scientific practices in which students will engage in order to learn a disciplinary core idea, often also addressing a crosscutting concept, such that teachers can effectively plan, focus, and assess students’ understanding.
Materials
These sections list the supplies required to carry out each activity within a lesson. They are quantified and grouped based on teacher needs, group needs, and individual needs.
Introducing the Lesson
This feature is included when activities are specifically designed to launch a lesson, often including integration of the previous reading or homework assignment.
Discussion Types
Types of discussion are described elsewhere in this Overview and are identified within each activity: Brainstorming, Synthesizing, or Pressing for Understanding. Each discussion has a stated purpose, followed by suggested prompts to guide conversation. Prompts are not intended as a script but provide teachers with alternatives they can use or from which they can shape their own questions— both factual/close ended and open ended to encourage thinking, challenging, explaining, and arguing from evidence.

IQWST OVERVIEW xIII
Reading Follow Up and Introducing Reading
Suggestions for introducing and following up reading aid comprehension, retention, and integration of reading into science lessons, with numerous opportunities to address the Common Core in doing so. Readings are designed to be done independently, as homework, providing students with opportunities to revisit class activities, to connect science to their everyday lives, to deepen their understanding of content, and to apply their understanding to new examples and contexts. The pacing of lessons, as described, presumes that reading is not an in- class activity but is an at- home activity to extend student learning. Reading is addressed more fully elsewhere in this Overview.
Teacher Supports
Icons
Apple – Signals an “aside” to the teacher, often a strategy or a hint about student thinking likely to arise during an activity. Strategies and hints are embedded at points in the lessons that are most helpful to the teacher.
✓ Checkmark – Signals a point at which the teacher should stop and check students’
understanding before moving forward in the lesson or unit. Often, the ideas accom-panied by this icon can be used as assessment opportunities. Open Book – Signals either a reading assignment or a follow-up homework activity
at the point in a lesson that it is best assigned. Typically the book icon is at the end of an activity and indicates work that is to be done in preparation for the activity that follows.
! Safety – Signals precautions important to ensure safety in a lesson. Many lessons do not have specific safety precautions; instead, the lesson directs the teacher to the Overview, where general precautions, to be followed across IQWST lessons, are outlined.
Key – Signals smaller- scale learning goals that may be components of a larger disci-
plinary core idea. Key ideas might also include scientific principles derived from class activities, important definitions, or a new type of X to be added to a list of “types of X” students have been compiling in the unit. Key ideas might include main ideas at which students should arrive after an activity, reading, or class discussion.
Probe – Signals that technology is used in a particular lesson either for modeling (e.g., a computer simulation) or for quantitative measurement (e.g., probes and data loggers).
Pencil (only in Student Edition) – Signals places in which a written response is ex-pected. Because questions are used as headers and are also woven throughout read-ings to engage students as active readers, an icon is used to indicate when a written response, rather than simply “thinking about,” is required.
Projected Images (PI)
The value for students of seeing images in science cannot be overestimated. Projected Images (PI) are to be displayed for the class. Selected images may be printed for display on the Driving Question Board and perhaps laminated for reuse.

xIv IQWST OVERVIEW
Each IQWST lesson includes projected images, charts, and graphs to expand students’ understanding of science concepts. These colorful images are most effective for instruction if they are displayed in the front of the room on the white board. The images are located on the IQWST Portal in each unit folder, and all are named clearly.
The IQWST Portal
The IQWST Portal is an online resource for educators and students to access IQWST cur-riculum resources, including teacher editions of IQWST textbooks, student lab books, unit materials lists, assessments, and more. The IQWST Portal also provides access to digital resources including lesson- specific videos and audio files with narration of every student reading. Interactive resources and simulations like NetLogo are also located on the IQWST Portal.
The IQWST Portal is organized with each of the 12 units listed as a course. Within each course the content is divided into learning sets that are composed of multiple lessons. Within the lessons, educators can access digital versions of IQWST print materials, digital resources, and interactive resources. Each unit also contains a news section with up- to- date links to articles and research relevant to physical science, chemistry, life science, and Earth science.

IQWST OVERVIEW xv
DIffERENTIaTION IN IQWST
Range of Student LearnersStrategies built into IQWST lessons acknowledge students’ differing capabilities, expecta-tions, experiences, preferred learning styles, language proficiency, reading strategy use, and science background knowledge, among others. Materials address diverse needs by con-necting classroom science to students’ everyday, real-world interests and experiences. Each activity provides opportunities for teacher guidance, for independent work as well as small-group and whole-group interaction, for investigation, for discussion, and for reading, writing, and talking science. Opportunities for differentiation abound in each of these areas and in each lesson, so all students can work at their appropriate level of challenge.
Activity-based experiences enable students to share common experiences from which to build understanding. Students with kinesthetic preferences can use their strengths as doers and problem solvers. Those with verbal preferences can talk and write about pro-cesses and practices and can contribute ideas from readings to the discussion. Those with tactile preferences can manipulate materials. Those with visual preferences observe rather than only read about science. IQWST does not require memorizing definitions, writing paragraphs using vocabulary, or writing lab reports. Students with a range of learning preferences, language abilities, and other strengths and weak areas as learn-ers can contribute to, engage in, and learn from each investigation— independently and collaboratively.
Specific differentiation opportunities are described in the Preparing the Lesson pages that precede each lesson. The following general strategies apply across IQWST.
General Differentiation Strategies • Students begin each unit with an activity to generate original questions that will form
the Driving Question Board (DQB) for the unit. Some of their questions will not fit into any of the categories used to organize the DQB and will not be addressed in the unit. Such questions may be assigned to students as an ongoing, individual project that they complete using various resources.
o Such projects enable students who benefit from “going beyond” the unit to do so independently. With the teacher’s discretion, projects for advanced students might come from such work, requiring use of multiple resources with varied text complexity, as specified in the Common Core.
o Passionate interest has been shown to motivate students who struggle with reading to nonetheless read texts well beyond their Lexile level or presumed “ability” in a quest to learn more about something they are invested in. English Learners, students with learning disabilities, and struggling readers should thus be encouraged to investigate topics in which they are keenly interested. Some students will need support with resources (e.g., Internet search terms or sug-gested websites), but it is important to encourage all students to pursue areas of interest.
xvI IQWST OVERVIEW
• Two follow- up questions that students cannot get wrong, simply by virtue of having read are (1) What did you find most interesting about last night’s reading? and (2) What is one new thing you learned as you read last night’s assignment? Some variation of either of these questions can be used for accountability purposes (i.e., Did the student read?) and for encouragement purposes (i.e., There are no wrong answers).
• Discussion is important to allow exchange of ideas and examination of one’s own ideas. Many students, especially English-language learners, students with learning disabilities, or students with auditory processing difficulties, struggle to make sense of a question and formulate a response in time to raise their hands and articulate their ideas orally. For such students, consider a think-pair-share strategy. Pose a question and provide students with time to think about their response (or to write their ideas). Then, pair students with partners to share ideas. The teacher can then call on a pair, who can give a response they have had time to rehearse. This activity can be taken a step further to square the response by having two pairs talk together.
• Some students participate more fluently and comfortably if they are sometimes told ahead of time which question they are going to be asked to share their ideas about.Preparation time allows them to jot notes, to practice orally, or to reread a written re-sponse and be confident about sharing aloud. A teacher can prepare a sticky note such as “Be ready to talk about your answer to Question 3,” and can place that note on a student’s book in the course of teaching a lesson. This enables students with a range of language proficiencies, background knowledge, memory, or ability to process infor-mation time to think through their ideas and thus to be more confident and successful sharing in whole- class contexts.
Reading Differentiation Strategies • Readings are designed based on research indicating that when students are passion-
ate about a topic they often read well beyond their determined “reading level.” Thus, IQWST readings emphasize engaging students in science. In many programs, read-ing level is simplified by shortening sentences and using easier vocabulary. However, doing so shortchanges students in two ways. First, shorter sentences require removal of connecting words (therefore, so, then) that actually support comprehension. Second, simplifying text by limiting multisyllabic words shortchanges students by ensuring that weaker readers remain unable to engage with texts that use the vocabulary of science. Therefore, IQWST does not differentiate with simplified materials but with strategies that support readers to learn all they can from the texts provided.
• IQWST lessons provide strategies for introducing reading, monitoring student com-prehension, and following up on reading assignments. A Getting Ready section begins each reading as a research-based strategy for improving comprehension—the sections generate interest and engage students, activate prior knowledge, and provide a pur-pose for reading. Although these strategies support all students, struggling readers can be explicitly taught the value of each of these components as strategies successful readers use to improve comprehension. Strong readers, often unknowingly, “wonder” about what they are about to read, thus providing a purpose for reading that improves their comprehension and retention.

IQWST OVERVIEW xvII
• Reading in science contains both main ideas and important details. Some IQWST read-ings employ methods for students who need to continue to work on reading strategies with built-in prereading strategies and advance organizers to help students with both text structure and content. Teachers may create additional advance organizers, as de-sired for particular readings.
• Encourage students to read all of the written material, as it is designed to support learning of key concepts, to extend the application of key ideas into the real world thus to generate interest in science, and to address the Common Core. However, many options enable the teacher to support struggling readers, students with learning dis-abilities, English Language Learners, and advanced students.
o If students find an assignment overwhelming, let them know what to focus on as they read, perhaps indicating (or marking) two or three sections of the read-ing that they should read carefully. Doing so gives them freedom to read all of the material but focuses their reading so that they are more likely to experience success when they can participate in follow-up class discussion because they focused on the “right” section of the reading.
o When a reading has multiple examples (e.g., a reading about how the eyes of three types of animals work), invite students to prepare to talk about any one of the three. Doing so does not erase the opportunity to read all but enables students to make choices and to focus their reading, providing encouragement and small steps toward success.
o Many opportunities exist for advanced students to conduct Internet searches and read more complex texts as they either pursue areas of interest or are as-signed such work by the teacher.
• Support readers by pre-identifying challenging language in the readings. On the board, write 2-3 words likely to be stumbling blocks, pronounce them, and provide connec-tions (if possible) to everyday use of such words or to cognates for English-language learners (e.g., consulting an English/Spanish science glossary). IQWST is built on a strong research base showing that the best way to learn vocabulary is to encounter and use words in context. Use an interactive Word Wall to display words so that they may be referred to often. Pre-identifying and pronouncing words that might cause difficulty is not meant as a strategy for teaching vocabulary but only as a way to ensure that when students encounter Leonardo da Vinci’s name or see “optical illusion” in print, they will not experience unfamiliar words as roadblocks.
• Readings should be previewed and followed up in class, and soon most students, even struggling readers, will attempt at least portions of the reading. Even if they do not read the entire assignment, or do not read well, students will make sense of whatever they do accomplish in ways that will help them learn. IQWST is not a textbook-driven curriculum, so using class time to read the materials does not align with a project- and inquiry-based philosophy in which students experience phenomena and then think about, write about, talk about, and read about science to learn content in meaningful ways. Encourage reluctant readers by asking follow-up questions that draw on exam-ples from the reading, making the focus not on details, but on sense making, so that all can feel successful and encouraged to read.

xvIII IQWST OVERVIEW
Writing Differentiation Strategies • Writing in science must be clear and accurate. For students with motor skills difficulties,
provide ample writing space by using the margins, the back of the page in the student book, or additional paper. Students can also write on a computer, print, and paste the page into the student book.
• To support students with learning disabilities, who may omit words in writing, suggest that they read their own writing aloud, as they can often “hear” omissions when they do so. Alternatively, a peer or family member can read a written response aloud to allow students to self-correct as they hear errors in their writing. Another person may also scribe while students who struggle with writing provide oral responses, allowing students to express their understanding of science ideas and to communicate more successfully.
Mathematics Differentiation Strategies • Measurements in science are precise, and measuring using science equipment can
be difficult. Collaborative investigations enable students with varied strengths to work together. Although all students should learn how to use the tools of science, students who have difficulties with motor skills or vision impairments, for example, do not need to physically measure or be the person solely responsible for reading the thermometer. Instead, students work together to carry out investigations.
• Procedures in science require a sequencing of steps that can be difficult for some stu-dents if instructions are given only orally or only in print. To support all students, review written instructions orally, step-by-step, as needed. Have students reread procedures even after they have been reviewed. Demonstrate procedures for investigations that are anticipated to cause confusion or frustration. Many students are more successful if they check off steps as each is completed. Following a procedure in science is also an element of the Common Core, so supporting students to accurately follow written procedures meets multiple goals.

IQWST OVERVIEW xIx
NGSS: SCIENTIfIC aND ENGINEERING PRaCTICES
The Framework and NGSS identify eight practices that build and refine scientific knowledge and thus are central to the scientific enterprise. Rather than separate content knowledge and inquiry skills, as in previous versions of national standards, NGSS defines each new standard as the combination of a core explanatory idea, a crosscutting concept, and one of eight scientific practices. IQWST is based on the same extensive research that forms the foundation of science education for the 21st century and the basis for the Framework and NGSS; thus IQWST lessons integrate and continually reinforce practices such that students develop greater facility with and deeper understanding of these practices and of the content they address.
Engaging in scientific practices enables students to experience how it is that scientists come to particular understandings rather than to experience science as a set of complete, discrete, isolated facts. In addition, a focus on practices, as an extension of previous approaches to inquiry, expands students’ understanding of science beyond viewing it as a limited set of procedures or as a single approach typically characterized as “the scientific method.”
Scientific practices require both knowledge and skill, and IQWST approaches scientific prac-tices in that manner; they are always contextualized. Rather than a lesson about “how to construct a good scientific explanation,” explanations are taught in the context of a lesson about core content using the construction of an evidence- based explanation as a way to think about, make sense of, and communicate one’s understanding of phenomena. All eight practices are reflected throughout IQWST. However, each unit’s learning goals emphasize particular practices, emphasizing those best taught (and practiced) in the context of a given unit’s learning goals and investigative activities.
• Asking Questions and Defining Problems • Developing and Using Models • Planning and Carrying Out Investigations • Analyzing and Interpreting Data • Using Mathematics, Information and Computer Technology, and Computational
Thinking • Constructing Explanations and Designing Solutions • Engaging in Argument from Evidence • Obtaining, Evaluating, and Communicating Information
Each of these is addressed individually in sections that follow.

xx IQWST OVERVIEW
Scientific Practice 1: asking Questions and Defining ProblemsA key IQWST instructional component is each unit’s Driving Question. A driving question is a rich, open- ended question that uses everyday language to situate scientific principles in con-texts that are meaningful to middle school students. The discussions, investigations, science readings, and writing activities all relate to the Driving Question. IQWST involves students in constructing, evaluating, communicating, and reaching consensus on scientific explana-tions of how and why phenomena happen. In order to engage in this practice, students must make sense of phenomena they study and then articulate and defend their understandings to themselves, each other, the teacher, and other audiences. As each unit progresses, stu-dents learn content that moves them closer to being able to answer the Driving Question in a grade- appropriate manner. As important, each unit purposefully solicits students’ origi-nal questions and provides the teacher with guidance about posting those questions on a Driving Question Board in the classroom and integrates them into the lessons. Thus science becomes “what I wonder about” rather than only “what I am told I should think about.”
In addition, in the process of exploring phenomena and wondering how and why things happen, students question one another about what they observe and the conclusions they draw. They question one another about the texts they read. They learn about questioning in this manner, as well as asking testable questions that students can answer by designing, planning, and carrying out an investigation. In some IQWST units, students work together to define a problem, determine how to find a solution, and compare ideas with others in the process of solving the problem.
Driving Question Board
To organize each IQWST unit, the Driving Question is displayed on a Driving Question Board (a bulletin board or large area on a wall). The Driving Question Board (DQB) is a tool used throughout IQWST to focus students’ attention, record what they have learned, and show students where they have been and the direction they are going. The DQB serves as a visual reference that remains in place throughout a unit. Lesson plans typically guide the teacher in their use. Although the teacher maintains the DQB, because it functions as a shared space to represent learning, students might also contribute regularly to the display.
Each IQWST lesson addresses a component of the unit’s Driving Question, supporting stu-dents in making sense of science content and determining which part of a question they can answer and which they still need to investigate. Thus, new lessons are motivated, in part, by what questions still need to be addressed. The visual display supports teachers and students in tracking and organizing ideas along the way.
Each unit invites students to post their own original questions on the DQB to encourage active engagement in a participatory classroom culture. As they think of new questions at any time during the unit, students write those questions on sticky notes and add them to the class DQB. Across a unit, the Driving Question Board will come to include the unit- specified question and subquestions, as well as student questions, drawings, photographs, artifacts, objects, and sample student work. The DQB will serve as a focal reference helpful to all but especially important for students for whom visual representations aid in their learning, such as connecting new ideas to previous understandings. Revisit the DQB with students

IQWST OVERVIEW xxI
in each lesson. Refer to it often. Point to artifacts displayed on it as a reminder of previous activities or understandings. Post on it summaries of scientific principles, as well as artifacts students create that relate to specific questions. Any projected image used in IQWST could be printed, laminated, or inserted into a plastic sleeve and displayed on the Driving Question Board. This includes models or data tables developed as a class or any other visual represen-tation of concepts students have studied.
Space on the Driving Question Board may be limited, but it is important that aesthetics and the neatness of the DQB do not outweigh the support provided to students when they can frequently refer to the visual representations as a reminder of activities done and content learned throughout a unit.
Scientific Practice 2: Developing and Using ModelsThe Framework describes the central role of constructing and using models to explain: “Science often involves the construction and use of a wide variety of models and simula-tions to help develop explanations about natural phenomena. Models make it possible to go beyond observations and imagine a world not yet seen. Models enable predictions . . . to be made in order to test hypothetical explanations.” NGSS specifies that models can include “diagrams, physical replicas, mathematical representations, analogies, and computer simula-tions,” all of which contain “approximations and assumptions” that students need to learn to recognize as a given model’s limitations. In science, models are used to help people under-stand, describe, predict, and explain phenomena in the real world.
Scientific modeling consists of several core practices: constructing models, using models to explain or predict, evaluating models, and revising models. IQWST engages students in all of these, supporting learners as they develop models, use models to explain, use models to predict, critique one another’s models, and revise models as they learn new information— engaging in modeling as real scientists do. Because modeling is often connected with other aspects of scientific practice, students’ experiences with modeling are embedded in the broader context of investigating, understanding, and explaining phenomena. Students cre-ate and use models to understand and apply scientific ideas, to illustrate and defend ideas, and to evaluate interpretations.
Engaging Students in Modeling
Students need to understand the purpose of models and modeling in science in order to effectively engage in the practice of developing and using models. Initially, it may be useful to have students think about other models they know, such as models of weather phenomena that scientists use to explain and predict the path of hurricanes, tornadoes, thunderstorms, or snowstorms.
Before Students Develop Models
1. It is helpful to emphasize that the point of developing models is to try to explain the phenomenon just investigated in class. Students’ models should demonstrate their best ideas about how to show how and why X happened, so that the model can be used to explain what happened to someone else.

xxII IQWST OVERVIEW
2. Begin to develop criteria for good models, which can be posted in the classroom and used throughout IQWST as students develop their own models and critique one another’s models. These ideas should come from class discussion and should be written in students’ own language. Important ideas include the following:
a. Models need to explain. Does the model show how and why the phenomena happened the way they did? Is there anything in the model that does not need to be here? Are there steps we are leaving out?
b. Models need to fit the evidence. Does this model fit what was seen about the phenomenon?
c. Models need to help others understand a phenomenon. Is the model easy to understand? Are there ways to clarify what it shows?
d. As lessons lead to the need for model revision to account for a new phenom-enon, address the idea that models also can be used to predict. Probe students with the following questions: What does our model predict about what will happen in situation X? Was that what actually happened? What does that mean about our model? What do we need to revise based on our new evidence?
Before Students Share Models
It is helpful to give students guidance about how they should listen to each other as they present their models. Eventually students will ask critical questions and make constructive suggestions to each other. Be sure to support that process until they understand this kind of classroom discourse. The following are ideas to address:
1. Different ideas will arise as we try to figure things out. This is our chance to put our heads together and come up with the best model we can come up with, as a group. But we need to agree on what we are looking for. As we listen to each other explain our models, remember what we created these models to try to do. Let’s talk about what is important.
2. All scientific models have limitations. Not every aspect of a phenomenon can be explained using a single model. Models often simplify as they illustrate things that are too small, too large, too fast, or too slow to observe without a model as a representa-tion. A static model cannot show movement. No model can sufficiently illustrate the number of molecules involved in a phenomenon nor the time required for others to take place.
3. More than one model can be used to explain the same phenomenon. Scientists judge how good a model is based on how well it helps to explain or predict phenomena— not by how similar it looks to the thing it aims to explain or describe. For example, a good model of gases can be used to explain all the behaviors of gases observed in the real world (e.g., what happens when air is cooled, heated, or compressed), but it will not be used to explain the behavior of solids. Different models have different advantages and disadvantages.
Constructing Models Depends on Scientific Argumentation
The practice of constructing models in IQWST draws critically on another scientific practice from the NRC Framework and NGSS, Engaging in Argument from Evidence. In the practice of constructing models in IQWST, argumentation occurs when students defend their proposed

IQWST OVERVIEW xxIII
models, showing how the model fits evidence and explains the phenomena. Argumentation occurs in classroom discourse when comparing and discussing competing models. IQWST lessons contain support for students to critique one another’s models and ultimately to reach consensus, both critical parts of the argumentation practice.
Scientific Practice 3: Planning and Carrying Out InvestigationsIQWST is an activity- based, phenomena- rich, investigative curriculum. Students plan inves-tigations that address the Driving Question for each unit and carry out investigations in each lesson. The investigations build understanding of core ideas throughout each unit, always directed at gaining more understanding toward being able to answer the Driving Question. In addition, students’ original questions not answered in the unit can be used as a springboard for additional investigation. Some investigations arise out of previous ones in a process of figuring out “what we know as a class” and “what we need to figure out next,” typically in learning the how and why of a process. Any such questions can motivate fur-ther investigation. Thus, besides those opportunities provided by the curriculum itself, the teacher can require or encourage the planning and carrying out of investigations that extend student learning beyond the performance expectations of a given unit.
Carrying out a multi step procedure is identified in the Common Core as an important science literacy skill; thus teachers might have students plan investigations, write procedures, and share plans and procedures with other groups to read and critique.
Scientific Practice 4: analyzing and Interpreting DataIQWST units engage students in observation, data collection and organization, interpreta-tion, and using data to make sense of phenomena they investigate. All lessons regularly use the language of “observation,” “data,” and “evidence.” Teachers are encouraged to ask students to support their ideas with evidence (e.g., Why do you think that? How could that happen? What if . . . ? What evidence do you/we have for that?), requiring students to con-sider their data carefully. Teachers encourage students to question data provided by others. This creates a situation in which using data as evidence to defend a claim makes sense— students need evidence because they will be questioned about their data in discussion.
Students analyze both qualitative and quantitative data in IQWST. They learn that both are important and while observation with the unaided eye enables them to make some sig-nificant claims, instrumentation and scientific tools enable them to be much more precise. Students analyze data they have collected themselves as well as data collected by others (e.g., changes in a population over time, melting points of substances they are unable to investigate in the classroom). Charts and graphs require understanding of independent and dependent variables, and investigations require understanding of what it means to control variables. Throughout the units, IQWST provides students with multiple opportunities to ana-lyze and interpret data through classroom discourse as a whole class, in small groups, in pairs, and independently, providing practice in multiple contexts that reinforce the development of this scientific practice.

xxIv IQWST OVERVIEW
Scientific Practice 5: Using Mathematics, Information and Technology, and Computational Thinking
NGSS specifies within this practice ideas such as “using digital tools,” for example, “to ana-lyze very large data sets for patterns and trends” and “to test and compare solutions to an engineering design problem.” In addition, this practice specifies a need for students to “measure and compare quantitative attributes of different objects and display the data using simple graphs.” Therefore, IQWST units include lessons that include probes, sensors, data loggers, and a sensor interface as digital tools that enable quantitative measurement and graphic display in a manner in which real scientists do their work.
IQWST uses the language of probes, sensors, dataloggers, and sensor interface for illustra-tive purposes, given rapid changes and advancements in technology and the attempt to use generic terms where possible. IQWST materials show photographs of and reference Pasco brand probes for several activities, as Pasco makes high- quality equipment for middle school use. If your school uses another brand of technology, adjustments may be required in the instructions to students. If your school does not have probeware, and you elect not to purchase such equipment, then more significant adjustment to activities will be necessary, especially where measurements may not be made quantitatively without similar devices. It is recommended, in keeping with the NGSS call for the types of scientific practices considered integral to science education, that probeware be used as recommended in IQWST. More specific guidelines and instructions specific to brands of probeware may be found on the Teacher Portal with updates available to teachers in a timely manner.
Mathematics is used throughout the IQWST program as students take measurements using the tools of science, collect data, plot data on graphs or create data tables, and come to understand and work with dependent and independent variables. Students use scientific probes to calculate in the manner of scientists. Computers are used for simulations of models of phenomena, such as predator/prey relationships, or for observing a phenomenon in slow motion so that it can be more carefully examined.
Scientific Practice 6: Constructing Explanations and Designing Solutions
The Framework defines explanations as “accounts that link scientific theory with scientific observations or phenomena” and identifies the related engineering practice of designing solutions, in which students construct and defend solutions to problems that draw on scientific ideas. In IQWST, these two aspects of the practice are combined as constructing, evaluating, and defending evidence- based scientific explanations. The scientific practice of explanation goes beyond asking students to describe what they know about a particular idea. Instead, students develop a chain of reasoning that shows why the phenomenon occurs as it does.
For example, rather than asking students simply to “explain the process of cellular respira-tion,” an IQWST Life Science Unit asks students to “explain why the air a human breathes out contains less oxygen than the air breathed in.” Students not only describe the process of respiration but also construct a causal chain that fits the evidence. Drawing on prior ideas from chemistry and physical science, such a chain should specify where glucose goes in the body, what materials can get into and out of cells, and conclude that a chemical reaction

IQWST OVERVIEW xxv
requiring both glucose and oxygen must be taking place in cells to convert energy to a form the organism can use.
What Does It Mean to Construct an Explanation?
In the practice of constructing explanations in IQWST, students make claims, use data as evidence to support their claims, and engage in reasoning that draws on scientific prin-ciples, or the “what we know” in science, to explain the “how” and “why” of phenomena they investigate in the classroom. Teachers pose questions that push students to think more deeply about what they have observed, read, and experienced, modeling this practice so that students learn to question one another. IQWST lessons support students in critiquing one another’s explanations, providing students with opportunities to talk, to write, to dis-cuss, to give and receive feedback, and to revise the explanations they have constructed. Many elements of the Common Core are addressed as students cite evidence from sources; integrate information from observations and from text; write arguments that use a claim, use data as evidence, and use logical reasoning in an explanatory text; and engage in revision focused on writing clearly and coherently for a specific purpose and audience.
Supports are designed around a framework that divides scientific explanations into three smaller, manageable, and teachable components for middle school students: claim, evidence, and reasoning (referred to as the C,E,R framework). IQWST identifies these components in order to support students as they learn to write in a new way.
Claim
A claim is a statement of one’s understanding about a phenomenon or about the results of an investigation. The claim is a testable statement about what happened. The claim expresses what the author is trying to help the audience understand and believe.
Claims may be made about data that students have been given or they have gathered them-selves. If an investigation has independent and dependent variables, the claim describes the relationship between them.
In practice, teachers have found it useful to teach that a claim must be a complete sen-tence, cannot begin with “yes” or “no,” and is typically the first sentence of an explanation. Although it is not necessary that a claim be the first sentence, experience has shown that freedom to vary the guidelines is best managed after the guidelines and their purpose have been learned.
The claim is often the part of an explanation that students find easiest to include and to iden-tify as they critique others’ explanations. One of the purposes of focusing on evidence- based scientific explanations is to help students include more than a claim (or “simple” answer to a question) in their writing.
Evidence
The evidence consists of the data used to support the claim. The evidence tells the audience the support the author has collected that makes the claim convincing.

xxvI IQWST OVERVIEW
An explanation must contain accurate and sufficient evidence in support of the claim. Evidence makes claims understandable and convincing. While “data” can refer to all the observations that students have collected or analyzed, data become “evidence” when used to support a claim. The evidence for explanations can come from investigations students conduct, from observations they make, or from reports of empirical research others have done. Where pos-sible, explanations incorporate more than one piece of data as evidence.
A goal in IQWST is to help students understand that data must be marshaled as evidence in support of a particular claim. In complex situations, more than one claim might be made about a single data set. It might also be that more data are available than are necessary to support a particular claim. Students must determine which are the appropriate data to use in support of a claim they have made and what are sufficient data to support that claim. The idea that multiple claims might be made using the same data develops across the curriculum as the inquiry activities become more complex, and students’ options for research questions (and resulting claims and evidence) become increasingly open ended.
Reasoning
Students learn that the accepted scientific understanding or principles that underlie the explanation must be made explicit in a process IQWST calls reasoning. The reasoning pres-ents the logic that leads from the evidence to the claim and, if possible, connects it with a scientific principle. The reasoning says why the claim makes sense, given what is understood so far about the phenomena. Reasoning ties in the scientific knowledge or theory that justi-fies the claim and helps determine the appropriate evidence. The reasoning may include a scientific principle that reflects the consensus students have developed so far about the phenomena they are investigating. It may also require a logical chain that shows how the principle and evidence work together to support the claim. For example, the reasoning for the effects of a competitor X on population Y may refer to a series of connected steps that start with the increase in population size of the competing species X, decrease of avail-able food sources needed by both X and Y, and then drop in population size of Y due to lack of food.
The reasoning connects to the general knowledge of the scientific community and a chain of logic to explain how particular data support a claim, given what scientists know about the world. Reasoning is the most difficult aspect of explanation writing for students to understand and is the most difficult aspect for teachers to teach. Reasoning requires relating general scientific principles— what is already known in science— to the specific question being inves-tigated and requires students to make explicit the steps of their thinking.
Scientific Practice 7: Engaging in argument from EvidenceThe Framework defines the central role of scientific argumentation in building scientific knowledge as “a process of reasoning that requires a scientist to make a justified claim about the world. In response, other scientists attempt to identify the claim’s weaknesses and limitations.” In the practice of constructing explanations in IQWST, argumentation occurs when students defend their explanations both in written form, by providing supporting evidence and reasoning, and in classroom discourse, when comparing and discussing com-peting explanations. IQWST lessons contain support for students to critique one another’s

IQWST OVERVIEW xxvII
explanations and to reach consensus, both critical parts of argumentation. Students learn about criteria for critiquing explanations that also apply to arguments: both must fit the evidence, be logically coherent, fit what is known in science, and include important steps in reasoning.
Argumentation is key in IQWST as it is in the Framework, NGSS, and the Common Core; thus significant attention is paid to evidence- based explanation and argumentation, and students engage in this practice in every IQWST unit.
Scientific Practice 8: Obtaining, Evaluating, and Communicating Information
Student readings provide additional information to support students’ in- class investigations. Readings are designed to be integrated into each lesson such that students obtain, evaluate, and communicate information from multiple sources— their own work, others’ work, and the science they read about— in all that they do. In addition, opportunities abound for additional research using the Internet, for example, so that students can pursue areas of individual interest that go beyond the performance expectations and grade- level standards. That is, a student who reads about solar sails, described in an IQWST reading as an example of the use of solar power, might wish to learn more about what solar sails are and how they work. Such reading might also trigger interest in alternative forms of energy and their advantages and disadvantages and lead to a written project designed to meet Common Core standards as situated in the context of the science being studied. This can enable a student to apply his or her understanding to global concerns or to issues in the local community. Such proj-ects, models, and written products that result can interest and motivate students, deepen content understanding, encourage engagement in scientific practices and literacy practices related to science, and provide application and extension opportunities beyond the class-room. In addition, deeper understanding will likely be fostered as the student encounters new ideas in science that fit with the knowledge gleaned from such a project as the core of learning— connecting new understandings with prior knowledge— is strengthened. IQWST does not require research paper types of projects; however, opportunities for teachers to collaborate across content areas such that students might explore science topics as a way to meet Common Core requirements is an option, given that students are likely to encounter many topics they wish to explore further as they investigate phenomenon and read, write, and talk science in every lesson.

xxvIII IQWST OVERVIEW
INSTRUCTIONaL SUPPORT fOR SCIENTIfIC PRaCTICES
The following strategies support students in developing experience with scientific practices.
Use Data to Build UnderstandingAs designed, earlier IQWST units help students become familiar with observation and data collec-tion and with using data to make sense of phenomena. Teachers are encouraged to ask students to support ideas with evidence (e.g., Why do you think that? How could that happen? What if . . . ? What evidence do you/we have for that?). Teachers allow students to question evidence pro-vided by others. This creates a situation in which using data as evidence to defend a claim makes sense— students need evidence because they will be questioned about it in discussion.
Model the PracticeThe teacher uses a think- aloud process to make thinking visible to students. This highlights the underlying aspects of scientific practices, making them explicit as the teacher “talks through” his or her thinking, modeling how good writers, modelers, thinkers, observers, or questioners think as they engage in the practice.
Identify the audienceAll written tasks should be constructed with an audience in mind. This helps students shape their writing, as is also required in the Common Core, so that the audience can make sense of a written explanation, a model, or a representation of data. In IQWST, students may be asked to think about convincing someone from another class of the validity of the claim in an explanation, to share with someone at home and get feedback, or to explain to an absentee student, someone new the school, or an elementary student.
Motivate the PracticeAs teachers incorporate explanation construction and modeling into lessons, they must help students move back and forth between the components of the practice (e.g., claim, evidence, reasoning) and the overall purpose of the practice. Otherwise, focusing on the components becomes formulaic, and students lose sight of the purpose of explanations and modeling in science. To help students see a need for this work, they are placed in situations in which they must engage in argumentation as a way to “convince” someone that their conclusions make sense and can be supported with data.
Generate CriteriaWhen students are asked to convince one another and to determine whether they are con-vinced by someone’s claim, they need criteria on which to base decisions. Although teachers begin with criteria in mind (described in each unit), they guide students to develop criteria in their own words. The framework can be given to students at the outset; however, students have a deeper understanding of the components and more buy- in when they work coopera-tively as a class to generate criteria or the framework for an explanation.

IQWST OVERVIEW xxIx
Critique ExamplesStudents are accustomed to process writing in ELA, but they tend to think that once some-thing is written in other content areas it is finished. Whole- class, teacher- led, and small- group critique of explanations and models helps students see that explanations can be revisited, rethought, and revised. A teacher can create sample explanations for critique purposes. Once students have written explanations, their work can be used anonymously for whole- class critique. Teacher- guided critique, in which the teacher asks probing questions in a discussion, is a useful next step. Once students have practiced in teacher- led sessions, they are ready to critique one another’s work. In any critique, strengths and weaknesses should be highlighted and suggestions for improvement offered. It is small- group or paired sharing, in which students compare ideas and justify their use of evidence, that IQWST emphasizes. It is in those comparison and justification activities that deep conceptual understanding takes place, and it is these activities that motivate the use of explanations and models in science.

xxx IQWST OVERVIEW
LITERaCy IN THE IQWST CLaSSROOM: INTEGRaTING THE COMMON CORE
IQWST supports literacy for diverse learners as students transition from learning to read and write in elementary school to reading and writing to learn in middle school. Lessons draw on the most recent research in literacy learning, with emphasis on reading comprehension and on the role that reading and writing— in tandem— play in learning. In IQWST, students learn by engaging with the tools, materials, ideas, and principles of science and by thinking, reading, writing, and talking science— positioning them to address every element of the Common Core for Science.
Literacy practices are integrated into every IQWST lesson. The curriculum encourages stu-dents to be reflective and critical thinkers, to ask questions of the teacher and each other, to share in small- and whole- group discussion, to read texts that connect science to their everyday lives and prior knowledge, to write responses to embedded questions, to construct models and written explanations and to revise them, to engage in argumentation to defend their ideas and to challenge one another’s thinking.
Student books are consumable, functioning as portfolios; the lab activity pages, models and diagrams students draw, readings, and all writing are in one place. Books can be used to teach additional skills by a specialist, support person, or teacher who chooses to teach anno-tation or highlighting, for example, as students write directly in their books.
Common Core Standards for Reading in Science (Grades 6– 8)*IQWST materials are designed to meet Common Core standards for reading and include strategies to guide teachers in addressing some standards with additional depth or differen-tiate for diverse students.
COMMON CORE STaNDaRD aS aDDRESSED IN IQWSTKey Ideas and Details
Cite specific textual evidence to support analysis of science and technical texts.
Discussion prompts and strategies for teachers and responses to questions embedded in readings ask students to refer to text for evidence.
Determine the central ideas or conclusions of a text; provide an accurate summary of the text distinct from prior knowledge or opinions.
Summarizing or referencing central ideas from text in discussion is often done in the “Reading Follow Up” section that begins most lessons.
Follow precisely a multistep procedure when carrying out an experiment taking measure-ments or performing technical tasks.
Activity sheets that accompany investigations and homework activities provide extensive practice in reading and following procedures.

IQWST OVERVIEW xxxI
COMMON CORE STaNDaRD aS aDDRESSED IN IQWST
Craft and Structure
Determine the meaning of symbols, key terms, and other domain- specific words and phrases as they are used in a specific scientific or technical context relevant to Grades 6– 8 texts and topics.
The language of science is key to science learning. Thus readings address vocabulary in a manner that is context rich, and use of an interactive Word Wall reinforces the reading and the use of science language.
Analyze the structure an author uses to orga-nize a text, including how the major sections contribute to the whole and to an understand-ing of the topic.
Readings provide opportunities for teacher-led analysis of structure.
Analyze the author’s purpose in providing an explanation, describing a procedure, or discussing an experiment in a text.
Readings provide an opportunity for teacher- led analysis of purpose.
Integration of Knowledge and Ideas
Integrate quantitative or technical information expressed in words in a text with a version of that information expressed visually (e.g., in a flowchart, diagram, model, graph, or table).
Readings support students in moving back and forth between text and visual information (e.g., “notice the shaded area in the diagram”), and some readings suggest that teachers reinforce this practice when previewing or reviewing readings.
Distinguish among facts, reasoned judgment based on research findings and speculation in a text.
This is best accomplished through suggested projects in which students pursue individual interests or go into more depth studying a topic related to class.
Compare and contrast the information gained from experiments, simulations, video, or multimedia sources with that gained from reading a text on the same topic.
Questions such as “How does what you read help you think about yesterday’s investiga-tion?” support students in integrating multiple sources of information. Videos and simulations, as well, are interwoven with reading and with hands- on investigations.

xxxII IQWST OVERVIEW
COMMON CORE STaNDaRD aS aDDRESSED IN IQWSTRange of Reading and Level of Text Complexity
By the end of Grade 8, students read and comprehend science texts in the Grades 6– 8 text complexity band independently and proficiently.Appendix A: New Research on Text Complexity 1. Texts of low complexity have simple,
well- marked structures; texts of high complexity have complex, implicit struc-tures. Graphics tend to be simple or supplementary to meaning of texts of low complexity; texts of high complexity have graphics essential to understanding a text.
2. Texts that rely on clear and conversational language tend to be easier to read than texts that rely on unfamiliar language (such as domain- specific vocabulary).
3. Texts that make few assumptions about the extent of readers’ life experiences and depth of their content/discipline knowl-edge are generally less complex than texts that make many assumptions in one or more of those areas.
4. Informational texts with an explicitly stated purpose are easier to comprehend than texts with an implicit, hidden, or obscure purpose.
As students transition from learning- to- read to reading- to- learn, IQWST supports them with built- in strategies for students and teachers. IQWST does not provide texts at multiple Lexile levels, based on research that indicates (1) that students who are interested in a topic will choose to read well beyond their test- determined reading level, and (2) that reducing word length and shortening sentences (key strategies for decreasing reading level) can impair comprehension. Rather than confine students who read below level to reading lesser content, materials suggest strategies for teachers to differentiate instruction so all students have opportunities to use the materi-als to develop as readers capable of using a range of written materials. Suggestions for students at the top of the grade level reading band encourage independent reading of texts beyond curriculum requirements, so no ceiling suppresses what IQWST students can achieve as readers and critical thinkers.
*Condensed/edited for length and purpose, omitting, for example, references to content other than science.
IQWST readings are integral to students’ understanding of science concepts and enable teachers to simultaneously address the reading- and writing- related elements of the Com-mon Core.
Readings • Extend classroom learning by providing additional examples of principles and con-
cepts encountered in class • Review in- class activities to help students understand and retain main ideas and to sup-
port absent students with content they missed • Elicit students’ prior knowledge and draw on it in engaging ways • Provide real- world connections that illustrate the value of science outside the classroom • Use examples with which middle school students are likely to have personal experience
or at least be familiar • Embed questions, to which students write responses, supporting integration of reading
and writing in the service of learning, as well as support students’ active engagement as readers
IQWST OVERVIEW xxxIII
Given that the ability to “read and comprehend complex informational texts independently and proficiently” is a lifelong skill defined as an Anchor Standard for Reading in the Common Core, IQWST materials are designed such that readings are intended to be done indepen-dently, outside of class time. The few exceptions, in which class time is specifically devoted to addressing some portion of a reading assignment, are clearly indicated in the materials.
Introducing Reading sections in the teacher materials often suggest that the teacher review the Getting Ready section of the student materials as a whole- class, oral activity, thus eliciting whole- class prior knowledge, engaging students in brief discussion, and setting a purpose for the homework reading. Reading setup could take as few as 2 to 3 minutes of class time, or as much as 10, depending on the teacher’s purpose, students’ abilities, and the nature of the individual activity, but in general, teachers should plan on three to five minutes to introduce the reading.

xxxIv IQWST OVERVIEW
The Student EditionAnnotated versions of the student pages— in the Teacher Resource Book— provide the teacher with likely student responses or expected responses (including correct answers, where appropriate) as well as ideas for using those responses as formative or summative assessments.
Driving Question Notes and Scientific Principles Pages
The first few pages of every student edition are provided as note- taking space in which stu-dents can record both their own individual ideas that connect with the Driving Question, and those big ideas generated by the class. Students should record their own original questions and can add information about those as they progress through the unit. Scientific principles are big ideas that the entire class “arrives at” by the end of many lessons and that students record for ongoing reference. The teacher materials often suggest ideas to be recorded on these pages, but they can be used to record any information the teacher or students deem appropriate. Tracking of scientific principles is a way to ensure that the class articulates “what we know so far” as students progress through the unit; it has common language to draw on when constructing explanations or arguments that draw on these big ideas.
Activity Sheets
IQWST students experience phenomena in a problem- based, investigative context, typi-cally guided by activity sheets for each lesson. These pages support students as they plan and carry out investigations, follow procedures, make predictions and compare them with what happened, organize and analyze data, and make sense of science. Activity sheets often include an opportunity for students to explain the how or why of a phenomenon, deepening students’ understanding as they engage in scientific practices.
Having a student read the “What will we do?” section aloud is one strategy to provide stu-dents with an overview of activities in which they are about to engage. Read through the procedure with students, demonstrate it, highlight key components, or summarize briefly so that students conceptualize the big picture of what they are going to do. For example, tell students “You are going to observe two materials separately, and then observe them again after you put them together. It is important that you describe your observations in the table on your activity sheet. Then, you will write some questions about what you observed.” Such review frames the activity for all students but is especially important for students who need to hear and not just read the procedure or who need to understand the big picture before making sense of the individual steps.
Homework
Some take- home assignments are designed as extension activities, typically requiring stu-dents to apply what they have learned to new contexts. These assignments reinforce in- class activities, providing independent practice focused on key ideas in each unit.
IQWST OVERVIEW xxxv
Using IQWST Readings EffectivelyThe Teacher Edition provides two primary ways of supporting students as readers in science by taking a brief amount of time to introduce the readings and consistently following up on readings in class discussion, as bell work at the beginning of class, or in a quiz- type format.
Introducing Reading
The best way to introduce readings is for the teacher to take the first few minutes of class time to generate interest. Materials typically include an Introducing Reading section with ideas. While spending a few minutes can have tremendous payoff for students, sometimes the teacher will be pressed to do something quick. Most important is that something is done to introduce the reading in order to engage interest, elicit prior knowledge, and set a pur-pose for reading.
Reading Follow Up
It is important to follow up the readings or other homework. Use the embedded assessments for grades or points or use them to generate follow- up discussion to begin a class period. Students held accountable for reading either through assessments or through in- class ques-tions that require having read the materials in order to participate in discussion are more likely to read as homework. As they enter class, a simple way to do this is to have on the board an opening question that draws on what they read.

xxxvI IQWST OVERVIEW
Common Core Standards for Writing in Science (Grades 6– 8)*
COMMON CORE STaNDaRD aS aDDRESSED IN IQWSTText Types and Purposes
Write arguments focused on discipline- specific content. (a) Introduce claims, distinguish from opposing claims, and organize reasons and evidence logically. (b) Support claims with logical reasoning and relevant, accurate data, and evidence. (c) Clarify relationships among claims, counterclaims, reasons, and evidence. (d) Maintain a formal style. (e) Provide a concluding statement that supports the argument.
One pervasive opportunity in IQWST is for students to construct evidence- based explana-tions of phenomena they investigate and to analyze and give feedback on the written explanations of their peers. In some units, this is taken a step further into argumentation, with written and oral defense of arguments: a key scientific practice supported when the unit content is conducive to argumentation. Read-ing and discussing writing can help students deepen their own understanding, hone their critical thinking skills, and support consensus- building or argumentation skills in a group. Such activities meet this standard as well as engaging in two of the eight scientific practices defined in NGSS.
Write informative/explanatory texts, including scientific procedures/experiments. (a) Intro-duce the topic clearly and organize ideas, concepts, and information as appropriate to achieving purpose. (b) Develop the topic with relevant facts, details, or other information. (c) Clarify the relationships among ideas and concepts. (d) Use precise language and domain- specific vocabulary to explain the topic. (e) Maintain a formal style and objective tone. (f) Provide a concluding statement that supports the explanation presented.
In addition to the information in the previous box, students write explanations in response to questions embedded in their reading materials and on activity sheets to conclude and make sense of investigations. Additional opportuni-ties to write explanatory texts are often pro-vided in the Differentiation Opportunities sections that precede each lesson.
Narrative skills—for example, write precise enough descriptions of step- by- step proce-dures they use in investigations that others can replicate them and (possibly) reach the same results.
Students write step- by- step procedures when they design investigations, meeting this standard as well as engaging in one of the eight scientific practices defined in NGSS.
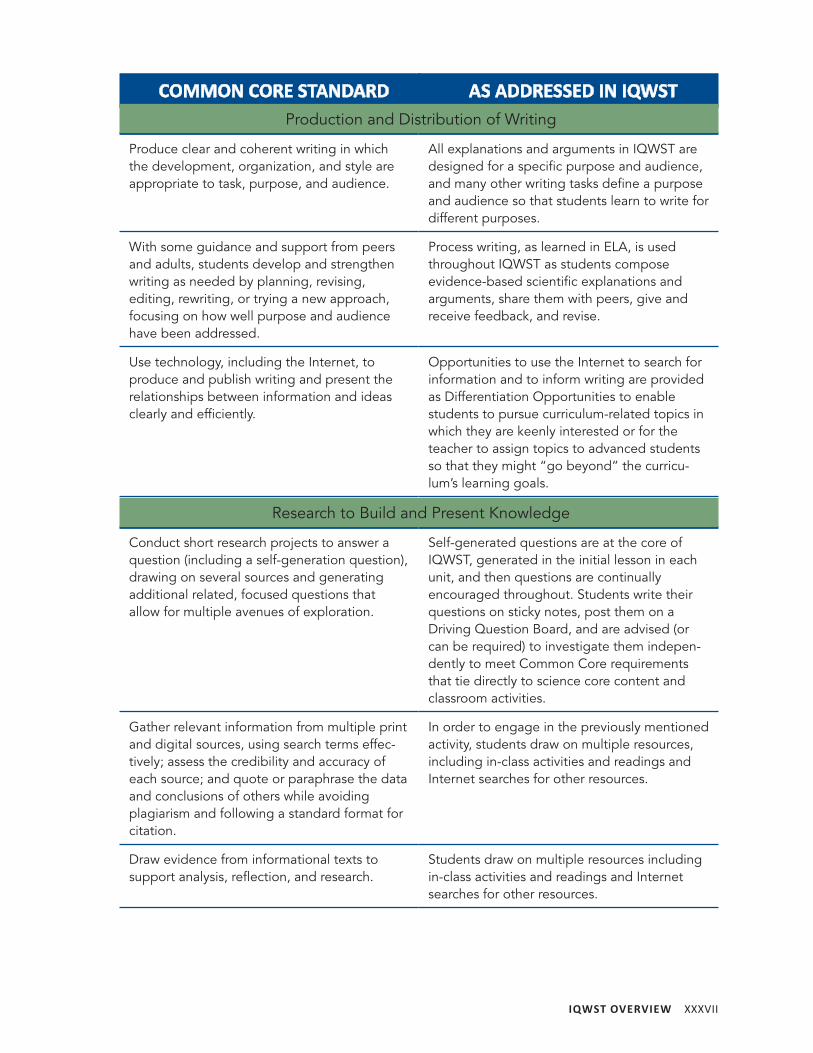
IQWST OVERVIEW xxxvII
COMMON CORE STaNDaRD aS aDDRESSED IN IQWSTProduction and Distribution of Writing
Produce clear and coherent writing in which the development, organization, and style are appropriate to task, purpose, and audience.
All explanations and arguments in IQWST are designed for a specific purpose and audience, and many other writing tasks define a purpose and audience so that students learn to write for different purposes.
With some guidance and support from peers and adults, students develop and strengthen writing as needed by planning, revising, editing, rewriting, or trying a new approach, focusing on how well purpose and audience have been addressed.
Process writing, as learned in ELA, is used throughout IQWST as students compose evidence- based scientific explanations and arguments, share them with peers, give and receive feedback, and revise.
Use technology, including the Internet, to produce and publish writing and present the relationships between information and ideas clearly and efficiently.
Opportunities to use the Internet to search for information and to inform writing are provided as Differentiation Opportunities to enable students to pursue curriculum- related topics in which they are keenly interested or for the teacher to assign topics to advanced students so that they might “go beyond” the curricu-lum’s learning goals.
Research to Build and Present Knowledge
Conduct short research projects to answer a question (including a self- generation question), drawing on several sources and generating additional related, focused questions that allow for multiple avenues of exploration.
Self- generated questions are at the core of IQWST, generated in the initial lesson in each unit, and then questions are continually encouraged throughout. Students write their questions on sticky notes, post them on a Driving Question Board, and are advised (or can be required) to investigate them indepen-dently to meet Common Core requirements that tie directly to science core content and classroom activities.
Gather relevant information from multiple print and digital sources, using search terms effec-tively; assess the credibility and accuracy of each source; and quote or paraphrase the data and conclusions of others while avoiding plagiarism and following a standard format for citation.
In order to engage in the previously mentioned activity, students draw on multiple resources, including in- class activities and readings and Internet searches for other resources.
Draw evidence from informational texts to support analysis, reflection, and research.
Students draw on multiple resources including in- class activities and readings and Internet searches for other resources.

xxxvIII IQWST OVERVIEW
COMMON CORE STaNDaRD aS aDDRESSED IN IQWSTRange of Writing
Students write routinely over extended time-frames (time for reflection and revision) and shorter timeframes (a single sitting or a day or two) for a range of discipline- specific tasks, purposes, and audiences.
This standard is met throughout IQWST, as writing is a component of every lesson; the writing for a range of purposes is a component of every unit.
*Condensed/edited for length and to apply only to science.
Summarizing is another valuable way to use writing, and it can be used to combine all three components of the Common Core. Summarizing requires determining and restating main ideas and findings. To support students in summarizing key ideas, provide practice for them to verbalize their thinking before writing or time to write about their ideas before sharing orally. For instance, before writing a summary of a reading, students could be asked the fol-lowing: How would you summarize this reading for students who were absent yesterday?Whatdidtheymissthattheyneedtoknow? After discussing, students will be better pre-pared to write summaries. Writing before sharing orally enables students to think and to process what they have learned before they are called upon to share ideas in class. These and other strategies support students as readers, writers, speakers, and listeners in the context of the science classroom.
In addition to the multiple opportunities provided for students to write to learn in IQWST lessons, activity sheets, readings, and home assignments, teachers can provide additional opportunities to meet the needs of individual students, many of which are suggested in the Differentiation Opportunities section that precedes each lesson.

IQWST OVERVIEW xxxIx
Common Core Standards for Speaking and Listening (Grades 6– 8)*
COMMON CORE STaNDaRD aS aDDRESSED IN IQWSTComprehension and Collaboration
Engage effectively in a range of collaborative discussions (one- on- one, in-group, and teacher- led) with diverse partners . . . building on others’ ideas and expressing their own clearly, (a) come to discussions prepared, having read required material, (b) follow rules for collegial discussions, (c) pose and respond to questions with elaboration and detail . . . connect the ideas of several speakers and respond to others’ questions and comments with relevant evidence, observations, and ideas; and (d) acknowledge new information expressed by others and, when warranted, qualify, justify, or modify their own views in light of the evidence presented.
These standards are addressed in daily discus-sion, often as a follow- up to reading, to make sense of science during and after investigations and as a precursor to writing. Students given opportunities to talk about their ideas and those of others; to use talk as a way to think more deeply; and to critique claims, evidence, and reasoning orally are then better positioned to be able to write convincingly about their ideas.
In addition, talking through ideas in this manner enables students to make sense of reading they have done or can set up reading as students read purposefully to determine whether their ideas were right, wrong, or somewhere in between.
Interpret and analyze information, main ideas, and supporting details presented in diverse media and formats (e.g., visually, quantitatively, orally) and explain how the ideas clarify a topic, text, or issue.
As students engage with phenomena during investigations, their work requires interpreting and analyzing information that is visual/observational, verbal as expressed in both oral and written texts, and both qualitative and quantitative, requiring students to synthesize information from multiple sources.
Delineate a speaker’s argument and specific claims, evaluating the soundness of the reasoning and the relevance and sufficiency of the evidence.
Activities throughout IQWST that call for explanation or argumentation also call for students to share and to critique one another’s ideas as specified in this standard.
Presentation of Knowledge and Ideas
Present claims and findings, sequencing ideas logically and emphasizing salient points in a focused, coherent manner; use appropriate eye contact, adequate volume, and clear pronunciation.
Activities throughout IQWST that call for expla-nation or argumentation, as well as modeling, also call for students to present their ideas to a partner, a small group, or to the whole class.
Include multimedia components and visual displays in presentations to clarify claims and findings and emphasize salient points.
Visual displays, especially models that accom-pany explanations and arguments, are con-structed and shared in every IQWST unit.
Adapt speech to a variety of contexts and tasks, demonstrating command of formal English when indicated or appropriate.
The primary manner of speaking and listening in IQWST is presenting ideas for comparison with others’ ideas and both giving and receiv-ing oral feedback.
*Condensed/edited for length and to generalize across Grades 6– 8.

xl IQWST OVERVIEW
Classroom CultureEstablishing a culture in which students actively participate in “talking science” is at the core of IQWST, but it is challenging for both teachers and students. By the time students have reached the middle grades, they know a great deal about what it means to “do school.” They raise their hands, do so only when they think they have the right answer, and respond to teacher- posed questions rather than to peers’ ideas. In an IQWST classroom, students ask questions that arise out of individual interests or concepts about which they are confused. They ask questions of other students, as well as the teacher. Science discussions promote active engagement in science learning such that everybody expresses their understanding and learns from each other. The goal is for students to develop as thinkers and problem solvers through participating in thoughtful talk about core content.
Sharing ideas openly, asking questions of one another, defending one’s ideas, and not having right answers challenges many students, as well. Students who are successful when reading and answering questions may not be comfortable discussing and exploring alternative ways to explore concepts. Students may be uncomfortable participating in discussions if they are unsure of the correct answer or may be uncomfortable with the idea that multiple responses may be considered correct at a given time in the process of learning. Students who are suc-cessful doing activities and discussing their reasoning may struggle when they are required to write about their ideas. Students who have looked to the teacher for answers and guidance may find it unusual that they need to question another student or provide rationale for their responses.
Establishing a classroom culture wherein students feel comfortable sharing and discussing with each other and feel confident about participating actively begins on the first day of class. Since IQWST may introduce a new manner of discussion for students, the teacher will need to model sharing, listening, and learning with students by demonstrating the value of contribu-tions, not just correct answers. The primary goal of oral discourse is for students to articulate their own understanding and to listen and respond to each other. This goal is assisted when the following occurs:
• All students are provided opportunities to participate. • All students are encouraged to participate. • Students are encouraged to think together, rather than only speak, if they think they
have the correct answer. • Students see the value in wrong answers for figuring things out. • Students are provided opportunities to write their responses before sharing aloud. • Students use information in readings as a springboard for discussion. • Students listen carefully to others and respond to others’ ideas.
Small-group discussions are an integral part of the inquiry process in IQWST. They provide the best opportunity for students to learn from each other and interact with their peers as well as with the teacher. It is important that all students have an opportunity to participate, express their ideas, listen to one another, and respect others’ ideas. Developing a classroom culture in which this is the norm may take time, especially if this is not what students are accustomed to in other classroom settings.

IQWST OVERVIEW xlI
Teacher SupportsIQWST lessons support teachers by providing scaffolding to help facilitate conversation. Teacher supports include a list of possible questions or prompts a teacher may use or adapt, as needed, possible student responses, information about what student responses might suggest about their understanding, and ideas about how to address those ideas. The les-sons support the teacher in creating a culture of science discourse by providing question stems such as these:
• What can you add to make this idea clearer? • How does this idea compare to the idea of the previous speaker? • What can you add to expand on what was just said? • How can you summarize our conclusions?
Three Types of Discussion
IQWST lessons identify discussions by type to assist teachers in recognizing the structure of the discussion and conducting the discussion according to the guidelines for each.
In IQWST, brainstorming is any discussion with the purpose of generating and sharing ideas without evaluating their validity. Prompts provided for all brainstorming discussions are sug-gestions meant to encourage students to express their ideas. It may be useful to record ideas on the board, on a computer, or on a transparency so that students can see what has been said and can build on others’ ideas. A photograph of notes recorded on the board, a printout, or a transparency can be attached to the Driving Question Board as a reminder of the activity.
1. Discussion: BrainstormingPurpose: To articulate and share ideas without evaluating their validity.
• All ideas are accepted in brainstorming. • Ideas are captured and recorded as they are generated. • Brainstorming prompts include the following: o What have you observed or experienced? o What do you think about when you hear the word . . . ? o What do you know about . . . ? o Who has a different way of thinking about this topic? • Follow- up can include, as appropriate, such questions as the following: Where
does that idea come from? How do you know? Where have you heard/seen/ experienced that before?
2. Discussion: SynthesizingPurpose: To put ideas together or assemble them from multiple activities into a
coherent whole. • Discussions may include making connections to personal experiences, to the
Driving Question, and to other lessons or content areas. • Synthesizing prompts include the following ones: o How does this connect to . . . ? o How does this support the Driving Question? o How does this help us think about the activity we did yesterday? o What do we know about this topic so far?

xlII IQWST OVERVIEW
In IQWST, the purpose of a Pressing for Understanding discussion is to get students to think more deeply and to make sense of their experiences. Some questions can lead to a simple answer, others to a deeper, more thoughtful answer. Learning through inquiry encourages students to think more deeply but only if their thinking is scaffolded until they learn to think in terms of how and why, to make connections, to analyze, and to synthesize. Probing ques-tions such as Why do you say that?,Whatmakesyouthinkthat?,andHowdoyouthinkthatworks? invite students to think more deeply and, over time, establish a culture in which doing so is the norm in science class.
3. Discussion: Pressing for UnderstandingPurpose: To figure things out or make sense of readings or activities while going
deeper and beyond surface answers. • Discussions may involve respectful challenge, debate, or arguments in which
students justify their ideas. • When pressed, students may revise their previous ideas as they learn new infor-
mation that shows the limitations of their previous understandings. • Pressing for Understanding prompts include the following: o How do you know? What evidence supports that idea? o Why does our old model not work to explain this new phenomenon? o How could we figure this out? o How does . . . compare to . . . ? o What new questions do you have?

IQWST OVERVIEW xlIII
THE LaNGUaGE Of SCIENCE: VOCaBULaRy
New Meanings, familiar WordsScience as a discipline is known for its challenging vocabulary; thus IQWST lessons contain supports to help students develop deeper understanding of science concepts, including how, when, and why particular language is used. Students are engaged in thinking about the language of science in multiple ways.
IQWST takes a research- based, contextual approach to science language, stressing the repeated, ongoing, pervasive use of new words in oral and written discourse, acknowledg-ing that language and conceptual understanding develop hand- in- hand. Science words are taught as they are needed. Typically, after a concept has been encountered, it is then given a label (the vocabulary word). A primary support for students occurs when teachers use science vocabulary frequently and appropriately and guide students to do so as well.
One of the hallmarks of successful readers is their ability to understand word meanings as they occur in varied contexts. When the teacher uses science vocabulary in context and calls attention to similarities and distinctions between words, all students are supported in build-ing their science vocabularies. Students’ everyday understanding can help or hinder their understanding of the uses of many words in science. Words like absorb and reflect have everyday uses that are consistent with their meanings in science, so linking the everyday to the scientific is likely to be helpful. However, words like volume and mass or words that name scientific practices such as modeling or explanation, have everyday meanings that may not help students understand the meaning in science. In those cases, making differences explicit supports students in learning multiple uses of words, including specific uses in science.
Simple routines used before students read new text can help students recognize and use sci-ence language as they read, write, and discuss their developing understandings.
Pre readingBefore asking students to read independently, the teacher can identify words that will be difficult for the class. Words the teacher anticipates will be difficult can be rehearsed by dis-playing them (on the board or on a Word Wall), pronouncing them, and providing a snapshot definitions aimed only to help students recognize the words when they encounter them in the context of written text. This scaffolding helps students move words from listening and speaking vocabulary to their reading and writing vocabulary.
Building VocabularyMany science words have common prefixes, suffixes, or root words. Building a list of words with similar word parts allows students to see, define, and make connections between words such as biology and ecology, especially when connected to biosphere, ecosystem, eco- friendly, biochemical, and biography, among others.
For teachers required to do more intense vocabulary study at the middle school level, strat-egies should support students in developing deeper understanding of science concepts,

xlIv IQWST OVERVIEW
rather than simply memorizing textbook- style definitions. Although writing vocabulary words in sentences is common school practice, it has not been shown to promote science vocabu-lary learning. Thus time is better spent engaged in tasks described in NGSS and the Common Core that use science vocabulary: constructing oral and written explanations and arguments, composing brief summaries, and answering questions that require both critical thinking and the use of appropriate vocabulary.
Interactive Word WallKeeping a space in the classroom to post new science language, as new words are encoun-tered, provides students with multiple exposures to new words and allows them to refer to the Word Wall when communicating ideas, formulating questions, or writing (and learning to spell science vocabulary). Having words posted allows the teacher to gesture to the Word Wall during discussion to support students in using science language in their talk. Words writ-ten on sentence strips can easily be moved to increase opportunities for connecting words in various ways, grouping them or creating concept maps. Word Walls may be enhanced by short definitions or by visual representations, as well. Students with artistic ability or who like to draw, or who learn by the act of creating representations may create visuals to post on the Word Wall along with new words. Most important is that the classroom is language rich, providing students with ongoing exposure to discipline- specific vocabulary, which supports them as readers, writers, and critical thinkers in science.

IQWST OVERVIEW xlv
aSSESSMENTS
Embedded/formative assessmentsFormative assessment opportunities are embedded within IQWST lessons. They occur dur-ing discussions, activities, and readings and can be used to gauge students’ understandings and developing science ideas in the moment. Formative assessments used regularly during the learning process enable the teacher to determine whether concepts need to be revisited, whether an optional activity would be beneficial for student learning, whether discussion should be extended or guided differently in order to support student learning, or whether some or all students would benefit from additional support. Formative assessments also enable teachers to provide explicit feedback to students on their ideas, so students can know in what ways they are on track toward meeting learning goals. Formative assessments also enable teachers to differentiate instruction in response to students’ current understandings. Questions embedded in readings and as suggested prompts for discussion include possible student responses and, where appropriate, correct answers. When using embedded assess-ments to gauge students’ understanding, analyze responses by listening for students’
• the ability to connect previous ideas with new content; • the ability to summarize ideas accurately; • current content understanding, as it will lead to meeting learning goals; and • developing use of appropriate science language.
Summative assessmentsMany of the embedded assessments, while designed for formative use, may be assigned points or letter grades. Any written response in the student books may be seen as a sum-mative opportunity. An option is to invite students to submit their one “best response” to questions in a lesson or their best evidence- based explanation or other revised response for a grade. This practice acknowledges that motivation, interest, and understanding vary from day to day and recognizes that assessing one’s best work helps students be more aware of their own performance and what constitutes “good work” in science. IQWST also provides a bank of questions, available electronically, that teachers may draw from to customize quiz-zes and tests. Questions may be used as they are or adapted to best match instruction or to meet students’ needs (i.e., differentiation).

xlvI IQWST OVERVIEW
SafETy PRaCTICES
Laboratory investigations, emphasized in the Framework and NGSS, excite students about the practice of science and lead to reflective discussions about investigation design and the real work of scientists. With investigations comes the need to teach laboratory safety and practice safety precautions with middle school students who may be new to lab experiences.
Science teachers are expected to take all possible actions to avoid accidents in the laboratory setting and to monitor labs for hazardous chemicals or flammable materials. This includes standard safety practices that include housekeeping to keep the laboratory areas clear of clutter and prohibiting unsupervised access to areas where electricity, chemicals, or heat sources are used.
Teachers should provide information about, and practice, laboratory evacuation drills. Gas and electricity should be shut off during any drills or whenever the class is leaving the lab. All exits must be kept free from obstructions, and no materials should be stored outside of the lab storage room. Safety rules should be posted in the room and reviewed with students prior to lab work. If the teacher, school, or district has specific science rules, those should be posted.
IQWST lessons contain specific safety information at the start of each lesson and throughout the lessons for easy reference for teacher and student. MSDS sheets should be consulted for appropriate use of all chemicals.
Science Lab RulesThere are many science rules to ensure safety in the laboratory. IQWST lessons have specific science cautions through each lesson to guide teachers and students, but middle school students, because of their inexperience with science labs, may need to be aware of certain safety procedures that include the following:
1. Clothing and Hair— Loose or baggy clothing, dangling jewelry, and long hair are safety hazards in the laboratory.
2. Cold and Heat Protection— Cold or hot materials should only be touched with hands protected by items such as safety tongs, safety mittens, or rubber gloves. In some instances, only the teacher should handle materials at extreme temperatures (e.g., dry ice).
3. Food— No eating, drinking, or use of cosmetics should occur during lab time. Even familiar substances used in activities (e.g., marshmallows for molecules) should not be consumed, as they may be contaminated in the lab setting.
4. Glass Caution— Glass should be used cautiously, and students should report any chipped, cracked, or scratched glassware should such occur during a lab activity.
5. Housekeeping— Work areas should be kept clean at all times, with backpacks, books, purses, and jackets placed away from lab tables.
6. Washup—Hands should be washed with soap and water before and after laboratory work. Students should not touch their faces or hair with either bare or gloved hands that have handled lab materials.

IQWST OVERVIEW xlvII
7. Safety Equipment— Personal protective equipment such as goggles, gloves, and aprons should be used as appropriate for the activity.
8. Allergies—All allergies should be noted for students and a plan put in place if pea-nuts, peanut oil, latex, or other known allergenic items are used in the lab. For example, although gloves and goggles provided in IQWST materials are latex- free, some units use balloons, which students with latex allergies should not handle.
9. Sniffing—When directed to “sniff” in the lab, students should be taught to follow the teacher’s directions for “wafting” odor to the nose.
These rules are general and should always be followed in a lab situation. IQWST provides a letter to parents that discusses science safety rules. If a school or district has another sci-ence letter, and/or additional safety rules, teachers should use the district letter and follow all school or district guidelines for safety in the science lab. For additional safety information, consult the NSTA safety portal at http://www.nsta.org/portals/safety.aspx.

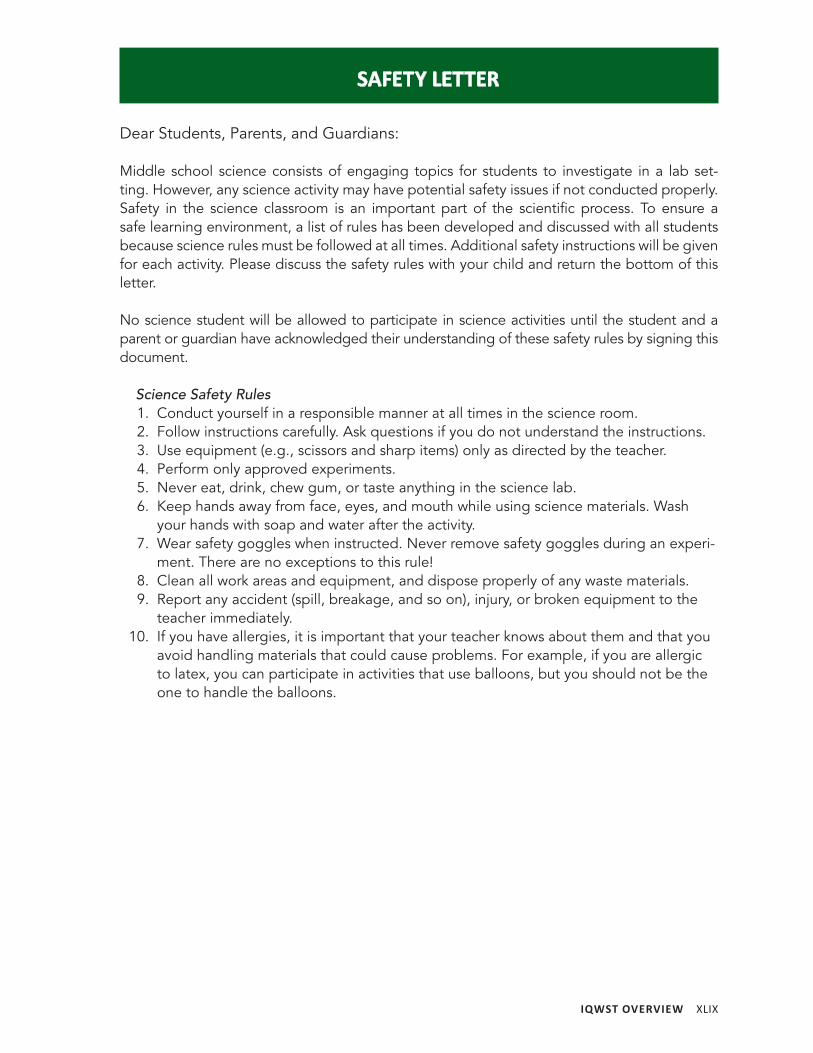
IQWST OVERVIEW xlIx
SafETy LETTER
Dear Students, Parents, and Guardians:
Middle school science consists of engaging topics for students to investigate in a lab set-ting. However, any science activity may have potential safety issues if not conducted properly. Safety in the science classroom is an important part of the scientific process. To ensure a safe learning environment, a list of rules has been developed and discussed with all students because science rules must be followed at all times. Additional safety instructions will be given for each activity. Please discuss the safety rules with your child and return the bottom of this letter.
No science student will be allowed to participate in science activities until the student and a parent or guardian have acknowledged their understanding of these safety rules by signing this document.
Science Safety Rules 1. Conduct yourself in a responsible manner at all times in the science room. 2. Follow instructions carefully. Ask questions if you do not understand the instructions. 3. Use equipment (e.g., scissors and sharp items) only as directed by the teacher. 4. Perform only approved experiments. 5. Never eat, drink, chew gum, or taste anything in the science lab. 6. Keep hands away from face, eyes, and mouth while using science materials. Wash
your hands with soap and water after the activity. 7. Wear safety goggles when instructed. Never remove safety goggles during an experi-
ment. There are no exceptions to this rule! 8. Clean all work areas and equipment, and dispose properly of any waste materials. 9. Report any accident (spill, breakage, and so on), injury, or broken equipment to the
teacher immediately. 10. If you have allergies, it is important that your teacher knows about them and that you
avoid handling materials that could cause problems. For example, if you are allergic to latex, you can participate in activities that use balloons, but you should not be the one to handle the balloons.

l IQWST OVERVIEW
SafETy aGREEMENT
Dear Students, Parents, and Guardians:
We are providing the Science Safety Rules to keep you informed of the school’s effort to cre-ate and maintain a safe science classroom/laboratory environment for all students.
Your signature on this letter indicates that you have read the Science Safety Rules, have reviewed them with your child, and are aware of the measures taken to ensure the safety of your son/daughter in the science classroom.
Parent/Guardian Signature:
Student Signature:
Date:
Important question – Does your child have any health issues or allergies? If yes, please list them here.

How Will It Move? is a five-week, project- based physical science unit that contex-tualizes concepts dealing with forces and motion in students’ real- world experiences. Four interesting devices provide a com-mon experience for all students to begin the unit, and future lessons circle back to making sense of the anchoring phenomena.
This practice of exploring, asking questions, and then continuing to revisit— each time knowing a little more of the science of what is happening— enables students to learn core ideas and crosscutting concepts about energy that can be used to explain a range of phenomena in the real world.
Unit overview
How will it Move?
The unit’s Driving Question is its title, How Will It Move? The core science idea and sci-entific practices in which students engage are instrumental to understanding the anchoring phenomena and answering the Driving Question. Students complete sev-eral investigations, each time cycling back to the four initial devices they observed in motion. Each cycle helps students delve into the science content to gain a deeper understanding of how forces influence
motion, how to describe motion, and the relationship between forces and energy. Throughout the unit, students construct and use models to explain and predict new phenomena.
Three learning sets structure the instruc-tional sequence, with eight total lessons. Some activities within lessons are optional, as the Driving Question can be explained without them.
Driving QUeStion
The first learning set consists of five lessons and focuses on identifying (1) systems, (2) the forces involved in them, (3) how forces can start and stop motion, and (4) how forces can be measured. Initially, students explore a Magnetic Cannon that behaves in a sur-prising, unpredictable manner. Students generate questions about the device itself; the Driving Question; and forces, motion, and energy in general. These questions are organized onto a Driving Question Board
(DQB) that guides the lessons throughout the unit. Most lessons should begin and end by referring to the DQB. In Lesson 2, students revisit the Magnetic Cannon and investigate three other devices: a Flying Balloon, Floating Magnets, and an Air- Powered Car. They learn the concept of systems as they determine some of the forces involved in the phenomena. In Lesson 3, students investigate in- line forces, learn-ing that these forces can reinforce, resist,
learning Set 1

2 HoW WIll It Move?
or cancel each other. These ideas are then applied to the four devices to explain that forces are the causal agents that make things start moving. In Lesson 4, students quantify forces using springs (optional) and
force probes. They then revisit the core con-cepts from Lessons 1– 3 from a quantitative perspective. In Lesson 5, students explore the idea of forces as the causal agents that make things stop moving.
The second learning set consists of two les-sons and addresses the idea that forces not only start and stop motion, but they can also change motion when it already exists. Being stationary is identified as a special example of being in motion with graphs used to describe and identify changes in motion. In Lesson 6, students analyze the motion of the balls in Newton’s Cradle to learn how to make time- dependent motion
graphs. These ideas are then applied to the Magnetic Cannon. Students make general conclusions about the nature of motion as represented in motion graphs. In Lesson 6, students are supported in generalizing from the conclusion of Lesson 3 (forces make things start moving) and Lesson 5 (forces make things stop moving) to conclude that forces are the cause of any change in motion.
learning Set 2
The third learning set consists of a single les-son and addresses the relationship between forces and energy. In it, students construct
a complete, evidence- based explanation of the behavior of the Magnetic Cannon.
learning Set 3

Unit Calendar
Unit Driving Question – How Will It Move?
Learning Set 1: What Makes It Start and Stop?
1– 2 Class Periods Lesson 1 – Anchoring Activity and Driving Question Board
Activity 1.1: Anchoring Activity
Activity 1.2: Driving Question Board
Reading 1.2: Newton’s Cradle
3– 4 Class Periods Lesson 2 – Which Forces Act on an Object?
Activity 2.1: Analyzing Apparatuses
Activity 2.2: Systems and Contact Forces
Homework 2.2: The World’s Greatest Sandwich
Activity 2.3: Forces that Act at a Distance
Reading 2.3: Balance and Force
Activity 2.4: Putting Things Together
4 Class Periods Lesson 3 – Why Does an Object Start Moving?
Activity 3.1: Objects that Begin Moving
Activity 3.2: More Objects that Begin Moving
Homework 3.2: Heavy-Duty Shopping
Activity 3.3: Complex Systems that Begin Moving
Reading 3.3: Why Does an Object Start Moving?
3– 4 Class Periods Lesson 4 – How Strong Is That Force?
Activity 4.1: Measuring Forces (Optional)
Activity 4.2: Measuring Force with Probes
Activity 4.3: Revisiting Familiar Apparatuses
Reading 4.3: What Keeps Things from Moving?
Reading 4.4: Who Will Win a Tug- of- War?
2 Class Periods Lesson 5 – Why Does an Object Stop Moving?
Activity 5.1: A Book that Stops Moving
Homework 5.1: Hard and Soft Landings
Activity 5.2: Recoil in the Magnetic Cannon
Reading 5.2: What Affects How Quickly Something Stops Moving?

Learning Set 2: What Makes It Change Its Motion?
2 Class Periods Lesson 6 – how Can We describe how an object moves?
Activity 6.1: Graphs that Show When a Ball Moves
Homework 6.1: Rat Race
Activity 6.2: Graphs that Show How a Ball Moves
Homework 6.2: Rat Race Part 2
Activity 6.3: Motion Graphs for the Magnetic Cannon
3 Class Periods Lesson 7 – Why do Things Change Their Speed or direction?
Activity 7.1: Changing Speed
Homework 7.1: Forces and Motions
Activity 7.2: Changing Direction
Reading 7.2: Planetary Motion
Activity 7.3: Newton’s First Law
Reading 7.3: Tides
Learning Set 3: Forces and Energy: What Is the Difference?
4 Class PeriodsLesson 8 – Using Forces and energy to Understand the magnetic Cannon
Activity 8.1: Revisiting and Summarizing the Scientific Principles
Homework 8.1: Motion Graph
Activity 8.2: Can We Explain the Behavior of the Magnetic Cannon?
Activity 8.3: Concluding the Activity
Reading 8.4: The Universe

PS3 SCientiFiC PrinCiPleS
1. Every two objects that touch apply a contact force to each other.
2. All forces always come in pairs, in opposite directions.
3. The beginning of motion is always caused by forces.
4. An object’s motion is influenced only by the forces that are applied to it, not by the
forces it applies to others.
5. Forces that are applied to an object in opposite directions counteract each other.
6. Forces that are applied to an object in the same direction reinforce one another.
7. For every force, there is an equal and opposite force.
8. Dynamic friction always acts on an object against the direction in which the object
moves.
9. The start and end of motion is always caused by forces.
10. Slowing down is caused by unbalanced forces acting against the direction of motion.
11. Speeding up is caused by unbalanced forces acting in the direction of motion.
12. Changing direction of motion is caused by unbalanced forces acting sideways.
13. An object will continue to remain at rest or move at a constant speed and in a straight
line unless it is subjected to unbalanced forces.


leSSon 1: Anchoring Activity And driving Question BoArd: Preparation 7
le���n 1
anchoring activity and Driving Question Board
PreParation
teacher Background information
The Magnetic Cannon
Much of this unit will be spent developing an explanation of this phenomenon. Students should not be expected to understand it at this point. Each learning set contributes cru-cial pieces of information needed to explain how the device works. The Magnetic Can-non works because the magnets pull on the incoming ball, making it accelerate toward them. Upon impact, the incoming steel ball applies a brief and strong force to the assembly of magnets and balls. This force overcomes the magnetic force attracting the outermost steel ball to the magnets and pushes it outward, away from the magnets. In this process, some magnetic energy is transformed into kinetic energy, letting the outgoing steel ball move faster than the incoming steel ball. Do not share this infor-mation, however. Allow students to discover it over time, as they come to understand the science of forces, motion, and energy.
Relationship between Force and Energy
Force and energy are related, but key dif-ferences between the two concepts include the following:
• An object has energy, but it does not have a force. Instead, an object applies a force to another object.
• A force has a direction; energy has no direction.
• Forces are useful to explain motion on a moment- to- moment basis; energy is especially useful for describing beginning- to- end changes.
Energy is addressed in the unit, but the relationship between it and forces is not addressed explicitly until the last lesson, pro-viding students with significant opportunity to construct a basic understanding of forces.
Common Student Ideas
On Activity Sheet 1.1 the term phenomenonis used. Phenomenon is a word used in sci-ence and IQWST for anything interesting for which data can be collected. Students com-monly think the term phenomenon means “something outstanding or exceptional.” Use this opportunity to discuss the different ways words are used in science and every-day life.

8 HoW WIll It Move?
Setup
Activity 1.1 Setup
Have the Magnetic Cannons set up prior to class. Each cannon should consist of two rulers placed close together to form a rail, two neodymium (silvery) magnets attached to each other and sitting on the rail, four steel balls on one side of the magnets, and the fifth steel ball should be loose.
! Safety guidelines
Refer to IQWST Overview.
Differentiation opportunities
1. Some of the questions that students raise will not fit into any of the three categories used to organize the Driving Question Board. As the IQWST Overview describes, such questions may be placed in a designated space called a “Parking Lot.” These ques-tions may be assigned to students as an ongoing project that they need to complete by the end of the unit or by the end of a learning set, using various resources. Such a project can provide additional information regarding students’ learning and can enable students who would benefit from “going beyond” the unit to do so indepen-dently. However, when questions align with individual students’ interests, this has been shown to motivate students who struggle with reading (e.g., to read texts well beyond their grade level or presumed “ability” in a quest to learn more about some-thing they are invested in). The teacher has the flexibility to use students’ own original questions in any of a number of ways suited to his or her students.
2. Consider assigning the project to groups, to advanced students who can handle the additional work associated with this task, or to students whose interest in a particular question is intense.
3. As students manipulate the Magnetic Cannon, consider alternatives that students might try, enact, and observe, such as changing the number of balls on the trigger sides, changing the number of magnets, or replacing metal balls (or some of the metal balls) with glass marbles. Key to this kind of investigation is to pose a question, enact the investigation to answer it, and take time to make sense of the results. Otherwise, scientific investigation can become an exercise in playing with the devices and not learning from them in ways that could reinforce the content, practices, and critical thinking skills in the IQWST units.

leSSon 1: Anchoring Activity And driving Question BoArd: teaching the lesson 9
le���n 1
anchoring activity and Driving Question Board
teaCHing tHe leSSon
Building CoherenceThis lesson provides students with a common, observed, and unexpected phenomenon that gen-erates questions and motivates learning about the core ideas in this unit.
timeframe1– 2 Class Periods
Performance expectationStudents will ask original questions that arise from observing a phenomenon and that will motivate learning about force, motion, and energy.
overviewActivity 1.1Observe the Magnetic Cannon.
Activity 1.2Ask questions about force, motion, and energy, which will be organized to structure the unit’s Driving Question Board.
! Safety
The Magnetic Cannon shoots a steel ball. While the ball does not obtain dangerous speeds, it is good practice, in general, to warn students not to aim the cannon at anyone.
materials – activity 1.1
For Each Group • Magnetic Cannon • Activity Sheet 1.1
activity 1.1 – anchoring activity
Students experiment with a Magnetic Cannon, which they will investigate throughout this unit. Students should have Activity Sheet 1.1 ready to record their observations.

10 HoW WIll It Move?
Place a Magnetic Cannon on a table. Place the loose steel ball on the rail on the side of the magnets where there are no other steel balls. Tell students that you will gently tap the steel ball so that it rolls very slowly toward the magnets. Ask students to predict what will happen when the ball reaches the magnets. Probe students’ ideas for why they make the predictions they do. Then let the ball roll slowly toward the magnets.
When the steel ball reaches the magnets, the furthest ball on the other side of the magnets will fly out, much faster than the incoming steel ball. Have something at the table’s end to keep the ball from flying off.
Distribute a cannon to each group and remind students to have someone ready to catch the steel ball that goes flying. Students follow the instructions on Activity Sheet 1.1 to experiment with the device and answer the questions as they go. About 5 minutes of experimenting and 10 minutes to complete the questions is often sufficient. Collect the cannons before leading the discussion.
Discussion – Pressing for Understanding
Purpose
Make sense of ideas about the cannon.
Suggested Prompts • How did the steel ball that flew out move compared to the steel ball that rolled
toward the magnet? • Why do you think that happened? • What evidence supports your claim? • Did it make a difference whether one, two, three, or four steel balls were attached to
the magnets? • Did it make a difference if you used one or two magnets? • What happened to the magnets and the steel balls connected to them during the
collision and firing? If they moved, did they move forward or backward? Why do you think that happened?
• Did the outgoing steel ball have more or less kinetic energy than the incoming steel ball?
• Where did this extra kinetic energy come from?
Although students can make some claims about the Magnetic Cannon, they cannot explain why it works.
Much of the unit will be devoted to understanding how the Magnetic Cannon and other things involving forces, motion, and energy work. Students will learn about why the planets move the way they do, how to know who will win a tug- of- war, and many other things. the Driving Question is How Will It Move? and the goal is to figure out ways to know in advance, for many scenarios, if something will move and, if so, how it will move. Students will be able to explain what they need to do in order to make something move the way they want it to.

leSSon 1: Anchoring Activity And driving Question BoArd: teaching the lesson 11
materials – activity 1.2
For the Teacher • (1) large poster board*
For Each Group • sticky notes* • (1) Newton’s Cradle
For Each Student • Activity Sheet 1.2
*This item is not included in the kit.
activity 1.2 – Driving Question Board
Asking questions, investigating phenomena, collecting data, and trying to figure things out are important to science. Have students generate a list of questions about the Magnetic Cannon and what makes things move the way they do. Some things move very quickly or very slowly. Some things do not move at all. The questions raised can deal with motion, forces, energy, or anything relevant. Collect the questions on a DQB to guide the investiga-tions students will engage in during the rest of the unit.
Questions may include the following: Does the incoming ball speed up as it nears the magnets? Does the outgoing ball slow down as it moves away from the magnets? Would this work with balls made of some-thing else? How would this work without magnets? How would this work with stronger magnets? How fast can I make the outgoing ball go? Since the magnets pull the balls toward them, what pushes the outgoing ball away? Where does the energy of the fast-moving ball come from?
Students list questions they have about the Magnetic Cannon and about how and why things move the way they do. After writing individual questions, they discuss their ideas in groups and decide on questions they will share. Each group should have a set of sticky notes on which to record their questions.
The Driving Question Board (DQB) should be structured around the foci of the unit:
• starting and stopping motion • changing and describing motion • the relationship between forces
and energy
Students’ questions should be catego-rized according to these three subjects. List the categories on the board with room for students to place their sticky notes. If students struggle to generate
Starting & StoppingMotion Changing Motion
Forces & Energy
How Will It Move?
LS1 LS2
LS3

12 HoW WIll It Move?
questions, discuss the categories briefly and provide a sample question that falls under one of the categories.
Once students have finished writing questions, they should decide as a group which category each of their questions belongs in, and one student from each group should post a question in the appropriate category. Some groups may be unsure where their questions go. Encour-age discussion and class decisions. Designate a “Parking Lot” for questions that do not clearly fit any of the three categories.
Once each group has placed their sticky notes on the DQB, read each question aloud and agree on category placement. If disagreement arises, encourage students to discuss their ideas. This activity
1. enables the class to become familiar with all the questions. 2. supports students in learning to participate in discussion and debate in a respectful
manner.
These questions will serve as a basis for the activities students will work on in the unit. The activities and investigations will provide evidence to help students answer the questions they have raised. New questions can be added at any time during the unit.
At the end of lessons, have students record notes about anything they have done or learned that might help them answer the Driving Question. they should also record scientific principles they have learned. Students may take notes individually, or you may provide items you wish to have them record as a class. new ques-tions may be added to the DQB at any time, so make sticky notes readily available, and encourage their use.
wrapping Up the lessonIn the next few weeks, students investigate the nature of motion in order to develop a full understanding of how and why things move the way they do. The ultimate goal will be to answer the Driving Question: How Will It Move? Since an object’s motion can be very simple or very complex, students should not expect there to be a simple answer to the Driving Question.
introducing reading 1.2 – newton’s CradleDistribute a Newton’s Cradle to each group and let stu-dents experiment until the lesson ends. Begin the next lesson by comparing the Newton’s Cradle with the Magnetic Cannon, which the reading discusses. Ask students the general question, “What do you think is going on?” Let them know that the next reading is about Newton’s Cradle. You might also wish to review students’ understanding of Kinetic Energy (KE), Gravitational Energy (GE), and Elastic Energy (EE) before reading. (These con-cepts were covered in IQWST PS2.)

leSSon 2: Which Forces Act on An oBject?: Preparation 13
le���n 2
which Forces act on an object?
PreParation
teacher Background Knowledge
The Devices
These four devices were chosen because (1) they involve different kinds of forces, (2) they are best described by different kinds of systems, (3) they are fun and easy to manip-ulate, and (4)they are inexpensive.
Complete explanations for the three ques-tions for each device (apparatus) are provided in this lesson. Do not expect students to pro-vide responses this complete, and do not share “right answers” at this point in the unit. The three questions are as follows:
1. Which components of the apparatus affect its motion? Construct a model of the apparatus that shows these components.
2. What are the forces acting on the components of the apparatus that influence its motion? Add these forces to your model.
3. How does the apparatus work? Write an explanation using your model.
Station #1 – Flying Balloon
The system is made of four components: the balloon with the straw glued to it, the string, the air inside the balloon, and the air outside the balloon.
The forces acting on the balloon are (1) the force of the air in the balloon pushing the bal-loon forward, (2) the force of the air outside the balloon pushing it backward, (3) the bal-loon’s weight, and (4) the upward force of the string on the balloon, keeping the balloon from falling. The drawing shows these forces.
The air pressure in the balloon pushes on the balloon in all directions. Its upward force on the balloon’s upper surfaces is balanced by its downward force on the balloon’s lower surfaces. However, its forward force on the balloon’s forward surfaces is not balanced by a backward force, since the balloon is open at the end (i.e., there is nothing to push on in the back). This net forward force pushes the balloon forward. There is also a backward force on the balloon by the air outside the
String
Straw
Balloon
AirAir
Earth

14 HoW WIll It Move?
balloon (air resistance or friction) that tries to stop the balloon from moving forward.
While the air inside the balloon pushes for-ward on the balloon, at the same time, the balloon pushes back on the air inside of it, forcing it out of the opening at its rear.
The balloon’s weight pulls the balloon down. It does not move down because this weight is balanced by an upward contact force with the string. At the same time, the balloon pulls down on the string, making it sag a bit.
In principle, Earth could be included as a component in this system and in the three others, but because it plays a constant role in all Earth- bound systems (the source of gravity), it is often not drawn as a part of a system. An object’s weight, however, should never be forgotten.
Station #2 – Floating Magnets
The system is made of two identical mag-nets and a test tube.
The forces acting on the upper magnet are (1) its weight and (2) the magnetic repul-sion between it and the lower magnet. The forces acting on the lower magnet are (1) its weight, (2) the magnetic repulsion between it and the upper magnet, and (3) the contact force between it and the test tube.
The bottom magnet is pushed down by the magnetic repulsion with the upper mag-net. It is also pulled down by its weight. These downward forces are balanced by the upward contact force between the magnet and the bottom of the tube.
The upper magnet is pulled down by its gravity. This force is balanced by the upward magnetic repulsion with the lower magnet.
Station #3 – Air- Powered Car
The system is made of a car with an attached fan (considered a single object), the table, and the surrounding air.
The forces acting on the car and fan are (1) the weight of the car and fan, (2) the force of the air pushing on the fan, and (3) the con-tact force between the car’s wheels and the table.
When the fan spins, it pushes the air back-ward. At the same time, the air pushes forward on the fan, making the car move forward.
Magnet’s Weight
Magnetic Repulsion
Mag
net
Mag
net
B
A
Contact Force between theTube and the Bottom Magnet
Tube
Fan Air
Car
Table
Earth

leSSon 2: Which Forces Act on An oBject?: Preparation 15
In parallel, the car is pulled down by its weight. This force is balanced by the upward contact forces between the car and the table.
Station #4 – Magnetic Cannon
The system consists of five iron balls, two magnets, and a rail on which the balls can roll.
The forces acting on the two rolling balls (ignoring the rest of the system for now) are (1) magnetic attraction to the magnets, (2) contact forces with the magnets (for Ball A) and with Ball D (for Ball E), (3) the balls’ weights (not shown—perpendicular to the drawing), and (4) contact forces with the rail (not shown—perpendicular to the drawing).
The magnetic attraction between Ball A and the magnets pulls Ball A toward the mag-nets. The magnitude of this force increases
as the ball gets nearer to the magnets. When Ball A strikes the magnets, it is subjected to magnetic attraction to the magnets and a contact force with the magnets. At first the contact force is greater than the magnetic attraction, causing Ball A to stop, but then it equals the magnetic attraction, balancing it.
At first Ball E is subjected to a contact force from Ball D and magnetic attraction by the magnets. The contact force is greater than the magnetic attraction, pushing Ball E away from the others. Once Ball E shoots out, it is subjected only to a magnetic attraction by the magnets, which decreases in magnitude as the ball gets farther away.
All this time the balls are pulled down by their weight. Contact forces with the rail bal-ance these weights so that the balls do not move at all in the vertical direction.
Magnetic Attractionbetween Ball A and
the Magnets
Contact Forces MagneticAttraction between
Ball E and the Magnets
A A B C D E E
Defining “System”
The term system is used across science con-tent areas, and across IQWST units, but not always with the same meaning. In the Life Science and Earth Science units, a system is a collection of components that interact with each other. In the Introduction to Chemistry units, a system includes a boundary that dis-tinguishes between something inside the system and outside of it. This is done to facil-itate the application of conservation laws; thus mass is conserved in a closed system.
Energy is conserved in a system that does not transfer energy to its surroundings. This unit uses the term system as a collection of components that interact with each other.
Representing the Vehicles
In science, the simplest possible model is typically chosen to represent the situation being analyzed. Aiming for simplicity means ignoring certain details, like the fact that the rope may be tied to a hook, which is attached to a vehicle’s chassis. It also means

16 HoW WIll It Move?
that sometimes the model will not represent certain aspects of reality, which may or may not be important, depending on what is being considered.
The simplest model is figuring out if one vehicle will succeed in getting the other vehicle out of the mud and ignoring all the parts from which the vehicles are composed, while considering only the two vehicles (as blocks) and the rope connecting them. This model ignores, for example, the rope’s elasticity and the fact that the rope is not exactly aligned with the direction in which one vehicle is facing (refer to PI: Vehicle in Tow in Activity 2.2), both things that do have an effect. The issue is whether their effect is small enough to be ignored.
The goal is not to figure out exactly how the vehicles will move, but to learn how to ana-lyze systems composed of multiple objects. However, when creating a model, one must consider which salient features need to be considered and which can be ignored.
Forces
Every two objects that touch each other apply a force to each other, no matter how small it may be. Students may suggest that they can touch an object ever so lightly with-out pushing it at all. In that case, ask them how they feel the object—that is, how do they know that they are touching some-thing? (Perhaps have them close their eyes and then touch something. How do they know they are “touching” it?) They can feel the object only because it applies a force, ever so small, to their fingers, and their fin-gers sense this force.
Actually all forces are forces that act at a distance. There are four fundamental forces— electromagnetic, gravitational, weak nuclear, and strong nuclear. Ignoring the nuclear forces, which are irrelevant to almost all every-day phenomena, every interaction can be
explained by considering only electromag-netic and gravitational forces. Both of these are forces that act at a distance.
All contact forces are electric in nature. The charged particles in the atoms that make up one object repel the charged particles in the second object that “touches” the first, but if electrical forces act at a distance, how can there be “contact”? The answer is, strange as it may seem, there is no such thing as contact. If one had magic glasses that allowed one to see what happens at the atomic level when two objects touch each other, one would see that the atoms of which they are made do not actually touch each other. When the atoms get close enough to each other, an electric attrac-tive or repulsive force develops between the atoms. This is the force that is identified mac-roscopically as the contact force.
The Paired Arrows Representation
The paired arrows in the diagram do not distinguish between pulls and pushes. This is a drawback of this representation. At this stage, this distinction is not important, but it will be important to remember when learn-ing to draw free- body diagrams of various components in Lesson 3.
The Earth- Moon System
The moon does not revolve around Earth; it actually revolves around the point that is the center of gravity of the Earth-Moon sys-tem. Likewise, Earth also revolves around this point. However, since Earth is so much more massive than the moon, the center of gravity for the Earth-Moon system lies inside Earth, so it appears as if Earth is not revolv-ing around anything (but the sun) and the moon is revolving around Earth.
Friction
In every example given until a particular point in this lesson, all contact forces are
leSSon 2: Which Forces Act on An oBject?: Preparation 17
drawn perpendicular to the contact sur-faces. The string pulls the straw up because the contact surface between them is hori-zontal. The table pushes the car up, just as the ground pushes up on the wagon, horse, and stuck car, because the contact surfaces in all of these cases are horizontal. Each ball bearing pushes horizontally on the ball bear-ings next to it because the contact surfaces between them are vertical.
While this is correct, there is actually also a kind of contact force that acts in parallel to the contact surface. This kind of contact force is called friction. Friction is introduced in Lesson 4, so if nobody mentions it until then or questions the perpendicularity of all the contact forces to the contact surfaces, there is no need to mention it. On the other hand, if students do mention it, tell them that they are right, that you have ignored friction until now. Explain that, other than in the horse- and- car example, it plays only a minor role, so by omitting it you have not done any real harm in what you are trying to figure out for now.
Common Student Ideas
Inanimate Objects and Forces
Many students have difficulty realizing that inanimate objects can apply forces, especially
when the objects are not moving. Students realize that when a car hits a pole, of course it applies a force to the pole, but they think that the ground does not apply a force to them when they stand on it. Students think they do not fall through the floor because the floor is solid, not because the floor applies a force to them.
Students typically identify force as the result of an action by a living creature. So, for example, a person can push a wall, but the wall cannot push back. When a person lies on a bed, they push down on the bed, but the bed does not push back up. This con-ception can be addressed by demonstrating instances where one inanimate object clearly applies a force (e.g., a heavy crate on the floor, a ladder leaning against a building).
In Newtonian mechanics, the influence of one object touching another is always described by using a force. It is not that the floor is not solid, but if the floor were not there and in its place was something that applied a force upward on them, like a spring, or another person pushing upward, they would not be able to tell the difference; the upward force would keep them standing in their places just as the floor does. So one is not saying that the floor is not solid but that its influ-ence can be described as a force.
Activity 2.1 Setup
Before class, arrange stations around the room. There are four devices, so prepare eight stations—the same apparatus at two different stations. This will allow you to limit the number of students in each group, so that everyone gets an opportunity to touch and observe the device, but you will not
have to spend too much time on this explor-atory activity. Each station should also have a card with instructions for students.
Station #1 – Flying Balloon
Glue the balloon to a two- inch straight piece of drinking straw and then, when the glue is dry, pass the thread through the straw.
Setup

18 HoW WIll It Move?
Tie each end of the thread to a stick to prevent the thread from coming out of the straw. (You may want to prepare a few spare balloons and straws in advance, in case the first bal-loon breaks.)
Station #3 – Air-Powered Car
Attach the fan to the car by using the modeling clay. The fan should be oriented so that it blows toward the rear of the car. Make sure the car rolls smoothly and does not tip over when the fan is turned on.
Station #2 – Floating Magnets

leSSon 2: Which Forces Act on An oBject?: Preparation 19
Station #4 – Magnetic Cannon
! Safety guidelines
Activity 2.1 uses balloons. Make appropriate accommodations for students with latex aller-gies so that they do not handle the balloons.
Differentiation opportunities
1. Activity 2.2 introduces a way to model systems used in this unit. Research reveals that some students have difficulty connecting the physical objects they see to a represen-tation of them that does not look like the real thing. You could draw cars as you diagram the system, rather than drawing the rectangles/boxes used in this activity, if you think it would be helpful. In this unit, simple geometric shapes are typically used to represent the various components of a system, but you may find it helpful to have some students draw the components differently, so they can focus on the content rather than being confused by the representation.
2. Students who are considered “hands- on learners” can be encouraged to manipulate objects in IQWST investigations. However, sometimes such students handle the materials at the expense of also participating actively in the sense- making compo-nents. Similarly, students who are considered good readers are sometimes not given opportunities to manipulate objects in an investigation because they are expected not to “need” to do so in order to engage, remain attentive, and learn. As much as possible, provide all students with opportunities to experience IQWST investigations via multiple means of engagement so that all students have an opportunity to won-der, to question, to think critically, to design, to test, to analyze, to interpret, to model, to explain, and to engage in argument as real scientists do. Although a given activity will not provide every student with an opportunity to do everything, pay attention so that across a series of lessons, students have opportunities to engage in science in a variety of ways.
3. Reading 2.3 involves do-at-home activities that you may wish to have some students do in class or investigate before or after school with your support. You may wish to provide alternative ways of doing the activities if you expect that not all students will have the necessary materials at home.


leSSon 2: Which Forces Act on An oBject?: Preparation 21
Flying BalloonBlow up the balloon several times. To prevent germs from traveling between students, use straws to blow up the balloon, in the following manner.
1. One student should insert a straw into the balloon’s opening, seal the balloon around the straw by pinching the balloon’s opening tightly around the straw, and blow up the balloon. Do not pop it!
2. Remove the straw from the balloon while pinching closed the opening of the balloon so that no air escapes.
3. Two students should hold the sticks at the ends of the string, pulling the string tight but not so tight that it breaks.
4. Move the balloon to the end of the string so that it is hanging underneath the string, with its opening facing toward the end of the string it is near.
5. Release the balloon and see what happens. Switch jobs and straws and repeat. 6. When you are finished, throw away the straws you used.
Station inStrUCtion CarDS
Photocopy and print two of each of the following cards. Then place them at each station. You may choose to laminate these for repeated use before cutting apart individual instruc-tion cards.
Floating Magnets
1. Hold the transparent tube vertically (up and down), and drop one magnet into it so that it lies on its bottom.
2. Drop another magnet into the tube and observe what happens. 3. Take the top magnet back out of the tube, turn it upside down, drop back into the tube,
and observe what happens. 4. Repeat this with the two magnets in a different order in the tube.


leSSon 2: Which Forces Act on An oBject?: Preparation 23
air- Powered Car
1. Place the car near the edge of a table with the fan pointing away from the table.
2. Turn on the fan, release the car, and observe what happens.
3. Be careful not to let the car and fan fall to the ground.
Magnetic CannonYou know what to do!


leSSon 2: Which Forces Act on An oBject?: teaching the lesson 25
le���n 2
which Forces act on an object?
teaCHing tHe leSSon
Building CoherenceThis lesson builds on curiosity generated in Lesson 1 to define forces and identify those present in four phenomena. It also introduces a way to model systems and the forces that act on a system’s components.
timeframe3– 4 Class Periods
Performance expectationStudents will carry out investigations to understand the components that comprise a system and to identify the forces that act between pairs of objects in a system.
overviewActivity 2.1Experiment with four devices, describe the forces involved, and explain how they think each works.
Activity 2.2Analyze scenarios to determine the compo-nents and the forces present in them.
Activity 2.3Apply what has been learned about sys-tems and forces to the Magnetic Cannon device.
Activity 2.4Review stations and present findings.
! Safety
Latex balloons are used in Activity 2.1. Be aware of any student allergies to latex and make appropriate accommodations.
introducing the lesson
Reading Follow Up
Demonstrate Newton’s Cradle (changing the number of balls you drop as you talk). Ask: “What do you think causes the ball to shoot out? Why do the balls shoot out differently?” (Students will likely say that the ball shoots out because another one came in. This is a description of the phenomena; today they are going to start figuring out the reason why it happens.) Ask: “How do you compare Newton’s Cradle with the Magnetic Cannon?” Call attention to the DQB; the unit begins by considering starting and stopping motion.
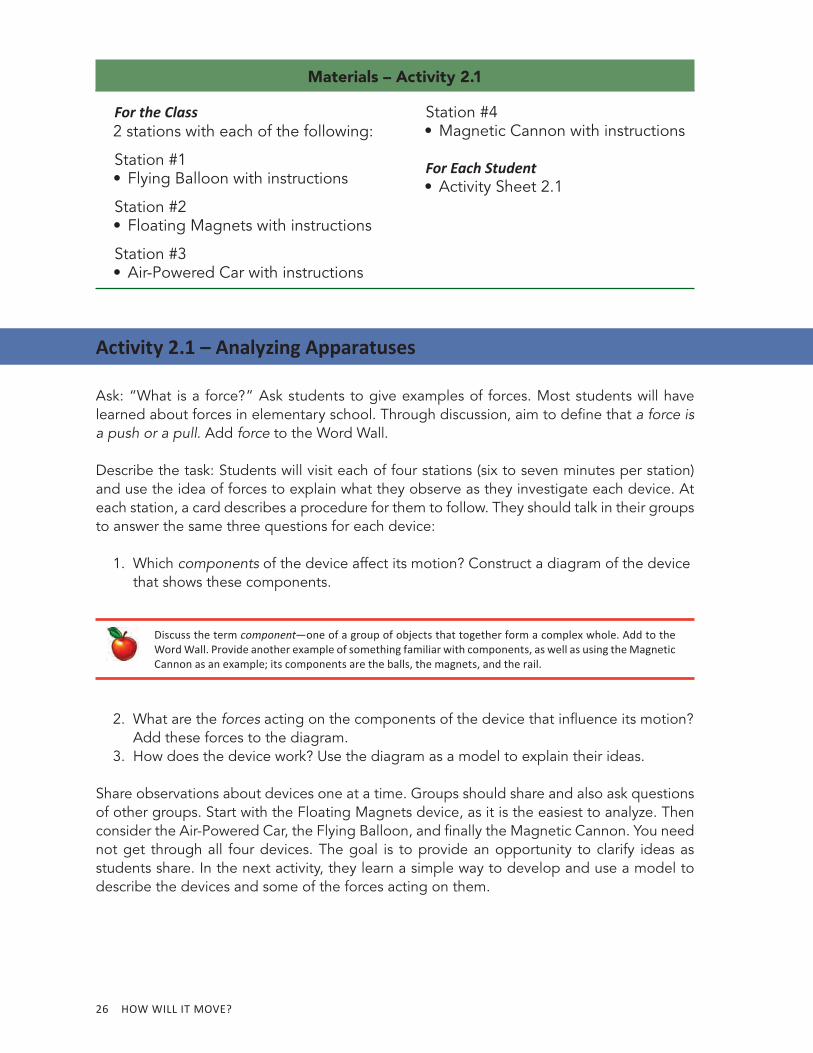
26 HoW WIll It Move?
materials – activity 2.1
For the Class 2 stations with each of the following:
Station #1 • Flying Balloon with instructions
Station #2 • Floating Magnets with instructions
Station #3 • Air- Powered Car with instructions
Station #4 • Magnetic Cannon with instructions
For Each Student • Activity Sheet 2.1
activity 2.1 – analyzing apparatuses
Ask: “What is a force?” Ask students to give examples of forces. Most students will have learned about forces in elementary school. Through discussion, aim to define that a force is a push or a pull. Add force to the Word Wall.
Describe the task: Students will visit each of four stations (six to seven minutes per station) and use the idea of forces to explain what they observe as they investigate each device. At each station, a card describes a procedure for them to follow. They should talk in their groups to answer the same three questions for each device:
1. Which components of the device affect its motion? Construct a diagram of the device that shows these components.
Discuss the term component— one of a group of objects that together form a complex whole. Add to the Word Wall. Provide another example of something familiar with components, as well as using the Magnetic Cannon as an example; its components are the balls, the magnets, and the rail.
2. What are the forces acting on the components of the device that influence its motion? Add these forces to the diagram.
3. How does the device work? Use the diagram as a model to explain their ideas.
Share observations about devices one at a time. Groups should share and also ask questions of other groups. Start with the Floating Magnets device, as it is the easiest to analyze. Then consider the Air- Powered Car, the Flying Balloon, and finally the Magnetic Cannon. You need not get through all four devices. The goal is to provide an opportunity to clarify ideas as students share. In the next activity, they learn a simple way to develop and use a model to describe the devices and some of the forces acting on them.

leSSon 2: Which Forces Act on An oBject?: teaching the lesson 27
materials – activity 2.2
For the Teacher • Projected Image (PI): Vehicle in Tow • PI: Two Hands • PI: Pushing the Wall • PI: Leaning Ladder • PI: Shoe on a Shelf
For Each Student • Activity Sheet 2.2
activity 2.2 – Systems and Contact Forces
Ask: “What have you learned about how scientists talk about ‘systems’? What makes something a sys-tem?” Each of the four devices can be called a system because it is composed of multiple components that interact with each other. Students will now analyze a different system and then apply what they learn to the devices.
Consider a vehicle trying to pull another vehicle with a rope (PI: Vehicle in Tow). One of the vehicles is stuck in mud. Ask: “What are the components of the system that influence its motion?” (two vehicles, the rope connecting them, the ground/mud, and the planet Earth [the source of gravity])
Draw a very simple diagram of the system, with rect-angles representing the components next to each other.
Compare this diagram with the photo in PI: Vehicle in Tow, recognizing that the location of the components in the diagram is similar to their location relative to each other in the real system. The boundary between the ground and Earth is dashed because they are not really two different components of the system; the ground (or mud) is actually just the top surface of Earth. Ask: “Which components interact with one another?” (Components interact with each other if they apply a force to each other—that is, if they pull or push each other.)
Rope Vehicle 2
Ground (Mud)
Earth
Vehicle

28 HoW WIll It Move?
Discuss the term interact— to influence one another, or in the case of forces and motion, to apply a force to one another. Add to the Word Wall.
Support students to see that each component interacts with the components that are next to it because they touch, and by touching, each applies a force to the other. Earth interacts with everything because its gravity pulls on everything. An object does not interact with itself. This can be represented in a table.
veHiCle roPe veHiCle 2 groUnD eartH
Vehicle + - + +
Rope + + - +
Vehicle 2 - + + +
Ground + - + +
Earth + + + +
A “+” signifies that two components interact with each other; a “– ” means they do not. A force that is the result of two objects touching each other is called a contact force. Add to the Word Wall. The next goal is to determine the direction of the contact forces that each object applies to the objects that it touches. For this, consider the idea that contact forces always come in pairs.
More Examples of Contact Forces
High Five
Have two students sitting next to each other do a high five or fist bump. Ask: “Did you feel a force when your hands met?” (yes) Ask: “What was the direction of the force you felt?” (pushing my hand backward) Ask: “For each pair, were the forces acting on your hands going in opposite directions?” (yes)
Draw two hands facing each other (or use PI: Two Hands). This is an example of a pair of forces that act in opposite directions; each hand pushes the other in the opposite direc-tion from which it is being pushed. While there are two forces, each hand generates one force and is subjected to one force.

leSSon 2: Which Forces Act on An oBject?: teaching the lesson 29
Ask: “Can you do a high five so that only one hand pushes but does not feel pushed back?” Students may say that they can do it so that they do not feel a force pushing back. Ask: “Did you feel anything against your hand?” (the other person’s hand) “How did they feel the other hand?” (by touching) The reason they “feel some-thing” is that when two things touch, they apply a force to one another.
Pushing the Wall
Now ask students to push their desks (not hard enough to move them). Ask: “Are you applying a force to the desk? Do you feel a force pushing back?” If students say that the desk cannot push back, ask what is differ-ent between pushing the desk and pushing someone’s hand?
PI: Pushing the Wall shows a person pushing a wall. It also shows that the hands are pushing the wall in one direction but are being pushed by the wall in the oppo-site direction. This is another example of a pair of forces that act in opposite directions. While there are two forces, each object (the person, the wall) applies one force and is subjected to the other.
Ladder Leaning against the Wall
PI: Leaning Ladder shows a ladder leaning against a wall. It shows that the ladder is pushing the wall in one direction but is being pushed by the wall in the opposite direction. Help students conclude that contact forces are acting in opposite directions. Each object (the lad-der, the wall) applies one force and is subjected to the other. Also help students to recognize the other pair of contact forces acting on the ladder that is not depicted in PI: Leaning Ladder. (The ladder pushes down on the floor and the floor pushes up on the ladder.)
Shoe on a Shelf
Show PI: Shoe on a Shelf. Ask: “If the shoe pushes down on the shelf, what does the shelf do?”
Discussion – Pressing for Understanding
Purpose
Conclude that contact forces always come in pairs.

30 HoW WIll It Move?
Suggested Prompts • When people push each other, is there one force acting or two? (two) How many
forces does each person apply? (one) How many forces does each person feel? (one) • Are you pushing down on your chairs? (yes) Are your chairs pushing up on you? (yes) • Can you think of an example where contact forces are not paired? (No; contact/
touching always involves a pair of forces.)
Post on the DQB (or Scientific Principles list): Contact forces always come in pairs.
Returning to the Stuck Vehicle
Return to the diagram of the stuck vehicle. Add a pair of arrows between all adjoining com-ponents to show which pairs of forces act in the system. Use the table of interactions to guide labeling. (Arrows between the ground and Earth will be discussed next.)
In every example we examined (High Five, Pushing the Wall, Ladder Leaning against the Wall, and Shoe on a Shelf), the objects pushed each other. In the case of the stuck vehicle, the objects are pulling each other. Ask: “Do you think that pull forces also come in pairs? What happens in a tug-of- war? When you do chin-ups, you pull the bar, but does it pull you as well? If it does not, then why do you not fall down?” Remind students that they are trying to represent the influence of one object on another by using forces. When one vehicle pulls the stuck vehicle forward, is the first vehicle being pulled backward? If not, then why is it so hard for the vehicle to go forward?
All contact forces, pushes or pulls, come in pairs. If one force is a push, then the other one will be a push as well; if one is a pull, the other will also be a pull. This means that the pairs always act in opposite directions. If students do not believe this, review all the examples examined so far. You might ask them to continue to think of exceptions, but there are none.
Modify “Contact forces always come in pairs” to read, “Contact forces always come in pairs, in opposite directions.” Students next consider forces that require contact and apply what they have learned about systems and contact forces to the four devices: the Flying Balloon, the Floating Magnets, the Air- Powered Car, and the Magnetic Cannon.
introducing Homework 2.2 – the world’s greatest SandwichReview with students that contact means whenever two objects touch— it does not matter what the objects are. Use objects around the room as examples. For homework, students
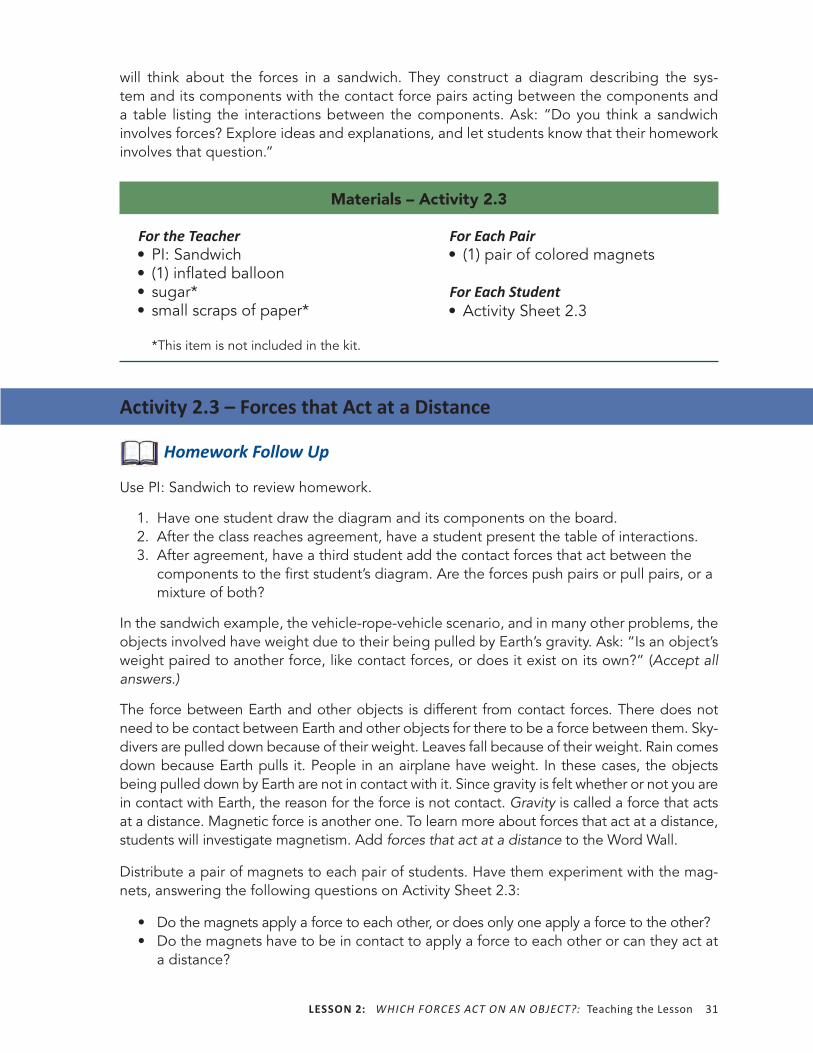
leSSon 2: Which Forces Act on An oBject?: teaching the lesson 31
will think about the forces in a sandwich. They construct a diagram describing the sys-tem and its components with the contact force pairs acting between the components and a table listing the interactions between the components. Ask: “Do you think a sandwich involves forces? Explore ideas and explanations, and let students know that their homework involves that question.”
materials – activity 2.3
For the Teacher • PI: Sandwich • (1) inflated balloon • sugar* • small scraps of paper*
For Each Pair • (1) pair of colored magnets
For Each Student • Activity Sheet 2.3
*This item is not included in the kit.
activity 2.3 – Forces that act at a Distance
Homework Follow Up
Use PI: Sandwich to review homework.
1. Have one student draw the diagram and its components on the board. 2. After the class reaches agreement, have a student present the table of interactions. 3. After agreement, have a third student add the contact forces that act between the
components to the first student’s diagram. Are the forces push pairs or pull pairs, or a mixture of both?
In the sandwich example, the vehicle- rope- vehicle scenario, and in many other problems, the objects involved have weight due to their being pulled by Earth’s gravity. Ask: “Is an object’s weight paired to another force, like contact forces, or does it exist on its own?” (Accept all answers.)
The force between Earth and other objects is different from contact forces. There does not need to be contact between Earth and other objects for there to be a force between them. Sky-divers are pulled down because of their weight. Leaves fall because of their weight. Rain comes down because Earth pulls it. People in an airplane have weight. In these cases, the objects being pulled down by Earth are not in contact with it. Since gravity is felt whether or not you are in contact with Earth, the reason for the force is not contact. Gravity is called a force that acts at a distance. Magnetic force is another one. To learn more about forces that act at a distance, students will investigate magnetism. Add forces that act at a distance to the Word Wall.
Distribute a pair of magnets to each pair of students. Have them experiment with the mag-nets, answering the following questions on Activity Sheet 2.3:
• Do the magnets apply a force to each other, or does only one apply a force to the other? • Do the magnets have to be in contact to apply a force to each other or can they act at
a distance?
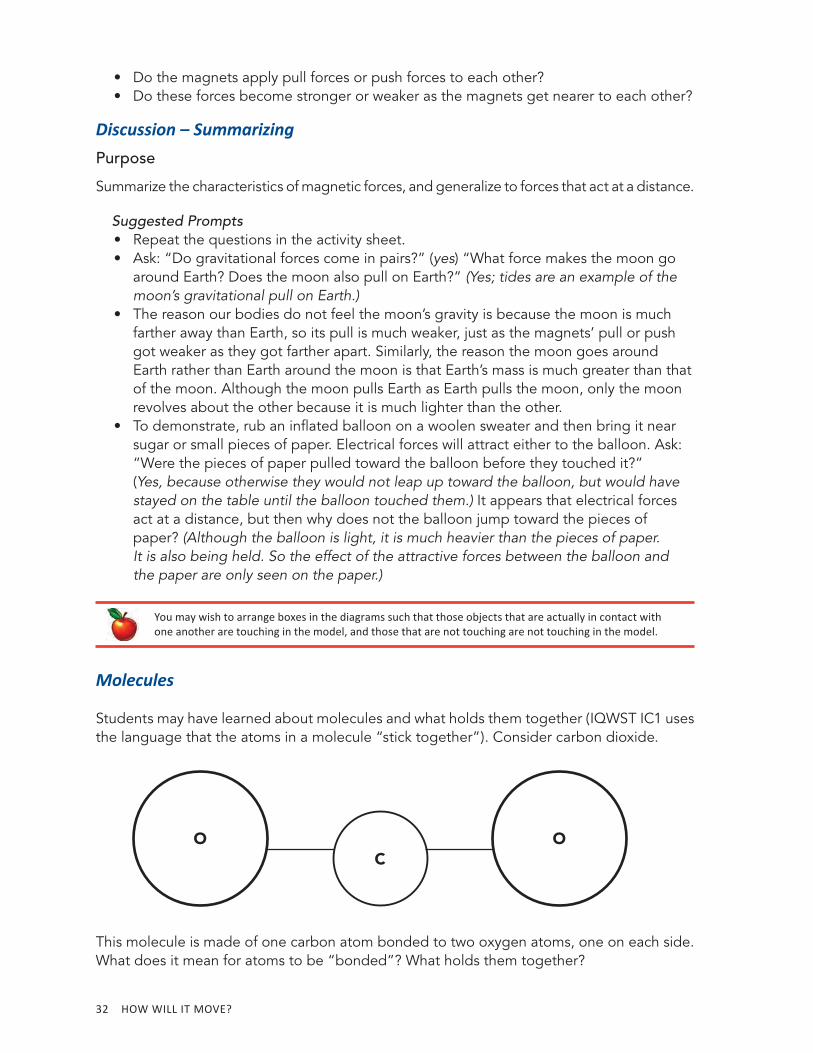
32 HoW WIll It Move?
• Do the magnets apply pull forces or push forces to each other? • Do these forces become stronger or weaker as the magnets get nearer to each other?
Discussion – Summarizing
Purpose
Summarize the characteristics of magnetic forces, and generalize to forces that act at a distance.
Suggested Prompts • Repeat the questions in the activity sheet. • Ask: “Do gravitational forces come in pairs?” (yes) “What force makes the moon go
around Earth? Does the moon also pull on Earth?” (Yes; tides are an example of the moon’s gravitational pull on Earth.)
• The reason our bodies do not feel the moon’s gravity is because the moon is much farther away than Earth, so its pull is much weaker, just as the magnets’ pull or push got weaker as they got farther apart. Similarly, the reason the moon goes around Earth rather than Earth around the moon is that Earth’s mass is much greater than that of the moon. Although the moon pulls Earth as Earth pulls the moon, only the moon revolves about the other because it is much lighter than the other.
• To demonstrate, rub an inflated balloon on a woolen sweater and then bring it near sugar or small pieces of paper. Electrical forces will attract either to the balloon. Ask: “Were the pieces of paper pulled toward the balloon before they touched it?” (Yes, because otherwise they would not leap up toward the balloon, but would have stayed on the table until the balloon touched them.) It appears that electrical forces act at a distance, but then why does not the balloon jump toward the pieces of paper? (Although the balloon is light, it is much heavier than the pieces of paper. It is also being held. So the effect of the attractive forces between the balloon and the paper are only seen on the paper.)
You may wish to arrange boxes in the diagrams such that those objects that are actually in contact with one another are touching in the model, and those that are not touching are not touching in the model.
Molecules
Students may have learned about molecules and what holds them together (IQWST IC1 uses the language that the atoms in a molecule “stick together”). Consider carbon dioxide.
o oC
This molecule is made of one carbon atom bonded to two oxygen atoms, one on each side. What does it mean for atoms to be “bonded”? What holds them together?

leSSon 2: Which Forces Act on An oBject?: teaching the lesson 33
• Think of the CO2 molecule as a system with three components and interactions between them. These interactions are forces; the forces between the atoms are electrical forces.
• Do the atoms actually touch each other or do they just get close enough to get attached? (The model of the CO2 molecule is drawn to show that the atoms do not touch each other, so the electrical force must be a force that acts at a distance.)
• Does the carbon atom pull on the oxygen atoms without the oxygen atoms pulling on it? Do the oxygen atoms do all the pulling, or do all pull each other? What about an O2 molecule? Does one of the oxygen atoms do all the pulling or do both pull each other? Is there a reason one oxygen atom should act differently than the other? Is there any reason why things should be different with the CO2 molecule? Can we conclude that electrical forces act in pairs, in the following way?
By the end of this activity, add to the Scientific Principles list the two ideas shown in bullet format. they should be “arrived at” as a class and worded in a way that makes sense for students. See the IQWSt overview for more information on Scientific Principles.
• every two objects that touch apply a contact force to each other.
• All forces always come in pairs, in opposite directions.
Return to the vehicle- pull- vehicle example and complete the diagram of the system with students. Dashed lines represent forces that act at a distance.
Add gravitational force, magnetic force, and electrical force to the Word Wall under the heading, Forces that Act at a Distance.
the class will start calling a diagram of a system that includes all the forces that act between its compo-nents a “model”; this is because the model can now be used to explain and predict the system’s behavior.
Rope Vehicle 2
Ground (Mud)
Earth
Vehicle

34 HoW WIll It Move?
Tell students that in the next activity, they are going to take everything they learned about forces and apply it to the four phenomena they experimented with in Activity 2.1.
introducing reading 2.3 – Balance and ForceStudents build physics “tricks” at home and analyze the components of the systems and the forces that act between them, extending the ideas introduced in this lesson so far. It high-lights contact forces and forces that act at a distance, and the fact that all these forces come in pairs. To generate interest in the reading, you may wish to show students the materials for the utensils/glass/toothpick activity and ask them if they think they could balance the two utensils from the edge of the glass using the toothpick. Let them know that the reading has instruction for how to do this activity at home, apply what they’ve learned so far, and then be ready to talk about it in the next class.
materials – activity 2.4
For the Class • stations from Activity 2.1
For Each Student • Activity Sheet 2.4
activity 2.4 – Putting things together
Reading Follow Up
Set up Reading 2.3 (hammer-and-ruler and the connected forks), and ask students to present their models, including the contact forces and the forces that act at a distance.
Students revisit the stations with the four devices. Now, they draw models of each device and its components, make a table of the interactions, and add arrows depicting the forces acting on the components. This is a step toward being able to explain how each device works. The important products that they will use later to explain the devices’ operation are the models. The interaction tables are a tool to keep track of the forces and to make sure they have not forgotten any, but the tables are not part of the model.
After students develop models and interaction tables, groups present and discuss (3– 4 min-utes per device, 20 minutes to conclude). When students return to their seats, they should work on the devices in the order they visited them, ensuring that every apparatus will have had a group that gave it their full attention.
Begin the discussion even if not all the groups are finished. Students should pay attention to the other group presentations because they need the information to complete their analyses for homework. Encourage students to comment on each other’s work. The end products for each of the apparatuses are shown at the top of the next page and in the Background Knowl-edge section.

leSSon 2: Which Forces Act on An oBject?: teaching the lesson 35
Fan Air
Car
Table
Earth
Magnet B
Magnet A
Test Tube
Earth

36 How will it Move?
The main difficulties that may arise in the discussion will probably have to do with the shape of the models and the role of the air in the Flying Balloon and the Air- Powered Car. Students may not realize that air can be pushed just as a solid object can; therefore, air can also push back just like a solid object. Students may have learned (IQWST IC1) that air is made of mol-ecules with space between them, so air is matter, and any type of matter can be subjected to, and apply, a force. What makes a kite stay up in the sky? How come I can push the air when I wave my hands?
Some students may raise the issue that friction or air resistance is also acting. this is true, and students will learn more about friction in another few lessons.
Wrapping Up the LessonReturn to the Starting and Stopping Motion section of the DQB to see if you have made prog-ress toward answering any of the student- generated questions. Given almost any mechanical system, students should be able to identify its components and the forces that act between them. That is a huge step toward being able to explain how and why things move.
String
Straw
Balloon
AirAir
Earth
Ball A Magnets Ball DBall B Ball C Ball E
Rail
Earth

leSSon 3: Why does An oBject stArt Moving?: Preparation 37
le���n 3
why Does an object Start Moving?
PreParation
teacher Background Knowledge
Scientific Principles versus “Explaining”
One aspect of science that is unique and dif-ficult for novices is that it strives for answers that are based on the minimum number of concepts but that have the largest pos-sible explanatory power. This is the reason why evidence- based explanations in science are different from everyday explanations. Students can provide explanations (in an everyday sense) of why motion begins in many different situations, but each expla-nation will be different from the others; so nothing is learned about a new situation from an old one. On the other hand, an evidence- based scientific explanation will be almost identical for all situations, meaning that if the concepts are understood, in principle, one should be able to explain how and why motion begins in almost any situation. IQWST’s use of the term scientific principlesaddresses this idea. Scientific principles are generalizations that apply across contexts, not just to the contexts encountered in a given classroom activity.
Systems and Their Components
Deciding which components to include in a system can be a challenge. In the example of the shot marble in Activity 3.1, clearly the marble and the rubber band need to be included, but should the table be included? Does it affect the marble’s motion? Clearly it does, for if there were no table, the marble would fall downward. What about Earth?
The answer again is yes, for a similar reason: If there were no Earth, there would be no gravity, and the ball might wander upward. What about the fingers holding the rubber band down? While the fingers do affect part of the system (the rubber band), they do not directly influence the part of the system we are focusing on— the marble. For this reason, we chose not to include the fingers in the sys-tem. Similarly, we can explain why we chose not to include the arm connected to the hand that tapped the tennis ball. While it clearly influences the hand’s motion, it does not directly influence the ball’s motion because it does not apply a force directly to the ball.
In general we can conclude that a system should include only the components— and all the components— that directly influence the motion of the component of interest.
Pressure
Pressure is defined as force per unit area. When you push on the wall with your hand, the force you apply to the wall divided by the contact area between your hand and the wall is the pressure you apply to the wall. The opposite is correct as well: Force is pressure times the area. In Activity 3.2, if the pres-sure in the cola is known before the bottle is opened, and the surface area of the bottle’s cap is also known, the product of the two is the force the cola applies to the cap, which is identical in size and opposite in direction to the force the cap applies to the cola.

38 HoW WIll It Move?
Common Student Ideas
The Cola Investigation
Students may find it hard to accept that it is the force of the bottle on the cola that makes it spray outward. If they raise this issue, remind them of what they learned about pairs of forces acting in opposite directions. Have students think about other examples, such as the Flying Balloon, in which the air pushed on the balloon, making it move forward, and at the same time the balloon pushed on the air, making it come out of the balloon. Remind them that an object cannot push itself. The beginning of motion is always caused by a force applied to an object by something outside of the object.
Students may ask why shaking the bottle before opening it increases the amount of spray. Shaking increases the pressure in the cola, which makes all the contact forces between the cola, the bottle, and the cap increase. When the bottle cap is removed, the upward force the bottle applies to the cola is greater than it would have been if the bottle had not been shaken, making the cola spray out stronger than before.
Setup
Specific instructions for activity setup are embedded within the lesson.
! Safety guidelines
Refer to IQWST Overview.
Differentiation opportunities
1. If you have students who finish Activity 3.3 quickly or who need more challenge, ask them to think of a rocket taking off vertically. There is a countdown, then fire starts coming out of the engine at the bottom of the rocket, and the rocket starts moving upward. Have students draw a free- body diagram of a rocket and use this diagram to explain why a rocket starts moving upward.
2. You might assign students to groups, or assign groups to the four devices according to the complexity of each device. The order of increasing difficulty is Floating Magnets, Magnetic Cannon, Air- Powered Car, and Flying Balloon. If time does not allow all groups to respond to all questions thoroughly, as you move through discus-sion of each apparatus, the strongest students will present the most complex device (the Flying Balloon) for all students in the class to hear, even if all students did not have time to write and thoroughly discuss their ideas about that particular device.

leSSon 3: Why does An oBject stArt Moving?: teaching the lesson 39
le���n 3
why Does an object Start Moving?
teaCHing tHe leSSon
Building CoherenceThis lesson identifies forces as the causal agents that make things start moving in every phenomenon.
This lesson makes connections to Lesson 2 in which students investigated several systems to determine what the forces are that make these systems begin to move.
timeframe4 Class Periods
Performance expectationsStudents will
• analyze the characteristics of two forces to determine whether they reinforce or counteract each other.
• analyze, construct, and use free- body diagrams to determine the forces acting on objects.
overviewActivity 3.1Consider simple situations in which an object begins to move because of a single force.
Activity 3.2Analyze scenarios involving multiple forces, realizing that forces can reinforce, counteract, or cancel each other.
Activity 3.3Revisit the four devices to determine which forces made the systems begin moving.
introducing the lessonNote: if additional space is needed for students to draw their models, have them use the blank pages at the end of their student books.
Show students PI: Magnetic Cannon Marble and the forces acting on its components. Ask: “Can you explain why the last ball shoots out?” (Students may suggest that the last ball shoots out because it is subjected to a force caused by the magnets, or one or both of the steel balls.) Ask students to point out on PI: Magnetic Cannon Marble which forces they mean. Have them explain why the last ball shoots out faster than the first ball. There will probably be no answers to this question. Explain that today they are going to learn why things begin to move. Point out the Starting Motion quadrant on the Driving Question Board (DQB) to remind students of their focus.

40 HoW WIll It Move?
materials – activity 3.1
For the Teacher • PI: Magnetic Cannon Marble • (1) tennis ball • (1) rubber band
For Each Student • Activity Sheet 3.1
activity 3.1 – objects that Begin Moving
Students are going to start thinking about what makes motion begin by looking at some very simple scenarios: a ball that is tapped by someone’s hand and a marble that is shot by a rubber band.
Put a tennis ball on the table so that all can see it. Make sure it is stationary. Then tap it so that it starts rolling. Ask students why the ball started moving. They will answer that it began mov-ing because it was tapped. Accept this answer. Then make a bridge with two fingers of one hand on the table, stretch the rubber band from them, and shoot a marble. Again, ask students why the marble started mov-ing. They will likely say that it moved because the rubber band was released. Challenge students to provide an explanation that will be the same for both the tapped tennis ball and for the marble.
Students will most likely be unable to give a single explanation that fits both cases. Explain that the answer involves the forces present in each case. After accepting a few responses, distribute Activity Sheet 3.1, where there are photos of the tennis ball being tapped and the marble being shot out by the rubber band.
Using what they learned in Lesson 2, have students make interaction tables showing all the interactions involved in each system and then draw models that show the various compo-nents of each system and the forces to which they each apply and are subjected. Tell students that they will use the models they will draw to explain why things start moving. The interac-tion tables are tools to help students make sure they have not forgotten any force.
✓ As students work, walk around the room checking on their progress. this is a good opportunity to assess how well they understand what was learned in lesson 2 and to identify students who may need some additional assistance.
After about 10 minutes, have two students present their interaction tables to the class. Have the rest of the class comment on the models. Students should modify the tables so that they achieve consensus. The two models and interaction tables should look similar to this:
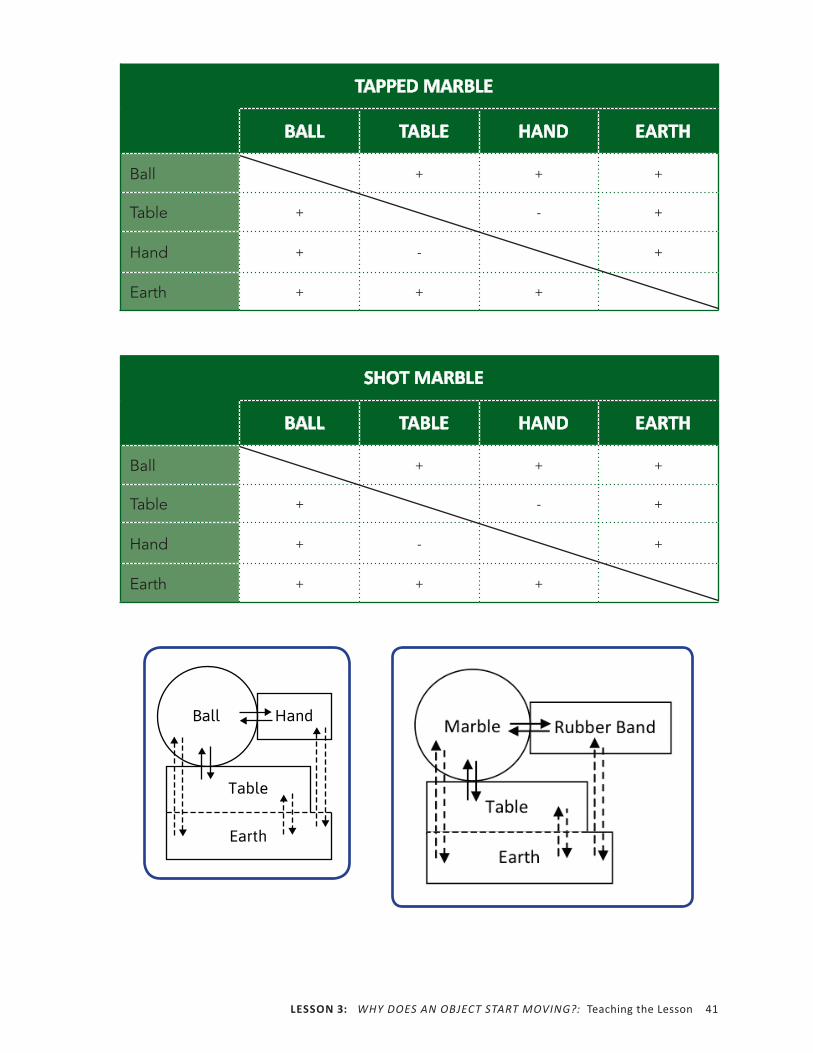
leSSon 3: Why does An oBject stArt Moving?: teaching the lesson 41
HandBall
Table
Earth
taPPeD MarBle
Ball taBle HanD eartH
Ball + + +
Table + - +
Hand + - +
Earth + + +
SHot MarBle
Ball taBle HanD eartH
Ball + + +
Table + - +
Hand + - +
Earth + + +

42 HoW WIll It Move?
Discussion – Pressing for Understanding
Purpose
Conclude that a force caused the tennis ball and the marble to begin moving.
Suggested Prompts • Each object (the tennis ball and the marble) is subjected to three forces. What are these
three forces? (the downward pull of Earth due to gravity, the upward push of the table [a contact force], and a sidewise force due to the hand or the rubber band)
• Which of these three forces do both objects have in common? (Both objects are subjected to the pull of Earth and the push of the table.)
• In which direction do these common forces act? (They act vertically—up and down.) • Which of the three forces that each object is subjected to was present before they
began moving? (the pull of Earth and the push of the table) • Did these two forces cause the objects to start moving? (No, otherwise they would have
made the objects move even before they were tapped or pushed by the rubber band.) • Which forces were felt by the two objects and acted in the direction in which they
began moving? (the horizontal push of the hand tapping the tennis ball and the horizontal push of the rubber band on the marble)
• the tennis ball began moving because a tapping force was applied to it.
• the marble began moving because the rubber band applied a force to it.
Ask: “Can you give an explanation for why both the tennis ball and the marble began to move?” (Both objects began moving because a force was applied to them.)
Explain that this sentence is correct, in general, for any object in the world. Post on the DQB: The beginning of motion is always caused by forces. Students complete Activity Sheet 3.1. Make sure students know that until now they have been examining only what makes motion begin, not what makes motion continue. That is a different issue that will be investigated later.
materials – activity 3.2
For the Teacher • (1) tennis ball
For Each Pair • (1) tennis ball
For Each Student • Activity Sheet 3.2 • Homework 3.2
activity 3.2 – More objects that Begin Moving
Tennis Ball
In Activity 3.1, students reached the conclusion that a tapped tennis ball and a marble shot by a stretched rubber band began moving because a force was applied to them. They

leSSon 3: Why does An oBject stArt Moving?: teaching the lesson 43
generalized that the beginning of motion is always caused by forces. Students now consider other objects that begin to move to verify whether this statement is correct for them as well.
Distribute a tennis ball to each pair of students. With the ball lying on a table, have one stu-dent push on the ball from one side and at the same time, the other student push it from the other side.
There are three possible scenarios that will occur.
1. The ball will move away from the student on the right and toward the student on the left. 2. The ball will move away from the student on the left and toward the student on the right. 3. The ball will remain stationary.
Using Activity Sheet 3.2, students construct one interactions table and one model that repre-sent all three scenarios. When they finish, have two students present their interaction tables and models.
Ball HanD 1 HanD 2 taBle eartH
Ball + + + +
Hand 1 + - - +
Hand 2 + - - +
Table + - - +
Earth + + + +
Discussion – Pressing for Understanding
Purpose
Conclude that forces acting in the opposite direction counteract each other.
Table
Earth
Hand 1 Hand 2Ball

44 HoW WIll It Move?
Suggested Prompts • What are the four forces that the ball is subjected to when it lies on the table and is
pushed by your hands? (the forces applied by Hand 1, Hand 2, the table, and Earth) • Which forces act in a vertical direction and which act horizontally? (The forces applied
by the table and by Earth act vertically; the forces applied by the hands act horizontally.) • Which forces influence the ball’s horizontal motion? Why do the others not affect its
horizontal motion? (Only the forces applied by the hands influence the ball’s horizon-tal motion. The forces applied by the table and by Earth act vertically and can only make the ball move up and down.)
• What happens if the force applied to the ball by Hand 1 is greater than the force applied to the ball by Hand 2? Why? (The ball will start moving to the right because the force applied by Hand 1 overcomes the force applied by Hand 2.)
• What happens if the force applied to the ball by Hand 1 is less than the force applied to the ball by Hand 2? Why? (The ball will start moving to the left because the force applied by Hand 1 is less than the force applied by Hand 2.)
• Suppose we pushed the ball with both hands but pushed harder with Hand 1 than with Hand 2. The ball responds in a certain manner. Can we get the ball to respond in the same manner while pushing it with only one hand? If yes, with which hand should we push the ball and how hard should we push it? (We should push in the same direction as Hand 1 pushed, but not as hard, because Hand 2 held back the ball and so decreased the effect of the force applied by Hand 1.)
Physicists say that two forces that are applied to an object in opposite directions counteract each other—that is, they decrease the effect of each other. Their joint influence (or the net force) is in the same direction as the direction of the stronger force, but it is less strong than that of the stronger force by itself. To make it simpler, look at the ball and the horizontal forces that act on it, not the vertical forces that act on it, not the forces it applies, and not the other objects in the system.
If the force applied by Hand 1 (Force 1) is greater than the force applied by Hand 2 (Force 2), draw a bigger line for Force 1 than for Force 2. In that case, Force 1 will overcome Force 2, and the ball will start moving to the right. Represent the motion to the right with an arrow, but a different kind of arrow. This way, you can distinguish between arrows representing forces and arrows representing motion.

leSSon 3: Why does An oBject stArt Moving?: teaching the lesson 45
What happens if the force applied by Hand 2 is greater than the force applied by Hand 1?
What happens if the forces applied by both hands are equal in strength?
Ask: “In analyzing how the ball would start moving, did we consider the forces applied to the ball or the forces applied by the ball?” This is an important scientific principle that should be emphasized several times in different contexts: An object’s motion is influenced only by the forces that are applied to it, not by the forces it applies to others. Post this on the Scientific Principles list.
More Objects that Begin Moving: A Dropped Ball
Students apply what they learned about forces and motion to a simpler situation— a dropped ball. Hold up one of the heavy balls so that everyone can see it, then let it drop. Ask stu-dents to construct tables of the interactions in the system and models of the system before, and immediately after, the ball is dropped. The models should show the forces that all the system’s components apply and are subjected to in each case. Give students a hint that a difference between the two situations is that the ball is subjected to one force in one situa-tion and two forces in the other.

46 HoW WIll It Move?
Have two students show their models to the class. Once agreement on them has been reached, ask students to con-struct two new models showing only the tennis ball and the forces it is subjected to before and after it was dropped, not the forces it applies or the other compo-nents of the system.
This procedure, of creating a table of interactions, drawing a model of the sys-tem with all the forces marked, and then isolating the component of interest and the forces that are applied to it, is done frequently by physicists. The model of a single object and the forces that act on it is called a free- body diagram, because the object is freed from its surroundings. The influence of all the surroundings is represented through the forces they apply to the object of interest.
Students construct several free- body diagrams in this unit. The purpose is to isolate a body from its surroundings and to represent the forces that act on it. Knowledge of these forces allows students to explain and predict how the object moves.
Ask: “In which direction does the ball begin to fall when it is dropped?” They now construct a scientific explanation of why this is so. (The ball begins to fall downward because a single downward force— the gravitational pull of Earth— acts on it.) Ask: “In which direction does the ball begin to move when it is held in your hand?” (The answer depends upon the magni-tude of the force applied to the ball by the hand. If the force applied by the hand is identical to the force applied by Earth— also called the ball’s weight— the two forces cancel the effect of each other and the ball will not move. If, however, the force the hand applies is greater
Before Dropping the Ball
After Dropping the Ball
Ball Earth
Ball +
Earth +
Hand
Ball
Earth
Ball
Before Being Dropped After Being Dropped

leSSon 3: Why does An oBject stArt Moving?: teaching the lesson 47
than the ball’s weight, the ball will begin to move up. If the force the hand applies is less than the ball’s weight, the ball will begin to move down.)
What happens if instead of holding (or pulling) the ball up, your hand pushes it down? (The ball will begin to move down even more rapidly than it did when it was released.) Why? (Forces that are applied to an object in the same direction reinforce one another.) If you want to lift a heavy box, ask someone to help, because with two people pulling up, the upward forces you apply to the box reinforce one another, making it easier to overcome the down-ward force on the box (its weight).
Discussion – Summarizing
Suggested Prompts • Which forces determine whether an object will begin moving or not— the forces that
are applied to the object, the forces the object applies to its surroundings, or both? • Do forces applied in opposite directions reinforce or counteract each other? • In which direction can a force make a stationary object move? • Do forces applied in the same direction reinforce or counteract each other? • What causes an object to begin moving?
Post responses, diagrams, explanations, and photographs, as appropriate, on the DQB. Be sure students know that they are investigating only what makes motion begin, not what makes motion continue. That will be examined in a later lesson.
introducing Homework 3.2 – Heavy-Duty ShoppingStudents view a photograph of a shopping bag full of newly purchased items. They construct an interactions table and a model that describes the bag as it is lifted from the ground by their hands. They then draw a free- body diagram of the bag to show all the forces that deter-mine whether it will remain on the ground or begin moving upward. Ask a question such as, “If I had a bag of groceries here with bread in it, and another one with apples in it, what could you say about forces and lifting the two bags?” Or you might provide students with two items as props, or have someone come and lift both and discuss. Students will apply what they’ve learned to a similar situation for homework.
No Motion
Beg
in M
ovi
ng U
p
Hand
Ball
Earth
Ball

48 HoW WIll It Move?
materials – activity 3.3
For Each Student • Activity Sheet 3.3 • Reading 3.3
activity 3.3 – Complex Systems that Begin Moving
Homework Follow Up
Have students present their homework. On the board, and in this order, one draws the table of interactions, a second draws the model of the shopping bag being lifted, and the third draws the free- body diagram of the shopping bag. After the class reaches agreement on one item, have the next stu-dent present. When this is completed and agreed upon, ask: “Which forces does the upward pull of the hand on the shopping bag have to overcome for the bag to be lifted off the ground?”
Students return to the four devices they inves-tigated in Lesson 2. They construct free- body diagrams for all four devices to determine why they do or do not begin moving, and if they begin moving, why they begin moving in the direction they do. They should use the models of these apparatuses that were con-structed in Lesson 2. Provide students with the following hints to get them started.
• In the Floating Magnets, they should try to explain why the upper magnet floats.
• In the Magnetic Cannon, they should try to explain why the last ball goes shooting out.
• In the Air- Powered Car, they should think of the car and the fan as a single component to figure out why they start moving horizontally.
• In the Flying Balloon, they should treat the balloon and the straw as a single component to explain why they start moving along the thread.
Assign each group of students to two differ-ent apparatuses; they will analyze the two others as homework.
When students complete their work, hold a class discussion in which groups will pres-ent some of their conclusions. Give students about 20 minutes to conclude their work.
Start the class discussion even if not all the groups are finished. Tell students that they need to pay attention to the other groups’ presentations because they may need the information to complete their analyses at home. Let students comment on each oth-er’s work. The end products for each of the systems are shown on the following pages.
Ball E
Car & FanUpper Magnet
Ball D
Air Magnet
Magnetic Cannon Weight RailAir-Powered Car
WeightTableWeight
Floating MagnetLower
Magnet

leSSon 3: Why does An oBject stArt Moving?: teaching the lesson 49
Discuss the four apparatuses in order of increasing difficulty— Floating Magnets, Mag-netic Cannon, Air- Powered Car, and Flying Balloon.
Discussion – Pressing for Understanding
Purpose
Understand why each of the four devices begins to move.
Suggested Prompts • Floating Magnets
o What are the two forces that are applied to the upper magnet? (the weight of the magnet and the repulsive force of the lower magnet on the upper magnet)
o Which pull or push upward, and which pull or push downward? How do you know? (The magnet’s weight pulls it down because gravity always pulls objects down. The repulsive magnetic force pushes upward because if it had been downward the magnet could not float; there needs to be a force that counteracts the magnet’s weight.)
o What needs to be the relation between these two forces for the upper magnet to float without mov-ing? When will the magnet start moving up or down? (The magnet will float motionless if the magnetic repulsion is equal to the magnet’s weight. If the magnetic repulsion is greater than the magnet’s weight, the magnet will begin moving upward because the upward force will be greater than the downward force. If the magnetic repulsion is smaller than the magnet’s weight, the magnet will begin moving downward because the downward force will be greater than the up-ward force.)
o Does the lower magnet float as well? Explain your ideas. (The
lower magnet will never float because the magnetic repulsion it is subjected to acts downward, in the same direction as the mag-net’s weight, reinforcing it rather than counteracting it. The lower magnet does not begin moving downward because it is subjected to an additional upward force— the contact force with the bottom of the test tube.)
• Magnetic Cannon o What vertical forces act on the last
ball in the cannon (Ball E)? (the ball’s weight and the upward con-tact force with the rail)
o Do these forces influence the ball’s horizontal motion? Explain your ideas. (No, they do not influence the ball’s horizontal motion because they act in the vertical direction. Only horizontal forces influence horizontal motion.)
o What is the relationship between these two forces? (These two forces are equal to one another; otherwise the ball would start moving upward or downward.)
o Which horizontal forces act on Ball E? (The magnetic attraction force and the contact force with Ball D.)
o How do you know what is the di-rection of these forces? (The mag-netic force pulls Ball E toward the magnet because it is an attractive force; if it was repulsive, the ball would not remain connected to the other ball even before it shoots out. The contact force from Ball D must act in the opposite direction because it is what makes the ball shoot out.)
o What must be the relation between these forces for Ball E to shoot outward? (The contact force must be much larger than the magnetic force.)

50 HoW WIll It Move?
• Air- Powered Car o Why do you think the car and the
fan can be thought of as a single object? (This question is perhaps best answered with another ques-tion: Why is a tennis ball con-sidered a single object and not two halves, or two objects, stuck together? The reason is that both halves move together so nothing is gained by thinking of them sepa-rately. Likewise, since the car and the fan move together, nothing is gained by thinking of them sepa-rately; imagine that the fan simply has the shape of a car.)
o What vertical forces act on the car- fan? (their combined weight and the upward contact force with the table)
o Do these forces influence their horizontal motion? Explain your ideas. (No, they do not influence the horizontal motion because they act in the vertical direction. Only horizontal forces influence horizon-tal motion.)
o What is the relation between these two forces? (The upward contact force applied by the table is equal to the combined weights of the car- fan; otherwise the car- fan would start moving upward or downward.)
o Which horizontal force acts on the car- fan? (The contact force of the air acts on the car- fan.)
o How can the air apply a force to the car- fan? (The car- fan, when spinning, applies a force to the air. That is why the car- fan blows the air. We learned that forces always come in pairs, so if the car- fan pushes the air, then the air must push the car- fan.)
o In which direction does the air push the car- fan? (The air pushes the car- fan in the direction in which the car- fan begins to move, because it is the only force present that can
cause the car- fan to begin moving. This direction is the direction oppo-site to that in which the air is blown, because pairs of forces always oc-cur in opposite directions.)
• Flying Balloon o Why do you think the balloon and
the straw can be thought of as a single object? (Nothing is gained by thinking of the balloon and straw separately, since they move together as a single object.)
o What vertical forces act on the balloon- straw? (their combined weight and the upward contact force with the string)
o Do these forces influence the hori-zontal motion? Explain your ideas. (No, they do not influence the hori-zontal motion because they act in the vertical direction. Only horizontal forces influence horizontal motion.)
o What is the relation between these two forces? (The upward con-tact force applied by the string is equal to the combined weights of the balloon- straw; otherwise the balloon- straw would start moving upward or downward.)
o Which horizontal force acts on the balloon- straw? (the contact forces of the air inside the balloon and the air outside the balloon on the balloon- straw)
o How can air apply a force to the balloon- straw? (The balloon- straw applies a force to the air inside the balloon; it squeezes the air out. That is why the air gets blown outwards. Forces come in pairs; so, if the balloon- straw pushes the air, then the air must push the balloon- straw. As the balloon moves for-ward, it pushes the air outside out of its way; this air then pushed back on the balloon, trying to keep it from moving forward.)

leSSon 3: Why does An oBject stArt Moving?: teaching the lesson 51
o In which direction does the air push the balloon- straw? (The air inside the balloon pushes the balloon- straw in the direction in which the balloon- straw begins to move; the air outside pushes in the opposite direction.)
wrapping Up the lessonHighlight the similarity of the explanations and the processes of developing these expla-nations for the beginning of motion of the various objects. Scientists use very few ideas to explain a wide variety of phenomena. Emphasize that, until now, students have been examining only what makes motion begin, not what makes motion continue. That is a differ-ent issue that will be investigated in a later lesson.
In this lesson, a few principles should be added to the Scientific Principles lists:
• The beginning of motion is always caused by forces.
• Forces that are applied to an object in opposite directions counteract each other.
• Forces that are applied to an object in the same direction reinforce one another.
• An object’s motion is influenced only by the forces that are applied to it, not by the forces it applies to others.
Forces that cancel each other are said to be balanced, while forces that do not cancel each other are said to be unbalanced. This does not need to be added to the Scientific Principles list at this time. Given almost any mechanical system, students should be able to identify its components and the forces that act between them; draw a free- body diagram for the key component of the sys-tem; determine the relationship between the forces that act on this component; and explain why the key component begins or does not begin moving, and if it begins mov-ing, the direction in which this will happen.
introducing reading 3.3 – why Does an object Start Moving?Reading 3.3 analyzes three cases in which motion begins because of unbalanced forces— cola that foams out of a bottle when it is opened, an arrow that is shot out of a bow, and an arm moving down in an arm- wrestling competition. These situations are direct implementations of the ideas introduced in the lesson. They highlight the ideas that an object remains motionless when all the forces acting on it are balanced, and that when this balance is broken, motion will begin. To introduce reading, ask questions about forces and motion in any one of these scenarios, and provide students opportunities to share their ideas before they read.


leSSon 4: hoW strong is thAt Force?: Preparation 53
le���n 4
How Strong is that Force?
PreParation
teacher Background Knowledge
Scientific Investigation
Data gathering, organization, analysis, and interpretation are an integral component of every scientific investigation and thus of NGSS. When designing an investigation, one considers which data are needed to answer a question and how these data can be obtained. Before data can be used as evidence, they must be analyzed and subjected to tests that verify their credibility and to be sure that the data accurately represent certain characteris-tics of the investigated phenomenon. In this investigation, students need to decide what they are going to measure to determine how much a spring is elongated and how many times they need to make the same measure-ment to know that it is consistent (repetition). Should they get different answers with each measurement, they need to decide when dif-ferences are small enough to be ignored and when they cannot be ignored.
Experimental Variation
In every experiment there are influences that have not or cannot be controlled. For example, just as students were measuring the elongation of the spring, there may have been a breeze that moved the mass, chang-ing the spring’s elongation. The spring may warm up from all the handling and behave differently from when it is cold. There may be some friction between the springs and the tubes of the spring scales. Multiple mea-surements of the same values will often give different results. Since we do not know what
the impact of all these various influences during the measurements was, we cannot know what should have been the result. So we can never know what the correct value for a measurement is.
The question is whether the variance in results is small enough for our purposes. If the measurements results vary significantly from each other, there is a problem. We need to figure out what is causing this large variance in measurements, control it, and then repeat the measurements. For example, if we did the experiment in a windy room and the wind was changing all the time, it might have a significant influence on our results. We would need to move to a location where there was no wind and repeat the experiment.
If the measurements only vary a bit from each other, we can use the results as they are. What does it mean to vary only a bit? This is something the investigator needs to decide. It depends on the accuracy needed. For very accurate results, a smaller variance in the results is necessary. There are math-ematical procedures for determining how much variance is tolerable for a given level of accuracy, but that is beyond the scope of IQWST and middle school science standards.
Once the measurements are accepted as having a small enough variance, the average measurement is calculated (called the mean) as is the average distance of all the actual measurements from the mean (called the standard deviation). These two values are

54 HoW WIll It Move?
then used in all further references, not the actual measurements.
Elastic Energy
Hooke’s law, developed in 1678 by the British physicist, Robert Hooke, says that the force needed to extend or compress a spring by some distance is proportional to that dis-tance. Students may have studied elastic energy (IQWST PS2) and be familiar with the notion of deformation. Hooke’s law is typi-cally stated in mathematical form:
F = k × x
F is the force applied to the object (in this case, a spring), x is the deformation (elonga-tion or compression) of the spring, and k is constant number for every spring that rep-resents its hardness; a harder spring will be represented by a larger k.
Several things can be learned from Hooke’s law:
1. When no force is applied to a spring, it does not deform (when F = 0, then x = 0).
2. The larger the force, the larger the deformation (if F increases, then x must increase as well).
3. The harder the spring (larger k), the smaller its deformation for a given force.
The students’ third goal in this investigation (to determine whether there is a relation-ship between the amount the spring gets stretched by a mass hanging from it and the size of the mass) is actually to develop Hooke’s law, in mathematical or verbal form, without considering the influence of the spring’s ha rdness. Hooke’s law governs the magnitude of the force, not its direction. The direction of the force depends on whether the object is compressed or stretched.
Magnitude
Some objects are bigger or smaller than others; some are heavier or lighter than oth-ers. In either case, a property of the objects can be measured and compared. In the first case this property is volume; in the second, weight. The value assigned to these proper-ties is called their magnitude.
Forces also have a magnitude, so the “amount” of one force can be compared with another. Just as there are units for measur-ing the magnitude of distances (e.g., meters) and masses (e.g., grams), the magnitudes of forces is measured in Newtons (N). The mag-nitude of forces is typically measured with a dynamometer (a calibrated spring with a ruler attached to it) or electronically. In most electronic force probes, the force causes something like a small wire inside the probe to deform, changing its electrical resistance and causing the electric current flowing through the wire to change. This change is measured and translated into a force.
Forces are different from many properties in that they also have a direction. Mass has no direction. Energy has no direction. Force does. Other things have both magnitude and direction, such as electrical current: a current can be big or small, and it can flow in one direction or another in a circuit. Velocity has both a magnitude (called the speed) and a direction. Things that have both a magni-tude and a direction are called vectors.
Masses to Measure Newtons
Students will use washers as the “masses” in this lesson. They will do multiple mea-surements (repetition) of 3 different masses. Given 8 washers per group, a combination of 1, 2, and 4, or 1, 2, and 5 will work for the activity and will enable students to do the calculations.
leSSon 4: hoW strong is thAt Force?: Preparation 55
Setup
Specific instructions for activity setup are embedded within the lesson.
! Safety guidelines
Refer to IQWST Overview.
Differentiation opportunities
1. Reading 4.4 is an additional, optional reading on the topic of a tug-of-war. Although it is included in the student book for any student to be able to read, it is designed for more advanced students as a follow-up to Reading 4.3.
2. Washers are used as the “mass” to be used with the spring in this lesson. Some language work may be helpful for all students but especially for those for whom English is not their primary language, to differentiate meanings of the word mass. In some contexts, mass refers to an object (“Suspend the 100g mass from the spring.”). In other contexts, mass refers to a measurement (“Determine the mass of the sub-stance.”). You may wish to use this opportunity to talk about the use of context clues to help determine the meaning of words.


leSSon 4: hoW strong is thAt Force?: teaching the lesson 57
le���n 4
How Strong is that Force?
teaCHing tHe leSSon
Building CoherenceThis lesson revisits much of what students investi-gated qualitatively in Lessons 1– 3, now providing the means to measure and compare forces from a quantitative perspective.
timeframe3– 4 Class Periods
Performance expectationsStudents will
• plan and carry out an investigation testing the relationship between weight and a spring’s elongation, thus developing Hooke’s Law.
• use computational thinking, and force probe technology, to measure and analyze forces and construct Newton’s third law.
overviewActivity 4.1 (Optional)Investigate the relationship between a spring’s elongation and the mass hung from it.
Activity 4.2Measure force using probes to investigate Newton’s third law.
Activity 4.3Revisit Lesson 2 devices, using probes to measure some of the forces involved in these systems.
introducing the lessonAsk: “When an arrow is shot by a bow, how strong is the force that acts on it?” This lesson focuses on learning to measure the strength (or magnitude) of forces and figuring out how strong the forces are that are involved in the four devices students have been investigating.
materials – activity 4.1
For the Teacher • (1) sponge ball • PI: Graph • PI: Spring and Force
For Each Group • (1) 10N spring scale
• (1) ruler • (8) metal washers • (1) ring stand • (1) ring stand support
For Each Student • Activity Sheet 2.4

58 HoW WIll It Move?
activity 4.1 – Measuring Forces (optional)
In Activity 3.2, students pushed a tennis ball between two hands to see when it would begin moving left or right. Ask them if they noticed something additional that happened to the tennis ball, other than moving to the left or right. Someone may respond that the ball got compressed. Hold the sponge ball between your two hands, raise your hands so everyone can see them, and then push inwards, so that the ball gets compressed.
Ask students what they see happening and whether the same thing happened to the tennis balls when they pushed on them. A quick discussion should lead to agreement that the tennis balls got compressed, but not as much as the sponge ball. Students may have learned about the energy involved in compressing and stretching (IQWST PS2). In this lesson, students will revisit stretching and compressing, emphasizing forces rather than energy. The last lesson in this unit will bring together both forces and energy to help students distinguish between them and know which ideas are most useful in different situations.
Hold up the sponge ball again. Squeeze it a bit between your hands; then squeeze it harder. Ask students in which case you pushed harder— when the ball was compressed a bit or when it was compressed more. Ask them if they think this behavior is typical of all elastic objects— the harder they are pushed or pulled on, the more they will be compressed or stretched. Remind students that the term elastic is used to describe any object that returns to its original shape after being stretched or compressed.
Ask students if an elastic object will get stretched or compressed by the same amount each time the same forces are applied to it. This is what students will investigate next. Distribute a spring scale, ring stand, ruler, and three masses to each group, with the following goals:
1. Check whether the spring in the spring scale gets stretched by the same amount each time the same mass is hung from it.
2. Check whether the spring in the spring scale returns to its original shape each time after the mass hanging from it is removed.
3. Check to see if there is any relation between the amount the spring gets stretched by a mass hanging from it and the size of the mass.
4. Suggest a way to tell the size of a mass by the amount it makes the spring get stretched.
Provide students with no more explicit instructions than these four goals. Students design an experiment, collect and record data, analyze and interpret data, write a conclusion, and write a report as homework.
Constructing Hooke’s Law
Discussion – Pressing for Understanding
Purpose
Construct the meaning of Hooke’s law.

leSSon 4: hoW strong is thAt Force?: teaching the lesson 59
Suggested Prompts • Ask a group to describe how they checked whether the spring got stretched by the
same amount each time they hung the same mass. Have them describe their experi-mental setup and what they measured. Do not talk about results yet. Ask other students to comment on the described setup. Make sure that
o the setup controls all influences, other than the weight of the masses, which could affect the results;
o students measured or calculated the elongation of the spring; and o students made multiple measurements of the spring’s elongation for the same
mass. • Ask another group, whose setup meets these three criteria, to present their results in
a table.
It is likely that students will not have included an average measurement for each mass. In that case, do not mention this yet. Ask the class if the measurements for each mass are the same. They should be very similar or even identical. If they are not similar, the group must have erred in setting up their experiment, in making their measurements, or in recording their results. If they are slightly different, ask how they can know which measurement is correct.
Since it is impossible to know what the correct measurement is, we assume that it is likely somewhere in the vicinity of the measurements that were actually made. We use an average to decide on the assumed value of the correct measurement. This does not mean that the average value is actually the correct value. The average value is close to the correct value. If students do not know what an average is or how to calculate it, provide this information at this point. Demonstrate how to calculate the average of two, three, and four numbers that are similar to each other, such as 5.0, 5.4, 5.3, and 5.2. At this point, add an additional row to the table for the averages and calculate the values together with students.
Ask students if the springs returned to their original lengths each time after the masses hang-ing from them were removed. How do they know this?
Ask: “What patterns do you see in our data?” (The spring stretches more when a greater mass is hung from it.) Ask: “How can you use these results to predict how much the spring would stretch if a different mass was hung from it?”
MaSS #1 MaSS #2 MaSS #3
Measurement #1 [cm]
Measurement #2 [cm]
Measurement #3 [cm]
Average [cm]

60 HoW WIll It Move?
Have a student come to the board and draw a dot on the chart to represent the mass of 100g and the elongation associated with it. Then have another student do the same for 200g, and a third student for 500g. The graph should look now like this:
1098
7
6543
210
10009008007006005004003002001000 [g]
[cm]
1098
7
6543
210
10009008007006005004003002001000 [gr]
[cm]
Ask students if they see anything interesting about the three dots and the point where the two axes intersect. Draw a line connecting all three dots and the intersection of the axes, making sure the line continues beyond the dot farthest to the right.
Ask if any group made a graph of the spring’s elongation versus the mass hung on it. Ask why they decided to do so. Explain that a graph is a tool that will help them predict how much the spring will stretch in different situations. Give students a few minutes to make this graph in their activity sheets. Draw the following axis on the board without erasing the table of masses and elongations.

leSSon 4: hoW strong is thAt Force?: teaching the lesson 61
Ask students how this line can be useful. (It allows them to predict how much the spring will stretch when a known mass is hung from it. It also allows them to know what mass will cause the spring to stretch a known amount.) To demonstrate this, ask students how much they think the spring will stretch if they hang 600g from it. Accept a few answers and then ask a student that predicted an elongation of 6cm to come to the board and explain how he or she reached that prediction. The explanation should be based on drawing a vertical line up from 600g until the diagonal line, then drawing a horizontal line left from the intersection with the diagonal line to the vertical axis, where it arrives at 6cm.
1098
7
6543
210
10009008007006005004003002001000 [g]
[cm]
1098
7
65432
10
10009008007006005004003002001000 [g]
[cm]
Have students check their predictions by actually hanging 600g from the spring and mea-suring the elongation. Then have them predict the elongation for 800g and check their predictions.
Ask students to determine the mass of the spring that is stretched 3.5cm. In this case a hori-zontal line is drawn from 3.5cm until the diagonal line and from a vertical line is drawn down; it reached the horizontal axis at 350g.

62 HoW WIll It Move?
Remind students that before they began the investigation of springs and masses, the fol-lowing question was posed: Will an elastic object get stretched or compressed by the same amount each time the same forces are applied to it? This investigation demonstrated that
• a spring gets stretched by the same amount each time the same mass is hung on it. • a spring returns to its original length each time the hung mass is removed from it. • the amount a spring stretches is proportional to the mass hung from it.
Do the findings of the investigation answer the question? Explain your ideas. (The main difference is that this investigation did not consider how a force makes a spring stretch. It looked at how hung masses make a spring stretch. If a model of the system investigated is drawn, we will see that the mass applies a force to the spring.)
If we know what the mass is, what is the force it applies to the spring? That will be determined in Activity 4.2.
1098
7
654
33.5
350
2
10
10009008007006005004003002001000 [g]
[cm]
Earth
Table
Ring Stand
Mass
Spring Scale

leSSon 4: hoW strong is thAt Force?: teaching the lesson 63
materials – activity 4.2
For the Teacher • PI: Spring and Force • PI: Paired Forces
For Each Group • (1) force probe* • variety of metal washers
For Each Student • Activity Sheet 4.2
*This item is not included in the kit.
activity 4.2 – Measuring Force with Probes
Every object on or near Earth has weight because every object has mass and every object is subject to Earth’s gravity. Mass is measured in grams, using a balance or scale. It cannot be measured directly; mass is measured by comparing to other masses.
Imagine an object with a mass of 1kg (about 2.2lb). How much would it weigh? Remind stu-dents that an object’s weight is the force with which it is pulled downward because of gravity. If gravity were stronger, the object’s weight would increase even though its mass had not changed. A mass of 1kg weighs more on Jupiter, where the gravity is very strong, than it does on Earth; it weighs more on Earth than it does on the moon, where gravity is weak.
In honor of Isaac Newton, scientists named the unit in which force is measured newtons (N). Forces can be measured using spring scales (as in optional Activity 4.1) or force probes. One can calculate the weight of a given mass if the gravity is known. The weight of a mass of 1g on Earth is equal to approximately 1/100N. To figure out the weight in newtons of a known mass, divide the mass (in grams) by 100. The weight of 500g is 500/100 = 5N.
Experiment with this using digital force probes. Have each group of students hang various masses from a force probe and complete a table.
MaSS [g] weigHt [n] MaSS [g]/100
the measured weight in newtons should be almost the same as the mass in grams divided by 100.

64 HoW WIll It Move?
Mass and Weight
Discussion – Summarizing
Purpose
Solidify understanding of the relationship between an object’s mass and its weight on Earth.
Suggested Prompts • What is the difference between mass and weight? (Mass is a measure of the amount
of matter in an object; weight is the force that acts on the object due to gravity.) • Does an object’s mass change if it is moved from Earth to outer space? What about its
weight? Hint: in outer space there is very little gravity. (Mass does not depend on location or the existence of gravity. It is a property of the object alone. Therefore, it will not change as the object is moved from Earth to outer space. On the other hand, weight depends on gravity— the stronger the gravity, the greater an object’s weight. Therefore, an object’s weight will decrease and become almost zero as it is moved from Earth to outer space, where there is almost no gravity at all.)
• If an object’s mass is known, how can its weight on Earth be calculated? Explain the answer for a mass of 300g. (An object’s weight on Earth in newtons is its mass in grams divided by 100. A mass of 300g will have a weight of 3N on Earth.)
• If we know an object’s weight on Earth, how do we calculate its mass? Explain the answer for a weight of 8N. (An object’s mass in grams is its weight on Earth in new-tons times 100. A weight of 8N on Earth will have a mass of 800g.)
Students learned in Lesson 2 that all forces come in pairs. Students have learned that they act in opposite directions, but what can they say about the relation between their magnitudes? Have students push their hands together. Does it feel like one hand feels a greater force than the other? Have them clasp their fingers and try to pull them apart. Does it feel like one hand feels a greater force than the other?
1. Working in groups, have students connect two force probes. While one student pulls them apart or pushes them together, two other students take read-ings from the data- loggers. The student who is pulling the probes apart should hold them on the table, so they will not move while the readings are being taken. Make sure probes are parallel to each other, because the probes only measure forces along their axes.
2. Have students take turns pulling the probes apart and taking readings. Each group should make four readings.

Lesson 4: How Strong IS tHat Force?: Teaching the Lesson 65
Since each group will need two force probes, there will not be enough probes for all the groups to work simultaneously. Each group should spend about five minutes taking measurements and then pass the probes to another group.
The results should demonstrate that one probe measured about the same force as the other probe, regardless of how strong that force was. Since the force that each probe measured was the pair of the force that the other probe measured (see PI: Paired Forces), students can conclude that, in this case, paired forces are equal in magnitude.
Force Probe #1 [n] Force Probe #2 [n]
Have students repeat this experiment, except attach a magnet to each of the force probes. They should hold the probes close and directly opposite each other, in one line. Results will demonstrate that the magnetic force that one magnet applies to the other is identical in magnitude, but opposite in direction.
As an option, do this as a demonstration, holding the probes at different distances from each other while two students take the readings and another student records the results on the board in a table as before.
Newton’s Third Law
Discussion – Summarizing
Purpose
Summarize the relationship between paired forces.
Suggested Prompts • When two force probes pulled directly on each other, what type of forces did each
one apply to the other? How do you know? (contact forces because the two probes were in contact with each other)

66 HoW WIll It Move?
For the Class • (3) stations:
o Floating Magnets o Air- Powered Car o Flying Balloon
• (1) force probe*
For Each Student • Activity Sheet 4.3
• What is the relationship between these two forces with regard to their directions and magnitudes? (They are equal in magnitude but act in opposite directions.)
• When you sit on a chair, do you think that you push down on the chair harder, softer, or the same as the chair pushes up on you? Explain your ideas. (They are exactly the same because both forces are a pair of contact forces and all pairs of contact forces are equal in magnitude.)
• When the two force probes used magnets to pull each other, what kind of forces did each one apply to the other? Explain your ideas. (forces that acted at a distance because the two probes were not touching each other, nor were the two magnets)
• What is the relationship between these two forces with regards to their directions and magnitudes? (They are equal in magnitude but act in opposite directions.)
• Earth’s gravity pulls on the moon, keeping it in orbit. At the same time, the moon pulls back on Earth. Which pulls harder on the other? Explain your ideas. (Each pulls on the other with exactly the same force because both forces are a pair of forces that act at a distance, and all pairs of forces that act at a distance are equal in magnitude.)
Encourage students to make a general statement that summarizes what they have just learned about forces. Newton summarized his conclusions in a scientific principle: For every force, there is an equal and opposite force. This is called Newton’s third law. Newton did not prove the law; he conducted investigations and reached a conclusion. In 300+ years, scientists have not found a single case of a pair of forces that did not obey this law. However, in theory, it is possible that such a pair may exist. Science is not about what things are true, but about things we believe are true because we have no good reason to doubt them.
Post Newton’s third law and the relation between mass and weight on the Scientific Principles list. Students will now return to three of the four devices they investigated earlier and apply what they have learned to the apparatuses.
materials – activity 4.3
*This item is not included in the kit.
activity 4.3 – revisiting Familiar apparatuses
Students take the next step in understanding how three of the four devices they have inves-tigated actually work, by measuring the forces involved in each apparatus.

leSSon 4: hoW strong is thAt Force?: teaching the lesson 67
Explain that the same stations that students worked at a few days ago have been set up again. The goal this time is to use the force probes to make measurements that will allow them to determine the strength of each force that appears in the free- body diagrams they made in Lesson 3. They do not need to measure every force in each free- body diagram; some of the forces cannot be measured. However, using what they have learned about forces reinforcing or counteracting each other and the relation of forces to the start of motion, they should be able to figure out the magnitude of each force in each free- body diagram—even those they could not measure.
After each group has made their measurements, hold a class discussion in which each group will present some of their conclusions. Give students five to eight minutes at each apparatus and then another 10 minutes to conclude their work. Tell each group that, when they return to their seats, they should work on the systems in the order they visited them; this will ensure that every system will have had a group that gave it their full attention. Start the class dis-cussion even if not all the groups are finished. Tell students they need to pay attention to the other groups’ presentations because they may need the information they will learn from them to complete their analyses at home. Let students comment on each other’s work. The following paragraphs explain what needs to be measured in each apparatus and how the magnitudes of all the forces can be deduced from these measurements.
Floating Magnets
Students should weigh one of the magnets by hanging it from a force probe and then place both magnets in a test tube. Since the upper magnet floats motionless, the forces that act on it must cancel each other. This means that the force the lower magnet applies to the upper magnet must be identical in magnitude to the weight of the magnet, which was just measured.
Air- Powered Car
1. Students should weigh the car and fan. Since the car and fan do not move up and down, only left and right, the vertical forces that act on them must cancel each other. This means that the force the table applies to the car and fan must be identical in magnitude to the weight of the car and fan.
2. Students should turn on the fan and use the force probe to keep the car from moving by pushing in the oppo-site direction of the fan. They should be sure the probe is being held hori-zontally. When the car and fan does not move horizontally along the table, the horizontal forces that act on it must cancel each other. This means that the force the probe applies to the car (which is measured) must be identical in magnitude to the force of the air pushing on the car and fan.

68 HoW WIll It Move?
Flying Balloon
1. Students should weigh the balloon and straw. Since the balloon and straw do not move up and down, only along the string, the vertical forces that act on them must cancel each other. This means that the force the string applies to the balloon and straw must be identical in magni-tude to the weight of the balloon and straw.
2. Students should connect the force probe to the straw and let the air escape from the balloon. The force probe will keep the balloon and straw from moving by pushing in the oppo-site direction of the air. They should be sure the probe, balloon, and straw are all horizontal. When the balloon and straw do not move horizontally, the horizon-tal forces that act on them must cancel each other. This means that the force the probe applies to the straw (which is measured) must be identical in magnitude to the force of the air pushing on the balloon and straw. Under normal circumstances there is also the force of the air outside the balloon pushing backward on the balloon. Because the balloon does not move (the force probe prevents it from moving), the air outside the balloon does not apply any backward force on the balloon. It will be difficult for students to take readings because the force of the air on the balloon will change as the balloon deflates. In this case it is enough to get a rough measurement, just an order of magnitude.
wrapping Up the lessonStudents did not measure the Magnetic Cannon because the time during which the last ball is subjected to the force that propels it away is so short, and they would not have been able to measure it without knowing more about force probes. In the next lesson, students will take the next step toward understanding how things move by learning about why things stop. They will learn why some things keep moving (also IQWST PS2) and make connections between forces and energy.
introduce reading 4.3 – what Keeps things from Moving?Ask: “What do you know about friction? Who has ever played tug-of-war? What determine who wins at tug-of- war?” The reading shows that without friction our lives would be very dif-ficult and confusing, and that friction is actually responsible for the beginning of many types of motion, including walking. The reading provides an application of Newton’s third law to explain why the stronger group does not always win a tug- of- war competition.

leSSon 5: Why does An oBject stop Moving?: Preparation 69
le���n 5
why Does an object Stop Moving?
PreParation
teacher Background Knowledge
Friction
What causes friction? Why is the friction between rough surfaces typically greater than the friction between smooth surfaces? As there are many kinds of friction (only two— static and dynamic— are dealt with in this unit), there are many sources of friction. The model described here does not describe all kinds of friction, but it is useful for explaining many aspects of friction.
Students may have learned (IQWST PS1) that surfaces are never really completely smooth at the microscopic level, even if they appear to be smooth at the macroscopic level. Every surface has bumps and ridges. When two objects are placed in contact with each other, some of the bumps of one object’s surface fit into the other object’s ridges and vice versa.
Rather than having the two objects in contact along their surfaces, there are contact points between the two objects. Moving the objects in parallel to one another is now not so simple since there are horizontal obstacles that have to be overcome. These obstacles are the source of the friction between the two objects.
Setup
Specific instructions for activity setup are embedded within the lesson.

70 HoW WIll It Move?
! Safety guidelines
Refer to IQWST Overview.
Differentiation opportunities
Refer to IQWST Overview.

leSSon 5: Why does An oBject stop Moving?: teaching the lesson 71
le���n 5
why Does an object Stop Moving?
teaCHing tHe leSSon
Building CoherenceIn Lesson 3, students identified forces as the causal agents that make things start moving. Now, they identify forces as the causal agents that make things stop moving in every phenomenon.
timeframe2 Class Periods
Performance expectationsStudents will
• analyze pairs of forces to determine whether they reinforce or counteract each other.
• analyze forces to provide evidence to explain that forces always come in pairs between objects.
• construct, use, and analyze free- body diagrams as models that help explain and predict how an object will move.
overviewActivity 5.1Investigate friction by examining simple situations in which an object stops moving, either suddenly or gradually.
Activity 5.2Analyze forces to explain why components of an apparatus (Magnetic Cannon) start and stop.
introducing the lessonReading Follow Up
Read aloud the beginning of the section of Reading 4.3, “What Makes Friction Change?” Pose challenges, such as the following:
• When you sit in your chair and push against a table, sometimes your chair moves and sometimes it does not. Use the idea of friction to explain this. (When I sit on my chair and push on a table, my chair and I [assuming both of us are a single object because we move together] are subjected to four external forces— our combined weight, the force of the floor on the chair [both vertical forces], the force of the table on my hands as I push the table [the pair of the force I apply to the table], and the friction between the floor and chair [both horizontal forces].)

72 HoW WIll It Move?
(The friction counteracts the force of the table on you, canceling it out and letting you remain motionless. As you push harder on the table, the friction with the floor increases until it reaches its maximum value; if you push any harder, the friction will not be able to balance the force of the table on you and you will start moving away from the table.)
For Each Group • (1) hardcover book* • (1) force probe*
For Each Student • Activity Sheet 5.1
• Why is it hard to pull a nail out of a piece of wood? (The wood applies friction to the sides of the nail. The harder you pull on the nail, the greater the friction becomes to counteract the force you are applying. When you pull hard enough, you overcome the maximum value the friction can obtain, and the nail starts coming out.)
• Students may have learned that earthquakes are the result of plates slipping one against the other. The plates are pushed by the force applied to them by molten magma beneath them. The molten magma is there, pushing on the plates all the time, yet there are not earthquakes all the time. Why is this so? (There is static friction between the plates that the force of the magma has to overcome for the plates to slip.)
In these situations, the friction keeps an object from moving. Students have spent some time learning about how forces make things start moving. In this lesson they will look at the other end of motion— how forces make things stop.
materials – activity 5.1
*This item is not included in the kit.

leSSon 5: Why does An oBject stop Moving?: teaching the lesson 73
activity 5.1 – a Book that Stops Moving
Have students push one hand down on the table and at the same time move it across the table. Ask them if they feel a force holding their hands back, making it harder for them to move it than it would have been if they had moved their hands in the air. What is the force that is holding their hands back? Explain that friction is holding their hands back. This type of friction is called dynamic friction. Until now, the friction they considered existed only when the object being considered was motionless. The friction that exists in motionless situations is called static friction. Static means “unmoving or unchanging,” while dynamic means “changing.” Dynamic friction is the type of friction that appears when one object rubs against another, so that it is moving relative to the other. Explain that dynamic friction is similar to static friction, except that
• the dynamic friction between two surfaces is always smaller than the maximum value of the static friction between these two surfaces, and
• the magnitude of the dynamic friction does not depend on the magnitude of the other forces involved.
Ask students if they can think of situations where an object is subjected to friction even though the object is moving. For example, a skidding bicycle, a book sliding across a table, a swimmer swimming through water, or someone sliding down a slide or a rope. Accept all responses that involve friction and motion.
Have students gently shove the book across their tables, not so hard that it falls off the end. The book should stop on its own. Ask students to draw in Activity Sheet 5.1 two free- body diagrams for the book— one before it starts moving and one while it is moving. If they have trouble drawing the free- body diagrams directly, without first drawing a model of the entire system, draw a model of the system on the board and have them extract the free- body dia-gram of the book from it.

74 HoW WIll It Move?
Ask students what the two differences between the two free- body diagrams are. (In one the fric-tion is static, and in the other it is dynamic. In one there is a force applied by the hand to the book and in the other this force does not exist.)
Have students use a force probe to push the book horizontally, slowly pushing harder and harder until the book starts to move. While the book is moving, have students measure how hard they had to push before the book started moving, and compare this to how hard they have to push to keep the book moving. This may be difficult because the values displayed by the force probe will change all the time, but they should be able to notice three things:
1. There continues to be friction between the book and the table even when the book is moving.
2. This friction acts on the book against the direction of its motion, meaning it tries to stop the motion.
3. This dynamic friction is smaller than the maximum static friction, since they needed to push harder to start the book moving than to keep it moving.
The Role of Friction
Discussion – Pressing for Understanding
Purpose
Conclude that friction made the book slow down until it stopped moving.
Suggested Prompts • Look at the free- body diagram for the book before it began moving. If the static
friction is equal to the force of the force probe pushing the book, what will happen to the book? (The book will be in equilibrium [all forces acting on it cancel each other] and it will remain at rest.)
• If the force of the force probe on the book is greater than the maximum value of the static friction, what will happen to the book? (The two horizontal forces acting on the book will not balance, and so the book will start to move.)
• While the book is moving and the force probe is not touching it, how many horizontal forces act on it? Which are these forces? (While the book is moving, only one horizon-tal force acts on it— the dynamic friction with the table. The force probe no longer applies a force to the book because it does not touch it and because the force probe does not apply a force at a distance.)
• Since the book, while it is moving, is subjected only to one horizontal force (the force probe is not touching it), this force cannot be balanced. Does this force try to change the book’s motion? Explain. (Since the friction acts against the direction in which the book is moving, it wants to stop the book, so the book slows down until it stops.)
This is a general characteristic of dynamic friction— it always acts on an object against the direction in which the object is moving. Add the following statement to the Driv-ing Question Board: Dynamic friction always acts on an object against the direction in which the object moves.

leSSon 5: Why does An oBject stop Moving?: teaching the lesson 75
• While rowing in a pond, the person in the rowboat runs out of strength and stops rowing. How does the rowboat’s motion change and why? (The only horizontal force acting on the rowboat is the friction between the rowboat and the water, which pushes back on the rowboat, against the direction in which it is moving. The force causes the rowboat to slow down and finally stop.)
• When you pushed the book on the table, it had space to slow down and stop before falling off the edge. However, if you pushed it just the same, but nearer to the edge, it would not have space to stop; it would go over the edge. What can be concluded about dynamic friction? Does it make things stop or does it slow them down? Explain. (If friction made objects stop, it would make them stop no matter how far they had to travel. This is not the case, because the book can go over the edge of the table without stopping; therefore, friction makes an object slow down. An object will stop only if it has enough space to slow down enough so it can stop.)
If something slows down for a long enough time, it will finally stop. That is what happens when the book has the entire table to slide along. Friction makes it slow down until it finally stops. If the book is pushed even faster, it will need more time to slow. A longer table is needed to keep it from fall-ing over the edge.
Ask students if they think that only friction can make things slow down. What happens if the slid-ing book hit someone’s hand before reaching the edge of the table?
Have students draw a free- body diagram of the book sliding on the table as it hits someone’s hand. There are now two horizontal forces acting on the book— friction and the force of the hand. Both forces act in the same direction so they reinforce each other. This means that instead of just friction trying to stop the book, there is now a larger total horizontal force trying to stop it, and the result is that the book stops faster.
Ask students to give an explanation for why the book slows down and stops while sliding across the table. (it stops because one or more forces are applied to it against the direction in which it moves.)
That the end of motion is always caused by forces is a new understanding that is similar to one already on the Scientific Principles list about the “start” of motion. Combine these into a new principle: The start and end of motion is always caused by forces.
At this point, the Scientific Principles list should contain both the previous principle and “Dynamic friction always acts on an object against the direction in which the object moves.” As always, these principles should be “arrived at” as a class and worded in student-friendly language.
Book
DynamicFrictionWeight
Table
Hand
Direction of Motion
While Moving

76 HoW WIll It Move?
Explain that in the next activity students will use this new knowledge to make sense of some-thing in the Magnetic Cannon that they may not have noticed until now.
introducing Homework 5.1 – Hard and Soft landingsStudents analyze the forces that act on their bodies when they land on the ground after jumping off a stool. They are to jump off a low stool twice and land, once with their legs straight and once with their legs bent. Students are asked to explain why in the first case they feel a harder impact than in the second case.
Have students imagine standing on a bench or step and jumping off. Ask: “What do you do with your knees? Why? What would happen if you didn’t bend them?”
materials – activity 5.2
For Each Group • Magnetic Cannon
For Each Student • Activity Sheet 5.2
activity 5.2 – recoil in the Magnetic Cannon
Distribute Magnetic Cannons to groups. Students will investigate a characteristic of the Magnetic Cannon that they may not have noticed before.
Challenge students to focus not on the ball that shoots out but on the assembly of ball bear-ings and magnets that remain behind. Since they will not be interested in what happens to the ball that goes flying out, they can stop it right near the end of the rail on which the cannon sits. Students should fire the cannon several times, each time watching to see what happens to the part of the cannon that does not go flying, and make sure that the behavior they see is consistent.
Discussion – Pressing for Understanding
Purpose
Understand why the assembly of ball bearings and magnets that remains behind recoils backward and then stops.
Suggested Prompts • Call the collection of ball bearing
and magnets that do not go flying the assembly for short. What happens to the assembly when a ball is fired? (It moves backward, in the opposite direction to the ball flying out. It moves a short distance and then stops.)

leSSon 5: Why does An oBject stop Moving?: teaching the lesson 77
• What makes an object begin moving? Those who do not know the answer should look at the Driving Question Board.
• When something comes out of an object in one direction and the object moves in the opposite direction, we say that the object recoils. When the assembly recoils, does it begin moving? Which force(s) cause it to recoil?
Ask someone to draw a free- body diagram of the ball that shoots. This free- body diagram was constructed in Activity 3.3, so students should have a copy of it. Point out that the free- body diagram made in Lesson 3 did not include friction. Ask students if any friction acts on the shooting ball. Have someone add friction to the free- body diagram. Make sure it is drawn in the correct direction, which is opposite to the direction of motion, which is in the direction of the force Ball D applied to it when it shot out.
Using this free- body diagram as a guide, ask students to draw a free- body diagram for the assembly that remains behind, drawn for the instant at which Ball E shot out. Ask students if they need to draw each magnet and ball bearing separately or whether they can treat them as one object. (Since the assembly moves together as one unit, it can be treated as a single object.)
Repeat the question: Which force(s) cause the assembly to recoil? (Since it is only one force, the force Ball E applies to the assembly acts in the direction of motion, only it causes the assembly to begin moving in that direction.)
• Which force is greater, the force that makes the assembly recoil or the force that makes Ball E shoot out? (Since these forces are paired to each other, according to Newton’s third law, they must be equal in magnitude.)
• Why does the assembly recoil only a short distance and then stop? (In Activity 5.1, students learned that the end of motion is always caused by forces. When the assem-bly is moving backward, only one horizontal force acts on it— the friction with the rail. The force of Ball E no longer exists because Ball E is no longer in contact with the assembly. Therefore, the friction is the only force that can cause the assembly to slow down and stop.)
• Why does the assembly stop much sooner than the ball that shoots out? (There are two reasons:
1. The assembly begins moving at a slower speed than the shooting ball, so it is easier to stop it, and
2. The friction acting on the assembly is greater than the friction acting on the shoot-ing ball.)

78 HoW WIll It Move?
wrapping Up the lessonRevisit the DQB and summarize with students what they have learned thus far.
• to analyze phenomena as systems comprised of components and interactions • to isolate a component in a system and determine which forces act on it • to determine whether an object will begin moving or whether it will stop moving
introducing reading 5.2 – what affects How Quickly Something Stops Moving?Ask students questions related to any of the scenarios you expect to be familiar to them— water balloons, baseball, or a trapeze artist. The reading further examines the relationship between the magnitudes of a force and the rate at which something stops: When the stop-ping force is greater, the object stops more suddenly.
• Water balloon—When you catch a water balloon carefully, slowing it down and stop-ping it gradually, you apply a smaller force to the balloon. Because the force that acts on it is smaller, it stretches less and does not pop.
• Baseball—When a baseball is caught with a glove, it is slowed down and stopped gradually, meaning a smaller force is applied to it. This also means that a smaller force is applied to your hand, protecting your hand. When caught barehanded, the ball stops suddenly, requiring a greater force, meaning a greater force is applied to your hand.
• Trapeze—A trapeze artist falling off the trapeze and falling on the hard ground or on a safety net is the application of a great force.

leSSon 6: hoW cAn We descriBe hoW An oBject Moves?: Preparation 79
le���n 6
How Can we Describe How an object Moves?
PreParation
teacher Background Knowledge
Energy Conservation
Energy is conserved in the Magnetic Cannon, just as it is conserved in every known phenome-non. The additional kinetic energy the ball has when it shoots away from the Magnetic Cannon is actually magnetic energy that was converted into kinetic energy. If you look closely, you will see that the ball that enters the cannon stops next to the magnets, while the ball that leaves the cannon never touched the magnets; instead there were a few balls between it and the magnets. This different distance between the balls and the magnets is the key to understand-ing where the additional kinetic energy comes from. This will be investigated in Lesson 8. For now, do not share this information with students.
Specifics of the Representations
In Activity 6.2, the slanted line connecting point (0 seconds, 0cm) with point (0.5 seconds, 6cm) should not actually be straight, as drawn. A straight line means that the ball’s horizontal speed is constant when it is dropped, and this is not correct. The ball’s horizontal speed actu-ally increases as the ball falls, so the slanted line should actually be a curve shaped something like this . It is best to gloss over this for now and use only straight lines. Motion graphs that represent accelerated motion are addressed in high school physics.
The slanted lines connecting point (0 seconds, 0cm) with point (1 second, 2cm) for Ball A and leaving point (1 second, 7cm) for Ball E should not be straight, as drawn. As mentioned previously, a straight line in a motion graph means that an object’s speed is constant, and this is not correct for Balls A and E. As we see in a later lesson, Ball A accelerates toward the magnets, increasing its speed as it gets closer. Ball E, on the other hand, decreases its speed as it gets farther away from the magnets.
Setup
Specific instructions for activity setup are embedded within the lesson.

80 HoW WIll It Move?
! Safety guidelines
Refer to IQWST Overview.
Differentiation opportunities
1. Graphing and other visual representations can make understanding the science easier for some students, but such representations can be very challenging for other stu-dents. A think-aloud strategy for talking through representations and models as you construct them will be helpful. Students who understand the representations readily can help others via peer-to-peer explanation.
2. In addition, the constant movement back and forth between the “thing” (a physical object, or pointing to the air or Earth) and the representation of it with lines, boxes, arrows, circles, and so on is important for supporting many students in making con-nections, successfully engaging with the ideas, and learning the content.

leSSon 6: hoW cAn We descriBe hoW An oBject Moves?: teaching the lesson 81
le���n 6
How Can we Describe How an object Moves?
teaCHing tHe leSSon
Building CoherenceDevelop graphs describing the motion of Newton’s Cradle and the Magnetic Cannon. This lesson builds off Newton’s Cradle described in Reading 1.1 and students’ investigations of the Magnetic Cannon to develop multiple graphs that describe the motion of the toys’ components. It allows students to determine, using only graphs, when an object is subjected to imbalanced forces.
timeframe2 Class Periods
Performance expectationsStudents will
• construct time-dependent graphs and bar charts to describe the motion of multiple objects along one dimension.
• use graphs and charts as models to determine whether an object is subjected to unbalanced forces.
overviewActivity 6.1 • Revisit Newton’s Cradle, developing
and using representations to describe when the end-ball is moving and when it is not.
• Develop and use a bar chart to describe whether the ball is moving or not.
Activity 6.2Develop a graph to describe the depen-dency of the ball’s location on time, and compare this graph with the bar chart from Activity 6.1.
Activity 6.3Apply ideas to the Magnetic Cannon, and draw conclusions regarding the slopes of the lines in motion graphs.

82 HoW WIll It Move?
introducing the lesson
Reading Follow Up
Demonstrate Newton’s Cradle with one ball swinging back and forth, and the Magnetic Cannon with one ball hitting the assembly and another ball leaving from the opposite side. Review Reading 1.1 by comparing the two devices. (Important difference: In one, the ball shooting out moves at the same speed as the ball entering, while in the other the ball shoot-ing out moves faster than the ball entering.)
Ask: “If we ignore the losses to the surroundings (e.g., the air) because of sound and thermal energy (IQWST PS2), does the total energy of the system seem to be conserved in both cases?” (Newton’s Cradle appears to conserve energy; the Magnetic Cannon does not because the ball shooting out moves much faster than the one coming in.) Students will investigate this in a later lesson, but they first have to figure out how to measure and represent motion. This lesson is about making graphs to describe the motion of the balls in both toys.
materials – activity 6.1
For the Teacher • (1) Newton’s Cradle • PI: Newton’s Cradle • PI: Balls in Motion 1 • PI: Balls in Motion 2
For Each Student • Activity Sheet 6.1 • Homework 6.1
activity 6.1 – graphs that Show when a Ball Moves
Read a question or two from the DQB that address the second learning set, describing and explaining how motion changes. Students will now answer some of the questions related to the description of motion.
Display PI: Newton’s Cradle. Ask students to make a drawing on Activity Sheet 6.1 that shows when Ball A at the end of the Newton’s Cradle is moving and when it is not. Explain that they do not need to describe how much the ball is moving; they should only indicate it is moving. Ask a student who made a bar chart to share his or her drawing with the class. Ask: “How might we improve the way this drawing represents the ball’s motion?” If it is possible to build from the drawing in the board, do so. Otherwise, draw the following diagram as a way to represent the ball’s motion.
Moving
Not Moving

leSSon 6: hoW cAn We descriBe hoW An oBject Moves? : teaching the lesson 83
Explain that the drawing is read by following it from left to right. When a line is high, the ball is moving. When the line is low, the ball is stationary. The beginning of a “not- moving” or stationary line is directly underneath the end of the moving line because the moment the ball stops moving, it is not moving. The beginning of a moving line is directly above the end of the not- moving line because the moment the ball stops not moving, it is moving. To make it clearer, connect the lines with dashed, vertical lines.
Moving
Not Moving
0s .5s 1.5s 2.5s 3.5s 4.5s
Moving
Not Moving
Moving
Not Moving
The length of each line represents the amount of time the ball spends moving or not moving.
Suggested Prompts • Should the length of the moving and not- moving lines be the same length or should
some be longer than the others? (Students will likely be uncertain.) • Does it matter on which side of the cradle the ball is raised to start the motion?
(Students will likely respond that it makes no difference.) • Have students close their eyes. Start the cradle swinging and then ask them to open
their eyes. Ask: “Could you tell from which side the ball was raised to start the swing-ing?” (No, the motion is symmetric; one side behaves like the other.)
The time the ball on one end spends swinging must be the same as the time the ball on the other end spends swinging. Since the time one ball spends swinging is the time the other ball spends resting, the time each ball spends resting and swinging is the same. The length of the lines must be the same. Change the drawing on the board so that all the horizontal lines have the same length.
Notice that the first moving line is half as long as all the other lines. When the ball is dropped, it only moves downward, so it spends only half as much time in motion. Assume that we measured how long each ball spends swinging or resting and discovered that each period of movement or rest lasted one second. If we started counting time from the moment we released the ball, we could mark this information of the drawing as follows:
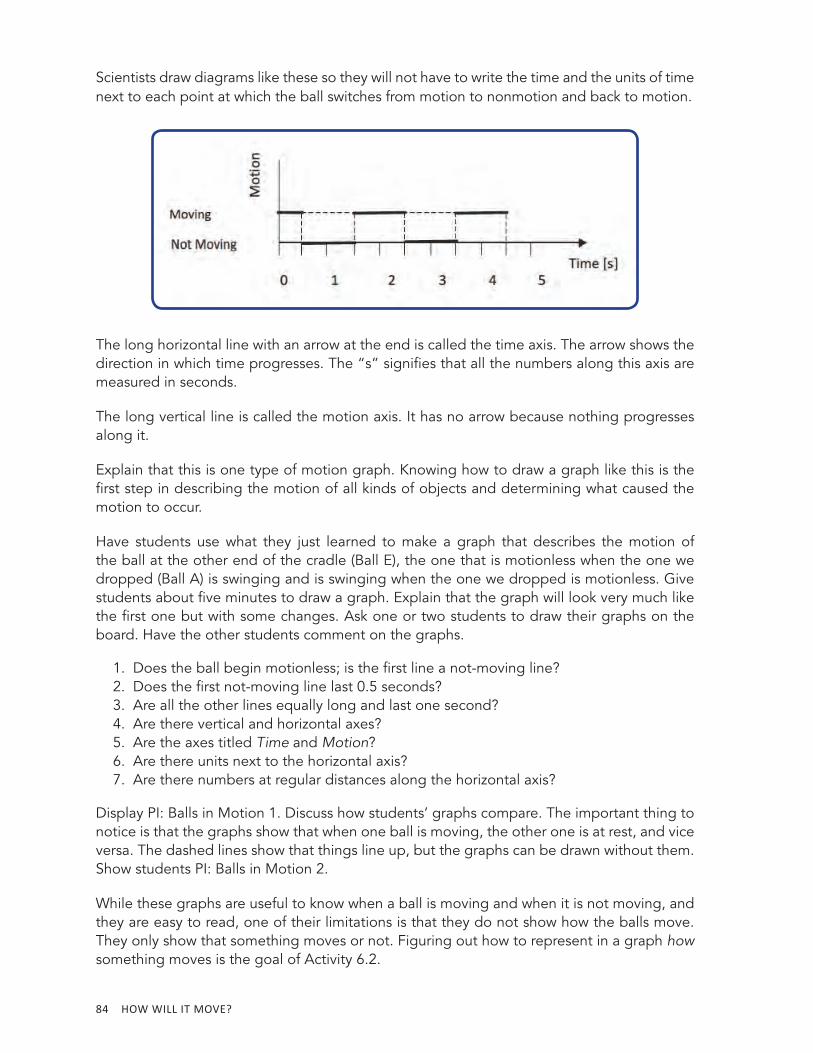
84 HoW WIll It Move?
Scientists draw diagrams like these so they will not have to write the time and the units of time next to each point at which the ball switches from motion to nonmotion and back to motion.
The long horizontal line with an arrow at the end is called the time axis. The arrow shows the direction in which time progresses. The “s” signifies that all the numbers along this axis are measured in seconds.
The long vertical line is called the motion axis. It has no arrow because nothing progresses along it.
Explain that this is one type of motion graph. Knowing how to draw a graph like this is the first step in describing the motion of all kinds of objects and determining what caused the motion to occur.
Have students use what they just learned to make a graph that describes the motion of the ball at the other end of the cradle (Ball E), the one that is motionless when the one we dropped (Ball A) is swinging and is swinging when the one we dropped is motionless. Give students about five minutes to draw a graph. Explain that the graph will look very much like the first one but with some changes. Ask one or two students to draw their graphs on the board. Have the other students comment on the graphs.
1. Does the ball begin motionless; is the first line a not- moving line? 2. Does the first not- moving line last 0.5 seconds? 3. Are all the other lines equally long and last one second? 4. Are there vertical and horizontal axes? 5. Are the axes titled Time and Motion? 6. Are there units next to the horizontal axis? 7. Are there numbers at regular distances along the horizontal axis?
Display PI: Balls in Motion 1. Discuss how students’ graphs compare. The important thing to notice is that the graphs show that when one ball is moving, the other one is at rest, and vice versa. The dashed lines show that things line up, but the graphs can be drawn without them. Show students PI: Balls in Motion 2.
While these graphs are useful to know when a ball is moving and when it is not moving, and they are easy to read, one of their limitations is that they do not show how the balls move. They only show that something moves or not. Figuring out how to represent in a graph how something moves is the goal of Activity 6.2.

leSSon 6: hoW cAn We descriBe hoW An oBject Moves? : teaching the lesson 85
introducing Homework 6.1 – rat raceHomework 6.1 describes a rat race in which the track the rats run on is divided into segments. At the end of each segment is a piece of cheese, which the rat has to eat before continuing to the next segment. A motion graph is provided for one of the rats. The stationary times are the intervals at which the rat is eating the cheese. The bigger the piece of cheese, the longer it takes the rat to finish it. The longer the segments between the pieces of cheese, the longer it takes the rat to complete them. Students analyze the graph and reach some conclusions about the cheese and the track. Students then redraw the graph as if all the segments were cut in half but the amount of cheese at each station was doubled. Introduce homework by asking students if they’ve ever seen experiments with a mouse in a maze. Have them talk about what they have seen. Their homework uses that scenario to help them think about the science they are learning. You may wish to show the class a video.
materials – activity 6.2
For the Teacher • (1) Newton’s Cradle • PI: Newton’s Cradle Drawing • PI: Balls in Motion 3 • PI: Balls in Motion 4
For Each Student • Activity Sheet 6.2 • Homework 6.2
activity 6.2 – graphs that Show How a Ball Moves
Homework Follow Up
Clarify understanding of the graphic representations before moving on to Activity 6.2, since the next activity builds directly on the graphing skills introduced in Activity 6.1.
The goal of this lesson is to embellish the motion graphs developed in Activity 6.1, so they represent additional information about the balls’ motion, such as where they were at what time and how fast they were moving. Ask students if they have any ideas how to do this. Accept all suggestions, but if anyone suggests changing the vertical motion axis to some-thing similar to the horizontal time axis except that it will show location rather than time, stop there and build off of it.
Draw on the board the graph describing the motion of Ball A.
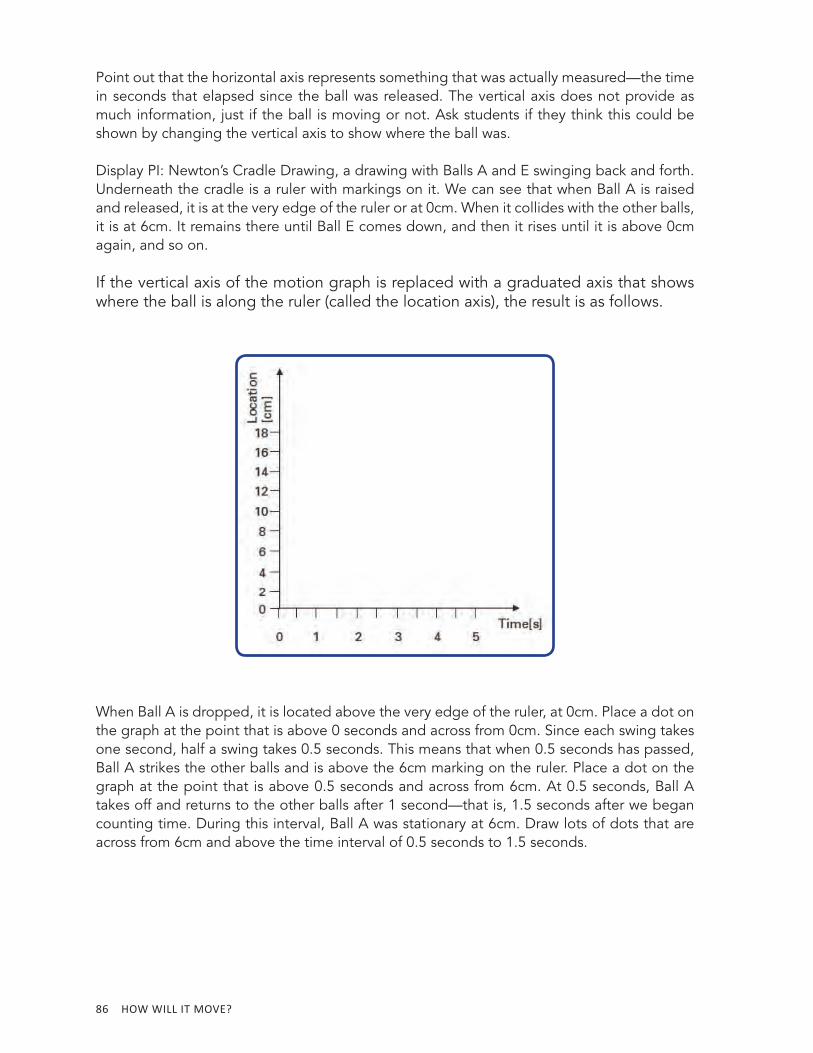
86 HoW WIll It Move?
Point out that the horizontal axis represents something that was actually measured— the time in seconds that elapsed since the ball was released. The vertical axis does not provide as much information, just if the ball is moving or not. Ask students if they think this could be shown by changing the vertical axis to show where the ball was.
Display PI: Newton’s Cradle Drawing, a drawing with Balls A and E swinging back and forth. Underneath the cradle is a ruler with markings on it. We can see that when Ball A is raised and released, it is at the very edge of the ruler or at 0cm. When it collides with the other balls, it is at 6cm. It remains there until Ball E comes down, and then it rises until it is above 0cm again, and so on.
If the vertical axis of the motion graph is replaced with a graduated axis that shows where the ball is along the ruler (called the location axis), the result is as follows.
When Ball A is dropped, it is located above the very edge of the ruler, at 0cm. Place a dot on the graph at the point that is above 0 seconds and across from 0cm. Since each swing takes one second, half a swing takes 0.5 seconds. This means that when 0.5 seconds has passed, Ball A strikes the other balls and is above the 6cm marking on the ruler. Place a dot on the graph at the point that is above 0.5 seconds and across from 6cm. At 0.5 seconds, Ball A takes off and returns to the other balls after 1 second—that is, 1.5 seconds after we began counting time. During this interval, Ball A was stationary at 6cm. Draw lots of dots that are across from 6cm and above the time interval of 0.5 seconds to 1.5 seconds.
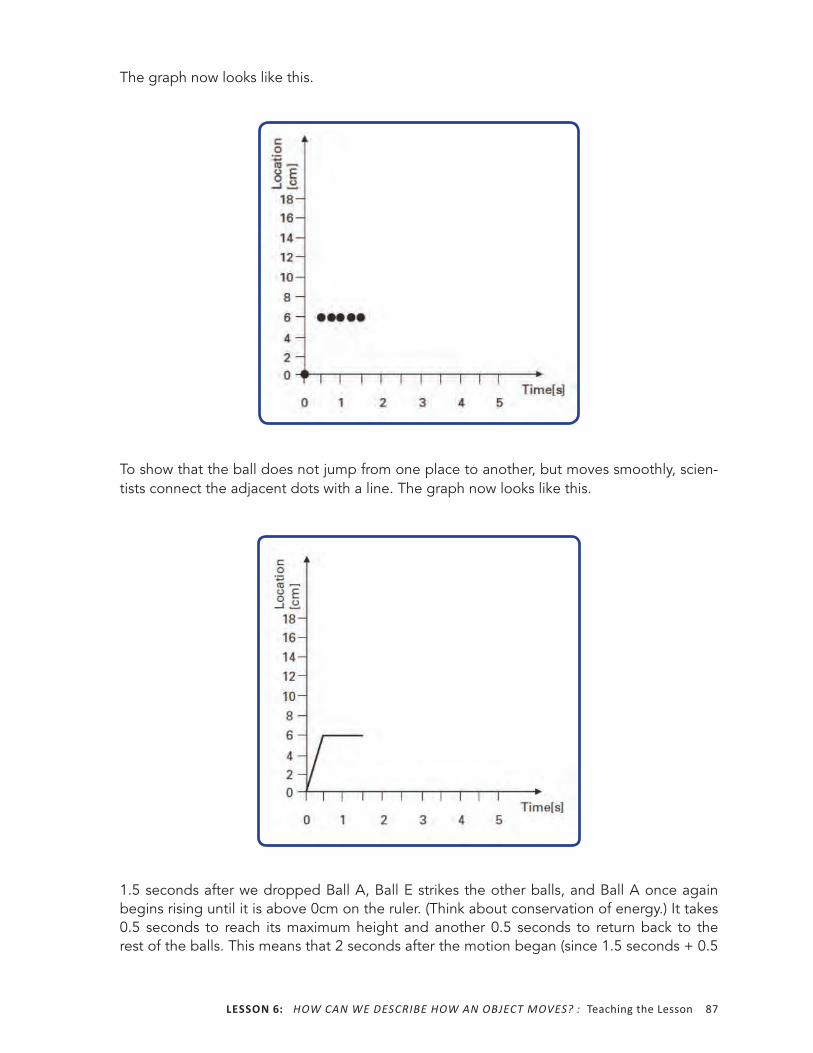
leSSon 6: hoW cAn We descriBe hoW An oBject Moves? : teaching the lesson 87
The graph now looks like this.
1.5 seconds after we dropped Ball A, Ball E strikes the other balls, and Ball A once again begins rising until it is above 0cm on the ruler. (Think about conservation of energy.) It takes 0.5 seconds to reach its maximum height and another 0.5 seconds to return back to the rest of the balls. This means that 2 seconds after the motion began (since 1.5 seconds + 0.5
To show that the ball does not jump from one place to another, but moves smoothly, scien-tists connect the adjacent dots with a line. The graph now looks like this.

88 HoW WIll It Move?
seconds = 2.0 seconds), Ball A is again above 0cm on the ruler, and at 2.5 seconds after the motion began (since 2.0 seconds + 0.5 seconds = 2.5 seconds), the ball is back above 6cm on the ruler. We plot this on the graph as follows.
This is the new motion graph for Ball A. When compared with the old motion graph on PI: Balls in Motion 3, it is less complicated and gives more information. We see if the ball is moving or not and can see its location when it is moving and when it is stationary.
Once again, Ball A remains stationary for 1 second, then swings up 0.5 seconds, down 0.5 seconds, then remains stationary for another second, and so on. This can be shown on the graph as follows.

leSSon 6: hoW cAn We descriBe hoW An oBject Moves? : teaching the lesson 89
As with the old graph, the new one is read from left to right, following the progression of time. Ball A starts above 0cm on the ruler at time 0 seconds, moves to above 6cm on the ruler at 0.5 seconds, stays motionless until 1.5 seconds, moves back to be above 0cm on the ruler at time 2.0 seconds, and so on.
Ask students if they see anything different between the areas of the graph where the ball is motionless and those areas where it is moving. When the line describing the ball’s motion is horizontal, the ball is motionless, and when it is slanted, the ball is moving. A horizontal line means that the ball is located all the time at the same point above the ruler (in this case, above 6cm), so it cannot be moving.
Have students draw a similar motion graph for Ball E. Activity Sheet 6.2 contains the two axes of the graph and the old motion graph for Ball E as a reference. Have students work in pairs. Walk around and help as needed; this may take some time. The final result appears in PI: Balls in Motion 4. Show PI: Balls in Motion 4 when everyone is finished, and discuss the meaning of the various parts of the graph. Show that when one ball is moving, the other is not, and vice versa. Emphasize that the different balls’ motion is represented at different heights on the graph because they are located at different places relative to the ruler.
Have students who do not complete this graph in class do so at home. Homework 6.2 pres-ents the graph of the same rat race, this time drawn using the new and more sophisticated representation. Students should reach conclusions about the race from the information in the graph.
materials – activity 6.3
For the Class • (1) Magnetic Cannon • PI: Magnetic Cannon
For Each Student • Activity Sheet 6.3 • Reading 6.3
activity 6.3 – Motion graphs for the Magnetic Cannon
Homework Follow Up
Check students’ understanding of motion graphs like those made in Activity 6.2. Clarify understandings before moving on to Activity 6.3, since it builds directly from the graphing skills introduced in Activity 6.2.
The goal is to draw more motion graphs, like those made in Activity 6.2 of Newton’s Cradle, but this time for the Magnetic Cannon. The motion of the balls in the Magnetic Cannon is simpler than that of the balls in Newton’s Cradle, so the resulting graphs will be simpler as well. Have students apply what they have learned, receiving assistance only as necessary. Focus on students who had difficulty with Homework 6.2.

90 HoW WIll It Move?
A new issue arises when drawing the new graphs— how to represent different speeds. Wait until a number of students become aware of this issue before discussing it with the whole class. If nobody raises it, you should do so when a few students share their graphs with the rest of the class.
The students’ task now is to draw two motion graphs, on the same axes, which depict the motion of the ball entering the cannon and the ball shooting out from it. Demonstrate the Magnetic Cannon again and remind students that the ball entering the cannon moves very slowly while the ball leaving the cannon moves much faster. Have students take out Activity Sheet 6.3. Display PI: Magnetic Cannon. This will provide the measurements students need to know where to place the graph on the axes. Tell students they should assume that they start counting time from the moment that the entering ball (Ball A) is released and that it takes this ball one second to reach the magnets. (Approximately 10 minutes is likely for this activity.)
When students have finished drawing their graphs, ask one or two of them to share their graphs with the class. The final graphs should look something like this.
A A B C D E E
10 2 3 4 5 6 7 8 9cm

leSSon 6: hoW cAn We descriBe hoW An oBject Moves? : teaching the lesson 91
Draw the graphs on the board, providing explanations. After each line, give students an opportunity to ask clarification questions.
Start from the motion graph of Ball A, as it is the simpler to understand of the two. At the instant we start measuring the elapsed time, Ball A is released at a spot directly above the 0cm mark on the ruler. Therefore its motion graph starts from the point (0 seconds, 0cm). After 1 second, it is above 2cm on the ruler—the point (1 second, 2cm) on the graph. It strikes the magnets and remains there motionless. The slanted line depicts the motion from the starting point until it hits the magnets, and the horizontal line depicts its lack of motion thereafter.
The motion graph for Ball E is also composed of two lines. The first line, which is horizontal, shows that the ball is stationary above the 7cm marking on the ruler until 1 second passes, which is the instant at which Ball A strikes the magnets and Ball E shoots out. When Ball E shoots out, it moves along the ruler toward higher values.
Ask students where Ball E is located 1 second after it shoots out. It is impossible to tell because a measurement of Ball E’s location after it was shot was not taken. It moved so quickly that it likely would have been located above a relatively high value on the ruler, had the ruler been long enough.
Ball A covered 2cm in 1 second before it struck the magnets. Since Ball E moved much faster than Ball A, no doubt it covered much more than 2cm in one second. Therefore, we can be sure that 1 second after Ball E shot out, which is 2 seconds after we started measuring time, Ball E must be at a location greater than 7cm + 2cm = 9cm above the ruler.
wrapping Up the lessonIn Activity 6.2, students concluded that a horizontal motion graph meant that the object was at rest and that a slanted line meant that the object was moving, because as time passes, the object changes its position. The class can now add an additional conclusion: The inclina-tion of a slanted motion curve describes how fast the object is moving. If the line has a great inclination, the object is moving fast because it changes its position a lot even in short time intervals. If the line has only a small inclination, the object is moving slowly because its posi-tion barely changes with time. To summarize:
• horizontal line = motionless • shallow inclination = slow speed • steep inclination = fast speed
Add the motion graphs for Newton’s Cradle and the Magnetic Cannon to the DQB. Also add to the DQB a note with the three summary statements from Activity 6.3.
Students have completed the last step needed to figure out how the Magnetic Cannon works. The graphs contain information that will be useful in the next and final lessons, where everything they have learned in this unit will be brought together.

92 HoW WIll It Move?

leSSon 7: Why do things chAnge their speed or direction?: Preparation 93
le���n 7
why Do things Change their Speed or Direction?
PreParation
teacher Background Knowledge
Video
Students may have seen this video (IQWST PS2).
Speed and Velocity
Students often think that velocity means “speed,” so the two words are synonyms. This is not completely accurate. The word speed means how fast an object is moving, regardless of its direction of motion. When an object changes its speed, it either moves faster or slower, regardless of whether it con-tinues moving in the same direction or not. However, velocity actually means speed and direction. This means that when the speed changes, the velocity changes, and when the direction of motion changes, the velocity
again changes, even if the speed remains unchanged. However, if the velocity changes, this means the speed changes, the direction of motion changes, or both change— we can-not know which is true. Therefore, by either saying that the speed changes or that the direction of motion changes, we are being more specific about what is happening than if we say that the velocity is changing.
Acceleration
The terms acceleration and decelerationwill not be used in the remainder of this unit. However, some students may have heard these terms, and this lesson provides an opportunity to clarify that accelerationmeans “increase of speed,” whereas decel-eration means “decrease of speed.”
Setup
Videos are needed to perform Activity 7.1. These can be accessed on the IQWST Portal at http://portal.iqwst.com. Note: You will need to log in and navigate to the lesson.
! Safety guidelines
Refer to IQWST Overview.

94 HoW WIll It Move?
Differentiation opportunities
If, by the beginning of Lesson 7.2, some students still do not understand the relationship between forces and changing speed, the following problems may be helpful. Students should work on these in class or where they can receive support with this concept.
• An elevator cabin that weighs 1,800N is carrying two people that weigh 800N each and is moving up at a constant speed. A cable pulls the elevator cabin up. What is the upward force of the cable on the elevator cabin? (F cable = 1,800 + [2 × 800] = 3,400N)
• The two people get off of the elevator and three other people, who also weigh 800N each, get on the elevator, which then moves down at a constant speed. Does the cable pull the elevator cabin up or down? (Since the elevator cabin moves at a con-stant speed, the forces acting on it must be balanced. Since there are four downward forces, the weights of the cabin and the three passengers, the cable must pull the cabin upward.)
• What force does the cable apply to the elevator cabin? (F cable = 1,800 + [800 × 3] = 4,200N)

leSSon 7: Why do things chAnge their speed or direction?: teaching the lesson 95
le���n 7
why Do things Change their Speed or Direction?
teaCHing tHe leSSon
Performance expectationStudents will analyze a variety of scenarios in order to construct laws of force and motion as they reason from specific cases to broader generalizations.
overviewActivity 7.1Consider what happens the moment after an object begins moving or a moment before it stops moving to conclude that (1) forces are the reason why objects change their speed and (2) being at rest is like being in motion with a speed of zero.
Activity 7.2Analyze situations to conclude that forces are responsible for both changes in speed and direction.
Activity 7.3Consider a situation in which objects move at a constant speed without changing direction to conclude the forces acting on the objects must balance each other.
introducing the lessonReading Follow Up
• Ask: “What kinds of stars did you learn about? How can you tell how hot they are?” (blue giant, yellow star, red dwarf, white dwarf; I can tell how hot they are by the color of light they emit.)
• Ask: “What kind of star is the sun?” (yellow star) • Ask: “Do the stars move?” Note: This is not covered in the reading, but it makes a
good connection to the next activity. (Yes, we do not see this motion because the stars are so far away from us. Imagine a person walking on the moon. From our perspective it would appear as if the person were not moving.)
• Ask: “Do stars change their motion? Explain your ideas.” (Accept all responses.)
Building CoherenceStudents have identified forces as the reason things start or stop moving, both examples of changing speed. This lesson expands on that understanding to show that forces are the cause of any change in motion— speeding up, slowing down, or changing direction.
timeframe3 Class Periods

96 HoW WIll It Move?
materials – activity 7.1
For the Teacher • Videos 7.1, 7.2, and 7.3
(accessible on the portal)
For Each Student • Activity Sheet 7.1 • Homework 7.1
activity 7.1 – Changing Speed
Ask: “What happens immediately after an object begins to move? Does it stop? Does it slow down? Does it speed up?” The answer depends on the object and the scenario. Ask students what happens to a ball immediately after it is thrown; it begins to slow down. When an airplane starts to move, it continues to speed up until it reaches takeoff speed. If a table is hit on the side, it will begin moving but immediately stop. All kinds of motion can occur after an object begins to move.
Slowing Down
Draw a table that shows different ways motion can change and what causes these changes.
tyPe oF Motion CHange CaUSe
Beginning to move
Stopping
Slowing down
Speeding up
Students may add changing direction or Moving at a constant speed in the left- hand column. If students do not suggest these additions, do not add them to the table at this time.
Encourage students to complete the table. They may suggest forces. Tell them that while they are correct, this is not exact enough. For example, the desk in front of them is subjected to forces but it does not do any of the things listed in the left- hand column. Explain that the table will show the nature of the forces that cause each type of motion (e.g., whether the forces are balanced or unbalanced and in which direction they act). Students should com-plete the first three rows easily, as they are a summary of what was learned in Lessons 3 and 5. The table should now look like this:

leSSon 7: Why do things chAnge their speed or direction?: teaching the lesson 97
Point out that the causes in the second and third rows are identical. Ask students to explain. Ask what happens to an object before it stops. Students will likely say that an object slows down before it stops. Ask them if an object always slows down before stopping, even if it stops suddenly, because it hits a wall.
Show Video 7.1, which is a slow- motion film of a basketball bouncing. Have students focus on what happens to the ball when it hits the ground. Show the video frame by frame several times. Students should notice that even though it seems that the ball rebounds instantly, it actually slows down until it stops and then starts moving upward. This is true of any object that stops. No matter how quickly it seems to stop, there is always a slowing down stage first.
Stopping and slowing down are caused by the same kind of forces. The difference between slowing down and slowing- down- and- stopping is the amount of slowing down. An object that slows down enough will stop. If an object does not slow down that much, it will continue moving, but slower.
Students should conclude that two separate rows for stopping and slowing down are unnec-essary. The Slowing down row suffices to cover both scenarios. Erase the Stopping row from the table.
Speeding Up
Focus now on the last row— Speeding up. Ask students what they think is the cause of speed-ing up. Once again, they will likely say forces. Remind them to talk about the special forces that cause an object to speed up. Someone will likely suggest that the cause is unbalanced forces acting in the same direction in which the object is moving. Show Videos 7.2 and 7.3, which show a soccer ball being kicked and an arrow being shot by a bow. In both these vid-eos, the objects (soccer ball and arrow) begin motionless, then start moving, then speed up. During this entire process, both objects are subjected to an unbalanced force— the contact force between the foot and the soccer ball and the contact force between the bow’s string and the arrow.
Add “Unbalanced forces acting in the direction in which motion occurs” to the bottom row in the table.
tyPe oF Motion CHange CaUSe
Beginning to move Unbalanced forces
StoppingUnbalanced forces acting against the direction of motion
Slowing downUnbalanced forces acting against the direction of motion
Speeding up

98 HoW WIll It Move?
It should now look like this:
tyPe oF Motion CHange CaUSe
Beginning to move Unbalanced forces
Slowing downUnbalanced forces acting against the direction of motion
Speeding upUnbalanced forces acting in the direction in which motion occurs
Emphasize the words against and in the in the bottom two rows, so the difference stands out.
Describe the following scenario and accompany it with this drawing on the board: An object is at rest on a table. An unbalanced force is applied to it to the right, causing the object to start moving. In which direction does the object begin to move?
Students should answer that the object begins mov-ing to the right. Draw a motion arrow to the right.
Repeat the question, but with the force acting to the left. Most everybody should respond that the object begins to move to the left. Point out that each time the object begins moving in the direction of the unbalanced force that acted on it. Ask students if they can think of an example where a motionless object begins moving in a direction different than that of the unbalanced force acting on it. Analyze suggested scenarios with the class to demonstrate that they actually fit the pattern just described— every motionless object begins to move in the direction of the unbalanced force that makes it start moving.
Direction in which Motion Begins
Force
Object
Object
Force

leSSon 7: Why do things chAnge their speed or direction? : teaching the lesson 99
Change the top row in the table so it now looks like this:
tyPe oF Motion CHange CaUSe
Beginning to moveUnbalanced forces acting in the direction in which the motion begins
Slowing downUnbalanced forces acting against the direction of motion
Speeding upUnbalanced forces acting in the direction in which motion occurs
Ask students if they see anything similar between the first and last row in the table. Once they point out that in both cases the unbalanced forces act in the direction of motion, ask them if an object that begins to move speeds up. This may be confusing. Ask when the object’s speed was greater—when it was motionless or when it had just started moving. Once an object is moving, the object is moving faster than it was when it was motionless, so clearly it sped up. Suggest now that these two lines can be combined into one, and redo the table so that it looks like the following:
tyPe oF Motion CHange CaUSe
Slowing downUnbalanced forces acting against the direction of motion
Speeding upUnbalanced forces acting in the direction in which motion occurs
this process—thinking of all possible situations, analyzing them, figuring out what they have in common and how they differ, and then trying to generate principles that explain them—is something scientists do. Scientists like to have the smallest number of principles that can explain the largest number of phenomena.

100 HoW WIll It Move?
Constant Speed
Ask: “What about situations in which the object does not speed up or slow down but moves at a constant speed? What kinds of forces act on it then? Are they balanced or unbalanced?”
Add “Constant Speed” to the left- hand column of the table.
tyPe oF Motion CHange CaUSe
Constant speed No unbalanced forces
Slowing downUnbalanced forces acting against the direction of motion
Speeding upUnbalanced forces acting in the direction in which motion occurs
Encourage students to discuss the issue with their neighboring peers. Then accept two or three answers. If students suggest that an object moving at a constant speed is subjected to an unbalanced force, ask them in which direction this force acts— forward or backward? If the force acts backward, why does the object not slow down? If the force acts forward, why does the object not speed up?
These questions should convince students that an object moving at a constant speed is not subjected to a backward force, but there may still be some uncertainty about a forward- acting force. Ask students how big the forward- acting force is and what determines how big it is. Their inability to answer these questions should prove that there is no unbalanced force acting forward on objects moving at a constant speed.
No Motion
Ask students what type of forces act on a motionless object. All the forces acting on a motion-less object must be balanced; otherwise the object would begin to move. Add this to the table:
tyPe oF Motion CHange CaUSe
Motionless No unbalanced forces
Constant speed No unbalanced forces
Slowing downUnbalanced forces acting against the direction of motion
Speeding upUnbalanced forces acting in the direction in which motion occurs

leSSon 7: Why do things chAnge their speed or direction? : teaching the lesson 101
Ask what the difference is between the first and second rows. In both cases there are no unbalanced forces. Ask students to imagine a ball moving at a constant speed of 1m per second. Since it moves at a constant speed, all forces acting on it must be balanced. The same ball is then rolled at a constant speed of 1cm per second, a hundred times slower than before, but still at a constant speed. Since the ball moves at a constant speed, all forces act-ing on it must be balanced. Have students imagine the same ball, but this time rolling even slower, at a constant speed of one thousandth of a centimeter per second. Since the ball still moves at a constant speed, all forces acting on it must be balanced.
Point out that as the ball moved slower each time, its speed got smaller. Ask students what is the smallest speed possible. What is the speed of a motionless ball? Some students may object that it has no speed, but ask them if it is correct to say that the ball has a speed of zero. Anything with a nonzero speed has to be moving, but motionless objects have a speed of zero.
Since a motionless object has a speed of zero and this speed does not change as long as the object remains motionless, clearly a motionless object has a constant speed. This is another example of the way scientists think—trying to use the smallest number of ideas to describe and explain the largest number of situations. The two top rows in the table can be combined; the resulting table should look like this:
tyPe oF Motion CHange CaUSe
Constant speed No unbalanced forces
Slowing downUnbalanced forces acting against the direction of motion
Speeding upUnbalanced forces acting in the direction in which motion occurs
Ask students if they know what the word acceleration means. Explain that acceleration means “increase of speed,” while deceleration means “decrease of speed.”
Activity Sheet 7.1 describes three scenarios— an airplane slowing down while in flight, a per-son hanging from a parachute moving down at a constant speed, and a runner accelerating from standstill. Students analyze the scenarios to determine the relationships between the forces involved. After having a few students present their conclusions, summarize this activity by revisiting the table on the board and pointing out that the class has identified and ana-lyzed the forces involved in three different kinds of motion:
1. When an object speeds up, it is always subjected to an unbalanced force acting in the direction of motion.
2. When an object slows down, it is always subjected to an unbalanced force acting against the direction of motion.

102 HoW WIll It Move?
3. When an object moves at a constant speed, it is not subjected to any unbalanced forces.
The opposite is true as well. We can know what kind of motion there will be if we know the forces that act on an object.
1. If an object is subjected to unbalanced forces acting in the direction of its motion, it will speed up.
2. If an object is subjected to unbalanced forces acting against the direction of its motion, it will slow down.
3. If an object is not subjected to an unbalanced force, it will move at a constant speed.
End this activity by pointing out that there is one more kind of motion that has not been ana-lyzed yet— changing direction— and that will be the focus of the next activity.
introducing Homework 7.1 – Forces and MotionsActivity Sheet 7.1 presents scenarios in which the nature of the motion was known, and from it students reached conclusions about the force involved. Homework 7.1 requires students to do the opposite. The forces involved in three different scenarios are described. Students need to determine what the nature of the motion will be— speeding up, slowing down, or moving at a constant speed. Ask students what forces they think act on a sailboat gliding across the water (or another scenario you think they will find interesting). Tonight’s home-work uses the sailboat example as an application of what students have learned this far.
materials – activity 7.2
For Each Group • (1) heavy ball (softball) • (1) ball bearing • (2) magnets
For Each Student • Activity Sheet 7.2 • Reading 7.2
activity 7.2 – Changing Direction
Check students’ homework to assess their understanding and to decide whether to proceed to the last step in analyzing forces and motion— forces that change the direction of motion.
Redraw the table from Activity 7.1, adding a row for changing direction, which is where the last discussion left off.
Ask students what kind of forces will cause an object to change direction. Somebody will probably suggest sideways forces, so add it to the table.
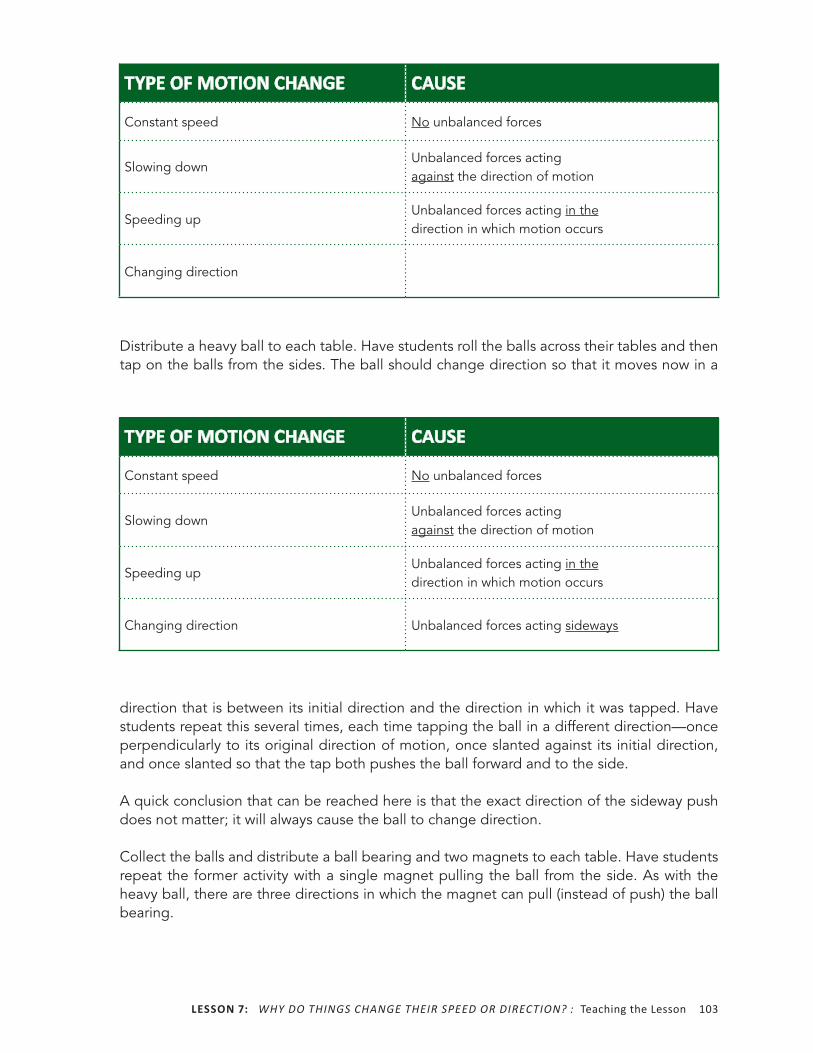
leSSon 7: Why do things chAnge their speed or direction? : teaching the lesson 103
Distribute a heavy ball to each table. Have students roll the balls across their tables and then tap on the balls from the sides. The ball should change direction so that it moves now in a
tyPe oF Motion CHange CaUSe
Constant speed No unbalanced forces
Slowing downUnbalanced forces acting against the direction of motion
Speeding upUnbalanced forces acting in the direction in which motion occurs
Changing direction
tyPe oF Motion CHange CaUSe
Constant speed No unbalanced forces
Slowing downUnbalanced forces acting against the direction of motion
Speeding upUnbalanced forces acting in the direction in which motion occurs
Changing direction Unbalanced forces acting sideways
direction that is between its initial direction and the direction in which it was tapped. Have students repeat this several times, each time tapping the ball in a different direction— once perpendicularly to its original direction of motion, once slanted against its initial direction, and once slanted so that the tap both pushes the ball forward and to the side.
A quick conclusion that can be reached here is that the exact direction of the sideway push does not matter; it will always cause the ball to change direction.
Collect the balls and distribute a ball bearing and two magnets to each table. Have students repeat the former activity with a single magnet pulling the ball from the side. As with the heavy ball, there are three directions in which the magnet can pull (instead of push) the ball bearing.

104 HoW WIll It Move?
Have students repeat this activity using two magnets. The magnets can pull the ball in oppo-site directions or push/pull it in the same direction. Have students estimate in which case the effect of the magnets is greater— when they act in the same direction or the opposite direction.
Ask students what happened to the ball bearing when the magnets pulled on it equally from both sides. (It continued moving straight, without changing direction.) Ask them if what they observed in this activity supports or contradicts the last row in the table on the board— changing motion is caused by unbalanced forces acting sideways. Ask students if they can think of any situation in which an object changes direction even though it is not subjected to a sideways force. Analyze these cases together to show that there is always an unbalanced sideways force when an object changes direction. Represent every situation with a free- body diagram in which every influence of the surroundings on the object of interest is depicted as a force.
Ask: “What does velocity mean?” Students will likely say that velocity means “speed,” so the two words are synonyms. This is not completely accurate. The word speed means how fast an object is moving, regardless of its direction of motion. When an object changes its speed, it either moves faster or slower, regardless of whether it continues moving in the same direction or not. However, velocity actually means “speed and direction.” This means that when the speed changes, the velocity changes, and when the direction of motion changes, the veloc-ity again changes, even if the speed remains unchanged. However, if the velocity changes, this means the speed changes, the direction of motion changes, or both change— we cannot know which is true. Therefore by either saying that the speed changes or that the direction of motion changes, we are being more specific about what is happening than if we say that the velocity is changing.
introducing reading 7.2 – Planetary MotionReading 7.2 describes the motion of the planets around the sun and the moon around Earth and the forces that influence their motion. This is an example where an unbalanced force acting sideways (the sun’s gravitational pull) causes objects (the planets) to change the direc-tion of motion. It also causes planets to speed up or slow down, since the force usually is not exactly sideways but is slanted a bit in or against the direction of the planets’ motion. The reading also describes this model of planetary motion, based on forces as well as Newton’s laws, which allowed astronomers to accurately predict the existence of Neptune. You might ask students the question used as a header on the first page of the reading, “What [do you think] makes the planets move?”
Reading Follow Up
Reading 7.2 contains a number of questions that check students’ understanding of the con-nection between the forces acting on planets and their motion. These questions can be used as formative assessments. Check students’ responses before continuing.

leSSon 7: Why do things chAnge their speed or direction? : teaching the lesson 105
materials – activity 7.3
For the Teacher • PI: Changing Direction • (1) metal spiral • (1) marble
For Each Student • Activity Sheet 7.3 • Reading 7.3
activity 7.3 – newton’s First law
Display PI: Changing Direction. Lift up the metal spiral and show students that PI: Changing Direction is actually a view of the metal spiral from above. Push a marble so that it rolls along the metal spiral, from the inside out. Hold up the spiral and trace the path that the marble will take until it reaches the end of the spiral. Now do the same thing on PI: Changing Direction so students can see the path on the screen.
Ask: “In which direction will the marble roll when it reaches the end of the spiral?” Place the metal spiral on your table and ask a volunteer. Have the volunteer place her finger on the table at a spot about a foot away from the spiral that she thinks the marble will reach after leaving the spiral. Mark this spot on PI: Changing Direction. Ask the rest of the students if they agree.
Roll the marble. Instead of continuing to roll circularly, it moves in a straight line, in the direc-tion in which it was moving when it left the spiral. Tell students that they have learned all that is needed to know to explain the marble’s behavior.
Suggested Prompts • What forces act on the marble when it is in the spiral? (Three forces act— the marble’s
weight, the upward contact of the table, and the sideways contact force of the spiral.) • Why does the marble change direction while it rolls along the spiral? (Since the
marble is subjected to an unbalanced sideways force by the spiral, it changes its direction of motion in the direction of the sideways force.)
• What forces act on the marble when it leaves the spiral? (Two forces act— the marble’s weight and the upward contact force of the table.)
• After the marble leaves the spiral, is it subjected to any forces that act on it sideways? (no)
• Reconsider the table we made in the prior lesson listing the relation between different types of motion and the forces that cause them. If there are no forces acting on the marble sideways, is there any reason that the marble should not continue rolling straight? (An object changes the direction of its motion only if it is subjected to unbalanced sideways forces. Since there are no forces acting on the marble sideways, it will not change the direction of its motion and will therefore continue to move in a straight line when it leaves the spiral.)

106 HoW WIll It Move?
Newton captured most of these ideas in a sentence referred to as Newton’s first law of motion: An object will continue to remain at rest or move at a constant speed in a straight line unless it is subjected to unbalanced forces. Add this to the list of Scientific Principles.
By the end of this lesson, four principles should have been added to the Scientific Principles list. As always, these principles have been “arrived at” as a class and should be written in language that makes sense to the class.
• Slowing down is caused by unbalanced forces acting against the direction of motion.
• Slowing down is caused by unbalanced forces acting against the direction of motion.
• Changing direction of motion is caused by unbalanced forces acting sideways.
wrapping Up the lessonStudents have learned a lot about forces and motion. With this knowledge, they should be able to explain and predict a wide range of motions. In the next and last lesson, they will do two things: apply this knowledge to give full explanations of the motion of the Magnetic Cannon, as well as the other apparatuses they investigated, and learn about the connection between forces and energy.
tyPe oF Motion CHange CaUSe
Constant speed No unbalanced forces
Slowing downUnbalanced forces acting against the direction of motion
Speeding upUnbalanced forces acting in the direction in which motion occurs
Changing direction Unbalanced forces acting sideways

leSSon 8: using Forces And energy to understAnd the MAgnetic cAnnon: Preparation 107
le���n 8
Using Forces and energy to Understand the Magnetic Cannon
PreParation
teacher Background Knowledge
Energy
Students may have learned about energy previously (IQWST PS2); thus, they will build on their understandings here.
Stars and Elements
This reading is provided if you choose to have students think about space science and how ideas they learned in this and other units apply to what happens in the larger Universe. The reading focuses on stars.
Stars are powered by nuclear reaction in their cores, mostly converting hydrogen into helium. New elements are produced during nuclear reactions. A star’s mass determines which elements will be created. The smallest stars convert only hydrogen into helium, while medium- sized stars, like the sun, can also convert helium into oxygen and carbon, when all the hydrogen has been used up. Big stars can also produce other elements, such as sodium, magnesium, sulfur, calcium, iron, and others. When these big stars explode as supernova, they emit these elements into space, where they become the building blocks for planets and life. We are all made out of these elements that were initially produced in stars. This reading is provided if you choose to have students think about space science and how ideas they learned in this and other units apply to what happens in the larger Universe. The reading focuses on stars.
Setup
Specific instructions for activity setup are embedded within the lesson.
! Safety guidelines
Refer to IQWST Overview.

108 HoW WIll It Move?
Differentiation opportunities
This lesson relies very heavily on discussion and on movement back and forth between mental models and representations, and between observations and articulation of ideas. Decisions about how to “chunk” the conversation will be ongoing so that students gradually build understanding of ideas across the lesson and are not lost at a point that the next idea cannot be built on a firm foundation. As needed, have students discuss an idea in pairs or small groups before moving on in whole- class discussion. Have students draw or write for a minute or two before sharing in whole- class discussion. Ongoing, formative assessment of students’ understanding is of the utmost importance as the class reviews and summarizes ideas from the entire unit. Use of the DQB, referencing objects and ideas posted in the class-room and physically pointing to them, as well as revisiting objects and devices from previous lessons, will also help students see and recall previous activities and what was learned by engaging in those activities.

leSSon 8: using Forces And energy to understAnd the MAgnetic cAnnon: teaching the lesson 109
le���n 8
Using Forces and energy to Understand the Magnetic Cannon
teaCHing tHe leSSon
Performance expectationsStudents will
• use scientific principles to construct an explanation of why Ball E in the Magnetic Cannon starts moving.
• use energy conservation to construct an explanation of why Ball E shoots out from the Magnetic Cannon.
overviewActivity 8.1Revisit and summarize activities from which scientific principles have been derived.
Activity 8.2Apply scientific principles to explain the behavior of the Magnetic Cannon.
Activity 8.3Revisit energy transformation and conserva-tion and connect these ideas to forces, providing a full explanation of the Magnetic Cannon.
materials – activity 8.1
Building CoherenceIn Lesson 3, students learned to make free- body diagrams. In Lesson 4, they learned how to mea-sure a force’s magnitude. In Lesson 5, they learned that forces make things start and stop moving. In Lesson 6, they learned how to graphically describe the motion of objects. Many relations between forces and motion were summarized in Lesson 7. This lesson draws on all this knowledge and con-nects it to what students have learned about energy to provide an explanation for the behavior of the Magnetic Cannon.
timeframe4 Class Periods
For the Teacher • PI: Motion Graph and Magnetic
Cannon
For Each Student • Activity Sheet 8.1 • Homework 8.1

110 HoW WIll It Move?
activity 8.1 – revisiting and Summarizing the Scientific Principles
Students first review everything they have learned thus far and use it to construct a complete scientific explanation for the behavior of the Magnetic Cannon. Review the scientific principles that have been sum-marized and ask students to recall which contexts were considered in obtaining the evidence to support each principle.
The following are a list of principles and evi-dence to support each principle.
1. All forces come in pairs, in opposite directions.
Supporting Contexts (from Lesson 2) • high fives • pushing the wall • a ladder leaning against a wall • a shoe on a shelf • sitting in a chair • the world’s greatest sandwich • chin- ups • pairs of magnets • Earth and the moon • a rubbed balloon and small pieces
of paper • CO2 molecule
2. For every force an object applies, there is an equal and opposite force acting on the object. This principle is the same as Principle 1, except it includes the addition that paired forces not only act in opposite directions but also have the same magnitude. For this reason, physicists typically ignore Principle 1 and use only Principle 2, which is called Newton’s third law of motion because it is one of the three prin-ciples of motion that Newton formulated. Principles 1 and 2 can be summarized as follows: For every force an object applies, there is an equal and opposite force acting on it (Newton’s third law of motion).
Supporting Contexts • all those listed for Principle 1 • pushing your hands together, clasp-
ing your fingers, and trying to pull your hands apart
• connecting force probes and pull-ing them apart
• connecting force probes to mag-nets while pulling them apart or pushing them together
• Take a hammer and hammer a nail into a block of wood. Ask: “What force makes the nail dig into the wood?” (The force the hammer applies to the nail every time it hits it.)
• What makes the hammer stop when it hits the nail? (The force the nail applies to the hammer every time the hammer hits it.)
• What is the relation between these two forces— the force the hammer applies to the nail and the force

leSSon 8: using Forces And energy to understAnd the MAgnetic cAnnon: teaching the lesson 111
the nail applies to the hammer? (According to Newton’s third law of motion, they are equal in magni-tude and opposite in direction.)
3. Forces that are applied to an object in opposite directions counteract each other.
Supporting Contexts (from Lesson 3) • pushing a heavy ball from opposite
sides • a ball being held and then dropped • the Floating Magnets
4. Forces that are applied to an object in the same direction reinforce one another.
Supporting Contexts (from Lesson 3) • pushing a ball down rather than just
dropping it • lifting a heavy carton
Principles 3 and 4 are combined and summarized by physicists in this manner: Multiple forces acting on an object along a straight line reinforce or counteract one another, depending on their direction.
• Why does a parachutist not fall, as in free fall? Create a diagram and add arrows if it helps clarify your answer. (The parachutist is subject-ed to two forces— weight [down] and the pull of the parachute [up]. These two forces act in opposite directions, so they counteract one another.)
5. An object’s motion is influenced only by the forces that are applied to it, not by the forces it applies to others. This principle has been used through-out the unit.
6. An object will continue to remain at rest or move at a constant speed and in a straight line unless it is subjected to unbalanced forces.
Supporting Contexts • a bouncing basketball • a kicked soccer ball • an arrow being shot by a bow
7. Unbalanced forces acting on an object change its speed or direction of motion, or both.
Supporting Contexts • shooting a marble with a rubber
band • dropping a tennis ball • the Air- Powered Car • the Flying Balloon • sliding a book across the table • recoil in the Magnetic Cannon • slow- motion videos of a bouncing
basketball, a kicked soccer ball, and an arrow being shot
• a ball being tapped from the side while rolling
• a ball bearing being pulled or pushed by magnets while rolling
• a marble rolling in a spiral
Principles 6 and 7 can be com-bined into a single statement: An object will change its speed of motion or direction or both if it is subjected to unbalanced forces; otherwise it will continue to remain at rest or move at a constant speed in a straight line.
Students may mention other rules that they think are principles (such as the beginning of motion is always caused by forces). Explain that these rules are actually specific instances of the more general principles. Ask them if they can identify which of the principles deal with the rule they mentioned (for example, the beginning of motion is always caused by forces is a specific example of the last principle).
• When you throw a basketball at the basket, why does it move in an arc rather than in a straight line? (The force of gravity that acts on the basketball during its motion does not act in the direction of the ball’s

112 HoW WIll It Move?
motion or against it. Instead, it always acts straight down, which is typically at an angle to the direction of the ball’s motion. For this reason, this force makes the ball change its direction of motion, making the ball move in an arc.)
introducing Homework 8.1 – Motion graphDisplay PI: Motion Graph and Magnetic Cannon, which shows the motion graph of the Magnetic Cannon that was developed in Lesson 6. Explain that this graph is going to be the starting point for the next activity in which students will use the principles previously summarized to give an explanation of how the Magnetic Cannon works. Have students think about this graph and use it and the following drawing it to answer some questions about the balls’ motion and the forces to which they are subjected.
materials – activity 8.2
For the Teacher • PI: Motion Graph and Magnetic
Cannon • PI: Forces • PI: Magnetic Attraction
For Each Student • Activity Sheet 8.2
activity 8.2 – Can we explain the Behavior of the Magnetic Cannon?
Show PI: Motion Graph and Magnetic Cannon and check students’ homework. Point out that each of the lines describing Ball A and Ball E’s motion is broken into two parts— a horizontal part and a slanted part. Ask if students know what this fact says about the motion of the two balls.
The fact that Ball A and Ball E’s motion lines are broken into two parts signifies that their motion changes at some point. If their motion had remained unchanged, the lines describing their motion would be straight throughout, not broken. Ask: “How did the motion of each of these two balls change?” (Ball A moved at first toward the magnets then stopped mov-ing when it hit them. Ball E was at first motionless, then shot out when Ball A reached the magnets.)
Demonstrate the Magnetic Cannon, making sure all students see that both Ball A and Ball E have two different stages to their motion. Remind students that being motionless is consid-ered a type of motion— it is motion with the speed of zero. Once there is consensus that the balls change their motion, point out the last principle from the previous lesson: An object will

leSSon 8: using Forces And energy to understAnd the MAgnetic cAnnon: teaching the lesson 113
change its speed of motion or direction or both if it is subjected to unbalanced forces; otherwise it will continue to remain at rest or move at a constant speed in a straight line. What does this principle have to say about the balls at the moment they changed their motion? (At the moment at which the balls changed their motion, they were both sub-jected to unbalanced forces.)
If the balls were subjected to unbalanced forces, what were these forces? In Lesson 2 students analyzed the forces acting on the various components of the Magnetic Cannon. Show the top part of PI: Forces (Newton’s third law of motion).
This diagram shows all the forces involved at the moment of impact. Explain that the diagram is crowded, so a simpler version of this diagram that shows only the forces act-ing on these two balls will be used. Show the bottom diagram of PI: Forces.
This diagram shows that each ball is subjected to four forces: its weight (acting downward), the contact forces with the rail (acting upward), the contact force with the magnet (for Ball A) and with Ball D (for Ball E), and the magnetic attraction of the magnets.
Have students draw free- body diagrams for each of the two balls. Display PI: Magnetic Attraction.
Discussion – Pressing for Understanding
Purpose
Apply understandings to explain the Magnetic Cannon.
Suggested Prompts • Only the forces that are applied to
Balls A and E are drawn, not the forces that they apply to their sur-roundings. Why? (An object’s motion is influenced only by the forces that
are applied to it, not by the forces it applies to others.)
• Balls A and E roll horizontally; they do not move vertically at all. What does this mean? (An object will change its speed of motion or direction or both if it is subjected to unbalanced forces; otherwise it will continue to remain at rest or move at a constant speed in a straight line. Balls A and E remain all the time at rest in the vertical direc-tion. This means that they are not subjected to unbalanced forces in this direction.)
• The free- body diagrams show that each ball is subjected to two vertical forces (weight and contact force with the rail), yet they do not move in the vertical direction and they are not subjected to vertical unbalanced forces. How is this possible? (The vertical forces that are applied to each ball are balanced. Because they act in opposite directions, they counteract each other according to the principle: Multiple forces acting on an object along a straight line reinforce or counteract one another, depending on their direction. The fact that they balance each other indicates that they are of equal magnitude.)
Since the vertical forces acting on each ball are of equal magnitude, they should be represented in the free- body diagrams by arrows of equal length. Display PI: Magnetic Attraction—Image B.
• Ball A was moving to the right and then stopped. Which force do you think was greater at the moment of impact, the magnetic attraction or the contact force with the magnet? (Since the ball changed its motion, it was subjected to unbalanced forces. An object will change its speed of motion

114 HoW WIll It Move?
or direction or both if it is subjected to unbalanced forces; otherwise it will continue to remain at rest or move at a constant speed in a straight line. Since the ball moved to the right and then stopped, the net unbalanced force to which it was subjected must have acted to the left. Since the magnetic attraction and contact force with the magnet act in opposite directions [magnetic attraction to the right, and contact force to the left], they counter-act one another. [Multiple forces acting on an object along a straight line reinforce or counteract one another, depending on their direction.] Since their total influence was to the left, the force acting to the left [the contact force] must be the greater of the two.)
• After Ball A stopped moving, it was still subjected to the same two forces as before (the magnetic attraction and the contact force with the mag-net). Are these two forces the same magnitude now as they were at the moment of impact? (Since the ball now does not move, its motion does not change, and it is not subjected to unbalanced forces. An object will change its speed of motion or direc-tion or both if it is subjected to unbalanced forces; otherwise it will continue to remain at rest or move at a constant speed in a straight line. Since the magnetic attraction and contact force with the magnet act in opposite directions [magnetic attrac-tion to the right and contact force to the left], they counteract one another. [Multiple forces acting on an object along a straight line reinforce or counteract one another, depending on their direction.] Since they are now balanced, they must be equal in magnitude. The magnetic attraction is the same now as it was at the moment of impact because the
distance between the ball and the magnet has not changed. [They are still touching each other.] At the moment of impact, the contact force with the magnet was greater than the magnetic attraction, but now it is equal to it. Since the magnitude of the magnetic attraction has not changed, the contact force must be smaller now than it was at the moment of impact.)
Ask students to think of another example. Does a wall apply a greater force when they run into it or when they lean against it? (This should help them gain an intuitive appreciation for the answer to the former question.)
• Ball E was not moving at first, but then it shot out to the right. Which force do you think was greater at the moment of impact: the magnetic attraction or the contact force with the magnet? Use the principles summa-rized earlier to support your answer. (Since the ball changed its motion, it was subjected to unbalanced forces. An object will change its speed of motion or direction or both if it is subjected to unbalanced forces; otherwise it will continue to remain at rest or move at a constant speed in a straight line. Since the ball started moving to the right, the net unbal-anced force to which it was subjected must have acted to the right. Since the magnetic attraction and contact force with the magnet act in opposite directions [magnetic attraction to the left and contact force to the right], they counteract one another. [Multiple forces acting on an object along a straight line reinforce or counteract one another, depending on their direction.] Since their total influence was to the right, the force acting to the right [the contact force] must be the greater of the two.)

leSSon 8: using Forces And energy to understAnd the MAgnetic cAnnon: teaching the lesson 115
All this can be summarized by redrawing the free- body diagrams for Balls A and E at the moment of impact. Note the new lengths of the horizontal lines depicting the horizontal forces acting on the two balls in their free- body diagrams (PI: Magnetic Attraction—Image C).
• Which ball, at the moment of impact, was subjected to a greater magnetic force of attraction, Ball A or Ball E? (Since Ball A is closer to the magnets than Ball E, it is subjected to a stron-ger magnetic force of attraction.)
We now understand the nature of all the forces involved in the workings of the Magnetic Cannon and why Ball E started moving to the right. This can be summarized as follows:
1. At the moment of impact, Balls A and E were subjected to unbalanced forces, Ball A to the left, and Ball E to the right. This is why Ball A stopped moving to the right, while Ball E started moving to the right.
2. At the moment of impact, the magnetic force applied to Ball A was greater than that applied to Ball E.
So we now understand why Ball E shot out while Ball A stopped moving. Why did Ball E shoot out so quickly, rather than just move slowly like Ball A? For that, we will need to think about the transformation and conser-vation of energy, which we will do in the next activity.
For the Teacher • PI: Kinetic and Magnetic Energy
For Each Student • Activity Sheet 8.3
materials – activity 8.3
activity 8.3 – Concluding the activity
Why does Ball E shoot out from the Magnetic Cannon much faster than Ball A reaches it? We have used everything we have learned so far in this unit, but we still do not know the answer. To explain this, we need to think of energy.
Ask students when an object has more kinetic energy— when it is moving fast or moving slow? (The faster an object moves, the more kinetic energy it has.) Ball A and Ball E are identical objects. Ball A, which moved slowly, had little kinetic energy. On the other hand, Ball E, which moved rap-idly, had more kinetic energy. Where does this additional kinetic energy come from? Does this not contradict the law of energy conservation that says that energy cannot be created or destroyed? (Accept all answers.)
Before students use energy to explain how the Magnetic Cannon works, be sure they understand the difference between forces and energy. The following questions will help highlight the difference. Prepare a table that summarizes the comparisons.
Suggested Prompts • Which has a direction— energy or
forces? (Force has a direction; energy does not.)
• What can an object have— energy or forces? (An object can have energy of many different kinds— kinetic, ther-mal, and so on. An object does not have force.)
• What does one object apply to another object— energy or forces? (An object applies forces, not energy. An

116 HoW WIll It Move?
object can transfer energy to another object. When an object applies a force to another object, the second object applies a force back on the first; therefore, both objects apply and are subjected to a force. However, when an object transfers energy to another object, the first object no longer has the energy; the second object does.)
• Which cannot be created or destroyed— energy or forces? (Energy is conserved; forces are not.)
• Which always comes in pairs— energy or forces? (Forces always come in pairs [Newton’s third law]; energy does not.)
• Which can be transformed— energy or forces? (Energy is transformed in every phenomenon; forces are not transformed.)
• Which can be counteracted— energy or forces? (Forces can counteract one
another; energy does not counteract.)
• Which causes motion to change— energy or forces? (Unbalanced forces cause motion to change; energy is necessary for motion to occur, but it does not necessarily cause it. For example, a ball held above the floor has gravitational energy; but it will not move unless we drop it.)
• Which would you use to explain phenomena involving sound, light, temperature, or electricity— energy or forces? (Energy is a useful property to explain these phenomena; forces are not, because forces only influence motion.)
• Which would you use to explain phenomena involving motion— energy or forces? (Both energy and forces are useful for explaining these phenomena.)
CHaraCteriStiC energy ForCeS
It has a direction. P
An object can have it. P
One object can apply it to another object. P
One object can transfer it to another object. P
It cannot be created or destroyed. P
It always comes in pairs. P
It is transformed. P
It can be counteracted. P
It causes motion to change. P
It is useful for explaining phenomena not involving motion. P
It is useful for explaining phenomena involving motion. P P
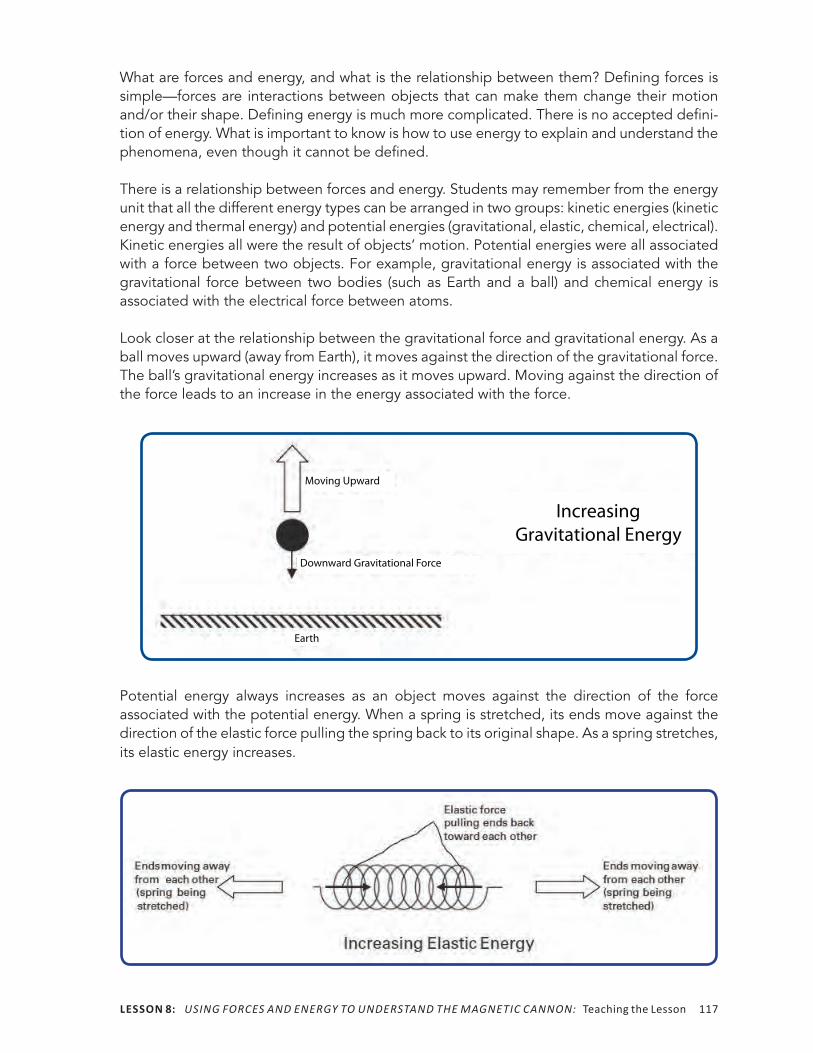
leSSon 8: using Forces And energy to understAnd the MAgnetic cAnnon: teaching the lesson 117
What are forces and energy, and what is the relationship between them? Defining forces is simple— forces are interactions between objects that can make them change their motion and/or their shape. Defining energy is much more complicated. There is no accepted defini-tion of energy. What is important to know is how to use energy to explain and understand the phenomena, even though it cannot be defined.
There is a relationship between forces and energy. Students may remember from the energy unit that all the different energy types can be arranged in two groups: kinetic energies (kinetic energy and thermal energy) and potential energies (gravitational, elastic, chemical, electrical). Kinetic energies all were the result of objects’ motion. Potential energies were all associated with a force between two objects. For example, gravitational energy is associated with the gravitational force between two bodies (such as Earth and a ball) and chemical energy is associated with the electrical force between atoms.
Look closer at the relationship between the gravitational force and gravitational energy. As a ball moves upward (away from Earth), it moves against the direction of the gravitational force. The ball’s gravitational energy increases as it moves upward. Moving against the direction of the force leads to an increase in the energy associated with the force.
Potential energy always increases as an object moves against the direction of the force associated with the potential energy. When a spring is stretched, its ends move against the direction of the elastic force pulling the spring back to its original shape. As a spring stretches, its elastic energy increases.
Moving Upward
Downward Gravitational Force
Earth
IncreasingGravitational Energy

118 HoW WIll It Move?
Suggested Prompts • What happens when a spring gets compressed? Does its elastic energy increase or
decrease? (Think about the direction of the elastic force relative to the direction the ends of the spring are moving.) (When a spring is compressed, its ends move inward while the elastic force trying to return the spring to its original shape pushes outward, against the direction in which the ends of the spring are moving. Thus, as with a spring being stretched, when a spring is compressed, its elastic energy increases.)
• What happens when an object moves in the same direction as the force, such as when a ball moves downward, in the direction of the gravitational force? (Just the opposite of what happens when it moves against the direction of the force— its potential energy [in this case gravitational energy] decreases.)
• Think about a magnet pulling on a steel ball bearing. When the ball bearing moves toward the magnet, does its magnetic energy increase or decrease? (It decreases because it is moving in the same direction as the magnetic force.)
• In which case is there greater magnetic energy— when a ball bearing is touching a magnet or when the same ball bearing is a distance away from the magnet? (There is greater magnetic energy when a ball bearing is touching a magnet than when it is a distance away from the magnet. As the ball bearing moves away from a magnet, it moves against the direction of the magnetic force it is subjected to, so its magnetic energy increases.)
This case is just like the case with Earth pulling on a ball. The nearer the ball is to Earth, the smaller the gravitational energy is, because as the ball moves toward Earth, it moves in the
Ball A Moving slowly
Ball E
KEAI ≈ 0MEAI = High
KEEI ≈ 0MEEI = High
Condition I
Ball A
Ball E Motionless
Magnets
Rail
Ball E Shooting out
Ball E
KEAI ≈ 0MEAI – Very small ≈ 0
KEEI = ?MEEI – High
Condition II
Ball A
Ball A Motionless
Magnets
Rail

leSSon 8: using Forces And energy to understAnd the MAgnetic cAnnon: teaching the lesson 119
same direction as the gravitational force to which it is subjected, so the gravitational energy decreases. Likewise with the magnet, the closer the ball bearing is to the magnet, the smaller the magnetic energy.
Using this knowledge, look at the Magnetic Cannon in two conditions: before Ball A is released (Condition I) and at the moment just after Ball A has collided with the magnets and Ball E has shot out (Condition II).
KE stands for kinetic energy. ME stands for magnetic energy. The subscript A or E indicates either Ball A or E, and the subscript I or II indicates either Condition I or II. As we learned in the energy unit, energy cannot be created or destroyed; it can only be transformed or trans-ferred. Assuming no energy was transferred elsewhere, the total energy in Condition I has to be identical to the total energy in Condition II. Since Balls B, C, and D have not changed their position, we know that their energy has not changed, so they can be ignored while discussing the transformations of energy between Condition I and Condition II. This means that the total energy of Balls A and E in Condition I needs to be identical to their total energy in Condition II.
In Condition I, the total energy of Balls A and E can be written like this:
Total Energy for Balls A and E in Condition I = Total Energy for Ball A in Condition I + Total Energy for Ball E in Condition I = (KEAI + MEAI) + (KEEI + MEEI) = (0 + MEAI) +
(0 + MEEI) = MEAI + MEEI = Double High Energy
In Condition II the total energy for Balls A and E can be written like this:
Total Energy for Balls A and E in Condition II = Total Energy for Ball A in Condition II + Total Energy for Ball E in Condition II = (KEAII + MEAII) + (KEEII + MEEII) = (0 + 0) +
(KEEII + MEEII) = KEEII + MEEII = KEEII + High Energy
Since the total energy for both balls in both conditions is the same, we can say
Double High Energy = KEEII + High Energy
Isolating KEEII, we get
KEEII = Double High Energy – High Energy = High Energy
This equation means there is a lot of energy at the start, in Condition I, even though both Balls A and E are motionless, because both balls have high magnetic energy. This is because they are both far from the magnet.
At the end, in Condition II, only Ball E has significant energy, because it is both moving and far from the magnet. Ball A, on the other hand, has almost no energy because it is motionless and next to the magnet. Because the energy at the start has to be the same as the energy at the end, all the energy that was at the start is equal to all the energy at the end. Since there is more magnetic energy at the start than at the end, the missing energy has been transformed into Ball E’s kinetic energy. This can be written like this:
KEEII = Double High Energy – High Energy = High Energy

120 HoW WIll It Move?
If Ball E has high energy at the end, this means that it must be moving very fast. The addi-tional kinetic energy that Ball E has at the end, compared with the kinetic energy Ball A had at the start, is the magnetic energy that has been transformed into kinetic energy.
wrapping Up the lesson
the explanation for the behavior of the Magnetic Cannon constructed in this activity is not simple. Do not be surprised if many students struggle with it. one of the main purposes of this activity was to give students a taste of what high school physics will be like. Hopefully the combination of analytical and quantitative thinking will intrigue some students and they will consider continuing to study physics.
If students understood this activity, it should be relatively simple for them to use its logic to predict the behavior of the Magnetic Cannon when certain of its characteristics are changed. Some of these situations were observed by students when they experimented with the can-non in Lesson 1.
Suggested Prompts • How does the speed at which Ball E shoots out depend on the distance at which Ball
A is released? (When Ball A is released at a closer distance to the magnets, it begins with less magnetic energy. Since there is less energy at the start, there has to be less energy at the end as well, so Ball E will come shooting out at a smaller speed [less kinetic energy].)
• What will happen to the speed of Ball E if only one magnet is used rather than two combined? (By using one magnet instead of two, we decrease the strength of the magnetic force and the magnetic energy. By decreasing the magnetic energy, there is less to be transformed into kinetic energy, so Ball E will come shooting out slower.)
introducing reading 8.4 – the UniverseReading 8.4 deals with the different kinds of stars found in the universe, supernova, and gal-axies, including their sizes and ages. Students calculate some astronomical distances in miles and light-years, explaining why light-years are a more convenient unit for describing astro-nomical distances. Connections are made to previous physical science units when explaining the connection between a star’s temperature and its color and how we can see light directly from a supernova and from an intergalactic cloud. You might ask students how they think ideas about forces and motion apply to objects/bodies in the universe. After they share some ideas, let them know that their reading for homework is about how some of the ideas the class has been studying apply to science in the sky.

Teacher’s Edition
How Will It Move?
Physical Science
Investigating and Questioning our World Investigating and Questioning our World through Science and Technology (IQWST)through Science and Technology (IQWST)
Developed with funding from Developed with funding from the National Science Foundationthe National Science Foundation
PS3 Move TE 2.0.1ISBN-13: 978-1-937846-81-7