how to use the volusia parks & trails travel guide phone app
TRANSCRIPT

How to Use the Volusia Parks & Trails Travel Guide Phone AppLet this intuitive application guide you to experience the the wonders of Volusia County. This section includes basic instructions for getting the most out of the app. Once you skim the tips here, start exploring the rich con-tent - no need to wait until you are in or even near Volusia to browse and make future plans.
All text in pink on the images are instructional notes. To see any image in this or any other section in a larger view, simply click on it, and you can zoom in as you would any other photo on your phone.
Category IndexThere are two main ways to navigate the app; the first is by Category Index.The category index allows you to choose sites using the 4 main groups of Do, See, Know, and Services.
Select one of the four indexes, and you will bring up a list of categories. Each category displays the number of entries at the right of the title. Click on a category, and an alphabetized list appears.
If you click the map icon at the bottom of the selected category menu without selecting a site, an interactive map showing all items in the list will appear. Once you are in the map mode, you can click the lower left cross-hairs icon to see your own position in relation to the sites on the map. In the lower right spot where the map icon was, there is now a menu icon which takes you back to the index list.
Map Icon

Home - goes to main menu“Back” goes to previous page
Clicking the crosshairs “around me” icon will show where you are in relation to other items on the map.
Map icon changes to menuicon. This will allow you to toggle back to the list view of sites.

Map ViewsWhen you first get to a map, if you are on an iphone, you can toggle what format you would like to view it in by clicking on the blue centered text below the map for: Online Standard, Online Satellite, or Online hybrid. These versions are only available if you have cell coverage. The final option, which is the default for no cov-erage, is Offline. Clicking on the list icon at bottom right will bring you back to the index list. Clicking on the crosshair icon at bottom left will show your location on the map as a blue dot (as illustrated above.)

If you click on any of the icons on the map, a box comes up with the name of the location. You can click on the orange buttons at either end of the box to jump through the locations on the map. When you click on one of the boxes, it will bring up the entry in the app for that site.
To make any content item a “favorite”, click on the star icon in the top right of the entry. It will turn blue until you un-select it. The Favorites Menu can be accessed at any time by clicking the star in the bottom left of any page it appears.
Click the star at the upper right to add this site to your favorites. This will add it to a favorites section you can access whenever you see the star at the bottom left on the screen. The trian-gle behind the star will turn from gray to blue.
Click the directions sign icon at the bottom center of any page to go straight to directions to the location from your current location.

Visual and step by step directions are available when you click the central “direction sign” at the bottom of any screen in the app.
Visual and step by step directions are available when you click the central “direction sign” icon at the bottom of any screen which displays it in the app. To exit a map, just click out of it as you would any other external program on your phone to get back to the app.

When you are in a site entry, the map’s context will have updated to apply to this location only, and will pull in the same location you just clicked as well as any additional driving directions associated with the entry.
Driving directions will be represented by a red car icon when the better driving entrance to an area differs from the general address given for a location. On iOS systems, there will also be a blue directional sign in the pop-up to reinforce the fact that clicking it will give driving directions.to

This is what the entry for an actual related site looks like on the map, It will lead back to the entry pageon the app for the site in question, and you can get directions there, or use red car alternate directions when provided. The red car directions are added when there is a best entry for a particular site which may not be immediately apparent from the default address of the site.
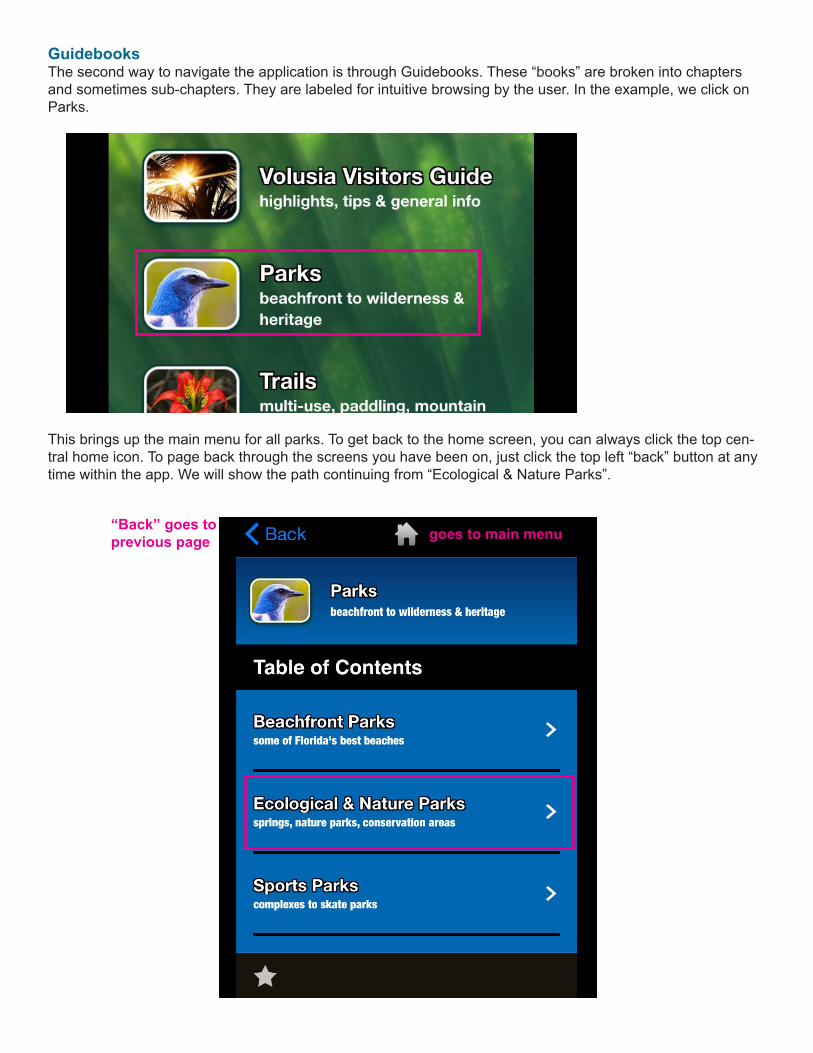
GuidebooksThe second way to navigate the application is through Guidebooks. These “books” are broken into chapters and sometimes sub-chapters. They are labeled for intuitive browsing by the user. In the example, we click on Parks.
This brings up the main menu for all parks. To get back to the home screen, you can always click the top cen-tral home icon. To page back through the screens you have been on, just click the top left “back” button at any time within the app. We will show the path continuing from “Ecological & Nature Parks”.
goes to main menu“Back” goes to previous page

In the Ecological and Nature Parks submenu, we select Springs, and from there select Blue Spring State Park.

Nothing is more than 3 or 4 clicks away in this app. The park guidebook is especially deep because of thediversity of the Volusia parks. Everything on this entry is the same as if you had navigated to it from the index.
Links and phone numbers in the app are highlighted orange and underlined to show they are clickable.

TrailsBoth park and trail entries have addresses, contacts and amenities listed. Trail entries have additional listings for trail specs. A trail entry could include a single trail or a multi-trail system. Some trail entries are park trail systems.
Trails Display on MapThe multi-segment Showcase Spring- to-Spring Trail shows all segments at once on the map. In the case of Showcase Trails like Spring-to-Spring, there will be a list of associ-ated trails at the bottom of the entry to expore isolated trails.
In the case of some parks or conservation areas, the trail system is seen as a single enti-ty with multiple segments, and that is the only view available.
Click the orange i button to expand the full listing for each trail.

Near MeThe Near Me button on the main menu is a unique feature. It will list the 25 Volusia Parks & Trails sites clos-est to your current location.
Location services must be enabled on your device for this to function. Like the index lists or site entries, you can click the map button to display them all on a map.