how to properly design an in-building das - alster
TRANSCRIPT

How to Properly Design
an In-Building DAS
Part I: Use of Directional Couplers in DAS
by Minfei Leng

How to Properly Design an In-Building DAS Part I: Use of Directional Couplers in DAS
PAGE 2
How to Properly Design an In-Building DAS
Introduction
RF in-building coverage has become a fast growing
market in recent years. Commercial wireless users
increasingly demand reliable communications inside
office and residential buildings for their business and
personal needs. At the same time, various local
municipalities have issued ordinances to ensure that
construction of new buildings include adequate radio
coverage of public safety signals. Efforts are also
underway to develop and implement national level
model codes for public safety in-building
communications, as seen by recent initiatives at National
Fire Protection Association (NFPA) and the International
Code Council (ICC).
A typical in-building coverage system consists of two
major components, a bi-directional amplifier (BDA, or
signal booster) relaying and amplifying the RF signal
traffic between the remote base station and the
portable or mobile radios, and a network to distribute
the signal to every corner of the desired coverage area.
How to Properly Design an In-Building DAS Part I: Use of Directional Couplers in DAS
PAGE 3
The most common type of the distribution network is a
system of coax cables and indoor antennas called a
Distributed Antenna System or DAS.
Most of the reference materials and application notes
on in-building coverage solutions have focused on the
booster technologies or system design architecture. One
often overlooked aspect in the system design is the DAS
implementation. This includes connecting all the cables
and antennas throughout the building and balancing the
signal levels at each DAS node. If ignored, an
improperly designed DAS results in degraded
performance and unnecessary cost increases. This 2-part
series of articles is an effort to outline a simple process
of designing a DAS in order to achieve the most
efficient RF coverage distribution. Part I talks about the
Use of Directional Couplers in DAS and Part II covers the
DAS Design Process.
Part I: Use of Directional
Couplers in DAS
When facing the question of
cable connections in a DAS,
many designers or installers choose the easy answer of using standard
two-way splitters for every cable and antenna junction. The splitters are
relatively inexpensive, and there is no thinking required. However,
except for the simplest systems with very small coverage area and few
antennas, the use of splitters will have a seriously negative impact on
the system performance.
Let’s look at an example. It’s a very simple DAS with five antennas. All
cable splits and antenna junctions are connected with two-way splitters.
Each splitter provides a 50%-50% split of the power, which translates
to a 3 dB insertion loss between the input port and the two output ports.
How to Properly Design an In-Building DAS Part I: Use of Directional Couplers in DAS
PAGE 4
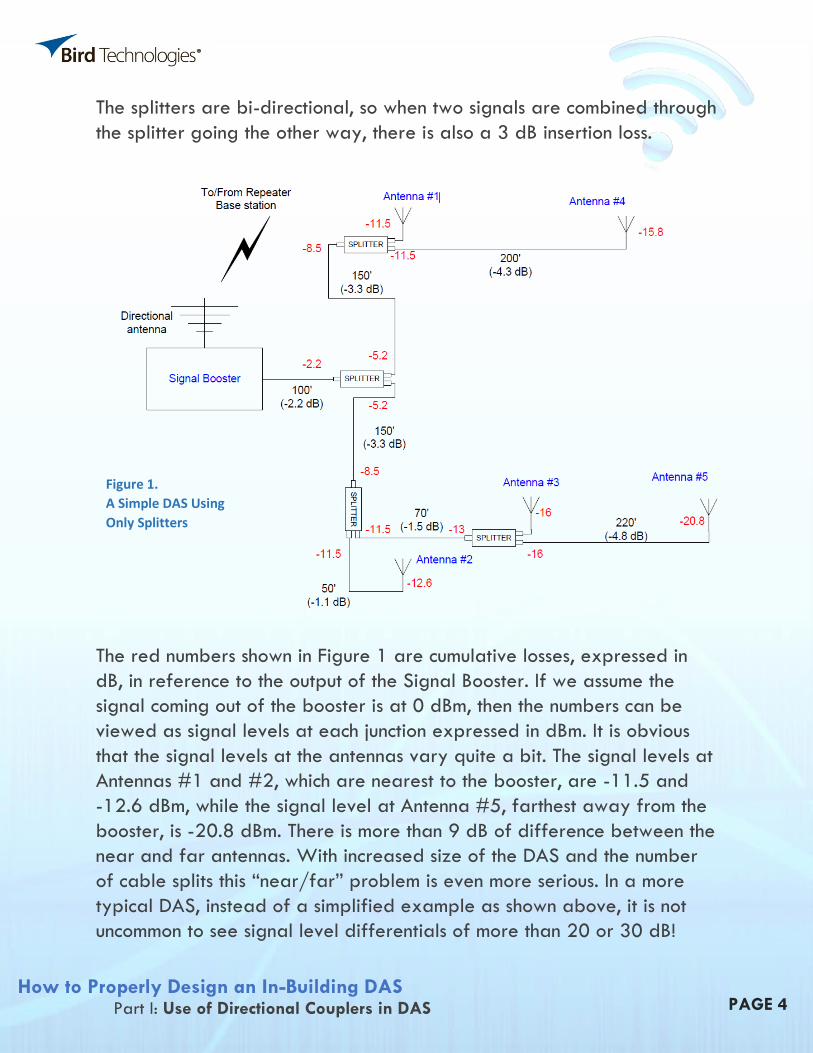
The splitters are bi-directional, so when two signals are combined through
the splitter going the other way, there is also a 3 dB insertion loss.
The red numbers shown in Figure 1 are cumulative losses, expressed in
dB, in reference to the output of the Signal Booster. If we assume the
signal coming out of the booster is at 0 dBm, then the numbers can be
viewed as signal levels at each junction expressed in dBm. It is obvious
that the signal levels at the antennas vary quite a bit. The signal levels at
Antennas #1 and #2, which are nearest to the booster, are -11.5 and
-12.6 dBm, while the signal level at Antenna #5, farthest away from the
booster, is -20.8 dBm. There is more than 9 dB of difference between the
near and far antennas. With increased size of the DAS and the number
of cable splits this “near/far” problem is even more serious. In a more
typical DAS, instead of a simplified example as shown above, it is not
uncommon to see signal level differentials of more than 20 or 30 dB!
Figure 1.
A Simple DAS Using
Only Splitters

How to Properly Design an In-Building DAS Part I: Use of Directional Couplers in DAS
PAGE 5
Such a scenario can lead to severe degradation of the in-building
coverage. When antenna nodes in the DAS have equalized losses, the
most uniform coverage is achieved, i.e. portables anywhere in the
coverage area “sound” the same. Whereas, such disparate signal levels
can lead to uneven and diminished coverage both in area size and in
audio quality. In extreme cases, calls may even be dropped. Imagine two
users in the building: one is positioned at Antenna #1 while the other is at
Antenna #5. They simultaneously key up their radios and try to talk back
to the central station. If they both use the same radios and are
transmitting at the same power level, the signal received from the user at
Antenna #1 is simply 9 dB stronger than the one at Antenna #5. If the
user at Antenna #1 happens to use a higher power radio, for instance a
mobile instead of a portable, his strong signal may activate the Output
Level Control in the booster, which is a mechanism used by the signal
booster to adjust the gain and output power per carrier based on the
strength of the incoming signals. (All
boosters have to be equipped with OLC in
order to comply with FCC regulation to
reduce undesired spurious emissions.)
Once the OLC is engaged, it reduces the
overall gain of the booster, which further
weakens the signal from Antenna #5.
Therefore the difference in signal levels
between the two incoming signals
increases, and the user with the weaker
signal will, most likely, not be able to
complete his call.
Additionally, to maintain a sufficient signal
to noise ratio, the loss in any DAS should
be limited to within 25~30 dB. In
expanding the example above, there is
another hallway beyond Antenna #5 that
requires coverage. It needs more cables
and splitters so; the loss on that branch

How to Properly Design an In-Building DAS Part I: Use of Directional Couplers in DAS
PAGE 6
will easily go beyond the 25 dB limit. In-line boosters will need to be
deployed to amplify the signals when loss exceeds that limit.
Since the signal levels at Antennas #1 and #2 are unnecessarily high, it
would be more efficient if we could divert some of the RF energy away
from Antennas #1 and #2 and send them toward #5. In other words, as
the signal comes out of the booster, what if we provide only a small
portion of the signal to the shorter branches, but preserve the majority of
the RF energy for the long run toward Antenna #5? We can accomplish
that with Directional Couplers. A 2-way splitter is a simple 3-port device,
forming a physical and a functional “Y”, a Directional Coupler is typically
a 4-port device.
As shown in Figure 2, right, the four ports
on the coupler have different
designations depending on the signal
path. When used in a DAS, one of the
ports will have a load connected to it.
The use of this port will become evident
shortly when we discuss the bi-directional
nature of the coupler. When a signal
enters the coupler from the #1 Input
Port, part of it comes out from the #2
Throughput Port (sometimes called
ThruLine Port) and another part of the
signal comes out from the #3 Coupled
Port (sometimes called Decoupled Port). The ratio between the signals is
commonly referred to as the “coupling ratio” and is usually noted in dB. If
the ratio is 3/3 dB, then the two signals are split 1:1 evenly and each
output is 3dB lower than the input signal. But the coupler can also be
constructed to have uneven split ratio. Let’s look at an example of a
4.8/1.8 dB coupler, which has a 1:2 split ratio, or in other words,
33/66% of the input signal.
Figure 2.
Example of a Typical
Directional Coupler Schematic

How to Properly Design an In-Building DAS Part I: Use of Directional Couplers in DAS
PAGE 7
As shown in Figure 3, compared to the input signal,
the output at the Throughput Port is 1.8 dB lower
than the input signal, while the output at the
Coupled Port is 4.8 dB lower.
However, the designations of the ports are not
fixed since the coupler itself is symmetrical. In
reality, a RF signal can enter any port. Whichever
port you select as the Input, the other port on the
same side becomes the Throughput Port, while the
port opposite side from the input becomes the
Coupled Port. As shown in Figure 4, if the signal is
now coming in from Port 2, which is now
designated as the Input Port, then we simply have a whole new set of
port designations noted in red.
Please notice that nothing has changed
physically between Figure 3 and Figure 4. The
load is still on Port #4. The only change is in
the reference point or the perspective of the
“input” port. Remember the signal booster and
DAS are bi-directional by nature, so another
way to look at these two figures is that the
coupler in Figures 3 and 4 is seen from the
perspectives of opposite signal paths (uplink
and downlink). In Figure 3, it’s the downlink
signal that goes from the booster out to the
DAS antenna node. In Figure 4, the signal from
the portable radio is picked up by the in-building antenna and is going
back toward the booster. In the case of Figure 4, the signal entering Port
#2 will have 1.8 dB loss when coming out of Port #1.
Another signal at -4.8 dB will go toward Port #4 where the energy is
absorbed by the load. Similarly, another uplink signal from the portable
radio back toward the booster enters the booster from Port #3 (marked
Figure 3.
A 4.8/1.8 dB Coupler
Figure 4.
The Same 4.8/1.8 Coupler with
Signal Coming In From Port #2

How to Properly Design an In-Building DAS Part I: Use of Directional Couplers in DAS
PAGE 8
as the Coupled Port in Figure 3). It loses 4.8 dB and comes out of Port #1
as well.
Some of that signal goes to Port #4 at -1.8 dB and is also absorbed by
the load. Hence, the signal paths between Ports #1 and #2, and Ports
#1 and #3 have the same loss in both directions. Such bi-directionality
and fixed loss ratio between ports ensure the DAS can be balanced
simultaneously for uplink and downlink signals.
Because of this bi-directionality, it’s crucial to make the correct port
connections during installation. A reversed connection will not be
immediately obvious, as the signals will still come through, albeit with
very different losses as the designer had intended. It is not unusual for a
DAS system to fail the coverage acceptance test even though the design
has plenty of margin built-in. The painstaking trouble-shooting process
would eventually lead to one or several couplers with reversed cable
connections. A simple yet effective way to ensure that the right cable is
going with the right coupler port is to have the field technicians hold the
coupler with the load oriented in the same way as shown on the
schematic. Then the rest of the ports simply fall into place by matching
the various cable segments on the DAS layout drawing.
An additional advantage of the coupler over the splitter is the isolation
between two ports at the opposite corners (Ports #1 and #4, Ports #2
and #3). Such isolation becomes instrumental in other applications of the
directional coupler, such as in a transmit combiner. However, that is not
the focus of this white paper.
Beyond the 3/3 dB and 4.8/1.8 dB ratios, couplers can be made to
have coupling ratios of 6.0/1.2 dB (25/75%), 7.0/1.0 dB (20/80%),

How to Properly Design an In-Building DAS Part I: Use of Directional Couplers in DAS
PAGE 9
and all the way to 30/0.1 dB (0.1/99.9%). Typically, a manufacturer
will offer a series of couplers with varying split ratios for an entire
frequency band. Some manufacturers even take advantage of the nature
of multiple harmonics and offer couplers that cover VHF, UHF, and 800
MHz frequencies simultaneously. Table 1 on the next page shows the
“TXRX Systems” brand coupler portfolio offered by Bird Technologies
Group.
Now, let’s take another look at the earlier using directional Couplers
instead of splitters.
With directional couplers, every antenna’s signal level is now within 1 dB
of each other. We don’t need to worry about the “near-far” problem
anymore. Nor do we have to spend additional money to install an in-line
booster, since the loss of 15.8 dB at Antenna #5 is far below our
threshold of 25~30 dB. Therefore, the judicious use of directional
couplers greatly improved the system performance by balancing the DAS
Figure 5.
A Simple DAS Using
Directional Couplers

How to Properly Design an In-Building DAS Part I: Use of Directional Couplers in DAS
PAGE 10
loss at each antenna node, and reduced the hardware cost by
eliminating the need for an in-line booster.
In summary, while the choices of signal boosters and antennas are often
the focus of the designer and the user of an in-building coverage system,
the directional couplers are equally critical in their contribution to the
successful implementation of the DAS.
If you are wondering how to select the correct couplers with the correct
split ratios to end up with the balanced signal levels as shown, please see
Part II of this article. We will provide a step by step instruction on the
DAS design, including how to calculate cumulative losses and how to
choose directional couplers in order to balance the signal levels.
Model Number
Frequency Band (MHz)
Coupled / Through put port Loss
Split Ratio in %
Multi-band Harmonic couplers
85-05-01 144-174/450-530/806-890
3.0/3.0 dB 50/50%
85-05-02 144-174/450-530/806-890
4.8/1.8 dB 33/66%
85-05-03 144-174/450-530/806-890
6.0/1.2 dB 25/75%
85-05-04 144-174/450-530/806-890
7.0/1.0 dB 20/80%
85-05-05 144-174/450-530/806-890
10/0.5 dB 10/90%
85-05-06 144-174/450-530/806-890
15/0.2 dB 3/97%
85-05-07 144-174/450-530/806-890
20/0.1 dB 1/99%
VHF couplers
85-38-01 132-174 3.0/3.0 dB 50/50%
85-38-02 132-174 4.8/1.8 dB 33/66%
85-38-03 132-174 6.0/1.2 dB 25/75%
85-38-04 132-174 7.0/1.0 dB 20/80%
85-38-05 132-174 10/0.5 dB 10/90%
UHF couplers
85-58-01 350-512 3.0/3.0 dB 50/50%
85-58-02 350-512 4.8/1.8 dB 33/66%
85-58-03 350-512 6.0/1.2 dB 25/75%
85-58-04 350-512 7.0/1.0 dB 20/80%
85-58-05 350-512 10/0.5 dB 10/90%
85-58-06 350-512 15/0.2 dB 3/97%
85-58-07 350-512 20/0.1 dB 1/99%
85-58-08 350-512 30/0.1 dB 0.1/99.9%
700/800/900MHz couplers
85-83-01 746-960 3.0/3.0 dB 50/50%
85-83-02 746-960 4.8/1.8 dB 33/66%
85-83-03 746-960 6.0/1.2 dB 25/75%
85-83-04 746-960 7.0/1.0 dB 20/80%
85-83-05 746-960 10/0.5 dB 10/90%
85-83-06 746-960 15/0.2 dB 3/97%
85-83-07 746-960 20/0.1 dB 1/99%
85-83-08 746-960 30/0.1 dB 0.1/99.9%
Table 1
Directional Couplers

How to Properly Design an In-Building DAS Part I: Use of Directional Couplers in DAS
PAGE 11
About the Author Bird Technologies has been the industry's standard
in radio frequency product reliability for over 70 years.
The criticality and definition of "reliability" can range
from accuracy and precision to longevity and clarity.
The uses can range from commercial applications to
military maintenance to electronic military
instrumentation. The measures of radio frequency
products’ quality (and success) can range from data
analysis to power measurement to signal strength. Bird
Technologies has a single-minded devotion to reliability
— no matter the criticality, use, or metrics. Bird = the
world's most reliable radio frequency products. With
Bird Technologies . . . You’re heard, loud and clear.
-Content provided by Minfei Leng

How to Properly Design
an In-Building DAS
Part II: The DAS Design Process
by Minfei Leng

How to Properly Design an In-Building DAS Part II: The DAS Design Process
PAGE 2
How to Properly Design an In-Building DAS
Introduction
RF in-building coverage has become a fast growing
market in recent years. Commercial wireless users
increasingly demand reliable communications inside
office and residential buildings for their business and
personal needs. At the same time, various local
municipalities have issued ordinances to ensure that
construction of new buildings include adequate radio
coverage of public safety signals. Efforts are also
underway to develop and implement national level
model codes for public safety in-building
communications, as seen by recent initiatives at National
Fire Protection Association (NFPA) and the International
Code Council (ICC).
A typical in-building coverage system consists of two
major components, a bi-directional amplifier (BDA, or
signal booster) relaying and amplifying the RF signal
traffic between the remote base station and the
portable or mobile radios, and a network to distribute
the signal to every corner of the desired coverage area.

How to Properly Design an In-Building DAS Part II: The DAS Design Process
PAGE 3
The most common type of the distribution network is a
system of coax cables and indoor antennas called a
Distributed Antenna System or DAS.
Most of the reference materials and application notes
on in-building coverage solutions have focused on the
booster technologies or system design architecture. One
often overlooked aspect in the system design is the DAS
implementation. This includes connecting all the cables
and antennas throughout the building and balancing the
signal levels at each DAS node. If ignored, an
improperly designed DAS results in degraded
performance and unnecessary cost increases. This 2-part
series of articles is an effort to outline a simple process
of designing a DAS in order to achieve the most
efficient RF coverage distribution. Part I talks about the
Use of Directional Couplers in DAS and Part II covers the
DAS Design Process.
Part II: The DAS Design
Process The first step of DAS design is to obtain an accurate
and up-to-date blueprint of the building. An
architectural drawing is best, but even a fire exit map will suffice, as
long as it’s drawn to scale. Be careful when using the scale on any
drawing to calculate the real dimensions; the piece of paper sitting on
your desk may not be the same size of the paper when the drawing
was originally made. If it has been shrunk to fit your 8.5x11” printer
paper, the “1in = 10ft” scale printed on the drawing is no longer valid.
When in doubt, it is always a good idea to double check. Known
building dimensions or square footage are also good references.
Another simple rule of thumb is to check the opening of a regular single
door, which has to have a 36-inch clearance as specified by ADA.
How to Properly Design an In-Building DAS Part II: The DAS Design Process
PAGE 4
Therefore, when everything else fails, you can always calculate the scale
by measuring width of a door on the drawing. The second step is to make sure you know all the relevant physical
information related to the building and the DAS installation. What kind
of material was used for exterior construction? Could some RF signals be
present on upper floors and near exterior boundaries that will reduce the
need for the in-building coverage? What kind of material was used for
interior construction, drywall or concrete? Is the building designed for a
special application that may result in RF blockage? Many hospitals and
power generating plants fall into this category. Are there any restrictions
on the cable runs and antennas installation? Some buildings won’t allow
any visible hardware for aesthetic reasons. Where can the cables go
between floors? Where will the head-end booster be located? Answers
to these questions will have a great impact on the coverage area for
each DAS node, hence dictating where and how the DAS should be
installed.
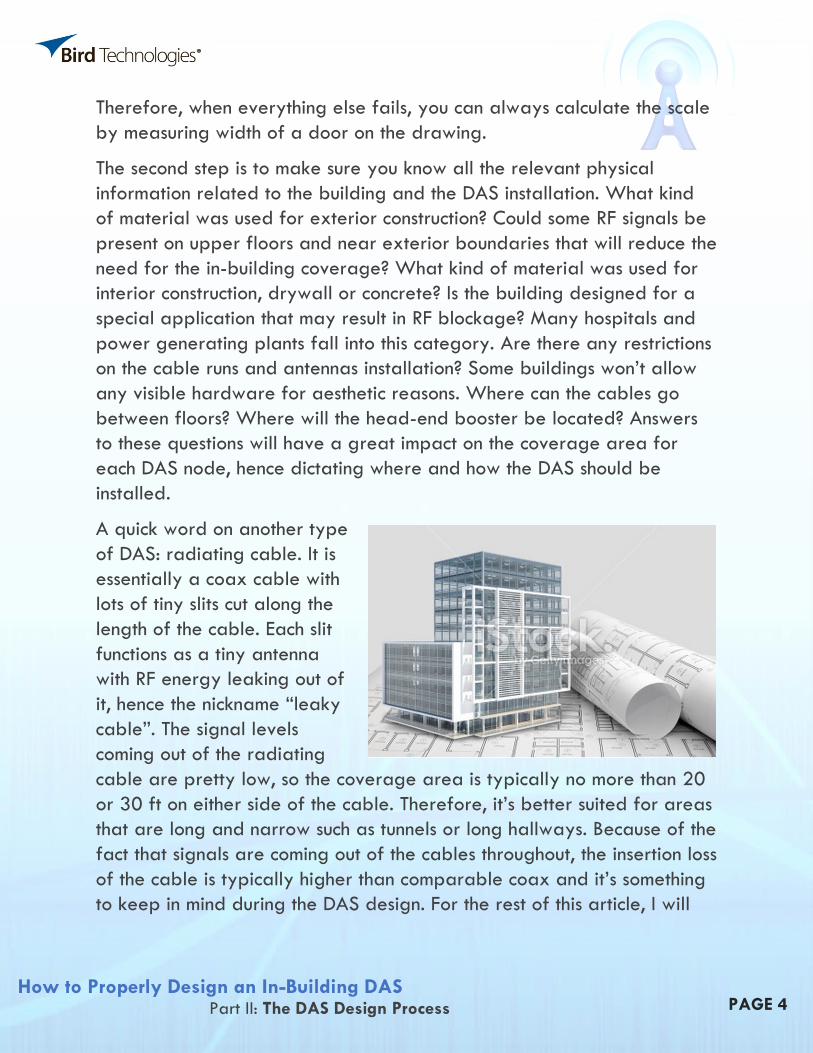
A quick word on another type
of DAS: radiating cable. It is
essentially a coax cable with
lots of tiny slits cut along the
length of the cable. Each slit
functions as a tiny antenna
with RF energy leaking out of
it, hence the nickname “leaky
cable”. The signal levels
coming out of the radiating
cable are pretty low, so the coverage area is typically no more than 20
or 30 ft on either side of the cable. Therefore, it’s better suited for areas
that are long and narrow such as tunnels or long hallways. Because of the
fact that signals are coming out of the cables throughout, the insertion loss
of the cable is typically higher than comparable coax and it’s something
to keep in mind during the DAS design. For the rest of this article, I will

How to Properly Design an In-Building DAS Part II: The DAS Design Process
PAGE 5
focus on the coax and antenna type of DAS, but the layout of a
radiating cable DAS can use the same design guidelines. With a scaled building blueprint in hand and a good understanding of
the particular limitations of the project, the designer can now sit down
and map out all the DAS nodes, i.e. locations of the antennas. Typically,
an omni-directional indoor antenna with 0 dBd of gain can adequately
cover an area with a 100~150 ft radius at 800 MHz, a 200~250 ft
radius at UHF, and a 300~400 ft radius at VHF. These numbers are
derived from link budgets based on the free space loss at those
frequencies and the typical power level put out by the signal booster.
Obviously, the designer has to exercise his or her judgment to account for
the unique circumstances
of the project. The same
antenna, at the same
frequency, will have
very different coverage
on an open office floor
with cubicles versus
coverage on a
dormitory with many
small rooms separated
by concrete walls.
After the location for each antenna node is picked out, the designer
“connects the dots,” with the lines representing cables in real life. We can
measure the length of the cable on paper, and then use the scale to
calculate the cable length. The insertion loss for the cable is calculated
based on specifications provided by the manufacturer. So, at this point,
we know the location and loss of each cable run. See Figure 6 for a
simplified drawing of one floor in a building, with two antenna nodes. It’s
assumed that this DAS covers multiple levels in the building, so there is a
vertical cable run that connects each floor. Therefore, we have two
antennas on the floor, one cable split for those 2 antennas, and another
cable split for the vertical cable run.

How to Properly Design an In-Building DAS Part II: The DAS Design Process
PAGE 6
In order to make it easier to
see, a DAS design is often
drawn up with 2 sets of
diagrams, one with direct
marking on the building
blueprint to indicate the
location of the antennas and
cable splits, and a second set
of “abstract” drawings
(typically in VisioTM or
AutocadTM) showing the cable
lengths and coupler models.
Figure 7 shows the “abstract”
version of the drawing for the
same DAS in Figure 6.
Here comes the important part
of DAS design: how do you
connect all the cable segments
and antennas to make them
into a network? As discussed in
Part I of this article, directional
couplers are much better
alternatives than splitters at
this task. They offer various
power split ratios to allow the
designer flexibility in
balancing the power level at
each DAS node.
The main goal of using couplers is to offset the difference in cable losses
by using the different loss ratios between the two outputs of the coupler.
For example, if a cable run is split into two branches, say 15 dB IL in one
branch vs. 5 dB IL in the other, we would like to select a coupler that has
10 dB of difference in power split ratios. Put the lower loss port on the
Figure 6.
An Example of One Floor in a Building DAS
Figure 7.
Abstract DAS Drawing

How to Properly Design an In-Building DAS Part II: The DAS Design Process
PAGE 7
higher loss branch,
and the higher loss
port on the lower loss
branch, and Presto:
we have two
branches with same
amount of total losses
(including the coupler
and the cable). Most
manufacturers of
directional couplers
provide a series of
products with
different split ratios to
allow the designer to match the loss differentials as closely as possible.
Back to the example we were looking at. In Figure 8, we have a branch
with 150 ft of cable with about 3.3 dB of insertion loss, and another
branch of 3 ft jumper cable with 0.5 dB of loss. We need to select a
coupler that can make up the loss differential in the two cable runs.
Browsing through the table of available couplers in a catalog, we select
a coupler model number with a 4.8/1.8 dB split ratio as Coupler #1. If
we connect the
longer cable run to
the throughput port
with 1.8 dB, and
connect the shorter
cable run to the
coupled port with
4.8 dB, the total
losses from the
input of the coupler
to the antennas are
3.3 + 1.8 = 5.1 dB
and 0.5 + 4.8 =
Figure 8.
DAS with Cable Losses
Figure 9.
Calculation of Cumulative Loss in DAS
How to Properly Design an In-Building DAS Part II: The DAS Design Process
PAGE 8
5.3 dB respectively. If we had used a 3 dB splitter, the total losses would
have been 3.3 + 3 = 6.3 dB and 0.5 + 3 = 3.5 dB. Right away, one can
see the benefit of using a coupler as it manages to balance the signal
levels at the two antennas within 0.2 dB of each other.
Next, we work our way backwards toward the booster. We take the
worse number of the two above (5.1 and 5.3 dB, so we use 5.3 dB), and
add the 0.5 dB cable loss between the two couplers, we get 5.8 dB,
which is the loss from the output of Coupler #2 to either Antenna #1 or
Antenna #2. See Figure 9 for the illustration of calculating the cumulative
loss.
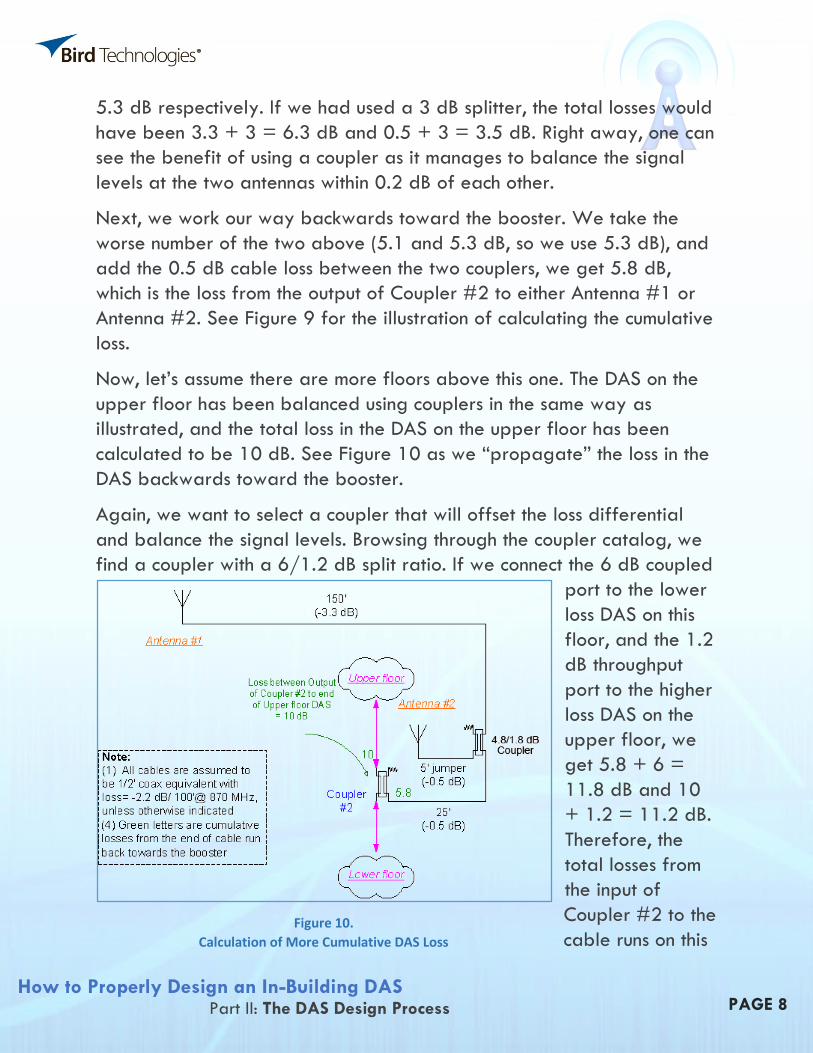
Now, let’s assume there are more floors above this one. The DAS on the
upper floor has been balanced using couplers in the same way as
illustrated, and the total loss in the DAS on the upper floor has been
calculated to be 10 dB. See Figure 10 as we “propagate” the loss in the
DAS backwards toward the booster.
Again, we want to select a coupler that will offset the loss differential
and balance the signal levels. Browsing through the coupler catalog, we
find a coupler with a 6/1.2 dB split ratio. If we connect the 6 dB coupled
port to the lower
loss DAS on this
floor, and the 1.2
dB throughput
port to the higher
loss DAS on the
upper floor, we
get 5.8 + 6 =
11.8 dB and 10
+ 1.2 = 11.2 dB.
Therefore, the
total losses from
the input of
Coupler #2 to the
cable runs on this Figure 10.
Calculation of More Cumulative DAS Loss

How to Properly Design an In-Building DAS Part II: The DAS Design Process
PAGE 9
floor and the cable
runs on the upper
floor are within 0.6
dB of each other.
See Figure 11 for a
total tally of all the
losses.
If there are more
floors below it or
more cable splits
between this one
and the booster, the
same iteration is to
be repeated until
we work all the way back to the booster. A typical in-building coverage
system can vary from 10,000 sq ft to 1,000,000 sq ft or more, with the
number of couplers from a handful to hundreds. However, the rules of
calculating the losses and selecting the couplers stay the same, allowing
the designer to balance any DAS and achieve the optimal signal levels
throughout the network.
As mentioned before, the total DAS loss should be limited to no more than
25~30 dB, in order to maintain a sufficient signal to noise ratio. As we
start calculating the loss and selecting couplers from the remote end of
the DAS and work backwards toward the booster, we eventually get to a
point that the system loss exceeds the limit. We know that we will need to
insert an in-line booster at that point. The exact location is of course
dependent on the practical constraints of the building, but wherever the
in-line booster is, the cumulative loss ends at its output, and starts from
zero again on the other side of the in-line booster. Another alternative is
to use coax with larger diameters with lower insertion loss. But that option
carries its own disadvantages such as high material and labor costs, as
well as the physical limitations on bending radius and weight support
issues.
Figure 11.
Completed DAS Design for One Floor

How to Properly Design an In-Building DAS Part II: The DAS Design Process
PAGE 10
In summary, DAS design is a combination of node placement and simple
mathematics. Couplers and coax cables do not have the glamour or
complexity of the signal booster. However, a little attention to these often
overlooked components in the DAS goes a long way to ensure that the
performance of the system lives up to the design specification and, more
importantly, to the expectation of the customer.
About the Author Bird Technologies has been the industry's standard
in radio frequency product reliability for over 70 years.
The criticality and definition of "reliability" can range
from accuracy and precision to longevity and clarity.
The uses can range from commercial applications to
military maintenance to electronic military
instrumentation. The measures of radio frequency
products’ quality (and success) can range from data
analysis to power measurement to signal strength. Bird
Technologies has a single-minded devotion to reliability
— no matter the criticality, use, or metrics. Bird = the
world's most reliable radio frequency products. With
Bird Technologies . . . You’re heard, loud and clear.
-Content provided by Minfei Leng