how-to make a switch adapted toy for children with special
TRANSCRIPT

How-to make a Switch Adapted Toy for Children with Special Needs and People With Disabilities, No Soldering Required
This toy modification takes a battery operated toy, that is activated with a single switch, and adds an additional externally operated switch. The external switch is a large format push button that allows for greater accessibility, by presenting a large target area to activate the toy. This modification requires no soldering or special skill set and can be carried out with simple tools. The difficulty level for the modification is: moderate. The material cost for this modification is approximately $5, not including tools.
TOOLS REQUIRED
Thread cutter or similar
This value multimeter is available from Harbor Freight for $4
Wire cutter and wire stripper or similar
Small screwdriver
Slip joint pliers or similar pliers with

MATERIALS REQUIRED
Specialty Item: Part Number: UG, by 3M QTY: 3/EA
The fabric adhesive allows for quicker
Battery operated, single switch toy.
1/8” audio plug external switch.
Glue gun
Threaded needle
Specialty Item: Part Number: 19800-000020-RS, by IEIQTY 1/EA Or also search with: “terminal block audio jack”
19-22AWGSplice Connector
Audio Jack Connector

This toy modification takes an electronic toy that plays sounds (moves and/or lights up) that is activated with a single switch:
And adds an external switch to it, like this:
Now you can control the toy externally, with the switch we added to it.

The external switch is a push button with 1/8” audio plug connector end.
The external switch is then connected to the toy through a 1/8” audio jack. This toy modification adds the 1/8” audio jack.

The plug can either be a 2 contact (mono) connector or 3 contact (stereo) connector as shown below:
Note: this diagram only shows the Plug side of the mating connectors, the Jack side is simply the mating end and is labeled the same, it will have 2 wires (Mono) or 3 wires (Stereo).
In the case of the mono plug (P1 - PLUG MONO) the toy is activated by making a connection between the TIP and SLEEVE. See diagram below.
In the case of the stereo plug (P2 - PLUG STEREO) the toy is activated by making a connection between the TIP and RING/SLEEVE (combination). See diagram below.

The reason for this extra connection (between RING and SLEEVE) is to ensure compatibility with all buttons, no matter what their type. Here’s how to identify the wires on your 1/8” audio jack connector, we will go over four different possibilities (or cases). Refer to the following photo for all possible jack/plug combinations but skip ahead to the correct case as shown below this photo.

IDENTIFY YOUR PLUG/JACK COMBINATION TYPE
CASE 1: - External Button Plug Type: TS (2 contacts)- Toy Jack Type: TS (2 wires)- GO TO CASE 1
CASE 2: - External Button Plug Type: TS (2 contacts)- Toy Jack Type: TRS (3 wires) - GO TO CASE 2
CASE 3: - External Button Plug Type: TRS (3 contacts)- Toy Jack Type: TS (2 wires) - GO TO CASE 3
CASE 4: - External Button Plug Type: TRS (3 contacts)- Toy Jack Type: TRS (3 wires)- GO TO CASE 4

CASE 1: WIRE PREPARATION- cut the wires long enough to reach the switch wherever you
decide to place the jack.WIRE IDENTIFICATION- Strip the ends of both wires, connect a single wire; one to each end of the multimeter leads.- Insert the audio plug connector into the audio jack connector.- Set your multimeter to the ohm setting, preferably with the
buzzer on.- Push down on the external push button and verify a
connection is made by looking at your multimeter. You should get a maximum reading of up to 5 ohms.
- If you’d like you can label one wire “SLEEVE”, and the other wire “TIP”.
CASE 2: WIRE PREPARATION- cut the wires long enough to reach the switch wherever you
decide to place the jack.WIRE IDENTIFICATION- Strip the ends of all 3 wires, begin with 2 of the 3 wires. Connect one wire to each end of the multimeter leads.- Insert the audio plug connector into the audio jack connector.- Set your multimeter to the ohm setting, preferably with the
buzzer on.- If a connection is made instantly (without having pressed the
external push button), label these wires SLEEVE and RING. The leftover wire is the TIP wire, label it as such.
- If you didn’t get this exact combination on your first try keep swapping out wires until you do, then continue on...
- Push down on the external push button and verify a connection is made by looking at your multimeter. You should get a maximum reading of up to 5 ohms.

CASE 3: - See CASE 1CASE 4: - See CASE 2
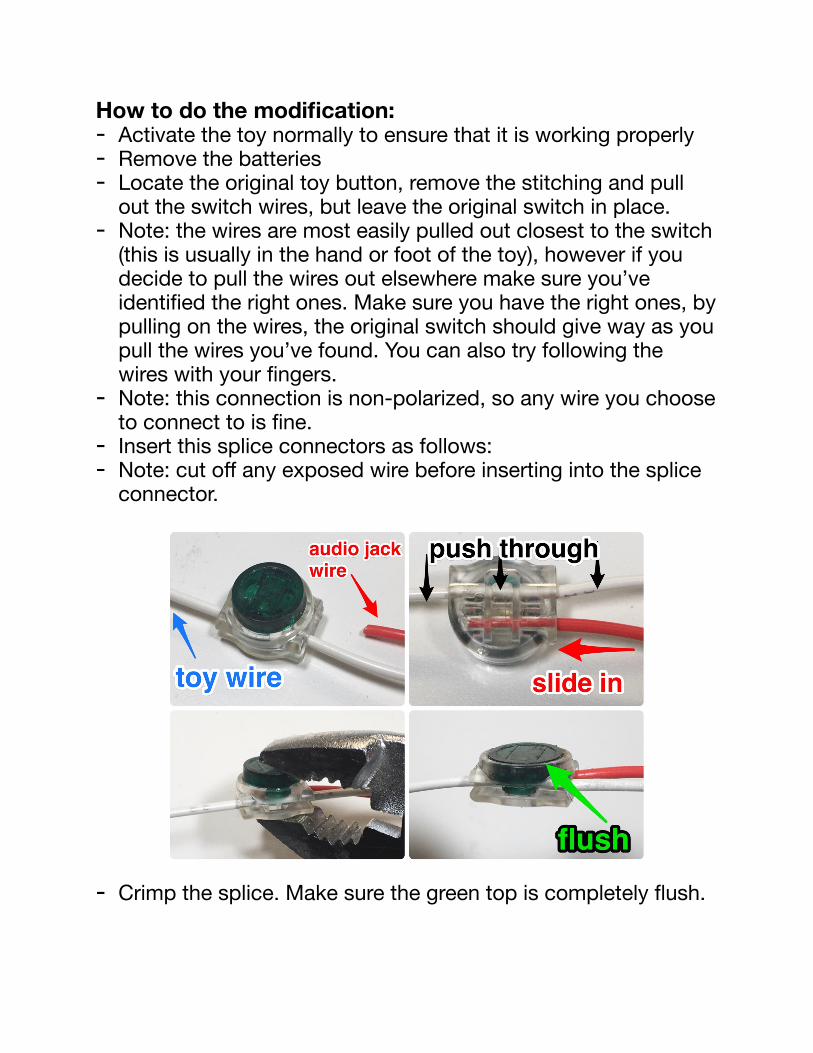
How to do the modification: - Activate the toy normally to ensure that it is working properly- Remove the batteries- Locate the original toy button, remove the stitching and pull
out the switch wires, but leave the original switch in place.- Note: the wires are most easily pulled out closest to the switch
(this is usually in the hand or foot of the toy), however if you decide to pull the wires out elsewhere make sure you’ve identified the right ones. Make sure you have the right ones, by pulling on the wires, the original switch should give way as you pull the wires you’ve found. You can also try following the wires with your fingers.
- Note: this connection is non-polarized, so any wire you choose to connect to is fine.
- Insert this splice connectors as follows:- Note: cut off any exposed wire before inserting into the splice
connector.
- Crimp the splice. Make sure the green top is completely flush.

- If you have a mono jack you will only be making two connections (SLEEVE and TIP). Connect one wire from the audio jack to one of the wires you pulled out, do the same for the second wire.
- If you have a stereo jack you will be making three connections. Connect the SLEEVE wire and the RING wire to either one of the single wires you fished out. Connect the TIP wire to the other wire.

- Ensure the splice connector is completely flush. Once installed it can only be removed by destroying the connector, if you need to remove it, it is best to leave it on and simply use another connector.
- Insert the batteries and test the toy with the external switch to see if it works. See troubleshooting at the end of this guide if it doesn’t.
- Insert the splice connectors and wires back into the toy.- If there is a nut threaded onto the audio jack remove it now. - Cover the audio jack with some scotch tape before putting it
back inside the toy. This will prevent any glue from getting into the audio jack connector body and preventing contact with the plug (external switch button).

- “Hot glue gun” the audio jack connector in a position that will allow for the external audio plug to connect without interfering with the toys’ operation. This usually means placing the audio jack behind the toy and parallel to the table it will be sitting on.
- Use enough glue to hold the audio jack solidly against the toy. It may be helpful to have the plug inserted into the jack to prevent any glue from getting inside.
- You may wind up using enough hot glue that stitching will not be required for final assembly.

- Apply textile adhesive around the material that will be sewn back together.

- Apply light stitching to seam the fabric back together.
- Replace the audio jack nut over the connector end for a clean finish.
- Check your external button one last time, Congratulations, you did it!
- If it doesn’t work, keep reading..!

TROUBLESHOOTING: - I’m sorry you’re on this page, don’t worry, we’ll fix it soon
enough!- Double check your crimp connectors, if the green tops are
even a little bit lifted, it may not work, make sure they are flush.- Inspect the crimp connector “windows”, the clear underside of
the green tops; make sure the wire is inserted all the way and that it has insulation all the way through (no exposed wires). Otherwise re-crimp with new connectors.
- Double check your batteries. Check the battery polarity or try swapping them into a toy that works to verify they are good batteries.
- Check your external push button switch, test the switch with your multimeter by placing the multimeter leads on the contacts of the 1/8” audio plug (turn the multimeter’s buzzer option on), ensure your switch is making contact between the SLEEVE and TIP as well as between the RING and TIP. You should be seeing a maximum of 5 ohms.
- Try inserting the plug into the jack several times to remove any possible glue debris from inside the 1/8” audio jack. Attempt to inspect the inside of the jack with a bright light and magnification if available.
- If you happen to have an extra 1/8” audio plug with a pigtail of exposed wires, plug this into the toy’s jack. Use a multimeter to check that the original switch makes contact when you turn it on/off. Between SLEEVE and TIP & RING and TIP, if it doesn’t make any contact you may have to try re-crimping the wires
- If the toy turns on instantly (no external button pushed), your wire labels may be mixed up, cut your wires and try again! Leave the crimp connectors on. Make sure your wire length will be long enough to reach. When you cut the wires you may want to leave them exposed so you can test out which combination works OK, before committing to crimping the wires back on.

- Your toy may just be a dud, maybe something was intermittently wrong already, and jostling it about sealed its fate. Grab another toy and try again!