how to - install eventtracker and change audit agent...how to - install eventtracker and change...
TRANSCRIPT

How to - Install EventTracker and Change Audit Agent Agent Deployment User Manual-v8.3
Publication Date: June 6, 2016

1
Agent Deployment User Manual v8.3
Abstract EventTracker Agent deployment processes are described in detail in this manual for v 8.3. EventTracker Agent can be deployed using methods like Active Directory Group Policy, Command Line, User Interface, and Manual Agent Install [Batch File Install]. The purpose of this document is to provide the step by step instructions to deploy EventTracker Agent using various methods and understand the deployment procedure.
Audience EventTracker users or system administrators, who wish to deploy the EventTracker Agent and Change Audit Agent.
The information contained in this document represents the current view of EventTracker. on the issues discussed as of the date of publication. Because EventTracker must respond to changing market conditions, it should not be interpreted to be a commitment on the part of EventTracker, and EventTracker cannot guarantee the accuracy of any information presented after the date of publication.
This document is for informational purposes only. EventTracker MAKES NO WARRANTIES, EXPRESS OR IMPLIED, AS TO THE INFORMATION IN THIS DOCUMENT.
Complying with all applicable copyright laws is the responsibility of the user. Without limiting the rights under copyright, this paper may be freely distributed without permission from EventTracker, if its content is unaltered, nothing is added to the content and credit to EventTracker is provided.
EventTracker may have patents, patent applications, trademarks, copyrights, or other intellectual property rights covering subject matter in this document. Except as expressly provided in any written license agreement from EventTracker, the furnishing of this document does not give you any license to these patents, trademarks, copyrights, or other intellectual property.
The example companies, organizations, products, people and events depicted herein are fictitious. No association with any real company, organization, product, person or event is intended or should be inferred.
© 2017 EventTracker Security LLC. All rights reserved. The names of actual companies and products mentioned herein may be the trademarks of their respective owners.

2
Agent Deployment User Manual v8.3
Table of Contents Abstract .................................................................................................................................................................... 1
Audience .................................................................................................................................................................. 1
Benefits/Advantages of EventTracker Windows Agent ............................................................................................ 4
Before You Begin ......................................................................................................................................................... 4
Download and Prepare EventTracker Agent MSI Installer Package for Deployment ............................................. 6
EventTracker 8.3 .......................................................................................................................................................... 6
Deploy through Command Line .................................................................................................................................. 6
Deploy through User Interface ................................................................................................................................... 7 Procedure to install with Agent.ini file ................................................................................................................ 11
Procedure to install with Agent.ini and etaconfig.ini files.................................................................................. 14
Deploy through Group Policy.................................................................................................................................... 18 Before you Begin ............................................................................................................................................... 18
Launch Group Policy Management Console ........................................................................................................ 21
Create the Group Policy Object in Active Directory for Software Deployment ................................................ 21
Verify Installation .................................................................................................................................................. 31
On Win XP, Win 2003 server operating systems ............................................................................................ 32
On Vista, Win 7, Win 8, Win 2008, Win 2008 R2, Win 2012, Win 2012 R2, Windows 10 and Windows 2016 operating systems .................................................................................................................................... 33
Limitation for Group Policy Installation ............................................................................................................... 34
How to deploy agent via Agent MSI in Server Core Machine?............................................................................... 35 Deploy through Command Line ............................................................................................................................ 36
Deploy through User Interface ............................................................................................................................. 37
Uninstall EventTracker Agent ............................................................................................................................... 39
How to launch EventTracker agent? .................................................................................................................... 43
How to launch Change Audit agent...................................................................................................................... 44
Manual Agent install V8.3 [Batch File Install] .......................................................................................................... 44 Installing EventTracker Agent ............................................................................................................................... 44
Preparing the files for manual agent installation ........................................................................................... 44
Performing the installation on XP/2K3 ............................................................................................................ 45
Performing the installation on Vista/2k8/Win7 when UAC is enabled ......................................................... 45

3
Agent Deployment User Manual v8.3
Performing the installation on Vista/2k8/Win7 (64 bit OS) ........................................................................... 45
Performing the installation on Win8/8.1/2012/10/16 (64 bit OS) ................................................................ 46
Preparing the files for manual agent installation (EventTracker Change Audit Agent) ............................... 46
Performing the installation on XP/2K3 ............................................................................................................ 46
Performing the installation on Vista/2k8/Win7 when UAC is enabled ......................................................... 47
Performing the installation on 64 bit OS ......................................................................................................... 47
4
Agent Deployment User Manual v8.3
Benefits/Advantages of EventTracker Windows Agent • Monitoring application log files, TCP/UDP network activities, USB devices, VMware infrastructure, file
and registry changes on the system • Software install/uninstall • Service start/stop • Send events with guaranteed delivery (TCP) • Performs automatic backup and clearing of the Windows Event Log • Send events as syslog messages to UDP, TCP and TLS/SSL destinations • Upload events as syslog formatted files to FTP, SFTP and SCP destinations • Perform SCAP based configuration assessments • Monitor file and registry changes on the system
Before You Begin
Before you begin with EventTracker agent deployment, there are few things you need to have and do. Please keep in mind the points described below,
• Ensure that the EventTracker Scheduler service of EventTracker Manager is running during the installation process.
• Network Share, where the EventTracker agent MSI files are stored should be accessible from all the target systems.
• Domain systems should have at least read access on Network Share, where the EventTracker MSI files are stored.
• Target system(s) should be member of the same domain.
• Once EventTracker agents are installed via group policy, you will not be able to uninstall the agents from the EventTracker system manager.
• If agent is deployed via command line and UI, then it has to be uninstalled from Control Panel or from All Programs from Start.
• To use all features of EventTracker Agent, .NET Framework should be installed as per system requirement.
• It is recommended to install EventTracker and Change Audit either by command line, System Manager or by group policy.

5
Agent Deployment User Manual v8.3
• For Windows 8/8.1/2012/2012 R2/10/2016, if .Net 3.5(which includes .Net 2.0 and .Net 3.0) is not
present, then the user will need to install it manually. ( Both for MSI and GPO)
• The new snapshots required for Change Audit will be taken at 2AM.
• To complete the installation, target system(s) need to be restarted after configuring software deployment policy.
• In Windows XP, sometimes it will take two reboots to get application installed. This is because Windows XP operates (by default) in a mode called Fast Logon Optimization. This means that the computer boots and logs in quicker, but it does mean that events that should occur during the computers boot or login will be delayed until the second boot or login.
• If the user wants to use config assessment then make sure that MSXML parser is available in that particular system. Approaches for installing MSXML parser- Ensure that the windows updates are up to date. Manually Install MSXML parser.
• After installing .NET 3.5, the system will restart automatically. In case after.Net 3.5 is installed and the
system prompts to restart, it is mandatory to restart the system and then continue with EventTracker Installation.
• The latest MSI package v 8.3 Build 9, if the user uninstalls through System Manager, both the features (EventTracker Agent and Change Audit) will get uninstalled. In case the user selects any one of the features and tries to uninstall, it will uninstall the complete MSI package (where all components of the MSI package are similar to the manager agent components).
• For v8.3, Build 9, if the user is enabling minimal GUI option in agent.ini, all the essential parameters must be filled in the ini. If the essential parameters are not filled by the users properly, it will display the warning
message “Please provide essential parameters in Agent.ini to proceed with the installation.” If the agent.ini is filled partially by the user, it will install the user selected feature
(EventTracker Agent) completely and the not selected feature (ChangAudit) will be installed partially.

6
Agent Deployment User Manual v8.3
NOTE:
Before deploying the EventTracker Agent, it is recommended that the EventTracker Scheduler service of EventTracker Manager is running during the installation process. This should be done so that the installer can connect with the EventTracker Manager and retrieve the license detail which is taken care of by the EventTracker Scheduler service. If, this is not done during the installation, you will not be able to access the EventTracker features that you opted for.
Download and Prepare EventTracker Agent MSI Installer Package for Deployment
Before you start with deployment, you need to extract MSI files to a suitable folder. Follow the instructions given below,
EventTracker 8.3 1. Download MSI package (e.g. AgentMSI_83.zip for v8.3) from the location provided by Prism
Microsystems Support team.
2. Extract AgentMSI_83.zip to AgentMSI_83\.
3. Fill the necessary details in “Agent.ini’ configuration file (refer Table 1 on how to specify the parameters).
Figure 1
Deploy through Command Line 1. To launch command line, click the Start button, and then click Run.

7
Agent Deployment User Manual v8.3
2. In Run dialog box, type ‘CMD’, and then click the ‘Ok’ button.
3. Change directory to AgentMSI_83.
4. Type ‘EventTrackerAgent.msi /qn’ command, and then click the Enter button.
NOTE:
• For Windows 8/8.1 and Windows 2012 operating system, .Net 3.5 will be enabled using a batch file provided in MSI package.
• All the parameters will be read from the "Agent.ini" configuration settings file, when the installer is running silently. If agent.ini and etaconfig.ini files are present in same folder, configuration will be deployed from etaconfig.ini file but the Suffix Name will be fetched from the Agent.ini file (in case the user has provided the suffix in agent.ini file).
• If agent.ini file does not contain any parameters, and etaconfig.ini file is also present in the same folder, then silent installation will not be successful.
• Agent.ini contains default value for shortcut as ‘0’; hence shortcut will not be created in startmenu. In order to get the shortcut in startmenu user has to manually change shortcut as ‘1’.
Deploy through User Interface NOTE: On Vista, Win 7, Win 8, Win 2008, Win 2008 R2, Win 2012 and Win 2012 R2 operating systems, the MSI Installer executable should run with ‘Administrative’ privileges.
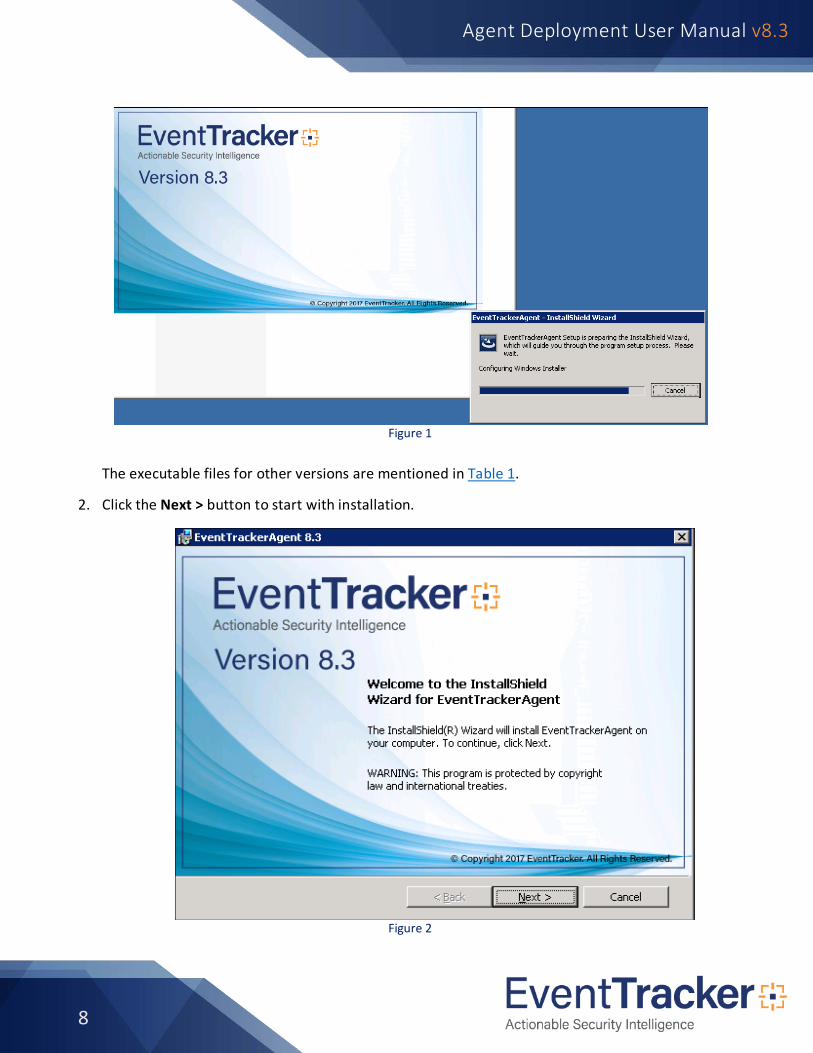
1. Click etwAgent.exe file for v8.3.
InstallShield Wizard pop up window appears on the screen.
8
Agent Deployment User Manual v8.3
Figure 1
The executable files for other versions are mentioned in Table 1.
2. Click the Next > button to start with installation.
Figure 2

9
Agent Deployment User Manual v8.3
3. Read the License Agreement, and then select the option ‘I accept the terms in the license agreement’.
Figure 3: License Agreement
4. Click the Next > button.
5. In Custom Setup, select EventTracker Windows Agent and Change Audit Agent based on the requirement.
Refer Figure 5.

10
Agent Deployment User Manual v8.3
Figure 4: Custom Setup
Click icon to select the installation options:
• Figure 5
• Select ‘This feature will be installed on local hard drive’ option to install only agent and not sub features.
OR • Select ‘This feature, and all subfeatures, will be installed on local hard drive’ option to install
agent as well as its sub features.
OR • Select the ‘This feature will not be available’ option, if you do not wish to install the agent.
6. Click the Change button to change the installation path of the agent and then click the Next > button.

11
Agent Deployment User Manual v8.3
Figure 6
7. In the Event destination pane, there are two methods to install EventTracker and Change Audit agents:
• Procedure to install with Agent.ini file
• Procedure to install with Agent.ini and etaconfig.ini files
Procedure to install with Agent.ini file a) Enter EventTracker Manager: (Ex. Win2k3x64), Port number: (Ex. 14505 to 14580).
b) Select Deploy SCAP/Deploy WINSCP option as per the requirement.
c) Enter License Server: (Ex. Win2k3x64), Port number: (Ex. 14503) and Change Audit Manager: (Ex. Win2k3x64).
d) Click the Next > button.
Refer Figure 10.

12
Agent Deployment User Manual v8.3
Figure 7: Event Destination
NOTE:
• If the agent.ini file has the proper inputs like manager name/port/license server etc., the application reads the information from the file automatically and displays the same in UI. There is no need to enter the values, provided if any change is required.
• The Event Destination(Figure: 10) window will be hidden, if the user has filled the configuration details in agent.ini
• The user can change the License Server name as per convenience.
If only EventTracker Windows Agent is selected, the below screen gets displayed.

13
Agent Deployment User Manual v8.3
If only Change Audit is selected, the following window gets displayed.

14
Agent Deployment User Manual v8.3
Procedure to install with Agent.ini and etaconfig.ini files a) To achieve this, first copy ‘etaconfig.ini’ file from”<INSTALLDIR>\EventTracker\Agent” folder to the
same directory/folder where setup resides.
b) In Event destination pane, select Deploy SCAP / Deploy WINSCP option as per the requirement.
c) Enter Change Audit Manager: (Ex. Win2k3x64) details and then click the Next > button.
Figure 8
NOTE:
• If agent.ini and etaconfig.ini files are present in same folder, configuration will be deployed from etaconfig.ini file but the Suffix Name will be fetched from the Agent.ini file (In case the user has provided suffix in agent.ini file).
• Also, if the user doesn’t select SCAP or WINSCP, the agent will be installed with both the features.
8. In this last step of the installation process, click the Install button.

15
Agent Deployment User Manual v8.3
Figure 9
NOTE: If suffix is enabled in the Agent.ini file, the below figure will get displayed.
If the user enters a suffix name in the Agent.ini file, then the name will be displayed in the “Please Enter Location name” field, by default. Also if the user wants to edit the suffix name, he /she can edit it in the below screen.
If the user does not add any suffix name in the .ini file, the field will be displayed blank.
Figure 13
16
Agent Deployment User Manual v8.3
NOTE: Allowed special character: “-“, “_”, “.” and the characters are limited to 100.
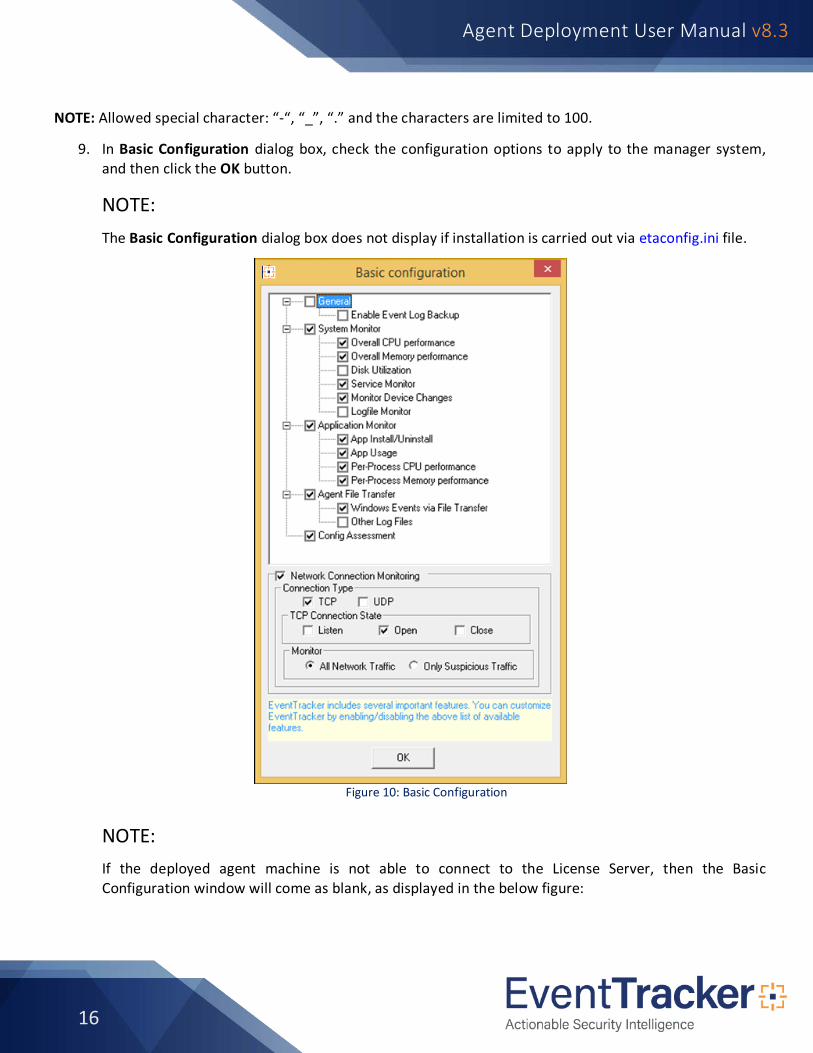
9. In Basic Configuration dialog box, check the configuration options to apply to the manager system, and then click the OK button.
NOTE: The Basic Configuration dialog box does not display if installation is carried out via etaconfig.ini file.
Figure 10: Basic Configuration
NOTE: If the deployed agent machine is not able to connect to the License Server, then the Basic Configuration window will come as blank, as displayed in the below figure:

17
Agent Deployment User Manual v8.3
Figure 14
10. Click the Finish button to complete the installation process.
Figure 15

18
Agent Deployment User Manual v8.3
Deploy through Group Policy Before you Begin 1. Modify Agent.ini and change EM (ENTERPRISE_MANAGER), CM (Change Audit manager), INSTALLDIR
(EventTracker Agent install directory) EP (ENTERPRISE_PORT), LS (License server name/ IP Address where the digital certificate is installed), and LP (License server port number) value appropriately.
Configuration Settings Sample Configuration
[INSTALL_PATH] INSTALLDIR=<Installation directory if agent need to be installed in other than default path> [END] [ENTERPRISE_MANAGER] EM=<EventTracker Manager Hostname or IP Address> [END] [ENTERPRISE_PORT] EP=<EventTracker Enterprise Port number> [END] [CHANGEAUDIT_MANAGER] CM=<Change Audit Manager Hostname or IP Address> [END] [REMEDIAL_ACTIONS] IR=1 [END] [LICENSE_SERVER] LS=<The server name/ IP Address where the digital certificate is installed> [END] [LICENSE_SERVER_PORT] LP=<License server port number> [END] Deploy SCAP components [DEPLOY_SCAP] DS= ‘1’ or ‘0’ [END] Deploy WINSCP components [DEPLOY_WINSCP] DW= ‘1’ or ‘0’ [END] Create startmenu shortcut [SHORTCUT] SC= ‘1’ or ‘0’ [END] Setup wizard with minimal GUI [MINIMAL_GUI] MIN_GUI=’1’ or ‘0’ [END] Ask for suffix is enable or not [ENABLE_SUFFIX] IS_SUFFIX=0 [END] System suffix name [SUFFIX_STRING] SUFFIX = [END]
[INSTALL_PATH] INSTALLDIR= [END] [ENTERPRISE_MANAGER] EM=Win2k3x64 [END] [ENTERPRISE_PORT] EP=14580 [END] [CHANGEAUDIT_MANAGER] CM=Win2k3x64 [END] [REMEDIAL_ACTIONS] IR=1 [END] [LICENSE_SERVER] LS=Win2k3x64 [END] [LICENSE_SERVER_PORT] LP=14503 [END] Deploy SCAP components [DEPLOY_SCAP] DS=1 [END] Deploy WINSCP components [DEPLOY_WINSCP] DW=1 [END] Create startmenu shortcut [SHORTCUT] SC=1 [END] Setup wizard with minimal GUI [MINIMAL_GUI] MIN_GUI=1 [END] Ask for suffix is enable or not [ENABLE_SUFFIX] IS_SUFFIX=1 [END] System suffix name [SUFFIX_STRING] SUFFIX = EventTracker
[END]
19
Agent Deployment User Manual v8.3
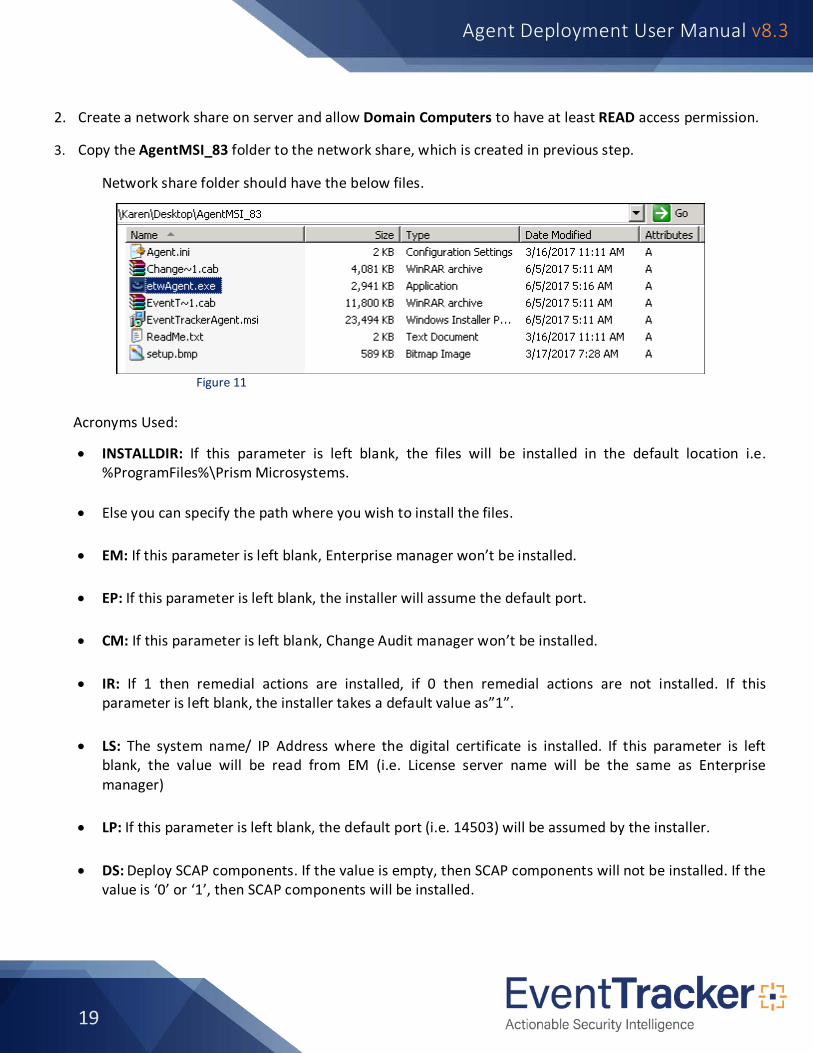
2. Create a network share on server and allow Domain Computers to have at least READ access permission.
3. Copy the AgentMSI_83 folder to the network share, which is created in previous step.
Network share folder should have the below files.
Figure 11
Acronyms Used:
• INSTALLDIR: If this parameter is left blank, the files will be installed in the default location i.e. %ProgramFiles%\Prism Microsystems.
• Else you can specify the path where you wish to install the files.
• EM: If this parameter is left blank, Enterprise manager won’t be installed.
• EP: If this parameter is left blank, the installer will assume the default port.
• CM: If this parameter is left blank, Change Audit manager won’t be installed.
• IR: If 1 then remedial actions are installed, if 0 then remedial actions are not installed. If this parameter is left blank, the installer takes a default value as”1”.
• LS: The system name/ IP Address where the digital certificate is installed. If this parameter is left blank, the value will be read from EM (i.e. License server name will be the same as Enterprise manager)
• LP: If this parameter is left blank, the default port (i.e. 14503) will be assumed by the installer.
• DS: Deploy SCAP components. If the value is empty, then SCAP components will not be installed. If the value is ‘0’ or ‘1’, then SCAP components will be installed.

20
Agent Deployment User Manual v8.3
• DW: Deploy WINSCP components. If the value is empty then WINSCP components will not be installed. If the value is ‘0’ or ‘1’, then WINSCP components will be installed.
• SC: Shortcut will not be created in startmenu, if the value is ‘0’ or empty. If the value is ‘1’, then
shortcut will be created in startmenu.
• MG: Setup wizard with minimal GUI, if the value is ‘1’. If the value is ‘0’, it means full GUI wizard.
• IS SUFFIX: Will ask for Suffix enabled or not. If the value is “0” it will be disabled and if the value is “1” it will be enabled.
• SUFFIX: Enter the system suffix name in this field.
NOTE: • All the parameters will be read from the "Agent.ini" configuration settings file, when the installer is
running silently.
• It is mandatory to specify either Enterprise Manager name or Change Audit Manager name.
• If user wish to install EventTracker Agent then Enterprise Manager Name (EM) is mandatory.
• If user wish to install Change Audit Agent then Change Audit Manager Name (CM) is mandatory.
• Remedial Actions are scripts or EXEs that can be launched at either the Agent or Manager Side, in response to events. If this option is enabled, predefined scripts will be placed in the EventTracker\Agent\Script folder.
• All checkbox setting in GUI like “Deploy SCAP components”, “Deploy WINSCP components”, “Remedial Actions components” will populate as per Agent.ini configuration.
• Microsoft XML Core Services (MSXML) is installed along with the MSI Agent Installer setup for 32-bit and 64-bit machines respectively.
• The Microsoft Visual C++ 2008 Redistributable Package (x86) which installs runtime components of Visual C++ Libraries required to run applications developed with Visual C++ is also installed along with the MSI Agent Installer setup.
• Before deploying the Agent, make sure that the Agent system(s) and domain controller are synchronized.

21
Agent Deployment User Manual v8.3
• For silent/GPO installation- installation will aborted if suffix/location name enable in Agent.ini and it value is empty.
Launch Group Policy Management Console 1. Select the Start button, select Settings, and then select Control Panel.
2. Select Administrative Tools, and then select Group Policy Management.
Figure 17
Create the Group Policy Object in Active Directory for Software Deployment
Follow the steps given below to create the new ‘Group Policy Object’ using the ‘Group Policy Management’ Snap-in,
1. In the Group Policy Management pane, expand Domains node, and then expand domain system
node.
2. Right click Group Policy Objects, and then click New.

22
Agent Deployment User Manual v8.3
Figure 18: Create Group Policy Object
3. Enter a name for this new GPO (Ex. AgentMSI GPO) and then click the OK button.
Figure 19: New GPO
4. Click the name of newly created GPO. In this case, ‘AgentMSI GPO’.

23
Agent Deployment User Manual v8.3
Figure 20
A. In the Security Filtering pane, click the Add button to apply GPO settings to the domain computers group (or ensure the authenticated users group is listed).
B. In the Enter the object name to select field, type the object name or a part of the object name, and then click the Check Names button to select the object name.
Figure 21

24
Agent Deployment User Manual v8.3
C. Click the OK button.
5. Right click the newly created GPO, and then click Edit. Group Policy Object Editor window will be opened. A. Expand the Computer Configuration, and open Software Settings.
Figure 22
B. Right-click Software Installation, select New, and then select Package.
Figure 23: Software installation, create new package
Open window displays.
25
Agent Deployment User Manual v8.3
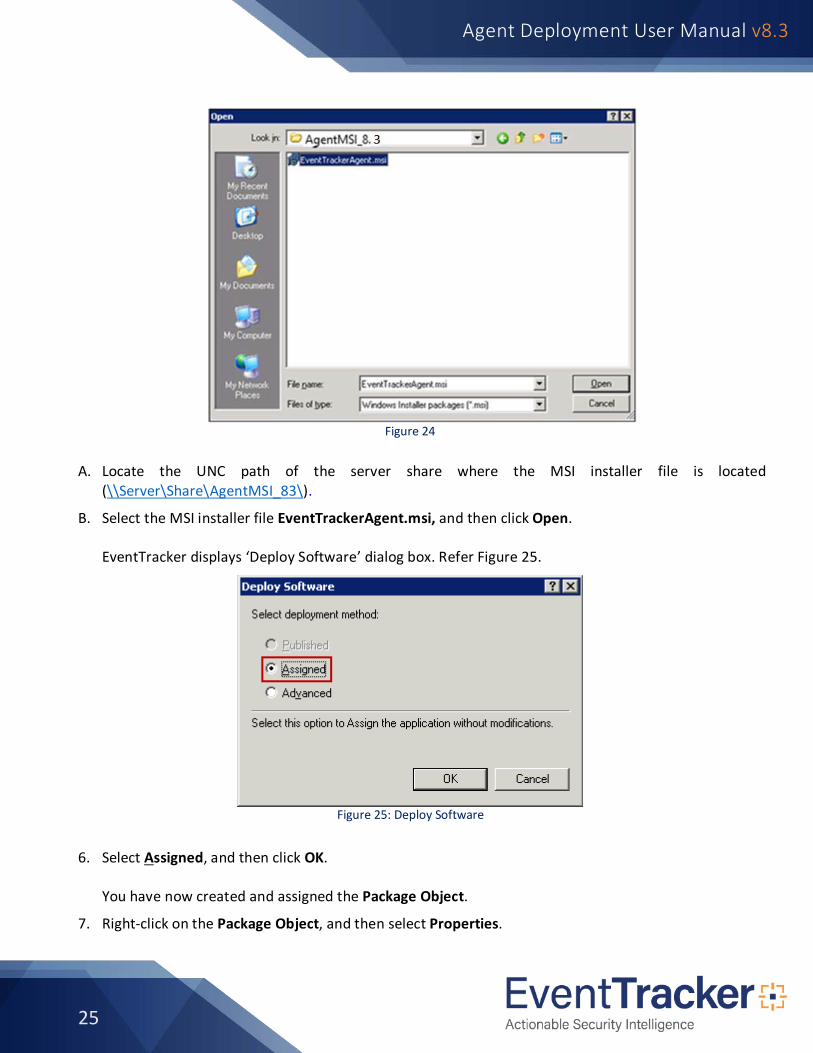
Figure 24
A. Locate the UNC path of the server share where the MSI installer file is located (\\Server\Share\AgentMSI_83\).
B. Select the MSI installer file EventTrackerAgent.msi, and then click Open. EventTracker displays ‘Deploy Software’ dialog box. Refer Figure 25.
Figure 25: Deploy Software
6. Select Assigned, and then click OK. You have now created and assigned the Package Object.
7. Right-click on the Package Object, and then select Properties.

26
Agent Deployment User Manual v8.3
8. Click the Security tab; select the Add button to add Domain Computers to provide security permissions.
Refer Figure 26.
Figure 26
9. Select the Advanced button, select Find Now.
Refer Figure 27.
27
Agent Deployment User Manual v8.3
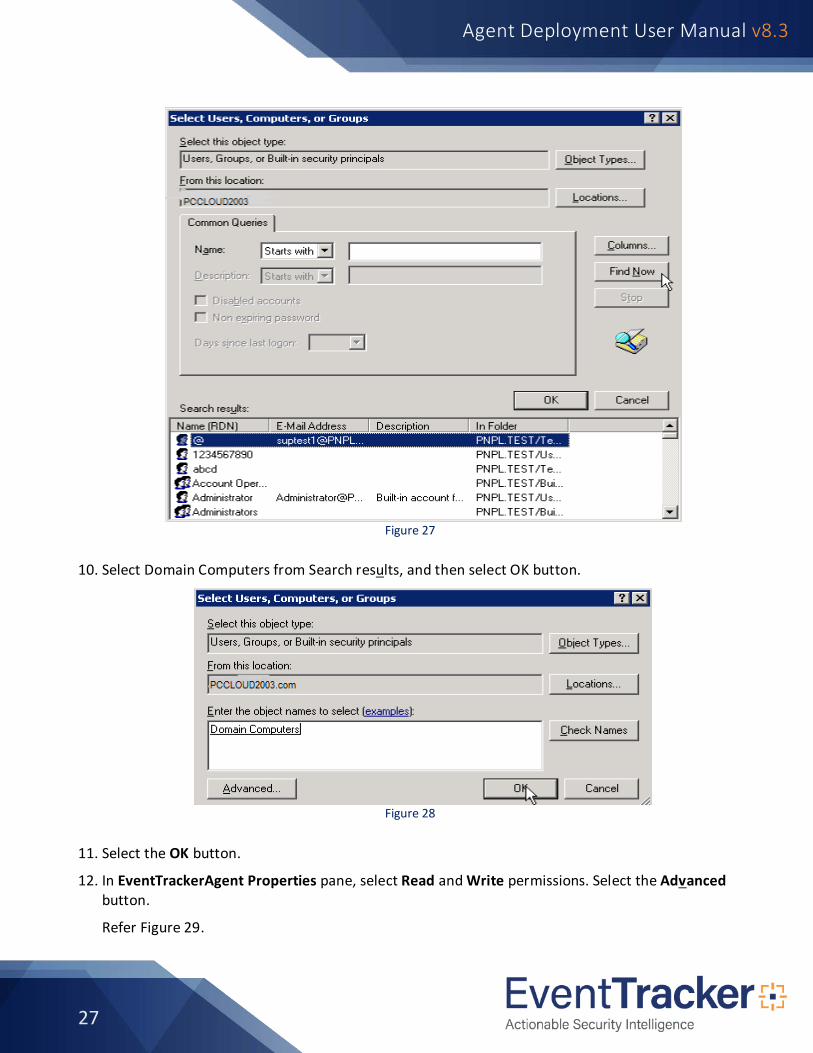
Figure 27
10. Select Domain Computers from Search results, and then select OK button.
Figure 28
11. Select the OK button.
12. In EventTrackerAgent Properties pane, select Read and Write permissions. Select the Advanced button.
Refer Figure 29.

28
Agent Deployment User Manual v8.3
Figure 29
NOTE:
Ensure Domain Computers has the Read and Write rights. 13. Select Domain Computers, and then click Edit.
Refer Figure 30.

29
Agent Deployment User Manual v8.3
Figure 30
14. Check the List Contents, Read All Properties, and Read Permissions options, if not selected. Select the OK button.
Refer Figure 30.
15. Select the Apply button and then select the OK button.
16. In Group Policy Management pane, right click the domain system name, and then select New
Organizational Unit (OU). A New Organizational Unit has to be created. Refer Figure 31.

30
Agent Deployment User Manual v8.3
Figure 31
17. Enter New Organizational Unit name.
For example: Group Policy.
18. Right click newly created OU, and then click Link an Existing GPO.
Refer Figure 32.
Figure 32

31
Agent Deployment User Manual v8.3
NOTE: Enable Enforced as “Yes”.
Navigate to Linked GPO, right-click and enable the Enforced.
19. In the Select GPO dialog box, select the appropriate domain name and newly created Group Policy Object, and then click the OK button.
20. Close the Group Policy window.
The MSI package has now been defined and is ready for the deployment. 21. Force replication to all other domain controllers.
NOTE:
EventTracker and Change Audit Agents will be installed once the target machines are restarted.
If agent.ini and etaconfig.ini files are present in same folder, configuration will be deployed from etaconfig.ini file.
Verify Installation Events will be sent to the target systems (i.e. "Manager" systems) upon successful deployment of EventTracker/ Change Audit agents. The name of the deployed agent along with their version number will

32
Agent Deployment User Manual v8.3
appear in the System manager screen. On Target systems, following events will be generated in System Event Log:
On Win XP, Win 2003 server operating systems
On successful Agent deployment:
Example 1: Event Type : Information
Event Source : Application Management
Event Category: None
Event ID : 301
User : NT AUTHORITY\SYSTEM
Computer : ESXWINXPVM8
Description : The assignment of application EventTrackerAgent from policy EventTracker Agent Deployment succeeded.
Example 2: Event Type : Information
Event Source : Application Management
Event Category: None
Event ID : 302
User : NT AUTHORITY\SYSTEM
Computer : ESXWINXPVM8
Description : The install of application EventTrackerAgent from policy EventTracker Agent Deployment succeeded.
On Failed Agent deployment:
Event Type : Warning
Event Source : Application Management
Event Category: None

33
Agent Deployment User Manual v8.3
Event ID : 102
User : NT AUTHORITY\SYSTEM
Computer : ESXWINXPVM8
Description : The install of application EventTrackerAgent from policy Software Deployment
policy failed.
On Vista, Win 7, Win 8, Win 2008, Win 2008 R2, Win 2012, Win 2012 R2, Windows 10 and Windows 2016 operating systems
On Successful Agent Deployment: Example 1: Log Name : System Source : Application Management Group Policy
Event ID : 301
Task Category : None
Level : Information
Keywords : Classic
User : SYSTEM
Computer : Esxwin2k8r2vm3.Toons.local
Description : The assignment of application EventTrackerAgent from policy Software Deployment policy succeeded.
Example 2: Log Name : System
Source : Application Management Group Policy
Event ID : 302
Task Category : None
Level : Information
Keywords : Classic
User : SYSTEM

34
Agent Deployment User Manual v8.3
Computer : Esxwin2k8r2vm3.Toons.local
Description : The install of application EventTrackerAgent from policy Software Deployment policy succeeded.
On Failed Agent Deployment:
• Log Name : System
• Source : Application Management Group Policy
• Event ID : 102
• Task Category : None
• Level : Error
• Keywords : Classic
• User : SYSTEM
• Computer : Esxwin2k8r2vm3.Toons.local
• Description : The install of application EventTrackerAgent from policy Software Deployment policy failed.
Limitation for Group Policy Installation • Retain configuration does not work via Group policy
• Upgrade agents is not supported via Group policy
• Modification features are not supported via Group policy
• Command line or silent installation doesn't support retain, upgrade and modify functions
• If EventTracker and Change Audit agent is installed via group policy then it is not possible to configure group policy to uninstall Change Audit or EventTracker agent only. While uninstalling both EventTracker and Change Audit agent will be uninstalled.
• GPO: shortcut value in agent.ini has to be kept as “One”, in case the user wants to uninstall agent from individual systems.
• GPO: In case the user wants to uninstall agent from all the systems using GPO uninstall option, then the shortcut value in agent.ini need not be changed.

35
Agent Deployment User Manual v8.3
How to deploy agent via Agent MSI in Server Core Machine?
1. Login to the server core system.
2. Copy the MSI package in the drive of server core machine. Make sure that the user has permission to the system.
3. Extract AgentMSI_83.zip to AgentMSI_83\.
4. Open Task Manager by pressing the key combinations Ctrl + Shift+ Esc.
5. Click Run New Task from File Menu.
Figure 33
6. To open Command prompt, type CMD in the Create New Task Screen.

36
Agent Deployment User Manual v8.3
Figure 34
7. The Command Prompt Screen will be displayed.
Deploy through Command Line 1. To locate the MSI package, type the following commands:
a. Exit from the System 32 folder by typing the command Cd\
b. Change the directory to Agentmsi_82 by entering the command Cd Agentmsi_82.
c. Now, open the Agent.ini file by typing Agent.ini.
Figure 35
The Agent.ini file will be displayed.
2. Fill the necessary details in “Agent.ini’ configuration file.

37
Agent Deployment User Manual v8.3
Figure 36
3. Type ‘EventTrackerAgent.msi /qn’ command, and then click the Enter button.
Figure 37
Deploy through User Interface 1. Type dir to list the files that are available in the Agentmsi_83 folder.

38
Agent Deployment User Manual v8.3
The files inside the directory are listed
2. Execute etwAgent.exe file by typing etwAgent.exe.
Figure 39
3. The EventTracker 8.3 InstallShield Wizard will get started.
Figure 40
4. To continue with the installation steps, please refer to Deploy through User Interface.

39
Agent Deployment User Manual v8.3
Uninstall EventTracker Agent 1. Open Task Manager by pressing the key combinations Ctrl + Shift+ Esc.
2. Click Run New Task from File Menu.
Figure 41
3. Type regedit in the Create New Task Screen.
Figure 42
• The Registry Editor screen will be displayed.

40
Agent Deployment User Manual v8.3
• Go to the following location to find the registry keys: Computer\HKEY_LOCAL_MACHINE\SOFTWARE\Wow6432Node\Microsoft\Windows\CurrentVersion\Uninstall\
Figure 43
4. Traverse through all the registry keys until you find: • DisplayName : EventTrackerAgent • Installsource: AgentMSI_83

41
Agent Deployment User Manual v8.3
Figure 44
5. Copy the key.
6. Open the Command Prompt and type MsiExec.exe/uninstall followed by the key.
Figure 45
7. Select Yes to confirm.

42
Agent Deployment User Manual v8.3
Figure 46
Figure 47
8. You will be asked whether to retain agent configuration settings.
• Click Yes if you wish to retain agent Configuration settings or else click No.
Figure 48
NOTE: In case you get the below message during the uninstall process, then the EventTracker and Change audit process has to be killed from task manager.

43
Agent Deployment User Manual v8.3
Figure 49
How to launch EventTracker agent? 1. Type dir to list the files that are available in the Agent folder.
The files inside the directory are listed.
2. Type etaconfig.exe and press Enter to open EventTracker Agent Configuration.
Figure 50

44
Agent Deployment User Manual v8.3
How to launch Change Audit agent 1. Change directory to the path where WcWindows folder is located.
2. Type dir to list the files that are available in the WcWindows folder.
3. Type WcWindows.exe and press Enter to open EventTracker Change Audit Agent.
Figure 51
• The EventTracker change audit agent is launched.
Manual Agent install V8.3 [Batch File Install]
Installing EventTracker Agent NOTE
The agent installation procedure is applicable only for EventTracker V 8.3 users.
Preparing the files for manual agent installation 1. Extract the zip file in the root directory of install drive.
2. Replace Agent\AITemp\etaconfig.ini with your copy of etaconfig.ini.
OR
Specify the manager details in Agent\AITemp\etaconfig.ini

45
Agent Deployment User Manual v8.3
3. Specify the license server details in Agent\etsetup.ins. Open the file Agent\etsetup.ins in notepad and replace “LicServ_Name=” with “LicServ_Name=<LicenseServerName>”. Substitute the text “<LicenseServerName>” with the name/IP of manager system.
4. If program files shortcut menu is not required, then open the file Agent\etsetup.ins in notepad and replace “PgmMenuShortCutReq=1” with “PgmMenuShortCutReq=0”.
5. If you do not want to install SCAP components on target system, then open the file
Agent\etsetup.ins in notepad and replace “ETADeploySCAP=1” with “ETADeploySCAP=0”.
6. If you do not want to install WinSCP components on target system, then open the file Agent\etsetup.ins in notepad and replace “ETADeployWinSCP=1” with “ETADeployWinSCP=0”.
The default etaconfig.ini available with this installer will not have a manager, license server configured, and File transfer, and Configuration assessment are disabled. If the default copy is not replaced, then please configure Manager and required settings by opening Programs-> EventTracker-> Agent Config (Agent Configuration GUI) or by running "etaconfig.exe" from installation path.
Performing the installation on XP/2K3 1. Execute install.bat.
Performing the installation on Vista/2k8/Win7 when UAC is enabled 1. Go to Start -> All Programs -> Accessories.
2. Right click on “Command Prompt” and select “Run as administrator” to open the command prompt
as administrator.
3. In the command prompt change the directory to the path where install.bat file is located.
4. Type “install.bat” and press enter.
Performing the installation on Vista/2k8/Win7 (64 bit OS) 1. Open the file Agent\etsetup.ins and update "INSTALLPATH=\Program Files (x86)\Prism
Microsystems\EventTracker\Agent".
2. Execute installx64.bat bat (If UAC is enabled, see Performing the installation on Win8 (32 bit OS).
3. Performing the installation on Win8 (32 bit OS)
46
Agent Deployment User Manual v8.3
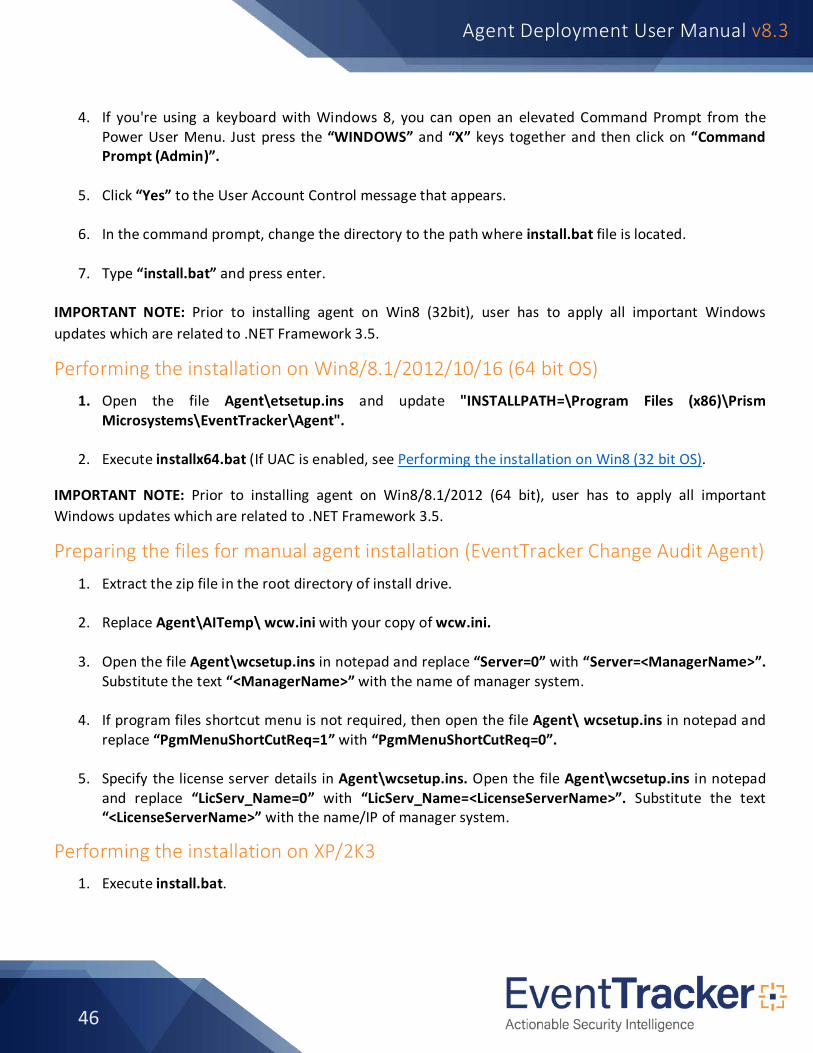
4. If you're using a keyboard with Windows 8, you can open an elevated Command Prompt from the Power User Menu. Just press the “WINDOWS” and “X” keys together and then click on “Command Prompt (Admin)”.
5. Click “Yes” to the User Account Control message that appears.
6. In the command prompt, change the directory to the path where install.bat file is located.
7. Type “install.bat” and press enter.
IMPORTANT NOTE: Prior to installing agent on Win8 (32bit), user has to apply all important Windows updates which are related to .NET Framework 3.5.
Performing the installation on Win8/8.1/2012/10/16 (64 bit OS) 1. Open the file Agent\etsetup.ins and update "INSTALLPATH=\Program Files (x86)\Prism
Microsystems\EventTracker\Agent".
2. Execute installx64.bat (If UAC is enabled, see Performing the installation on Win8 (32 bit OS).
IMPORTANT NOTE: Prior to installing agent on Win8/8.1/2012 (64 bit), user has to apply all important Windows updates which are related to .NET Framework 3.5.
Preparing the files for manual agent installation (EventTracker Change Audit Agent) 1. Extract the zip file in the root directory of install drive.
2. Replace Agent\AITemp\ wcw.ini with your copy of wcw.ini.
3. Open the file Agent\wcsetup.ins in notepad and replace “Server=0” with “Server=<ManagerName>”.
Substitute the text “<ManagerName>” with the name of manager system.
4. If program files shortcut menu is not required, then open the file Agent\ wcsetup.ins in notepad and replace “PgmMenuShortCutReq=1” with “PgmMenuShortCutReq=0”.
5. Specify the license server details in Agent\wcsetup.ins. Open the file Agent\wcsetup.ins in notepad
and replace “LicServ_Name=0” with “LicServ_Name=<LicenseServerName>”. Substitute the text “<LicenseServerName>” with the name/IP of manager system.
Performing the installation on XP/2K3 1. Execute install.bat.

47
Agent Deployment User Manual v8.3
Performing the installation on Vista/2k8/Win7 when UAC is enabled 1. Go to Start -> All Programs -> Accessories.
2. Right click “Command Prompt” and select “Run as administrator” to open the command prompt as administrator.
3. In the command prompt change the directory to the path where install.bat file is located.
4. Type “install.bat” and press Enter.
Performing the installation on 64 bit OS 1. Open the file Agent\wcsetup.ins and update "LocalRootDir=\Program Files (x86)\Prism
Microsystems\WCWindows".
2. Execute installx64.bat (If UAC is enabled, see Performing the installation on Vista/2k8/Win7 when UAC is enabled).