how to guide_changing the timing belt on a rb25det
TRANSCRIPT

NSOCH TBT v1.1 14/06/09 Page 1 of 10
‘How-to’ guides
Date: 7 June 2009 Title: Changing the Timing Belt on a RB25DET &RB25DE
Written by: seastate of Nissan Stagea Owners Club
Tools you will need:Basic hand tools, pulley puller.
Parts you will need (Nissan part no’s):
Idler Pulley N1307458S00 Tensioner Pulley NAY460NS010 Timing Belt N1302820P25 Crank sensor O ring N2213158S10
1./ Remove the battery 2/ Remove the air inlet 3/Remove the under-tray
NSOCH TBT v1.1 14/06/09 Page 2 of 10
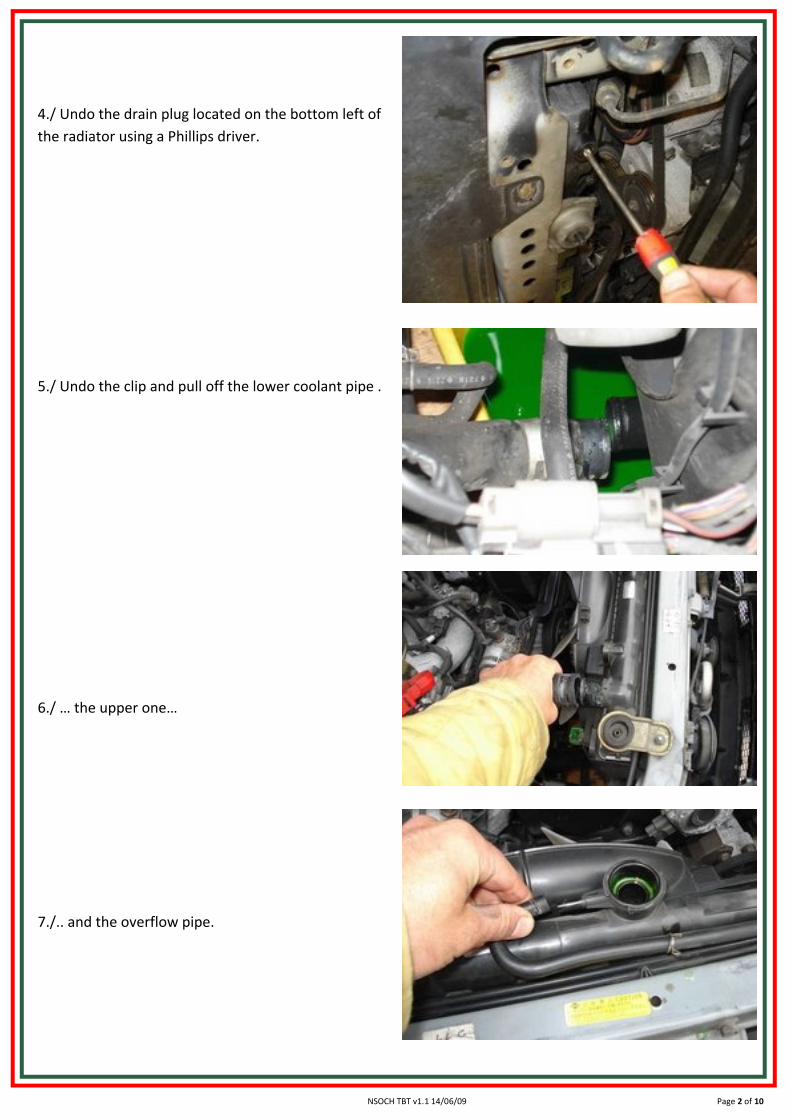
4./ Undo the drain plug located on the bottom left of the radiator using a Phillips driver.
5./ Undo the clip and pull off the lower coolant pipe .
6./ … the upper one…
7./.. and the overflow pipe.

NSOCH TBT v1.1 14/06/09 Page 3 of 10
8./ Remove the temperature sender plug.
9./ Remove the two securing clamps
10./ And finally remove the two oil cooler pipes at the bottom of the radiator. Have something handy to plugthe pipes to stop oil dribbling out. I used a couple of 8mm bolts with a bit of tape on them.

NSOCH TBT v1.1 14/06/09 Page 4 of 10
11./ Now carefully lift out the radiator.
12./ Loosen the alternator and remove the 4 nuts securing the fan and remove the fan.
13./ Remove the fan/alternator, power steering and aircon compressor belts

NSOCH TBT v1.1 14/06/09 Page 5 of 10
14./ Remove the Crank Angle Sensor plug, then undo
the three bolts and gently remove the sensor.
Note: Marking the position of the sensor on the cover before removing it, will allow you to put it back in exactly the same position when re-assembling
15./ Remove the Timing Belt Upper cover
16./ Position No.1 cylinder at TDC. Turn the crank clockwise until it reaches 0o.
This pic shows the timing indicator markings on the crank pulley and the lower timing belts cover. The first mark is 0o (as shown). Each mark is 5o

NSOCH TBT v1.1 14/06/09 Page 6 of 10
The cam pulleys will (should!) also align. The pics show them aligned on their marks.
17./ Remove the crank pulley bolt.
This will involve locking the crank somehow. The Nissan Manual tells you to remove the starter motor and use special tools as shown in the pic.
Alternatively you can make yourself something to hold the crank pulley or simply use an old alternator belt twisted a few times and then tightened with the alternator.
NOTE: Only unscrew it about 1cm or so because you’ll need the bolt to get the pulley puller on

NSOCH TBT v1.1 14/06/09 Page 7 of 10
18./ Use a pulley-puller pull off the crank pulley.
You don’t have to use the Nissan one, any pulley puller will do. The crank has two 6mm screw holes set 75mm apart.
19./ Remove the timing belt and crank pulley plate.
20./ Using an Allen key and spanner, turn the Tensioner Pulley to loosen it temporarily and remove the timing belt
21./ Remove the Tensioner Pulley
…and Idler Pulley

NSOCH TBT v1.1 14/06/09 Page 8 of 10
22./ Install a new Idler Pulley
23./ Install a new Tensioner Pulley.
Put the Tensioner spring on making sure to hook the spring in the groove on the pulley
Hold the Tensioner Pulley and hook the spring on the stud bolt by rotating it anti-clockwise
Put the washers and nut back on the Tensioner Pulley and just tighten it temporarily.
NOTE: The washers have a particular order (as shown in the pics below)

NSOCH TBT v1.1 14/06/09 Page 9 of 10
25./ Install the new Timing Belt, and using an Allen key in the Tensioner Pulley make sure the three timing marks are aligned.
Exhaust cam pulley Inlet cam pulley Crank pulley
26./ To tension the belt, replace the Crank Pulley bolt and use it to turn the crank clockwise twice with the Tensioner Pulley still loose.
Now simply tighten up the Tensioner Pulley, holding it in place with an Allen key, to the correct torque (43-58Nm).
27./ Replace the Crank Pulley Plate and the lower timing belt cover.
28./ Replace the Crank Pulley and bolt and tighten it up. NOTE: The washer goes with the flat face towards the Crank Pulley
29./ Replace the Upper Timing Belt Cover.

NSOCH TBT v1.1 14/06/09 Page 10 of 10
30./ Replace the ‘O’ ring on the crank angle sensor and apply high temperature grease to the spline before inserting the sensor into place
NOTE: there is a fitting joint in the spline. Make sure they are aligned before inserting it and don’t force it in.
Make sure it can spin freely. If not loosen the timing belt cover screws and move the cover around a bit.
31./ Replace the rest in reverse order to the removal procedure
NOTES: