how to guide - electronics for imaging guides/how to... · 2 how to guide overview this document...
TRANSCRIPT

HOW TO GUIDELicense Guide- Advanced Nesting Keys

2
HOW TO GUIDE
OverviewThis document describes the Optitex licensing system. The licensing system enables you to activate your software, based on the modules you have purchased. It includes a physical key and an activation file.The guide includes all licensing processes and issues, as well as best practices, troubleshooting and frequently asked questions.To help you better understand the process, we have divided this document into two main sections:
• Basic licensing information: Includes all you need to know about keys, the License Manager,
activation, etc.
• Advanced licensing and support information: Includes more advanced information for advanced
users and support.

3
HOW TO GUIDE
Basic Licensing InformationThis section describes all you need to know about Optitex licenses, activation, updating/upgrading, etc.The following topics are included: • Types of Keys
• Getting Started with a New License
• Optitex License Manager
• License Activation Overview
• How to work with Network keys: the basics
• Updating/Upgrading Existing Licenses
• Contacting Optitex with License Requests
Types of KeysThis section describes all the different types of Optitex license keys for Advanced nesting.
Nest ++ 2 Key
• This key is required for the Nest ++ 2 Module.
• It cannot be used on its own. It must be used together with one of the Optitex keys.
• Its shape is different than the above keys and its color is black.
• The same key can be: Permanent, Demo (Time limited) or Network.
• The Demo (Time limited) key can be extended by generating a code
Nest ++ 2 Key
For more information, see Nest ++ 2 licensing
4
HOW TO GUIDE
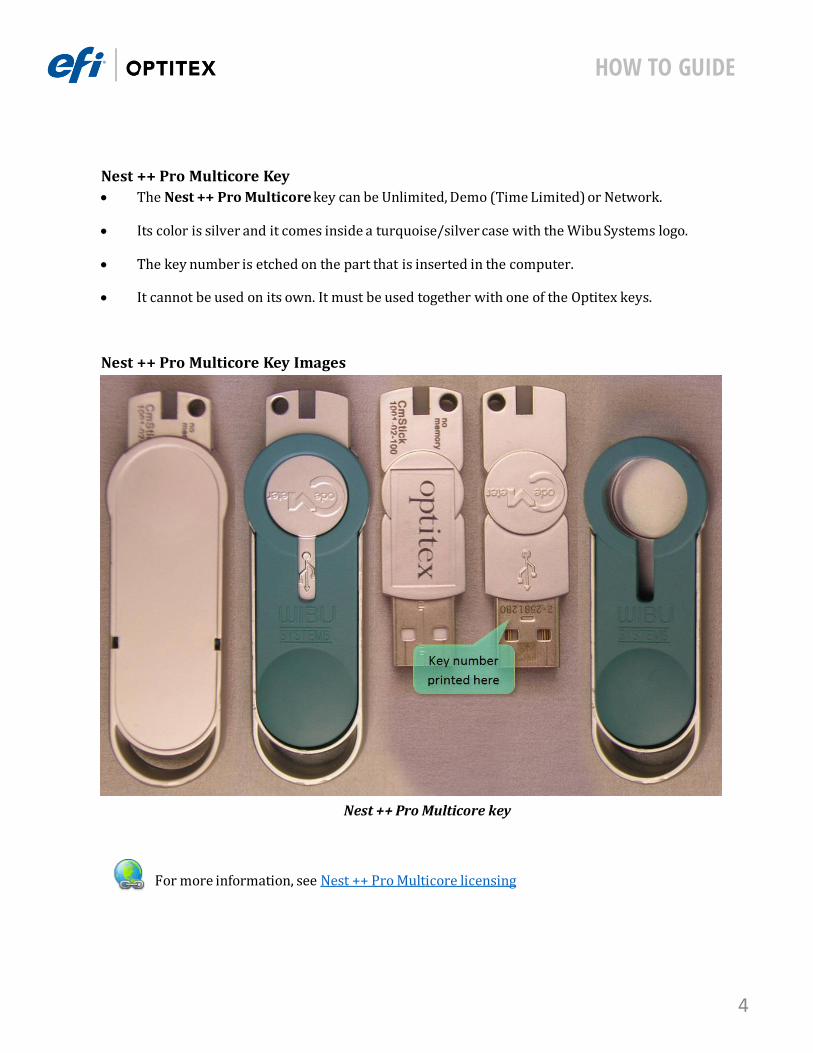
Nest ++ Pro Multicore Key
• The Nest ++ Pro Multicore key can be Unlimited, Demo (Time Limited) or Network.
• Its color is silver and it comes inside a turquoise/silver case with the Wibu Systems logo.
• The key number is etched on the part that is inserted in the computer.
• It cannot be used on its own. It must be used together with one of the Optitex keys.
Nest ++ Pro Multicore Key Images
Nest ++ Pro Multicore key
For more information, see Nest ++ Pro Multicore licensing

5
HOW TO GUIDE
Nest ++ 2 LicensingThis section describes all actions and work procedures that are required with Nest ++ 2 licensing. Nest ++ 2 licenses require different setup and activation than regular licenses:
• An additional license key alongside the current Optitex key.
• A different license utility and not the regular License Manager.
• Nest ++ 2 license keys can be permanent, Demo (time limited) or network.
The following topics are covered:
• Verifying your nest ++ 2 key requirements
• Checking your nest ++ 2 license key number
• Renewing an expired nest ++ 2 license key
• The Nest ++ 2 license key Sentinel Monitor
Verifying your Nest ++ 2 Key Requirements
Before using Nest ++ 2, please verify:
1. The Optitex Installation has completed successfully.
2. The Optitex license is activated and running (check License Manager).
3. The Optitex nesting pack Installation has completed successfully.
4. The nesting pack version matches the Optitex version.
5. The USB license key is inserted in the local machine and its light is on.
Note: After inserting the License key in one of the available USB ports on your machine, wait for windows to install the drivers for the key. This is done automatically and normally takes less than a minute. The process is complete when the light of the license key is on. Usually there is also a notification from Windows if you click the icon on the taskbar.
What to do If the Nest ++2 key light is not on?
1. Try to switch the USB port.
2. If step 1 above doesn’t help, reinstall the nesting pack and make sure to allow installing the nest
++2 key Sentinel drivers during the process.

6
HOW TO GUIDE
Viewing your Nest ++ 2 License Key Number and system information
Check your nesting system information, license key number and expiration status.
To check the Nest ++2 system information:
1. Using Optitex Marker, on the menu bar select Help > About Optitex Mark.
The About dialog opens:
2. Click Product Information.
The Nesting Information dialog opens
3. Scroll to the Nest ++ 2 section (if needed).
The information is displayed:

7
HOW TO GUIDE
Renewing an Expired Nest ++ 2 License Key
If your Nest ++ 2 Demo (time limited) key has expired, you will be notified in advance so you can renew it.To renew your key, you need to generate a code and send it to Optitex. You will then receive a renewal code in return.
Running the Renewal Utility
To generate the code to send to Optitex:
8. Run C:\Program Files (x86)\OptiTex [#]\App\AutoNesterLM.exe.
The Auto Nester License Manager dialog opens:
9. To verify that your license key is installed and recognized, click the Show
License Status button.
The Nest ++ 2 Info dialog opens:

8
HOW TO GUIDE
10. Click the Get Code button.
A code is generated.
11. Copy the code and open a case in the self-service portal with the key number and the code.
12. After a while, a response code will be sent back to you.
13. Copy and paste the response code in the Enter Update Code field.
14. Click the Enter Update Code button.
Your license is ready for use.
Note: Use Get Code once. Using it repeatedly will invalidate the key.

9
HOW TO GUIDE
The Nest ++ 2 License Key Sentinel Monitor
The Sentinel Monitor can be used to verify the strength of the Nest ++ 2 license key. This allows you to verify that the key is intact.
Opening the Sentinel Monitor
To open the Sentinel Monitor:
• Using any web browser, go to the URL: http://localhost:6002/.
Following some Java activity and a security confirmation, the Sentinel
Monitor opens, listing Sentinel keys:

10
HOW TO GUIDE
Nest ++ Pro Multicore LicensingThis section introduces the new Nest ++ Pro Multicore nesting licensing system.Nest ++ Pro Multicore combines a new and improved algorithm with Multicore functionality that runs in parallel on all the CPUs, reaching the desired result much quicker. Auto compaction is embeddedto achieve better efficiency and gain. The Nest ++ Pro is protected by a dedicated Code Meter license key.
• This new nesting module was released with Optitex version 12.2 in November 2013.
• Nest ++ Pro Multicore is a new product which requires a new physical license key.
• Nest ++ Pro Multicore is a new and improved independent nesting module.
The following topics are covered in this section:
• Getting started with the new Nest ++ Pro Multicore system
• The Nest ++ Pro Multicore key
• Nest ++ Pro Multicore installation
• Opening the Code Meter license utility
• Checking your Nest ++ Pro Multicore information
• Opening Code Meter Web Admin
Getting Started with the New Nest ++ Pro Multicore system
This section describes first steps & a checkup list for Nest ++ Pro Multicore.
Nest ++ Pro Multicore System Prerequisites
1. Verify that you have the recommended system requirements.
• Nest ++ Pro Multicore will yield best results with abundant resources!
1. Install Optitex 12.2 or later.
2. Install the Nesting Pack matching the Optitex version.
• Install the Code Meter runtime environment (setup starts automatically at the end of the
Nesting Pack installation).
1. Verify that you have an Optitex key with the appropriate modules activated.
2. Verify that you have the Code Meter License key available.
Notes:• The Code Meter license key comes ready to use and does not require activation.
• Code Meter license key updates may be applied later on.

11
HOW TO GUIDE
The Nest ++ Pro Multicore Key
The Code Meter Nest ++ Pro Multicore license key is new and different from other Optitex license keys.The key is an all-purpose key (regular, demo (time limited) or network).The Nest ++ Pro Multicore key belongs to a new product and does not replace any old keys. For example, the Nest ++ 2 license key is separate from the Nest ++ Pro Multicore key. The new Nest ++ Pro Multicore keys can run alongside the Nest ++ 2 license keys, or can be installed independently.
Notes:• For Nest ++ Pro Multicore to function, you need 2 keys simultaneously:
1. Optitex Key.
2. Nest ++ Pro Multicore Key.
• To operate Nest ++ Pro Multicore and Nest ++2 on the same computer, you
need 3 keys simultaneously:
1. Optitex Key.
2. Nest ++ Pro Multicore Key.
3. Nest ++ 2 key.
Nest ++ Pro Optitex Licensed Modules
In addition to the Code Meter license key, you must also have the appropriate modules
activated in your Optitex License key. Check this using the License Manager:
Optitex nest ++ Pro licensed modules

12
HOW TO GUIDE
Nest ++ Pro Multicore Installation
Nest ++ Pro Multicore is installed by the Optitex Nesting Pack. The Nesting Pack installs the Nest ++ Pro algorithm as well as the Code Meter runtime environment. The Code Meter runtime environment also includes the Code Meter Control Center: a utility used to monitor and update the license, or to configure the network environment.
Note: The Code Meter runtime installation is a separate process which is started by the
Nesting Pack installation and has to be completed by you.
Installing the Code Meter Runtime Environment
To install Code Meter drivers
20. Run Optitex Nesting pack.
21. At the end of the Nesting Pack installation, two driver installers are started automatically:
a) Code Meter Runtime Installation (see following image).
b) Sentinel protection installer (optional: required for nest ++2).
This guide is focused on the Nest ++ Pro & Code Meter license system:

13
HOW TO GUIDE
22. Click Next and proceed with the installation.
The Code Meter Runtime environment is installed.
Opening the CodeMeter License Utility
Use the CodeMeter Control Center utility to check your key number, create license requests or apply license updates.
To start the Code Meter license utility.
1. Go to Start > All Programs > CodeMeter > CodeMeter Control Center.
The CodeMeter Control Center opens, with your license key number displayed:
Updating your Nest ++ Pro Multicore LicenseYou must update your Nest ++ Pro Multicore license to extend the time limit. The License update process requires generating and sending a license request file which is answered by the license update file.

14
HOW TO GUIDE
Checking your Nest ++ Pro Multicore InformationCheck your Nest ++ Pro Multicore key information to:• Check your key number and system information
• For Demo (time limited) keys:
• To see how many days you have left until expiration.
• To verify the extension of the time limit, after an update has been applied.
To check the license expiration status:
1. Using Optitex Marker, on the menu bar select Help > About Optitex Mark.
The About dialog opens:
2. Click Product Information.
The Nesting Informationdialog opens

15
HOW TO GUIDE
3. Scroll to the Nest ++ Pro Multicore section (if needed).
The information is displayed:
Generating the License Request FileIn order to extend the license, a request file has to be created first.Create and send the license request file. This is done using the CodeMeter Control Center Utility.

16
HOW TO GUIDE
To create a license request:
1. Open the CodeMeter Control Center.
2. Click License Update.
The CmFAS Assistant opens:
3. Click Next.

17
HOW TO GUIDE
4. Select Create license request and click Next.
5. Select Extend existing license and click Next.

18
HOW TO GUIDE
6. Select Fraunhofer-Institut… and click Next.
7. Click the button to browse for the required folder to save the file.
8. Keep the existing file name, based on the key number (recommended) and click Commit.
The *.WibuCmRaC file is saved and the confirmation dialog opens.
9. Click Finish.
The dialog closes.
10. Attach the saved request file with your license key number to a new Self-service Portal case.
11. Optitex will send you the license update file.

19
HOW TO GUIDE
Applying the License Update File The license update file is sent to you following your license request.Use it to extend your license.
To update your CodeMeter license key
1. Open the CodeMeter Control Center.
2. Go to File > Import License.
The Import CodeMeter Licenses Contents dialog opens.
25. Browse for and select the license update file received (*.WibuCmRaU) and click Import.
The update takes place:
26. The update is applied and a confirmation message appears:

20
HOW TO GUIDE
Nest ++ Pro Multicore License Network EnvironmentWhen your Nest ++ Pro Multicore license key has more than one license concurrently (floating), the network environment should be configured:
• The license server (the computer with the license key) will supply the license to the clients.
• The clients will access the server in order to get their license.
The Nest ++ Pro Multicore License Network environment is configured using the Code Meter Web Admin.
Opening the Code Meter Web Admin
27. Make sure the Code Meter runtime environment is installed.
28. Open the CodeMeter Control Center.
29. Click Web Admin at the bottom right.
The Code Meter Web Admin opens in your browser:

21
HOW TO GUIDE
Configuring the Nest ++ Pro Multicore License ServerTurn the computer with the license key to a server
To distribute licenses to clients:
30. Open the Code Meter Web Admin.
31. Go to Configuration > Server.
32. Select the Run Network Server checkbox, and then click Apply.
The computer is now a server.

22
HOW TO GUIDE
Configuring the Nest ++ Pro Multicore License Client
33. Open the Code Meter Web Admin.
34. Go to Configuration > Network.
35. Click Add, and then enter the license server’s IP address as follows:
36. Click OK and then Apply.
The Client configuration is completed.
This document contains proprietary and confidential information of EFI- Optitex. This document shall not be used, disclosed or reproduced, in whole or in any part, for any purpose other than to evaluate the information contained herin, without the prior written consent of EFI-Optitex. Title in and to this document and all information contained herin remains at all times with EFI-Optitex.