how to: creative uses of the “w niche 12” & “w lesene 12”
DESCRIPTION
You can use the “W Niche 12” & “W Lesene 12” to create more than a basic recess or protrusion. These can be used to create features like differences in material e.g. brick plinths, vertical & horizontal recesses, colour bands etcTRANSCRIPT

[1]
TIPS & TRICKS Thursday 30 July 2009
WELCOME TO OUR THIRD TIPS & TRICKS NEWSLETTERWe trust that this will help our ArchiCARE clients to become more proficient and expert users.
how to become an expert ArchiCAD user
How to: Creative uses of the “W Niche 12” & “W Lesene 12”You can use the “W Niche 12” & “W Lesene 12” to create more than a basic recess or protrusion. These can be
used to create features like differences in material e.g. brick plinths, vertical & horizontal recesses, colour bands
etc... Note: The “W Lesene 12” can create protrusions with a minimum value of 1 mm & the “W Niche 12” can
create recesses with a minimum depth of 1 mm.
TotalCAD SOLUTION CENTREmost experienced and reputable Virtual Building provider in Southern Africa!

[2]
[3]
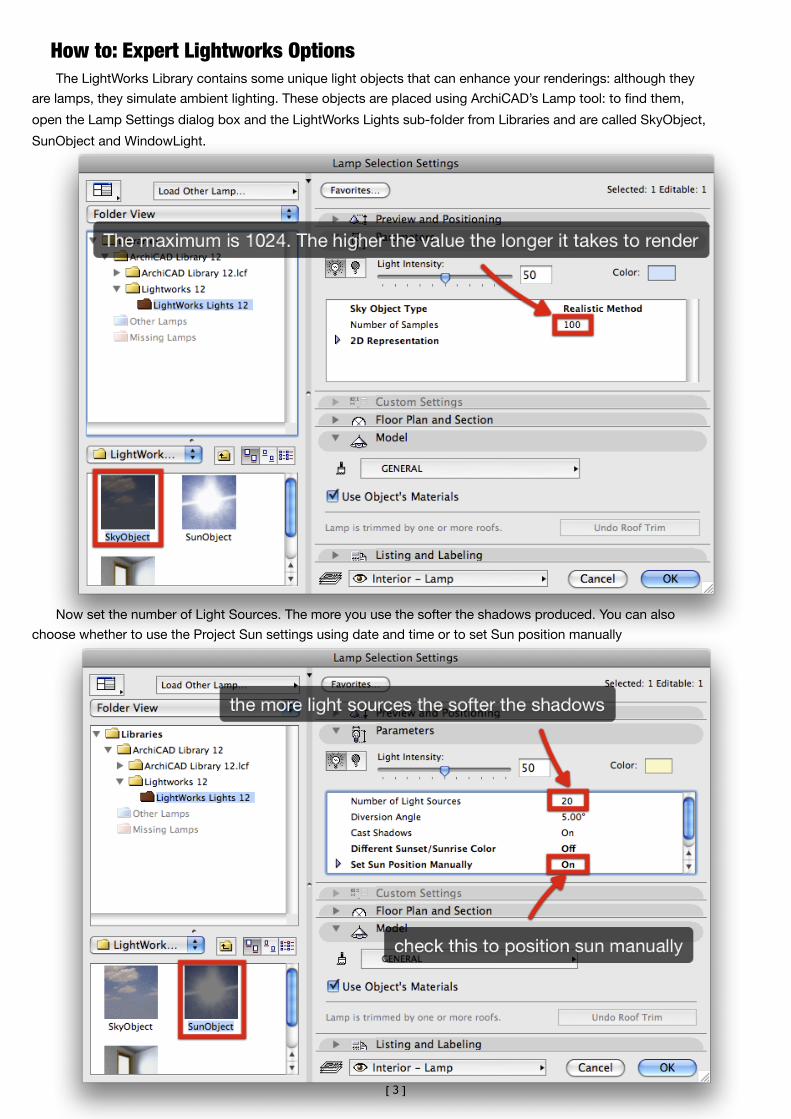
The LightWorks Library contains some unique light objects that can enhance your renderings: although they
are lamps, they simulate ambient lighting. These objects are placed using ArchiCAD’s Lamp tool: to find them,
open the Lamp Settings dialog box and the LightWorks Lights sub-folder from Libraries and are called SkyObject,
SunObject and WindowLight.
Now set the number of Light Sources. The more you use the softer the shadows produced. You can also
choose whether to use the Project Sun settings using date and time or to set Sun position manually
How to: Expert Lightworks Options

[4]
Now switch off the ArchiCAD Sun and the Camera light. You can adjust the intensity level of the Sun Object &
Sky Object lights in their respective settings dialog boxes. But, the “Ambient” checkbox and its associated
intensity value, will also affect these objects’ lighting effects. Note: Please do not change the resolution. It refers
to screen resolution and not printing resolution
Now place both the Sky Object and Sun Object anywhere on the floor plan.

[5]
The result after using the PhotoRender Projection using the LightWorks rendering engine and using the settings
above. The materials are “standard” LightWorks materials.
Please note: the Alfa 147 used in the Rendering above was downloaded for free as a sample from http://
www.doschdesign.com/products/3d/Cars_2005_V1-1.html. The vertical and horizontal slots in the walls were
made using the W Niche 12.

[6]
Since the LightWorks Rendering Engine is both hardware and memory-intensive, here follow some suggestions
for speeding up your work while using it.
• Uncheck the Reflection checkbox in the Effects field of the LightWorks Effects panel of the PhotoRendering
Settings dialog box. Reflection is probably the one factor increasing rendering time the most. If you turn
Reflection off, you will still be able to set lighting correctly, yet generate faster renderings.
• Choose the Off checkbox in the Antialiasing field of the LightWorks Effects panel of the PhotoRendering
Settings dialog box. This will also decrease rendering time while showing the effects of lights correctly.
• When setting lights and materials select a small model piece with the thick (multi-story) marquee and
experiment with that. Then, when all is set, you can render the whole model.
• The SkyObject and SunObject lamps work quite well even when the number of light sources is set to low
numbers (even as low as 4). At the same time, setting them to such low values will substantially decrease their
memory requirements and increase rendering speed.
• You can experiment with your setting choosing hard shadows. This will increase speed over using soft
shadows while the character of the rendering will not change markedly.
• You can check the settings of your picture on a smaller rendering, thereby saving time. You may want
your final rendering to be 1600x1200 pixels, but you can check and set your settings on a 400x300 pixel
rendering as well. You can also zoom on details and create small detail renderings of those.
Besides a good camera position, a good rendering requires good lights and good material shaders. You should
set lighting on a small model or partial model without Reflection and Antialiasing, few light sources and Hard
Shadows. Setting materials can also be done on a partial model. Then, when all is set, Reflection, Antialiasing
and Soft Shadows can be turned on a full model.
LightWorks Tips