how to create cascading style sheets - new river ... style sheets (css) are collections of...
TRANSCRIPT

Adobe Dreamweaver CS5 Activity 3.6 guide
© 2010 Adobe Systems Incorporated How to create Cascading Style Sheets 1
How to create Cascading Style SheetsCascading style sheets (CSS) are collections of formatting rules that control the appearance of content on a web page. By using style sheets, you can achieve greater consistency across your website (even if your site consists of only one page). CSS styles provide you with a wide range of options for formatting text. This guide shows you how to take advantage of Cascading Style Sheets to maintain consistency and to apply characteristics to text.
If you’ve been using Adobe Dreamweaver CS5, you may have been using CSS without knowing it. Dreamweaver formats all text with CSS by default. Every time you change certain text properties in the Property inspector, such as text size and text color, Dreamweaver prompts you to define a mew CSS rule or update a style for the text. Dreamweaver places these style definitions in the beginning of each web page’s code. A collection of these definitions is known as an internal style sheet, because it is contained within an individual web page.
Internal style sheets (sometimes called embedded style sheets) are great for maintaining consistency within a document, but Cascading Style Sheets are especially useful for maintaining consistency across a number of different pages. By using an external style sheet—a separate document that holds CSS style information—you can make sure that text appearance is consistent across multiple pages. Not only does a consistent appearance look more professional, but usability experts say that site visitors find what they’re looking for more easily on sites where text appearance and placement is consistent.
Defining CSS styles
The most basic way to define CSS styles in Dreamweaver is to apply formatting by using the CSS options in the Property inspector. When you do, you are prompted to create a new CSS rule. You need to name the new rule and define the type of CSS.
There are three main types of CSS:
A Class style is similar to the styles you use in word processing and page layout programs. For example, you may want to format all body text in 10-point, Arial, dark green type. You can create a Class style with these attributes and then apply this style to all body text in your web site.
A Tag style applies global formatting to individual HTML tags, as opposed to individual selections. Suppose you want to modify the Heading 1 paragraph style to always appear in purple text. Instead of creating a class style and applying it to every heading in the document, you can create an HTML Tag style with these attributes and apply it to the Heading 1 <h1> tag. In effect, you are redefining the HTML tag.
An ID style is only used once within a document or page. It is used as a unique identifier (ID) for a style applied to elements such as a header, banner, or menu that is only present in one location in the document.
A Compound style is used to format text in different ways based on how a user interacts with the text. For example you can use a compound style to change the look of text when a user rolls over a link. Compound styles can also be used to group selectors, for tags or classes that share the same properties.
Whenever possible, redefine existing tags instead of creating new CSS styles. The existing tags provide a useful hierarchy for both you and the users of your site, and they also make it easier for people using screen readers to use your site.
In addition to using the CSS options in the Property inspector, you can define, apply, and modify CSS styles by using the CSS panel, which you will do in this guide.

Activity 3.6 guide Adobe Dreamweaver CS5
2 How to create Cascading Style Sheets © 2010 Adobe Systems Incorporated
To redefine an existing HTML style tag by using a CSS Tag rule:
1. Start Dreamweaver.
2. Create a new HTML document.
3. Save and name the Dreamweaver document.
4. Type some text in the document.
5. Select the text.
6. Using the Property inspector, apply an HTML tag such as Heading 1 to the text.
The text appears in the default Heading 1 format (Figure 1).
7. Make sure the CSS Styles panel is open and expanded.
If it is not open, select Window > CSS Styles.
8. To create a new style, click the New CSS Rule button (+) at the bottom of the CSS Styles panel (Figure 2).
The New CSS Rule dialog box opens (Figure 3).
9. In the Selector Type pop-up menu, select Tag.
This option lets you add CSS properties to an existing HTML tag.
10. From the Selector Name pop-up menu, select h1 (the tag for Heading 1).
11. In the Rule Definition pop-up menu, select This Document Only or New Style Sheet File.
The option This Document Only defines the style as part of the document’s internal style sheet. The option New Style Sheet File defines the style as part of an external style sheet.
12. Click OK.
Note: If you choose to create an external style sheet by selecting New Style Sheet File, you are prompted to select a location for the new style sheet (.css) document.
Figure 1 Text with default Heading 1 tag applied
Figure 2 CSS Styles panel
Figure 3 New CSS Rule dialog box
New CSS Rule button
Adobe Dreamweaver CS5 Activity 3.6 guide
© 2010 Adobe Systems Incorporated How to create Cascading Style Sheets 3
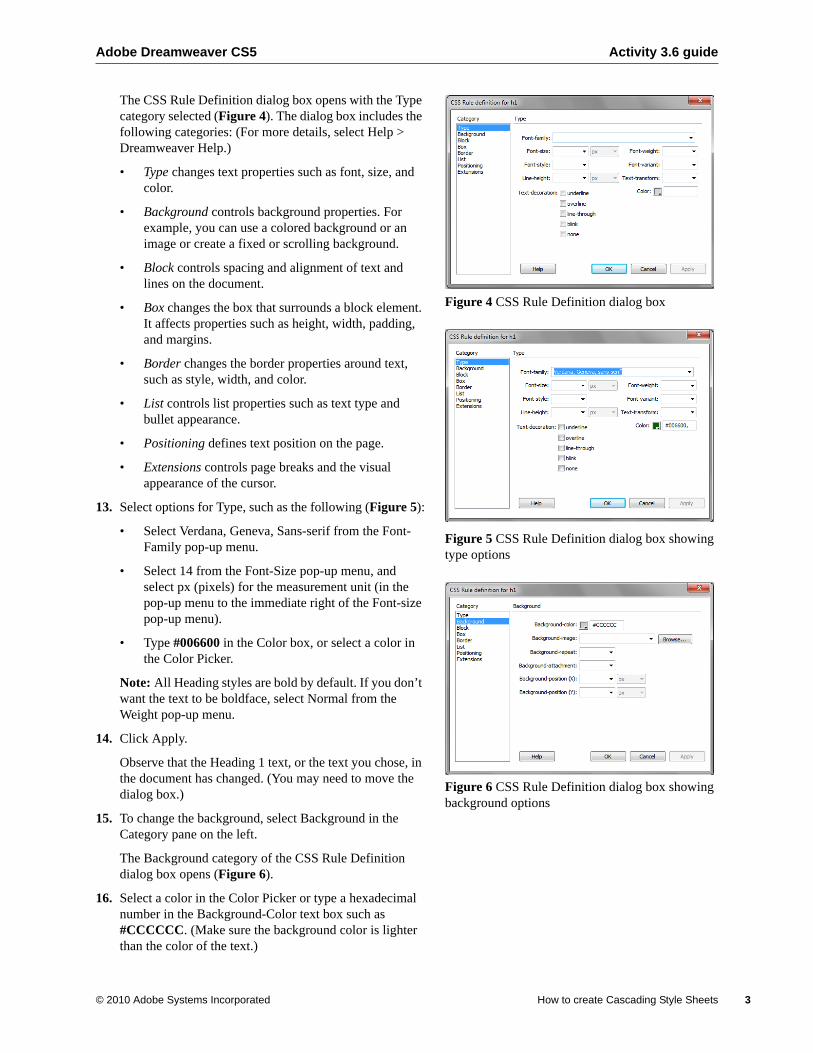
The CSS Rule Definition dialog box opens with the Type category selected (Figure 4). The dialog box includes the following categories: (For more details, select Help > Dreamweaver Help.)
• Type changes text properties such as font, size, and color.
• Background controls background properties. For example, you can use a colored background or an image or create a fixed or scrolling background.
• Block controls spacing and alignment of text and lines on the document.
• Box changes the box that surrounds a block element. It affects properties such as height, width, padding, and margins.
• Border changes the border properties around text, such as style, width, and color.
• List controls list properties such as text type and bullet appearance.
• Positioning defines text position on the page.
• Extensions controls page breaks and the visual appearance of the cursor.
13. Select options for Type, such as the following (Figure 5):
• Select Verdana, Geneva, Sans-serif from the Font-Family pop-up menu.
• Select 14 from the Font-Size pop-up menu, and select px (pixels) for the measurement unit (in the pop-up menu to the immediate right of the Font-size pop-up menu).
• Type #006600 in the Color box, or select a color in the Color Picker.
Note: All Heading styles are bold by default. If you don’t want the text to be boldface, select Normal from the Weight pop-up menu.
14. Click Apply.
Observe that the Heading 1 text, or the text you chose, in the document has changed. (You may need to move the dialog box.)
15. To change the background, select Background in the Category pane on the left.
The Background category of the CSS Rule Definition dialog box opens (Figure 6).
16. Select a color in the Color Picker or type a hexadecimal number in the Background-Color text box such as #CCCCCC. (Make sure the background color is lighter than the color of the text.)
Figure 4 CSS Rule Definition dialog box
Figure 5 CSS Rule Definition dialog box showing type options
Figure 6 CSS Rule Definition dialog box showing background options
Activity 3.6 guide Adobe Dreamweaver CS5
4 How to create Cascading Style Sheets © 2010 Adobe Systems Incorporated
17. Click Apply to see your changes.
18. To change the border and its properties, select Border in the Category pane.
The Border category of the CSS Rule Definition dialog box opens (Figure 7).
19. Under Style, you can make changes such as deselecting the option Same For All and selecting the option Solid in the Top pop-up menu.
20. Under Width, you can make changes such as typing 1 in the Top pop-up menu, and leaving pixels selected as the measurement unit.
21. Under Color, you can make changes such as entering #006600, or whatever color you chose in step 13.
22. Click OK.
The CSS Rule Definition dialog box closes.
Observe that the appearance of the Heading 1 text you created has now changed (Figure 8).
23. Make sure the CSS Styles panel is open.
If it is not, select Window > CSS Styles.
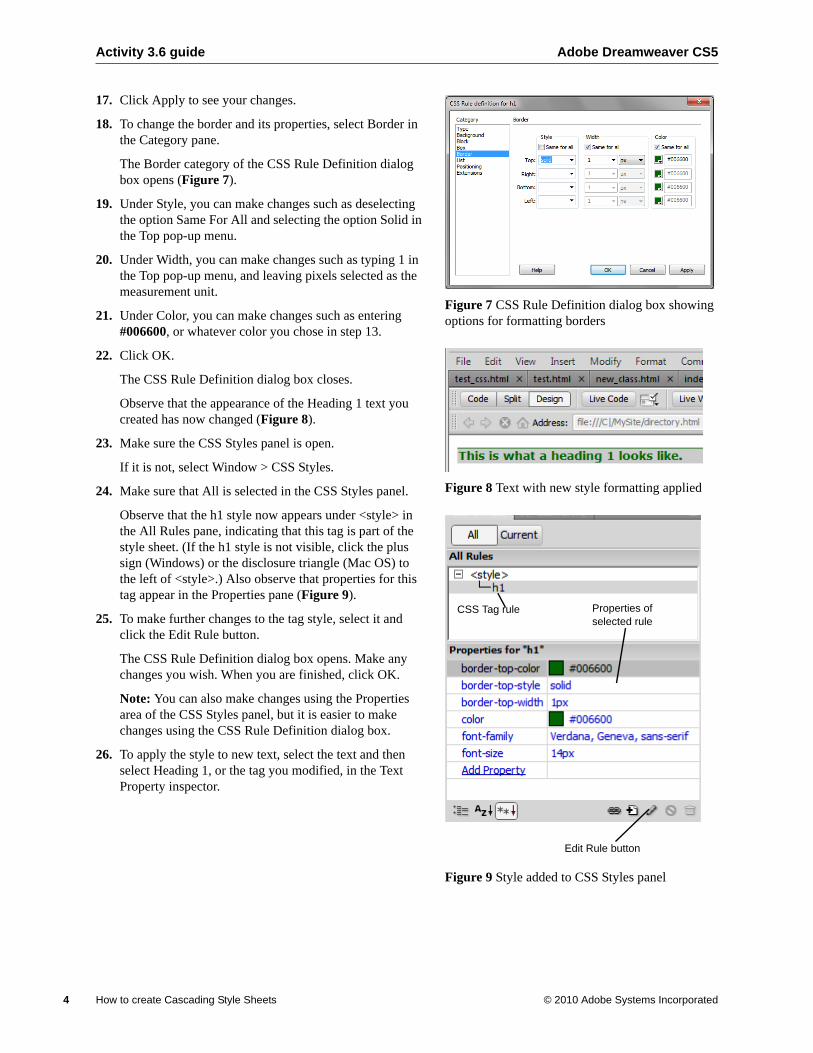
24. Make sure that All is selected in the CSS Styles panel.
Observe that the h1 style now appears under <style> in the All Rules pane, indicating that this tag is part of the style sheet. (If the h1 style is not visible, click the plus sign (Windows) or the disclosure triangle (Mac OS) to the left of <style>.) Also observe that properties for this tag appear in the Properties pane (Figure 9).
25. To make further changes to the tag style, select it and click the Edit Rule button.
The CSS Rule Definition dialog box opens. Make any changes you wish. When you are finished, click OK.
Note: You can also make changes using the Properties area of the CSS Styles panel, but it is easier to make changes using the CSS Rule Definition dialog box.
26. To apply the style to new text, select the text and then select Heading 1, or the tag you modified, in the Text Property inspector.
Figure 7 CSS Rule Definition dialog box showing options for formatting borders
Figure 8 Text with new style formatting applied
Figure 9 Style added to CSS Styles panel
Edit Rule button
Properties of selected rule
CSS Tag rule

Adobe Dreamweaver CS5 Activity 3.6 guide
© 2010 Adobe Systems Incorporated How to create Cascading Style Sheets 5
To disable or enable rule properties:
You can disable individual rule properties for testing or to fine-tune appearances.
1. Select the rule in the Properties pane of the CSS Styles panel.
2. Click the Disable/Enable CSS Properties button.
A red circle appears next to the property (Figure 10) and the text to which the rule applies is changed (Figure 11).
To enable the property, do one of the following:
• Double-click the property.
• Select the rule and click the Disable/Enable CSS Properties button.
Note: As an alternative to clicking the Disable/Enable CSS Properties button, you can disable or enable a rule by clicking the space to the left of the rule.
Figure 10 Disabling a rule property
Figure 11 Result of disabling property
Disable/Enable CSS
Property button
Activity 3.6 guide Adobe Dreamweaver CS5
6 How to create Cascading Style Sheets © 2010 Adobe Systems Incorporated
To create a new CSS Class rule:
1. Start Dreamweaver.
2. Create a new HTML document.
3. Save and name the Dreamweaver document.
4. Type some text in the document. Make sure that no formatting is applied to the text (Figure 12).
5. Make sure the CSS Styles panel is open.
If it is not, select Window > CSS Styles.
6. To create a new style, click the New CSS Rule button (+) at the bottom of the panel.
The New CSS Rule dialog box opens (Figure 13).
7. In the Selector Type pop-up menu, select Class.
This option creates a new Class rule.
8. In the Selector Name box, type a name for the style such as .warning.
Note: Class rule names must begin with a period and cannot contain spaces or special characters. If you forget to type the period, Dreamweaver will add this automatically.
9. In the Rule Definition pop-up menu, select This Document Only or New Style Sheet File.
The option This Document Only defines the style as part of the document’s internal style sheet. The option New Style Sheet File defines the style as part of an external style sheet.
Note: If you choose to create an external style sheet by selecting New Style Sheet File, you are prompted to select a location for the new style sheet (.css) document.
10. Click OK.
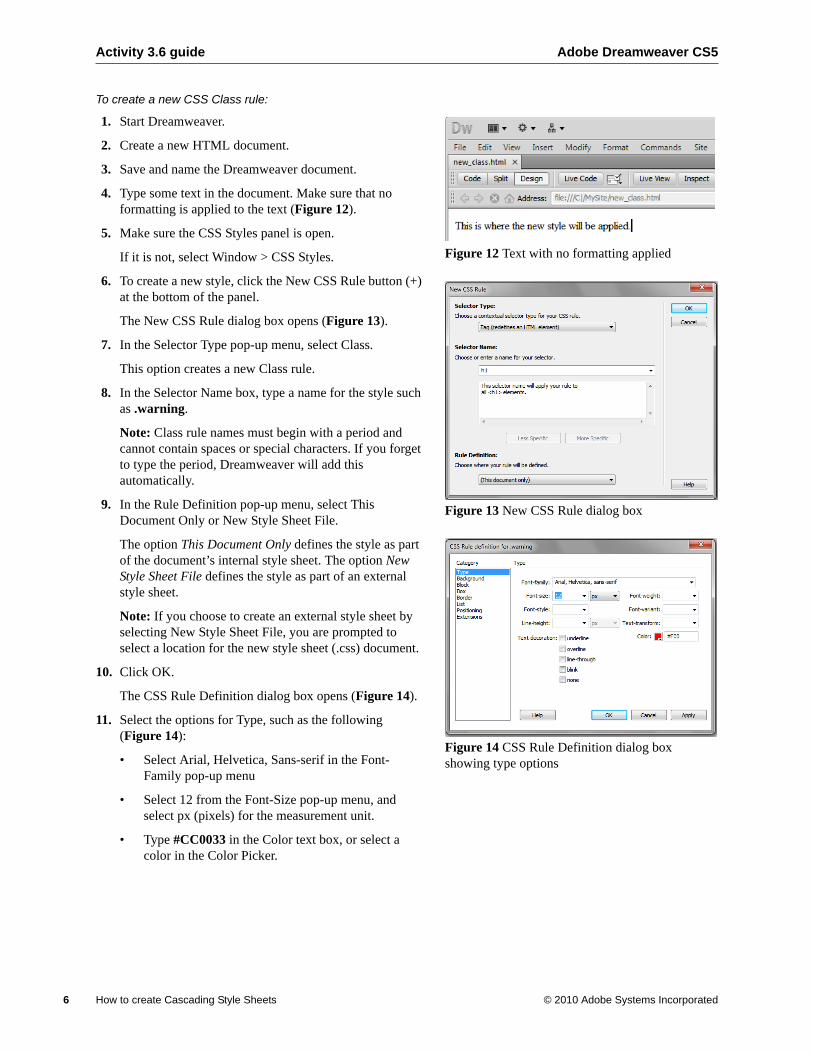
The CSS Rule Definition dialog box opens (Figure 14).
11. Select the options for Type, such as the following (Figure 14):
• Select Arial, Helvetica, Sans-serif in the Font-Family pop-up menu
• Select 12 from the Font-Size pop-up menu, and select px (pixels) for the measurement unit.
• Type #CC0033 in the Color text box, or select a color in the Color Picker.
Figure 12 Text with no formatting applied
Figure 13 New CSS Rule dialog box
Figure 14 CSS Rule Definition dialog box showing type options

Adobe Dreamweaver CS5 Activity 3.6 guide
© 2010 Adobe Systems Incorporated How to create Cascading Style Sheets 7
12. To change the formatting of text blocks, select Block in the Category pane.
The Block category of the CSS Rule Definition dialog box opens (Figure 15).
13. In the Letter-Spacing box, you can make changes such as typing 3 and selecting pixels for the measurement unit.
This setting adds space between each letter.
14. In the Text-Indent box, you can make changes such as typing 5 and selecting pixels for the measurement unit.
15. Click OK.
The CSS Rule Definition dialog box closes.
16. Select the document text.
17. Make sure the Property inspector is open and the HTML option is selected.
The Property inspector is docked at the bottom of the screen. If the Property inspector is not open, select Window > Properties.
18. Select warning, or the name of your style, from the Class pop-up menu (Figure 16).
19. In the document, deselect the text by positioning the mouse pointer next to it and clicking once.
Observe that the format of the text has changed (Figure 17).
20. Make sure the CSS Styles panel is open.
If it is not, select Window > CSS Styles.
21. Make sure that All is selected in the CSS Styles panel.
Observe that the newly created CSS rule now appears under <style> in the All Rules pane, indicating the new rule is part of a CSS style sheet. Also observe that properties for the style appear in the Properties pane.
22. To make further changes to the style, select it and click the Edit Rule button.
The CSS Rule Definition dialog box opens.
Note: You can also make changes by using the Properties pane of the CSS Styles panel.
Figure 15 CSS Rule Definition dialog box showing options for formatting text blocks
Figure 16 Text Property inspector
Figure 17 Formatting applied to text

Activity 3.6 guide Adobe Dreamweaver CS5
8 How to create Cascading Style Sheets © 2010 Adobe Systems Incorporated
Grouping selectors
Often, you will want multiple tags to share characteristics. For example, you might want all headers on your site--those tagged by h1, h2, h3, and h4--to use the Verdana, Geneva, sans-serif font family, be colored maroon, and have a one-point border above them. In such cases, you can group selectors by using the Compound Selector option in the CSS Styles panel.
To group selectors:
1. Start Dreamweaver.
2. Create a new HTML document.
3. Save and name the Dreamweaver document.
4. Type some text in the document. Make sure that no formatting is applied to the text (Figure 12).
5. Make sure the CSS Styles panel is open.
If it is not, select Window > CSS Styles.
6. To create a new style, click the New CSS Rule button (+) at the bottom of the panel.
The New CSS Rule dialog box opens (Figure 13).
7. In the Selector Type pop-up menu, select Compound.
Compound rules affect two or more tags.
8. In the Selector Name box, enter the tags to be included in the group, separated by commas, such as h1, h2, h3, h4 (Figure 18).
9. In the Rule Definition pop-up menu, select a location for the rule.
10. Click OK.
The CSS Rule Definition dialog box opens.
11. Enter properties for the group, such as font family, background color, and border.
12. Click OK.
The CSS Rule Definition dialog box closes, and the group selector is listed in the CSS Styles panel. The properties you entered will now apply to all tags included in the group.
13. Select the text you typed in step 4.
14. In the Text Property inspector, select one of the four grouped tags from the Format pop-up menu.
Figure 18 Entering a group selector
Figure 19 Group selector in CSS Styles panel

Adobe Dreamweaver CS5 Activity 3.6 guide
© 2010 Adobe Systems Incorporated How to create Cascading Style Sheets 9
Using descendant selectors
Descendant selectors let you specify a tag or class that appears within (as a descendant of) another tag or class. For example, since headings are generally bold, text that you want to emphasize within a heading might not show up if you simply use a <strong> tag, which is the default when you apply Bold in the Text Property inspector. You can use a descendant selector to apply an alternative form of emphasis, such as changing the color of text every time you have a <strong> tag that appears within an <h2> tag.
To create a descendant selector:
1. Start Dreamweaver.
2. Create a new HTML document.
3. Save and name the Dreamweaver document.
4. Type some text in the document. Make sure that no formatting is applied to the text (Figure 12).
5. Make sure the CSS Styles panel is open.
If it is not, select Window > CSS Styles.
6. To create a new style, click the New CSS Rule button (+) at the bottom of the panel.
The New CSS Rule dialog box opens (Figure 13).
7. In the Selector Type pop-up menu, select Compound.
Compound rules affect two or more tags.
8. In the Selector Name box, enter the tag that is to be a descendant of another tag, such as h2 strong.
The Selector Definition box states how the rule applies, such as “This selector name will apply your rule to all <strong> elements that are within any <h2> elements.” (Figure 20).
9. In the Rule Definition pop-up menu, select a location for the rule.
10. Click OK.
The CSS Rule Definition dialog box opens.
11. Select a text color that differs from the text color defined for <h2>.
12. Click OK.
The CSS Rule Definition dialog box closes, and the descendant selector is listed in the CSS Styles dialog box. The properties you entered will now apply to all tags that are descendants of the first tag. In the H2 tag example (Figure 21), the <h2> tag applies to all the text, but the part of the text to which the <strong> tag is applied has a different color.
Figure 20 Defining a descendant selector
Figure 21 Result of descendant selector applied
<h2> tag <strong> tag applied

Activity 3.6 guide Adobe Dreamweaver CS5
10 How to create Cascading Style Sheets © 2010 Adobe Systems Incorporated
13. Select the text you typed in step 4.
14. In the Text Property inspector, select h2 from the Format pop-up menu.
15. Select a word from the text to which you applied the <h1> tag.
16. In the Text Property inspector, click the Bold button to apply the <strong> tag to the word.
Using pseudo class selectors
Pseudo class selectors are special selectors which refer to characteristics of the page instead of some element of a class or tag itself.
Pseudo class selectors are especially useful for links (Figure 22). By default, pseudo class selectors apply to all links in a page. The following pseudo class selectors are available in Dreamweaver:
• Link (a:link) controls the normal state of the link. The default color is blue.
• Visited (a:visited) controls the link format after a visitor has clicked it. The default color is purple.
• Hover (a:hover) controls the link format as the pointer moves over the link. The default color is red.
• Active (a:active) controls the link format while it is being clicked. The default color is red.
Figure 22 Pseudo class selectors
To add a pseudo class selector:
1. Start Dreamweaver.
2. Create a new HTML document.
3. Save and name the Dreamweaver document.
4. Make sure the CSS Styles panel is open.
If it is not, select Window > CSS Styles.
5. To create a new style, click the New CSS Rule button (+) at the bottom of the panel.
The New CSS Rule dialog box opens.
6. In the Selector Type pop-up menu, select Compound.
Compound rules affect two or more tags.
Visited link
Unvisited link
Link with pointer hovering over it

Adobe Dreamweaver CS5 Activity 3.6 guide
© 2010 Adobe Systems Incorporated How to create Cascading Style Sheets 11
7. In the Selector Name box (Figure 23), select one of the following from the popup menu:
• a:link
• a:visited
• a:hover
• a:active
For this example, select a:link.
8. Click OK.
The CSS Rule Definition dialog box opens.
9. Select a type color or other properties.
10. Click OK.
The CSS Rule Definition dialog box closes, and the pseudo class selector is listed in the CSS Styles dialog box. The properties you entered will now apply to all links in the page.
11. Create a link and preview the page in a browser.
Figure 23 Selector Name box in the New CSS Rule dialog box

Activity 3.6 guide Adobe Dreamweaver CS5
12 How to create Cascading Style Sheets © 2010 Adobe Systems Incorporated
Edit styles
After you create styles, you can still make changes to them by using the Edit Rule button.
To edit styles:
1. To view a style sheet’s rules, click the plus symbol (Windows) or triangle (Mac OS) beside the style sheet you want to edit in the CSS Styles panel.
Dreamweaver displays style sheet’s rules.
2. Select the rule you want to edit.
3. At the bottom of the CSS Styles panel, click the Edit Rule button (Figure 24).
The CSS Rule Definition dialog box for the selected style opens (Figure 25).
4. Make formatting changes in the CSS Rule Definition dialog box. Then click OK.
The changes take effect immediately. Because you are editing an external style sheet, the same changes are applied to any other documents attached to this style sheet.
Figure 24 CSS Styles panel
Figure 25 CSS Rule Definition dialog box
Edit Rule