how to create a wiki - austin community college district
TRANSCRIPT

1
HOW TO CREATE A WIKI Constructivist Collaboration Tool
Teaching & Technology Trends Symposium at Austin Community College March 30, 2007
Jimmy D. Clark, Instructional Design Specialist
Introduction
What You Will Learn in this Workshop
In this workshop you will learn what wikis are and why they are a valuable learning tool in a constructivist learning environment. You will view a demonstration that explains how to set up a free wiki at Wetpaint.com add some pages to it, make some simple editing changes, and use some of the other features of a Wetpaint wiki. If you have basic word processing skills you should be able to follow this handout.
Goals and Objectives for this Workshop (Time Permitting)
The demonstration will cover: 1. Creating a site for our wiki 2. Creating an account at Wetpaint 3. Creating the pages for our wiki 4. Making some simple editing changes to the pages 5. Using the search feature on our wiki 6. Inviting others to contribute to our wiki 7. Using the wiki Help system
Prerequisites
You only need basic word processing skills and familiarity with Web browsers to complete this workshop.
What is a Wiki?
Wiki Defined
A wiki, as defined by Wikipedia, “is a type of website that allows the visitors themselves to easily add, remove and otherwise edit and change some available content without the need for registration.” ( http://en.wikipedia.org/wiki/Wikis)
Wikis as a Constructivist Learning Tool
A wiki is a great constructivist learning tool because wikis are effective tools for collaborative authoring. The 2005 EDUCAUSE Learning Initiative “7 Things You Should Know About Wikis” states that “wikis can provide individual interactivity, collaborative learning, cognitive tools, authenticity, and more; all collaborative learning elements.” (Be Constructive: Blogs, Podcasts, and Wikis as Constructivist Learning Tools, Learning Solutions eMagazine, July 31, 2006). Please refer to the copy of this article in your handout for more information about how wikis can be used in the constructivist learning environment.

2
A Brief History of Wikis
The first wiki was created by software engineer Ward Cunningham in 1995. He wanted to create “the simplest database that would work,” for software developers. He chose the word “wiki” for the name of his database because “wiki” is the Hawaiian word for “quick” or “hurry.” The largest and bestknown wiki is Wikipedia, the free online encyclopedia used by millions of people every day. Wikipedia says there are currently 1,375,837 articles in the English Wikipedia. The English Wikipedia alone has over 511 million words, more than ten times as many as the next largest Englishlanguage encyclopedia, Encyclopedia Britannica. All of the wikis in Wikipedia have a combined total of more than 1,438 million words in 4.6 million articles in over 200 languages. Over 209,000 authors have contributed to all Wikipedia language versions.
Creating Your Wiki
We are going to set up our wikis at a website named Wetpaint because this site allows you to create a free wiki and it is very easy to use. Some sites that host free wikis require the user to learn and use special formatting codes. Editing a wiki at Wetpaint is as easy as typing text in a word processor. The URL of Wetpaint.com is at www.wetpaint.com. Follow these easy steps to set up your wiki:
Figure 1: Tell Wetpaint the Name of Your Wiki
Click the green button whose text reads “create your own wetpaint site now!”
3
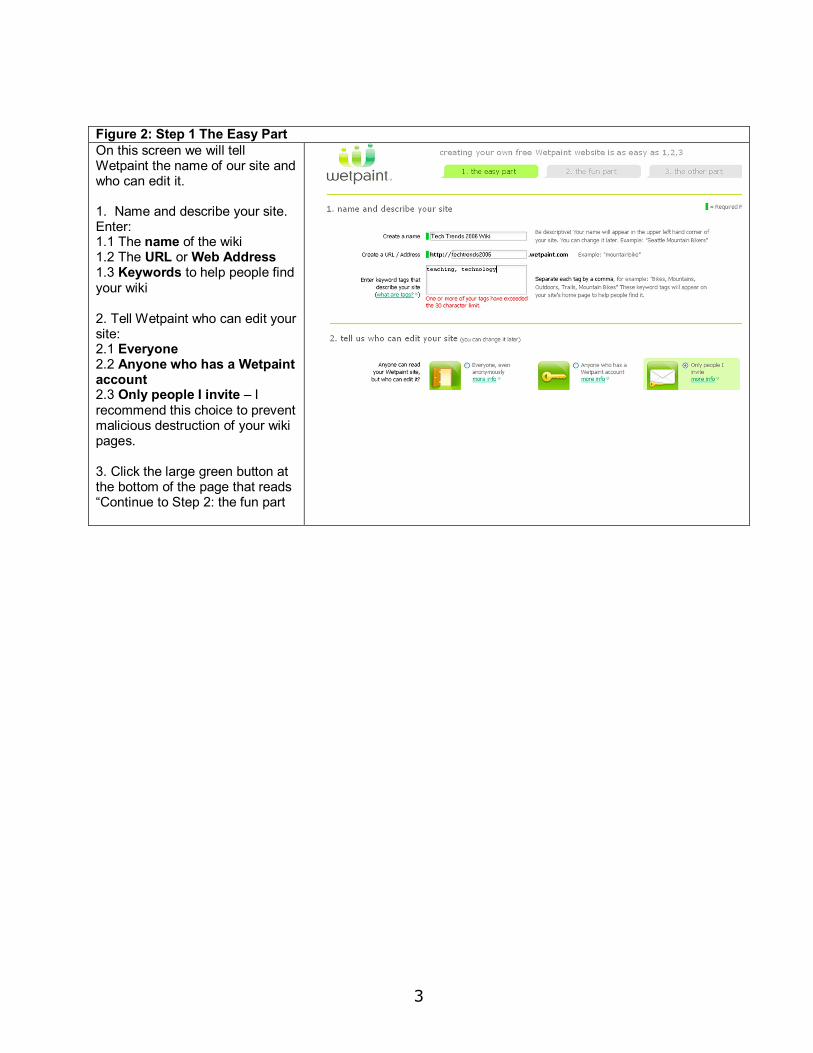
Figure 2: Step 1 The Easy Part On this screen we will tell Wetpaint the name of our site and who can edit it.
1. Name and describe your site. Enter: 1.1 The name of the wiki 1.2 The URL or Web Address 1.3 Keywords to help people find your wiki
2. Tell Wetpaint who can edit your site: 2.1 Everyone 2.2 Anyone who has a Wetpaint account 2.3 Only people I invite – I recommend this choice to prevent malicious destruction of your wiki pages.
3. Click the large green button at the bottom of the page that reads “Continue to Step 2: the fun part

4
Figure 3: Step 2: The Fun Part On this screen we will select a template for our wiki. 1. There are many templates available. Highlight one you like. You can always change it later.
2. Click the green button whose text reads “Continue to Step 3 the other part”.
Figure 4: Step 3 The Other Part 1. Follow the instructions shown in the illustration to the right to create an account at Wetpaint.com.
2. After you have entered all the information Wetpaint needs to set up your account, click the large green button that reads “I’m done, create my Wetpaint site!”

5
Figure 5: Site Being Created 1. An image similar to the one on the right will display while your wiki site is being created.
2. When your site has been created, click the green button whose text reads “Take me to my site.”
3. Your wiki website will open at Wetpaint. The entire web address (URL) will display in the browser’s address bar. For example: http://techtrends2006.wetpaint.com.
4. Open the email you received from Wetpaint and print it. It contains the URL and other important information about your wiki site.
Figure 6: Tech Trends 2006 Home Page The image on the right shows the home page of the Tech Trends wiki displayed in the browser. Note how the elements of the page are displayed:
1. Banner at the top 2. Navigation bar on the left 3. Main content in the middle, with EasyEdit button near the top. 4. Footer at the bottom
Click the EasyEdit button to start creating your home page.

6
Figure 7: Adding Content to the Home Page Several buttons similar to the text editing buttons in Microsoft Word display at the top of the editing screen.
Remember, you must always sign in to your wiki before you begin editing it.
1. Type a brief description of your wiki in the text box in the middle of the page.
2. Click the Save button to save your changes.
3. A message box will pop up asking you if you wish to add an Edit Note. An Edit Note helps keep track of who made changes to the site and when. Add one if you wish.

7
Figure 8: Adding a Page to the Wiki Let’s add a new page to our wiki. A new page will be a child page (one step below it in the hierarchy) of the page you have open, so always be certain you know which page you are on before adding a new page.
1. With the home page open, click the Add a Page link in the Page Toolbox on the right side of the page. The Add a Page dialogue box opens.
2. Fill out the following text boxes: 2.1 Confirm the page location – Shows where the new page will appear in the wiki. If the new page should be linked to the home page, be sure the page location is Home > New page name. 2.2 Enter page name 2.3 Add keyword tags – Describe what a page is about to the web browser. 2.4 Start with a template – Let’s use Blank Page for this page.
3. Click the Add Page button to create the new wiki page.
4. Follow the same steps to add other new pages to your wiki.
Figure 9: New Page has been Added to Wiki The new page opens in the browser. The title of the new page is listed in the navigation bar under the title of the page it is linked to, which is the page that it follows in the hierarchy of pages. Example: Home
• History of the Wiki

8
Figure 10: Three New Pages have been Added to the Wiki Figure 10 shows what the navigation bar looks like after adding three pages to the wiki:
• Characteristics of Wikis • History of the Wiki • Wiki Communities
It also shows when the latest update was made.
Figure 11: Adding Text to the Home Page Let’s add some content to the home page we created for our wiki. Follow these 4 easy steps: 1. Open the home page if it is not already open. You must sign in before you can edit a wiki, so, signin if you are not signedin.
2. Click the EasyEdit button. A message appears asking if you want to allow access to the Clipboard. Click either Yes or No.
3. Type the content you wish to add in the text box. Use the formatting buttons on the EasyEdit Toolbar to bold, italicize, or underline text, to add numbered or bulleted lists, to justify text, etc. These buttons perform exactly the same as the formatting buttons in Microsoft Word.
4. When you finish adding content, click the Save button and add an edit note if you wish.

9
Figure 12: Adding a Link to the Home Page It is easy to add links to a wiki page, as explained below: 1. Click the Add Link button on the EasyEdit toolbar.
2. Type the text you wish to link to in the Enter the text message box.
3. Type the URL of the web page you are linking to in the Link to message box. You may also copy and paste a link from a web page into the message box.
4. Click the Add Link button. The text you added the link to is now blue and underlined.
5. Save your changes and either add an edit note or skip the edit note.
6. Click the link to test it after the page is refreshed in the Browser. After the page that is linked to opens in another browser window, click the Back button to return to your wiki.

10
Figure 13: Adding an Image
Let’s add an image to our home page. Make certain the image you are going to place in your page is no larger than 500 kilobytes (or, about 400 X 500 pixels). Just follow these easy steps: 1. Click the Add Image button on the Easy Edit toolbar. The Add Image dialog box opens.
2. The first step is to tell the program where the image is.
2.1 If the image is on your computer, click the Browse button and locate the image on a drive or folder. When you locate the image, highlight it in the list of files in the File Upload dialog box and click the Open button to close the dialog box. Add a description of the image in the Name this Image dialog box. This will allow screen readers to add audio to describe the image. Click the Add Image button to upload the image.
2.2 If the image is on a web page, click the radio button next to the text on the Web and type the URL of the page the image is on in the message box. Add a description of the image in the Name this Image dialog box. Click the Add Image button to upload the image.
2.3 If the image does not display, follow the steps listed in 2.1 or 2.2 again.
Note: Follow this link to learn all about pixels and image sizes.

11
Using Other Wiki Features
In the last part of this tutorial we are going to learn to use other wiki tools, including the search feature, inviting others to contribute to your wiki, renaming pages, and using the help system.
Figure 14: Using the Wiki Search Feature The wiki search feature is similar to the one in Microsoft Word. To search for a term on one of the pages of your wiki: 1. You can search the wiki from any page in the wiki. Type the term you wish to search for in the search box. As shown in Figure 14, I searched the Tech Trends wiki for the term “wikis” and learned that it was used three times and on two pages of the wiki.
2. To get used to using the search feature, practice searching for a few other terms you think you might have used while creating your wiki.

12
Figure 15: Inviting Others to Contribute to Your Wiki The most valuable feature of wikis is that they are great tools for collaboration among users. It is very easy to invite others to join you in editing and maintaining your wiki. Just follow these steps: 1. You must signin to invite others to join your wiki, so signin if you are not already signedin.
2. Click Invite others on the Page Toolbox on the right side of the screen.
3. On the left side of the Invite others page several message boxes display that you need to fill out before inviting someone to join your wiki. They are: 3.1 Select the role you want the person you are inviting to assume in your wiki. You cannot select “Administrator” because a wiki can have only one administrator, and that is you.
3.2 I suggest you select “Writer” because writers are allowed to edit wikis and add information to them.
3.3 Enter the email address of the person you are inviting to join your wiki.
3.4 Add a customized message if you wish. If you do not customize your message, the message on the right side of the page under Invitation Preview will appear.
3.5 Change the way your name will appear in the invitation if you wish.
3.6 Click the Send Invitations button.
13
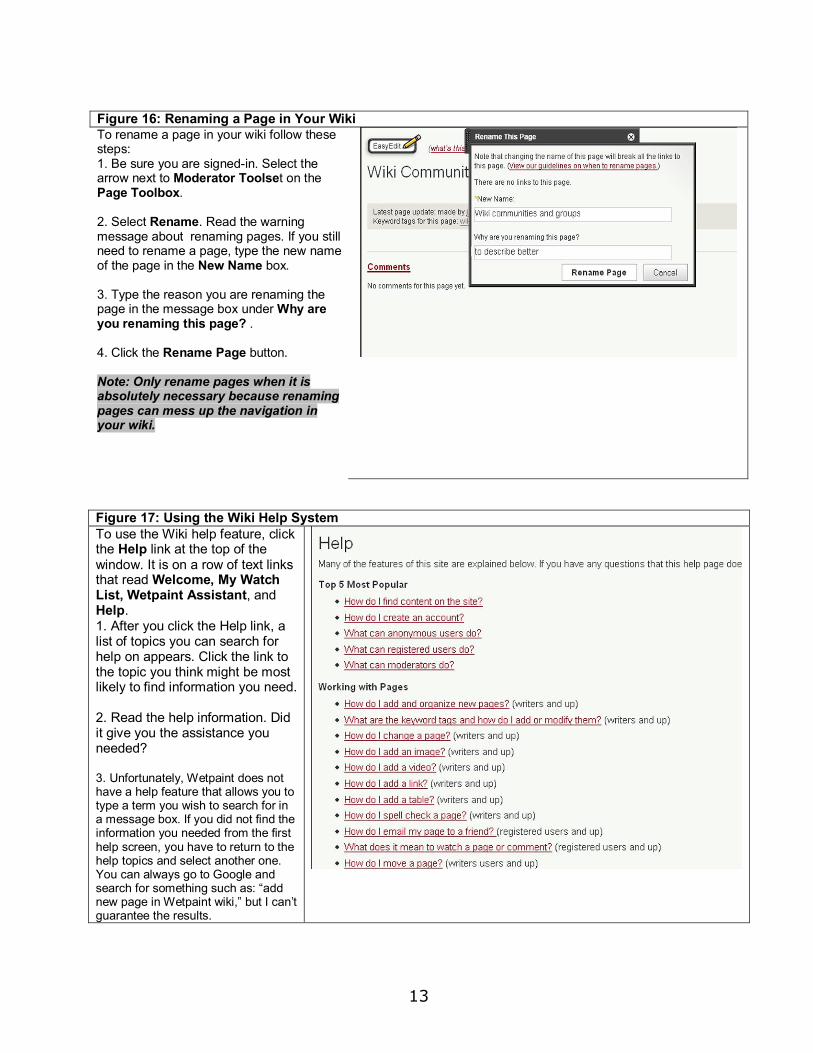
Figure 16: Renaming a Page in Your Wiki To rename a page in your wiki follow these steps: 1. Be sure you are signedin. Select the arrow next to Moderator Toolset on the Page Toolbox.
2. Select Rename. Read the warning message about renaming pages. If you still need to rename a page, type the new name of the page in the New Name box.
3. Type the reason you are renaming the page in the message box under Why are you renaming this page? .
4. Click the Rename Page button.
Note: Only rename pages when it is absolutely necessary because renaming pages can mess up the navigation in your wiki.
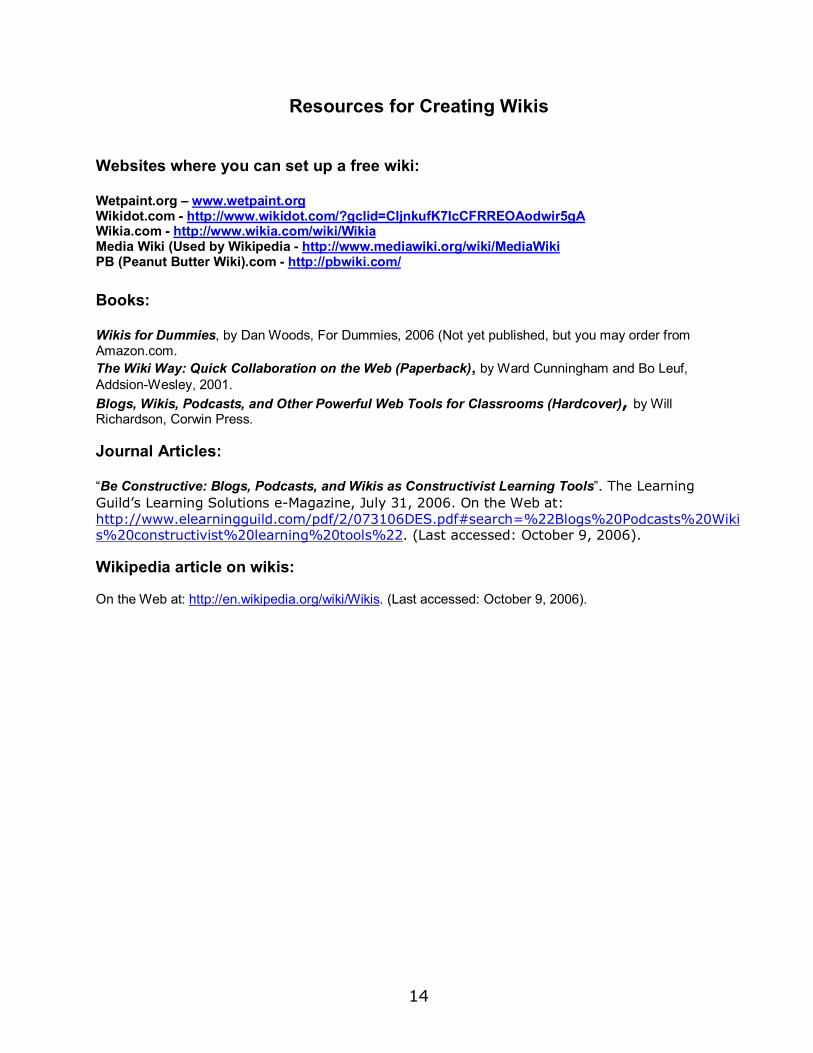
Figure 17: Using the Wiki Help System To use the Wiki help feature, click the Help link at the top of the window. It is on a row of text links that read Welcome, My Watch List, Wetpaint Assistant, and Help. 1. After you click the Help link, a list of topics you can search for help on appears. Click the link to the topic you think might be most likely to find information you need.
2. Read the help information. Did it give you the assistance you needed?
3. Unfortunately, Wetpaint does not have a help feature that allows you to type a term you wish to search for in a message box. If you did not find the information you needed from the first help screen, you have to return to the help topics and select another one. You can always go to Google and search for something such as: “add new page in Wetpaint wiki,” but I can’t guarantee the results.
14
Resources for Creating Wikis
Websites where you can set up a free wiki:
Wetpaint.org – www.wetpaint.org Wikidot.com http://www.wikidot.com/?gclid=CIjnkufK7IcCFRREOAodwir5gA Wikia.com http://www.wikia.com/wiki/Wikia Media Wiki (Used by Wikipedia http://www.mediawiki.org/wiki/MediaWiki PB (Peanut Butter Wiki).com http://pbwiki.com/
Books:
Wikis for Dummies, by Dan Woods, For Dummies, 2006 (Not yet published, but you may order from Amazon.com. The Wiki Way: Quick Collaboration on the Web (Paperback), by Ward Cunningham and Bo Leuf, AddsionWesley, 2001. Blogs, Wikis, Podcasts, and Other Powerful Web Tools for Classrooms (Hardcover), by Will Richardson, Corwin Press.
Journal Articles:
“Be Constructive: Blogs, Podcasts, and Wikis as Constructivist Learning Tools”. The Learning Guild’s Learning Solutions eMagazine, July 31, 2006. On the Web at: http://www.elearningguild.com/pdf/2/073106DES.pdf#search=%22Blogs%20Podcasts%20Wiki s%20constructivist%20learning%20tools%22. (Last accessed: October 9, 2006).
Wikipedia article on wikis:
On the Web at: http://en.wikipedia.org/wiki/Wikis. (Last accessed: October 9, 2006).