how to create a new contract workspace
TRANSCRIPT

How to Create a New Contract Workspace – V4
How to Create a New Contract Workspace r
OBJECTIVE:
This guide focuses on the process of creating a new Contract Workspace in Ariba. A Contract
Workspace is a project management tool in Ariba that is used to manage the creation and
maintenance of a contract. Contracts created from a UW Sourcing Event that require negotiation, as well as contracts already executed, can be published in the Contract Workspace.
The Contract Workspace:
Is used to model all the steps in the contract process through tasks. Is used as a repository for contract-related documents.
In this step-by-step guide, Contract Managers will learn how to:
Create a new Contract Workspace from a UW Sourcing Event Enable Desktop File Sync (DFS), a feature of Internet Explorer that is used to expedite
contract version management.
Determine if a supplier is available to use in the Contract Workspace. Create a Contract Workspace by providing information and answering commodity-
related questions that are unique to specific contract types. Assign the Contract ID number to the name of the Contract Add Contact information to the Contract Upload files into the Documents section.

How to Create a New Contract Workspace –V4 Page - 2
HOW TO CREATE A NEW CONTRACT WORKSPACE FROM A UW SOURCING EVENT
Click here to access this step-by-step guide if the contract you want to create is the result of a Sourcing Event conducted through the UW Ariba Sourcing module.
DESKTOP FILE SYNC (DFS) Desktop File Sync must be enabled in order to complete the Contract Workspace
process and publish a Contract.
Click here to learn more about DFS.
Ensure you are using I.E. browser version 11 or older.
Contact Ginny Morris, Tu Pak or John Whitney if you need help setting up DFS.
CONTRACT WORKSPACE SUPPLIER CONFIRMATION PROCESS
Check to see if your supplier is registered in the Contract Workspace by using the Supplier Confirmation Process step-by-step guide.
BEFORE YOU START - Important related information!

How to Create a New Contract Workspace –V4 Page - 3
How to Create a New Contract Workspace
1. Using your IE (Internet Explorer) browser, log into eProcurement: https://ar.admin.washington.edu/AribaBuyer/uw/login.asp
2. On the Dashboard under Common Actions -> Manage, click the Strategic Sourcing link:
3. To create a new contract workspace, click on Create -> Contract Workspace (Procurement)
Click Strategic Sourcing
Click Create
Select Contract Workspace (Procurement)

How to Create a New Contract Workspace –V4 Page - 4
4. The following screen will appear and demonstrates entering the attributes of: Name,
Description, Related ID, Copy from Contract, Test Project, Hierarchical Type, Base
Language, Predecessor Project, Emergency Contracts, Exposure to PHI?, Data Security
Required?, and Third Party.
Enter a temporary Name for the contract
with a brief description. This Name will be replaced when the Contract ID is assigned
Asterisk indicates required data entry or selection
Set Test Project to Yes, if you’re working in
the training module, or set to No if creating
a real contract
Required by Ariba. Do not change. Use
Contract Type field described in Step 5 below to specify UW Contract Type
If created from a Sourcing Event, this will
default to the name of the Sourcing Project. If
not, you can leave this set to (no value)
Selecting Yes for these fields will drive
clauses that are added to the contract document. Click the “i” for more information
This is an example of an information window that appears after clicking “i”
How to Create a New Contract Workspace –V4 Page - 5
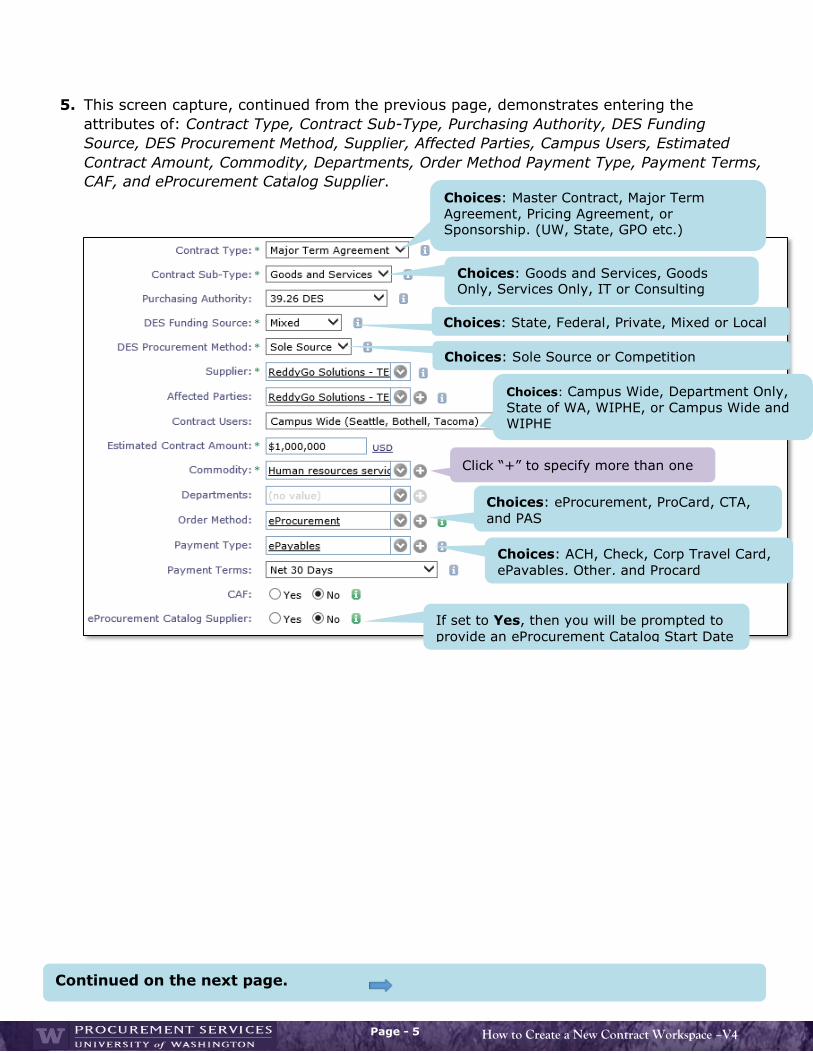
5. This screen capture, continued from the previous page, demonstrates entering the
attributes of: Contract Type, Contract Sub-Type, Purchasing Authority, DES Funding
Source, DES Procurement Method, Supplier, Affected Parties, Campus Users, Estimated
Contract Amount, Commodity, Departments, Order Method Payment Type, Payment Terms,
CAF, and eProcurement Cat alog Supplier.
Choices: Master Contract, Major Term
Agreement, Pricing Agreement, or Sponsorship. (UW, State, GPO etc.)
Choices: Goods and Services, Goods Only, Services Only, IT or Consulting
Click “+” to specify more than one
Choices: eProcurement, ProCard, CTA,
and PAS
Choices: ACH, Check, Corp Travel Card,
ePayables, Other, and Procard
If set to Yes, then you will be prompted to
provide an eProcurement Catalog Start Date
Choices: State, Federal, Private, Mixed or Local
Choices: Sole Source or Competition
Choices: Campus Wide, Department Only,
State of WA, WIPHE, or Campus Wide and WIPHE
Continued on the next page.
How to Create a New Contract Workspace –V4 Page - 6
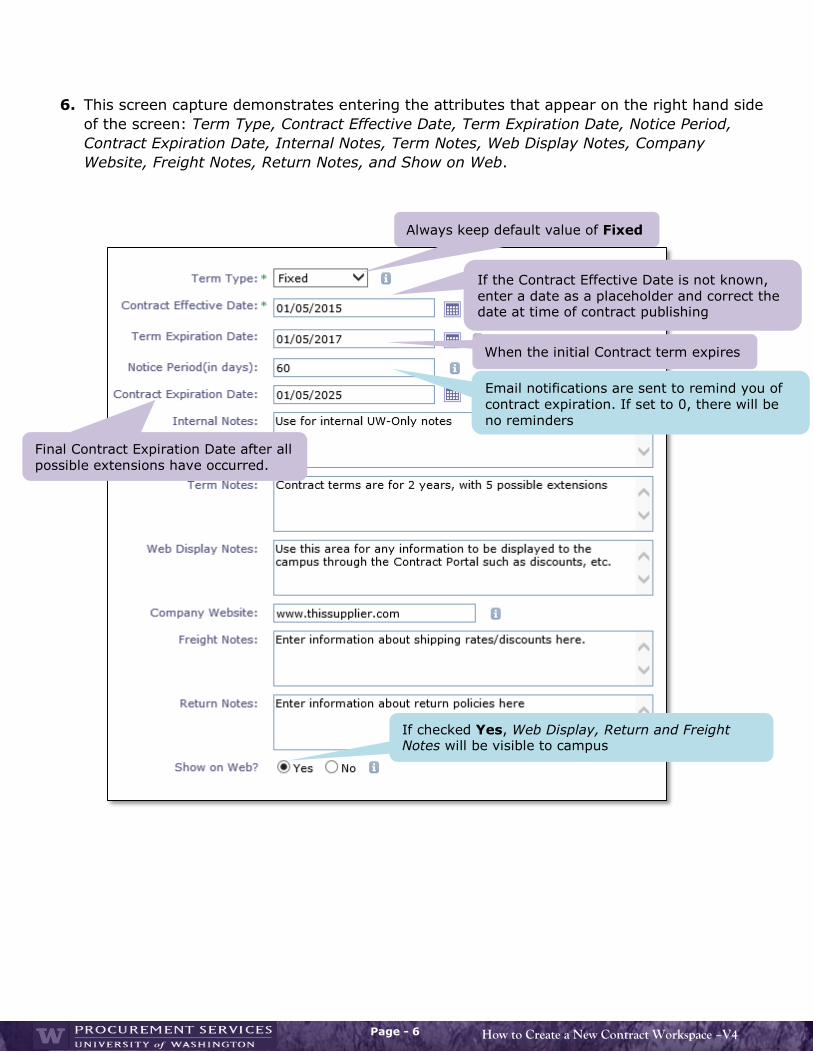
6. This screen capture demonstrates entering the attributes that appear on the right hand side
of the screen: Term Type, Contract Effective Date, Term Expiration Date, Notice Period,
Contract Expiration Date, Internal Notes, Term Notes, Web Display Notes, Company
Website, Freight Notes, Return Notes, and Show on Web.
Always keep default value of Fixed
If the Contract Effective Date is not known,
enter a date as a placeholder and correct the date at time of contract publishing
Email notifications are sent to remind you of
contract expiration. If set to 0, there will be
no reminders
If checked Yes, Web Display, Return and Freight Notes will be visible to campus
When the initial Contract term expires
Final Contract Expiration Date after all
possible extensions have occurred.

How to Create a New Contract Workspace –V4 Page - 7
7. After all of the required contract fields have been entered, scroll down to the bottom of the
screen and select either the University of Washington Contracting Template or the
University of Washington IT Template, and answer the associated questions. Some of
the questions are different within both Templates due to commodity related policies and
procedures.
The first question asks, “Is this Contract already executed,” meaning the contract
has already been negotiated.
Answer No if the Contract has not been executed.
Answer Yes if the Contract has already been executed (example: State, GPO
contracts).
NOTE: There are many Tasks that can be Marked Complete in the Contract
Workspace if the Contract is already executed, which allows the Contract to
be Published more quickly.
The other questions listed are: Will this contract use supplier paper? Is there a
possibility this contract will access federal funds? If work on this contract occurs near
children or students, a background check may be necessary. Do you require a
background check for this contract? Will there be any options to extend this contract?
8. After selecting the responses to the questions, click Create.
University of Washington Contracting Template
Select responses to the questions here.
How the questions are answered will
determine whether additional information or contract related forms are required
University of Washington IT Template Click Create
Supplier paper = Utilizing a contract
provided by the supplier. Not a UW
generated contract
Other contract specific questions

How to Create a New Contract Workspace –V4 Page - 8
9. After clicking Create, the Overview screen will appear. A Contract ID is now assigned to
the Contract Workspace project starting with the letters “CW,” then followed by a 7-digit
number. The Contract ID number, including the CW before the number and a brief
description of the Contract, will replace the temporary name assigned in Step 4 of this guide.
This is to establish a standardized naming convention and enhance reporting functions.
To change the temporary Contract Name and replace it with the Contract ID number:
Click Actions > Edit Overview
10. On the next screen, enter the Contract ID number (with the CW before the number) and
add a brief description of the Contract. Then click OK.
11. The Contract ID/description becomes the new Contract Name and will be displayed at
the top of the next screen.
Click Actions > Edit Overview
Consulting Services for Human Resources

How to Create a New Contract Workspace –V4 Page - 9
12. To add a supplier Contact, click on the Documents tab, then click on Catalog
Attributes, Contacts and Amendments and select Open:
Click the Documents tab
Click on Catalog Attributes, Contacts and Amendments
Select Open
Continued on the next page.
How to Create a New Contract Workspace –V4 Page - 10
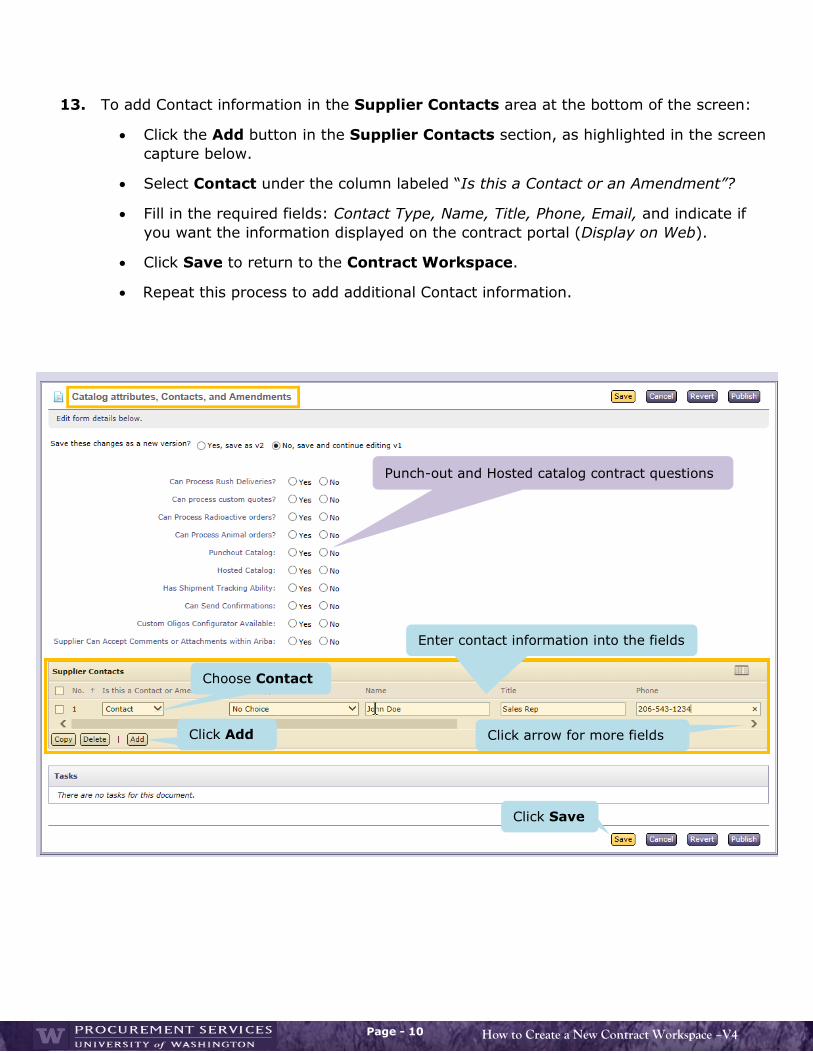
13. To add Contact information in the Supplier Contacts area at the bottom of the screen:
Click the Add button in the Supplier Contacts section, as highlighted in the screen
capture below.
Select Contact under the column labeled “Is this a Contact or an Amendment”?
Fill in the required fields: Contact Type, Name, Title, Phone, Email, and indicate if
you want the information displayed on the contract portal (Display on Web).
Click Save to return to the Contract Workspace.
Repeat this process to add additional Contact information.
Click arrow for more fields Click Add
Punch-out and Hosted catalog contract questions
Click Save
Choose Contact
Enter contact information into the fields

How to Create a New Contract Workspace –V4 Page - 11
14. To Upload Documents into the Contract Workspace, click on the Documents tab.
Click on the Actions button drop-down arrow and select Upload > Document
Select Browse to locate and Upload the file from your computer
Provide a file description
Click Create
Note: File size capacity in the Contract Workspace cannot exceed 100
MB per file.
Browse and upload the document
document from
You can leave this set to the default No. Documents
other than the main UW Agreement document do
not have to be published in the Contract Workspace

How to Create a New Contract Workspace –V4 Page - 12
After clicking Create, a page appears with the Overview Tab highlighted and the details
of the document are displayed. The document can be Edited, Copied, Moved and
Published for use by other team members.
Note: Documents that are uploaded can remain in a Draft status and do not have
to be published, with the exception of the main contract agreement.
Click Done to complete the document upload.
After clicking Done, the uploaded file
will be displayed in the Documents section
Click Done

How to Create a New Contract Workspace –V4 Page - 13
STOP!
15. Important: To continue, please refer to the Using Ariba Contract Workspace to
Negotiate and Manage Contracts Guide to complete the Contract Workspace publishing
process.
End of Guide