how to create a course create a course.pdf · presentation format: blended, face-to-face, online...
TRANSCRIPT

How to Create a Course
Go to http://bvsd.truenorthlogic.com
Log in with your district username and password (firstname.lastname and district password)
The homepage will display once you’ve logged in
Click on the “Administration” tab on the top of the page

Click on “Course Administration”
Click on “Create New Learning Opportunity”
Click on instructor led course

Create a course
Note that required fields are identified by an asterisks (*)
Course Title: be generic, keep the year out so
you can reuse it, start the title with your
school/department location name (i.e.,
Angevine Middle: Staff Meetings – School
Reform/PD)
Links: Relevant links for a course (i.e.,
Schoology)
Course Description: Description to help with
course searches, include instructor or presenter
name
Site/department: Will default to your location, if
you can create courses for multiple sites, you will
have a drop-down
Contact Person: Name of contact person for
course
Contact Phone: Phone number of contact person
Contact Email: Email for contact person
Course Provider: Will default and doesn’t need to
be changed unless you are using Schoology
Credit Types: Choose instructional seat time and
enter number of hours or credit

Once all course fields are complete, click “Create Instructor Led Course”
Once the course is created, you can select the course settings
Course settings help highlight courses in the catalogue or restrict users from finding courses
Two setting are required: Competencies (rubrics) and Subjects
Course Survey: Choose Professional Learning
Feedback Survey for all professional learning
opportunities, choose None for meetings
Allow participant to enroll in multiple sections
of same course: Click if it is okay for participants
to enroll in multiple sections of same course
Archive: Click if you want to archive course now.
It will not appear in the catalogue.

Course settings option #1: Locations
Availability: Courses will automatically appear in
the catalogue for all employees, click Set
Locations to select a particular location. Only
individuals with the specified location will have
the ability to view this course from the catalog.
To select School-based employees only:
1) Select Ed Center
2) Click on Remove Selected
3) Click Done
To select Central Admin/Ed Center employees only:
1) Select Elementary, Middle, High School, and K-8
2) Click on Remove Selected
3) Click Done
To select all employees by level (Ed Center, Elementary,
K-8, Middle, or High School):
1) Select levels you don’t want to target
2) Click on Remove Selected
3) Click Done

To select a specific school or department
1) Select Type: School
2) State: Colorado
3) Region: BVSD (automatically defaults)
4) County: BVSD (automatically defaults)
5) District: Choose Ed Center, Elementary, K-8,
Middle, High
6) School: Choose specific school or department
1
2
5
6

Once you have chosen the department or school you want to target, click “Add”
Your selection will appear
Click the boxes next to Elementary, Middle, High School, K-8, and Ed Center selections (these selections
are what allow classes to appear to all users)
Click Remove Selected

Only your school or department selection will remain
Click Done
To select external guests (community
members, substitute teachers, etc):
Select Type: Region
State: State1 (automatically defaults)
Region: External Guest
Important: If you want to control the number
of seats that external guests can register for,
set up a separate section visible only to
external guests and limit your seats for that
section based on the number available to
external guests.
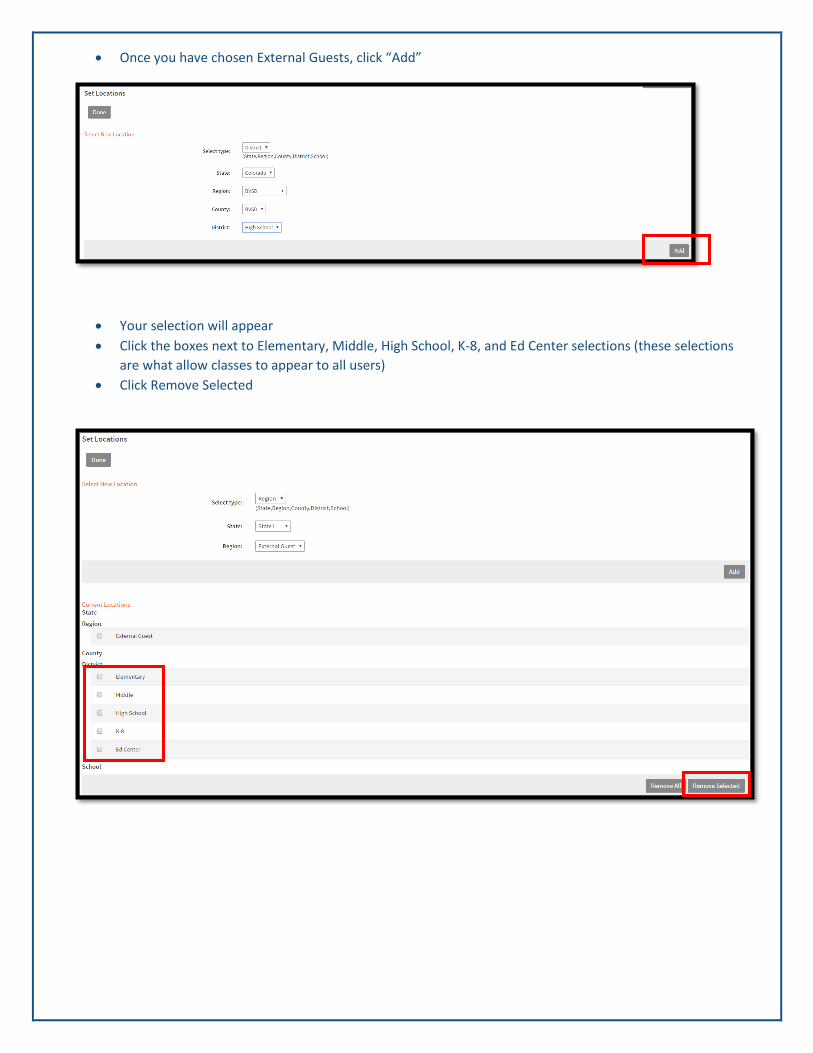
Once you have chosen External Guests, click “Add”
Your selection will appear
Click the boxes next to Elementary, Middle, High School, K-8, and Ed Center selections (these selections
are what allow classes to appear to all users)
Click Remove Selected

Only your location selection will remain
Click done
Course settings option #2, 3, and 4: Required/Recommended/Restricted Demographics
To enable demographics, click “Set…”
Required: This option will put the course
in a demographics required channel on
the homepage for employees. This setting
should be used sparingly and only if the
course has an end date. If not, the course
will remain in the channel indefinitely.
Recommended: This option will put the
course in a demographics recommended
channel on the homepage for employees.
This setting should be used sparingly and
only if the course has an end date. If not,
the course will remain in the channel
indefinitely. Additionally, you should not
recommend and require the same course
Restricted: This option will allow you to
restrict who can view the course in the
catalog. This setting works with location
and supersedes selections made under
Set Required or Set Recommended.
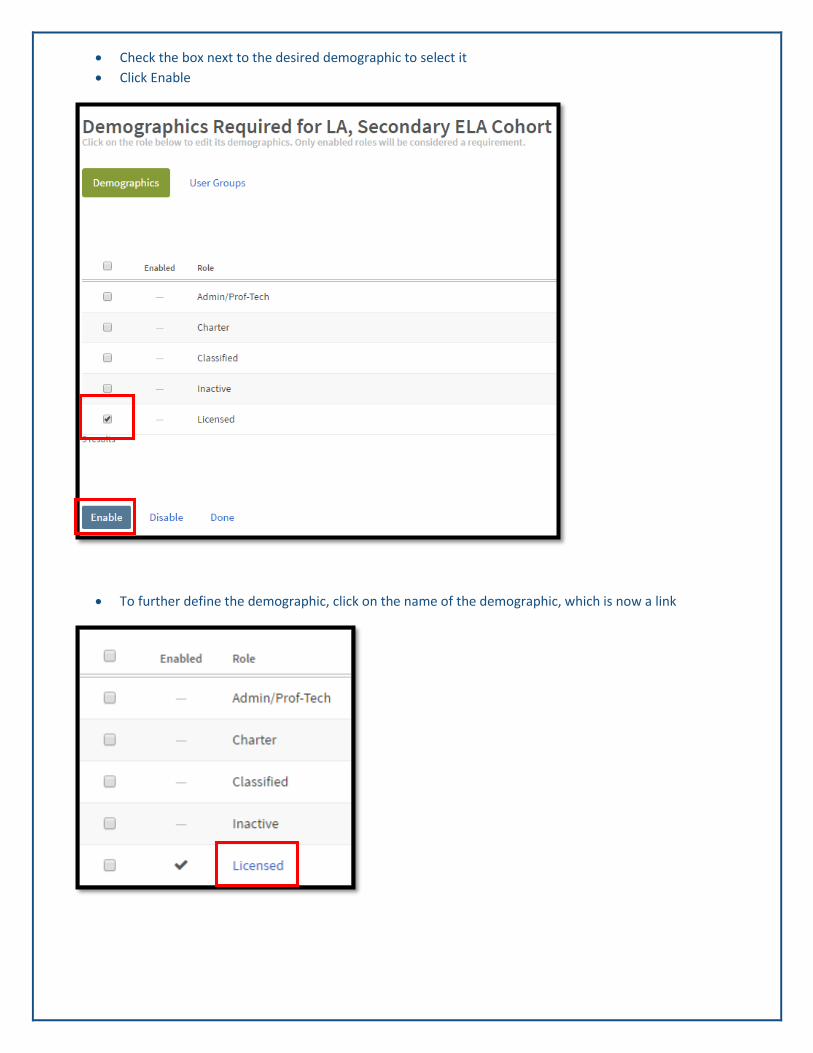
Check the box next to the desired demographic to select it
Click Enable
To further define the demographic, click on the name of the demographic, which is now a link

Use the navigation tree to narrow your demographic selection
Click next to the demographic attribute you want to use
Click Save
Click Done to return to course settings
Contract Status: This should be used sparingly unless a
particular group of employees is being targeted (i.e.,
probationary teachers)
Employee Group: Do not use
Job Code: This will narrow the demographics by job code
Level: This will narrow the demographics to Elementary,
Secondary, or Special Service Providers (this only applies to
licensed staff)
Subject: This will narrow the demographics by IC subject (this
only applies to licensed staff)

Course settings option #5: Competencies
To align the course with BVSD Evaluation Effectiveness Standards, click Align Rubrics under the
Competencies setting
IMPORTANT: THIS IS REQUIRED
Select all standards and elements that apply
This helps employees search for courses based on their goals
Click Save
Course settings option #6: Subjects
To align the course with a subject, click Align Subjects
IMPORTANT: THIS IS REQUIRED

Select all subjects/categories that apply
This helps employees search for courses
Click Save

Create a section for the course
Scroll down below the course and settings area
Click New Section
Create a section
Note that required fields are identified by an asterisk (*)
Section Title: be specific,
include the year, a sub-topic
of the course, etc
Location/Room #: Site
location and room
Street Address, City, State,
Zip: There is a Google map
feature that is enabled if you
enter these fields, highly
recommended

Instructors: N/A, available after
section is created
Attendance: Can be taken once or
twice a day
Start Time and End Time: When the
section starts and ends
Section Start Date: The date the
section starts
Section End Date: The date the
section ends or the last date
homework will be graded, whichever
is greater
Presentation Format: Blended, Face-
to-Face, Online
Max # of Participants: Enter a
number, if left at 0 the course will not
appear in the catalogue and you will
need to register participants yourself
Allow Waitlist: Check if you will allow
a waitlist
Max Waitlist Size: Indicate how many
participants can sign up for the
waitlist
End of Registration Date: Last day
participants can register for a
course/section. Important: also last
date participants can withdraw on
their own.
Waitlist Cutoff Date: Last day
participants can register for the
waitlist. Important: also last date
participants can be automatically
moved from the waitlist to registered
without instructor intervention.
Release Section Now: Click
to release the section
immediately
Release Section At: Schedule
the release of your section
for a time and date in the
future. Important: Must
release section next day if
offering a sub.

Once all section fields are complete, click “Create”
The section details will appear
Scroll down
Click on Instructors
Substitute: None, Half-
Day, Full Day
Contact
Name/Email/Phone
for Account
Code/Attendance:
Enter the contact for
account code and
attendance questions
Fund, Location,
Program, Project,
Activity, Account
Category: Required if a
half-day or full-day sub
was selected

Enter the name of the instructor you want to add
Click Find User
Click the box to the left of the person’s name and click Add User(s)
Repeat as needed to add multiple instructors
Click Done

The section details appear again
Scroll down
Select Class Times
Class times are required to take attendance and attendance is required for all professional learning
opportunities
Click Add New Day
The date and time entered on the section fields will appear
If you need to add additional dates and times, click the Add New Day button
Enter the date and times
Repeat as needed

If you have recurring dates, select from the Recurring Dates drop-down
Click Save Changes
The section details appear again
Scroll down
Click done