how to configure openstack swift with modern … | how to configure openstack swift with modern tape...
TRANSCRIPT

How to Configure OpenStack Swift with Modern Tape O R A C L E W H I T E P A P E R | A U G U S T 2 0 1 7

0 | HOW TO CONFIGURE OPENSTACK SWIFT WITH MODERN TAPE
Table of Contents
Introduction 1
Oracle HSM Installation 1
Prior to Installation 1
Download the Oracle HSM software packages from edelivery and install 1
Update environment variables for commands and man pages 3
Install the Oracle HSM Web GUI 3
Swift Installation 3
Configure HSM 3
Configure the QFS file systems 3
Configure Swift 5
Modify /etc/swift/swift.conf 5
Modify /etc/swift/proxy-server.conf 5
Configure the Rings on the Proxy Server 6
Start the Swift Services 7
Saving Swift Configuration Files: 7
Using Swift 7

1 | HOW TO CONFIGURE OPENSTACK SWIFT WITH MODERN TAPE
Introduction
As digital data grows exponentially, the demands on storage systems are increasing. There is a need
for storage systems that can scale, handle many concurrent users, and be accessible via a URL.
Public cloud storage systems are addressing the challenge of handling web-scale workloads.
OpenStack Swift is an open source option to create a durable and scalable object storage system as
part of a private cloud or public cloud offering.
Oracle StorageTek provides a comprehensive portfolio of tape drives, tape libraries, and related
software. Oracle Hierarchical Storage Manager (HSM) software is a mature, scalable storage
management tool that is optimized for writing and reading tapes.
This paper describes how to setup OpenStack Swift with Oracle HSM for the lowest cost cold storage.
By combining these two products, users get the best of web interfaces via OpenStack and the best in
tape archive management software via Oracle HSM.
Oracle HSM Installation
The installation of Oracle HSM is well documented in the manuals available here:
http://docs.oracle.com/cd/E51305_01/index.html
Prior to Installation
You should have a tape library and primary disk cache available and setup for use.
Download the Oracle HSM software packages from edelivery and install
» Login to edelivery.oracle.com, select the “Oracle StorageTek Products” Product Pack. For the platform select
your version of Oracle Solaris (x86 or SPARC).
» You will need to install Oracle HSM version 6.0 at a minimum. This version was enhanced to support extended
attributes so that Swift could run on the QFS file system.
» Download the zip file “Oracle Hierarchical Storage Manager” which includes both Oracle HSM and the QFS file
system. You do not need to download “StorageTek QFS Software” as it is included with the Oracle
Hierarchical Storage Manager download.
» Unzip the zip file
# unzip V74688-01.zip # ls -1 ./ ../ COPYRIGHT.txt README.txt Oracle-HSM_6.0\ linux.iso
» Move to the Oracle-HSM_6.0 directory and then to the subdirectory that corresponds to your host architecture,
either solaris_sparc/ or solaris_x64/, and list the contents.

2 | HOW TO CONFIGURE OPENSTACK SWIFT WITH MODERN TAPE
In the example, we change to the solaris_sparc/ subdirectory: # cd Oracle-HSM_6.1-01 cd solaris_x64/ # ls -1 ./ ../ S10/ S11/ S11_ips/ fsmgr_5.4.01.zip fsmgr_setup*
» When Solaris 11 or later is installed on the host, you can install the software using the Image Packaging
System. To use IPS, change to the subdirectory S11_ips/ and Install Oracle HSM Software Using the Image
Packaging System (IPS).
# cd S11_ips/
» List the contents of the subdirectory S11_ips/.
# ls -1 ./ ../ repo.samqfs/
» Change to the repository subdirectory repo.samqfs/.
# cd repo.samqfs/ # ls -1 ./ ../ pkg5.repository publisher/
» To install both the Oracle HSM and StorageTek QFS Software packages, use the command pkg install -g . --
accept SUNWsamfs SUNWsamqassy, where . is the current directory (the repository) and SUNWsamfs and
SUNWsamqassy are the Oracle HSM Image Packaging System package names.
# pkg install -g . --accept SUNWsamfs SUNWsamqassy Creating plan ... * The licence and distribution terms for any publically available version or * derivative of this code cannot be changed. i.e. this code cannot simply be * copied and put under another distribution licence * [including the GNU Public Licence.] */ Packages to install: 2 Create boot environment: No Create backup boot environment: Yes DOWNLOAD PKGS FILES XFER (MB) SPEED Completed 2/2 520/520 21.4/21.4 0B/s PHASE ITEMS Installing new actions 693/693 Updating package state database Done Updating image state Done Creating fast lookup database Done
» When the packages finish installing, run the post-installation script, sam-qfs-post-install. It is located in the util/
subdirectory of the Oracle HSM installation directory (either /opt/SUNWsamfs/ or /opt/SUNWqfs/). In the
example, we run /opt/SUNWsamfs/util/sam-qfs-post-install:

3 | HOW TO CONFIGURE OPENSTACK SWIFT WITH MODERN TAPE
# /opt/SUNWsamfs/util/sam-qfs-post-install - The administrator commands will be executable by root only (group bin). If this is the desired value, enter "y". If you want to change the specified value enter "c". ... #
Update environment variables for commands and man pages
» add /opt/SUNWsamfs/bin and /opt/SUNWsamfs/sbin to the system PATH variable
» Add the Oracle HSM directory /opt/SUNWsamfs/man to the system MANPATH variable
Install the Oracle HSM Web GUI
» Start the installation process by running the fsmgr_setup script from the directory where you downloaded the
Oracle HSM software.
# ./fsmgr_setup
Swift Installation
Install swift using the following command # pkg install swift swiftclient
Configure HSM
Configure the QFS file systems
Typically, metadata information is stored on the same device as the file data. However, QFS has the option of storing the metadata on a separate device from the file data to improve performance. In this example, the metadata is separated from the file data by leveraging the ma file system. Metadata is stored in the mm device and file data is stored in the md device. It is recommended to store the metadata (mm device) on flash for improved performance during ingest and when backing up the metadata. There will be one file system “samqfs1”. There is also one tape library with 4 tape drives.
» NOTE: More than 1 file system per LUN is not recommended for performance reasons. However, you may
assign multiple LUNs to a single file system.
Add devices to the MCF file /etc/opt/SUNWsamfs/mcf on the Oracle HSM metadata server.
# mcf # ######################################################################### # # # ----- SAM-FS Filesystem Definitions -------- # # # Equipment Equip. Equip. Family Device Addit. # Identifier Ordinal Type Set State Params. # ---------- ------- ------ ------ ------ ------- samqfs1 100 ma samqfs1 - shared /dev/dsk/c0t600144F0E8944B00000057D8369A0003d0s0 101 mm samqfs1 - - /dev/dsk/c0t600144F0A44D8000000057D8369A0005d0s0 102 mr samqfs1 - - /dev/dsk/c0t600144F0A44D8000000057D8369A0006d0s0 103 mr samqfs1 - -

4 | HOW TO CONFIGURE OPENSTACK SWIFT WITH MODERN TAPE
/dev/dsk/c0t600144F0DCFE0600000057D8369B0005d0s0 104 mr samqfs1 - - /dev/dsk/c0t600144F0DCFE0600000057D8369B0006d0s0 105 mr samqfs1 - - /dev/dsk/c0t600144F05A478B00000057D8369B0003d0s0 106 mr samqfs1 - - /dev/dsk/c0t600144F05A478B00000057D8369B0004d0s0 107 mr samqfs1 - -
If you need to determine the disks available, run the following command:
# format Searching for disks...done AVAILABLE DISK SELECTIONS: 0. c0t600144F0A44D8000000057D8369A0005d0 <SUN-COMSTAR-1.0-14.55TB> /scsi_vhci/disk@g600144f0a44d8000000057d8369a0005 1. c0t600144F0A44D8000000057D8369A0006d0 <SUN-COMSTAR-1.0-14.55TB> /scsi_vhci/disk@g600144f0a44d8000000057d8369a0006 2. c0t600144F0DCFE0600000057D8369B0005d0 <SUN-COMSTAR-1.0-14.55TB> /scsi_vhci/disk@g600144f0dcfe0600000057d8369b0005 3. c0t600144F0DCFE0600000057D8369B0006d0 <SUN-COMSTAR-1.0-14.55TB> /scsi_vhci/disk@g600144f0dcfe0600000057d8369b0006 4. c0t600144F0E8944B00000057D8369A0003d0 <SUN-COMSTAR-1.0-1.29TB> /scsi_vhci/disk@g600144f0e8944b00000057d8369a0003 5. c0t600144F05A478B00000057D8369B0003d0 <SUN-COMSTAR-1.0-14.55TB> /scsi_vhci/disk@g600144f05a478b00000057d8369b0003 6. c0t600144F05A478B00000057D8369B0004d0 <SUN-COMSTAR-1.0-14.55TB> /scsi_vhci/disk@g600144f05a478b00000057d8369b0004 7. c1t0d0 <LSI-MR9261-8i-2.13-1.09TB> /pci@0,0/pci8086,e0a@3,2/pci1000,9263@0/sd@0,0 8. c1t1d0 <LSI-MR9261-8i-2.13-3.64TB> /pci@0,0/pci8086,e0a@3,2/pci1000,9263@0/sd@1,0
Confirm the disk is formatted by selecting the disk:
Specify disk (enter its number): 0 selecting c0t600144F0A44D8000000057D8369A0005d0 [disk formatted]
Check the mcf file for errors by running the sam-fsd command. The sam-fsd command reads the Oracle HSM configuration files and initializes the file systems. It will stop if it encounters an error:
# sam-fsd Tell the samd service to reread the mcf file and reconfigure itself accordingly. Correct any errors reported and repeat as necessary.
# samd config Create the file system using the /opt/SUNWsamfs/sbin/sammkfs -S command and the family set name of the file system.
# sammkfs -S samqfs1 Add the new file system to the operating system's virtual file system configuration. The /etc/vfstab file on the Oracle HSM metadata server would have the following entries based on this example:
# cat /etc/vfstab #device device mount FS fsck mount mount #to mount to fsck point type pass at boot options # /devices - /devices devfs - no - /proc - /proc proc - no - ctfs - /system/contract ctfs - no -

5 | HOW TO CONFIGURE OPENSTACK SWIFT WITH MODERN TAPE
objfs - /system/object objfs - no - sharefs - /etc/dfs/sharetab sharefs - no - fd - /dev/fd fd - no - swap - /tmp tmpfs - yes - /dev/zvol/dsk/rpool/swap - - swap - no - samqfs1 - /srv/node/samqfs1 samfs - no stripe=0,shared,bg
» If the new QFS shared file system does not already have a mount point, create the directory for the mount
point. For example:
# mkdir /srv # mkdir /srv/node # mkdir /srv/node/samqfs1
» Give the mount point the 755 set of permissions. For example:
# chmod 755 /srv/node/samqfs1
» Make sure you make swift the owner of the file system so that it can create directories
# chown –R swift:swift /srv/node/samqfs1
» Mount the file system on the metadata server before you mount the file system on any client hosts. For
example, run the following on the metadata server:
# mount samqfs1
» Verify that the file system is mounted on the metadata server.
# df -k
Configure Swift
Modify /etc/swift/swift.conf
Generate two random strings by running the following command: # od -t x8 -N 8 -A n < /dev/random 0ee918c710c7738c # od -t x8 -N 8 -A n < /dev/random 39e7f95d2108f056
Use the string generated as the swift_hash_path_suffix in the /etc/swift/swift.conf file. The file should look something like the following:
[swift-hash] swift_hash_path_suffix = 0ee918c710c7738c swift_hash_path_prefix = 39e7f95d2108f056
Modify /etc/swift/proxy-server.conf
Edit /etc/swift/proxy-server.conf with the following. We are configuring this with tempauth so remove authtoken and keystoneauth from pipeline. Comment out the sections [filter:authtoken] and [filter:keystoneauth]
[DEFAULT] bind_port = 8080 [pipeline:main] #pipeline = catch_errors gatekeeper healthcheck proxy-logging cache container_sync bulk tempurl ratelimit tempauth authtoken keystoneauth container-quotas account-quotas slo dlo proxy-logging proxy-server
6 | HOW TO CONFIGURE OPENSTACK SWIFT WITH MODERN TAPE
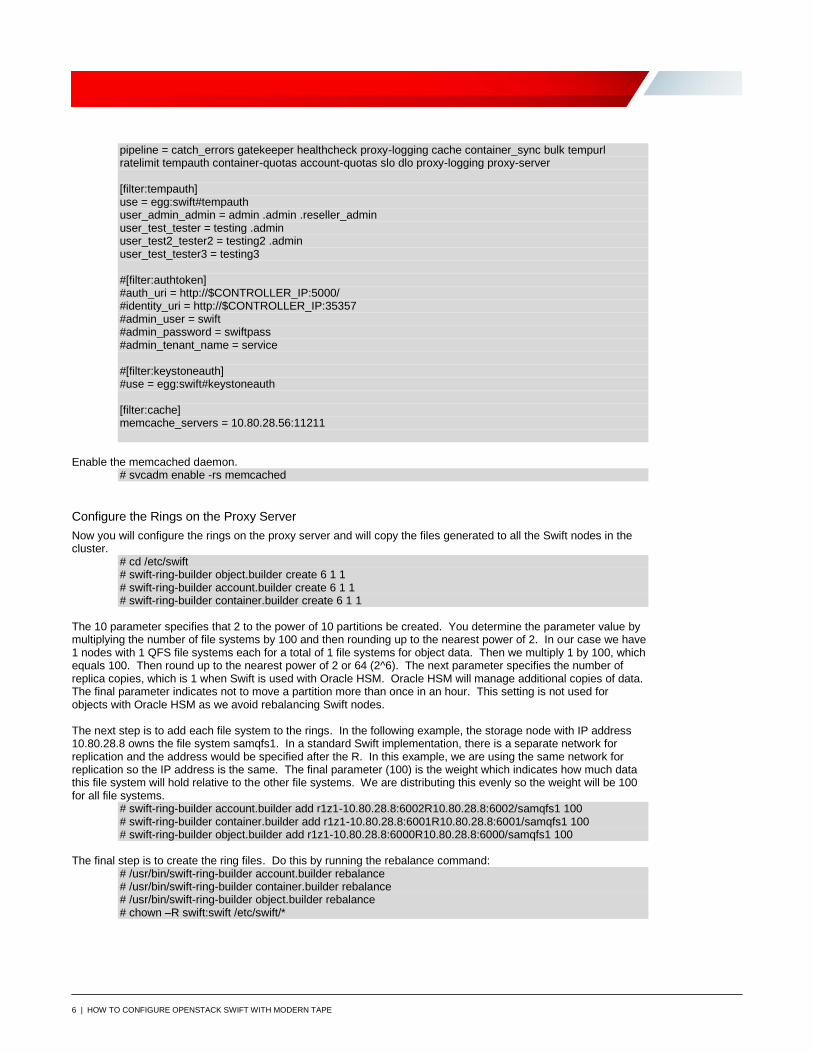
pipeline = catch_errors gatekeeper healthcheck proxy-logging cache container_sync bulk tempurl ratelimit tempauth container-quotas account-quotas slo dlo proxy-logging proxy-server [filter:tempauth] use = egg:swift#tempauth user_admin_admin = admin .admin .reseller_admin user_test_tester = testing .admin user_test2_tester2 = testing2 .admin user_test_tester3 = testing3 #[filter:authtoken] #auth_uri = http://$CONTROLLER_IP:5000/ #identity_uri = http://$CONTROLLER_IP:35357 #admin_user = swift #admin_password = swiftpass #admin_tenant_name = service #[filter:keystoneauth] #use = egg:swift#keystoneauth [filter:cache] memcache_servers = 10.80.28.56:11211
Enable the memcached daemon.
# svcadm enable -rs memcached
Configure the Rings on the Proxy Server
Now you will configure the rings on the proxy server and will copy the files generated to all the Swift nodes in the cluster.
# cd /etc/swift # swift-ring-builder object.builder create 6 1 1 # swift-ring-builder account.builder create 6 1 1 # swift-ring-builder container.builder create 6 1 1
The 10 parameter specifies that 2 to the power of 10 partitions be created. You determine the parameter value by multiplying the number of file systems by 100 and then rounding up to the nearest power of 2. In our case we have 1 nodes with 1 QFS file systems each for a total of 1 file systems for object data. Then we multiply 1 by 100, which equals 100. Then round up to the nearest power of 2 or 64 (2^6). The next parameter specifies the number of replica copies, which is 1 when Swift is used with Oracle HSM. Oracle HSM will manage additional copies of data. The final parameter indicates not to move a partition more than once in an hour. This setting is not used for objects with Oracle HSM as we avoid rebalancing Swift nodes. The next step is to add each file system to the rings. In the following example, the storage node with IP address 10.80.28.8 owns the file system samqfs1. In a standard Swift implementation, there is a separate network for replication and the address would be specified after the R. In this example, we are using the same network for replication so the IP address is the same. The final parameter (100) is the weight which indicates how much data this file system will hold relative to the other file systems. We are distributing this evenly so the weight will be 100 for all file systems.
# swift-ring-builder account.builder add r1z1-10.80.28.8:6002R10.80.28.8:6002/samqfs1 100 # swift-ring-builder container.builder add r1z1-10.80.28.8:6001R10.80.28.8:6001/samqfs1 100 # swift-ring-builder object.builder add r1z1-10.80.28.8:6000R10.80.28.8:6000/samqfs1 100
The final step is to create the ring files. Do this by running the rebalance command:
# /usr/bin/swift-ring-builder account.builder rebalance # /usr/bin/swift-ring-builder container.builder rebalance # /usr/bin/swift-ring-builder object.builder rebalance # chown –R swift:swift /etc/swift/*

7 | HOW TO CONFIGURE OPENSTACK SWIFT WITH MODERN TAPE
You can get a summary of a ring by running the swift-ring-builder command specifying a ring, for example: # /usr/bin/swift-ring-builder object.builder
NOTE: While Swift allows storage nodes to be added dynamically, this should be avoided when using tape storage. When Swift rebalances, objects are copied from one storage node to another. This would cause objects to be read from tape and impact performance. Instead, configure enough Swift Storage Nodes/QFS clients and QFS file systems to handle the anticipated total object count. After running the commands, the following files will be created in /etc/swift:
account.ring.gz, container.ring.gz, object.ring.gz
Copy these files to every storage node in the Swift cluster under the /etc/swift directory, which should be owned by the swift user.
Start the Swift Services
Start the services on the storage nodes. # SWIFT_SVC="swift-upgrade swift-proxy-server swift-account-server swift-container-server swift-object-server swift-container-updater swift-object-updater swift-account-reaper swift-object-expirer" # svcadm enable $SWIFT_SVC # svcs $SWIFT_SVC STATE STIME FMRI online Apr_17 svc:/application/openstack/swift/swift-upgrade:default online Apr_25 svc:/application/openstack/swift/swift-account-reaper:default online Apr_25 svc:/application/openstack/swift/swift-account-server:default online Apr_25 svc:/application/openstack/swift/swift-container-updater:default online Apr_25 svc:/application/openstack/swift/swift-proxy-server:default online Apr_25 svc:/application/openstack/swift/swift-object-server:default online Apr_25 svc:/application/openstack/swift/swift-object-updater:default online Apr_25 svc:/application/openstack/swift/swift-object-expirer:default online Apr_25 svc:/application/openstack/swift/swift-container-server:default
NOTE: Do not start the auditor service on the storage nodes for object data as this will cause files to be recalled from tape and impact performance. Instead use the data integrity validation feature in Oracle HSM to confirm that data is valid.
Saving Swift Configuration Files:
For protection, copy the contents of /etc/swift/* to each QFS file system because you can’t lose the contents of /etc/swift/swift.conf or the ring builder files. If you are using keystone for authentication, then also copy the contents of /etc/keystone/* to each QFS file system.
Using Swift
If you are using TempAuth for authentication, run the following command on the proxy: /usr/bin/swift -A http://localhost:8080/auth/v1.0/ -U test:tester -K testing stat
You can set your profile so you don’t have to enter the user info and password with every swift command:
# cat .profile export ST_AUTH=http://localhost:8080/auth/v1.0 export ST_USER=test:tester export ST_KEY=testing
List the containers:
# swift list Create a container
# swift post container1 List the conainers
# swift list container1

8 | HOW TO CONFIGURE OPENSTACK SWIFT WITH MODERN TAPE
You may use the swift command to create containers and add objects. For more information on the swift command, see the Swift Administration Guide: http://docs.openstack.org/user-guide/content/managing-openstack-object-storage-with-swift-cli.html For more information on using Swift, see the Swift API Reference Manual: http://docs.openstack.org/api/openstack-object-storage/1.0/content/
Oracle Corporation, World Headquarters Worldwide Inquiries
500 Oracle Parkway Phone: +1.650.506.7000
Redwood Shores, CA 94065, USA Fax: +1.650.506.7200
Copyright © 2017, Oracle and/or its affiliates. All rights reserved. This document is provided for information purposes only, and the
contents hereof are subject to change without notice. This document is not warranted to be error-free, nor subject to any other warranties or conditions, whether expressed orally or implied in law, including implied warranties and conditions of merchantability or fitness for a particular purpose. We specifically disclaim any liability with respect to this document, and no contractual obligations are formed either directly or indirectly by this document. This document may not be reproduced or transmitted in any form or by any means, electronic or mechanical, for any purpose, without our prior written permission. Oracle and Java are registered trademarks of Oracle and/or its affiliates. Other names may be trademarks of their respective owners. Intel and Intel Xeon are trademarks or registered trademarks of Intel Corporation. All SPARC trademarks are used under license and are trademarks or registered trademarks of SPARC International, Inc. AMD, Opteron, the AMD logo, and the AMD Opteron logo are trademarks or registered trademarks of Advanced Micro Devices. UNIX is a registered trademark of The Open Group. 0817 How to Configure OpenStack Swift with Modern Tape August August 2017
C O N N E C T W I T H U S
blogs.oracle.com/oracle
facebook.com/oracle
twitter.com/oracle
oracle.com