how to configure guest management on the dwc … · how to configure guest management on the...
TRANSCRIPT
Configuration Guide
How to Configure Guest Management on the DWC-1000
Overview
This guide describes how to configure and customize a billing profile and generate temporary
user account on the D-Link DWC-1000 Unified Controller for user authentication.

How to Configure Guest Management on the DWC-1000
Situation Note
Guest Management is a widely used solution in the places where provide wireless internet service, such
as hotel, coffee shop, airport, etc. The Guest Management service allows guests, visitors, or customers
to access corporate internet or public internet by authenticating from Captive Portal. The Guest
Management service generates account, controls usage, and manages access security. Each temporary
account, or the issued ticket, is with time-limited or volume-limited internet access privileges. The
Guest Management allows generate temporary account by batch, and it allows to provide account
details to the guest by printout. It can also monitor or extend the usage on the specific account
manually after account created or activated.
The scenario in this guide shows how to configure a billing profile, generate temporary account,
monitor status and extend account usage. All connection from dlink_guest SSID required performing
authentication before being granted Internet access. The account access privilege is set from the billing
profile.
A temporary account includes 4 milestones by timeline:
Account Creation: the temporary account is generated by front desk account in the local
database.
Account Activation: the temporary account is activated and it is valid for use.
Account Depletion: the temporary account is run out usage time or usage volume.
Account Expiration: the temporary account is expired no matter usage time/ volume running
out or not, and it is removed from the local database
NOTE: The screenshots in this guide are from the DWC-1000’s firmware version 4.2.0.2_WW. If you are using an
earlier version of the firmware, the screenshots may not be identical to what you see on your browser.

How to Configure Guest Management on the DWC-1000
The billing profile can be various depending on how to put the value in the settings. The configurations in
the examples below are describing five most comment types of billing profiles: 1. The temporary account usage time is limited by duration. The account has the expiration time.
The account is valid while the account is created.
This billing profile is suitable for the scenario in Hotel. The temporary account is created and
valid while customers check-in. See the billing profile example “Hotel” which sets usage period
is 2 days but allow modify it from the front desk account.
2. The temporary account usage time is limited by duration. The account has the expiration time.
The account is valid while the account first logs in.
This billing profile is suitable for the scenario in Coffee Shop, Airport, etc. The customer can use
wireless internet service for a period of time counting from first time logs in. See the billing
profile example “Coffee Shop” which sets usage period is 2 hours.
3. The temporary account is valid with specific date and time. The account has the expiration time.
This billing profile is suitable for the scenario in Press Conference. The organizer generates
accounts before the event and delivery account information to participator in advanced if
necessary. The temporary account would be only valid from specific date and time. See the
billing profile example “Press Conference” which sets account is valid from 10am on 28-Mar-
2013. The front desk account can add visitor’s name (such as organization name, company
name) and generate account by batch.

How to Configure Guest Management on the DWC-1000
4. The temporary account has limited time usage. The account doesn’t have the expiration time
until the usage is run out.
This billing profile is suitable for the scenario in Hotspot. The service provider charge the
wireless service based on usage time. See the billing profile example “Hotspot- time” which sets
account default usage time is 3 hours. This account allows multiple devices log in at the same
time. The front desk account allows modify or extend the usage time.
5. The temporary account has limited usage traffic. The account doesn’t have the expiration time
until the usage is run out.
This billing profile is suitable for the scenario in Hotspot. The service provider charge the
wireless service based on usage volume. See the billing profile example “Hotspot- traffic” which
sets account usage volume is 20 MB.
Configuration Steps
1. Set up the AP profile and VLANs based on the network architecture. Please refer to the “How to
Configure an AP Profile on DWC-1000” guide.
2. Enable Captive Portal on SSID “dlink_guest”. Please refer to the “How to Configure a Captive
Portal on DWC-1000” guide, version 1.1.
3. Discover and manage an AP from the network. Please refer to the “How to Configure Layer 2
Discovery on the DWC-1000” and "How to Configure Layer 3 Discovery on the DWC-1000"
guide.

How to Configure Guest Management on the DWC-1000
4. Build up the front desk user list in the User Database. Go to ADVANCED> Users> Group. Click
Add to add a new user group.
5. Fill in the necessary information under Group Configuration, enter a Group Name such as
“FrontDesk” in the below screenshot, and select “Front Desk User” under User Type. Click Save
Settings.

How to Configure Guest Management on the DWC-1000
6. Create a user account. Go to ADVANCED> Users> Users. Click Add to add a new user account
for front desk user.
7. Fill in the necessary information under Users Configuration. For Select Group, choose
“FrontDesk” which was created in the previous step. Click Save Settings.

How to Configure Guest Management on the DWC-1000
8. Create Billing Profiles. Navigate to SETUP> Captive Portal> Billing Profiles. Click Add to add a
new billing profile.
8-a. Hotel
Enter a profile name such as “Hotel” and its description in the below screenshot. Enable “Valid
with Begin and End time”. Select “Start while account created”. Fill in “2”, and select “Days” as
the unit. Then, enable “Allow Frontdesk to Modify Duration”. Click Save Settings.

How to Configure Guest Management on the DWC-1000
8-b Coffee Shop
Enter a profile name such as “Coffee Shop” and its description in the below screenshot. Enable
“Valid with Begin and End time”. Select “Start while account login”. Fill in “2”, and select “Hours”
as the unit. Click Save Settings.
8-c Press Conference
How to Configure Guest Management on the DWC-1000
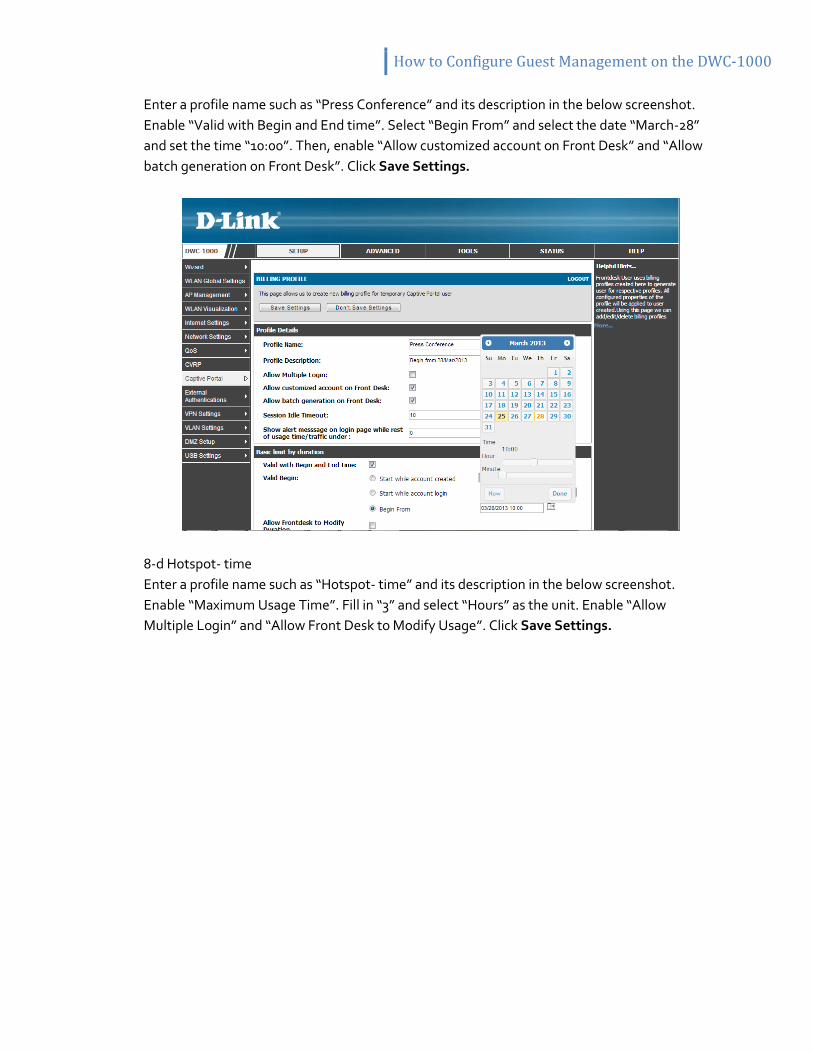
Enter a profile name such as “Press Conference” and its description in the below screenshot.
Enable “Valid with Begin and End time”. Select “Begin From” and select the date “March-28”
and set the time “10:00”. Then, enable “Allow customized account on Front Desk” and “Allow
batch generation on Front Desk”. Click Save Settings.
8-d Hotspot- time
Enter a profile name such as “Hotspot- time” and its description in the below screenshot.
Enable “Maximum Usage Time”. Fill in “3” and select “Hours” as the unit. Enable “Allow
Multiple Login” and “Allow Front Desk to Modify Usage”. Click Save Settings.

How to Configure Guest Management on the DWC-1000
8-e Hotspot- traffic
Enter a profile name such as “Hotspot- traffic” and its description in the below screenshot.
Enable “Maximum Usage Traffic”. Fill in “20” and select “MB” as the unit. Click Save Settings.
The billing profile list is as below.

How to Configure Guest Management on the DWC-1000
Above steps are the settings on DWC-1000. Now, generate a temporary account Front Desk page.
9. Login Front Desk page. Front Desk page URL is http://<ip_interface>/frontdesk. Use front desk
account username/ password log into system.
After login, the page shows all billing profiles which are set from DWC-1000.

How to Configure Guest Management on the DWC-1000
10. Generate temporary accounts.
10-a Hotel
The default value is 2 days. The front desk account can change the duration manually. The
Expiration Date and Time automatically change based on current time from NTP server and
required duration. For example, the date for this screenshot is 25-Mar-2013, and the system
shows 27-Mar-2013 as the expiration date.
If change the duration to 5 days, the expiration date change to 30-Mar-2013.
One account is generated per time. Click Generate
How to Configure Guest Management on the DWC-1000
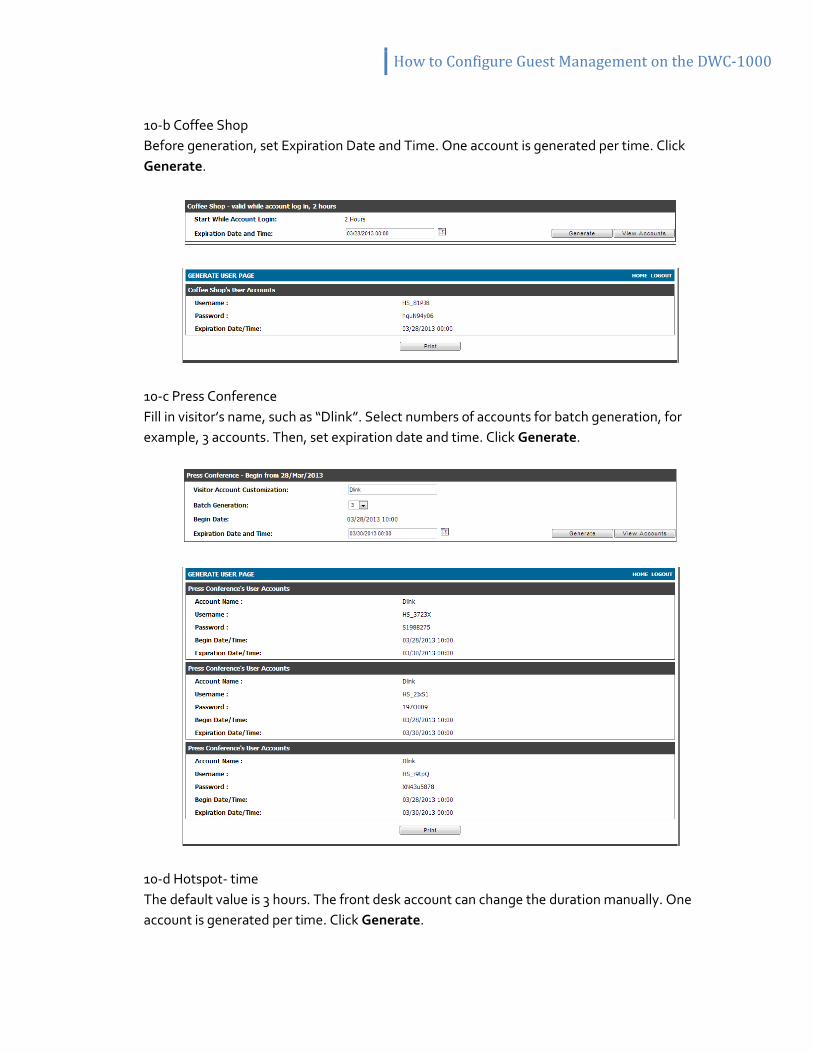
10-b Coffee Shop
Before generation, set Expiration Date and Time. One account is generated per time. Click
Generate.
10-c Press Conference
Fill in visitor’s name, such as “Dlink”. Select numbers of accounts for batch generation, for
example, 3 accounts. Then, set expiration date and time. Click Generate.
10-d Hotspot- time
The default value is 3 hours. The front desk account can change the duration manually. One
account is generated per time. Click Generate.

How to Configure Guest Management on the DWC-1000
10-d Hotspot- traffic
One account is generated per time. Click Generate.
11. Print out the account information by click Print, and then click Print All. The information would
send to the internet printer. Below use billing profile “Hotspot- traffic” as an example.

How to Configure Guest Management on the DWC-1000
12. Monitor temporary account status and extend account usage duration or volume. Click View
Accounts for reviewing generated temporary account status. Below use billing profile “Hotel”
as an example.
Extend account usage time. Select the account and click Extend Session.
Change the Expiration Date/ Time. Click Extend. Then this account would adapt the new value.

How to Configure Guest Management on the DWC-1000

How to Configure Guest Management on the DWC-1000
www.dlink.com
D-Link, D-Link logo, D-Link sub brand logos and D-Link product trademarks are trademarks or registered trademarks of D-Link Corporation and its subsidiaries.
All other third party marks mentioned herein are trademarks of the respective owners.
Copyright © 2013 D-Link Corporation. All Rights Reserved.