honda prelude headlight replacement · honda prelude headlight replacement replace the headlights...
TRANSCRIPT

Honda Prelude Headlight ReplacementReplace the headlights on a 97-01 model Honda Prelude. Also, install HIDs during replacement.
Written By: Memphis Engineering Solution
Honda Prelude Headlight Replacement
© iFixit — CC BY-NC-SA www.iFixit.com Page 1 of 10

INTRODUCTION
This is a guide on replacing the Headlights on a 97-01 model Honda Prelude. This guide includesdisassembly for the front end of the car as well as installing HID bulbs over stock replacement parts.
TOOLS:Socket Set (1)
Socket Wrench (1)
Super Glue (1)
PARTS:97-01 Honda Prelude Headlight
Assemblies (1)HID Bulbs (1)
Honda Prelude Headlight Replacement
© iFixit — CC BY-NC-SA www.iFixit.com Page 2 of 10

Step 1 — Preparing Workspace
Make sure that your car is parkedon a level surface with theemergency brake on. A commonworkplace for anyone without agarage is a driveway or carport.
It is helpful to place a tarpunderneath your car as it provides acontrasting background to locatefallen screws and parts. The tarpalso provides a smooth, non-abrasive surface to place parts andtools.
Step 2 — Disconnect Battery
Locate the positive and negativeleads on the battery and removethem with a 10mm socket.
If you have an aftermarket airintake, it is also helpful to removethe filter to allow for more space toreach the wires and screws for theheadlights.
Honda Prelude Headlight Replacement
© iFixit — CC BY-NC-SA www.iFixit.com Page 3 of 10
Step 3 — Removing the Front Bumper- Part 1
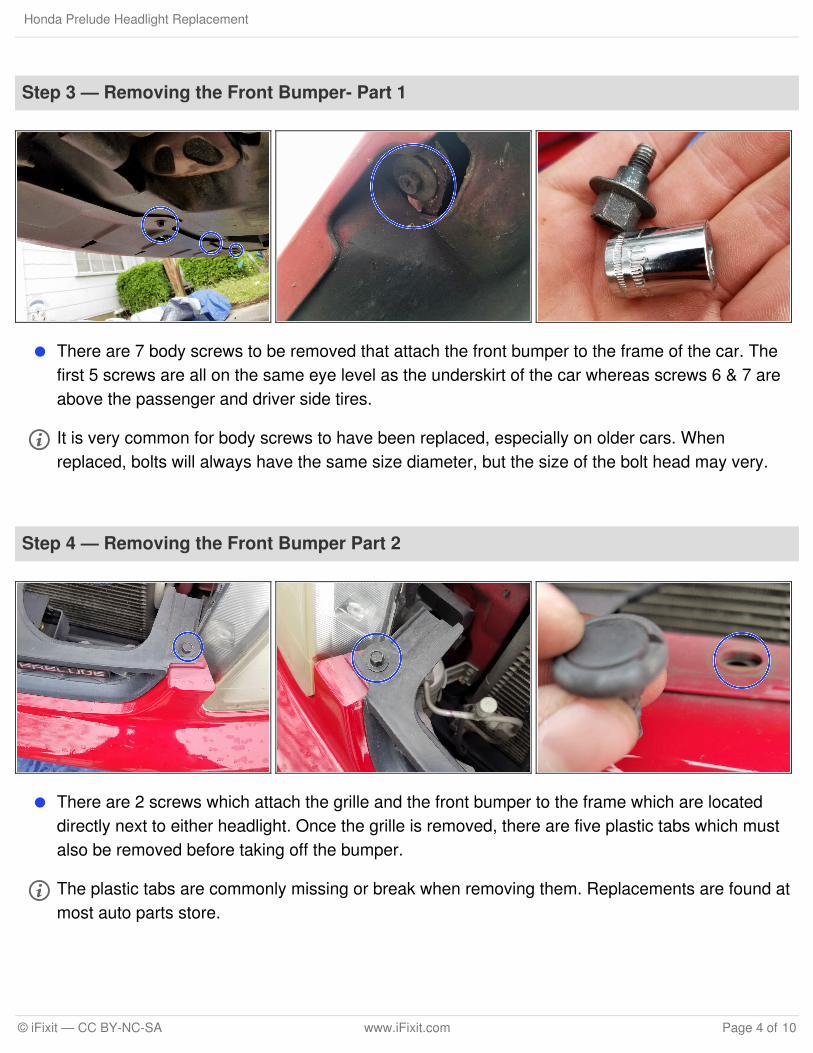
There are 7 body screws to be removed that attach the front bumper to the frame of the car. Thefirst 5 screws are all on the same eye level as the underskirt of the car whereas screws 6 & 7 areabove the passenger and driver side tires.
It is very common for body screws to have been replaced, especially on older cars. Whenreplaced, bolts will always have the same size diameter, but the size of the bolt head may very.
Step 4 — Removing the Front Bumper Part 2
There are 2 screws which attach the grille and the front bumper to the frame which are locateddirectly next to either headlight. Once the grille is removed, there are five plastic tabs which mustalso be removed before taking off the bumper.
The plastic tabs are commonly missing or break when removing them. Replacements are found atmost auto parts store.
Honda Prelude Headlight Replacement
© iFixit — CC BY-NC-SA www.iFixit.com Page 4 of 10

Step 5 — Removing the Front Bumper - Part 3
Now as you remove the front bumper, be sure to only pull it off far enough to reach down andunplug the wires to the passenger and driver side blinkers and running lights. Alternatively tofreeing the wire, the bulb and wire harness may both be freed by twisting counterclockwise. Onceeverything is unplugged, pull gently until the bumper is free.
If there is any significant resistance when trying to free the bumper, then check to see if any boltsor wire connections have been missed to prevent damages.
It is optional to place the removed bumper on a blanket to prevent damage.
Honda Prelude Headlight Replacement
© iFixit — CC BY-NC-SA www.iFixit.com Page 5 of 10
Step 6 — Disconnect Wires to Headlights
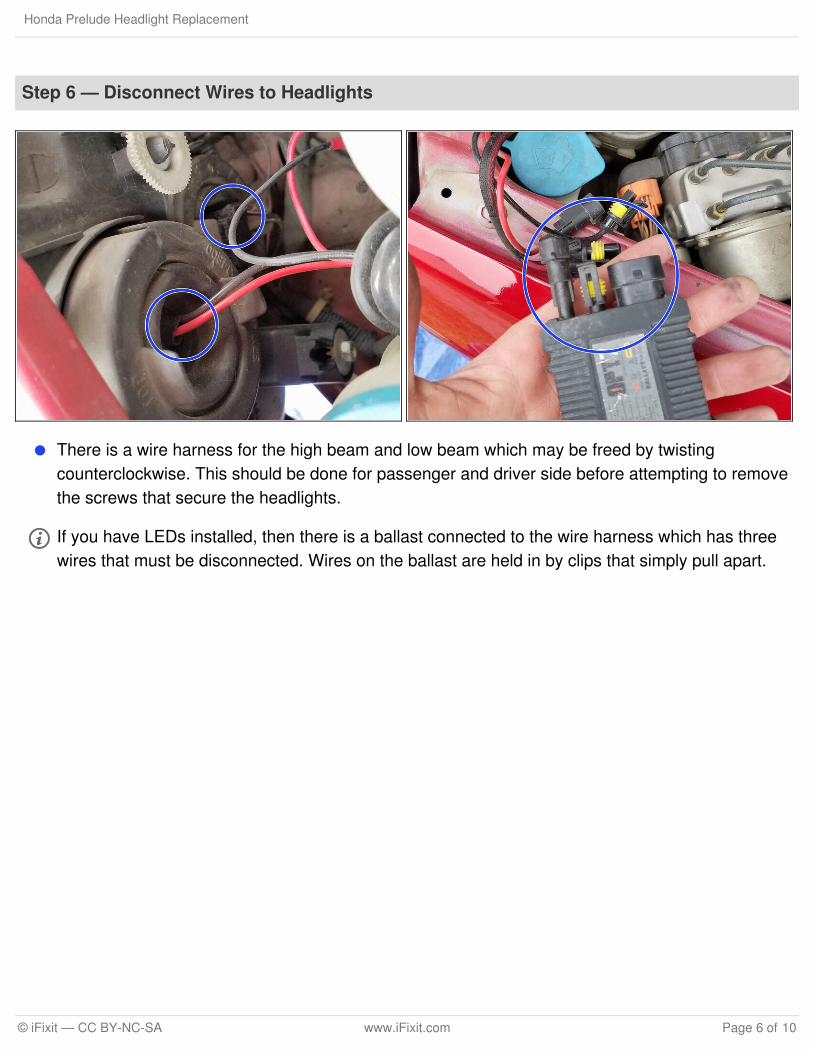
There is a wire harness for the high beam and low beam which may be freed by twistingcounterclockwise. This should be done for passenger and driver side before attempting to removethe screws that secure the headlights.
If you have LEDs installed, then there is a ballast connected to the wire harness which has threewires that must be disconnected. Wires on the ballast are held in by clips that simply pull apart.
Honda Prelude Headlight Replacement
© iFixit — CC BY-NC-SA www.iFixit.com Page 6 of 10
Step 7 — Removing Headlight Screws
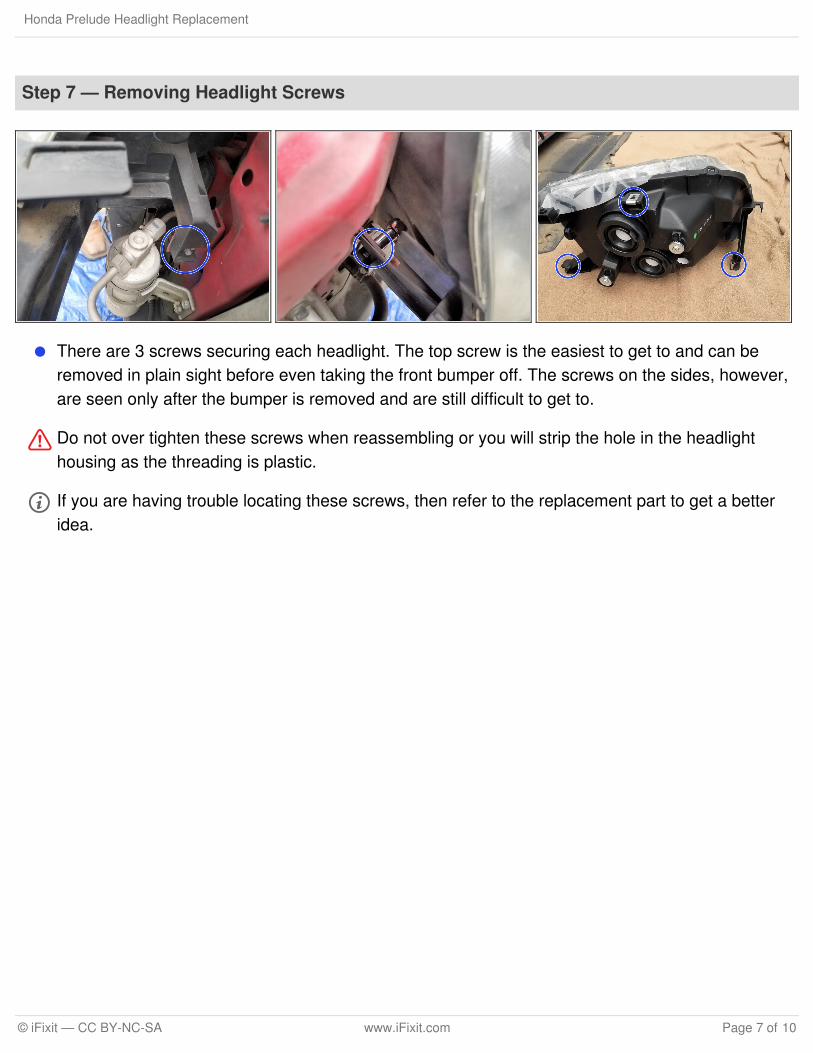
There are 3 screws securing each headlight. The top screw is the easiest to get to and can beremoved in plain sight before even taking the front bumper off. The screws on the sides, however,are seen only after the bumper is removed and are still difficult to get to.
Do not over tighten these screws when reassembling or you will strip the hole in the headlighthousing as the threading is plastic.
If you are having trouble locating these screws, then refer to the replacement part to get a betteridea.
Honda Prelude Headlight Replacement
© iFixit — CC BY-NC-SA www.iFixit.com Page 7 of 10

Step 8 — Removing Headlight
When removing the headlight, take care to avoid touching any bulbs with your hands or wear alatex glove. Furthermore, do not force the assembly to come out. If the assembly does not comefree with a gentle pull then something is likely still attached.
Step 9 — Installing HIDs
The HIDs are not designed to fit into the factory housing which holds the stock bulbs in with asimple locking mechanism highlighted in green. To account for this, use a strong adhesive to gluethe HID into the rubber moisture barrier which will also be glued to the assembly.
It is recommended to follow the instructions for your choice of adhesive for drying, but this processmay be sped up with a blow dryer if running short on time. It should also be noticed that sinceadhesive is being used, the moisture barrier will also have to be replaced if the HID needs to bereplaced.
Honda Prelude Headlight Replacement
© iFixit — CC BY-NC-SA www.iFixit.com Page 8 of 10

Enjoy your new Headlights!
Step 10 — Wiring the HIDs
If HIDs are installed, then the factory wire harness no longer clips in. Now, you will need to placethe positive and negative leads from the HID into the wire harness. Following, secure theconnection with electrical tape. Furthermore, you may secure the ballasts for the HIDs to the frameof your car with zip ties.
If your turn your lights on and they do not work, reverse the order in which you placed these leads.Finally, be sure to place any warranties or receipts in your glove box in case the replacement partsmalfunction.
Step 11 — Reassembly
Follow the disassembly steps in reverse to secure the new headlight assembly. Take care to usethe same bolts that were removed and replace any missing bolts with stock body screws from anauto parts store.
Honda Prelude Headlight Replacement
© iFixit — CC BY-NC-SA www.iFixit.com Page 9 of 10

This document was last generated on 2017-09-09 02:59:36 PM.
Honda Prelude Headlight Replacement
© iFixit — CC BY-NC-SA www.iFixit.com Page 10 of 10