holiday card design -...
TRANSCRIPT

Holiday Card Design
Create a holiday card using more advanced Corel Draw processes
1) Create a rectangle using the Rectangle tool. It should be fairly large.
2) Use the Fountain Fill option. Choose similar colors, one light and the other darker. Set the Angle at 90.
3) Create a complex star.
Using the settings menu at the top of the page, make the number of points 13, and the sharpness 5

4) Capture the silhouette of the star. Go to Effects > Create Boundary. Drag the new silhouette shape off to the side. Delete the original star.
(note: the background color was changed in process for easier visibility)
5) Next, fill the silhouette white. Then remove the black outline by right clicking the X at the top of your color palette.
6) Copy and paste (or just hit the + key) to duplicate your stars. Line up 5 stars across the top section of your rectangle. Select them all and hit the “E” button.

7) Drag a box around this row of stars, and hit copy. Paste the entire row of stars beneath the top row, offsetting them as shown below. Then copy and paste a bottom row of stars that lines up with the top.
8) Now click on a single star, and duplicate it. Shrink the star to approximately half the original size, and place it in an empty space between the other stars. Repeat this process to form a pattern similar to below.

9) Now create a perfect circle. Click the Ellipse tool, and then hold down Ctrl while dragging a circle from the top of the rectangle to the bottom. Roughly center it.
10) Look for the Lens tab on your Objects toolbar. If not there, go to Window > Dockers > Lens.
11) Make sure your circle is selected. Look at the Lens docker open to the right.
Select Fish Eye, and then set the rate at 175.
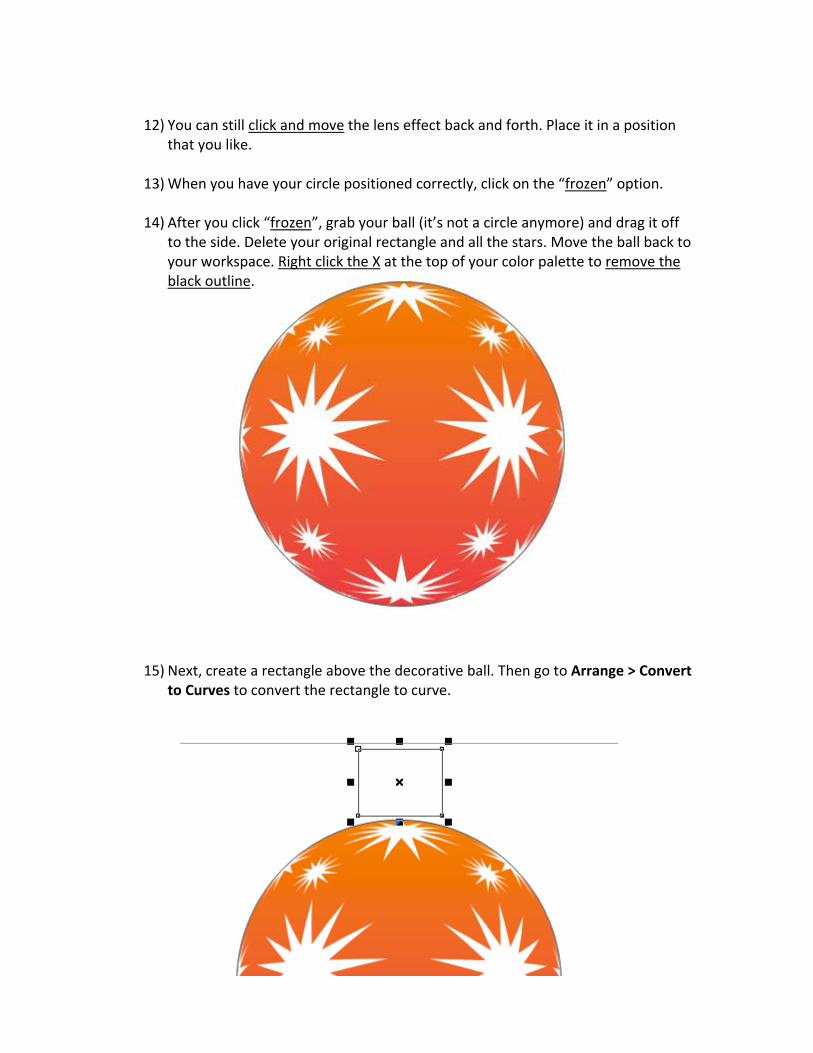
12) You can still click and move the lens effect back and forth. Place it in a position
that you like.
13) When you have your circle positioned correctly, click on the “frozen” option.
14) After you click “frozen”, grab your ball (it’s not a circle anymore) and drag it off to the side. Delete your original rectangle and all the stars. Move the ball back to your workspace. Right click the X at the top of your color palette to remove the black outline.
15) Next, create a rectangle above the decorative ball. Then go to Arrange > Convert to Curves to convert the rectangle to curve.

16) Next click the “Shape” tool (under the pick tool). Use the shape tool to drag the top corners of the rectangle in to form the new shape below.
17) Now use the shape tool to add 7 nodes along the bottom line. To do this, simply pick a spot on the line and double click. It should look something like this.
18) Click on each node and reshape the bottom to form a shape like you see below.

19) Now you will apply a custom fill from the Preset menu. Select the new shape, and go to Fountain Fill. From the Preset menu, scroll to “Cylinder Gold 04” and click it.
20) If you click and drag each small triangle back and forth along the slider you can change the brightness levels of the gradient. Click OK.

21) The cap will now be filled with this gradient. Remove the outline by right clicking the X above your color palette.
22) Add a darker shade of similar color to one side of the cap. Do this by going back to your Fountain fill, and click on the triangle to the far right. Click the “Others” button, and choose a darker shade of similar color. Make sure that triangle is pulled all the way to the right. Next click the triangle immediately to the left of it, and choose a slightly less dark shade using the “Others” button.
23) Your cap will look similar to the one below.
24) Now move your cap onto the top of the ball. Next, draw a rectangle over the cap as shown below.

25) Click the “Shape” tool, and grab a corner of the rectangle. Pull it all the way to the right or left.
26) Copy and paste this rounded object. Then hold down “Shift” and grab a corner of the copied shape and pull it inward. This will constrain the object. When done, give a small pull upwards to even out the boundaries.
27) Drag a box around both of these rounded objects, and go to the top of the screen and click the “Combine” button.

28) Drag this new object off to the side.
29) Make sure the combined object is selected. Go to Edit > Copy Properties From. In the box that pops up, check the “Fill” option. Click OK.
30) Hover your mouse over the cap, and click. This should transfer your fill into the
hook. Remove the outline by right clicking the X.
31) Move your newly filled object back over the cap. Click “Shift + Pg Down” to move it behind the cap. Then select both the hook and the cap at the same time, hold down Ctrl + G, and group the objects together.

32) Begin the reflective process. Click on your ball. Click Ctrl + U to ungroup any objects. Go to Effects > Create Boundary. This will create a circle outline of your ball. Move it off to the side.
33) Go down and find the “Fill Color” button in the lower right hand portion of the
screen. Double click on it to bring up the color chooser box. Pick a color that is similar to your original fill, but considerably darker.
34) Fill your new circle.
35) Find your Transparency button from the left hand toolbar (part of a flyout). Go to the top of the screen, and from the transparency type dropdown select “radial”. From the dropdown next to it select “Multiply”

36) Click on your ball to move the effect, re‐do the effect, and get it placed how you want. Use the slider on the dotted line to change lighting.
37) To move your new transparent shape over the original, switch to the Pick tool and select the transparent ball, hold down Shift and click the original ball so that both are selected. Next, center the transparent ball by hitting C on your keyboard, then E. The ball should now be lined up with the original.

38) You can now experiment with other transparent colors from your color palette by simply clicking on them. If a different color appeals to you more, then go with it.
39) Move the Cap and Hook assembly to the front by clicking on it, and holding Shift + Page Up.

40) Create a highlight by drawing a circle over the ball as shown below. Fill it white, and remove the outline.
41) Go to your transparency tool. Click above the white circle, and drag down. Do this a couple times until you like it. Move the slider back and forth as well.

42) Next, create a string attached to the top of the hook. Simply use the rectangle tool to create a thin object. Stretch it and position it so that it looks like its attached to the top. Right click the X to remove outline.
43) Drag a box around the entire drawing, and click Ctrl + G to group the entire thing.
44) You can now copy and paste this drawing, re‐size it, and arrange it however you
like
45) You must create at least TWO additional decorative balls with different designs as part of your overall composition.