hlc courses management - healthstream · granting test/evaluation override permissions ... hlc...
TRANSCRIPT

Administrator access to features and functions described in the HLC Help documentation is dependent upon the administrator’s role and affiliation. Administrators may or may not have full access.
HLC Courses Management
HealthStream Learning CenterTM


HLC Courses Management Contents
Updated: September 2011 i
Contents Courses Overview ..................................................................................................... 1
Definitions ...................................................................................................................................... 1 Developing a Course ....................................................................................................................... 1
Adding a Course ....................................................................................................... 3
Learning Activities ..................................................................................................... 7
Adding a Learning Activity ............................................................................................................... 7 Creating a Test-out Opportunity ....................................................................................................... 8 Completion Mode ............................................................................................................................ 9
Examples of Completion Mode Applications ................................................................................... 9
Completion Mode Impact on Course Completion ......................................................................... 10
Editing a Learning Activity ............................................................................................................. 11 Deleting a Learning Activity ........................................................................................................... 11
Authoring Center Learning ....................................................................................... 12
Adding an Authored Learning Activity ............................................................................................. 12 Previewing Your Authored Learning Activity .................................................................................... 13 Adding a SCORM Learning Activity ................................................................................................. 14
Importing SCORM Content ......................................................................................................... 15
Choosing a Folder ..................................................................................................................... 15
SCORM Player Properties ............................................................................................................... 15
Adjusting SCORM Player Properties for a SCORM Learning Activity ............................................... 16
+ SCORM Player Properties for Beginner Users ........................................................................... 16
+ SCORM Player Properties for Advanced Users .......................................................................... 17
Adding a Course Attachment Learning Activity ................................................................................ 21
Classroom Activities ................................................................................................ 26
Adding a Classroom Activity ........................................................................................................... 26 Editing a Classroom Activity Using the No Show Option ................................................................... 28
Changing the No Show Option from Failed to Incomplete ............................................................ 28
Changing the No Show Option from Incomplete to Failed ............................................................ 30
Adding a Virtual Class Activity ........................................................................................................ 33
Tests ...................................................................................................................... 35
Adding a Test ............................................................................................................................... 35 Editing Test Settings ..................................................................................................................... 36 Adding Test Questions .................................................................................................................. 39
Adding a True/False Test Question ............................................................................................. 41

HLC Courses Management Contents
Updated: September 2011 ii
Adding a Multiple Choice Test Question ...................................................................................... 44
Adding a Multiple Select Test Question ....................................................................................... 47
Adding a Matching Test Question ............................................................................................... 51
Adding a Drop Down Choice Test Question ................................................................................. 55
Managing Test Question Groups .................................................................................................... 58
Marking Test Questions Mandatory ............................................................................................ 58
Sorting Test Questions .............................................................................................................. 59
Moving Test Questions .............................................................................................................. 60
Editing Test Question Group Settings ............................................................................................. 61 Previewing a Test ......................................................................................................................... 63 Editing a Test ............................................................................................................................... 65 Deleting a Test ............................................................................................................................. 66
Evaluations ............................................................................................................. 67
Adding an Evaluation .................................................................................................................... 67 Editing Evaluation Settings ............................................................................................................ 68 Adding Evaluation Questions.......................................................................................................... 68
Adding a True/False Evaluation Question .................................................................................... 71
Adding a Multiple Choice Evaluation Question ............................................................................. 73
Adding a Multiple Select Evaluation Question .............................................................................. 76
Adding a Likert Scale Evaluation Question .................................................................................. 79
Adding a Free Text Evaluation Question ..................................................................................... 82
Adding a Matching Evaluation Question ...................................................................................... 83
Adding a Drop Down Choice Evaluation Question ........................................................................ 86
Managing Evaluation Question Groups ........................................................................................... 89
Sorting Evaluation Questions ..................................................................................................... 89
Moving Evaluation Questions ..................................................................................................... 90
Editing Evaluation Question Group Settings .................................................................................... 91 Previewing an Evaluation ............................................................................................................... 92 Editing an Evaluation .................................................................................................................... 94 Deleting an Evaluation .................................................................................................................. 95 Exporting and Importing Tests and Evaluations .............................................................................. 96 Granting Test/Evaluation Override Permissions ............................................................................... 98
Adding CE Credit to a Course ................................................................................. 100
Previewing a Course .............................................................................................. 102
Publishing a Course ............................................................................................... 103
Using Quick Publish ..................................................................................................................... 104 Using Advanced Publish ............................................................................................................... 106

HLC Courses Management Contents
Updated: September 2011 iii
Viewing Current Publishing Settings for a Course .......................................................................... 109
Republishing a Course ........................................................................................... 111
Searching for a Course .......................................................................................... 113
Editing an HLC Course ........................................................................................... 114
Copying a Course .................................................................................................. 115
Creating a New Course Version .............................................................................. 117
Un-enroll and Re-enroll Considerations ......................................................................................... 118 Creating the New Version ............................................................................................................ 119
Publishing Updated Versions of HealthStream Regulatory Courses ........................... 121
Changing Course Ownership .................................................................................. 123
Inactivating or Retiring an HLC Course ................................................................... 124
Inactivating a Course .................................................................................................................. 124 Retiring a Course ........................................................................................................................ 125 Course Inactivation vs. Course Retirement ................................................................................... 127
Note: This guide is updated frequently. If you save or print this document, you should frequently cross-reference the date stamp on any local copies with the most current version posted in the Help system.

HLC Courses Management Contents
Updated: September 2011 iv

HLC Courses Management Courses Overview
Updated: September 2011 1
Courses Overview The HLC provides functionality that allows administrators to develop and deliver comprehensive education to employees. Education is delivered as courses. Courses are developed by HealthStream (HealthStream regulatory library), by third-party content vendors (for example, Fetal Monitoring courseware), and can be developed by administrators using a variety of tools.
HealthStream regulatory courses can be modified by HLC administrators using the Annotations feature. The pre- and post-assessment tests within HealthStream regulatory courses can be edited using the assessment builder tool inside the course management feature of the HLC.
Definitions Course
A collection of one or more learning activities made available to students by assignment, administrator registration in a class or by self-selection from the Catalog tab. A course can include one or more learning activities.
Learning Activity
A single educational component within a course. Learning activities that can be added to an administrator-developed HLC course include:
• Authored learning activities (Authoring Center customers only) • Course attachments (Authoring Center customers only) • Classroom activities • Virtual class activities (Virtual Class customers only) • Tests • Evaluations
Note: Completion reports are based upon completion of an entire course, not on individual learning activities.
Developing a Course Prior to developing a course within the HLC, the administrator should consider the overall course construction, and determine what pre-work is necessary before the course details are entered into the system. For example, if the course includes:
• One or more authored activities, those activities must first be developed in the Authoring Center. • One or more tests, the test questions must be determined. • One or more classroom activities, buildings, rooms and resources must first be added. (See the
Buildings and Resources Overview in the HLC Buildings and Resources Management user guide.) You may also need to add instructors, if those teaching the class are not already administrators in the system with access rights to schedule classes. (See Adding an Administrator in the HLC Administrator Management user guide.)
• An evaluation, the evaluation questions must be determined. • Continuing education credit, all CE credit management components must first be added to the
system. (See the CE Credit Overview in the HLC CE Credit Management user guide.)
You may also need to add or edit categories prior to developing your course. (See Adding a Category and Editing a Category in the HLC Category Management user guide.)

HLC Courses Management Courses Overview
Updated: September 2011 2
You may consider creating a custom default certificate template in the certificate template editor to associate with the course. (See Adding a Certificate Template in the HLC CE Credit Management user guide.)
Once all pre-work has been completed, you are ready to add your administrator-developed HLC course.

HLC Courses Management Adding a Course
Updated: September 2011 3
Adding a Course To add a course
1. On the Courses tab, click Add a Course. The Add a Course page appears.
2. In the Course Title box, enter the title of the course.
Tip: Click if you want to check the spelling of the title.
3. In the Description text area, enter a description of the course.
Tip: Click if you want to check the spelling of the description.
4. In the Learning Objectives text area, enter the learning objectives of the course. Tip: This is a WYSIWYG field that allows formatting of text (bold, italic, underline, numbered lists, bullet lists, font name, size, and color). You can also check the spelling of the learning objectives by
clicking in the toolbar.
Tip: Click if you want to check the spelling of the learning objectives.
Note: Course title, description, and learning objectives will be visible to students on the Course Overview page.
An orange asterisk (*) indicates a required field.

HLC Courses Management Adding a Course
Updated: September 2011 4
5. Click Select Course Categories to choose default course categories. The Category Selection page appears.
6. Select the check box(es) next to one or more categories. Subcategories will be revealed, if available, by clicking the + to the left of a category name.
7. Click Select. The system returns you to the Add a Course page with the categories you selected in the Default Categories box.
8. In the Default Certificate list, select the certificate you want students to receive upon completing the course. Note: The certificate template selected as the course default is the certificate all students will receive for course completion, regardless of whether or not they qualify for any CE credit associated with the course. Select either the HealthStream default or another default (non-CE) certificate as the course default. If CE credit is associated with the course, those students qualifying for the CE credit will receive both the default certificate and the appropriate CE certificate.
An orange asterisk (*) indicates a required field.

HLC Courses Management Adding a Course
Updated: September 2011 5
9. In the Development Status list, select the course status. Note: Development status can assist administrators in managing course development work. Update of development status may be required to allow certain administrator roles (for example, Education Office Assistant) to publish a completed course.
10. Leave the Learning Activities completed sequentially check box selected if you want students to be required to complete learning activities sequentially. This selection prevents students from completing learning activities in random order. They can only access a learning activity after previous activities are completed. If cleared, students can complete learning activities in any order they choose.
11. Click Additional Properties to reveal the following additional, optional course properties.
• In the Course Identifier box, enter additional information with which to identify the course. The course identifier does not have to be unique.
• Do not enter a value into the Course Fee, No Show Fee, and Cancel Fee boxes unless the customer has a PayPal account that is linked to the HLC for payment processing. If you add a course fee, the student will be presented with an online billing wizard requesting credit card payment.
HLC Courses Management Adding a Course
Updated: September 2011 6
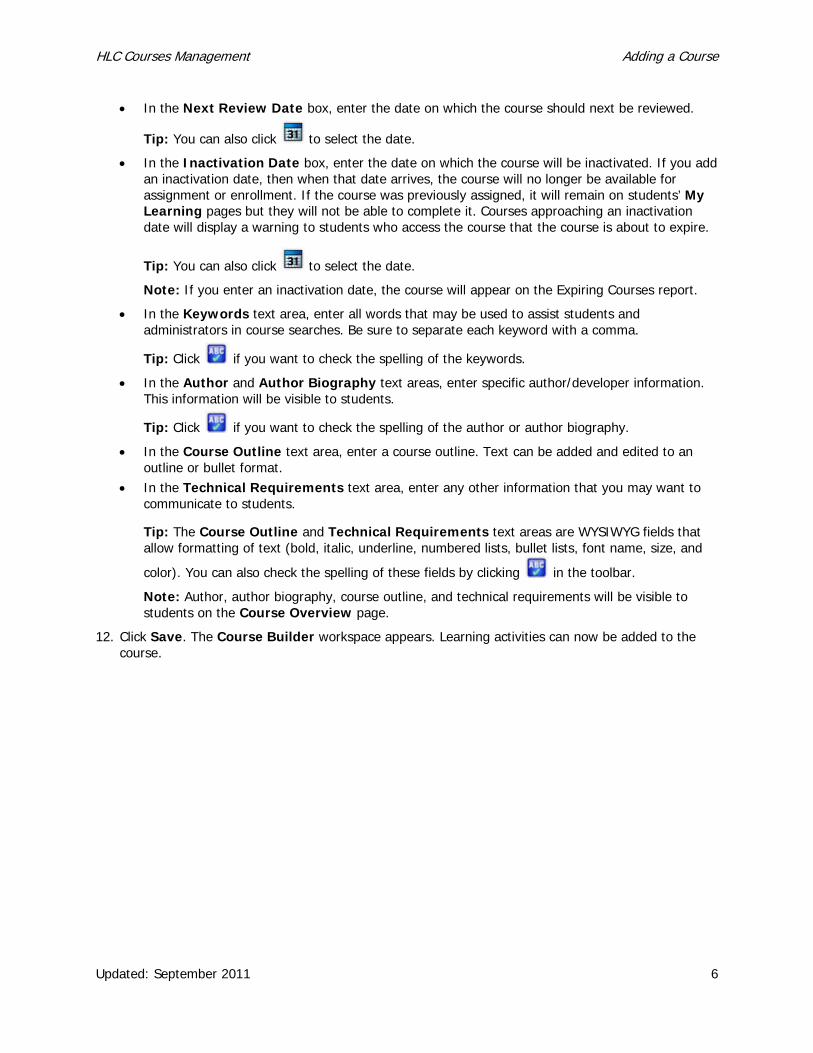
• In the Next Review Date box, enter the date on which the course should next be reviewed.
Tip: You can also click to select the date.
• In the Inactivation Date box, enter the date on which the course will be inactivated. If you add an inactivation date, then when that date arrives, the course will no longer be available for assignment or enrollment. If the course was previously assigned, it will remain on students’ My Learning pages but they will not be able to complete it. Courses approaching an inactivation date will display a warning to students who access the course that the course is about to expire.
Tip: You can also click to select the date.
Note: If you enter an inactivation date, the course will appear on the Expiring Courses report.
• In the Keywords text area, enter all words that may be used to assist students and administrators in course searches. Be sure to separate each keyword with a comma.
Tip: Click if you want to check the spelling of the keywords.
• In the Author and Author Biography text areas, enter specific author/developer information. This information will be visible to students.
Tip: Click if you want to check the spelling of the author or author biography.
• In the Course Outline text area, enter a course outline. Text can be added and edited to an outline or bullet format.
• In the Technical Requirements text area, enter any other information that you may want to communicate to students.
Tip: The Course Outline and Technical Requirements text areas are WYSIWYG fields that allow formatting of text (bold, italic, underline, numbered lists, bullet lists, font name, size, and
color). You can also check the spelling of these fields by clicking in the toolbar.
Note: Author, author biography, course outline, and technical requirements will be visible to students on the Course Overview page.
12. Click Save. The Course Builder workspace appears. Learning activities can now be added to the course.

HLC Courses Management Learning Activities
Updated: September 2011 7
Learning Activities A learning activity is a single educational component within a course. Learning activities that can be added to a course include:
• Authored learning activities (Authoring Center customers only) • Course attachments (Authoring Center customers only) • Classroom activities • Virtual class activities (Virtual Class customers only) • Tests • Evaluations
Adding a Learning Activity One or more learning activities can be added to a single course at any time until the course is published. (See Publishing a Course in this document.)
A course must be added to the HLC before learning activities can be added. You may need to create learning activities outside the HLC prior to incorporating them into a course. For example, you can author online activities through the Authoring Center before adding them to a course.
You can add learning activities to a course as soon as the course is added to the HLC (See Adding a Course in this document) or you can search for the course at a later time and add learning activities if the course has not yet been published (see Searching for a Course in this document).
Note: You cannot add, delete, or rearrange learning activities after a course has been published; however, you can edit learning activities and republish the course (see Editing a Course and Republishing a Course in this document). If you need to add, delete, or rearrange learning activities after a course is published, you must create a new course or a new course version (see Creating a New Course Version in this document).
Regardless of the type of learning activity you wish to add, you will complete a common properties page.
Completing the Common Properties page
1. In the Name box, enter the name for the activity. 2. In the Completion Mode list, select the completion mode. This selection dictates the student
requirement for each activity (see Understanding Completion Mode in this document). 3. In the Description text area, enter a description, if desired. This entry is not visible to students. 4. In the Estimated Completion Time boxes, enter the time, in hours and minutes, for this learning
activity. These values are an estimation of the amount of time it will take students to complete the activity; it does not reflect actual time spent. Upon course completion, the system will total the estimated completion times entered for each learning activity that was completed within the course and will display an estimated time for the completed course on the student transcript. If a student completes a learning activity more than one time (for example, multiple attempts to pass a test), the system will count the estimated time for each attempt. If you do not wish to record an estimated completion time for an activity, you must enter a zero (0) in both the Hours and Minutes boxes. Note: To accurately reflect the estimated completion time for a course, it is recommended that estimated completion times (in hours and minutes) be entered for every learning activity within the course. If you do not wish to record an estimated completion time for the course upon completion, enter zeros (0) into the Hours and Minutes boxes for each learning activity. The estimated time will then display as zero (0) on the selected reports.

HLC Courses Management Learning Activities
Updated: September 2011 8
5. In the Minimum Passing Score box, enter the minimum passing score for this learning activity. The minimum passing score is available for scored learning activities (tests, classroom). A percent score can be entered requiring the student to meet or exceed that score to successfully complete the learning activity. If the student fails to meet the passing score he or she may or may not fail the course, depending on the activity’s completion mode setting (see Understanding Completion Mode in this document).
6. In the Score Percent Weight box, enter the score percent weight for this learning activity. For instance, a course containing two tests and one classroom activity may have a score percent of 25% entered for each test (totaling 50%) and have a score percent of 50% entered for the classroom activity. When the student completes the course, the system will calculate an overall course score based upon the scores earned for each scored activity and the entered score percent weights. The overall course score will appear on the student’s transcript. Tip: If the course contains only one scored learning activity, and you wish to have the score for that activity appear on the student transcript, enter a score percent weight of 100% for that activity.
7. Select the Meeting minimum passing score will immediately complete the course check box if you want to use a scored learning activity as a test-out opportunity for students. See Completion Mode in this document for additional information on setting up a test-out opportunity for a course. Note: You do not need to select this check box when the learning activity is the last activity within a course. This box is used to identify learning activities that are being used as test-out opportunities only.
8. Select the Allow this learning activity to be overridden check box if you want to give permission to subsidiary affiliations to edit the test or evaluation. Affiliations given override permission are identified using the permissions feature prior to course publishing. Note: This check box is available only for tests and evaluations. See Granting Test/Evaluation Override Permissions in this guide.
9. Click Save when you have entered all the information. You can now begin adding your learning activities.
See the following sections of this document for information on creating each learning activity:
• Adding an Authored Learning Activity • Adding a Classroom Activity • Adding a Virtual Class Activity • Adding a Test • Adding an Evaluation
Creating a Test-out Opportunity A scored learning activity (test or classroom activity) can be added to an administrator-developed course to serve as a test-out opportunity for students. This test-out opportunity can be added as the first learning activity within the course, or any place within the course that the administrator deems appropriate.
To create a test-out opportunity
1. Click Add a Test or Add a Classroom Template. 2. Name the activity. 3. In the Completion Mode list, select Completion Required. 4. Add an activity description if desired.

HLC Courses Management Learning Activities
Updated: September 2011 9
5. In the Estimated Completion Time boxes, enter the time, in hours and minutes, for this learning activity, if desired. Note: The system will total the estimated completion times for only the learning activities that were completed.
6. In the Minimum Passing Score box, enter the minimum passing score for this learning activity (0 – 100).
7. Enter 100 in the Score Percent Weight box for this activity. If the student fails the test-out opportunity and is required to complete the other learning activities, then the score of the test-out activity will not be averaged with the other course learning activities.
8. Select the Meeting the minimum passing score will immediately complete course check box. 9. Enter appropriate score percent weights (totaling 100%) for any other learning activities in the
course, assuming these other activities will be required if the student does not pass the test-out opportunity.
10. Click Save. Note: If the learning activity is a test, determine the maximum number of test attempts (See Adding a Test in this document) from the Test Settings page. Do not set the maximum attempts to No Maximum, otherwise students will remain in the loop until they pass the test (forcing them to test out rather than complete other learning activities).
Completion Mode When entering the common properties of each course learning activity, you must determine the completion mode for the activity. Completion mode options include:
• Not Required – Students do not have to complete the learning activity to successfully complete the course.
• Completion Required – Students must complete the learning activity, but are not required to meet a specific requirement to move on to other activities or to complete the course.
• Pass Required – Students must complete the learning activity and must meet or exceed the minimum passing score or they will fail the learning activity and fail the course. Students who fail a course will see the following message:
Examples of Completion Mode Applications When a learning activity is part of a course, but not essential to the overall goals of the course, it may be marked Not Required. For example, an optional pre-test may be included in a course for students who wish to test their current knowledge of the course content prior to engaging in the other learning activities.
When a learning activity is necessary for successful course completion, it will be marked Completion Required. This completion mode is most appropriate for authored learning activities (online content) where passing cannot be measured. An evaluation within a course is that is required for course completion should also be given this designation.
Pass Required will be used when the student must meet a minimum score to proceed through or complete the course. Pass required can be used for tests or classroom activities. Tests are graded by the system to immediately determine if the designated minimum passing score was met. Classes must be graded by the instructor or administrator after the classroom activity has occurred.

HLC Courses Management Learning Activities
Updated: September 2011 10
Completion Mode Impact on Course Completion The following scenarios outline common uses of completion mode, and the impact of each on course completion.
Scenario 1
A test marked Completion Required with a designated Minimum Passing Score will allow a student to take the test up to the maximum number of test attempts to reach the minimum passing score. If the minimum passing score is not achieved within the maximum number of attempts, the student will no longer be able to access the test, but will be able to move on through the other learning activities within the course. If the Meeting minimum passing score will immediately pass the course check box is selected, and the student meets or exceeds the minimum passing score, the student will pass the entire course (test out) and will not have to complete the other learning activities within the course.
Scenario 2
A test marked Pass Required with a designated Minimum Passing Score will allow a student to take the test up to the maximum number of test attempts to reach the minimum passing score. If the minimum passing score is not achieved within the maximum number of attempts, the student fails the test and therefore fails the course. If the course was assigned, he or she will be un-enrolled and re-assigned the course (if the due date has not yet passed or the course is part of a recurring assignment) and must repeat all learning activities.
Note: Administrators can also directly enroll students in a course with a pre-test or post-test by registering them for a class that is in the course. If the student fails the course they are no longer enrolled.
Scenario 3
A class marked Completion Required with a designated Minimum Passing Score will be satisfied if the student is graded as having attended and a score is entered (whether or not the minimum passing score is met). If the Meeting minimum passing score will immediately pass the course check box is selected for the class, and if the student meets or exceeds the minimum passing score, once graded, the student will pass the entire course and will not have to complete the other learning activities within the course.
Scenario 4
A class marked Pass Required with a designated Minimum Passing Score will be satisfied if the student is graded as having passed, achieving the minimum passing score. If the student is marked as Attended, and the score does not meet the minimum requirement, the student fails the class and the course. If the course was assigned, he or she will be un-enrolled and re-enrolled from the course (if the due date has not yet passed or the course is part of a recurring assignment) and must repeat all learning activities.
Note: Administrators can also directly enroll students in a course by registering them for a class that is in the course. If the student fails the course they are no longer enrolled.

HLC Courses Management Learning Activities
Updated: September 2011 11
Editing a Learning Activity Learning activities can only be edited prior to course publishing.
Note: To edit a learning activity within a published course, the course must be versioned. See Creating a New Course Version in this guide.
To edit a learning activity
1. Click the learning activity name link. 2. Make the desired changes. 3. When you are done, click Save.
Deleting a Learning Activity Learning activities can only be deleted prior to course publishing.
Note: To delete a learning activity within a published course, the course must be versioned. See Creating a New Course Version in this guide.
To delete a learning activity
1. Click the learning activity name link. 2. Click Common Properties. 3. Click Delete. A confirmation prompt appears. 4. Click OK to delete the learning activity from the course.

HLC Courses Management Authoring Center Learning
Updated: September 2011 12
Authoring Center Learning HealthStream Authoring Center customers can add authored learning activities (self-developed online content) to their HLC courses. The authored activity can be developed inside the HLC using the HTML editor, or it can be developed outside the HLC using any third-party HTML authoring tool.
Adding an Authored Learning Activity To add an authored learning activity to a course
1. Search for the course to which you want to add an authored learning activity. See Searching for a Course in this document for details on conducting a course search. The Course Builder page appears.
2. Click Add an Authoring Center Activity. The Common Properties page appears.
3. Complete the Common Properties page. See Adding Learning Activities in this document.
An orange asterisk (*) indicates a required field.

HLC Courses Management Authoring Center Learning
Updated: September 2011 13
4. Click Save. The Content Manager appears, and a message displays requesting that you select a folder or add a new one.
5. From the Content Manager, click the desired folder to select it. Your chosen folder should include all necessary pages and media. Tip: Additionally, you can create a folder, create your content, or upload your content to a folder at this point. See Content Manager Overview in the Authoring Center User Guide for more information.
6. Click Save. A confirmation prompt appears, indicating which folder you selected. The selected authored learning activity is now associated with the course.
7. Click Return to Course Builder to exit the Content Manager and return to the main Course Builder page.
Previewing Your Authored Learning Activity To preview your learning activity
1. Click the desired folder name in the Content Manager so that it is selected. 2. Click Preview Pages to display the content in a secondary window. This window displays how the
content will appear to students when it is viewed through your course.
HLC Courses Management Authoring Center Learning
Updated: September 2011 14
Adding a SCORM Learning Activity HealthStream Authoring Center customers can add Authored SCORM learning activities (self-developed online content) to their HLC courses. The SCORM activity is developed outside the HLC using HealthStream’s advanced authoring platform, Lectora by Trivantis, or any other SCORM-compliant e-learning development tool. SCORM content can be added to your authoring account either by direct upload from Lectora, using the Import option within the HLC (described below), or using a third-party FTP software client.
Note: Tests and evaluations created as part of a SCORM learning activity will notbe usable in test or evaluation reports on the HLC’s Reports tab. When creating a course, consider using the HLC’s integrated assessment builder for constructing tests and evaluations. This will ensure that reporting is available.
Before uploading SCORM content to the HealthStream Authoring Center, you should:
• Test that the content is meets SCORM standards. You should use the third-party SCORM testing tools at www.scorm.com to verify that your content meets SCORM standards. (A free SCORM Cloud Account registration is required to access the SCORM.com test tracker.)
• Ensure that the content meets HealthStream’s Authoring Center Policies and Guidelines. When directly uploading your content from Lectora, your content is automatically tested for compliance with these policies. If you are importing SCORM content developed in another development tool, you are responsible for ensuring that your content is in compliance.
For detailed information about adding SCORM content to an HLC course, review the Adding SCORM Content to your HLC Course self-instructional module (found in the HLC Help System, under the HealthStream Authoring Center chapter). This module covers the following:
• Preparing SCORM content with Lectora • Preparing SCORM content with a tool other than Lectora. • Adding SCORM content to an HLC course • Managing HLC SCORM content
To add an SCORM learning activity to a course
1. Search for the course to which you want to add an SCORM learning activity. See Searching for a Course in this document for details on conducting a course search. The Course Builder page appears.
2. Click Add a SCORM Activity. The Common Properties page appears. Note: Online content that is not SCORM based is added by clicking Add an Authoring Center Activity from the Course Builder page.
3. Complete the Common Properties page. See Adding a Learning Activity in this document. 4. Click Save. 5. The default for Learning Standard is SCORM. Do not change this setting.
Note: The Learning Standard list also contains an option for AICC. Do not use the AICC option unless you have been trained and have received documentation from HealthStream.
6. Select the SCORM content to associate with the course. Select Import or Choose a Folder. • If your desired SCORM content has not been added to your authoring account (for example, via
Lectora or FTP), select Import. • If your SCORM content is available on your authoring account, select Choose a Folder.
Note: If the SCORM content was previously transferred to your authoring account, you will not need to import it again. Simply choose the folder that contains the SCORM content.
HLC Courses Management Authoring Center Learning
Updated: September 2011 15
Importing SCORM Content To import SCORM Content
Importing SCORM content allows you to browse for and select a ZIP file that contains SCORM content. The ZIP file will be imported to your authoring account and unzipped as a content folder.
1. Click Browse to the right of the field ZIP course package to import. The file selector for your web browser will open.
2. Browse for the ZIP file containing SCORM content on your local hard drive. 3. Click Open in the browser’s file selector. 4. Click Load on the SCORM Import page. The HLC will import the ZIP file and unzip the file in your
authoring directory. 5. Click Preview if you wish to preview the authored content that you have selected. 6. Click Save. The Title Properties page appears. This page contains 7 menu links with SCORM-
specific configuration options. See SCORM Title Properties in this document for more information. 7. Click Save. The selected SCORM learning activity is now associated with the course.
Choosing a Folder To choose a folder
Choosing a folder allows you to select a SCORM content folder in your authoring account.
1. Click the desired folder name link. A listing of SCORM assets within the folder appear in the window to the right.
2. Click Preview if you wish to preview the authored content that you have selected. 3. Click Save. The Title Properties page appears. This page contains 7 menu links with SCORM-
specific configuration options. See SCORM Title Properties in this document for more information.
SCORM Player Properties When adding a SCORM learning activity, you have the ability to adjust how the SCORM player behaves when the learning activity is launched by a student. The controls are preset so that courses properly built in an e-learning authoring tool will behave consistently and correctly within HealthStream.
As such, it is recommended that the SCORM player properties are not adjusted unless you have an understanding of SCORM and its behaviors.
SCORM compliance requires that control of the SCORM player properties is made available to administrators. Administrators should note that the majority of the player properties are considered advanced features and have serious ramifications in how the course behaves.
Explanations of SCORM player properties are found below categorized into user experience levels.

HLC Courses Management Authoring Center Learning
Updated: September 2011 16
Adjusting SCORM Player Properties for a SCORM Learning Activity SCORM Player Properties are automatically presented after the user adds a SCORM learning activity (see Adding a SCORM Learning Activity in the HLC Courses Management User Guide), with the default settings selected. These settings can be accessed at any time.
To do so
1. Perform a course search. See Searching for a Course in the HLC Courses Management User Guide for details on conducting a course search. The Course Builder page appears.
2. Click the name of the SCORM learning activity that you wish to edit from the Course Structure tree view. The Course Builder screen for that learning activity appears and allows you to view or edit SCORM player properties. The navigational controls appear by default.
3. Edit player properties as desired. 4. Click Save to save changes. 5. Access any subset of SCORM player properties by clicking the appropriate link the in secondary
menu.
+ SCORM Player Properties for Beginner Users For beginner users, HealthStream recommends that the standard SCORM player properties are not adjusted. If you authored your course in an authoring tool, your course was likely designed to include the course navigation and behavior that you desire, and the default SCORM player settings are established to display your content correct and consistently.
Navigational Controls
These settings determine the availability of navigational controls in the SCORM Player.
• Show Navigation Bar: Enables the default SCORM player navigation bar. If your course already contains controls for the user to navigate through the course and see his or her progress, there is likely no need to enable the navigation bar. When this is enabled, you can make further adjustments: • Show Finish Button: Determines if the Exit Course button appear within the SCORM
navigation bar. • Show Close SCO Button - Determines if the Close SCO buttons appear in the upper right
portion of the player window. It is recommended that this option remain off, as it isn’t useful to most customers.
• Enable Previous/Next - Determines if the Previous and Next buttons appear within the SCORM navigation bar.
• Show Progress Bar: Determines if the progress appears within the SCORM navigation bar. • Show Help: Determines if the Help button appears within the SCORM navigation bar.
• Prevent Right Click: Prevents the learner from right-clicking in the SCORM player window. This should be used if you wish to prevent the user from looking at the internal structure of the content or data in the player.
• Show Course Structure: Determines if the course structure appears in the SCORM player. The course structure will appear to the left of the display stage in outline format. When this is enabled, you can make further adjustments: • Course Structure Starts Open: Determines if the course structure starts open or closed. The
learner can always show/hide the course structure if it is available and the navigation bar is shown.
• CourseStructureWidth: Determines the width (in pixels) of the course structure sidebar.

HLC Courses Management Authoring Center Learning
Updated: September 2011 17
Launch Behavior
These settings determine how the parts of the SCORM Player will be launched.
• SCO Launch Type: Determines how the SCO will be launched, with the following options: • Frameset – Launches the SCO in the same window rather than opening it in a new window. • New Window – Launches the SCO in a new window. • New Window After Click – Launches the SCO in a new window after forcing the user to click
on an explicit link. This setting can be useful for circumventing popup blockers. • New Window Without Browser Toolbar – Launches the SCO in a new window without the
standard browser toolbar or other chrome.
• Player Launch Type: Determines how the SCORM player will be launched. Note that the SCORM player can have a separate launch type from that of the SCO itself. The SCORM player can be given the following options: • Frameset - Launches the SCORM player in the same window, rather than opening it in a new
window. • New Window - Launches the player in a new window. • New Window After Click - Launches the player in a new window after forcing the user to click
on an explicit link. This setting can be useful for circumventing popup blockers. • New Window Without Browser Toolbar - Launches the player in a new window without the
standard browser toolbar.
• New Window Options - If you specify that the SCO or player should launch in a new window, you can also specify how the new window should be sized, with the following options: • User Browser Defaults - The size of the window defaults to the user’s default browser
settings. • Full Screen - The browser opens to its full screen size. • Specify New Window Dimensions - The browser opens in the dimensions (in pixels) that you
define. • Prevent Window Resize - Disables the user’s ability to re-size the SCO and/or player windows.
+ SCORM Player Properties for Advanced Users Advanced users with an understanding of the SCORM Player at the expert level can make further adjustments to the SCORM player properties. Advanced features are outlined below:
Note: While SCORM player properties can be adjusted with a great deal of granularity, HealthStream suggests the administrator proceed with caution. The options detailed below are for advanced users only and should only be attempted by administrators who are expert in understanding the behavior of the SCORM Player.
Rudimentary Sequencing
These settings control what action the SCORM Player will take when an SCO exits. There are three factors the SCORM Player looks at when determining the action to take: the position of the SCO in the course (is it in the middle or is it the last SCO), the state of the SCO/Course, and the SCORM exit type specified by the SCO.
Note: This sequencing is ONLY AVALIABLE FOR SCORM 1.2 courseware and attempts to mimic the more advanced sequencing that is pre-built into SCORM 2004 standard.

HLC Courses Management Authoring Center Learning
Updated: September 2011 18
You can specify the action per exit type (Normal, Suspend, Timeout, Logout) and specify different actions when the course is satisfied or not satisfied. You can also specify different settings for Intermediate SCO (SCOs that are in the middle of the course) and the Final SCO (the last SCO of the course).
Note: The Normal mode below handles 99% of the sequencing you might require; as such, HealthStream recommends that these settings not be changed.
The exit types are:
• Normal – when a user exits an SCO using correct navigation methods. • Suspend – When a user exits an SCO in an unexpected manner; for example, skipping between
SCOs in a multi-SCO course. • Timeout – When a uer’s LMS session times out. • Logout – When a user ends his or her LMS session while an SCO is still active.
Each exit type can be given the following options:
• Exit course - The user closes the SCORM Player and is returned to the LMS automatically. • Exit course after confirm - The learner is asked to confirm the wish to exit the course. If so, the
learner will return to the LMS. If the learner cancels the request, a message page is displayed. • Go to next SCO - The learner is taken to the next SCO automatically. This is useful when there are
multiple SCOs in a SCORM course and you desire the course to flow seamlessly from SCO to SCO. If applied to the final SCO, a message page is displayed.
• Display message - The learner is presented a message page. The SCORM player determines what message to display based on the current state of the player.
• Do nothing - The SCORM player will take no action.
Rudimentary Rollup
These settings specify how to score courses. These settings are not applicable to SCORM 2004 courses since SCORM 2004 Simple Sequencing allows the content to specify these behaviors.
• Score Rollup Mode - Determines the way in which the SCORM Player will rollup scores to the course level, with the following options: • Score Provided by Course - Useful for single-SCO courses, this parameter simply transfers the
score provided by the first SCO in the course to the course-level. • Average Score of All Units - Sums up all the provided scores and divides by the total number
of SCOs in the course. • Average Score of All Units with Scores - Sums up all the provided scores and divides by the
number of units that actually reported scores. • Fixed Average - Sums up all the provided scores and divides by a fixed number (as specified in
the Number of Scoring Objects setting).
• Number of Scoring Objects - Indicates how many SCOs should report a score. This setting only applies if the Score Rollup Mode is Fixed Average.
• Status Rollup Mode - Determines how completion status is rolled up to the course level, with the following options: • Status provided by course - Useful for single SCO courses, this parameter transfers the status
provided by the first SCO in the course to the course level. • Complete When All Units Complete - The course is considered complete when all of the
SCOs have achieved completion. This means that the lesson status value is Failed, Completed, or Passed.

HLC Courses Management Authoring Center Learning
Updated: September 2011 19
• Complete When All Units Satisfactorily Complete - The course is considered complete when all of the SCOs have achieved completion in a satisfactory manner. This means that the lesson status value is either Completed or Passed.
• Complete When Threshold Score is Met - The course is considered complete when its rolled up score (as determined by the Score Rollup Type) exceeds a certain threshold (specified in the Threshold Score For Completion parameter).
• Complete When All Units Complete and Threshold Score is Met - The course is considered complete when all of the SCOs have achieved completion and when its rolled-up score exceeds the threshold specified in the Threshold Score For Completion parameter.
• Threshold Score for Completion - Determines the threshold for completion. This is a decimal value between 0.0 and 0.1 (multiplied by 100, this value equates to a percentage). This setting only applies when the Status Rollup Mode is set to Complete When Threshold Score is Met.
• First SCO is Pretest - Enabling this option indicates that if the first SCO achieves a lesson status of Passed, the rest of the SCOs in the course will be marked complete.
Compatibility Settings
The compatibility settings are used when content is not acting in a desired manner with the default settings.
• Finish Causes Immediate Commit - This setting is provided to manage single-SCO configurations in which it is difficult to capture the exit effectively. You may wish to set this to True if a single SCO course is not recording completions successfully.
• Wrap SCO Window with API - When an SCO is launched in a new window, some poorly implemented SCORM content may have trouble accessing the SCORM API. This setting will wrap an empty frameset around the SCO window which presents an API that relays calls back to the SCORM Player API.
• Always Flow to First SCO - If enabled, the SCORM Player will always load the first SCO in a course upon initial launch regardless of whether sequencing rules dictate this behavior.
• Enable Validation of SCORM Interaction Results - Determines whether the interaction responses are validated for the expected SCORM format. Use this setting when you want to include descriptive text in addition to the single number/character allowed by SCORM 1.2. This affects both the user response and the correct response.
• Mastery Score Overrides Lesson Status - The mastery score is a score set within the content. This setting lets the mastery score trump all other pass/complete settings in the SCO.
• Reset RunTime Data Timing - Determines when to reset runtime data, with the following options: • Never - SCORM Player will never reset CMI runtime data. • When Exit Is Not Suspend - Only preserves CMI runtime data if exit is suspend. • On Each New Sequencing Attempt - The SCORM Player will reset the CMI runtime data every
time the SCORM 2004 sequencing algorithms dictate that a new attempt should begin. • Return to LMS Action - In response to the SCORM 2004 4th Edition requirement that LMS's
provide an interface that allows learners to choose their exit type when leaving a course, the SCORM Engine now has a menu prompt when the learner clicks Return to LMS. This package property allows course administrators to turn this prompt on and off and also to control the default exit type used when the prompt is turned off.
• Disable Root Activity - Forces the root level course activity to be disabled to prevent creating a new attempt.
• Rollup at SCO Unload - Forces rollup at all SCO unloads to handle when Terminate/LMSFinish is not called by the SCOs.

HLC Courses Management Authoring Center Learning
Updated: September 2011 20
• Completion Status of failed Success Status - The value of the Completion Status field if the success status is failed.
• Make Student Preferences Global to Course - When selected, any student preferences specified for an SCO will be applied to all SCOs in a course.
Communication Settings
These settings affect how the player saves course status.
Note: It is highly recommended that these settings not be changed; they are used by HealthStream only when troubleshooting SCORM player issues.
• Maximum Failed Attempts - Determines the maximum number of attempts to try a runtime data update to the central server before declaring failure.
• Commit Frequency - Determines how often, in milliseconds, runtime data sends updates back to the central server. Note: Some events force immediate updates.
Debugger Options
These settings relate to client-side (browser) logging.
Note: It is highly recommended that these settings not be changed; they are used by HealthStream only when troubleshooting SCORM player issues.
• Control - Determines the level of logging that should be performed within the control subsystem on the client.
• Runtime - Determines the level of logging that should be performed within the runtime subsystem on the client.
• Sequencing - Determines the level of logging that should be performed within the sequencing subsystem on the client.
• Include Timestamps - Determines whether timestamps should be recorded within the client-side log.
History Options
These settings affect the collection of launch history information.
• Capture History - Determines if the course should report information about each attempt. • Capture Detailed History - Determines if the course should report detailed information about each
attempt.

HLC Courses Management Authoring Center Learning
Updated: September 2011 21
Adding a Course Attachment Learning Activity HLC administrators who also have the HealthStream Authoring Center can add course attachment learning activities to their administrator-developed courses. Two types of course attachments are available: Web address hyperlinks (URLs) and document files.
The Instructions field allows up to 256 characters for informing students what to do with the file or URL presented.
When the Course Attachment page is presented to the student, the Continue button is disabled. After the student clicks on the course attachment file link or URL, the Continue button is enabled, allowing the student to proceed with the course.
Online (URLs)
A URL hyperlink allows for a course attachment to link to information on the Internet or the customer’s intranet. The address must be complete. Typically, a URL begins with http://. Entering “www.website.com” will not work.
Document Files
A total of 42 file types are supported. They are shown below.
.au .dotx .jpeg .potm .pptm .xslb
.css .flv .mov .potx .pptx .xlsm
.csv .gif .mp2 .ppam .rtf .xltm
.doc .htm .mp3 .pps .swf .xltx
.docm .html .mpa .ppsm .txt .xml
.docx .jpe .mpv2 .ppsx .xlam .xsd
.dotm .jpg .pdf .ppt .xls
The maximum file size is 5 MB.
The course attachment can be configured as a Required or Not Required activity in the course using the desired completion mode selection. Course attachments have no score and therefore cannot impact an overall course score.

HLC Courses Management Authoring Center Learning
Updated: September 2011 22
To add an online (URL) course attachment learning activity
1. Search for the course to which you want to add a course attachment learning activity. See Searching for a Course in this document for details on conducting a course search. The Course Builder page appears.
2. Click Add a Course Attachment. The Common Properties page appears.
3. Complete the Common Properties page. (See Adding a Learning Activity in this document.) Note: If the Completion Mode is set to Completion Required, students will be required to click on the download link to complete the course. If the Completion Mode is set to Not Required, students will be able to proceed with any subsequent learning activities that may appear in the course.
An orange asterisk (*) indicates a required field.

HLC Courses Management Authoring Center Learning
Updated: September 2011 23
4. Click Save. The Attachment Type defaults to Online.
5. In the Instructions text area, enter instructions to the student. 6. In the Title box, enter the online course attachment title. 7. In the URL box, enter the desired URL (Web address) into the URL field. The URL must begin with
http:// or similar prefix, not www. 8. Click Save. The selected URL course attachment learning activity is now associated with the course.
Note: If the URL link points to your intranet, and a student is accessing the HLC from outside your organization’s network firewall, the student may not be able to access the intranet via the learning activity link, and therefore will be unable to complete the course.
To add a document file course attachment learning activity
Note: If your organization's Authoring Account FTP/virtual directory is at the Enterprise-level, only courses developed at the Enterprise-level can include document attachments.
1. Search for the course to which you want to add a course attachment learning activity. See Searching for a Course in this document for details on conducting a course search. The Course Builder page appears.
An orange asterisk (*) indicates a required field.

HLC Courses Management Authoring Center Learning
Updated: September 2011 24
2. Click Add a Course Attachment. The Common Properties page appears.
3. Complete the Common Properties page. (See Adding a Learning Activity in this document.) Note: If the Completion Mode is set to Completion Required, students will be required to click on the download link to complete the course. If the Completion Mode is set to Not Required, students will be able to proceed with any subsequent learning activities that may appear in the course.
4. Click Save. The Attachment Type defaults to Online. 5. In the Instructions text area, enter instructions to the student. 6. Click File. The page will refresh to include a Browse button.
7. In the Title box, enter the document title. 8. Click Browse. The browser will display a file selector to allow you to browse your computer’s hard
drive or network to select a single file. 9. Select a file from your computer or network.
An orange asterisk (*) indicates a required field.
An orange asterisk (*) indicates a required field.

HLC Courses Management Authoring Center Learning
Updated: September 2011 25
10. Click Save. The selected document file course attachment learning activity is now associated with the course. Tip: Consider providing guidance to students as to when and where to save a file attachment as opposed to opening the file directly from the HLC.
Note: If the source file is edited, the file course attachment must also be edited to include the latest version of the source file. If the course has already been published, once the course attachment is edited, the course will have to be republished for students to see the most recent course attachment.
Tip: Because course attachments will remain available in the course after the course has been completed, instructions (or the attachments themselves) may need to include a Do not use after (date) notation.

HLC Courses Management Classroom Activities
Updated: September 2011 26
Classroom Activities The HLC requires you to set up a classroom template before you can schedule a classroom activity.
Adding a Classroom Activity To add a classroom activity to a course
1. Search for the course to which you want to add a classroom activity. See Searching for a Course in this document for details on conducting a course search. The Course Builder page appears.
2. Click Add a Classroom Template. The Common Properties page appears.
3. Complete the Common Properties page. See Adding Learning Activities in this document.
An orange asterisk (*) indicates a required field.

HLC Courses Management Classroom Activities
Updated: September 2011 27
4. Click Save. The Classroom Template appears.
5. In the Minimum Size and Maximum Size boxes, enter the minimum and maximum class size. The default settings are 0. (These values can be edited later when scheduling a class).
6. In the Class Comments, Class Material, Class Material Contact, and Class Material Location text areas, add the desired information.
7. Click Add Instructors to select qualified instructors for the class. The Search Instructor(s) page appears, from which you can search for all instructors within your database.
8. Enter the desired search terms. 9. Click Search. A list of matching instructors appears at the bottom of the page.
An orange asterisk (*) indicates a required field.

HLC Courses Management Classroom Activities
Updated: September 2011 28
10. Click Check All Current Search Results if you wish to add all instructors found on your search to the classroom template, or select the check box(es) for those instructor(s) you wish to add.
11. Click Continue. You are returned to the Class Template with the instructor you selected in the Qualified Instructors box.
12. Select the Use Only Qualified Instructors check box if you wish to limit the instructors who can teach the class to only those added to the classroom template. If not selected, you will be able to conduct another instructor search when scheduling classes. Note: All administrators with rights to schedule classes are considered instructors in the HLC and will be included in your search return if they match your search criteria.
13. In the No Show list, select the No Show rule for the class: • Student is Incomplete – This selection results in students graded as No Show remaining in
incomplete status, when the class learning activity completion mode is Completion Required or Pass Required. Grading the student as No Show will not fail the class.
• Student Fails the Course – This selection results in students graded No Show as failing the class and therefore failing the course when the class learning activity completion mode is Completion Required or Pass Required.
Note: See Grading a Class for additional information about No Show grading.
14. Click Save. The classroom activity has now been added to the course. Note: You will be prompted to schedule classes once the course is published.
Editing a Classroom Activity Using the No Show Option You can edit a classroom activity using the No Show option in two ways:
• Changing the No Show Option from Failed to Incomplete • Changing the No Show Option from Incomplete to Failed
Changing the No Show Option from Failed to Incomplete Prior to the February 2009 enhancement deployment, all classroom activities followed the Student Fails the Course No Show Rule. Students previously graded as No Show for a class with a completion mode of Pass Required or Completion Required failed the class and therefore the course.

HLC Courses Management Classroom Activities
Updated: September 2011 29
If the course was assigned, the course was automatically reassigned when the student was graded as No Show.,
If the course was elective the course would no longer appear on the My Learning page and would not appear on the student’s transcript.
Today, when students are graded as No Show for a class, they will either fail the course or remain in an Incomplete status for the course. This is determined by the No Show Rule setting on the class learning activity Classroom Template page.
To change the class No Show Rule from Student Fails the Course to Student is Incomplete
1. Search for the course that contains the classroom learning activity that you want to edit. See Searching for a Course in this document for details on conducting a course search. The Course Builder page appears.
2. Click the class learning activity link from the course navigation tree. The Classroom Template page appears.
3. Click No Show Rule: Student is Incomplete. 4. Click Save.

HLC Courses Management Classroom Activities
Updated: September 2011 30
5. Republish the course. Note: Changing the No Show Rule setting on a prior class learning activity and republishing the course will apply to new classes scheduled for this learning activity. It will neither impact students subsequently registered in existing classes, nor will it impact existing No Show grades unless the grade status is changed and saved. If you choose to change the No Show Rule setting for a class, carefully review the steps below to understand the impact of the rule change on the class and the students in the class.
To change a student’s grade status from Failed (due to No Show)
1. Search for the course that contains the classroom learning activity that you want to edit. See Searching for a Course in this document for details on conducting a course search. The Course Builder page appears.
2. Click the class learning activity link from the course navigation tree. The Classroom Template page appears.
3. Click the Grade link. The list of previously graded students appears. 4. Clear the No Show check box next to any No Show students whose status you wish to change. 5. Click Save. The No Show students are now in an ungraded status and will no longer appear on the
No Show report. The system also removes the failure status from the course. 6. When the student status has been changed to ungraded, choose one of the following options:
• If you want the student’s status to be Incomplete, select No Show as the student’s grade, and click Save. The student will appear on the No Show report, but will not be able to complete the course.
• If you want the student to proceed through the course, click Manage Registrations, and click Drop to remove the student’s class registration. The student can now be registered into another class (or self-register if class settings allow) and proceed through the course. The student will not appear on the No Show report.
Note: Administrators can elect to include failed courses on transcripts as well as run the Failed Courses report.
Changing the No Show Option from Incomplete to Failed Prior to the February 2009 enhancement deployment, all classroom activities followed the Student Fails the Course No Show Rule. Students previously graded as No Show for a class with a completion mode of Pass Required or Completion Required failed the class and therefore the course.
If the course was assigned, the course was automatically reassigned when the student was graded as No Show.

HLC Courses Management Classroom Activities
Updated: September 2011 31
If the course was elective the course would no longer appear on the My Learning page and would not appear on the student’s transcript.
Today, when students are graded as No Show for a class, they will either fail the course or remain in an incomplete status for the course. This is determined by the No Show Rule setting on the class learning activity Classroom Template page.
To change the class No Show Rule from Student is Incomplete to Student Fails the Course
1. Search for the course that contains the classroom learning activity that you want to edit. See Searching for a Course in this document for details on conducting a course search. The Course Builder page appears.
2. Click the class learning activity link from the course navigation tree. The Classroom Template page appears.
3. Click No Show Rule: Student Fails the Course. 4. Click Save. 5. Republish the course.
Note: Changing the No Show Rule setting on a class learning activity and republishing the course will apply to new classes scheduled for this learning activity. It will not impact students subsequently registered in existing classes, nor will it impact existing No Show grades unless the grade status is changed and saved. If you choose to change the No Show Rule setting for a class, carefully review the steps below to understand the impact of the rule change on the class and the students in the class.

HLC Courses Management Classroom Activities
Updated: September 2011 32
To change a student’s grade status from Incomplete (due to No Show)
1. Search for the course that contains the classroom learning activity that you want to edit. See Searching for a Course in this document for details on conducting a course search. The Course Builder page appears.
2. Click the class learning activity link from the course navigation tree. The Classroom Template page appears.
3. Click the Grade link. The list of previously graded students appears. 4. Clear the No Show check box next to any No Show students whose status you wish to change. 5. Click Save. The No Show students are now in an ungraded status and will no longer appear on the
No Show report. 6. When the student status has been changed to ungraded, choose one of the following options:
• If you want the student’s status to be Failed, check No Show as the student’s grade, and click Save. The student will appear on the No Show and Failed Courses reports.
• If you want the student to proceed through the course, click Manage Registrations, and click Drop to remove the student’s class registration. The student can now be registered into another class (or self-register if class settings allow) and proceed through the course. The student will not appear on the No Show report.
Note: Administrators can elect to include failed courses on transcripts as well as run the Failed Courses report.

HLC Courses Management Classroom Activities
Updated: September 2011 33
Adding a Virtual Class Activity Only HealthStream Virtual Class customers can add virtual class activities to their HLC courses.
To add a virtual class activity
1. Search for the course to which you want to add a virtual class activity. See Searching for a Course in this document for details on conducting a course search. The Course Builder page appears.
2. Click Add a Virtual Class Template. The Common Properties page appears.
3. Complete the Common Properties page. (See Adding a Learning Activity in this document.) 4. Click Save. The Virtual Class Template appears. 5. Enter additional information as desired in the optional fields. 6. Click Add Instructors to select qualified instructors for the virtual class. You are presented with a
search page which allows you to search for all instructors within your database. 7. Click Check All Current Search Results if you wish to add all instructors found on your search to
the classroom template, or click the check box(es) for those instructors you wish to add. 8. Click Continue.
An orange asterisk (*) indicates a required field.

HLC Courses Management Classroom Activities
Updated: September 2011 34
9. Select the Use Only Qualified Instructors check box if you wish to limit the instructors who can teach the class to only those added to the virtual class template. If left cleared, you will be able to conduct another instructor search when scheduling virtual classes. Note: All administrators with rights to schedule classes are considered instructors in the HLC and will be included in your search return if they match your search criteria.
10. Select the No Show rule for the class: • Student is Incomplete – This selection will result in students graded as No Show remaining in
incomplete status, when the virtual class learning activity completion mode is Completion Required or Pass Required. Grading the student as No Show will not fail the virtual class.
• Student Fails the Course – This selection will result in students graded as No Show failing the virtual class and therefore failing the course when the virtual class learning activity completion mode is Completion Required or Pass Required.
See Grading a Class in the HLC Class Management user guide for additional information about No Show grading.
11. Click Save. The virtual class activity has now been added to the course. Note: You will be prompted to schedule virtual classes once the course is published.

HLC Courses Management Tests
Updated: September 2011 35
Tests Tests are used to assess a student’s understanding of a course. They include a series of questions pertaining to the course material.
Adding a Test Tests can be placed anywhere within the course—for example—as the first learning activity, between two other learning activities, or as the final learning activity. Depending upon the Completion Mode selected from the Common Properties page, tests can serve as pre- and post-assessments.
To add a test
1. Search for the course to which you want to add a test. See Searching for a Course in this document for details on conducting a course search. The Course Builder page appears.
2. Click Add a Test. The Common Properties page appears.
3. Enter the common properties. (See Adding a Learning Activity in this document.) 4 Click Save. The test editing page appears.
An orange asterisk (*) indicates a required field.

HLC Courses Management Tests
Updated: September 2011 36
Editing Test Settings To edit test settings
1. Click Edit Settings. The Assessment Settings page appears. This feature allows you to customize the test properties.
2. In the Maximum Test Attempts list, select the maximum number of times a student can take the test. This feature allows you to limit the number of times students can attempt a test. If a student fails to pass a test marked with a Pass Required Completion Mode within the specified number of attempts, he or she will fail the test and fail the course.
3. In the Time Limit (minutes) box, enter the time limit for the test, in minutes. If a time limit is set, the student will see a display clock when taking the test. If the student does not complete the test within the allotted time, the test will be graded and unmarked test questions will be marked as incorrect. If the result is a failed test, this may or may not fail the course, depending on the Completion Mode setting for the test.
4. In the Presentation Mode list, select how the test will be presented to the student. • SinglePage generates all test questions on a downward scrolling page. • MultiPage generates each test question on its own page.
5. In the Display Feedback For list, select how test feedback is displayed to the student after the test is completed: • Select All Questions to display each question, the answer chosen by the student, and the
correct answer. • Select Correctly Answered Questions Always to display each question answered correctly,
regardless of whether the student passed or failed the test. • Select Incorrectly Answered Questions Always to display each question answered
incorrectly and any associated rationale, regardless of whether the student passed or failed the test.
An orange asterisk (*) indicates a required field.

HLC Courses Management Tests
Updated: September 2011 37
• Select Correctly Answered Questions When Student Passes to display each question answered correctly if the student passed the test.
• Select Correctly Answered Questions When Student Fails to display each question answered correctly if the student failed the test.
• Select Incorrectly Answered Questions When Student Passes to display each question answered incorrectly and any associated rationale if the student passed the test.
• Select Incorrectly Answered Questions When Student Fails to display each question answered incorrectly and any associated rationale if the student failed the test.
• Select None to display the achieved percentage score only.
6. In the Printing Mode list, select the condition under which students can print the test and test results: • Select Always Print to allow students to print the test and test feedback. • Select Never Print to prevent students from printing the test or test feedback. This is the
default setting. 7. Leave the Shuffle questions when this test is rendered check box selected if you want to
randomize question delivery each time a test is generated. See Test Question Shuffle Functionality in this document for more information.
8. Select the Shuffle answers when this test is rendered check box selected if you want to randomize the order of answers for multiple-choice, drop down choice, multiple select, matching, and true/false questions. Note: Selecting the Shuffle answers when this assessment is rendered check box will randomize the order of answers for all applicable question types on the test. Select this check box only if you want to enable randomization across all questions.
9. Select the Allow the student to pause this test (requires a time limit) check box if you want a Pause button to be placed on the test. If the student needs to leave a test before completing it, clicking Pause will prevent the test from automatically failing once the system times out. The student can return to the paused test at any time, and all previously answered questions will be remain. Note: You cannot enable the Pause feature if a time limit has been set for the test.
10. In the Introduction text area, you can add an introduction to the test by typing the introductory message into the WYSIWYG editor. The introduction can be formatted using the editing tools. See Using the WYSIWYG Editors in the HLC About the HLC User Guide for more information about the WYSIWYG editor.
11. Click Save to save test settings. Tip: To create a pre-test or test-out opportunity, see Creating a Test-out Opportunity in this document.
Test Question Shuffle Functionality When the Shuffle Questions setting on the Test Settings page (see Editing Test Settings in this document) is selected, test questions will be presented in randomized order (or, shuffled) each time a test is delivered. The Shuffle Questions option has no bearing on which questions are selected to appear on the test.
If the Shuffle Questions setting is not selected, then the order of the test questions selected to appear will be based on their order within the question group. If there are two or more question groups, questions will be ordered first by question group. If the number of allocated questions is less than the total number of questions in the question group, the HLC will randomly select which question from the group will appear on the test (after any mandatory questions in the group are selected).

HLC Courses Management Tests
Updated: September 2011 38
Note: In addition to shuffling questions, you can also set test question answers to shuffle randomly. See Editing Test Settings in this document for more information about shuffling answers.
How HLC Tests are Rendered
When a student selects a test in a course, the HLC will first select any questions marked mandatory. If the number of allocated questions in a question group is greater than the number of mandatory questions, the HLC will randomly select additional questions from the group to present on the test. If there are no mandatory questions in the group, the HLC will randomly select all questions from the group to present in the test.
Tip: To preserve question order in a question group on a test, set the Allocated Questions setting on the Edit Group Settings page to equal the number of questions in the group. If this is not desirable, consider moving some of the questions into a separate question group using the move questions option. See Moving Test Questions in this document.
The number of questions presented in the test from each group will always be equal to the Allocated Questions setting on the Edit Group Settings page. However, if the number of mandatory questions is greater than the Allocated Questions setting, then all mandatory questions will be presented on the test. In other words, the Mandatory Question setting takes precedence over the Allocated Questions setting.
The following table describes the affect of the Shuffle Questions selection based upon different test question group scenarios.
TQ = Total number of questions in question group
MQ = Number of mandatory questions in question group
AQ = Number of questions allocated for use in the question group (selected from the Edit Group Settings page)
Question Group Setup
Question Selection
Shuffle Questions Enabled
Shuffle Questions Disabled
TQ > AQ AQ will be randomly selected from the available TQ.
Questions will be displayed in random order.
AQ will be displayed in the order in which they appear in the assessment builder.
TQ = AQ All TQ in the group will appear on the test.
AQ will be displayed in random order.
AQ will be displayed in the order in which they appear in the assessment builder.
TQ > AQ
MQ = AQ
Only MQ in the group will appear on the test.
MQ will be displayed in random order.
MQ will be displayed in the order in which they appear in the assessment builder.
TQ > MQ
AQ > MQ
All MQ will appear on the test. The remaining AQ will be randomly selected from the available TQ.
All questions, including mandatory and randomly selected questions will be displayed in random order.
MQ will be displayed in the order in which they appear in the assessment builder then remaining AQ will be displayed according to the random order in which they were selected.
MQ > AQ
Note: The # of AQ will be increased to accommodate the number of MQ.
Only MQ in the group will appear on the test.
MQ will be displayed in random order.
MQ will be displayed in the order in which they appear in the assessment builder.

HLC Courses Management Tests
Updated: September 2011 39
Adding Test Questions To add test questions
1. Click Default Group to begin creating test questions.
The Default Group page appears.

HLC Courses Management Tests
Updated: September 2011 40
You can place all test questions in this single group, or you can create multiple question groups by clicking Add Group. Each question group can be renamed and has its own settings, including the number of questions you wish to deliver from each group. Students will not see the question groups when taking a test.
Note: Once questions are created, each question group must be edited to indicate how many of the available questions are to be delivered in the test. See Managing Test Question Groups in this document.
2. Click Add Question.
The Select a Question Type page appears.

HLC Courses Management Tests
Updated: September 2011 41
3. In the Select a question type list, select one of the five test question types: • True/False • Multiple Choice • Multiple Select • Matching • Drop Down Choice
4. Click Continue.
See the following sections for details about adding each type of question and for managing a question group once all questions are added.
Adding a True/False Test Question To add a True/False test question
1. In the Select a question type list, select True/False. 2. Click Continue. The True/False question page appears.
3. In the Question Name box, enter the question name. 4. In the Question Text editing area, enter the question text into the WYSIWYG editing window, using
desired formatting tools. (See Using the WYSIWYG Editors in the online help.) 5. In the Custom Identifier box, enter text that identifies this question, if desired. 6. Select the Use extended feedback check box, if desired. Extended feedback allows the student to
view the question, the answer he or she chose, and all potential answers and associated rationale when scoring the test. Note: You must select the Display feedback when this assessment is graded check box on the Test Settings page for extended feedback to be used.
An orange asterisk (*) indicates a required field.

HLC Courses Management Tests
Updated: September 2011 42
7. In the Order lists, change the order in which the answers will display, if desired.
Note: If the Shuffle answers when this assessment is rendered option is enabled for this test, then the order set here will be overridden and your answers will be randomized when presented to students.
8. In the Correct column, select the correct answer (the default is True). 9. Click Edit if you want to edit the answers or to add rationale.
An orange asterisk (*) indicates a required field.

HLC Courses Management Tests
Updated: September 2011 43
Tip: You can edit the default True/False answers to other answer options that may be more appropriate to your question, such as Yes/No, Correct/Incorrect, or other word opposites.
10. Do one of the following: • Click Save and Add Another if you wish to add more questions to this question group. You are
returned to the Select a Question Type page. • Click Save if this is the final question you wish to add. You are returned to the Default Group
page.
11. You may preview the new question by clicking Preview. The True/False question appears in a Preview window, as shown below.

HLC Courses Management Tests
Updated: September 2011 44
Adding a Multiple Choice Test Question A multiple choice question allows the student to make only one answer choice within the test. All answers appear as a list of options below the questions.
Note: The drop-down choice question functions the same as the multiple choice question, with the exception that the answer choices are presented in a drop-down menu.
To add a Multiple Choice test question
1. In the Select a question type list, select Multiple Choice. 2. Click Continue. The Multiple Choice question page appears.
3. In the Question Name box, enter the question name. 4. In the Question Text editing area, enter the question text into the WYSIWYG editing window, using
desired formatting tools. (See Using the WYSIWYG Editors in the online help.) 5. In the Custom Identifier box, enter text that identifies this question, if desired. 6. Select the Use extended feedback check box, if desired. Extended feedback allows the student to
view the question, the answer he or she chose, and all potential answers and associated rationale when scoring the test. Note: You must select the Display feedback when this assessment is graded check box on the Test Settings page for extended feedback to be used.
An orange asterisk (*) indicates a required field.

HLC Courses Management Tests
Updated: September 2011 45
7. Click Add New Answer.
The Answer page appears.
8. Select the This answer is correct check box if you are entering the correct answer. 9. In the Answer Text editing area, enter the answer text. 10. In the Rationale editing area, enter the rationale, if desired.
An orange asterisk (*) indicates a required field.

HLC Courses Management Tests
Updated: September 2011 46
11. Do one of the following: • Click Continue and Add Another if you wish to add more answers to this question. You are
returned to the Answer page. Repeat steps 9 and 10. • Click Continue if this is the final answer you wish to add. You are returned to the Multiple
Choice question page.
Note: You must add at least two answers to a multiple choice question.
12. In the Order lists, change the order in which the answers will display, if desired.
Note: If the Shuffle answers when this assessment is rendered option is enabled for this test, then the order set here will be overridden and your answers will be randomized when presented to students.
13. In the Correct column, change the correct answer if you desire. 14. Click Edit if you want to edit the answers or to add rationale. 15. Do one of the following:
• Click Save and Add Another if you wish to add more questions to this question group. You are returned to the Select a Question Type page.
• Click Save if this is the final question you wish to add. You are returned to the Default Group page.
An orange asterisk (*) indicates a required field.

HLC Courses Management Tests
Updated: September 2011 47
16. You may preview the new question by clicking Preview. The Multiple Choice question appears in a Preview window, as shown below.
Adding a Multiple Select Test Question A multiple select question allows for more than one correct answer to a single question. Students make their selections by clicking check boxes on the test and must select all correct answers to correctly answer the question.
To add a multiple select test question
1. In the Select a question type list, select Multiple Select. 2. Click Continue. The Multiple Select question page appears.
3. In the Question Name box, enter the question name.
An orange asterisk (*) indicates a required field.

HLC Courses Management Tests
Updated: September 2011 48
4. In the Question Text editing area, enter the question text into the WYSIWYG editing window, using desired formatting tools. (See Using the WYSIWYG Editors in the online help.) Tip: You may wish to add a hint to your question text so that students will know that there may be more than one correct answer. For instance, you may add the statement: Check all correct answers.
5. In the Custom Identifier box, enter text that identifies this question, if desired. 6. Select the Use extended feedback check box, if desired. Extended feedback allows the student to
view the question, the answer he or she chose, and all potential answers and associated rationale when scoring the test. Note: You must select the Display feedback when this assessment is graded check box on the Test Settings page for extended feedback to be used.
7. Click Add New Answer.

HLC Courses Management Tests
Updated: September 2011 49
The Answer page appears.
8. Select the This answer is correct check box if you are entering the correct answer. 9. In the Answer Text editing area, enter the answer text. 10. In the Rationale editing area, enter the rationale, if desired. 11. Do one of the following:
• Click Continue and Add Another if you wish to add more answers to this question. You are returned to the Answer page. Repeat steps 9 and 10.
• Click Continue if this is the final answer you wish to add. You are returned to the Multiple Select question page.
Note: You must add at least two answers to a multiple select question.
An orange asterisk (*) indicates a required field.

HLC Courses Management Tests
Updated: September 2011 50
12. In the Order lists, change the order in which the answers will display, if desired.
Note: If the Shuffle answers when this assessment is rendered option is enabled for this test, then the order set here will be overridden and your answers will be randomized when presented to students.
13. In the Correct column, change the correct answer if you desire. 14. Click Edit if you want to edit the answers or to add rationale. 15. Do one of the following:
• Click Save and Add Another if you wish to add more questions to this question group. You are returned to the Select a Question Type page.
• Click Save if this is the final question you wish to add. You are returned to the Default Group page.
An orange asterisk (*) indicates a required field.

HLC Courses Management Tests
Updated: September 2011 51
16. You may preview the new question by clicking Preview. The Multiple Select question appears in a Preview window, as shown below.
Adding a Matching Test Question Matching questions allow you to provide a list of items, and allow students to select the appropriate item match from a corresponding list.
To add a matching test question
1. In the Select a question type list, select Matching. 2. Click Continue. The Matching question page appears.
3. In the Question Name box, enter the question name. 4. In the Question Text editing area, enter the question text into the WYSIWYG editing window, using
desired formatting tools. (See Using the WYSIWYG Editors in the online help.)
An orange asterisk (*) indicates a required field.

HLC Courses Management Tests
Updated: September 2011 52
5. In the Custom Identifier box, enter text that identifies this question, if desired. 6. Select the Use extended feedback check box, if desired. Extended feedback allows the student to
view the question, the answer he or she chose, and all potential answers and associated rationale when scoring the test. Note: You must select the Display feedback when this assessment is graded check box on the Test Settings page for extended feedback to be used.
7. Click Add New Answer.

HLC Courses Management Tests
Updated: September 2011 53
The Answer page appears.
8. Select the Use match text as distractor (item text is not required) check box if you want to add an additional selection in the answer list that has no item match.
9. In the Answer Text editing area, enter the answer text. Leave blank if you selected the Use match text as distractor check box in the previous step.
10. In the Match box, enter the match. If you selected the Use match text as distractor check box in step 8, then enter the match distractor. Matches must be unique. Using the same match for more than one item may result in question scoring errors.
11. In the Rationale editing area, enter the rationale, if desired. 12. Do one of the following:
• Click Continue and Add Another if you wish to add more answers to this question. You are returned to the Answer page. Repeat steps 9 and 10.
• Click Continue if this is the final answer you wish to add. You are returned to the Matching question page.
Note: You must add at least two answers to a matching question (excluding distractors).
An orange asterisk (*) indicates a required field.

HLC Courses Management Tests
Updated: September 2011 54
13. In the Order lists, change the order in which the answers will display, if desired.
Note: If the Shuffle answers when this assessment is rendered option is enabled for this test, then the order set here will be overridden and your answers will be randomized when presented to students.
14. In the Correct column, change the correct answer if you desire. 15. Click Edit if you want to edit the answers or to add rationale. 16. Do one of the following:
• Click Save and Add Another if you wish to add more questions to this question group. You are returned to the Select a Question Type page.
• Click Save if this is the final question you wish to add. You are returned to the Default Group page.
An orange asterisk (*) indicates a required field.

HLC Courses Management Tests
Updated: September 2011 55
17. You may preview the new question by clicking Preview. The Matching question appears in a Preview window, as shown below.
Adding a Drop Down Choice Test Question A drop down choice question allows the student to make only one answer choice within the test. All answers are displayed in a drop-down menu on the test.
Note: The multiple choice question functions the same as a drop down choice question except that all answers are displayed as a list of options below the question.
To add a drop down choice test question
1. In the Select a question type list, select Drop Down Choice. 2. Click Continue. The Drop Down Choice question page appears.
3. In the Question Name box, enter the question name.

HLC Courses Management Tests
Updated: September 2011 56
4. In the Question Text editing area, enter the question text into the WYSIWYG editing window, using desired formatting tools. (See Using the WYSIWYG Editors in the online help.)
5. In the Custom Identifier box, enter text that identifies this question, if desired. 6. Select the Use extended feedback check box, if desired. Extended feedback allows the student to
view the question, the answer he or she chose, and all potential answers and associated rationale when scoring the test. Note: You must select the Display feedback when this assessment is graded check box on the Test Settings page for extended feedback to be used.
7. Click Add New Answer.
The Answer page appears.
8. Select the This answer is correct check box if you are entering the correct answer. 9. In the Answer Text editing area, enter the answer text. 10. In the Rationale editing area, enter the rationale, if desired.
An orange asterisk (*) indicates a required field.

HLC Courses Management Tests
Updated: September 2011 57
11. Do one of the following: • Click Continue and Add Another if you wish to add more answers to this question. You are
returned to the Answer page. Repeat steps 9 and 10. • Click Continue if this is the final answer you wish to add. You are returned to the Drop Down
Choice question page.
Note: You must add at least two answers to a drop down choice question.
12. In the Order lists, change the order in which the answers will display, if desired.
Note: If the Shuffle answers when this assessment is rendered option is enabled for this test, then the order set here will be overridden and your answers will be randomized when presented to students.
13. In the Correct column, change the correct answer if you desire. 14. Click Edit if you want to edit the answers or to add rationale. 15. Do one of the following:
• Click Save and Add Another if you wish to add more questions to this question group. You are returned to the Select a Question Type page.
• Click Save if this is the final question you wish to add. You are returned to the Default Group page.

HLC Courses Management Tests
Updated: September 2011 58
16. You may preview the new question by clicking Preview. The drop down choice question appears in a Preview window, as shown below.
Managing Test Question Groups Once all questions are added to a question group, you can manage the question group, including editing group settings.
Marking Test Questions Mandatory If there are questions within the question group that you would like delivered each time the test is generated, you can mark the questions mandatory.
To mark mandatory questions
1. From the question group page, select the check boxes in the Mandatory column for the desired questions.

HLC Courses Management Tests
Updated: September 2011 59
2. Click Update Mandatory. The system informs you that the questions were updated successfully.
Sorting Test Questions You can have test questions delivered in a specific order.
Note: You must clear the Shuffle questions when this assessment is rendered check box on the Assessment Settings page if you want to deliver questions in a specific order. If you do not clear this check box, question sorting will be overridden.
To sort questions
1. From the question group page, click Sort Questions.

HLC Courses Management Tests
Updated: September 2011 60
The Sort Questions page appears.
2. Click the question name in the left-hand box for the question you wish to move. 3. Click the desired Move button to place the question in the desired order. 4. Once all questions are positioned as desired, click Save.
Moving Test Questions If you have more than one question group, you can move questions from one group to another.
To move questions
1. From the question group page, click Move Questions.

HLC Courses Management Tests
Updated: September 2011 61
The Move Questions page appears.
3. Select the check boxe(es) next to the question name(s) of the questions you want to move, or select the Select All check box.
4. Select the destination question group. 5. Select the Take me to the destination group after the move is complete check box if you
want to automatically open that question group after saving the move. 6. Click Save.
Editing Test Question Group Settings To edit group settings
1. From the question group page, click Edit Group Settings.

HLC Courses Management Tests
Updated: September 2011 62
The Question Group Settings page displays.
2. In the Name box, change the group name, if desired. 3. In the Description text area, add a description, if desired. 4. In the Questions from the Group to Include on Test box, enter the number of questions to
include from the group or click Use All if you want to use all of the questions in the group. Note: You do not have to use all questions in a group for each test. For example, you may create 10 questions within a question group, but designate that only 5 of the 10 are to be used. If you select the Shuffle questions when this assessment is rendered check box on the Assessment Settings page, then each time the test is delivered a different combination of 5 questions out of the available 10 will be asked. If one or more questions are marked Mandatory, those questions will be used every time the test is delivered.
5. Click Save.
An orange asterisk (*) indicates a required field.

HLC Courses Management Tests
Updated: September 2011 63
Previewing a Test To preview a test
1. Clicking Back from a question group page returns you to the test level.
2. From this page you can preview the test as it will appear to students. Click Preview Test.

HLC Courses Management Tests
Updated: September 2011 64
3. The test will generate as it appears to students.

HLC Courses Management Tests
Updated: September 2011 65
Editing a Test A test can be edited at any time. Note: Editing a question will result in the counts for the question, as they appear on the Test Question Analysis Report, being reset to zero. Specifically, if the text of the question, any answer, the indication of which answer is correct, the addition of an answer choice, or the removal of an answer choice, will cause a reset. If you wish to preserve that data, first run the Test Question Analysis Report and store the results, or consider versioning the course. This is because the HLC cannot distinguish between an edit that changed the meaning of the question or answer and an edit that merely fixed a typo. If the meaning was changed and the question count is not reset, the data on the reports would no longer be valid.
To edit a test
1. Click the test name from the course learning activities listing. The Test page appears.
2. Make any or all of the following changes: • Click Edit Settings to edit the test settings, make the desired changes, and click Save. • Click the question group name to edit question group settings, make the desired changes, and
click Save. • Click the question group name to edit a specific question, click the question name, make the
desired changes, and click Save. • Click Common Properties to edit the common properties, make the desired changes, and click
Save. • Add new question groups and questions, if desired.
Note: If the edited test is within a published course, the course must be republished for edits to be activated. (See Editing a Course in this document.)

HLC Courses Management Tests
Updated: September 2011 66
Deleting a Test Tests can be deleted only prior to course publishing.
To delete a test
1. Click the test name from the course learning activities listing. The Test page appears.
2. Click Common Properties. The Common Properties page appears.
3. Click Delete. A confirmation prompt appears. 4. Click OK to delete the test.
Note: To delete a test from a published course, you must create a new course version. (See Creating a New Course Version in this document.)
An orange asterisk (*) indicates a required field.

HLC Courses Management Evaluations
Updated: September 2011 67
Evaluations Evaluations are used to provide an instructor with a student’s assessment of the course material and instructor’s effectiveness.
Adding an Evaluation Evaluations can be added to administrator-developed HLC courses. By making learning activities sequential within the course (see Adding a Course and Publishing a Course in this document), you can place the evaluation as the last learning activity so that students must first complete all other learning activities.
To add an evaluation
1. Search for the course to which you want to add an evaluation. See Searching for a Course in this document for details on conducting a course search. The Course Builder page appears.
2. Click Add an Evaluation. The Common Properties page appears.
3. Enter the common properties. (See Adding a Learning Activity in this document.) 4. Click Save. The evaluation editing page appears.
An orange asterisk (*) indicates a required field.

HLC Courses Management Evaluations
Updated: September 2011 68
Editing Evaluation Settings To edit evaluation settings
1. Click Edit Settings. The Assessment Settings page appears.
2. In the Introduction WYSIWYG editor, enter an introduction, if desired. 3. Click Save.
Adding Evaluation Questions To add evaluation questions
1. Click Default Group to begin creating evaluation questions.

HLC Courses Management Evaluations
Updated: September 2011 69
The Default Group page appears.
You can place all questions in this single group, or you can create multiple question groups by clicking Add Group. Each question group can be renamed and can include a description.
Note: If multiple question groups are used in an evaluation, the question group names will be visible to students.
Note: Unlike tests, all questions placed within an evaluation question group will be used in the evaluation.
2. Click Add Question.

HLC Courses Management Evaluations
Updated: September 2011 70
The Select a Question Type page appears.
3. In the Select a question type list, select one of the seven evaluation question types: • True/False • Multiple Choice • Multiple Select • Likert Scale • Free Text • Matching • Drop Down Choice
See the following sections for details about adding each type of question and for managing a question group once all questions are added.
4. Click Continue.

HLC Courses Management Evaluations
Updated: September 2011 71
Adding a True/False Evaluation Question To add a True/False evaluation question
1. In the Select a question type list, select True/False. 2. Click Continue. The True/False question page appears.
3. In the Question Name box, enter the question name. 4. In the Question Text editing area, enter the question text into the WYSIWYG editing window, using
desired formatting tools. (See Using the WYSIWYG Editors in the online help.) 5. In the Custom Identifier box, enter text that identifies this question, if desired. 6. In the Order lists, change the order in which the answers will display, if desired.
An orange asterisk (*) indicates a required field.

HLC Courses Management Evaluations
Updated: September 2011 72
7. Click Edit if you want to edit the answers or to add rationale.
Tip: You can edit the default True/False answers to other answer options that may be more appropriate to your question, such as Yes/No, Correct/Incorrect, or other word opposites.
8. Do one of the following: • Click Save and Add Another if you wish to add more questions to this question group. You are
returned to the Select a Question Type page. • Click Save if this is the final question you wish to add. You are returned to the Default Group
page.
9. You may preview the new question by clicking Preview. The True/False question appears in a Preview window, as shown below.

HLC Courses Management Evaluations
Updated: September 2011 73
Adding a Multiple Choice Evaluation Question A multiple choice question allows the student to make only one answer choice within the evaluation. All answers appear as a list of options below the questions.
Note: The drop-down choice question functions the same as the multiple choice question, with the exception that the answer choices are presented in a drop-down menu.
To add a Multiple Choice evaluation question
1. In the Select a question type list, select Multiple Choice. 2. Click Continue. The Multiple Choice question page appears.
3. In the Question Name box, enter the question name. 4. In the Question Text editing area, enter the question text into the WYSIWYG editing window, using
desired formatting tools. (See Using the WYSIWYG Editors in the online help.) 5. In the Custom Identifier box, enter text that identifies this question, if desired.
An orange asterisk (*) indicates a required field.

HLC Courses Management Evaluations
Updated: September 2011 74
6. Click Add New Answer.
The Answer page appears.
7. In the Answer Text editing area, enter the answer text. 8. Do one of the following:
• Click Continue and Add Another if you wish to add more answers to this question. You are returned to the Answer page. Repeat steps 9 and 10.
• Click Continue if this is the final answer you wish to add. You are returned to the Multiple Choice question page.
Note: You must add at least two answers to a multiple choice question.
An orange asterisk (*) indicates a required field.

HLC Courses Management Evaluations
Updated: September 2011 75
9. In the Order lists, change the order in which the answers will display, if desired.
10. Click Edit if you want to edit the answers or to add rationale. 11. Do one of the following:
• Click Save and Add Another if you wish to add more questions to this question group. You are returned to the Select a Question Type page.
• Click Save if this is the final question you wish to add. You are returned to the Default Group page.
12. You may preview the new question by clicking Preview. The Multiple Choice question appears in a Preview window, as shown below.

HLC Courses Management Evaluations
Updated: September 2011 76
Adding a Multiple Select Evaluation Question A multiple select question allows for more than one correct answer to a single question. Students make their selections by clicking check boxes on the evaluation.
To add a multiple select question
1. In the Select a question type list, select Multiple Select. 2. Click Continue. The Multiple Select question page appears.
3. In the Question Name box, enter the question name. 4. In the Question Text editing area, enter the question text into the WYSIWYG editing window, using
desired formatting tools. (See Using the WYSIWYG Editors in the online help.) Tip: You may wish to add a hint to your question text so that students will know that there may be more than one correct answer. For instance, you may add the statement: Check all correct answers.
5. In the Custom Identifier box, enter text that identifies this question, if desired.
An orange asterisk (*) indicates a required field.

HLC Courses Management Evaluations
Updated: September 2011 77
6. Click Add New Answer.
The Answer page appears.
7. In the Answer Text editing area, enter the answer text. 8. Do one of the following:
• Click Continue and Add Another if you wish to add more answers to this question. You are returned to the Answer page. Repeat steps 9 and 10.
• Click Continue if this is the final answer you wish to add. You are returned to the Multiple Select question page.
Note: You must add at least two answers to a multiple select question.
An orange asterisk (*) indicates a required field.

HLC Courses Management Evaluations
Updated: September 2011 78
9. In the Order lists, change the order in which the answers will display, if desired.
10. Click Edit if you want to edit the answers or to add rationale. 11. Do one of the following:
• Click Save and Add Another if you wish to add more questions to this question group. You are returned to the Select a Question Type page.
• Click Save if this is the final question you wish to add. You are returned to the Default Group page.
12. You may preview the new question by clicking Preview. The Multiple Select question appears in a Preview window, as shown below.

HLC Courses Management Evaluations
Updated: September 2011 79
Adding a Likert Scale Evaluation Question Likert Scale questions are found in evaluations and not in tests. Likert Scale questions measure how significantly a user agrees or disagrees with a statement.
To create a Likert Scale evaluation question
1. In the Select a question type list, select Likert Scale. 2. Click Continue. The Likert Scale question page appears.
3. In the Question Name box, enter the question name. 4. In the Question Text editing area, enter the question text into the WYSIWYG editing window, using
desired formatting tools. (See Using the WYSIWYG Editors in the online help.) 5. In the Custom Identifier box, enter text that identifies this question, if desired.
An orange asterisk (*) indicates a required field.

HLC Courses Management Evaluations
Updated: September 2011 80
6. Click Add New Answer.
The Answer page appears.
7. In the Answer Text editing area, enter the answer text. 8. In the Weight box, add the answer weight. The default is 1. If answer weight is used, the
Evaluation Scores by Course report multiplies the number of times an answer is selected by the weight assigned to the answer. This calculation appears in the Response Value column for each Likert Scale question. For example, the answer text may be Excellent, with a weight of 4. The next answer text may be Good, with a weight of 3. The third answer may be Fair, with a weight of 2, and the final answer Poor with a weight of 1.
An orange asterisk (*) indicates a required field.

HLC Courses Management Evaluations
Updated: September 2011 81
9. Do one of the following: • Click Continue and Add Another if you wish to add more answers to this question. You are
returned to the Answer page. Repeat steps 9 and 10. • Click Continue if this is the final answer you wish to add. You are returned to the Likert Scale
question page.
Note: You must add at least two answers to a Likert Scale question.
10. In the Order lists, change the order in which the answers will display, if desired.
11. Click Edit if you want to edit the answers. 12. Do one of the following:
• Click Save and Add Another if you wish to add more questions to this question group. You are returned to the Select a Question Type page.
• Click Save if this is the final question you wish to add. You are returned to the Default Group page.

HLC Courses Management Evaluations
Updated: September 2011 82
13. You may preview the new question by clicking Preview. The Likert Scale question appears in a Preview window, as shown below.
Adding a Free Text Evaluation Question To add a free text evaluation question
1. In the Select a question type list, select Free Text. 2. Click Continue. The Free Text question page appears.
3. In the Question Name box, enter the question name. 4. In the Question Text editing area, enter the question text into the WYSIWYG editing window, using
desired formatting tools. (See Using the WYSIWYG Editors in the online help.) Tip: You may wish to add a hint to your question text so that students will know that there may be more than one correct answer. For instance, you may add the statement: Check all correct answers.
5. In the Custom Identifier box, enter text that identifies this question, if desired. 6. In Display text box as, select Single line to limit the amount of text added to the student’s
answer or Multiple line for unlimited text responses.
An orange asterisk (*) indicates a required field.

HLC Courses Management Evaluations
Updated: September 2011 83
7. Do one of the following: • Click Save and Add Another if you wish to add more questions to this question group. You are
returned to the Select a Question Type page. • Click Save if this is the final question you wish to add. You are returned to the Default Group
page.
8. You may preview the new question by clicking Preview. The Free Text question appears in a Preview window, as shown below.
Adding a Matching Evaluation Question Matching questions allow you to provide a list of items, and allow students to select the appropriate item match from a corresponding list.
To add a matching evaluation question
1. In the Select a question type list, select Matching. 2. Click Continue. The Matching question page appears.
3. In the Question Name box, enter the question name.
An orange asterisk (*) indicates a required field.
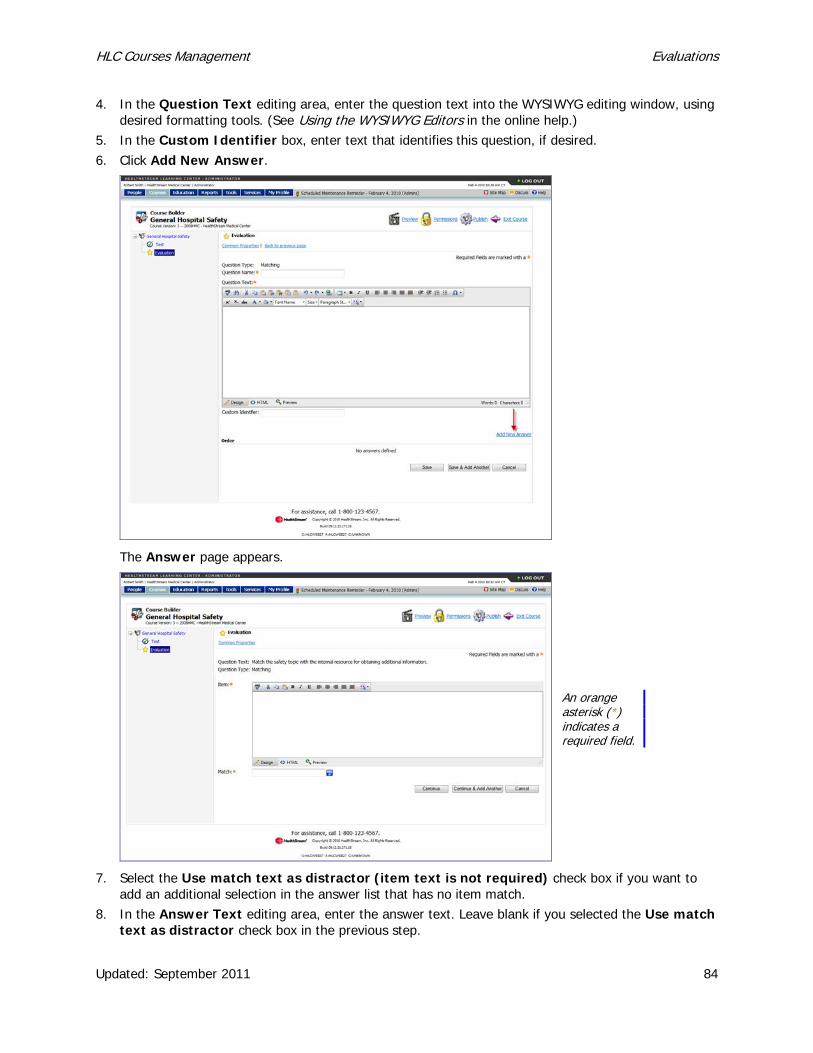
HLC Courses Management Evaluations
Updated: September 2011 84
4. In the Question Text editing area, enter the question text into the WYSIWYG editing window, using desired formatting tools. (See Using the WYSIWYG Editors in the online help.)
5. In the Custom Identifier box, enter text that identifies this question, if desired. 6. Click Add New Answer.
The Answer page appears.
7. Select the Use match text as distractor (item text is not required) check box if you want to add an additional selection in the answer list that has no item match.
8. In the Answer Text editing area, enter the answer text. Leave blank if you selected the Use match text as distractor check box in the previous step.
An orange asterisk (*) indicates a required field.

HLC Courses Management Evaluations
Updated: September 2011 85
9. In the Match box, enter the match. If you selected the Use match text as distractor check box in step 8, then enter the match distractor. Matches must be unique. Using the same match for more than one item may result in question scoring errors.
10. In the Rationale editing area, enter the rationale, if desired. 11. Do one of the following:
• Click Continue and Add Another if you wish to add more answers to this question. You are returned to the Answer page. Repeat steps 9 and 10.
• Click Continue if this is the final answer you wish to add. You are returned to the Matching question page.
Note: You must add at least two answers to a matching question.
12. In the Order lists, change the order in which the answers will display, if desired.
13. In the Correct column, change the correct answer if you desire. 14. Click Edit if you want to edit the answers or to add rationale. 15. Do one of the following:
• Click Save and Add Another if you wish to add more questions to this question group. You are returned to the Select a Question Type page.
• Click Save if this is the final question you wish to add. You are returned to the Default Group page.

HLC Courses Management Evaluations
Updated: September 2011 86
16. You may preview the new question by clicking Preview. The Matching question appears in a Preview window, as shown below.
Adding a Drop Down Choice Evaluation Question A drop down choice question allows the student to make only one answer choice within the evaluation. All answers are displayed in a drop-down menu on the evaluation.
Note: The multiple choice question functions the same as a drop down choice question except that all answers are displayed as a list of options below the question.
To add a drop down choice evaluation question
1. In the Select a question type list, select Drop Down Choice. 2. Click Continue. The Drop Down Choice question page appears.
3. In the Question Name box, enter the question name.

HLC Courses Management Evaluations
Updated: September 2011 87
4. In the Question Text editing area, enter the question text into the WYSIWYG editing window, using desired formatting tools. (See Using the WYSIWYG Editors in the online help.)
5. In the Custom Identifier box, enter text that identifies this question, if desired. 6. Click Add New Answer.
The Answer page appears.
7. In the Answer Text editing area, enter the answer text. 8. Do one of the following:
• Click Continue and Add Another if you wish to add more answers to this question. You are returned to the Answer page. Repeat steps 9 and 10.
• Click Continue if this is the final answer you wish to add. You are returned to the Drop Down Choice question page.
Note: You must add at least two answers to a drop down choice question.
An orange asterisk (*) indicates a required field.

HLC Courses Management Evaluations
Updated: September 2011 88
9. In the Order lists, change the order in which the answers will display, if desired.
Note: If the Shuffle answers when this assessment is rendered option is enabled for this test, then the order set here will be overridden and your answers will be randomized when presented to students.
10. Click Edit if you want to edit the answers. 11. Do one of the following:
• Click Save and Add Another if you wish to add more questions to this question group. You are returned to the Select a Question Type page.
• Click Save if this is the final question you wish to add. You are returned to the Default Group page.
12. You may preview the new question by clicking Preview. The drop down choice question appears in a Preview window, as shown below.

HLC Courses Management Evaluations
Updated: September 2011 89
Managing Evaluation Question Groups Once all questions are added to a question group, you can manage the question group, including editing group settings.
Sorting Evaluation Questions You can have evaluation questions delivered in a specific order.
To sort questions
1. From the question group page, click Sort Questions.
The Sort Questions page appears.
2. Click the question name in the left-hand box for the question you wish to move.

HLC Courses Management Evaluations
Updated: September 2011 90
3. Click the desired Move button to place the question in the desired order. 4. Once all questions are positioned as desired, click Save.
Moving Evaluation Questions If you have more than one question group, you can move questions from one group to another.
To move questions
1. From the question group page, click Move Questions.
The Move Questions page appears.
2. Select the check boxe(es) next to the question name(s) of the questions you want to move, or select the Select All check box.
3. Select the destination question group.

HLC Courses Management Evaluations
Updated: September 2011 91
4. Select the Take me to the destination group after the move is complete check box if you want to automatically open that question group after saving the move.
5. Click Save.
Editing Evaluation Question Group Settings To edit group settings
1. From the question group page, click Edit Group Settings.
The Question Group Settings page displays.
2. In the Name box, change the group name, if desired. 3. In the Description text area, add a description, if desired. 4. Click Save.
An orange asterisk (*) indicates a required field.

HLC Courses Management Evaluations
Updated: September 2011 92
Previewing an Evaluation To preview an evaluation
1. Clicking Back from a question group page returns you to the evaluation level.
2. From this page you can preview the test as it will appear to students. Click Preview Evaluation.

HLC Courses Management Evaluations
Updated: September 2011 93
3. The evaluation will generate as it appears to students.

HLC Courses Management Evaluations
Updated: September 2011 94
Editing an Evaluation An evaluation can be edited at any time.
Note: Editing a question or an answer will result in the counts for the question, as they appear on the Evaluation Scores Report, being reset to zero. If you wish to preserve that data, first run the Evaluation Scores Report and store the results, or consider versioning the course. This is because the HLC cannot distinguish between an edit that changed the meaning of the question or answer and an edit that merely fixed a typo. If the meaning was changed and the question count is not reset, the data on the reports would no longer be valid.
To edit an evaluation
1. Click the evaluation name from the course learning activities listing. The Evaluation page appears.
2. Make any or all of the following changes: • Click Edit Settings to edit the evaluation settings, make the desired changes, and click Save. • Click the question group name to edit question group settings, make the desired changes, and
click Save. • Click the question group name to edit a specific question, click the question name, make the
desired changes, and click Save. • Click Common Properties to edit the common properties, make the desired changes, and click
Save. • Add new question groups and questions, if desired.
Note: If the edited evaluation is within a published course, the course must be republished for edits to be activated. (See Editing a Course in this document.)

HLC Courses Management Evaluations
Updated: September 2011 95
Deleting an Evaluation Evaluations can be deleted only prior to course publishing.
To delete an evaluation
1. Click the evaluation name from the course learning activities listing. The Evaluation page appears.
2. Click Common Properties. The Common Properties page appears.
3. Click Delete. A confirmation prompt appears. 4. Click OK to delete the evaluation.
Note: To delete an evaluation from a published course, you must create a new course version. (See Creating a New Course Version in this document.)
An orange asterisk (*) indicates a required field.
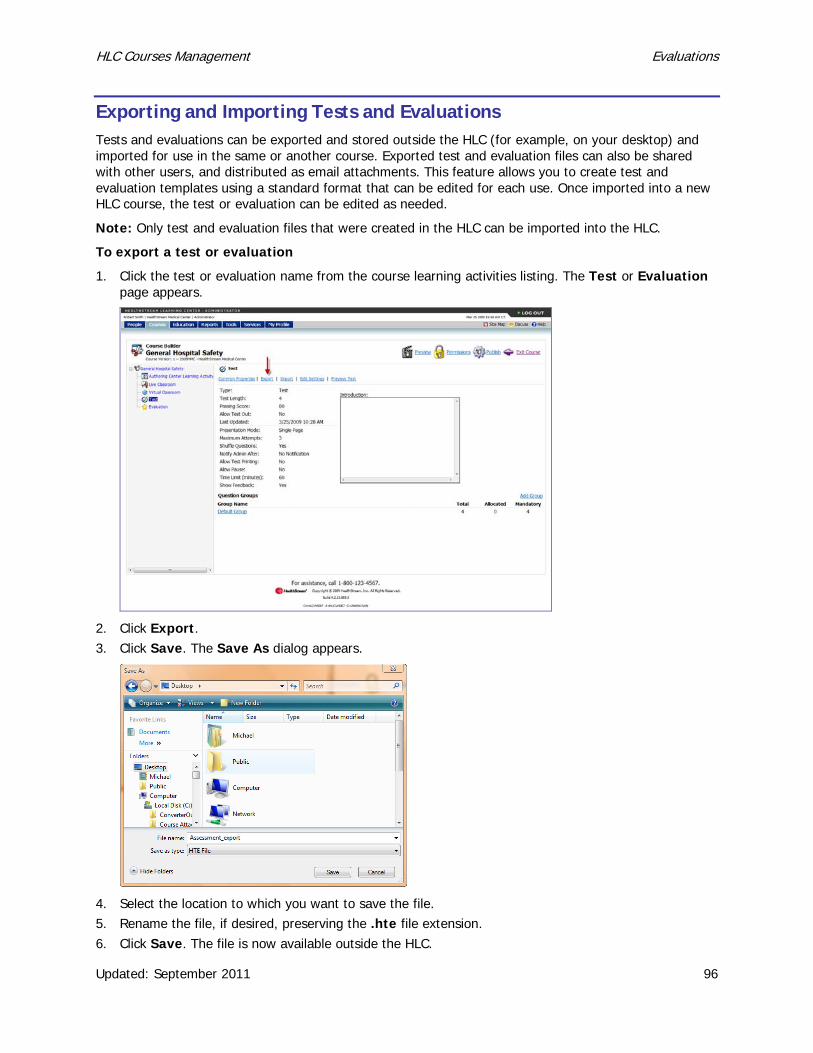
HLC Courses Management Evaluations
Updated: September 2011 96
Exporting and Importing Tests and Evaluations Tests and evaluations can be exported and stored outside the HLC (for example, on your desktop) and imported for use in the same or another course. Exported test and evaluation files can also be shared with other users, and distributed as email attachments. This feature allows you to create test and evaluation templates using a standard format that can be edited for each use. Once imported into a new HLC course, the test or evaluation can be edited as needed.
Note: Only test and evaluation files that were created in the HLC can be imported into the HLC.
To export a test or evaluation
1. Click the test or evaluation name from the course learning activities listing. The Test or Evaluation page appears.
2. Click Export. 3. Click Save. The Save As dialog appears.
4. Select the location to which you want to save the file. 5. Rename the file, if desired, preserving the .hte file extension. 6. Click Save. The file is now available outside the HLC.
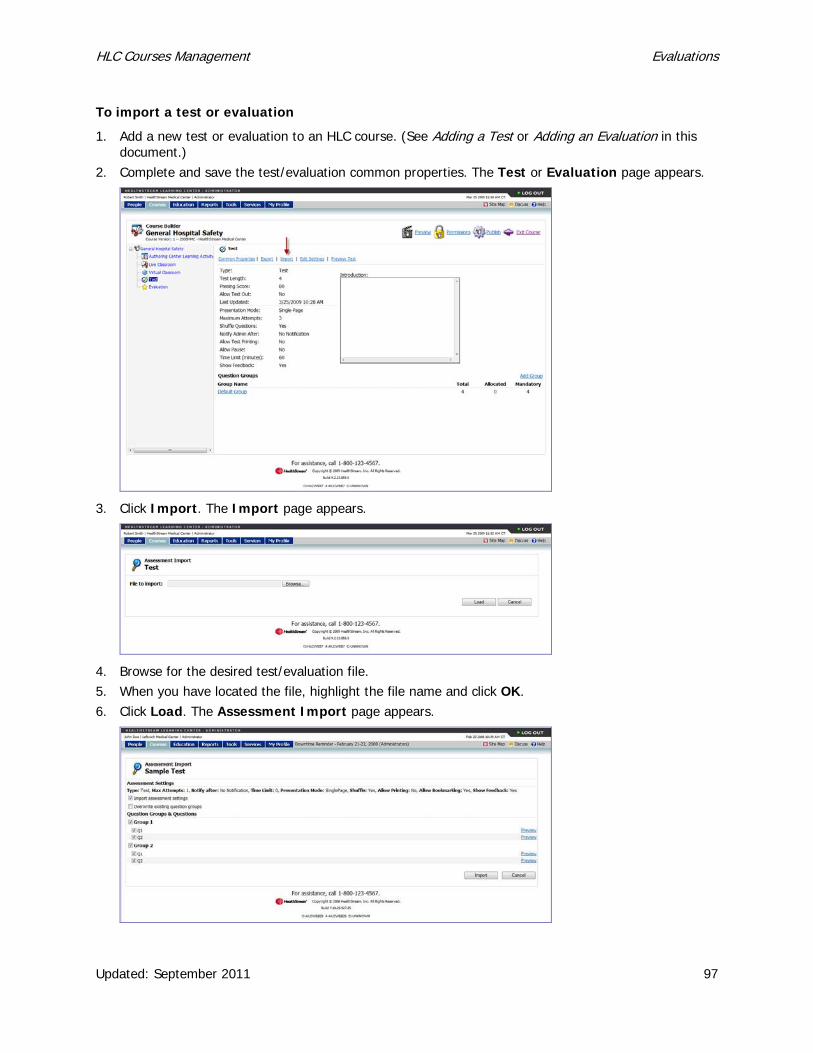
HLC Courses Management Evaluations
Updated: September 2011 97
To import a test or evaluation
1. Add a new test or evaluation to an HLC course. (See Adding a Test or Adding an Evaluation in this document.)
2. Complete and save the test/evaluation common properties. The Test or Evaluation page appears.
3. Click Import. The Import page appears.
4. Browse for the desired test/evaluation file. 5. When you have located the file, highlight the file name and click OK. 6. Click Load. The Assessment Import page appears.

HLC Courses Management Evaluations
Updated: September 2011 98
7. Select the Import assessment settings check box if you want to import the settings as per the original test/evaluation
8. Select the Overwrite existing question groups check box if you want to overwrite the existing question groups within the new test/evaluation (such as the default group). If you choose to overwrite the question groups, then all question groups existing in the new test or evaluation will be deleted and replaced by those within the file being imported. Note: Once the import is completed, you can edit the new test/evaluation settings and/or question groups.
9. Clear any questions or question group check box(es) that you do not want to import. You may preview each question by clicking Preview to the right of each question.
10. Click Import. 11. Click OK. You can now make any desired edits to the test/evaluation settings, question groups, or
questions.
Granting Test/Evaluation Override Permissions Administrators can grant permission for subsidiary affiliations to override and edit tests and evaluations. Without this permission, administrators at subsidiary levels cannot edit the tests or evaluations.
To grant override permission for a test or evaluation within a course
1. Be sure that the Allow this learning activity to be overridden check box is selected on the test/evaluation Common Properties page. (See Adding Learning Activities in this document.)
2. Prior to publishing the course, click Permissions from the Course Builder page.

HLC Courses Management Evaluations
Updated: September 2011 99
The Affiliations page appears.
3. Click Add Affiliations. The Find Affiliations(s) page appears.
4. Search for the affiliation to which you want to grant permission. 5. Click the affiliation name.
5. Select the Allow subsidiary affiliations to access this course in the Course Builder check box.
6. Click Save.
To grant permissions to more than one affiliation, repeat steps 2 through 6.
Note: When permissions are granted, the permission allows for editing of all tests and evaluations within the course for which the Allow this learning activity to be overridden check box was selected.
An orange asterisk (*) indicates a required field.

HLC Courses Management Adding CE Credit to a Course
Updated: September 2011 100
Adding CE Credit to a Course Continuing education (CE) credit can be added to administrator-developed HLC courses, if the organization is accredited or approved to do so, using the HLC CE Credit Management functionality.
Compliance with CE accreditation or approving body rules and regulations is the customer’s responsibility. HealthStream strongly recommends involving those within your organization who have expertise in and responsibility for your continuing education program(s) if you choose to utilize the CE Credit Management functionality.
Carefully review the information in the CE Credit Management section of the Help system prior to utilizing this feature.
Prior to adding CE credit to a course, the accreditation/approval must be set up in the system (see CE Credit Management Overview in the online Help).
To add CE credit to a course
1. Search for the course to which you want to add CE credit. See Searching for a Course in this document for details on conducting a course search. The Course Builder page appears.
2. Click Manage Course CE Credit. The Manage Course CE Credit page appears.

HLC Courses Management Adding CE Credit to a Course
Updated: September 2011 101
3. Click Add Course CE Credit. The Add Course CE Credit page appears.
4. In the Accredited/Approved list, select a provider. 5. In the Credit Units box, enter the number of credit units. 6. Leave the Show certificate upon completion check box selected unless you do not want students
to receive a CE certificate. 7. In the Initial Date box, enter the initial date of course CE approval. Prior to this date, no CE credit
will be issued for course completion.
Tip: You can also click to select the dates.
8. In the Expiration Date box, enter the expiration date of course CE issuance. After this date, no further CE credit will be issued for course completion.
Tip: You can also click to select the dates.
9. In the Course Level Accreditation/Approval Statement text area, add a statement, if desired. 10. Click Save. 11. To add another type of CE credit, click Back to Course CE Credits. 12. Click Add Course CE Credit and repeat Steps 4 – 10.
Note: If CE credit is added to a course that has already been published, you must republish the course to activate the CE credit.
An orange asterisk (*) indicates a required field.

HLC Courses Management Previewing a Course
Updated: September 2011 102
Previewing a Course Once course development is complete, you can preview the course. The preview will display the course as students will see it from their My Learning pages and the Catalog tab.
To preview a course
1. Search for the course that you want to preview. See Searching for a Course in this document for details on conducting a course search. The Course Builder page appears.
2. Click Preview. The Course Details page appears.
Learning activities appear at the top of the page. If the course was developed for learning activities to be completed sequentially, only the first learning activity is enabled. CE credit applied to the course appears at the bottom of the page. Click the X in the upper right of the page to close the preview.

HLC Courses Management Publishing a Course
Updated: September 2011 103
Publishing a Course To activate a course in the HLC, it must be published. Publishing makes a course available for assignment, or, if desired, to be elected by students from the Catalog tab.
Note: Once a course is published, you cannot add, delete or rearrange learning activities within the course.
To publish a course
1. Search for the course that you want to publish. See Searching for a Course in this document for details on conducting a course search. The Course Builder page appears.
2. Click Publish. The Publish page appears.
3. In the Course Development Status list, select the development status of the course. 4. You can now choose between Quick Publish or Advanced Publish. Quick Publish allows the
course to be published to the entire institution using a common set of publishing properties. Advanced Publish allows publishing properties to be customized for specific subsidiary affiliations.

HLC Courses Management Publishing a Course
Updated: September 2011 104
Using Quick Publish If you wish to publish the course to the entire institution using a common set of publishing properties, use the Quick Publish feature.
To publish a course with Quick Publish
Make the desired selections under Quick Publish.
1. Leave the This course can be used by subsidiary affiliations check box selected if you want the course to be available for use by administrators in subsidiary affiliations with access to course building or assignments features.
2. Leave the This course can be used for enrollment (assignment and/or class registration) check box selected if you want the course to be available for administrator delivery to students via group or individual assignment or by class registration.
3. Leave the This course can be used with Learning Events check box selected if you want course completion to be satisfied by a learning event.
4. Leave the This course can be used in Reports check box selected if you want the course available for inclusion in reports.
5. Leave the Students may self-enroll from the Catalog tab check box selected if you want the course available to be taken as an elective.
6. Leave the This version is the active version of this course at the selected affiliation(s) check box selected if you want the course to be active in the system. See Creating a New Course Version in this document for further details about versioning a course.
7. Select the Un-enroll and re-enroll students that are currently enrolled but have not completed any version of this course check box if you want the system to un-enroll and re-enroll students when publishing subsequent course versions. (See Creating a New Course Version in this document for further details about versioning a course.) Note: If you choose to un-enroll and re-enroll students who are already enrolled in the course, then students will be required to repeat all previously completed learning activities within the course and students will be dropped from all classes within the course for which they were previously registered.

HLC Courses Management Publishing a Course
Updated: September 2011 105
8. Select the Add this course to the Courseware Exchange check box to share this course including any authored online activities, tests, and evaluations within the course with other HLC customers through the Courseware Exchange. When this check box is selected, the page will refresh to display the courseware exchanges available to your organization. Select the check boxes next to the names of the exchanges to which you will share this course. Note: If you have utilized A.D.A.M. Pro Resource Library assets in the content, you must choose only the Authoring Pro Exchange option when sharing your authored content.
9. Click Quick Publish. A warning page appears, as shown below.
10. Click Confirm. A course publish request is submitted, as shown below.
11. To view the status of your publish request, click Go to Request Manager.

HLC Courses Management Publishing a Course
Updated: September 2011 106
Using Advanced Publish If you wish to publish a course to specific subsidiary affiliations only, or if you wish to customize the publish settings for subsidiary affiliations, use the Advanced Publish feature.
To publish a course with Advanced Publish
1. Click Advanced Publish. A warning page appears, as shown below.
2. Click Add Affiliations to Receive Course. The Find affiliation(s) page appears.
3. Search your organizational hierarchy for the desired subsidiary affiliation(s) using alphabetical, word search, or hierarchy search.
4. Click Search. The search results appear in the Search Results box. 5. In the Search Results box, select the check box(es) next to the name(s) of the subsidiary
affiliation(s) to which you wish to publish.

HLC Courses Management Publishing a Course
Updated: September 2011 107
6. Click Select. The selected affiliations will appear in the hierarchy tree on the left.
7. Click the name link of each affiliation. The affiliation publishing options appear.
In addition to the standard publishing settings (see Quick Publish in this document), you may also choose the following:
• Go Live Date – the date in which the course becomes available for the selected affiliation. • Inactivation Date – the date at which the course is no longer available. • Course Fee, No Show Fee, and Cancel Fee – fees applied to the course.
Note: Course Fee, No Show Fee, and Cancel Fee should not be added unless the customer has a PayPal account that is linked to the HLC for payment processing. If a course fee is added, the student will be presented with an online billing wizard requesting credit card payment.

HLC Courses Management Publishing a Course
Updated: September 2011 108
8. Click Save Settings. A warning page appears, as shown below.
9. Click Continue. A course publish request is submitted, as shown below.
10. To view the status of your publish request, click Go to Request Manager.

HLC Courses Management Publishing a Course
Updated: September 2011 109
Viewing Current Publishing Settings for a Course You may wish to review publishing settings for an existing course to make changes. By initiating the republishing process, you can review current settings and make changes or cancel the process to leave settings as they are.
To view current publishing settings for a course
1. Search for the course. See Searching for a Course in this document for details on conducting a course search. The Course Builder page appears.
2. Click Publish. The next screen allows you to select publishing options.
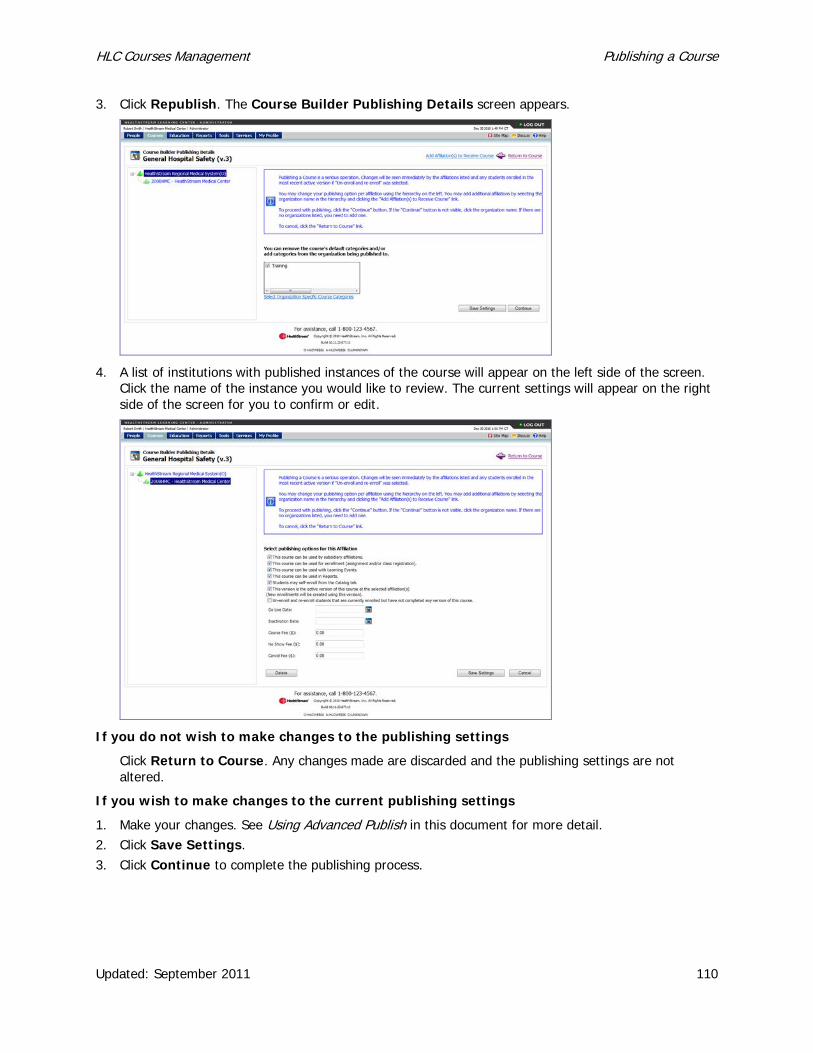
HLC Courses Management Publishing a Course
Updated: September 2011 110
3. Click Republish. The Course Builder Publishing Details screen appears.
4. A list of institutions with published instances of the course will appear on the left side of the screen. Click the name of the instance you would like to review. The current settings will appear on the right side of the screen for you to confirm or edit.
If you do not wish to make changes to the publishing settings
Click Return to Course. Any changes made are discarded and the publishing settings are not altered.
If you wish to make changes to the current publishing settings
1. Make your changes. See Using Advanced Publish in this document for more detail. 2. Click Save Settings. 3. Click Continue to complete the publishing process.

HLC Courses Management Republishing a Course
Updated: September 2011 111
Republishing a Course If edits are made to a published course, the course must be republished to activate the changes.
To republish a course
1. Search for the course that you want to republish. See Searching for a Course in this document for details on conducting a course search. The Course Builder page appears.
2. Make the desired edits to the course or learning activities. 3. Click Publish. The Publish page appears.

HLC Courses Management Republishing a Course
Updated: September 2011 112
4. Click Republish. The Course Builder Publishing Details screen appears.
5. Click Continue. If you choose, you can use the Quick Publish or Advanced Publish options to change the publish settings for the course. See Quick Publish and Advanced Publish in this document.

HLC Courses Management Searching for a Course
Updated: September 2011 113
Searching for a Course To search for a course
1. On the Courses tab, click Manage Courses. The Browse for a Course page appears.
2. Conduct a course search. You can search alphabetically, by category, or whole word or partial word + wildcard. You can also narrow your search by selecting a development status and selecting the corresponding check boxes. By default, courses marked Retired are filtered out of your search criteria, however, you can select to include retired courses by selecting the Retired check box. Note: You can also select the All Versions check box to search for all versions (not just the currently active version) of the course.
3. Click Search. The system returns a listing of all courses that match your search criteria. 4. Click the name link of the selected course.

HLC Courses Management Editing an HLC Course
Updated: September 2011 114
Editing an HLC Course HLC courses may be edited as needed. You can edit a course at any time as long as the course has not been published. If the course has been published, it must be republished after edits are made to activate the changes. Examples of course edits include:
• Changing course properties • Editing a test question • Re-naming a learning activity • Adding CE credit
Note: You cannot add, delete or rearrange learning activities in a course that has already been published.
Consider whether to edit and republish an already-published course, creating a new course version, or creating a new course is the best option. See additional information in Creating a New Course Version in this document.
To edit a course
1. Perform a course search. See Searching for a Course in this document for details on conducting a course search. The Course Builder page appears.
2. Make the desired edits to the course. 3. Republish the course. See Republishing a Course in this document.

HLC Courses Management Copying a Course
Updated: September 2011 115
Copying a Course Administrators with the ability to create a course may choose to copy a course. This feature is useful when you need to create a new course quickly using components of an existing published course or for creating pre-defined course templates for quick re-use.
A copied course exists in the HLC as a new, independent course. The course from which the copy was made remains unchanged in the system; it simply acts as a template for the new course. After the copy is made, the two courses are completely distinct courses in the system, with no relationship between them.
The following components of a course are copied into the new instance:
• All course properties, including CE credit. • All learning activities and their common properties. • All test and evaluation question groups and questions.
Note: All authored activity assets will be copied into a new folder in the Authoring Center. Consider re-associating your authored activities to the original content folder if you wish to have both courses reference the same content, or leave the association as-is if you wish to edit the copied HTML files for the newly-created course.
Note: Classes are not copied with a course. The classroom activity and it’s common properties is copied, but new classes must be scheduled within the classroom activity. See Adding a Class in the HLC Classes Management user guide for details on adding classes to a course.
Note: While SCORM learning activities are copied, your SCORM content remains mapped to the original course’s SCORM content folder.
Copying a Course vs. Creating New Course Version
Copying a course is a shortcut for adding a new course. The feature is designed to let you use an existing course as a template, which saves you time by allowing you to re-use course properties and learning activities.
Since the copied course is not related to the original, the copy will not substitute for the original in assignments, exemptions, curricula, equivalents, or reports. If you need to make changes to an existing course and wish to keep assignments, exemptions, curricula, equivalents, and reporting unchanged, you should consider creating a new course version instead.
To copy a course
1. Search for the published course that you want to copy. See Searching for a Course in this document for details on conducting a course search. The Course Builder page appears.

HLC Courses Management Copying a Course
Updated: September 2011 116
2. Click Copy Course. A confirmation prompt appears.
Note: After you click OK to confirm, the new course will be created in your system. Click OK only if you are certain you wish to create a copy of this course.
3. Click OK. 4. The Course Properties page will be displayed in Course Builder for the new course. The name of
the new course will be the original course name with the word COPY appended to the end.
5. Change the course name as needed. 6. Modify the new course’s properties and learning activities as needed and publish when ready. See
Publishing a Course in this document. Note: The development status of the new course is automatically set to In Development. The course version is set to one, regardless of what the original course’s version was when it was copied.

HLC Courses Management Creating a New Course Version
Updated: September 2011 117
Creating a New Course Version You may choose to create a new course version, or create a new course when you need to:
• Add or delete a learning activity. • Rearrange learning activities. • Make significant changes to a learning activity, such as extensive edits to a test or authored content. • Make changes to CE credit associated with the course.
Consider the following when determining if course versioning or creating a new course is most appropriate:
Reporting on a course spans all course versions. If you need to report on a course version separately from the previous version or versions, create a new course. The system will view the new course as separate and distinct from other course versions.
When a course is versioned:
• Any authored learning activities are copied in the authoring directory and associated with the new course version. When editing authored content, be sure to select the correct version in the Content Manager.
• Any Authored SCORM learning activities are not copied. The new course version’s SCORM learning activity will be no longer associated with a content folder in your authoring account. You must associate it with an existing folder, import a new content folder or publish new content from Lectora. See the Adding an Authored SCORM Learning Activity guide.
• Test Question Analysis, Test Scores, and other test reports are reset to 0. However, report data for the previous versions are preserved, and reports can be generated for previous course versions.
• CE credit attached to the previous version is transferred to the new course version. Follow accreditation/approval guidelines to ensure appropriate CE credit issuance.
• All classes scheduled for a class learning activity in a version of the course remain with that course version. The new version will not have any classes scheduled for it.
Course versioning does not affect assignments or exemptions.
When a course is published that has two or more versions, only the published version is the active version. The active version of the course is:
• Available for assignments (but doesn’t require existing assignments to be updated) • Available in the student’s course catalog
If it is important to allow students to be able to choose which version to complete, or for administrators to choose which version to assign, consider creating a new course instead of a new version.
Note: Read the following section, Un-enroll and Re-enroll Considerations. When the Un-enroll and Re-enroll Students from this Version of the Course check box on the Publish page is cleared, students currently enrolled in the course will remain enrolled in that version of the course, whereas new enrollments will belong to the new (active) version.
Reports include completions for all versions of the course, though versions are not itemized. If it is important to make that distinction, consider creating a new course instead of a new version.
HLC Courses Management Creating a New Course Version
Updated: September 2011 118
Un-enroll and Re-enroll Considerations If you choose to version a course, consider the implications of the un-enroll and re-enroll selection when the new version is published.
For administrators
If you select the Un-enroll and Re-enroll Students from this Version of the Course check box, administrators:
• Will no longer be able to register students for upcoming classes in the previous course version. • Will be able to manage prior classes associated with the previous course version. • Will not be able to assign the previous course version.
If you do not select the Un-enroll and Re-enroll Students from this Version of the Course check box, administrators:
• Cannot register students for classes associated with the previous version (except for any students that are still enrolled in the previous version).
• Cannot schedule new classes for the previous version. • Cannot assign the previous version of the course.
For students
If you select the Un-enroll and Re-enroll Students from this Version of the Course check box, enrolled students who have not yet completed the course:
• Are un-enrolled and re-enrolled into the new course version. • Are dropped from any classes in which they were previously registered. • Must complete all learning activities within the course from the beginning. • Are able to register or be registered (by an administrator) for classes associated with the new course
version only.

HLC Courses Management Creating a New Course Version
Updated: September 2011 119
If you do not select the Un-enroll and Re-enroll Students from this Version of the Course check box, all students who have not yet completed the course:
• Will remain in the previous version (whether they were assigned, enrolled in or elected the previous course version).
• Will remain in any classes in which they are registered. • Can choose to drop a class registration, but can only re-register for classes associated with the
course version they are currently in (the previous course version).
Creating the New Version To create a new course version
1. Search for the course that you want to version. See Searching for a Course in this document for details on conducting a course search. The Course Builder page appears.
2. Click Manage Course Versions. A listing of all previous course versions appears.

HLC Courses Management Creating a New Course Version
Updated: September 2011 120
3. Click Create New to the right of the course version you wish to replicate. The Course Version Confirmation page appears.
4. In the Notes text area, enter notes about the new course version. 5. Click Confirm. The course version is incremented by one; in the example below, the course is at
Version 2. The new course version is now in edit mode. You can add, delete and rearrange learning activities, as well as make any other desired changes.
6. Publish the new course version. Consider the impact of your un-enroll and re-enroll selection. See Publishing a Course in this document.
An orange asterisk (*) indicates a required field.

HLC Courses Management Publishing Updated Versions of HealthStream Regulatory Courses
Updated: September 2011 121
Publishing Updated Versions of HealthStream Regulatory Courses As HealthStream regulatory courses are updated and made available, you are able to choose if and when you wish to publish the new versions to your HLC. You will be notified when new course versions become available. The version number of the update will be included in the customer notification, and will also appear on the course storyboard and Regulatory and Patient Safety schedules found in the HLC Help. The new versions will be placed, un-published, within your course listing from the Manage Courses area of the HLC.
Once a new regulatory course version becomes available in your Manage Courses area, you can determine if you wish to publish it immediately, or if you would like to publish it at a later date.
Note: Before you proceed with publishing a new course version, be sure you have exported annotations from any existing version of the course you may want to use in the new version. Once you publish the new version, you will not be able to export annotations from the previous version. See Exporting and Importing Annotations for instructions.
To publish an updated version of a HealthStream regulatory course
1. Search for the course that you want to publish. You must include all versions by clicking the All Versions check box on the search page. See Searching for a Course in this document for details on conducting a course search. The Course Builder page appears.
Note: If you currently have a HealthStream regulatory course being updated and the new course version does not appear in your search return, contact your HealthStream support service.
2. Click Preview to review the updated course content and assessments.

HLC Courses Management Publishing Updated Versions of HealthStream Regulatory Courses
Updated: September 2011 122
3. Click Publish. The Publish page appears.
4. Select Quick Publish or Advanced Publish. (See Quick Publish and Advanced Publish in this document).
5. Click Go to Request Manager. The course publishing request should say Processing or Completed. If the course publishing request message is Failed, contact your HealthStream support service.

HLC Courses Management Changing Course Ownership
Updated: September 2011 123
Changing Course Ownership Courses developed at the department level must be removed as a department association before the department can be deleted. To do this, you must identify department-owned courses by running a department utilization report, specifying to include department-owned courses (see the Department Utilization Report in the HLC Reports user guide).
Once a course has been identified as being owned by a department you can change ownership of that course to the institution level.
To change course ownership
1. Log in as an administrator with institution administrator rights. 2. Search for the department-owned course that you want to publish. See Searching for a Course in this
document for details on conducting a course search. 3. Click the name link of the department-owned course. The following page appears.
4. Click Ownership. The following page appears.
5. Click Save. Note: Classes associated with the course will remain as they existed in the department-owned course.

HLC Courses Management Inactivating or Retiring an HLC Course
Updated: September 2011 124
Inactivating or Retiring an HLC Course Courses may be inactivated or retired in the HLC. Inactivation occurs automatically once an inactivation date is added to the Course Properties page. Retiring a course involves manually changing the course development status to Retired and clearing certain publish options prior to republishing the course. Both accomplish the same goal—making the course unusable by students and, if desired, administrators. Using the inactivation method will allow the course to display on the Expiring Courses report. Using the retirement method will allow the course to be removed from students’ My Learning pages.
Inactivating a Course To inactivate a course in the HLC
1. Search for the course that you want to inactivate. See Searching for a Course in this document for details on conducting a course search. The Course Builder page appears.
2. Click Manage Course Properties. The Course Properties page appears.
An orange asterisk (*) indicates a required field.

HLC Courses Management Inactivating or Retiring an HLC Course
Updated: September 2011 125
3. Click Show Additional Properties. The Course Properties page refreshes to include additional options, as shown below.
4. In the Inactivation Date box, enter the date on which you want the course to become inactive.
Tip: You can also click to select the dates.
5. Click Save.
If the course has already been published, you must republish the course by clicking Publish and selecting the desired publishing options. If the course has not yet been published, you can proceed with course development and then publish the course when ready. (See Publishing a Course in this document.) When a course reaches the inactivation date, it is no longer available for assignment or, if in progress, can no longer be completed. The inactivated course remains available for reporting purposes.
Note: Courses that include an inactivation date will appear on the Expiring Courses report. If a course has been assigned and is due to expire, a notification will appear on the My Learning page for students 30 days prior to expiration. Thereafter, the inactive course will remain on a student’s My Learning page until the student is exempted from the course. (Removing the course from an assignment or deleting the assignment itself will remove report data from Assignment Completion Reports and is therefore not recommended.)
Retiring a Course To retire a course in the HLC
1. Search for the course that you want to retire. See Searching for a Course in this document for details on conducting a course search. The Course Builder page appears.

HLC Courses Management Inactivating or Retiring an HLC Course
Updated: September 2011 126
2. Click Publish (even if the course was previously published and is live). The Publish page appears.
3. In the Course Development Status list, select Retired.
Note: This selection alone does not retire the course. You must proceed through steps 4, 5, and 6 to retire the course.
4. Under Quick Publish, clear all publish options except the This course can be used in Reports and This version is the active version of this course at the selected affiliation check boxes. This will ensure that while the course is retired, it can still be included in reports as needed. Note: Students currently enrolled in the course will remain enrolled until they either un-enroll from the course or are un-enrolled by an administrator.
5. Click Quick Publish or Advanced Publish if the course was previously published to subsidiary affiliations and you want the course to be retired for all affiliations.
6. Click Confirm. The course is no longer available for any use within the HLC, except for reporting purposes.
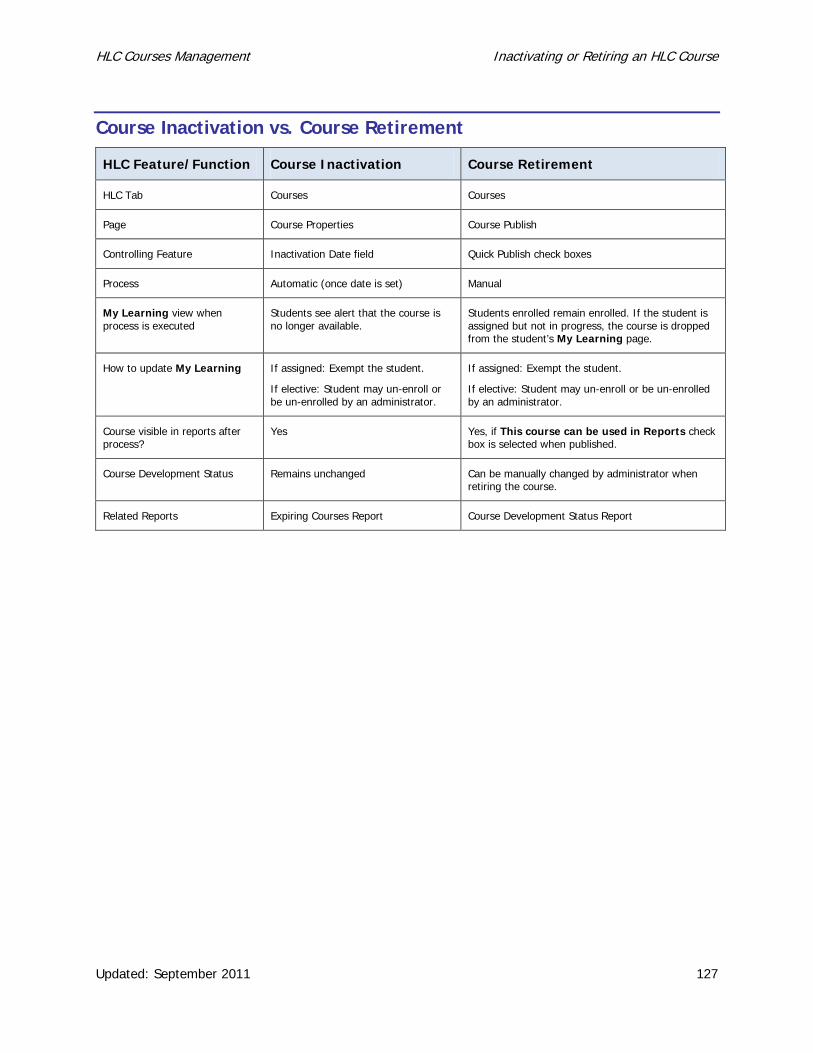
HLC Courses Management Inactivating or Retiring an HLC Course
Updated: September 2011 127
Course Inactivation vs. Course Retirement
HLC Feature/Function Course Inactivation Course Retirement
HLC Tab Courses Courses
Page Course Properties Course Publish
Controlling Feature Inactivation Date field Quick Publish check boxes
Process Automatic (once date is set) Manual
My Learning view when process is executed
Students see alert that the course is no longer available.
Students enrolled remain enrolled. If the student is assigned but not in progress, the course is dropped from the student’s My Learning page.
How to update My Learning If assigned: Exempt the student.
If elective: Student may un-enroll or be un-enrolled by an administrator.
If assigned: Exempt the student.
If elective: Student may un-enroll or be un-enrolled by an administrator.
Course visible in reports after process?
Yes Yes, if This course can be used in Reports check box is selected when published.
Course Development Status Remains unchanged Can be manually changed by administrator when retiring the course.
Related Reports Expiring Courses Report Course Development Status Report

HLC Courses Management Inactivating or Retiring an HLC Course
Updated: September 2011 128