hitachi compute blade embedded fibre channel switch · pdf filemk-99com140-00 hitachi compute...
TRANSCRIPT

MK-99COM140-00
Hitachi Compute Blade Embedded Fibre Channel Switch Module
License Installation Guide
Document Organization
Product Version
Getting Help
Contents
FASTFIND LINKS

ii
Hitachi Compute Blade Embedded Fibre Channel Switch Module License Installation Guide
© 2010-2014 Hitachi, Ltd. All rights reserved.
No part of this publication may be reproduced or transmitted in any form or by any
means, electronic or mechanical, including photocopying and recording, or stored in a database or retrieval system for any purpose without the express written
permission of Hitachi, Ltd.
Hitachi, Ltd., reserves the right to make changes to this document at any time without notice and assumes no responsibility for its use. This document contains
the most current information available at the time of publication. When new or revised information becomes available, this entire document will be updated and
distributed to all registered users.
Some of the features described in this document might not be currently available. Refer to the most recent product announcement for information about feature and
product availability, or contact Hitachi Data Systems Corporation at
https://portal.hds.com.
Notice: Hitachi, Ltd., products and services can be ordered only under the terms and conditions of the applicable Hitachi Data Systems Corporation agreements.
The use of Hitachi, Ltd., products is governed by the terms of your agreements with Hitachi Data Systems Corporation.
Hitachi is a registered trademark of Hitachi, Ltd., in the United States and other
countries. Hitachi Data Systems is a registered trademark and service mark of Hitachi, Ltd., in the United States and other countries.
Archivas, Essential NAS Platform, HiCommand, Hi-Track, ShadowImage,
Tagmaserve, Tagmasoft, Tagmasolve, Tagmastore, TrueCopy, Universal Star Network, and Universal Storage Platform are registered trademarks of Hitachi Data
Systems Corporation.
AIX, AS/400, DB2, Domino, DS6000, DS8000, Enterprise Storage Server, ESCON,
FICON, FlashCopy, IBM, Lotus, MVS, OS/390, RS6000, S/390, System z9, System z10, Tivoli, VM/ESA, z/OS, z9, z10, zSeries, z/VM, and z/VSE are registered
trademarks or trademarks of International Business Machines Corporation.
All other trademarks, service marks, and company names in this document or website are properties of their respective owners.
Microsoft product screen shots are reprinted with permission from Microsoft
Corporation.
Contents iii
Hitachi Compute Blade Embedded Fibre Channel Switch Module License Installation Guide
Contents
Preface .................................................................................................... v
Intended Audience ............................................................................................... vi Release Notes ...................................................................................................... vi Document Organization ........................................................................................ vi Referenced Documents ......................................................................................... vii Document Conventions ........................................................................................ viii Getting Help......................................................................................................... ix
Comments ........................................................................................................... ix
Before Use ............................................................................................ 1-1
Preparations .......................................................................................... 2-1
Pre-confirmation .................................................................................... 3-1
User Registration ................................................................................... 4-1
Log in to the Web site ............................................................................ 5-1
Install the License .................................................................................. 6-1
Download Recommended Configuration Information ................................ 7-1
Completion Steps ................................................................................... 8-1
Troubleshooting ..................................................................................... 9-1


Preface v
Hitachi Compute Blade Embedded Fibre Channel Switch Module License Installation Guide
Preface
This document describes how to use the license for Brocade Fibre Channel switch module.
This preface includes the following information:
Intended Audience
Product Version
Release Notes
Document Organization
Referenced Documents
Document Conventions
Getting Help
Comments
Notice: The use of the license for Brocade Fibre Channel switch module and all other Hitachi Data Systems products is governed by the terms of your agreement(s) with Hitachi Data Systems.

vi Preface
Hitachi Compute Blade Embedded Fibre Channel Switch Module License Installation Guide
Intended Audience
This license package is for Hitachi Embedded Fibre Channel Switch. This manual provides the information necessary to install the license.
Release Notes
Read the Readme for the Fabric OS before installing and using this product. They may contain requirements or restrictions that are not fully described in
this document or updates or corrections to this document.
Document Organization
The following table provides an overview of the contents and organization of this document. Click the chapter title in the left column to go to that chapter.
The first page of each chapter provides links to the sections in that chapter.
Chapter Description
Chapter 1. Before Use Provides what you should know before you begin to install the license for a Hitachi Embedded Fibre Channel Switch module.
Chapter 2. Preparations Provides information on what you need to have in order to install
the license for an Embedded Switch module and describes how to make connections.
Chapter 3. Pre-confirmation Describes a set of procedures to check the status of the Compute Blade.
Chapter 4. User Registration Describes how to create and configure a user account necessary to access the Web site for obtaining a license key.
Chapter 5. Log in the Web site Describes how to log in to the Web site and where the Web site for obtaining a license key is.
Chapter 6. Install the License Describes how to install the license in the Embedded Fibre Channel Switch module.
Chapter 7. Download
Recommended Configuration Information
Describes how to download the configuration file in the Embedded Fibre Channel Switch module.
Chapter 8. Completion Steps Check if there is more alternate path of Fibre Channels.
Chapter 9. Troubleshooting Provides lists some common troubles which you may encounter while performing a task.

Preface vii
Hitachi Compute Blade Embedded Fibre Channel Switch Module License Installation Guide
Referenced Documents
Compute Blade and Brocade Fibre Channel switch module documents:
Compute Blade 500 Series Getting Started Guide, MK-91CB500002
Compute Blade 2000 User’s Guide, MK-99BDS2K001
Fabric OS Administrator’s Guide, MK-99COM096, MK-99COM111,
MK-99COM0126
Fabric OS Command Reference, MK-99COM097, MK-99COM112,
MK-99COM111

viii Preface
Hitachi Compute Blade Embedded Fibre Channel Switch Module License Installation Guide
Document Conventions
This document uses the following typographic conventions:
Convention Description
Regular text bold In text: keyboard key, parameter name, property name, hardware labels, hardware button, hardware switch.
In a procedure: user interface item
Italic Variable, emphasis, reference to document title, called-out term
Screen text Command name and option, drive name, file name, folder name, directory name, code, file content, system and application output, user input
< > (angled brackets) Variable (used when italic is not enough to identify variable).
[ ] (square bracket) Optional values
{ } braces Required or expected value
| vertical bar Choice between two or more options or arguments
_(underline) Default value, for example, [a | b]
This document uses the following icons to draw attention to information:
Icon Meaning Description
WARNING
This indicates the presence of a potential risk that might cause death or severe injury.
CAUTION
This indicates the presence of a potential risk that might cause relatively mild or moderate injury.
NOTICE NOTICE This indicates the presence of a potential risk that might cause severe damage to the equipment and/or damage to surrounding properties.
Note This indicates notes not directly related to injury or severe damage to equipment.
Tip This indicates advice on how to make the best use of the equipment.

Preface ix
Hitachi Compute Blade Embedded Fibre Channel Switch Module License Installation Guide
Getting Help
The Hitachi Data Systems customer support staff is available 24 hours a day, seven days a week. If you need technical support, log on to the Hitachi Data
Systems Portal for contact information: https://portal.hds.com
Comments
Please send us your comments on this document: [email protected]. Include the document title and number including the revision level (for
example, -07), and refer to specific sections and paragraphs whenever possible. All comments become the property of Hitachi Data Systems Corporation.
Thank you!

1
Before Use 1-1
Hitachi Compute Blade Embedded Fibre Channel Switch Module License Installation Guide
Before Use
This chapter provides what you should know before you begin to install the license for a Hitachi Embedded Fibre Channel Switch module.
Purpose
Check the Package Contents

1-2 Before Use
Hitachi Compute Blade Embedded Fibre Channel Switch Module License Installation Guide
Purpose This manual describes how to install the following license for the Hitachi Compute Blade 8Gbps/16Gbps Embedded Fibre Channel Switch module.
License for 8Gbps switch
Product number
For CB2000 For CB500
Ports on demand (POD) GV-BE2FSL1X1-Y GV-BE2FSL1X1-Y
ISL Trunking GV-BE2FSL2X1-Y GV-BE2FSL2X1-Y
Fabric Watch GV-BE2FSL3X1-Y GV-BE2FSL3X1-Y
License for 16Gbps switch
Product number
For CB2000 For CB500
Ports on demand (POD) - GV-BE2FSL4X1-Y
ISL Trunking - GV-BE2FSL2X1-Y
Fabric Vision - GV-BE2FSL5X1-Y
Extended Fabric - GV-BE2FSL6X1-Y
Enter Prise - GV-BE2FSL7X1-Y
Before using the 8Gbps/16Gbps Embedded Fibre Channel Switch module, please
also read the following manuals: In addition, the referred manual is different depend on the system unit that installed the 8Gbps/16Gbps Embedded Fibre Channel Switch module.
Compute Blade 500 Series Getting Started Guide, MK-91CB500002
Compute Blade 2000 User’s Guide, MK-99BDS2K001
Fabric OS Administrator’s Guide, MK-99COM096, MK-99COM111,
MK-99COM126
Fabric OS Command Reference, MK-99COM097, MK-99COM112,
MK-99COM127
Check the Package Contents Check the following to ensure that you have received exactly what you ordered. If
you have not received what you ordered, please contact your dealer where you purchased the package from.
The package part number indicates exactly what you ordered.
You have all the items shown in the Package Contents list.
If the package contains an additional instruction sheet, please be sure to read the sheet.

Before Use 1-3
Hitachi Compute Blade Embedded Fibre Channel Switch Module License Installation Guide
Requirements for Use of license feature
To use the license feature, you need to:
(1) Install a license key
(2) In case of Fabric Watch, Fabric Vision or Enter Prise license key, Download a configuration file (containing the Hitachi recommended configuration information).
This manual describes (1) how to install the license and (2) how to download a configuration file (containing the Hitachi recommended configuration information).

1-4 Before Use
Hitachi Compute Blade Embedded Fibre Channel Switch Module License Installation Guide
2
Preparations 2-1
Hitachi Compute Blade Embedded Fibre Channel Switch Module License Installation Guide
Preparations
This chapter provides information on what you need to have in order to install the license for an Embedded Switch module and describes how to make
connections.
Supplied Items
User Preparations
Connecting

2-2 Preparations
Hitachi Compute Blade Embedded Fibre Channel Switch Module License Installation Guide
Supplied Items 1. When installing Ports on demand, ISL Trunking or Extended Fabric license
Software License Package
Transaction key form
License sticker Embedded Fibre Channel
Switch Module License
Installation Manual
(this manual)
or
or
or
Hitachi Compute Blade
Embedded Fibre Channel
Switch Module
License Installation
Manual
2.When installing Fabric Watch or Fabric Vision License Software License Package
Transaction key form
License sticker Embedded Fibre Channel
Switch Module License
Installation Manual
(this manual)
or
Hitachi Compute Blade
Embedded Fibre Channel
Switch Module
License Installation
Manual
"Compute Blade Fibre Channel Switch Accessory CD (EN)" This CD is supplied with Embedded Fibre Channel Switch equipment.
Software License
Package
Do Not Discard! License Enclosed!
Ports on
demand
ISL
Trunking
Software License
Package
Do Not Discard! License Enclosed!
Fabric
Watch
Fabric
Vision
Extended
Fabric

Preparations 2-3
Hitachi Compute Blade Embedded Fibre Channel Switch Module License Installation Guide
3.When installing Enter Prise License Software License Package
Transaction key form
License sticker Embedded Fibre Channel
Switch Module License
Installation Manual
(this manual)
Hitachi Compute Blade
Embedded Fibre Channel
Switch Module
License Installation
Manual
"Compute Blade Fibre Channel Switch Accessory CD (EN)" This CD is supplied with Embedded Fibre Channel Switch equipment.
User Preparations
This section provides information on what you need to have in order to install the
license.
(1) Hardware/software requirements for license key acquisition
The following table shows the hardware/software necessary to obtain a license to be installed in the Fibre Channel Switch.
Item Requirements
One PC
Internet access(*1) Web browser
(*1) You need to set up access to Internet.
Software License
Package
Do Not Discard! License Enclosed!
ISL
Trunking
Fabric
Vision
Extended
Fabric

2-4 Preparations
Hitachi Compute Blade Embedded Fibre Channel Switch Module License Installation Guide
(2) Hardware/software requirements for Fibre Channel switch connection
The following table shows the hardware/software necessary to connect to the Fibre Channel Switch module where the license is to be installed and operate the switch
via its commands.
Item Requirements
One PC (*1) LAN connectivity telnet tool (such as Tera Term or HyperTerminal)
One LAN cable (cross cable(*2)) (*1)
Category 5 or upper
(*1) If you already have a PC connected to the 8Gbps/16Gbps Embedded Fibre
Channel Switch module through LAN (for purposes such as management), you can use the existing configuration.
(*2) If you have no cross LAN cable, prepare two straight cables and HUB when
connecting to LAN port of 8Gbps Fibre Channel Switch module.

Preparations 2-5
Hitachi Compute Blade Embedded Fibre Channel Switch Module License Installation Guide
Connecting
(1) CB2000
Connecting to the 8Gbps embedded Fibre Channel Switch module through LAN depends on the Switch module network setting. You can confirm the Switch module setting by using the LC command, a system console command of the
Management module.
1. Case that “Ext” status in the Switch module setting screen shows “Int” indicated by selecting "SW" in the LC command of management module. This
setting is the default at shipment.
2. Case that “Ext” status in the Switch module setting screen shows “Ext” indicated by selecting "SW" in the LC command of management module.
The screen copy bellow shows the sample of the Switch module network setting.
Connect a LAN cable to the LAN interface connector for the system console at the MGMT0 port of the Management module. When two Management modules
are installed, connect the LAN cable to the one with the MSR LED that lights solid green.
-- Switch module network setting --
SW Ext IP address Subnetmask Default gateway Ext port Synchronize
-- ---- ---------------- --------------- --------------- -------- -----------
0 Ext 0. 0. 0. 0 0. 0. 0. 0 0. 0. 0. 0 MGMT-0 No
1 Ext 0. 0. 0. 0 0. 0. 0. 0 0. 0. 0. 0 MGMT-0 No
2 Int ------------- ------------- ------------- ------ ---------
3 Int ------------- ------------- ------------- ------ ---------
4 Int ------------- ------------- ------------- ------ ---------
5 Ext 172. 16.102. 52 255.255. 0. 0 0. 0. 0. 0 MGMT-0 Yes
System console terminal
LAN cable

2-6 Preparations
Hitachi Compute Blade Embedded Fibre Channel Switch Module License Installation Guide
Case that “Ext” status in the Switch module setting screen shows “IOSW” indicated by selecting "SW" in the LC command of management module.
The screen copy bellow shows the sample of the Switch module network setting.
Connect a LAN cable to the LAN interface connector for the system console at
the embedded Fibre Channel Switch module.
-- Switch module network setting --
SW Ext IP address Subnetmask Default gateway Ext port Synchronize
-- ---- ---------------- --------------- --------------- -------- -----------
0 Ext 0. 0. 0. 0 0. 0. 0. 0 0. 0. 0. 0 MGMT-0 No
1 Ext 0. 0. 0. 0 0. 0. 0. 0 0. 0. 0. 0 MGMT-0 No
2 Int ------------- ------------- ------------- ------ ---------
3 Int ------------- ------------- ------------- ------ ---------
4 Int ------------- ------------- ------------- ------ ---------
5 IOSW 192.168. 0.101 255.255.255. 0 0. 0. 0. 0 MGMT-0 No
LAN cable
Rear of Compute Blade 2000
Using LAN cross cable
8Gbps Fibre Channel Switch
Using LAN straight cables
LAN straight cable
8Gbps Fibre Channel Switch
LAN cross cable
8Gbps Fibre Channel Switch

Preparations 2-7
Hitachi Compute Blade Embedded Fibre Channel Switch Module License Installation Guide
(2) CB500
There are the following two ways for connecting to the embedded Fibre Channel
Switch module through LAN.
1. Connects via the LAN interface connector at the management module 2. Connects via the LAN interface connector at the embedded Fibre Channel Switch
module Note that 16Gbps Fibre Channel Switch module does not have the LAN interface connector.
Therefore, only 8Gbps Fibre Channel Switch module can connect via the LAN interface connector at the switch module
You can confirm the Switch module setting through the web console or CLI
console. See the following manuals for details of how to confirm and how to set.
■Compute Blade 500 Series Web Console Setup Guide, MK-91CB500015
■Compute Blade 500 Series CLI Console Setup Guide, MK-91CB500034
i. Connects via the LAN interface connector at the management module
Connect a LAN cable to the LAN interface connector for the system console at the MGMT0 port of the Management module. When two Management modules are
installed, connect the LAN cable to the one with the MSR LED that lights solid green.
System console
terminal
LAN cable
MSR

2-8 Preparations
Hitachi Compute Blade Embedded Fibre Channel Switch Module License Installation Guide
ii. Connects via the LAN interface connector at the embedded Fibre Channel Switch module (For 8Gbps Fibre Channel Switch module only)
Connect a LAN cable to the LAN interface connector for the system console at the embedded Fibre Channel Switch module.
LAN cable
System console
terminal
LAN cable
SFP
SFP
SFP
SFP
SFP
SFP
8Gbps Fibre Channel Switch
LAN cross cable
LAN straight cable
Using LAN cross cable
Using LAN straight cables
8Gbps Fibre Channel Switch
8Gbps Fibre Channel Switch

3
Pre-confirmation 3-1
Hitachi Compute Blade Embedded Fibre Channel Switch Module License Installation Guide
Pre-confirmation
This chapter describes a set of procedures to check the status of the Compute Blade with at least one Embedded Fibre Channel Switch module
Check the System Status
Confirm the Fibre Channel Switch’s WWN

3-2 Pre-confirmation
Hitachi Compute Blade Embedded Fibre Channel Switch Module License Installation Guide
Check the System Status
Check the status of the Compute Blade with at least one Embedded Fibre Channel Switch module.
(1) Checking Compute Blade power status
Check the Power LED (PWR) to see the power status of the Compute Blade
■ Green: Indicates that the main power is turned on.
Go to the next step, (2) Checking server operation status.
■ Amber: Indicates that the system is in standby state.
Go to the next step, (2) Checking server operation status.
■ Off: Indicates that the Compute Blade does not receive power.
First, connect the Compute Blade to AC power and close its circuit breaker to turn it into standby state. Then, go to the next step, (2) Checking server operation status.
Compute Blade 2000 Compute Blade 500
Power LED (PWR)

Pre-confirmation 3-3
Hitachi Compute Blade Embedded Fibre Channel Switch Module License Installation Guide
(2) Checking server operation status
If the Fibre Channel Switch is operating during installing the ISL Trunking, Fabric Watch, Enter Prise or Fabric Vision license according to this manual, the communication lines of the Switch may be confused. Therefore, it is strongly recommended that all the Compute Blade servers be stopped and in standby state before installing the license.
Use the following flowchart to check the operation status and configuration of the servers.
Can all Compute Blade servers be stopped?
Yes
START
No
Have servers connected to embedded fibre channels all stopped?
Yes
No
Do servers connected to embedded fibre channels have alternate fiber channel paths?
Yes
No
Stop all servers and go to
Section 2 (Confirm the Fibre Channel Switch's
WWN).
You can proceed to license installation.
Go to Section 2 (Confirm the Fibre Channel
Switch's WWN).
Enable path to Fiber Channel Switch where
license is not to be installed, and switch paths.
Once paths have been successfully switched,
go to Section 2 (Confirm the Fibre Channel
Switch's WWN).
With this configuration, you need to stop all servers to proceed to license installation. Wait until all servers can be stopped.
If the Fibre Channel Switch is operating during installing the ISL Trunking, Fabric Watch,
Fabric Vision or Enter Prise license, the communication lines of the Switch may be confused.
This may result in loss of connection to servers or devices (such as servers and disks), which
may cause system down.
If you install a Fabric Watch, Fabric Vision or Enter Prise license and download configuration
information while servers are operating, be sure to follow the steps shown below.
Warning

3-4 Pre-confirmation
Hitachi Compute Blade Embedded Fibre Channel Switch Module License Installation Guide
Confirm the Fibre Channel Switch’s WWN
(1) Use a LAN cable to connect either the primary-side Management module or LAN
interface connector of Fibre Channel Switch module with the PC (for connection to the Embedded Fibre Channel Switch module). (For more information on the connection, see (2) Hardware/software
requirements for Management module connection in Section 2, "User Preparations" of Chapter 2.)
(2) Check that the Fibre Channel Switch is up and running. Telnet to the switch and login as an administrator (admin) with the appropriate user ID and password.
* For information on the user registration for the Fibre Channel Switch, see "Compute Blade Fibre Channel Switch User's Guide."
(3) Enter the licenseshow command to check that no purchased license has been installed.
Fabric OS (SW5460)
switch login: xxxxx ← Enter User ID of administrator (admin).
Password: xxxxx ← Enter Password.
switch:admin>
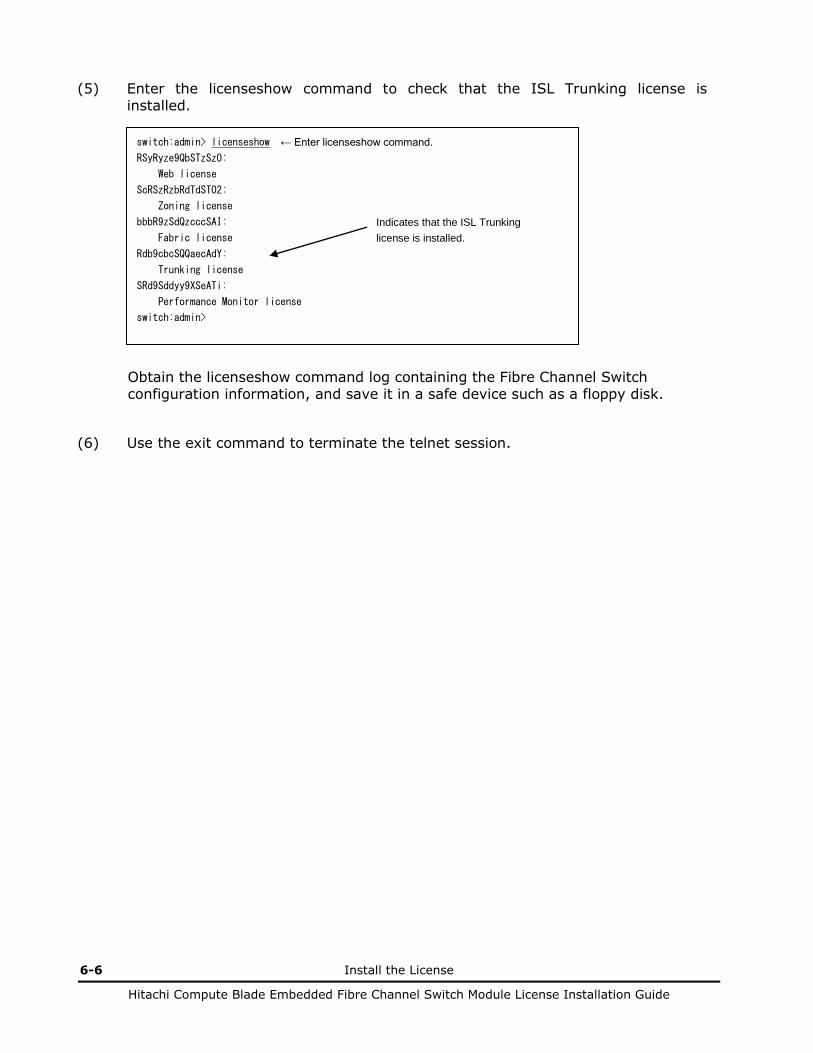
switch:admin> licenseshow ← Enter licenseshow command
S9Rz9beQRyTAS0AT:
Fabric license
dQ9dzzScQeRAe0A:
Extended Fabric license
RyceSQ9SzzUzdfTK:
Fabric Watch license
RyceSQ9SzzWzdfTM:
Performance Monitor license
switch:admin>
Check that there is license line.
Pre-confirmation 3-5
Hitachi Compute Blade Embedded Fibre Channel Switch Module License Installation Guide
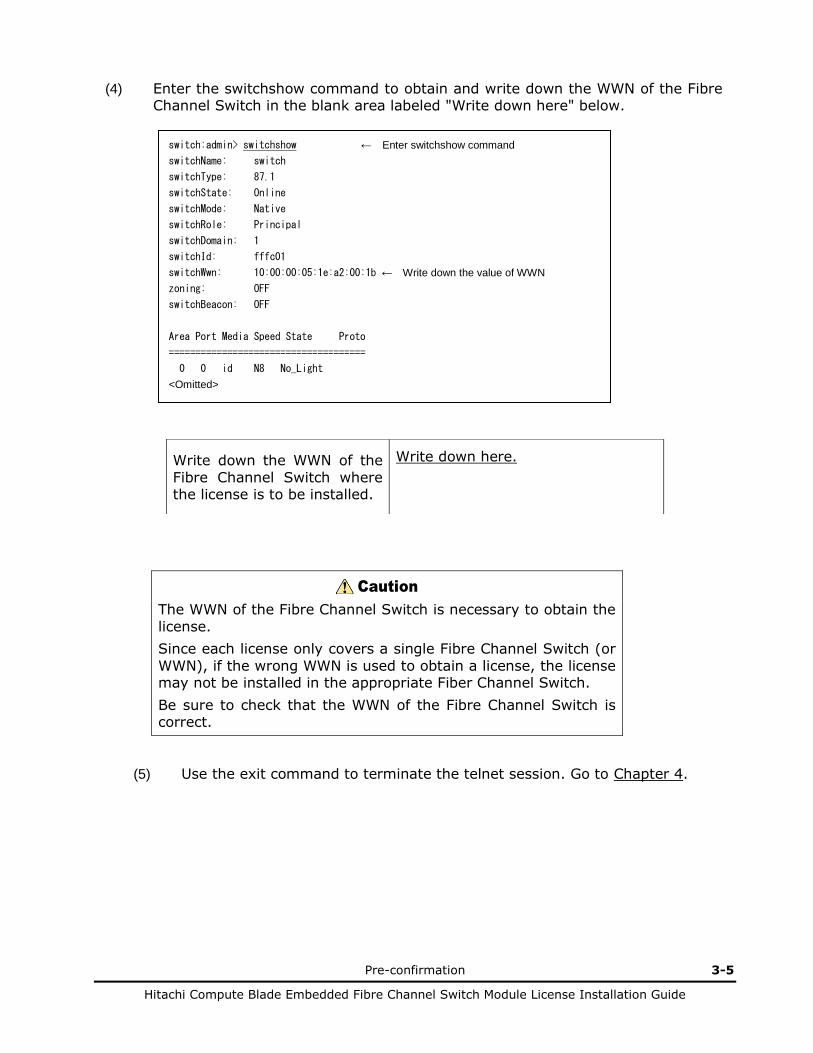
(4) Enter the switchshow command to obtain and write down the WWN of the Fibre Channel Switch in the blank area labeled "Write down here" below.
The WWN of the Fibre Channel Switch is necessary to obtain the
license.
Since each license only covers a single Fibre Channel Switch (or
WWN), if the wrong WWN is used to obtain a license, the license may not be installed in the appropriate Fiber Channel Switch.
Be sure to check that the WWN of the Fibre Channel Switch is correct.
(5) Use the exit command to terminate the telnet session. Go to Chapter 4.
Write down the WWN of the
Fibre Channel Switch where the license is to be installed.
Write down here.
switch:admin> switchshow ← Enter switchshow command
switchName: switch
switchType: 87.1
switchState: Online
switchMode: Native
switchRole: Principal
switchDomain: 1
switchId: fffc01
switchWwn: 10:00:00:05:1e:a2:00:1b ← Write down the value of WWN
zoning: OFF
switchBeacon: OFF
Area Port Media Speed State Proto
=====================================
0 0 id N8 No_Light
<Omitted>
Caution

3-6 Pre-confirmation
Hitachi Compute Blade Embedded Fibre Channel Switch Module License Installation Guide

4
User Registration 4-1
Hitachi Compute Blade Embedded Fibre Channel Switch Module License Installation Guide
User Registration
This chapter describes how to create and configure a user account necessary to access the Web site for obtaining a license key.
User Registration

4-2 User Registration
Hitachi Compute Blade Embedded Fibre Channel Switch Module License Installation Guide
It is not necessary to create any more account if you once created a user account.
User Registration
(6) Set up the PC so that it has access to Internet. Open the Web browser and go to
the URL shown below. The Brocade Web site appears.
http://www.brocade.com
The contents of the Brocade Web site might be changed without any prior notice.
(2) On the Brocade Web site screen, click MyBrocade Log In.
(3) Click "register now" to start user registration. If you already have a user
account, it is not necessary to get any more account. You can login with the
account you got before.
Caution
Click Register now
Caution
Click MyBrocade Log In
User Registration 4-3
Hitachi Compute Blade Embedded Fibre Channel Switch Module License Installation Guide
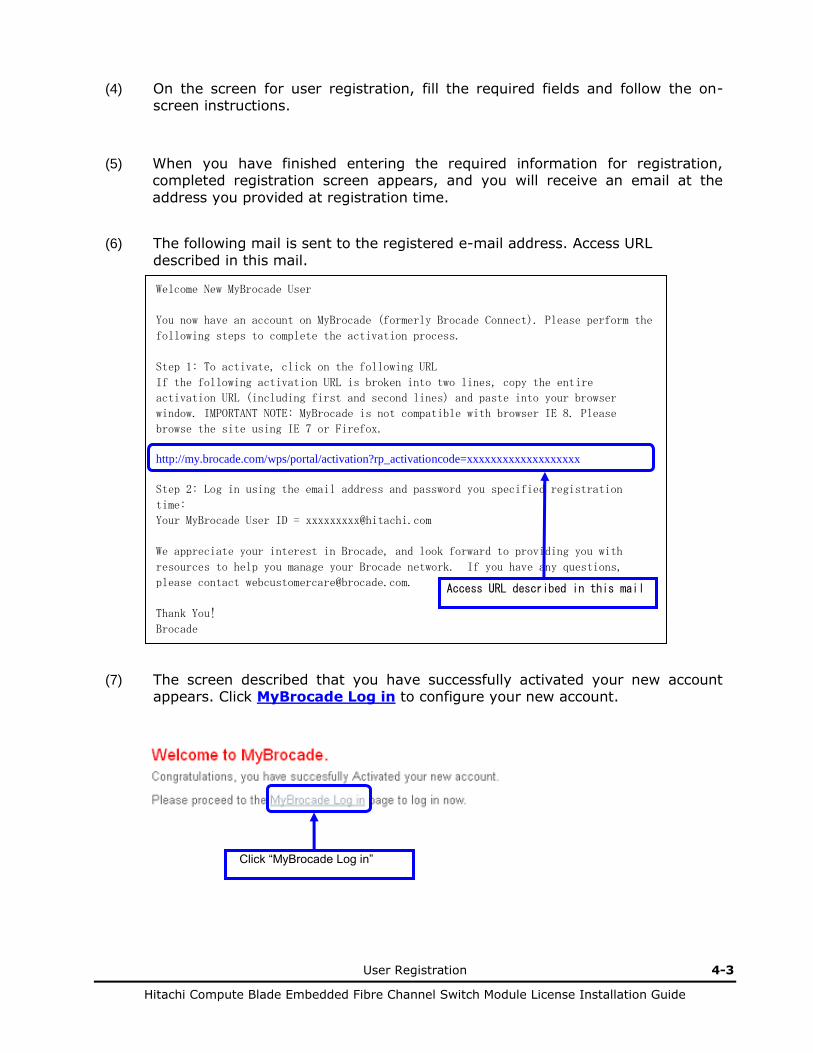
(4) On the screen for user registration, fill the required fields and follow the on-screen instructions.
(5) When you have finished entering the required information for registration, completed registration screen appears, and you will receive an email at the
address you provided at registration time.
(6) The following mail is sent to the registered e-mail address. Access URL
described in this mail.
(7) The screen described that you have successfully activated your new account
appears. Click MyBrocade Log in to configure your new account.
∨
Welcome New MyBrocade User
You now have an account on MyBrocade (formerly Brocade Connect). Please perform the
following steps to complete the activation process.
Step 1: To activate, click on the following URL
If the following activation URL is broken into two lines, copy the entire
activation URL (including first and second lines) and paste into your browser
window. IMPORTANT NOTE: MyBrocade is not compatible with browser IE 8. Please
browse the site using IE 7 or Firefox.
http://my.brocade.com/wps/portal/activation?rp_activationcode=xxxxxxxxxxxxxxxxxxx
Step 2: Log in using the email address and password you specified registration
time:
Your MyBrocade User ID = [email protected]
We appreciate your interest in Brocade, and look forward to providing you with
resources to help you manage your Brocade network. If you have any questions,
please contact [email protected].
Thank You!
Brocade
Access URL described in this mail
Click “MyBrocade Log in”
4-4 User Registration
Hitachi Compute Blade Embedded Fibre Channel Switch Module License Installation Guide
(8) On the “Log in” screen, enter your USER ID (email address you provided) and password, and click login
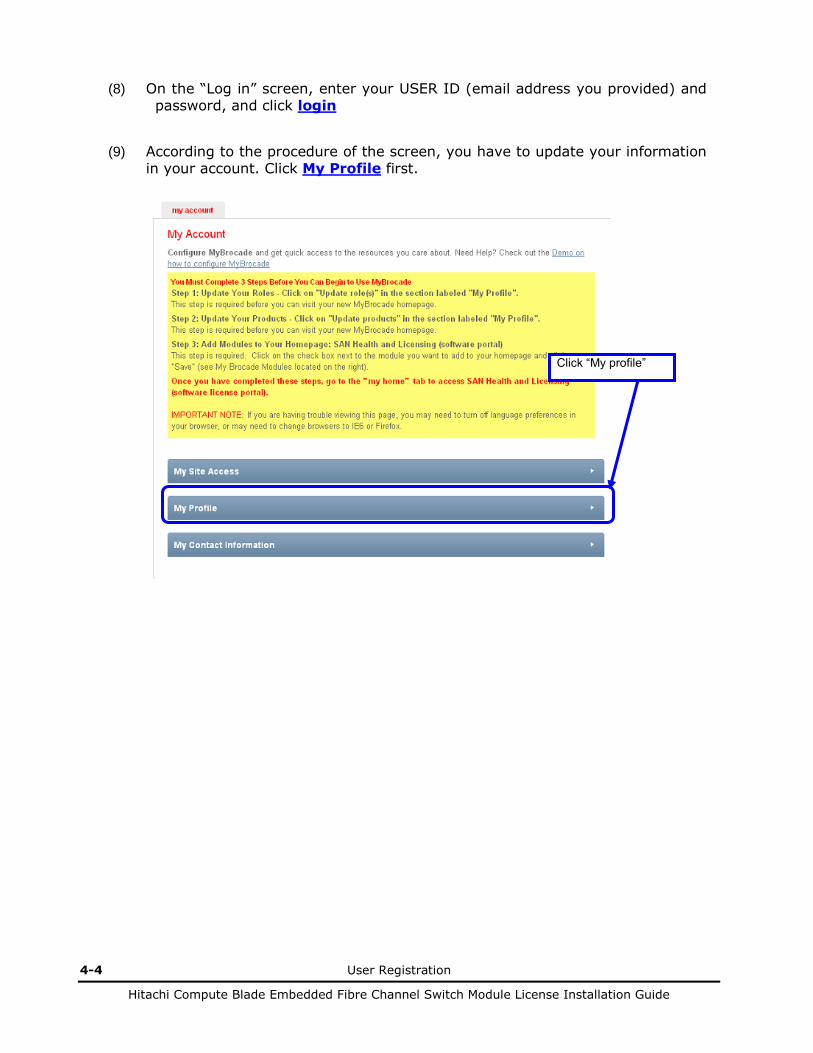
(9) According to the procedure of the screen, you have to update your information
in your account. Click My Profile first.
Click “My profile”

User Registration 4-5
Hitachi Compute Blade Embedded Fibre Channel Switch Module License Installation Guide
(10) On the “My Profile” screen, click Update Roles(s) and open the “Role(s)” screen. Select all checkboxes that apply and click SAVE EDITS.
Select all that apply
Click “Update Roles(s)”
Click “SAVE EDITS”

4-6 User Registration
Hitachi Compute Blade Embedded Fibre Channel Switch Module License Installation Guide
(11) On the “My Profile” screen, click Update Products and open the “Product” screen. Select all checkboxes that apply and click SAVE EDITS.
Click “Update Products”
Select all that apply
Click “SAVE EDITS”
User Registration 4-7
Hitachi Compute Blade Embedded Fibre Channel Switch Module License Installation Guide
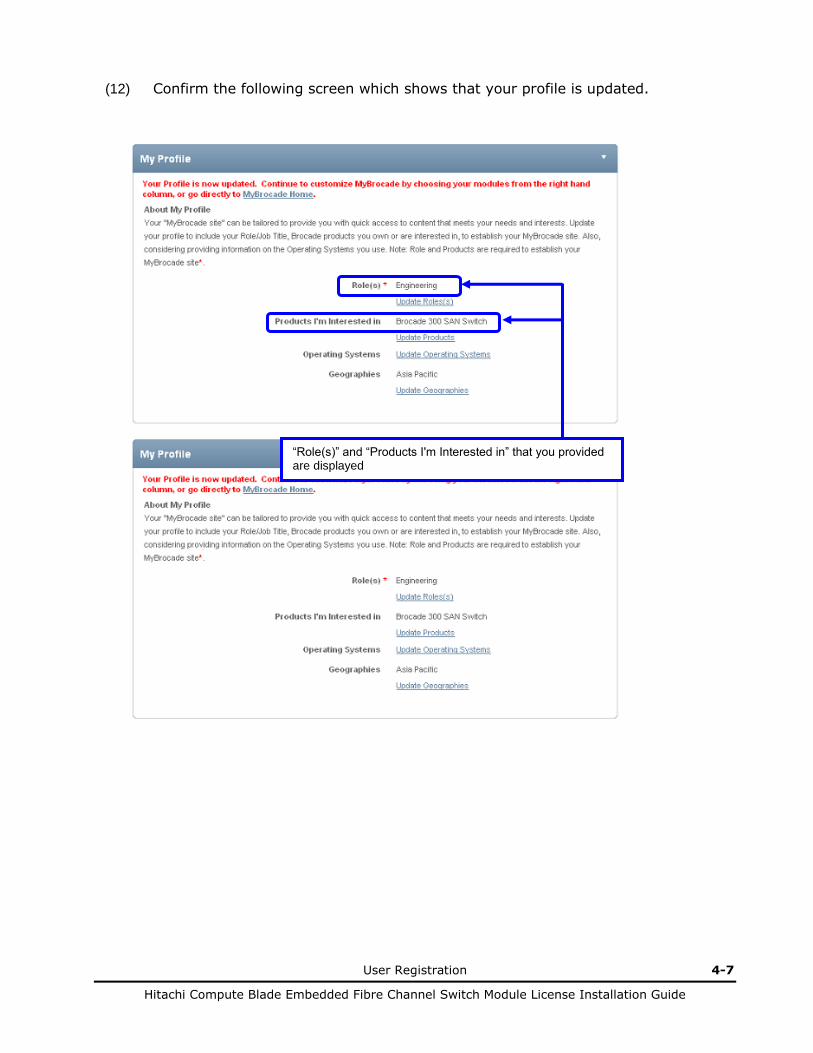
(12) Confirm the following screen which shows that your profile is updated.
“Role(s)” and “Products I'm Interested in” that you provided are displayed

4-8 User Registration
Hitachi Compute Blade Embedded Fibre Channel Switch Module License Installation Guide
(13) Open the “My Brocade Modules” as below. (It is on a right edge of the screen). Select Licensing checkbox in Generally Available Modules column,
and click SAVE EDITS.
Click this arrow, if a content of “My Brocade Modules” is not displayed.
Select “Licensing” checkbox
After you select “Licensing” checkbox, click “SAVE EDITS”.
Review the message which shows that modules are successfully saved

User Registration 4-9
Hitachi Compute Blade Embedded Fibre Channel Switch Module License Installation Guide
(14) You now finish user registration and configuring your account. Click Log Out(in
the screen top right corner)to log out Web site.
Refer to a following chapter about the procedure to obtain a license key.

4-10 User Registration
Hitachi Compute Blade Embedded Fibre Channel Switch Module License Installation Guide

5
Log in to the Web site 5-1
Hitachi Compute Blade Embedded Fibre Channel Switch Module License Installation Guide
Log in to the Web site
This chapter describes how to log in to the Web site and where the Web site for obtaining a license key is.
Customer Log in
Enter the Software Portal
Obtain the License Key

5-2 Log in to the Web site
Hitachi Compute Blade Embedded Fibre Channel Switch Module License Installation Guide
It is not necessary to create any more account if you once created a user account.
Customer Log in (Log in to MyBrocade)
(1) Set up the PC so that it has access to Internet. Open the Web browser and go to
the URL shown below. The Brocade Web site appears.
http://www.brocade.com
(2) On the Brocade Web site screen, click MyBrocade Log In.
(3) On the “Log in” screen, enter your USER ID and PASSWORD and click login..
Caution
Click “MyBrocade Log In”

Log in to the Web site 5-3
Hitachi Compute Blade Embedded Fibre Channel Switch Module License Installation Guide
Enter the Software Portal
(1) If you log in the Brocade Web site, click Enter the Software Portal > on the
“Licensing Tools” screen.
(Omitted)
If “Enter the Software Portal >“ is not displayed, your profile might not have been
updated in your account in the procedure of chapter 4 User Registration. Review your
registered profile in your account. If you click “my account” menu in the screen top,
you can go to a registration screen of your profile. When you click “my home” menu,
you return to an original screen.
(2) Click License Management > Brocade FOS > License Generation with
Transaction Keys.
Click “Enter the Software Portal >”
Caution
Click “License Generation with Transaction Keys”
5-4 Log in to the Web site
Hitachi Compute Blade Embedded Fibre Channel Switch Module License Installation Guide
Obtain the License Key
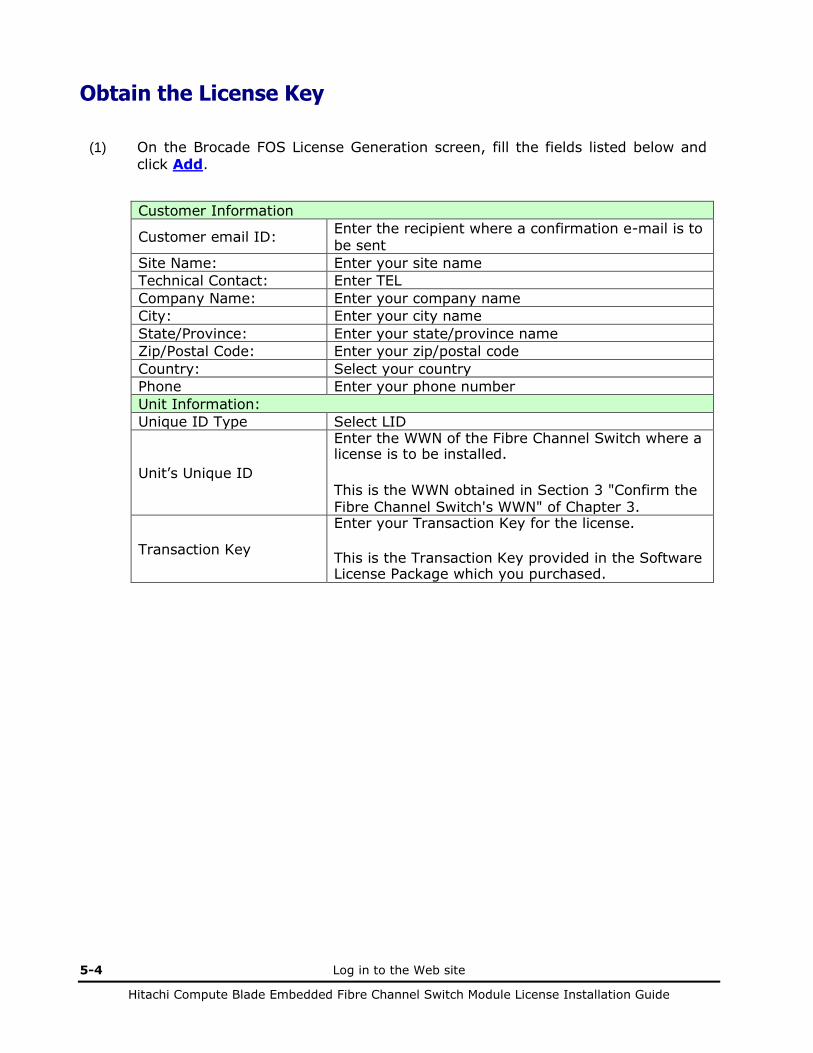
(1) On the Brocade FOS License Generation screen, fill the fields listed below and
click Add.
Customer Information
Customer email ID: Enter the recipient where a confirmation e-mail is to be sent
Site Name: Enter your site name
Technical Contact: Enter TEL
Company Name: Enter your company name
City: Enter your city name
State/Province: Enter your state/province name
Zip/Postal Code: Enter your zip/postal code
Country: Select your country
Phone Enter your phone number
Unit Information:
Unique ID Type Select LID
Unit’s Unique ID
Enter the WWN of the Fibre Channel Switch where a license is to be installed.
This is the WWN obtained in Section 3 "Confirm the Fibre Channel Switch's WWN" of Chapter 3.
Transaction Key
Enter your Transaction Key for the license.
This is the Transaction Key provided in the Software License Package which you purchased.

Log in to the Web site 5-5
Hitachi Compute Blade Embedded Fibre Channel Switch Module License Installation Guide
Fill the fields and click “Add”.

5-6 Log in to the Web site
Hitachi Compute Blade Embedded Fibre Channel Switch Module License Installation Guide
(2) When switch and license information you provided is displayed in the bottom of Unit Information, review the displayed information. If there is no error, select
the I have read and accept the Brocade End User License Agreement checkbox, and click Generate.
(3) On the screen such as below, the License Key is displayed. Write down the value
of the "License Key" column in the blank area. You will receive the e-mail which is written the License Key you obtained.
(4) Click Log Out in the Web site screen top and log out.
10:00:xx:xx:xx:xx:xx:xx xxxxxxxxxxxxxxxxxxxx xxxxxxxxxxxx
xxxxxxxxx
v
xxxxxxxxxxxxxxxxxxxxx
xxxxxxx
TEL
xxxxxxx
xxxxxxx
xxxxxxx
xxxxxxx
xxxxxxx
xxxxxxxxxxxxxxxxxxxx 10:00:xx:xx:xx:xx:xx:xx xxxxxxxxxxxx
xxxxxxxxx
xxxxxxxxxxxxxxxxxxxxxxxxxxxxxxxxxxxx
xxxxxxxxxxxxxxxxxxxxx
Write down the value of the "License Key" column

6
Install the License 6-1
Hitachi Compute Blade Embedded Fibre Channel Switch Module License Installation Guide
Install the License
This chapter describes how to install the license in the Embedded Fibre Channel Switch module.
Check Compute Blade Status
Install the Ports On Demand License
Install the ISL Trunking License
Install the Fabric Watch License
Install the Fabric Vision License
Install the Extended Fabric License
Install the Enter Prise License

6-2 Install the License
Hitachi Compute Blade Embedded Fibre Channel Switch Module License Installation Guide
Check Compute Blade Status
Chapter 3 shows the requirements to be met to perform the procedure in this chapter. If the configuration, the status of the Compute Blade and Fibre Channel
Switches meet the requirements, go to Section 2 "Install the License."
Otherwise, follow the steps shown in Section 1 "Check System Status" of Chapter 3 and activate the Fibre Channel Switch.
Install the Ports On Demand License
(1) Use a LAN cable to connect the PC and the Management module or 8Gbps Embedded Fibre Channel Switch module (for connection to the 8Gbps Embedded
Fibre Channel Switch module). (For more information on the connection, see Section 3 “Confirm the Fibre Channel Switch's WWN" of Chapter 3.)
(2) Check that the Fibre Channel Switch is up and running. Telnet to the switch and
login as an administrator (admin) with the appropriate user ID and password.
(3) Use the licenseadd command to install a license key. The syntax for the licenseadd command is as follows:
Fabric OS (SW5460)
switch login: xxxxx ← Enter User ID of administrator (admin).
Password: xxxxx ← Enter Password.
switch:admin>
switch:admin> licenseadd SRd9Sddyy9VSeATg ← Enter licenseadd command.
adding license-key [SRd9Sddyy9VSeATg]
switch:admin>
License Key. Enter your license key obtained in Section 3 "License Key Acquisition." of Chapter 5

Install the License 6-3
Hitachi Compute Blade Embedded Fibre Channel Switch Module License Installation Guide
(4) Enter the licenseshow command to check that the Ports On Demand license is
installed.
Obtain the licenseshow command log containing the Fibre Channel Switch
configuration information, and save it in a safe device such as a floppy disk.
(5) Enter the portenable command to enable the ports added by the Ports On Demand license.
(6) Use the exit command to terminate the telnet session.
switch:admin> licenseshow ← Enter licenseshow command.
RSyRyze9QbSTzSzO:
Web license
ScRSzRzbRdTdST02:
Zoning license
bbbR9zSdQzcccSAI:
Fabric license
SRd9Sddyy9XSeATi:
Performance Monitor license
SRd9Sddyy9VSeATg:
First Ports on Demand license - additional 10 port upgrade license
switch:admin>
Indicates that the Ports On Demand
license is installed.
switch:admin> portenable 4 ← Enter portenable command (enable port4).
switch:admin> portenable 5 ← Enter portenable command (enable port5).
6-4 Install the License
Hitachi Compute Blade Embedded Fibre Channel Switch Module License Installation Guide
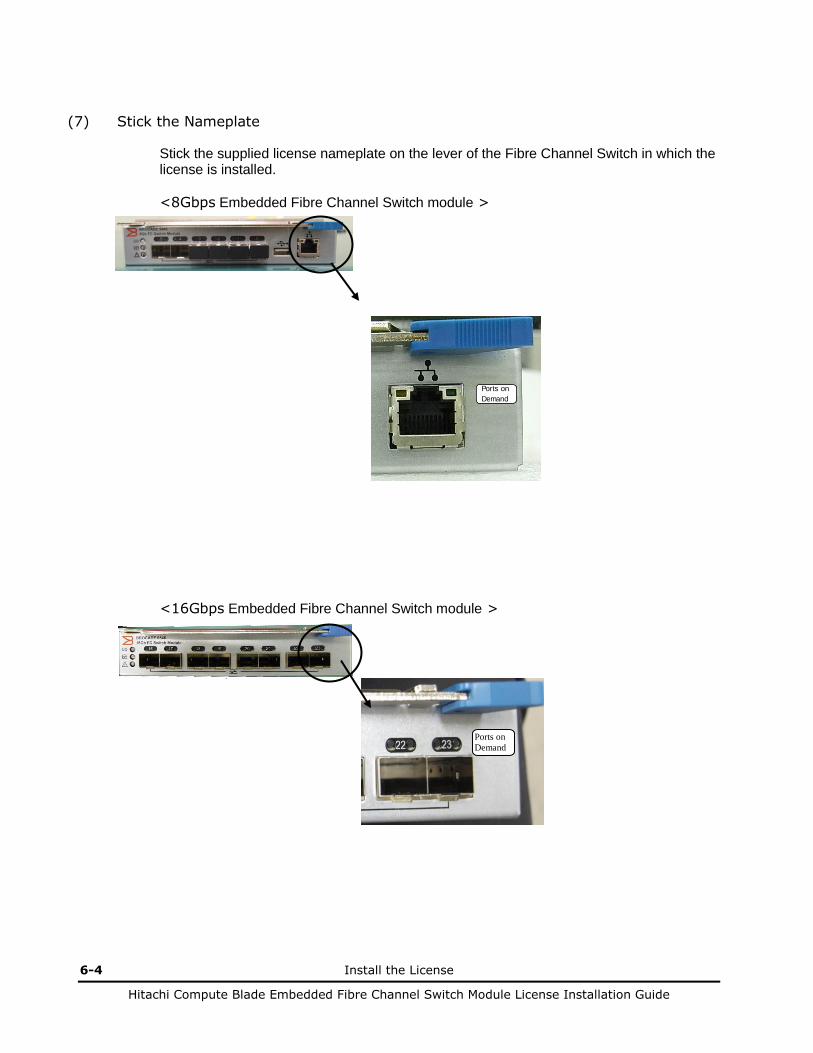
(7) Stick the Nameplate
Stick the supplied license nameplate on the lever of the Fibre Channel Switch in which the license is installed.
<8Gbps Embedded Fibre Channel Switch module >
<16Gbps Embedded Fibre Channel Switch module >
Ports onDemand
Ports on
Demand
Ports on
Demand

Install the License 6-5
Hitachi Compute Blade Embedded Fibre Channel Switch Module License Installation Guide
Install the ISL Trunking License
(1) Use a LAN cable to connect the PC and the Management module or 8Gbps
Embedded Fibre Channel Switch module (for connection to the 8Gbps Embedded
Fibre Channel Switch module). (For more information on the connection, see Section 3 “Confirm the Fibre Channel Switch's WWN" of Chapter 3.)
(2) Check that the Fibre Channel Switch is up and running. Telnet to the switch and
login as an administrator (admin) with the appropriate user ID and password.
(3) Use the licenseadd command to install a license key.
The syntax for the licenseadd command is as follows:
(4) Enter the switchdisable command and the switchenable command to enable the ISL
Trunking license.
Fabric OS (SW5460)
switch login: xxxxx ← Enter User ID of administrator (admin).
Password: xxxxx ← Enter Password.
switch:admin>
switch:admin> switchdisable ← Enter switchdisable command.
Wait for about 30 seconds until the Fibre Channel Switch become disable
switch:admin> switchenable ← Enter switchenable command.
switch:admin> licenseadd Rdb9cbcSQQaecAdY ← Enter licenseadd command.
adding license-key [Rdb9cbcSQQaecAdY]
For license change to take effect, use portdisable/portenable or
switchdisable/switchenable commands...
switch:admin>
6-6 Install the License
Hitachi Compute Blade Embedded Fibre Channel Switch Module License Installation Guide
(5) Enter the licenseshow command to check that the ISL Trunking license is installed.
Obtain the licenseshow command log containing the Fibre Channel Switch configuration information, and save it in a safe device such as a floppy disk.
(6) Use the exit command to terminate the telnet session.
switch:admin> licenseshow ← Enter licenseshow command.
RSyRyze9QbSTzSzO:
Web license
ScRSzRzbRdTdST02:
Zoning license
bbbR9zSdQzcccSAI:
Fabric license
Rdb9cbcSQQaecAdY:
Trunking license
SRd9Sddyy9XSeATi:
Performance Monitor license
switch:admin>
Indicates that the ISL Trunking
license is installed.

Install the License 6-7
Hitachi Compute Blade Embedded Fibre Channel Switch Module License Installation Guide
(7) Stick the Nameplate
Stick the supplied license nameplate on the lever of the Fibre Channel Switch in which the license is installed.
<8Gbps Embedded Fibre Channel Switch module >
<16Gbps Embedded Fibre Channel Switch module >
Ports onDemand

6-8 Install the License
Hitachi Compute Blade Embedded Fibre Channel Switch Module License Installation Guide
Install the Fabric Watch License (1) Use a LAN cable to connect the PC and the Management module or 8Gbps
Embedded Fibre Channel Switch module (for connection to the 8Gbps Embedded
Fibre Channel Switch module). (For more information on the connection, see Section 3 “Confirm the Fibre Channel Switch's WWN" of Chapter 3.)
(2) Check that the Fibre Channel Switch is up and running. Telnet to the switch and
login as an administrator (admin) with the appropriate user ID and password.
(3) Use the licenseadd command to install a license key.
The syntax for the licenseadd command is as follows:
(4) Enter the licenseshow command to check that the Fabric Watch license is installed.
Obtain the licenseshow command log containing the Fibre Channel Switch configuration information, and save it in a safe device such as a floppy disk.
switch:admin> licenseadd Rdb9cbcSQQUecAdS ← Enter licenseadd command.
adding license-key [Rdb9cbcSQQUecAdS].
switch:admin>
License Key. Enter your license key obtained in Section 3 "License Key Acquisition." of Chapter 5
Fabric OS (SW5460)
switch login: xxxxx ← Enter User ID of administrator (admin).
Password: xxxxx ← Enter Password.
switch:admin>
switch:admin> licenseshow ← Enter licenseshow command.
RSyRyze9QbSTzSzO:
Web license
Rdb9cbcSQQUecAdS:
Fabric Watch license
ScRSzRzbRdTdST02:
Zoning license
bbbR9zSdQzcccSAI:
Fabric license
SRd9Sddyy9XSeATi:
Performance Monitor license
switch:admin>
Indicates that the Fabric Watch license
is installed.
Install the License 6-9
Hitachi Compute Blade Embedded Fibre Channel Switch Module License Installation Guide
(5) Use the exit command to terminate the telnet session.
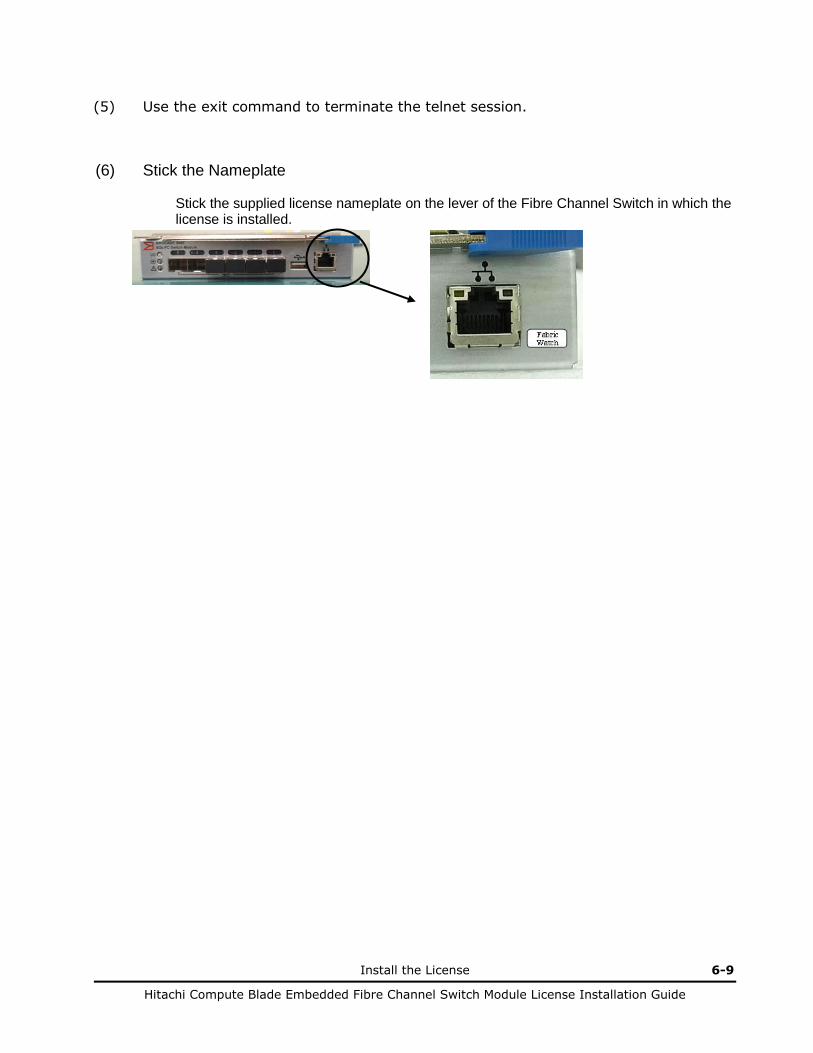
(6) Stick the Nameplate
Stick the supplied license nameplate on the lever of the Fibre Channel Switch in which the license is installed.

6-10 Install the License
Hitachi Compute Blade Embedded Fibre Channel Switch Module License Installation Guide
Install the Fabric Vision License (1) Use a LAN cable to connect the PC and the Management module (for connection
to the 16Gbps Embedded Fibre Channel Switch module). (For more information on the connection, see Section 3 “Confirm the Fibre Channel Switch's WWN" of Chapter 3.)
(2) Check that the Fibre Channel Switch is up and running. Telnet to the switch and
login as an administrator (admin) with the appropriate user ID and password.
(3) Use the licenseadd command to install a license key. The syntax for the licenseadd command is as follows:
Fabric OS (SW5460)
switch login: xxxxx ← Enter User ID of administrator (admin).
Password: xxxxx ← Enter Password.
switch:admin>
switch:admin> licenseadd Rdb9cbcSQQUecAdS ← Enter licenseadd command.
adding license-key [Rdb9cbcSQQUecAdS].
switch:admin>
License Key. Enter your license key obtained in Section 3 "License Key Acquisition." of Chapter 5

Install the License 6-11
Hitachi Compute Blade Embedded Fibre Channel Switch Module License Installation Guide
(4) Enter the licenseshow command to check that the Fabric Vision license is installed.
Obtain the licenseshow command log containing the Fibre Channel Switch configuration information, and save it in a safe device such as a floppy disk.
(5) Use the exit command to terminate the telnet session.
(6) Stick the Nameplate
Stick the supplied license nameplate on the lever of the Fibre Channel Switch in which the license is installed.
switch:admin> licenseshow ← Enter licenseshow command.
RSyRyze9QbSTzSzO:
Web license
Rdb9cbcSQQUecAdS:
Fabric Vision license
ScRSzRzbRdTdST02:
Zoning license
bbbR9zSdQzcccSAI:
Fabric license
SRd9Sddyy9XSeATi:
Performance Monitor license
switch:admin>
Indicates that the Fabric Vision license
is installed.
Fabric
Vision

6-12 Install the License
Hitachi Compute Blade Embedded Fibre Channel Switch Module License Installation Guide
Install the Extended Fabric License
(1) Use a LAN cable to connect the PC and the Management module (for connection to
the 16Gbps Embedded Fibre Channel Switch module). (For more information on the connection, see Section 3 “Confirm the Fibre Channel Switch's WWN" of Chapter 3.)
(2) Check that the Fibre Channel Switch is up and running. Telnet to the switch and
login as an administrator (admin) with the appropriate user ID and password.
(3) The syntax for the licenseadd command is as follows:
(4) Enter the licenseshow command to check that the Fabric Vision license is installed.
Fabric OS (SW6546)
switch login: xxxxx ← Enter User ID of administrator (admin).
Password: xxxxx ← Enter Password.
switch:admin>
switch:admin> licenseadd b9RbQdyRzQcAScRu ← Enter licenseadd command.
adding license-key [b9RbQdyRzQcAScRu].
switch:admin>
switch:admin> licenseshow ← Enter licenseshow command.
RSyRyze9QbSTzSzO:
Web license
Rdb9cbcSQQUecAdS:
Extended Fabric license
ScRSzRzbRdTdST02:
Zoning license
bbbR9zSdQzcccSAI:
Fabric license
SRd9Sddyy9XSeATi:
Performance Monitor license
switch:admin>
Indicates that the Extended Fabric license
is installed.

Install the License 6-13
Hitachi Compute Blade Embedded Fibre Channel Switch Module License Installation Guide
(7) Use the exit command to terminate the telnet session.
After installation of the Extended Fabric license, switch gets to be able to use all functions of long distance mode. Please refer to Administrator guide and Command reference guide for more information about long distance mode.
(8) Stick the Nameplate
Stick the supplied license nameplate on the lever of the Fibre Channel Switch
in which the license is installed.
Extended
Fabric

6-14 Install the License
Hitachi Compute Blade Embedded Fibre Channel Switch Module License Installation Guide
Install the Enter Prise License
(1) Use a LAN cable to connect the PC and the Management module (for connection to
the 16Gbps Embedded Fibre Channel Switch module). (For more information on the connection, see Section 3 “Confirm the Fibre Channel Switch's WWN" of Chapter 3.)
(2) Check that the Fibre Channel Switch is up and running. Telnet to the switch and
login as an administrator (admin) with the appropriate user ID and password.
(3) The syntax for the licenseadd command is as follows:
(4) Enter the switchdisable command and the switchenable command to enable the ISL
Trunking license.
Fabric OS (SW6546)
switch login: xxxxx ← Enter User ID of administrator (admin).
Password: xxxxx ← Enter Password.
switch:admin>
switch:admin> licenseadd b9RbQdyRzQcAScRu ← Enter licenseadd command.
adding license-key [b9RbQdyRzQcAScRu].
switch:admin>
switch:admin> switchdisable ← Enter switchdisable command.
Wait for about 30 seconds until the Fibre Channel Switch become disable
switch:admin> switchenable ← Enter switchenable command.

Install the License 6-15
Hitachi Compute Blade Embedded Fibre Channel Switch Module License Installation Guide
(5) Enter the licenseshow command to check that the Enter Prise license is installed.
Obtain the licenseshow command log containing the Fibre Channel Switch configuration information, and save it in a safe device such as a floppy disk.
(6) Use the exit command to terminate the telnet session.
After installation of the Enter Prise license, switch gets to be able to use all functions of long distance mode. Please refer to Administrator guide and
Command reference guide for more information about long distance mode.
(7) Stick the Nameplate
Stick the supplied license nameplate on the lever of the Fibre Channel Switch in which the license is installed.
switch:admin> licenseshow ← Enter licenseshow command.
RSyRyze9QbSTzSzO:
Web license
ScRSzRzbRdTdST02:
Zoning license
bbbR9zSdQzcccSAI:
Fabric license
r9fYMGY7aWNDFZfL3HS9DTRW3C9AEMBgBABND:
Extended Fabric license
Trunking license
Fabric Vision license
switch:admin>
Indicates that the Extended Fabric, Trunking
and Fabric Vision license is installed.
Extended
Fabric
Fabric
Vision
ISL
Trunkiing

6-16 Install the License
Hitachi Compute Blade Embedded Fibre Channel Switch Module License Installation Guide
7
Download Recommended Configuration Information 7-1
Hitachi Compute Blade Embedded Fibre Channel Switch Module License Installation Guide
Download Recommended Configuration Information
This chapter describes how to download the configuration file in the Embedded Fibre Channel Switch module.
Preparation for FTP server
Check Compute Blade Status
Download Recommended Configuration Information

7-2 Download Recommended Configuration Information
Hitachi Compute Blade Embedded Fibre Channel Switch Module License Installation Guide
Preparation for FTP server
To use the Fabric Watch feature, you also need to download a configuration file (containing the recommended configuration information) to the Fibre Channel
Switch in addition to installing the Fabric Watch, Fabric Vision or Enter Prise license. The download procedure in this chapter requires an FTP server to run on the networked UNIX system. If you have no FTP server connected to the Fibre Channel
Switch, you can use the PC connected to the Fibre Channel Switch as an FTP server by installing the standard Windows IIS FTP server on the PC. If you already have an FTP server connected to the Fibre Channel Switch, you can
skip installation of IIS FTP Server.
For detail on how to install of IIS FTP server, please refer to the Microsoft Corporation
site.
Check Compute Blade Status
Chapter 3 shows the requirements to be met to perform any of the procedures in this chapter. If the configuration and status of the Compute Blade and Fibre
Channel Switches meet the requirements, go to Section 2 "Install the IIS FTP Server" or Section 3 "Download Recommended Configuration Information."
Otherwise, follow the steps shown in Section 1 "Check System Status" of Chapter 3
and activate the Fibre Channel Switch.
Download Recommended Configuration Information (1) Use Windows Explorer to locate the Fabric Watch configuration file and copy the file
into the "C:\inetpub\ftproot" on the PC connected to the switch.
(Copy the file, not the folder.) If you are going to use an FTP server other than IIS, copy the configuration file into an appropriate directory for FTP transfer.
Use the following configuration file contained in the supplied CD or in the embedded USB(Configuration file can be contained in embedded USB only if system is CB500):
i. CB2000
8Gbps Switch module: ¥ FW ¥CB2000¥ FWconfig_sw5460_*.txt
ii. CB500 8Gbps Switch module: ¥ FW ¥CB500¥ FWconfig_sw5460_*.txt 16Gbps Switch module: ¥ FW ¥CB500¥ FWconfig_sw6546_*.txt
If your installed license is the Fabric Vision or Enter Prise license, you can use MAPS
(Monitoring and Alerting Policy Suite) feature on 16Gbps Embedded Fibre Channel
Switch module. If you use MAPS feature, refer to “Monitoring and Alerting Policy Suite
Administrator’s Guide” in “Compute Blade Fibre Channel Switch Accessory DVD” to start

Download Recommended Configuration Information 7-3
Hitachi Compute Blade Embedded Fibre Channel Switch Module License Installation Guide
the MAPS. (2) Use a LAN cable to connect the PC and the Management module or Embedded Fibre
Channel Switch module (for connection to the Embedded Fibre Channel Switch
module). (For more information on the connection, see Section 3 " Confirm the Fibre Channel Switch's WWN" of Chapter 3.)
(3) Check that the Fibre Channel Switch is up and running. Telnet to the switch and
login as an administrator (admin) with the appropriate user ID and password.
To telnet, use the same network address for the Fibre Channel Switch and PC, when you use a LAN cable to connect the PC and the Fibre Channel Switch module.
(4) Enter the switchdisable command to turn the Fibre Channel Switch offline.
(5) Enter the configdownload command to download the recommended Fabric Watch
configuration information.
Fabric OS (SW5460)
switch login: xxxxx ← Enter User ID of administrator (admin).
Password: xxxxx ← Enter Password.
switch:admin>
switch:admin>switchdisable ← Enter switchdisable command
switch:admin> configdownload ← Enter switchdisable command.
Protocol (scp or ftp) [ftp] : ftp ← Enter ftp.
Server Name or IP Address [host] : 10.0.1.10 ← Enter the IP address of ftp.
User Name [user] : upload ← Enter upload.
File Name [config.txt] : FWconfig_sw5460_r*.txt ← Enter the name of
the configuration file.. Section (all|chassis [all]):all ← Enter all.
Password : password ← Enter password.
*** CAUTION ***
This command is used to download a backed-up configuration
for a specific switch. If using a file from a different
switch, this file's configuration settings will override
any current switch settings. Downloading a configuration
file, which was uploaded from a different type of switch,
may cause this switch to fail. A switch reboot might be
required for some parameter changes to take effect.
configDownload operation may take several minutes
to complete for large files.
Do you want to continue (yes, y, no, n): [no]y ← Type “y.”
<snip>
configDownload complete: All config parameters are downloaded
switch:admin>

7-4 Download Recommended Configuration Information
Hitachi Compute Blade Embedded Fibre Channel Switch Module License Installation Guide
(6) Enter the switchenable command to turn the Fibre Channel Switch online.
(7) Enter the fwclassinit command to activate the Fabric Switch.
(8) Enter the reboot command to reboot the Fibre Channel Switch.
(9) The telnet session is terminated.
switch:admin>switchenable ← Enter switchenable command.
switch:admin>fwclassinit ← Enter fwclassinit command.
fwClassInit: Fabric Watch is updating...
fwClassInit: Fabric Watch has been updated.
switch:admin>
switch:admin>reboot ← Enter reboot command.

8
Completion Steps 8-1
Hitachi Compute Blade Embedded Fibre Channel Switch Module License Installation Guide
Completion Steps
.
Check fibre channels for alternate path

8-2 Completion Steps
Hitachi Compute Blade Embedded Fibre Channel Switch Module License Installation Guide
Check fibre channels for alternate path Now that your license is installed, you are ready to perform the completion steps,
depending on the action that you have taken during preconfirmation described in Chapter 3.
i. If you have switched to the alternate path to the Fiber Channel Switch where
the license is not to be installed.
If necessary, you should switch back to the path to Fibre Channel Switch where the license is installed.
This completes the process.
ii. If you have stopped only the servers connected to fibre channels.
No completion step is required. You have already completed the process.

9
Troubleshooting 9-1
Hitachi Compute Blade Embedded Fibre Channel Switch Module License Installation Guide
Troubleshooting
This chapter lists some common troubles which you may encounter while performing a
task described in this manual.
Troubleshooting
9-2 Troubleshooting
Hitachi Compute Blade Embedded Fibre Channel Switch Module License Installation Guide
Troubleshooting
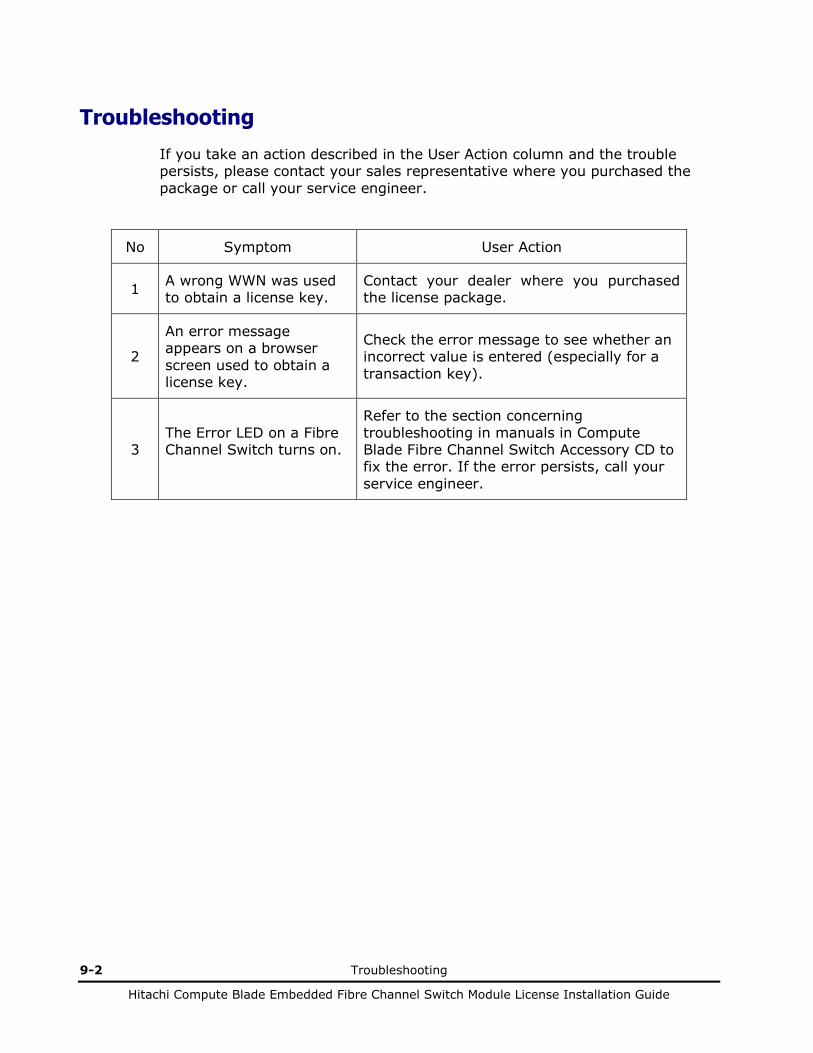
If you take an action described in the User Action column and the trouble persists, please contact your sales representative where you purchased the
package or call your service engineer.
No Symptom User Action
1 A wrong WWN was used to obtain a license key.
Contact your dealer where you purchased the license package.
2
An error message appears on a browser
screen used to obtain a license key.
Check the error message to see whether an incorrect value is entered (especially for a
transaction key).
3 The Error LED on a Fibre Channel Switch turns on.
Refer to the section concerning
troubleshooting in manuals in Compute Blade Fibre Channel Switch Accessory CD to fix the error. If the error persists, call your
service engineer.

Hitachi Compute Blade Embedded Fibre Channel Switch Module License Installation Guide

MK-99COM140-00
Hitachi Data Systems
Corporate Headquarters
2845 Lafayette Street Santa Clara, California 95050-2639 U.S.A. www.hds.com
Regional Contact Information
Americas
+1 408 970 1000 [email protected]
Europe, Middle East, and Africa +44 (0) 1753 618000 [email protected]
Asia Pacific
+852 3189 7900 [email protected]