hgm8152 genset parallel (with mains) controller …smartgen.cn/data/download/hgm8152_en.pdfhgm8152...
TRANSCRIPT

HGM8152
Genset Parallel (With Mains) Controller
USER MANUAL
SMARTGEN (ZHENGZHOU) TECHNOLOGY CO., LTD.

HGM8152 GENSET PARALLEL CONTROLLER USER MANUAL
HGM8152 Genset Parallel (With Mains) Controller 2019-09-10 Version 1.1 Page 2 of 70
CONTENTS
1 OVERVIEW ............................................................................................................................................ 6
2 PERFORMANCE AND CHARACTERISTICS ....................................................................................... 6
3 SPECIFICATION .................................................................................................................................... 8
4 OPERATION .......................................................................................................................................... 9
4.1 INDICATORS ................................................................................................................................ 9
4.2 PUSHBUTTONS ......................................................................................................................... 10
4.3 LCD DISPLAY ............................................................................................................................ 11
4.3.1 MAIN DISPLAY ...................................................................................................................... 11
4.3.2 PARARMETERS SETTING MENU ........................................................................................ 13
4.3.3 PARAMETER SETTING ........................................................................................................ 13
4.4 AUTO START/STOP OPERATION ............................................................................................ 13
4.5 MANUAL START/STOP OPERATION ....................................................................................... 14
4.6 SWITCH CONTROL PROCEDURES ........................................................................................ 15
4.6.1 MANUAL CONTROL PROCEDURES ................................................................................... 15
4.6.2 AUTOMATIC CONTROL PROCEDURE ............................................................................... 16
5 PROTECTIONS ................................................................................................................................... 16
5.1 WARNING ALARMS................................................................................................................... 16
5.2 SHUTDOWN ALARMS ............................................................................................................... 19
5.3 TRIP AND STOP ALARMS ........................................................................................................ 21
5.4 TRIP ALARM .............................................................................................................................. 22
6 WIRING CONNECTION ...................................................................................................................... 23
7 SCOPES AND DEFINITIONS OF PROGRAMMABLE PARAMETERS ............................................. 26
7.1 CONTENTS AND SCOPES OF PARAMETERS ....................................................................... 26
7.2 DEFINABLE CONTENTS OF PROGRAMMABLE OUTUT PORTS ......................................... 37
7.2.1 DEFINED PERIOD OUTPUT ................................................................................................. 41
7.2.2 DEFINED COMBINATION OUTPUT ..................................................................................... 42
7.3 DEFINED CONTENTS OF PROGRAMMABLE INPUT PORTS (ALL GROUND CONNECTED
(B-) IS ACTIVE) ....................................................................................................................................... 42
7.4 SELECTION OF SENSORS ....................................................................................................... 45
7.5 CONDITIONS OF CRANK DINSCONNECT SELECTION ........................................................ 46
8 PARAMETER SETTING ...................................................................................................................... 46
9 SENSOR SETTING ............................................................................................................................. 47
10 COMMISSIONING ............................................................................................................................... 48
10.1 STEP 1: SINGLE UNIT DEBUGGING ....................................................................................... 48
10.2 STEP 2: MANUAL PARALLEL OPERATION OFF-LOAD ......................................................... 48
10.3 STEP 3: MANUAL PARALLEL OPERATION ON-LOAD ........................................................... 48
10.4 STEP 4: AUTOMATIC PARALLEL OPERATION ...................................................................... 48
11 MAINS PARALLEL MODE ................................................................................................................... 49
11.1 GEN CONTROL MODE ............................................................................................................. 49
11.2 MAINS CONTROL MODE .......................................................................................................... 50

HGM8152 GENSET PARALLEL CONTROLLER USER MANUAL
HGM8152 Genset Parallel (With Mains) Controller 2019-09-10 Version 1.1 Page 3 of 70
11.3 LOAD RECEPTION MODE ........................................................................................................ 51
11.4 AMF CONTROL MODE .............................................................................................................. 52
11.5 ISLAND START MODE .............................................................................................................. 53
12 TYPICAL APPLICATION ..................................................................................................................... 54
13 POWER MANAGEMENT MODE ......................................................................................................... 56
14 NEL TRIP ILLUSTRATION .................................................................................................................. 57
15 INSTALLATION .................................................................................................................................... 58
15.1 BATTERY VOLTAGE INPUT ..................................................................................................... 58
15.2 SPEED SENSOR INPUT ........................................................................................................... 58
15.3 OUTPUT AND EXPAND RELAYS ............................................................................................. 58
15.4 AC INPUT ................................................................................................................................... 58
15.5 WITHSTAND VOLTAGE TEST .................................................................................................. 59
16 GSM SHORT MESSAGE ALARM AND REMOTE CONTROL ........................................................... 59
16.1 GSM SHORT MESSAGE ALARM ............................................................................................. 59
16.2 GSM SHORT MESSAGE REMOTE CONTROL ........................................................................ 59
17 CONNECTIONS OF CONTROLLER WITH J1939 ENGINE .............................................................. 61
17.1 CUMMINS ISB/ISBE................................................................................................................... 61
17.2 CUMMINS QSL9 ........................................................................................................................ 61
17.3 CUMMINS QSM11(IMPORT) ..................................................................................................... 61
17.4 CUMMINS QSX15-CM570 ......................................................................................................... 62
17.5 CUMMINS GCS-MODBUS ......................................................................................................... 62
17.6 CUMMINS QSM11 ..................................................................................................................... 63
17.7 CUMMINS QSZ13 ...................................................................................................................... 63
17.8 DETROIT DIESEL DDEC III / IV ................................................................................................ 63
17.9 DEUTZ EMR2 ............................................................................................................................. 64
17.10 JOHN DEERE ............................................................................................................................. 64
17.11 MTU MDEC ................................................................................................................................ 64
17.12 MTU ADEC(SMART MODULE) ................................................................................................. 65
17.13 MTU ADEC (SAM MODULE) ..................................................................................................... 65
17.14 PERKINS .................................................................................................................................... 65
17.15 SCANIA ....................................................................................................................................... 66
17.16 VOLVO EDC3 ............................................................................................................................. 66
17.17 VOLVO EDC4 ............................................................................................................................. 67
17.18 VOLVO-EMS2 ............................................................................................................................ 67
17.19 YUCHAI ...................................................................................................................................... 68
17.20 WEICHAI ..................................................................................................................................... 68
18 ETHERNET INTERFACE .................................................................................................................... 69
18.1 ETHERNET INTERFACE INTRODUCTION .............................................................................. 69
18.2 NETWORK CLIENT MODE ........................................................................................................ 69
18.3 CONTROLLER AND NETWORK CABLE CONNECTION ........................................................ 69
18.3.1 CONTROLLER CONNECT WITH PC WITH A LINE OF CABLE .......................................... 69
18.3.2 CONTROLLER AND PC CONNECTION VIA SWITCHBOARD (OR ROUTER). ................. 69
19 FAULT FINDING .................................................................................................................................. 70

HGM8151 GENSET PARALLEL UNIT USER MANUAL
HGM8152 Genset Parallel (With Mains) Controller 2019-09-10 Version 1.1 Page 4 of 70
Chinese trademark
English trademark
SmartGen ―make your generator smart
SmartGen Technology Co., Ltd.
No. 28 Jinsuo Road
Zhengzhou City
Henan Province
P. R. China
Tel: 0086-(0)371-67988888/67981888
0086-(0)371-67991553/67992951
0086-(0)371-67981000(overseas)
Fax: 0086-(0)371-67992952
Web: www.smartgen.com.cn
www.smartgen.cn
Email: [email protected]
All rights reserved. No part of this publication may be reproduced in any material form (including
photocopying or storing in any medium by electronic means or other) without the written permission of
the copyright holder.
Applications for the copyright holder’s written permission to reproduce any part of this publication should
be addressed to SmartGen Technology at the address above.
Any reference to trademarked product names used within this publication is owned by their respective
companies.
SmartGen Technology reserves the right to change the contents of this document without prior notice.
Table 1 Software Version
Date Version Content
2019-04-24 1.0 Original release
2019-09-10 1.1 Added characteristic description.
HGM8152 GENSET PARALLEL CONTROLLER USER MANUAL
HGM8152 Genset Parallel (With Mains) Controller 2019-09-10 Version 1.1 Page 5 of 70
This manual is only applicable for HGM8152 Controller.
Table 2 Notation Clarification
Symbol Instruction
NOTE Highlights an essential element of a procedure to ensure correctness.
CAUTION! Indicates a procedure or practice, which, if not strictly observed, could result in
damage or destruction of equipment.
WARNING!
Indicates a procedure or practice, which could result in injury to personnel or loss of life
if not followed correctly.

HGM8152 GENSET PARALLEL CONTROLLER USER MANUAL
HGM8152 Genset Parallel (With Mains) Controller 2019-09-10 Version 1.1 Page 6 of 70
1 OVERVIEW
HGM8152 Genset Parallel (with Mains) Controller is especially designed for extremely high/low
temperature environment (-40~+70)°C. It applies self-luminous Vacuum Fluorescent Display (VFD) and
electronic components with extreme high/low temperature resistance, therefore it can work reliably
under extreme temperature condition. After careful consideration for the electromagnetic compatibility on
different occasions in designing process, it provides strong guarantee for it to work under complex
electromagnetic interference environment. It is plug-in wiring terminal structure, which is convenient to
product maintenance and upgrade. Chinese, English, and other various languages can be displayed on
controller.
HGM8152 Genset Parallel (with Mains) Controller possesses GOV (Engine Speed Governor) and
AVR (Automatic Voltage Regulator) control function, and multiple running modes with Mains parallel. For
example, constant active power/reactive power/power factor outputs of genset, mains peak-clipping
function, and ceaseless mains supply recover function. This realizes genset automatic start/stop, parallel
running, data measurement, alarm protection and "three remotes" functions. Controller can precisely
monitor all kinds of working statuses of genset, and when genset is abnormal, controller shall
automatically parallel off from the bus, stop the genset, and display fault information. Controller carries
SAE J1939 port, which can communicate with multiple ECUs (Engine Control Unit) with J1939 port. It
employs 32-bit micro-processor technology, realizing functions of precise measuring for most
parameters, set value adjustment, timing and fixed value adjustment etc. Most parameters can be
regulated from front panel, and all parameters can be adjusted via USB on PC. And parameters can also
be regulated and monitored via RS485 or Ethernet on PC. It has compact structure, simple wiring, high
reliability, and can be used widely in various genset automatic parallel system.
2 PERFORMANCE AND CHARACTERISTICS
Main characteristics are as below:
— With ARM-based 32-bit SCM, it has high integration of hardware, and reliability is promoted to a great
degree.
— Large screen of graphic dot-matrix VFD, Chinese/English are optional, and can be selected on site,
which provides convenience for debugging persons.
— Acrylic material of hard screen for protection, with better wear resisting and scratch resistant
performance;
— Silicon panel and button, which makes it have stronger adaptability for high/low environment;
— RS485 communication port, which can realize "three remotes" function with ModBus protocol;
— Ethernet communication port, realizing Ethernet monitoring (it needs to use controller with Ethernet
port);
— SMS function, which can automatically send alarm information to pre-set 5 phone numbers when
there is alarm occurred, and can also control and check genset status by texts;
— CAN BUS port, which can connect ECU with J1939; this not only can monitor normal data (water
temperature, oil pressure, speed, and fuel consumption etc.) of ECU, but also can control start, stop,

HGM8152 GENSET PARALLEL CONTROLLER USER MANUAL
HGM8152 Genset Parallel (With Mains) Controller 2019-09-10 Version 1.1 Page 7 of 70
speed raising, and speed dropping etc. via CANBUS port (it needs to use controller with CANBUS
port);
— Suitable for (120/240V) power, 50/60Hz system of 3-phase 4-wire, 3-phase 3-wire, single phase
2-wire, 2-phase 3 wire;
— Collect and display 3-phase voltage, 3-phase current, frequency, and power factor of genset;
— Collect and display 3-phase voltage, 3-phase current, frequency, and power factor of mains;
— Complete mains parallel off protection function, over frequency, under frequency, over voltage, under
voltage, frequency change ratio, vector change;
— Detection functions of over voltage, under voltage, over frequency, under frequency, over current,
over power, reverse power, loss of phase, reverse phase sequence for genset;
— 3 fixed analog sensors (temperature, oil pressure, and fuel level);
— 2 programmable analog sensors can be set to temperature, pressure, or level sensor;
— Precisely collect all kinds of engine parameters:
Temperature WT °C/°F display can be selected;
Oil Pressure kPa/psi/bar display can be selected;
Fuel Level Unit: %;
Speed Unit: r/min;
Battery Voltage Unit: V;
Charger Voltage Unit: V;
Timer 65535 hours are available;
Accumulated Start Times max. 65535 times are available;
— Control protection function: realizing diesel genet auto start/stop, breaker close/open (switch transfer),
and thorough fault display protection functions;
— All outputs are relay outputs;
— Parameter setting function: allowing users to change and set parameters, and this will be restored in
internal FLASH memory, and will not lose at power outage. A majority of parameters can be adjusted
on front panel, and all parameters can be regulated by USB port on PC, or by RS485/Ethernet port on
PC;
— Diverse temperature, voltage, level sensor curves can be used directly and sensor curves can also
be users defined;
— Multiple crank disconnect conditions can be selected (Gen frequency, speed, oil pressure);
— Power supply range DC(8~35)V, which can suit different starter battery voltage environment;
— Event Log, Real Time Clock, Scheduled Start/Stop(once per month/week/day, and loading or not can
also be set) functions;
— Can be used as indicating instrument (only indication, alarm and relay doesn't act);
— Maintenance function, maintenance time due can be set;
— All parameters are adjusted by digitalization, getting rid of analog adjustment of traditional
potentiometer, improving reliability and stability of whole controller;
— Sealing gasket is designed between enclosure and panel window; waterproof level is IP55;
— Metal clips are used to fix the controller, which has outstanding performance in high temperature;
— Modular structure design, pluggable wiring terminal, build-in installation with compact structure and
easy mounting features;
— Accumulated running A and B, Accumulated power A and B; Users can clear up the accumulations,
which makes convenience for users to operate by themselves;

HGM8152 GENSET PARALLEL CONTROLLER USER MANUAL
HGM8152 Genset Parallel (With Mains) Controller 2019-09-10 Version 1.1 Page 8 of 70
3 SPECIFICATION
Table 3 Technical Parameters
Parameter Details
Working Voltage DC8. 0V to 35. 0V, continuous power supply
Overall Consumption <4W (Standby mode: ≤2W)
AC Input:
3 Phase 4 Wire
3 Phase 3 Wire
Single Phase 2 Wire
2 Phase 3 Wire
AC 15V - 360V (ph-N)
AC 30V - 620V (ph- ph)
AC 15V - 360V (ph-N)
AC 15V - 360V (ph-N)
AC Frequency 50Hz/60Hz
Speed Sensor Voltage 1. 0 V to 24 V (RMS)
Speed Sensor Frequency Maximum 10,000 Hz
Start Relay Output 16A DC28V power supply output
Fuel Relay Output 16A DC28V power supply output
Flexible Relay Output 1 7A DC28V power supply output
Flexible Relay Output 2 7A DC28V power supply output
Flexible Relay Output 3 7A DC28V power supply output
Flexible Relay Output 4 7A AC250V volts free output
Flexible Relay Output 5 8A AC250V volts free output
Flexible Relay Output 6 8A AC250V volts free output
Case Dimensions 242mm×186mm×53mm
Panel Cutout 214mm×160mm
CT Secondary Current Rated 5A
Working Conditions Temperature: (-40~+70)°C Humidity: (20~93)%RH
Storage Conditions Temperature:(-40~+70)°C
Protection Level IP55 Gasket: when sealing gasket is installed between enclosure and
panel window;
Insulation Intensity Apply AC2.2kV voltage between high voltage terminal and low voltage
terminal and the leakage current is not more than 3mA within 1min.
Weight 0.85kg

HGM8152 GENSET PARALLEL CONTROLLER USER MANUAL
HGM8152 Genset Parallel (With Mains) Controller 2019-09-10 Version 1.1 Page 9 of 70
4 OPERATION
4.1 INDICATORS
Description for a part of indicators:
Table 4 Alarm Indicators
Alarm Type Alarm Indicator
No Alarm Indicator off
Warning Slow flashing (1 time/s)
Trip Alarm Slow flashing (1 time/s)
Shutdown Alarm Fast flashing (5 times/s)
Trip and Stop Alarm Fast flashing (5 times/s)
Status indicator: illuminates always after crank disconnection before ETS stop, and extinguishes for
other periods;
Gen normal indicator:light on always when generating is normal; flashes when generating is
abnormal; extinguishes when there is not generating power.
Mains normal indicator: light on always when mains is normal; flashes when mains is abnormal;
extinguishes when there is not mains power.

HGM8152 GENSET PARALLEL CONTROLLER USER MANUAL
HGM8152 Genset Parallel (With Mains) Controller 2019-09-10 Version 1.1 Page 10 of 70
4.2 PUSHBUTTONS
Table 5 Button Description
Icons Keys Description
Stop
Stop the running generator in auto/manual mode;
Reset alarm in stop mode;
Test panel indicators (lamp test) by pressing over 3s;
Stop the genset fast by pressing again in stop process.
Start Start the genset in manual mode.
Manual Mode Put controller in manual mode.
Auto Mode Put controller in auto mode.
Mute/Reset Alarm
Clear up alarm sound;
Reset trip alarm by pressing over 3s if trip (not shutdown) alarm
occurred.
Gen Close/Open Control generator close/open in manual mode.
Mains Open/Close Control mains close/open in manual mode.
Set/Confirm Entering setting screen.
Up/Increase
1) Screen scroll;
2) Move up cursor and increase value in setting menu.
Down/Decrease
1) Screen scroll;
2) Move down cursor and decrease value in setting menu.
Left 1) Screen scroll;
2) Left move cursor in setting menu.
Right 1) Screen scroll;
2) Right move cursor in setting menu.
Confirm Confirm inputted content in setting menu.
Exit 1)Return to main screen;
2) Return to previous menu in setting menu.

HGM8152 GENSET PARALLEL CONTROLLER USER MANUAL
HGM8152 Genset Parallel (With Mains) Controller 2019-09-10 Version 1.1 Page 11 of 70
NOTE: Press and simultaneously in manual mode, and it can force generator to crank. At this time
successful start will not be judged according to crank disconnect conditions, operator will have to crank the starter motor
manually; when operator decides that the engine has fired, he/she should release the button and start output will be
deactivated. Safety on delay will be initiated.
WARNING! Default password is 00318. Users can change it in case others change the advanced parameter settings.
Please clearly remember the password after changing. If you forget it, please contact SmartGen services and feedback
PD information in controller ABOUT page to us.
4.3 LCD DISPLAY
4.3.1 MAIN DISPLAY
Main screen is displayed by pagination. is used to scroll the pages and is to scroll the
screen.
Main Screen includes the following:
A part of statuses
Gen: voltage, frequency
Load: current, active power, reactive power
Mains: voltage, frequency
Engine: speed, temperature, oil pressure
NOTE: Main screens will circularly display if there is not scroll operation.
Status includes the following:
Genset status, switch status, mains status;
Engine includes the following:
Engine speed, engine temperature, engine oil pressure, fuel level, flexible sensor 1, flexible sensor 2,
battery voltage, charger voltage, engine accumulated running time, accumulated start times and user A
and B accumulated running time;
NOTE: If CAN BUS port is used to read engine information by J1939, this page also includes: coolant pressure,
coolant level, fuel temperature, fuel pressure, inlet temperature, exhaust temperature, turbo pressure, fuel consumption,
total fuel consumption and so on. Different engines have different parameters displayed.

HGM8152 GENSET PARALLEL CONTROLLER USER MANUAL
HGM8152 Genset Parallel (With Mains) Controller 2019-09-10 Version 1.1 Page 12 of 70
Generator includes the following:
Phase voltage, line voltage, frequency, phase sequence, each phase current, each phase and total
active power (positive and negative), each phase and total reactive power (positive and negative), each
phase and total apparent power, each phase and average power factor (positive and negative),
accumulated energy, earth current, unbalanced current and user A B accumulated energy.
NOTE: Power factor display illustration:
NOTE:
P stands for active power;
Q stands for inactive power.
Table 6 Power Factor Illustration
Bus includes the following:
Phase voltage, line voltage, frequency, phase sequence, current, power etc.
SNYC includes the following:
Synchronoscope, power percentage etc.
Alarm displays all alarm information, including:
Warning, shutdown alarm, trip shutdown and trip but not shutdown;
NOTE: ECU warning and shutdown alarm illustration: if detailed alarm information is displayed, check the engine
based on it; Otherwise, obtain information by checking user manual according to SPN alarm code.
Event log:
Records all start/stop events (shutdown alarm, trip and shutdown alarm, manual/auto start/stop), real
time of occurred alarms, and genset parameters;
Others includes:
Power factor Conditions Active power Reactive power Remark
COS>0L P>0,Q>0 Input Input Load is resistor-inductance;
COS>0C P>0,Q<0 Input Output Load is resistor-capacitance.
COS<0L P<0,Q>0 Output Input Load is equal to an under excitation generator.
COS<0C P<0,Q<0 Output Output Load is equal to an over excitation generator.
NOTE:
1. Input active power, genset or mains sends active power to load.
2. Output active power, load supplies power to generator or mains.
3. Input reactive power, generator or mains sends reactive power to load.
4. Output reactive power, load sends reactive power to generator or mains.

HGM8152 GENSET PARALLEL CONTROLLER USER MANUAL
HGM8152 Genset Parallel (With Mains) Controller 2019-09-10 Version 1.1 Page 13 of 70
Time and Date, maintenance due, input/output ports status, network settings etc.
About includes:
Released software and hardware version, product PD number.
4.3.2 PARARMETERS SETTING MENU
Press key and enter user menu:
Parameter: Input correct password (factory default is 00318) and you cam enter parameter setting
screen.
Language: Simplified Chinese, English and others are optional (others default: Espanol).
Commissioning: On load, off load or defined commissioning can be selected. On load or off load,
commissioning time, after-commissioning mode (manual mode, auto mode, stop mode) can be set for
defined commissioning.
Clear users’ accumulation: Accumulated running A, accumulated running B, accumulated power A,
and accumulated power B can be cleared up.
4.3.3 PARAMETER SETTING
Mains Set
Timers set
Engine set
Generator set
Load set
Breaker set
Temperature sensor set
Oil pressure sensor set
Liquid level sensor sett
Flexible senor 1
Flexible senor 2
Switch input port set
output port set
Module set
Scheduling and maintenance set
GSM set
Synchronization set
Expansion module set
NOTE: press and parameter setting can exit directly in setting process.
4.4 AUTO START/STOP OPERATION
Press and indicator beside shall be illuminated, which means genset is in auto start mode.
Automatic Start Sequence:

HGM8152 GENSET PARALLEL CONTROLLER USER MANUAL
HGM8152 Genset Parallel (With Mains) Controller 2019-09-10 Version 1.1 Page 14 of 70
1) When “Remote Start” (on load) is active or mains is abnormal, “Start Delay” timer is initiated;
2) “Start Delay” countdown will be displayed on LCD;
3) When start delay is over, preheat relay outputs (if configured), and “preheat delay XX s” information
will be displayed on LCD;
4) After the above delay, the fuel relay (if configured) outputs for 1s, and then the start relay outputs. If
crank disconnection doesn't occur in start delay, fuel relay and start relay stops outputting and enter
"crank rest time", waiting for next crank;
5) During pre-set crank attempts, if crank disconnection doesn't occur, then controller issues "failed to
start" signal and stops the genset. "failed to start" alarm shall be displayed on the alarm page of LCD;
6) If crank is successful in any of the crank attempts, "safety on" timer is energized. During this period
low oil pressure, high temperature, under speed and charge alternator failure alarms are inactive.
After this period "start idle" timer is initiated (if configured);
7) During “start idle” delay, under speed, under frequency, under voltage alarms are inhibited. When
this delay is over, “warming up” delay is initiated (if configured);
8) When “warming up delay” is over, if generator is normal, its indicator will be illuminated. If voltage
and frequency has reached on-load requirements, the closing relay will be energized, generator will
take load, generator power indicator will turn on, and generator will enter normal running state; if
voltage and frequency are abnormal, the controller will initiate shutdown alarm (alarm will be
displayed on LCD alarm page).
NOTE: When genset start is triggered by remote start (off load) input, process is the same as above; the only thinf is in
procedure 8), close relay doesn't output, and genset doesn't take load.
Automatic Stop Sequence,
1) After mains normal delay is over, mains close relay outputs; mains supply indicator is illuminated.
When remote start input is inactive and mains is normal, "stop delay" is initiated;
2) After“stop delay” has expired, generator close relay opens, gen supply indicator is extinguished.
"warming up delay" is initiated;
3) "Stop idle delay" (if configured) starts, and idle speed relay is energized;
4) “ETS solenoid hold” begins, and ETS relay is energized while fuel relay is de-energized, complete
stop is detected automatically;
5) "Wait stop delay" begins, and complete stop is detected automatically;
6) When generator is stopped completely, “after stop” delay will be initiated. Otherwise, controller
enters stop failure, and issues "fail to stop" warning ( if generator is stopped successfully after “fail to
stop” alarm has initiated, “after stop” delay will be initiated and the alarm will be removed
automatically);
7) Generator goes to standby mode after “after stop” delay.
4.5 MANUAL START/STOP OPERATION
MANUAL START: Press and controller enter manual mode. Manual mode indicator is
illuminated. Press and start the genset, crank disconnection is detected automatically and it goes
to high speed running automatically as well. For high temperature, low oil pressure, over speed and

HGM8152 GENSET PARALLEL CONTROLLER USER MANUAL
HGM8152 Genset Parallel (With Mains) Controller 2019-09-10 Version 1.1 Page 15 of 70
abnormal voltage occasions during generator running, controller can protect genset to stop quickly.
Press to control breaker close/open. (Please refer to procedure 3)~8) of Automatic Start Sequence
for details, only breaker open/close ways are different).
MANUAL STOP: Press and it can stop the running genset. (Please refer to procedure 2)~7) of
Automatic Start Sequence for details.)
NOTE: In manual mode, for breaker close/open procedure please refer to Switch Control Procedure of generator in
this manual.
4.6 SWITCH CONTROL PROCEDURES
4.6.1 MANUAL CONTROL PROCEDURES
When controller is in manual mode, switch control process is conducted manually. Breaker
close/open is controlled by close/open key.
Gen Close Operation:In normal running process, genset voltage and frequency reaches load
requirements and press ,
when mains is not closed, issue gen close signal directly;
when mains is already closed, controller shall control GOV and AVR to synchronize genset with
mains. When synchronization conditions are satisfied, issue gen close signal, and parallel genset
with mains.
Gen Open Operation: Press ,
when mains is not closed, issue gen open signal directly;
when mains is closed already, controller firstly transfers load to mains, and then issue gen open
signal.
Mains Close Operation: Press mains close key ,
when gen is not closed, issue mains close signal directly;
when gen is closed already, controller shall control GOV and AVR to make genset synchronizing
with mains. When conditions are met, issue mains close signal, and parallel genset with mains.
Mains Open Operation: Press mains open key ,
when gen is not closed, issue mains open signal directly;
when gen is closed already, controller first will transfer load to gen, and then issues mains open
signal.

HGM8152 GENSET PARALLEL CONTROLLER USER MANUAL
HGM8152 Genset Parallel (With Mains) Controller 2019-09-10 Version 1.1 Page 16 of 70
4.6.2 AUTOMATIC CONTROL PROCEDURE
When controller is in auto mode, the switch control procedure is automatic control procedure.
NOTE:Auxiliary input of breaker close must be configured for input port, and wiring must be connected correctly.
5 PROTECTIONS
5.1 WARNING ALARMS
When controller detects warning signals, it only issues warnings, not shutdown the genset.
Table 7 Warning Alarms
No Type Description
1 Over Speed When the controller detects that the engine speed has exceeded the
pre-set value, it will initiate a warning alarm.
2 Under Speed When the controller detects that the engine speed has fallen below the
pre-set value, it will initiate a warning alarm.
3 Loss of Speed Signal When the controller detects that the engine speed is 0 and the action is
selected “Warn”, it will initiate a warning alarm.
4 Gen Over Frequency When the controller detects that the genset frequency has exceeded the
pre-set value, it will initiate a warning alarm.
5 Gen Under Frequency When the controller detects that the genset frequency has fallen below
the pre-set value, it will initiate a warning alarm.
6 Gen Over Voltage When the controller detects that the generator voltage has exceeded the
pre-set value, the controller will initiate a warning alarm.
7 Gen Under Voltage When the controller detects that the genset voltage has fallen below the
pre-set value, it will initiate a warning alarm.
8 Gen Over Current
When the controller detects that the genset current has exceeded the
pre-set value and the action is selected “Warn”, it will initiate a warning
alarm.
9 Fail To Stop After “fail to stop” delay, if gen-set does not stop completely, it will
initiate a warning alarm.
10 Charge Alternator
Failure
When the controller detects that charger voltage has fallen below the
pre-set value, it will initiate a warning alarm.
11 Battery Over Volt When the controller detects that start battery voltage has exceeded the
pre-set value, it will initiate a warning alarm.
12 Battery Under Volt When the controller detects that start battery voltage has fallen below
the pre-set value, it will initiate a warning alarm.
13 Maintenance Due When count down time is 0 and the action is selected “Warn”, it will
initiate a warning alarm.
14 Reverse Power
When controller detects that the reverse power value (power is
negative) has exceeded the pre-set value and the action is selected
“Warn”, it will initiate a warning alarm.
15 Over Power When controller detects that the over power value (power is positive)

HGM8152 GENSET PARALLEL CONTROLLER USER MANUAL
HGM8152 Genset Parallel (With Mains) Controller 2019-09-10 Version 1.1 Page 17 of 70
No Type Description
has exceeded the pre-set value and the action is selected “Warn”, it will
initiate a warning alarm.
16 ECU Warn If an error message is received from ECU via J1939, it will initiate a
warning alarm.
17 Gen Switch Fail Warn When gen close status input is not set for input port, it will initiate a
warning alarm.
18 Mains Switch Fail Warn When main close status input is not set for input port, it will initiate a
warning alarm.
19 Temperature Sensor
Open Circuit
When the controller detects that the temperature sensor is open circuit
and the action is selected “Warn”, it will initiate a warning alarm.
20 High Temperature When the controller detects that engine temperature has exceeded the
pre-set value, it will initiate a warning alarm.
21 Low Temperature When the controller detects that engine temperature has fallen below
the pre-set value, it will initiate a warning alarm.
22 Oil Pressure Sensor
Open Circuit
When the controller detects that the oil pressure sensor is open circuit
and the action is selected “Warn”, it will initiate a warning alarm.
23 Low Oil Pressure When the controller detects that the oil pressure has fallen below the
pre-set value, it will initiate a warning alarm.
24 Level Sensor Open
Circuit
When the controller detects that the level sensor is open circuit and the
action is selected “Warn”, it will initiate a warning alarm.
25 Low Fuel Level When the controller detects that the fuel level has fallen below the
pre-set value, it will initiate a warning alarm.
26 Flexible Sensor 1 Open
Circuit
When the controller detects that the flexible sensor 1 is open circuit and
the action is selected “Warn”, it will initiate a warning alarm.
27 Flexible Sensor 1 High When the controller detects that the sensor 1 value has exceeded the
pre-set upper limit value, it will initiate a warning alarm.
28 Flexible Sensor 1 Low When the controller detects that the sensor 1 value has fallen below the
pre-set lower limit value, it will initiate a warning alarm.
29 Flexible Sensor 2 Open
Circuit
When the controller detects that the flexible sensor 2 is open circuit and
the action is selected “Warn”, it will initiate a warning alarm.
30 Flexible Sensor 2 High When the controller detects that the sensor 2 value has exceeded the
pre-set upper limit value, it will initiate a warning alarm.
31 Flexible Sensor 2 Low When the controller detects that the sensor 2 value has fallen below the
pre-set lower limit value, it will initiate a warning alarm.
32 Digital Input When digit input port is set as warning and the alarm is active, it will
initiate a warning alarm.
33 GSM Communication
Failure
When GSM is active and GSM module isn't detected by the controller,
controller will initiate a warning alarm.
34 HMP300
Communication Failure
When HMP300 is enabled, and HMP300 module isn't detected,
controller will initiate a warning alarm.
35 Earth Fault When controller detects that the earth fault current has exceeded the
pre-set value and the action is selected “Warn”, it will initiate a warning

HGM8152 GENSET PARALLEL CONTROLLER USER MANUAL
HGM8152 Genset Parallel (With Mains) Controller 2019-09-10 Version 1.1 Page 18 of 70
No Type Description
alarm.
36 Imbalance Current
When imbalance current detection is enabled and controller detects
unbalanced current value exceeded pre-set value, the action is selected
“Warn”, it will initiate a warning alarm.
37 Fail to sync When the controller does not detect synchronization signal within the
pre-set synchronization time, it will initiate a warning alarm.
38 GOV Reach Limit When GOV output reaches max. value or min. value, controller issues a
warning signal.
39 AVR Reach Limit When AVR output reaches max. value or min. value, controller issues a
warning signal.
40 Loss of Excitation
When loss of excitation detection is active and the controller detects that
the genset negative reactive power has exceeded the pre-set value, it
will initiate a warning alarm.
41 Gen Loss of Phase When controller detects gen loss of phase, it initiates a warning signal.
42 Gen Phase Seq Wrong When controller detects gen phase sequence wrong, it initiates a
warning signal.
43 Mains Over Freq When controller detects mains frequency is over pre-set limit, it initiates
a warning signal.
44 Mains Under Freq When controller detects mains frequency is below pre-set limit, it
initiates a warning signal.
45 Mains Over Voltage When controller detects mains voltage is over pre-set limit, it initiates a
warning signal.
46 Mains Under Voltage When controller detects mains voltage is below pre-set limit, it initiates a
warning signal.
47 Mains ROCOF When controller detects mains ROCOF is over pre-set limit, it initiates a
warning signal.
48 Mains Vector Shift When controller detects mains vector change is over pre-set limit, it
initiates a warning signal.

HGM8152 GENSET PARALLEL CONTROLLER USER MANUAL
HGM8152 Genset Parallel (With Mains) Controller 2019-09-10 Version 1.1 Page 19 of 70
5.2 SHUTDOWN ALARMS
When controller detects shutdown alarm, it will send signal to open breaker and shuts down
generator immediately.
Table 8 Shutdown Alarms
No Type Description
1 Emergency Stop When the controller detects an emergency stop alarm signal, it will
initiate a shutdown alarm.
2 Over Speed When the controller detects that the generator speed has exceeded the
pre-set value, it will initiate a shutdown alarm.
3 Under Speed When the controller detects that the generator speed has fallen below
the pre-set value, it will initiate a shutdown alarm.
4 Loss of Speed Signal When the controller detects that the engine speed is 0 and the action is
selected “Shutdown”, it will initiate a shutdown alarm.
5 Gen Over Frequency When the controller detects that the genset frequency has exceeded the
pre-set value, it will initiate a shutdown alarm.
6 Gen Under Frequency When the controller detects that the genset frequency has fallen below
the pre-set value, it will initiate a shutdown alarm.
7 Gen Over Voltage When the controller detects that the generator voltage has exceeded the
pre-set value, the controller will initiate a shutdown alarm.
8 Genset Under Voltage When the controller detects that the genset voltage has fallen below the
pre-set value, it will initiate a shutdown alarm.
9 Fail To Start If the engine does not fire after the pre-set number of attempts, it will
initiate a shutdown alarm.
10 Gen Over Current
When the controller detects that the genset current has exceeded the
pre-set value and the action is selected “Shutdown”, it will initiate a
shutdown alarm.
11 Maintenance Due When count down time is 0 and the action is selected “Shutdown”, it will
initiate a shutdown alarm.
12 ECU Shutdown If an error message is received from ECU via J1939, it will initiate a
shutdown alarm.
13 ECU Comm. Fail If the module does not detect the ECU data via J1939 after engine start,
it will initiate a shutdown alarm.
14 Reverse Power
When the controller detects that the reverse power value (power is
negative) has exceeded the pre-set value and the action is selected
“Shutdown”, it will initiate a shutdown alarm.
15 Over Power
When the controller detects that the over power value (power is positive)
has exceeded the pre-set value and the action is selected “Shutdown”, it
will initiate a shutdown alarm.
16 Temperature Sensor
Open Circuit
When the controller detects that the temperature sensor is open circuit
and the action is selected “Shutdown”, it will initiate a shutdown alarm.

HGM8152 GENSET PARALLEL CONTROLLER USER MANUAL
HGM8152 Genset Parallel (With Mains) Controller 2019-09-10 Version 1.1 Page 20 of 70
No Type Description
17 High Temperature When the controller detects that engine temperature has exceeded the
pre-set value, it will initiate a shutdown alarm.
18 Oil Pressure Open
Circuit
When the controller detects that the oil pressure sensor is open circuit
and the action is selected “Shutdown”, it will initiate a shutdown alarm.
19 Low Oil Pressure When the controller detects that the oil pressure has fallen below the
pre-set value, it will initiate a shutdown alarm.
20 Level Sensor Open
Circuit
When the controller detects that the level sensor is open circuit and the
action is selected “Shutdown”, it will initiate a shutdown alarm.
21 Flexible Sensor 1 Open
Circuit
When the controller detects that the flexible sensor 1 is open circuit and
the action is selected “Shutdown”, it will initiate a shutdown alarm.
22 Flexible Sensor 1 High When the controller detects that the sensor 1 value has exceeded the
pre-set upper limit value, it will initiate a shutdown alarm.
23 Flexible Sensor 1 Low When the controller detects that the sensor 1 value has fallen below the
pre-set lower limit value, it will initiate a shutdown alarm.
24 Flexible Sensor 2 Open
Circuit
When the controller detects that the flexible sensor 2 is open circuit and
the action is selected “Shutdown”, it will initiate a shutdown alarm.
25 Flexible Sensor 2 High When the controller detects that the sensor 2 value has exceeded the
pre-set upper limit value, it will initiate a shutdown alarm.
26 Flexible Sensor 2 Low When the controller detects that the sensor 2 value has fallen below the
pre-set lower limit value, it will initiate a shutdown alarm.
27 Digital Input When digit input port is set as shutdown and the alarm is active, it will
initiate a shutdown alarm.
28 Earth Fault
When the controller detects that the earth fault current has exceeded the
pre-set value and the action is selected “Shutdown”, it will initiate a
shutdown alarm.
29 Imbalance Current
When Imbalance Current detection is enabled and the controller detects
the imbalanced current has exceeded the pre-set value and the action is
selected “Shutdown” it will initiate a shutdown alarm.
30 Gen Phase Sequence
Wrong
When the controller detects phase sequence wrong, it will initiate a
shutdown alarm.
31 Volt Bus Phase
Sequence Wrong
When the controller detects mains phase sequence wrong, it will initiate
a shutdown alarm.
32 Volt Bus Error After synchronized-closing, when the controller detects the voltage
difference between generator and bus, it will initiate a shutdown alarm.
33 Loss of Excitation
When loss of excitation is enabled, and the controller detects that the
genset negative reactive power has exceeded the pre-set value, it will
initiate a shutdown alarm.

HGM8152 GENSET PARALLEL CONTROLLER USER MANUAL
HGM8152 Genset Parallel (With Mains) Controller 2019-09-10 Version 1.1 Page 21 of 70
5.3 TRIP AND STOP ALARMS
When controller detects trip and stop alarm signal, it immediately disconnects gen close signal, and
stops the genset after cooling.
Table 9 Trip and Stop Alarms
No. Type Description
1 Gen Over Current
When the controller detects that the genset current has exceeded the
pre-set value and the action is selected “Trip and Stop”, it will initiate a
trip and stop alarm.
2 Maintenance Due When count down time is 0 and the action is selected “Trip and Stop”, it
will initiate a trip and stop alarm.
3 Reverse Power
When the controller detects that the reverse power value (power is
negative) has exceeded the pre-set value and the action is selected
“Trip and Stop”, it will initiate a trip and stop alarm.
4 Over Power
When the controller detects that the over power value (power is positive)
has exceeded the pre-set value and the action is selected “Trip and
Stop”, it will initiate a trip and stop alarm.
5 Digital Input When digit input port is set as “Trip and Stop” and the alarm is active, it
will initiate a trip and stop alarm.
6 Earth Fault
When the controller detects that the earth fault current has exceeded the
pre-set value and the action is selected “Trip and Stop”, it will initiate a
trip and stop alarm.
7 Imbalance Current
If earth imbalance current detection is enabled, when the controller
detects the imbalance current has exceeded the pre-set value and the
action is selected “Trip and Stop”, it will initiate a trip and stop alarm.
8 Loss of Excitation
If loss of excitation fault detection is enabled, when the controller detects
that the genset negative reactive power has exceeded the pre-set value,
it will initiate a trip and stop alarm.
9 Mains Over Freq When the controller detects that the mains frequency has exceeded the
pre-set value, it will initiate a trip and stop alarm.
10 Mains Under Freq When the controller detects that the mains frequency has fallen below
the pre-set value, it will initiate a trip and stop alarm.
11 Mains Over Voltage When the controller detects that the mains voltage has exceeded the
pre-set value, it will initiate a trip and stop alarm.
12 Mains Under Voltage When the controller detects that the mains voltage has fallen below the
pre-set value, it will initiate a trip and stop alarm.
13 Mains ROCOF When the controller detects that the ROCOF (change rate of frequency)
has exceeded the pre-set value, it will initiate a trip and stop alarm.
14 Mains Vector Shift When the controller detects that vector shift value has exceeded the
pre-set value, it will initiate a trip and stop alarm.

HGM8152 GENSET PARALLEL CONTROLLER USER MANUAL
HGM8152 Genset Parallel (With Mains) Controller 2019-09-10 Version 1.1 Page 22 of 70
5.4 TRIP ALARM
When controller detects trip alarm signal, it immediately disconnects the gen close signal, but genset
doesn't stop.
Table 10 Trip Alarms
No. Type Description
1 Gen Over Current When the controller detects that the genset current has exceeded the
pre-set value and the action is selected “Trip”, it will initiate a trip alarm.
2 Reverse Power
When the controller detects that the reverse power value (power is
negative) has exceeded the pre-set value and the action is selected
“Trip”, it will initiate a trip alarm.
3 Over Power
When the controller detects that the over power value (power is positive)
has exceeded the pre-set value and the action is selected “Trip”, it will
initiate a trip alarm.
4 Digital Input When digit input port is set as “Trip” and the alarm is active, it will initiate
a trip alarm.
5 Earth Fault When controller detects that the earth fault current has exceeded the
pre-set value and the action is selected “Trip”, it will initiate a trip alarm.
6 Gen Breaker Fail When controller detects gen breaker close/open fails, it will initiate a trip
alarm.
7 Mains Breaker Fail When controller detects mains breaker close/open fails, it will initiate a
trip alarm.
8 Imbalance Current
If imbalance current detection is enabled, when the controller detects
the imbalance current has exceeded the pre-set value and the action is
selected “Trip”, it will initiate a trip alarm.
9 Loss of Excitation
If loss of excitation fault detection is enabled, when the controller detects
that the genset negative reactive power has exceeded the pre-set value,
it will initiate a trip alarm.

HGM8152 GENSET PARALLEL CONTROLLER USER MANUAL
HGM8152 Genset Parallel (With Mains) Controller 2019-09-10 Version 1.1 Page 23 of 70
6 WIRING CONNECTION
Controller back panel is as below:
Fig. 1 Controller Back Panel
HGM8152 GENSET PARALLEL CONTROLLER USER MANUAL
HGM8152 Genset Parallel (With Mains) Controller 2019-09-10 Version 1.1 Page 24 of 70
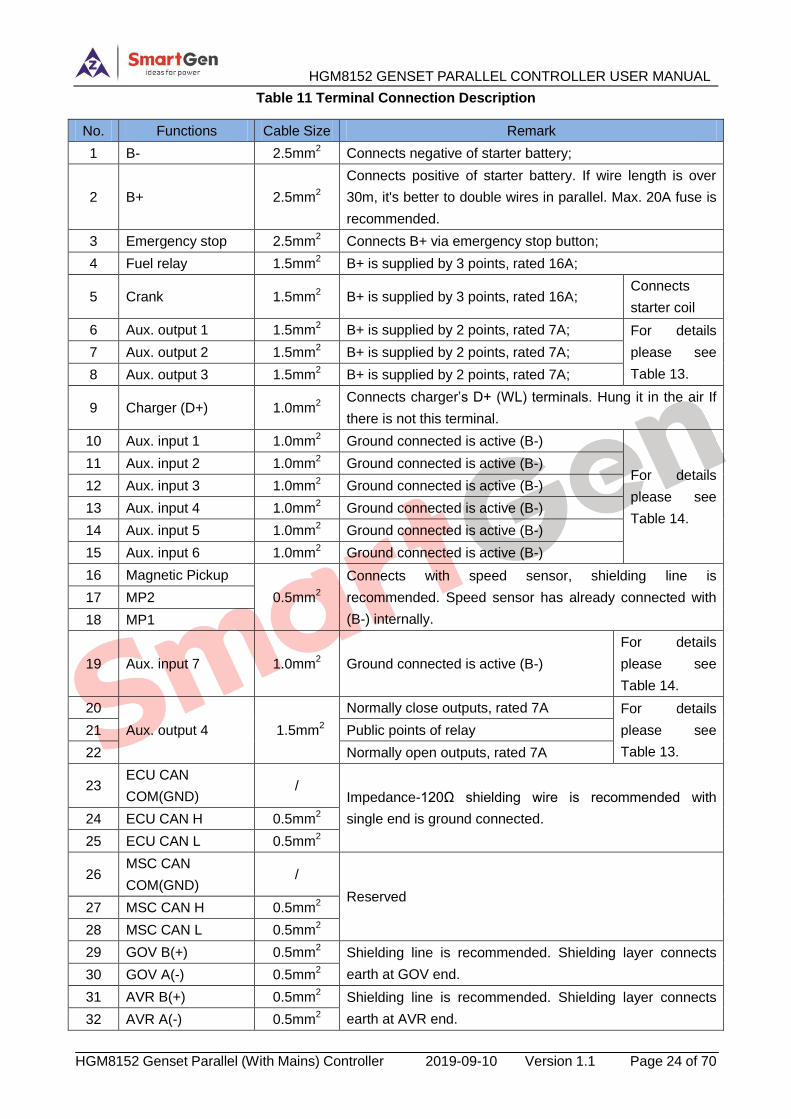
Table 11 Terminal Connection Description
No. Functions Cable Size Remark
1 B- 2.5mm2 Connects negative of starter battery;
2 B+ 2.5mm2
Connects positive of starter battery. If wire length is over
30m, it's better to double wires in parallel. Max. 20A fuse is
recommended.
3 Emergency stop 2.5mm2 Connects B+ via emergency stop button;
4 Fuel relay 1.5mm2 B+ is supplied by 3 points, rated 16A;
5 Crank 1.5mm2 B+ is supplied by 3 points, rated 16A;
Connects
starter coil
6 Aux. output 1 1.5mm2 B+ is supplied by 2 points, rated 7A; For details
please see
Table 13.
7 Aux. output 2 1.5mm2 B+ is supplied by 2 points, rated 7A;
8 Aux. output 3 1.5mm2 B+ is supplied by 2 points, rated 7A;
9 Charger (D+) 1.0mm2
Connects charger’s D+ (WL) terminals. Hung it in the air If
there is not this terminal.
10 Aux. input 1 1.0mm2 Ground connected is active (B-)
For details
please see
Table 14.
11 Aux. input 2 1.0mm2 Ground connected is active (B-)
12 Aux. input 3 1.0mm2 Ground connected is active (B-)
13 Aux. input 4 1.0mm2 Ground connected is active (B-)
14 Aux. input 5 1.0mm2 Ground connected is active (B-)
15 Aux. input 6 1.0mm2 Ground connected is active (B-)
16 Magnetic Pickup
0.5mm2
Connects with speed sensor, shielding line is
recommended. Speed sensor has already connected with
(B-) internally.
17 MP2
18 MP1
19 Aux. input 7 1.0mm2 Ground connected is active (B-)
For details
please see
Table 14.
20
Aux. output 4 1.5mm2
Normally close outputs, rated 7A For details
please see
Table 13.
21 Public points of relay
22 Normally open outputs, rated 7A
23 ECU CAN
COM(GND) /
Impedance-120Ω shielding wire is recommended with
single end is ground connected. 24 ECU CAN H 0.5mm2
25 ECU CAN L 0.5mm2
26 MSC CAN
COM(GND) /
Reserved 27 MSC CAN H 0.5mm
2
28 MSC CAN L 0.5mm2
29 GOV B(+) 0.5mm2 Shielding line is recommended. Shielding layer connects
earth at GOV end. 30 GOV A(-) 0.5mm2
31 AVR B(+) 0.5mm2 Shielding line is recommended. Shielding layer connects
earth at AVR end. 32 AVR A(-) 0.5mm2
HGM8152 GENSET PARALLEL CONTROLLER USER MANUAL
HGM8152 Genset Parallel (With Mains) Controller 2019-09-10 Version 1.1 Page 25 of 70
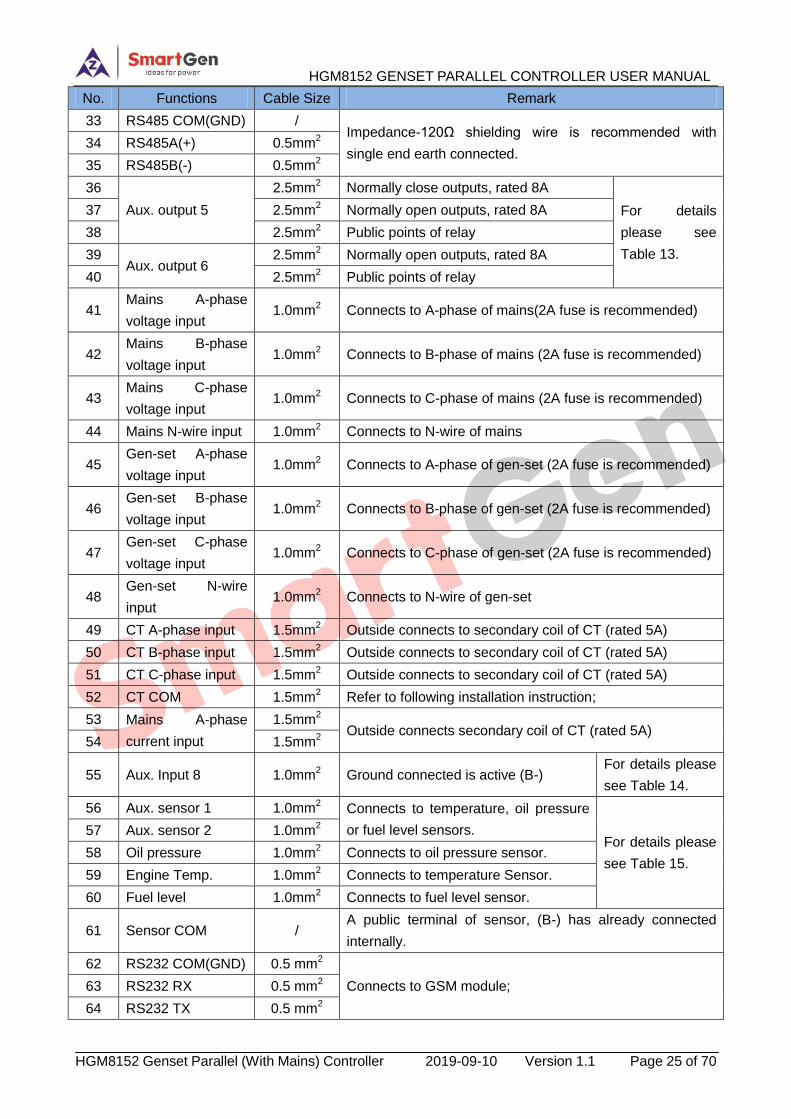
No. Functions Cable Size Remark
33 RS485 COM(GND) / Impedance-120Ω shielding wire is recommended with
single end earth connected. 34 RS485A(+) 0.5mm
2
35 RS485B(-) 0.5mm2
36
Aux. output 5
2.5mm2 Normally close outputs, rated 8A
For details
please see
Table 13.
37 2.5mm2 Normally open outputs, rated 8A
38 2.5mm2 Public points of relay
39 Aux. output 6
2.5mm2 Normally open outputs, rated 8A
40 2.5mm2 Public points of relay
41 Mains A-phase
voltage input 1.0mm
2 Connects to A-phase of mains(2A fuse is recommended)
42 Mains B-phase
voltage input 1.0mm
2 Connects to B-phase of mains (2A fuse is recommended)
43 Mains C-phase
voltage input 1.0mm
2 Connects to C-phase of mains (2A fuse is recommended)
44 Mains N-wire input 1.0mm2 Connects to N-wire of mains
45 Gen-set A-phase
voltage input 1.0mm
2 Connects to A-phase of gen-set (2A fuse is recommended)
46 Gen-set B-phase
voltage input 1.0mm
2 Connects to B-phase of gen-set (2A fuse is recommended)
47 Gen-set C-phase
voltage input 1.0mm
2 Connects to C-phase of gen-set (2A fuse is recommended)
48 Gen-set N-wire
input 1.0mm
2 Connects to N-wire of gen-set
49 CT A-phase input 1.5mm2 Outside connects to secondary coil of CT (rated 5A)
50 CT B-phase input 1.5mm2 Outside connects to secondary coil of CT (rated 5A)
51 CT C-phase input 1.5mm2 Outside connects to secondary coil of CT (rated 5A)
52 CT COM 1.5mm2 Refer to following installation instruction;
53 Mains A-phase
current input
1.5mm2
Outside connects secondary coil of CT (rated 5A) 54 1.5mm
2
55 Aux. Input 8 1.0mm2 Ground connected is active (B-)
For details please
see Table 14.
56 Aux. sensor 1 1.0mm2 Connects to temperature, oil pressure
or fuel level sensors. For details please
see Table 15.
57 Aux. sensor 2 1.0mm2
58 Oil pressure 1.0mm2 Connects to oil pressure sensor.
59 Engine Temp. 1.0mm2 Connects to temperature Sensor.
60 Fuel level 1.0mm2 Connects to fuel level sensor.
61 Sensor COM / A public terminal of sensor, (B-) has already connected
internally.
62 RS232 COM(GND) 0.5 mm2
Connects to GSM module; 63 RS232 RX 0.5 mm2
64 RS232 TX 0.5 mm2

HGM8152 GENSET PARALLEL CONTROLLER USER MANUAL
HGM8152 Genset Parallel (With Mains) Controller 2019-09-10 Version 1.1 Page 26 of 70
NOTE1: USB port on back panel is parameter configuration port and can set controller on PC.
NOTE2: Ethernet port on back panel is network monitoring port, and can monitor controller on PC.
7 SCOPES AND DEFINITIONS OF PROGRAMMABLE PARAMETERS
7.1 CONTENTS AND SCOPES OF PARAMETERS
Table 12 Parameter Setting Contents and Range
No. Items Range Defaults Description
Mains Setting
1 AC System (0-3) 0
0: 3P4W;
1: 3P3W;
2: 2P3W;
3: 1P2W;
2 Rated Voltage (30-30000)V 230
Provide standard for mains over/under
voltage detection; it is primary voltage of CT;
When AC system is 3P3W, it is wire voltage;
for other systems, it is phase voltage;
3 Rated Frequency (10.0-75.0)Hz 50.0 Provide standard for mains over/under
frequency detection;
4 Normal Time (0-3600)s 10 Check time for mains from abnormal to
normal;
5 Abnormal Time (0-3600)s 5 Check time for mains from normal to
abnormal;
6 PT Fitted (0-1) 0 0: Disable
1: Enable
7 Over Voltage (0-200)% 120
Rated voltage percentage; return value
(default 116%) and delay value (default 5s)
can also be set;
8 Under Voltage (0-200)% 80
Rated voltage percentage; return value
(default 84%) and delay value (default 5s)
can also be set;
9 Over Frequency (0-200)% 114
Rated frequency percentage; return value
(default 110%) and delay value (default 5s)
can also be set;
10 Under Frequency (0-200)% 90
Rated frequency percentage; return value
(default 94%) and delay value (default 5s)
can also be set;
11 CT Ratio (5-6000)/5 500 Ratio of externally connected CT;
12 Full-load Active
Power (1-60000)kW 345
Full-load active power of mains, used for
load share;
13 Full-load Reactive
Power (1-60000)kvar 258
Full-load reactive power of mains, used for
load share;

HGM8152 GENSET PARALLEL CONTROLLER USER MANUAL
HGM8152 Genset Parallel (With Mains) Controller 2019-09-10 Version 1.1 Page 27 of 70
No. Items Range Defaults Description
14 Sync. Alarm (0-1) 0 0: Electrical Trip
1: Aux. Mains Fail
15 Over Voltage (0-200)% 105 Rated voltage percentage; alarm action
(default: trip and stop) and delay value
(default: 0.1s) can also be set; 16 Under Voltage (0-200)% 95
17 Over Frequency (0-200)% 105 Rated frequency percentage; alarm action
(default: trip and stop) and delay value
(default: 0.1s) can also be set; 18 Under Frequency (0-200)% 95
19 ROCOF (0-1.00)Hz/s 0.20
Set value is ROCOF; alarm action (default:
trip and stop) and delay value (default: 0.1s)
can also be set;
20 VECTOR (0-20.0)° 6.0
Set value is Vector Shift; alarm action
(default: trip and stop) and delay value
(default: 0.1s) can also be set;
Timer Setting
1 Start Delay (0~3600)s 5 Time from remote start signal is active to
genset start.
2 Stop Delay (0~3600)s 30 Time from remote start signal is inactive to
genset stop.
3 Preheat Delay (0~3600)s 0 Time of pre-powering heat plug before
starter is powered up.
4 Cranking Time (3~60)s 8 Time of starter powered on
5 Crank Rest Time (3~60)s 10 The waiting time before second power up
when engine start fails.
6 Safety On Delay (0-3600)s 10
Alarms for low oil pressure, high
temperature, under speed, under frequency
/voltage, charge fail are inactive.
7 Start Idle Time (0~3600)s 10 Idle running time of genset at starting.
8 Warming Up Time (0~3600)s 30 Warming up time between genset close and
high speed running.
9 Cooling Time (0~3600)s 60 Radiating time before genset stop, after
genset unloads.
10 Stop Idle Time (0~3600)s 10 Idle running time at genset stop.
11 ETS Solenoid Hold (0~3600)s 20 Stop electromagnet’s power on time when
genset is stopping.
12 Fail to Stop Delay (0~3600)s 0
Time between ending of genset idle delay
and complete stop when “ETS time” is set 0;
Time between ending of ETS hold delay and
complete stop when “ETS Hold output time”
is not 0.
13 After Stop Time (0~3600)s 0 Time between genset complete stop
becoming standby status.

HGM8152 GENSET PARALLEL CONTROLLER USER MANUAL
HGM8152 Genset Parallel (With Mains) Controller 2019-09-10 Version 1.1 Page 28 of 70
No. Items Range Defaults Description
Engine Setting
1 Engine Type (0~39) 0 Default: Conventional Engine (not J1939);
Select the right one when connects J1939;
2 Flywheel Teeth (10~300) 118
Tooth number of engine flywheel, used for
judging starter separation conditions and
inspecting engine speed. Refer to following
installation instructions.
3 Rated Speed (0~6000) r/min 1500 Provides standards for judging
over/under/loading speed.
4 Loading Speed (0~100)% 90
Rated speed percentage; Controller detects
when it is ready to load. It won’t switch on
when speed is under loading speed.
5 Loss of Speed
Signal (0~3600)s 5
Time from detecting speed is 0 to confirm
the action.
6 Loss of Speed
Signal Action (0~1) 0
0: Warn;
1: Shutdown
7 Over Speed
Shutdown (0~200)% 114 Rated speed percentage; delay value (over
speed default: 2s; and under speed default:
3s) also can be set. 8 Under Speed
Shutdown (0~200)% 80
9 Over Speed Warn (0~200)% 110 Rated speed percentage, return value (over
speed default: 108 and under speed default:
90) and delay value (default: 5s) can also be
set. 10 Under Speed Warn (0~200)% 86
11 Battery Rated
Voltage (0~60.0)V 24.0
Standard for detecting over/under voltage of
battery.
12 Battery Over Volts
Alarm (0~200)% 120
Rated voltage percentage of battery, delay
value (default: 60s) and return value (over
voltage default: 115 and under voltage
default: 90) can also be set. 13
Battery Under Volts
Alarm (0~200)% 85
14 Charge Alt Fail (0~60.0)V 8.0
During genset normal running, when charger
D+(WL) voltage is lower than this, warning is
initiated;
15 Start Attempts (1~10) times 3
Max. crank times when crank fails. When it
is satisfied, controller will send start failure
signal.
16 Crank Disconnect (0~6) 2
Please refer to Table 16.
There are 3 conditions of disconnecting
starter with engine. Each condition can be
used alone or simultaneously for separating
the start motor and genset as soon as
possible.

HGM8152 GENSET PARALLEL CONTROLLER USER MANUAL
HGM8152 Genset Parallel (With Mains) Controller 2019-09-10 Version 1.1 Page 29 of 70
No. Items Range Defaults Description
17 Disconnect
Generator Freq (0~200)% 30
Gen rated frequency percentage; when
generator frequency is higher than the set
value, starter will be disconnected. Refer to
following installation instruction.
18 Disconnect Engine
Speed (0~200)% 30
Rated speed percentage; when generator
speed is higher than the set value, starter
will be disconnected. Refer to the installation
instruction.
19 Disconnect Oil
Pressure (0~1000)kPa 200
When generator oil pressure is higher than
the set value, starter will be disconnected.
Refer to the installation instruction.
Generator Setting
1 AC System (0~3) 0
0: 3P4W;
1: 3P3W;
2: 2P3W;
3: 1P2W.
2 Poles (2-64) 4
Numbers of generator pole, used for
calculating engine speed when there is not
speed sensor.
3 Rated Voltage (30~30000)V 230
Standards for detecting gens over/under
voltage and loading voltage. It is also
primary voltage when voltage transformer is
used.
4 Loading Voltage (0~200)% 90
Generator rated voltage percentage; it is
detected when controller is preparing to take
load; when gen voltage is less than loading
voltage, it won't enter normal running period;
5 Rated Frequency (10.0-75.0)Hz 50.0 Standards for detecting over/under/load
frequency.
6 Loading Frequency (0~200)% 90
Gen rated frequency percentage; it is
detected when controller is preparing to take
load; when gen frequency is less than
loading one, it won't enter normal running
period;
7 Volt. Trans.(PT) (0~1) 0 0: Disable;
1:Enable
8 Over Volt. Shutdown (0~200)% 120 Gen rated volt. Percentage; delay value
(default: 3s) can also be set. 9 Under Volt.
Shutdown (0~200)% 80
10 Over Freq.
Shutdown (0~200)% 114
Gen rated freq. percentage; Delay value
(over frequency default: 2s and under
frequency default: 3s) can also be set. 11 Under Freq. (0~200)% 80

HGM8152 GENSET PARALLEL CONTROLLER USER MANUAL
HGM8152 Genset Parallel (With Mains) Controller 2019-09-10 Version 1.1 Page 30 of 70
No. Items Range Defaults Description
Shutdown
12 Over Volt. Warn (0~200)% 110 Gen rated volt. Percentage; delay value
(default: 5s) and return value (over volt
default: 108 and under volt default: 86) also
can be set. 13 Under Volt. Warn (0~200)% 84
14 Over Freq. Warn (0~200)% 110 Gen rated freq. percentage; delay value
(default: 5s) and return value (over
frequency default: 108 and under frequency
default: 86) also can be set. 15 Under Freq. Warn (0~200)% 84
Generator Load Setting
1 Current Trans. (5~6000)/5 500 Ratio of external CT;
2 Rated Full-load
Current (5~6000)A 500
Generator’s rated current, standard of load
current.
3 Rated Power (1-20000)kW 276 Generator’s rated power, standard of load
power.
4 Overload Current (0~200)% 120
Rated full-load current percentage of gen;
delay value also can be set to definite time
limit or inverse time limit.
5 Over Power (0~200)% 110
Rated active power percentage of generator;
delay value (default: 30s) and action
(default: trip and stop) can also be set.
6 Reverse Power (0~200)% 10
Rated active power percentage of generator;
delay value (default: 10s) and action
(default: trip and stop) can also be set.
7 Earth Fault (0~1) 0 0: Disable
1: Enable.
8 Imbalance Current (0~1) 0 0: Disable
1: Enable.
9 Loss of Excitation (0~200)% 20%
Rated reactive power percentage of
generator; delay value (default: 5s) and
action (default: trip) can also be set.
Switch Setting
1 Close Time (0~20.0)s 5.0 Close pulse width; when it is 0, it means
constant output.
2 Open Time (0~20.0)s 3.0 Open pulse width;
Module Setting
1 Power On Mode (0~2) 0
0: Stop mode
1: Manual mode
2: Auto mode
2 Module Address (1~254) 1 Controller address at remote monitoring;
3 Stop Bit (0~1) 0 0: 2 stop bits;
1: 1 stop bit

HGM8152 GENSET PARALLEL CONTROLLER USER MANUAL
HGM8152 Genset Parallel (With Mains) Controller 2019-09-10 Version 1.1 Page 31 of 70
No. Items Range Defaults Description
4 Language (0~2) 0
0: Simplified Chinese
1: English
2: Others
5 Password (0~65535) 00318 For entering parameter setting
6 Temp. Unit Select (0-1) 0 0: ℃ 1: ℉
7 Pressure Unit Select (0-2) 0
0:kPa;
1:Psi;
2:Bar.
8 Unparallel Mode
Enable (0-1) 0
0: Disable;
1: Enable
9 Date and Time Set current date and time.
10 Ethernet Enable (0~1) 1
0: Disable;
1: Enable
All Ethernet setting changes (e.g. IP
address, Subnet mask) are active after
controller re-power on.
11 HMP300 Enable (0~1) 0
0: Disable;
1: Enable
When it is disabled, mains current and
power use module has data themselves;
when it is enabled, mains current and power
data are read from HMP300 module;
GSM Setting
1 GSM Enable (0-1) 0 0: Disable;
1: Enable
2 Phone Number Set Max. 20 bit It needs to add area code of region or
country; e.g. China 8613666666666
Scheduling And Maintenance Setting
1 Scheduled Run (0~1) 0 0: Disable;
1: Enable
2 Scheduled Not Run (0~1) 0 0: Disable;
1: Enable
3 Maintenance (0~1) 0 0: Disable;
1: Enable
Analog Sensors Setting
Temperature Sensor
1 Curve Type (0~15) 7 SGX
2 Open Circuit Action (0~2) 0
0: Warn
1: Shutdown
2: No action
3 High Temp. (0-300)ºC 98 When sensor value is over this value, it

HGM8152 GENSET PARALLEL CONTROLLER USER MANUAL
HGM8152 Genset Parallel (With Mains) Controller 2019-09-10 Version 1.1 Page 32 of 70
No. Items Range Defaults Description
Shutdown initiates shutdown alarm; it is detected only
after safety delay is over; delay value
(default: 3s) also can be set.
4 High Temp Warn (0-300)ºC 95
When sensor value is over this value, it
initiates warning alarm; it is detected only
after safety delay is over; delay value
(default: 3s) also can be set.
5 Low Temp. Warn (0~1) 0 0: Disable;
1: Enable
Oil Pressure Sensor
1 Curve Type (0~15) 7 SGX
2 Open Circuit Action (0~2) 0
0: Warn
1: Shutdown
2: No action
3 Low OP Shutdown (0~1000)kPa 103
When sensor pressure is lower than this
value, it initiates shutdown alarm; it is only
detected after safety delay is over; delay
value (default: 3s) also can be set.
4 Low OP Warn (0~1000)kPa 124
When sensor pressure is lower than this
value, it initiates warning alarm; it is only
detected after safety delay is over; delay
value (default: 5s) and return value (default:
138) also can be set.
Fuel Level Sensor
1 Curve Type (0~15) 0 Not used.
2 Open Circuit Action (0~2) 0
0: Warn;
1: Alarm Shutdown;
2: No Action
3 Low Fuel Level
Warn (0~300)% 10
When sensor level is lower than this value, it
initiates low warning alarm; it is detected
always; delay value (default: 5s) and return
value (default: 15) also can be set.
Flexible Sensor 1
1 Flexible Sensor 1
Setting (0~3) 0
0: Not Used;
1: Temp. Sensor
2: Pressure Sensor
3: Liquid Level sensor
Temp./pressure/level sensors can be set;
Flexible Sensor 2
1 Flexible Sensor 2
Setting (0~1) 0
0: Not Used;
1: Temp. Sensor
2: Pressure Sensor

HGM8152 GENSET PARALLEL CONTROLLER USER MANUAL
HGM8152 Genset Parallel (With Mains) Controller 2019-09-10 Version 1.1 Page 33 of 70
No. Items Range Defaults Description
3: Liquid Level sensor
Temp./pressure/level sensors can be set;
Digital Input Ports
Digital Input Port 1
1 Contents Setting (0~55) 31 Remote start (demand).
2 Active Type (0~1) 0 0: Closed to active
1: Open to active
Digital Input Port 2
1 Contents Setting (0~55) 27 Low oil pressure shutdown
2 Active Type (0~1) 0 0: Close
1: Open
Digital Input Port 3
1 Contents Setting (0~55) 26 High temperature shutdown
2 Active Type (0~1) 0 0: Close
1: Open
Digital Input Port 4
1 Contents Setting (0~55) 13 Gen close status
2 Active Type (0~1) 0 0: Close
1: Open
Digital Input Port 5
1 Contents Setting (0~55) 0 User defined.
2 Active Type (0~1) 0 0: Close
1: Open
3 Active Range (0~3) 3
0: From safety on
1: From starting
2: Always active
3: Deactive
4 Active Actions (0~4) 4
0: Warn;
1: Shutdown;
2:Trip and stop
3:Trip
4: Indication
5 Delay (0~20.0)s 2.0 Time from detecting input port is active to
confirm.
6 Description LCD displaying contents when the input is
active.
Digital Input Port 6
1 Contents Setting (0~55) 44 Reserved
2 Active Type (0~1) 0 0: Close
1: Open
Digital Input Port 7
1 Contents Setting (0~55) 0 User defined

HGM8152 GENSET PARALLEL CONTROLLER USER MANUAL
HGM8152 Genset Parallel (With Mains) Controller 2019-09-10 Version 1.1 Page 34 of 70
No. Items Range Defaults Description
2 Active Type (0~1) 0 0: Close
1: Open
3 Active Range (0~3) 3
0: From safety on
1: From starting
2: Always active
3: Deactive
4 Active Actions (0~4) 4
0: Warn;
1: Shutdown;
2:Trip and stop
3:Trip
4: Indication
5 Active Delay (0~20.0)s 2.0 Time from detecting input port is active to
confirm.
6 Description LCD displaying contents when the input is
active.
Digital Input Port 8
1 Contents Setting (0-55) 15 Mains close status input;
2 Active Type (0-1) 0 0: Close
1: Open
Relay Output Ports
Relay Output Port 1
1 Contents Setting (0~299) 44 Generator OK.
2 Output Type (0~1) 0 0:Normally open;
1:Normally close
Relay Output Port 2
1 Contents Setting (0~299) 48 Common Alarm.
2 Output Type (0~1) 0 0:Normally open;
1:Normally close
Relay Output Port 3
1 Contents Setting (0~299) 38 Energize to Stop.
2 Output Type (0~1) 0 0:Normally open;
1:Normally close
Relay Output Port 4
1 Contents Setting (0~299) 35 Idle Control.
2 Output Type (0~1) 0 0:Normally open;
1:Normally close
Relay Output Port 5
1 Contents Setting (0~299) 30 Gen Open Output.
2 Output Type (0~1) 0 0:Normally open;
1:Normally close
Relay Output Port 6
1 Contents Setting (0~299) 29 Gen Close Output.

HGM8152 GENSET PARALLEL CONTROLLER USER MANUAL
HGM8152 Genset Parallel (With Mains) Controller 2019-09-10 Version 1.1 Page 35 of 70
No. Items Range Defaults Description
2 Output Type (0~1) 0 0:Normally open;
1:Normally close
Sync Setting -Basic
1 Dead Bus Volt (10-50)V 30 It is considered bus is dead when bus
voltage is lower than dead bus voltage.
2 Voltage Difference (0-30)V 3
It is considered voltage synchronization
when the voltage difference between
generator and bus is lower than
synchronization voltage difference.
3 Positive Freq
Difference (0-2.0)Hz 0.2
It is considered frequency synchronization
when the frequency difference between
generator and bus is less than positive
difference but above negative difference. 4
Negative Freq
Difference (0-2.0)Hz 0.1
5 Phase Angle
Difference (0-20)° 10
It is considered phase synchronization when
the initial phase difference between gen and
bus is lower than synchronizing phase angle
difference.
6 Difference
Frequency (0-1.00)Hz 0.10
Frequency difference of adjusting gen
frequency to be above mains freq.
7 MSC ID (0-31) 1 Inactive for HGM8152;
8 MSC Priority (0-31) 0 Inactive for HGM8152;
9 Full-load kW rating (0-20000)kW 276 Used for load sharing.
10 Full-load kVar rating (0-20000)kvar 210 Used for load sharing.
11 Baud Rate (0-3) 1
0:500 kBit/s;
1:250 kBit/s;
2:125 kBit/s;
3:50 kBit/s.
12 Scheduled Run PCT (0-100)% 80 Schedule the load value of other genset
when start on demand.
13 Scheduled Stop
PCT (0-100)% 50
Schedule the load value of other genset
when start on demand.
14 Load Ramp Rate (0.1-100.0)%/s 3.0 Speed rate(%/s) of genset load/load
shedding
15 Load Ramp Point (0.1-40.0)% 10.0
16 Load Ramp Delay (0-30)s 0
17 Starting Options (0-1) 1 Inactive for HGM8152;
18 MSC Modules (1-32) 2 Inactive for HGM8152;
19
MSC Too Few
Modules Action
Type
(0-2) 1 Inactive for HGM8152;
20 Balance Engine
Hours (1-1000)h Disable Inactive for HGM8152;

HGM8152 GENSET PARALLEL CONTROLLER USER MANUAL
HGM8152 Genset Parallel (With Mains) Controller 2019-09-10 Version 1.1 Page 36 of 70
No. Items Range Defaults Description
21 Fail to Sync Delay (5.0-300.0)s 60.0 When the controller doesn't detects Sync.
signal during the preset delay, it will send
corresponding alarm signal according to the
action type.
Action Type:
0: Warn
1: Trip
22 Fail to Sync Action (0-1) 0
23 NEL Trip Enable (0-1) 0
0: Disable
1: Enable;
For details of function description please
refer to the following contents;
24 NEL Trip Value 1 (0-200)% 90
25 NEL Trip Delay 1 (0-3600)s 5
26 NEL Trip Value 2 (0-200)% 100
27 NEL Trip Delay 2 (0-3600)s 1
28
NEL Auto
Reconnection
Enable
(0-1) 0
29 NEL Auto
Reconnection Value (0-200)% 50
30 NEL Auto
Reconnection Delay (0-3600)s 5
31 NEL Number (1-3) 3
Sync Setting - GOV
1 Output Type (0-1) 1 0: Internal Relay output
1: Internal Analog Output
2 Output Reverse (0-1) 0 0: Disable
1: Enable
3 Loading Action (0-2) 1
0: None
1: Adjust to Rated Frequency
2: Adjust to Center Point
4 Center Voltage SW1 (0-10.0) 0 Default central voltage: 0V.
5 Voltage Range
SW2 (0-10.0) 2.0 Default volt. range: (-1.5~+1.5)V
6 Sync Gain (0-500) % 20 Adjust and control before paralleling.
7 Sync Stability (0-2000) % 20 Adjust and control before paralleling.
8 Load Control Gain (0-500) % 20 Adjust and control after paralleling.
9 Load Control
Stability (0-2000) % 20 Adjust and control after paralleling.
Sync Setting - AVR
1 Output Type (0-1) 1 0: Relay output
1: Analog Voltage Output
2 Output Reverse (0-1) 0 0: Disable
1: Enable.
3 Loading Action (0-2) 1 0: None

HGM8152 GENSET PARALLEL CONTROLLER USER MANUAL
HGM8152 Genset Parallel (With Mains) Controller 2019-09-10 Version 1.1 Page 37 of 70
No. Items Range Defaults Description
1: Adjust to Rated Frequency
2: Adjust to Center Point
4 Centre Voltage
SW1 (0-10.0) 0 Default central voltage: 0V.
5 Voltage Range
SW2 (0-10.0) 2.0 Default volt. range: (-1.5~+1.5)V
6 Sync Control Gain (0-500) % 20 Adjust and control before paralleling.
7 Sync Control
Stability (0-2000) % 20 Adjust and control before paralleling.
8 Load Control Gain (0-500) % 20 Adjust and control after paralleling.
9 Load Control
Stability (0-2000) % 20 Adjust and control after paralleling.
7.2 DEFINABLE CONTENTS OF PROGRAMMABLE OUTUT PORTS
Table 13 Definable Contents of Programmable Output Ports
No. Type Description
0 Not Used
1 Custom Period 1
For details of function description please see the following
contents.
2 Custom Period 2
3 Custom Period 3
4 Custom Period 4
5 Custom Period 5
6 Custom Period 6
7 Custom Combined 1
8 Custom Combined 2
9 Custom Combined 3
10 Custom Combined 4
11 Custom Combined 5
12 Custom Combined 6
13 Pre-set Output Used for pre-heating control;
14 Reserved
15 Reserved
16 Reserved
17 Air Flap Control Act at over speed shutdown and emergence stop. It closes the
air inflow.
18 Audible Alarm
Act at warning, shutdown, and trips; Can connect an
announciator externally; When “alarm mute” configurable input
port is active, it is prohibited to output;
19 Louver Control Act when genset starts and disconnect when genset has
stopped completely;
20 Fuel Pump Control It is controlled by the upper and lower limits of fuel pump;

HGM8152 GENSET PARALLEL CONTROLLER USER MANUAL
HGM8152 Genset Parallel (With Mains) Controller 2019-09-10 Version 1.1 Page 38 of 70
No. Type Description
21 Heater Control It is controlled by the upper and lower limits of heating control;
22 Cooler Control It is controlled by the upper and lower limits of cooling control;
23 Oil Pre-supply Output Act from crank to safe running periods;
24 Generator Excite Output in start process. If there is not generator frequency
during hi-speed running, it outputs for 2 seconds again.
25 Pre-lubricate Act from pre-heating to safe running periods.
26 Remote Control Output This port is controlled by communication (PC).
27 GSM Power Supply It is used for supply power for GSM module (power off and
reset GSM module when GSM fails to communicate);
28 Reserved
29 Gen Close Output Control generator to take load.
30 Gen Open Output Control generator to unload.
31 Mains Close Output Control mains to take load.
32 Mains Open Output Control mains to unload;
33 Start Relay
34 Fuel Relay Act when genset is starting and disconnect when stop is
completed.
35 Idle Control
Used for engine with idle speed; close before starting and
open in warming up delay; close during stop idle mode and
open when stop is completed.
36 Speed Raise Relay Act in warming up delay.
37 Speed Drop Relay Act at stop idle speed and waiting to stop periods;
38 Energize to Stop Used for engines with ETS electromagnet; close when stop
idle is over and open when pre-set “ETS delay” is over.
39 Speed Drop Pulse Act for 0.1s when controller enters stop idle, used to control
part of ECU dropping to idle speed.
40 ECU Stop Used for ECU engine to control its stop.
41 ECU Power Supply Used for ECU engine to control its power.
42 Speed Raise Pulse Act for 0.1s when controller enters warming up delay; used to
control part of ECU raising to normal speed.
43 Crank Success Close when a successful start signal is detected.
44 Generator OK Act when generator is normal.
45 Generator Load Available Act in periods of generator ok and hi-speed cooling.
46 Mains normal output
47 Synchronizing
48 Common Alarm Act at genset common warning, common shutdown, common
trip alarms.
49 Common Trip and Stop Act at common trip and stop alarms.
50 Common Shutdown Act at common shutdown alarms.
51 Common Trip Act at common trip alarms without stop.
52 Common Warning Act at common warning alarms.
53 Reserved

HGM8152 GENSET PARALLEL CONTROLLER USER MANUAL
HGM8152 Genset Parallel (With Mains) Controller 2019-09-10 Version 1.1 Page 39 of 70
No. Type Description
54 Battery Over Voltage Act at battery’s over voltage warning alarms.
55 Battery Under Voltage Act at battery’s low voltage warning alarms.
56 Charge Alternator Failure Act at charge failure warning alarms.
57 Reserved
58 Reserved
59 Reserved
60 ECU Warning Indicates ECU sends a warning signal.
61 ECU Shutdown Indicates ECU sends a shutdown signal.
62 ECU Communication Failure Indicates controller cannot communicates with ECU.
63 PWM Voltage Raise
64 PWM Voltage Drop
65 PWM Speed Raise
66 PWM Speed Drop
67 Reserved
68 Reserved
69 Digital Input 1 Active Act when input port 1 is active
70 Digital Input 2 Active Act when input port 2 is active
71 Digital Input 3 Active Act when input port 3 is active
72 Digital Input 4 Active Act when input port 4 is active
73 Digital Input 5 Active Act when input port 5 is active
74 Digital Input 6 Active Act when input port 6 is active
75 Digital Input 7 Active Act when input port 7 is active
76 Digital Input 8 Active Act when input port 8 is active
77~80 Reserved
81~96 Extension Digital Input 1-16
Active
Act when extension digital input ports 1-16 are active;
97~98 Reserved
99 Emergency Stop Act at emergency stop alarms.
100 Fail To Start Act at failed start alarms.
101 Fail To Stop Act at failed stop alarms.
102 Under Speed Warn Act at under speed alarms.
103 Under Speed Shutdown Act under speed shuts down alarms.
104 Over Speed Warn Act at over speed warning alarms.
105 Over Speed Shutdown Act at over speed shutdown alarms.
106 Reserved
107 Reserved
108 Reserved
109 Gen Over Freq. Warn Act at generator over frequency warnings.
110 Gen over Freq. Shutdown Act at generator over frequency shutdown alarms.
111 Gen Over Volt Warn Act at generator over voltage warnings.
112 Gen Over Volt Shutdown Act at generator over voltage shutdown alarms.

HGM8152 GENSET PARALLEL CONTROLLER USER MANUAL
HGM8152 Genset Parallel (With Mains) Controller 2019-09-10 Version 1.1 Page 40 of 70
No. Type Description
113 Gen Under Freq. Warn Act at generator low frequency warnings.
114 Gen Under Freq. Shutdown Act at generator low frequency shutdown alarms.
115 Gen Under Volt. Warn Act at generator low voltage warnings.
116 Gen Under Volt. Shutdown Act at generator low voltage shutdowns.
117 Gen Loss of Phase Act at generator loss phase alarms.
118 Gen Phase Sequence Wrong Act at generator reverse phase alarms.
119 Reserved
120 Over Power Alarm Act when controller detects generator has over power.
121 Reserved
122 Generator Reverse Power Act when controller detects generator has reverse power.
123 Over Current Alarm Act at over current alarms.
124 Reserved
125 Mains Inactive
126 Mains Over Frequency
127 Mains Over Voltage
128 Mains Under Frequency
129 Mains Under Voltage
130 Mains Phase Sequence
Wrong
131 Mains Loss of Phase
132~133 Reserved
134 NEL1 Trip
135 NEL2 Trip
136 NEL3 Trip
137~138 Reserved
139 High Temp Warn Act at hi-temperature warnings.
140 Low Temp Warn Act at low temperature warnings.
141 High Temp Shutdown Act at hi-temperature Shutdown alarms.
142 Reserved
143 Low Oil Pressure Warn Act at low oil pressure warnings.
144 Low Oil Pressure Shutdown Act at low oil pressure shutdowns.
145 Oil Pressure Open Circuit Act when oil pressure sensor is open circuit.
146 Reserved
147 Low Fuel Level Act when controller has low oil level alarm.
148 Reserved
149 Reserved
150 Flexible Sensor 1 High Warn
151 Flexible Sensor 1 Low Warn
152 Flexible Sensor 1 High Shut
153 Flexible Sensor 1 Low Shut
154 Flexible Sensor 2 High Warn

HGM8152 GENSET PARALLEL CONTROLLER USER MANUAL
HGM8152 Genset Parallel (With Mains) Controller 2019-09-10 Version 1.1 Page 41 of 70
No. Type Description
155 Flexible Sensor 2 Low Warn
156 Flexible Sensor 2 High Shut
157 Flexible Sensor 2 Low Shut
158~161 Reserved
162 Expand 1 Sensor 15 High
Shutdown
163 Expand 1 Sensor 15 High
Warn
164 Expand 1 Sensor 15 Low
Shutdown
165 Expand 1 Sensor 15 Low
Warn
166_201 Expand 1 Sensor 16-24
202~229 Reserved
230 Stop Mode Act when system in stop mode.
231 Manual Mode Act when system in Manual mode.
232 Reserved
233 Auto Mode Act when system in Auto mode.
234 Generator Load Indicator
235 Mains Load Indicator
236~239 Reserved
240~279 PLC Flag1~40 Act when PLC is marked as 1;
280~299 Reserved
7.2.1 DEFINED PERIOD OUTPUT
Defined period output is composed by 2 parts: period output S1 and condition output S2.
While S1 and S2 are TRUE synchronously, OUTPUT;
While S1 or S2 is FALSE, NOT OUTPUT.
Period output S1 can be set to one or several period outputs of genset; delay time and output time
after entering the periods can be set as well.
Condition output S2 can be any contents of output setting.
NOTE: Delay time and output time of period output S1 both are 0, output S1 are true in this period.
For example:
Output period: start
Delay output time: 2s
Output time: 3s
Condition output contents: output port 1 is active

HGM8152 GENSET PARALLEL CONTROLLER USER MANUAL
HGM8152 Genset Parallel (With Mains) Controller 2019-09-10 Version 1.1 Page 42 of 70
Close when condition output active/inactive: close when active (disconnect when inactive);
When output port 1 is active, and when it enters start period, and delays for 2s, this defined period output starts outputting,
and after outputting for 3s, it stops outputting;
When output port 1 is inactive, defined output period doesn't output.
7.2.2 DEFINED COMBINATION OUTPUT
Defined combination output is composed by 3 parts: condition output S1 or S2 and condition output
S3.
S1 or S2 is TRUE, and S3 is TRUE, defined combination output is outputting;
S1 and S2 are FALSE, or S3 is FALSE, defined combination output is not outputting.
NOTE: S1, S2, S3 can be set as any contents except for “defined combination output” in the output settings.
NOTE: 3 parts of defined combination output (S1, S2, S3) couldn’t include or recursively include themselves.
For example:
Contents of OR condition output S1: Input port 1 is active;
Close when OR condition output S1 is active /inactive: close when active (disconnect when inactive);
Contents of OR condition output S2, input port 2 is active;
Close when OR condition output S2 is active /inactive: close when active (disconnect when inactive);
Contents of AND condition output S3: Input port 3 is active;
Close when AND condition output S3 is active /inactive: close when active (disconnect when inactive);
When input port 1 active or input port 2 is active, if input port 3 is active, defined combination output is outputting; If input
port 3 is inactive, defined combination output is not outputting;
When input port 1 is inactive and input port 2 is inactive, whatever input port 3 is active or not, defined combination output
is not outputting.
7.3 DEFINED CONTENTS OF PROGRAMMABLE INPUT PORTS (ALL GROUND CONNECTED (B-)
IS ACTIVE)
Table 14 Definable Contents of Programmable Output Ports
No. Type Description
0 Users Defined
Users can define the following;
Indication: indicate only, not warning or shutdown.
Warning: warn only, not shutdown.
Shutdown: alarm and shutdown immediately
Trip and stop: alarm, generator unload and shutdown after hi-speed
cooling;
Trip: alarm, generator unload but not shutdown.
Never: input is inactive.

HGM8152 GENSET PARALLEL CONTROLLER USER MANUAL
HGM8152 Genset Parallel (With Mains) Controller 2019-09-10 Version 1.1 Page 43 of 70
No. Type Description
Always: input is active all the time.
From crank: detect when crank starts.
From safety on: detect after safety on delay.
1 Reserved
2 Alarm Mute It can prohibit “Audible Alarm” output when it is active.
3 Alarm Reset It can reset shutdown alarm and trip alarm when it is active.
4 60Hz Active Use for ECU engine with CANBUS and it is 60Hz when input is active.
5 Lamp Test All LED indicators are illuminated when input is active.
6 Panel Lock All buttons in panel are inactive except and
there is on the right of first row in LCD Status screen when input is
active.
7 War Mode All shutdown alarms are prohibited except emergency stop and over
speed shutdown, and there is also not start idle speed time.
8 Idle Mode Under voltage/frequency/speed protection is inactive.
9 Auto Stop Inhibit In Auto mode, during generator normal running, when input is active,
generator shutdown is prohibited automatically.
10 Auto Start Inhibit In Auto mode, generator start is prohibited automatically when input is
active.
11 Scheduled Run Inhibit In Auto mode, fixed time genset start is prohibited when input is
active.
12 Reserved
13 Gen Closed Aux. Connects aux. point of generator loading switch;
14 Gen Load Inhibit Genset close is inhibited when input is active.
15 Mains Closed Aux Connects aux. point of mains loading switch;
16 Mains Load Inhibit Mains close is inhibited when input is active.
17 Auto Mode Lock When input is active, controller enters Auto mode; mode keys on the
panel are inactive.
18 Auto Mode Inhibit When input is active, controller won’t work under Auto mode and
simulate and auto keys does not work.
19 Reserved
20 Black Start Input
21 Alarm Stop Inhibit All shutdown alarms are prohibited except emergence stop.
22 Instrument Mode All outputs are prohibited in this mode.
23 Non-parallel Mode
24 Reset Maintenance
Alarm
Controller will set maintenance time and date as default when input is
active.
25 Reserved
26 High Temp Shut Connects sensor digital input.
27 Low Oil Pressure Shut Connects sensor digital input.
28 Remote Start
(On Load)
In Auto mode, when input is active, genset can be started and takes
load after genset running normal; when input is inactive, genset will

HGM8152 GENSET PARALLEL CONTROLLER USER MANUAL
HGM8152 Genset Parallel (With Mains) Controller 2019-09-10 Version 1.1 Page 44 of 70
No. Type Description
stop automatically.
29 Remote Start
(Off Load)
In Auto mode, when input is active, genset can be started and takes
off load after genset running normal; when input is inactive, genset will
stop automatically.
30 Manual Start Aux In Auto mode, when input is active, genset will start automatically;
when input is inactive, genset will stop automatically;
31 Remote Start
(On Demand)
In Auto mode, when input is active, genset will start/stop according to
load;
32 Remote Start Island
In Auto mode, when input is active, genset will start automatically and
takes load after normal running; when input is inactive, mains takes
load and genset unloads and stops automatically;
33 Simulate Stop Button An external button can be connected and pressed as the simulate
panel key. 34 Simulate Manual Button
35 Reserved
36 Simulate Auto Button
An external button can be connected and pressed as the simulate
panel key.
37 Simulate Start Button
38 Simulate Gen
Close/Open Button
39 Simulate Mains
Close/Open Button
40 NEL Manual Trip
41 NEL Manual
Reconnection
42 Power Management
Mode
43 Reserved
44 Reserved
45 Aux Mains Normal In Auto mode, when input is active, it means mains is normal;
46 Aux Mains Abnormal In Auto mode, when input is active, it means mains is abnormal;
47 Alternative Config 1 When input is active, alt. configuration is active; it can be set to
different parameters, which is convenient for users to select current
configuration (not only by input port).
48 Alternative Config 2
49 Alternative Config 3
50 Balance Test
51 Speed Raise
52 Speed Drop
53 Voltage Raise
54 Voltage Drop
55 Reserved

HGM8152 GENSET PARALLEL CONTROLLER USER MANUAL
HGM8152 Genset Parallel (With Mains) Controller 2019-09-10 Version 1.1 Page 45 of 70
7.4 SELECTION OF SENSORS
Table 15 Sensor Selection
No. Description Remark
1 Temperature Sensor
0 Not used
1 Custom Resistance Curve
2 Custom 4-20mA curve
3 VDO
4 CURTIS
5 VOLVO-EC
6 DATCON
7 SGX
8 SGD
9 SGH
10 PT100
11 SUSUKI
12 PRO
13-15 Reserved
Defined resistance’s range is
(0~6)kΩ.
2 Pressure Sensor
0 Not used
1 Custom Res Curve
2 Custom 4-20mA curve
3 VDO 10Bar
4 CURTIS
5 VOLVO-EC
6 DATCON 10Bar
7 SGX
8 SGD
9 SGH
10 VDO 5Bar
11 DATCON 5Bar
12 DATCON 7Bar
13 SUSUKI
14 PRO
15 Reserved
Defined resistance’s range is
(0~6)kΩ.
3 Oil Level Sensor
0 Not used
1 Custom Resistance Curve
2 Custom 4-20mA curve
3 SGD
4 SGH
5~15 Reserved
Defined resistance’s range is
(0~6)kΩ.
NOTE: User should make special declare for order if your genset uses 4~20mA sensor.

HGM8152 GENSET PARALLEL CONTROLLER USER MANUAL
HGM8152 Genset Parallel (With Mains) Controller 2019-09-10 Version 1.1 Page 46 of 70
7.5 CONDITIONS OF CRANK DINSCONNECT SELECTION
Table 16 Selection of Crank Disconnection Conditions
No. Setting Contents
0 Gen frequency
1 Speed sensor
2 Speed sensor + Gen frequency
3 Oil pressure
4 Oil pressure + Gen frequency
5 Oil pressure + Speed sensor
6 Oil pressure + Speed sensor + Gen frequency
NOTES:
a) There are 3 conditions to make starter disconnected with engine, that is, speed sensor, generator frequency and
engine oil pressure. All of them can be used separately. We recommend that engine oil pressure should be used with
speed sensor and generator frequency together, in order to make the starter motor separated with engine immediately
and check crank disconnect exactly.
b) Speed sensor is the magnetic equipment which is installed in starter for detecting flywheel teeth.
c) When set it speed sensor, users must ensure that the number of flywheel teeth is the same as settings, otherwise,
“over speed stop” or “under speed stop” may be caused.
d) If genset is without speed sensor, please don’t select corresponding items, otherwise, “start fail” or “loss speed signal”
maybe be caused.
e) If genset is without oil pressure sensor, please don’t select corresponding items.
f) If generator frequency is not selected in crank disconnect settings, controller will not collect and display the relative
power quantity (can be used in water pump set); if speed sensor isn't selected in crank disconnect setting, the rotating
speed displayed in controller is calculated by generator frequency and number of poles.
8 PARAMETER SETTING
CAUTION! Please change controller parameters when generator is in standby mode (e. g. start conditions selection,
configurable input, configurable output, various delay etc.), otherwise shutdown alarm or other abnormal phenomenon
may occur. .
NOTES:
1) Maximum value must be over minimum set value in case that too high and too low may happen at the same time;
2) When warning alarm is being set, please set the correct return value; otherwise it may cause abnormal alarms. When
maximum value is being set, return value shall be less than the set value; when minimum value is being set, return value
must be over set value;
3) Please set generator frequency value as low as possible at crank disconnection, aiming to make the starter separated
faster as soon as crank is successful;
4) Configurable inputs could not be set the same item; otherwise, there may be abnormal functions. However, configurable
outputs can be set to the same item.

HGM8152 GENSET PARALLEL CONTROLLER USER MANUAL
HGM8152 Genset Parallel (With Mains) Controller 2019-09-10 Version 1.1 Page 47 of 70
9 SENSOR SETTING
— When sensor is reselected, sensor curve will be standard value. For example, if temperature sensor
is SGX (120°C resistor type) at factory default, sensor curve is SGX (120°C resistor type); if it is
selected to SGD (120°C resistor type), then temperature sensor curve is SGD curve.
— If there is difference between standard sensor curve and used sensor, users can adjust it in “curve
type” input.
— When sensor curve is inputted, X value (resistor) must be inputted from small to large, otherwise,
mistake occurs.
— If sensor type is selected “none”, sensor curve does not work.
— If sensor has alarm switch only, users must set it to “none”, otherwise, there may be shutdown or
warning.
— The headmost or backmost values in the vertical coordinates can be set the same as below:
Fig. 2 Curve Settings
Table 17 Normal Pressure Unit Conversion Form
Unit pa kgf/cm2 bar psi
1Pa 1 1.02x10⁻⁵
1x10⁻⁵
1.45x10⁻⁴
1kgf/cm2 9.8x10
4 1 0.98 14.2
1bar 1x10⁵ 1.02 1 14.5
1psi 6.89x10³ 7.03x10
-2 6.89x10
-2 1

HGM8152 GENSET PARALLEL CONTROLLER USER MANUAL
HGM8152 Genset Parallel (With Mains) Controller 2019-09-10 Version 1.1 Page 48 of 70
10 COMMISSIONING
10.1 STEP 1: SINGLE UNIT DEBUGGING
1) Check parameter configuration of the controller;
2) Check gen-set wiring connections;
3) For manual start, check if engine and generator data is normal;
4) For manual start, check if switch open and close are normal;
5) For manual start, check after breaker close if generator frequency can be adjusted to the rated
frequency (e.g. set the rated frequency to 52Hz/48Hz);
6) For manual start, check after breaker close if generator voltage can be adjusted to the rated voltage
(e.g. set the rated voltage to 240V/220V);
7) Start genset on load manually, check if power factor, active power and reactive power are normal; if
negative value occurs, check generator voltage and current phase sequences, current transformer
incoming line direction, secondary current dotted terminal of current transformer;
8) For manual start of single unit, do performance test according to national standards.
NOTE: Please refer to HGM9500 Parallel Plan List for more information on GOV and AVR settings.
10.2 STEP 2: MANUAL PARALLEL OPERATION OFF-LOAD
1) Set gen control mode: active power 0%, reactive power 0%;
2) Parallel close breakers manually, and check whether genset synchronizing parallel is smooth, and
whether impulse current is too large;
3) After genset offload parallel, check whether active power, reactive power outputs are 0 or not; if they
are not 0, observe whether there is power oscillation; if there is, properly adjust power control gain
and stability values, or adjust gain and stability potentiometer of engine GOV or generator AVR to
make active power and reactive power not oscillate, and to make output close to 0;
10.3 STEP 3: MANUAL PARALLEL OPERATION ON-LOAD
1) Set gen control mode: active power 50%, reactive power 20%;
2) After manual parallel, perform soft loading test, and check whether there is very large overshoot or
power oscillation; if there is, properly adjust load ramp;
3) After manual parallel on load, perform soft unloading test; check whether genset opens after
unloading reaches pre-set minimum loading percentage;
10.4 STEP 4: AUTOMATIC PARALLEL OPERATION
1) Set gen control mode: active power 50%, reactive power 20%;
2) In auto mode, mains is normal; check whether mains breaker closes as usual; when digital input of
remote start on load (demand) is active, genset starts automatically to parallel and loads to set
power; When digital input of remote start on load (demand) is inactive, genset unloads and stops
automatically.

HGM8152 GENSET PARALLEL CONTROLLER USER MANUAL
HGM8152 Genset Parallel (With Mains) Controller 2019-09-10 Version 1.1 Page 49 of 70
11 MAINS PARALLEL MODE
11.1 GEN CONTROL MODE
Output pre-set active power, reactive power and power factor.
Fig. 3 Steady Power Output Mode

HGM8152 GENSET PARALLEL CONTROLLER USER MANUAL
HGM8152 Genset Parallel (With Mains) Controller 2019-09-10 Version 1.1 Page 50 of 70
11.2 MAINS CONTROL MODE
Set mains load power value. Gen shall take the surpassing part over pre-set mains power. Mains
control mode must be connected with mains CT.
Fig. 4 Mains Peak Clipping Mode

HGM8152 GENSET PARALLEL CONTROLLER USER MANUAL
HGM8152 Genset Parallel (With Mains) Controller 2019-09-10 Version 1.1 Page 51 of 70
11.3 LOAD RECEPTION MODE
Load reception mode must be connected with mains CT.
Fig. 5 Load Reception Mode

HGM8152 GENSET PARALLEL CONTROLLER USER MANUAL
HGM8152 Genset Parallel (With Mains) Controller 2019-09-10 Version 1.1 Page 52 of 70
11.4 AMF CONTROL MODE
Automatic mains inactive start mode.
Fig. 6 AMF Mode

HGM8152 GENSET PARALLEL CONTROLLER USER MANUAL
HGM8152 Genset Parallel (With Mains) Controller 2019-09-10 Version 1.1 Page 53 of 70
11.5 ISLAND START MODE
Fig. 7 Island Output Mode

HGM8152 GENSET PARALLEL CONTROLLER USER MANUAL
HGM8152 Genset Parallel (With Mains) Controller 2019-09-10 Version 1.1 Page 54 of 70
12 TYPICAL APPLICATION
Fig. 8 HGM8152 3P4W Typical Diagram
NOTE: Fuse F1:min. 2A; max. 20A; Fuse F2:max. 32A. Users should select suitable fuse depending on practical
application.
Fig. 9 HGM8152 3 Phase 3 Wire Typical Diagram
Fig. 10 HGM8152 2 Phase 3 Wire Typical Diagram

HGM8152 GENSET PARALLEL CONTROLLER USER MANUAL
HGM8152 Genset Parallel (With Mains) Controller 2019-09-10 Version 1.1 Page 55 of 70
Fig. 11 HGM8152 Single Phase 2 Wire Typical Diagram
NOTE: HGM8152 can realize parallel function with mains by a programmable input port. Under mains parallel
mode, gen is in parallel with mains. Genset can only output steady power (load mode is set to gen control mode).
Fig. 12 HGM8152 Extension Module Typical Diagram

HGM8152 GENSET PARALLEL CONTROLLER USER MANUAL
HGM8152 Genset Parallel (With Mains) Controller 2019-09-10 Version 1.1 Page 56 of 70
13 POWER MANAGEMENT MODE
Power management mode can be selected via a configurable input port.
Fig. 13 Power Management Mode Flow Chart

HGM8152 GENSET PARALLEL CONTROLLER USER MANUAL
HGM8152 Genset Parallel (With Mains) Controller 2019-09-10 Version 1.1 Page 57 of 70
14 NEL TRIP ILLUSTRATION
Non-Essential Load ---- is NEL for short.
The controller can control NEL1, NEL2 and NEL3 to trip separately. The order of the essentiality is:
NEL3 > NEL2 > NEL1.
Auto Trip:
When NEL auto trip is enabled: If genset power has exceeded NEL trip value, after trip delay NEL1
will trip for the earliest, and next is NEL2, NEL3;
When NEL auto reconnection is enabled: If genset power has fallen below the auto reconnection set
value, after the auto reconnection delay NEL3 will be reconnected for the earliest, and next is NEL2,
NEL1;
Fig. 14 NEL Trip Diagram
Manual Trip
If NEL manual trip input is active (failing edge is active), NEL1 will trip without delay; If NEL manual
trip input is active again, NEL2 will trip; If NEL manual trip input is active for the third time, NEL3 will
trip. During this process, the controller does not detect if the genset power has exceeded the NEL
trip value or not.
If NEL manual reconnection input is active (failing edge is active), NEL3 will be reconnected without
delay; If NEL manual reconnection input is active again, NEL2 will reconnect; If NEL manual
reconnection input is active for the third time, NEL1 will reconnect. During this process, the
controller detects the genset power: if the genset power has fallen below the NEL reconnection
value, then the input is active; if it doesn’t, the input is deactivated.
NOTE: When auto trip and auto reconnection are enabled, manual trip is still active.

HGM8152 GENSET PARALLEL CONTROLLER USER MANUAL
HGM8152 Genset Parallel (With Mains) Controller 2019-09-10 Version 1.1 Page 58 of 70
15 INSTALLATION
Controller is panel built-in design and it is fixed by clips when installed. The controller overall
dimensions and cutout size are as below:
Fig. 15 Case Dimensions and Cutout
15.1 BATTERY VOLTAGE INPUT
HGM8152 controller suits wide range battery voltage (8~35) VDC. Negative of battery must be
connected with the shell of starter. The wire diameter of connecting B+ and B- with battery negative and
positive must not be less than 2.5mm2. If floating charger is installed, please firstly connect output wires
of charger to battery’s positive and negative directly, then connect wires from battery’s positive and
negative to controller power input terminals in order to prevent charger disturbing the controller’s normal
working.
15.2 SPEED SENSOR INPUT
Speed sensor is the magnetic equipment installed in starter and for detecting teeth of flywheel. Its
connection wires to controller should apply 2 cores shielding line. The shielding layer should connect to
terminal 16 in controller while another side shall hang up in air. The other two signal wires are connected
to No.17 and No.18 terminals in controller. The output voltage of speed sensor should be within
AC(1~24)V (effective value) during the full speed. AC12V is recommended (at rated speed). When
speed sensor is installed, let the sensor spun to contacting flywheel first, then port out 1/3 lap, and lock
the nuts of sensor at last.
15.3 OUTPUT AND EXPAND RELAYS
CAUTION! All outputs of controller are relay contact outputs. If it needs to expand relays, please add freewheel diode
to both ends of expansion relay coils (when coils of relay has DC current) or, increase resistance-capacitance return
circuit (when coils of relay has AC current), in order to prevent disturbance to controller or other equipments.
15.4 AC INPUT
Current input must be connected to outside current transformer. Current transformer’s secondary
side current must be 5A. At the same time, phases of current transformer and input voltage must be
correct, otherwise collected current and active power may not be correct.
NOTE: ICOM port must be connected to negative pole of battery.

HGM8152 GENSET PARALLEL CONTROLLER USER MANUAL
HGM8152 Genset Parallel (With Mains) Controller 2019-09-10 Version 1.1 Page 59 of 70
WARNING! When there is load current, transformer’s secondary side is prohibitted to open circuit.
15.5 WITHSTAND VOLTAGE TEST
CAUTION! When controller has been installed in control panel, if high voltage test is needed, please disconnect
controller’s all terminal connections, in order to prevent high voltage entering controller and damaging it.
16 GSM SHORT MESSAGE ALARM AND REMOTE CONTROL
16.1 GSM SHORT MESSAGE ALARM
When controller detects alarms, it will send short messages to pre-set phone automatically.
NOTE: All alarms, shutdown, trip and stop and trip will send messages to pre-set phone. Warnings are sent to the
phone according to the users pre-set.
16.2 GSM SHORT MESSAGE REMOTE CONTROL
Users send order message to GSM module, then controller will make actions according to this SMS
order and pass back corresponding operation information. Controller only executes the orders pre-set.
Detailed order messages are as below:

HGM8152 GENSET PARALLEL CONTROLLER USER MANUAL
HGM8152 Genset Parallel (With Mains) Controller 2019-09-10 Version 1.1 Page 60 of 70
Table 18 SMS Order List
No. SMS Orders Pass back Information Description
1 SMS
GENSET
GENSET ALARM Stop alarms
Obtaining genset
status;
SYSTEM IN STOP MODE
GENSET AT REST
Standby status in
stop mode
SYSTEM IN MANUAL MODE
GENSET AT REST
Standby status in
manual mode
SYSTEM IN AUTO MODE
GENSET AT REST
Standby status in
auto mode
SYSTEM IN STOP MODE
GENSET IS RUNNING
Running status in
stop mode
SYSTEM IN MANUAL MODE
GENSET IS RUNNING
Running status in
manual mode
SYSTEM IN AUTO MODE
GENSET AT RUNNING
Running status in
stop mode
2 SMS START
GENSET ALARM Shutdown alarm or trip
alarm
Start genset
STOP MODE NOT START Cannot start in stop
mode
SMS START OK Start in manual
mode
AUTO MODE NOT START Cannot start in auto
mode
3 SMS STOP
MODE SMS STOP OK Set as stop mode
4 SMS MANUAL
MODE SMS MANUAL MODE OK Set as manual mode
5 SMS AUTO
MODE SMS AUTO MODE OK Set as auto mode
6 SMS DETAIL Pass back information can be
set via controller software. Gets detailed information of genset.
7 SMS INHIBIT
START
INHIBIT START OK Set as inhibit start
8 SMS PERMIT
START
PERMIT START OK Remove inhibit boot
NOTE1: National or area codes must be added on the phone number; e.g. China: 8613666666666.
NOTE2: Information shall be sent as exactly as the table contents and letters shall be capitalized.
NOTE3: Details of Pass back information from SMS DETAIL includes: working mode, mains voltage, generator
voltage, load current, mains frequency, generator frequency, active power, apparent power, power factor, battery voltage,
D+ voltage, water temperature, oil pressure, fuel level, engine speed, total running time, genset status, and alarm status.

HGM8152 GENSET PARALLEL CONTROLLER USER MANUAL
HGM8152 Genset Parallel (With Mains) Controller 2019-09-10 Version 1.1 Page 61 of 70
17 CONNECTIONS OF CONTROLLER WITH J1939 ENGINE
17.1 CUMMINS ISB/ISBE
Table 19 Connector B
Terminals of controller Connector B Remark
Fuel relay output 39
Start relay output - Connect with starter coil directly
Auxiliary output port 1
Expand 30A relay, battery
voltage of 01,07,12,13 is
supplied by relay
ECU power
Set configurable output 1 as “ECU power”
Table 20 9-pin Connector
Terminals of controller 9 pins connector Remark
CAN GND SAE J1939 shield CAN communication shielding line(connect
with ECU terminal only)
CAN(H) SAE J1939 signal Impedance 120Ω connecting line is
recommended.
CAN(L) SAE J1939 return Impedance 120Ω connecting line is
recommended.
Engine type: Cummins ISB
17.2 CUMMINS QSL9
Suitable for CM850 engine control module.
Table 21 50-pin Connector
Terminals of controller 50 pins connector Remark
Fuel relay output 39
Start relay output - Connect to starter coil directly
Table 22 9-pin Connector
Terminals of controller 9 pins connector Remark
CAN GND SAE J1939 shield-E CAN communication shielding line(connect
with ECU terminal only)
CAN(H) SAE J1939 signal-C Using impedance 120Ω connecting line
CAN(L) SAE J1939 return-D Using impedance 120Ω connecting line
Engine type: Cummins-CM850
17.3 CUMMINS QSM11(IMPORT)
It is suitable for CM570 engine control module. Engine type is QSM11 G1, QSM11 G2.
Table 23 C1-pin Connector
Terminals of controller C1 connector Remark
Fuel relay output 5&8 Outside expand relay, when fuel output,
making port 5 and port 8 of C1 connected
Start relay output - Connect to starter coil directly

HGM8152 GENSET PARALLEL CONTROLLER USER MANUAL
HGM8152 Genset Parallel (With Mains) Controller 2019-09-10 Version 1.1 Page 62 of 70
Table 24 3-pin Data Link Connector
Terminals of controller 3 pins data link connector Remark
CAN GND C CAN communication shielding line(connect
with ECU terminal only)
CAN(H) A Using impedance 120Ω connecting line
CAN(L) B Using impedance 120Ω connecting line
Engine type: Cummins ISB
17.4 CUMMINS QSX15-CM570
It is suitable for CM570 engine control module. Engine type is QSX15.
Table 25 50-pin Connector
Terminals of controller 50 pins connector Remark
Fuel relay output 38 Oil spout switch
Start relay output - Connect to starter coil directly
Table 26 9-pin Connector
Terminals of controller 9 pins connector Remark
CAN GND SAE J1939 shield-E CAN communication shielding line(connect
with ECU terminal only)
CAN(H) SAE J1939 signal-C Using impedance 120Ω connecting line
CAN(L) SAE J1939 return-D Using impedance 120Ω connecting line
Engine type: Cummins QSX15-CM570
17.5 CUMMINS GCS-MODBUS
It is suitable for GCS engine control module. Use RS485-MODBUS to read information of engine.
Engine types are QSX15, QST30, QSK23/45/60/78 and so on.
Table 27 D-SUB Connector 06
Terminals of controller D-SUB connector 06 Remark
Fuel relay output 5&8
Outside expand relay, when fuel output,
making port 5 and 8 of the connector 06
connected.
Start relay output - Connect to starter coil directly
Table 28 D-SUB Connector 06
Terminals of controller D-SUB connector 06 Remark
RS485 GND 20 CAN communication shielding line(connect
with ECU terminal only)
RS485+ 21 Using impedance 120Ω connecting line
RS485- 18 Using impedance 120Ω connecting line
Engine type: Cummins QSK-MODBUS, Cummins QST-MODBUS, Cummins QSX-MODBUS

HGM8152 GENSET PARALLEL CONTROLLER USER MANUAL
HGM8152 Genset Parallel (With Mains) Controller 2019-09-10 Version 1.1 Page 63 of 70
17.6 CUMMINS QSM11
Table 29 Engine OEM Connector
Terminals of controller OEM connector of engine Remark
Fuel relay output 38
Start relay output - Connect with starter coil directly
CAN GND - CAN communication shielding line(connect
with controller’s this terminal only)
CAN(H) 46 Using impedance 120Ω connecting line
CAN(L) 37 Using impedance 120Ω connecting line
Engine type: Common J1939
17.7 CUMMINS QSZ13
Table 30 Engine OEM Connector
Terminals of controller OEM connector of engine Remark
Fuel relay output 45
Start relay output - Connect to starter coil directly
Programmable output 1 16&41 Idle speed control, normally open output.
Making 16 connected to 41 during
high-speed running via external expansion
relay.
Programmable output 2 19&41 Pulse raise speed control, normally open
output. Making 19 connected with 41 for 0.1s
during high-speed warming via external
expansion relay.
CAN GND - CAN communication shielding line(connect
with controller’s this terminal only)
CAN(H) 1 Using impedance 120Ω connecting line
CAN(L) 21 Using impedance 120Ω connecting line
Engine type: Common J1939
17.8 DETROIT DIESEL DDEC III / IV
Table 31 Engine CAN Connector
Terminals of controller CAN port of engine Remark
Fuel relay output
Expand 30A relay, battery
voltage of ECU is supplied
by relay
Start relay output - Connect to starter coil directly
CAN GND - CAN communication shielding line(connect
with controller’s terminal only)
CAN(H) CAN(H) Using impedance 120Ω connecting line
CAN(L) CAN(L) Using impedance 120Ω connecting line
Engine type: Common J1939

HGM8152 GENSET PARALLEL CONTROLLER USER MANUAL
HGM8152 Genset Parallel (With Mains) Controller 2019-09-10 Version 1.1 Page 64 of 70
17.9 DEUTZ EMR2
Table 32 F Connector
Terminals of controller F connector Remark
Fuel relay output
Expand 30A relay, battery
voltage of 14 is supplied by
relay. Fuse is 16A
Start relay output - Connect to starter coil directly
- 1 Connect to battery negative pole
CAN GND - CAN communication shielding line(connect
with controller’s terminal only)
CAN(H) 12 Impedance 120Ω connecting line is
recommended.
CAN(L) 13 Impedance 120Ω connecting line is
recommended.
Engine type: VolvoEDC4
17.10 JOHN DEERE
Table 33 21-pin Connector
Terminals of controller 21 pins connector Remark
Fuel relay output G,J
Start relay output D
CAN GND - CAN communication shielding line(connect with
controller’s terminal only)
CAN(H) V Using impedance 120Ω connecting line
CAN(L) U Using impedance 120Ω connecting line
Engine type: John Deere
17.11 MTU MDEC
Suitable for MTU engines, 2000 series, 4000series;
Table 34 X1 Pin Connector
Terminals of controller X1 connector Remark
Fuel relay output BE1
Start relay output BE9
CAN GND E CAN communication shielding line(connect with
one terminal only)
CAN(H) G Using impedance 120Ω connecting line
CAN(L) F Using impedance 120Ω connecting line
Engine type: MTU-MDEC-303

HGM8152 GENSET PARALLEL CONTROLLER USER MANUAL
HGM8152 Genset Parallel (With Mains) Controller 2019-09-10 Version 1.1 Page 65 of 70
17.12 MTU ADEC(SMART MODULE)
It is suitable for MTU engine with ADEC (ECU8) and SMART module.
Table 35 ADEC (X1 Port)
Terminals of controller ADEC (X1port) Remark
Fuel relay output X1 10 X1 Terminal 9 Connected to negative of battery
Start relay output X1 34 X1 Terminal 33 Connected to negative of battery
Table 36 ADEC (X4 Port)
Terminals of controller SMART (X4 port) Remark
CAN GND X4 3 CAN communication shielding line(connect to
controller’s this terminal only)
CAN(H) X4 1 Using impedance 120Ω connecting line
CAN(L) X4 2 Using impedance 120Ω connecting line
Engine type: MTU-ADEC
17.13 MTU ADEC (SAM MODULE)
It is suitable for MTU engine with ADEC (ECU7) and SAM module.
Table 37 ADEC (X1 Port)
Terminals of controller ADEC (X1port) Remark
Fuel relay output X1 43 X1 Terminal 28 Connected to negative of battery
Start relay output X1 37 X1 Terminal 22 Connected to negative of battery
Table 38 SAM (X23 Port)
Terminals of controller SAM (X23 port) Remark
CAN GND X23 3 CAN communication shielding line(connect with
controller’s this terminal only)
CAN(H) X23 2 Using impedance 120Ω connecting line
CAN(L) X23 1 Using impedance 120Ω connecting line
Engine type: Common J1939
17.14 PERKINS
It is suitable for ADEM3/ ADEM4 engine control module. Engine type is 2306, 2506, 1106, and 2806.
Table 39 Connector
Terminals of controller Connector Remark
Fuel relay output 1,10,15,33,34
Start relay output - Connect to starter coil directly
CAN GND - CAN communication shielding line(connect
with controller’s terminal only)
CAN(H) 31 Using impedance 120Ω connecting line
CAN(L) 32 Using impedance 120Ω connecting line
Engine type: Perkins

HGM8152 GENSET PARALLEL CONTROLLER USER MANUAL
HGM8152 Genset Parallel (With Mains) Controller 2019-09-10 Version 1.1 Page 66 of 70
17.15 SCANIA
It is suitable for S6 engine control module. Engine type is DC9, DC12, and DC16.
Table 40 B1 Connector
Terminals of controller B1 connector Remark
Fuel relay output 3
Start relay output - Connect to starter coil directly
CAN GND - CAN communication shielding line(connect
with controller’s terminal only)
CAN(H) 9 Using impedance 120Ω connecting line
CAN(L) 10 Using impedance 120Ω connecting line
Engine type: Scania
17.16 VOLVO EDC3
Suitable engine control mode is TAD1240, TAD1241, and TAD1242.
Table 41 "Stand alone" Connector
Terminals of controller “Stand alone” connector Remark
Fuel relay output H
Start relay output E
programmable output 1 P ECU power
Configurable output 1,"ECU power"
Table 42 "Data Bus" Connector
Terminals of controller “Data bus” connector Remark
CAN GND - CAN communication shielding line(connect
with controller’s terminal only)
CAN(H) 1 Using impedance 120Ω connecting line
CAN(L) 2 Using impedance 120Ω connecting line
Engine type: Volvo
NOTE: When this engine type is selected, preheating time should be set to at least 3 seconds.

HGM8152 GENSET PARALLEL CONTROLLER USER MANUAL
HGM8152 Genset Parallel (With Mains) Controller 2019-09-10 Version 1.1 Page 67 of 70
17.17 VOLVO EDC4
Suitable engine types are TD520, TAD520 (optional), TD720, TAD720 (optional), TAD721, TAD722,
and TAD732.
Table 43 Connector
Terminals of controller Connector Remark
Fuel relay output
Expanded 30A relay, and
relay offers battery voltage
for terminal14. Fuse is 16A
Start relay output - Connect to starter coil directly
1 Connected to negative of battery
CAN GND - CAN communication shielding line(connect
with controller’s terminal only)
CAN(H) 12 Using impedance 120Ω connecting line
CAN(L) 13 Using impedance 120Ω connecting line
Engine type: VolvoEDC4
17.18 VOLVO-EMS2
Volvo Engine types are TAD734, TAD940, TAD941, TAD1640, TAD1641, and TAD1642.
Table 44 Engine CAN Port
Terminals of controller Engine’s CAN port Remark
programmable output 1 6 ECU stop
Configurable output 1 “ECU stop”
Programmable output 2 5 ECU power
Configurable output 2 “ECU power”
3 Negative power
4 Positive power
CAN GND - CAN communication shielding line(connect
with controller’s terminal only)
CAN(H) 1(Hi) Using impedance 120Ω connecting line
CAN(L) 2(Lo) Using impedance 120Ω connecting line
Engine type: Volvo-EMS2
NOTE: When this engine type is selected, preheating time should be set to at least 3 seconds.

HGM8152 GENSET PARALLEL CONTROLLER USER MANUAL
HGM8152 Genset Parallel (With Mains) Controller 2019-09-10 Version 1.1 Page 68 of 70
17.19 YUCHAI
It is suitable for BOSCH common rail pump engine.
Table 45 Engine 42-pin Port
Terminals of controller Engine 42 pins port Remark
Fuel relay output 1.40 Connect to engine ignition lock
Start relay output - Connect to starter coil directly
CAN GND - CAN communication shielding line(connect
with controller’s this terminal only)
CAN(H) 1.35 Using impedance 120Ω connecting line
CAN(L) 1.34 Using impedance 120Ω connecting line
Table 36 Engine 2-pin Port
Battery Engine 2 pins Remark
Battery negative 1 Wire diameter 2.5mm2
Battery positive 2 Wire diameter 2.5mm2
Engine type: BOSCH
17.20 WEICHAI
It is suitable for Weichai BOSCH common rail pump engine.
Table 47 Engine Port
Terminals of controller Engine port Remark
Fuel relay output 1.40 Connect to engine ignition lock
Start relay output 1.61
CAN GND - CAN communication shielding line(connect
to the controller at this end only)
CAN(H) 1.35 Using impedance 120Ω connecting line
CAN(L) 1.34 Using impedance 120Ω connecting line
Engine type: GTSC1
NOTE: If there is any question of connection between controller and ECU communication, please feel free to contact
SmartGen’s service.

HGM8152 GENSET PARALLEL CONTROLLER USER MANUAL
HGM8152 Genset Parallel (With Mains) Controller 2019-09-10 Version 1.1 Page 69 of 70
18 ETHERNET INTERFACE
18.1 ETHERNET INTERFACE INTRODUCTION
ETHERNET port is used for controller monitoring, which can realize network client connection mode.
NOTE: After changing controller network parameters (e.g. IP address, sub network mask etc.) new settings will take
effect only after the controller is restarted.
18.2 NETWORK CLIENT MODE
When the controller is used as network client, it can be monitored via network port by using TCP
ModBus protocol.
The procedure is as the following:
1) Set IP address and sub network mask of the controller. IP address must in the same network
segment with monitoring equipment (e.g. PC), but is different from it; e.g.: if monitoring equipment IP
address is 192.168.0.16, controller IP can be 192.168.0.18, sub network mask is 255.255.255.0.
2) Connect the controller. It can be connected to the monitoring equipment directly using network cable
or via switchboard.
3) The communication between the controller and monitoring equipment is carried out by TCP ModBus
protocol.
NOTE: In this connection mode controller parameters can be set. SmartGen provides testing software for this
connection mode. Communication protocol can be obtained from the SmartGen service.
18.3 CONTROLLER AND NETWORK CABLE CONNECTION
Table 48 Controller Internet Access
No. Name Description
1 TX+ Tranceive Data+
2 TX- Tranceive Data-
3 RX+ Receive Data+
4 NC Not connected
5 NC Not connected
6 RX- Receive Data-
7 NC Not connected
8 NC Not connected
18.3.1 CONTROLLER CONNECT WITH PC WITH A LINE OF CABLE
For this connection crossover cable must be used.
Crossover cable: EIA/TIA 568A standard on one end and EIA/TIA 568B on the other end.
NOTE: If PC network port has Auto MDI/MDIX function, parallel cable can also be used.
18.3.2 CONTROLLER AND PC CONNECTION VIA SWITCHBOARD (OR ROUTER).
Parallel lines must be used.
Parallel cable: EIA/TIA 568A standard on both ends or EIA/TIA 568B standard on both ends.
NOTE: If switchboard (or router) network port has Auto MDI/MDIX function, crossover cable can also be used.

HGM8152 GENSET PARALLEL CONTROLLER USER MANUAL
HGM8152 Genset Parallel (With Mains) Controller 2019-09-10 Version 1.1 Page 70 of 70
19 FAULT FINDING
Table 49 Fault Finding
Symptoms Possible Solutions
Controller no response with
power.
Check starting batteries;
Check controller connection wirings;
Check DC fuse.
Genset shutdown
Check the water/cylinder temperature is too high or not;
Check the genset AC voltage;
Check DC fuse.
Controller emergency stop
Check emergence stop button is correct or not;
Check whether the starting battery positive is correctly connected
with the emergency stop input;
Check whether the circuit is open.
Low oil pressure alarm after crank
disconnect
Check the oil pressure sensor and its connections.
High water temperature alarm
after crank disconnect
Check the temperature sensor and its connections.
Shutdown Alarm in running
Check related switch and its connections according to the
information on LCD;
Check programmable inputs.
Fail to Start
Check fuel oil circuit and its connections;
Check starting batteries;
Check speed sensor and its connections;
Refer to engine manual.
Starter no response Check starter connections;
Check starting batteries.
Genset running while ATS not
transfer
Check ATS;
Check the connections between ATS and controllers.
RS485 communication is
abnormal
Check connections;
Check setting of COM port is correct or not;
Check if RS485’s connections of A and B is reversely connected;
Check RS485 transfer model is damaged or not;
Check communication port of PC is damaged or not.
ECU communication failed
Check connections of CAN high and low polarity;
Check if 120Ω resistor is correctly connected;
Check if type of engine is correct;
Check if connections between controller and engine and outputs
setting are correct.
ECU warning or stop
Get information from LCD of alarm page;
If there is detailed alarm, check engine according to description. If
not, please refer to engine manual according to SPN alarm code.
____________________________________