hf10 therapy accessory guides - s21.q4cdn.com · hf10 therapy accessory guides how to use the trial...
TRANSCRIPT

HF10 THERAPYACCESSORY GUIDESHow to use the Trial StimulatorHow to use the Remote ControlHow to use the Charger

HOW TO USE THE TRIAL STIMULATORFor Patients in the Trial Phase
1. Stimulation Increase Button
2. Low Battery Indicator Light
3. Stimulation ON Indicator Light
4. Stimulation Decrease Button
5. Stimulation OFF Button
3
2
41
5
DEFAULT MODE OF THE TRIAL STIMULATOR• In the default mode, the plus and minus buttons are locked. This locking feature prevents accidental pressing of the buttons,
which can change the settings.
• When it is locked, only the Stimulation OFF Button will respond.
• Even in the locked state, you can still receive therapy.
• Stimulation settings can be changed with the Remote Control.
TURNING STIMULATION OFF1. Press .
• Stimulation ON Indicator Light will turn OFF.
• only turns stimulation OFF. It does not turn stimulation ON.
• will turn stimulation OFF, even while the Trial Stimulator’s buttons are locked.
TURNING STIMULATION ON• Refer to the Remote Control Guide.
CHANGING STIMULATION LEVEL• Refer to the Remote Control Guide

ENSURING CABLE CONNECTIONIf one of the cables is disconnected from the Trial Stimulator, it may beep
continuously. Reinsert the cable using the following steps:
1. Ensure that stimulation is OFF. Press to stop the alarm and stimulation.
2. Check the color of the sticker at the Trial Stimulator end of the OR Cable.
3. Plug the OR Cable into the Trial Stimulator’s port that matches the color of
the OR Cable’s sticker. A click will sound once the cable is fully inserted into
the Trial Stimulator.
4. Please use Remote Control to turn stimulation back on.
REPLACING THE BATTERIESWhen the Low Battery Indicator Light ( ) is flashing or ON, the Trial Stimulator’s batteries need to be replaced.
To change the batteries, follow these steps:
1. Turn the Trial Stimulator OFF by pressing .
2. Remove the battery cover on the back of unit and then remove the 2 batteries.
3. Confirm that the new batteries are the purple batteries provided by Nevro.
(These batteries should not be used for any other purpose). DO NOT use AA batteries.
4. Insert the new purple batteries into the battery compartment. As with all battery installations, be sure to match (+) and (-) ends
of batteries with the corresponding connectors inside battery compartment.
5. Replace the cover and restart stimulation using the Remote Control.

1. Remote Control ON/OFF Button
2. Stimulation Level Indicator
3. Stimulation OFF Button
4. Stimulation Start/Increase Button
5. Stimulation Decrease Button
6. Program Indicator
7. Program Selection Button
8. Stimulator Battery Level Indicator
(Charge level of the IPG or Trial Stimulator)
32
4
8
1
5
6
7
1 2 3
4
5
6
7
8
TURNING REMOTE CONTROL ON1. Press and hold it until you see lights turn on and hear a beep.
2. You may need to press it up to 5 seconds.
• If the Remote Control communicates with the implanted stimulator (IPG) or Trial Stimulator, your current program (1, 2, or 3)
will light up. You will also see lights on the Stimulation Level Indicator indicating therapy is ON.
• If the Remote Control cannot communicate with the IPG or Trial Stimulator, you will hear 3 beeps and the lights on the
Remote Control will turn OFF.
• Repeat Steps 1 and 2 until you have a link with the IPG or Trial Stimulator. Moving the Remote Control closer to the IPG or Trial
Stimulator will assist in establishing communication.
• Other buttons on the Remote Control will respond only when the Remote Control
is ON and linked to an IPG or Trial Stimulator.
TURNING REMOTE CONTROL OFF1. Press or do not use it for 2 minutes.
• Remote Control will turn OFF automatically after 2 minutes of inactivity.
• Stimulation continues even when the Remote Control is OFF.
• DO NOT press to turn OFF the Remote Control. The turns stimulation OFF.
HOW TO USE THE REMOTE CONTROL For Patients in the Trial and Implant Phase

TURNING STIMULATION OFF1. Once the Remote Control is ON, press to turn stimulation OFF.
• The lights on the Stimulation Level Indicator will be OFF when
stimulation is OFF.
• This button only turns stimulation OFF. It does not turn
stimulation ON.
Stimulation OFFStimulation ON
TURNING STIMULATION ON & CHANGING PROGRAM1. To turn the stimulation ON, press . The Remote Control must be ON in order to turn
stimulation ON.
• The stimulation is ON unless it has been turned OFF.
• When the stimulation is turned ON (after it was turned OFF), the IPG will be on the
starting level for the last active program used.
2. To change the program, press .
• Program Indicator light will start blinking.
• Press repeatedly until the light is at the desired program number.
• Once desired program is selected, do not press any buttons until the light stops blinking.
The Remote Control will sound one beep to confirm the new program setting. Verify that
the light above the desired program number is steadily illuminated.
• If the Remote Control beeps 3 times and the Program Indicator goes back to the previous
program, then the program was not successfully changed. Place the Remote Control closer
to the IPG or Trial Stimulator and repeat from the beginning of Step 2.

CHANGING STIMULATION LEVEL1. Press to increase stimulation level.
2. Press to decrease stimulation level.
• For each or that was successfully pushed, 1 beep will sound.
• The level of stimulation can be seen in the Stimulation Level Indicator.
• When the stimulation level for the selected program is either at the maximum or minimum level AND you try to go one level
further, 2 beeps will sound, indicating that you are at the currently programmed limit.
• Depending on the specific program settings in your IPG or Trial Stimulator, each step up or down, and its corresponding beep
may or may not result in a change in the number of lights illuminated in the Stimulation Level Indicator.
The lights in the Indicator may not necessarily change with each beep.
TIPS• When you turn the Remote Control ON and hear 6 beeps, it is an alert to change the batteries in the Remote Control.
• If the Remote Control will not turn ON, replace the batteries.
• Change the Remote Control’s batteries every 3 months.
• The Remote Control uses 2 AA alkaline batteries only. DO NOT USE lithium or rechargeable batteries.
• When the Stimulation Battery Level Indicator shows 2 bars or less, the batteries in the Trial Stimulator need to be replaced (if
you are in trial phase) or the IPG needs to be recharged using the Charger.
• If you hear 3 beeps after pressing any button, it indicates that your button-press was not accepted. Move the Remote Control
closer to the stimulator, then try pushing the button again.
• If still not successful, the battery level of the IPG or Trial Stimulator may be low. In such scenario, you will hear 3 beeps and the
lights will turn off on the Remote Control.
• If it becomes increasingly difficult to establish communication with the IPG or Trial Stimulator, this may be an indication that
the batteries in the Remote Control are getting weak and should be replaced.
Stimulation Level Indicator

1. Charging Coil
2. Charger Battery Level Indicator
3. Antenna Strength Indicator
4. Stimulation OFF Button
5. Charge Start Button
6. Power Adapter Port
7. IPG Battery Level Indicator
PREPARING FOR CHARGING1. Place the center of the circular Charging Coil over the top of your implanted pulse generator (IPG).
• Figure 1 shows that the top of the IPG (in yellow box) is at the center of the Charging Coil.
• Figure 2 shows an IPG implanted just below the belt-line. Your IPG may be in a different location, such as on your front side, in
the abdomen (not shown).
Figure 1 Figure 2
32
6
4
7
1
2 3 4
5 6 7
HOW TO USE THE CHARGERFor Patients in the Implant Phase

CHARGING4. Once the link is made, you will see lights cascading upwards on both the Charger Battery Level Indicator and the IPG Battery
Level Indicator, indicating charging is in progress.
• If during this process the link is lost, the Charger will beep as it searches for the IPG link. Reposition the blue Charging Coil and
repeat Steps 1 & 2.
COMPLETING CHARGING5. Once the charging is completed, one long beep will sound and the lights on the Charger will turn OFF. Check the IPG Battery
Level to make sure the battery has been fully charged.
6. Use the Remote Control to check that the IPG is turned ON.
7. Plug the Charger into the wall socket to ensure that the Charger will be ready for the next charging session.
• To plug the Charger into the wall socket, connect the provided Power Adapter into the Charger’s Power Adapter Port first.
Then plug the Power Adapter into the wall socket.
• There is no harm in continuously charging the Charger. The battery will not be damaged.
Charger Battery Level
Charger’s Power Adapter
IPG Battery Level
Antenna Strength Indicator
INITIATING CHARGING2. Press and hold until beeping starts, then release.
• Beeping and blinking of green lights will continue until the Charger links with the IPG. If a link with the IPG is not made within
10-12 seconds, the Charger will sound one long beep and shut off automatically. Reposition the Charging Coil and press
again.
• Once lights show on the Antenna Strength Indicator, a link has been made. More lights mean a better link, making it less likely
that charging will be interrupted by small movements.
• If the link is suboptimal or lost, the Antenna Strength Indicator will show only the small orange bar and beep intermittently.
3. If the link is not made, suboptimal, or lost, reposition the blue Charging Coil slowly and repeat Steps 1 & 2.
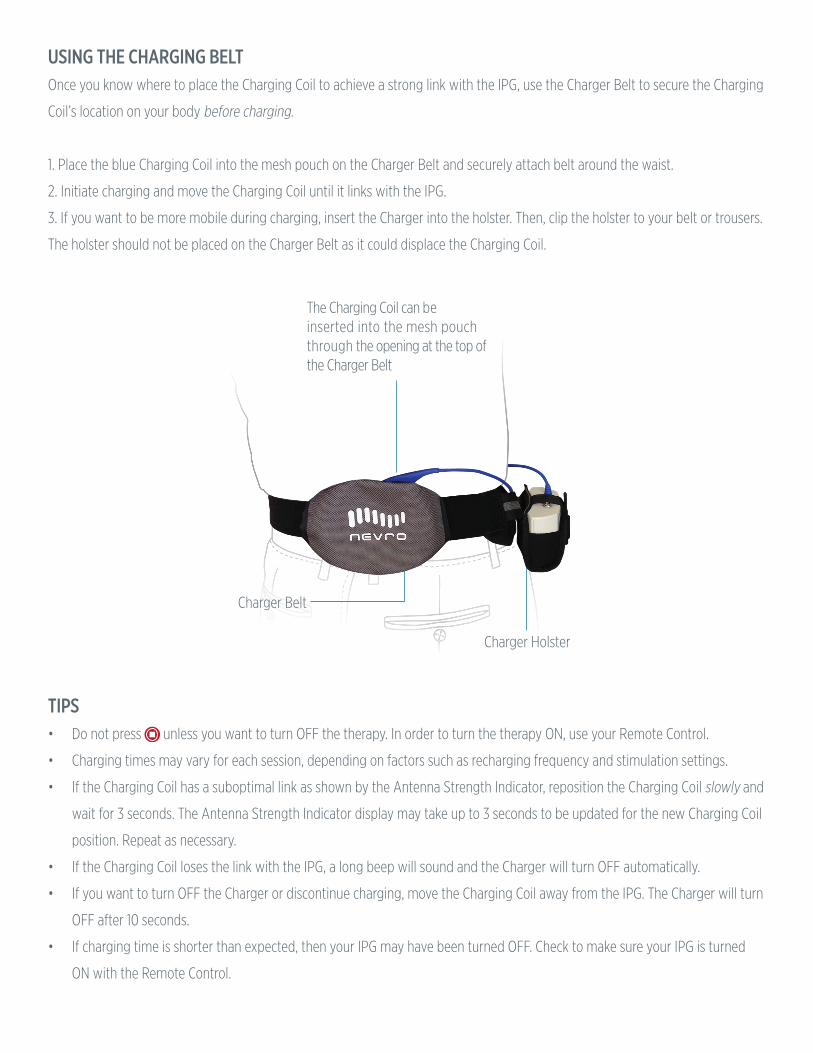
Charger Holster
Charger Belt
The Charging Coil can be inserted into the mesh pouch through the opening at the top of the Charger Belt
USING THE CHARGING BELTOnce you know where to place the Charging Coil to achieve a strong link with the IPG, use the Charger Belt to secure the Charging
Coil’s location on your body before charging.
1. Place the blue Charging Coil into the mesh pouch on the Charger Belt and securely attach belt around the waist.
2. Initiate charging and move the Charging Coil until it links with the IPG.
3. If you want to be more mobile during charging, insert the Charger into the holster. Then, clip the holster to your belt or trousers.
The holster should not be placed on the Charger Belt as it could displace the Charging Coil.
TIPS• Do not press unless you want to turn OFF the therapy. In order to turn the therapy ON, use your Remote Control.
• Charging times may vary for each session, depending on factors such as recharging frequency and stimulation settings.
• If the Charging Coil has a suboptimal link as shown by the Antenna Strength Indicator, reposition the Charging Coil slowly and
wait for 3 seconds. The Antenna Strength Indicator display may take up to 3 seconds to be updated for the new Charging Coil
position. Repeat as necessary.
• If the Charging Coil loses the link with the IPG, a long beep will sound and the Charger will turn OFF automatically.
• If you want to turn OFF the Charger or discontinue charging, move the Charging Coil away from the IPG. The Charger will turn
OFF after 10 seconds.
• If charging time is shorter than expected, then your IPG may have been turned OFF. Check to make sure your IPG is turned
ON with the Remote Control.

IMPORTANT REMINDERS• Do not charge the IPG while the Charger is plugged into the wall. Always remove the Power Adapter before pressing the
Charge Start Button.
• Recharge the IPG regularly to develop an easy-to-remember routine.
• While charging, the Charging Coil may become warm. If pain or discomfort is felt, cease charging and contact your doctor or
Nevro representative.
• After recharging the IPG, plug the Charger back into the wall so that the Charger will be ready for your next recharging
session.
• Use the Remote Control after charging to verify that the therapy is ON.
• If charging times dramatically increase, please notify your Nevro representative.
For full instructions on the HF10 therapy accessories, warnings, and precautions, please refer to the Patient Manual.
All patients do not respond the same way to spinal cord stimulation (SCS) and experiences may vary. Patients should consult a physician to understand the potential benefits and risks of treatment with SCS.
MDSS GMBHSchiffgraben 41D-30175 Hannover, Germany
Australian Sponsor: Emergo Asia Pacific Pty Ltd201 Sussex Street, Darling Park, Tower II, Level 20Sydney, NSW 2000Australia
Effective 4 May 2010 ! USA
Senza, HF10, Nevro, and the Nevro logo are trademarks of Nevro Corp. © 2016 Nevro Corp. All Rights Reserved. 12218 Rev. A
Nevro Corp.
1800 Bridge Parkway Redwood City, CA 94025 USA www.nevro.com Tel. 1.650.251.0005 Toll-free 1.888.956.3876