here's the support file for you to read. - xdcc...
TRANSCRIPT

Support
1. What exactly is XDCC Klipper and what it does? .............................................................2 2. Installing XDCC Klipper ...................................................................................................2
2.1 Registering the xdcc:// Protocol..................................................................................3 3. XDCC Klipper Configuration ............................................................................................3
3.1 Misc ............................................................................................................................3 3.1.1 Timing................................................................................................................5 3.1.2 Tracking .............................................................................................................6
3.2 Email ...........................................................................................................................7 3.2.1 Email Functions .................................................................................................9
3.3 Colors........................................................................................................................10 3.3.1 Bots ..................................................................................................................10 3.3.2 Status Window.................................................................................................11
3.4 Sounds & Media .......................................................................................................11 3.5 Filters ........................................................................................................................12 3.6 Windows ...................................................................................................................14 3.7 Web...........................................................................................................................15
4. The Right Click Menus ....................................................................................................16 5. XDCC Klipper Windows .................................................................................................20
5.1 The Klipper Window ................................................................................................20 5.2 The XDCC Klipper Status Window .........................................................................21 5.3 The Filters Window ..................................................................................................22 5.4 The Offline Browser Window ..................................................................................23
6. Using Special functions....................................................................................................24 6.1 Email Functions ........................................................................................................24 6.2 Remote Control.........................................................................................................27
6.2.1 Installing Apache + PHP + MySQL on your own computer ...........................28 6.2.1.1 Getting a Subdomain ...........................................................................28 6.2.1.2 Installing the Server .............................................................................29
6.2.1.2.1 Configuring the MySQL (Relevant to Secondary Search Engine)......................................................................................................................31
6.2.2 Configuring Apache.........................................................................................32 6.2.2.1 Creating a VHost .................................................................................33
6.2.3 Installing the Remote Control..........................................................................34 6.3 Secondary Search Engine .........................................................................................35

2
1. What exactly is XDCC Klipper and what it does?
XDCC Klipper is a mIRC add-on which makes the DCC Browsing and downloading easier.
XDCC Klipper helps you manage those XDCC, and XDCC clone, bots, so you don't scroll through
endless drabble in different Channels. Original idea By 4:20 Studios, modifications made by DC_Playa,
SnypeTEST, Barc0de, and me: Saragani.
XDCC Klipper helps you download the packs, resume it, enter the queue etc, and make your life easier.
An explanation on how to use XDCC Klipper will appear later on this tutorial.
2. Installing XDCC Klipper XDCC Klipper 4.43 requires mIRC 6.12 or newer (versions 4.4 – 4.421 requires mIRC 6.16) Before Installing XDCC Klipper you need to configure your mIRC. Start your mIRC and configure it as explained:
A) Tools Options Connect Options Enable reconnect on disconnection
B) Tools Options IRC Disable Rejoin channels on connect
C) Tools Options- IRC Enable Keep channels open
D) Tools Options DCC On send request Auto get file. If file exists resume
E) Tools Options DCC Options Uncheck Show Warning
F) Tools Options DCC Folders DCC ignore Disabled. Uncheck the "Turn ignore back on
in:"
G) Tools Options Connect options Retry Change the retry connection to the max, and the retry
delay to 60 seconds.
H) Close mIRC configuration and press ALT+R. Then click on Options and Uncheck the Initialization
Warning.
I) If you are using mIRC 6.17 and newer then Tools Options Other Lock All the
commands (Com, Decode, Dll, Run) Must be enabled (unmarked)
After you have configured mIRC you can install XDCC Klipper. Open the Zip file with WinZip, and then
extract the files to any directory you want. If you already have an older version of XDCC Klipper loaded
in your mIRC then overwrite the older version to prevent 2 different versions of being loaded to your
mIRC. After you have extracted the files, then you can load them in 2 ways (Choose 1):

1) You can write in mIRC: /load -rs "X:\the path to your xdcc klipper\xdccklipper.mrc"
For example: /load -rs "c:\program files\xdcc klipper\xdccklipper.mrc"
2) Open the script editor by pressing ALT+R and then click on File-->Load, Browse to the location of xdccklipper.mrc, choose the xdccklipper.mrc file and click on Open. This will load your XDCC Klipper.
2.1 Registering the xdcc:// Protocol XDCC Klipper submits the data which is being collected by users to a search engine called IRC Klipper.
IRC Klipper has links which start with xdcc:// which makes XDCC Klipper to connect to the server and
start downloading the pack in the link. In order to be able to use those links you need to register the
xdcc:// protocol in Internet Explorer. For registering this protocol you need to first load XDCC Klipper
as explained. Then right click on the main window and choose:
Script Options-->Registry Key Maker-->Create Key
Unlike previous versions (Versions prior to 4.4x), you don't need to choose the OS you have, and you
don't need to look for the xdcc.reg file and double click it, because XDCC Klipper does it automatically
now.
3. XDCC Klipper Configuration After you have loaded XDCC Klipper then you can configure it. The default options usually suite for
most people. To open the configuration right click on the main window and choose:
Script Options-->XDCC Klipper Configuration
3.1 Misc
3

4
Save downloaded files inside directories with Bots names will download the files which are named the
same as the bot. This is good when you request the same file from different bots and you want to leave
the fastest one and remove the others. If you don't enable this option then when the other transfers start,
they will try to write to the same file and the transfer will fail.
XDCC Klipper can move completed files to a different drive/directory when the transfer is done. This
version now uses an external script (a .vbs file) to move the file. This was made to solve the problem
that mIRC is single threaded which would locks up mIRC until it finishes moving the file. It is important
to enable in your Antivirus to run the vbs script.
XDCC Klipper has a built in spam/virus messages blocker which blocks PMs (Private messages)
considered as spam and then ignores the spammer. The database of the spam blocker is being updated
automatically. It has the following spam blocking levels: None, Normal, High and Extreme.
None – Spam blocking is disabled
Normal – XDCC Klipper will only block spam which appear in spam database
High – XDCC Klipper will block any PM which has http:, www, porn, freeipods, xxx etc.
Extreme – XDCC Klipper will block any PM you get!
Accept files from trusted users only will make XDCC Klipper accept files only from users which appear
in your XDCC Klipper Status Window. If you use other downloading scripts (for downloading from
fserves, you will need to disable this option). This function was added to prevent infected users from
sending you viruses.
After 180 seconds (By default. The delay can be changed) a request that the bot didn't reply on is being
timed out. You can configure your XDCC Klipper to Do Nothing, or to request the pack again after that
period.
A file called Finished.txt contains a list of completed files. By default is being deleted when you exit
mIRC. You can disable the file delete.
When a download fails, you can tell your XDCC Klipper to trim the end of the file. This was meant to
reduce the file corruption which might happened when the transfer was closed because of bad
connection.
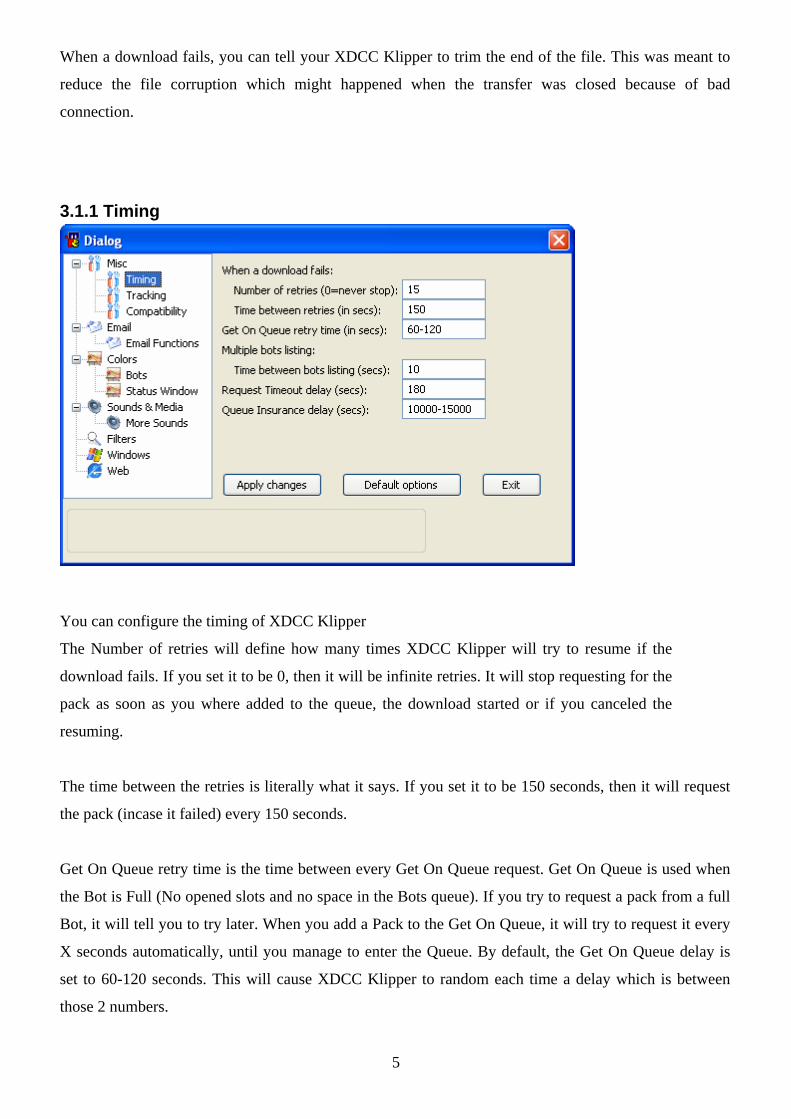
3.1.1 Timing
You can configure the timing of XDCC Klipper
The Number of retries will define how many times XDCC Klipper will try to resume if the
download fails. If you set it to be 0, then it will be infinite retries. It will stop requesting for the
pack as soon as you where added to the queue, the download started or if you canceled the
resuming.
The time between the retries is literally what it says. If you set it to be 150 seconds, then it will request
the pack (incase it failed) every 150 seconds.
Get On Queue retry time is the time between every Get On Queue request. Get On Queue is used when
the Bot is Full (No opened slots and no space in the Bots queue). If you try to request a pack from a full
Bot, it will tell you to try later. When you add a Pack to the Get On Queue, it will try to request it every
X seconds automatically, until you manage to enter the Queue. By default, the Get On Queue delay is
set to 60-120 seconds. This will cause XDCC Klipper to random each time a delay which is between
those 2 numbers.
5

XDCC Klipper allows you to request the list of packs from bots. You can select multiple bots and
request a list. The time between bots listing defines how much time it will pass between each List
request. It is suggested not to have delay set too low (as you could be kicked and banned from channel
for flooding)
Queue insurance delay is the delay that XDCC Klipper will wait until it requests a queued pack again if
the bot didn't update your queue position. For example, you have requested pack #1 from BOT and it
told you that you are in position #5. Usually the bot should update you with your current queue position
from time to time (It varies in different bots). To ensure that the BOT didn't lose you in the queue,
XDCC Klipper will request the pack again after 1 Hour from the last update.
3.1.2 Tracking
If Enable Tracking on new packs is checked then XDCC Klipper will have track packs that are being
added to the Klipper windows. If you right mIRC main window and choose XDCC Klipper Windows
Open the New Packs window, then you will see that a new window was opened. You can also open
this window by pressing F6 if you are located on the Klipper window. Pressing F6 again will refresh the
New Packs window. Each time the New Packs window is being opened or being refreshed you will see
only the packs that were added the Klipper window since the last time you opened or refreshed the New
Packs window.
If you have XDCC Klipper set to have 1 Klipper window for all networks then you will see only 1 New
Packs window. 6

If you have XDCC Klipper set to have a Klipper window for each then you will see only a New Packs
window for every network, and each of them can be refreshed separately.
When you are inside the New Packs window, then you can refresh it using F5.
Pack Tracking currently allows you to track changes in the bots name and also in pack number. If
enabled it will auto change timers and data in the Klipper window and Status window and will try to
find a matching pack number from the same bot if the original pack number of the pack that you
requested was changed. We are currently don't suggest using pack number tracking unless you really
need it (For example there is a bot that changes its listing very often, a good example can be TV bots).
Track downloads and warn from duplicates (is enabled) will do a check every time a download starts. It
will check if the same filename exists in another item in the status window and that the item is marked
as finished, or the same filename exists in the "Completed Files" directory. If one of the situations
occurs, you will get a duplicates warning. This was meant to prevent you from downloading the same
file twice. If you also enable the "Auto Cancel" then it will prevent duplicate file from being
downloaded.
3.2 Email
The E-mail configuration is important for using the E-mail functions. XDCC Klipper allows you to
receive e-mails that can tell your mIRC what to download, you can ask it to send you downloads report,
and you can even tell it to run programs (Like VNC, Remote Admin, Emule .....)
7

8
The Username is the username which is used for login to the e-mail account
The Verification Code is a code that you define which helps decreasing the possibility that unauthorized
person will tell your computer what to download, or run programs.
The Password is the password which is used for login to the e-mail account
The POP3 server is the incoming mail server
The SMTP server is the outgoing mail server
Your e-mail address is very important if you want to be able to send downloads reports.
Checking the "Show messages about the e-mails" will show messages every X seconds about the
amount of e-mails in the Inbox.
"Using Hotmail Account" must be checked incase you want to use a Hotmail.com account. (Dahhh!!!)
In order to use Hotmail account you need a little software called Hotmail Popper that can be found at
http://www.boolean.ca/hotpop/ .
In order to use it, you need to install the Hotmail Popper, and then configure the POP3 and the SMTP
servers to be 127.0.0.1
If you are not using a Hotmail account, you must uncheck the "Using Hotmail Account".
Since 6 months ago Microsoft has decided to change few things in her Hotmail service then only "old"
accounts can use outlook to send emails, and sometimes you also need to enter the website and enter a
code. This may prevent you from using hotmail.
If your email account requires Authentication in order to send emails then you need to enable the SMTP
authentication.

3.2.1 Email Functions
This configuration menu lets you enable/disable one or more the email functions. If you don't enter any
email configuration then those functions won't work. If all email configurations are set then all 3 email
functions are accessible. This window let you disable few of them and not all of them (For example,
security reasons)
9

3.3 Colors The Colors windows allow you to configure the colors of line in the Klipper window, the Status window
etc. Those configuration suit for most users, but if you have a dark background in your mIRC, you will
most likely need to change some of the colors in order to see dark lines. The color of Bots is being
determined by their names (It is being calculated using an algorithm)
3.3.1 Bots
10

3.3.2 Status Window
3.4 Sounds & Media
In this window you can enable/disable Event sounds of XDCC Klipper (Some of the users think that
those sounds are useful).
You can also configure your XDCC Klipper to support movie previewing while it's being downloaded.
All you need is to download VideoLan Medial Player and configure its location.
11

3.5 Filters You can define filters. The filters (Upper filters have higher priority for match) will let you get in your
Filters window only packs which match the filter than you entered. From version 4.43 and on, you can
also define the filters to match specific bots and/or channels. All you need to do just like the example
shows (all the following example are legit):
Windows 2001 [bot=Winb0005,Winb0012]
Windows 2001 [channel=#winbeta,#winsoft,#xdcc]
Windows 2001 [bot=Winb0005,Winb0012] [channel=#winbeta]
Windows 2001 [channel=#winbeta] [bot=Winb0005,Winb0012]
This way you can tell the filters to match only for bots or channels that you want.
You need to enable the specific filter for XDCC Klipper to catch it (The most left column). It is
suggested to have a different color of each filter so you will be able to distinguish between them easily
in the Filters window.
You can also enable the auto Download for few filters (Again, in order that this function will work, the
filter must be enabled). It will automatically request a pack if the bot list it and it matches the filter you
have entered.
As you can see in the picture blow, the auto download has 3 states: Unchecked, Checked with V
and Checked with Square.
12

13
When unchecked, auto download is disabled.
When checked with a V, the auto download version 1. It will download any pack that it is found to be
matching your criteria.
Be aware that if you don't baby sit your XDCC Klipper, you could find yourself requesting lots of packs
(and maybe ending up banned by the channel Ops). Use it only if you know that something is going to
be released soon in the channels that you are on, and you want to be one of the first users to enter the
queue.
When checked with a square, the auto download version 2. It will download packs that it are found to
be matching your criteria, but none of them has the same description, for example:
With the auto download version 2, if define for example Stargate 9 10
This will filter only Stargate episodes which are probably season 9 episode 10.
The thing with the new method is that if the description of the file is IDENTICAL in all bots then it will
request it only from the first bot.
For example:
Bot1 pack #1 Stargate S09E10 LOL
Bot1 pack #2 Stargate S09E10 LOL
Bot2 pack #1 Stargate S09E10 LOL
Bot3 pack #3 Stargate S09E10 LOL
Bot4 pack #6 Stargate S09E10 LOL
Bot5 pack #1 Stargate S09E10 LOL-HDTV
If we assume that Bot1 listed first then it will request the pack only from Bot1 and Bot5.

3.6 Windows
In this configuration window you can configure if some of the windows or all of them will be
automatically opened on Connect/Start.
By default XDCC Klipper is configured to load the old content of the status window (just before you
closed mIRC), reconnect the servers and request the packs again. You can change the "When mIRC starts"
so XDCC Klipper will only load the old status window content, but will not try to connect to any server,
or you can also tell it not to load the old status window at all.
The Klipper and the Filters window are being refreshed every 60 seconds (by default). You can enable
disabled the refreshing, change the refresh delay and disable the refreshing of the window you are
currently viewing (current active window).
Suppress ads will prevent the Ads of the bots to appear in your channels window. This is good to
prevent trashing the windows or to see if XDCC Klipper doesn't catch one kind of bots. This is me
14

3.7 Web
Enabling packs submission enables the submission to IRC Klipper. You will most likely not have to
configure anything in this window.
You can configure a secondary search engine, so your XDCC Klipper will submit the packs to another
search engine (The search engine must be using the IRC Klipper PHP source code).
You can also configure a remote control server address. It will allow you to control your XDCC Klipper
using a website. The website must support PHP!
I added a Search bot (If someone messages you !search something), your XDCC Klipper will give him
results. This option is disabled by default, and it is a good thing to have it disabled unless you actually
want to run a search bot!!!
15

4. The Right Click Menus
All the Windows of XDCC Klipper, and also the Main mIRC window, the channels window, and the
nicklist have right click menus. Those menus will let you do stuff (For example, opening the
configuration). The right click menus for the XDCC Klipper windows will be explained for each
window in the next sections.
If you right click on Shutdown/Close on top of your mIRC, then you can either choose Shutdown
Computer, Close mIRC or Disable Shutdown/Close:
Use this option to shutdown your computer or close mIRC when all transfers are done (All items in
your Status Window are completed). Every time you start your mIRC it unset the state of this
configuration back to disabled. XDCC Klipper will try to shutdown your computer or close mIRC if one
of those options enabled and mIRC just finished receiving a file.
If you don't see the Shutdown/Close Icon (It might happen when loading XDCC Klipper when a version
older than 4.4 is currently loaded to your mIRC) then write: /tbtrayload
Another useful right click menus are the menus which appear in the main mIRC window and also in the
channels windows. When you right click on one those windows you get:
16

With this right click menu you can open the search dialog which let you search on search engines like
IRC Klipper and Packetnews:
You can also configure XDCC Klipper, open windows (Status Window, Klipper Window, Filters
Window and Offline Browser Window), search packs inside the Offline Browser, export the Offline
Browser to a HTML file, reload and unload XDCC Klipper, register the xdcc:// protocol, turn On/Off
XDCC Klipper, etc.
You can also save the password for login a server (Nickserv authentication). When choosing "Save
Nickserv Login", XDCC Klipper will request the password for the network you right clicked on its
windows. Next time you will connect to that network, XDCC Klipper will auto send the identify
command to the server. Note: This is one of the functions which require mIRC 6.16.
17

Another important right click menu is the one you get when you right click a nicklist in a channel. If you
right click a bot (Or mark few bots and right click them) then you can do stuff like requesting a pack or
requesting a list of packs. All those functions will work on the first bot which is marked accept the "List
selected bots", and "Enter Batch Syntax" which are meant to be used on a list of marked bots. All you
need it to right click on the nick list and choose XDCC Klipper Functions:
As you can see, you can list Bot(s), and stop the multiple listing. You can also use the "Get Pack" to
request a pack once. If the bots queue is full then you will automatically added to the Get On Queue list.
Get On Queue is a function which request the pack every define delay (by default it is random number
between 60 and 120 seconds). If you are added to the bots queue, or the download starts, XDCC Klipper
will automatically stop using the Get On Queue for that bot.
Entering the syntax manually for 1 bot or more is usually something that a newbie shouldn't deal with.
XDCC Klipper should usually recognize the syntax of the bot if it list (Syntax is how you request the
pack, for example: /ctcp bot xdcc send #1, /msg bot xdcc send #1, or /msg bot please gimme pack #1).
If you tell XDCC Klipper to download the pack by using a link taken from IRC Klipper then the link
should also contain the syntax, so usually there is no need to enter the syntax manually.
18

19
For entering the syntax for 1 bot, you need to write the syntax as the bot told you, but without the #x at
the end, for example: /msg [xk]-dcc01 xdcc send
If you want to enter the syntax for a bunch of bots which has a similar syntax, then use a right function
and write the syntax in a form of: /msg xknicks ……, for example: /msg xknicks xdcc send
XDCC Klipper will automatically replace the xknicks with the right bots name.
If you request a pack and the bot is offline, then XDCC Klipper will automatically add the pack/bot to a
waiting list, and will request the pack when the bot returns (if it will return at all). You can disable to
auto request for all the bots (XDCC Klipper will not add the bots to a waiting list anymore) by choosing
"Disable the Auto Apply…"

5. XDCC Klipper Windows There are main kinds of windows in XDCC Klipper: The Klipper Window(s), The Status Window, The
Filters Window and the Offline Browser Window. Each of them has its own purpose.
5.1 The Klipper Window In this window you can see the list of packs that the bots offered. If you choose to have a Klipper
window for each network, then each network will have its on window and it will contain the packs
which were collected on that network only. If you choose 1 Klipper window, then it will contain the
packs from all networks.
If you right click on a line or lines in the Klipper Window, you can do stuff. Choosing Visual will let
you change the size of columns and choose if you want 1 Klipper Window or lots of Klipper Windows.
Choosing Sorting will let you sort the data in the window. On the Get Pack(s) you can choose if you
want to request using Get Pack, or using Get On Queue. You can also Batch request selected packs.
You can also do search inside the windows. Types of searches are regular search inside all networks, or
in the current network if using lots of Klipper Windows. Another type (Which was added in version 4.4)
is the advanced search which also let you choose minimum and maximum size:
20

You can also save/load/export to HTML the Klipper Window using the right click menus on that
window.
5.2 The XDCC Klipper Status Window In the Status Window, you can find all the information you need about the downloads, etc... It is
important that you will work with it (so leave it opened), because you will most likely have to do some
Right clicking and stuff like that on that window.
For example: If you are downloading a file, and you want to cancel it, then closing the transfer window
(or clicking the cancel) will cancel the download, but will also cause the file to be resumed (after the
period you have set. Default is 150 seconds). You can cancel the resuming from the Status Window.
A smarter thing will be to cancel the download from the Status Window itself (It will automatically
close the transfer window, and will not resume).
You can also remove packs from the Get On Queue, or from the Klipboard. Disable the scheduling (will
not download the file), or start the scheduled download right now....
If you have a pack in the Status Window which is being downloaded, in Get On Queue, on Queue, or
other than in the Klipboard, removing the line will automatically search for the next pack from that bot
which is in the Klipboard list, and will request it, so if you wanna cancel all the packs from a specific
bot, start from the packs which are in the Klipboard first!!.
You can also mark more than one pack and press DEL in order to cancel few packs.
Using the right click you can disable packs and do lots of actions. XDCC Klipper now has 1 status
window for all network, which will probably make your control of the downloads easier. Furthermore,
when you close mIRC (or when mIRC crashes), the content of this window is not being erased, so when
you start mIRC again, it will auto-connect to the servers and channels and will request the packs again.
Few things that I have added to version 4.4 are the option to preview a movie while it is being
downloaded (Only if the file is mpeg or avi. It won't work on tar/rar files), and that you can also cancel a
download and Delete the file from your HD, or open a file after it is completed.
21

5.3 The Filters Window
In this window you see the packs that XDCC Klipper caught which match the filters you have defined.
This way you can see in real time if there are packs that match your criteria in any network that you are
connected to, so you could request it. You can also define XDCC Klipper to download automatically all
22

23
the packs which match your criteria…. But be careful on that one, because you might find yourself
banned form the server because of leaching/requesting too many packs, or just find yourself with lots of
packs in your status window that you will need to cancel later.
5.4 The Offline Browser Window The offline Browser window collects information from all networks, and it doesn't being erased when
you close your mIRC. This can help you look for things even when you are offline. Just make sure to
clear it every once in a while so it won't have out of date or that it won't be too big. Note that when the
offline browser is big it takes a lot of time to open it.

24
6. Using Special functions XDCC Klipper support some advanced functions which might be helpful for some users from time to
time.
6.1 Email Functions
There are 3 e-mail functions in XDCC Klipper: xdccmail, xdccstat and xdccrun. The xdcctest is only
used for testing incoming mail, and there for it is not a function.
Email function were good when other options were not available (For example Remote Control which is
by far much better), and they were coded back in the old versions.
Incase you want to check the incoming mail, you need to send the e-mail account that is configured in
XDCC Klipper an e-mail with the subject xdcctest
When XDCC Klipper will check the e-mail account again it will tell you that the test went OK.
The xdccmail function lets you tell your computer what to download by sending it an e-mail. This is
good when you are away from the computer. The format of the e-mail must be:
Subject: xdccmail VCode
(incase you didn't defined a verification code, leave the Vcode empty).
:start
Network Server Channel Bot Packs
Network Server Channel Bot Packs
:end
Here is a good example:

You can tell XDCC Klipper to have more than 1 pack from the same bot.
You can also cancel packs using the xdccmail function. The only difference is that you don't need to put
":start" and ":end". All you need to write is:
:cancel Network Bot Pack
The xdccstat function lets you get downloads report by e-mail.
The format of the e-mail must be:
Subject: xdccstat Vcode
(If you didn't define Verification code then leave the Vcode empty).
:goback email_address
The e-mail address is where the report will be sent to. You can tell XDCC Klipper to send the e-mail to
more than 1 recipient if you put more than 1 :goback line
Here is a good example:
25

The third E-mail function (xdccrun) can let you run programs my using e-mail (Incase you wanna run
VNC or emule, but you are away from the computer, I mean far far away from the computer).
Since this function could be dangerous (for example: someone can run format c: /q /Y ), then this
function can not run without a Verification Code. If you didn't define one, then you will not be able to
use this function. Further more, the xdccrun has a double identification. You will also need to put your
e-mail password in the subject (So if someone wants to run programs in your computer, he must know
both the Vcode and the e-mail password).
The e-mail must be on the following form:
Subject: xdccrun Vcode Password
:xdccrun x:\path\file.exe ( + switches )
For example: :xdccrun c:\flashfxp\flashfxp.exe 243.23.11.19
Here is a good example:
26

TIP: If you know of a certain programs that you will most likely gonna run, then create a batch file that
runs them, and put it in the main directory of mIRC. Then, when you send the e-mail, you just need to
write a short command:
:xdccrun emule.bat
6.2 Remote Control Remote control is a tool which helps you control your mIRC when you are away from it by having a
website hosted somewhere which supports PHP. XDCC Klipper sends data to the website every 30
seconds, and XDCC Klipper picks jobs from the server every 60 seconds (this delay can be configured
in the XDCC Klipper configuration).
The website contains a small PHP script coded by Butabi which is meant to "talk" with XDCC Klipper.
Me and Butabi worked on it so the PHP website will be able to talk and control XDCC Klipper. You can
download the remote control version 0.4 from the following link:
http://xdccklipper.sourceforge.net/Remote 0.4.zip
You can download the remote control version 0.5 from the following link:
http://xdccklipper.sourceforge.net/Remote 0.5.zip
NOTE: Remote Control 0.4 works only with XDCC Klipper 4.42. XDCC Klipper 4.42 works only
with Remote Control 0.4 (and it should also work with version 0.5).
XDCC Klipper 4.43 requires Remote Control 0.5 (Because of the Pack number tracking)
If you are using XDCC Klipper 4.41 or older then you need Remote Control 0.3
27

You can see an screenshot of the of the website where you can see and control your mIRC status
window (You can tell it to start download things by searching IRC Klipper or Packetnews and then
clicking on the link, or you can click on Cancel which will tell XDCC Klipper to cancel the download):
6.2.1 Installing Apache + PHP + MySQL on your own computer
This section is meant only for people who want and can run the HTTP server on their own computer.
This is by far the best solution because we have seen situations that scripts doesn't run well on some web
hosting services (mostly the free one). First make sure that you have port 80 opened and available.
(Some programs like Emule (if you enable http server) and Bitlord tend to use this port). If port 80 is
being used, then please configure the software that uses it to use another port. Port 80 is the default port
for HTTP server.
6.2.1.1 Getting a Subdomain
First we will start by getting a Domain for your computer. Domain convert this: 84.31.120.12 into this:
WaSaBi.no-ip.info. In another words…. It makes IP into a text address. It is also important because
your IP may change, and if you are far from the computer then you have no idea what it is now.
28

29
Domains usually cost money, but you can get subdomains for free by services such as No-IP.com
First go to www.no-ip.com , click on the Sign Up Now and register a new account. Then login into your
account (your email should be sent to you my mail), Expand the Host/Redirects if it's not expended and
choose add. Choose a host name (For example wasabi), choose an extension for your subtomain (For
example zapto.org), and then click on Create Host.
Now go to: http://www.no-ip.com/downloads.php?page=win
Get the latest version of the program, download it, install it, configure it (subdomain, username
password etc), and then this small program will update the information about your IP and will bind it to
the subdomain you chose.
Wait few minutes and then try to ping your subdomain, for example: Start Run Ping wasabi.no-
ip.info
You should get something like:
Pinging wasabi.no-ip.com [84.31.120.12] with 32 bytes of data:
Reply from 84.31.120.12: bytes=32 time<1ms TTL=64
Reply from 84.31.120.12: bytes=32 time<1ms TTL=64
Reply from 84.31.120.12: bytes=32 time<1ms TTL=64
Make sure that the IP you see is not 192.168.*, because then it will mean that no-ip program sends your
internal IP address, and you will not be able to connect to the server from outside. For solving this
problem you just need configure the no-ip program to send the right address.
Btw, you can configure the no-ip program to start with windows or run as service. Running as service is
suggested because then it auto loads when windows starts and you also don't see the icon in the task bar.
6.2.1.2 Installing the Server
The easiest way will be using a pre-made pack which will auto install all the needed servers on your
computer. I suggest XAMPP (AMPP sands for Apache MySQL PHP Perl). It is easy to install, easy to
control and very stable. If you have an older version of XAMPP installed then it is suggested to uninstall
it first, because leftovers can make the new version not to work. You can get XAMPP at:
http://www.apachefriends.org/en/xampp-windows.html

After downloading the file, run and install XAMPP. Then start the XAMPP control panel:
If you click on the Start, then it will start the server. When installing XAMPP it asks you if you want to
install it as service, this will tell windows to run it on startup. You can also choose which servers
(apache, mysql, etc) will start as service by checking or un-checking the Svc. For having the Remote
Control, you only need to start the Apache.
If you want to run a Secondary Search Engine on your computer (section 6.3 Secondary Search Engine),
then you will also need to start the MySQL. For configuring the MySQL see section 6.2.1.2.1
Configuring the MySQL (Relevant to Secondary Search Engine)
If you don't need a MySQL server then jump straight to section 6.2.2 Configuring Apache
30

6.2.1.2.1 Configuring the MySQL (Relevant to Secondary Search Engine)
Start the MySQL server. Then go to IE and write: http://127.0.0.1/phpmyadmin/
Now create a new database which will be used by your search engine:
Click on Create, and then after the database was created the choose if from the list of databases on the
left. Now we want to create the table that will be used by your search engine. I assume that you have the
IRC Klipper 1.1 pack, so inside it you will find a file called ircklipper.sql. Open this file with Notepad,
Copy the text to your clipboard, and go back to phpmyadmin. After choosing the database from the list
on the left you have an option called SQL on the top of the page, Click on it.
Now in the text box that you see paste the text that you copied and then click on Go. You should not see
a message like: "Your SQL query has been executed successfully".
Now it is time to create a user for the database. On the list of databases on the left choose (Databases)…
Now click on Privileges. Click on Add a new User, and configure username password, host and
privileges and click on Go. For example:
31

You may also consider deleting the Root user (which doesn't have any password) and configuring the
phpmyadmin for the new username and password (for better security).
6.2.2 Configuring Apache
Apache (the HTTP server) is being configured by XAMPP, and it is not always configured the way we
want. For example, you are planning to have the php and html files located on one directory while
XAMPP configures Apache to have them on another directory. To configure Apache, open the XAMPP
directory, enter the Apache directory, then the conf directory
(for example: D:\apachefriends\xampp\apache\conf\), and open httpd.conf with Notepad. Make sure
you make a backup first before you start messing with that file (If you screw something then apache will
not work!!!).
Now search for DocumentRoot. You should see that it is configured to something like:
DocumentRoot "D:/apachefriends/xampp/htdocs"
32

33
You will need to change the DocumentRoot to the location of your HTML and PHP files, for example:
DocumentRoot "D:/remote control/"
This is a very important note: The Slashes must be / and not \
After changing the DocumentRoot and saving the file you MUST restart the apache server (By clicking
on Stop and then Start from the Control Panel of XAMPP) for the changes to be applied.
Now if you go to: http://127.0.0.1/ or to your subdomain (for example: http://wasabi.no-ip.info ) then
you should see your website while assuming that you already extracted the Remote Control files
somewhere.
6.2.2.1 Creating a VHost
This section can be useful for people who want to have 2 different websites on the same computer and
that each of them has a different domain. VHost (which stands for Virtual Host) allow you to have 2
websites on the same computer, which can be good if you have 2 computers which download things
with mIRC, and you want that each of them will submit data to the Remote Control (and you will need
to have 2 Remote Control websites / directories on your computer for that one), or you already have a
working website on your computer and you want to add another one with a different domain.
If you don't need it then don't setup a VHost
In order to have a VHost, open the httpd.conf with Notepad. Then search for #</VirtualHost>
Below that you need to enter the VHost information. Here is an example of the lines you need to add: NameVirtualHost *:80 <VirtualHost *:80> ServerName wasabi2.no-ip.com DocumentRoot "D:/SE-MY/" </VirtualHost> <VirtualHost *:80> ServerName wasabi.no-ip.com DocumentRoot "D:/WaSaBi/" </VirtualHost> You must have NameVirtualHost *:80. It tells apache to use VirtualHost and listen to port 80 Put in ServerName the domain/subdomain you want to use, and in DocumentRoot the location of each of the websites. Don't forget to restart Apache!!

6.2.3 Installing the Remote Control
In order to be able to use it, you will need to upload the PHP files to your website (Or put them in the
right directory incase you have created the website on your own computer), and configure it.
First thing to do is to give permissions to the script to be able to run the scrip and write the files. This
action is called CHMOD. If you want to CHMOD a file, then just connect with ftp client to the server,
choose the files, right click and choose CHMOD. All the files except array.txt, ircklipper.txt, jobs.txt
and packetnews.txt should be CHMODed to 644. The files in red must be CHMODed to 777 (so the
script will be able to write data into it)
Now we need to configure username and password (which are saved inside the passwd.txt file).
Enter the URL to the chpass.php, example: http://wasabi.no-ip.info/chpass.php
You will be prompted for username/password ... enter admin/1234
Enter your desired username/password (anything you want) and click submit, the new user/pass is set.
Another file you can configure is the config.php. To be more specific, you might want to change the
style. Changing the style will change how the progress bar looks. Please note that for using a graphical
progress bar you need to have GDI installed (which might not be installed by your hosting). XAMPP has
it installed so no worry☺. By default the style is set to analog which doesn't require GDI. This is how
the styles look like:
analog:
winxp:
osx:
led:
solaris:
Now comes the part where you configure XDCC Klipper.
34

In order it to work, you need to enable the remote control by PHP. Then you need to enter the address of
the website, for example www.mycontrol.com/wasabi/php-control/
Then enter the username and password that you have configured in the website, for example:
WaSabi:12345
After configuring the server address, the username & password and enabling the Remote, then it should
work fine.
6.3 Secondary Search Engine The purpose of this function is to allow the user to submit the data to other search engines beside IRC
Klipper (which is back ☺ and online now for almost a year). In order to have this function working you
need to download IRC Klipper source code, or submit the data to a website which works with that
source code.
Incase you are creating your own search engine, download the source code. Then you will need to
upload it to a website which supports PHP and MySQL (If you want to have the search engine on your
own computer and you don't know how to get apache+php+mysql installed then please read section
6.2.1 Installing Apache + PHP + MySQL on your own computer.
You will need to have a database off course, and you will need to configure (edit) the IRC Klipper
source code so it will fit the website (Username and password to the database and also the database
name). The files that should be edited are MySQL.inc.php and main.php
In each of them you must enter database name, host, username and password. In main.php you must
also change the table name to packs.
35

If you submit the data to an already existing website, then you only need to configure XDCC Klipper.
You need to enable packs submission and also enable the "submit packs to another SE". Don't forget to
enter the address of the search engine. This address is the address of the index.php (as well as the
submit.php file).
The current version of the IRC Klipper source code on Sourceforge website is version 1.1
If you are using another version of IRC Klipper source code (for example 1.7 or 2.0) then load XDCC
Klipper, close mIRC, open the klipper.ini and change the following line:
SecondaryVersion=1.1
Change the 1.1 to the version that you use (Please note that legit values are only 1.1, 1.7 and 2.0).
After changing the value and saving the file then you can start your mIRC again.
If you have any questions you may contact our team in the forum: http://www.xdccklipper.info
36