hemodialysis user · pdf fileclinical procedures” in the clinical procedures...
TRANSCRIPT

CLINICAL PROCEDURES V. 1.0
HEMODIALYSIS MODULE
USER MANUAL
Patch MD*1.0*6
May 2008
Revised March 2017
for MD*1.0*50
Department of Veterans Affairs
Health Systems Design and Development
Provider Systems


Revision History
Description Date Author
Patch MD*1.0*6 released. May 2008 Alfred Bustamante
1Patch MD*1.0*19 released.
Added notes regarding Recent Postings & Infectious
Diseases (Chapter 4).
Added list of lab tests that display on the Rx and Lab tab
(Chapter 5).
March 2009 Alfred Bustamante
2Patch MD*1.0*20 released.
Updated Figure 10-1, 10-9, and 10-12 with new screen
captures to show Procedure description text. Add PCE
Data content description in Confirming PCE Data
Without Changing Anything section in Chapter 10.
November 2010 Shirley Ackerman
Patch MD*1.0*50 March 2017 David R. Michael
Bobbie Donaldson
1 MD*1.0*19 March 2009 Patch 19 release added.
2 MD*1.0*20 November 2010 Patch 20 release added.


March 2017 Hemodialysis Patch MD*1.0*50 i
User Manual
Table of Contents Revised November 2010 .................................................................................................... i
for MD*1.0*20 .................................................................................................................... i
1. Introduction .......................................................................................................................... 1-1
Intended Audience ......................................................................................................... 1-1
Related Manuals............................................................................................................. 1-1
Product Benefits ............................................................................................................. 1-2
2. Ordering a Hemodialysis Procedure .................................................................................. 2-1
Requirements for CP Manager..................................................................................... 2-1
Ordering a Dialysis Procedure in CPRS ...................................................................... 2-2
Checking in a New Study Using CP User .................................................................... 2-9
3. Working with Hemodialysis ................................................................................................ 3-1
Requirements for the User ............................................................................................ 3-1
Opening Hemodialysis ................................................................................................... 3-1
Selecting a Patient .......................................................................................................... 3-2
Enabling/Disabling a Patient Record ......................................................................... 3-5
Study List Right-Click Menu ..................................................................................... 3-6
Study List Command Buttons .................................................................................... 3-7
Review (Read-Only) Study Viewing ......................................................................... 3-7
Hemodialysis Patient Data Screen Areas ..................................................................... 3-9
Title Bar ..................................................................................................................... 3-9
Menu Bar ................................................................................................................... 3-9
Patient Info Bar ........................................................................................................ 3-14
Patient Data Screen Buttons..................................................................................... 3-15
Tabs/Options Screen ................................................................................................ 3-15
Status Line ............................................................................................................... 3-16
Display Application Version.................................................................................... 3-16
Defining the Tabs of the Hemodialysis Patient Data Screen.................................... 3-17
Cover Tab................................................................................................................. 3-18
Rx and Lab Tab ........................................................................................................ 3-19
Pre-Treatment Tab ................................................................................................... 3-20
Access Tab ............................................................................................................... 3-21

Table of Contents
ii Hemodialysis Patch MD*1.0*50 March 2017
User Manual
Flowsheet Tab .......................................................................................................... 3-22
Post-Treatment Tab .................................................................................................. 3-23
Summary Tab ........................................................................................................... 3-24
Submit Tab ............................................................................................................... 3-25
4. Editing/Viewing Information on the Cover Tab ............................................................... 4-1
Current Treatment Information .................................................................................. 4-1
Recent Postings & Infectious Diseases ......................................................................... 4-4
Alternate Display of Recent Postings & Infectious Diseases .................................... 4-5
Treatment History (Vascular Access Monitoring) ...................................................... 4-5
Past Treatment Data ...................................................................................................... 4-6
5. Entering Dialysis Prescription and Labs ........................................................................... 5-1
Dialysis Rx ...................................................................................................................... 5-2
Lab Results ..................................................................................................................... 5-2
Displaying Lab Results .............................................................................................. 5-2
Comments ....................................................................................................................... 5-5
Comments Business Rules ............................................................................................. 5-6
6. Entering Pre-Treatment Information ................................................................................ 6-1
Pre-Treatment Assessment ........................................................................................... 6-2
Pain Assessment ............................................................................................................. 6-3
Comments ....................................................................................................................... 6-6
7. Entering Access Information .............................................................................................. 7-1
Access Sites ..................................................................................................................... 7-3
Adding a New Site ..................................................................................................... 7-3
Assessing and Selecting a Site for Use ...................................................................... 7-5
Removing a Site ......................................................................................................... 7-6
Deleting a Site ............................................................................................................ 7-8
Access Points Summary ................................................................................................. 7-8
Access Site Details .......................................................................................................... 7-9
Current Site Status ..................................................................................................... 7-9
Sites Detail ............................................................................................................... 7-10
Comments ..................................................................................................................... 7-11
8. Entering Flowsheet Information ........................................................................................ 8-1
Flowsheet ........................................................................................................................ 8-2

Table of Contents
March 2017 Hemodialysis Patch MD*1.0*50
User Manual
iii
Flowsheet Buttons ...................................................................................................... 8-3
Flowsheet Right-Click Menu ..................................................................................... 8-4
Adding a TIU Note ......................................................................................................... 8-5
Creating TIU Note Templates....................................................................................... 8-7
Performing the Falls Assessment .................................................................................. 8-8
Reviewing TIU Note Text .............................................................................................. 8-9
Medication List............................................................................................................. 8-10
Medication List Columns ......................................................................................... 8-11
Comments ..................................................................................................................... 8-12
9. Entering Post-Treatment Information ............................................................................... 9-1
Post-Treatment Assessment .......................................................................................... 9-2
Pain Assessment ............................................................................................................. 9-2
Falls Risk Evaluation ..................................................................................................... 9-2
Comments ....................................................................................................................... 9-2
10. Viewing Summary Information ........................................................................................ 10-1
Treatment Summary ................................................................................................... 10-2
Clinic/Location ............................................................................................................. 10-2
Healthcare Providers ................................................................................................... 10-3
Procedures and Diagnosis (CPT/ICD Codes) ............................................................ 10-5
Diagnosis.................................................................................................................. 10-5
Procedures ................................................................................................................ 10-6
Service Connected Conditions .................................................................................... 10-7
Confirming PCE Data Without Changing Anything ............................................... 10-8
Comments ..................................................................................................................... 10-9
11. Submitting the Study ......................................................................................................... 11-1
Treatment Status Report ............................................................................................. 11-2
Alternate Treatment Status Report Display.............................................................. 11-3
Viewing Additional Reports ........................................................................................ 11-4
Submitting the Study ................................................................................................... 11-5
Viewing Submitted Study Results .............................................................................. 11-7
Viewing Study Results in CPRS .............................................................................. 11-7
Viewing Study Results in CP User .......................................................................... 11-9
12. Attaching Results/External Attachments to a Study Using CP User ............................ 12-1

Table of Contents
iv Hemodialysis Patch MD*1.0*50 March 2017
User Manual
13. Site Configurable Options ................................................................................................. 13-1
Displaying the Options Screen .................................................................................... 13-1
Exiting the Options Screen .......................................................................................... 13-1
Customizing Drop-down List Items ........................................................................... 13-2
Adding a TIU Note Title .......................................................................................... 13-3
Verifying the TIU Note Title Addition .................................................................... 13-4
Adding a List Item ................................................................................................... 13-5
Deleting List Items ................................................................................................... 13-7
Saving Custom Lists ................................................................................................ 13-8
Loading Custom Lists .............................................................................................. 13-9
Preferences.................................................................................................................... 13-9
Preferences (System vs. User) ............................................................................... 13-10
Configuring System Preferences .............................................................................. 13-10
Assigning System Preferences to Users .................................................................... 13-14
Editing User Preferences........................................................................................ 13-16
ADMIN ONLY Rights ............................................................................................... 13-17
Report Templates ....................................................................................................... 13-18
Editing a Report Template ..................................................................................... 13-18
Creating a New Report Template .......................................................................... 13-24
Note Templates ........................................................................................................... 13-26
Editing Data Fields .................................................................................................... 13-27
14. Data Tables ......................................................................................................................... 14-1
Administrators ............................................................................................................. 14-1
Adding Administrators............................................................................................. 14-2
Application Events ....................................................................................................... 14-3
Study Events ................................................................................................................. 14-3
Defining Application Events Screen Buttons ............................................................ 14-4
15. Troubleshooting ................................................................................................................. 15-1
Preventing PCE “Data Loss” in the Hemodialysis Application .............................. 15-1
Reloading Flowsheet Data ........................................................................................... 15-3
Resolving “No Note Text” Error ................................................................................ 15-5
Issue Description ...................................................................................................... 15-5
Using More Than One Dialysis Device During a Treatment ................................... 15-6

Table of Contents
March 2017 Hemodialysis Patch MD*1.0*50
User Manual
v
16. Glossary .............................................................................................................................. 16-1
17. Index .................................................................................................................................... 17-1

Table of Contents
vi Hemodialysis Patch MD*1.0*50 March 2017
User Manual

March 2017 Hemodialysis Patch MD*1.0*50 1-1
User Manual
1. Introduction Hemodialysis is a new module of the Clinical Procedures (CP) package that provides features
specific to hemodialysis treatment. Hemodialysis allows you to collect hemodialysis treatment
information from the medical device, and manually enter treatment data into the application.
Pre-dialysis vitals, information obtained during treatment, and post-dialysis vitals can be entered
into the Hemodialysis data entry screens. A Treatment Summary is created and used to fill out
Centers for Medicare & Medicaid Services (CMS)/End Stage Renal Disease (ESRD) forms.
Topics discussed in this chapter are:
Intended Audience
Related Manuals
Product Benefits
Intended Audience
This User Manual is intended for use by clinicians, physicians, nurses, technicians, Technical
Support Office (TSO), and Information Resource Management Systems (IRMS). End users
should be familiar with the following:
Windows operating systems
CPRS functionality
Related Manuals
Here is a list of related manuals that you may find helpful:
Hemodialysis Installation Guide
Hemodialysis Technical Manual
Clinical Procedures Installation Guide
Clinical Procedures Technical Manual and Package Security Guide
Clinical Procedures Implementation Guide
Clinical Procedures User Manual
Clinical Procedures Release Notes
CPRS User Manual
Consult/Request Tracking User Manual
Consult/Request Tracking Technical Manual
Text Integration Utilities (TIU) Implementation Guide
Introduction
1-2 Hemodialysis Patch MD*1.0*50 March 2017
User Manual
Text Integration Utilities (TIU) User Manual
Vitals/Measurements User Manual
You can locate these manuals in the VistA Documentation Library (VDL). Select Clinical from
the VDL web page, select the package you want, and then select the manuals. For example, you
can select CPRS on the left side of the page. The list of CPRS manuals is displayed.
Product Benefits
Common User Interface
Clinicians can use Hemodialysis to collect data from the medical device and manually
enter data into the data entry screens.
Links to Other Packages
Hemodialysis interfaces with packages such as Computerized Patient Record System
(CPRS), Consult/Request Tracking package, Text Integration Utility package (TIU),
Vitals package, and Patient Care Encounter (PCE).

March 2017 Hemodialysis Patch MD*1.0*50 2-1
User Manual
2. Ordering a Hemodialysis Procedure This chapter describes the process to follow for ordering dialysis procedures. (Although you can
order several types of procedures in CPRS, you must follow the steps in this chapter to order
dialysis procedures.) This chapter uses the example of ordering a dialysis procedure to describe
the Hemodialysis ordering process. Be sure to follow the required steps in sequential order. You
can do the optional steps as needed.
1. Requirements for CP Manager. Required
2. Ordering a Dialysis Procedure in CPRS. Required
3. Checking in a New Study Using CP User. Required
Requirements for CP Manager
All Hemodialysis procedures must be set up in CP Manager before they can be used by this
application. Hemodialysis procedures should be set up like CP procedures. Make sure that each
hemodialysis procedure has the field Processing Application set to Hemodialysis (Figure 2-1).
Any other type of procedure will default to the Default setting. Refer to Chapter 6 “Setting Up
Clinical Procedures” in the Clinical Procedures Implementation Guide for more information on
setting up procedures.
Figure 2-1

Ordering a Hemodialysis Procedure
2-2 Hemodialysis Patch MD*1.0*50 March 2017
User Manual
Next, Consult Services must be set up and Consult Procedures must be created. Refer to Chapter
8 “Setting Up Consults for Clinical Procedures” in the Clinical Procedures Implementation
Guide for more information on setting up procedures.
Ordering a Dialysis Procedure in CPRS
This section describes how to order a dialysis procedure through CPRS. Keep in mind that you
can only order a dialysis procedure order and not a consult request.
In addition to becoming familiar with the CPRS ordering process, you can learn about the
interpreter, which is the user role within ASU that supports CP. The interpreter is a User Role
created by ASU that defines a user who can interpret (sign-off or verify) the procedure’s final
report. The Clinical Application Coordinator (CAC) defines interpreters in the Consults
package.
If you are an interpreter for a specific procedure, you can receive an alert when the procedure
results are ready for review. Additional comments can be added if necessary along with the
Procedure Summary code and the electronic signature. The following example describes how to
order a dialysis procedure through the CPRS Consults tab.
Contingency plan: If there is no order for the Hemodialysis procedure, the user will have to
manually record the treatment data and enter it into the Hemodialysis application at a later time.
To order a Hemodialysis procedure, do the following:
1. Logon to CPRS. The Patient Selection window displays.
2. Select a patient. The Cover Sheet window displays. Notice that Patientthree
Hemodialysis is the selected patient (Figure 2-2).
Figure 2-2

Ordering a Hemodialysis Procedure
March 2017 Hemodialysis Patch MD*1.0*50
User Manual
2-3
3. Click the Consults tab at the bottom of the window (Figure 2-3).
Figure 2-3
4. If you want to review an existing Consult or procedure, select one in the list from the
upper left panel. The lower left panel contains any supporting documents for the selected
consult or procedure, and the larger right panel contains the order details.

Ordering a Hemodialysis Procedure
2-4 Hemodialysis Patch MD*1.0*50 March 2017
User Manual
5. Click New Procedure on the left side of the Consults tab. You can also order a clinical
procedure from the Orders tab. The Provider & Location for Current Activities window
(Figure 2-4) displays.
Figure 2-4
6. Select an Encounter Provider from the list.
7. Select either the Clinic Appointments or the New Visit tab.
- Select Clinic Appointments if the patient already has an appointment through
Scheduling.
- Select New Visit if an appointment has not been made through Scheduling, and then
select a location from the list of Visit Locations. The selected location displays in the
Encounter Location field.
- If the patient had existing admissions, these are displayed under the Hospital
Admissions tab.
Ordering a Hemodialysis Procedure
March 2017 Hemodialysis Patch MD*1.0*50
User Manual
2-5
8. Click OK. The Order a Procedure window displays.
9. To order the dialysis procedure, perform the following steps:
- Select a hemodialysis procedure from the Procedure dropdown list (Figure 2-5).
- Complete the appropriate fields.
- Click Accept Order.
- Click Quit.
Figure 2-5
10. To sign the consult procedures, select File > Review/Sign Changes. The Review/Sign
Changes window displays.
Note: The appearance of the Review/Sign Changes window will vary depending on
which user key you were assigned by IRM. There are three possibilities:
ORES (Provider)
ORELSE (Nurse/Clinician)
OREMAS (Clerk)
ORES (Provider) Key
11. If you have the ORES (Provider) key, the Review/Sign Changes window looks like
Figure 2-6. Click OK, then skip to step 15.

Ordering a Hemodialysis Procedure
2-6 Hemodialysis Patch MD*1.0*50 March 2017
User Manual
Figure 2-6
ORELSE (Nurse/Clinician) Key
12. If you have the ORELSE (Nurse/Clinician) key, the Review/Sign Changes window looks
like Figure 2-7. If you select Hold until Signed, click OK then skip to step 15.
If you select Signed on Chart, click OK then continue to step 14.
Figure 2-7

Ordering a Hemodialysis Procedure
March 2017 Hemodialysis Patch MD*1.0*50
User Manual
2-7
OREMAS (Clerk) Key
13. If you have the OREMAS (Clerk) key, the Review/Sign Changes window looks like
Figure 2-8. If you select Hold until Signed, click OK then skip to step 15.
If you select Signed on Chart, click OK then continue to step 14.
Figure 2-8
14. The Electronic Signature window displays (Figure 2-9). Enter your signature code, then
click OK.
Figure 2-9
15. Click the Orders tab to review the ordered procedure. The procedure order appears on
the Active Orders sheet (Figure 2-10). You are ready to proceed to the next section to
check-in the patient using CP User.
Ordering a Hemodialysis Procedure
2-8 Hemodialysis Patch MD*1.0*50 March 2017
User Manual
Figure 2-10
Ordering a Hemodialysis Procedure
March 2017 Hemodialysis Patch MD*1.0*50
User Manual
2-9
Checking in a New Study Using CP User
Checking in a new study is the next step in the Clinical Procedures process. You need to check in
a new study in CP User after a procedure has been ordered. (Keep in mind that the CP check-in
is not related to the Scheduling check-in process.)
If you want to link multiple results to one procedure, you can check in multiple studies for the
same procedure that you ordered through Consults. In this way, you do not have to order
multiple procedure requests.
Note: It is recommended that you create a new procedure request every month. When
determining how often your site should create a new procedure request, keep in mind two things:
1) consider how heavy your site’s work load is and 2) remember that Hemodialysis reports
display on the CPRS Consults tab attached to the original procedure request. The more reports
that are attached to one result, the more difficult it will be to search for a particular result.
In this example, the dialysis procedure was ordered and a new study for the dialysis procedure is
being checked in.
1. To check in a new study, first logon to CP User and select the patient.
2. Choose File > Check-In New Study to check in the patient.
Figure 2-11
3. Select a Consult procedure order for the selected patient (Figure 2-11). The Clinical
Procedure column lists the consult procedure orders. Notice that the dialysis procedure is
selected.
Note: You can only select from Clinical Procedure request orders that are in the Pending
(p), Scheduled (s), Partial Results (pr), Complete (c), and Active (a) statuses.
Discontinued (d) and Cancel statuses are excluded.

Ordering a Hemodialysis Procedure
2-10 Hemodialysis Patch MD*1.0*50 March 2017
User Manual
4. Depending on the consult procedure you selected, the appropriate instruments for that
procedure are displayed. Click the appropriate instrument if more than one is listed, or
click No Instrument if no instrument is associated with this procedure. In Figure 2-11,
GAMBRO EXALIS (Bi-Directional) is the appropriate instrument in this example and is
selected.
5. You must associate each CP study with a PCE visit, which is the hospital location where
the procedure is performed. This step is Required.
For the majority of TIU notes created through CP, the visit association is completed in
the background. If a visit has already been recorded but the note wasn’t linked
(standalone visits, such as telephone or walk-in visits), you can select a visit from the
Clinical Procedures Check In edit screen (Figure 2-11).
To link the CP study to the visit, select information from the Outpatients Visits tab on
Figure 2-11. You can also select the New Visit tab and enter NOW for the date and time.
6. Click Check-In. The main CP User window displays (Figure 2-12).
7. Highlight the treating specialty option in the Studies column (for example, Renal, as in
Figure 2-12) to display the hemodialysis procedures.
Note: The Procedure column displays the following information: Patient name, study
number, consult number, and date/time of the procedure request.
Figure 2-12

Ordering a Hemodialysis Procedure
March 2017 Hemodialysis Patch MD*1.0*50
User Manual
2-11
If the study is checked-in for an instrument with a uni-directional interface, the status is
Ready to Complete. If the study is checked-in for an instrument supported by a bi-
directional interface, the status is Pending Instrument Data (as indicated in the Status
column in Figure 2-12).
8. At this point, the clinician performs the procedure on the instrument and transmits the
results back to VistA.

Ordering a Hemodialysis Procedure
2-12 Hemodialysis Patch MD*1.0*50 March 2017
User Manual

March 2017 Hemodialysis Patch MD*1.0*50 3-1
User Manual
3. Working with Hemodialysis This chapter describes how to get started with Hemodialysis.
The following topics are discussed in this chapter.
Requirements for the User
Opening Hemodialysis
Selecting a Patient
o Enabling/Disabling a Patient Record
o Study List Right-Click Menu
o Study List Command Buttons
o Review (Read Only) Study Viewing
o Access History List
Hemodialysis Patient Data Screen Areas
o Title Bar
o Menu Bar
o Patient Info Bar
o Patient Data Screen Buttons
o Tabs/Options Screen
o Status Line
Defining the Tabs of the Hemodialysis Patient Data Screen
Requirements for the User
Labs must be taken mid-week for the KT and KT/V calculations to return accurate results.
Opening Hemodialysis
Double-click the Hemodialysis icon on your desktop. If you are not currently logged into the
VistA system, you need to enter your signon credentials. Click OK. The main Hemodialysis
window is displayed with the Hemodialysis Study List displaying in the foreground, Figure 3-1.

Working with Hemodialysis
3-2 Hemodialysis Patch MD*1.0*50 March 2017
User Manual
Figure 3-1
Selecting a Patient
The Study List displays first after you have logged on to Hemodialysis. Use this screen 1) to
select the patient whose study you wish to open or 2) to disable a patient’s record so other users
can only view the patient’s study in read-only mode (i.e., no changes to the record will be saved).
Note: To view disabled records, the following option must be set to TRUE: Show Disabled
Studies to Users.
For (non-ADMIN) users to disable or enable a study, the following option must be set to TRUE:
Allow USER control Study Status.
1. Select File > Select Patient or click the Select Patient button if the Active Patients list is
not already displayed. Only active dialysis patients (patients who are already checked-in
through CP User) show on this list, Figure 3-1.
The Active Studies listview contains the following column headings:
Study #
Patient Name
Sex
DOB – Date of birth
SSN – Social security number
Checked In Time – Date & time both display

Working with Hemodialysis
March 2017 Hemodialysis Patch MD*1.0*50
User Manual
3-3
Status – Enabled, Disabled, or In Use
Status By – User who changed study status
Since – Date & time of status change
Workstation – Computer where user changed status
2. Click the patient’s name. Additional information about the selected patient displays in the
Active Patients window (Figure 3-1). If you select a sensitive patient, a sensitive patient
window is displayed indicating that the patient’s information should only be accessed on
a need to know basis.
Figure 3-2
The DOB and SSN columns of a sensitive patient each displays three X’s instead of
numbers, as shown here and in Figure 3-1.
Figure 3-3
Notes: If the IN USE icon displays in the column to the left of a Study #, that patient’s
record has already been opened. You are limited to viewing this record in read-only
mode.
The DISABLED icon displays in the column to the left of a study # of each patient
record that has been disabled. You are limited to viewing this record in read-only mode.
3. Click Select to open the patient’s record, or click Review to open the patient’s record in
read-only mode. The Cover tab displays (Figure 3-4).
Tip: A quicker way to open a patient’s record is to double-click the patient’s name.

Working with Hemodialysis
3-4 Hemodialysis Patch MD*1.0*50 March 2017
User Manual
Figure 3-4

Working with Hemodialysis
March 2017 Hemodialysis Patch MD*1.0*50
User Manual
3-5
Enabling/Disabling a Patient Record
To prevent users from making changes to a patient’s study, use the Study List to disable it. Users
are still permitted to view a disabled study. Please note that a TIU Note can still be added to a
disabled study.
Note: To disable a patient’s record, the following parameter must be set to TRUE: Allow USER
control Study Status.
To disable a patient’s record, do the following:
1. At the Study List, click the desired study.
2. Click Disable. The DISABLED icon displays in the column to the left of the Study #.
Other users may open this study, but they cannot save changes to it.
Note: When a user opens a study in read-only mode, the status line displays R/O (Figure
3-5) instead of the word Editable (Figure 3-4). Also, the Save button is inactive.
Figure 3-5
USERS with the “Allow USER control Study Status” set to TRUE can re-enable a disabled
study. To re-enable a patient’s record after it has been disabled, do the following:
1. At the Study List, click the desired study.
2. Click Enable. The DISABLED icon is cleared from the column to the left of the Study #.
Users are free to save changes to the study.

Working with Hemodialysis
3-6 Hemodialysis Patch MD*1.0*50 March 2017
User Manual
Study List Right-Click Menu
Right-click within the Active Studies list or Detail Panel to display a menu of additional options
(Figure 3-8). This menu also provides an alternate way to execute the functions of the command
buttons. Click the desired option to execute a specific function. Check marks display to indicate
that an option which can be toggled on or off is on.
The following options are available from the Study List right-click menu:
Refresh: Reload the Study List.
Select: Open the study selected in the Active Studies List.
Review: Open the selected study in Read-Only mode.
Enable: Activate the selected disabled study. Requires ADMIN rights or the User
Preference named “Allow USER control Study Status” must be set to TRUE.
Disable: Deactivate the selected active study. Users can still view the study in Read-
Only mode, but they cannot save changes to it. Requires ADMIN rights or the User
Preference named “Allow USER control Study Status” must be assigned to set to
TRUE. A TIU Note can still be added to a disabled study.
Autorefresh: Toggles Autorefresh on and off. When on, the Study List reloads
automatically at the interval specified in the “Study List Refresh Rate” User/System
Preference. (See “Configuring System Preferences.”)
Show Legend: When selected, the study list icons are explained towards the bottom of
the Study List screen (Figure 3-6).
Figure 3-6
Show Details: When selected, details about the selected study display in a panel to the
right of the Study List (Figure 3-7). The following details are listed in this area:
o Patient name
o SSN
o DOB
o Sex
o Check-in status (indicates if checked into CP User)
o Check-in date/time
o Study #
o Study Status (Enabled, Disabled, In Use)

Working with Hemodialysis
March 2017 Hemodialysis Patch MD*1.0*50
User Manual
3-7
Figure 3-7
Close: Exit the Study List without selecting a patient.
Figure 3-8
Study List Command Buttons
The command buttons below the title bar perform the same functions as the Study List right-
click menu options, described above.
Figure 3-9
Review (Read-Only) Study Viewing
Review, or Read-Only, mode allows you to open a study that is currently in use or that has been
disabled. Please note that in Review mode you can view the study data but not save any changes.
This is designed to prevent concurrency issues resulting from two users simultaneously trying to
save data to a single study. Please note that a TIU Note can be added to a read-only study.
To view a study in Review mode, highlight the study in the Active Studies listview, then click
the Review button.
Alternately, if the study is already disabled or in use by another user, simply double clicking the
study row will open the study in Review mode.
There are three indicators that a study you are viewing is in Review mode:

Working with Hemodialysis
3-8 Hemodialysis Patch MD*1.0*50 March 2017
User Manual
The Save button is disabled.
The status line displays R/O (for read only) instead of Editable.
The background color of the screen changes to the color set in the “Color Review”
preference (Figure 3-10). (To set the Review mode background color, see the section
“Configuring System Preferences.”)
Figure 3-10

Working with Hemodialysis
March 2017 Hemodialysis Patch MD*1.0*50
User Manual
3-9
Hemodialysis Patient Data Screen Areas
The CP Hemodialysis Patient Data screens contain six major areas where you can view
information or enter data. These areas are described below.
Title Bar
Menu Bar
Patient Info Bar
Patient Data Screen
Tabs/Options Screen
Status Line
Note: Screen captures in this manual may differ slightly from what you see on your screen.
Title Bar
The title bar runs along the top edge of the Hemodialysis window. It contains the name of the
application and the version number.
The three buttons at the far right of the title bar allow you to minimize, maximize/restore, and
close the window.
Menu Bar
or
The menu bar lies below the title bar. The Hemodialysis menu bar contains five options: File,
Options/Patient Data, Documents/Assessments, Tools, and Help. Click an option on the menu
bar to list all the operations you can perform from within that menu. Click the desired option to
execute a specific function.
Each menu option and its corresponding suboptions display as follows:
File
The following options are available from the File menu:
Select: Save current data and display the Study List to choose a different patient.
Patient Info: Display a window which contains patient information such as social
security #, address, admission history, health insurance, and service connection.
Save: Save current study data to the database.
Exit: Save current data and close the Hemodialysis application.

Working with Hemodialysis
3-10 Hemodialysis Patch MD*1.0*50 March 2017
User Manual
Options/Patient Data
The second menu option does not drop down. It simply toggles you between the Patient Data
tabs and the Options screen.
Options: Display the Options screen.
Patient Data: Close the Options screen and return to the Patient Data tabs.
Documents/Assessments
or
The third menu option changes depending on which tab is currently selected. Its purpose is to
allow you to access the toolbar functions without using a mouse.
Keyboard Access: Press <Alt> + <A> to expand the Assessments menu, then press the
underlined letter to choose a specific option.
The Documents menu option displays on the following tabs:
Cover
Submit
The Assessments menu option displays on the following tabs:
Rx and Lab
Pre-Treatment
Access
Flowsheet
Post-Treatment
Summary
The following lists indicate the Documents/Assessments menu options which appear on the eight
tabs of the Hemodialysis application. The underlined letters indicate which key activates the
option once the menu is expanded (by pressing <Alt> + <A>). The screen captures demonstrate
how the menu options appear on the respective toolbars.
Cover Tab Documents Menu
Rx and Lab Tab Assessments Menu
Comments
o New
o Edit

Working with Hemodialysis
March 2017 Hemodialysis Patch MD*1.0*50
User Manual
3-11
o Delete
o View
Pre-Treatment Assessments Menu
Pain Assessment Edit
Comments
o New
o Edit
o Delete
o View
Access Tab Assessments Menu
VA Site
o Add
o Remove VA Site
o Select VA Site
Comments
o New
o Edit
o Delete
o View
Flowsheet Tab Assessments Menu
Flowsheets
o Refresh
o Edit Entry
o Add Entry
o Invalidate
o Add TIU
o Reload
Medications

Working with Hemodialysis
3-12 Hemodialysis Patch MD*1.0*50 March 2017
User Manual
o Edit Entry
o Add
o Invalidate
o Delete
Comments
o New
o Edit
o Delete
o View
Post Treatment Tab Assessments Menu
Pain Assessment Edit
Comments
o New
o Edit
o Delete
o View
Summary Tab Assessments Menu
PCE Information
o Location
o Providers
o Procedures
o Diagnoses
o Service
o Confirm
Comments
o New
o Edit
o Delete
o View

Working with Hemodialysis
March 2017 Hemodialysis Patch MD*1.0*50
User Manual
3-13
Submit Tab Documents Menu
Refresh
Add TIU
Sign & Submit
Tools
The following options are available from the Tools menu:
Show Gateway Info: Display a window containing the following gateway
information: Gateway Status, Job ID, Last Purge Date, Maximum Log Entries, Node,
Polling Interval, Start date/time, and the name of the user who started the gateway,
UCI, and volume where the gateway is running. If the gateway is down, the window
simply displays the message, “Gateway Status: Down.”
Set Pending Status: Change the status of a study from Error to Pending. To enable
this option, two conditions must be met: 1) the Allow USER Reset Study Status
preference must be set to TRUE (See the section “Configuring System Preferences,”)
and 2) the selected study must be in an error status.
Show Treatment Status Report: Toggle the Treatment Status Report (on the Submit
tab) on/off.
Help
The following options are available from the Help menu:
Contents: Display the online Help file.
Clinical Procedures Web Site: Launch a browser window and display the Clinical
Procedures web site.
About: Display Hemodialysis application version #, server version, copyright info,
compilation date, and CRC value.
Working with Hemodialysis
3-14 Hemodialysis Patch MD*1.0*50 March 2017
User Manual
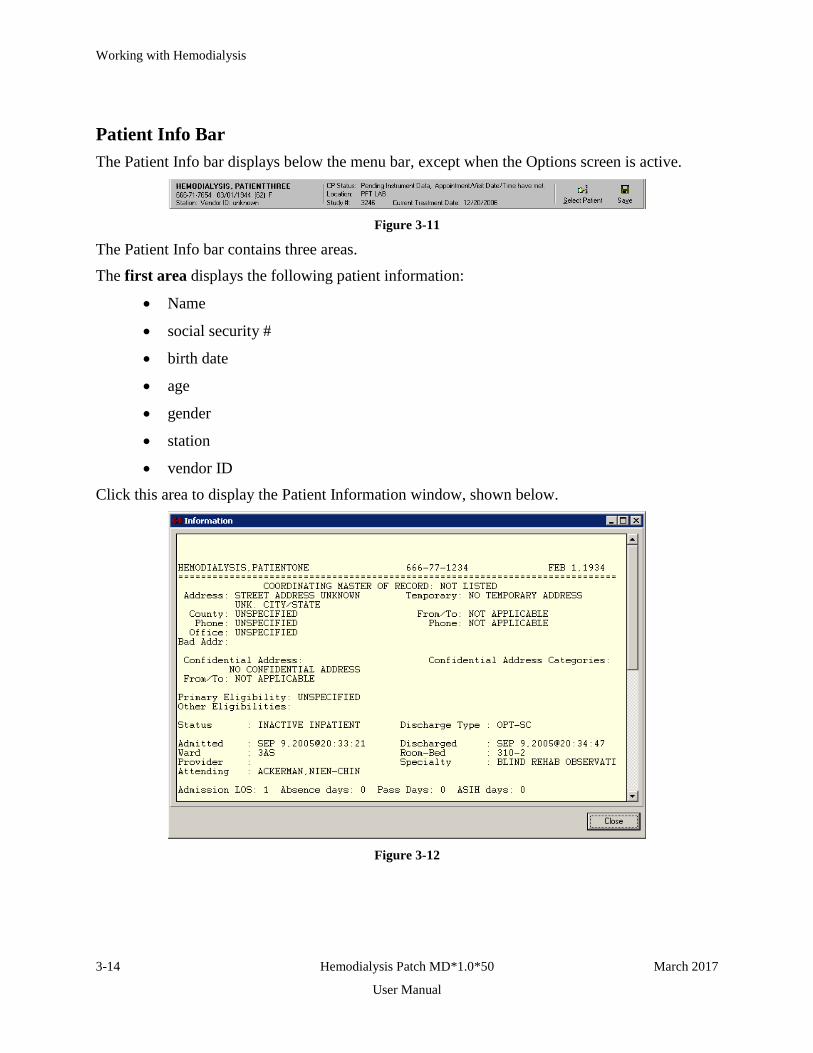
Patient Info Bar
The Patient Info bar displays below the menu bar, except when the Options screen is active.
Figure 3-11
The Patient Info bar contains three areas.
The first area displays the following patient information:
Name
social security #
birth date
age
gender
station
vendor ID
Click this area to display the Patient Information window, shown below.
Figure 3-12

Working with Hemodialysis
March 2017 Hemodialysis Patch MD*1.0*50
User Manual
3-15
The second (middle) area displays the following treatment information:
CP study status (“Error”, “Pending instrument data” etc.) and if the appointment
date/time was met.
location
study #
current treatment date.
If the study status is “Error,” the study status displays in red, as shown below.
Figure 3-13
The third area contains the Patient Data screen buttons and is described in the very next section.
Patient Data Screen Buttons
Select: Displays the Hemodialysis Study List, from which you can open a new
patient record.
Save: Saves information on the current treatment.
Tabs/Options Screen
The Tabs screen area is the primary place for viewing and entering study data. There are eight
tabs:
Cover
Rx and Lab
Pre-Treatment
Access
Flowsheet
Post-Treatment
Summary
Submit
These tabs are described in detail later in the section “Defining the Tabs of the Hemodialysis
Patient Data Screen” and the subsequent chapters.

Working with Hemodialysis
3-16 Hemodialysis Patch MD*1.0*50 March 2017
User Manual
The Options screen is hidden until you select Options from the menu bar. Once selected, the
Options screen takes the place of the Patient Info bar and the Tabs screen area. To close the
Options screen and return to the Tabs, select Patient Data from the menu bar.
Access the Options screen to view and modify site configurable options, which are described in
detail in the “Site Configurable Options” section of this User Manual.
Status Line
Figure 3-14
The status line is the gray bar running along the bottom edge of the Hemodialysis window.
It displays the following information, from left to right:
Options Reloaded (This message displays for 15 seconds after you start the
application.)
Server and port #
Study #
Editable or R/O (Indicates study may be edited or is open in read-only mode.)
User name
Current user role (USER or ADMIN)
CP Gateway status (Up or Down)
Display Application Version
To display the version and build number of the application, press the following key combination
at any Patient Data or Options screen: <Ctrl> + <Shift> + <V>
The version and build number display on the left-hand side of the status bar for about fifteen
seconds.
Figure 3-15

Working with Hemodialysis
March 2017 Hemodialysis Patch MD*1.0*50
User Manual
3-17
Defining the Tabs of the Hemodialysis Patient Data Screen
There are eight tabs that make up the Hemodialysis Patient Data screen. They are as follows:
Cover
Rx and Lab
Pre-Treatment
Access
Flowsheet
Post-Treatment
Summary
Submit
Using these tabs in order from left to right follows the workflow process of entering data before,
during, and after a hemodialysis treatment. The tabs are described in more detail below.

Working with Hemodialysis
3-18 Hemodialysis Patch MD*1.0*50 March 2017
User Manual
Cover Tab
This is the Cover tab (Figure 3-16). After selection of a patient, this is the first tab to display.
You can view current treatment information, past treatment information by date, and vascular
access monitoring information on this tab. This screen also displays information about infectious
diseases, transplant status, allergies, clinical warnings, and advanced directives. Finally, you can
use this screen to print historical result reports.
For more detailed information about the Cover tab, see “Chapter 4: Editing/Viewing Information
on the Cover Tab.”
Figure 3-16

Working with Hemodialysis
March 2017 Hemodialysis Patch MD*1.0*50
User Manual
3-19
Rx and Lab Tab
Use the Rx and Labs tab to enter the dialysis prescription and view lab results (Figure 3-17).
Notes dealing with the prescription or lab results can be entered into the Comments area.
For more detailed information about the Rx and Lab tab, see “Chapter 5: Entering Dialysis
Prescription and Labs.”
Figure 3-17

Working with Hemodialysis
3-20 Hemodialysis Patch MD*1.0*50 March 2017
User Manual
Pre-Treatment Tab
The Pre-Treatment tab is used to enter pre-dialysis vitals and pre-dialysis pain assessment
(Figure 3-18). Notes dealing with pre-treatment assessment can be entered into the Comments
area.
For more detailed information about the Pre-Treatment tab, see “Chapter 6: Entering Pre-
Treatment Information.”
Figure 3-18

Working with Hemodialysis
March 2017 Hemodialysis Patch MD*1.0*50
User Manual
3-21
Access Tab
You can enter information about vascular access sites on the Access tab (Figure 3-19). Use this
tab to add, assess, select, remove, and comment on access sites.
For more detailed information about the Access tab, see “Chapter 7: Entering Access
Information.”
Figure 3-19

Working with Hemodialysis
3-22 Hemodialysis Patch MD*1.0*50 March 2017
User Manual
Flowsheet Tab
Use the Flowsheet tab to capture data from the dialysis instrument and manually enter dialysis
information and medications used during treatment (Figure 3-20). Notes dealing with flowsheet
data or medications given during treatment can be entered into the Comments area.
For more detailed information about the Flowsheet tab, see “Chapter 8: Entering Flowsheet
Information.”
Figure 3-20

Working with Hemodialysis
March 2017 Hemodialysis Patch MD*1.0*50
User Manual
3-23
Post-Treatment Tab
The Post-Treatment tab is used to enter vitals, observations, and pain assessment after the
dialysis treatment has completed (Figure 3-21). Notes dealing with post-treatment assessment
can be entered into the Comments area.
For more detailed information about the Post-Treatment tab, see “Chapter 9: Entering Post-
Treatment Information.”
Figure 3-21

Working with Hemodialysis
3-24 Hemodialysis Patch MD*1.0*50 March 2017
User Manual
Summary Tab
You can enter/view summary information, vascular access monitoring, and billing information
about the dialysis treatment on the Summary tab (Figure 3-22). Under Billing Information, you
can enter associated CPT and ICD9 codes, clinical indicators and associate providers with this
treatment session. Notes dealing with billing and environmental conditions can be entered into
the Comments area.
For more detailed information about the Summary tab, see “Chapter 10: Viewing Summary
Information.”
Figure 3-22

Working with Hemodialysis
March 2017 Hemodialysis Patch MD*1.0*50
User Manual
3-25
Submit Tab
You can view the final report for the dialysis treatment, along with past reports, on the Submit
tab (Figure 3-23). The TIU Documents area on this tab allows you to review TIU notes. This tab
can optionally display a checklist to alert you if key information was omitted on one of the
previous tabs. Use this tab to submit the final report.
For more detailed information about the Submit tab, see “Chapter 11: Submitting the Study.”
Figure 3-23

Working with Hemodialysis
3-26 Hemodialysis Patch MD*1.0*50 March 2017
User Manual

March 2017 Hemodialysis Patch MD*1.0*50 4-1
User Manual
4. Editing/Viewing Information on the Cover Tab The Cover tab is the first tab you see after selecting a patient. Information on the current
treatment along with past treatment information can be found on this tab.
The following information is displayed on the Cover tab:
Current Treatment Information
Recent Postings
Infectious Diseases
Treatment History
Figure 4-1
Current Treatment Information
The first time you open a study, the Read Only checkbox will be unchecked so you can enter the
treatment information. Each time you open the study again, the Read Only checkbox will be
checked, so you can view the previously entered treatment information. If you want to edit this
information, you can uncheck the Read Only checkbox and edit the information (Figure 4-2).
Note: If you want the Treatment Information to default as Read Only for new studies, ADMIN
users can set the “Set the new study Cover to Read Only” option to TRUE (Options menu >
Preferences > System Preferences > Set the new study Cover to Read Only).

Editing/Viewing Information on the Cover Tab
4-2 Hemodialysis Patch MD*1.0*50 March 2017
User Manual
Figure 4-2
Edit the information for the following fields:
Current Treatment Date: Select the date of the current treatment (defaults to Check-in date).
ESRD Diagnosis: Select the ICD9 Code associated with the ESRD diagnosis.
Diagnosis Date: Select the date the patient was first diagnosed with ESRD.
Initial Therapy Date: Select the date of the first Hemodialysis treatment for this patient.
Modality: Select the type of dialysis treatment to be performed. This dropdown list is site
configurable for ADMIN users. (See “Customizing Drop-down List Items.”)
Code Status: Select either DNR, AD Signed or Full. This dropdown list is site configurable for
ADMIN users. (See “Customizing Dropdown List Items.”)
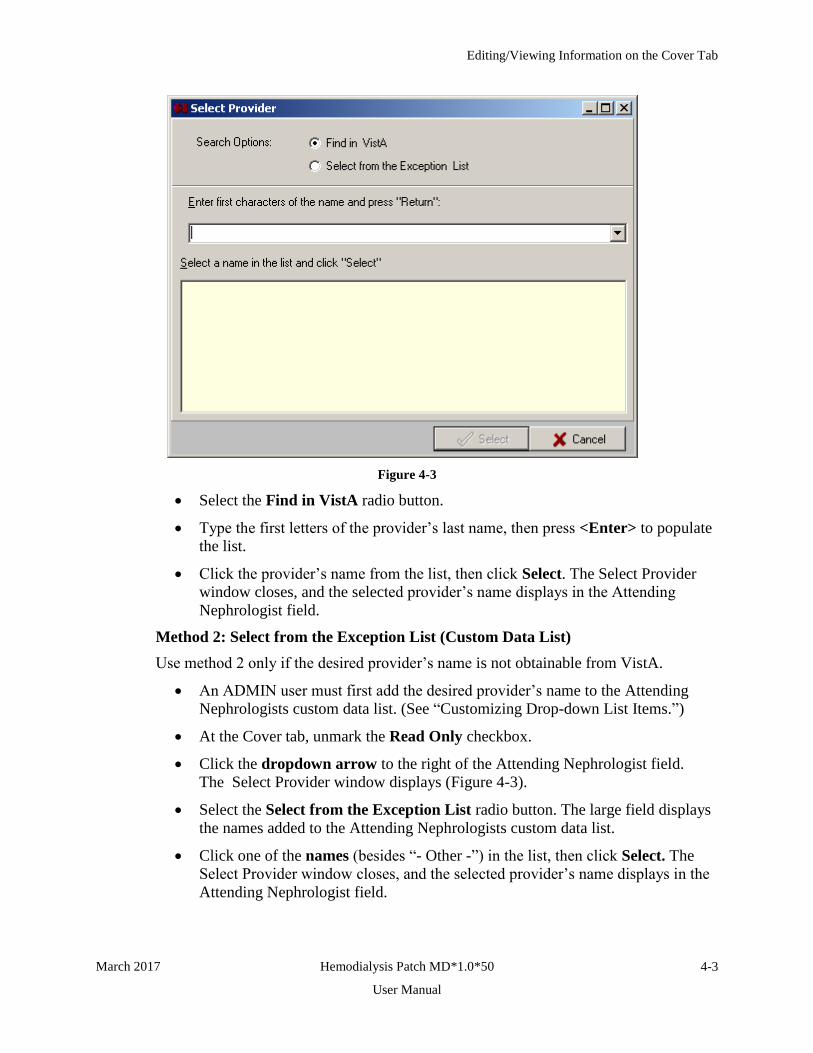
Attending Nephrologist: Select the name of the attending Nephrologist. Choose the
Nephrologist’s name in one of three ways:
Method 1: Find in VistA (Recommended)
Note: This method is recommended because the names get pulled from the VistA
database. If the provider’s name does not appear in the list, use Method 2 or 3, below.
Unmark the Read Only checkbox.
Click the dropdown arrow to the right of the Attending Nephrologist field.
The Select Provider window displays (Figure 4-3).
Editing/Viewing Information on the Cover Tab
March 2017 Hemodialysis Patch MD*1.0*50
User Manual
4-3
Figure 4-3
Select the Find in VistA radio button.
Type the first letters of the provider’s last name, then press <Enter> to populate
the list.
Click the provider’s name from the list, then click Select. The Select Provider
window closes, and the selected provider’s name displays in the Attending
Nephrologist field.
Method 2: Select from the Exception List (Custom Data List)
Use method 2 only if the desired provider’s name is not obtainable from VistA.
An ADMIN user must first add the desired provider’s name to the Attending
Nephrologists custom data list. (See “Customizing Drop-down List Items.”)
At the Cover tab, unmark the Read Only checkbox.
Click the dropdown arrow to the right of the Attending Nephrologist field.
The Select Provider window displays (Figure 4-3).
Select the Select from the Exception List radio button. The large field displays
the names added to the Attending Nephrologists custom data list.
Click one of the names (besides “- Other -”) in the list, then click Select. The
Select Provider window closes, and the selected provider’s name displays in the
Attending Nephrologist field.

Editing/Viewing Information on the Cover Tab
4-4 Hemodialysis Patch MD*1.0*50 March 2017
User Manual
Method 3: Add a Name On the Fly
Use method 3 only if the desired provider’s name is not obtainable from VistA and an
ADMIN user is not available to add the provider’s name to the site’s custom data list..
Unmark the Read Only checkbox.
Click the dropdown arrow to the right of the Attending Nephrologist field.
The Select Provider window displays (Figure 4-3).
Select the Select from the Exception List radio button.
Click “- Other -” from the name list, then click Select. The Select Provider
popup displays (Figure 4-4)..
Figure 4-4
Type the provider’s name in the Name field, then click OK. The Select
Provider popup closes, and the provider’s name displays in the Attending
Nephrologist field.
Visit Schedule: Check the checkboxes for the days that represent the patient’s treatment
schedule, such as Monday, Wednesday, Friday.
Transplant Status: Indicate if this patient is a candidate for transplant or not by selecting the
appropriate radio button to the right of the Transplant Status label. If you select Candidate,
indicate if a workup is in progress or if the patient has been referred to a transplant center.
Recent Postings & Infectious Diseases
Allergies, Clinical Warnings, Advanced Directives, and Infectious Diseases are listed in the
Recent Postings & Infectious Diseases area (Figure 4-1).
1Notes:
Clinical Warnings: Only the date and time display, not the full text of the clinical warnings.
Advanced Directives: The display shows Yes or No to indicate whether advanced directives
exist.
Infectious Diseases: This area does not provide data for the following three diseases: Hepatitis B
Surface Antigen, Hepatitis B Surface Antibody, and Hepatitis C Surface Antibody. Check the
Lab Results area on the Rx and Lab tab for data pertaining to these three diseases.
1 MD*1.0*19 March 2009 Added notes regarding Recent Postings & Infectious Diseases

Editing/Viewing Information on the Cover Tab
March 2017 Hemodialysis Patch MD*1.0*50
User Manual
4-5
Alternate Display of Recent Postings & Infectious Diseases
An alternate display of Recent Postings & Infectious Diseases is available. Figure 4-1 shows
what the Recent Postings & Infectious Diseases area looks like if the “Show Infectious Diseases
information as Tree” parameter is set to FALSE. If you set the “Show Infectious Diseases
information as Tree” parameter to TRUE, it displays as shown in Figure 4-5.
When this parameter is set to TRUE, click the plus sign (+) next to the infectious disease to view
data for that disease.
Figure 4-5
Treatment History (Vascular Access Monitoring)
You can view the latest information on vascular access monitoring in the Treatment History
section of the screen. This information is based on vascular access monitoring information
entered into this Hemodialysis application, so if you are using this application for the first time,
no vascular access monitoring information will display.
To change the maximum number of past treatments that will display in the list, change the Study
Load Limit value at the Options screen. (See “Configuring System Preferences.”)
Figure 4-6
Editing/Viewing Information on the Cover Tab
4-6 Hemodialysis Patch MD*1.0*50 March 2017
User Manual
Past Treatment Data
You can view data for a past treatment by selecting its row in the Treatment History area. Data
for the selected treatment displays in the view below the Treatment History area (Figure 4-7).
Information on past treatments is based on treatment information entered into this Hemodialysis
application, so if you are using this application for the first time, no past treatment data displays.
The information listed below can appear in this area (each on its own tab), depending on what
has been entered for the particular study. If a tab contains a TIU note, the TIU note number
displays on the tab. Click a tab to view the record.
Summary: This section displays Pre- and Post- vitals, treatment duration, and dialysis
totals and averages (Figure 4-7).
TIU note (yellow icon): The yellow icon indicates a comment saved as a separate TIU
note.
TIU note (white icon): The white icon indicates a Falls Risk Evaluation that is saved as a
separate TIU note.
Results (green icon): The Results tab, which displays the Summary Report, will only
display for studies that have already been submitted.
Figure 4-7
March 2017 Hemodialysis Patch MD*1.0*50 5-1
User Manual
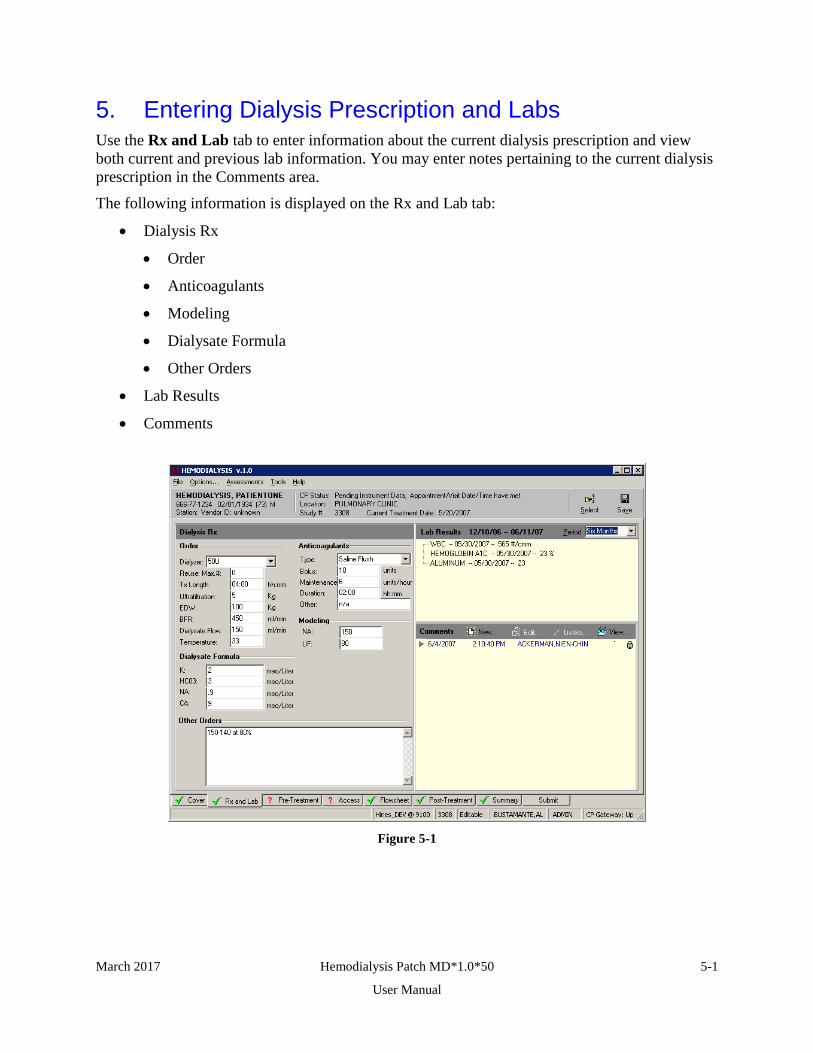
5. Entering Dialysis Prescription and Labs Use the Rx and Lab tab to enter information about the current dialysis prescription and view
both current and previous lab information. You may enter notes pertaining to the current dialysis
prescription in the Comments area.
The following information is displayed on the Rx and Lab tab:
Dialysis Rx
Order
Anticoagulants
Modeling
Dialysate Formula
Other Orders
Lab Results
Comments
Figure 5-1

Entering Dialysis Prescription and Labs
5-2 Hemodialysis Patch MD*1.0*50 March 2017
User Manual
Dialysis Rx
Enter the dialysis prescription by performing the following steps:
1. Click the Rx and Lab tab.
2. The most recent dialysis prescription displays in the Dialysis Rx section of the screen.
For first time patients being monitored by the Hemodialysis application, manually enter
the patient’s prescription into the Dialysis Rx section. The Dialyzer dropdown list is site
configurable for ADMIN users. (See “Customizing Drop-down List Items.”)
Lab Results
Use the Labs area to display lab data for a time period of your choosing.
Displaying Lab Results
1. Use the Period dropdown list to choose the time period for which to display lab data
(Figure 5-2).
Figure 5-2
The Period dropdown list contains the following options:
Today
T-x (T-2 means two days ago through today, T-7 means seven days ago through
today, etc.)
Three Months
Six Months
One Year
Date Range
If you choose Date Range, the Date Range Selection window displays (Figure 5-3).
Select start and end dates, then click OK.

Entering Dialysis Prescription and Labs
March 2017 Hemodialysis Patch MD*1.0*50
User Manual
5-3
Figure 5-3
Note: The shorter the selected time period, the faster the display populates with data.
The selected date range displays in the toolbar, to the left of the Period drop-down list,
and the lab data displays just below (Figure 5-4).
Figure 5-4
Note: When you leave the Rx and Lab tab, the lab results are cleared. To see the results
again, reselect a time period from the Period drop-down list.
1Local tests mapped to the following National Lab Tests will display in this area:
National Lab Code Lab Test
84520 BUN (Blood Urea Nitrogen)
82565 CREATININE
84295 SODIUM
84140 POTASSIUM
82435 CHLORIDE
82830 CARBON DIOXIDE
82310 CALCIUM
84100 PHOSPHORUS
82040 ALBUMIN
84455 AST (Aspartate Aminotransferase)
84465 ALT (Alanine Aminotransferase)
84075 ALKALINE PHOSPHATASE
82250 BILIRUBIN
83020 HEMOGLOBIN
1 MD*1.0*19 March 2009 Added list of Lab Results that display on the Rx and Lab tab.

Entering Dialysis Prescription and Labs
5-4 Hemodialysis Patch MD*1.0*50 March 2017
User Manual
85055 HEMATOCRIT
85569 WBC (White Blood Count)
86806 PLATELETS
83057 HEMOGLOBIN A1C
82466 CHOLESTEROL
84480 TRIGLYCERIDES
82370 FERRITIN
83540 IRON
82060 TRANSFERRIN
84012 PARATHYROID HORMONE
81512 ALUMINUM
89068 HEPATITIS B SURFACE ANTIGEN
89065 HEPATITIS B SURFACE ANTIBODY
89067 HEPATITIS B SURFACE ANTIBODY
82013 HEPATITIS B SURFACE ANTIBODY
89095 HEPATITIS B SURFACE ANTIBODY
89127 HEPATITIS B SURFACE ANTIBODY
89128 HEPATITIS B SURFACE ANTIBODY
87398 HEPATITIS B SURFACE ANTIBODY
89699 HEPATITIS B SURFACE ANTIBODY
89070 HEPATITIS C ANTIBODY
87261 FLU
Entering Dialysis Prescription and Labs
March 2017 Hemodialysis Patch MD*1.0*50
User Manual
5-5
Comments
Add notes in the Comments section at the bottom of the screen. Comments can be locked so that
no one (including the creator of the note) can modify them.
To add a Comment, do the following:
1. Click the New button on the Comments toolbar. The Comment window displays and
cursor focus is in the Text field.
2. Type your comment in the Text field, then click Save. The note is not yet locked. It may
still be edited or deleted.
3. To lock the note, do one of the following:
Click the Save button after you have typed your note: This immediately saves
and locks the note. The note becomes a permanent part of this treatment.
Select a different patient or exit Hemodialysis (without clicking Lock): When
you return to the current tab, the comment is locked. You may no longer edit the
note, and the note becomes a permanent part of this treatment.

Entering Dialysis Prescription and Labs
5-6 Hemodialysis Patch MD*1.0*50 March 2017
User Manual
Comments Business Rules
The following rules govern the way comments work:
1. A new comment is initially UNLOCKED.
2. A comment remains UNLOCKED until one of the following happens:
User clicks the Save button
User selects another patient
Note: Switching between tabs does not change the locked status of a comment.
3. Locking the comment prevents future updates for the comment.
4. A LOCKED comment has a special indicator (padlock icon).
5. A LOCKED comment CANNOT be unlocked.
6. An UNLOCKED comment can be updated, but only by author of the note.
7. An UNLOCKED comment can be deleted.
8. Comments cannot be invalidated. If you entered a comment in error and then locked it,
add an additional comment to describe the situation.

March 2017 Hemodialysis Patch MD*1.0*50 6-1
User Manual
6. Entering Pre-Treatment Information This is where you can enter vitals information taken before the treatment begins. This tab also
contains a pre-treatment pain assessment. Notes dealing with pre-treatment information can be
entered at the bottom of this tab in the Comments area.
The following information is entered/displayed on the Pre-Treatment tab:
Pre-Treatment Assessment
Weight
Temperature
Blood Pressure and Pulse
Other
Mental Status
Barriers to Learning
Patient Education
Patient Transportation
Safety Checks
Pain Assessment
Comments
Figure 6-1

Entering Pre-Treatment Information
6-2 Hemodialysis Patch MD*1.0*50 March 2017
User Manual
Pre-Treatment Assessment
Enter pre-dialysis assessments by performing the following steps:
1. Click the Pre-Treatment tab.
2. Take pre-dialysis vitals and assessments and record them on the Pre-Treatment
Assessment section of this screen. Enter pre-treatment assessment data for the
following fields:
Weight: Enter the patient’s Pre-Weight and Treatment Goal Weight in Kg.
Note: The Estimated Dry Weight (EDW) value is for display only and cannot be
modified from this screen. It can only be changed by editing the EDW value on the
Rx and Lab tab.
Temperature: Enter the patient’s temperature in Fahrenheit.
Blood Pressure and Pulse: Enter the patient’s blood pressure and pulse while the
patient is seated and standing.
Other:
Indicate whether the patient shows any signs of Edema (yes or no).
Enter the patient’s Respirations before treatment.
Indicate whether the patient has Shortness of Breath (SOB) (yes or no).
Enter the Station # and Machine #.
Mental Status: Indicate the mental status of the patient before treatment by checking
the appropriate check box(es). (More than one check box can be selected.) If you
select Oriented, indicate the level by selecting the appropriate radio button.
Barriers to Learning: Indicate whether the patient has any barriers to learning by
checking the appropriate check box(es).
Patient Education: Indicate whether the patient has been informed about all aspects of
the treatment. Make sure all the patient’s questions regarding treatment have been
answered. If you select Yes, the Key and Initial fields become active. Fill these
fields if your site requires them.
Patient Transportation: Select the patient’s mode of transportation from the dropdown
list. The following options are initially available: ambulatory, bed, motorized wheel
chair, wheel chair, and stretcher. This dropdown list is site configurable for ADMIN
users. (See “Customizing Drop-down List Items.”)
Safety Checks: Select Yes or No to indicate whether the Safety Checks have been
completed. Safety checks are determined by site and usually depend on the device
that is used.

Entering Pre-Treatment Information
March 2017 Hemodialysis Patch MD*1.0*50
User Manual
6-3
Pain Assessment
Click the Edit button (Figure 6-2) to display the Pain Assessment window (Figure 6-3).
Figure 6-2
Note: You may also display the Pain Assessment window by selecting Pain Assessment Edit
option from the Assessments menu.
Keyboard-only method: Press <Alt> + <A> to expand the Assessments menu, then press <P>
to select Pain Assessment Edit.
Figure 6-3
The Pain Assessment window contains three sections of questions. The first section contains a
drop-down list that is always active. It may also contain a pair of radio buttons, depending on the

Entering Pre-Treatment Information
6-4 Hemodialysis Patch MD*1.0*50 March 2017
User Manual
value selected for the “Pain assessment based on how patient tolerates pain” parameter. For
more information on changing parameters, see “Configuring System Preferences.”
If the “Pain assessment based on how patient tolerates pain” parameter is set to FALSE, the first
section of the Pain Assessment window contains only the “How bad is the pain?” drop-down list
(Figure 6-4).
Figure 6-4
Select a value from the dropdown to indicate how bad the patient’s pain is by choosing 0-10 or
99 for pain tolerance.
If the pain is indicated as 1 or above, the next two sections of questions are active and should be
completed.
Note: 1 is the default pain level that activates the second two question areas. This level is site
configurable. To change the pain level that activates the additional questions, change the value in
the Pain Level parameter. See “Configuring System Preferences.”
If the “Pain assessment based on how patient tolerates pain” parameter is set to TRUE, the first
section of the Pain Assessment window contains both the “How bad is the pain?” drop-down list
and a pair of radio buttons with the following labels: Can patient tolerate pain? Yes/No (Figure
6-5).
Figure 6-5
Select a value from the dropdown to indicate how bad the patient’s pain is by choosing 0-10 or
99 for pain tolerance.
Next, select a radio button to indicate if the patient can tolerate pain or not. If the No radio button
is selected, the next two sections of questions are active and should be completed.
Note: If the value in the “How bad is the pain?” dropdown is set to 0, the radio buttons and the
next two sections of questions are disabled.
If the value in the “How bad is the pain?” dropdown is set higher than 0 and if the Yes radio
button is selected, the next two sections of questions are disabled.
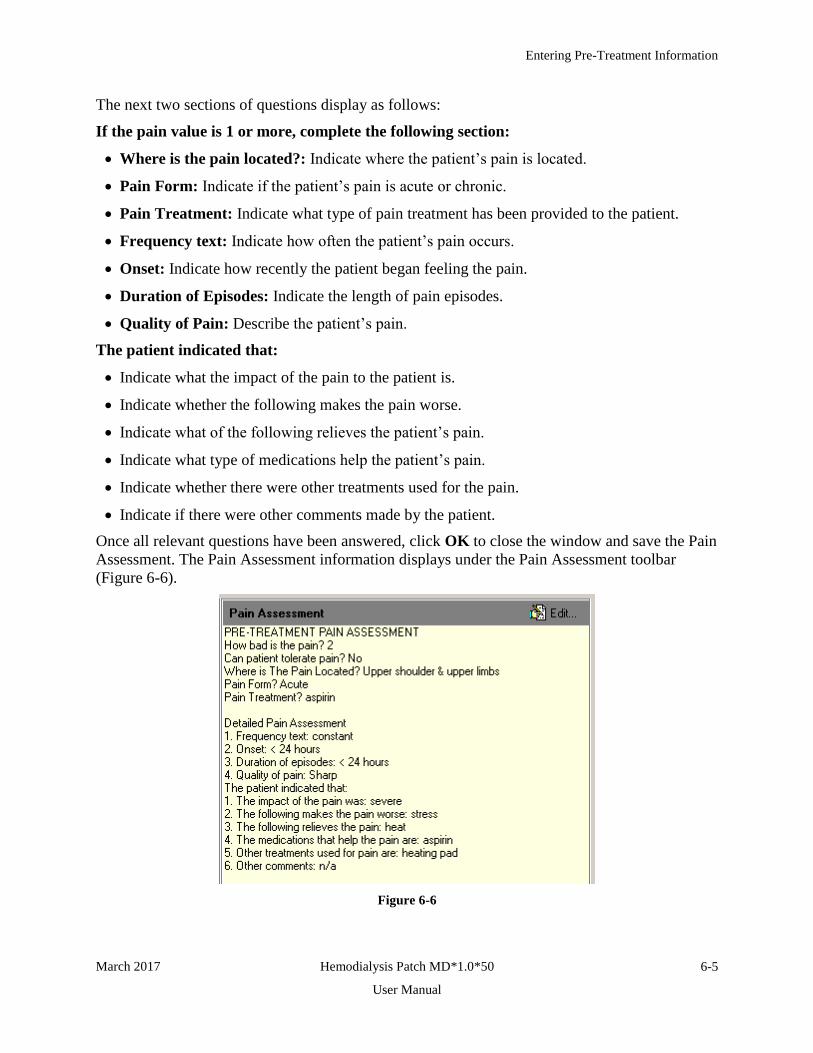
Entering Pre-Treatment Information
March 2017 Hemodialysis Patch MD*1.0*50
User Manual
6-5
The next two sections of questions display as follows:
If the pain value is 1 or more, complete the following section:
Where is the pain located?: Indicate where the patient’s pain is located.
Pain Form: Indicate if the patient’s pain is acute or chronic.
Pain Treatment: Indicate what type of pain treatment has been provided to the patient.
Frequency text: Indicate how often the patient’s pain occurs.
Onset: Indicate how recently the patient began feeling the pain.
Duration of Episodes: Indicate the length of pain episodes.
Quality of Pain: Describe the patient’s pain.
The patient indicated that:
Indicate what the impact of the pain to the patient is.
Indicate whether the following makes the pain worse.
Indicate what of the following relieves the patient’s pain.
Indicate what type of medications help the patient’s pain.
Indicate whether there were other treatments used for the pain.
Indicate if there were other comments made by the patient.
Once all relevant questions have been answered, click OK to close the window and save the Pain
Assessment. The Pain Assessment information displays under the Pain Assessment toolbar
(Figure 6-6).
Figure 6-6

Entering Pre-Treatment Information
6-6 Hemodialysis Patch MD*1.0*50 March 2017
User Manual
Comments
Pre-Treatment notes can be added and viewed in the Comments area in the lower-right corner of
the screen. For detailed instructions, see the “Comments” section in Chapter 5.

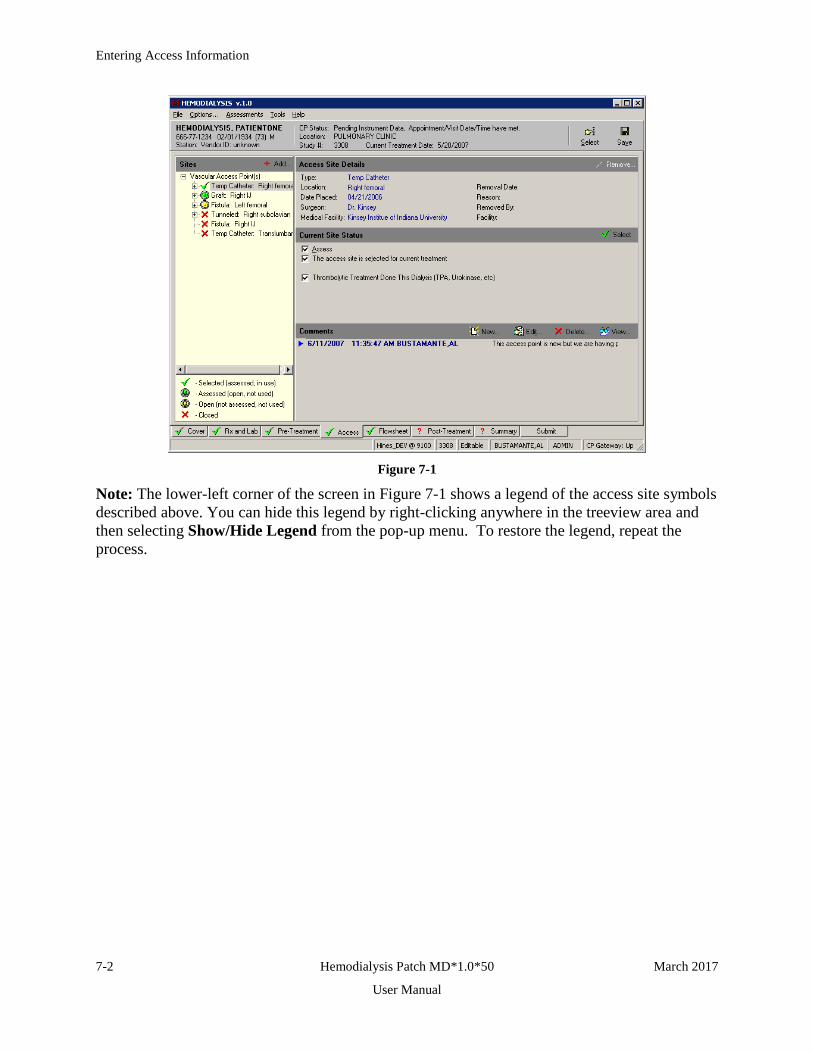
March 2017 Hemodialysis Patch MD*1.0*50 7-1
User Manual
7. Entering Access Information Use the Access tab to enter information on past and current access sites. You can track which
sites are currently being used and which are unusable at this time. You can also view the
treatment history of each site sorted by date.
A symbol indicating the status of each access site is located next to each site. The definitions for
these symbols are as follows:
Yellow Circle – Site is available, but not assessed.
Green Circle – Site has been assessed and is available for use.
Green Checkmark – Site has been assessed and selected for use.
Red X – Site has been removed and cannot be used anymore.
The following information is displayed on the Access tab:
Access Sites
Adding a New Site
Assessing and Selecting a Site for Use
Removing a Site
Deleting a Site
Access Points Summary
Access Site Details
Current Site Status
Sites Detail
Comments
Entering Access Information
7-2 Hemodialysis Patch MD*1.0*50 March 2017
User Manual
Figure 7-1
Note: The lower-left corner of the screen in Figure 7-1 shows a legend of the access site symbols
described above. You can hide this legend by right-clicking anywhere in the treeview area and
then selecting Show/Hide Legend from the pop-up menu. To restore the legend, repeat the
process.

Entering Access Information
March 2017 Hemodialysis Patch MD*1.0*50
User Manual
7-3
Access Sites
The following activities can be performed from this screen:
Adding a New Site
Assessing and Selecting a Site for Use.
Removing a Site
Deleting a Site
Adding a New Site
Add a new site for the selected patient by performing the following steps:
1. Click Add. The Add A New Access Site screen displays, Figure 7-2.
Note: You can also access the Add function by right-clicking an access site treeview
node and then clicking Add on the popup menu.
Figure 7-2
2. Select the Access Type from the drop-down list. The following options are available:
Fistula
Graft
Tunneled Catheter
Temporary Catheter
3. Select the Location from the drop-down list. The following options are available:
Right IJ (internal jugular)
Left IJ (internal jugular)
Right femoral
Left femoral
Right subclavian
Left subclavian

Entering Access Information
7-4 Hemodialysis Patch MD*1.0*50 March 2017
User Manual
Translumber
Right forearm
Left forearm
Right upperarm
Left upperarm
Right thigh
Left thigh
Other
4. Select the Date Placed from the drop-down calendar.
5. Choose the surgeon’s name in one of three ways:
Method 1: Using the Select Button (Recommended)
Note: This method is recommended because the names get pulled from the VistA
database. If the provider’s name does not appear in the list, use Method 2 or 3, below.
Click Select to choose from the Select Provider list (Figure 7-3).
Figure 7-3
Type the first letters of the provider’s last name, then press <Enter> to populate
the list.
Click the provider’s name from the list, then click Select. The Select Provider
window closes, and the selected provider’s name displays in the Surgeon field.
Method 2: Using the Drop-down List
Use method 2 only if the desired provider’s name does not display in the Select
Provider list.

Entering Access Information
March 2017 Hemodialysis Patch MD*1.0*50
User Manual
7-5
An ADMIN user must first add the desired provider’s name to the Surgeons
custom data list. (See “Customizing Drop-down List Items.”)
At the Add A New Access Site window, select the provider’s name from the
Surgeon drop-down list. The selected provider’s name displays in the Surgeon
field.
Method 3: Adding a New Surgeon on the Fly
Use method 3 only if the desired provider’s name does not display in the Select
Provider list and no ADMIN user is available to add the desired provider’s name to
the Surgeons custom data list.
Select -- Other -- from the Surgeon drop-down list. The Surgeon Name Input
Box displays.
Figure 7-4
Type the surgeon’s name in the Surgeon Name field, then click OK. The name
displays in the Surgeon field.
6. Select the Medical Facility.
Note: The process of selecting the medical facility is identical to the process of
selecting the Surgeon. (See step 5, above.) It is recommended that you use the Select
button to choose the medical facility from the VistA database, but if the desired medical
facility does not appear in the list, an ADMIN user can add the name to the Medical
Facilities custom data list. (See “Customizing Drop-down List Items.”) If an ADMIN
user is not available to add the name to the Medical Facilities custom data list, you can
add a facility on the fly as described above under the heading Method 3.
7. Click Add. The Add A New Access Site screen closes.
8. A yellow circle icon displays next to the new site, indicating that it is available for use.
Assessing and Selecting a Site for Use
You will first assess a selected site, then select the site for use for the current treatment.
Note: Only Selected access sites will display on the Summary Report on the Submit tab.
Assess a site by performing the following steps:
1. Select the site you want to assess on the Sites treeview.
2. Select the Assess checkbox under Site Status. The Assess fields will be editable (Figure
7-5).
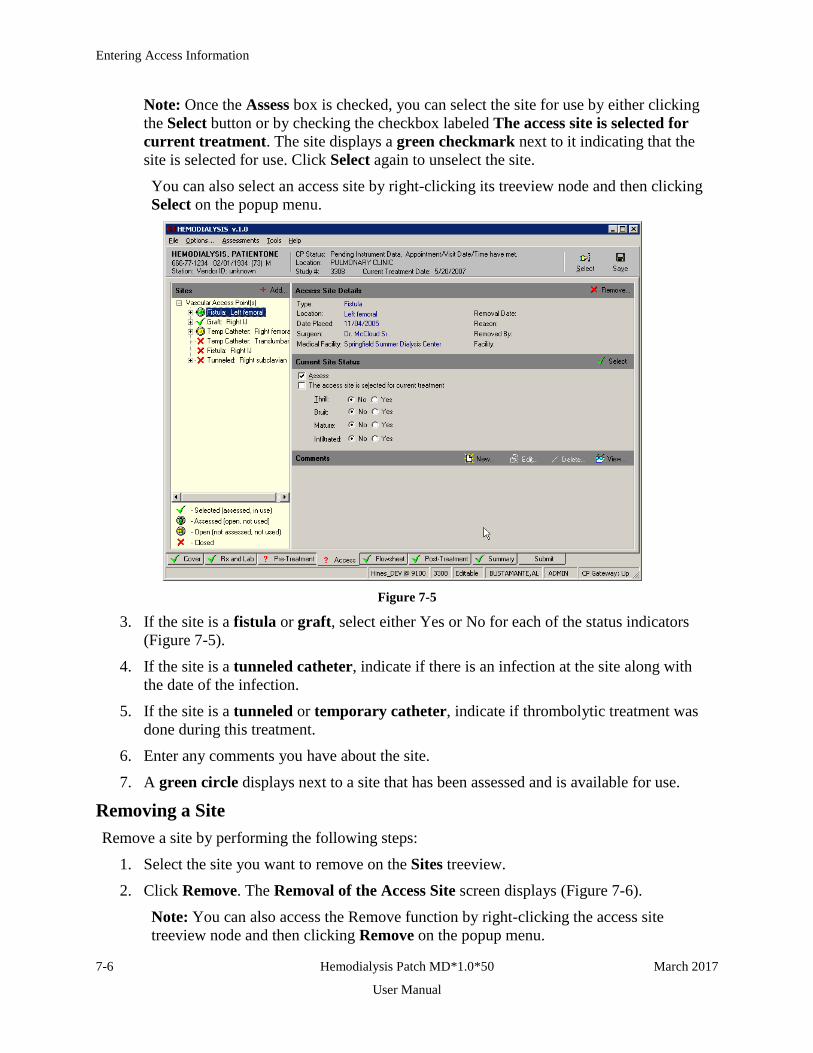
Entering Access Information
7-6 Hemodialysis Patch MD*1.0*50 March 2017
User Manual
Note: Once the Assess box is checked, you can select the site for use by either clicking
the Select button or by checking the checkbox labeled The access site is selected for
current treatment. The site displays a green checkmark next to it indicating that the
site is selected for use. Click Select again to unselect the site.
You can also select an access site by right-clicking its treeview node and then clicking
Select on the popup menu.
Figure 7-5
3. If the site is a fistula or graft, select either Yes or No for each of the status indicators
(Figure 7-5).
4. If the site is a tunneled catheter, indicate if there is an infection at the site along with
the date of the infection.
5. If the site is a tunneled or temporary catheter, indicate if thrombolytic treatment was
done during this treatment.
6. Enter any comments you have about the site.
7. A green circle displays next to a site that has been assessed and is available for use.
Removing a Site
Remove a site by performing the following steps:
1. Select the site you want to remove on the Sites treeview.
2. Click Remove. The Removal of the Access Site screen displays (Figure 7-6).
Note: You can also access the Remove function by right-clicking the access site
treeview node and then clicking Remove on the popup menu.

Entering Access Information
March 2017 Hemodialysis Patch MD*1.0*50
User Manual
7-7
Figure 7-6
3. Information about the site is displayed at the top of the screen.
4. Select the Date Removed from the calendar.
5. Select the Reason (Fate) for the site being removed from the dropdown list.
6. Enter the name of the Surgeon and Medical Facility. For more details on selecting
surgeons and medical facilities, see step 5 in the section “Adding a New Site.”
7. Click Remove. The Remove An Access Site screen closes, and the Access screen is
displayed.
Note: If you click Remove without first filling in the Reason, Surgeon, and/or Medical
Facility fields, the following Warning popup displays:
Figure 7-7
8. The site now has a red X next to it to indicate it has been removed and cannot be used
anymore.

Entering Access Information
7-8 Hemodialysis Patch MD*1.0*50 March 2017
User Manual
Note: The site removal information cannot be updated at a later time.
Deleting a Site
An access site which was never used may be deleted by an ADMIN user. This feature is
provided in case an access site is added by mistake. Once an access site has been used, it
becomes a permanent part of the patient’s record and cannot be deleted—only removed, as
described in the section above.
An access site can be removed from the treeview if ALL of the following conditions are true:
The user has ADMIN rights.
The site has no history.
The site was not removed.
The site is not selected.
The site is not assessed.
To delete a site that meets the conditions above, do the following:
1. Double-click the access site’s treeview node. A pop-up confirmation window
displays the question, “Delete the Node?”
2. Click Yes. The node is deleted.
Access Points Summary
To review information about all access points for the current patient, click the top node (Vascular
Access Points) of the Sites treeview. A summary of all access points displays in the detail area
to the right of the Sites treeview (Figure 7-8).
The following information is displayed for each access point listed:
Type
Location
Date Placed
Placed At (medical center location where the access point was inserted)
Placed By
*Date Removed
*Removed At (medical center location)
*Removed By
*Removal Reason
Note: Information in the list above preceded by an asterisk (*) displays only for access points
which have been closed.

Entering Access Information
March 2017 Hemodialysis Patch MD*1.0*50
User Manual
7-9
Figure 7-8
Access Site Details
The detail area to the right of the Sites treeview displays information relevant to the selected site.
The top detail area, labeled Access Site Details, displays the following information: type,
location, date placed, surgeon who placed the site, medical facility, removal date, reason for
removal, surgeon who removed the site, and the facility where the removal occurred.
Current Site Status
More detailed information about the site displays under the heading Current Site Status. In the
Sites treeview, select the site for which you want to view the status, and additional site
information displays below the Access Site Details area.
The information which displays in the Current Site Status area depends on the type of site. The
following lists show what information displays for each site type:
Fistula
Assess checkbox: Check this box to indicate that the site has been assessed. Checking the box
activates several fields in this screen area.
The access site is selected for current treatment checkbox: Check this box for the site used
for the treatment.
Thrill: No/Yes: Select the appropriate radio button.
Bruit: No/Yes: Select the appropriate radio button.
Mature: No/Yes: Select the appropriate radio button.
Infiltrated: No/Yes: Select the appropriate radio button.

Entering Access Information
7-10 Hemodialysis Patch MD*1.0*50 March 2017
User Manual
Graft
Assess checkbox: Check this box to indicate that the site has been assessed. Checking the box
activates several fields in this screen area.
The access site is selected for current treatment checkbox: Check this box for the site used
for the treatment.
Thrill: No/Yes: Select the appropriate radio button.
Bruit: No/Yes: Select the appropriate radio button.
Mature: No/Yes: Select the appropriate radio button.
Infiltrated: No/Yes: Select the appropriate radio button.
Tunneled Catheter
Assess checkbox: Check this box to indicate that the site has been assessed. Checking the box
activates several fields in this screen area.
The access site is selected for current treatment checkbox: Check this box for the site used
for the treatment.
Add Last Infection Description: Check box to provide infection information. Checking the
box activates the next two fields.
Date of Last Infection: Select a date from the drop-down calendar.
Infection: Enter the infection type.
Thrombolytic Treatment Done This Dialysis (TPA, Urokinase, etc): Check this box if true.
Temporary Catheter
Assess checkbox: Check this box to indicate that the site has been assessed. Checking the box
activates several fields in this screen area.
The access site is selected for current treatment checkbox: Check this box for the site used
for the treatment.
Thrombolytic Treatment Done This Dialysis (TPA, Urokinase, etc): Check this box if true.
Sites Detail
Additional information is available for an access site if you expand its treeview node. Click the
plus sign to the left of a site to expand the node. The node that displays is called Treatment
History (Figure 7-9). Click the Treatment History node to display History Summary in the detail
area to the right. The History Summary area provides the following information for the selected
site: date used, study numbers, and Current Site Status information.

Entering Access Information
March 2017 Hemodialysis Patch MD*1.0*50
User Manual
7-11
Figure 7-9
Note: An access site with no plus sign to its left (for example, see the Fistula: Translumbar node
in Figure 7-10) has never been used and therefore has no treatment history.
You can expand the Treatment History node to display the dates and study numbers when the
site was used (Figure 7-10).
Figure 7-10
Click one of the date nodes to display History Details for that specific date/study.
Comments
Access Site notes can be added and viewed in the Comments area in the lower-right corner of
the screen. For detailed instructions, see the “Comments” section in Chapter 5.
Note: Information displaying in the Comments area pertains only to the access point selected in
the Sites treeview. In Figure 7-11, for example, the comment dated 4/3/2008 is only associated
with the Tunneled Right Subclavian access point.

Entering Access Information
7-12 Hemodialysis Patch MD*1.0*50 March 2017
User Manual
Figure 7-11

March 2017 Hemodialysis Patch MD*1.0*50 8-1
User Manual
8. Entering Flowsheet Information The Flowsheet tab stores treatment information that was previously stored on paper. Notes
dealing with flowsheet information can be entered at the bottom of this tab.
The following information is displayed on the Flowsheet tab:
Flowsheet – Data sent from instrument or entered in manually during treatment.
Medication List – Other medicines used during treatment.
Comments
Important: Labs must be taken mid-week for the KT and KT/V calculations to return accurate
results.
Figure 8-1

Entering Flowsheet Information
8-2 Hemodialysis Patch MD*1.0*50 March 2017
User Manual
Flowsheet
View Flowsheet information by performing the following steps:
1. Click the Flowsheet tab.
2. Initiate treatment for the prescribed amount of time.
3. Record readings from the dialysis instrument at site specific intervals (every 15 minutes,
30 minutes, etc.). Readings from the instrument are automatically sent to the
Hemodialysis application and can be found in the Flowsheet.
Note: ADMIN users (and USERS with the “Flowsheet Refresh Rate” User Preference)
can change the reading interval by editing the System/User Preference named
“Flowsheet Refresh Rate.” (See “Configuring System Preferences.”)
Definitions of the terms used on the flowsheet columns are as follows:
Marker column - The first column is not labeled. It displays a right-pointing triangular arrow
to indicate which row is selected.
Date - Date of the reading
Time - Time of the reading
Figure 8-2
Source - The fourth column is labeled Source. It displays an icon to indicate whether the data
contained in the row originated from the machine or if it was hand entered.
- Indicates hand-entered data.
- Indicates machine-entered data.
B/P - Blood pressure
MAP - Mean arterial pressure
HR - Heart rate
BFR - Blood flow rate
DFR - Dialysis flow rate
AP - Arterial pressure
VP - Venous pressure
TMP - Trans membrane pressure
UFR - Ultrafiltration rate
Fluid Off - Cumulative volume of fluid removed from patient
HEP (CUM) – Cumulative Heparin infusion
COND - Conductivity

Entering Flowsheet Information
March 2017 Hemodialysis Patch MD*1.0*50
User Manual
8-3
BIC - Bicarbonate bath
DIAL TEMP - Dialysate temperature
IONIC DIAL - Measurement of clearance via ionic or conductivity estimation
Kt/V - Dose of dialysis
Flowsheet Buttons
The following buttons display above the Flowsheet listview:
Refresh – Get instrument data now. (Clicking this button also resets the
Autorefresh timer.)
Edit Entry – Edit a Flowsheet entry row.
Add Entry – Add manual entries to the Flowsheet. The Hemodialysis Flowsheet
Entry Editor window displays (Figure 8-3). Click OK when you are done adding
values to the table, or click Cancel to discard changes without saving them. Click
Help to display “Entering Flowsheet Information” topic from the Help file.
Invalidate – Mark a valid row of data as invalid. Also click this button to mark an
invalid row as valid.
Tip: You may also double-click a row to mark it invalid. Double click an
invalidated row to mark it valid again.
Add TIU – Attach a new TIU note to this study.
Reload – Reprocess records from VistA database. (See “Reloading Flowsheet
Data” in the Troubleshooting chapter.)
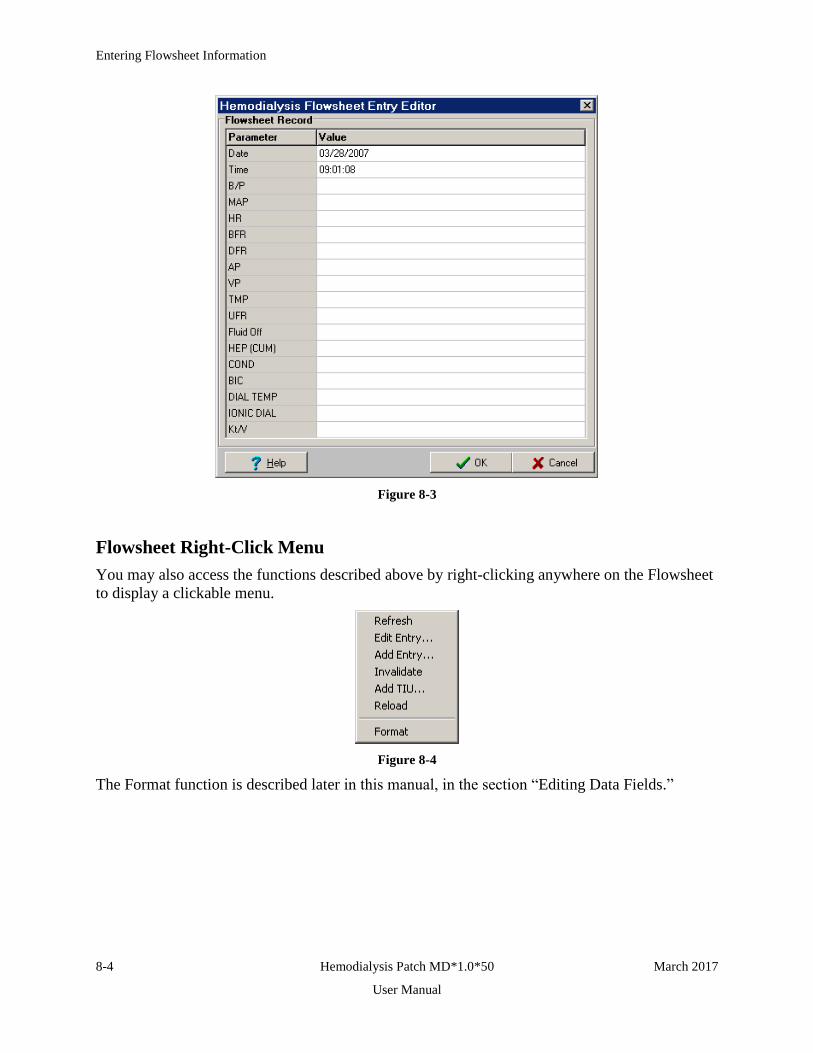
Entering Flowsheet Information
8-4 Hemodialysis Patch MD*1.0*50 March 2017
User Manual
Figure 8-3
Flowsheet Right-Click Menu
You may also access the functions described above by right-clicking anywhere on the Flowsheet
to display a clickable menu.
Figure 8-4
The Format function is described later in this manual, in the section “Editing Data Fields.”

Entering Flowsheet Information
March 2017 Hemodialysis Patch MD*1.0*50
User Manual
8-5
Adding a TIU Note
You may add a TIU Note to a study from two places in Hemodialysis:
Flowsheet tab – Click Add TIU, above the Flowsheet grid.
Submit tab – Click Add TIU, to the right of the Document Details heading.
Clicking either Add button displays the same TIU note window. To complete the TIU note, do
the following:
1. Select a title from the Select TIU Title drop-down list. This title will display on the
CPRS Consults tab in the Related Documents treeview, making it easier for you to locate
a specific note.
Figure 8-5
Note: In order for 1) your TIU note titles to display in the Select TIU Title drop-down list
and 2) the TIU notes to display on the CPRS Consults tab, you must do two things:
The TIU note titles must be defined in TIU. For instructions about adding new
TIU note titles in TIU, see Chapter 4 of the Clinical Procedures Implementation
Guide.
After the TIU note title is defined, it must be added to Hemodialysis. TIU Titles
can be added at the Options screen. Expand the Custom Data Lists node, then
click TIU Note Titles. See “Customizing Drop-down List Items” for more
information.
Additional Note: TIU note titles must be entered into Hemodialysis exactly as
they were defined in TIU. If the TIU note title entered into Hemodialysis does not
match one of the titles defined in TIU (or if a note title is not selected), the default
TIU note title defined in CP Manager will be used.
2. To use a predefined note template, click the template name from the Select Note
Template list.
Note: The Select Note Template list does not display if the “Show TIU Note Templates”
System Preference is set to FALSE. It is hidden (set to FALSE) by default. (See
“Configuring System Preferences.”)

Entering Flowsheet Information
8-6 Hemodialysis Patch MD*1.0*50 March 2017
User Manual
3. Modify the template note text, if necessary.
4. To add the Falls Risk Assessment to the TIU note text, click Add Falls Assessment. The
Falls Risk Evaluation window displays. After completing the form, click OK to insert the
Assessment text into the TIU note.
Note: The Add Falls Assessment button only displays in the TIU Note window if the
“Falls Assessment as Separate TIU Note” option is set to TRUE.
(For details on completing this form, see “Performing the Falls Assessment.”)
5. Enter your electronic signature code in the Signature field, then press <Enter> (or click
the Save button).

Entering Flowsheet Information
March 2017 Hemodialysis Patch MD*1.0*50
User Manual
8-7
Creating TIU Note Templates
Users with ADMIN rights can create TIU note templates. If you logon as a user without ADMIN
rights, you will not be able to create new note templates. To create a new TIU note template, do
the following:
1. On the menu bar, click Options. The Options screen displays.
2. Click the Note Templates node on the options tree. A list of all existing note templates
displays in the panel to the right of the options tree.
3. Click the Add button. The Option window displays.
4. Type the name of the template in the Item field.
5. Type a description in the Value field, then click OK. The new template name displays in
the Note Templates list. At this point, the new template name is saved. You do not need
to click Save to DB.
6. Click the node of the new template name in the options tree.
7. The new template is still blank. Create the layout of your new template as described in
“Editing a Report Template.”
Note: You must click Save to DB to save the template layout.
8. The new note template will be available the next time you add a TIU note.

Entering Flowsheet Information
8-8 Hemodialysis Patch MD*1.0*50 March 2017
User Manual
Performing the Falls Assessment
1. From the TIU Note window, click the Add Falls Assessment button.
Note: The Add Falls Assessment button only displays in the TIU Note window if the
“Falls Assessment as Separate TIU Note” option is set to TRUE.
2. Click the FALLS RISK EVALUATION checkbox to activate this form. The Age field
is display only and cannot be modified here.
3. Select one of the following radio buttons:
No History of Falls in the last 12 months. Monitor at future appointment.
No History of Falls since last visit to this clinic. Monitor at future appointment.
Patient states history of falls. No gait and balance problems noted. Provided Falls
Prevention Handout. Monitor at future appointment.
Patient states history of falls. Gait and balance problems identified.
4. If you selected the fourth radio button, a series of checkboxes is enabled to allow you to
identify the patients gait and/or balance problems. Check any of the following boxes that
apply:
muscle weakness
gait deficit
visual deficit
balance deficit
cognitive impairment
Type any additional gait or balance problems in the Other field.
5. Check the Ambulatory assistive device used box, if appropriate.
6. If you checked the Ambulatory assistive device used box, check any of the following
boxes that apply:
cane
crutches
brace
walker
wheelchair
electric wheelchair (WC)/scooter
Type any additional ambulatory assistive device in the Other field.
7. Check the Consult to RMS (Rehabilitation Medicine Service) Physical Therapy for
sensitive device evaluation box, if appropriate.
8. Check the Falls Prevention handout given. Monitor at future Appointments box, if
appropriate.

Entering Flowsheet Information
March 2017 Hemodialysis Patch MD*1.0*50
User Manual
8-9
9. Click the Preview button at the top of the form to see the Falls Risk Evaluation text that
will be inserted in the TIU note.
Click OK to close the preview window.
10. Click OK to insert the Falls Risk Evaluation text in the TIU note, or click Cancel to close
the Falls Risk Evaluation window without saving changes.
Reviewing TIU Note Text
To review the TIU note text, do the following:
1. Click the Submit tab. The TIU Documents list displays all notes and reports attached to
the current study. TIU note titles contain the date and time, as follows:
FEB 06, 2006@13:10:32
2. Click the desired note title. Complete note text can be reviewed in the display panel to
the right.
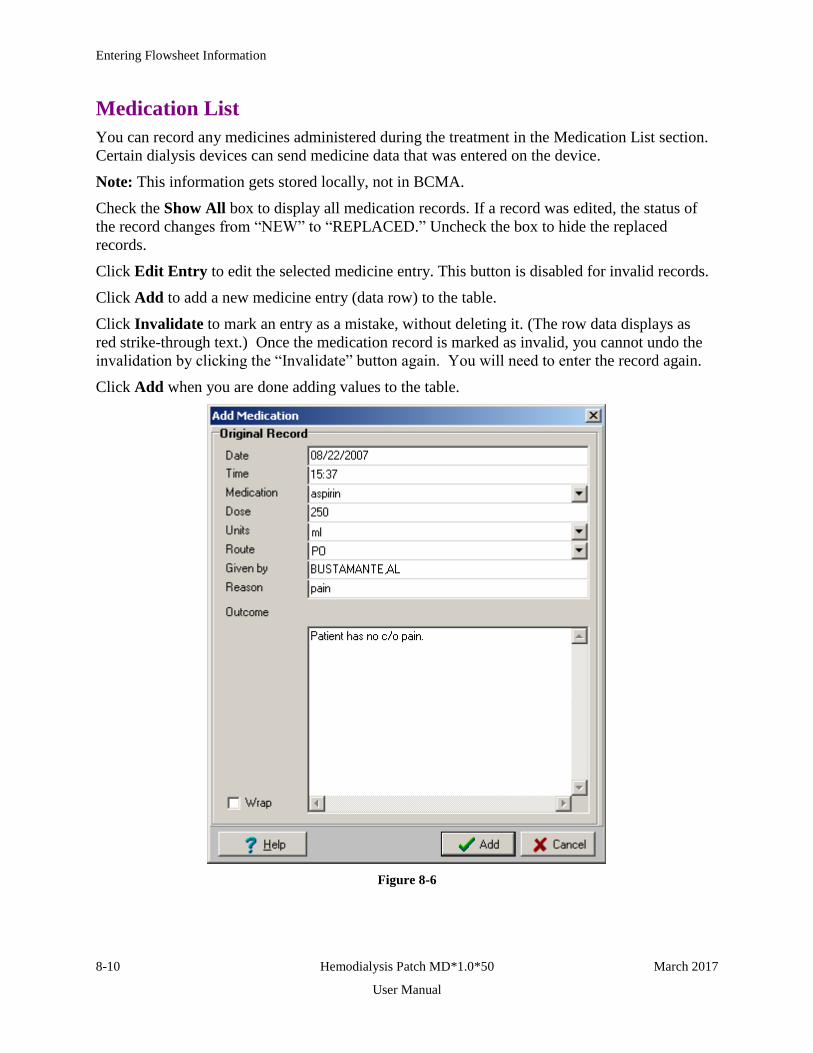
Entering Flowsheet Information
8-10 Hemodialysis Patch MD*1.0*50 March 2017
User Manual
Medication List
You can record any medicines administered during the treatment in the Medication List section.
Certain dialysis devices can send medicine data that was entered on the device.
Note: This information gets stored locally, not in BCMA.
Check the Show All box to display all medication records. If a record was edited, the status of
the record changes from “NEW” to “REPLACED.” Uncheck the box to hide the replaced
records.
Click Edit Entry to edit the selected medicine entry. This button is disabled for invalid records.
Click Add to add a new medicine entry (data row) to the table.
Click Invalidate to mark an entry as a mistake, without deleting it. (The row data displays as
red strike-through text.) Once the medication record is marked as invalid, you cannot undo the
invalidation by clicking the “Invalidate” button again. You will need to enter the record again.
Click Add when you are done adding values to the table.
Figure 8-6

Entering Flowsheet Information
March 2017 Hemodialysis Patch MD*1.0*50
User Manual
8-11
If you need to edit a medication record, highlight the medication record by clicking on the
medication record once and click Edit Entry. This displays the Edit Medication screen.
Figure 8-7
Note: The original medication record is on the left window pane. The right window pane is the
replacement record for you to edit. Once you are done editing the record, click the Update
button on the bottom of the window. The record will now have a status of “REPLACED.”
Unless the Show All box is checked, the replaced record will be hidden from view. The changes
that were entered on the Replacement Record window pane will be the new record.
Medication List Columns
The following information can be entered in the Medication List:
Date - Date the entry was added.
Time
Medication
Dose
Units
Route
Given By
Reason
Outcome

Entering Flowsheet Information
8-12 Hemodialysis Patch MD*1.0*50 March 2017
User Manual
A user with ADMIN rights can modify the drop-down list choices for the following:
Medications
Units
Route
Dropdown list options are configurable for ADMIN users. (See “Customizing Drop-down List
Items.”)
Comments
Add Flowsheet notes in the Comments area at the bottom of the screen. For detailed
instructions, see the “Comments” section in Chapter 5.

March 2017 Hemodialysis Patch MD*1.0*50 9-1
User Manual
9. Entering Post-Treatment Information This is where you can enter vitals information taken after the treatment. You can also track any
observations of the treatment such as if goal weight was achieved or how the patient tolerated the
treatment. Notes dealing with post treatment information can be entered at the bottom of this tab
in the Comments area.
The following information is displayed on the Post-Treatment tab:
Post-Treatment Assessment
Weight
Temperature
Blood Pressure and Pulse
Other
Mental Status
Observations
Patient Transportation
Pain Assessment
Falls Risk Evaluation
Comments
Figure 9-1

Entering Post-Treatment Information
9-2 Hemodialysis Patch MD*1.0*50 March 2017
User Manual
Post-Treatment Assessment
Enter post-dialysis assessments by performing the following steps:
1. Click the Post-Treatment tab.
2. Take post-dialysis vitals and assessments and record them in the Post-Treatment
Assessment section of this screen. Enter post-assessment data for the following fields:
Weight: Enter the patient’s Post-Weight in Kg.
Note: Treatment Goal Weight cannot be modified from this screen. Change it by
editing the Tx Goal Weight value on the Pre-Treatment tab.
Temperature: Enter the patient’s temperature in Fahrenheit.
Blood Pressure and Pulse: Enter the patient’s blood pressure and pulse while patient is
seated and standing.
Other:
Indicate whether the patient shows any signs of Edema (yes or no).
Enter the patient’s Respiration before treatment.
Indicate whether the patient has Shortness of Breath (SOB) (yes or no).
Mental Status: Indicate the mental status of the patient before treatment by checking
the appropriate check box(es). (More than one checkbox can be selected.) If you
select Oriented, indicate the level by selecting the appropriate radio button.
Observations: Enter post-treatment observations into the Observations section of the
screen. If there are any additional observations check Other – Describe and enter
them into the text box provided.
Patient Transportation: Select the patient’s mode of transportation from the dropdown
list. The following options are available: ambulatory, bed, motorized wheel chair,
wheel chair, and stretcher.
Pain Assessment
The Post-Treatment Pain Assessment functions exactly the same way as the Pre-Treatment Pain
Assessment. For more information, see “Pain Assessment” in Chapter 6.
Falls Risk Evaluation
The Falls Risk Evaluation displays on the Post-Treatment tab if the “Falls Assessment as
Separate TIU Note” option is set to FALSE.
Click the Edit button to add a Falls Risk Evaluation. For more information on completing the
Falls Risk Assessment, see “Performing the Falls Assessment” in Chapter 8.
Comments
Post-Treatment notes can be added and viewed in the Comments area at the bottom of the
screen. For detailed instructions, see the “Comments” section in Chapter 5.

March 2017 Hemodialysis Patch MD*1.0*50 10-1
User Manual
10. Viewing Summary Information The Summary tab displays a summary of the current treatment such as treatment start and end
times, key lab results and vascular access monitoring information. Overall comments on the
treatment can be noted on this tab. You can enter billing information and healthcare providers on
this tab, as well.
The following information is displayed on the Summary tab:
Treatment Summary
Clinic/Location
Healthcare Providers
Procedures and Diagnosis (CPT/ICD Codes)
Service Connected Conditions
Confirming PCE Data Without Changing Anything
Comments
1Figure 10-1
Note: If the appointment/visit date/time is in the future, the date/time has not meet, the PCE data
entry buttons will be grayed out until the appointment/visit date/time has been met.
1 Patch MD*1.0*20 November 2010 – Update Figure 10-1 with new screen capture to show Procedure text
description.

Viewing Summary Information
10-2 Hemodialysis Patch MD*1.0*50 March 2017
User Manual
Treatment Summary
You can view summary information for the treatment in the Treatment Summary section of the
Summary tab. Located along the left-hand side of the screen, this data is organized into three
sections:
Treatment Summary
Averages and Totals
Vascular Access
The fields in the Treatment Summary and Averages and Totals sections may populate
automatically, depending on your site’s instruments and configuration. If this information is
generated by an instrument, it cannot be edited. If your instruments do not send this data, then
you may enter it manually by typing it into the fields.
Enter data into the Vascular Access section manually by typing it into the fields.
Clinic/Location
Click the Location button on the PCE Data toolbar to select the treatment location from a popup
window.
Figure 10-2
Notes: Once a location has been selected, only a user with ADMIN rights can change the
location.
If the location changes for a patient, PCE data will not carry over from a previous study. PCE
data must then be re-entered manually. For more information on this subject, see the
Troubleshooting section “Preventing PCE “Data Loss”.”
The PCE data (ICD, CPT) will carry over from a previous study if both studies share the same 1)
hospital location and 2) procedure request(s).

Viewing Summary Information
March 2017 Hemodialysis Patch MD*1.0*50
User Manual
10-3
Healthcare Providers
Use the Providers tab to associate providers to a treatment and specify one provider as primary.
To associate healthcare providers to a treatment, do the following:
1. On the Summary tab, click the Providers button. The PCE Information window
displays and the Providers tab is active (Figure 10-3).
Figure 10-3
2. To view current PCE information, click Get PCE Info. A window displays the Visit #,
Provider(s), Diagnosis, and CPT (procedure code). Click OK to close the window.
Figure 10-4

Viewing Summary Information
10-4 Hemodialysis Patch MD*1.0*50 March 2017
User Manual
3. Type one or more letters of the provider’s last name into the edit field in the top-left
corner of the window, then press <Enter> or click Search. The listview below the edit
field displays the names of providers that match the letters you entered (Figure 10-5).
Figure 10-5
4. Highlight a name from the list of available providers, and then click the Move Right
button. The selected name displays in the list of selected providers (Figure 10-6).
Figure 10-6
5. If more than one provider is associated with a treatment, checkmark the Primary Care
Provider by clicking the provider’s name.
6. To remove a name from the list of selected providers, highlight the name, then click the
Move Left button.
7. Click Save Data in PCE to close the Billing Information window and return to the
Summary tab, or click Cancel to return to the Summary tab without saving changes.
Note: To add diagnoses, procedures, or environmental conditions, you may simply click
the appropriate tab on the Billing Information window (Figure 10-6). You don’t have to
return to the Summary tab in between procedures.

Viewing Summary Information
March 2017 Hemodialysis Patch MD*1.0*50
User Manual
10-5
Procedures and Diagnosis (CPT/ICD Codes)
Diagnosis
Use the Diagnosis tab to list diagnoses performed during a treatment and to specify one as the
primary diagnosis. To list diagnoses performed during a treatment, do the following:
1. On the Summary tab, click the Diagnoses button. The PCE Information window
displays and the Diagnosis tab is active
2. Type a few characters (alphanumeric) of the diagnosis into the Search field in the top-
left corner of the window, then press <Enter> or click Search. The treeview below the
Search field displays matching diagnoses.
Figure 10-7 shows the results of searching for the word lung. Note that wildcard
characters are not needed to locate the word in the middle of a line. In fact, this search
returned results which are related to lungs even when the word is not part of the
diagnosis, such as Pulmonary Aspergillosis and Adult Respiratory Distress Syndrome.
Figure 10-7
1. Expand treeview nodes, if necessary. Highlight a diagnosis, and then click the Move
Right button. The selected diagnosis displays in the list of selected diagnoses.
Repeat as needed.

Viewing Summary Information
10-6 Hemodialysis Patch MD*1.0*50 March 2017
User Manual
Shortcut: Double click a diagnosis to move it from one list to the other.
2. If more than one diagnosis is associated with a treatment, select the check box of the
primary diagnosis.
Figure 10-8
3. Click Save Data in PCE to apply changes, close the Billing Information window, and
return to the Summary tab, or click Cancel to return to the Summary tab without saving
changes.
Procedures
Use the Procedures tab to list procedures performed during a treatment and specify one as the
primary. 1Users can search for Current Procedures Terminologies (CPT) and Healthcare
Common Procedure Coding System (HCPCS) codes. To associate procedures to a treatment, do
the following:
1. On the Summary tab, click the Procedures button. The PCE Information window
displays and the Procedures tab is active
2. Type a few characters (alphanumeric) of the procedure into the Search field in the top-
left corner of the window, then press <Enter> or click Search. The treeview below the
Search field displays matching procedures.
3. Expand treeview nodes, if necessary. Highlight a procedure, and then click the Move
Right button. The selected procedure displays in the list of selected procedures.
Repeat as needed.
Shortcut: Double click a procedure to move it from one list to the other.
4. If a procedure was performed more than once, click the procedure’s Quantity cell, and
then type the number.
Figure 10-9
5. Repeat steps 2-4, as needed.
1 Patch MD*1.0*20 November 2010 – Reference CPT and HCPCS codes and update Figure10-9 with new screen
capture.

Viewing Summary Information
March 2017 Hemodialysis Patch MD*1.0*50
User Manual
10-7
6. Click Save Data in PCE to apply changes, close the Billing Information window, and
return to the Summary tab, or click Cancel to return to the Summary tab without saving
changes.
Service Connected Conditions
Use the Service tab to indicate when the following conditions are associated with a patient:
Service Connected Condition
Combat Veteran
Agent Orange Exposure
Ionizing Radiation Exposure
Environmental Contaminants
Military Sexual Trauma (MST)
Head and/or Neck Cancer
To set environmental condition indicators, do the following:
1. On the Summary tab, click the Service button. The PCE Information window displays
and the Service Connected Conditions tab is active. Some, or possibly none, of the
radio buttons on this tab are available (Figure 10-10). Availability of options is based on
the current patient’s profile.
Figure 10-10
2. For each available service condition, click the Yes radio button if the condition is
applicable to the current patient, or click No if it is not.
3. Click Save in PCE to store the changes and return to the Summary tab, or click Cancel
to discard changes and return to the Summary tab.
The title bar of the PCE Information window displays the words UPDATED On
followed by the following information (Figure 10-11):
The date

Viewing Summary Information
10-8 Hemodialysis Patch MD*1.0*50 March 2017
User Manual
The time
The user name
Figure 10-11
Confirming PCE Data Without Changing Anything
For each treatment, if you do not add or change PCE information, you are still required to
confirm that the existing PCE data is correct. 1Current PCE data displays on the summary tab
under the label “PCE Data,” as shown in the following:
1) Location – workload location
2) Healthcare Providers – Primary Care Provider and provider(s) associated with the treatment
3) Diagnoses (ICD Codes) – International Classification of Diseases (ICD) Diagnosis Code,
code description, and if it is a primary code
4) Procedures (CPT Codes) – Current Procedure Terminology (CPT) or Healthcare Common
Procedure Coding System (HCPCS Code), code description, and quantity
5) Service Connection/Rated Disabilities – environment condition indicators associated with the
patient
Figure 10-12
1 Patch MD*1.0*20 November 2010 – Add description for the PCE Data screen and update Figure10-12 to show
example text description for CPT and HCPCS codes.
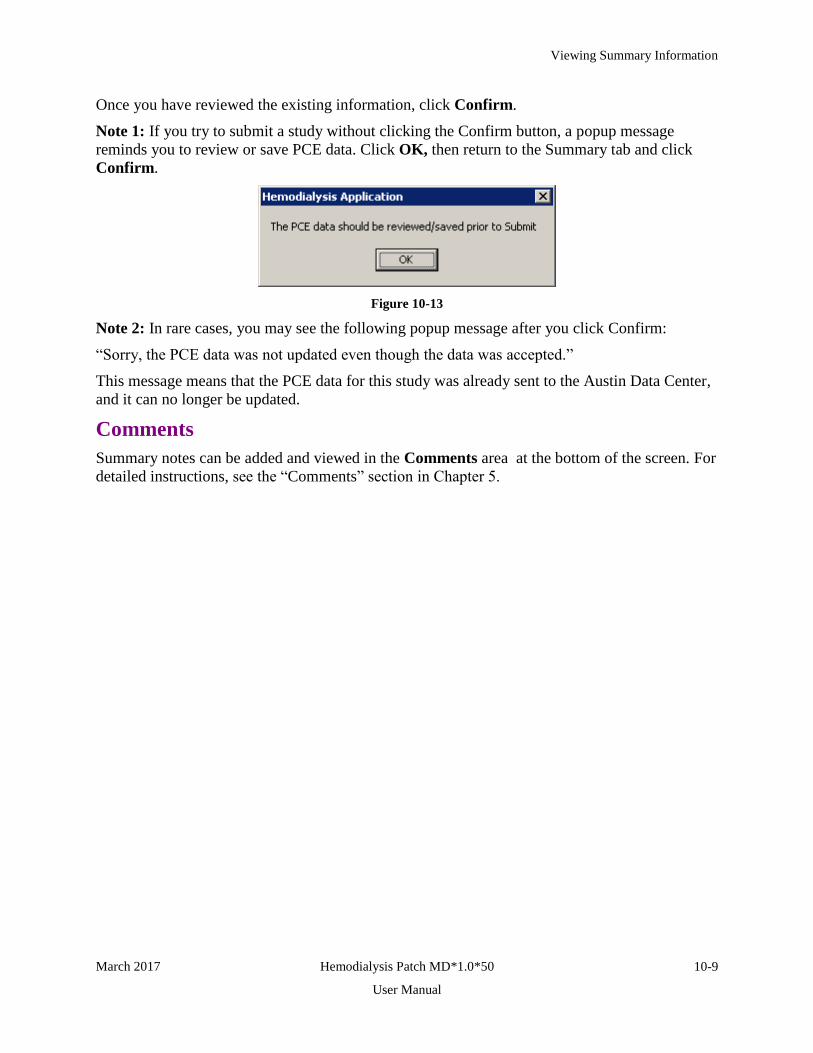
Viewing Summary Information
March 2017 Hemodialysis Patch MD*1.0*50
User Manual
10-9
Once you have reviewed the existing information, click Confirm.
Note 1: If you try to submit a study without clicking the Confirm button, a popup message
reminds you to review or save PCE data. Click OK, then return to the Summary tab and click
Confirm.
Figure 10-13
Note 2: In rare cases, you may see the following popup message after you click Confirm:
“Sorry, the PCE data was not updated even though the data was accepted.”
This message means that the PCE data for this study was already sent to the Austin Data Center,
and it can no longer be updated.
Comments
Summary notes can be added and viewed in the Comments area at the bottom of the screen. For
detailed instructions, see the “Comments” section in Chapter 5.

Viewing Summary Information
10-10 Hemodialysis Patch MD*1.0*50 March 2017
User Manual
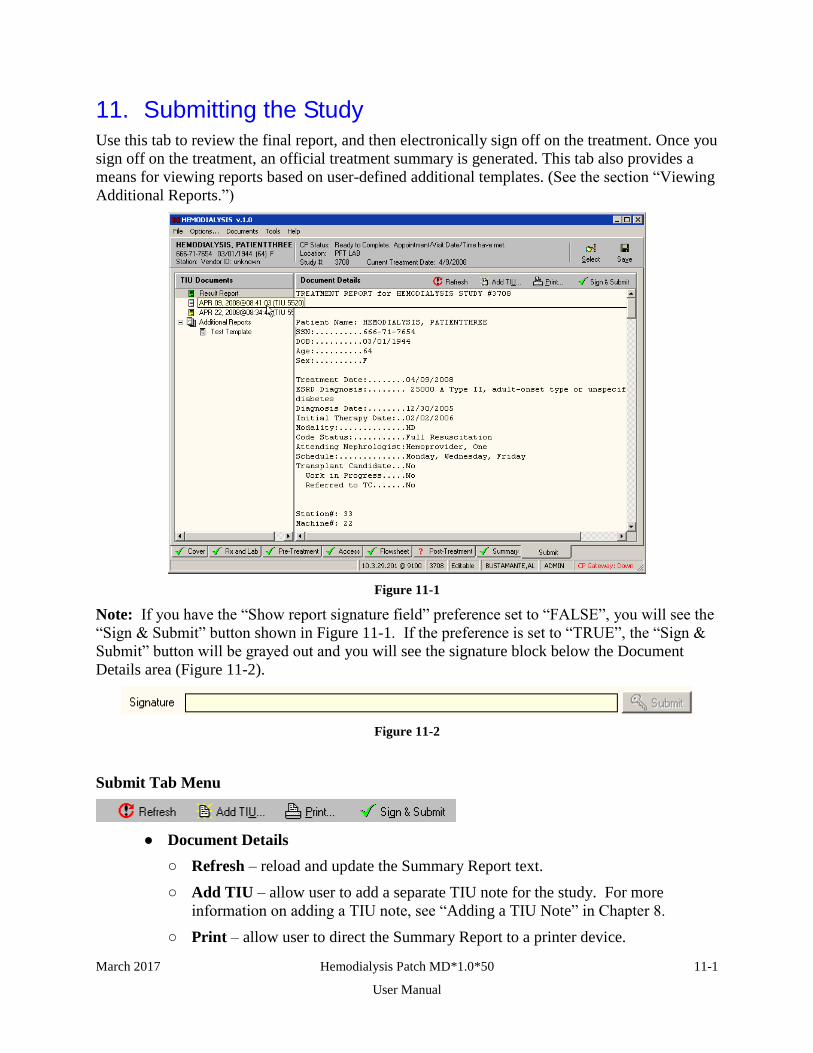
March 2017 Hemodialysis Patch MD*1.0*50 11-1
User Manual
11. Submitting the Study Use this tab to review the final report, and then electronically sign off on the treatment. Once you
sign off on the treatment, an official treatment summary is generated. This tab also provides a
means for viewing reports based on user-defined additional templates. (See the section “Viewing
Additional Reports.”)
Figure 11-1
Note: If you have the “Show report signature field” preference set to “FALSE”, you will see the
“Sign & Submit” button shown in Figure 11-1. If the preference is set to “TRUE”, the “Sign &
Submit” button will be grayed out and you will see the signature block below the Document
Details area (Figure 11-2).
Figure 11-2
Submit Tab Menu
● Document Details
○ Refresh – reload and update the Summary Report text.
○ Add TIU – allow user to add a separate TIU note for the study. For more
information on adding a TIU note, see “Adding a TIU Note” in Chapter 8.
○ Print – allow user to direct the Summary Report to a printer device.

Submitting the Study
11-2 Hemodialysis Patch MD*1.0*50 March 2017
User Manual
○ Sign & Submit – button visibility controlled by the preference “Show report
signature field”. This button controls the visibility of the signature field.
Treatment Status Report
This tab contains a checklist to provide quick visual confirmation that you filled in all required
fields on the previous seven tabs. The Treatment Status Report consists of three columns which
display the following information: Tab name, Status, and Comments (Figure 11-3).
Figure 11-3
The Treatment Status Report contains one row for each of the previous seven tabs (i.e., Cover,
Rx and Lab, Pre-Treatment, Access, Flowsheet, Post-Treatment, and Summary). The Status
column displays one of the following status icons:
Red question mark: Check for missing data on the specified tab.
Green checkmark: Data looks OK.
The Question mark icon is followed by a comment containing information about the specific
field(s) requiring attention. For example, “Check: <PreBPSysSit>” means to go to the Pre-
Treatment tab and check the seated systolic blood pressure. That field may be blank, or it may
contain data outside of that field’s accepted range.
Shortcut: Double-click the Treatment Status Report row to jump to the associated tab so you
can correct the entry.
The Checkmark icon displays when all fields on its respective tab have been filled with data
within the acceptable ranges. This Treatment Status Report cannot verify the accuracy of the data
beyond checking that it fits within the acceptable ranges, however, so you should still view the
final report for this treatment before submitting the study.
Note: This Treatment Status Report is provided to inform you when certain fields are left blank.
It will not actually prevent you from submitting the study. The only requirements for you to
submit the study are the electronic signature code and confirmation of the PCE data.
The Red question marks and Green checkmarks also display directly on the tabs, Figure 11-4.
Figure 11-4

Submitting the Study
March 2017 Hemodialysis Patch MD*1.0*50
User Manual
11-3
Alternate Treatment Status Report Display
If you prefer, you can prevent the Treatment Status Report from displaying on the Submit tab.
This leaves more room on the Submit tab to display the Treatment Summary and Documents list,
as shown below, Figure 11-5:
Figure 11-5
To turn off the Treatment Status Report on the Submit tab, do one the following:
Method 1
1. Click the Tools menu. If the Treatment Status Report is currently turned on, a checkmark
displays in front of the option Show Treatment Status Report.
Keyboard shortcut: Press <Ctrl>+<Alt>+<P>.
2. Click the Show Treatment Status Report parameter to turn off the Treatment Status
Report. The next time you click the Tools menu, the checkmark will not display in front
of the Show Treatment Status Report parameter.
Method 2
1. Click the Options menu to display the Options screen.
2. On the Tables treeview, expand the Preferences node.
3. Click System or User Preferences. Preferences display in the panel on the right.
4. Set the Show Treatment Status Report parameter to FALSE.
Shortcut: Double-clicking a TRUE/FALSE parameter toggles the value.

Submitting the Study
11-4 Hemodialysis Patch MD*1.0*50 March 2017
User Manual
5. Click Save To DB to apply the change.
Viewing Additional Reports
Multiple report templates may be defined on the Report List node found on the Options screen,
but only one report is submitted to CPRS: the report specified in the “Summary Report Name”
System Preference. You may, however, find it convenient to view some of the other reports that
have been defined. For example, if your job requires you to verify only flowsheet data, it would
be a timesaver if you could easily display a report containing only flowsheet data and nothing
else. To view additional reports, do the following:
1. At the Options screen, expand the Preferences node, then select System Preferences.
2. Set the Show Additional Reports parameter to TRUE, then return to the Patient Data
screen.
3. Select the Submit tab, if it isn’t already selected. A new treeview node, labeled
Additional Reports, displays below the Result Report node. The Additional Reports list
displays the names of all defined reports except for the report specified in the “Summary
Report Name” System Preference. (That one already displays when you click Result
Report, above.) Click a tab to view the record.
4. Click the report you wish to display. The report displays in the summary panel to the
right (Figure 11-6).
Note: The report that gets filed to CPRS is still the one specified in the “Summary Report
Name” preference. To file a different report, change that preference before submitting the
study.
Figure 11-6

Submitting the Study
March 2017 Hemodialysis Patch MD*1.0*50
User Manual
11-5
Submitting the Study
Submit the study by completing the following steps.
1. Review the Treatment Status Report.
Note: When the Treatment Status Report is hidden, review the red question marks and
green checkmarks that display directly on the tabs.
2. Review the final report.
Notes: You can add a note by clicking the Add TIU button and entering a new note.
Any new notes should be entered before signing off on the treatment.
Click the Print button to obtain a hard copy of the final report.
Prior to submitting the study, attach any additional instrument results and/or external
attachments. For more information, see the following chapter, “12. Attaching
Results/External Attachments to a Study Using CP User.”
3. The electronic signature and submission steps vary slightly depending on whether the
“Show report signature field” parameter is set to TRUE or FALSE. Follow the
appropriate steps below, based on your parameter setting.
“Show report signature field” parameter is set to TRUE:
Enter your Electronic Signature Code in the Signature field to electronically
sign off on the treatment summary. Proceed to step 4.
Note: If you try to submit a study without first confirming PCE Data on the
Summary tab, a popup message reminds you to review or save PCE data. Click
OK on the popup message, then return to the Summary tab and click Confirm.
Figure 11-7
“Show report signature field” parameter is set to FALSE:
Click the Sign & Submit button. The Study Report displays in a window.
Review the report before signing.
Note: If you click the Sign & Submit button without first confirming PCE Data
on the Summary tab, a popup message reminds you to review or save PCE data.
Click OK on the popup message, then return to the Summary tab and click
Confirm.
Enter your Electronic Signature Code in the Signature field to electronically
sign off on the treatment summary.

Submitting the Study
11-6 Hemodialysis Patch MD*1.0*50 March 2017
User Manual
4. Click Submit to submit the study. The Submit screen closes and a confirmation
window displays a message that the study was submitted (along with the study
number).
Figure 11-8
Note: If you enter the wrong Electronic Signature Code, a popup window states, “You
have entered an incorrect Electronic Signature code…Try again!” Click OK to close the
popup. If you enter the wrong code three times, the field locks and the study goes into
error status. To reset the study, expand the Tools menu and select Set Pending Status.
5. Click OK to close the confirmation window. The Active Patients list displays. An
official treatment summary is generated at this point.

Submitting the Study
March 2017 Hemodialysis Patch MD*1.0*50
User Manual
11-7
Viewing Submitted Study Results
Submitted study results may be viewed in either CPRS or CP User.
Viewing Study Results in CPRS
To view submitted study results in CPRS, do the following:
1. Launch CPRS and select the patient.
2. Click the Consults tab.
3. Select the consult from the All consults treeview display (Figure 11-9). The summary
report for the selected consult displays in the large field to the right.
Figure 11-9
4. To view related documents (such as TIU notes), click the appropriate document in the
Related Documents treeview (Figure 11-10). The selected document displays in the
field to the right.
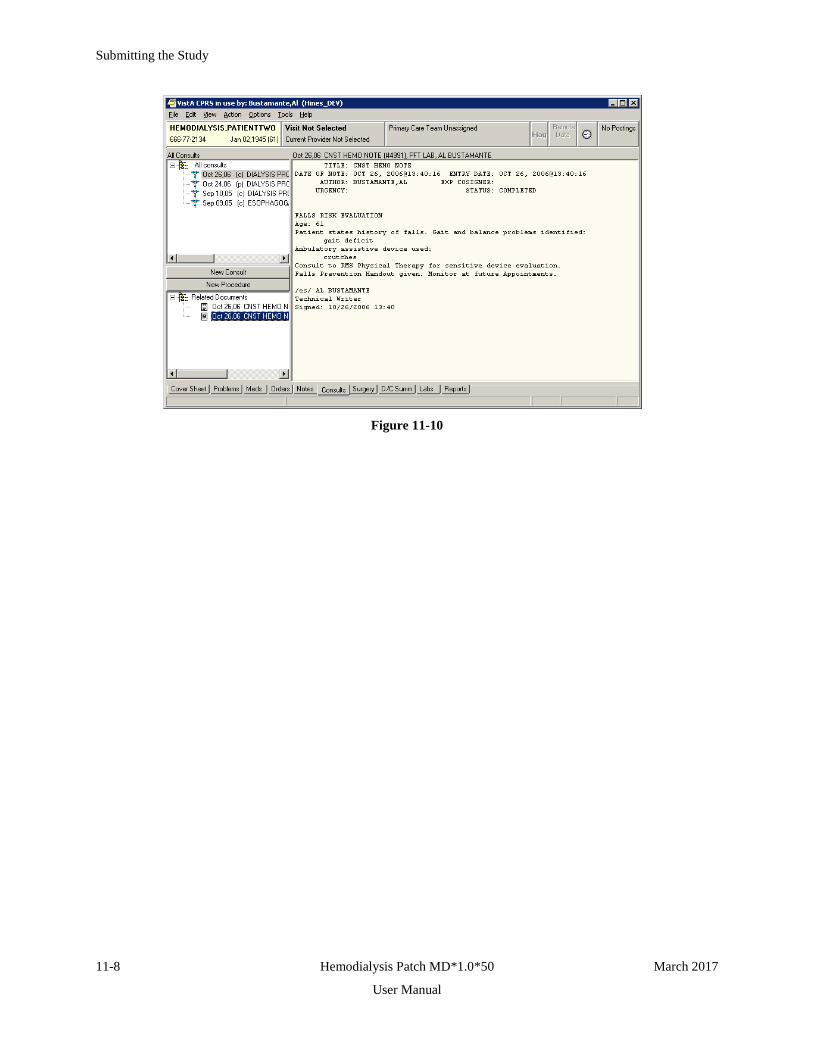
Submitting the Study
11-8 Hemodialysis Patch MD*1.0*50 March 2017
User Manual
Figure 11-10

Submitting the Study
March 2017 Hemodialysis Patch MD*1.0*50
User Manual
11-9
Viewing Study Results in CP User
To view submitted study results in CP User, do the following:
1. Launch CP User and select the patient.
2. Select Renal from the Studies list (Figure 11-11).
Figure 11-11
3. Double-click the procedure in the Procedure list. The Clinical Procedures Study window
displays.
4. To view the report summary, click the magnifying glass icon below the TIU Note
heading (Figure 11-12).
Figure 11-12
5. To view the Consult, click the magnifying glass icon below the Consult heading.

Submitting the Study
11-10 Hemodialysis Patch MD*1.0*50 March 2017
User Manual

March 2017 Hemodialysis Patch MD*1.0*50 12-1
User Manual
12. Attaching Results/External Attachments to a Study Using CP User
Prior to submitting the Hemodialysis study, you can use CP User to attach any additional
instrument results and/or external attachments. You can only open studies that have an Error,
Complete, Ready to Complete, or New status.
When a study is in the Ready to Complete or New status, you can open the study and finish
entering any data that was missed. An example of missed data is an external attachment that was
not associated with the study.
1. Open the study and add results and/or external attachments. Click Open Study or select
File > Open Study. Figure 12-1 displays.
Figure 12-1
2. Click +Results to select and submit the result to Vista Imaging. Only results for the
patient and instrument used for the procedure are displayed. To select multiple results,
hold down the CTRL key. To select a range of results, highlight the initial result, hold
down the Shift key, and then click the last result.
3. You can also click +Files (Figure 12-1) to add additional attachments from the External
Attachment Directory. If the External Attachment Directory has not been defined for this
procedure, the last directory that was accessed may be displayed. You can browse for
other attachments to link to the study.
Note: If the system parameter Allow Non-Instrument Attachments was not selected in
CP Manager, +Files does not appear on the Clinical Procedures Study screen, you are not
permitted to associate additional attachments with the procedure.
4. Submit the study. The images are copied to the RAID and the TIU document is created
and associated with the procedure order.

Attaching Results/External Attachments to a Study Using CP User
12-2 Hemodialysis Patch MD*1.0*50 March 2017
User Manual
5. From Figure 12-1, click the magnifying glass under TIU Note to view the TIU Note for
that study if it is available. The magnifying glass for the TIU document is unavailable if
the result has not been submitted to Vista imaging. Once the result is copied to Vista
Imaging, you can view the TIU document of the study before or after the interpretation
has been entered, Figure 12-2.
Figure 12-2
6. From Figure 12-1, you can also click the magnifying glass under Consult to view the
Consult report for that study.

Attaching Results/External Attachments to a Study Using CP User
March 2017 Hemodialysis Patch MD*1.0*50
User Manual
12-3
Figure 12-3

Attaching Results/External Attachments to a Study Using CP User
12-4 Hemodialysis Patch MD*1.0*50 March 2017
User Manual

March 2017 Hemodialysis Patch MD*1.0*50 13-1
User Manual
13. Site Configurable Options This section describes some of the parameters that are site configurable. The following topics are
covered in this section:
Displaying the Options Screen
Exiting the Options Screen
Customizing Drop-down List Items
o Adding a TIU Note Title
o Verifying the TIU Note Title Addition
o Adding a List Item
o Deleting List Items
o Saving Custom Lists
o Loading Custom Lists
Preferences
o Preferences (System vs. User)
Configuring System Preferences
Assigning System Preferences to Users
ADMIN ONLY Rights
Report Templates
o Editing a Report Template
o Creating a New Report Template
Note: For instructions on modifying the list of Administrators, see the Hemodialysis Installation
Guide.
Displaying the Options Screen
To display the Options screen, do the following:
1. On the menu bar, click Options. The Hemodialysis screen changes to the Options screen.
Exiting the Options Screen
To exit the Options screen, do the following:
1. On the menu bar, click Patient Data. The Options screen changes back to the
Hemodialysis tab that was active when you switched to the Options screen.

Site Configurable Options
13-2 Hemodialysis Patch MD*1.0*50 March 2017
User Manual
Customizing Drop-down List Items
The Hemodialysis tabs contain several dropdown lists which can be customized on the Options
screen. ADMIN users can access the Options screen to view and edit the dropdown list items.
The following dropdowns are customizable:
Customizable Field Location
Anticoagulants Rx and Lab tab
Attending Nephrologists Cover tab
Code Statuses Cover tab
Dialyzer List Rx and Lab tab
Education Codes Pre-Treatment tab Key field
ESRD Diagnoses Cover tab
Medical Facilities Access tab – Add New Access Site window
Medications Flowsheet tab – Add Medications window
Medication Routes Flowsheet tab – Add Medications window
Medication Units Flowsheet tab – Add Medications window
Medication Statuses Reserved for future use.
Medication Reasons Reserved for future use.
Modalities Cover tab
Surgeons Access tab – Add New Access Site window
TIU Note Titles
Note: TIU Note Titles are a special case.
There is a unique process for adding TIU
Note Titles, which is described later in this
chapter in the section “Adding a TIU Note
Title.”
TIU Note window
Transportation Methods Pre-Treatment and Post-Treatment tabs

Site Configurable Options
March 2017 Hemodialysis Patch MD*1.0*50
User Manual
13-3
Adding a TIU Note Title
This section describes how to add a TIU Note Title to a Custom Data List. To add any other type
of item to a Custom Data List, see the section “Adding a List Item.”
Note: Before you start the following workflow to add a TIU Note Title to Hemodialysis,
first add the TIU Note Title to TIU, as described in CP Implementation Guide.
To add a TIU Note Title to Hemodialysis, do the following:
1. On the Hemodialysis menu bar, click Options. The Hemodialysis screen changes to the
Options screen.
2. Expand the Custom Data Lists node on the options tree, if necessary, and then click the TIU
Note Titles node. The selected list displays in the table to the right.
3. Click Add. The Select TIU Title of the CP Class Document window displays.
Figure 13-1
4. Type the first characters of the TIU Note Title in the white field, then press <Enter>.
Predefined TIU Note Titles beginning with the letters you entered display in the yellow field.
Note: TIU Note Titles that were defined for Hemodialysis should begin with the letters
“CP.”
5. Click the desired TIU Note Title from the list, then click Select. The “Select TIU Title of the
CP Class Document” window closes, and the new TIU Note Title displays in the TIU Note
Titles list.
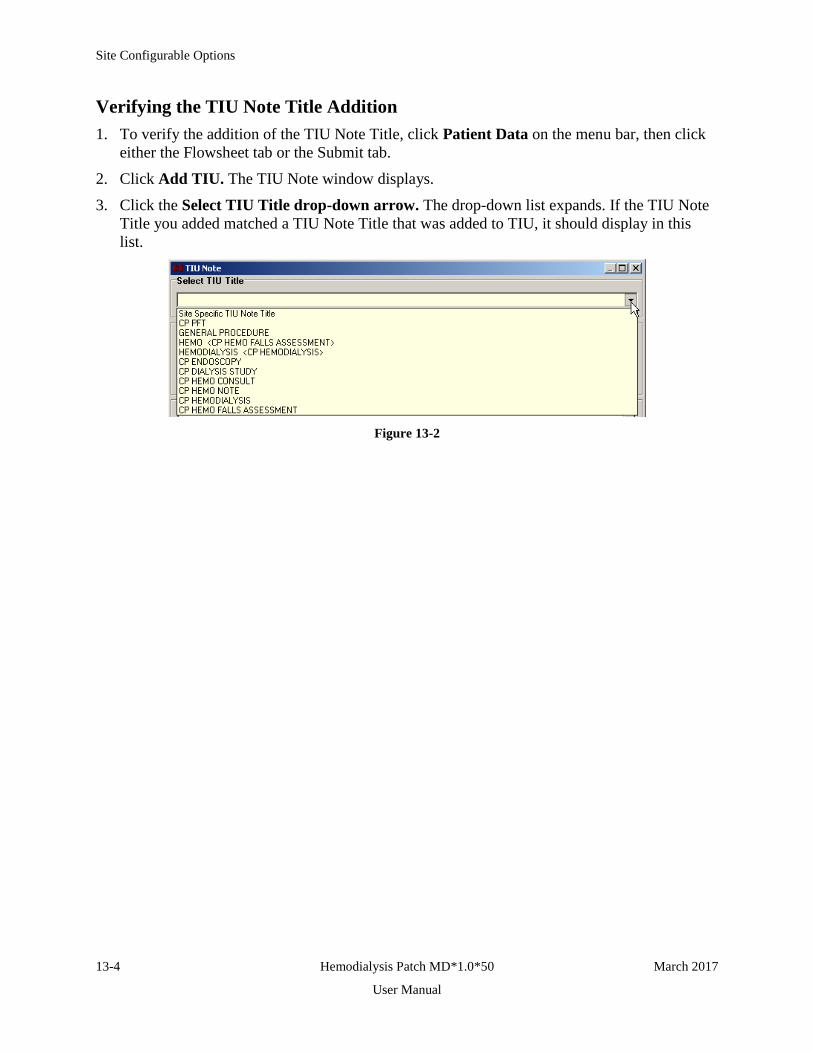
Site Configurable Options
13-4 Hemodialysis Patch MD*1.0*50 March 2017
User Manual
Verifying the TIU Note Title Addition
1. To verify the addition of the TIU Note Title, click Patient Data on the menu bar, then click
either the Flowsheet tab or the Submit tab.
2. Click Add TIU. The TIU Note window displays.
3. Click the Select TIU Title drop-down arrow. The drop-down list expands. If the TIU Note
Title you added matched a TIU Note Title that was added to TIU, it should display in this
list.
Figure 13-2

Site Configurable Options
March 2017 Hemodialysis Patch MD*1.0*50
User Manual
13-5
Adding a List Item
1. On the menu bar, click Options. The Hemodialysis screen changes to the Options screen.
2. Expand the Custom Data Lists node on the options tree, if necessary, then click the node of
the list you’d like to change. The selected list displays in the table to the right.
For example, click the Anticoagulants node to add another anticoagulant to the list. The list
of anticoagulants displays to the right, as in Figure 13-3.
Figure 13-3
3. To add an item to the list, click the Add button, above the listview.
Note 1: These buttons display only for users with ADMIN rights.
Figure 13-4
Note 2: The Default button will restore the original values for the parameter you have
selected. The default values are values that were exported with the Parameters during
installation. For a listing of the exported default values, refer to the Clinical Procedures
Implementation Guide.
4. The Option window displays (Figure 13-5). Type at least one character (numeric or
alphabetic—to be used for sorting the list) in the Item field, then press <Tab>.

Site Configurable Options
13-6 Hemodialysis Patch MD*1.0*50 March 2017
User Manual
Figure 13-5
5. Type the new item in the Value field, then click OK. The new item displays in the data list.
Figure 13-6
6. Click the Save To DB button to write the changes to the database. (The Save to DB button
functions like the Apply button commonly found in Windows.)
Important: The dropdown list values will not change until you click Save To DB.
Note: The custom data listviews sort the values in the columns as strings. That means that if
you enter numbers in the Item column, they are sorted according to the first character, not
numerically (as shown by the first three rows of Figure 13-7). In order to maintain numerical
sequence, use leading zeroes (as shown by the last three rows of Figure 13-7).
Figure 13-7

Site Configurable Options
March 2017 Hemodialysis Patch MD*1.0*50
User Manual
13-7
Deleting List Items
1. On the menu bar, click Options. The Hemodialysis screen changes to the Options screen.
2. Expand the Custom Data Lists node on the options tree, if necessary, then click the node of
the list you’d like to change. The selected list displays in the table to the right.
3. To delete an item to the list, highlight the item in the listview, then click the Delete button,
above the listview.
Tip: Click the row within the Value column to highlight an item.
Figure 13-8
4. A Confirm dialog displays. Click Yes.
Figure 13-9
5. Click the Save To DB button to write the changes to the database.
Important: The dropdown list values will not change until you click Save To DB.
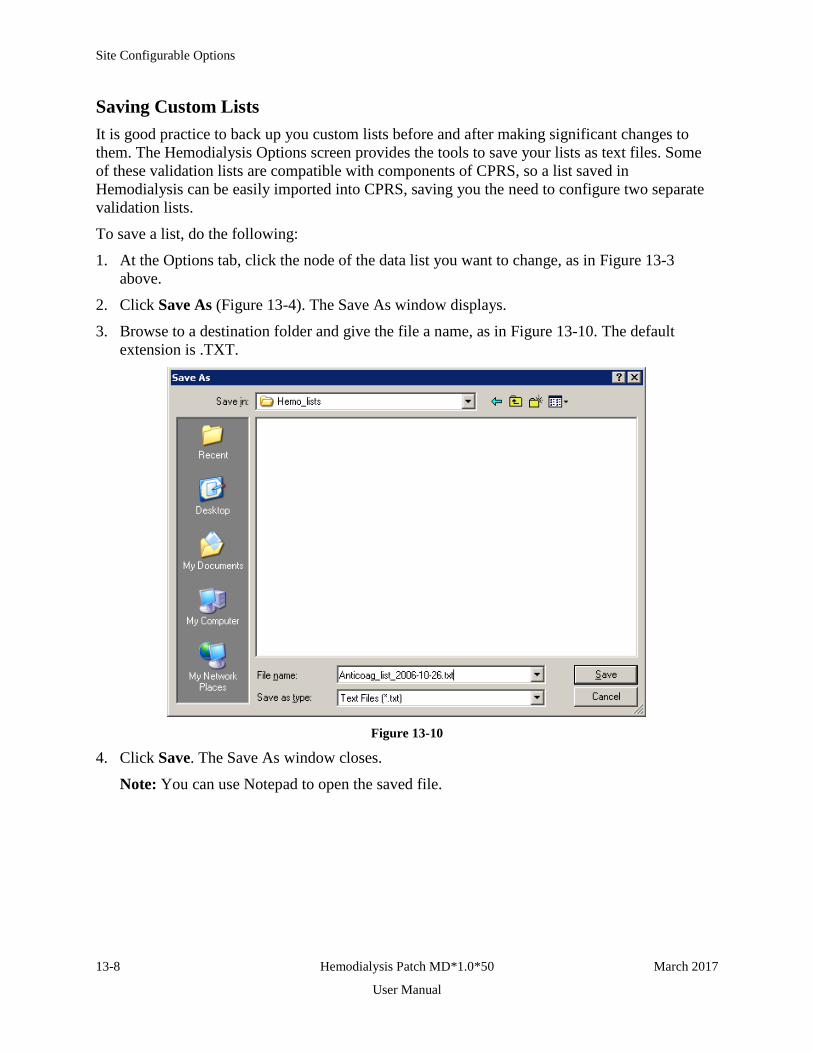
Site Configurable Options
13-8 Hemodialysis Patch MD*1.0*50 March 2017
User Manual
Saving Custom Lists
It is good practice to back up you custom lists before and after making significant changes to
them. The Hemodialysis Options screen provides the tools to save your lists as text files. Some
of these validation lists are compatible with components of CPRS, so a list saved in
Hemodialysis can be easily imported into CPRS, saving you the need to configure two separate
validation lists.
To save a list, do the following:
1. At the Options tab, click the node of the data list you want to change, as in Figure 13-3
above.
2. Click Save As (Figure 13-4). The Save As window displays.
3. Browse to a destination folder and give the file a name, as in Figure 13-10. The default
extension is .TXT.
Figure 13-10
4. Click Save. The Save As window closes.
Note: You can use Notepad to open the saved file.

Site Configurable Options
March 2017 Hemodialysis Patch MD*1.0*50
User Manual
13-9
Loading Custom Lists
To restore a custom list from a file, do the following:
1. At the Options tab, click the node of the data list you want to change, as in Figure 13-3
above.
2. Click Load from File. The Open window displays.
3. Navigate to the location of the file, then highlight it and click Open. The list from the file
now displays in the listview.
Important: When you load a list, it completely replaces the current list.
Preferences
At the Options screen, click the Preferences node to display a list of all available preferences
and their current settings (Figure 13-11). This screen displays System Preference settings by
default, unless User Preferences have been defined. If User Preference settings exist, those will
display because they override System Preferences. This screen is for display only. The next
sections of this chapter describe how you can modify the settings.
Figure 13-11

Site Configurable Options
13-10 Hemodialysis Patch MD*1.0*50 March 2017
User Manual
Preferences (System vs. User)
Expanding the Preferences node reveals two nodes below it: System Preferences and User
Preferences.
Figure 13-12
Changes made to System Preferences take effect system wide. They affect ALL USERS.
Changes made to User Preferences affect only the logged-on user.
Note: Two parameters are controlled strictly through User Preferences:
Allow USER Reset Study Status
Show Treatment Status Report
“Show Treatment Status Report” is automatically added to the User Preferences list. “Allow
USER Reset Study Status” must be added manually.
Configuring System Preferences
Expand the Preferences node, then click the System Preferences node to reveal configurable
system parameters. The parameter names are listed in alphabetical order. Parameter names and
values are not case sensitive.
The following parameters may be configured on this screen:
Parameter Name Description
Allow USER control
Study Status
TRUE or FALSE – If TRUE, a USER can change the status
of a study (enabled/disabled) in the Active Patients list.
Allow USER delete blank
F/S record
TRUE or FALSE – If TRUE, a USER can delete a blank
flowsheet row that comes over from a machine.
Note: An ADMIN user can delete a blank flowsheet record
no matter how this option is set.
Allow USER Reset Study
Status
TRUE or FALSE – If TRUE, a USER can change the study
ERROR status to PENDING.
Note: This preference is locked at the system level. To
change it, do so at the user level.
Application Web Page
URL
Address of Clinical Procedures website
Blanks Placeholder A group of characters to be displayed in reports whenever
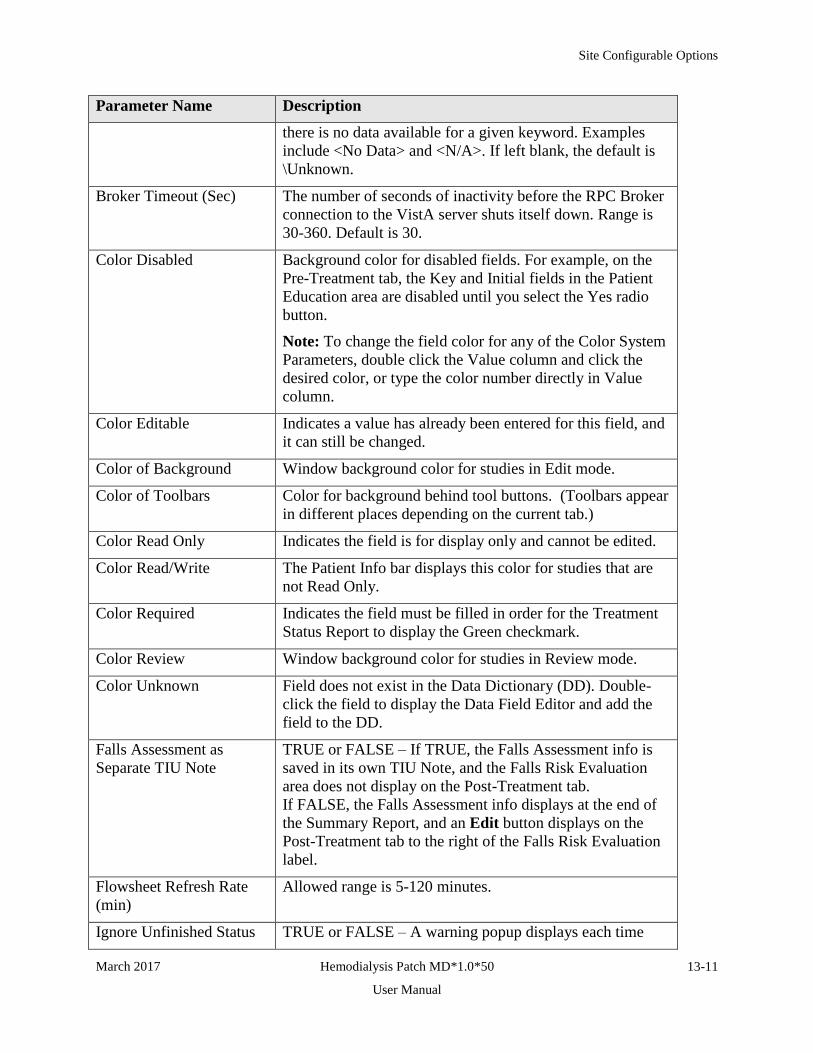
Site Configurable Options
March 2017 Hemodialysis Patch MD*1.0*50
User Manual
13-11
Parameter Name Description
there is no data available for a given keyword. Examples
include <No Data> and <N/A>. If left blank, the default is
\Unknown.
Broker Timeout (Sec) The number of seconds of inactivity before the RPC Broker
connection to the VistA server shuts itself down. Range is
30-360. Default is 30.
Color Disabled Background color for disabled fields. For example, on the
Pre-Treatment tab, the Key and Initial fields in the Patient
Education area are disabled until you select the Yes radio
button.
Note: To change the field color for any of the Color System
Parameters, double click the Value column and click the
desired color, or type the color number directly in Value
column.
Color Editable Indicates a value has already been entered for this field, and
it can still be changed.
Color of Background Window background color for studies in Edit mode.
Color of Toolbars Color for background behind tool buttons. (Toolbars appear
in different places depending on the current tab.)
Color Read Only Indicates the field is for display only and cannot be edited.
Color Read/Write The Patient Info bar displays this color for studies that are
not Read Only.
Color Required Indicates the field must be filled in order for the Treatment
Status Report to display the Green checkmark.
Color Review Window background color for studies in Review mode.
Color Unknown Field does not exist in the Data Dictionary (DD). Double-
click the field to display the Data Field Editor and add the
field to the DD.
Falls Assessment as
Separate TIU Note
TRUE or FALSE – If TRUE, the Falls Assessment info is
saved in its own TIU Note, and the Falls Risk Evaluation
area does not display on the Post-Treatment tab.
If FALSE, the Falls Assessment info displays at the end of
the Summary Report, and an Edit button displays on the
Post-Treatment tab to the right of the Falls Risk Evaluation
label.
Flowsheet Refresh Rate
(min)
Allowed range is 5-120 minutes.
Ignore Unfinished Status TRUE or FALSE – A warning popup displays each time

Site Configurable Options
13-12 Hemodialysis Patch MD*1.0*50 March 2017
User Manual
Parameter Name Description
you submit a study before an end-of-study message is
received from the medical instrument. Enter TRUE in this
field to suppress warning messages.
Note: Some instruments cannot send an end-of-study
message.
Overwrite Manual Input TRUE or FALSE – If TRUE, instrument data replaces
previously-entered manual data on the Pre- and Post-
Treatment tabs. The default is TRUE.
Pain assessment based on
how patient tolerates pain
TRUE or FALSE – If TRUE, the second two question areas
(on Pre- and Post-Assessments) are disabled if the patient is
able to tolerate the pain, no matter what pain level is
indicated in the “Pain Level” parameter.
Pain Level The minimum pain level that requires answers to additional
questions on Pre- and Post-Treatment tabs.
Report keyword The Report keyword is a string which, if included in a TIU
Note, identifies that TIU Note as the Result Report. Once
the study has been submitted, the Result Report TIU Note
displays a green icon on its tab in the Treatment History
area of the Cover tab.
The default value is "TREATMENT REPORT."
Reverse Flowsheet Order TRUE or FALSE – Display flowsheet data rows in reverse
chronological order.
Save Flowsheet Vitals TRUE or FALSE – If TRUE, send Flowsheet vital signs
data to the Vitals package. The default is FALSE.
Note: In order to send data to the Vitals package, the Vitals
package must be installed at your site.
Save Vitals TRUE or FALSE – If TRUE, send Pre- and Post-Treatment
vital signs data to the Vitals package. The default is FALSE.
Note: In order to send data to the Vitals package, the Vitals
package must be installed at your site.
Set the new study Cover
to Read Only
TRUE or FALSE – Set the default of the Treatment
Information checkbox to Read Only the first time a study is
opened.
Show Additional Reports TRUE or FALSE – If TRUE, display a list of all available
summary reports on the Submit tab.
Show Disabled Studies to
Users
If FALSE (default) both ADMIN and USER level users will
not see disabled studies in the Active patients list.
Show Flowsheet Event TRUE or FALSE – If TRUE, display additional information

Site Configurable Options
March 2017 Hemodialysis Patch MD*1.0*50
User Manual
13-13
Parameter Name Description
Copies about patient treatment in flowsheet.
Show Infectious Diseases
information as Tree
(Cover tab) TRUE or FALSE – If TRUE, Recent Postings
& Infectious Diseases display in separate areas, with
Infectious Diseases in a treeview. If FALSE, Recent
Postings & Infectious Diseases display in the same area, as a
list.
Show report signature
field
(Submit tab) TRUE or FALSE – If TRUE, the electronic
signature field displays at the bottom of the Submit tab, next
to a submit button (and the Sign & Submit button is
disabled). If FALSE, the Sign & Submit button is enabled
and the electronic signature field and (lower) Submit button
are hidden.
Show TIU Note
Templates
TRUE or FALSE – If TRUE, a list of available TIU Note
Templates displays on the TIU Note window. (Initially, the
default is FALSE.)
Show Treatment Status
Report
Display the Treatment Status Report on the Submit tab.
(See “Treatment Status Report.”)
Study List Refresh Rate
(sec)
Sets the Study List refresh rate when the AutoRefresh box
has been checked. Range is 7-999. Default is 60.
Study Load Limit The maximum number of studies that will display in the
Treatment History table on the Cover tab.
Summary Report Name The name of the report template to be used when a study is
submitted. See the Report List for available templates. The
default is Summary Report.
To edit these parameters, do the following.
1. Highlight the Value by clicking it with your mouse pointer (Figure 13-8).
2. Type the new value, then press <Enter>.
Shortcut: Double-click TRUE or FALSE values to toggle the value.
3. Click Save To DB to apply the changes.
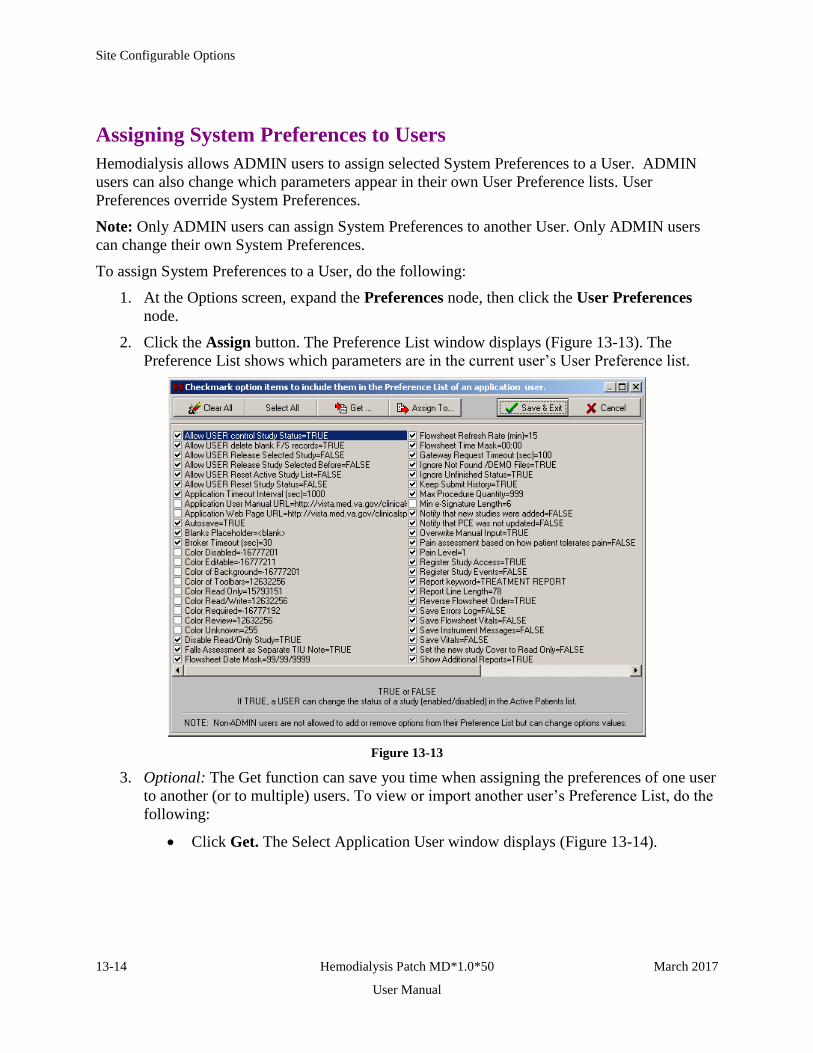
Site Configurable Options
13-14 Hemodialysis Patch MD*1.0*50 March 2017
User Manual
Assigning System Preferences to Users
Hemodialysis allows ADMIN users to assign selected System Preferences to a User. ADMIN
users can also change which parameters appear in their own User Preference lists. User
Preferences override System Preferences.
Note: Only ADMIN users can assign System Preferences to another User. Only ADMIN users
can change their own System Preferences.
To assign System Preferences to a User, do the following:
1. At the Options screen, expand the Preferences node, then click the User Preferences
node.
2. Click the Assign button. The Preference List window displays (Figure 13-13). The
Preference List shows which parameters are in the current user’s User Preference list.
Figure 13-13
3. Optional: The Get function can save you time when assigning the preferences of one user
to another (or to multiple) users. To view or import another user’s Preference List, do the
following:
Click Get. The Select Application User window displays (Figure 13-14).
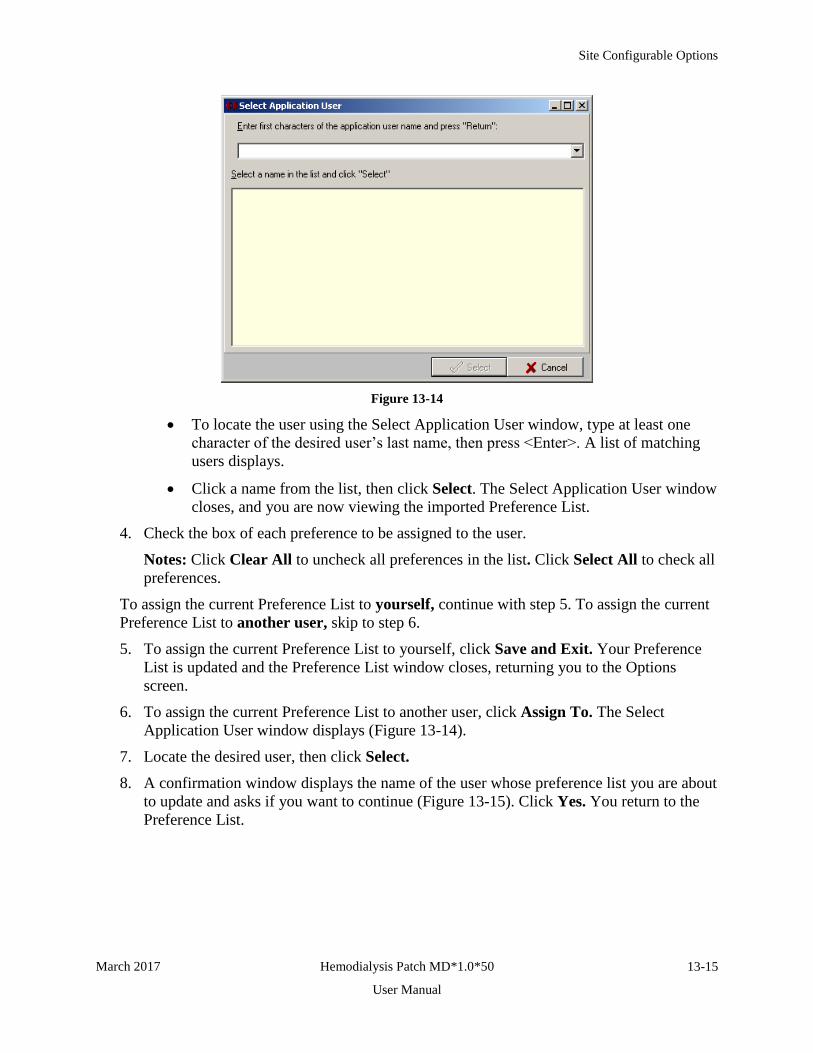
Site Configurable Options
March 2017 Hemodialysis Patch MD*1.0*50
User Manual
13-15
Figure 13-14
To locate the user using the Select Application User window, type at least one
character of the desired user’s last name, then press <Enter>. A list of matching
users displays.
Click a name from the list, then click Select. The Select Application User window
closes, and you are now viewing the imported Preference List.
4. Check the box of each preference to be assigned to the user.
Notes: Click Clear All to uncheck all preferences in the list. Click Select All to check all
preferences.
To assign the current Preference List to yourself, continue with step 5. To assign the current
Preference List to another user, skip to step 6.
5. To assign the current Preference List to yourself, click Save and Exit. Your Preference
List is updated and the Preference List window closes, returning you to the Options
screen.
6. To assign the current Preference List to another user, click Assign To. The Select
Application User window displays (Figure 13-14).
7. Locate the desired user, then click Select.
8. A confirmation window displays the name of the user whose preference list you are about
to update and asks if you want to continue (Figure 13-15). Click Yes. You return to the
Preference List.
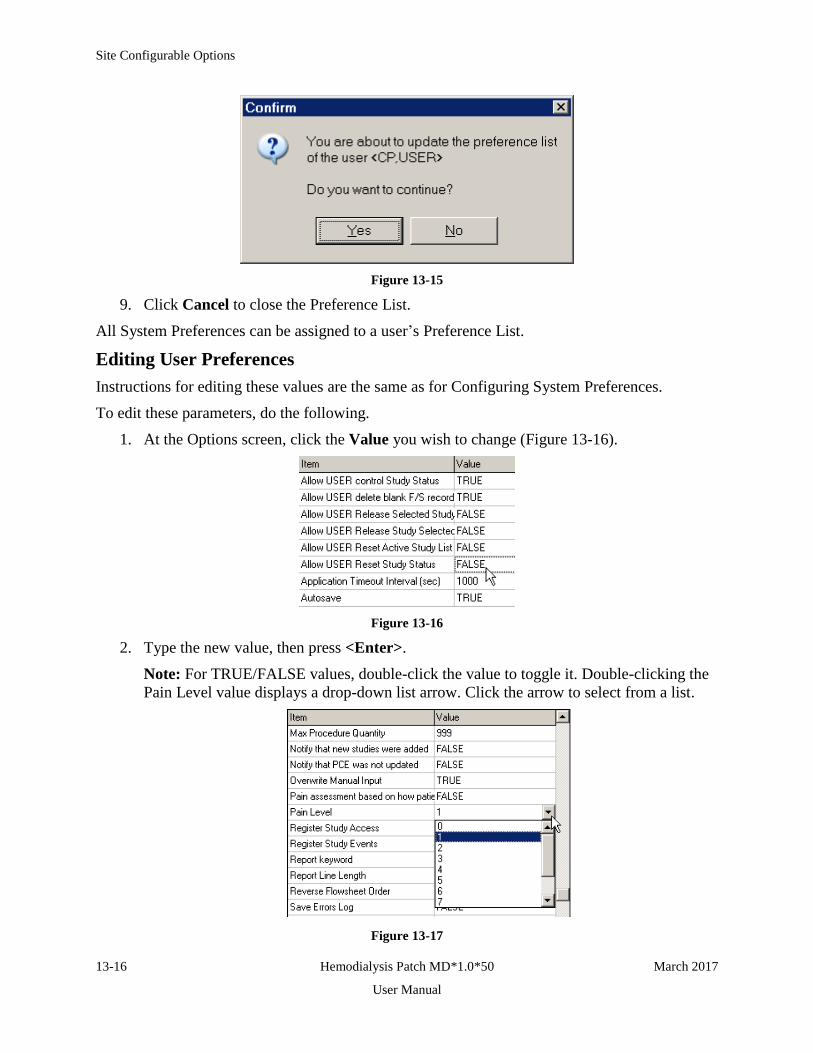
Site Configurable Options
13-16 Hemodialysis Patch MD*1.0*50 March 2017
User Manual
Figure 13-15
9. Click Cancel to close the Preference List.
All System Preferences can be assigned to a user’s Preference List.
Editing User Preferences
Instructions for editing these values are the same as for Configuring System Preferences.
To edit these parameters, do the following.
1. At the Options screen, click the Value you wish to change (Figure 13-16).
Figure 13-16
2. Type the new value, then press <Enter>.
Note: For TRUE/FALSE values, double-click the value to toggle it. Double-clicking the
Pain Level value displays a drop-down list arrow. Click the arrow to select from a list.
Figure 13-17

Site Configurable Options
March 2017 Hemodialysis Patch MD*1.0*50
User Manual
13-17
3. Click Save To DB to apply the changes.
Note: The “Show Treatment Status Report” User Preference cannot be permanently deleted. If it
is deleted, it will be restored (with a default value of TRUE) the next time the application is
started.
ADMIN ONLY Rights
The following list contains the actions which only ADMIN users can perform. These actions
cannot be assigned to a USER’s Preference List.
Reload flowsheet (Flowsheet tab)
Change Application Setup (Preferences)
Modify Custom Data Lists (Preferences)
Review Application Events
Create templates for Reports and TIU Notes
Modify System Preferences
Delete blank flowsheet records (This item can be assigned to a USER’s Preference
List)
Access and use the Data Field Editor (by right-clicking a field then clicking Format)
Edit a user’s Preference List (Preferences)
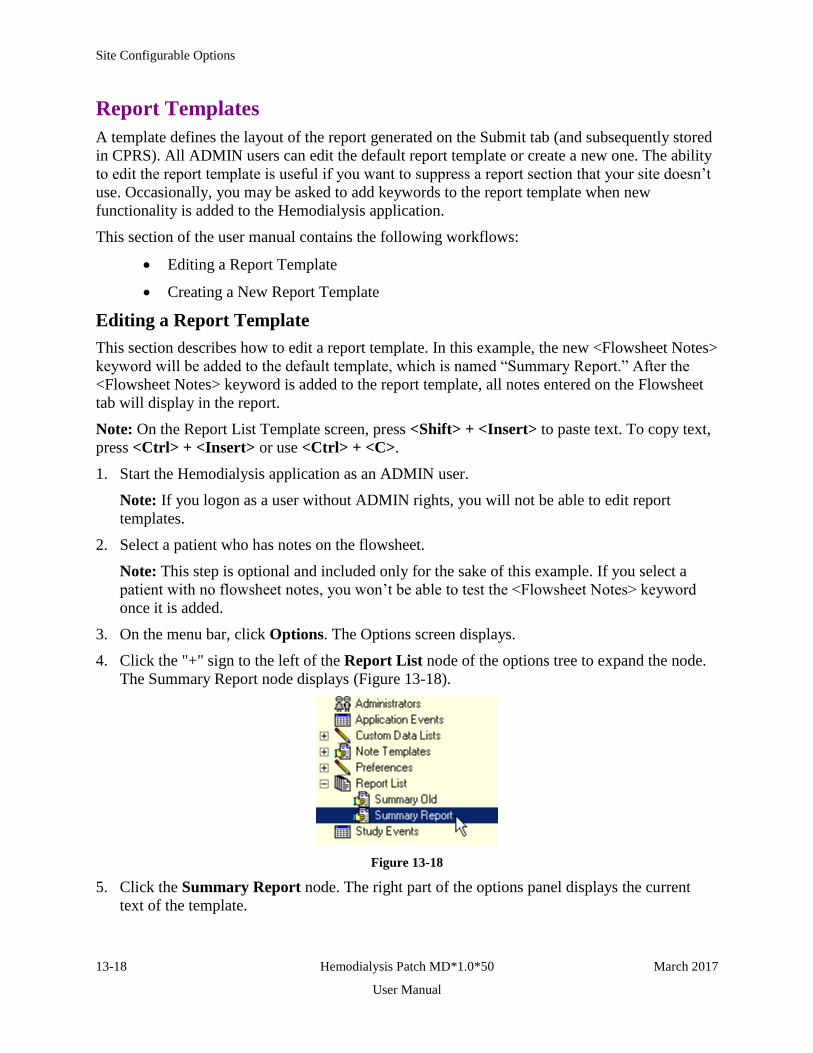
Site Configurable Options
13-18 Hemodialysis Patch MD*1.0*50 March 2017
User Manual
Report Templates
A template defines the layout of the report generated on the Submit tab (and subsequently stored
in CPRS). All ADMIN users can edit the default report template or create a new one. The ability
to edit the report template is useful if you want to suppress a report section that your site doesn’t
use. Occasionally, you may be asked to add keywords to the report template when new
functionality is added to the Hemodialysis application.
This section of the user manual contains the following workflows:
Editing a Report Template
Creating a New Report Template
Editing a Report Template
This section describes how to edit a report template. In this example, the new <Flowsheet Notes>
keyword will be added to the default template, which is named “Summary Report.” After the
<Flowsheet Notes> keyword is added to the report template, all notes entered on the Flowsheet
tab will display in the report.
Note: On the Report List Template screen, press <Shift> + <Insert> to paste text. To copy text,
press <Ctrl> + <Insert> or use <Ctrl> + <C>.
1. Start the Hemodialysis application as an ADMIN user.
Note: If you logon as a user without ADMIN rights, you will not be able to edit report
templates.
2. Select a patient who has notes on the flowsheet.
Note: This step is optional and included only for the sake of this example. If you select a
patient with no flowsheet notes, you won’t be able to test the <Flowsheet Notes> keyword
once it is added.
3. On the menu bar, click Options. The Options screen displays.
4. Click the "+" sign to the left of the Report List node of the options tree to expand the node.
The Summary Report node displays (Figure 13-18).
Figure 13-18
5. Click the Summary Report node. The right part of the options panel displays the current
text of the template.

Site Configurable Options
March 2017 Hemodialysis Patch MD*1.0*50
User Manual
13-19
Note: "Summary Report" is the name of the default report sent to the CPRS. If you are using
another template, select its name from the options tree.
6. Scroll through the template text to find the FLOWSHEET section of the report.
Figure 13-19
In the report template text shown above (Figure 13-19), all words not enclosed between
brackets (<>) will display in the report exactly as they appear in the template.
The <KEYWORDS> between brackets (e.g., <FLOWSHEET>, <MEDICINE TABLE>,
<Summary Post Weight>) are placeholders and will be replaced with data, as in the sample
report shown below (Figure 13-20).
Note: Keywords are CASE SENSITIVE.
Notice that blank lines and horizontal divider lines also display in the report output. These
may be copied and pasted, as well, to improve readability of the report.

Site Configurable Options
13-20 Hemodialysis Patch MD*1.0*50 March 2017
User Manual
Figure 13-20
7. The report template text is available for editing. Modify the template text to include the
<Flowsheet Notes> keyword. You may copy and paste the template text or type it manually.
Figure 13-21
Note: On the Report List Template screen, press <Ctrl> + <Insert> or press <Ctrl> + <C>
to copy the selected text. To paste text, press <Shift> + <Insert>.

Site Configurable Options
March 2017 Hemodialysis Patch MD*1.0*50
User Manual
13-21
In the example above (Figure 13-21), the <Flowsheet Notes> keyword was added directly
below the <FLOWSHEET> keyword.
Notes: Type carefully! If a keyword is misspelled, it will not work. To display a list of all
available keywords, check the Show Keywords box.
Figure 13-22
Tip: Double-clicking a keyword in the list inserts it into the template wherever the cursor is.
8. Click the Verify button to verify that all keywords are correct. If not, those keywords will
display in red Figure 13-23.

Site Configurable Options
13-22 Hemodialysis Patch MD*1.0*50 March 2017
User Manual
Figure 13-23
Note: Dictionary keywords display in blue and nondictionary keywords display in green. A
dictionary keyword is directly linked to a specific field from one of the Hemodialysis tabs,
such as EDW or Pulse. A nondictionary keyword can represent an entire range of data, such
as MEDICINE TABLE, or it can be used to insert information dynamically, such as Now or
Version.
9. To verify that the new keyword works, click the Report tab at the bottom-left corner of the
template editor (Figure 13-24).
Figure 13-24
10. Click the Process Template button at the top-right corner of the template editor panel. The
application generates a report based on the selected template.

Site Configurable Options
March 2017 Hemodialysis Patch MD*1.0*50
User Manual
13-23
Figure 13-25
11. Verify that the newly-added keywords produced the desired effect. In the example above
(Figure 13-25), Flowsheet Notes are included in the report, right between the Flowsheet data
and Medication List data.
12. If the report text is correct, save the updated template for future use. To do so, first click the
Template tab at the bottom-left corner of the template editor (Figure 13-26).
Figure 13-26
13. Click the Save to DB button to save changes.
After the template text is saved, it is available for all users at your site.
Note: Report templates can now be saved and loaded. Follow the same instructions found in the
following sections:
Saving Custom Lists
Loading Custom Lists

Site Configurable Options
13-24 Hemodialysis Patch MD*1.0*50 March 2017
User Manual
Creating a New Report Template
If you do not want to change the default Summary Report template, or if you simply wish to
create additional report templates, you may elect to create a new report. To create a new report
template, do the following:
1. Start the Hemodialysis application as an ADMIN user.
Note: If you logon as a user without ADMIN rights, you will not be able to create new report
templates.
2. Select a patient or click Cancel to get to the Hemodialysis main screen.
3. On the menu bar, click Options. The Options screen displays.
4. Click the Report List node on the options tree. A list of all existing report templates displays
in the panel to the right of the options tree. (Double-click the Report List node to expand it,
if it isn’t already.)
Figure 13-27
5. Click the Add button. The Option window displays.
Figure 13-28
6. Type the name of the template in the Name field.
7. Type a description in the Value field, and then click OK. The new report information
displays in the template list.
8. Click Save To DB. If you do not save the new template to the database, it will be lost the
next time you run the Hemodialysis application.
9. The new template will not display under the Report List node until you exit Hemodialysis
and then restart it, so repeat steps 1-4. You should end up back at the options tree, with the
Report List node expanded.
10. Click the new template in the options tree.

Site Configurable Options
March 2017 Hemodialysis Patch MD*1.0*50
User Manual
13-25
Figure 13-29
11. At this point, the new template is still blank. Create the layout of your new template as
described in “Editing a Report Template.” Don’t forget to click Save to DB when you’re
finished!
12. Now that you have created a new report template, you must make it the active template.
(Otherwise, Hemodialysis will continue to use your old template when generating reports.)
Expand the Options node, then click System Preferences.
13. Highlight the name of the existing report template in the Summary Report Name row.
Figure 13-30
14. Type the new template name, then click Save To DB.
Figure 13-31
15. Exit the Options screen (by clicking Patient Data on the menu bar) and click the Submit tab.
The treatment report should now be using your new report template.
Note 1: If the treatment report still appears to be using the old template, return to the Options
screen to make sure that you typed the Summary Report Name correctly and saved
everything to the database.

Site Configurable Options
13-26 Hemodialysis Patch MD*1.0*50 March 2017
User Manual
Figure 13-32
Note 2: Report templates can be saved and loaded. Follow the same instructions found in the
following sections:
Saving Custom Lists
Loading Custom Lists
Note Templates
This section of the manual compares and contrasts Note templates and Report templates.
TIU Note templates function very much like Report templates. Both use a combination of free
text and keywords to display data in a predefined layout. For information on creating and editing
Note Templates, see the section “Report Templates” (p. 13-16).
Unlike a Report template, which is preselected (from the Options screen) and automatically used
to generate the Result Report on the Submit tab, a Note Templates is (optionally) selected at the
time a TIU Note is created.
Note: The text of a report cannot be updated while the Note text is editable.

Site Configurable Options
March 2017 Hemodialysis Patch MD*1.0*50
User Manual
13-27
Editing Data Fields
The Data Field Editor provides a convenient way for an ADMIN user to modify the way certain
fields behave. For example, a field can be set as not required, which means that it will not
trigger a red question mark to display on the Treatment Status Report when the field is left blank.
A field can also be set so that data coming from a device overwrites the field’s current value.
For additional information on Data Field Editor functions, see the table below.
Note: Only ADMIN users can access the Data Field Editor.
To edit a data field, do the following:
1. Right-click in the field you want to change, then click Format. The Data Field Editor
window displays.
Figure 13-33
2. Click the field you wish to change. Editable fields either contain drop-down lists or
accept free text entries. Read-only fields, indicated in the table below, are not editable.
The following fields are available on the Data Field Editor window:

Site Configurable Options
13-28 Hemodialysis Patch MD*1.0*50 March 2017
User Manual
Tag Used in Reports. They represent values
from the application tables. This field is
read-only.
DataLabel Used for display on Treatment Status
Report (on the Submit tab).
Note: If this field is set to blank, a
warning message pops up and the original
value of the label is restored.
Required TRUE or FALSE – If TRUE and the field
is blank, the background color of the field
will be set according to the “Color
Required” parameter and a red question
mark will display on the Treatment Status
Report (on the Submit tab), if enabled,
and on its respective tab at the bottom of
the screen.
Default is TRUE. (If the Required field is
left blank, it is TRUE.)
Overwrite TRUE or FALSE – If TRUE and the
device can send data, the data from the
device will replace a populated field (Rx
and Lab tab only). Default is FALSE.
Note: This field is supported by Gambro
instruments only.
Domain The name of the Custom Data List that is
used to populate the field (e.g.,
Anticoagulants). This field is read-only.
MinValue Minimum allowed value – This field is
read-only.
MaxValue Maximum allowed value – This field is
read-only.
Comments Free-text remarks
3. Click OK to save changes, or click Cancel to exit the Data Field Editor without saving
changes.

March 2017 Hemodialysis Patch MD*1.0*50 14-1
User Manual
14. Data Tables This section describes the three data tables which are accessible from the Options treeview:
Administrators, Application Events and Study Events The following topics are covered in this
section:
● Administrators
○ Adding Administrators
Application Events
Study Events
o Defining Application Events Screen Buttons
Administrators
The Administrators contains a list of users who has ADMIN rights. Click the Administrators
node. You will see a list of Administrators. If you are opening the Administrators option for the
very first time, the list will be blank.
Figure 14-1

Data Tables
14-2 Hemodialysis Patch MD*1.0*50 March 2017
User Manual
Adding Administrators
Click the Add button towards the top of the screen.
Figure 14-2
The Select Provider window displays. Type the first letters of the provider’s last name in
the drop-down list, then press <Enter>. A list of providers displays in the large field with
the yellow background.
Figure 14-3
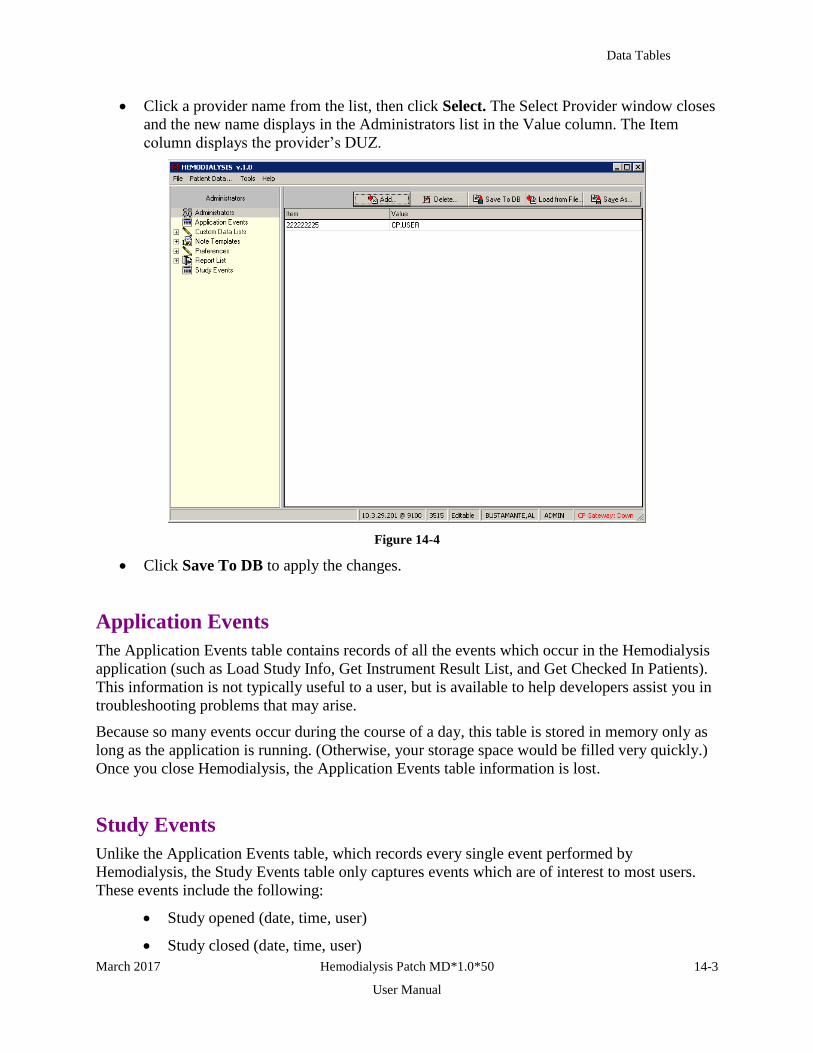
Data Tables
March 2017 Hemodialysis Patch MD*1.0*50
User Manual
14-3
Click a provider name from the list, then click Select. The Select Provider window closes
and the new name displays in the Administrators list in the Value column. The Item
column displays the provider’s DUZ.
Figure 14-4
Click Save To DB to apply the changes.
Application Events
The Application Events table contains records of all the events which occur in the Hemodialysis
application (such as Load Study Info, Get Instrument Result List, and Get Checked In Patients).
This information is not typically useful to a user, but is available to help developers assist you in
troubleshooting problems that may arise.
Because so many events occur during the course of a day, this table is stored in memory only as
long as the application is running. (Otherwise, your storage space would be filled very quickly.)
Once you close Hemodialysis, the Application Events table information is lost.
Study Events
Unlike the Application Events table, which records every single event performed by
Hemodialysis, the Study Events table only captures events which are of interest to most users.
These events include the following:
Study opened (date, time, user)
Study closed (date, time, user)

Data Tables
14-4 Hemodialysis Patch MD*1.0*50 March 2017
User Manual
Billing info
Instrument data
Study Events data is stored from one session to the next.
Defining Application Events Screen Buttons
The following buttons appear along the top of the lower panel display of Application Events. Use
them to navigate the Application Events table.
Jump to the first row of the table.
Select the previous row.
Select the next row.
Jump to the last row of the table.

March 2017 Hemodialysis Patch MD*1.0*50 15-1
User Manual
15. Troubleshooting This section describes solutions to troublesome situations. The following topics are covered:
Preventing PCE “Data Loss”
Reloading Flowsheet Data
Resolving “No Note Text” Error
Using More Than One Dialysis Device During a Treatment
Preventing PCE “Data Loss” in the Hemodialysis Application
Sometimes PCE data (i.e., billing info, healthcare providers, procedures, diagnoses, and
environmental conditions) does not carry over from one Hemodialysis treatment to the next. In that
case of “data loss,” a Hemodialysis user must re-enter this information manually prior to submitting
the study data. This section describes the situations which can cause PCE data loss, so you can keep
such occurrences to a minimum.
Overview
One reason PCE data can disappear is because it is not permanently stored by the Hemodialysis
application. Very simply put, the data does not belong to Hemodialysis. It belongs to PCE (Patient
Care Encounter), which is a subsystem of CPRS. Hemodialysis merely retrieves the data and
presents it within its Summary tab. It’s provided as a convenience to avoid requiring the user to open
CPRS during each study to obtain this information..
In order for Hemodialysis to be able to find the PCE data and display it, certain conditions must be
met. First, PCE data must still be available. Every two weeks, PCE data is sent to Austin, TX, so
accountants can bill the necessary people. One month after the data is sent to Austin, that data
becomes unavailable to Hemodialysis. In that case, the appropriate fields in the Hemodialysis
application appear blank and a user must manually populate them.
The next set of conditions concerns the way Hemodialysis retrieves the data from PCE. When a
patient’s data is retrieved from VistA, the Hemodialysis application requests PCE data based on the
following information:
Patient ID
Order #
Location of the treatment (Clinic)
If any of this information changes between treatments or is missing, Hemodialysis would not be able
to retrieve the data. For example, if a patient receives treatment at a different facility, the location
will be different and the PCE data will not be available to Hemodialysis. Likewise, if a patient
receives treatment under a new (or old) order #, the PCE data will not be carried over from the
previous treatment.

Troubleshooting
15-2 Hemodialysis Patch MD*1.0*50 March 2017
User Manual
Recommendations
Based on the overview (above), it is clear that under some circumstances, re-entry of the PCE data is
unavoidable. The following recommendations are provided to help you prevent the avoidable
reasons for PCE data loss.
1. Each time you check-in a patient for a Study (at the CP User Clinical Procedures Check In
screen), be sure to select the latest Consult procedure order for the patient.
2. If you are concerned that a patient has gone close to a month without a treatment, consult your
local administrator to determine the exact time data is sent to Austin.
CPRS users are required to create a new order each year, so expect that once a year you must re-
enter the PCE data.

Troubleshooting
March 2017 Hemodialysis Patch MD*1.0*50
User Manual
15-3
Reloading Flowsheet Data
The Reload maintenance utility allows an ADMIN user to reprocess data that has already been
sent to the VistA database. It also provides the ability to back up the original data in the Log or
as a file.
To use this utility, do the following:
1. Click the Reload button above the Flowsheet listview. The Reload Options window
displays.
Note: The Reload button is hidden from non-ADMIN users.
Figure 15-1
2. Choose what to do with the original Flowsheet data:
Clear the Save current data in a file checkbox if you do not wish to back up the
original data. The contents of the tables will be replaced with the data from the
selected source. Skip to step 5.
Check the Save current data in a file checkbox to save the current data in the log
or as a file. The file location field is enabled. Continue with step 3.
3. To choose the location to store the data, click the ellipsis button, to the right of the file
location field. The Save As window displays.
4. Navigate to the desired folder and enter a filename, then click Save.
5. Choose whether to process all records or only those which have not been previously
processed. Click one of the following radio buttons.
Only New (not processed before)
Reload All Available Data Messages

Troubleshooting
15-4 Hemodialysis Patch MD*1.0*50 March 2017
User Manual
6. Choose Reload Options for Flowsheet, Medications, and Flowsheet Comments:
Do not Change Original Flowsheet – The original records remain untouched.
Duplicate records may result.
Delete Only Instrument Records –Original records obtained from the
instrument will be deleted, but manually added records remain untouched.
Delete All– Both instrument records and manually added records will be deleted.
7. Click Reload to reprocess data, or click Cancel to exit without making changes.

Troubleshooting
March 2017 Hemodialysis Patch MD*1.0*50
User Manual
15-5
Resolving “No Note Text” Error
This section describes the workflow to correct the following issue:
Issue Description
A “No note text” error popup displays when you try to Sign and Save a TIU note (Figure 15-2).
This can occur when adding a TIU note from either the Flowsheet tab or the Submit tab.
Figure 15-2
Explanation and Solution
The Note Template list is blank. At least one Note Template must exist to prevent this error.
Add a blank template to the Note Templates.
1. Start Hemodialysis as an ADMIN user.
2. Click the Options menu to display the Options screen.
3. Click the Note Templates node.
4. Click the Add button. The Option window displays.
5. Type Blank in the Name field (Figure 15-3).
6. Type Blank Template in the Value field.
Figure 15-3
7. Click OK. The new template "Blank" should display in the Note Templates list.
8. Click Save To DB button
9. Click the Patient Data menu and verify that the blank template is available in Select
Note Template area of the TIU Note window.

Troubleshooting
15-6 Hemodialysis Patch MD*1.0*50 March 2017
User Manual
Using More Than One Dialysis Device During a Treatment
If a patient needs to be transferred from one device to another during a treatment (for example, if
a dialysis device goes down), the following process is recommended for handling the situation:
1. Check-in the patient (using CP User) to device #1.
2. Start the treatment. (Data from device #1 is transferred to Hemo study #1.)
3. Device #1 goes down.
4. Disconnect patient from device #1.
5. In Hemodialysis, make a note that the procedure was stopped. Include the reason.
6. Submit Hemo study #1 for device #1.
7. Transfer the patient to device #2.
8. Check-in the patient (CP User) to device #2.
9. Restart the treatment. (Data from device #2 is transferred to Hemo study #2.)
10. In Hemodialysis, make a note that this study is a continuation of another study. Include
the study number of Hemo study #1.
11. Submit Hemo study #2.
Note 1: There will be two Treatment Reports for the treatment. The reports cannot be merged.
Note 2: If the patient is transferred additional times, please note that there should be a separate
CP User check-in for each device, and every check-in will result in a separate report.

March 2017 Hemodialysis Patch MD*1.0*50 16-1
User Manual
16. Glossary Access: As used on the Hemodialysis Access tab, access refers to an intravenous point of entry.
Access Code: A unique sequence of characters known by and assigned only to the user, the
system manager and/or designated alternate(s). The access code (in conjunction with the
verify code) is used by the computer to identify authorized users.
Access History List: A screen area on the Hemodialysis Study List window which displays
information about which studies were opened, enabled, or disabled; the dates and times of
access; and the users which accessed the studies.
Action: A functional process that a clinician or clerk uses in the TIU computer program. For
example, “Edit” and “Search” are actions. Protocol is another name for Action.
ADP Coordinator/ADPAC/Application Coordinator: Automated Data Processing Application
Coordinator. The person responsible for implementing a set of computer programs
(application package) developed to support a specific functional area such as clinical
procedures, PIMS, etc.
AP: Arterial pressure
Application: A system of computer programs and files that have been specifically developed to
meet the requirements of a user or group of users.
Application Events: All events which occur in the Hemodialysis application (such as Load
Study Info, Get Instrument Result List, and Get Checked In Patients).
Archive: The process of moving data to some other storage medium, usually a magnetic tape,
and deleting the information from active storage in order to free-up disk space on the system.
ASU: Authorization/Subscription Utility, an application that allows sites to associate users with
user classes, allowing them to specify the level of authorization needed to sign or order
specific document types and orderables. ASU is distributed with TIU in this version;
eventually it will probably become independent, to be used by many VistA packages.
Attachments: Attachments are files or images stored on a network share that can be linked to
the CP study. CP is able to accept data/final result report files from automated instruments.
The file types that can be used as attachments are the following:
.txt Text files
.rtf Rich text files
.jpg JPEG Images
.jpeg JPEG Images
.bmp Bitmap Images
.tiff TIFF Graphics (group 3 and group 4 compressed and uncompressed types)
.pdf Portable Document Format
.html Hypertext Markup Language

Glossary
16-2 Hemodialysis Patch MD*1.0*50 March 2017
User Manual
.DOC (Microsoft Word) files are not supported. Be sure to convert .doc files to .rtf or .pdf
format.
Background Processing: Simultaneous running of a "job" on a computer while working on
another job. Examples would be printing of a document while working on another, or the
software might do automatic saves while you are working on something else.
Backup Procedures: The provisions made for the recovery of data files and program libraries
and for restart or replacement of ADP equipment after the occurrence of a system failure.
BFR: Blood flow rate
BIC: Bicarbonate bath
Boilerplate Text: A pre-defined TIU template that can be filled in for Titles, Speeding up the
entry process. TIU exports several Titles with boilerplate text which can be modified to meet
specific needs; sites can also create their own.
B/P: Blood pressure
Browse: Lookup the file folder for a file that you would like to select and attach to the study.
(e.g., clicking the “...” button to start a lookup).
Bulletin: A canned message that is automatically sent by MailMan to a user when something
happens to the database.
Business Rule: Part of ASU, Business Rules authorize specific users or groups of users to
perform specified actions on documents in particular statuses (e.g., an unsigned TIU note
may be edited by a provider who is also the expected signer of the note).
Class: Part of Document Definitions, Classes group documents. For example, “CLINICAL
PROCEDURES” is a class with many kinds of Clinical Procedures notes under it. Classes
may be subdivided into other Classes or Document Classes. Besides grouping documents,
Classes also store behavior which is then inherited by lower level entries.
COND: Conductivity
Consult: Referral of a patient by the primary care physician to another hospital service/
specialty, to obtain a medical opinion based on patient evaluation and completion of any
procedures, modalities, or treatments the consulting specialist deems necessary to render a
medical opinion.
Contingency Plan: A plan that assigns responsibility and defines procedures for use of the
backup/restart/recovery and emergency preparedness procedures selected for the computer
system based on risk analysis for that system.
Coversheet: Usually the initial screen of an application or document, a coversheet displays
introductory information about what is contained within.
CP: Clinical Procedures.
CP Definition: CP Definitions are procedures within Clinical Procedures.
CP Study: A CP study is a process created to link the procedure result from the medical device
or/and to link the attachments browsed from a network share to the procedure order.

Glossary
March 2017 Hemodialysis Patch MD*1.0*50
User Manual
16-3
CPRS: Computerized Patient Record System. A comprehensive VistA program, which allows
clinicians and others to enter and view orders, Progress Notes and Discharge Summaries
(through a link with TIU), Problem List, view results, reports (including health summaries),
etc.
Custom Data List: A feature of the Hemodialysis Options area which provides the ability to
customize dropdown lists, but only a user with Admin rights can edit the lists.
DB: Database. A structure for the storage of digital information.
Detail: As used on the Hemodialysis Study List window, detail refers to patient information
pertaining to a study highlighted in the list. It includes the following information: patient
name, SSN, DOB, sex, check-in status, study #, and study status. To turn detail on/off, right
click the Study List screen and select Show Details.
Device: A hardware input/output component of a computer system (e.g., CRT, printer).
DFR: Dialysate flow rate
DIAL TEMP: Dialysate temperature
Dictionary: A description of file structure and data elements in the GUI.
Dictionary Keywords: A code which acts as a placeholder and represents a particular data
value. A dictionary keyword is directly linked to a specific field from one of the
Hemodialysis tabs, such as EDW or Pulse. When inserted into a Report template, the data
value will display in place of the keyword when the report is generated.
DOB: Date of birth
Document Class: Document Classes are categories that group documents (Titles) with similar
characteristics together. For example, Cardiology notes might be a Document Class, with
Echo notes, ECG notes, etc. as Titles under it. Or maybe the Document Class would be
Endoscopy Notes, with Dialysis notes, etc. under that Document Class.
Document Definition: Document Definition is a subset of TIU that provides the building blocks
for TIU, by organizing the elements of documents into a hierarchy structure. This structure
allows documents (Titles) to inherit characteristics (such as signature requirements and print
characteristics) of the higher levels, Class and Document Class. It also allows the creation
and use of boilerplate text and embedded objects.
Edit: Used to change/modify data typically stored in a file.
ESRD: End-Stage Renal Disease
Field: A data element in a file.
File: The M construct in which data is stored for retrieval at a later time. A computer record of
related information.
File Manager or FileMan: Within this manual, FileManager or FileMan is a reference to VA
FileMan. FileMan is a set of M routines used to enter, edit, print, and sort/search related data
in a file, a database.
File Server: A machine where shared software is stored.
Flowsheet: A grid for displaying incoming patient vitals data.
Glossary
16-4 Hemodialysis Patch MD*1.0*50 March 2017
User Manual
Fluid Off: Cumulative volume of fluid removed from patient
FMT: Format.
Gateway: The software that performs background processing for Clinical Procedures.
Global: An M term used when referring to a file stored on a storage medium, usually a magnetic
disk.
GUI: Graphical User Interface - a Windows-like screen that uses pull-down menus, icons,
pointer devices, and other metaphor-type elements that can make a computer program
more understandable, easier to use, allow multi-processing (more than one window or
process available at once), etc.
HEP (CUM): Cumulative Heparin infusion
HR: Heart rate
IJ: Internal jugular
Interpreter: Interpreter is a user role exported with USR*1*19 to support the Clinical
Procedures Class. The role of the Interpreter is to interpret the results of a clinical procedure.
Users who are authorized to interpret the results of a clinical procedure are sent a notification
when an instrument report and/or images for a CP request are available for interpretation.
Business rules are used to determine what actions an interpreter can perform on a document
of a specified class, but the interpreter themselves are defined by the Consults application.
These individuals are ‘clinical update users’ for a given consult service.
IONIC DIAL: Measurement of clearance via ionic or conductivity estimation
IRMS: Information Resource Management Service.
Keywords: A code which acts as a placeholder and represents a particular data value. When
inserted into a Report template, the data value will display in place of the keyword when the
report is generated.
Kernel: A set of software utilities. These utilities provide data processing support for the
application packages developed within the VA. They are also tools used in configuring the
local computer site to meet the particular needs of the hospital. The components of this
operating system include: MenuMan, TaskMan, Device Handler, Log-on/Security, and other
specialized routines.
Kt/V: Dialyzer clearance multiplied by time, divided by the volume of water a patient's body
contains
LAYGO: An acronym for Learn As You Go. A technique used by VA FileMan to acquire new
information as it goes about its normal procedure. It permits a user to add new data to a file.
Legend: An explanation of symbols or icons.
Log: A screen area on the Study List which provides the time and description of application
events as they occur. To display the Log, select Show Log from the Study List Right-click
menu.

Glossary
March 2017 Hemodialysis Patch MD*1.0*50
User Manual
16-5
M: Formerly known as MUMPS or the Massachusetts (General Hospital) Utility Multi-
Programming System. This is the programming language used to write all VistA
applications.
MailMan: An electronic mail, teleconferencing, and networking system.
MAP: Mean arterial pressure
Marker Column: A listview column whose sole purpose is to indicate which row is selected.
Mask: A data input format which prevents users from entering data that is inconsistent with the
expected values. For example, a Date field would accept only numbers that fit the edit mask
mm/dd/yyyy.
Menu: A set of options or functions available to users for editing, formatting, generating reports,
etc.
Module: A component of a software application that covers a single topic or a small section of a
broad topic.
Namespace: A naming convention followed in the VA to identify various applications and to
avoid duplication. It is used as a prefix for all routines and globals used by the application.
Network Server Share: A machine that is located on the network where shared files are stored.
Nodes: A treeview level. A plus or minus box to the left of a node indicates that it can be
expanded or closed by double clicking the node or single clicking the plus/minus box.
Nondictionary Keywords: Used in a Report Template, a nondictionary keyword can represent
an entire range of data, such as MEDICINE TABLE, or it can be used to insert information
dynamically, such as Now or Version.
Notebook: This term refers to a GUI screen containing several tabs or pages.
Note Template: A predefined block of text which can be quickly stored and retrieved in order to
prevent a user from typing the same note information repeatedly.
OI: Office of Information, formerly known as Chief Information Office Field Office,
Information Resource Management Field Office, and Information Systems Center.
Option: See “Preferences.”
Package: Otherwise known as an application. A set of M routines, files, documentation and
installation procedures that support a specific function within VistA.
Page: This term refers to a tab on a GUI screen or notebook.
Parameter: See “Preferences.”
Password: A protected word or string of characters that identifies or authenticates a user, a
specific resource, or an access type (synonymous with Verify Code).
PCE: Patient Care Encounter.
Pointer: A special data type of VA FileMan that takes its value from another file. This is a
method of joining files together and avoiding duplication of information.

Glossary
16-6 Hemodialysis Patch MD*1.0*50 March 2017
User Manual
Preferences: Functionality that is customizable by the user. Preferences can allow users to turn
certain functions on/off (e.g., Save Errors Log, Show Additional Reports), change the way
the screen looks (e.g., Show Infectious Diseases information as Tree), or set values (e.g.,
Flowsheet Refresh Rate). The Options screen contains System Preferences and User
Preferences. System Preferences affect all Hemodialysis users unless they have User
Preferences defined. User Preferences override System Preferences.
Procedure Request: Any procedure (EKG, Stress Test, etc.) which may be ordered from
another service/specialty without first requiring formal consultation.
Program: A set of M commands and arguments, created, stored, and retrieved as a single unit in
M.
Queuing: The scheduling of a process/task to occur at a later time. Queuing is normally done if
a task uses up a lot of computer resources.
RAID: Redundant Array of Inexpensive Drives. Imaging uses this to store images.
Release: Releasing a study means unlocking it so that it can be accessed by users. This must be
done occasionally if the systems crashes, kicking out the user but leaving the study in a
locked status.
Reload: Reprocess data that has already been sent to the VistA database.
Report Template: A predefined block of text and keywords which formats the data from a
Hemodialysis study so it can be displayed for comfortable, efficient viewing. A report
template is customizable so that a site can include in its reports only that information that is
desired.
Result: A consequence of an order. Refers to evaluation or status results. When you use the
Complete Request (CT) action on a consult or request, you are transferred to TIU to enter the
results.
<RET> Carriage return.
RMS: Rehabilitation Medicine Service
Routine: A set of M commands and arguments, created, stored, and retrieved as a single unit in
M.
Rx: Prescription.
Security Key: A function which unlocks specific options and makes them accessible to an
authorized user.
Sensitive Information: Any information which requires a degree of protection and which should
be made available only to authorized users.
Site Configurable: A term used to refer to features in the system that can be modified to meet
the needs of each site.
Software: A generic term referring to a related set of computer programs. Generally, this refers
to an operating system that enables user programs to run.
SSN: Social Security number.

Glossary
March 2017 Hemodialysis Patch MD*1.0*50
User Manual
16-7
Status Symbols: Codes used in order entry and Consults displays to designate the status of the
order.
Tag: A code which acts as a placeholder and represents a particular data value. When inserted
into a Report template, the data value will display in place of the tag when the report is
generated.
Task Manager or TaskMan: A part of Kernel which allows programs or functions to begin at
specified times or when devices become available. See Queuing.
TIME: Current time
Title: Titles are definitions for documents. They store the behavior of the documents which use
them.
TIU: Text Integration Utilities.
TMP: Trans membrane pressure
Treatment Status Report: A screen area optionally displayed on the Submit tab, used to inform
users at a glance if any data was not filled in on any one of the application tabs.
UFR: Ultrafiltration rate
URR: Urea reduction ratio - The reduction in urea as a result of dialysis
User: A person who enters and/or retrieves data in a system, usually utilizing a CRT.
User Class: User Classes are the basic components of the User Class hierarchy of ASU
(Authorization/Subscription Utility) which allows sites to designate who is authorized to do
what to documents or other clinical entities.
User Role: User Role identifies the role of the user with respect to the document in question
(e.g., Author/Dictator, Expected Signer, Expected Cosigner, Attending Physician, etc.).
Utility: An M program that assists in the development and/or maintenance of a computer system.
Verify Code: A unique security code which serves as a second level of security access. Use of
this code is site specific; sometimes used interchangeably with a password.
VistA: Veterans Health Information Systems and Technology Architecture.
VP: Venous pressure
Workstation: A personal computer running the Windows 9x or NT operating system.
XML: Extensible Markup Language – A simplified subset of Standard Generalized Markup
Language (SGML). Its primary purpose is to facilitate the sharing of data across different
information systems.

Glossary
16-8 Hemodialysis Patch MD*1.0*50 March 2017
User Manual
March 2017 Hemodialysis Patch MD*1.0*50 17-1
User Manual
17. Index
A
Access Site Detail, 7-9
Access Sites, 7-3
Access tab, 3-21, 7-1
Adding a TIU Note, 8-5
Adding Administrators, 14-2
ADMIN ONLY Rights, 13-17
Administrators, 14-1
Alternate Treatment Status Report, 11-3
Application Events, 14-3
Assigning System Preferences to Users, 13-14
Attaching Results to a Study, 11-5, 12-1
B
benefits, 1-2
C
checking in
studies, 2-1, 2-9, 5-1
Clinic/Location, 10-2
Comments, 5-5
Comments Business Rules, 5-6
Configurable Options, 13-1
Configuring System Options, 13-10
Configuring User Options, 13-14
Confirming PCE Data, 10-1, 10-8
consult procedures
ordering, 2-2
Cover Tab, 4-1
CP process, 2-1, 6-1
CP User, 3-1
Icons, 3-15
opening, 3-1
selecting a patient, 3-2
CPRS
ordering a consult procedure, 2-1, 2-2
Current Treatment Information, 4-1
Customizing Dropdown List Items, 13-2
D
Data Tables, 14-1
defining the CP User window, 3-17
Diagnoses, 10-1, 10-5
Display Application Version, 3-16
Dropdown List Items
Customizing, 13-2
E
Editing Data Fields, 13-27
Enabling/Disabling a Patient Record, 3-5
Entering Flowsheet Information, 8-1
F
Falls Assessment, 8-8
Flowsheet, 8-2
Flowsheet tab, 3-22, 8-1
G
Glossary, 16-1
H
Healthcare Providers, 10-3
I
images
displaying, 7-1
Infectious Diseases, 4-4
intended audience, 1-1
introduction, 1-1
L
Lab Data
displaying, 5-2
Lab Results, 5-2
M
Medication List, 8-10
N
Note Templates, 13-26
O
Options Screen
Displaying, 13-1
Options Screen Buttons, 14-4
ordering
consult procedures, 2-2
Overall Comments, 10-8
P
Past Treatment Parameters, 4-6
patient
selecting in CP User, 3-2
Patient Info Bar, 3-14
Post-Assessments, 9-2
Post-Pain Assessment, 9-2
Post-Treatment Information, 9-1
Post-Treatment tab, 3-23, 9-1

Index
17-2 Hemodialysis Patch MD*1.0*50 March 2017
User Manual
Pre-Assessments, 6-2
Preferences, 13-9
Pre-Pain Assessment, 6-3
Pre-Treatment tab, 3-20, 6-1
Preventing PCE Data Loss, 15-1
Procedures, 10-1, 10-5
Providers, 10-3
R
Recent Postings, 4-4
related manuals, 1-1
Reloading Flowsheet Data, 15-3
Report Template, 13-18
Creating new, 13-24
Editing, 13-18
Requirements for CP Manager, 2-1
Requirements for the User, 3-1
Resolving “No Note Text” Error, 15-5
Review (Read Only) Study Viewing, 3-7
Rx and Lab Tab, 3-19, 5-1
S
Saving Custom Lists, 13-8
Screen Areas
Patient Data, 3-9
Site Configuration, 3-16, 13-1
Status Line, 3-16
study
checking in, 2-1, 2-9
Study Events, 14-3
Study List Command Buttons, 3-7
Study List Menus, 3-6
Submit tab, 3-25, 11-1
Submitting the Study, 11-1, 11-5
Summary tab, 3-24, 10-1
T
Tabs, 3-1, 3-15, 3-17
TIU Note Templates
creating, 8-7
TIU Note Text
reviewing, 8-9
TIU Note Title
adding, 13-3
verifying creation of, 13-4
Transplant Status, 4-4
Treatment History, 4-5
Treatment Status Report, 11-2
Treatment Summary, 10-2
Troubleshooting, 15-1
U
Update Diagnosis, 10-5
Update Procedures, 10-6
V
Vascular Access Monitoring, 4-5
Viewing Additional Reports, 11-4
viewing results, 7-1
Viewing Study Results, 11-7
Viewing Summary Information, 10-1
W
Working with Hemodialysis, 3-1