heirloom cutwork and lace hankie tutorial - peas in a pod
TRANSCRIPT
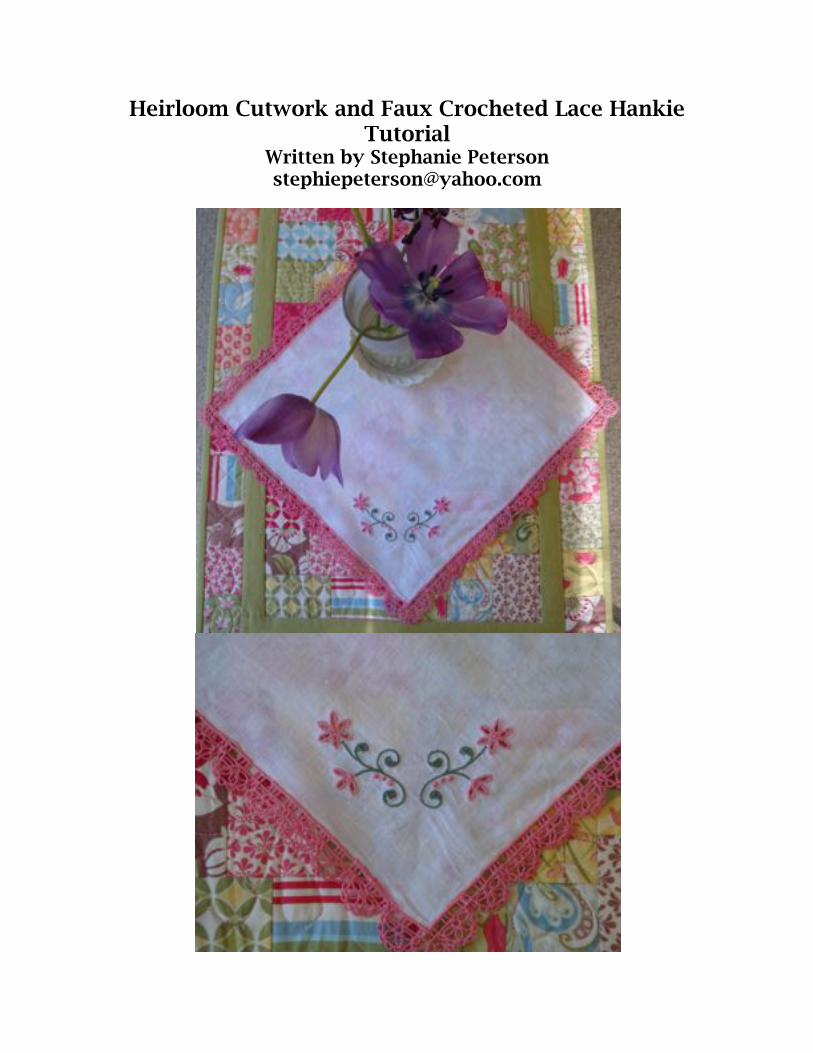
Heirloom Cutwork and Faux Crocheted Lace Hankie Tutorial
Written by Stephanie Peterson [email protected]
Heirloom Cutwork and Faux Crocheted Lace Hankie 2
Here is a pretty little hankie I made for my dear mother-in-law, who still uses a hankie and keeps one in her purse at all times. For the longest time, I have wanted to make her some linen hankies and to crochet a lace edge. But, I don’t really know how to crochet…I would love to learn, but every time I go to learn it, I have to practice on projects that I am not really interested in. I looked and looked for tutorials on crocheting lace edges and for books on crocheting lace edges. I had trouble finding much. This has really kept me from learning the skill. When I saw these lace embroideries, I thought, “Great! I can make the hankies now, and even though I won’t have crocheted the lace, I will have made the lace!” It was a little intimidating to try the lace at first, but it was really quite easy and fun. I wrote this tutorial in case there were others out there in the same boat as me. I hope you like the hankies, and I hope you like this accompanying tutorial that will show you how to make one for yourself. If you do, please send me photos! I would love to see what you created!
A NOTE ABOUT MY TUTORIAL: I am not necessarily the most experienced person at sewing and embroidery. I make a lot of mistakes. I am guessing most people really practice things before they write their tutorials, because they all look so perfect! I wish I could be like that! When I wrote this tutorial, I decided to show you all my “warts,” mistakes, and things to watch out for. I thought it might be helpful to you to see what kinds of mistakes I encountered as I did this project. I figured, if they happened to me, they might happen to you. If I could show you what they are, maybe you can avoid them. I hope this approach helps. It’s a little humbling to show you all my imperfections, but I hope it is educational and that you can learn from my mistakes! Please read all the instructions before you start your project!
PART I: Let’s get organized and ready to go For this tutorial, I am using the Daisy Lace and Daisy Cutwork embroidery designs that I purchased from My Fair Lady Designs (www.myfairladydesigns.com). I highly recommend these designs. Shelly does great work…her designs are so beautiful, and the quality of the stitch out is remarkable. I have never been disappointed by any design I have ordered. And, the price for her design sets is very reasonable. Furthermore, her instructions are impeccable. They are so detailed that a novice can easily follow them. Although I have written this tutorial based on my specific project, most of the steps and tips are based directly on My Fair Lady’s instructions provided with the designs as a PDF file. (p.s. I asked Shelly Smola for permission to base my tutorial on her
Heirloom Cutwork and Faux Crocheted Lace Hankie 3
instructions, and she gave me permission to do so.) This was my first time making lace with my embroidery machine, and it was my second time making the cutwork. (I had made it one previous time in a class with Shelly and another time in another class with other people…that’s the class where my design fell apart after doing the cutwork, because the design I was given to use wasn’t designed for cutwork. See below, and trust me on that advice.)
IMPORTANT: Do NOT try these techniques using designs that are not made for doing cutwork and lace. I have tried doing cutwork with designs that look like they might work for this purpose but were not made for cutwork. The threadwork all unraveled on me when I did the cutwork with these designs. So, you really need to use designs that have been made for that purpose.
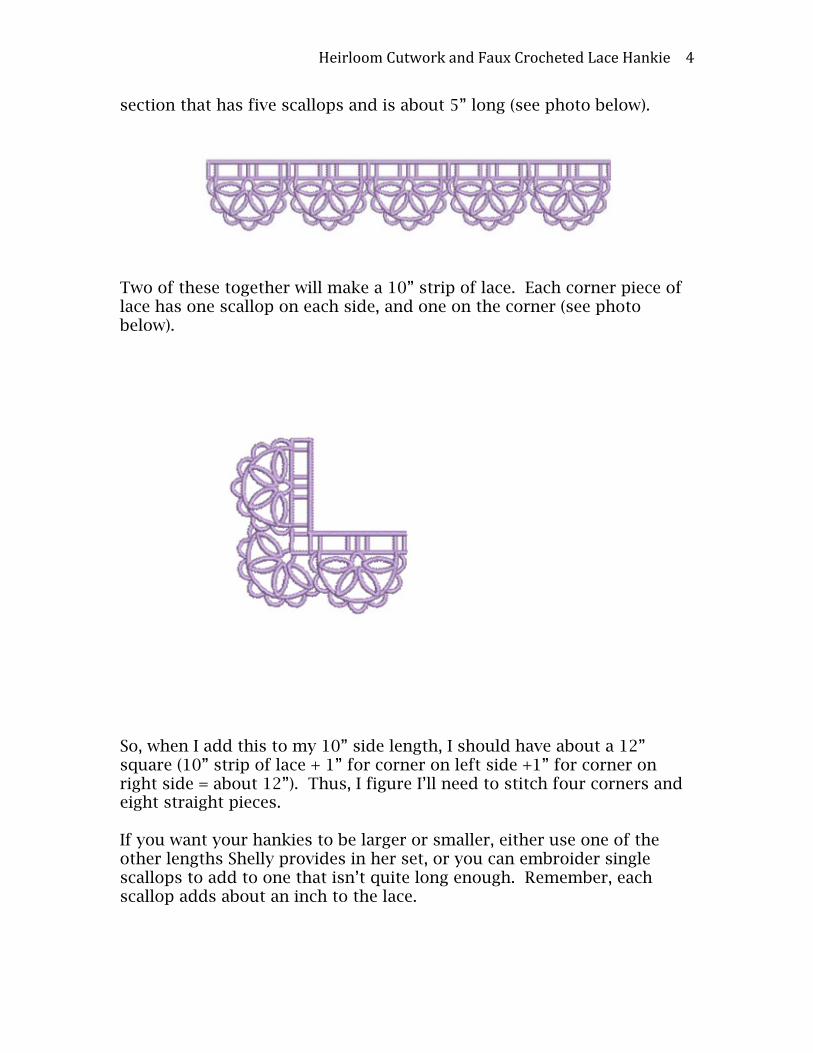
Supplies: Heirloom cutwork and lace embroidery designs Water-soluble mesh stabilizer 80/12 sharp embroidery needle 80/12 sharp universal needle Thread Embroidery nips 505 or Sulky KK2000 Adhesive Spray 1/8” ribbon if desired Water soluble marker Premade linen hankie or a 15”x15” square of linen (at least—you may want it larger to make hooping easier) Difficulty level: I’d put this at an intermediate level. You can make it more or less challenging, depending how intricate your choice of cutwork design is. PART II: Let’s begin by making the lace The first step is choosing your design and getting it into your sewing machine. I researched the “typical” size of hankies and found that the size is highly variable. It seemed like most of the women’s hankies were somewhere around 12” or 13”. So, I decided to make my hankies about this size. The particular lace design I am using has lace “parts” in different lengths. Each scallop on the lace is about 1” wide. So, I chose to use the lace
Heirloom Cutwork and Faux Crocheted Lace Hankie 4
section that has five scallops and is about 5” long (see photo below).
Two of these together will make a 10” strip of lace. Each corner piece of lace has one scallop on each side, and one on the corner (see photo below).
So, when I add this to my 10” side length, I should have about a 12” square (10” strip of lace + 1” for corner on left side +1” for corner on right side = about 12”). Thus, I figure I’ll need to stitch four corners and eight straight pieces. If you want your hankies to be larger or smaller, either use one of the other lengths Shelly provides in her set, or you can embroider single scallops to add to one that isn’t quite long enough. Remember, each scallop adds about an inch to the lace.
Heirloom Cutwork and Faux Crocheted Lace Hankie 5
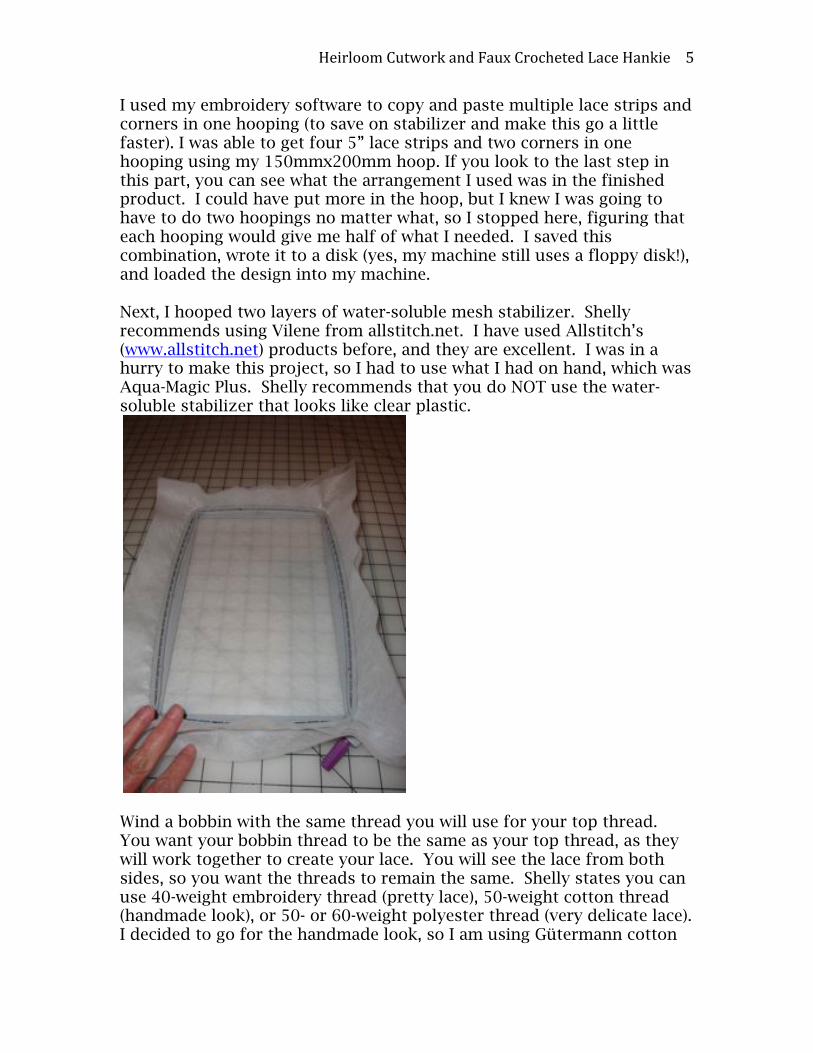
I used my embroidery software to copy and paste multiple lace strips and corners in one hooping (to save on stabilizer and make this go a little faster). I was able to get four 5” lace strips and two corners in one hooping using my 150mmx200mm hoop. If you look to the last step in this part, you can see what the arrangement I used was in the finished product. I could have put more in the hoop, but I knew I was going to have to do two hoopings no matter what, so I stopped here, figuring that each hooping would give me half of what I needed. I saved this combination, wrote it to a disk (yes, my machine still uses a floppy disk!), and loaded the design into my machine. Next, I hooped two layers of water-soluble mesh stabilizer. Shelly recommends using Vilene from allstitch.net. I have used Allstitch’s (www.allstitch.net) products before, and they are excellent. I was in a hurry to make this project, so I had to use what I had on hand, which was Aqua-Magic Plus. Shelly recommends that you do NOT use the water-soluble stabilizer that looks like clear plastic.
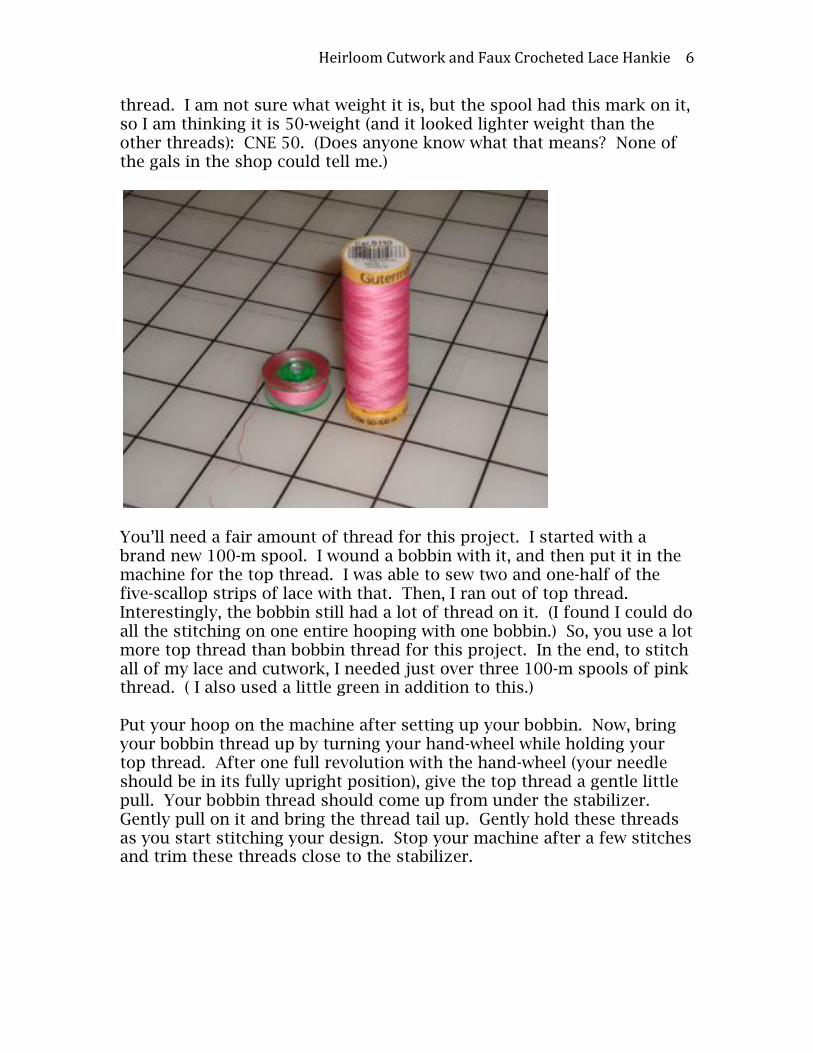
Wind a bobbin with the same thread you will use for your top thread. You want your bobbin thread to be the same as your top thread, as they will work together to create your lace. You will see the lace from both sides, so you want the threads to remain the same. Shelly states you can use 40-weight embroidery thread (pretty lace), 50-weight cotton thread (handmade look), or 50- or 60-weight polyester thread (very delicate lace). I decided to go for the handmade look, so I am using Gütermann cotton
Heirloom Cutwork and Faux Crocheted Lace Hankie 6
thread. I am not sure what weight it is, but the spool had this mark on it, so I am thinking it is 50-weight (and it looked lighter weight than the other threads): CNE 50. (Does anyone know what that means? None of the gals in the shop could tell me.)
You’ll need a fair amount of thread for this project. I started with a brand new 100-m spool. I wound a bobbin with it, and then put it in the machine for the top thread. I was able to sew two and one-half of the five-scallop strips of lace with that. Then, I ran out of top thread. Interestingly, the bobbin still had a lot of thread on it. (I found I could do all the stitching on one entire hooping with one bobbin.) So, you use a lot more top thread than bobbin thread for this project. In the end, to stitch all of my lace and cutwork, I needed just over three 100-m spools of pink thread. ( I also used a little green in addition to this.) Put your hoop on the machine after setting up your bobbin. Now, bring your bobbin thread up by turning your hand-wheel while holding your top thread. After one full revolution with the hand-wheel (your needle should be in its fully upright position), give the top thread a gentle little pull. Your bobbin thread should come up from under the stabilizer. Gently pull on it and bring the thread tail up. Gently hold these threads as you start stitching your design. Stop your machine after a few stitches and trim these threads close to the stabilizer.

Heirloom Cutwork and Faux Crocheted Lace Hankie 7
Heirloom Cutwork and Faux Crocheted Lace Hankie 8
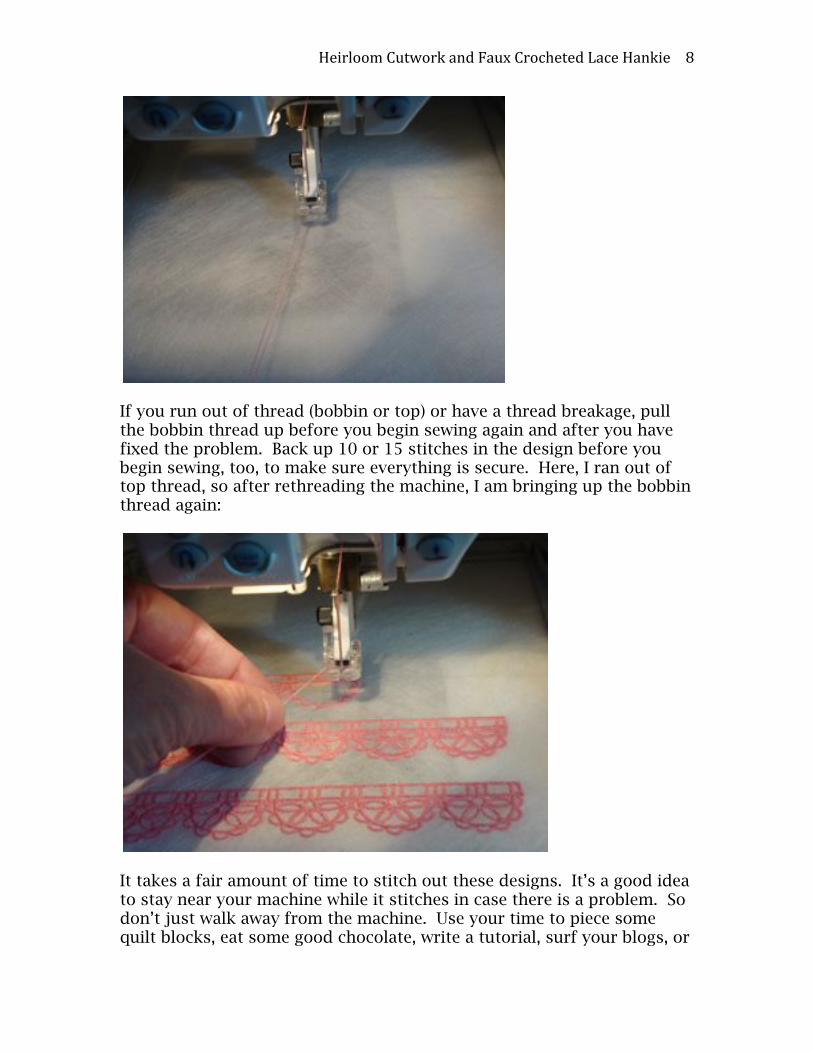
If you run out of thread (bobbin or top) or have a thread breakage, pull the bobbin thread up before you begin sewing again and after you have fixed the problem. Back up 10 or 15 stitches in the design before you begin sewing, too, to make sure everything is secure. Here, I ran out of top thread, so after rethreading the machine, I am bringing up the bobbin thread again:
It takes a fair amount of time to stitch out these designs. It’s a good idea to stay near your machine while it stitches in case there is a problem. So don’t just walk away from the machine. Use your time to piece some quilt blocks, eat some good chocolate, write a tutorial, surf your blogs, or
Heirloom Cutwork and Faux Crocheted Lace Hankie 9
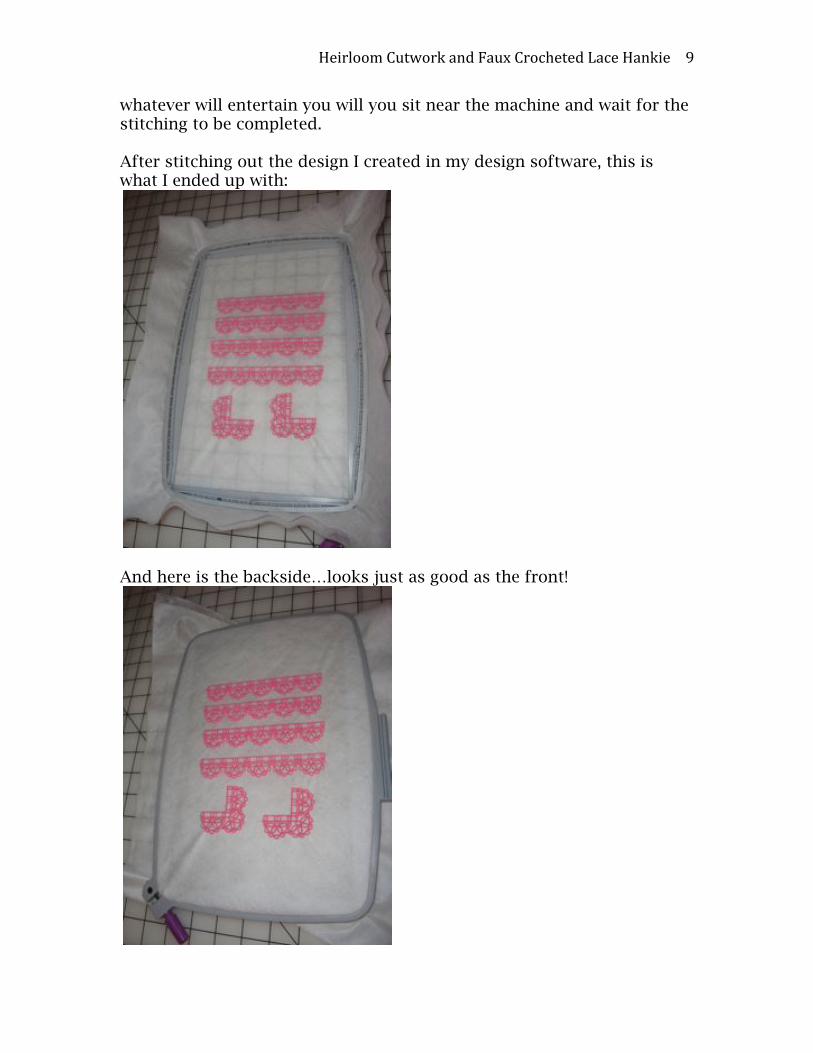
whatever will entertain you will you sit near the machine and wait for the stitching to be completed. After stitching out the design I created in my design software, this is what I ended up with:
And here is the backside…looks just as good as the front!
Heirloom Cutwork and Faux Crocheted Lace Hankie 10
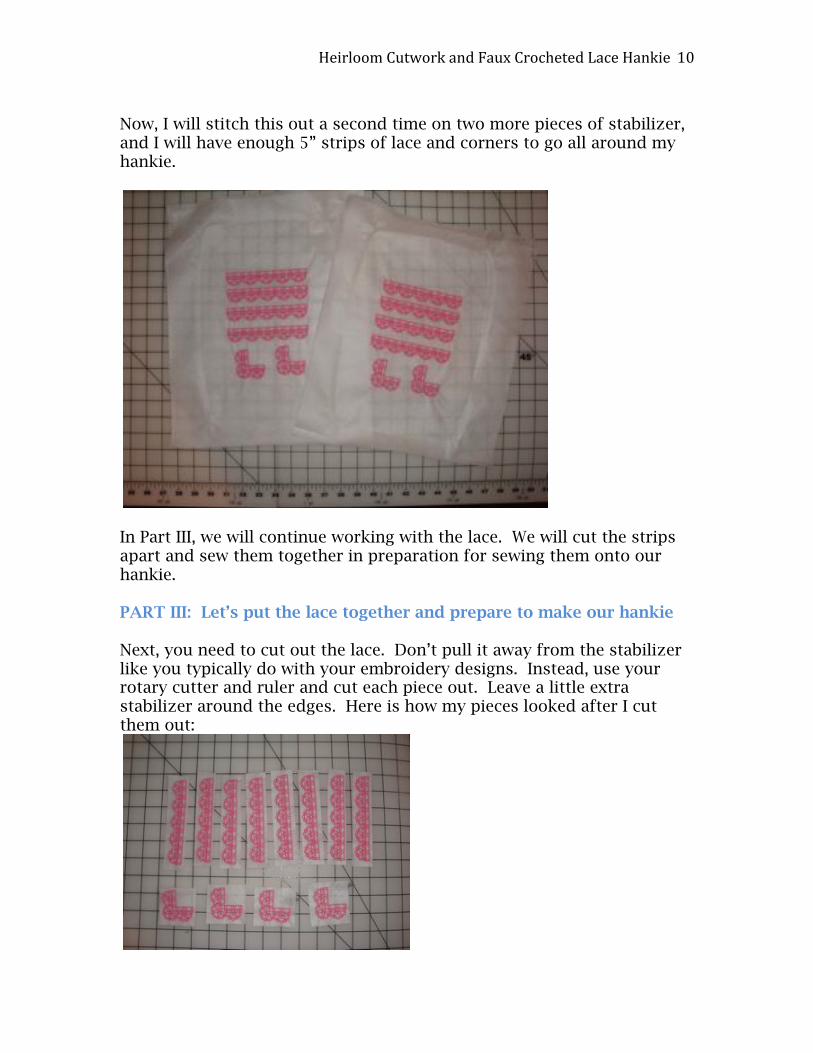
Now, I will stitch this out a second time on two more pieces of stabilizer, and I will have enough 5” strips of lace and corners to go all around my hankie.
In Part III, we will continue working with the lace. We will cut the strips apart and sew them together in preparation for sewing them onto our hankie. PART III: Let’s put the lace together and prepare to make our hankie Next, you need to cut out the lace. Don’t pull it away from the stabilizer like you typically do with your embroidery designs. Instead, use your rotary cutter and ruler and cut each piece out. Leave a little extra stabilizer around the edges. Here is how my pieces looked after I cut them out:
Heirloom Cutwork and Faux Crocheted Lace Hankie 11
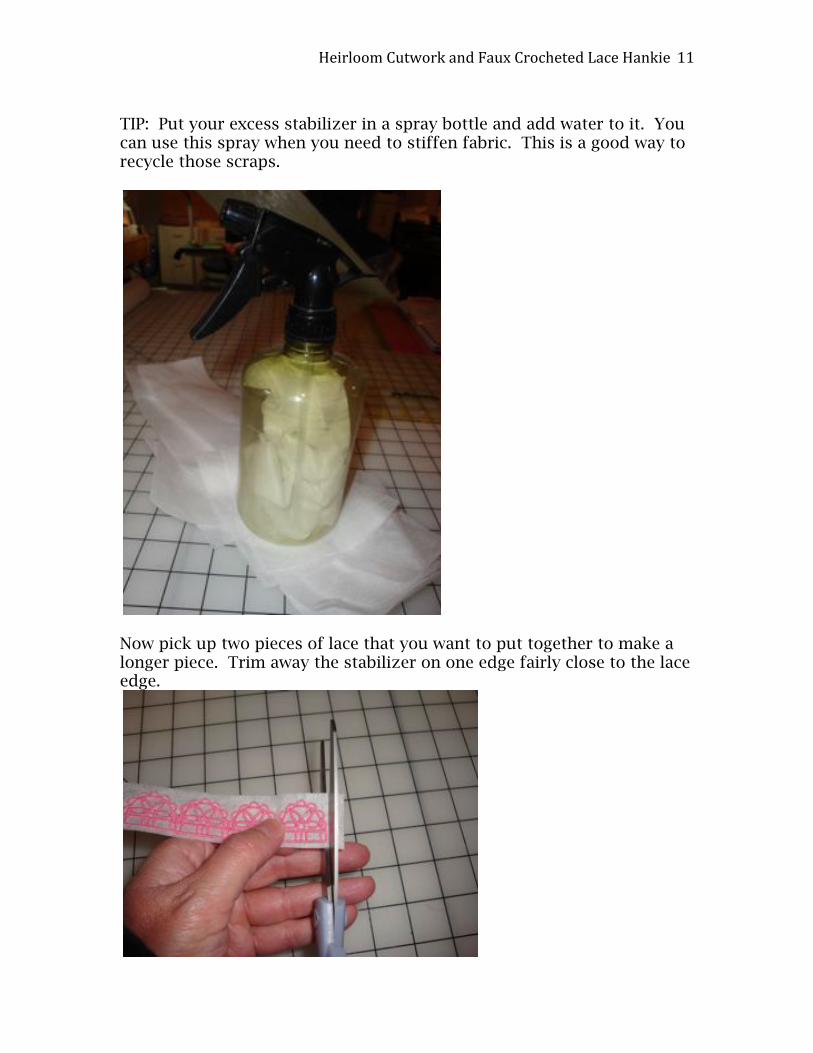
TIP: Put your excess stabilizer in a spray bottle and add water to it. You can use this spray when you need to stiffen fabric. This is a good way to recycle those scraps.
Now pick up two pieces of lace that you want to put together to make a longer piece. Trim away the stabilizer on one edge fairly close to the lace edge.

Heirloom Cutwork and Faux Crocheted Lace Hankie 12
Line up the “bar” on the lace piece you cut the stabilizer on with the last bar on the previous section. Remember, there should be three “bars” here. You are meeting up the middle “bar” for the section.
Now, head to your sewing machine. Again, put the same thread you used for your embroidery in the top and in the bobbin. Set up your machine to a 1.7mm stitch width and .5mm stitch length. I stitched this on a scrap of stabilizer just to check the stitching to see if it looked like it would work.
Heirloom Cutwork and Faux Crocheted Lace Hankie 13
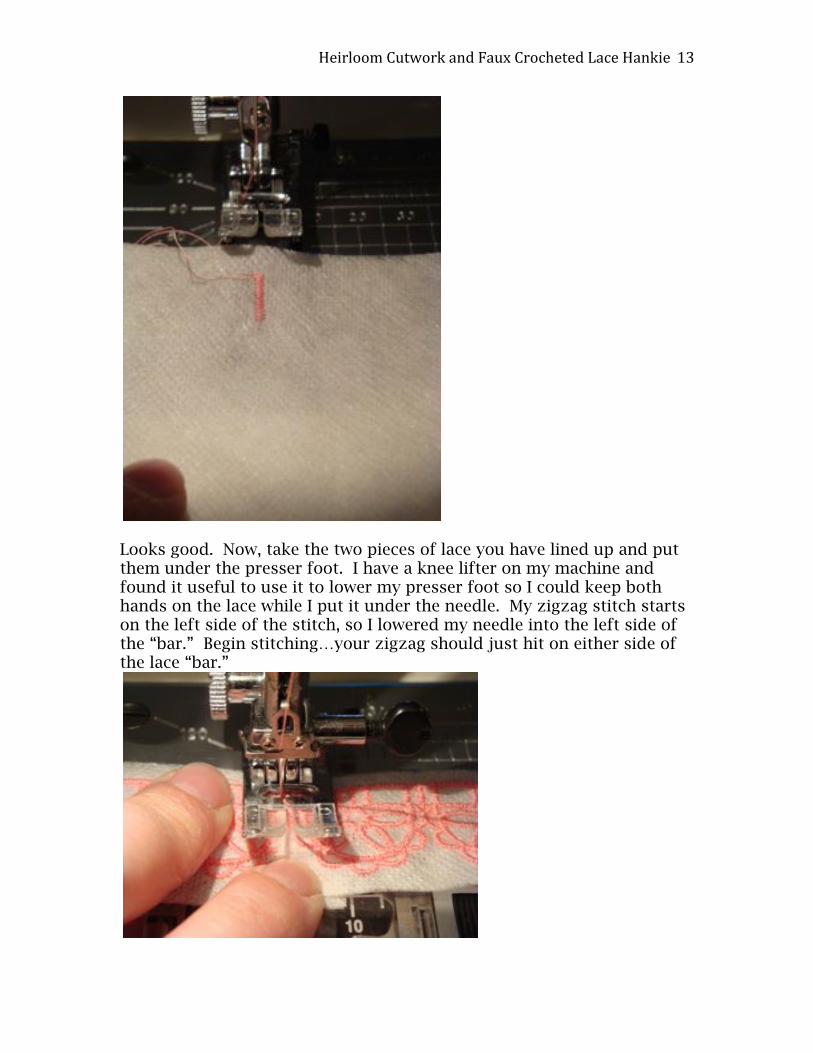
Looks good. Now, take the two pieces of lace you have lined up and put them under the presser foot. I have a knee lifter on my machine and found it useful to use it to lower my presser foot so I could keep both hands on the lace while I put it under the needle. My zigzag stitch starts on the left side of the stitch, so I lowered my needle into the left side of the “bar.” Begin stitching…your zigzag should just hit on either side of the lace “bar.”
Heirloom Cutwork and Faux Crocheted Lace Hankie 14
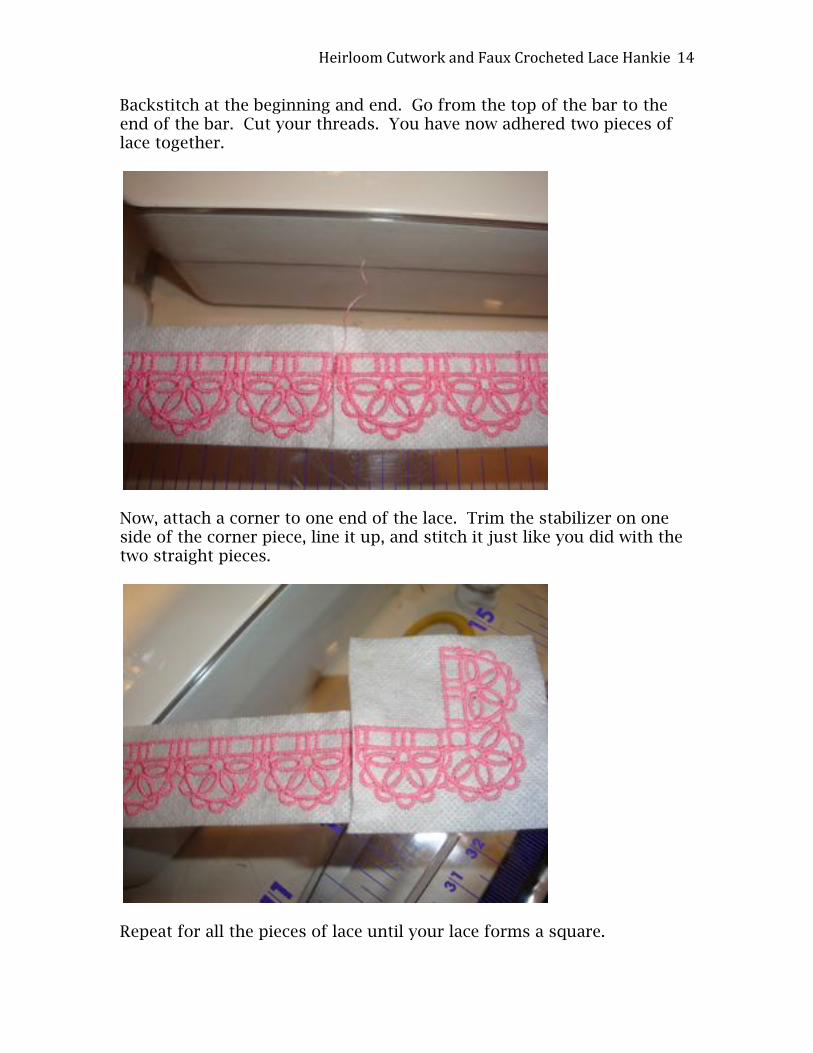
Backstitch at the beginning and end. Go from the top of the bar to the end of the bar. Cut your threads. You have now adhered two pieces of lace together.
Now, attach a corner to one end of the lace. Trim the stabilizer on one side of the corner piece, line it up, and stitch it just like you did with the two straight pieces.
Repeat for all the pieces of lace until your lace forms a square.

Heirloom Cutwork and Faux Crocheted Lace Hankie 15
You now have the lace to go around your hankie!
Next, in Part IV we’ll make the hankie to go inside the lace. PART IV: Making the hankie I prewashed, dried, and pressed my linen before making my hankies. I didn’t want the linen to shrink after I did the embroidery. I thought this might distort the embroidery.
Heirloom Cutwork and Faux Crocheted Lace Hankie 16
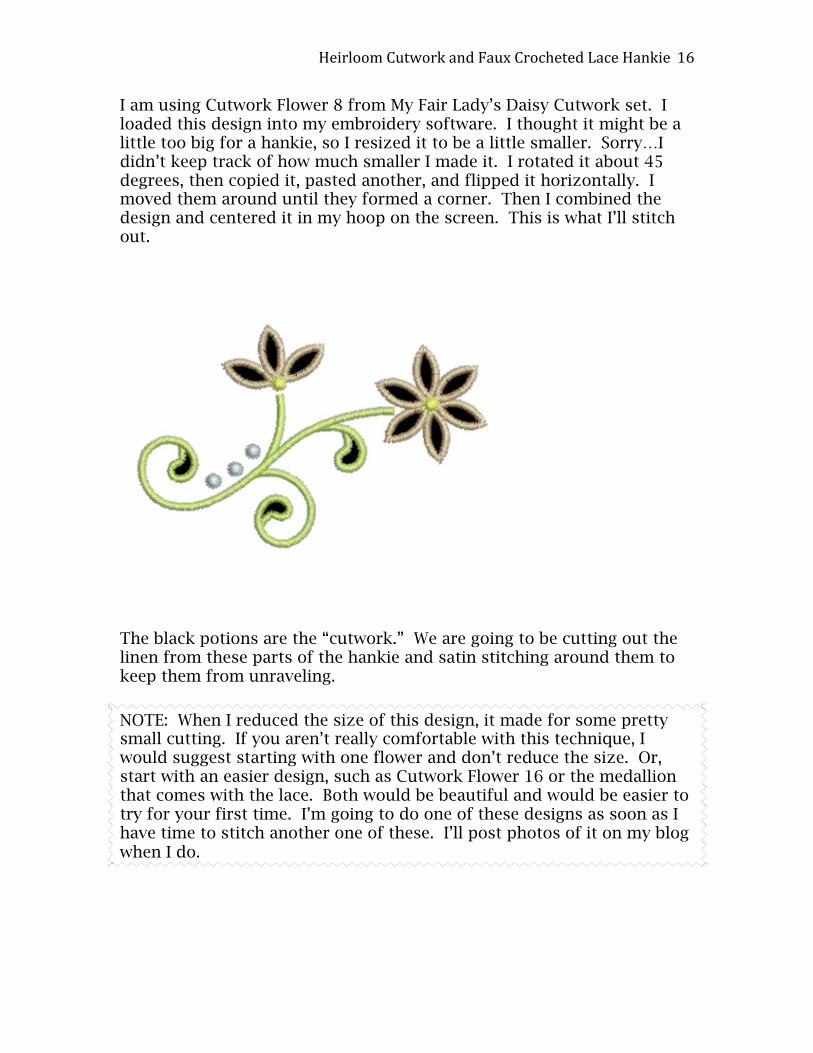
I am using Cutwork Flower 8 from My Fair Lady’s Daisy Cutwork set. I loaded this design into my embroidery software. I thought it might be a little too big for a hankie, so I resized it to be a little smaller. Sorry…I didn’t keep track of how much smaller I made it. I rotated it about 45 degrees, then copied it, pasted another, and flipped it horizontally. I moved them around until they formed a corner. Then I combined the design and centered it in my hoop on the screen. This is what I’ll stitch out.
The black potions are the “cutwork.” We are going to be cutting out the linen from these parts of the hankie and satin stitching around them to keep them from unraveling.
NOTE: When I reduced the size of this design, it made for some pretty small cutting. If you aren’t really comfortable with this technique, I would suggest starting with one flower and don’t reduce the size. Or, start with an easier design, such as Cutwork Flower 16 or the medallion that comes with the lace. Both would be beautiful and would be easier to try for your first time. I’m going to do one of these designs as soon as I have time to stitch another one of these. I’ll post photos of it on my blog when I do.
Heirloom Cutwork and Faux Crocheted Lace Hankie 17
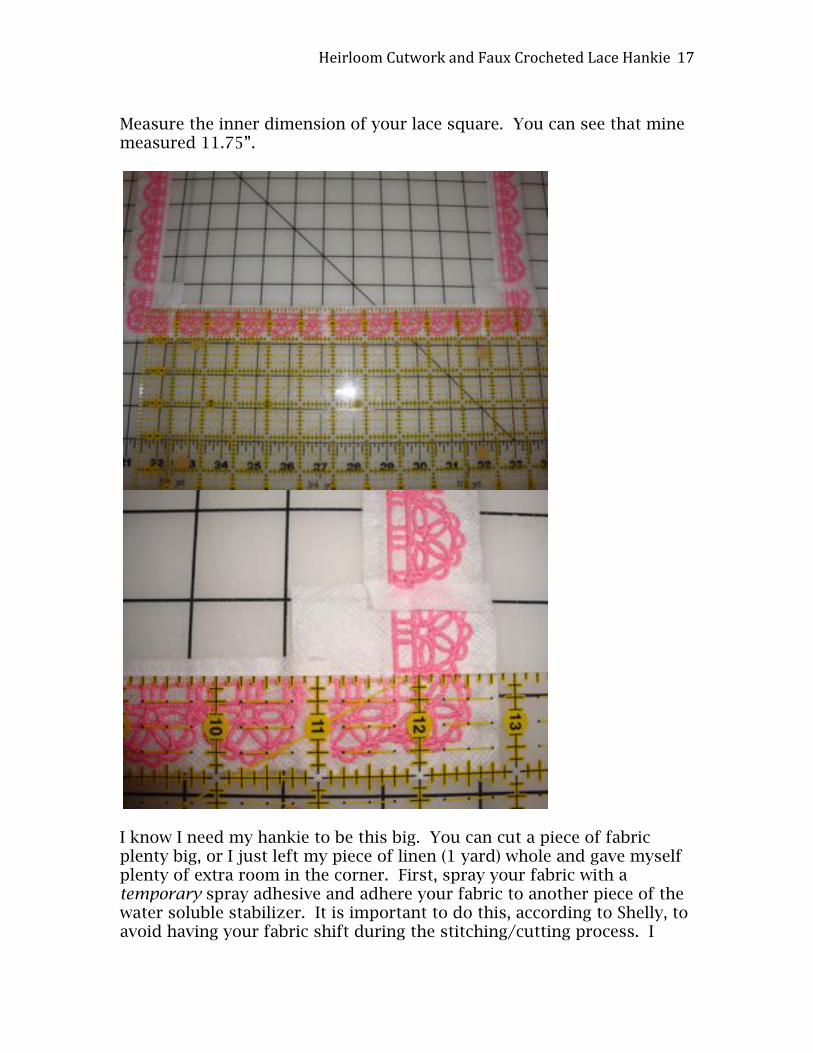
Measure the inner dimension of your lace square. You can see that mine measured 11.75”.
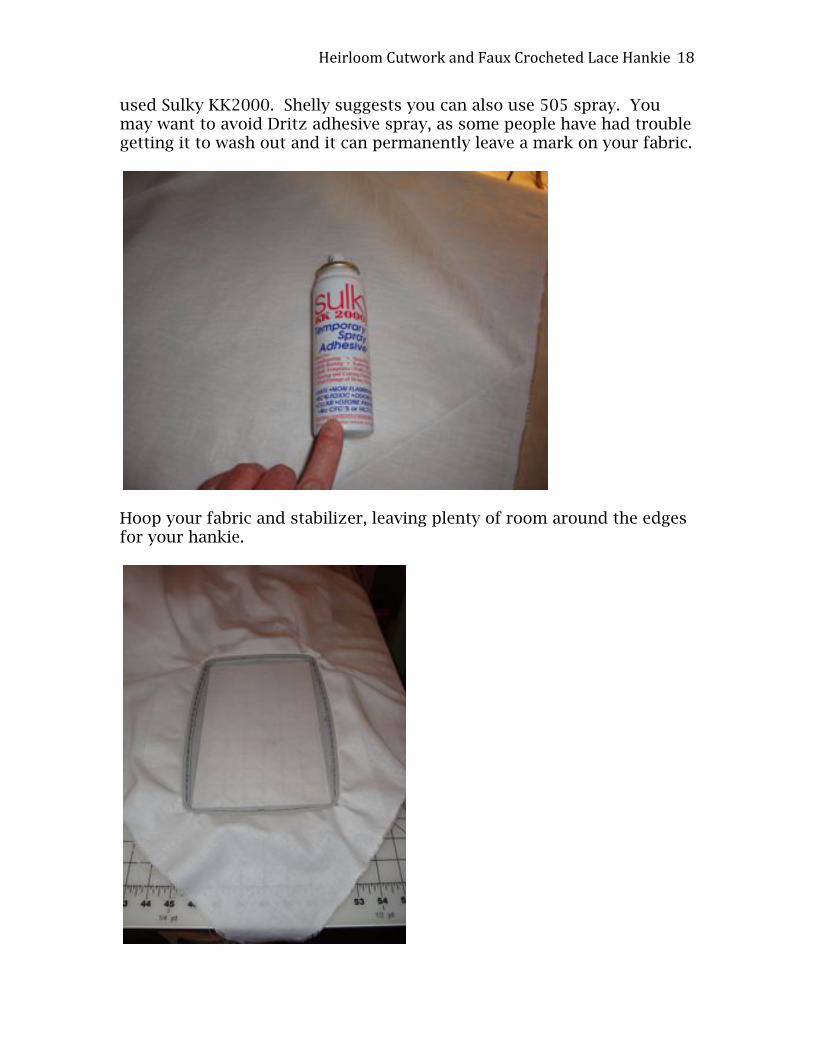
I know I need my hankie to be this big. You can cut a piece of fabric plenty big, or I just left my piece of linen (1 yard) whole and gave myself plenty of extra room in the corner. First, spray your fabric with a temporary spray adhesive and adhere your fabric to another piece of the water soluble stabilizer. It is important to do this, according to Shelly, to avoid having your fabric shift during the stitching/cutting process. I
Heirloom Cutwork and Faux Crocheted Lace Hankie 18
used Sulky KK2000. Shelly suggests you can also use 505 spray. You may want to avoid Dritz adhesive spray, as some people have had trouble getting it to wash out and it can permanently leave a mark on your fabric.
Hoop your fabric and stabilizer, leaving plenty of room around the edges for your hankie.

Heirloom Cutwork and Faux Crocheted Lace Hankie 19
Shelly taught me an important lesson in “hoop etiquette.” This is very important throughout this cutwork process. When carrying your hoop to the machine, inserting your hoop in the machine, and removing the hoop from the machine, hold your hoop BY THE HOOP NOT BY THE FABRIC. The photo below shows how my fingers are holding the hoop on the back side as I carry my hoop to the machine:
This photo (below) shows how your hand should NOT look on the back of the hoop as you carry it to the machine. If you transport your hoop this way, you will stretch your fabric and cause it to shift in the hoop. You won’t be happy with your stitch out if you carry your hoop in this manner.
Heirloom Cutwork and Faux Crocheted Lace Hankie 20
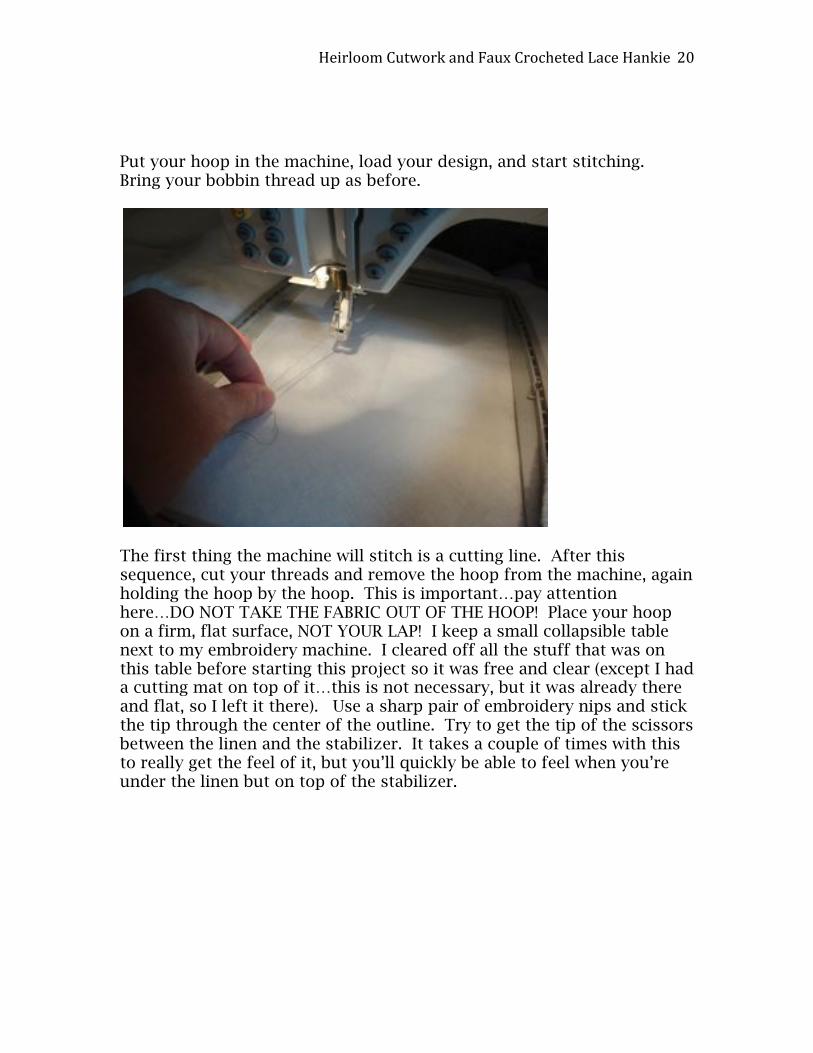
Put your hoop in the machine, load your design, and start stitching. Bring your bobbin thread up as before.
The first thing the machine will stitch is a cutting line. After this sequence, cut your threads and remove the hoop from the machine, again holding the hoop by the hoop. This is important…pay attention here…DO NOT TAKE THE FABRIC OUT OF THE HOOP! Place your hoop on a firm, flat surface, NOT YOUR LAP! I keep a small collapsible table next to my embroidery machine. I cleared off all the stuff that was on this table before starting this project so it was free and clear (except I had a cutting mat on top of it…this is not necessary, but it was already there and flat, so I left it there). Use a sharp pair of embroidery nips and stick the tip through the center of the outline. Try to get the tip of the scissors between the linen and the stabilizer. It takes a couple of times with this to really get the feel of it, but you’ll quickly be able to feel when you’re under the linen but on top of the stabilizer.
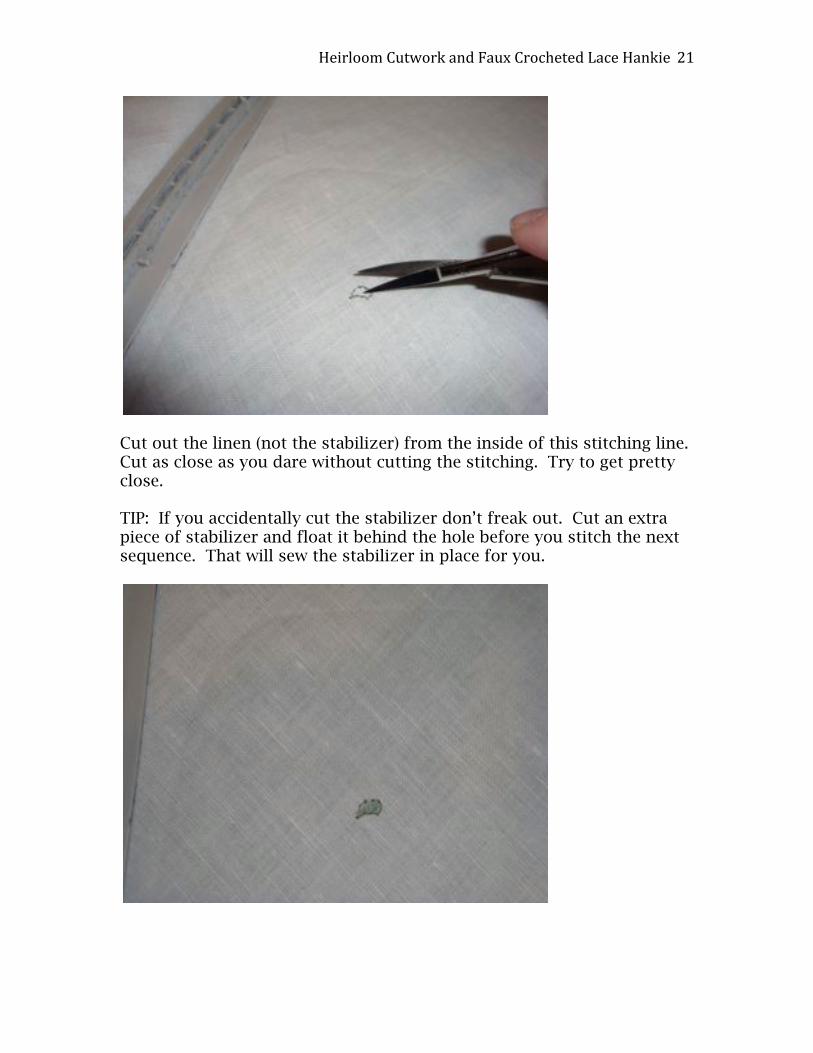
Heirloom Cutwork and Faux Crocheted Lace Hankie 21
Cut out the linen (not the stabilizer) from the inside of this stitching line. Cut as close as you dare without cutting the stitching. Try to get pretty close. TIP: If you accidentally cut the stabilizer don’t freak out. Cut an extra piece of stabilizer and float it behind the hole before you stitch the next sequence. That will sew the stabilizer in place for you.
Heirloom Cutwork and Faux Crocheted Lace Hankie 22
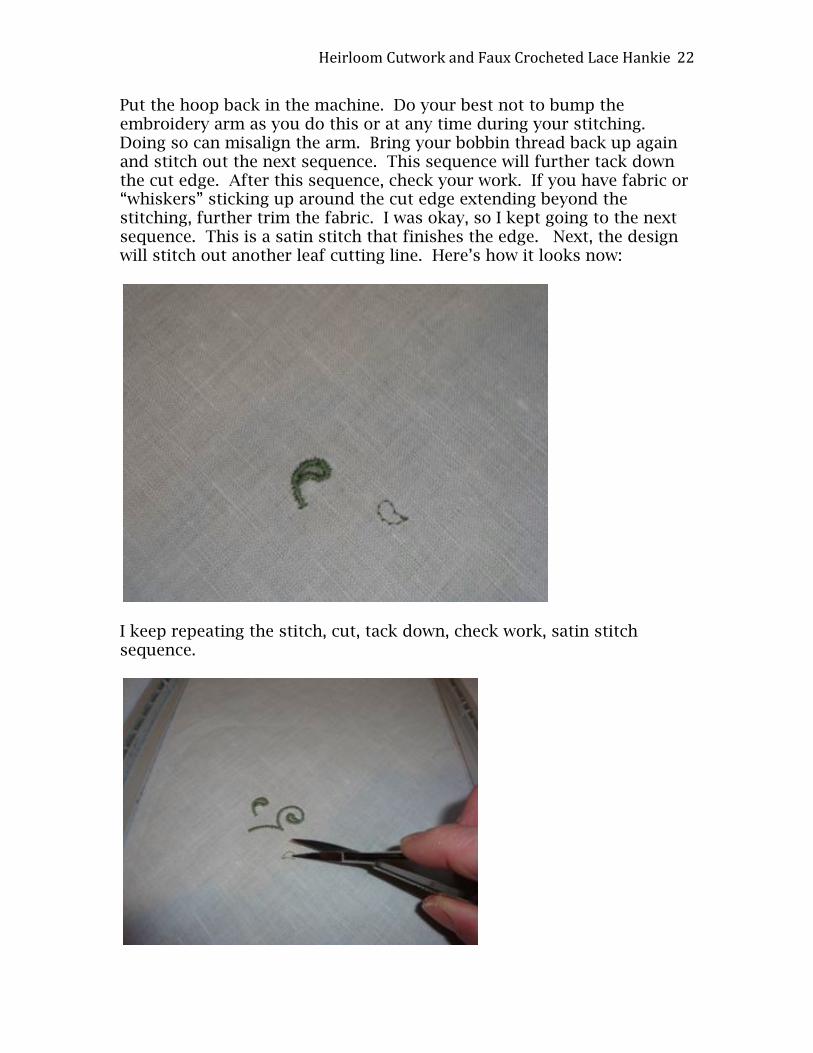
Put the hoop back in the machine. Do your best not to bump the embroidery arm as you do this or at any time during your stitching. Doing so can misalign the arm. Bring your bobbin thread back up again and stitch out the next sequence. This sequence will further tack down the cut edge. After this sequence, check your work. If you have fabric or “whiskers” sticking up around the cut edge extending beyond the stitching, further trim the fabric. I was okay, so I kept going to the next sequence. This is a satin stitch that finishes the edge. Next, the design will stitch out another leaf cutting line. Here’s how it looks now:
I keep repeating the stitch, cut, tack down, check work, satin stitch sequence.
Heirloom Cutwork and Faux Crocheted Lace Hankie 23
Heirloom Cutwork and Faux Crocheted Lace Hankie 24
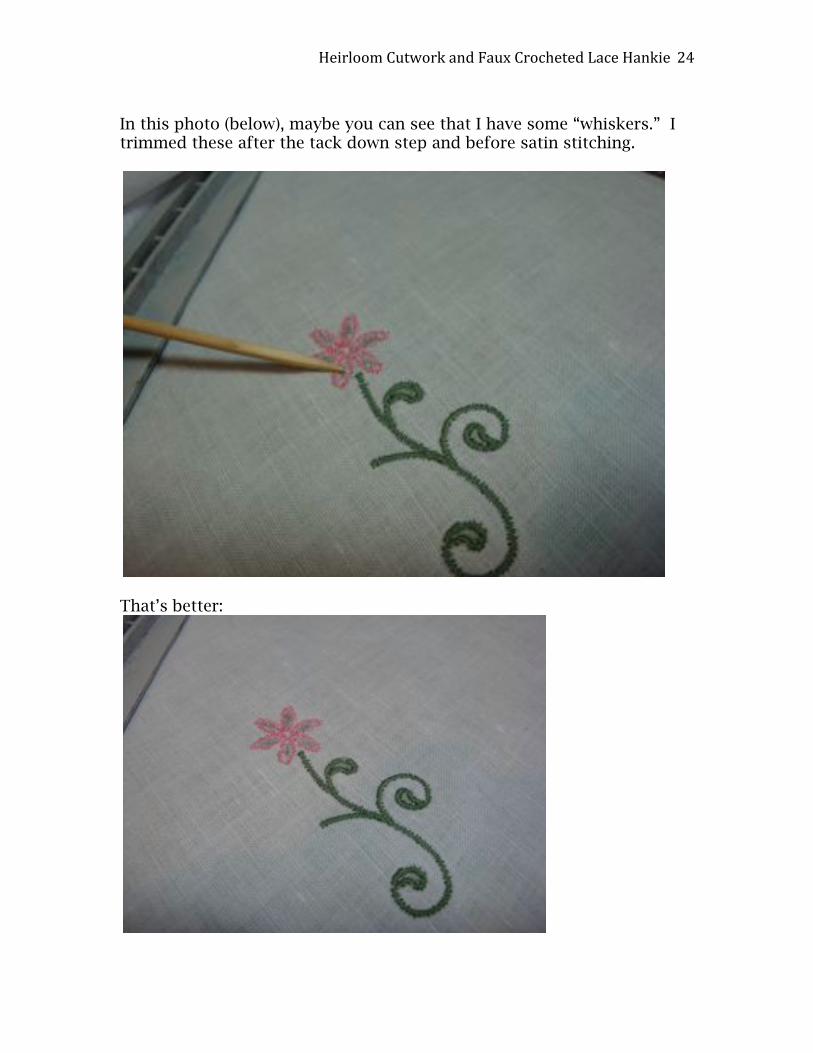
In this photo (below), maybe you can see that I have some “whiskers.” I trimmed these after the tack down step and before satin stitching.
That’s better:

Heirloom Cutwork and Faux Crocheted Lace Hankie 25
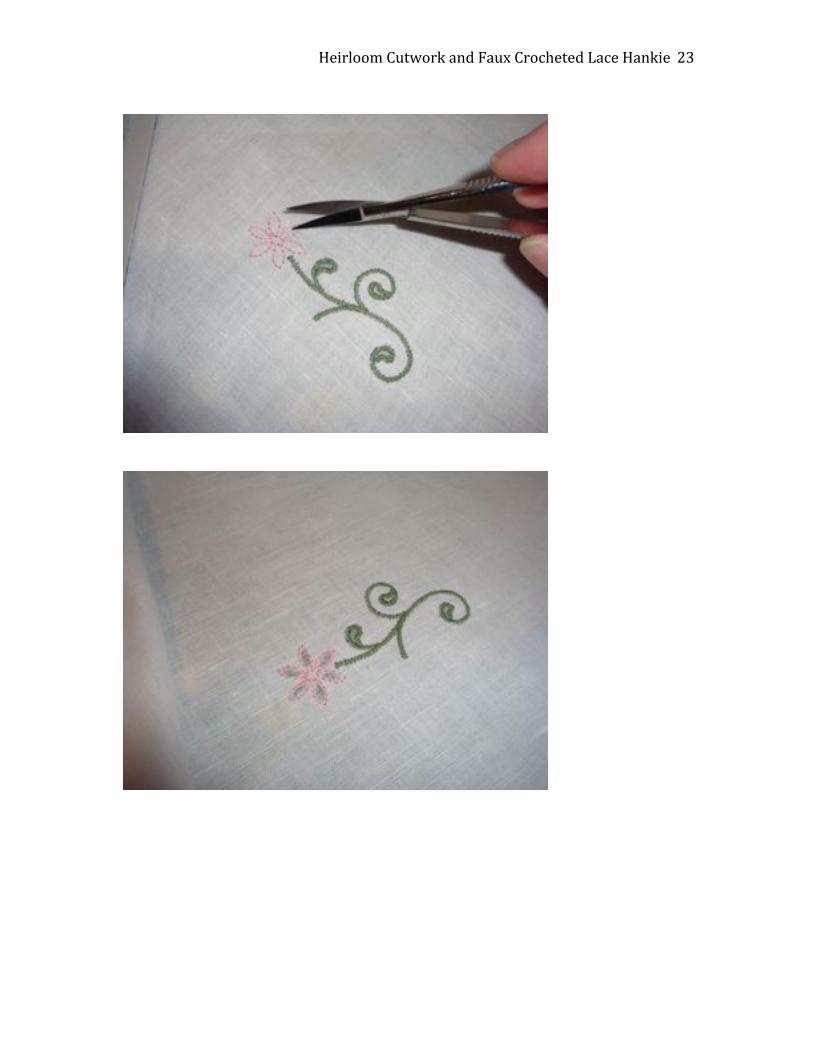
Keep stitching until both flowers are done. Here’s how mine looked when I was done:
NOW you can unhoop your fabric. Trim away the extra stabilizer. Don’t worry about getting too close. We’ll be washing it away later anyway.
Heirloom Cutwork and Faux Crocheted Lace Hankie 26
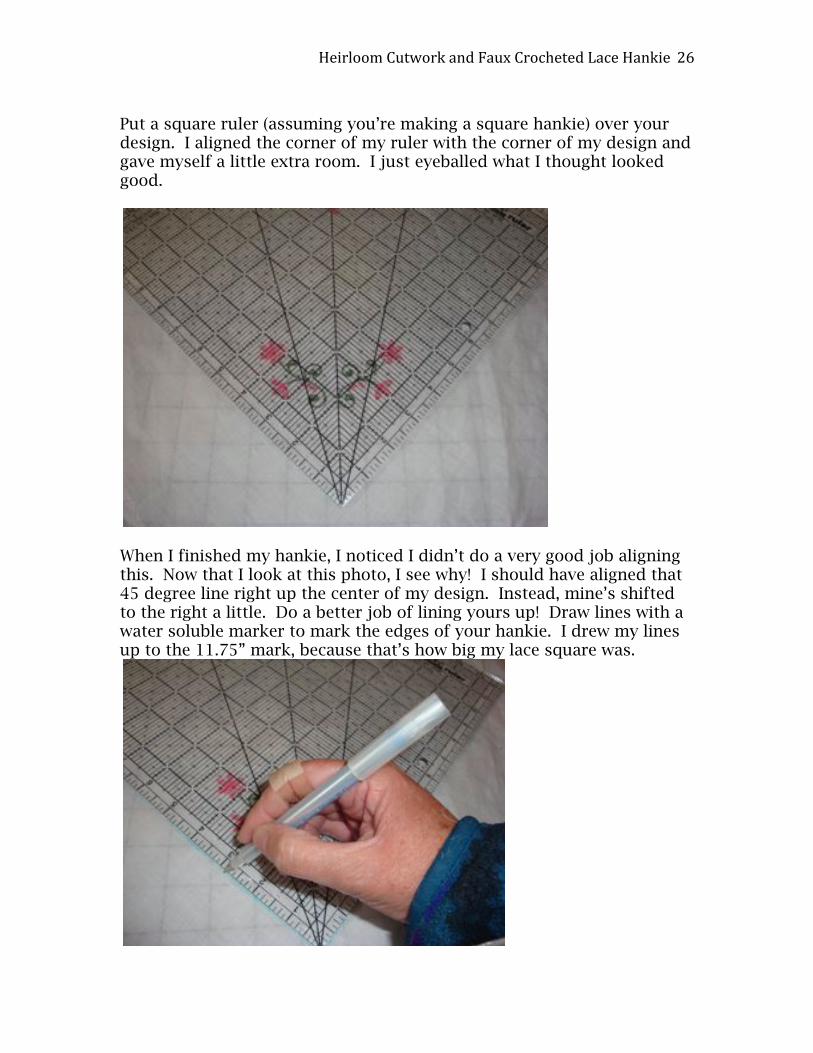
Put a square ruler (assuming you’re making a square hankie) over your design. I aligned the corner of my ruler with the corner of my design and gave myself a little extra room. I just eyeballed what I thought looked good.
When I finished my hankie, I noticed I didn’t do a very good job aligning this. Now that I look at this photo, I see why! I should have aligned that 45 degree line right up the center of my design. Instead, mine’s shifted to the right a little. Do a better job of lining yours up! Draw lines with a water soluble marker to mark the edges of your hankie. I drew my lines up to the 11.75” mark, because that’s how big my lace square was.
Heirloom Cutwork and Faux Crocheted Lace Hankie 27
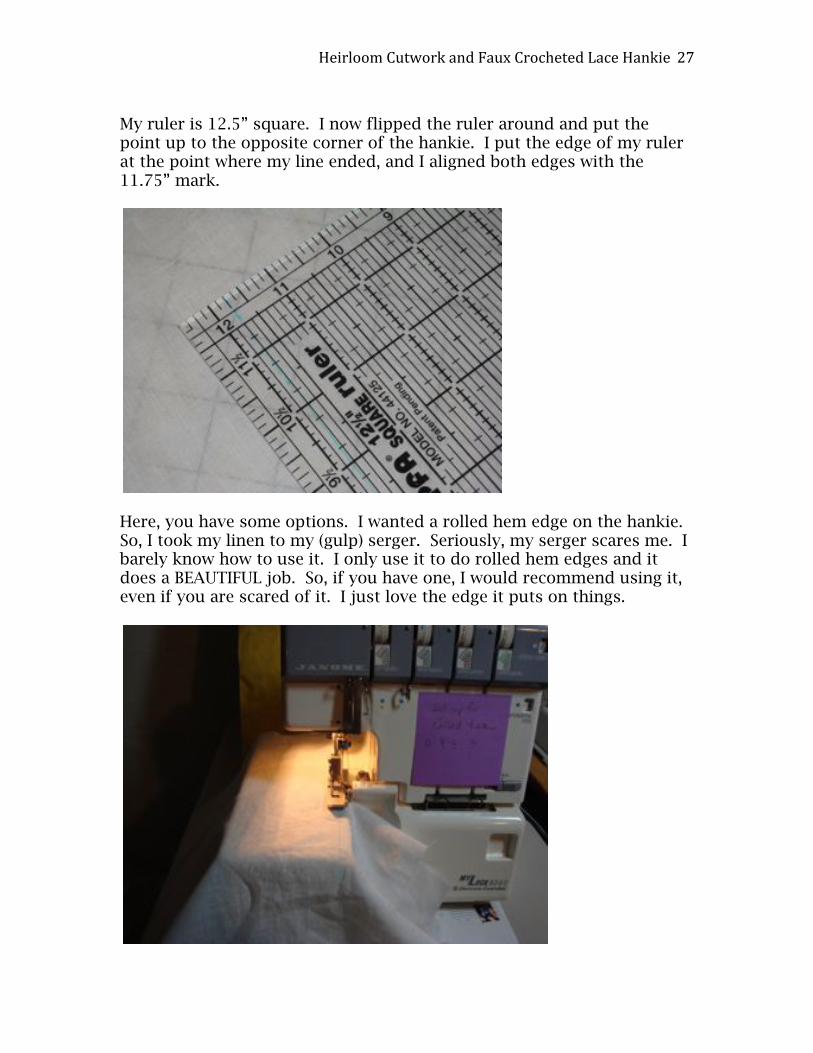
My ruler is 12.5” square. I now flipped the ruler around and put the point up to the opposite corner of the hankie. I put the edge of my ruler at the point where my line ended, and I aligned both edges with the 11.75” mark.
Here, you have some options. I wanted a rolled hem edge on the hankie. So, I took my linen to my (gulp) serger. Seriously, my serger scares me. I barely know how to use it. I only use it to do rolled hem edges and it does a BEAUTIFUL job. So, if you have one, I would recommend using it, even if you are scared of it. I just love the edge it puts on things.
Heirloom Cutwork and Faux Crocheted Lace Hankie 28
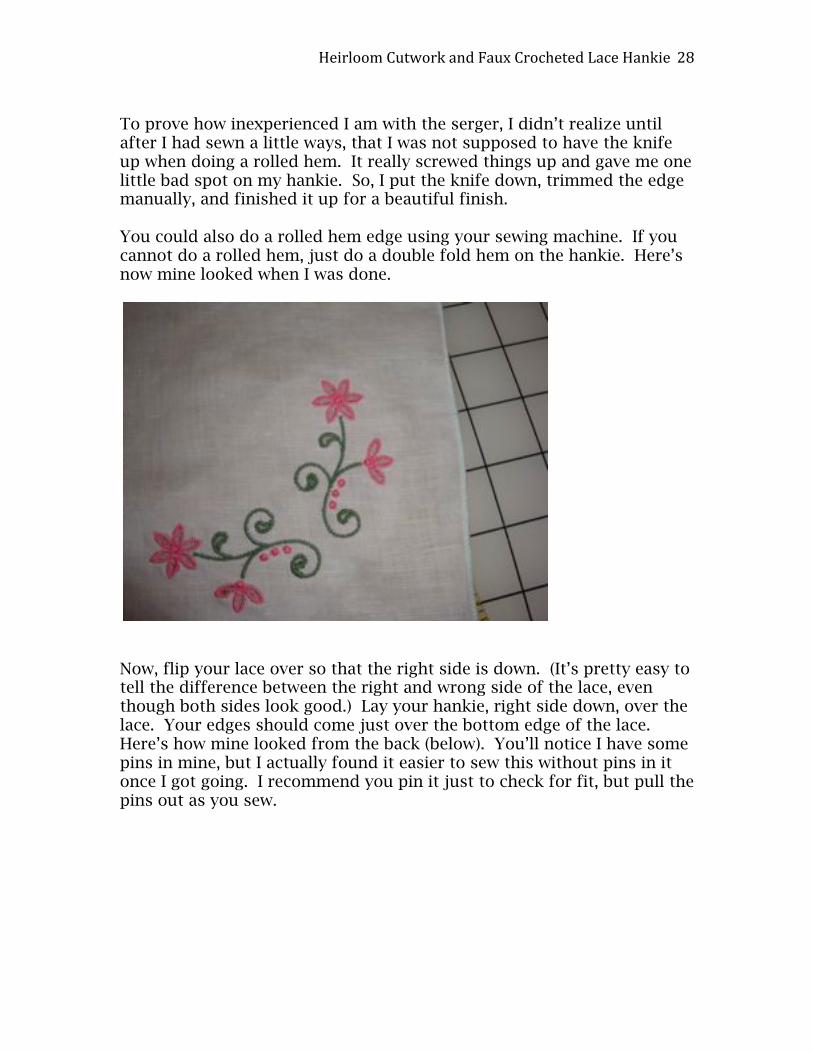
To prove how inexperienced I am with the serger, I didn’t realize until after I had sewn a little ways, that I was not supposed to have the knife up when doing a rolled hem. It really screwed things up and gave me one little bad spot on my hankie. So, I put the knife down, trimmed the edge manually, and finished it up for a beautiful finish. You could also do a rolled hem edge using your sewing machine. If you cannot do a rolled hem, just do a double fold hem on the hankie. Here’s now mine looked when I was done.
Now, flip your lace over so that the right side is down. (It’s pretty easy to tell the difference between the right and wrong side of the lace, even though both sides look good.) Lay your hankie, right side down, over the lace. Your edges should come just over the bottom edge of the lace. Here’s how mine looked from the back (below). You’ll notice I have some pins in mine, but I actually found it easier to sew this without pins in it once I got going. I recommend you pin it just to check for fit, but pull the pins out as you sew.
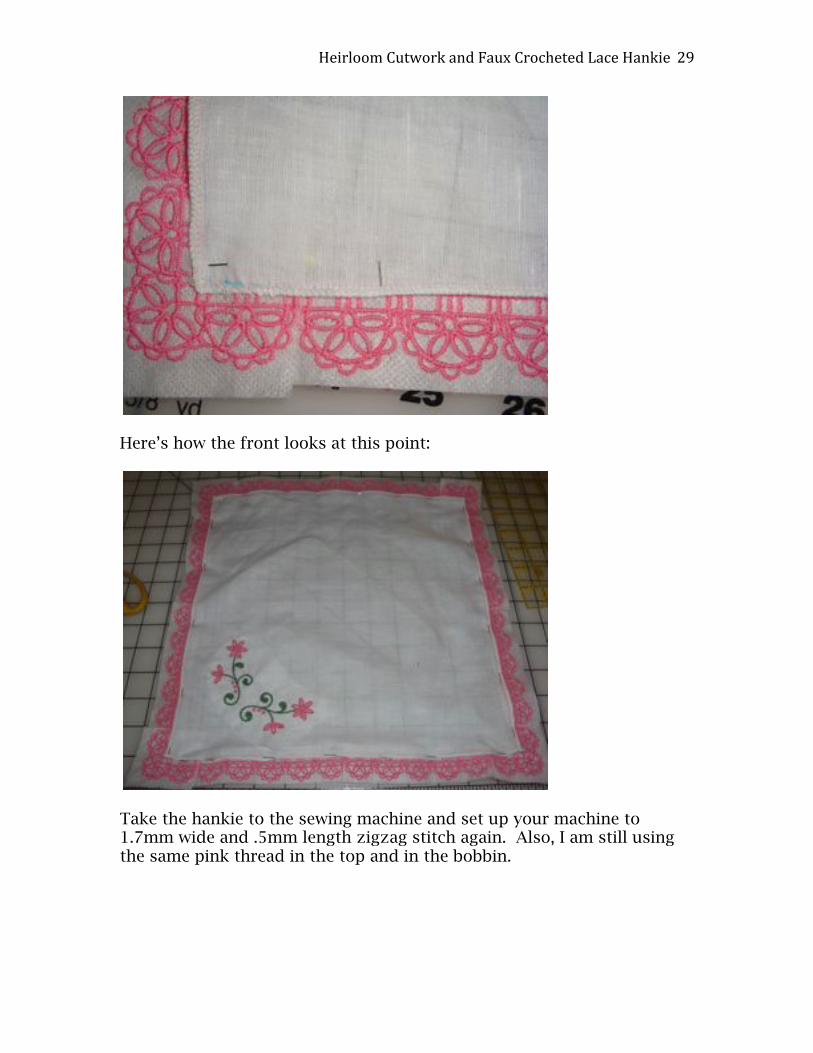
Heirloom Cutwork and Faux Crocheted Lace Hankie 29
Here’s how the front looks at this point:
Take the hankie to the sewing machine and set up your machine to 1.7mm wide and .5mm length zigzag stitch again. Also, I am still using the same pink thread in the top and in the bobbin.
Heirloom Cutwork and Faux Crocheted Lace Hankie 30
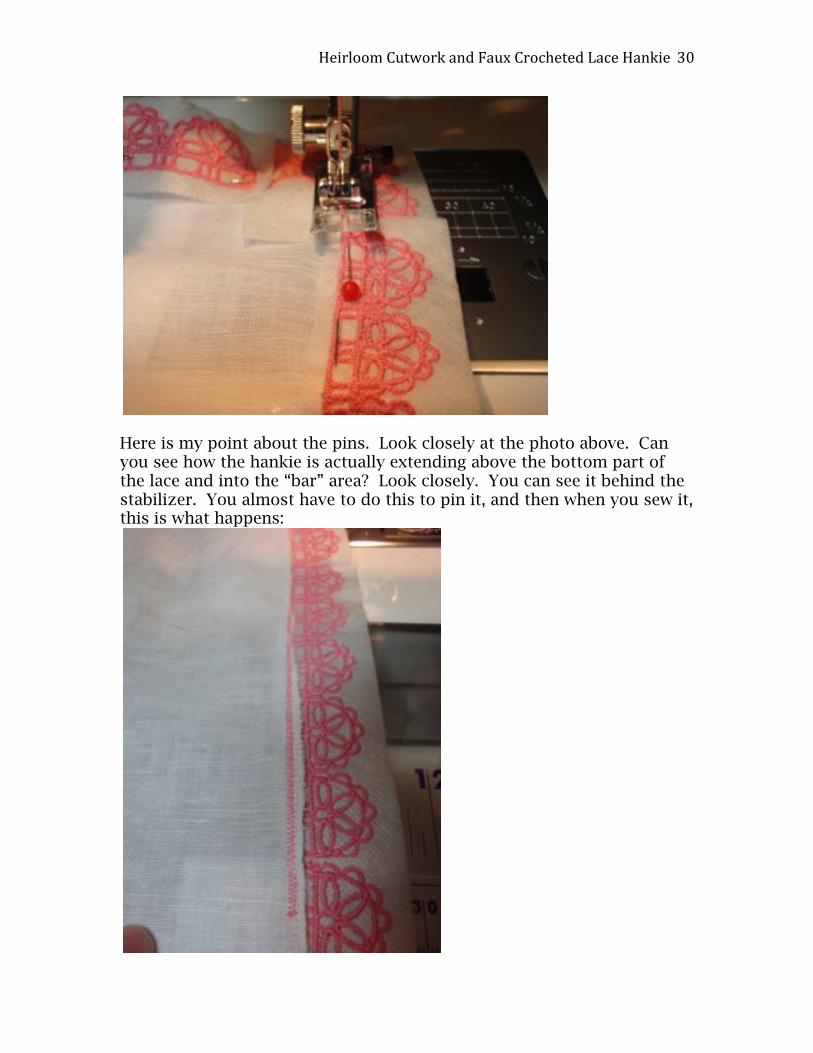
Here is my point about the pins. Look closely at the photo above. Can you see how the hankie is actually extending above the bottom part of the lace and into the “bar” area? Look closely. You can see it behind the stabilizer. You almost have to do this to pin it, and then when you sew it, this is what happens:
Heirloom Cutwork and Faux Crocheted Lace Hankie 31
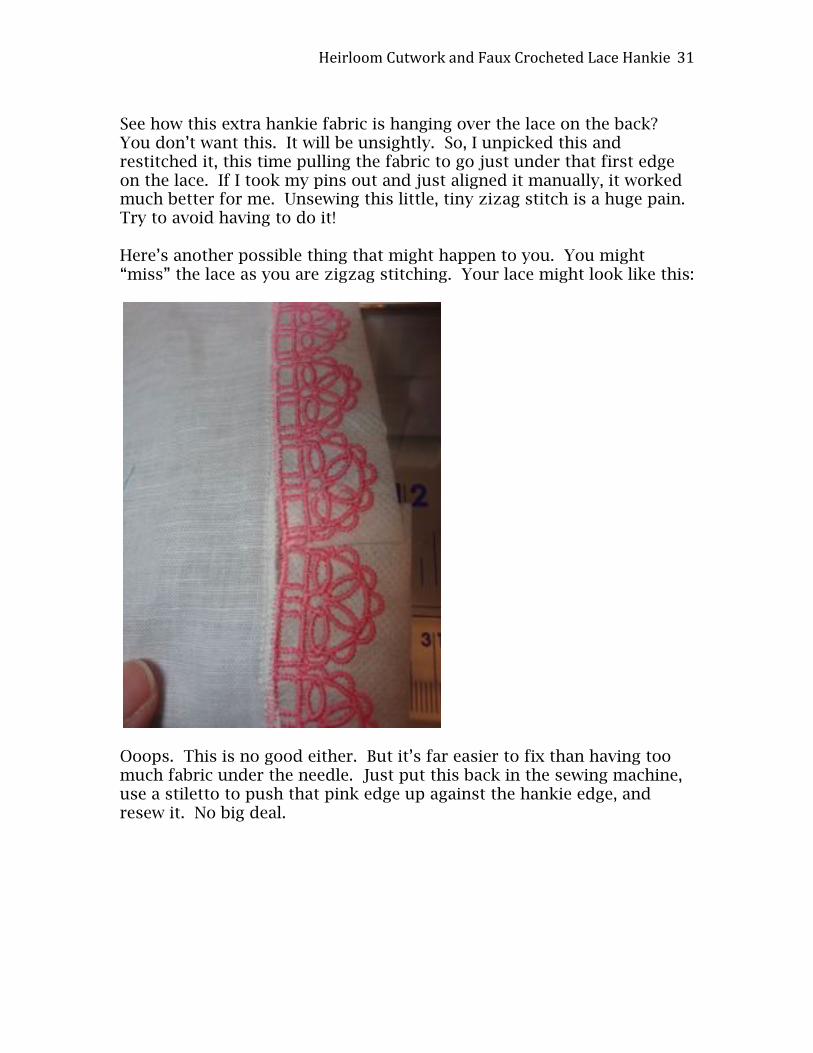
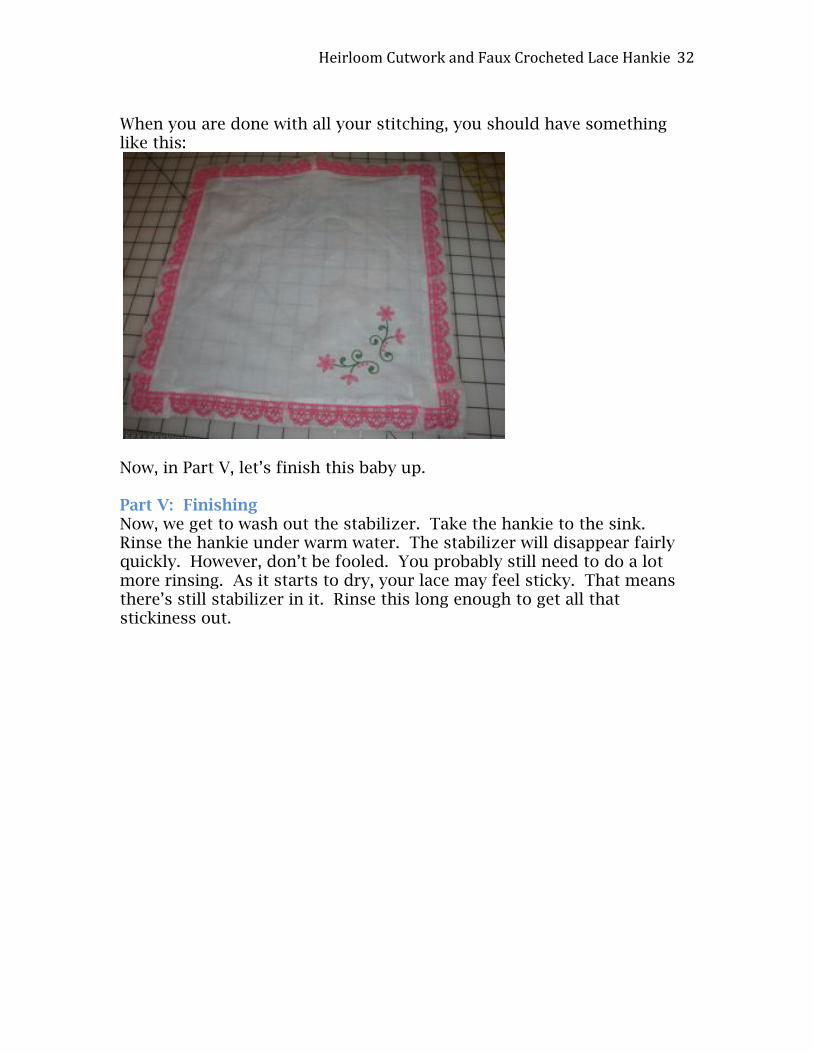
See how this extra hankie fabric is hanging over the lace on the back? You don’t want this. It will be unsightly. So, I unpicked this and restitched it, this time pulling the fabric to go just under that first edge on the lace. If I took my pins out and just aligned it manually, it worked much better for me. Unsewing this little, tiny zizag stitch is a huge pain. Try to avoid having to do it! Here’s another possible thing that might happen to you. You might “miss” the lace as you are zigzag stitching. Your lace might look like this:
Ooops. This is no good either. But it’s far easier to fix than having too much fabric under the needle. Just put this back in the sewing machine, use a stiletto to push that pink edge up against the hankie edge, and resew it. No big deal.
Heirloom Cutwork and Faux Crocheted Lace Hankie 32
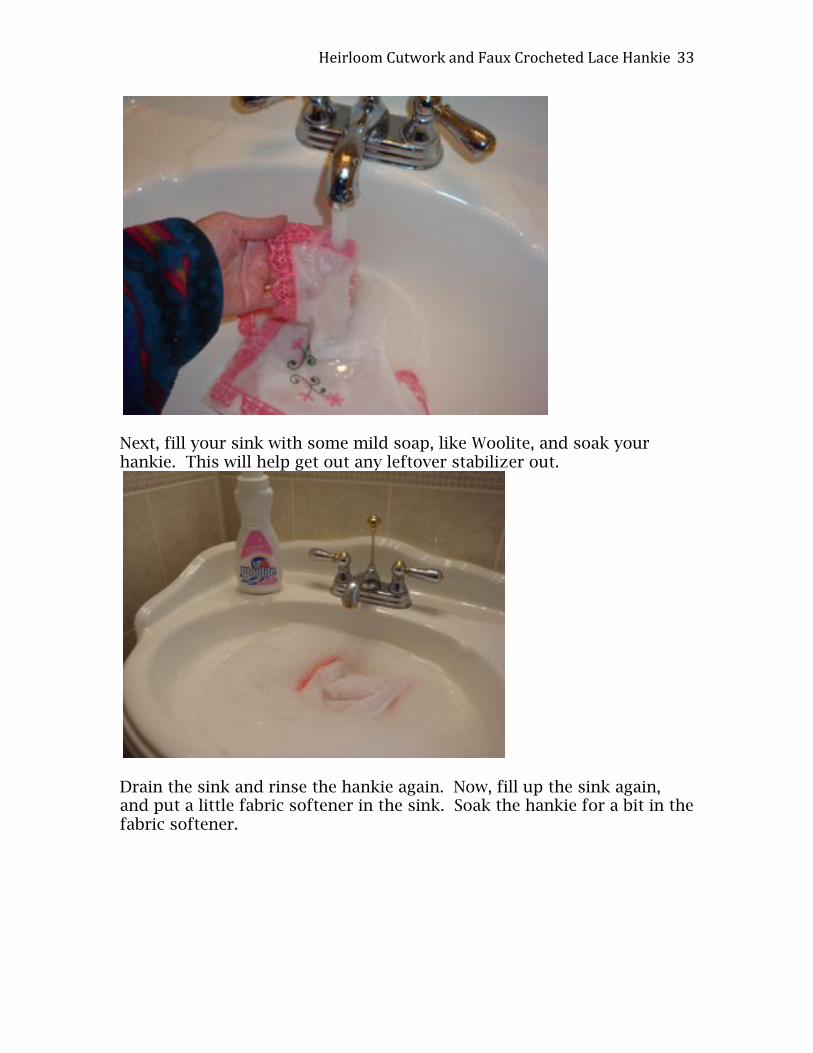
When you are done with all your stitching, you should have something like this:
Now, in Part V, let’s finish this baby up. Part V: Finishing Now, we get to wash out the stabilizer. Take the hankie to the sink. Rinse the hankie under warm water. The stabilizer will disappear fairly quickly. However, don’t be fooled. You probably still need to do a lot more rinsing. As it starts to dry, your lace may feel sticky. That means there’s still stabilizer in it. Rinse this long enough to get all that stickiness out.
Heirloom Cutwork and Faux Crocheted Lace Hankie 33
Next, fill your sink with some mild soap, like Woolite, and soak your hankie. This will help get out any leftover stabilizer out.
Drain the sink and rinse the hankie again. Now, fill up the sink again, and put a little fabric softener in the sink. Soak the hankie for a bit in the fabric softener.
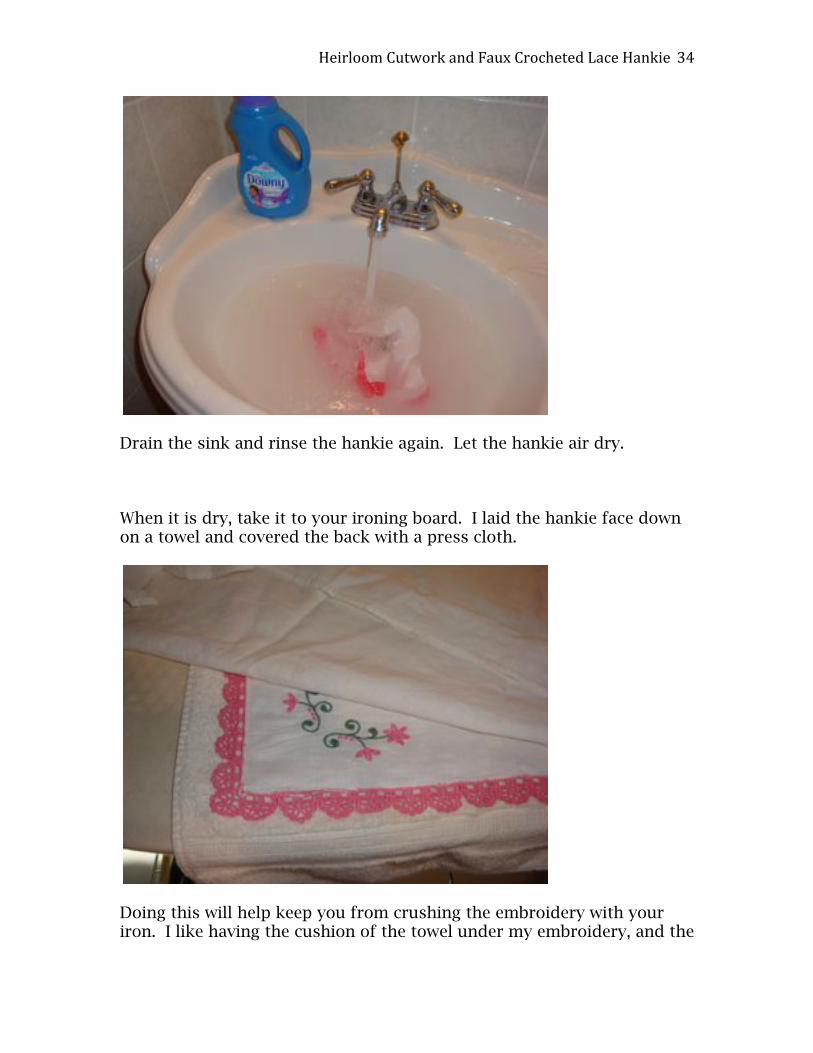
Heirloom Cutwork and Faux Crocheted Lace Hankie 34
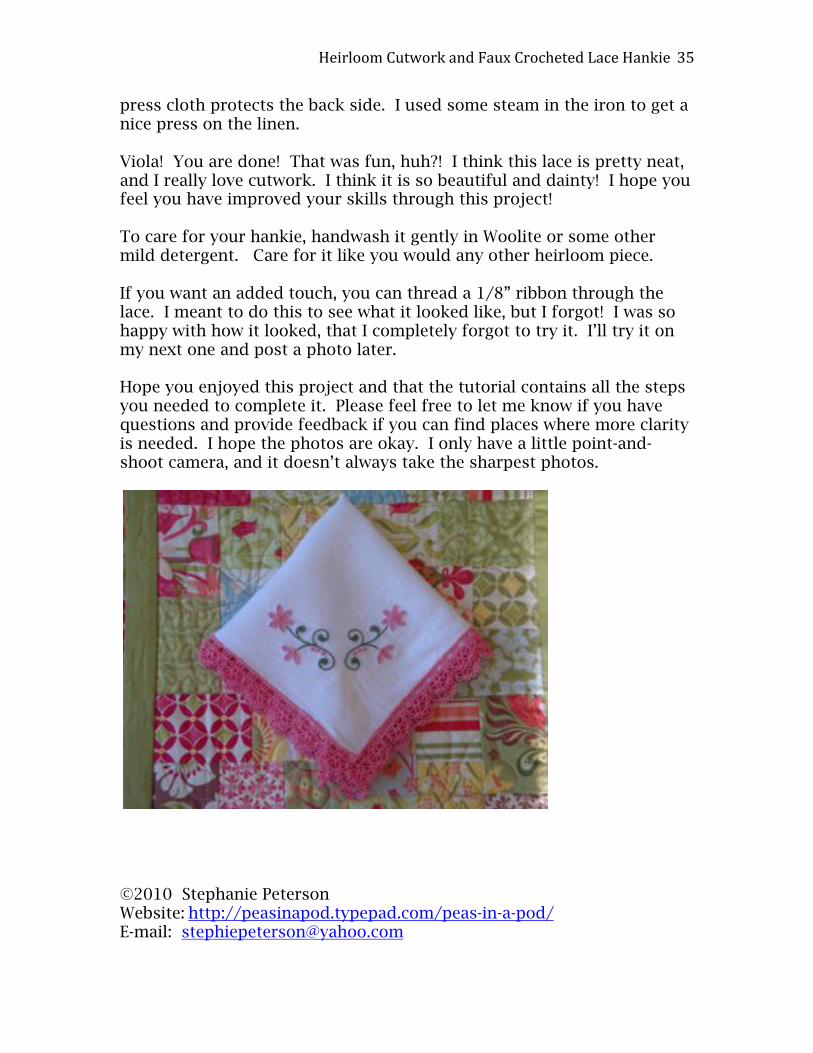
Drain the sink and rinse the hankie again. Let the hankie air dry. When it is dry, take it to your ironing board. I laid the hankie face down on a towel and covered the back with a press cloth.
Doing this will help keep you from crushing the embroidery with your iron. I like having the cushion of the towel under my embroidery, and the
Heirloom Cutwork and Faux Crocheted Lace Hankie 35
press cloth protects the back side. I used some steam in the iron to get a nice press on the linen. Viola! You are done! That was fun, huh?! I think this lace is pretty neat, and I really love cutwork. I think it is so beautiful and dainty! I hope you feel you have improved your skills through this project! To care for your hankie, handwash it gently in Woolite or some other mild detergent. Care for it like you would any other heirloom piece. If you want an added touch, you can thread a 1/8” ribbon through the lace. I meant to do this to see what it looked like, but I forgot! I was so happy with how it looked, that I completely forgot to try it. I’ll try it on my next one and post a photo later. Hope you enjoyed this project and that the tutorial contains all the steps you needed to complete it. Please feel free to let me know if you have questions and provide feedback if you can find places where more clarity is needed. I hope the photos are okay. I only have a little point-and-shoot camera, and it doesn’t always take the sharpest photos.
©2010 Stephanie Peterson Website: http://peasinapod.typepad.com/peas-in-a-pod/ E-mail: [email protected]

Heirloom Cutwork and Faux Crocheted Lace Hankie 36
These instructions are for personal use only. They are provided free of charge on my website and are not to be used for sale or use in classes for profit. If you wish to use these instructions for purposes of teaching a class, please e-mail me for permission first. These instructions are not intended to be sold in a shop or store.