hands-on lab exercise guidedocs.citrixvirtualclassroom.com/events/syn2015/syn-619.pdf · 619: first...
TRANSCRIPT

619: First Look at the Next Generation of StoreFront Project X1 Hands-on Lab Exercise Guide
James Hsu May 2015
| 1 |
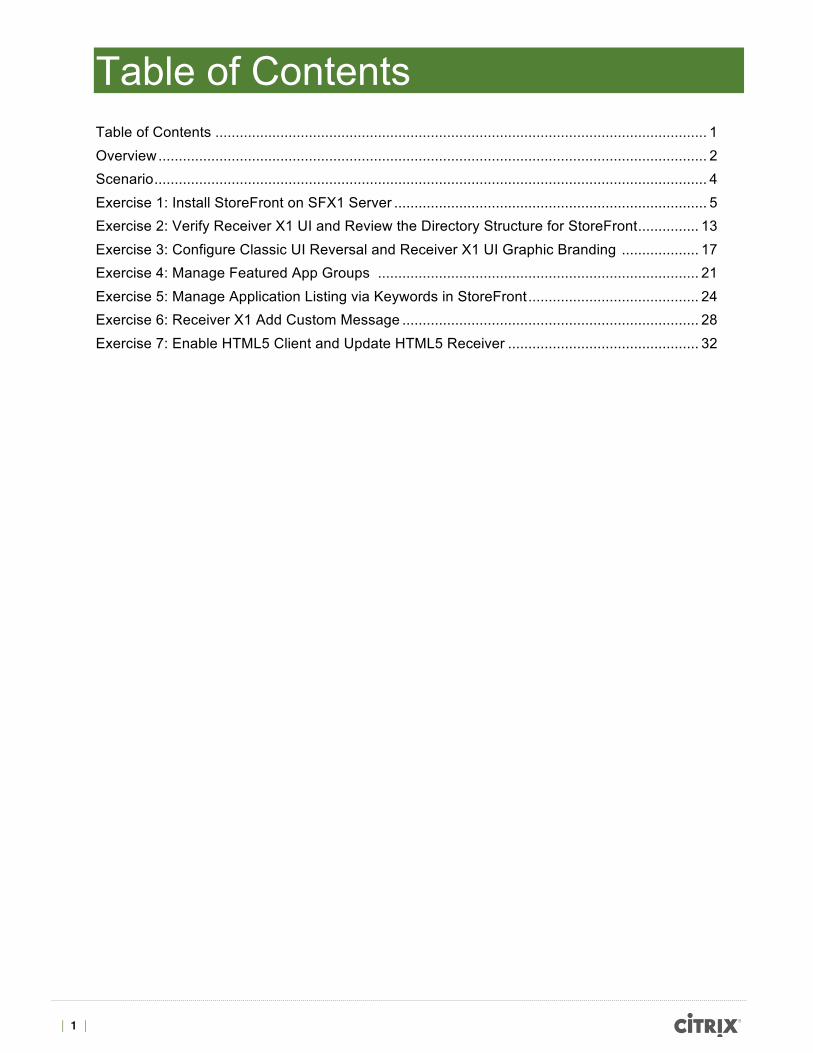
Table of Contents Table of Contents ......................................................................................................................... 1 Overview ....................................................................................................................................... 2 Scenario ........................................................................................................................................ 4 Exercise 1: Install StoreFront on SFX1 Server ............................................................................. 5 Exercise 2: Verify Receiver X1 UI and Review the Directory Structure for StoreFront ............... 13 Exercise 3: Configure Classic UI Reversal and Receiver X1 UI Graphic Branding ................... 17 Exercise 4: Manage Featured App Groups ............................................................................... 21 Exercise 5: Manage Application Listing via Keywords in StoreFront .......................................... 24 Exercise 6: Receiver X1 Add Custom Message ......................................................................... 28 Exercise 7: Enable HTML5 Client and Update HTML5 Receiver ............................................... 32
| 2 |
Overview Hands-On Training Module Objective This training will provide hands on experience of basic StoreFront deployment for internal network without external users. This lab will cover how Receiver X1 can be used and how to provide some customizations to the user interface of the ReceiverX1.
Prerequisites Active Directory, XenDesktop and XenApp administration and management. Basic NetScaler
Audience Citrix Partners, Customers, Sales Engineers, Consultants, Technical Support
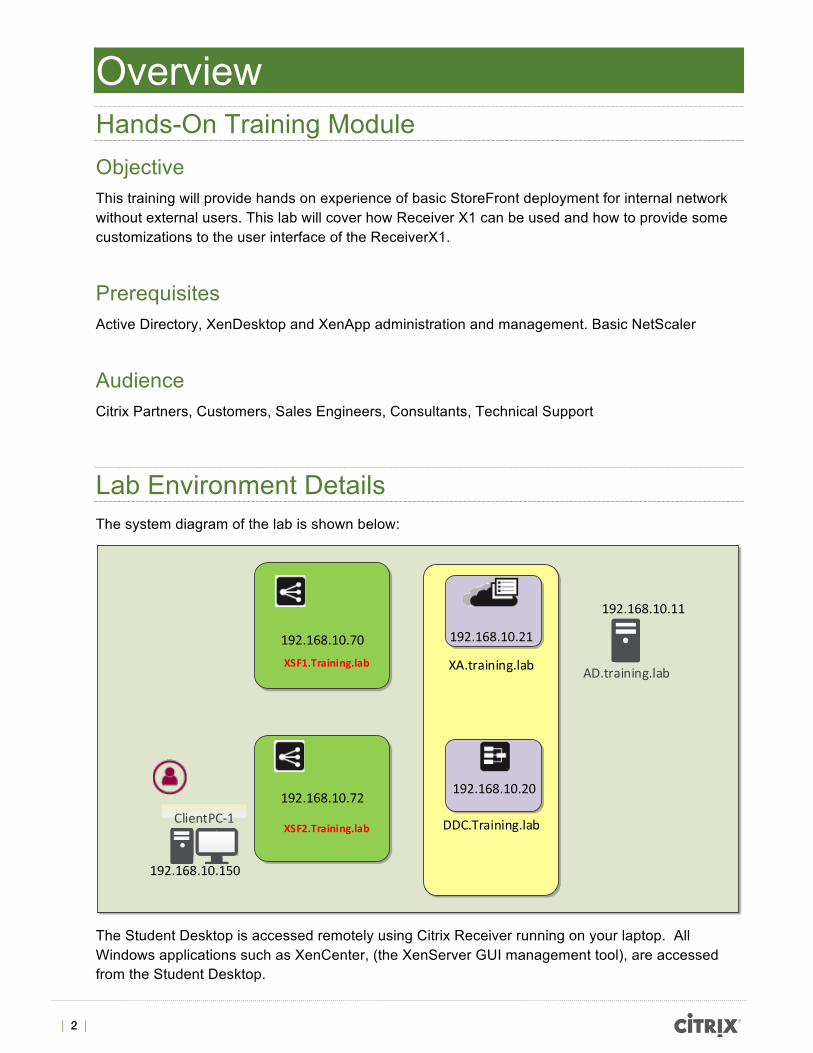
Lab Environment Details The system diagram of the lab is shown below:
AD.training.lab
ClientPC-‐1
192.168.10.21
192.168.10.150
192.168.10.11
XSF1.Training.lab
192.168.10.70
192.168.10.20
DDC.Training.lab
XA.training.lab
192.168.10.72
XSF2.Training.lab
The Student Desktop is accessed remotely using Citrix Receiver running on your laptop. All Windows applications such as XenCenter, (the XenServer GUI management tool), are accessed from the Student Desktop.

| 3 |
Lab Guide Conventions This symbol indicates particular attention must be paid to this step
Special note to offer advice or background information
reboot Text the student enters or an item they select is printed like this
VMDemo Filename mentioned in text or lines added to files during editing
Start Bold text indicates reference to a button or object
Focuses attention on a particular part of the screen (R:255 G:20 B:147)
Shows where to click or select an item on a screen shot (R:255 G:102 B:0)
List of Virtual Machines Used VM Name IP Address Description / OS
AD.training.lab 192.168.10.11 DC/ DNS/ Software file share
DDC.training.lab 192.168.10.20 Site1 Citrix Delivery Controller without StoreFront
NS.training.lab (MIP) 192.168.10.50 Management IP for NetScaler in Training lab ClientPC-1.training.lab 192.168.10.150 Domain Joined Student PC XA.training.lab 192.168.10.21 XenApp 7.6 host for Site1 SFX1,training.lab 192.168.10.70 StoreFront server SFX2.training.lab 192.168.10.72 Demo StoreFront server
Required Lab Credentials The credentials required to connect to the environment and complete the lab exercises.
VM Name User ID Password Description
*.Training.lab User1 Citrix123 Training domain User1 *.Training.lab Administrator Citrix123 Citrix XenDesktop Site and Domain Admin NetScaler Admin nsroot nsroot Netscaler admin account
| 4 |
Scenario • Install StoreFront on SFX1 server
• Customize Receiver for Web appearance
• Manage Featured App Groups
• Enable application filtering for StoreFront site, and configure keywords for mandatory application deployment
• HTML5 receiver deployment and update
• Advanced configuration for shared subscription database for multiple stores
| 5 |
Exercise 1 Install StoreFront on SFX1 Server Overview In this exercise, we will be installing StoreFront software on SFX1.training.lab server and configure StoreFront server to work with XenDesktop 7.6 site.
Step by step guidance Estimated time to complete this lab: 15 minutes.
Step Action
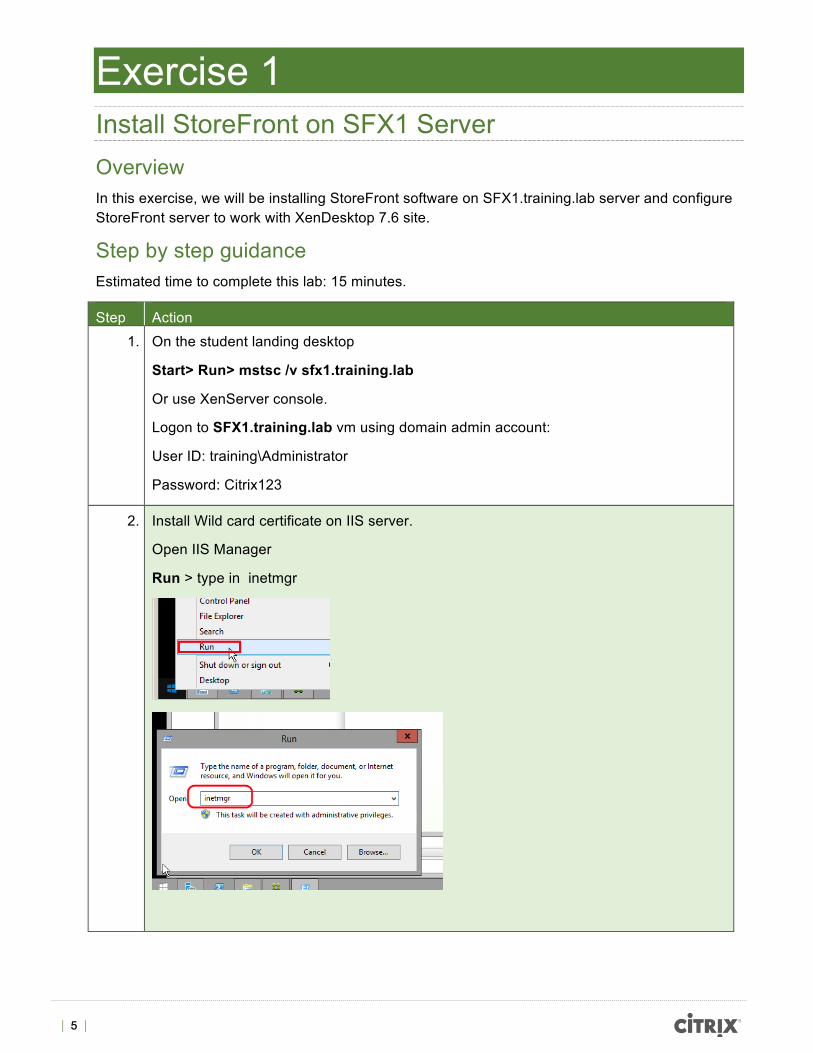
1. On the student landing desktop
Start> Run> mstsc /v sfx1.training.lab
Or use XenServer console.
Logon to SFX1.training.lab vm using domain admin account:
User ID: training\Administrator
Password: Citrix123
2. Install Wild card certificate on IIS server.
Open IIS Manager
Run > type in inetmgr

| 6 |
3. Click on SFX1 under IIS Features View Click on Server Certificates.
On the Actions panel click on Import…
Certificate file (.pfx): \\ad\software\training.pfx
Password: Citrix123

| 7 |
4. Click on SFX1> Sites > Default Web Site > in Actions Click on Bindings…
Click on Add… to add https Binding for the Default Web Site.
Select Type: https: and SSL certificate: *.training.lab click on Select… then click on OK.
Click Close to close the window.

| 8 |
5. Search > Citrix StoreFront and launch Citrix StoreFront console
6. Click on “Create a new deployment”.
| 9 |
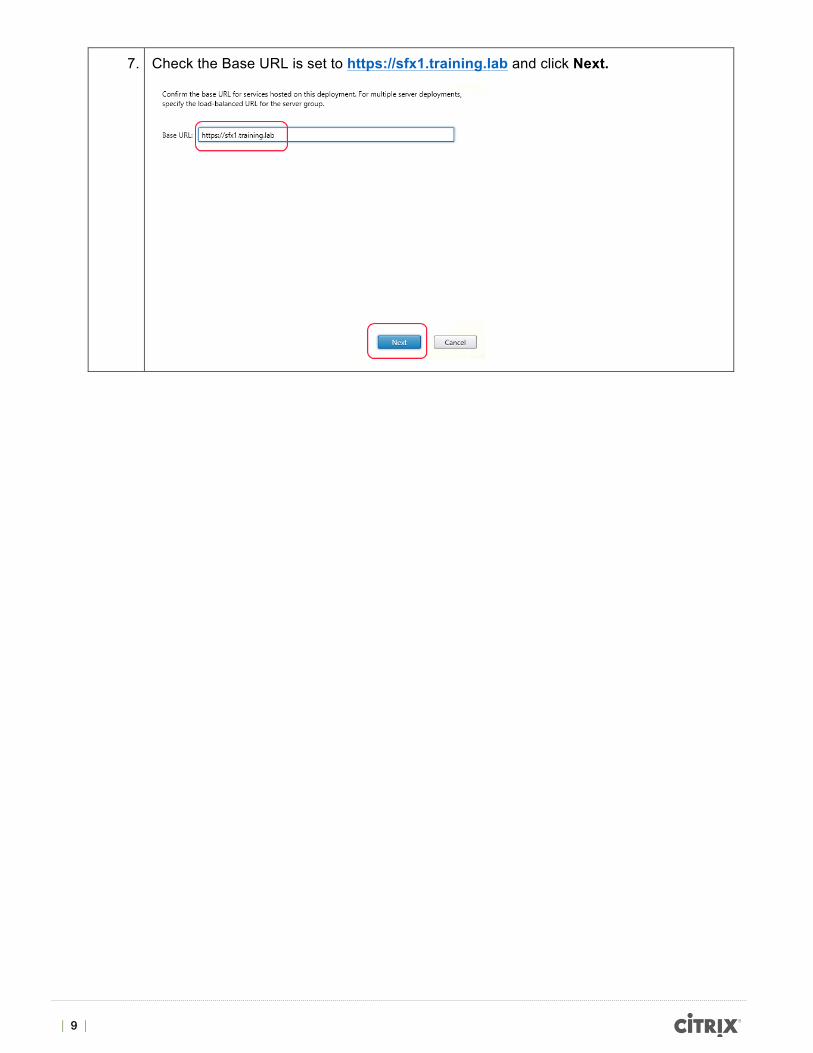
7. Check the Base URL is set to https://sfx1.training.lab and click Next.

| 10 |
8. Assign Store name Site1.
Add Delivery Controllers click Add… to Add Delivery Controller click on Add… and Type in Server IP 192.168.10.20 then click OK.
Change Transport type to HTTP and port 80 click OK
Click Next.
Notes: In this lab environment we are using HTTP as XML communication port it is not recommended for production use.
| 11 |
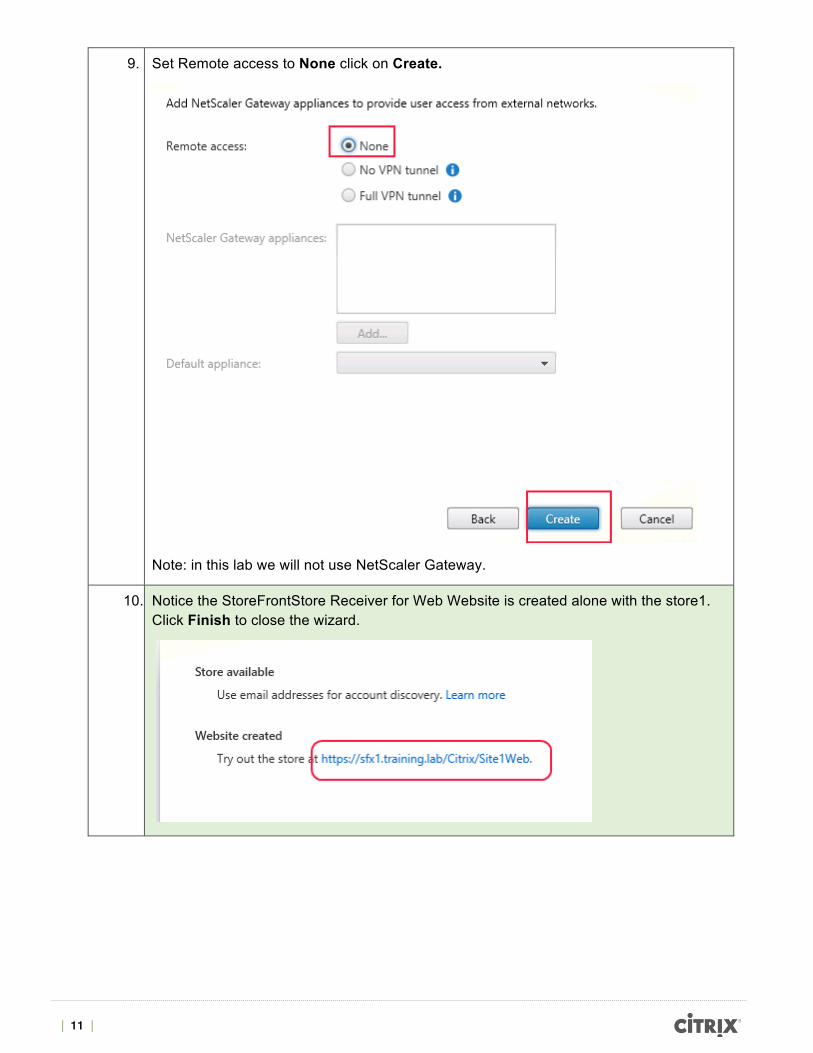
9. Set Remote access to None click on Create.
Note: in this lab we will not use NetScaler Gateway.
10. Notice the StoreFrontStore Receiver for Web Website is created alone with the store1. Click Finish to close the wizard.

| 12 |
11. Click on Receiver for Web and verify the Site1Web in created.
Exercise Summary In this lab, you installed and configured a single store StoreFront server on a single host with HTTPs enabled for the base URL.
The XenApp 7.6 environment was pre-configured and the Delivery Controller is running on 192.168.10.20 a few applications has been published.
| 13 |
Exercise 2 Verify Receiver X1 UI and Review the Directory Structure for StoreFront Overview In this exercise, you will be exploring the Receiver X1 UI and also reviewing the directory structure for StoreFront.
Step by step guidance Estimated time to complete this lab: 10 minutes.
Step Action
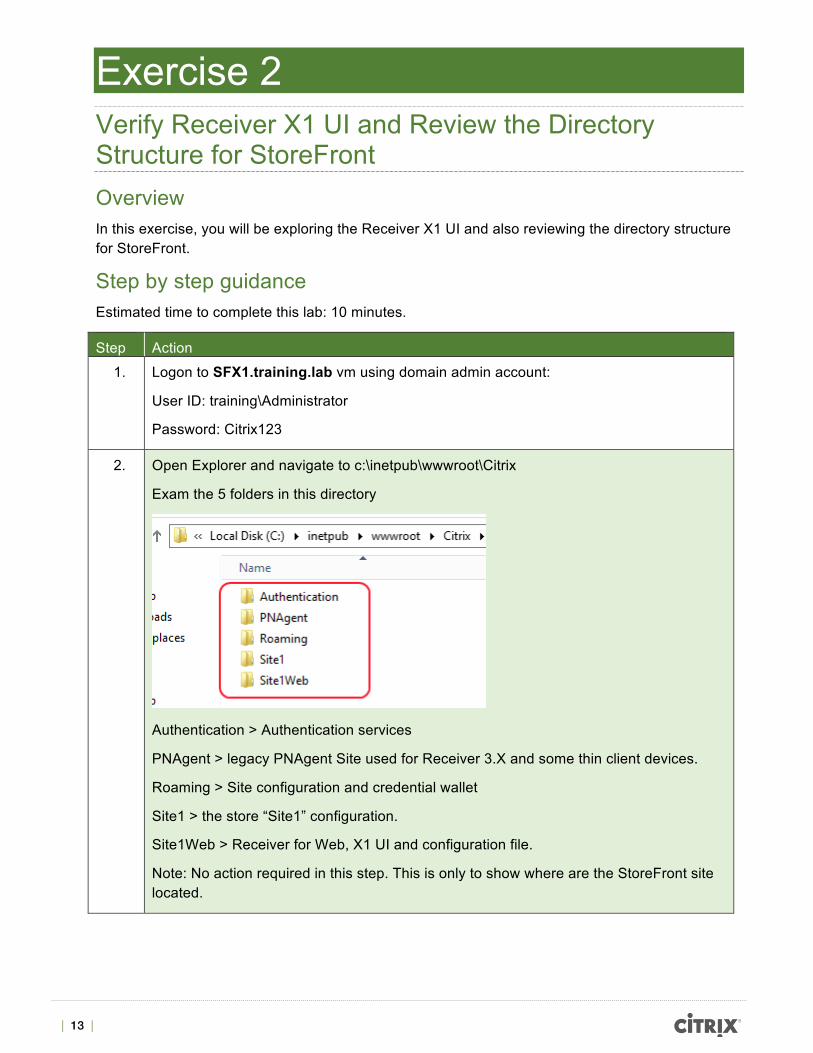
1. Logon to SFX1.training.lab vm using domain admin account:
User ID: training\Administrator
Password: Citrix123
2. Open Explorer and navigate to c:\inetpub\wwwroot\Citrix
Exam the 5 folders in this directory
Authentication > Authentication services
PNAgent > legacy PNAgent Site used for Receiver 3.X and some thin client devices.
Roaming > Site configuration and credential wallet
Site1 > the store “Site1” configuration.
Site1Web > Receiver for Web, X1 UI and configuration file.
Note: No action required in this step. This is only to show where are the StoreFront site located.
| 14 |
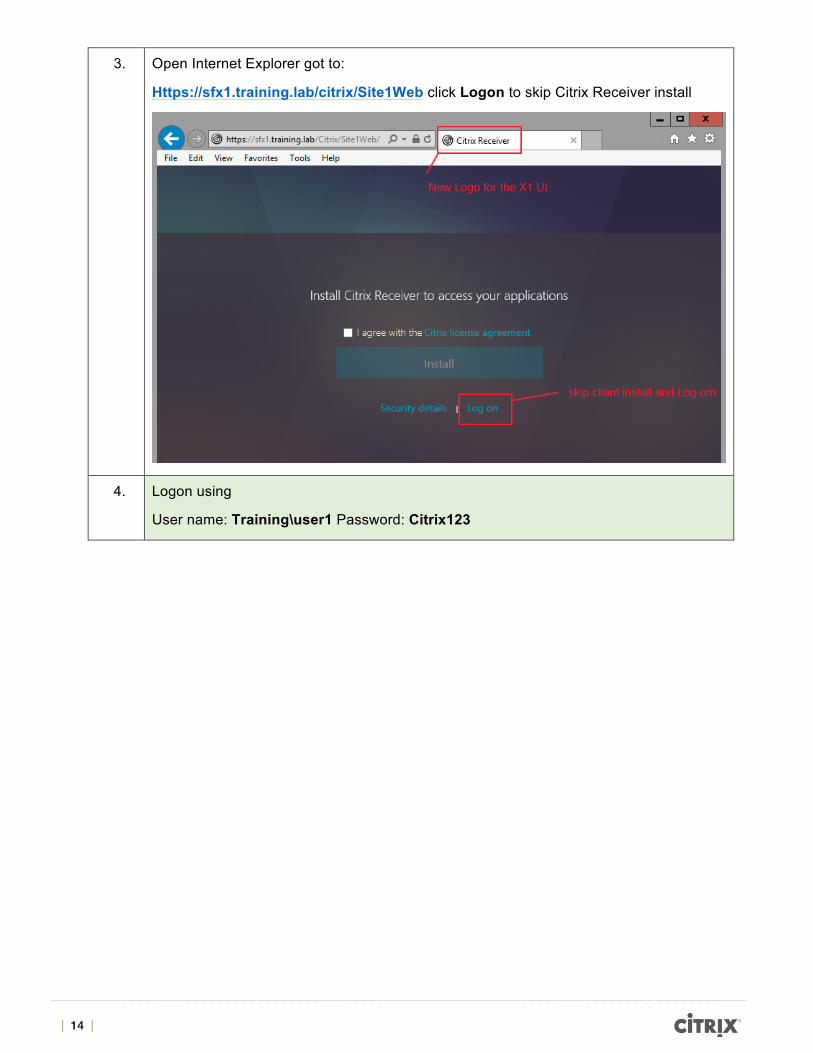
3. Open Internet Explorer got to:
Https://sfx1.training.lab/citrix/Site1Web click Logon to skip Citrix Receiver install
4. Logon using
User name: Training\user1 Password: Citrix123

| 15 |
5. Notice the new UI for Receiver X1.
Click on Add+ for Publisher 2013 application to add in Favorites app.
6. Click on FAVORITES tab.
Notice Publisher 2013 is in the list and right click on the application will allow user to Start the application or Remove the application.

| 16 |
7. Close the browser and reopen the browser and logon to the StoreFront site with the same user ID as before.
https://sfx1.training.lab/Citrix/Site1Web/
User name: Training\User1
Password: Citrix123
Notice the default page is now selected as FAVORITES which is set as default for all users after application subscription is completed.
Exercise Summary Initial review of the new user interface (UI) without modification.
| 17 |
Exercise 3 Configure Classic UI Reversal and Receiver X1 UI Graphic Branding Overview In this exercise, you will learn how to reverse the Receiver X1 UI to Classic green UI. Customize Receiver X1 UI with Citrix StoreFront Admin console.
Step by Step Guidance Estimated time to complete this lab: 15 minutes.
Step Action
1. Logon to server sfx1.training.lab with Training\Administrator account
User ID: training\Administrator
Password: Citrix123
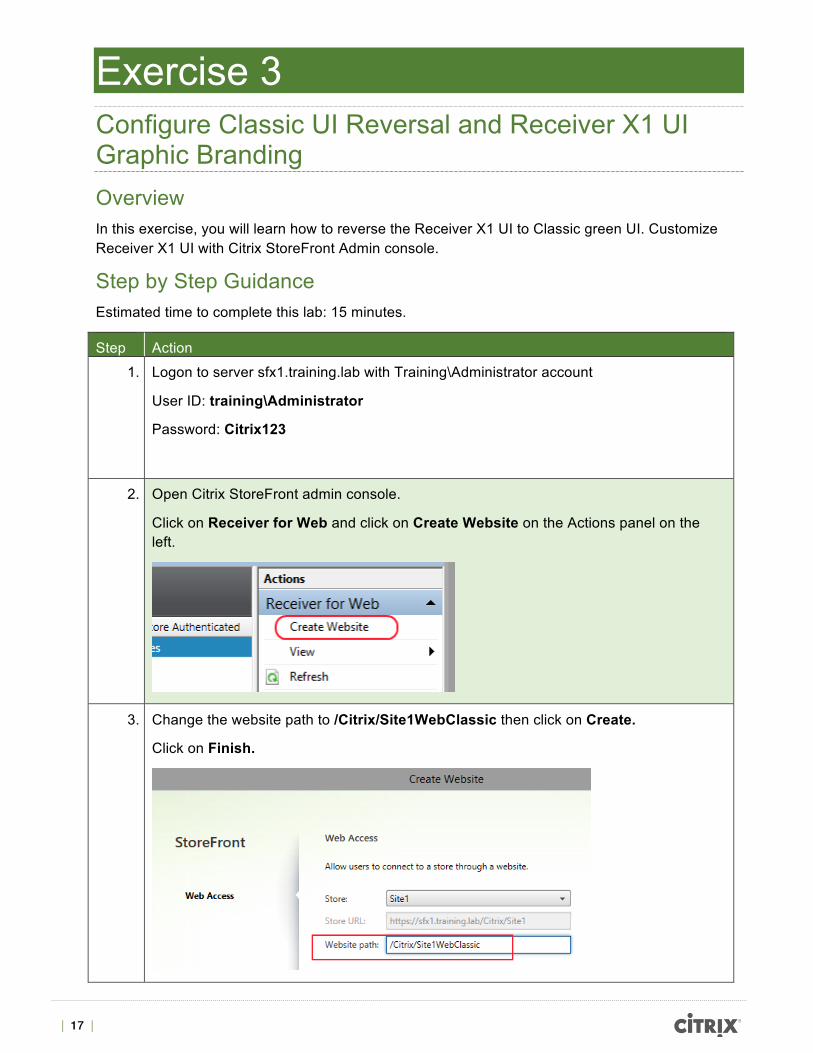
2. Open Citrix StoreFront admin console.
Click on Receiver for Web and click on Create Website on the Actions panel on the left.
3. Change the website path to /Citrix/Site1WebClassic then click on Create.
Click on Finish.
| 18 |
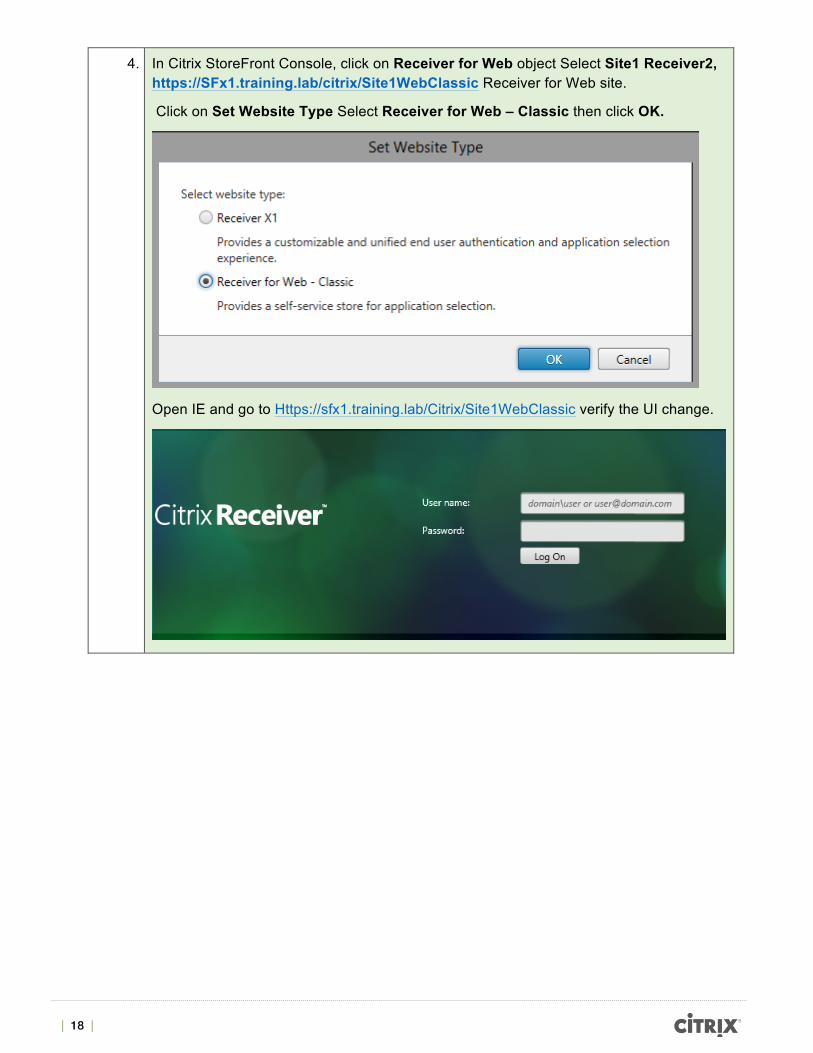
4. In Citrix StoreFront Console, click on Receiver for Web object Select Site1 Receiver2, https://SFx1.training.lab/citrix/Site1WebClassic Receiver for Web site.
Click on Set Website Type Select Receiver for Web – Classic then click OK.
Open IE and go to Https://sfx1.training.lab/Citrix/Site1WebClassic verify the UI change.

| 19 |
5. In Citrix StoreFront Console, click on Receiver for Web object Select Site1 Receiver. Click on Customize Website Ap…
Select the Standard res logo: \\ad\software\energco_logo_color.png
Select High res logo: \\ad\software\energco_logo_white.png
Notice the preview windows change.
Set background color as the color of your choice.
Open IE and logon to https://sfx1.training.lab/citrix/Site1web/
User Id: training\user1
Password: Citrix123

| 20 |
6. The configuration of the branding content is located in c:\inetpubwwwroot\Citrix\Site1Web\Custom
You can find the logo file stored in this directory.
Open Style.CSS with notepad and you can find the change.
Exercise Summary In this lab, we demonstrated the configuration of UI branding with simple logo.
| 21 |
Exercise 4 Manage Featured App Groups Overview In this exercise, we are going to configure 2 Featured App Groups to allow administrator to showcase the Featured Applications to user in the Receiver X1 UI.
Step by Step Guidance Estimated time to complete this lab: 10 minutes.
Step Action
1. Logon to server sfx1.training.lab with Training\Administrator account
User ID: training\Administrator
Password: Citrix123
Open Citrix StoreFront console
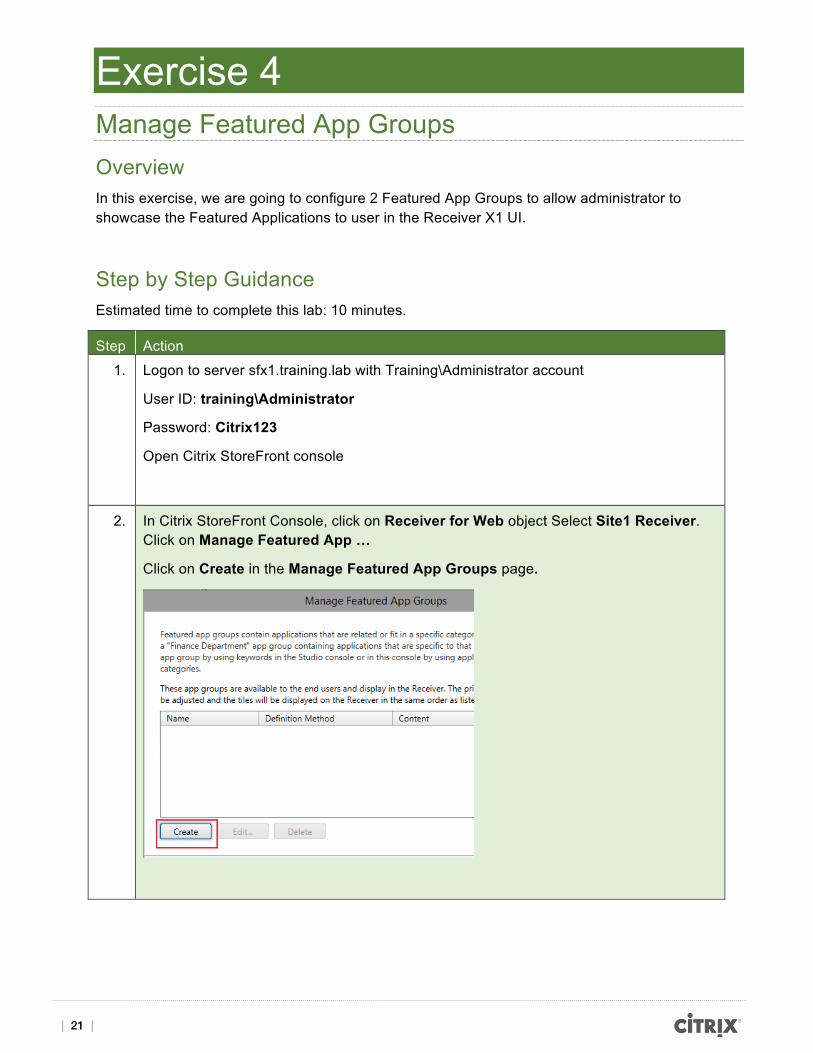
2. In Citrix StoreFront Console, click on Receiver for Web object Select Site1 Receiver. Click on Manage Featured App …
Click on Create in the Manage Featured App Groups page.
| 22 |
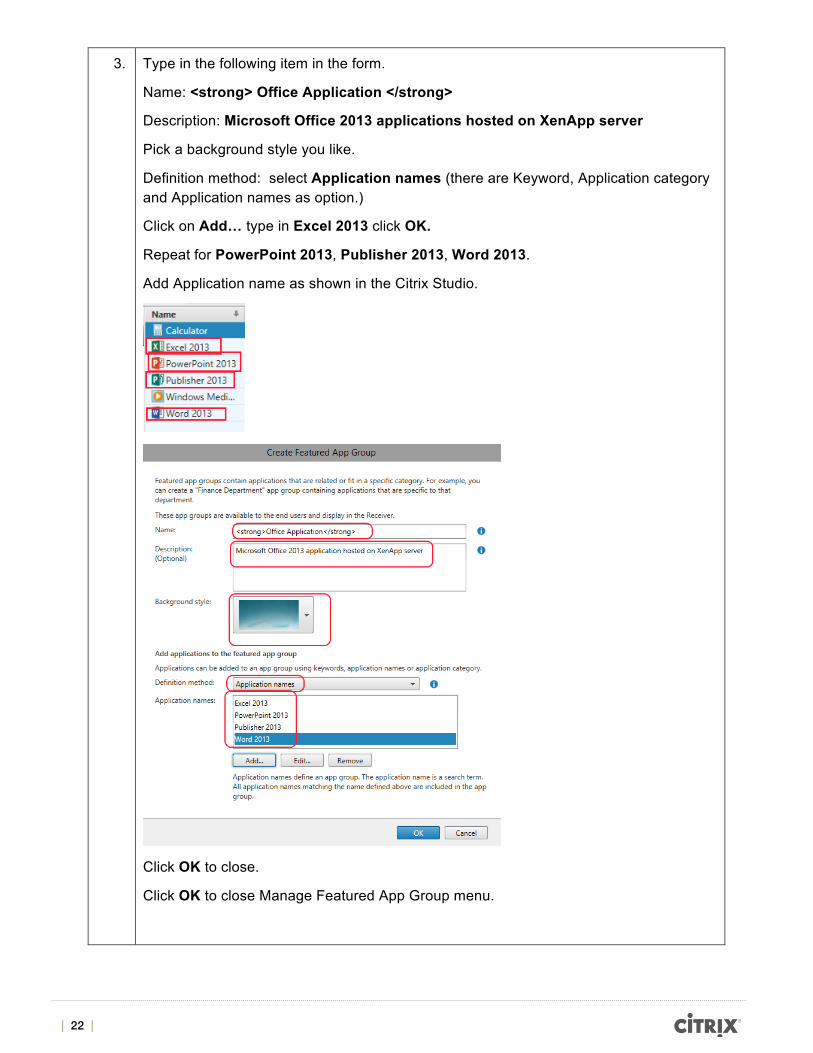
3. Type in the following item in the form.
Name: <strong> Office Application </strong>
Description: Microsoft Office 2013 applications hosted on XenApp server
Pick a background style you like.
Definition method: select Application names (there are Keyword, Application category and Application names as option.)
Click on Add… type in Excel 2013 click OK.
Repeat for PowerPoint 2013, Publisher 2013, Word 2013.
Add Application name as shown in the Citrix Studio.
Click OK to close.
Click OK to close Manage Featured App Group menu.

| 23 |
4. Open IE and logon to Https://sfx1.training.lab/citrix/Site1Web
Notice there are only 3 icons in the “Office Application” group.
Due to limited space, we limited the display to 3 icons on the page.
Click on the Office Application group, you will see the full application list in the “Office Application” group.
Exercise Summary In this exercise, we configured receiver X1 Application Group.

| 24 |
Exercise 5 Manage Application Listing via Keywords in StoreFront Overview In this exercise, we are going to manage application listing via keywords.
Step by Step Guidance Estimated time to complete this lab: 15 minutes.
Step Action
1. Logon to server ddc.training.lab with Training\Administrator account ( you can RDP to the server directly run> mstsc /v ddc.training.lab)
User ID: training\Administrator
Password: Citrix123
Open Citrix Studio
2. Click on Delivery Groups > Applications.
Select Windows Media Player click on Properties in the Actions panel.

| 25 |
3. In description and keywords: type in “Keywords:Auto”
This will enable automatic subscription of this app for user who have access to it.
Note: User is allowed to remove this app from his subscription.
4. Click on Delivery Groups > Applications.
Select Word 2013 click on Properties in the Actions panel.
| 26 |
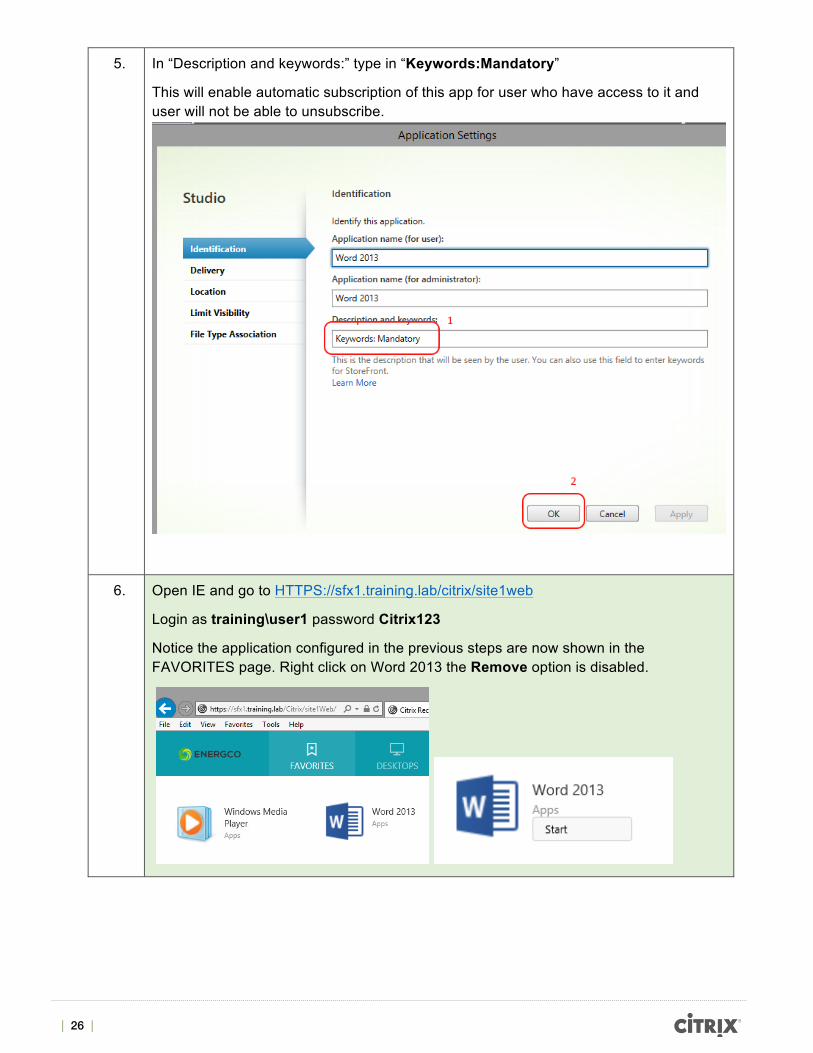
5. In “Description and keywords:” type in “Keywords:Mandatory”
This will enable automatic subscription of this app for user who have access to it and user will not be able to unsubscribe.
6. Open IE and go to HTTPS://sfx1.training.lab/citrix/site1web
Login as training\user1 password Citrix123
Notice the application configured in the previous steps are now shown in the FAVORITES page. Right click on Word 2013 the Remove option is disabled.

| 27 |
Exercise Summary In this exercise, we use keywords to automate application subscription for our users. To learn more about keywords such as Prefer, Featured go to the following eDoc link.
http://support.citrix.com/proddocs/topic/receiver-windows-40/receiver-windows-config-app-delivery.html

| 28 |
Exercise 6 Receiver X1 Add Custom Message Overview In this exercise we will add custom message to the Receiver X1 editing a java script.
Step by Step Guidance Estimated time to complete this lab: 15 minutes.
Step Action
1. Logon to server sfx1.training.lab with Training\Administrator account
User ID: training\Administrator
Password: Citrix123
Open File Explorer
Go to C:\inetpub\wwwroot\Citrix\site1Web\custom
2. Edit Script.js with Notepad.
| 29 |
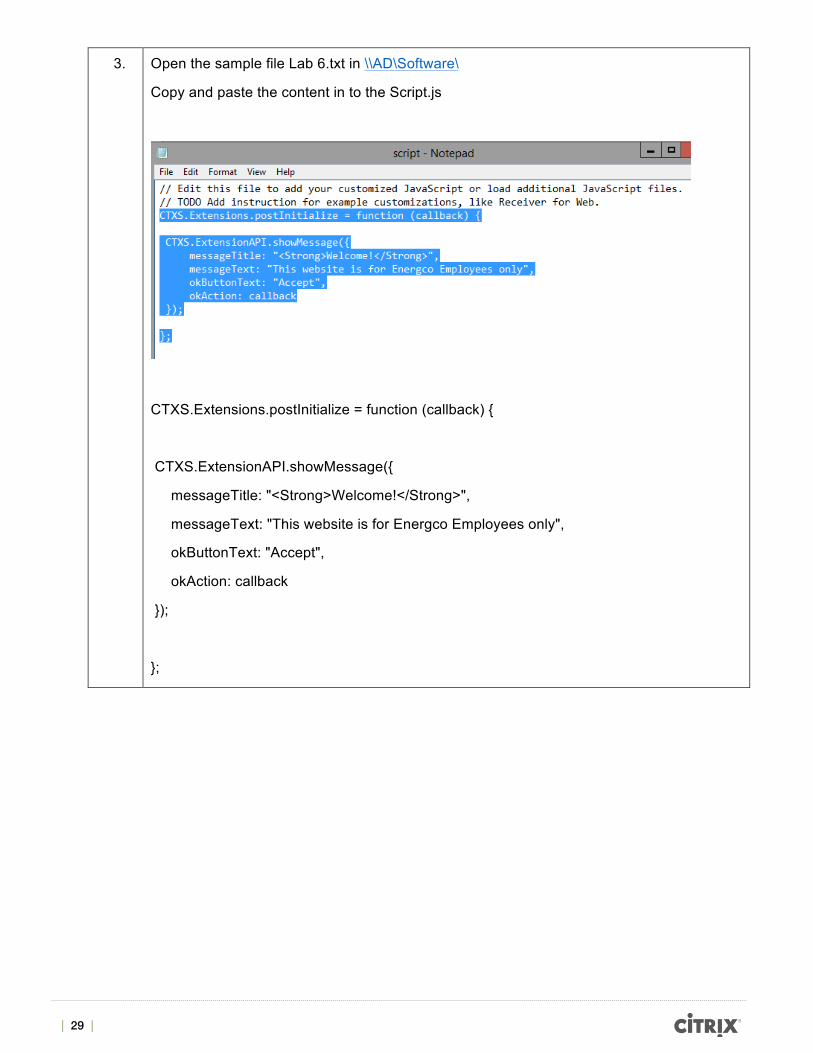
3. Open the sample file Lab 6.txt in \\AD\Software\
Copy and paste the content in to the Script.js
CTXS.Extensions.postInitialize = function (callback) {
CTXS.ExtensionAPI.showMessage({
messageTitle: "<Strong>Welcome!</Strong>",
messageText: "This website is for Energco Employees only",
okButtonText: "Accept",
okAction: callback
});
};
| 30 |
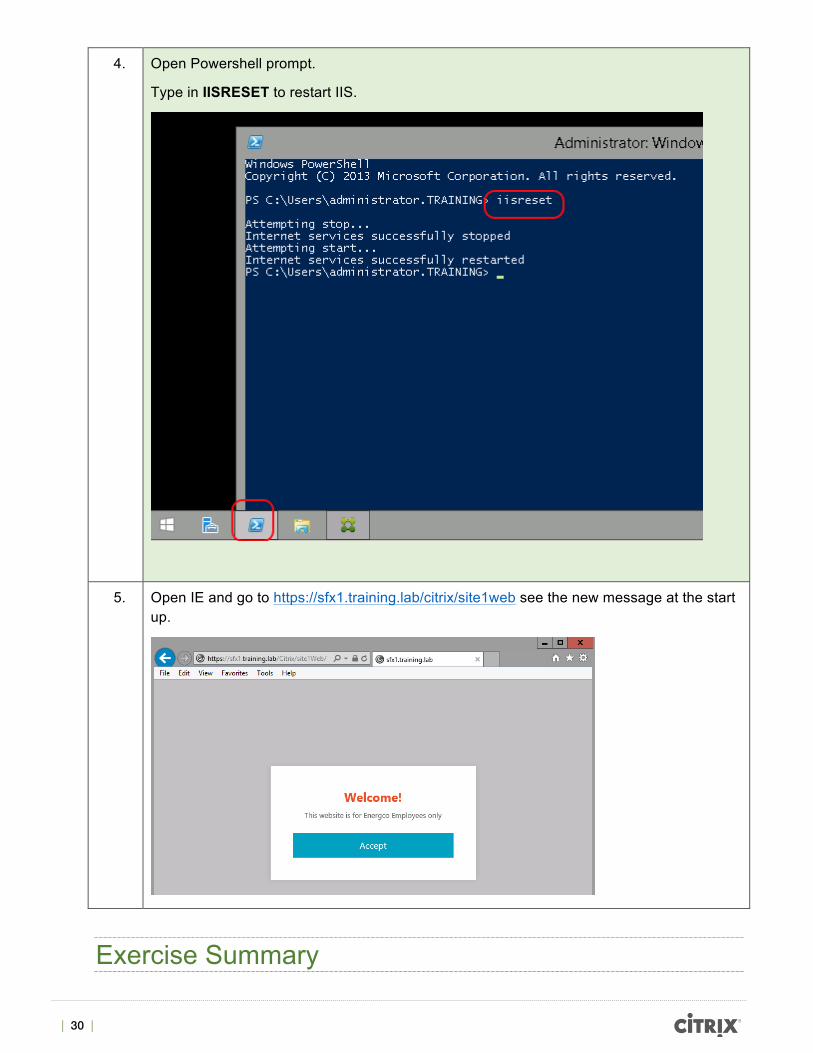
4. Open Powershell prompt.
Type in IISRESET to restart IIS.
5. Open IE and go to https://sfx1.training.lab/citrix/site1web see the new message at the start up.
Exercise Summary

| 31 |
In this exercise, we demonstrated a simple Java script customization on the Receiver X1 UI.
To learn more about this customization go to the following Citrix blog.
http://blogs.citrix.com/2015/03/09/deploying-and-branding-receiver-x1/

| 32 |
Exercise 7 Enable HTML5 Client and Update HTML5 Receiver Overview In this exercise, we will enable HTML5 Client access for StoreFront and setup the required policy in Citrix studio.
Step by Step Guidance Estimated time to complete this lab: 20 minutes.
Step Action
1. Logon to DDC.training.lab as Training\administrator
Open Citrix Studio
Click on Policies node
Click on Create policy

| 33 |
2. Enable WebSockets to support HTML5 client.
On the search windows type Websockets.
Click on Select WebSockets connections Edit Setting select Allowed then click OK
Then click Next.
Select Delivery Group click on Assign.
| 34 |
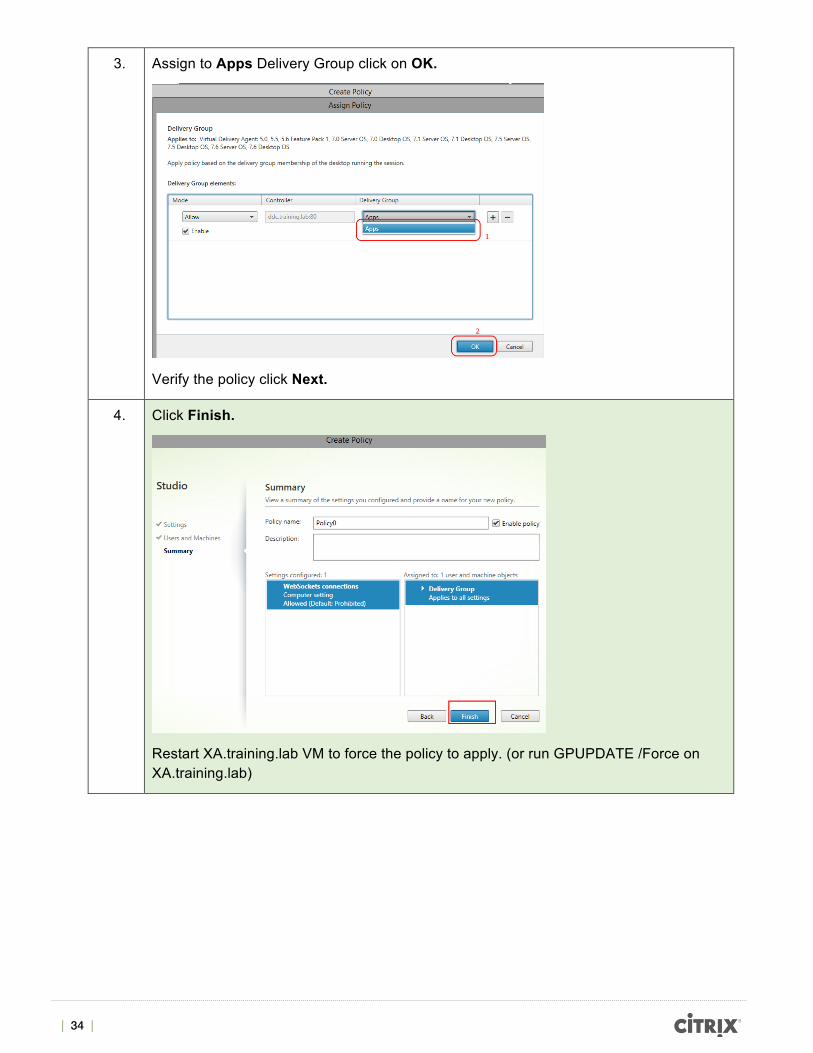
3. Assign to Apps Delivery Group click on OK.
Verify the policy click Next.
4. Click Finish.
Restart XA.training.lab VM to force the policy to apply. (or run GPUPDATE /Force on XA.training.lab)

| 35 |
5. log on to SFX1.training.lab with training\administrator
Go to Receiver for Web in Citrix StoreFront node select Site1 Receiver, click on Deploy Citrix Receiver and select Use receiver for HTML5 if local install fails click OK.
6. Notice the HTML 5 receiver version is listed with the Receiver for Website.
| 36 |
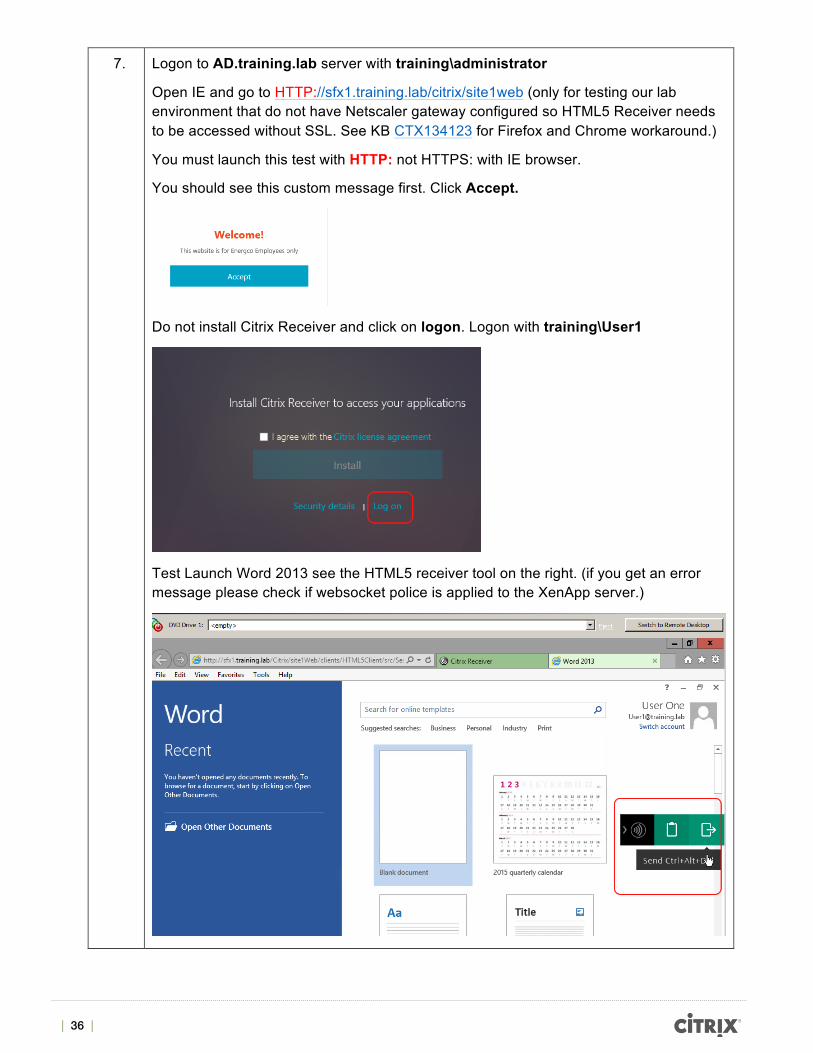
7. Logon to AD.training.lab server with training\administrator
Open IE and go to HTTP://sfx1.training.lab/citrix/site1web (only for testing our lab environment that do not have Netscaler gateway configured so HTML5 Receiver needs to be accessed without SSL. See KB CTX134123 for Firefox and Chrome workaround.)
You must launch this test with HTTP: not HTTPS: with IE browser.
You should see this custom message first. Click Accept.
Do not install Citrix Receiver and click on logon. Logon with training\User1
Test Launch Word 2013 see the HTML5 receiver tool on the right. (if you get an error message please check if websocket police is applied to the XenApp server.)
| 37 |
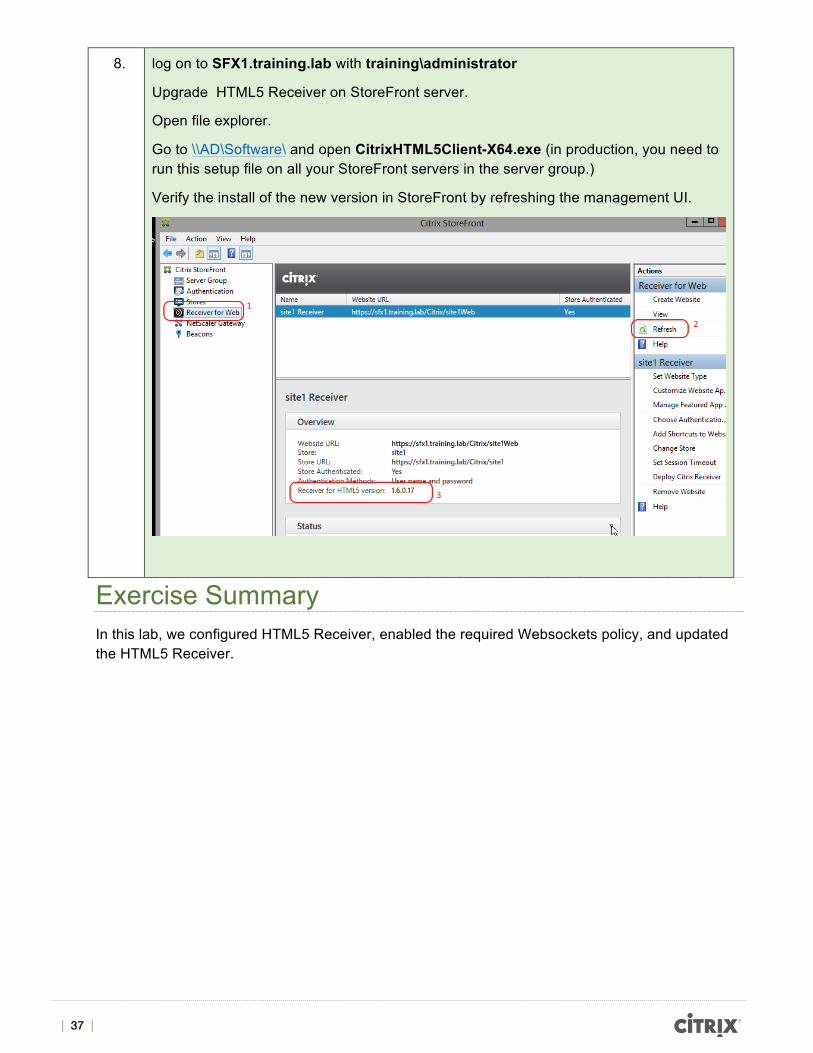
8. log on to SFX1.training.lab with training\administrator
Upgrade HTML5 Receiver on StoreFront server.
Open file explorer.
Go to \\AD\Software\ and open CitrixHTML5Client-X64.exe (in production, you need to run this setup file on all your StoreFront servers in the server group.)
Verify the install of the new version in StoreFront by refreshing the management UI.
Exercise Summary In this lab, we configured HTML5 Receiver, enabled the required Websockets policy, and updated the HTML5 Receiver.

| 38 |
Revision: Change Description Updated By Date
1.0 Original Version James Hsu May 2015
About Citrix Citrix Systems, Inc. designs, develops and markets technology solutions that enable information technology (IT) services. The Enterprise division and the Online Services division constitute its two segments. Its revenues are derived from sales of Enterprise division products, which include its Desktop Solutions, Datacenter and Cloud Solutions, Cloud-based Data Solutions and related technical services and from its Online Services division's Web collaboration, remote access and support services. It markets and licenses its products directly to enterprise customers, over the Web, and through systems integrators (Sis) in addition to indirectly through value-added resellers (VARs), value-added distributors (VADs) and original equipment manufacturers (OEMs). In July 2012, the Company acquired Bytemobile, provider of data and video optimization solutions for mobile network operators.
http://www.citrix.com