handbook for teacher
TRANSCRIPT

Web Programming and
Internet Teaching
Methods
HANDBOOK FOR TEACHERS
Vocational School of Economics and Management
„Yordan Zahariev”
Kyustendil 2014

Financed under IPA Bulgaria – Macedonia Cross-border Programme 2007 - 2013
2
CONTENTS
HTML, WEB DESIGN AND CSS
HTML.............................................................................................................................................................................. 5
SUBJECT 1: HTML language ............................................................................................................................................ 5
What is HTML language? ................................................................................................................................................... 5
Developing HTML pages .................................................................................................................................................... 5
Structure of an HTML document ........................................................................................................................................ 6
HTML elements in BODY section ........................................................................................................................................ 6
WEB DESIGN................................................................................................................................................................. 13
SUBJECT 2: Preparation for development of a web site ................................................................................................ 13
1. Research. ...................................................................................................................................................................... 13
2. Planning and building the structure. ............................................................................................................................ 13
3. Design and development of the site. ............................................................................................................................ 13
4. Testing. ......................................................................................................................................................................... 13
5. Maintenance. ............................................................................................................................................................... 13
SUBJECT 3: The Dreamweaver 8 Interface .................................................................................................................... 13
1. Start working ............................................................................................................................................................... 13
2. Setting up a local site ................................................................................................................................................... 14
3. Starting a new HTML page........................................................................................................................................... 15
4. Saving a webpage - File/Save. ..................................................................................................................................... 16
5. Rules to observe when naming a file ........................................................................................................................... 16
6. The interface ................................................................................................................................................................ 16
7. Working with panels and documents ........................................................................................................................... 17
8. Insert bar (Insert) ......................................................................................................................................................... 17
9. Page title ...................................................................................................................................................................... 17
10. Page preview .............................................................................................................................................................. 17
SUBJECT 4: Webpage designing with tables. Setting up tables. Formatting tables. ....................................................... 17
Financed under IPA Bulgaria – Macedonia Cross-border Programme 2007 - 2013
3
1. Setting up a table ......................................................................................................................................................... 18
2. Formatting cells – Properties panel ............................................................................................................................. 19
3. Sorting a table .............................................................................................................................................................. 20
4. Modifying a table ......................................................................................................................................................... 20
5. Nested tables................................................................................................................................................................ 21
SUBJECT 5: Text input in the webpage .......................................................................................................................... 21
1. Text input ..................................................................................................................................................................... 21
2. Setting up the content structure .................................................................................................................................. 22
3. New lines ...................................................................................................................................................................... 22
4. Non-breaking space ..................................................................................................................................................... 22
5. Text alignment ............................................................................................................................................................. 22
6. Formatting characters.................................................................................................................................................. 22
7. Adding special characters ............................................................................................................................................ 22
8. Horizontal lines ............................................................................................................................................................ 22
9. Automatic date insertion ............................................................................................................................................. 23
10. Lists ............................................................................................................................................................................ 23
SUBJECT 6: HOW TO WORK WITH IMAGES ................................................................................................................... 24
1.Inclusion of images ....................................................................................................................................................... 24
2. Working with images ................................................................................................................................................... 26
3. Editing images .............................................................................................................................................................. 28
5. Creating image links and image mapping ................................................................................................................... 29
SUBJECT 7: Hypertext and image links .......................................................................................................................... 29
Insertion and locking to named anchors ....................................................................................................................... 29
1. Designation .................................................................................................................................................................. 29
2. Types. .......................................................................................................................................................................... 30
3. Creating hyperlinks. ..................................................................................................................................................... 30
4. Modifying a link's destination. ..................................................................................................................................... 30
6. Insertion of an anchor and creation of an internal link to it. ....................................................................................... 30
7. Insertion of an anchor and creation of an external link to it. ....................................................................................... 31
8. Editing anchors. ........................................................................................................................................................... 31
Financed under IPA Bulgaria – Macedonia Cross-border Programme 2007 - 2013
4
9. Setting a color and format for hyperlinks..................................................................................................................... 31
SUBJECT 8: Insertion of flash animations and flash buttons.......................................................................................... 32
1. Creating flash text ........................................................................................................................................................ 32
2. Insertion of flash buttons ............................................................................................................................................. 32
3. Insertion of flash animation. ........................................................................................................................................ 33
SUBJECT 9: How to create a web photo album ............................................................................................................. 33
SUBJECT 10: Interactive forms. Insertion of rollover images ......................................................................................... 34
1. Advantages. ................................................................................................................................................................. 34
2. Tools for insertion of interactive elements. .................................................................................................................. 34
3. Insertion of a rollover image. ....................................................................................................................................... 35
SUBJECT 11: Developing new styles. Internal and external styles. ................................................................................ 36
1. Definition. .................................................................................................................................................................... 36
2. Designation. ................................................................................................................................................................. 36
3. Types. ........................................................................................................................................................................... 36
5. Creating new external files........................................................................................................................................... 37
CSS ............................................................................................................................................................................... 39
SUBJECT 12: What is CSS language (Cascading Style Sheets) ......................................................................................... 39
SUBJECT 13: Styles in an HTML document .................................................................................................................... 43
Financed under IPA Bulgaria – Macedonia Cross-border Programme 2007 - 2013
5
HTML
SUBJECT 1: HTML language
What is HTML language?
HTML (abbreviation of the English: term: HyperText Markup Language, translated in
Bulgarian as „език за маркиране на хипертекст“) is the main markup language used for description
and design of web pages. HTML is an Internet standard, and the rules are set by the International
Consortium W3C. The present version of the standard is HTML 5.0 (28 October 2014)
Documents are described by means of special elements called HTML elements or markup
symbols consisting of labels or tags (HTML tags) and angle brackets (as in the element <html>).
HTML elements are the fundamental building units of a web page. They form different parts of the
text in a web page such as titles, citations, sections, hypertext links, etc. Most often HTML elements
are in pairs like <h1> and </h1>.
In most cases, the HTML code is written in text files and then it is placed on servers,
connected to the Internet. These files consist of text with markup codes – instructions for the browser
how to display the text. It is the web browsers that can read the HTML documents and display them
as web pages. Browsers do not show the HTML tags, they use them to interpret the contents of the
page.
The main advantage of the HTML is that the so created documents can be displayed on
various devices. Documents can be as properly displayed on the small display of a pager or a mobile
telephone as on the monitor of a personal computer.
The very first open public description of HTML is a document called “HTML tags”, was first
put on the Internet by Tim Berners-Lee at the end of 1991. He described 18 elements, comprising a
basic, pretty simple frame of HTML.
Developing HTML pages
To develop HTML-based web page you can use a simple text editor. This way requires good
knowledge of HTML tags so that they can be integrated in the text to be displayed on the page. Also,
of more frequent use are some user-friendly instruments which do not presume the user's knowledge
of HTML and allow web page design by the WYSIWYG method. The Word word-processor is an
adequate tool for this purpose which allows the user to save a document as an HTML file and make
changes in it. There are special developing HTML tools such as Microsoft, FrontPage, Macromedia
Dreamweaver, Notepad, Notepad++, Sublime Text etc.
Financed under IPA Bulgaria – Macedonia Cross-border Programme 2007 - 2013
6
Structure of an HTML document
The HTML standard specifies the elements that devide a document into a descriptive and a
functional (executable) part. The format of an HTML document is as follows:
Descriptive part
HTML is an element which tells the WWW user that the next information is an HTML code.
Each document starts with <HTML> and ends with </HTML>. The contents is saved in a file with
.html or .htm extensions for those operating systems that recognize file name formats.
HEAD is a title element that provides identification information about the HTML document.
<TITLE>, <BASE>, <META> may be used in it. The title element comes after the <HTML>
element and before the <BODY> element, where the contents of the document is. The element's start
tag is <HEAD> and the end tag is </HEAD>.
TITLE is part of the HEAD element. It starts with <TITLE> and ends with </TITLE>. When
a WWW client interprets the document, the input document title will be displayed in the window
title. The title text will not be included and displayed in the document's main field, however, this
function should not be ignored.
Executable part
BODY is the second, the longest and the most essential part of the HTML document. It is the
document's body where you place the information to be displayed to the WWW user. The element's
start tag is <BODY>coming right after </HEAD> and its end tag is </BODY > just before
</HTML>. The title part allows attributes to the overall appearance. Generally, the element looks like
this:
<HTML> - “BEGINNING OF DOCUMENT ”;
<HEAD> - “TITLE LABEL”;
<TITLE>My first web page </TITLE>
</HEAD>
<BODY> - “ESSENCE”;
Learning HTML is fun!
</BODY>
</HTML> - “END OF DOCUMENT”.
HTML elements in BODY section
1. Paragraph format - <P> - is the instruction for a new paragraph. To increase the space between
paragraphs you can use an empty definition by not entering text between <P> and </P> but a special
string ( ). The new paragraph instruction can be used in two formats – short or detailed, the
latter provides options for alignment of the text - ALIGN.
Short code: <P>Text</P>

Financed under IPA Bulgaria – Macedonia Cross-border Programme 2007 - 2013
7
Detailed code: <P ALIGN=”left”|”center”|”right”> Text </P>
2. New line - <BR> - This element provides single line spacing within a paragraph or a list when the
text is to be organized in multiple separate lines.
3. Comment - <!> - <!-- Text --> is an element which enters a comment into the HTML code and that
will not be interpret and therefore will not be displayed in the document's main field.
4. Colors - rrbbgg defines a color of the applied attribute according to the RGB color model, specified
as a hexadecimal number starting with the symbol "#" or the English name of the respective color.
- rr – a hexadecimal byte specifying the red component with values from 00 to FF.
- bb - a hexadecimal byte specifying the green component with values from 00 to FF.
- gg - a hexadecimal byte specifying the blue component with values from 00 to FF.
5. Horizontal line - <HR> is the instruction that results in a horizontal line at the specified place. The
weight and the type of the line is controlled with a number of options. For most WWW users this line
has an empty line before and after it. This element is useful when dividing the document in separate
units or chapters.
Alignment attributes (options):
ALIGN=”LEFT”|”RIGHT”|”CENTER” - aligns the line horizontally - left|right|center.
SIZE=n – specifies the line's weight depending on the number of n in pixels.
WIDTH=n|n% - specifies the line's length with number n in pixels or per cent.
CO enters a comment LOR ="#rrggbb" – specifies the line's color.
6. Character format - tag for bold type - <B> …</B>
- tag for underlined characters - <U> …</U>
- tag italic - <I> … </I>
- <MARQUEE>…</MARQUEE> - scrolling text
- <SUB>… </SUB> - subscript
- <SUP> … <SUP> - superscript
- <FONT> …</FONT> - specifies the text color, size and font
• color COLOR=“# rrggbb”
• size SIZE= _ ( one of the numbers 1,2,3,4,5,6,7);
• font FACE= “Tahoma” (name of font).
Example: <FONT COLOR =“#CC00FF” SIZE=”5” FACE=“Dauphin”> text </FONT>
<I>Learning HTML is fun! </I>
7. Headings – Size of characters. The tags from <h1> to <h6> define the headings in an HTML
document. <h1> defines the most significant heading. <h6> defines the least important one.
<h1>HEADING 1</h1>
………………………………

Financed under IPA Bulgaria – Macedonia Cross-border Programme 2007 - 2013
8
<h6>Heading 6</h6>
8. Options for the <BODY> element The title part of the body allows that attributes specifying the
overall appearance be used. Generally the element will look like this:
<BODY ALINK=”#rrbbgg” BACKGROUND=URL BGCOLOR=”#rrbbgg” LINK=”#rrbbgg”
TEXT=”#rrbbgg” VLINK=”#rrbbgg”>
• LINK – specifies a hyperlink's color;
• ALINK- specifies an active hyperlink's color;
• VLINK- specifies a visited hyperlink's color; ;
• BACKGROUND - specifies the URL address of an image (gif, jpg or png), used as
background of the document;
• BGCOLOR - specifies the color of the page;
• TEXT - specifies the color of the characters in the text;
• BGPROPERTIES = ”fixed” – scrolling option;
• rrbbgg - specifies the attribute's color according to the RGB model.
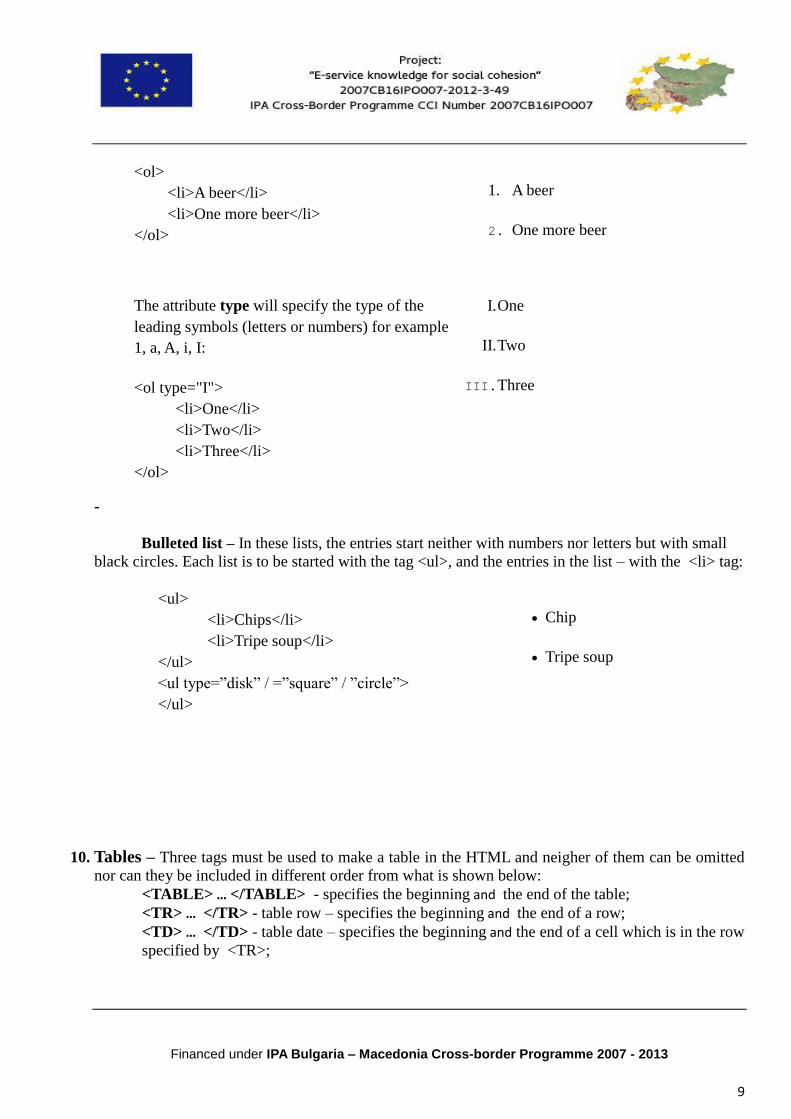
9. Lists
- Numbered lists – Numbered lists start with the tag <ol> and each entry in the list
– with <li>:
Financed under IPA Bulgaria – Macedonia Cross-border Programme 2007 - 2013
9
-
Bulleted list – In these lists, the entries start neither with numbers nor letters but with small
black circles. Each list is to be started with the tag <ul>, and the entries in the list – with the <li> tag:
<ul>
<li>Chips</li>
<li>Tripe soup</li>
</ul>
<ul type=”disk” / =”square” / ”circle”>
</ul>
Chip
Tripe soup
10. Tables – Three tags must be used to make a table in the HTML and neigher of them can be omitted
nor can they be included in different order from what is shown below:
<TABLE> … </TABLE> - specifies the beginning and the end of the table;
<TR> … </TR> - table row – specifies the beginning and the end of a row;
<TD> … </TD> - table date – specifies the beginning and the end of a cell which is in the row
specified by <TR>;
<ol>
<li>A beer</li>
<li>One more beer</li>
</ol>
1. A beer
2. One more beer
The attribute type will specify the type of the
leading symbols (letters or numbers) for example
1, a, A, i, I:
<ol type="I">
<li>One</li>
<li>Two</li>
<li>Three</li>
</ol>
I. One
II. Two
III. Three

Financed under IPA Bulgaria – Macedonia Cross-border Programme 2007 - 2013
10
<TH> … </TH>- used to specify table headings – aligns the cell in the center and specifies
bold type characters in it.
<table border="1">
<tr>
<th>Column 1</th>
<th>Column 2</th>
<th>Column 3</th>
</tr>
<tr>
<td>row 1, Column 1</td>
<td>row 1, Column 2</td>
<td>row 1, Column 3</td>
</tr>
<tr>
<td>row 2, Column 1</td>
<td>row 2, Column 2</td>
<td>row 2, Column 3</td>
</tr>
</table>
The Table options specify the table
appearance; they are included in the <TABLE>
tag. The options should be consistent with each
other and they cannot exceed the size of the table:
- WIDTH – specifies the table absolute (in pixels, for example: WIDTH=100) or relative
(compared to the size of the screen, for example WIDTH=80%) width;
- HEIGHT - specifies the table absolute height (in pixels, for example: HEIGHT=100);
Column 1 Column 2 Column 3
row 1, column 1 row 1, column
2 row 1, column 3
row 2, column 1 row 2, column
2 row 2, column 3

Financed under IPA Bulgaria – Macedonia Cross-border Programme 2007 - 2013
11
- BGCOLOR – specifies the color for the table's background, for example
BGCOLOR=#0000FF;
- BORDER – specifies the border weight in dots (pixels), for example BORDER=5; by
default the weight is 2 pixels; BORDER=0 will create an invisible border; borders are helpful when a
table is created and can be removed at any time;
- BORDERCOLOR – specifies the border color; a hexadecimal equivalent of the desired
color;
- BORDERCOLORDARK="#rrggbb" – specifies the color for the darker borders (upper
and left cell borders, bottom and right table borders);
- BORDERCOLORLIGHT="#rrggbb" – specifies the color for the lighter borders (bottom
and right cell borders, upper and left table borders);
- BACKGROUND – specifies the image to be used as a background for the table; not
recommended, for example BACKGROUND="image.gif";
- ALIGN – defines the position (alignment) of the table or a cell; possible options: left, center,
right;
- VALIGN - defines the the vertical position (alignment) of the table or a cell; possible
options: top, center, bottom;
- HSPACE – adds distance to both left and right borders of the table; for example
HSPACE=20 (in pixels);
- VSPACE - adds distance to both upper and bottom borders of the table (in pixels);
- CELLPADDING – specifies the distance in dots (pixels) from the border to the text, i.e. the
margin, for example CELLPADDING=3;
- CELLSPACING - specifies the space in dots (pixels) between the fields (respectively
between table rows and columns), for example CELLSPACING=3.
The default options for CELLPADDING and CELLSPACING are "1", not "0", so if you do
not want to have space between the cells and would like to minimize the distance between the cell
contents and its border, then you should always specify CELLPADDING="0" CELLSPACING="0".
- <CAPTION> … </ CAPTION > - Table captions
Combining rows and columns – combining adjacent cells
The numbers in the tags <TD> and <TH> specify the number of columns and rows which are
to be combined in one cell:
- ROWSPAN = „n” - the merge takes place vertically and downward in the specified area;
- COLSPAN = “n” - the specified cell will spread onto the area of the table that would
otherwise be adjacent cells on the right.
11. Hyperlinks - Hyperlinks are links to/addresses of resources on the net – other HTML files,
documents, created with various applications, images, etc.
Hyperlinks to an Internet address – In the following example we will use the address for the site
http://abv.bg/. <a href="http://abv.bg">ABV Mail</a>
Financed under IPA Bulgaria – Macedonia Cross-border Programme 2007 - 2013
12
The mail will open on the page of this tutorial. This is useful when you create links to pages
on your site. However, if the link directs to an external page, it is more convenient that it open in a
new window. To specify how the link will be handled, you can use the target options.
- If you want the link to open in the same window, then use target="_self" or leave it out
since that is the default option.
- If you want the link to open in a new window, then you need to specify target="_blank"
<a href="http://abv.bg" target="_blank">ABV Mail</a>
Hyperlinks to a page defined on the same site
<a href="author.html"> Author</a>
Anchor hyperlinks – Anchors are links to places or elements in the same HTML document. As, for
example, in the tutorial, you are reading, we have specified an achor for the beginning of the text:
<a name="begin" id="begin"></a>
<h3>LEARNING MODULES -> Web site administration</h3>
The key attribute when specifying an anchor is name. You have to give the anchor a unique
name and no other anchor in the document can have the same name. Somewhere in the document, a
hyperlink to this anchor is defined. It should be like this:
<a href="#begin">Link to the beginning of this document</a>
12. Images – Images are declared with the following tag: <img >. It does not require an end tag. Here is
an example of image inclusion:
<p>This is a centered image:
<img src="/kuche.jpg" width="200" height="150" alt="calligraphy-dog" align="middle" >
</p>
The following options are attributes of the <img > tag:
name of image-file. src="address-of-file" – where "address-of-file" is the path to the
directory (from the referring directory) where the image is, including the file name. Do not
forget to specify the exact location of the image when it is in a different folder from that of the
.html document.
width="width" in pixels
height="height" in pixels
alt="alternative name" – The text that will be displayed in the place of the image when for
some reasons it cannot be loaded.
Financed under IPA Bulgaria – Macedonia Cross-border Programme 2007 - 2013
13
A good approach is to use meaningful alternative names: some of the site visitors
might have bad sight and they may use text-to-speech browsers. The only way for them to know
about the image is through the alternative name.
Positioning to the text. align="position"- and one of the following options for position:
o bottom: The bottom of the image aligns with the text.
o middle: The middle line of the image and the text are one line.
o top: The top of the image is on the line of the text.
o left: The image is placed in the left part of the display.
o right: The text is on the left and the image – immediately to the right of it.
Border = "border" – Image border.
Financed under IPA Bulgaria – Macedonia Cross-border Programme 2007 - 2013
14
WEB DESIGN
SUBJECT 2: Preparation for development of a web site
1. Research.
Before you start working on the site, it is good to know:
- what the target audience of your site will be; what the visitors' interests are;
- why there is a demand for the site;
- what its visitors would like to find;
- what is the most relevant contents for the site;
- what is the message of the site or what you would like to share with its visitors;
- it is important that you know your competitors and how they build their sites.
2. Planning and building the structure.
The key characteristics for the success of a web site is how comprehensible and easy to work
with it is.
a) the site's structure – in order to be clear, communicable and user-friendly you should plan
the site's structure. You need to develop a detailed map of the site.
b) build a structure of files and folders – we recommend that you make separate folders for
different file types (a folder for the HTML code, for images, multimedia, cascade sets of styles
(CSS)).
3. Design and development of the site.
This is the stage where you define general types of styles that provide specific information for
the appearance, interface, colors and styles that are to be used in the site.
4. Testing.
You should test how different browsers (Microsoft Internet Explorer, Mozilla Firefox, Opera,
Safari) display the pages, make sure you do this for all pages and links.
5. Maintenance.
This stage includes addition of new pages, update of links, change of contents and images.
SUBJECT 3: The Dreamweaver 8 Interface
1. Start working
When you launch Dreamweaver for the first time on your computer, you need to choose one
of the two options:
- Designer – integrates all Dreamweaver windows and panels in an enviroment which is
optimized for the purpose of visual web site development;
- Coder – suitable for programmers who work mainly with HTML and other languages
for web programming. Choose Designer.
Financed under IPA Bulgaria – Macedonia Cross-border Programme 2007 - 2013
15
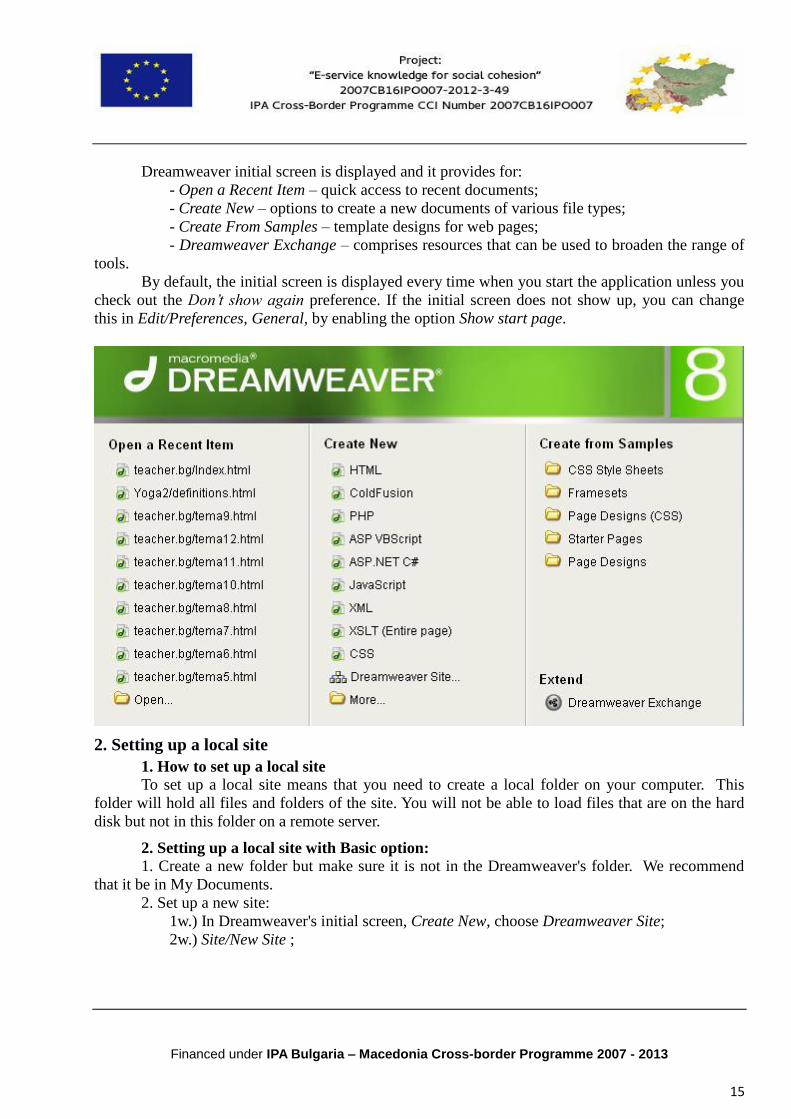
Dreamweaver initial screen is displayed and it provides for:
- Open a Recent Item – quick access to recent documents;
- Create New – options to create a new documents of various file types;
- Create From Samples – template designs for web pages;
- Dreamweaver Exchange – comprises resources that can be used to broaden the range of
tools.
By default, the initial screen is displayed every time when you start the application unless you
check out the Don’t show again preference. If the initial screen does not show up, you can change
this in Edit/Preferences, General, by enabling the option Show start page.
2. Setting up a local site
1. How to set up a local site To set up a local site means that you need to create a local folder on your computer. This
folder will hold all files and folders of the site. You will not be able to load files that are on the hard
disk but not in this folder on a remote server.
2. Setting up a local site with Basic option: 1. Create a new folder but make sure it is not in the Dreamweaver's folder. We recommend
that it be in My Documents.
2. Set up a new site:
1w.) In Dreamweaver's initial screen, Create New, choose Dreamweaver Site;
2w.) Site/New Site ;
Financed under IPA Bulgaria – Macedonia Cross-border Programme 2007 - 2013
16
3w.) Site/Manage Sites and press button New. Choose Site in the pop-up menu. A dialog
box opens Site Definition with two tabs – Basic (simple) and Advanced (complete). The default
option is Basic and it will take you through a number of steps. Advanced gives additional options and
settings and does not provide the text explanations available in Basic. Choose Basic.
3. Type the site name in the first input field (it will remain hidden for the site's visitors); press
button Next
4. Dreamweaver will ask you whether you would like to work with server technology. Choose
the first option, button Next.
5. Decide on how you will handle the files before you publish them – choose the first option.
6. Specify the folder where you will keep the local files – this is the local root folder that you
have already created; press Next.
7. Specify the remote server on which you will publish your files:
- None
- Local/Network – to test the files on you computer first
- FTP –to publish the files on a remote server
- Choose None and press Next
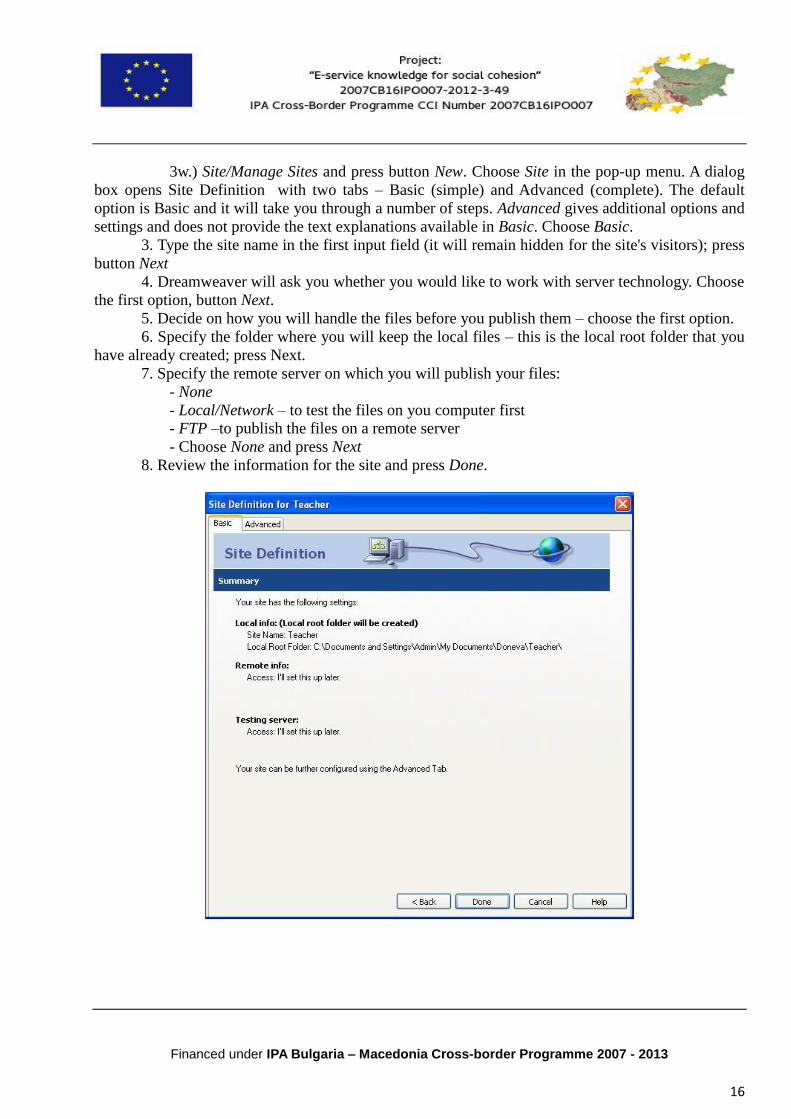
8. Review the information for the site and press Done.
Financed under IPA Bulgaria – Macedonia Cross-border Programme 2007 - 2013
17
3. Starting a new HTML page
1w.) File/New – a dialog box opens New Document with 2 tabs: General and Templates.
Choose General and then from the category Basic Page choose HTML. Press Create button.
2w.) In Dreamweaver's initial screen, choose the column Create New, HTML.
4. Saving a webpage - File/Save.
If the file already exists, when importing images and other elements all paths to these will be
loaded properly.
Dreamweaver automatically adds an HTML extension to the name of the file for HTML
documents. If the default extension is not HTM then go to Edit/Preferences, category New Document
and specify HTML in the input text field Default Extension.
5. Rules to observe when naming a file
The filename can include letters from the Latin alphabet, Arabic numbers (the name cannot
start with a number though), underscore.
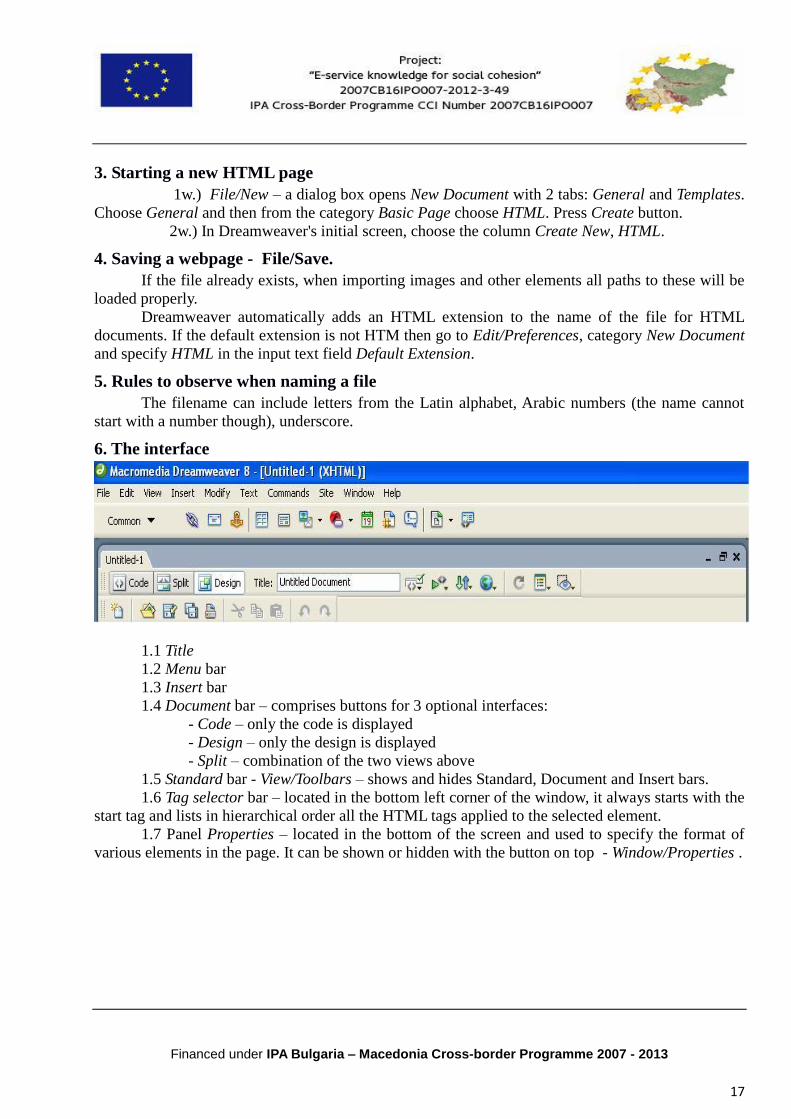
6. The interface
1.1 Title
1.2 Menu bar
1.3 Insert bar
1.4 Document bar – comprises buttons for 3 optional interfaces:
- Code – only the code is displayed
- Design – only the design is displayed
- Split – combination of the two views above
1.5 Standard bar - View/Toolbars – shows and hides Standard, Document and Insert bars.
1.6 Tag selector bar – located in the bottom left corner of the window, it always starts with the
start tag and lists in hierarchical order all the HTML tags applied to the selected element.
1.7 Panel Properties – located in the bottom of the screen and used to specify the format of
various elements in the page. It can be shown or hidden with the button on top - Window/Properties .

Financed under IPA Bulgaria – Macedonia Cross-border Programme 2007 - 2013
18
7. Working with panels and documents
They provide options for the input and change of the contents. They can be selected in the
Window menu. A mouse click on the arrow under the panel name will show or hide the panel. A
click on the icon against the panel name will open the panel menu. By default the CSS, Application,
Tag Inspector and Files groups are shown.
8. Insert bar (Insert)
a) designation – it is used to add contents to web pages. It can be visualized as a list or tab
menu.
b) to switch the formats:
- If in a list menu format, you can change the format and display it as a combination of tabs
with button Common/Show as Tabs;
- If the format is the tab menu, you can switch to the list menu format – from Options in the
upper right of the panel Insert/Show as menu.
c) options:
- Common – contains the most used elements of a web page like hyperlinks, tables, images,
templates.
- Layout –provides options for table creation, layers and frames; options for table appearance;
- Forms – contains all elements that build online forms;
- Text – with buttons for text formats;
- HTML – contains buttons for inclusion of data (meta data, key words and description) in the
Head section of the webpage;
- Application – for inclusion of dynamic webpage elements;
- Flash Elements – provides options for files that are created with Flash;
- Favorites – facilitates the user to make a list of preferred objects in the Insert bar.
9. Page title
The title of each page will be displayed in the browser's title bar and it should be specified
before you input the page's contents. (in the Document bar, field Title).
10. Page preview
a) choose a browser – browsers display web pages differently and that is why the pages
should be tested beforehand:
1) File/Preview in Browser/Edit Browser List;
2) A dialog box opens - Preferences, choose category Preview in Browser – you can
see a list of installed browsers. You can add/remove a browser to/from the list (if you have more than
one browser on your computer) with the buttons (+) and (–).
Financed under IPA Bulgaria – Macedonia Cross-border Programme 2007 - 2013
19
b) page preview – Document bar, button Preview/Debug in Browser (F12).
SUBJECT 4: Webpage designing with tables. Setting up tables. Formatting tables.
There are three layouts available in Dreamweaver: Standard, Layout, Expanded (choose a
layout in Insert bar, category Layout, buttons View/Тable Mode). The Expanded layout displays tables
slightly bigger and with thicker borders. The tables do not look the way they are displayed by the
browsers.
1. Setting up a table
1w.) Insert bar, category Layout, button Table;
2w.) Insert bar, category Common, button Table;
3w.) Insert/Table;
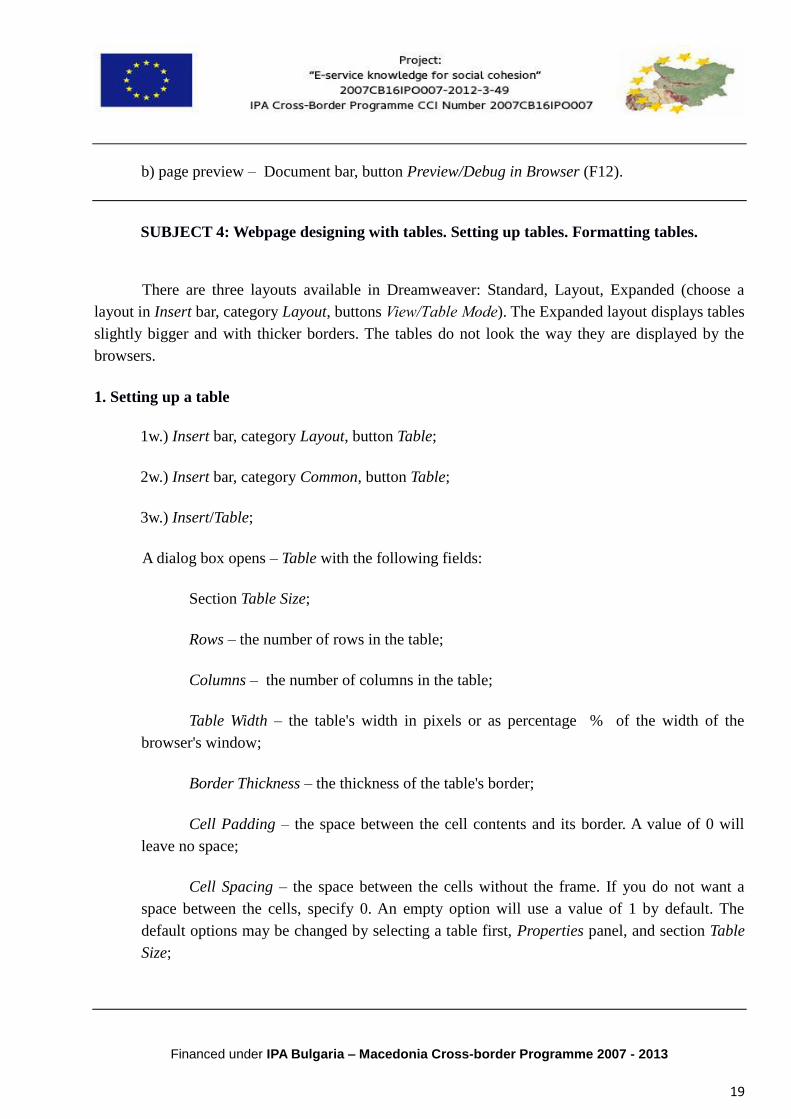
A dialog box opens – Table with the following fields:
Section Table Size;
Rows – the number of rows in the table;
Columns – the number of columns in the table;
Table Width – the table's width in pixels or as percentage % of the width of the
browser's window;
Border Thickness – the thickness of the table's border;
Cell Padding – the space between the cell contents and its border. A value of 0 will
leave no space;
Cell Spacing – the space between the cells without the frame. If you do not want a
space between the cells, specify 0. An empty option will use a value of 1 by default. The
default options may be changed by selecting a table first, Properties panel, and section Table
Size;

Financed under IPA Bulgaria – Macedonia Cross-border Programme 2007 - 2013
20
Section Header – options for the content of the heading cell: None – no heading cell,
Left – for rows only, Top – for columns only , Both – for both rows and columns.
Heading rows and columns describe the content. They are common for tables with data and
are not used when tables are set up for the sake of design and situation of different elements. Header
option has an attribute for scope – thus, the row and column heading cells content is considered the
identification of each cell.
Example: If you specify the option for top column title Top and you input Order in the
topmost cell of the first column, then the content of the rest cells in the column will begin with the
word Order.
Caption – it is visible to all visitors and can be aligned to the top, bottom, left or right of the
table.
Summary – the summary information is not displayed on the webpage. It only describes the
table's designation and context.
When a table is selected, horizontal and vertical lines are displayed. These mark the width and
the height of the rows and columns respectively. If you click outside the table, the lines disappear.
Table visual aids can be enabled/disabled in View/Visual Aids/Table Widths.
To move from cell to cell – use Tab. If the input text is long, the table automatically adjusts
the respective column's width to take the text. The top row is heading and the cell content is centered
and bold type.
2. Formatting cells – Properties panel
a) cell background – with Properties/BackGround Color (Bg) you can choose a background
color for the cell, button BackGround URL of cell selects an image.
b) automatical table formatting:
1) Commands/Format Table…
2) a dialog box Format Table – choose one of the proposed optional formats. This tool
is disabled for tables with headings.
Financed under IPA Bulgaria – Macedonia Cross-border Programme 2007 - 2013
21
c) alignment of cell content – panel Properties, tick Horz – horizontal alignment, Vert –
vertical.
d) No wrap – the text cannot be shown in multiple lines; the cell width gets bigger in order to
take the whole information; Header – specifies the selected cell as heading; the cell content is
centered and bold.
e) border color – button Brdr, Properties panel.
3. Sorting a table
You can sort the content of one column (or more). Tables with merged cells cannot be sorted.
1) select the table
2) Commands/Sort Table
3) A dialog box opens - Sort Table with the following options:
Sort By – specifies which column is to be sorted;
Order – whether the content is to be sorted alphabetically or numerically;
Then By – defines a second sorting criteria;
Sort Includes the First Row – whether the first row is included in the range
Sort Header Rows, Sort Footer Rows – whether the heading rows will be sorted too;
Keep All Row Colors The Same After the Sort has been Completed – if the option is
checked, row colors attributes do not change for the same data.
Example: Let us sort a table the first row of which is colored and after the sorting the content
of the first row moves to the second row. If the option is checked, then the color, too, will move onto
the second row. Alternatively, the color remains on the first row.
4. Modifying a table
a) modifying the size of rows and columns – Properties panels, options W and H
Financed under IPA Bulgaria – Macedonia Cross-border Programme 2007 - 2013
22
b) insert a new row/column:
1w.) place the cursor in the last cell of the table and press Tab
2w.) click in the last row/column, Modify/Table/Insert Row, Insert Columns, Insert
Rows or Columns
c) Dividing cells
1) select a cell
2) Properties panel, button Split Cell or Modify/Table/Split Cell
d) Combining cells
1) select the cells
2) Properties panel, button Merge Cell or Modify/Table/Merge Cell
You can combine any number of cells as long as their selection form a rectangular shape.
5. Nested tables
1) set up two tables
2) fill in the table that you want to insert into the other table
3) select the table; Edit/Cut
4) click in the cell of the second table where you wish to insert the first one;
Edit/Paste.
SUBJECT 5: Text input in the webpage
1. Text input
1w.) direct input in Dreamweaver's screen
2w.) text copy from other applications
3w.) open an HTML document
Financed under IPA Bulgaria – Macedonia Cross-border Programme 2007 - 2013
23
4w.) open text files directly in Dreamweaver's screen
Dreamweaver can open wordprocessors' text files as long as they are saved as ASCII text
files.
Text files (.txt) always open in a new window in Code view. To preserve the lines of the
ASCII files, you need to change the setting of Dreamweaver Line Break Type:
1) Edit/Preferences
2) A dialog box opens Preferences, Category list, Code Format
3) Line Break Type - CR LF
2. Setting up the content structure
HTML has six heading levels. Level 1 is the largest font, and level 6 – the smallest. When you
specify a text as heading, some space is automatically added to the line; this can me changed only in
CSS:
1) we select the heading 2) In Properties, menu Format, Heading 1- 6
3. New lines
To create a new line without space above it (new single line), you can do the following:
1w.) new line (line break) – Shift + Enter – note that this is a new line and not a new
paragraph, therefore you do not have additional space between the lines;
2w.) Insert/HTML/Special Character/Line break;
3w.) From Insert bar, tab Text, menu Characters, Line break;
4. Non-breaking space
It is inserted between characters, words or other elements that should not be separated as
mathematical equations, proper names or dates.
We place the cursor somewhere in between the words
1w.) Ctrl + Shift + Space
2w.) Insert/HTML/Special Characters/Non-breaking Space;
3w.) The Insert bar, tab Text, menu Characters, Non-breaking Space;
5. Text alignment
There are five alignment alternatives: Default (no alignment is specified), Align Left (text
aligned to the left margin), Align Center (aligned to the center), Align Right (aligned to the right) as
well as Justify in panel Properties. The best alignment styles for text and images are provided with
CSS.
6. Formatting characters
1) select the text to be formatted
2) Properties panel, buttons B, I or Text/Style
Teletype – characters are displayed with constant width
7. Adding special characters
We can add characters that do not have a respective button on the keyboard. These have
special HTML codes and alternative key combinations.
The Insert bar, Text page, menu Characters, choose a symbol
Example: © - copyright information

Financed under IPA Bulgaria – Macedonia Cross-border Programme 2007 - 2013
24
The Characters menu is not complete. For additional symbols – Insert/HTML Special
Characters/Other
8. Horizontal lines
a) insertion – Horizontal lines (horizontal rules) run across the page and visually divide it into
sections.
1w.) The Insert bar, HTML page, button Horizontal rule
2w.) Insert/HTML/Horizontal rule
A horizontal line places with preliminary set up spaces above and below, this can be modified
only in CSS.
b) horizontal line properties – they are displayed in the Properties panel when the line is
selected.
W – line width
H – line height
Pixels – measurement units (pixels, percent)
Shading – shadow
Align – alignment style
Class – CSS styles
9. Automatic date insertion
Dreamweaver provides you with an option to insert date and time and trace the time of the
last page modification. The program updates these automatically each time the page is saved. This
date is not dynamic and it does not change to reflect the time when the page is just read.
1w.) The Insert bar, category Common, button Date
2w.) Insert/Date – a dialog box opens:
Day format – choose the day
Date format – choose a date format
Time format – choose a time format
Update automatically on save – if the option is checked, the is automatically
updated each time the page is saved, the date format can me changed at any time by:
1) Set the date
2) In Properties panel, Edit date format – An Insert date dialog box opens –
make the necessary changes; OK
10. Lists
There are three types of lists in Dreamweaver: numbered (ordered), bulleted (unordered) and
lists of definitions (definition lists).
1. Numbered lists 1w.) In Properties panel, button Ordered List
2w.) Text/List/Ordered List
2. Bulleted lists (lists starting with symbols) These may be with small dots or squares.
1w.) In Properties panel, button Unordered List
2w.) Text/List/Unordered List
3. Additional options
Financed under IPA Bulgaria – Macedonia Cross-border Programme 2007 - 2013
25
1) click anywhere in the list
2) Properties panel, button List Item… or Text/List/Properties
3) List Properties dialog box opens:
attribute List Type – type of the list
attribute Style – style of the list
attribute New Style – style of different list items (not the whole list)
attribute Reset Count to – change of numbering type starting from the point of
the cursor and on
4. Lists of definitions These lists comprise of terms and their definitions. The defined term is aligned to the left and
its definition is indented to the right and placed on the next line.
Text/List/Definition List
5. Nested lists Nested lists can be of the same type as of the parent list or different. When inserted in other
lists, the nested items receive different numbers. In bulleted lists, the leading symbols (bullets) are
different.
1) select the nested list; 2) button Text Indent
SUBJECT 6: HOW TO WORK WITH IMAGES
1.Inclusion of images
1. Graphic formats on the web
The process of working with images to save them in a suitable for the web form is called
optimization and it can be done with computer software for graphic design such as Macromedia
Fireworks and Adobe Photoshop. The key consideration at the choice of design format is the best
possible quality at the smallest filesize.
a) GIF (Graphic Interchange Format) – it is suitable for text, vector graphic, images of few
colors or small size. GIF supports an 8-bit pallette, i.e. up to maximum of 256 colors. GIF images
load fast, there are a greater number of options for their optimization and they are used to create
animation and transparency effects. The file extension is gif.
b) JPEG (Joint Photographic Experts Group) – the best choice for photographs (you can save
smaller than the GIF files with a better quality) and images of a great color pallette. JPEG uses a 24-
bit pallette, preserving all nuances. The file extensions are jpg and jpeg.
c) PNG (Portable Network Graphic) – it provides more options for color control – you can
preserve all colors just like with JPEG, or limit their number as with GIF. PNG does not support
animation and such images are not displayed by some older browsers. The file extension is png.
2. Insertion of an image The image can be:
- a small image tiled across the page and covering the whole background with the size of the
browser's window. It is not affected by the scrolls.
Financed under IPA Bulgaria – Macedonia Cross-border Programme 2007 - 2013
26
- a larger image whose location is specified by CSS. They define whether the image will be
tiled horizontally, vertically, in both directions or will not tile at all.
You should save your files before you import an image. The relative paths on the hard disk
will not be recognized on the remote server. If you insert an image without saving the document
beforehand you might get “incorrect” display.
a) in a separate page ( by creating a style)
1) Modify/Page Properties, category Appearance
2) button Browse – to search for image files. There is an optional provision to specify
the image repetition. You can also define page fields – very useful when the image affects
their size.
b) in all pages of the site (by creating an external style)
1) in case you do not have an external style (rule)already, you will have to create one;
if you have one – panel CSS Styles, list All Rules – select the rule body (it redefines the tag
that contains the document contents), button Edit Style.
2) A dialog box opens, CSS Rule Definition for body in name_of_file, category
Background, button Browse
3) A dialog box opens, Select Image Source – find the image of preference; OK or
Select.
If the image file is not in the local site, then Dreamweaver displays a warning and asks
you to put it in the site. All the pages and elements that you use in the site are in the root
folder. Additionally, you can use elements which are not in the root folder, but can be found
on the Internet. For this purpose you will need their absolute addresses. Such elements are not
displayed in the Document window, so if you want to preview the page with them you will
have to do this in a browser.
4) a dialog box CSS Rule Definition:
- choose a repetition style for the selected image – menu Repeat. The available options are:
Repeat – y – the selected background image is repeated vertically
Repeat – x - the selected background image is repeated horizontally
Repeat - the selected background image is repeated both vertically and horizontally
(enabled by default)
No-Repeat – repetition is disabled
- Attachment – with this option you can specify whether the background image is with a fixed
position or it will scroll with the rest of the page (the option cannot be used with not repeated
images).
- Horizontal position and Vertical position – they are used to control the background image
position. The horizontal position values are left, center, right, and the vertical position ones - top,
center, bottom.
3. Deletion of an image 1w.) Modify/Page Properties, Appearance category, field Background – delete the name
of the file
2w.) panel CSS, Properties list, Background attribute– change or delete the name of the file
4. Placing images in the pages 1) In the Insert bar, Common category, Images menu– choose Image (or Insert/Image)
Financed under IPA Bulgaria – Macedonia Cross-border Programme 2007 - 2013
27
2) A dialog box opens, Select Image Source – select an image of preference
Preview images – while searching, you can see what the image looks like
Look in – select the folder you want to search in
Files of Type – use this option to filter the displayed files by file type
File name – displays the name of the selected file
URL – the path that the document will use to load the image
Relative to: Document (by default) – the path to the image that is relative to the
document; on the right you will see the name of document in which the image will be
inserted. Site Root – the path to the image that is relative to the site's root; the site's name is on
the right
Options for dynamic sites:
○ File System – this is the default method for file selection on sites that do not use server
technology
○ Data Sources – the document is created on application server (on dynamic sites)
3) OK
4) Type in alternative text in the filed of Alternate Text in the Image Tag Accessibility
Attributes; OK . The alternative text will be displayed when users disable images, browsers cannot
display images, an image cannot load or for some other reason the user cannot see the image. The Alt
text should be the image's text equivalent – it should describe its function. For a selected image, the
text can be modified in the Properties panel.
2. Working with images
1. Resizing and refreshing images 1w.) Select the image and change the values in the fields for W and H; press Enter or just click
in the Document window.
The new width and height attributes in the img tag make the image look smaller or bigger, yet its real
dimensions have not been decreased (increased). The filesize in the Properties panel does not
change.
2w.) Click on the selected image's handlers and resize it. To keep the proportions, press Shift
and drag the handler in the bottom right corner.
3w.) Use a graphic editor (for example Macromedia Fireworks or Adobe Photoshop) – this
method gives the smallest filesize.
To restore the original dimensions of the image press the button Reset Image To Original Size which
is in Properties panel (there is a refreshment icon that is on the border line between the W and H
fields).
If you need to use large images or images on other servers, then you can define images of not
so good quality (low source image) which load first. The full image is displayed in the same place
when it has loaded. The low source image is just like a dialog box, it can be 'loaded' and defined in
Properties panel, field low src.
2. Image positioning with CSS
Example: Alignment of an image to the left, text wrapping – to the right of the image
1) Panel CSS Styles, New CSS Rule button
2) ○ Class Selector Type; field Name – type in a name for the CSS file; OK
3) A dialog box opens, CSS Rule Definition, Box category

Financed under IPA Bulgaria – Macedonia Cross-border Programme 2007 - 2013
28
All elements in the document are mapped in rectangular areas called boxes. In CSS this concept is
used to control the objects' appearance, position, etc. There are blocks of boxes and each box can
hold other boxes in it.
Choose left in float menu (floating); OK
4) Select an image in the Document window
5) Properties Panel, Class menu– choose the name of the external file in step 2)
3. Naming an image Use short names with small letters, do not include white spaces and special symbols. These
are only internal names.
1) Select the image.
2) Properties panel, type the name in the filename text field (the top left of the panel,
right under the image size).
4. Image borders 1w.) Through definitions in CSS
1) If you have already created CSS to manipulate the image, go to the CSS Style panel,
All Rules list, press button Edit Style; if you do not have a CSS style – create an external
style (rule) to control the image.
2) A dialog box CSS Rule Definition opens, category Border – Set your preferences
for Style, Width, Color; OK
2w.) Through the attribute border of the img tag
1) Select the image
2) Properties panel, field Border – specify your preference
When the image is also a link, the border color will be the default Link Color (unless there is
a CSS style).
5. Adjustment of margins around images Margins are measured in pixels.
1w.) In CSS – each side of objects can be separately controlled
1) Same as in 4.1)
2) A dialog box CSS Rule Definition opens, category Box
In Margin uncheck the Same for all field and make adjustments for Top, Right, Bottom, Left;
Enter.
2w.) Through the attributes H space, V space of the img tag – they add the same margin on
both sides of the image (you cannot add a space to just one side as in CSS)
1) Select the image
2) Properties panel, fields H space, V space – input your preference
6. Preserving a space for an image If an image is not available at the time of the page design, then you may use a placeholder. It
preserves the space and gives an idea of how the final image will look like in place and between the
other elements.
1) Place the cursor at the insertion point;
2) On Insert bar, category Common, menu Images, option Image Placeholder
3) A dialog box Image Placeholder opens – set up your preferences (Name, Width, Height,
Color, Alternate text); OK
Financed under IPA Bulgaria – Macedonia Cross-border Programme 2007 - 2013
29
The reserved space is indicated in the Document window. It is filled in with the specified
color and states the image file name and size. In the browser – you will see a missing image icon in
its place + alternative text in a rectangular box with the size and color, specified in the dialog box.
7. Replacing a placeholder (or one image with another) 1) In the Document window – double click on the placeholder.
2) Select Image Source dialog box opens – select an image; OK
3) The image is displayed in the space of the placeholder in the Document window. The
filename and the alternative text are not brought to the foreground of the image.
3. Editing images
1w.) With an external graphic editor – it must be installed on the computer and set up as
follows:
1) Edit/Preferences
2) A dialog box Preferences opens – it is used to link external graphic editors as default
editors of files with different extensions.
3) Category File Types/Editors
4) Choose gif from the Extensions list. Press button + above the list Editors and select a
graphic editor, such as Fireworks; button Make Primary
5) Repeat step 4) for extensions .jpeg and .png; OK
6) Select an image
7) Panel Properties
Button Edit – opens and modifies the image in an external application
Button Optimize In Fireworks – changes the image's shape, the quality (for JPEG) and
the color pallette (for GIF)
Button Resample – changes the image resolution. It is good to start with a higher
resolution and gradually reach a lower resolution of preference.
2w.) With the use of the built-in tools of Dreamweaver and Fireworks
When you choose a tool, a message is displayed that the action will change the original image
on the disk. Choose OK. This modification affects all copies of the image in the site as well. If you
do not want this to happen, you should make a copy of the image, give it a different name and then
work with it.
- Cropping
1) Select the image
2) Properties panel, Crop tool
You can see a selection area on the image. The area has central and end handlers on its sides.
The selection is smaller than the image and it has almost the same proportions. The image inside it is
clear. When you place the cursor in its center, it takes the shape of an arrow cross and at this point the
selection can me moved. The image can be resized with the help of the handlers.
3) Modify the selection area as you like but leave it smaller that the image; Enter (or double
click in the selection or click on the Crop icon in panel Properties)
The is cropped by the selection. The size of the image is reduced.
To undo the action, click in the Document window off the image (or Edit/Undo Crop or
Ctrl+Z).
- Brightness and contract
Financed under IPA Bulgaria – Macedonia Cross-border Programme 2007 - 2013
30
1) Select the image
2) Properties Panel, tool Brightness and Contrast
3) A dialog box opens Brightness/Contrast which has 2 slide switches with ranges from -100
to +100. Make your adjustments.; OK
- Image sharpening (acutance)
1) Select the image
2) Properties panel, tool Sharpen
3) The Sharpen dialog box opens with a slide switch of 0 to 10. Make your adjustments;
Press OK.
5. Creating image links and image mapping
1. Creating image links 1) Select the image
2) Panel Properties, text field Link – type the path to the linked object
To refer to a document that is not in the local file system or the site's root folder, you will need
to provide the object's absolute address. Absolute paths start with http:// (HyperText Transfer
Protocol) and they imply that the user is connecting to a web server. The rest of the absolute path is
the site's address. All links to documents of external sites are absolute.
4) Save the file and test it in a browser
2. Image mapping (image map) Image mapping is used to devide an image into several areas called hotspots This method is
useful at creating geographic maps.
a) Creating a hotspot
1) Select the image
2) Panel Properties, text field Map (if hidden, click on the down arrow (▼) in the
bottom right of the panel Properties) – input a mapname (do not use spaces and special
symbols)
3) Panel Properties, choose an instrument:
Rectangular Hotspot – creates a rectangular hotspot (draw a rectangle around the targeted area in the
image)
Shift + Rectangular Hotspot - creates a square hotspot
Oval Hotspot - creates a circle hotspot
Polygon Hotspot – creates areas of complex shapes, each mouse click adds a new
point; a straight line connects it to the next point
b) resizing a map
1) Properties panel, tool Pointer Hotspot
2) drag a handler (so that the area includes only one hotspot)
c) moving a hotspot – place the cursor in it a drag it
d) deletion of a hotspot – select the hotspot and press Backspace or Delete
e) addition of Alt text to a hotspot – it describes what the link refers to - Properties panel, text
field Alt for definition of the hotspot's reference - Properties panel, text field Hotspot Link – input the
path to the target Target – specifies how the target is to be opened.
Financed under IPA Bulgaria – Macedonia Cross-border Programme 2007 - 2013
31
SUBJECT 7: Hypertext and image links
Insertion and locking to named anchors
1. Designation
These links direct the users to documents in the site or other resources on the web.
2. Types.
a) Relative – they are limited to the same site and refer to objects located in the site's folders.
Use only that portion of the path that is external for the current referring document.
b) absolute – they provide the full web address of a site or information resource.
3. Creating hyperlinks.
a) Relative
1) Select the word (phrase)
2) Properties panel, button Browse to search for a file
3) Select a file on the hard disk; press OK – the name of the file is displayed in the text
field Link of the Properties panel
b) Absolute
1) Select the word (phrase)
2) Properties panel, text field Link – type in the target's absolute address; press Enter;
c) A hyperlink to an email address
1w.) Simultaneous insertion of the text and email address
1. Click at the insertion point
2. Insert bar, category Common, button Email Link (or Insert/Email Link)
3. A dialog box Email Link: in the Text field – input your name; in field E-mail
– type in your email address;
4. OK – the text is displayed on the page as a hyperlink;
2w.) Creating a link to an existing text on the page
1) Select the text
2) Insert bar, category Common, button Email Link (or Insert/Email Link)
3) Dialog box Email Link , the selected text will be displayed in the Text field
3w.) 1) Click at the point of preference
2) Input the text mailto: and the email address immediately after the word in the
field Link of the Properties panel
4. Modifying a link's destination.
1) Click anywhere in a link
2) Make the necessary changes in the Link field in the Properties panel.
5. Anchor. A certain spot in the page referred to by a link.
6. Insertion of an anchor and creation of an internal link to it.
1) Modify/Page Properties, category Links – set a color for hyperlinks
2) Place the cursor right before the word which will be referred to by a link
3) 1w.) Insert/Named Anchor
2w.) Insert bar, category Common, Named Anchor

Financed under IPA Bulgaria – Macedonia Cross-border Programme 2007 - 2013
32
4) A dialog box Named Anchor opens, in the text field Anchor Name – type a name for the
anchor
5) Select the text to be a hyperlink.
6) 1w.) Properties Panel, panel Link – input #anchor name. The # symbol is mandatory as it
instructs the browser that the link is internal.
2w.) With the mouse drag the Point to File icon on Properties to the anchor. Release the
mouse button when the cursor is over the anchor. The #anchor name is displayed in the text field
Link. This method eliminates typos.
7. Insertion of an anchor and creation of an external link to it.
1w.) 1) Create anchor in the file of reference.
2) Open the file where you will create the link and select the text for the hyperlink.
3) Properties, panel Link – input the name of the file that contains the anchor, #anchor
name
2w.) 1) Open the two files that contain both the anchor and the hyperlink in two separate
windows.
2) Select the link in one file, click on Point to File icon and then go to the designated
anchor in the second file.
8. Editing anchors.
1) Click on the anchor.
2) Properties, field Name – modify the anchor's name.
9. Setting a color and format for hyperlinks.
Unless otherwise specified, a browser will display the page's hyperlinks of its default
settings. They may differ for different browsers. Hyperlinks' color should be in contrast (but not
harshly) with the background and the other elements, so that they are distinctively visualized.
1) Modify/Page Properties…, category Links
2) We set link properties
Link Font – (same as page font) – hyperlinks inherit the styles created for the
document
Link Color – the color of the link before its being visited (the default color is blue)
Visited Links – the color of the link after it has been visited (the default color is purple)
Rollover Links – the color of the link when the cursor is rolled over it
Active Links – the color of the link on mouse click
The color of the link is a hexadecimal number. Or you can click in the color field on the left of
the text field – a palette of color hues opens (button – opens a menu with other color palettes)
Underline Style: - underline style enabled
Always Underline – underline style constantly turned on
Never Underline – underline style disabled
Show Underline Only on Rollover – underline style enabled only on cursor rollover the
hyperlink
Underline on Rollover – the underline disappears once the mouse loses focus on the
link.
3) OK
Financed under IPA Bulgaria – Macedonia Cross-border Programme 2007 - 2013
33
SUBJECT 8: Insertion of flash animations and flash buttons
1. Creating flash text
a) Description – Text of type Flash combines the best characteristics of text and images. You
can use any font and create the text in Dreamweaver. The created text is then saved as a Flash file
with extension .swf.
b) Creation:
1) Go to the insertion point.
2) Insert bar, category Common, menu Media, Flash Text
3) A dialog box Insert Flash Text opens with the following options:
- Font – font
- Size – size
- Color – color
- Text – text to be displayed on the page
- Rollover Color – a second color on mouse rollover the text
4) In the field Save as – input a name and choose extension .swf.
5) The flash text is displayed in the Document window and dialog Flash Accessibility
Attributes opens
6) in Title – enter the text
c) Changing the size of flash text
1) Select Flash text.
2) Drag one of the handlers to change the text size.
Text of type flash is a vector image that preserves its contents when it is resized or scaled. To
keep the dimensional ratio, while resizing the flash text you should keep button Shift pressed.
To view available effects, in panel Properties, press button Play
d) Modification of flash text
1) Double click on Flash text (if it is not enabled, first press button Stop on panel
Properties)
2) A dialog box opens Insert Flash Text – make the necessary changes
3) Button Apply – to see the result
2. Insertion of flash buttons
A flash graphic is vector, such files are of a small size and they are loaded faster compared to
raster graphics. You can insert flash button without having flash.
a) Flash buttons' status depending on the mouse cursor point and whether a mouse button is
pressed or not
1) The button's status when the mouse cursor is placed over it;
2) The button when the mouse cursor is placed over it but no mouse button is pressed;
3) The button when the mouse cursor is placed over it and the mouse button is pressed;
b) Creation:
1) The Insert bar, Common category, Media menu, Flash button icon
2) A dialog box Insert Flash Button

Financed under IPA Bulgaria – Macedonia Cross-border Programme 2007 - 2013
34
3) In the Style field – choose a style
Button Text – the text to be seen on the button
Font and Size – font and size of characters
Sample – preview of the button's appearance. To see how it works simply move
to mouse over the button.
Bg color – button's color
Save as – input a name with extension .swf; OK;
4) The Flash Accessibility Attributes dialog box opens – in the Title field – input the
title of the button (the text)
5) In the Properties panel press the Play button – you can see the button the way it
will be displayed in the browser.
c) Modifying of flash buttons
1) Double click on the Flash button icon
2) A dialog Insert Flash Button opens – make the necessary changes
3) Press the Apply button – you will see the result
d) Addition of new button templates
1) Create buttons in Flash as SWT Generator Template
2) Save these in Configuration\Flash Objects\Flash Buttons of the Dreamweaver's
folder.
3. Insertion of flash animation.
You can insert flash animation only if it has already been created. This type of animations
cannot be designed directly in Dreamweaver, you will need to use Flash.
1) Start a new paragraph.
2) On the Insert bar, Common category, Media menu, Flash
3) In the Select file dialog box – choose a video with an extension .swf. Browsers will not
display files of types .fla .swt. Press the Select button.
4) A dialog box Object Tag Accessibility Attributes opens – in the Title field – input the name
of the Flash animation file.
5) On the Properties panel:
Loop – check the option out for constant repetition;
Autoplay – check out if you want the animation to start automatically;
Play button – press the button to view the animation;
Stop button – the button stops the animation.
SUBJECT 9: How to create a web photo album
How to make a photo album of various designation using Dreamweaver? For any purpose
from showing family photos to friends to offering catalogs, etc. In your gallery, each photo has to
have a Thumbnail, in other words a smaller variant of the photo that will be displayed prior to the real
photo and will be referring to it. First decide on which photos to include in the gallery and place them
in one folder. Do not worry about their size, Fireworks will take care of that and will reduce them and
create their Thumbnails. And you will also have to start Fireworks…
Financed under IPA Bulgaria – Macedonia Cross-border Programme 2007 - 2013
35
1) Open one of your pages in Dreamweaver.
2) Make a separate folder for your photos. Give it a name like 'album', 'photoalbum' or
whatever comes to your mind.
3) Back in Dreamweaver, go to Commands --> Create Web Photo Album. You will see a box
with a lot of options and settings in it. Here is a list with their designation.
Photo Album Title – You will type the name of your album here.
Subheading Info – This field is optional, however, the text you input here will be
displayed with the big photo.
Other Info – You will see this text on your page along with the big photo.
Source Images Folder – Press the Browse button and point to the folder that contains
all your photos.
Destination Folder – This folder has a special function, it was created in step 2). So
click on the Browse button and point to it;
Thumbnail Size – You can specify the size of the thumbnails on your page, so make
your adjustment (Recommendation: 100 x 100 is the best size)
Columns – Set up your preference for the number of columns in which the thumbnails
will be arranged on the screen. (Recommendation: 4 or 5 is a good number)
Thumbnail Format – You can use either JPEG or GIF for your Thumbnails.
Photo Format - ou can use either JPEG or GIF for your big photos.
Once you have done the settings, press OK. Now Fireworks will start creating all those
smaller images we already mentioned earlier and which we called Thumbnails. That will take a few
minutes depending on the total number of the photos in the folder and their size. When Fireworks has
done its job, you will be able to look at your web album.
4) A new page with thumbnails will be displayed in your page. It will have the name
index.html. Now you will have to place your template on the page with the thumbnails.
5) Below the name of your photo album there will be three other folders: Thumbnails,
Images, and Pages.
- Thumbnails – all small images – icons will be in this folder.
- Images – all your photos (of original size) are here.
- Pages – all the pages that have links in them to the Thumbnails.
SUBJECT 10: Interactive forms. Insertion of rollover images
Interactive elements and user feedback are essential web site components. An interactive
process implements an action and its response, it is dual-direction communication.
1. Advantages.
a) web site contents is easy to read and comprehend;
b) Direct and easy navigation through all the pages.
2. Tools for insertion of interactive elements.
a) Dynamic pages and use of database;
b) Macromedia Flash;
Financed under IPA Bulgaria – Macedonia Cross-border Programme 2007 - 2013
36
c) Quick Time Virtual Reality (QTVR) – a format that supports 360-degree panorama views
and interactive components;
d) JavaScript – used to create scripts executed for the user by the browser;
e) Java Server Pages (JSP) – scripts executed by the server and then the result is sent to the
user;
f) Behavior in Dreamweaver – a dialog with programs with JavaScript code that can be easily
included in the web site.
Behaviors are combinations of one action or series of actions and an event.
The action is what takes place as a consequence of the user's step ( for example replacement
of images).
The event is what provokes the action (for example the mouse rolls over an image or is
clicked).
- predefined behaviors
- addition of behaviors
- creation of custom behaviors
3. Insertion of a rollover image.
This is an images that changes when the user places the mouse over it. This is done with 2
images that are placed in the same position.
1) The Insert bar, Common category, Images menu, Rollover Image button (or
Insert/Interactive Image/Rollover Image)
2) A dialog box Insert Rollover Image opens
Image Name – image name (the default names are Image1, Image2, …..). Do not
include spaces or special symbols and do not start the name with a number.
Browse buttons – choose the files for the original (the first) and the alternative
(second) images. The two images must have equal dimensions.
Alternate Text – input Alt text
Preload Rollover Image – the browser loads the second image at the display of the
page. If the option is not enabled, the second image will load only after the user has placed the mouse
over the first image.
When Click Go to URL – use the Browse button to select the file that will be the link
for the rollover image. It will be shown in the Link field on the Properties panel when the rollover
image is selected.

Financed under IPA Bulgaria – Macedonia Cross-border Programme 2007 - 2013
37
SUBJECT 11: Developing new styles. Internal and external styles.
1. Definition.
a) A style – also called a rule – is a set of attributes that defines and controls the appearance of
each element. Each style has a name that tells the browsers how to display a certain element;
b) Style Sheets – a group of styles;
c) Cascading styles – they define the hierarchy and priority of the styles. Each new style in a
page predefines the previous style.
2. Designation.
Styles control the format, the appearance and the layout of the elements in the web pages. All
browsers of versions 4.0 and higher support CSS. The CSS style code is placed in the head tag of the
HTML page.
3. Types.
a) internal – it is defined and used only in the current document (when certain formatting is
needed just for that page). Dreamweaver creates it automatically when you format a text or a page.
b) external – a text file containing formatting attributes (only CSS code). All pages that are to
be displayed with the created styles must contain a reference to it. This is used when the site is
designed to have one layout for all its pages.

Financed under IPA Bulgaria – Macedonia Cross-border Programme 2007 - 2013
38
4. Creating new internal styles.
Modify/Page Properties, Appearance category
a) Specify the background color – Background Color
b) Modify the font – Page Font, the combinations of fonts in the Page Font menu tell the
browser how to display the text. If the first font in the list is not available, then the browser tries to
use the second. If it is not available either, then the browser attempts the third font. When neither of
the listed fonts is available, the browser applies its own default font.
c) Change the font size – Size
d) Choose the text color - Text Color
5. Creating new external files.
These are applied automatically on the contents included in them – in all documents that refer
to them.
A) Creating a style for a tag
1) Place the cursor in the text using the tag and select the tag in the Tag selector
2) In the CSS Styles panel, New CSS Rule icon
3) A dialog box New CSS Rule opens. Choose the Tag radio button
4) The Tag text field should be displaying the selected tag without the angle brackets < >
5) In the Define in field press the menu radio button and choose the referenced external set of
styles; OK
6) A dialog CSS Rule Definition …. in ….. opens
Put in your preferences; OK
The file of the external styles opens automatically in a new tab of the Document window. You
can review CSS files in the Code view. In case you intend to make changes in it, make sure you have
saved the CSS file first.
Financed under IPA Bulgaria – Macedonia Cross-border Programme 2007 - 2013
39
B) Creating a text formatting style with paragraph tags
1) Place the cursor in the paragraph – the Tag selector bar shows the HTML tag p for
paragraph definition
2) In the CSS Styles panel, New CSS Rule icon
3) A dialog box New CSS Rule opens. Choose the Tag radio button.
4) The Tag text field should contain p. If it is not there, include it.
5) In the Define in section press the menu radio button and select the document that will use
the styles; OK
6) A dialog box opens CSS Rule Definition …. in …..
Make adjustments; OK
C) Creating a style for predefined list formats
1) Place the cursor in the first line of the list. Click on the ul, ol in the Tag selector (these are
HTML tags for the whole list; li – refers to specified items in the list)
2) In the CSS Styles panel, New CSS Rule icon
3) A dialog box New CSS Rule opens. Choose the Tag radio button.
4) The Tag text field should contain ol. If not – select it.
5) In the Define in field press the menu radio button and choose the referenced external set of
styles; OK
6) A dialog CSS Rule Definition …. in ….. opens, Type category – make your adjustments;
OK

Financed under IPA Bulgaria – Macedonia Cross-border Programme 2007 - 2013
40
CSS
SUBJECT 12: What is CSS language (Cascading Style Sheets)
1. CSS (Cascading Style Sheets) is a language for description of styles - used mainly to
describe the layout of a document written in a markup language. Most often it is used in combination
with HTML, but it may be applied to any XML document. Officially the CSS specification is
maintained by the W3C.
CSS is designed to separate the content and structure of web pages from their visualization.
Before the CSS standards, established by the W3C in 1995, the content of the sites and their design
style were written in the same HTML page. As a result, the HTML code was complicated and
unreadable and any change in the design of a site required adjustments page by page in the whole
site. With CSS, the format styles can be placed in a single file and thus a change will be reflected
immediately in all pages that use the same CSS file.
2. The language – The CSS language allows you to specify the look of all elements of an
HTML page - fonts, sizes, colors, backgrounds, etc. The CSS consists of a sequence of style rules
each of which is a selector followed by a number of attributes and values. For example, in the
following CSS code: p {font-size: 9pt;} there is one rule. It consists of a selector p and the attribute
font-size which is set to 9 points. This rule will determine the font size of 9 points for for all
paragraphs.
3.Selectors - Selectors are used to indicate to which elements of the HTML document a
certain style is to be applied. There are many types of selectors. Some selectors give some dynamics
to the page. For example, without other tools, CSS can create pop-up menus, hyperlinks that change
their color on rollover, etc.
4. Types of selectors - CSS have several types of selectors:
1. Class selectors - With the CSS you can create your own classes for each selector. After a
class has been defined and assigned to a number of selectors, all these selectors will have the same
appearance. The syntax is as follows: selector.class {attribute: value}
Example:
We have an h1 blue heading class and p paragraph class, with paragraphs aligned to the left.
You can give the class any name, in this case for the sake of convenience we will name it blue. Thus,
the whole code will look like this: h1.blue {color: # 0000ff}
p.left {text-align: left}
Thus, the classes are defined and they should be placed in the head section of the main
HTML page, closed between the <style> and </style> tags : <style type="text/css">
h1.blue {color: #0000ff}

Financed under IPA Bulgaria – Macedonia Cross-border Programme 2007 - 2013
41
p.left {text-align: left}
</style>
The so defined classes can be used in the document's body with the following code:
<h1 class="blue"> Blue Heading </h1>.
Example:
<html>
<head>
<title>I. Class selectors</title>
<meta http-equiv=Content-Type content="text/html; charset=windows-1251" />
<style type="text/css">
h1.blue {color: #FFFF00}
.left {text-align: left}
</style>
</head>
<body>
<h1 class="blue"> The sea is blue </h1>
<p class="left"> The summer in Burgas is hot and there are plenty of
seagulls </p>
<h1> Article 2 </h1>
<h1 class="blue"> ...and the skies are blue </h1>
</body>
</html> There is another way for classes to be defined – they do not have to be associated with a
certain selector: .class {attribute: value}
In this case, the above code will look like this: .blue {color: #0000ff}
.left {text-align: left}
2. ID selectors - - With this type of selectors you can define additional attributes that are not
specified in the declared classes. Again, names are at your choice. The syntax is as follows:
#id {attribute: value} / or also selector# id {attribute: value} /
After adding and id selector in the above example: <head>
<title>css</title>
<meta http-equiv=Content-Type content="text/html; charset=windows-1251" />
<style type="text/css">
.left {text-align: left}
#rb {color:#ff0000; font-weight:bold}
</style>
</head>
We can include the following code in the document body: <p class="left" id="rb"> Blood is dark red and it flows from left to right </p>
You can add a paragraph without the declared class: <p id="rb"> Good wine is red, dark red </p>
Financed under IPA Bulgaria – Macedonia Cross-border Programme 2007 - 2013
42
3. Context selectors – a combination of several selectors and the occurrence of the class
effect on these depends on their arrangement. The syntax is as follows:
First selector, second selector ... {attribute: value}
For example, we can put the following code in the head section
<head>
<title>css</title>
<meta http-equiv=Content-Type content="text/html; charset=windows-1251" />
<style type="text/css">
p i b {color:#00ff00}
<style>
</head>
If then we input the following in the document body:
<p><i><b> Frogs are green and tilted </b></i> ..but fish are not </p> it will appear green bold italic and the rest of the text will have a regular style.
4. Groups of selectors Comma separated, several selectors of the same effect can be combined in a group, i.e. they
have attributes with the same values. The syntax for grouping is:
selector1,selector2,selector3,... {attribute: value}. Example: <head>
<title>More than one effects on a single code line</title>
<meta http-equiv=Content-Type content="text/html; charset=windows-1251" />
<style type="text/css">
h1,h2,h3,p,del {color: #ff0000}
</style>
</head> The h1, h2, h3 selectors, the paragraph selector, the strikethrough text selector are grouped
and they all have the red color attribute. If we now insert in the HTML document's body: <del> Strikethrough red text </del>
then this text not only will be displayed strikethrough, and this is what the tag is meant for, but it will
also be displayed in red.
Comments in CSS - in HTML the code is: <!--Comments and explanations-->
In CSS a comment must be enclosed in between a forward slash followed by an "asterisk" and
an "asterisk" followed by a forward slash: /*Commented text*/.
Properties and values
An HTML element's property is a specific characteristics of the element, the value is the
measurement of this property. For example, the size, being a property, can be given a value of
different measurement units, the color – a value that is either the standard name of the color or hex
numbers from #ffffff (white) to #000000 (black).
Basic properties in CSS
Property Description Optional values Examples
Financed under IPA Bulgaria – Macedonia Cross-border Programme 2007 - 2013
43
color Text color One of the 16 names for colors defined in
HTML 4.0: aqua, black, blue, fuchsia,
gray, green, lime, maroon, navy, olive,
purple, red, silver, teal, white, yellow.
Color of the RGB model: color:rgb
(R,G,B)
color:blue
color:rgb(255,255,255)
color:rgb(0,0,0)
background-
color
Background color Same values as with color background-color:black
text-align Text alignment left, right, center, justify text-align:center
font-style Font style normal, italic, oblique font-style:italic
font-weight Font weight normal, lighter, bold, bolder font-weight:bold
font-size Font size Values in pixels, em, percent or word:
large, small, x-small, x-large
font-size:110 %
font-size:0.8em
font-size:20px
font-size:x-large
font-family Font serif, sans-serif, cursive, fantasy,
monospace, Arial, Courier, "Times New
Roman"
font-family:sans-serif
font-family:"Times New
Roman"
list-style-type List entry leading symbol decimal, upper-alpha, lower-alpha, upper-
roman, lower-rman
list-style-type:square
list-style-type:lower-
roman
width The width of an element
(e.g. table)
Percent of page width width:50%
border Table border Thickness in pixels and type of line: solid,
dotted, dashed, double, groove
border:3px solid
margin Margins on all sides of
the element
auto margin:auto
margin-left Left margin Values in em margin-left:1em
margin-right Right margin Values in em margin-right:3em
margin-top Top margin Values in em margin-top:5em
margin-
bottom
Bottom margin Values in em margin-bottom:2em
border-
collapse
Type of table border collapse border-collapse:collapse
link Subclasses of anchors a:link a:link{color:black}
visited a:visited
hover a:hover
active a:active
float Relative location on the
page
left, right float:left;
clear Disable left/right
wrapping
left, right, both clear:both
Financed under IPA Bulgaria – Macedonia Cross-border Programme 2007 - 2013
44
SUBJECT 13: Styles in an HTML document
There are three ways to specify a style of an HTML document.
Inherited style of an element - This style is called inline. The style code is input in the style
attribute of the tag. The resulting style is valid only for the element it refers to (however some of its
subelements can inherit the style under certain conditions). This method is limited since it does not
allow the use of CSS selectors.
<h2 style="font-size: 10pt; color: blue;">Hello</h2>
A block of styles – This style is called internal. It is a block of styles included in a <style>
tag. This tag should be placed in the HTML document's header (the <head> tag).
A file of styles - This style is called external. It is a single file which consists of a number of
styles and there is a reference to it in the HTML document. This is the only method that conforms to
the concept of separating the content from the layout. The reference to such files is included in
between the <head> tags and has the following syntax:
<link rel = "stylesheet" href = "http://example.com/css/style.css" type = "text / css" />
There is no limitation to the number of files of reference, however, try to keep their number
minimized as it affects the loading of the web page negatively.
This teacher’s handbook has been produced in the frame of the project " E-
service knowledge for social cohesion ", funded by IPA CBC Bulgaria -
Macedonia, CCI number 2007CB16IPO007. The Project partners take full
responsibility for the contents of the handbook thus it does not represent the
official views and policies of the European Union and the Managing Authority.