hand-pollination: corn - seed savers exchange 2. shoots will emerge out of the husk leaves once...
TRANSCRIPT

Hand-Pollination: Corn
Hand-pollination is a tech-nique used by seed savers to ensure that plants produce seed that is true-to-type and that flowers are not contami-nated by the pollen from an-other variety.
The process varies among spe-cies, but with plants that pro-duce unisexual flowers like corn, the uncontaminated pollen from male flowers is transported to the unpollinat-ed stigma of female flowers. Once the pollen is transferred, the female blossom is again covered to prevent contamina-tion by any other pollen.
1

Figure 2. Shoots will emerge out of the husk leaves once tassels begin to appear at the top of the stalk. These small leaves must be cut and bagged prior to the emergence of silks.
Figure 1. Tassels are ready for bagging once anthers begin to emerge along outer the tips of the branches.
Hand-Pollinating Corn
Because corn pollen can travel a quarter mile or more on the wind, and because corn is grown in nearly every region of the United States, it is often unreliable to depend on isolation by distance when trying to save true-to-type seed from a corn variety. Thus precautions should be taken to prevent hybridization when saving seed from corn. The most reliable and easiest method is hand pol-lination. Special wax-coated tassel and silk bags can be purchased to cover the plant’s tassels and silks before they start shedding (tas-sels) or receiving (silks) pollen. The tassels, or the plant’s inflo-rescence of male flowers (Figure 1), are formed at the top of the stalk of corn and produce pollen. The silks, which are the stigmas of female flowers (Figure 2), grow out of to the ears located on the stalk of the plant. Each successfully pollinated silk will form a single kernel on the cob.
This handout describes how to hand pollinate corn plants us-ing bulked pollen and is different than the larger scale method of chain sibbing.
Determining When to Start Bagging
When to bag shoots:Begin scouting for and bagging young ears, called shoots, when tassels begin to emerge. To find shoots, look for husk leaves along the stem where silks will soon begin to emerge from the tiny ears (Figure 1). Learning to identify and bag ears is essential to the hand-pollination process. Once silks are visible, they may already be contaminated with foreign pollen, so it is vital that ears are bagged before silks emerge.
When to bag tassels:As the tassels emerge from the top of the plant and mature, the lat-eral branches begin to droop away from the main stalk and become horizontal. Once the anthers (usually red or yellow and smaller than a grain of rice) start to emerge along the tips of the later-al branches and the main branch of the tassel, the tassel is ready for bagging (Figure 1). If the tassels are bagged while they are still green, they will stop developing and never shed pollen.
Weather and time of day have a strong bearing on when tassels will shed pollen. High humidity can cause anthers to remain closed. Anthers generally begin to shed pollen in the morning after the dew has evaporated and any morning chill is gone. Pollen shedding decreases as temperatures top 86°F. Anthers may close up during the hottest part of the day then reopen in the afternoon or even-ing. Therefore, the best time to bag tassels is in late afternoon the day prior to pollination.
2

Bagging Shoots
Shoots can be bagged anytime during the day af-ter the dew has dried. Again, it is important that shoots are identified and bagged before any silks have emerged and have been contaminated. Shoot bags and tassel bags can be purchased from Lawson Bag Company or other vendors.
1. Once a shoot is identified, grab the protective husk leaf and pull it downward, tearing it from the plant completely.
2. Cut off the tip of the shoot with a pocket knife or scissors, being careful to only cut through the sheath of leaves and not into the cob. At this time the silks should not be visible, but this cut may sev-er some unemerged silks, which will be visible as a pea-sized circle in the center of the shoot (Figure 3).
3. Create a small vertical slit between the ear and the stalk to make room for the shoot bag (Figure 4).
4. Put a shoot bag over the shoot, pulling the bot-tom of the bag snuggly into the slit so it will not be easily blown off (Figure 5).
Figure 3. Identify shoots and remove husk leaves by pulling downward, tearing them from the plant. Using a scissors or pocket knife, cut of the tip of the husk leaves to reveal the silks (left). Cut the husk leaves down to reveal a pea-sized circle in the center of the shoot, exposing the silks (right).
Figure 4. Use a knife or the closed end of the shoot bag to create a small slit between the shoot and the stalk.
Figure 5. Shoot bags should be placed securely on shoots before any silks have emerged.
3

Bagging the Tassels
Once tassels are producing pollen, they can be bagged. 1. Grab the stalk just below the tassel and shake vig-orously, ensuring that no foreign pollen, anthers, or dead pollen are left on the tassel before bagging.
2. Pull all of the branches of the tassel upward and together, placing the brown “tassel bag” over the en-tire tassel (Figure 6). Pull the bag down far enough that it can be attacked to the tassel stalk.
3. Fold the opening of the bag so that pollen will not fall out of the bottem (see Inset 1 for instructions). Staple or paper clipping the bag shut right beside the stalk so that it is tightly fastened around the stalk and does not allow the powdery pollen to fall out of the bag.
Figure 6. Place tassel bags securely over tassels the night before pollinations are to take place.
Inset 1.Folding
Tassel Bags
Place the open bag over the tassels.
Fold the bag in half lengthwise around the tassels and corn stalk, pinching the stalk between the flat edges of the bag.
Fold the bottom of the bag so that the opening is tight around the stalk. Secure this fold with a paperclip.
4
Pollinating
Pollination should be done quickly and precisely to avoid contamination of silks by airborn pollen. Note that a very small volume of quality pollen is needed to fully pollinate an ear and seed savers will usually have an abundance of pollen. Good quality pollen will by pow-dery with very little clumping.
1. Try and spread the harvested pollen out evenly to wait-ing ears. Mentally estimate the amount of pollen avail-able for each pollination.
2. Stand upwind of the ear that is about to be pollinated to block airborn pollen and remove the shoot bag from each ear only when it is time to sprinkle the pollen onto the silks.
3. Sprinkle a dash of pollen onto the silks, applying enough so that the pollen is just visible on the silks (Fig-ure 8). Additionally, make sure to sprinkle the pollen uniformly, not dumping all of the pollen onto one spot on the silks.
Collecting Pollen
Pollination should take place in the morning after an-thers have opened and any dew has evaporated. Be sure to wait until tassel bags are completely dry.
1. Bend the stalk of the bagged plant at a slight down-ward angle, making sure not to bend too far and break the tassel or the plant.
2. Give the tassel bag a vigorous shake in order to dis-lodge as much of the pollen from the anthers as pos-sible.
3. Keeping the stalk bent at the downward angle, un-fasten the staple and gently shake the tassel to dislodge even more pollen while removing the bag.
4. Mix the contents of all the tassel bags together by pouring all the harvested pollen into one shoot bad and shaking it vigorously.
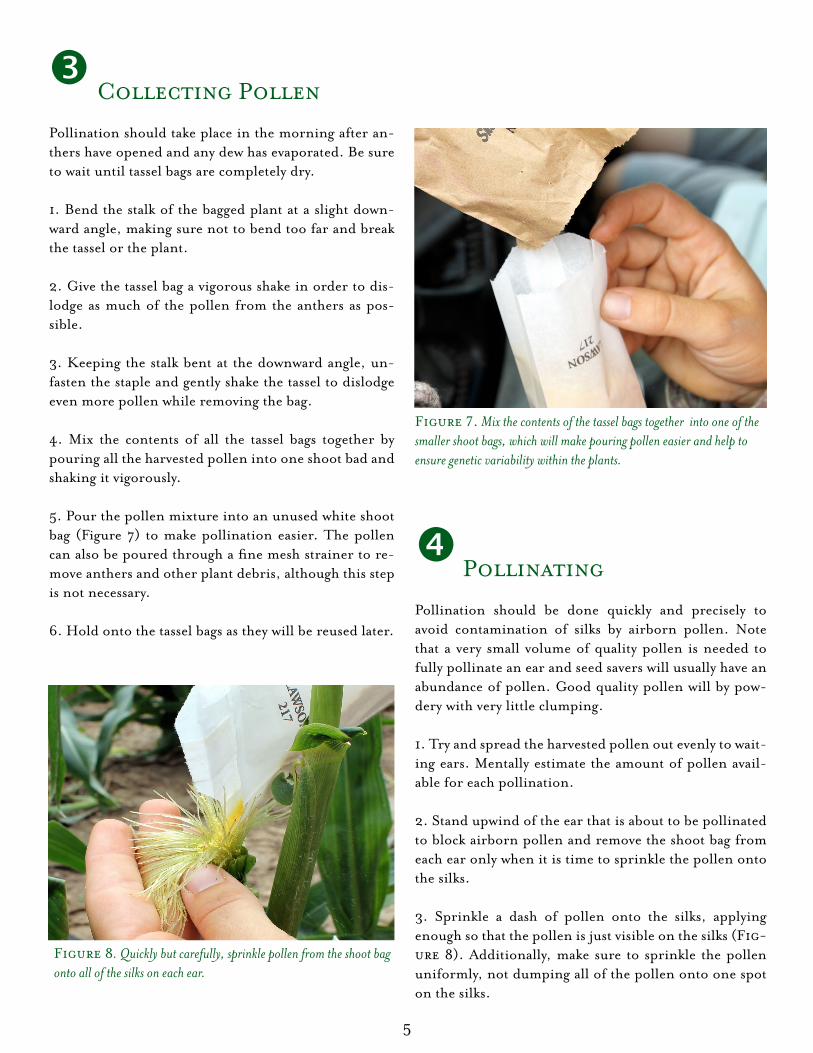
5. Pour the pollen mixture into an unused white shoot bag (Figure 7) to make pollination easier. The pollen can also be poured through a fine mesh strainer to re-move anthers and other plant debris, although this step is not necessary.
6. Hold onto the tassel bags as they will be reused later.
Figure 7. Mix the contents of the tassel bags together into one of the smaller shoot bags, which will make pouring pollen easier and help to ensure genetic variability within the plants.
Figure 8. Quickly but carefully, sprinkle pollen from the shoot bag onto all of the silks on each ear.
5

Figure 9. Re-cover the ears using a used tassel bag to prevent contamination by wind-blown pollen.
Materials
• Ear shoot bags-Lawson 217• Tassel bags-Lawson 401, 402, or 404• Colored flagging ribbon• Paperclips or stapler and staples• Permanent markers• Fine mesh kitchen strainers or sieves• Garden shears or scissors• Hand sanitizer and/or rubbing alcohol
Covering the Ears
1. Recover the ear with a brown tassel bag used to collect the pollen, wedging the back of the bag between the ear and the stalk, into the old slit. Pull the bag’s bottom cor-ners around the stalk as if it were an apron and staple them so that the bag is secured to the stalk. Make sure it is tight enough that it sill not blow off, but loose enough to allow the ear to develop (Figure 9).
2. Leave the bags in place until the silks are have dried down. The bags can remain on the plant until harvest, in some regions, and serve as markers for which ears have been hand-pollinated. In regions where bagged ears become moldy or high winds routinely dislodge the bags, use flagging tape or some other tag to mark each hand pollinated ear.
3. Kernels can either be allowed to dry on the plant until fully hardened, or har-vested and dried in a protected area once split kernels will not expel any liquid when squeezed.
Seed Savers Exchange 3094 North Winn Road, Decorah, Iowa 52101
563.382.5990 • seedsavers.org
Funding for this hand-out provided in part by
Silos and Smokestacks National Heritage Area.
silosandsmokestacks.org
6