hamilton - fantastic furniture
TRANSCRIPT

Version 1.0
Hamilton Bedside 2 Drawer
fantasticfurniture.com.au

fantasticfurniture.com.au Page 2
Looks like you’ve found
your Fantastic!We’re thrilled you’ve chosen Fantastic Furniture
to help create a home you’ll love!
Recommended weight capacity : 50kgs on top.
Love it? Share it!Fantastic buy! Share how it looks at home on Instagram for
your chance to win a $250 Fantastic Furniture Gift Card!
@fantasticfurniture

Page 3
Read through the instructions carefully before you begin.
Assembly Checklist
Identify and lay out all of the components before you begin assembly.
Unless instructed, do not fully tighten screws until the item is fully assembled.
! Never use power tools unless specifically instructed. They can damage your components or hardware if used incorrectly.
! The most common mistakes made during assembly are using the wrong hardware or
getting components back to front.
! Always use a soft surface (such as carpet or cardboard) when assembling your product to avoid scratching or damaging the surface of the product.
! Bulky items such as wardrobes and bunk beds should be assembled in the room they will be used in as they may not fit through a door once assembled.
! Never use any glue until you are certain that the parts belong together.
! Periodically check and re-tighten all fasteners. Check the product care label orwebsite for product care instructions.
! If you are having any difficulties assembling your product, missing any hardware or components please visit our website Help Centre for further assistance.
! Please see page 2 for any safety requirements or weight restrictions.
Make sure you have all the required tools. Never use power tools unless instructed.
Useful Information
fantasticfurniture.com.au

Parts listTop Panel (P1); Left Side Panel (P2); Right Side Panel (P3); Bottom Front Rail (P4);Bottom Back Rail (P5); Back Panel (P6);2 x Drawer Fronts (P7); 2 x Left Drawer Sides (P8);2 x Right Drawer Sides (P9);2 x Drawer Bases (P10);2 x Drawer Backs (P11);Top Front Rail (P12)
Hardware pack
Left Drawer Side (P8)
Right Drawer Side (P9)Drawer Back
(P11)
Drawer Base (P10)
Drawer Front (P7)
Top Panel (P1) Right Side
Panel(P3)
Left Side Panel (P2)
Back Panel(P6)
Bottom Back Rail (P5)
Bottom Front Rail (P4)
Top Front Rail (P12)
20 x Cam Bolts (H3)
20 x Cam Nuts (H4)
8 x Dowels (H1)
20 x Small Screws (H5)
2 x CL RunnerTracks (H6)
2 x CR Runner Tracks (H7)
2 x DR Runners (H9)
2 x Handle Bolt (H11)
2 x Handle (H10)
2 x DL Runners (H8)
8 x Medium Screws (H2)
2 x Long Screws (H14)
4 x Wedges (H12)
4 x Wedge Screws
(H13)
What you needto assemble the product
Other tools you need:Phillips head screwdriver;
Page 4fantasticfurniture.com.au
DO NOT USE
x 2

12 x SmallScrews (H5)
(P2)
(P2)
(P3)
(P3)
You will need
Step 1
H7
CR
H5
Step 2
You will need
Phillips Head Screwdriver
Phillips Head Screwdriver
8 x Cam Bolts(H3)
Attach 2 x CL RunnerTracks (H6) and 2 x CR Runner Tracks (H7) to Left&Right Side Panels (P2&P3) with 12 x Small Screws (H5) by tightening with the Phillips Head Screwdriver.
Attach 8 x Cam Bolts (H3) to Left&Right Side Panels (P2&P3) by tightening with the Phillips Head Screwdriver.
fantasticfurniture.com.au Page 5
2 x CL RunnerTracks (H6)
H6 CL
H5
H5
H5
H3
H3
H3
H3
H3
H3
H5
H5
H6
H6
H7
H7
2 x CR RunnerTracks (H7)
H3
H3

You will need
Step 3
This is how a cam nut works........
The head of the cam bolt goes into the open mouth of the cam nut. You then turn the cam nut so it tightens over the bolt.
Step 4
You will need
Insert 4x Dowels (H1) into Left Side Panel (P2). Insert 4 x Cam Nuts (H4) into Rails (P4&P5&P12) as shown. Rotate the cam nuts so the arrows point towards the incoming cam bolts. Attach Rails (P4&P5&P12) to Left Side Panel (P2) by tightening all cam nuts with the Phillips Head Screwdriver.
Insert 4 x Dowels (H1) and 4 x Cam Nuts (H4) into Rails (P4&P5&P12) asshown. Rotate the cam nuts so the arrows point towards the incoming cam bolts. AttachRight Side Panel (P3) to Rails (P4&P5&P12) by tightening all cam nuts with the Phillips Head Screwdriver.
4 x Dowels (H1)
4 x Cam Nuts(H4)
Phillips Head Screwdriver
4 x Dowels (H1)
4 x Cam Nuts(H4)
Phillips Head Screwdriver
(P2)
(P3)
(P12)
(P12)
(P4)
(P4)
(P5)
(P5)
fantasticfurniture.com.aufantasticfurniture.com.au Page 6
H1
H1
H1
H1
H4
H4
H4
H4
H4
H4
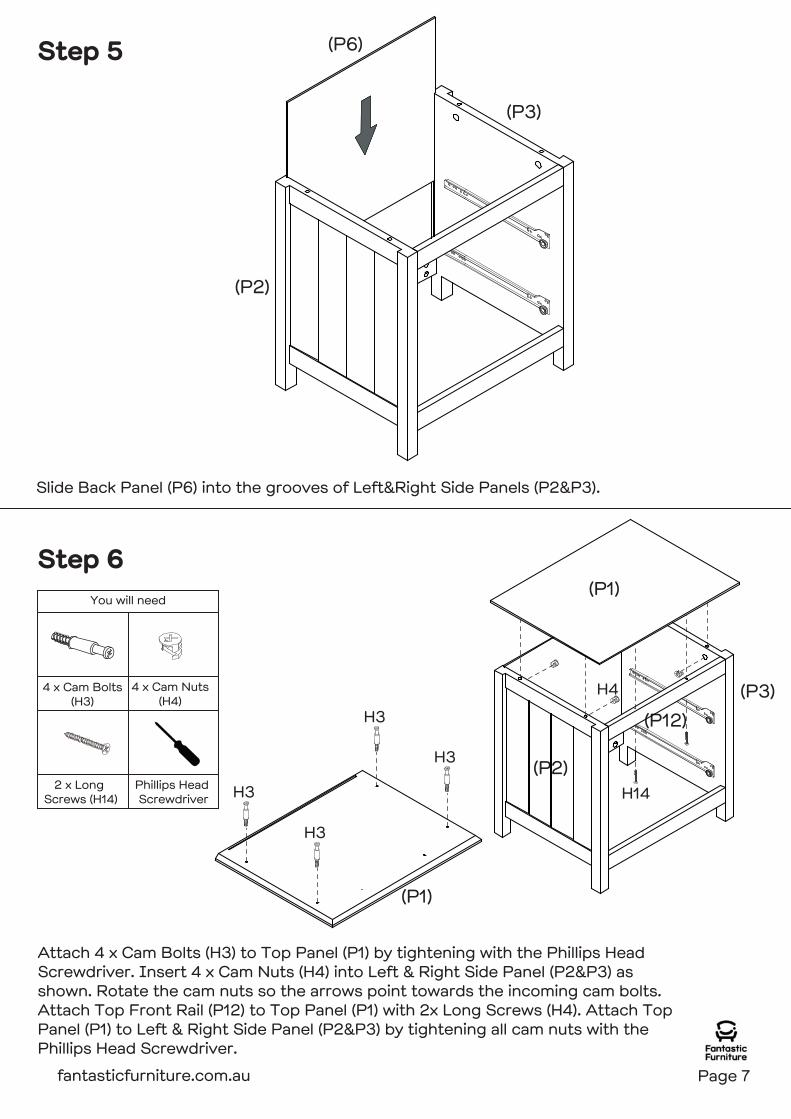
Slide Back Panel (P6) into the grooves of Left&Right Side Panels (P2&P3).
Attach 4 x Cam Bolts (H3) to Top Panel (P1) by tightening with the Phillips Head Screwdriver. Insert 4 x Cam Nuts (H4) into Left & Right Side Panel (P2&P3) as shown. Rotate the cam nuts so the arrows point towards the incoming cam bolts.Attach Top Front Rail (P12) to Top Panel (P1) with 2x Long Screws (H4). Attach Top Panel (P1) to Left & Right Side Panel (P2&P3) by tightening all cam nuts with the Phillips Head Screwdriver.
Step 5
You will need
Phillips Head Screwdriver
Step 6
4 x Cam Nuts(H4)
4 x Cam Bolts(H3)
(P2)
(P2)
(P12)
(P1)
(P1)
(P3)
(P3)
(P6)
fantasticfurniture.com.au Page 7
H4
H14
H3
H3
H3
H3
2 x Long Screws (H14)

You will need
Step 7
Secure Back Panel (P6) in place with 4 x Wedges (H12) using 4 x Wedge Screws (H13). Tighten with a Phillips Head Screwdriver.
Attach 8 x Cam Bolts (H3) to Drawer Fronts (P7x2). Tighten with a Phillips Head Screwdriver.
You will need
Step 8
Phillips Head Screwdriver
4 x Wedges(H12)
4 x Wedge Screws (H13)
Phillips Head Screwdriver
8 x Cam Bolts(H3)
(P6)
(P7)
fantasticfurniture.com.au Page 8
H12
H12
H13H13
x2
H3H3
H3H3

You will need
Step 9
Slide the Drawer Base (P10x2) into the grooves between drawer sides as shown.
Attach Drawer Backs (P11x2) to DrawerSides (P8x2&P9x2) with 8 x Medium Screws (H2), make sure that the groove lines up the whole way around the drawer. Tighten with a Phillips Head Screwdriver.
8 x Cam Nuts(H4)
x2
Attach Drawer Sides (P8x2&P9x2) to Drawer Front (P7x2). Insert 8 x Cam Nuts (H4) into the holesof Drawer Sides (P8x2, P9x2). Make sure the opening on cam nuts point towards the incoming cam bolts. Tighten with a Phillips Head Screwdriver.
(P8)
(P8)
(P8)
(P9)
(P9)
(P9)
(P11)
(P10)
(P7)
fantasticfurniture.com.au Page 9
Phillips Head Screwdriver
H4
H4
H4
H4
H2H2
H2H2
x2
Step 10
x2
You will need
Step 11
Phillips Head Screwdriver
8 x Medium Screws (H2)

Attach 2 x Handles (H10) to Drawer Fronts (P7x2) with 2 x Handle Bolts (H11) by tightening with the Phillips Head Screwdriver.
You will need
Step 13
x2
Attach 2 x DL Runners (H8) to Left Drawer Sides (P8x2) and 2 x DR Runners (H9) to Right Drawer Side (P9x2) with 8 x Small Screws (H5) using a Phillips Head Screwdriver.
(P8)
(P7)
(P9)
fantasticfurniture.com.au Page 10
You will need
Step 12
8 x SmallScrews (H5)
Phillips Head Screwdriver
2 x DR Runners (H9)
2 x DL Runners (H8)
x2
H5
H5
H11
H10
H5
H5 H9
H8
3 x Handle Bolts (H11)
3 x Handles (H10)
Phillips Head Screwdriver

Job Complete!In the interest of our environment please dispose of all packaging thoughtfully.
Insert the assembled drawers into the corresponding compartments as shown. Ensure the drawers slide easily along the rails.
(P7)
(P7)
fantasticfurniture.com.au Page 11
Step 14

Version 1.0
HamiltonBed Double
fantasticfurniture.com.au

fantasticfurniture.com.au Page 2
Looks like you’ve found
your Fantastic!
Love it? Share it!Fantastic buy! Share how it looks at home on Instagram for
your chance to win a $250 Fantastic Furniture Gift Card!
@fantasticfurniture
We’re thrilled you’ve chosen Fantastic Furniture to help create a home you’ll love!

Page 3
Read through the instructions carefully before you begin.
Assembly Checklist
Identify and lay out all of the components before you begin assembly.
Unless instructed, do not fully tighten screws until the item is fully assembled.
! Never use power tools unless specifically instructed. They can damage your components or hardware if used incorrectly.
! The most common mistakes made during assembly are using the wrong hardware or
getting components back to front.
! Always use a soft surface (such as carpet or cardboard) when assembling your product to avoid scratching or damaging the surface of the product.
! Bulky items such as wardrobes and bunk beds should be assembled in the room they will be used in as they may not fit through a door once assembled.
! Never use any glue until you are certain that the parts belong together.
! Periodically check and re-tighten all fasteners. Check the product care label orwebsite for product care instructions.
! If you are having any difficulties assembling your product, missing any hardware or components please visit our website Help Centre for further assistance.
! Please see page 2 for any safety requirements or weight restrictions.
Make sure you have all the required tools. Never use power tools unless instructed.
Useful Information
fantasticfurniture.com.au
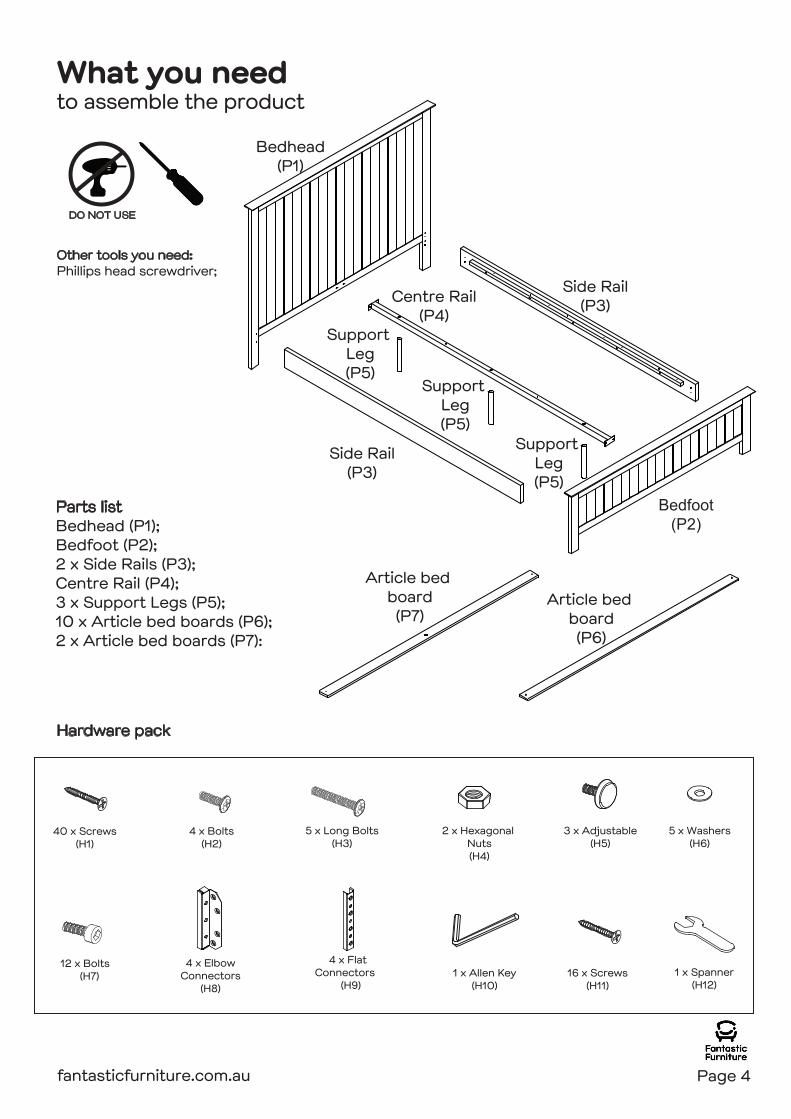
Parts listBedhead (P1); Bedfoot (P2); 2 x Side Rails (P3); Centre Rail (P4);3 x Support Legs (P5);10 x Article bed boards (P6);2 x Article bed boards (P7):
Hardware pack
What you needto assemble the product
Other tools you need:Phillips head screwdriver;
Page 4
DO NOT USE
fantasticfurniture.com.au
Side Rail(P3)
Side Rail(P3)
Article bed board(P7)
Article bed board(P6)
Bedhead(P1)
Bedfoot(P2)
Centre Rail(P4)
Support Leg(P5)
Support Leg(P5)
Support Leg(P5)
40 x Screws(H1)
2 x Hexagonal Nuts(H4)
5 x Washers(H6)
1 x Allen Key(H10)
5 x Long Bolts(H3)
4 x Bolts(H2)
3 x Adjustable (H5)
16 x Screws(H11)
4 x ElbowConnectors
(H8)
4 x Flat Connectors
(H9)
12 x Bolts (H7) 1 x Spanner
(H12)

You will need
Step 1
Step 2
You will need
Attach 4 x Flat Connectors (H9) to Bedfoot (P2) with 8 x Screws (H1) by tightening with the Phillips Head Screwdriver.
(P1)
(P2)
Phillips head screwdriver
fantasticfurniture.com.au Page 5
Attach 2 x Flat Connectors (H9) to Bedhead (P1) with 8 x Screws (H1) by tightening with the Phillips Head Screwdriver.
8 x Screws(H1)
2 x Flat Connectors (H9) H1
H1
H9
H9
H1
H9
H1
H9Phillips head screwdriver
8 x Screws(H1)
2 x Flat Connectors (H9)

(P3)
(P3)
(P3)
x2
You will need
Step 3
(P2)
Attach 4 x Elbow Connectors (H8) to Side Panels (P3 x 2) with 16 x Screws (H11) by tightening with the Phillips Head Screwdriver.
You will need
Step 4
Attach Side Panels (P3 x 2) to Bedfoot (P2) with 6 x Bolts (H7) by tightening with 1 x Allen Key (H10).
Phillips head screwdriver
fantasticfurniture.com.au Page 6
Required
Two People
H11
H8
H10
H7
16 x Screws(H11)
4 x ElbowConnectors (H8)
H11
H8
1 x Allen Key(H10)
6 x Bolts (H7)

(P3)
(P3)
(P1)
(P5)
(P5)
(P5)
(P4)
Attach Support Legs (P5 x 3) to Centre Rail (P4) with 3 x Washers (H6) and 3 x Long Bolts (H3) using Phillips Head Screwdriver. Insert the 3 x Adjustable (H5) into the Support Legs (P5 x 3) .
fantasticfurniture.com.au Page 7
Required
Two People
You will need
Step 5
Attach Side Panels (P3 x 2) to Bedhead (P1) with 6 x Bolts (H7) by tightening with 1 x Allen Key (H10).
You will need
Step 6
1 x Allen Key(H10)
6 x Bolts (H7)
H10
H7
3 x Long Bolts(H3)
3 x Adjustable (H5)
3 x Washers(H6)
H5
H5
H5
H3H6
H3H6
H3H6
Phillips head screwdriver

(P4)
You will need
Step 7
fantasticfurniture.com.au Page 8
4 x Bolts(H2)
(P1)
(P2)
(P2)
(P1)
H2
H2
You will need
Step 8
4 x Screws(H1)
Phillips head screwdriver
H6H4
2 x Hexagonal Nuts (H4)
Attach Article Bed Boards (P7x2) to Centre Rail (P4) with 2 x Washers (H6), 2 x Long Bolts (H3) and 2 x Hexagonal Nuts (H4) using Spanner (H12) and Phillips Head Screwdriver. Then screw Article Bed Boards (P7x2) with 4 x Screws (H1). Move the bed in proper position after adjusting the foot 5mm upwards. Once the bed is in correct position , please rotate and adjust foot to the floor level.
Attach Centre Rail (P4) to Bedhead (P1) and Bedfoot (P2) screw with 4 x Bolts (H2). Tighten with a Phillips Head Screwdriver.
2 x Washers(H6)
H3
2 x Long Bolts(H3)
(P4)
(P7)
(P7)
(P3)
(P3)H1
H1
H1 H12
H1
H3
H6
H4
H4
H3
H6
Phillips head screwdriver
1 x Spanner(H12)

You will need
Step 9
fantasticfurniture.com.au Page 9
Job Complete!In the interest of our environment please dispose of all packaging thoughtfully.
(P3)
(P3)
Attach Article Bed Boards (P6 x 10) to Side Rails (P3 x 2) with 20 x Screws (H1). Tighten with a Phillips head screwdriver.
Phillips head screwdriver
20 x Screws(H1)
H1
H1

Version 1.0
HamiltonDresser 6 Drawer
fantasticfurniture.com.au
fantasticfurniture.com.au Page 2
Looks like you’ve found
your Fantastic!We’re thrilled you’ve chosen Fantastic Furniture
to help create a home you’ll love!
WARNING: ENSURE THE WALL STRAP IS ATTACHED TO AVOID SERIOUS INJURY.
To avoid any serious or fatal injury, this product has been supplied with a wall strap to prevent toppling. We strongly recommend that this product is permanently fixed to the wall or other suitable sur-face. Connecting attachments for your wall are not included since
different surface materials require different attachments. Please seek professional advice if you are in doubt of what wall connections to
use.
Recommended weight capacity : 50kgs on top.
Love it? Share it!Fantastic buy! Share how it looks at home on Instagram for
your chance to win a $250 Fantastic Furniture Gift Card!
@fantasticfurniture

Page 3
Read through the instructions carefully before you begin.
Assembly Checklist
Identify and lay out all of the components before you begin assembly.
Unless instructed, do not fully tighten screws until the item is fully assembled.
! Never use power tools unless specifically instructed. They can damage your components or hardware if used incorrectly.
! The most common mistakes made during assembly are using the wrong hardware or
getting components back to front.
! Always use a soft surface (such as carpet or cardboard) when assembling your product to avoid scratching or damaging the surface of the product.
! Bulky items such as wardrobes and bunk beds should be assembled in the room they will be used in as they may not fit through a door once assembled.
! Never use any glue until you are certain that the parts belong together.
! Periodically check and re-tighten all fasteners. Check the product care label orwebsite for product care instructions.
! If you are having any difficulties assembling your product, missing any hardware or components please visit our website Help Centre for further assistance.
! Please see page 2 for any safety requirements or weight restrictions.
Make sure you have all the required tools. Never use power tools unless instructed.
Useful Information
fantasticfurniture.com.au

Parts listTop Panel (P1); Left Side Panel (P2); Right Side Panel (P3); Top Rail (P4);2 x Rails (P5); Bottom Rail (P6);Divider (P7);Top Rail (P8):Bottom Rail (P9):2 x Back Panels (P10)6 x Drawer Fronts (P11) :6 x Left Drawer Sides (P12);6 x Right Drawer Sides (P13);6 x Drawer Bases (P14);6 x Drawer Backs (P15);
Hardware pack
Left Drawer Side (P12)
Right Drawer Side (P13)Drawer Back
(P15)
Drawer Base (P14)
Drawer Front (P11)
Top Panel (P1)
Right Side Panel(P3)
Left Side Panel (P2)
Back Panel(P10)
Back Panel(P10)
Top Rail (P8)
Top Rail (P4)
Rail (P5)
Rail (P5)
Bottom Rail (P6)
Divider (P7)
Bottom Rail (P9)
51 x Cam Bolts (H3)
51 x Cam Nuts (H4)
11 x Dowels (H1)
72 x Small Screws (H5)
6 x CL RunnerTracks (H6)
6 x CR Runner Tracks (H7)
6 x DR Runners (H9)
6 x Handle Bolt (H11)
6 x Handle (H10)
6 x DL Runners (H8)
28 x Screws (H2)
8 x Wedges (H12)
8 x Wedge Screws
(H13)
2 x LongScrews
(H14)
What you needto assemble the product
Other tools you need:Phillips head screwdriver;
Page 4fantasticfurniture.com.au
DO NOT USE
x 6
1 x Safety Screw (H16)
1 x SafetyStrap(H15)
2 x Washers (H17)

18 x SmallScrews (H5)
(P3)
(P3)
(P2)
(P2)
You will need
Step 1
H7
CR
H5
Step 2
You will need
Phillips Head Screwdriver
Phillips Head Screwdriver
16 x Cam Bolts(H3)
Attach 3 x CL Runner Tracks (H6) toLeft Side Panel (P2) with 9 x Small Screws (H5) by tightening with the Phillips Head screwdriver. Attach 3 x CL Runner Tracks (H7) to Right Side Panel (P2) with 9 x Small Screws (H5) by tightening with the Phillips Head screwdriver.
Attach 8 x Cam Bolts (H3) to Left Side Panel (P2) by tightening with the Phillips head screwdriver. Attach 8 x Cam Bolts (H3) to Right Side Panel (P3) by tightening with the Phillips head screwdriver.
fantasticfurniture.com.au Page 5
3 x CL RunnerTracks (H6)
H6 CL
H5
H5
H5
H5
H5
H6
H7
H7
H7
H6
H6
H5
H5
H3
H3
H3
H3
H3
H3
H3
H3
H3
H3
3 x CR RunnerTracks (H7)

You will need
Step 3
This is how a cam nut works........
The head of the cam bolt goes into the open mouth of the cam nut. You then turn the cam nut so it tightens over the bolt.
Step 4
You will need
Attach 3 x CL RunnerTracks (H6), 3 x CR Runner Tracks (H7) and 4 x Cam Bolts (H3) to Divider Panel (P7) with 18 x Small Screws (H5) by tightening with the Phillips Head Screwdriver.
Attach 1 x Cam Bolt (H3) intoBottom Rail (P6). Insert 1 x Dowel (H1) into Top Rail (P4) and 1 x Cam Nut (H4) into Divider (P7) as shown.Rotate the cam nuts so the arrow points towards the incoming cam bolts. Attach Rails (P4 & P6) to Divider (P7) by tightening with the Phillips Head Screwdriver.
Phillips Head Screwdriver
1 x Dowels (H1)
1 x Cam Nuts(H4)
Phillips Head Screwdriver
FLIP
Cam Nut hole nearby bottom
(P7)
(P7)
(P7)(P4)
(P6)
H7
CR
H5
fantasticfurniture.com.aufantasticfurniture.com.au Page 6
H6 CL
H5
H5
H5
H6
H6
H3
H3
H7
H7
H1
H3H4
H7
H6
H5
H5
H5
H5
18 x SmallScrews (H5)
3 x CL RunnerTracks (H6)
3 x CR RunnerTracks (H7)
4 x Cam Bolts(H3)
1 x Cam Bolts(H3)
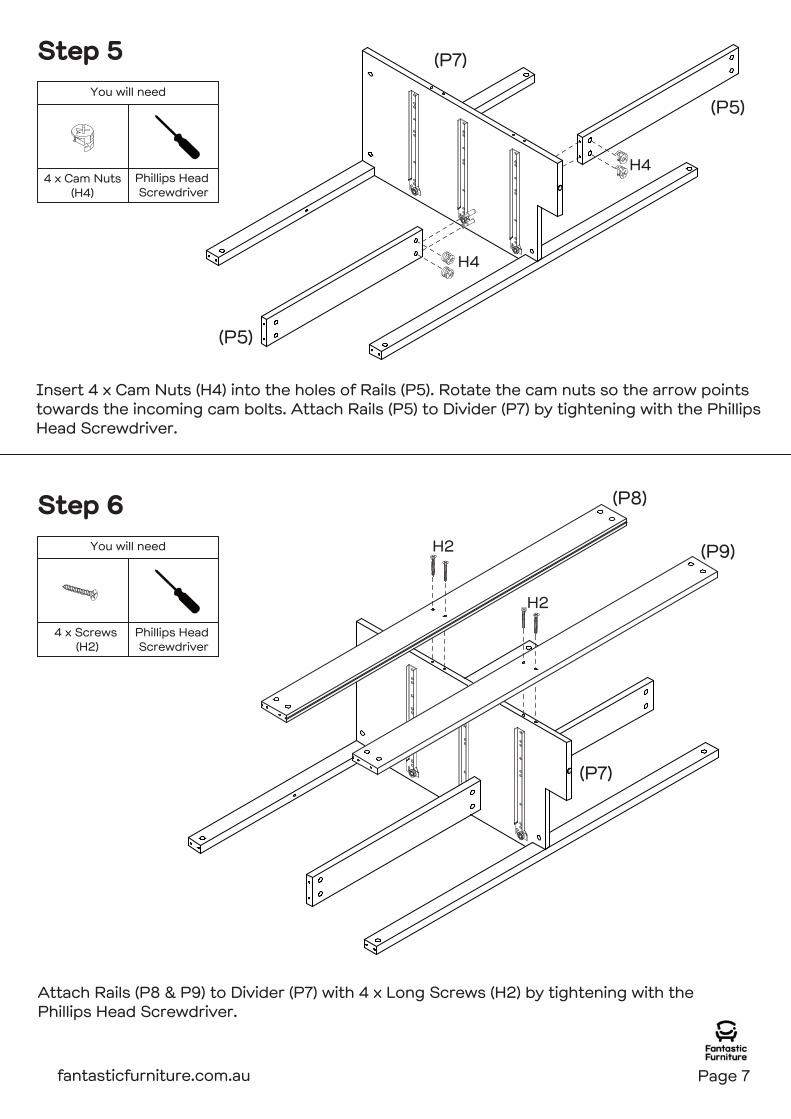
Insert 4 x Cam Nuts (H4) into the holes of Rails (P5). Rotate the cam nuts so the arrow points towards the incoming cam bolts. Attach Rails (P5) to Divider (P7) by tightening with the Phillips Head Screwdriver.
Attach Rails (P8 & P9) to Divider (P7) with 4 x Long Screws (H2) by tightening with the Phillips Head Screwdriver.
You will need
Phillips Head Screwdriver
Step 6
You will need
Phillips Head Screwdriver
Step 5
4 x Cam Nuts(H4)
(P7)
(P5)
(P5)
(P7)
(P9)
(P8)
fantasticfurniture.com.au Page 7
H4
H2
H2
H4
4 x Screws (H2)
You will need
Step 7
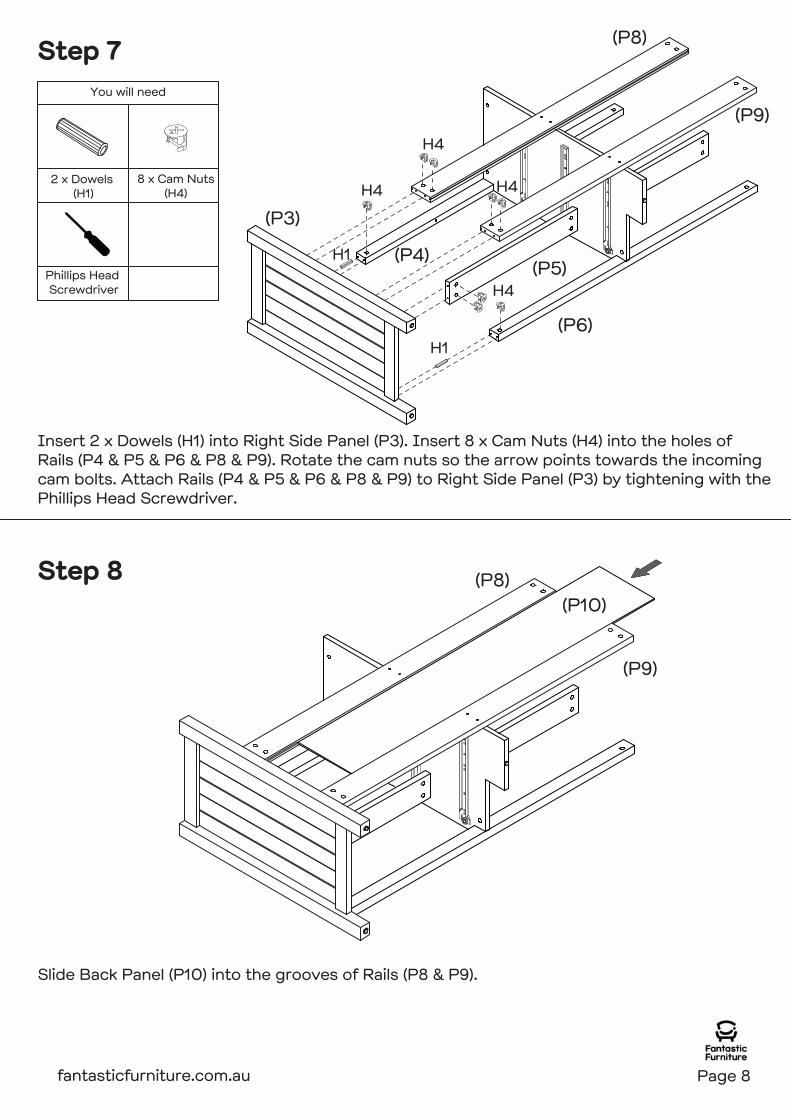
Insert 2 x Dowels (H1) into Right Side Panel (P3). Insert 8 x Cam Nuts (H4) into the holes ofRails (P4 & P5 & P6 & P8 & P9). Rotate the cam nuts so the arrow points towards the incoming cam bolts. Attach Rails (P4 & P5 & P6 & P8 & P9) to Right Side Panel (P3) by tightening with the Phillips Head Screwdriver.
Slide Back Panel (P10) into the grooves of Rails (P8 & P9).
Step 8
Phillips Head Screwdriver
8 x Cam Nuts(H4)
2 x Dowels (H1)
(P3)
(P4)
(P6)
(P5)
(P8)
(P8)
(P9)
(P9)
(P10)
fantasticfurniture.com.au Page 8
H4
H1
H1
H4
H4
H4
You will need
Step 9
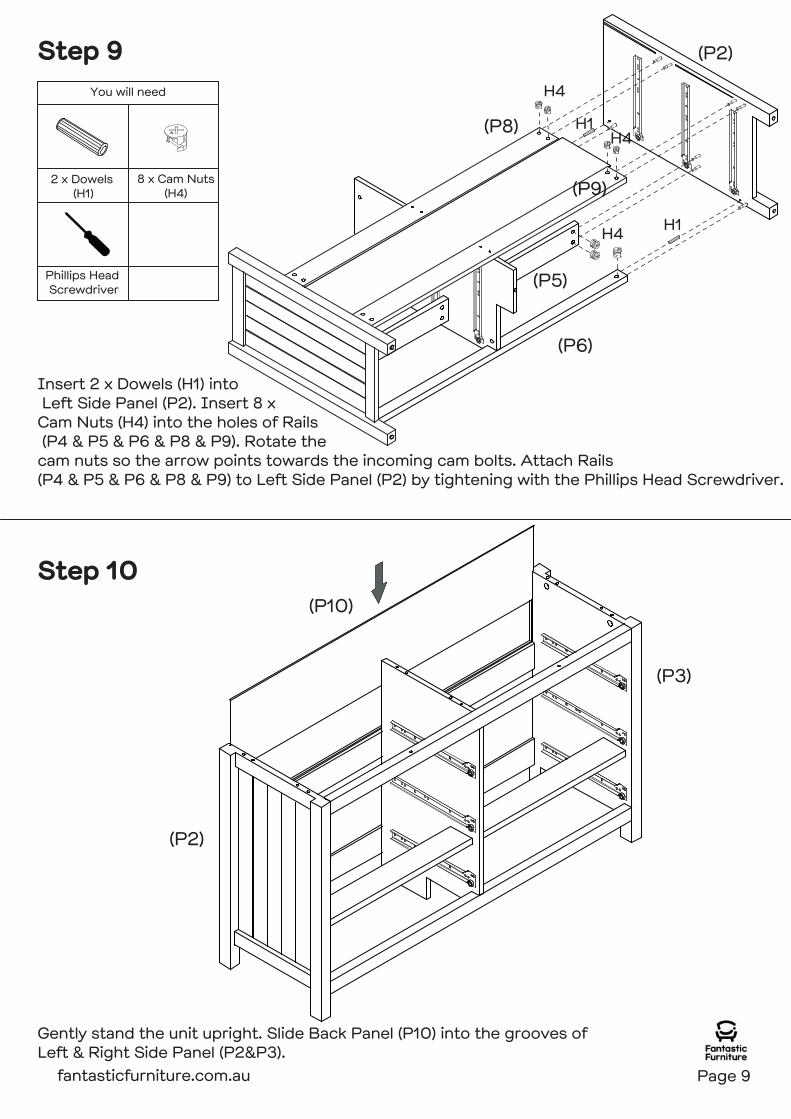
Insert 2 x Dowels (H1) into Left Side Panel (P2). Insert 8 x Cam Nuts (H4) into the holes of Rails (P4 & P5 & P6 & P8 & P9). Rotate the cam nuts so the arrow points towards the incoming cam bolts. Attach Rails (P4 & P5 & P6 & P8 & P9) to Left Side Panel (P2) by tightening with the Phillips Head Screwdriver.
Gently stand the unit upright. Slide Back Panel (P10) into the grooves of Left & Right Side Panel (P2&P3).
Step 10
Phillips Head Screwdriver
8 x Cam Nuts(H4)
2 x Dowels (H1)
fantasticfurniture.com.au Page 9
(P2)
(P6)
(P10)
(P3)
(P2)
(P5)
(P8)
(P9)
H4
H4H1
H1H4
You will need
Step 12
Phillips Head Screwdriver
6 x Cam Nuts(H4)
6 x Dowels (H1)
You will need
Step 11
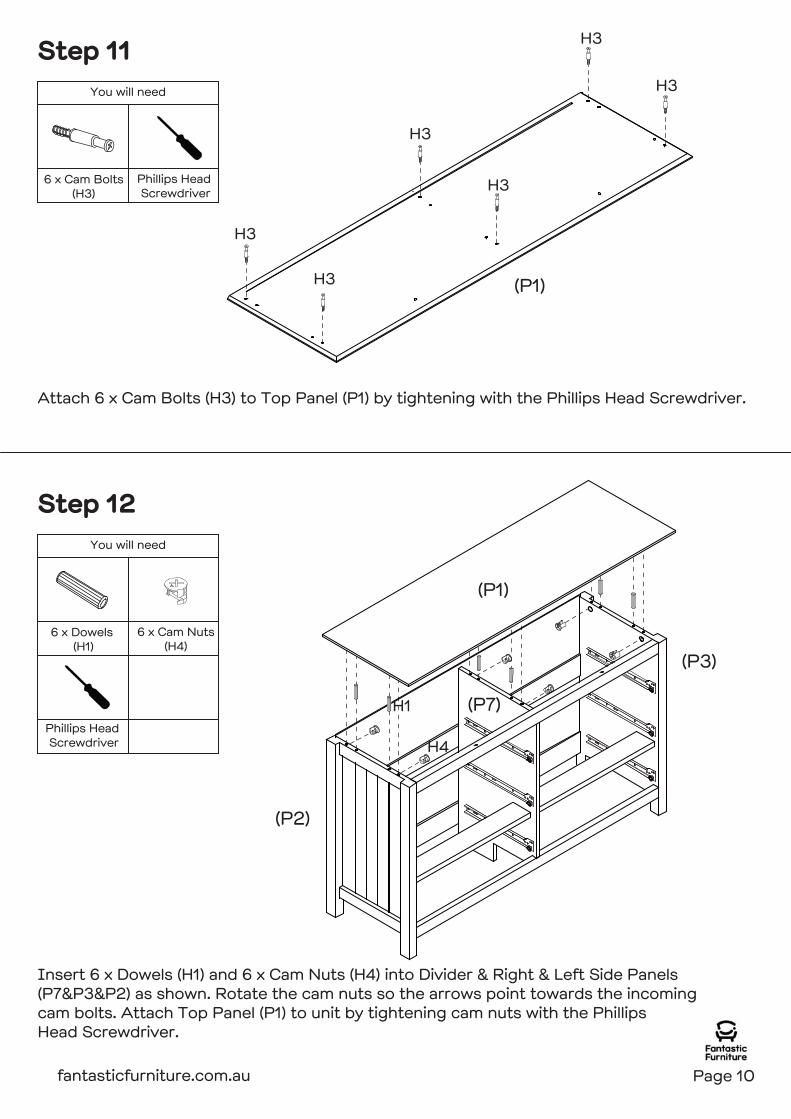
Attach 6 x Cam Bolts (H3) to Top Panel (P1) by tightening with the Phillips Head Screwdriver.
Insert 6 x Dowels (H1) and 6 x Cam Nuts (H4) into Divider & Right & Left Side Panels (P7&P3&P2) as shown. Rotate the cam nuts so the arrows point towards the incoming cam bolts. Attach Top Panel (P1) to unit by tightening cam nuts with the Phillips Head Screwdriver.
Phillips Head Screwdriver
fantasticfurniture.com.au Page 10
(P3)
(P7)
(P1)
(P1)
(P2)
H3
H3
H1
H4
H3
H3
H3
H3
6 x Cam Bolts(H3)

You will need
Step 13
Secure Top Panel (P1) to Rail (P4) with 3 x Long Screws (H2) by tightening with the Phillips Head Screwdriver.
Secure Back Panel (P10 x 2) in place with 8 x Wedges (H12) using 8 x Wedge Screws (H13) by tightening with the Phillips Head Screwdriver. Use 1 x Safety Screw (H15) and 1 x Washer (H17) to connect 1 x Safety Strap (H16) on Top Panel (P1) by tightening with the Phillips head screwdriver.
Step 14
Phillips Head Screwdriver
You will need
Phillips Head Screwdriver
1 x Safety Strap (H15)
1 x Safety Strap Screw (H16)
1 x Washer (H17)
8 x Wedges(H12)
8 x Wedge Screws (H13)
fantasticfurniture.com.au Page 11
(P1)
(P1)
(P10)
(P10)
(P1)
(P4)H14
H14
H14
H15
H15
H12
H12
H13
H13
H17
H17
H16
H16
2 x LongScrews (H14)

You will need
Step 15
Phillips Head Screwdriver
x6
You will need
Step 16
24 x Cam Nuts(H4)
Insert 24 x Cam Nuts (H4) into Left & Right Drawer Sides (P12x6 & P13x6) as shown. Rotate the cam nuts so the arrows point towards the incomingcam bolts. Attach Left & Right Drawer Sides (P12x6&P13x6) to Drawer Fronts (P11x6) by tightening the cam nuts with the Phillips Head Screwdriver.
Attach 24 x Cam Bolts (H3) to Drawer Fronts (P11x6) by tightening with the Phillips Head Screwdriver.
(P12)
(P13)
(P11)
Phillips Head Screwdriver
H4
H4
H4
H4
x6
fantasticfurniture.com.au Page 12
(P11)
H3H3
H3H3
24 x Cam Bolts(H3)
Slide Drawer Bases (P14x6) into the grooves of Left & Right Drawer Sides (P12x6&P13x6).
(P12)
(P13)
(P14)Step 17
x6
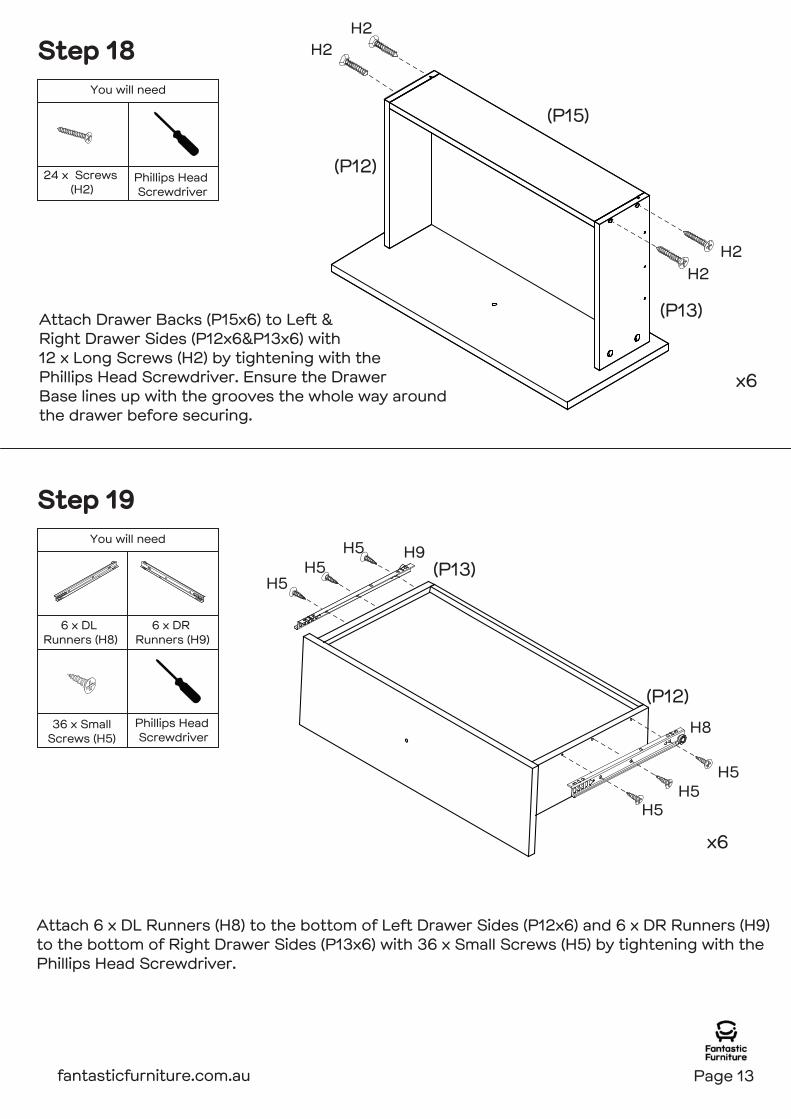
Attach Drawer Backs (P15x6) to Left & Right Drawer Sides (P12x6&P13x6) with 12 x Long Screws (H2) by tightening with the Phillips Head Screwdriver. Ensure the DrawerBase lines up with the grooves the whole way aroundthe drawer before securing.
x6
x6
Attach 6 x DL Runners (H8) to the bottom of Left Drawer Sides (P12x6) and 6 x DR Runners (H9) to the bottom of Right Drawer Sides (P13x6) with 36 x Small Screws (H5) by tightening with the Phillips Head Screwdriver.
(P12)
(P12)
(P13)
(P13)
(P15)
fantasticfurniture.com.au Page 13
H2
H2
H2
H2
You will need
Step 18
You will need
Step 19
36 x SmallScrews (H5)
Phillips Head Screwdriver
6 x DR Runners (H9)
6 x DL Runners (H8)
Phillips Head Screwdriver
24 x Screws (H2)
H5
H5
H5H5
H5H5
H9
H8

Attach 6 x Handles (H10) to Drawer Fronts (P11x6) with 6 x Handle Bolts (H11) by tightening with the Phillips Head Screwdriver.
Step 21
Insert the assembled drawers into the corresponding compartments as shown. Ensure the drawers slide easily along the rails.
(P11)
fantasticfurniture.com.au Page 14
You will need
Step 20
x6
H10
H11 6 x Handle Bolts (H11)
6 x Handles (H10)
Phillips Head Screwdriver

Job Complete!In the interest of our environment please dispose of all packaging thoughtfully.
Screw
Wall
You will need
Step 22
Phillips Head Screwdriver
1 x Washer(H17)
Screw and Wall Plug are not provided.Please use appropriate fixtures for your wall.
Seek advice from a qualified trades person on how to attach this safety strap to your specific wall.
Move the unit to the final position, and attach the safety strap to the wall securely.Make sure it is firmly attached and snug fit.
fantasticfurniture.com.au Page 15
H17