hal e-bank manual - halcom.com
TRANSCRIPT

HAL E-BANK MANUAL
ADDITIONAL TOOLS AND SETTINGS
Hal E-Bank version: 21.X.X.01

-2- -2-
Content of Manual The manual consists of several content sections. The current section is highlighted on the
list. The manual's content sections are also available online at wwweng.halcom.si/support.
1. PAYMENTS
2. CROSS-BORDER PAYMENTS AND OPERATIONS WITH FOREIGN CURRENCIES
3. REMOTE SIGNING
4. ADDRESS BOOK
5. QUALIFIED DIGITAL CERTIFICATE ONE FOR ALL
6. REVIEW OF BALANCE, TRANSACTIONS AND STATEMENTS
7. BANK NOTICES AND MESSAGES TO BANK
8. ADDITIONAL TOOLS AND SETTINGS
9. FILE EXCHANGE
10. E-INVOICES
11. SEPA DIRECT DEBIT
12. SDD REFUSALS AND MANDATES

ADDITIONAL TOOLS AND SETTINGS
-3- -3-
Table of Contents
TOOLS ........................................................................................................ 4
Personal Number (PIN) Change .................................................................................... 6
Settings ................................................................................................................ 7
TCP/IP .......................................................................................................................... 8
Payment Details ............................................................................................................... 8
E-Forms ......................................................................................................................... 9
Import/Export ................................................................................................................. 9
Balance Overview ........................................................................................................... 16
My Accounts and Descriptive Names ..................................................................................... 17
Miscellaneous ................................................................................................................ 18
Address Book ................................................................................................................. 19
Smart Card or USB Key Test ...................................................................................... 20
Exchange of Smart Card or USB Key ............................................................................ 21
Address Book ........................................................................................................ 21
Debtor Identifiers ................................................................................................... 22
SDD creditor identifiers ........................................................................................... 23
Deleting Old Data (Database Cleanup) .......................................................................... 24
Database Security Backup ......................................................................................... 25
Hal E-Bank / Personal ...................................................................................................... 25
Hal E-Bank / Corporate .................................................................................................... 26
Search ................................................................................................................. 27
Currency Conversion ............................................................................................... 28
Service Programs ................................................................................................... 29
PERMISSIONS FOR WORKING WITH HAL E-BANK ..................................................... 31
System of Permissions for Working with Hal E-Bank ......................................................... 32
COMMUNICATION ......................................................................................... 34
My First Connection ................................................................................................ 34
Connection Settings ................................................................................................ 35
HELP ........................................................................................................ 36

ADDITIONAL TOOLS AND SETTINGS
-4-
Tools
In Hal E-Bank, through the Tools function (A) you can access the following functionalities:
• Personal number (PIN) change
• Settings
o TCP/IP o Payment details o E-Forms o Import/Export o Balance overview o My accounts and descriptive names o Miscellaneous o Address book
• Smart card or USB key test
• Exchange of smart card or USB key
• Address book
• Debtor identifiers
• SDD creditor identifiers
• Database cleanup
• Database backup
• Search
• Currency conversion
• Service programs1
1 The set of service programs can vary from account to account, if the accounts are opened at different banks
offering different service programs.

ADDITIONAL TOOLS AND SETTINGS
-5-
o Repair database
o Collect system information
o Delete client profiles
o Update bookmarks
o Import bank directory
o Update bank register
o Unblock personal number (PIN code)
o Account number conversion from BBAN to IBAN
o Reimport of E forms
o Import default account data into address book
o Import NPI mandates data
o Migrate E-Bank data
o Certificate export
o Database upgrade

ADDITIONAL TOOLS AND SETTINGS
-6-
Personal Number (PIN) Change Due to security reasons, we recommend to change the personal number (PIN code) on a monthly basis.
1 In the toolbar, click the "Change personal number" (1a) icon or via the menu bar Tools select
the command Tools > Personal number (PIN) change (1b).
2 A warning will appear informing you that the program will interrupt work with the electronic
bank in order to change your personal number. If you have completed your work, confirm this
window. Otherwise, first complete the work and repeat the procedure.
3 The window for changing the PIN code will appear. Enter the old and the new personal number
(the number should consist of 6 to 8 characters). Confirm the new personal number due to
security reasons by entering it again. Confirm the entry by clicking OK.
4 The program displays a notification stating that the PIN code was successfully changed.
Confirm the notification.
In order to continue working with Hal E-Bank, you need to sign up again.

ADDITIONAL TOOLS AND SETTINGS
-7-
Settings The Hal E-Bank program enables you to set functions which will make your work easier.
1 Select the command Tools > Settings or the command Alt + O.
2 The Settings window opens. On top of the window, tabs are located. Select the desired tab. In
continuation, the description is provided about which items can be set in each tab.

ADDITIONAL TOOLS AND SETTINGS
-8-
TCP/IP
In the TCP/IP tab, you can set the way of refreshing data.
You can specify whether during sending data to the bank
you want to refresh data, accept bank's exchange rate lists
or if you wish to refresh data when starting the program.
1 Select the command Tools > Settings or the
command Alt + O
(see the Settings chapter).
1 Select the TCP/IP tab.
2 Enter the maximum number of batches at sending
into the field.
3 Select the desired content regarding sending,
receiving and refreshing of data.
4 Confirm the selection by clicking OK.
Payment Details
The tab enables you to set in advance 12 payment
details, which you use most frequently when
completing payment orders. In the payment order,
you can call them by clicking on »?« or by selecting
the appropriate function button.
1 Select the command Tools > Settings or the
command Alt + O (see the Settings chapter).
2 Select the Payment details tab.
3 In the fields, enter desired payment details. At
completing the order, you can enter payment
details faster by using function buttons (F1, F2
…), namely »F1« for »Payment details 1«, »F2«
for »Payment details 2« …
4 Confirm the selection by clicking OK.

ADDITIONAL TOOLS AND SETTINGS
-9-
E-Forms
The bank defines available e-forms (overnight
deposits, etc.). They are available in the
Preparation/Forms folder. By default settings,
this folder is empty.
1 Select the command Tools > Settings or
the command Alt + O (see the Settings
chapter).
2 Select the E- Forms tab.
3 Select default e-forms for different
folders.
4 Confirm the selection by clicking OK.
Import/Export
We recommend you:
• to import/export data with the XML SEPA converter,
• that at import/export you always prepare or export in accordance with the highest version of
the scheme and to also set the converter in such a way. Data import/export with the highest
version of the converter ensures uniformity of data with the rules which currently apply to
conduction of payment services.
Setting converters of import and export manually
Payment orders for import in domestic payment system can be prepared in two formats:
• text file, which corresponds to Hal E-Bank specifications of import-export formats,
• orders are prepared by banks' instructions for submission and reception of data with
payment orders.

ADDITIONAL TOOLS AND SETTINGS
-10-
You can select whether summary and title row are also taken into
account at import:
1 Select the command Tools > Settings or the command Alt +
O (see Settings chapter).
2 Select the Import/Export tab.
3 Select »Market«, if this option is available.
4 In drop-down menus, select the desired values.
5 Select the command Set converter as default; otherwise,
the converters will remain unchanged.
6 Confirm the selection by clicking OK.
Automatic recognition of import file format
At import of orders/batches, the Hal E-Bank program itself recognizes the import file format and runs
the converter suitable to the format, in accordance with its settings.
To turn off the automatic recognition of the import converter, uncheck the field "Automatic
recognition of import file format for the import of payment orders" (see picture above) and then set
the import converter manually.
Additional option of setting import/export converters
In addition to the setting of converters via the menu Tools > Settings (Alt + O), you can set this also
in Preparation of orders/batches. You can find further information on those settings in the manual
Payments, Order import.

ADDITIONAL TOOLS AND SETTINGS
-11-
Display of data on export converter
In the folder Preparation and Review (of orders, batches, transactions, statements, e-invoices), next
to the option for Export the data on the default export converter is also displayed, which can be
reset.

ADDITIONAL TOOLS AND SETTINGS
-12-
SEPA RB 7.0 and versioning of XML SEPA converter
On February 1, 2014, the new rules of conducting business with the SEPA credit payments and SEPA
direct debits (SEPA RB 7.0) shall enter into force. The new rules don’t change the data model from the
version SEPA RB 4.0 to 6.0, but they rather expand the range of values in certain codebooks, which
you can select from the drop-down menus (e.g. values for the category purpose code for the
UPN/SEPA form, etc.).
Now, also for the selection of the XML SEPA converter there is an option to select the scheme version.
In the »Data standard« row (1) on the drop-down menu below the column »Selected value«, select the
data standard (2).
Data import/export with this version of the data standard ensures uniformity of data with the rules
which currently apply to conduction of payment services.

ADDITIONAL TOOLS AND SETTINGS
-13-
Formats of Import/Export Files
For more information on import/export formats, see the web page
http://www.halcom.si/en/support/?action=showEntry&data=378.
Import/Export of SEPA mass payments batch
The import of the SEPA mass payments batch (MP SEPA batch) is conducted in the same way as import
of other batches with payment orders (see the Payments manual). The import is enabled in the
Domestic payments (1) by selecting the Document type DPS batch (payment orders) (2) and only for
the XML SEPA type of file (3). In Converter parameters in the row »Import batches MP SEPA as
ordinary batch«, set the selected value to »NO« (4). Confirm the selection (5, 6 and 7). If the value is
set to »YES«, the program imports the prepared MP SEPA batch as an ordinary batch with orders.

ADDITIONAL TOOLS AND SETTINGS
-14- -14-
When importing the MP SEPA batch, you must
also set the batch type of the batch that you
are importing (open / closed). This can be done
in the MISCELLANEOUS tab. Here, you can also
set whether you wish the notification for the
selection of batch type to be displayed each
time you import an MP SEPA batch.
ADDITIONAL TOOLS AND SETTINGS
-15- -15-
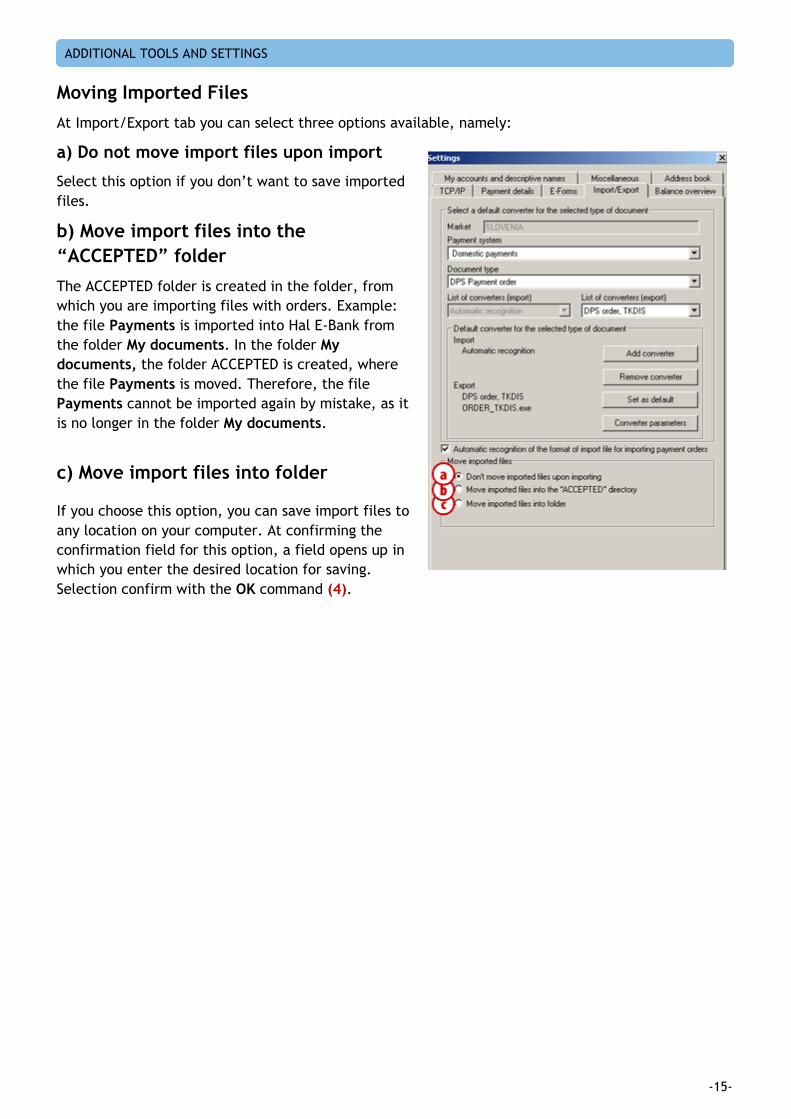
Moving Imported Files
At Import/Export tab you can select three options available, namely:
a) Do not move import files upon import
Select this option if you don’t want to save imported
files.
b) Move import files into the
“ACCEPTED” folder
The ACCEPTED folder is created in the folder, from
which you are importing files with orders. Example:
the file Payments is imported into Hal E-Bank from
the folder My documents. In the folder My
documents, the folder ACCEPTED is created, where
the file Payments is moved. Therefore, the file
Payments cannot be imported again by mistake, as it
is no longer in the folder My documents.
c) Move import files into folder
If you choose this option, you can save import files to
any location on your computer. At confirming the
confirmation field for this option, a field opens up in
which you enter the desired location for saving.
Selection confirm with the OK command (4).

ADDITIONAL TOOLS AND SETTINGS
-16-
Balance Overview
In the Balance overview tab, you can set the balance overview for selected accounts.
1 Select the command Tools > Settings or the command Alt + O
(see the Settings chapter).
2 Select the Balance overview tab.
3 Select the Add command.
4 A new window will open. In the field »Descriptive name of view«, enter the name (4a) for a
new view. Select accounts (4b) and add them (4c) to the list. Then confirm the selection (4d).
5 Confirm with the OK command.
You can review the new view for selected accounts in the folder Review > Balance. Select the view in
the drop-down menu »Balance view« (A1). The balance for accounts is written in the new view (A2).
ADDITIONAL TOOLS AND SETTINGS
-17-
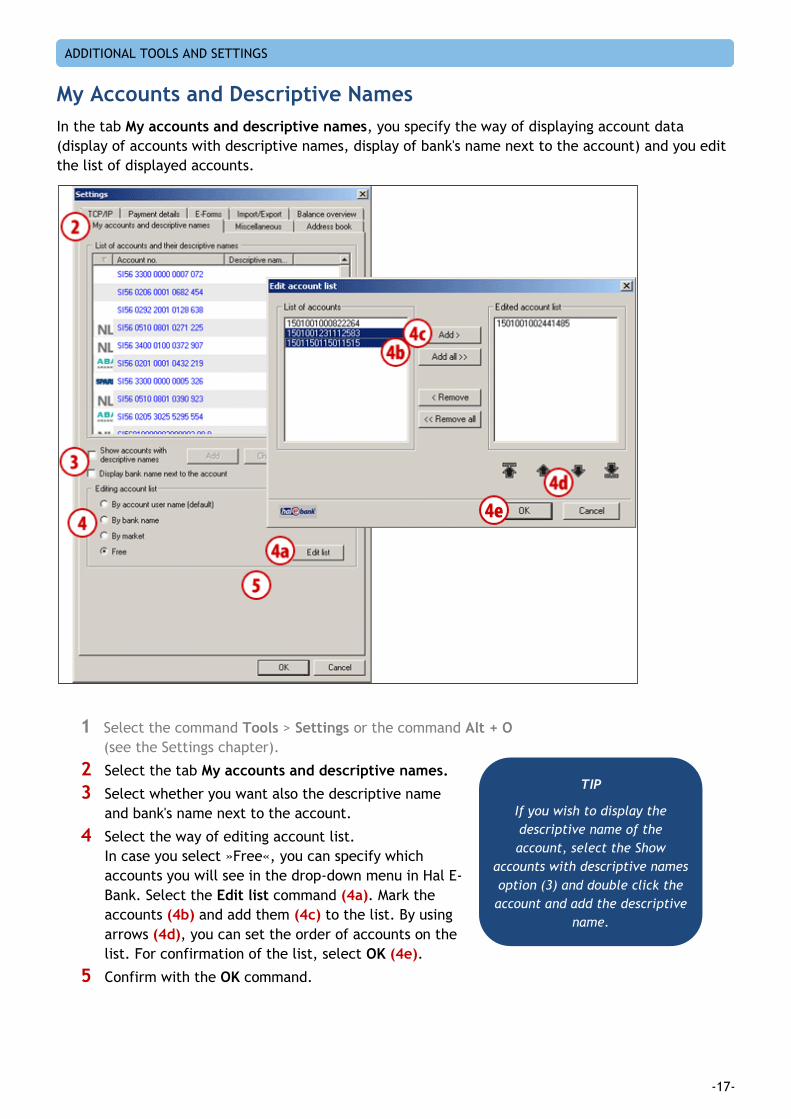
My Accounts and Descriptive Names
In the tab My accounts and descriptive names, you specify the way of displaying account data
(display of accounts with descriptive names, display of bank's name next to the account) and you edit
the list of displayed accounts.
1 Select the command Tools > Settings or the command Alt + O
(see the Settings chapter).
2 Select the tab My accounts and descriptive names.
3 Select whether you want also the descriptive name
and bank's name next to the account.
4 Select the way of editing account list.
In case you select »Free«, you can specify which
accounts you will see in the drop-down menu in Hal E-
Bank. Select the Edit list command (4a). Mark the
accounts (4b) and add them (4c) to the list. By using
arrows (4d), you can set the order of accounts on the
list. For confirmation of the list, select OK (4e).
5 Confirm with the OK command.
TIP
If you wish to display the
descriptive name of the
account, select the Show
accounts with descriptive names
option (3) and double click the
account and add the descriptive
name.

ADDITIONAL TOOLS AND SETTINGS
-18-
Miscellaneous
In the Miscellaneous tab, you can set the following:
• reminder for database archiving,
• activate displaying of notifications about certificate expiration and specify number of days for notification prior to expiration,
• maximum number of displayed documents,
• maximum number of orders in the MP SEPA batch,
• default account at program startup,
• default purpose code for the order,
• default reference type for the debit on the UPN / SEPA PPD order,
• default reference type for the debit on the UPN / SEPA PPT Order.
You can also activate/deactivate the displaying of notification on different time zones, checking of
adjustment of time on a local computer and on server, review of unread messages at program start,
for payment orders entry of data without use of address book, showing the notification for the
selection of the batch type at the import of the SEPA MP
batches and define default type of the SEPA MP batch (open
/closed). You can also activate/deactivate the displaying of
notification on exceeded database size and specify the
maximum allowed database size in MB.
1 Select the command Tools > Settings or the command
Alt + O (see Settings chapter).
2 Select the Miscellaneous tab.
3 Enter and select the desired data.
4 Confirm with the OK command.

ADDITIONAL TOOLS AND SETTINGS
-19-
Address Book
In the Address book tab, you can specify whether at
entering partner or bank on payment order the program
will search by the beginning of name or by any pattern in
name.
You can enable use of only capital letters or use of small
and capital letters in address book.
1 Select the command Tools > Settings or the
command Alt + O (see the Settings chapter).
2 Select the Address book tab.
3 Select the desired settings.
4 Confirm with the OK command.

ADDITIONAL TOOLS AND SETTINGS
-20-
Smart Card or USB Key Test You can test your smart card or USB key.
1 Select the command Tools > Smart card or USB key test.
2 The window Personal number (PIN code) opens. Enter the number (PIN code) of your smart
card or USB key.
3 Select the OK command.
4 A notification will appear on success of testing smart card or USB key. Confirm the notification.

ADDITIONAL TOOLS AND SETTINGS
-21-
Exchange of Smart Card or USB Key If you would like to continue your work with a different smart card or USB key, you can do that
without the need to close down Hal E-Bank and start it again.
1 Select the command Tools > Exchange of smart card or USB key.
2 The window Personal number (PIN code) opens. Enter a different smart card or USB key you
would like to continue working with. Enter the number (PIN code) of smart card of USB key.
3 Confirm the entry with OK command. You can continue working with Hal E-Bank.
Address Book Work with the address book is described in the section ADDRESS BOOK. It is also available at the
website wwweng.halcom.si/support in the section Users Manuals under the mentioning of section:
Address book.

ADDITIONAL TOOLS AND SETTINGS
-22-
Debtor Identifiers When completing some payment orders, it is mandatory to enter also data on debtor's identifiers (Hal
E-Bank user). If you want your identification data to be entered automatically when completing
payment orders, you can set this in Tools > Debtor identifiers.
1 Select the command Tools > Debtor identifiers.
2 The window Debtor identifiers opens. If there are multiple accounts available for work, select
the account you want to set identifiers for.
3 Enter identifiers. Set of identifiers differs by type of user, namely Legal entity or Consumer;
you select the type of user by selecting the appropriate tab (3a).
4 From the drop-down menu, select the default type of identifier and enter the issuer of default
identifier (4a). If you would like to use the identifier which is not in the recommended
selection, select Other identification and enter data.
5 If you want to import this data at import of payment orders, check the field Use of identifiers
when importing orders.
6 Confirm the entry by clicking OK.

ADDITIONAL TOOLS AND SETTINGS
-23-
SDD creditor identifiers When doing business with SEPA direct debits, the data on SDD creditor identifier is also mandatory.
For Slovenian creditors, the data is written in the format: SI (country code), KK (calculated control
number), ZZZ (constant) and tax number (e.g. SI02ZZZ12345678). If you want that data to be imported
at import of orders you can set this by marking a mark in the field Use of identifiers when importing
orders.
1 Select the command Tools > SDD creditor identifiers.
2 The window SDD creditor identifiers opens. If you have multiple accounts at disposal, select
the account you would like to set identifiers for.
3 Enter the identifier.
4 If you want this data to be imported at import of the SDD orders, mark the field Use of
identifiers when importing orders.
5 Confirm the entry by OK command.

ADDITIONAL TOOLS AND SETTINGS
-24-
Deleting Old Data (Database Cleanup) From Hal E-Bank, you can delete old data (data without address book, template or files). Such data
can be saved or archived, but they will not be visible in the Hal E-Bank program any more. In case
there is a lot of old data, deleting it enables faster functioning of the program.
1 Select the command Tools > Database cleanup.
2 A notification will appear informing you that Hal E-Bank will close down. Confirm if you want
to conduct database cleanup.
3 In the »Cleaning database« window, enter the date until which the data will be deleted. If you
want to save or archive data, check »Create archive file«. Select the Clean database
command.
4 In the »Clean database«, confirm if you really want to delete data.
5 A notification will appear informing you that deletion is completed successfully. Close the
window.
To continue working with Hal E-Bank, you need to sign in again.

ADDITIONAL TOOLS AND SETTINGS
-25-
Database Security Backup Usually, we are not aware of the importance of data backup until we face a loss of data. Statistics
indicate that a loss of data when using Hal E-Bank occurs most frequently due to errors on hardware
(hard disk), while occasionally problems also occur in functioning of databases.
The responsibility for data backup lies with the user!
The procedure for creating database security backup depends on the type of Hal E-Bank program you
are using.
Hal E-Bank / Personal
In Hal E-Bank / Personal, the data (payment orders, statements, transactions, balance, e-invoices,
etc.) are saved on your computer's local disk.
You can archive the up-to-date database (all data without address book, e-invoices and templates) in
the Hal E-Bank / Personal program. In this way, you create a security backup of the data.
1 Select Tools > Database backup.
2 A notification will appear informing you that Hal E-Bank will close down.
Confirm if you want to conduct database backup.
Continued on next page …

ADDITIONAL TOOLS AND SETTINGS
-26-
3 A window will open, where you select whether you want
to delete archive copies or not (3a). Then, you can change
the path (3b), where archive data will be saved on your
local disk and click OK (3c).
4 A notification will appear informing you that archiving was
successful. Close the window.
To continue working with Hal E-Bank, you need to sign in again.
If you want to create a security backup of address book, see
section ADDRESS BOOK, the chapter Exporting and Importing
Data from/into Address Book, sub-chapter Procedure of
exporting data from address book.
Hal E-Bank / Corporate
In Hal E-Bank / Corporate program, the data (payment orders, statements, transactions, balance, e-
invoices, etc.) are saved on server located in your company. Data security backup can be created by
the system administrator in a company. He can also set periodical creation of backup copies. Upon
such setting, the data is saved automatically.
For help, please contact Halcom's help desk at [email protected] or by phone at +386 1 200 33 69
(working hours are published on the web page: www.halcom.si).
TIP
You can set a reminder for data
backup. By using the command
Tools > Settings, the
Miscellaneous tab in the field
»Database archiving reminder«,
set the frequency of reminders
(see chapter Tools/Settings/
Miscellaneous).

ADDITIONAL TOOLS AND SETTINGS
-27-
Search You can conduct search of individual transactions, orders or batches in the archive easier by using the
search. Search is also available in cross-border payments and in preparation of orders/batches.
1 Select the command Tools > Search (selection is also available by clicking on the icon
in the tool bar or with the command Ctrl + F).
2 The window opens where you enter search criteria.
3 Perform the search by clicking Search.
4 The data will remain filtered until you turn the search off by clicking the icon or
.

ADDITIONAL TOOLS AND SETTINGS
-28-
Currency Conversion Hal E-Bank enables currency conversion. In order to do this, you must have an exchange rate list in Hal
E-Bank, which is sent to you by the bank. In order for the currency conversion to be accurate (last
exchange rate list acquired), refresh the data first (A).
1 Select the command Tools > Currency conversion.
2 A window will open, where you select the bank.
3 Select both currencies (entry and exit). Enter the amount you want to
calculate (3a). The program conducts and displays conversion. If you did
not acquire the last exchange rate list, the program warns you that the
conversion is not possible (the exchange rate list must be acquired).
4 Close the window by Close command.

ADDITIONAL TOOLS AND SETTINGS
-29-
Service Programs Service programs are additional programs installed on your computer with Hal E-Bank. They enable the
conduction of operations, which need to be performed rarely. You can access them via the command Tools >
Service programs (A).The set of service programs can vary from account to account, if the accounts are opened
at different banks offering different service programs.
WARNING
Do not start some of the service programs on your own! They are intended for use under expert supervision of the technical support to electronic banking users.
Repair database starts the program, which checks the databases used by Hal E-Bank. Use this program
in case of slow functioning of the program, missing data or problems at entering new partners into the
Address book.
Collect system information starts the program, which collects data on the computer on which you are
using Hal E-Bank. Start the program before contacting technical support for use of electronic banking.
Delete client profiles deletes the list of accounts you are authorized for.
Update bookmarks starts the program, which acquires again the data from the bank’s server. You can
specify data, which you would like to acquire, date (newer data will be acquired) and account, for
which you would like to acquire data again.
Import bank directory starts the program, which updates the bank directory in Hal E-Bank. Start the
program only when needed upon receiving adequate files from the bank.

ADDITIONAL TOOLS AND SETTINGS
-30-
Update bank register starts the program, which updates the list of banks. Start the program only
when needed upon receiving adequate files from bank.
Unblock personal number (PIN code) starts the program, by which you can unblock the locked
qualified digital certificate.
Account number conversion from BBAN to IBAN starts the program, which converts the accounts in
the BBAN format in Address book into the IBAN format.
Reimport of E-Forms starts the preparation of forms for re-import into the database.
Import default account data into address book starts the program, which enables that at upgrade of
older versions of the client to the version 16.0.0.00 or higher the user that the data on e-invoice
recipients are automatically transferred from the code book for import of e-invoices into the address
book of business partners.
Import data on NPI mandates data opens the program, which enables setting of data and import of
data on existing NPI DB mandates.
Migrate E-Bank data starts the program which prepares or expands the .zip file of the entire
electronic bank archive from the old computer to the new one. For migration help yourself with
instructions.
Export certificate starts the program, with which you can export and print the data on your qualified
digital certificate. You can find out more on the printout and export of the certificate in the section
Qualified digital certificates one for all.
Database upgrade starts the program for the upgrade of the database. The program first checks
whether the data in the database has been updated. If the database has been updated, the program
will notify you that an upgrade is not required. If the database has not been updated, you can use the
same program to perform the upgrade (update).
ADDITIONAL TOOLS AND SETTINGS
-31-
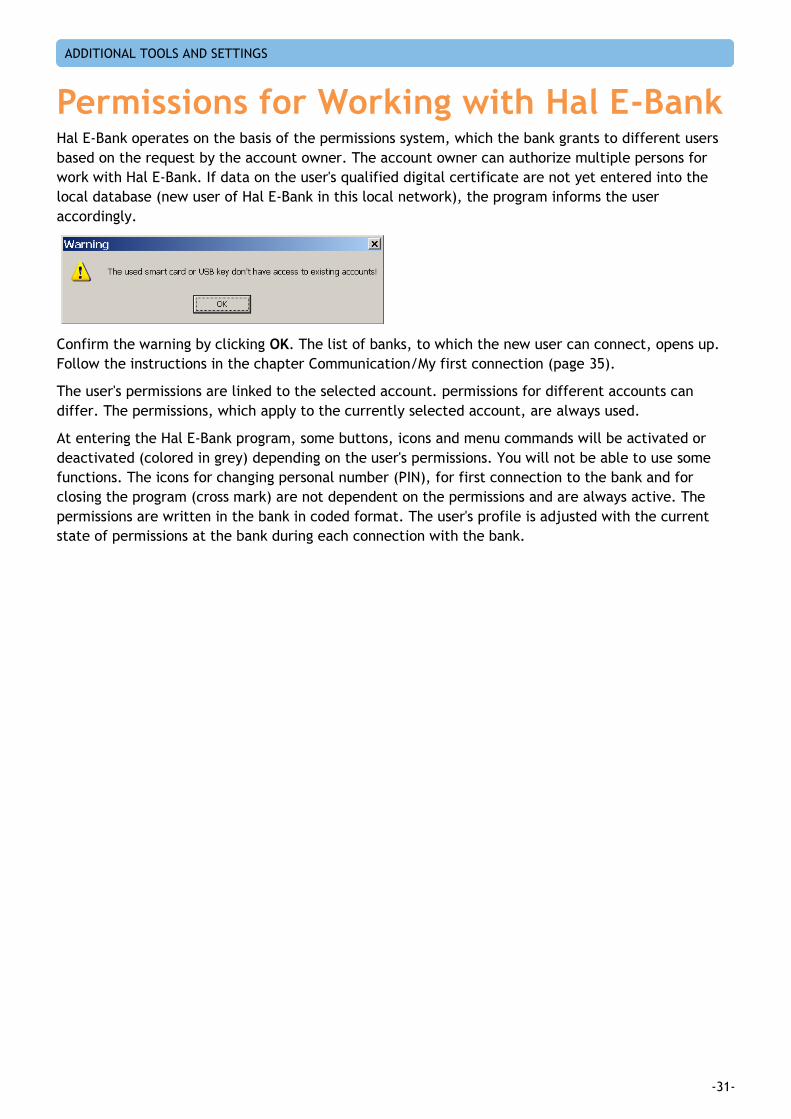
Permissions for Working with Hal E-Bank Hal E-Bank operates on the basis of the permissions system, which the bank grants to different users
based on the request by the account owner. The account owner can authorize multiple persons for
work with Hal E-Bank. If data on the user's qualified digital certificate are not yet entered into the
local database (new user of Hal E-Bank in this local network), the program informs the user
accordingly.
Confirm the warning by clicking OK. The list of banks, to which the new user can connect, opens up.
Follow the instructions in the chapter Communication/My first connection (page 35).
The user's permissions are linked to the selected account. permissions for different accounts can
differ. The permissions, which apply to the currently selected account, are always used.
At entering the Hal E-Bank program, some buttons, icons and menu commands will be activated or
deactivated (colored in grey) depending on the user's permissions. You will not be able to use some
functions. The icons for changing personal number (PIN), for first connection to the bank and for
closing the program (cross mark) are not dependent on the permissions and are always active. The
permissions are written in the bank in coded format. The user's profile is adjusted with the current
state of permissions at the bank during each connection with the bank.

ADDITIONAL TOOLS AND SETTINGS
-32-
System of Permissions for Working with Hal E-Bank The permissions for work with Hal E-Bank are divided into the permissions for work with the selected
account, SDD permissions and permissions for work with files.
You can check the permissions of the user currently using the Hal E-Bank program by clicking the
button next to the account owner's name.
The window »Account owner and the trustee for the selected account« will open. Detailed information
on the user currently using Hal E-Bank are displayed (permissions, digital certificate information,
etc.), for the selected account.
You close the review of data on the account owner and the account trustee by clicking the Back
button .
1. Permissions for the selected account:
• Permissions for entering data is intended for using the Address book of business partners
and their accounts and for preparation or import of payment orders.
• Permissions for batches preparation is intended for forming payment orders in batches (in
case you don't have the permissions for preparation of batches, prepare orders individually).
• Permissions for signing is intended for reviewing payment orders and signing batches, but
at the same time also for changing and completing the Address book. For signing orders and
batches, the signature category described in continuation, is also important.

ADDITIONAL TOOLS AND SETTINGS
-33-
• Permissions for sending data is intended for transfer of data between the bank's server and
the Hal E-Bank local database.
• Permissions for reviewing is intended for review of transaction items, statements,
balances, notifications, etc.
• Permissions for administering is intended for administrative operations in Hal E-Bank, such
as deleting local database, refreshing program from the bank's server, etc.
2. SDD Permissions
• Permissions for entering data is intended for using the Address book of business partners
and their accounts and for preparation orders and batches or preparation of orders/batches
for direct debits,
• Permissions for batches preparation is intended for forming orders in batches (in case you
don't have the permissions for preparation of batches, prepare orders individually),
• Permissions for signing is intended for reviewing orders and signing batches, but at the
same time also for changing and completing the Address book. For signing orders and
batches, the signature category described in continuation, is also important,
• Permissions for sending data is intended for transfer of data between the bank's server and
the Hal E-Bank local database,
• Permissions for reviewing is intended for review of transaction items, statements,
balances, notifications, etc.
3. Permissions Authorizations for work with files:
• Permissions for entering files is intended for preparation or import of files.
• Permissions for signing is intended for reviewing files and signing.
• Permissions for sending files is intended for transfer of files between the bank's server and
the Hal E-Bank local database.
• Permissions for reviewing files is intended for review of files.
Apart from permissions, there is also the signature category; it defines which signature the user can
perform on each account. Namely, for each account the number of required left (minimum 0,
maximum 3) and right (minimum 1 and maximum 3) signatures is specified.
The users, who sign documents, are classified in four signature categories:
a. First (1.) category enables the user to perform all missing left and right signatures, which
means that he/she can sign the document on his/her own,
b. Second (2.) category enables the user to perform the left or the right signature, depending
on the order of signing,
c. Third (3.) category enables only the left signature,
d. Fourth (4.) category enables only the right signature.

ADDITIONAL TOOLS AND SETTINGS
-34-
Communication
My First Connection If you open a new account with the bank, you have to establish the first connection to the bank in Hal
E-Bank.
1 Select Communication > My first connection to the bank.
2 The window opens, where you select the bank with which you want to
establish the first connection.
3 Confirm the selection by clicking Connect.
4 A window opens, where you enter the personal number (PIN code).
5 Confirm the entry of personal number by using the OK command.
The connection with the bank is established. The data are transferred from the
bank. If the notification window opens, close it.

ADDITIONAL TOOLS AND SETTINGS
-35-
Connection Settings In Hal E-Bank, you can specify for each bank separately the type of connection, IP address and name
of dial-up connection, if you use the dial-up connection. In case of the HTTPS connection, you can also
specify the HTTPS IP address.
1 Select Communication > Connection settings.
2 The window opens, where you select the bank from the list (2a). If
necessary, change the settings (2b).
The connection with the bank's server will be successful only if all connection
parameters are set correctly. Correct settings have to be entered before the
first start of the client. The bank will send you all the settings details.
3 Confirm the entry by OK command.
ADDITIONAL TOOLS AND SETTINGS
-36-
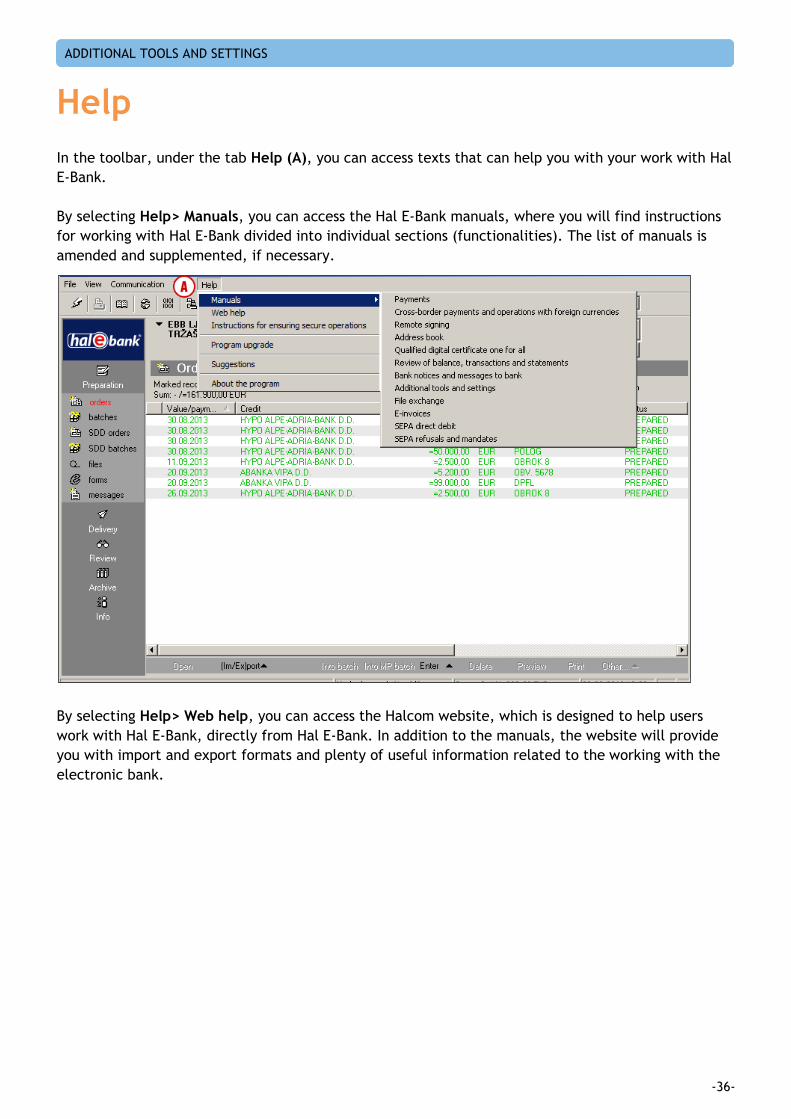
Help
In the toolbar, under the tab Help (A), you can access texts that can help you with your work with Hal
E-Bank.
By selecting Help> Manuals, you can access the Hal E-Bank manuals, where you will find instructions
for working with Hal E-Bank divided into individual sections (functionalities). The list of manuals is
amended and supplemented, if necessary.
By selecting Help> Web help, you can access the Halcom website, which is designed to help users
work with Hal E-Bank, directly from Hal E-Bank. In addition to the manuals, the website will provide
you with import and export formats and plenty of useful information related to the working with the
electronic bank.
ADDITIONAL TOOLS AND SETTINGS
-37-
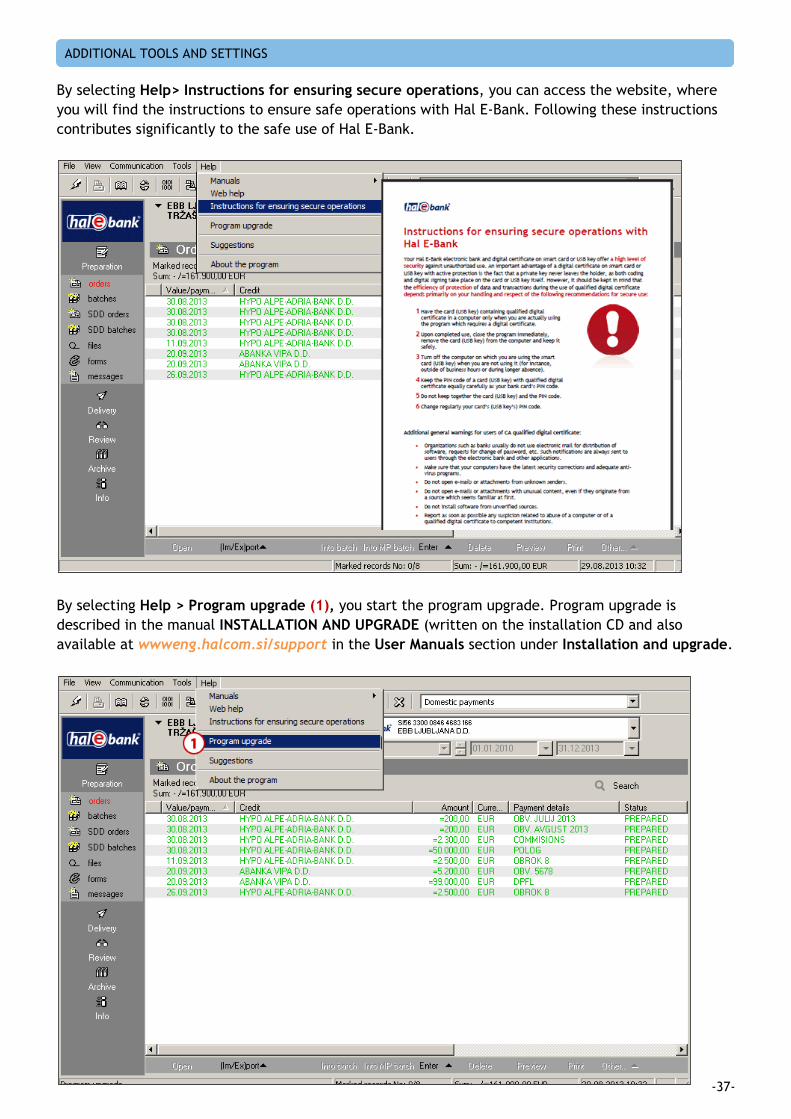
By selecting Help> Instructions for ensuring secure operations, you can access the website, where
you will find the instructions to ensure safe operations with Hal E-Bank. Following these instructions
contributes significantly to the safe use of Hal E-Bank.
By selecting Help > Program upgrade (1), you start the program upgrade. Program upgrade is
described in the manual INSTALLATION AND UPGRADE (written on the installation CD and also
available at wwweng.halcom.si/support in the User Manuals section under Installation and upgrade.
ADDITIONAL TOOLS AND SETTINGS
-38-
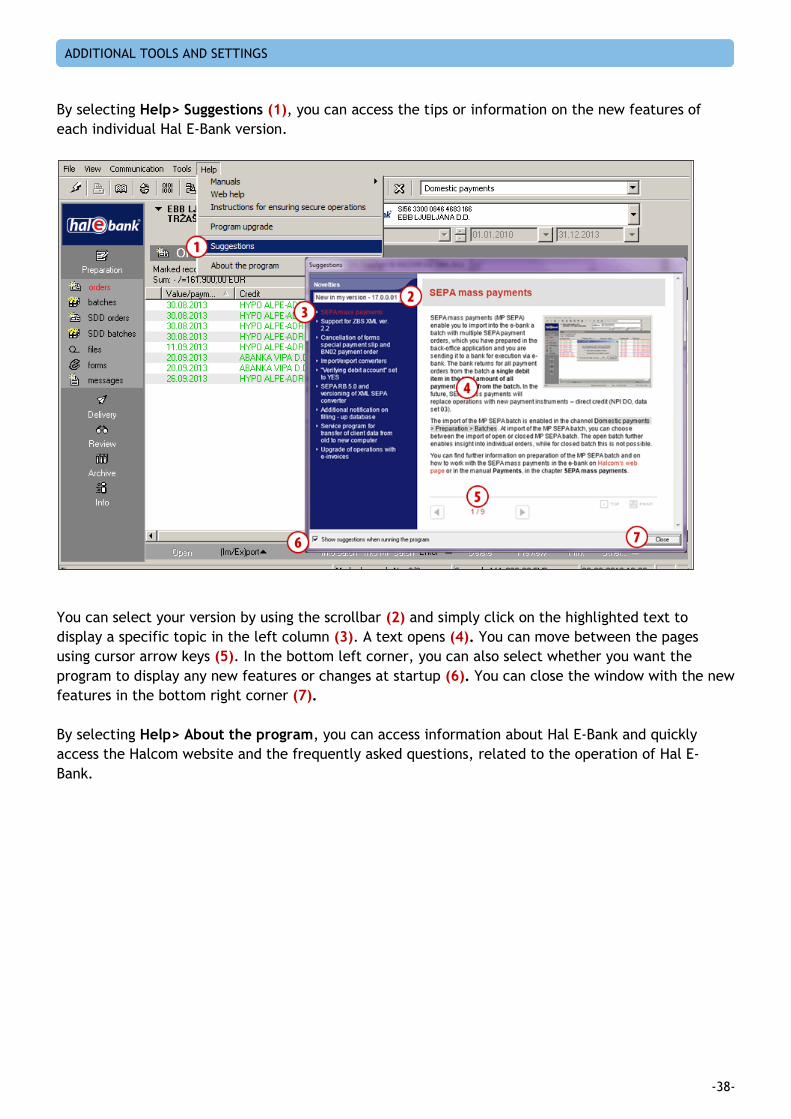
By selecting Help> Suggestions (1), you can access the tips or information on the new features of
each individual Hal E-Bank version.
You can select your version by using the scrollbar (2) and simply click on the highlighted text to
display a specific topic in the left column (3). A text opens (4). You can move between the pages
using cursor arrow keys (5). In the bottom left corner, you can also select whether you want the
program to display any new features or changes at startup (6). You can close the window with the new
features in the bottom right corner (7).
By selecting Help> About the program, you can access information about Hal E-Bank and quickly
access the Halcom website and the frequently asked questions, related to the operation of Hal E-
Bank.