habiteqtm system manager programming guide -...
TRANSCRIPT

HabiTEQ System Manager Programming Guide - Version 1
- 1 -
HabiTEQTM System Manager
Programming Guide
PEDM-021-EN Copyright GE Industrial Solutions, 2010

HabiTEQ System Manager Programming Guide - Version 1
- 2 -
INDEX 1. Introduction to HabiTEQ Home Automation System ................................................ 5
1.1 HabiTEQ Home Automation System Description.............................................. 5 1.2 System Configuration ......................................................................................... 6 1.3 Programming Options......................................................................................... 6 1.4 HabiTEQ System Limitations............................................................................. 7 1.5 How to Plan your installation ............................................................................. 8 1.6 Types of controllers .......................................................................................... 10
2. Installation of HabiTEQ System Manager................................................................ 12 2.1 Where to find HabiTEQ System Manager.............................................................. 12 2.2 System Manager requirements.......................................................................... 12 2.3 Installing System Manager ............................................................................... 13 2.4 Starting the HabiTEQ System Manager ........................................................... 16 2.5 Setting Up the HabiTEQ System Manager....................................................... 16
2.5.1 Communication with the Controller ................................................................ 17 2.5.2 Other Setup Options......................................................................................... 20
2.5.2.1 Location and Daytime............................................................................... 20 2.5.2.2 Module Verify Error Address ............................................................... 21 2.5.2.3 SD Bank Information............................................................................ 21 2.5.2.4 Thermostats Settings................................................................................. 21
3. HabiTEQ System Manager Command Line ............................................................. 22 3.1 Open and Save ........................................................................................................ 22 3.2 Upload..................................................................................................................... 22
3.2.1 Swap SD Banks................................................................................................ 26 3.2.2 Program / Verify modules from SD................................................................. 26 3.2.3 CTD Firmware Upgrade .................................................................................. 26 3.2.4 Reboot CTD..................................................................................................... 27 3.2.6 Force Upgrade.................................................................................................. 27
3.3 DownLoad......................................................................................................... 27 3.3.1 Events Downloading........................................................................................ 27 3.3.2 Downloading Programs from controller to System manager ................... 29
3.4 Programming Modules............................................................................................ 30 3.5 Choosing Outputs.................................................................................................... 31
3.5.1 Toggle .............................................................................................................. 33 3.5.2 Push Button...................................................................................................... 33 3.5.3 Dimmer1B / Dimmer2B .................................................................................. 33 3.5.4 Up/Down1B / Up/Down2B.............................................................................. 33 3.5.5 Intermittent....................................................................................................... 33 3.5.6 Thermostat ....................................................................................................... 33 3.5.7 Sequence .......................................................................................................... 35 3.5.8 Timers .............................................................................................................. 36 3.5.9 Output Properties ................................................................................................ 37

HabiTEQ System Manager Programming Guide - Version 1
- 3 -
3.6 Choosing scenes...................................................................................................... 39 3.6.1 Simulation........................................................................................................ 41 3.6.2 Multilink .......................................................................................................... 43
3.7 Setting Schedules (Weekly Program) ..................................................................... 46 3.8 Control table selection ............................................................................................ 47 3.9 Infrared Samples ..................................................................................................... 48
3.9.1 Creating Infrared Samples ............................................................................... 48 3.9.1.1 Through an SWC04I/XX .......................................................................... 48 3.9.1.2 Through a THI01X/XX............................................................................. 49
3.9.2 Check the Samples. .......................................................................................... 50 3.9.3 Allocate outputs to the sampled Infrared codes............................................... 52
3.9.3.1 Through an SWC04I/XX .............................................................................. 52 3.9.3.2 Through a THI01X/XX................................................................................. 53
3.9.4 Emitting Infrared Code via the IRG04............................................................. 55 3.10 Creating Logic Functions...................................................................................... 56
3.10.1 Boolean Logic (If – Then – Else) .................................................................. 56 3.10.2 Analog Logic (X,/,+,-,<,>,=) ......................................................................... 58
3.11 Choosing an alarm ................................................................................................ 60 4. Input Modules ............................................................................................................... 63
4.1 Input Modules Configuration.................................................................................. 63 4.1.1 INP04 ............................................................................................................... 64 4.1.2 INP08/INP16.................................................................................................... 65 4.1.3 INP08/230........................................................................................................ 66
5. Output Modules ........................................................................................................ 67 5.1 Relay Module Configuration (REL04/REL08) ...................................................... 67 5.2 Shutter Module (ROL02)........................................................................................ 69 5.3 Dimmer Module (DIM04) ...................................................................................... 70 5.4 Analogue Dimmer Module (ANA04/ANR04) ....................................................... 72
6. Switch Programming ................................................................................................ 73 7. HMI Modules........................................................................................................... 77
7.1 Thermostat Indicator Display- THI01 ................................................................... 77 7.1.1 Configuring THI01 .......................................................................................... 77 7.1.2 Using THI01 .................................................................................................... 78
7.2 Touch Screen 5.8 – TSC5.8 .................................................................................... 80 7.2.1 Configuring TSC5.8......................................................................................... 80 7.2.2 Using TSC5.8................................................................................................... 81
7.3 GSM Interface Programming - SMS01 .................................................................. 81 7.3.1 Setting parameters............................................................................................ 81 7.3.2 Sim card installation ........................................................................................ 81 7.3.3 Telephone numbers configuration ................................................................... 82 7.3.4 Commands edition ........................................................................................... 82
8. Movement Detector Sensor Programming................................................................ 86 8.1 Module specifications ............................................................................................. 86 8.2 Configurations parameters ...................................................................................... 86

HabiTEQ System Manager Programming Guide - Version 1
- 4 -
8.2.1 Trigger.............................................................................................................. 86 8.2.2 LED field ......................................................................................................... 87 8.2.3 Timers field...................................................................................................... 87 8.2.4 INPUT field ..................................................................................................... 87
9. Configuration Notes.................................................................................................. 88 9.1 Advanced configuration.......................................................................................... 88
9.1.1 Module Verify Error Address .......................................................................... 88 9.1.2 Swapping SD banks with analog logic ............................................................ 91 9.1.3 Timer 5............................................................................................................. 92
9.2 General recommendations ...................................................................................... 94 10. FAQs ..................................................................................................................... 95

HabiTEQ System Manager Programming Guide - Version 1
- 5 -
1. Introduction to HabiTEQ Home Automation System This Chapter gives the introduction to the user about the HabiTEQ Home Automation system, brief description about the system, system limitations and how to plan the installation. It also describes about the controllers, which is the brain of the home automation system. The various types of controllers have also been described here.
1.1 HabiTEQ Home Automation System Description The HabiTEQ Home Automation system provides manual, automated and remote control (via IR remote controller or via SMS, or via internet ) of various electrical products in a home. As shown in the block diagram, a central control (Controller) communicates with multiple input / output modules (I/O modules) in the home over a custom, dedicated two wire bus. The Controller:
- Maintains the operation of this bus; - Handles bi-directional and simultaneous communication between the controller and the I/O
modules on the bus; - Provides power to the HabiTEQ modules on the bus; - Stores the time-based output sequences and output sequences based on the state of input
modules and sends commands to output devices to modify their state based on these output sequences, remote commands or manual commands
- Can also provide a separate communication link over Ethernet to Internet-based terminals for remote control and monitoring.
I/O Modules monitor the communication bus for commands from the Controller to change output state and communicate their status and change of status to the Controller, based on operations at the I/O Modules.

HabiTEQ System Manager Programming Guide - Version 1
- 6 -
1.2 System Configuration As it was explained before, the system is divided into the following operating modules: Input Modules, for connecting external contacts such as solar/wind detector, movement detector, door switches and push buttons. The following configurations are defined for these devices depend on the external possibilities:
• INP04, • INP08/INP16 • INP08/230
Output Modules,
• RELAY module, suitable for switching different devices. • SHUTTER module, suitable for switching shutters / blinds / curtains. • DIMMER module, suitable for dimming consumers of 40-500VA. • ANALOGUE Dimmer module, suitable for controlling four analog dimmers.
Other Modules,
• HMI modules, o THI, Thermostat Indicator Display . o TSC, Touch Screen. o GSM Interface Programming-SMS.
• Movement Detector Sensor Programming . • IRG04, Infrared generator. These modules are able to generate any IR code and transmit it to
any device.
1.3 Programming Options The previous modules can be programmed to meet the specifications determined by a client. This requires the creation of different programs where the user enters the desired conditions at home, based on the different modules of the system. These programs can be saved in different configuration files (.qdb) HabiTEQ System allows you to create these programs through the following tools:
• Programming the modules. • Creating Logic Functions. • Multilink option to control multiple outputs from one switch. • Defining Schedules to set the desired status for the different outputs. • Creating Scenes. A scene is a complete situation where lights, blinds participate having a
complete result within your area. • Sequence the Scenes. • Using Simulation when you are away from home. • Control table selection (List of outputs to control).
(All these tools will be explained in detail in this user-manual)

HabiTEQ System Manager Programming Guide - Version 1
- 7 -
1.4 HabiTEQ System Limitations When installing the HabiTEQ home automation system you need to take into account the following Limitations a. The installation size is limited by:
• The number of modules that can be supplied by the controller, which is dependent on the maximum power supplied on the bus of that respective controller:
o CTD01 (with and without Ethernet): Maximum 200mA on the bus (~13 HabiTEQ modules)
o CTD02 (with and without Ethernet): Maximum 500mA on each bus (~35 HabiTEQ modules on each bus)
Remark: to know the exact power consumption for each module on the bus please refer to data sheets available • The number of available outputs: each controller has 388 available outputs, 91 scenes and
99 clock times. • The maximum length of a bus branch measured from the controller: the length of each bus is
restricted to a maximum of 150 meters, i.e. the module at the greatest distance from the controller is 150 meters away. We strongly recommend to lay the bus in a loop i.e. the top and bottom of the loop join up at the controller. In this case (with a sealed loop) we can increase the total length to 300 meters. In case of non-optimal communication on the bus when maximum distance is used (will depend on total bus-load), add an RC circuit (220 Ohms in conjunction with 100nF) at the end of the bus. Normally there will be no need for RC circuits.
b. Other installation requirements are:
• Wiring needs to be done with any cable with minimum 2x1mm2 conductors as a bus lead and with proper shielding to avoid EMC issues. The green protected EIB wire (4 x 0,5mm2) is also allowed when the conductors are guided per 2 in order to obtain a section of minimum 2 x 1mm2.
• When using the IRG04 module, make sure to place the IR emisors that come along with the IRG04 immediately in front of the IR port of the device to operate
• The bus can be mounted in any architecture (closed loop, tree, star, …) as long as the distance and section requirements are respected. The bus can be tapped up to a length of about 30m. Normally an RC circuit is not needed, however you can add an RC circuit (220 Ohms in conjunction with 100nF) if you experience non-optimal communication.
• As the bus has not polarity it is not possible to connect consumers incorrectly.
• HabiTEQ modules with a thermostat sensor (SWC04T, SWC02T, THI and TSC5’8) should not be placed near heating or cooling devices to assure a good performance of the thermostat.
• MDI should be located on the best place to get a maximum coverage of the viewing angle
(110 degrees – 7 meters distance) and NOT in any location near heating or cooling devices

HabiTEQ System Manager Programming Guide - Version 1
- 8 -
1.5 How to Plan your installation Define number outputs and inputs needed Based on the floor plan of the building, the desired outputs (relays, dimmers, motors, valves, etc.) and input devices to control the outputs (switches, input-modules, motion detectors, infrared sensors, temperature sensors, displays, touch screens, etc) need to be defined. Number each room on the floorplan and define per room the outputs and inputs needed. We suggest to use different codes and colors for the different function of the modules: as you can see in the example below we use red for 230V modules, green for modules on the bus and blue for potential free inputs.
This will give you an overview of the installation requirements you need to order the required products and to install the modules at the correct locations. Define cabling method The cabling of the installation is of key importance. As mentioned before, The bus can be mounted in any architecture (closed loop, tree, star, …) as long as the distance and section requirements are respected:
• The maximum length of a bus branch measured from the controller is restricted to 150 meters, i.e. the module at the greatest distance from the controller is 150 meters away. We strongly recommend to lay the bus in a loop i.e. the top and bottom of the loop join up at the controller. In this case (with a sealed loop) we can increase the total length to 300 meters.
• Wiring needs to be done with any cable with minimum 2x1mm2 conductors as a bus lead. The green protected EIB wire (4 x 0,5mm2) is also allowed when the conductors are guided per 2 in order to obtain a section of minimum 2 x 1mm2.

HabiTEQ System Manager Programming Guide - Version 1
- 9 -
The bus can be tapped up to a length of about 30m. Normally an RC circuit is not needed, however you can add an RC circuit (220 Ohms in conjunction with 100nF) if you experience non-optimal communication. All the 230V circuits that need to be controlled individually need to be connected separately to the required output modules (dimmer, relay) in the distribution board.
The modules on the bus need all to be connected on the bus – preferably in a closed loop to ensure optimal distance. The potential-free modules need to be connected in a star-fashion to the distribution board.

HabiTEQ System Manager Programming Guide - Version 1
- 10 -
Tips and Tricks
• When regular pushbuttons need to be connected to the HabiTEQ system (instead of the HabiTEQ SWCXX smart switches), DIN-rail input modules in the enclosure (INP08, INP16) or input modules on the bus (INP02, INP04) can be used.
• While the DIN-rail input modules are the cheapest option in terms of product cost per connected input, additional wiring and installation costs will be required as all potential-free devices (regular pushbuttons, magnetic contacts for doors or windows, PIR-sensors,...) need to be connected in a star to the distribution board.
• To ensure optimal total cost of installation and optimal future flexibility, it is suggested to work with input modules on the bus. INP04 devices require less wiring and installation time and can in the future always be replaced with any other HabiTEQ module on the bus (motion detectors, touch screen, smart switch,...).
• In case of non-optimal communication on the bus when maximum distance is used (will depend on total bus-load), add an RC circuit (220 Ohms in conjunction with 100nF) at the end of the bus. Normally there will be no need for RC circuits.
• Check for short circuits before activating the controller.
1.6 Types of controllers Depending on the installation you are planning to use you may select a different type of controller. Here are the different types and the description of it.
CTD01 without Ethernet
The controller supplies the necessary power and data to all the connected modules. Features: • 1 bus connection max. 1 x 200mA
• USB connection • 388 outputs • Boolean logic (and/or/if then else) and analogue logic (+,-,x,/) • 100 switch times, with each 15 outputs
• 92 scenes • Presence simulation • 2GB SD card with 10 memory banks available (for 10 different system configurations) • Width: 4 modules (DIN) • Comes with DIN-rail power supply (4 modules)
CTD01 with Ethernet
The controller supplies the necessary power and data to all the connected modules. Features: • 1 bus connection max. 1 x 200mA
• USB connection • Ethernet connection
• 388 outputs • Boolean logic (and/or/if then else) and analogue logic (+,-,x,/) • 100 switch times, with each 15 outputs
• 92 scenes • Presence simulation • 2GB SD card with 10 memory banks available (for 10 different system configurations) • Width: 4 modules (DIN) • Comes with DIN-rail power supply (4 modules)

HabiTEQ System Manager Programming Guide - Version 1
- 11 -
CTD02 without Ethernet
The controller supplies the necessary power and data to all the connected modules. Features:
• 2 bus connection max. 2 x 500mA • USB connection
• 388 outputs • Boolean logic (and/or/if then else) and analogue logic (+,-,x,/)
• 100 switch times, with each 15 outputs • 92 scenes
• Presence simulation • 2GB SD card with 10 memory banks available (for 10 different system configurations) • Width: 6 modules (DIN)
• Comes with DIN-rail power supply (4 modules) CTD02 with
Ethernet The controller supplies the necessary power and data to all the connected modules.
Features: • 2 bus connection max. 2 x 500mA
• USB connection • 388 outputs
• Boolean logic (and/or/if then else) and analogue logic (+,-,x,/) • 100 switch times, with each 15 outputs
• 92 scenes • Presence simulation • 2GB SD card with 10 memory banks available (for 10 different system configurations) • Width: 6 modules (DIN)
• Comes with DIN-rail power supply (4 modules)

HabiTEQ System Manager Programming Guide - Version 1
- 12 -
2. Installation of HabiTEQ System Manager
2.1 Where to find HabiTEQ System Manager The HabiTEQ System Manager is the software program you will use to program the HabiTEQ system. In the HabiTEQ System Manager you can create outputs (on/off, timers, sequences, scenes, clocks, alarms...) and define how to control these outputs (which button on a switch / motion detector / etc. turns on which output). All of these settings will be saved in a .qdb (HabiTEQ Database) file. The HabiTEQ System Manager is freely available. You can download the latest version from our website http://www.gepowercontrols.com/ex/product_portfolio/residential/domotics/q_logic.html Click on “English” in the top right corner and you will be taken to a page where you can download the System Manager. Once the System Manager is downloaded, you will have a shortcut to the program on your desktop. ATTENTION: the SYSTEM MANAGER III is ONLY used to program CTD controllers (CTD01, CTD01E, CTD02, CTD02E, CTD03, and CTD03E), AND IS NOT COMPATIBLE with not GE marked controllers. The configuration software for CTL controllers is the Serial Manager II and can be downloaded on http://www.HabiTEQ.be/nederlands/Downloads/software.asp
2.2 System Manager requirements Before installing the SW you need to make sure your PC complies with the following requirements.
• Supported OS: Windows server 2003, Windows server 2008, Windows 7, Windows Vista, Windows XP
• Processor: 1Ghz Pentium or equivalent recommended • RAM: minimum 256Mb, preferably 1GB • Hard disk: 100Mb free space • Display: 800x600 (minimum), 32-bit • Ports: USB and Ethernet port available

HabiTEQ System Manager Programming Guide - Version 1
- 13 -
2.3 Installing System Manager Here are the steps for installation:
1. Downloading
2. Click on “Run” if you want to install directly or “Save” if you want to save the SW in your PC
and install it later on

HabiTEQ System Manager Programming Guide - Version 1
- 14 -
3. Click on “Next”
4. Select the option of accepting the agreement and click on “Next”

HabiTEQ System Manager Programming Guide - Version 1
- 15 -
5. Select the folder where you want the folder saved and click on “Next”
6. Click on “Next”
7. After checking that everything is defined as you wanted click on “Install” and the installation will take place. You will just need to click on “Finish” in the final window and you will get a direct access to your SW in the desktop

HabiTEQ System Manager Programming Guide - Version 1
- 16 -
2.4 Starting the HabiTEQ System Manager When the HabiTEQ System Manager application is launched, the following screen will appear on which you can select a language by clicking on a flag. Then press OK. There is no need to fill out a user name and password – this might be necessary in future versions of the System Manager.
2.5 Setting Up the HabiTEQ System Manager In the menu bar of the System Manager, click on “Tools” and then “Setup” to set up the communication between the System Manager and the Controller. Remark: Before trying to communicate to the controller you need to make sure that the wiring of the system is done as indicated in the different data sheets and then power up

HabiTEQ System Manager Programming Guide - Version 1
- 17 -
2.5.1 Communication with the Controller There are two ways to communicate with the Controller once this has been powered up:
1. Over USB: possible with every CTD as all of them (CTD01, CTD01E, CTD02, CTD02E) have a USB port on board
2. Over Ethernet: only if the CTD has an Ethernet port – the CTD01E, CTD02E. NOTE: It is highly recommended to use a firewall-protected router
a. USB If you want to communicate over USB, click the USB option in the Setup screen. Make sure that the selected communication ports are set from COM 1 to COM 15 to detect all the possible problems you may have. To check if the communication is fine just click on Read the settings
b. Ethernet There are 2 ways to connect via an Ethernet cable to the CTD:
1. If you have a direct connection between your PC and the Ethernet-port on the CTD, use a crossover Ethernet cable (is supplied with your CTD – usually grey cable, is mentioned on the plastic bag in which the cable is contained).
2. If you connect to the CTD via a router, you need to connect the controller to the router using a straight Ethernet cable (also supplied with the CTD – usually yellow cable). You also need to use a straight cable when you connect your computer with the router. If you have a wireless router you can connect wirelessly with the controller.
Note: It is recommended to connect the controller through router if available to avoid network configuration changes in the personal PC In order for the device to operate over Ethernet, an IP address has to be assigned. When the device is powered, it does not yet have an IP address. When the CTD is connected through a router, this router has an integrated DHCP, which ensures that every connected device has an IP address.

HabiTEQ System Manager Programming Guide - Version 1
- 18 -
In order to assign the correct IP address to the CTD, click the Ethernet option in the Setup screen, and then click on “Properties”.

HabiTEQ System Manager Programming Guide - Version 1
- 19 -
By clicking on Properties, the System Manager will be searching for the MAC-address of the CTD in your network. When the MAC-address and corresponding IP address has been found, double click on the address that will appear in the Properties screen. The properties screen will disappear and the correct IP address will be filled out in the IP-address field in the Setup screen. When you connect directly from your computer with the Controller, you will get an IP address starting with 169.XXX. When you connect via a router, you will get an IP address starting with 192.XXX. Note: Connect first the network cable and then activate the device in order to acquire an IP address through the DHCP. It can obviously also be connected directly to a PC and in the case a cross cable is required (the grey cable that comes with it). It is recommended to initialize with the cross cable directly connected to a PC and then connect it to each network. Setting a Password to the Ethernet Connection: The devices are supplied without password. If the devices connect to the internet or if you want to make changes through the internet it is necessary to set a password. In order to set a first time password, erase the old password and place a new one two times and it is entered in the interface. This is accomplished via the screen displayed above; after setting a password 2 times, press the option “send new password to the interface”. Attention !! • Communication always takes place through ports 8444 and 8445, which is entered, in the “setup”
window in the command “Port” next to the IP address. • IP address and Port: 8444 • And the communication means via RS232 (this is the default parameter that doesn’t need to be
changed)

HabiTEQ System Manager Programming Guide - Version 1
- 20 -
On the left side of the set-up screen you can select whether you want your controller to automatically change to daylight savings time, initialize the controller in different languages (so you will get menus, instructions etc on e.g. a TSC5.8 or THI in the respective language). On the right hand side of the Setup screen you will see the real-time data on the Controller power supply and the inside temperature of the controller. You will also find information on the power supply to the bus and the current load on the bus (will show as many busses as you have on your Controller – 1,2 or 3). As a CTD01 can handle 200mA on its bus, and a CTD02 can handle 500mA on each of their busses, the current load shows you if you can add more HabiTEQ devices on the busses.
2.5.2 Other Setup Options There is other set up options, which the user can modify, which has been described below. 2.5.2.1 Location and Daytime
This option allows you to select the location where you are living. This will give you the List of sunrises and sunsets for every day of the year for that particular location (click on the “List”-button to see the actual times). You can offset these times from -60 seconds (both sunrise and sunset will be 60 seconds earlier) to +60 seconds (sunrise and sunset will be 60 seconds later) to adjust even further for your own specific location in case you cannot find your own specific location in the drop-down list. You can allocate an output to this daytime. If you create a fictive output called “daytime”, this output will be active when it actually is daytime at your location. Hence you can use this Daytime output for logic functions (e.g. if Daytime = off, lights gardens = on).

HabiTEQ System Manager Programming Guide - Version 1
- 21 -
2.5.2.2 Module Verify Error Address The module verify error address in the set-up screen is an output you can select that will be turned on in case an error is detected in a module on the bus. To configure this option it is needed a deep knowledge of the system. Therefore this is explained in point 9.1 Advanced configuration. 2.5.2.3 SD Bank Information
The SD card on the HabiTEQ CTD has 10 memory banks. This means that you can store up to 10 different configurations for your HabiTEQ system (called .qdb files) on the SD card. By clicking on the SD Bank Names button, you can give different names to these different configurations – e.g. summer, winter, holidays, …
You can use analog logic (see under 3.10.2) to automatically switch between different SD banks, e.g. based on date and time (from summer to winter), or to manually switch between banks by pressing a push button or activating a scene. Keep in mind you will need to have separate .qdb files with their own specific configurations to load into the different SD banks (e.g. you make a configuration “summer” (e.g. summer.qdb), and a configuration “winter” (winter.qdb) and load the summer configuration in SD Bank 0, and the winter qdb in SD Bank 2). To see more details about programming go to section 9.1 2.5.2.4 Thermostats Settings
On the right hand side of the set-up screen, you can change the main settings for your thermostat programs. In the HabiTEQ system you can predefine 5 different thermostat programs. The default settings are No Clock, Freeze, Economy, Comfort and Night. When programming a thermostat in a

HabiTEQ System Manager Programming Guide - Version 1
- 22 -
switch, a THI or a TSC (see 3.4 - Thermostats for more information) you will be able to define the temperature level for each program. In the set-up screen however, you can define the names for each program, and you can define which program you want to control using scenes and clocktimes (or schedules). If you want to have a particular program controlled via scenes (e.g. when you push an all-on scene your thermostats also go to a different program) or via a clocktime (e.g. change a thermostat program from economy to comfort at a predefined time), you need to tick the box next to the program. Those programs that you do not want to control via clocktimes or scenes need to have the box next to them empty; this would mean that if you have set a thermostat on this specific program, it overrules any scenes or clocktimes. E.g. an anti-freeze program that you only activate when you are on holidays and that only would start the heating if the roomtemperature would fall below 5 degrees Celsius. Even if you would have forgotten to deactivate a clocktime that always turns on your bathroom heating at 6:00 in the morning, if your thermostat would be on this Anti-freeze program it would stay on this program.
3. HabiTEQ System Manager Command Line The HabiTEQ System Manager command line looks as follows
3.1 Open and Save
The first two buttons on the left are for opening and saving programming files (.qdb).
3.2 Upload
The upload button is used to upload your instructions to the controller. You need to make sure the computer on which you are using the System Manager is connected to the controller via your Ethernet connection or via your USB Port. Every time you make a change to the .qdb file in the System Manager, the upload arrow will turn red. This means that you need to upload changes to the controller. If you forget to do so, when you close the System Manager, you will get the message that you have not sent all changes to the controller. You can then select to send the changes or to ignore the changes you made.

HabiTEQ System Manager Programming Guide - Version 1
- 23 -
After the addition of any materials or change in the programming you should ALWAYS upload to the controller so that all changes or additions can be put into effect. It is also necessary as soon as the components and outputs are entered to upload all data because otherwise no test can be carried out for the outputs. Always make sure that you are connected to the CTD via the Ethernet or the USB port when you want to upload. When you push the Upload button, you will see the following screen.
Every time you want to upload a completely new .qdb file (e.g. to first time you configure your system or when you want to upload a new .qdb file in a new SD Bank), transmit “All” to the controller. After this first time you can upload only “All modules (Only unsent)” if you changed some settings in your program. The upload happens in different steps: first you will upload your configuration from your PC to the SD Card on the controller. As a next step you will be able to program all the modules on the bus. As mentioned above, you are able to upload up to 10 different .qdb files into different SD Banks (e.g. a winter program, a summer program, a holiday program, an early shift program, a late shift program etc). On how to name the different SD banks see item 3.2 above. Make sure you select the correct SD Bank using the drop-down list in the window shown above before pushing the “Transmit” button.

HabiTEQ System Manager Programming Guide - Version 1
- 24 -
After you clicked “Transmit”, the SD Bank you selected on your SD Card will be programmed, and afterwards you will see the following screen:
If you click “No”, this means that even though your SD Card has been programmed, this program has not been executed in your local installation (your modules have not been (re)programmed). This could be an interesting option if you want to prepare an installation: you upload the complete installation (qdb file) to the SD Card, don’t execute the program by clicking “No”, take out the SD Card and plug the card into another controller. As soon as you will have plugged in the SD Card into another CTD, the configuration on the SD Card will be executed and the HabiTEQ system that is connected to the other controller will be programmed. Note: For this you need to make sure that the serial numbers and the modules you have uploaded in the SD are the same to the ones in the system where the SD card is going to be placed

HabiTEQ System Manager Programming Guide - Version 1
- 25 -
If you want to (re)program the specific installation you are working on, click “Yes” and you’ll see the following screen:
If you want to program for the first time or reprogram the specific installation you are working on, click “Yes” and you’ll see the following screen:
When you get any error messages, it might mean that a module has not been found: could be that the module is not connected correctly to the bus. First retry to program that module, if it is still giving you an error check the connection between the module and the bus. When you click on the “Prog. GROUP modules from SD” you will only upload those modules that showed an error message before.

HabiTEQ System Manager Programming Guide - Version 1
- 26 -
On the upload screen there are some other options:
3.2.1 Swap SD Banks The SD card has 10 banks and 10 different programs can be stored in it. If you want to change from one SD Bank (e.g. that holds the Summer program) to another one (that holds the Winter program). You can also swap SD banks via logic functions or through activation of an output on a switch / touch screen / …
3.2.2 Program / Verify modules from SD If you have loaded the program on the SD card but have not executed that program yet (no programming of the modules). When you slide the SD card into the CTD it will also automatically execute the program on the first bank.
3.2.3 CTD Firmware Upgrade Every time you download the latest version of the System Manager, it will also include the latest firmware upgrade. When you connect the System Manager to the CTD, you will get a message when you don’t have the latest version of the firmware, and will ask you to upload the latest version. By clicking on the arrow next to firmware upgrade, you will see a window with an .upg file – double-click on the most recent one (highest version number) to upgrade your firmware.

HabiTEQ System Manager Programming Guide - Version 1
- 27 -
3.2.4 Reboot CTD This will reboot your controller – do not use unless you are required to do so when updating FW.
3.2.6 Force Upgrade The system will not allow you to upgrade to a version of the firmware that is older than the current version you are using. In case you would want to use an older version anyhow, you can force upgrade to this older version via this button.
3.3 DownLoad
The button is used to download the events or the module scanning that the system has recorded Programs are downloaded by restoring from SD as explained in next point 3.3.2.
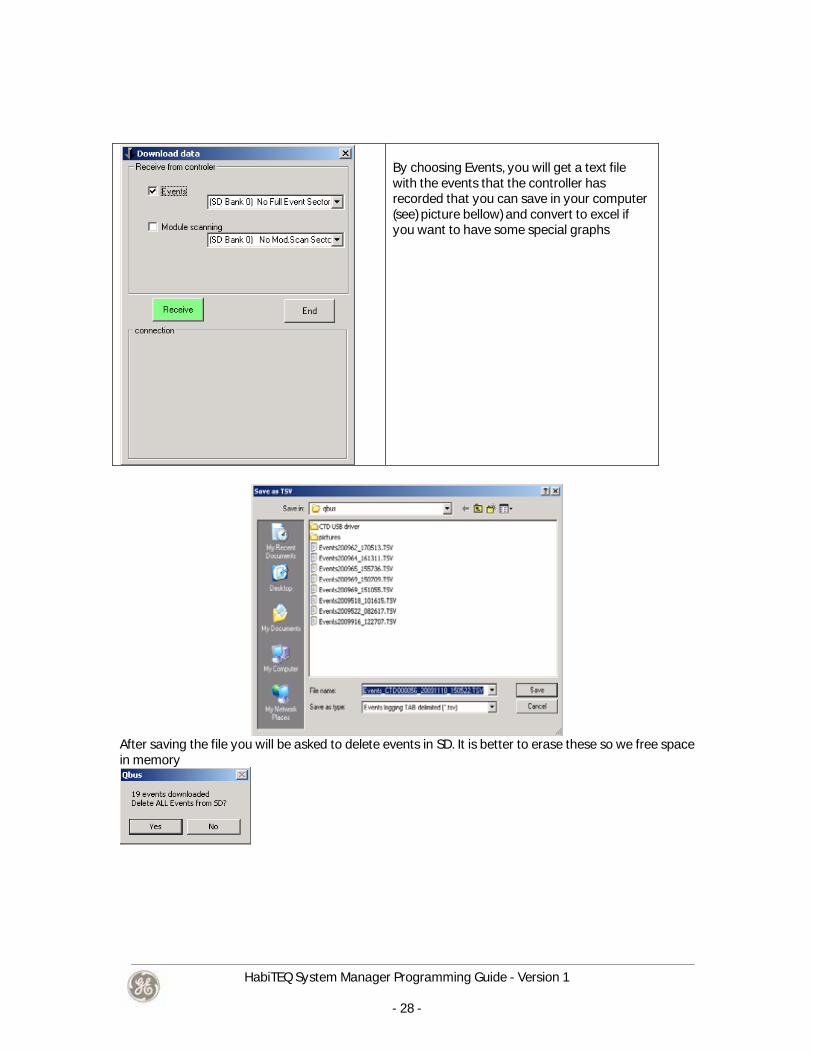
By choosing specifically download, you will get the displayed screen where you have the opportunity to choose the type of data you would like to retrieve from the controller’s memory: events (logging of what happened on the bus), Scanning (gives you list of status of scanned modules). In order to get the events or the scan status, make sure to indicate that you want events to be logged on that specific output (in the properties field – see 3.5.8 / module to be scanned – see 2.5.2.2. To see more about module scanning please refer to section 9.1.1
3.3.1 Events Downloading The download button can be used too to download events saved in the controller. But only outputs that have been defined to keep
HabiTEQ System Manager Programming Guide - Version 1
- 28 -
By choosing Events, you will get a text file with the events that the controller has recorded that you can save in your computer (see) picture bellow) and convert to excel if you want to have some special graphs
After saving the file you will be asked to delete events in SD. It is better to erase these so we free space in memory
HabiTEQ System Manager Programming Guide - Version 1
- 29 -
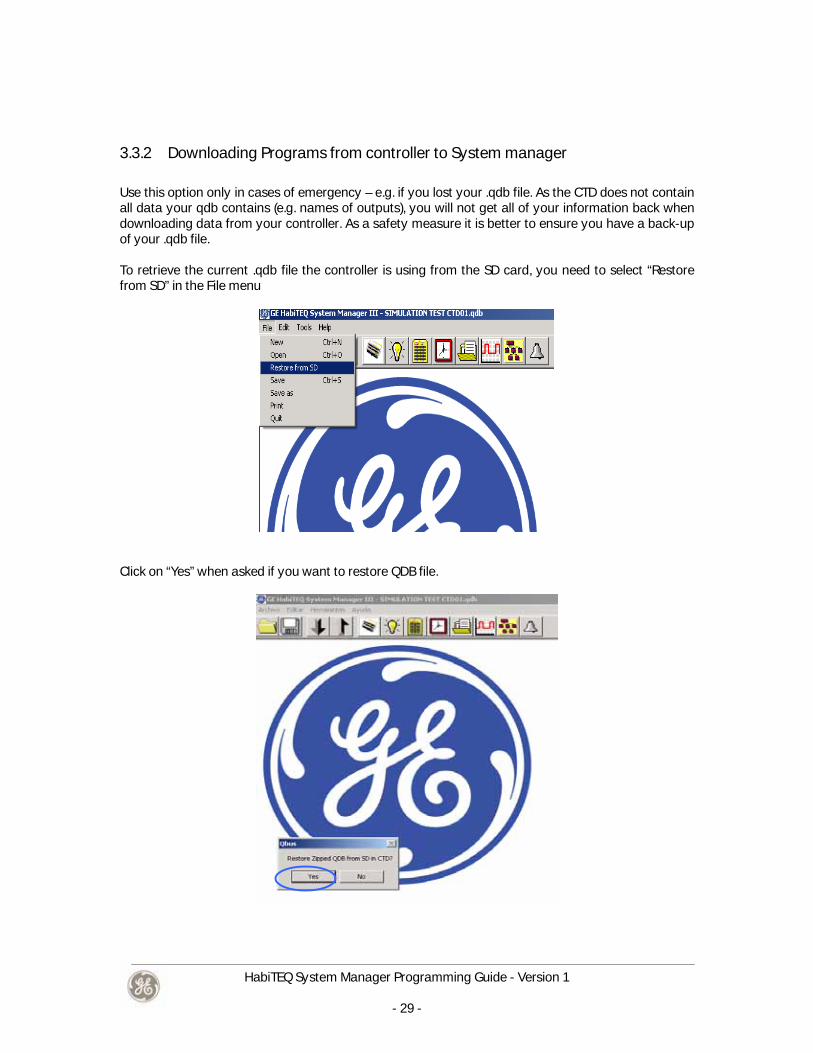
3.3.2 Downloading Programs from controller to System manager Use this option only in cases of emergency – e.g. if you lost your .qdb file. As the CTD does not contain all data your qdb contains (e.g. names of outputs), you will not get all of your information back when downloading data from your controller. As a safety measure it is better to ensure you have a back-up of your .qdb file. To retrieve the current .qdb file the controller is using from the SD card, you need to select “Restore from SD” in the File menu
Click on “Yes” when asked if you want to restore QDB file.

HabiTEQ System Manager Programming Guide - Version 1
- 30 -
Your restored .qdb file will be saved under the C:\Program Files\habiteq directory under the name TestRelaisManualXXX.qdb. Note: You need to make sure the computer on which you are using the System Manager is connected to the bus via your Ethernet connection or via your USB Port before you try to download the program.
3.4 Programming Modules
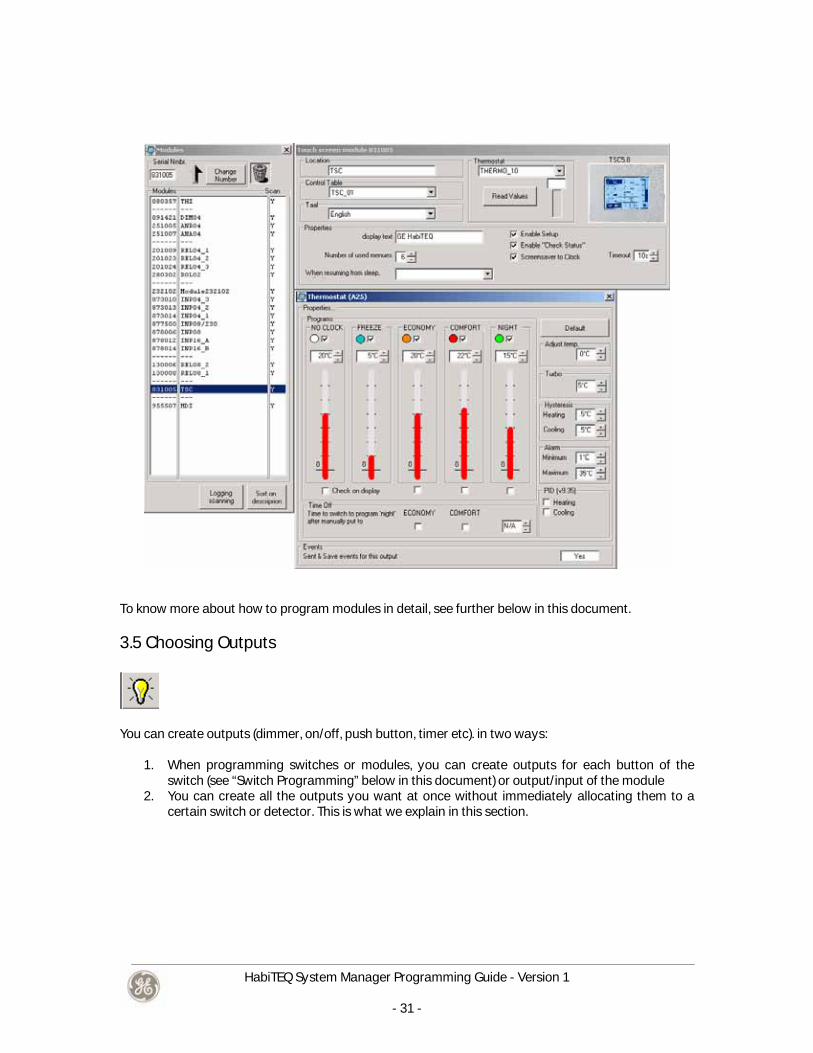
This option opens up the main programming window. The following screen appears by choosing “modules”.
On the upper left side you type the serial number for the module you want to program. Each module has its unique serial number and as soon as you type it then the related module will appear as it is shown in the following screen. The following screen contains more than one module such as relay04, relay08, dimmer, thermostats, switches, etc. In case you want to delete a module, select it and then press the button with the recycle bin (upper right corner) . If you want to change the serial number of a module you have to select the “Change number” button and add the new serial directly. Moreover, if you want to enter the switches for use with a specific program then you can do it without having to enter the switches' serial numbers one by one. Pressing the lower left side button "Scan for modules" - "start scanning" and then pressing one by one the switches, they will be recognized and used in the program.
HabiTEQ System Manager Programming Guide - Version 1
- 31 -
To know more about how to program modules in detail, see further below in this document.
3.5 Choosing Outputs
You can create outputs (dimmer, on/off, push button, timer etc). in two ways:
1. When programming switches or modules, you can create outputs for each button of the switch (see “Switch Programming” below in this document) or output/input of the module
2. You can create all the outputs you want at once without immediately allocating them to a certain switch or detector. This is what we explain in this section.

HabiTEQ System Manager Programming Guide - Version 1
- 32 -
Clicking the Output Button (lamp), the following screen will appear :
In order to create a new output, use the button “Wizard New Output”. The following window will then appear:
In this window, select the type of output you want to create. If you want to select lighting then use the first option as it is shown and choose the type of output. Below you’ll find a list of output types you can use in your HabiTEQ system. Once you have selected the type of output you want, press “next” and name the output; then press “finish”. The screen above shows the outputs. Using the keys on the right of the output list (All, On/Off, Dimmers…) you can select which outputs appear so that you can find an output faster; for example, pressing the All button, all outputs will be displayed. Using the on/off button will display only the on/off contacts; the dimmer key will display only the dimmer contacts etc. Selecting one output and pressing the “Used in” button will display information about where in your program this output is used. It provides you also with the relay or dimmer component serial number, the switches’ serial number as well as the central command and scenario names where it belongs. Finally, selecting a contact and pressing the “Read values” button will provide you with the output status at that moment (on or off). The “Test” button can be used to test this specific output as well.

HabiTEQ System Manager Programming Guide - Version 1
- 33 -
3.5.1 Toggle
The toggle option is the one also referred to as "on/off". Push once will turn the output on, push again and it will turn the output off.
3.5.2 Push Button
Only when the button is pushed the output is active - e.g. for a doorbell. Do not confuse the push button on the switch with the push button option! You can use the push button on the switch for any mode (on/off, push button, timer…), one of which is the push button mode.
3.5.3 Dimmer1B / Dimmer2B Dimmer 1B stands for Dimmer one button (when dimmer is off push the button once for the dimmer to go to 100%, then push once to go to 0%, or hold the button to get the dimmer to the right level of light. Dimmer 2B stands for dimmer with 2 buttons; this will give you one Dimmer2B (Up) output and one Dimmer2B (Down) output that you could allocate to two different switches.
3.5.4 Up/Down1B / Up/Down2B
Similar as for Dimmers, there is a Up/Down1B option (to use one button) and an Up/Down2B option (for two button control of the shutter / motor – one up/open and one down/close).
3.5.5 Intermittent
The Intermittent function gives you the option to intermittently turn on / off an output (e.g. garden sprinklers).
3.5.6 Thermostat
By selecting a thermostat in a THI or clicking on “properties” in a thermostat switch (SWC04T/XXX), the following thermostat screen will appear.

HabiTEQ System Manager Programming Guide - Version 1
- 34 -
This screen shows 4 thermostat programs and the manual operation. By clicking the fields right underneath the program names, you can select which programs you want to control from the thermostat. For each of the four programs there are the following options:
• The ‘Turbo’ option can be used if you have an additional valve or circuit in which you can control to speed up the heating in the room. Turbo option is activated when the difference in degrees between the set point and the measured temperature is bigger than the turbo point defined. In that case, you might want add heating from this second controlled heating unit (turbo heating = heating from both units). Turbo function, once turned on, stays on until heating is satisfied. (Turbo + Tª measured= Tª desired)
• The “hysteresis” defines the range of temperature allowed in order to engage the heating
system. This is to avoid oscillation between heating and cooling in case you control both heating and cooling.
E.g. if you want the heating to kick in when temperature is below 20 degrees and cooling to happen if the temperature is above 20 degrees you will get constant oscillation between cooling and heating. Setting both heating and cooling hysteresis at 3 degrees with a desired temperature of 20ºC means that:
- if measured temperature is lower than 20ºC, then the heating will be active until the 20ºC are reached and cooling will not start until the measured temperature is higher than 23ºC.
- if measured temperature is higher than 20ºC, then the cooling will be active until the 20ºC are reached and heating will not start until the measured temperature is lower than 17ºC.

HabiTEQ System Manager Programming Guide - Version 1
- 35 -
The hysteresis should be set only by the installer once the characteristics of the building are known. On the alarm option define the highest and lowest temperature threshold (as it is indicated in the scheme above) and select whether you want to close a contact (this can be achieved through the relay) or to create an alarm, which will notify you through your mobile phone (if you have SMS module) or via Ethernet (if you have an Ethernet port on the controller). In the “check on display” box you can select which programs you want to see on the display of your touch screen TSC5.8 if you click on the Check Status button of the TSC5.8. The “Time to switch to program ‘night’” boxes can be used to automatically have the system switched from Economy or Comfort program to the Night program after a selected number of minutes. Attention:
- Temperatures of 0° or less are not supported. - Cooling or heating can be activated/disabled depending on the season (winter / summer)
or customer specifications, by programming analogue logic functions with date as explained in point 3.10.2. Please note that the output in relay must be different from thermostat output. Eg:
- In case of temperature sensor failure the last good temperature value will remain constant
in the thermostat display of THI and TSC.
3.5.7 Sequence A “sequence” uses only scenes and these have to be sequential. The following screen will appear as soon as the “sequence” is selected. Please read scenes section 3.6 to understand this type of output properly.

HabiTEQ System Manager Programming Guide - Version 1
- 36 -
On choice 1 place the first scenario and then the 2nd one follows automatically because it’s the next one in the scenario sequence as you have made them. This means that when you press the sequence recall control button, the first button press will execute the position 1 scenario and the next button press will execute the position 2 scenarios. The process is looped. With the “Aantal” option on the right you can select the number of scenarios that this sequence includes, i.e. if we placed 3 or 4 then 4 scenarios will be displayed. Choose the first one and the rest will follow the one set as primary according to the sequence that these scenes were made. Controlling them can be achieved from the control point by looping the pressure on the sequence control button.
3.5.8 Timers In the HabiTEQ System manager software you can select 5 different timer modes. Timer 1 With each push on the button a timer is activated or de-activated. For example in a hallway, one push on the button turns the light on for a given period of time (to be defined by yourself by clicking on the “Properties” button where you can select the time in minutes or seconds by clicking on the “Min” or “Sec” button), a second push on the button turns the light off. Timer 2 With each push on the button the timer is reset to its defined time. For example if your timer is set to 3 minutes, each time you push the button the timer will start to run for 3 minutes. This timer does not work with motion detectors – motion detectors keep counting down the time set in the detector module. Timer 3 The first push on the button will activate the timer. A second push on the button will activate the on-off mode – hence the timer value will be of no importance anymore. A third push of the button will turn off the output. For example, at the front door, you want to use a timer but also have the opportunity to keep the light on indefinitely without the timer shutting it off automatically. By selecting Timer 3 and setting it for e.g. 3 minutes, if you push the button the timer will be activated for 3 minutes and then the light will be shut off. If you push the button twice, the light will remain on until you push it a third time – then the light will turn off. Timer 4 This is a coupled timer: an impulse (pushing a button, detecting motion…) will activate an output (e.g. output 1). After a delay (can be defined by the user) a second output will be activated (e.g. output 2 chosen by the user). When output 1 is deactivated, after a defined delay output 2 also will be deactivated. Example: when coming home in the evening the motion detector outside turns on the front door lighting and 1 minute later the hallway light.To program this timer, you need to allocate Timer4 input for the first output.

HabiTEQ System Manager Programming Guide - Version 1
- 37 -
When clicking on “enter” a pop-up screen will ask to define the output that will be linked (after a delay) to this first output (this will be define as Timer4(delay). You can define the delay time by clicking on “Properties”.
Timer 5 With this timer you can coordinate a manual input (a switch) and a detector input. A detector will only activate an output if it detects motion or if the light level falls below a defined level (see below in programming MDI/MDO). In the HabiTEQ system, a detector has priority over a switch. This means that if you plan to control an output that is controlled by a detector also by a switch, this output will not react on the command given by the switch if the parameters of the detector are not matching (e.g. no motion was detected or the light level is still too high – the detector will turn off your output immediately after you have given the command by the switch to turn it on). You can circumvent this issue by using a Timer 5. The description of how this is programmed because of the difficulty is in section 9.1.
3.5.9 Output Properties Each output will show a properties page on the right hand side. These are the properties correlated for this particular key.

HabiTEQ System Manager Programming Guide - Version 1
- 38 -
You can also go to the properties of an output directly from the modules in the Modules field of the System Manager

HabiTEQ System Manager Programming Guide - Version 1
- 39 -
Reload: add a delay for activating or de-activating the selected output (delay between when you push the switch and the (de-) activation of the related output. Display Link: the name that will appear on a display (e.g. TSC5.8) Display Warning: Warning on a display when the output is still active. E.g. on a TSC 5.8. You can check status – this will give you an overview of all outputs that are still active and that were selected through the properties screen to show if they are still active via display warning. Simulation: does this output have to be taken into account for the presence simulation tool that is a standard part of the system? E.g. it is not useful to have a thermostat output or a light in a hallway with no external windows to be part of a simulation. Switch Time: not active Logic / Link: used to create multilink’s. A multilink is a setting whereby you can control multiple outputs from one switch. It is not the same as a scenario – with a scenario you can set multiple outputs to a predefined level. A multilink allows you to actually control multiple outputs together (e.g. increase or decrease all dimmers in your living room together; with a scenario you can only activate them). See under item 3.6.2 how to work with multilinks.
3.6 Choosing scenes
HabiTEQ provides you the option to create scenes. A scene is a complete situation where lights, blinds, dimmer etc participate so that you can have a complete result within your area. Selecting the scene button will display the following screen.

HabiTEQ System Manager Programming Guide - Version 1
- 40 -
On the right side of the screen the startups contained in your program are displayed. On the left side of the screen, select “new scene”. Next, either by double clicking or by using the -> and <- buttons, move the startups you want in the scene you are creating. Change the startup values based on what you want to do, selecting the related startup and using the up or down buttons located on the right side of the scene screen. The “set all values” option activates all the scene startups while the “clear all values” option sets all scene startups in an off status. If you are making two opposite scenes, complete the first one, then create a new scene using the “copy from” button and copy the previous scene; afterwards, use either "clear all values" or "set all values" depending on what situation you want to attribute to the new scene. Note: when you are using thermostats in your scenes, you need to make sure that those programs you want to control via a scene need to be activated ad being “ scene and clocktime controllable”. These settings can be adapted in the Setup screen (Tools – Setup) – see also “Thermostat settings” under item 2.5.2 .4 in this manual. The Scenes can be activated by any one of the following
1. Switches connected to the INPUT modules including INP04, INP08, INP16 & INP08/230 2. THI module (THI01) 3. Touch screen module (TSC 5.8) 4. Also from the system manager using the TEST button in the scenes window as shown above

HabiTEQ System Manager Programming Guide - Version 1
- 41 -
3.6.1 Simulation This application can be used when you are away to simulate someone is actually home. The HabiTEQ system can be set to record all the events that happen on the bus, and will play these events when the simulation tool is activated.
Step1. Select outputs First of all, you need to select which outputs will be part of the simulation. E.g. it makes no sense to include heating outputs – is not visible from the outside and would be a waste of energy. Click on the Output Button to see the list of outputs you created in the qdb. For each output you can select if you want this specific output to be activated in a simulation:
Once you have selected all outputs you want to be activated in a simulation, you can check that list by clicking on the “Edit”-button, then on “Simulation” which will give you a screen that will contain only those outputs that have been selected to be activated in a simulation.
Step2. Record simulation Now that you selected all the outputs you want to use during simulation, you need to record the events that happen during a regular time period so these same events can be replayed during the simulation. In order to record a simulation, you need to allocate one button of a switch or touch screen to “Record Simulation”.
Using a Switch: On the specific switch you want to use, click on a button, click on “Scenes” and scroll down till you find “- Record sim -”. When you want to start recording, click on that button.

HabiTEQ System Manager Programming Guide - Version 1
- 42 -
Using a Touch Screen: You can allocate the Record Sim button to the touch screen. In the control table, you can select Scenes in the Output list and select the required simulation button. Using the Switches Connected to the Input Modules: The Record simulation button can be assigned to the switches connected to the input modules, which includes INP04, INP08, INP16, INP08/230. The procedure for assigning is same as described in point 6. Remarks: - The recording of a simulation will start immediately. The system will record until you stop recording by pushing the button again (or by pushing the “Simulation”-button which will automatically cause the record function to stop). If you do not stop recording, the system will continue to record – if it reaches the end of the week, it will overwrite the events it recorded during the same hour the week before. - The system can record with a maximum speed of 1 record per second, and up to 90 records per hour. When you stop recording, the system will save all events up to one minute before recording was stopped. - If you stop recording and then record again during the same hour, the database for that hour will be cleared; you will lose the events that were recorded earlier during the same hour. - To download the recorded events to your .qdb file, go to “Edit”, “Simulation”, and click on the arrow pointing downward in the Simulation list. This will download only the recorded events from the controller. YOU FIRST NEED TO STOP THE RECORDING BEFORE DOWNLOADING THE RECORDED EVENTS; THESE EVENTS ARE ONLY SAVED TO THE SD CARD WHEN RECORDING IS STOPPED.

HabiTEQ System Manager Programming Guide - Version 1
- 43 -
If you changed certain events in the simulation list you can upload the adapted simulation list to the controller by clicking on the red upload arrow. - Simulation will record all the events coming from input modules and HMI modules. Also scenes are entirely recorded (schedules or outputs activated thru SW are nor recorded!); however when Simulation is played, the system will only play those outputs in the recorded scene that were assigned to be part of the simulation.
Step 3: Play the simulation You can activate the simulation by clicking on the “Simulation” button you can allocate to a switch or to a control table in the same way as you allocated the “Record Sim” button (see above). When you click on “Simulation”, the simulation will start playing immediately. The simulation will play the events on the same day, hour, minute and second as it recorded the events. You can check the list of events per day and time by clicking “Edit”, “Simulation”. In this screen you can select the respective day and see the list of events recorded. You can alter this list by adding events (click on “Insert Line” and then on the output you want to add). You can alter the times in the output list (select an output in the simulation list and change the time using the clock on the right), the status of the output (click on the arrow up or down on the right hand side of the simulation list). As the simulation tool records all events per day, you will need to record for an entire week in order to have a list of events for every day in the simulation tool. If you only recorded one day, the simulation will only run during that specific day. You can however add events to other days as well by copying days that you have recorded events (use the copy button in the simulation list). Note: Simulation playing will not overwrite any other logic or schedules programmed
When you have recorded a scene, the Simulation will only play those outputs of that scene that were assigned to be activated in a simulation (see Step 1: Select Outputs). Note: current configuration will go on running although simulation is being played
3.6.2 Multilink A multilink is a setting whereby you can control multiple outputs from one switch. It is not the same as a scene – with a scene you can set multiple outputs to a predefined level. A multilink allows you to

HabiTEQ System Manager Programming Guide - Version 1
- 44 -
actually control multiple outputs together (e.g. increase or decrease all dimmers in your living room together; with a scene you can only activate them). Multilink’s are mostly used to control all dimmers or all shutters in a room / building at the same time. Here’s how we program multilinks. Step 1: create a fictive address called e.g. AllShutters (go to “outputs” in the System Manager and use the Wizard New Output). The output mode needs to be the same as the outputs to control (up/down for shutters or dimmer for dimmers) Step 2: In the Properties field of the newly created “AllShutters” output click on the “No”-button next to Logic/Link
You will be able to select a new multilink – e.g. called AllShutters Multilink, and select all the shutters from the list on the right hand side that you want to control via the same two buttons (one button for up, one for down).
Now all that’s left is to allocate the All Shutters Fictive output to a switch or input module – using the pushbuttons on that switch you will be able to control all shutters at the same time.

HabiTEQ System Manager Programming Guide - Version 1
- 45 -

HabiTEQ System Manager Programming Guide - Version 1
- 46 -
3.7 Setting Schedules (Weekly Program)
HabiTEQ has an integrated timer. Selecting this button will display the following screen.
• On the right side, the screen with all the outputs appears again. • On the left side of the screen, you can create a "new schedule" and set the time when you
want it to be activated. • Then, move all outputs you would like to include in the schedule and set the status you want
them to have when this schedule is recalled by use of the arrows. • The days of the week in green color are the selected ones, i.e. they are they ones on which
you want the program to be activated during this specific selected time. • If you don’t want this activated every day then deselect the days you don't want this
activated. Note: One schedule is limited to 15 individual outputs or one scene. (This scene can control ALL
outputs). Make sure to create 2 schedules – one when you want certain outputs to be activated, and one when you want the outputs to go off.

HabiTEQ System Manager Programming Guide - Version 1
- 47 -
3.8 Control table selection
The HabiTEQ Control Tables are in essence a list of outputs you want to control using a THI, a TSC5.8 or SMS module. When you select a new control table, you will also need to select the “Type” of module you will use to link it to. The following screen will appear once a control table is selected.
The outputs are displayed on the right side of the screen. The tables are on the left side of the monitor. Table 001 is usually the first one and that is usually made into the touch screen table. In order to create it use the menu buttons on the right side of the left side of screen. Select Menu 1 and double click on the menu button so that you can rename it as you want. Then, having selected menu 1, move the outputs your want in menu 1. Similarly select menu 2 and move the desired outputs for menu 2, etc. The buttons “insert line” and “delete line”, you can add a line between outputs if you have forgotten to move some of them or to delete what in the end you won't need. Using the “delete line” the related output is not deleted from the actual program; it is only erased from the table or menu. You also have the option to not use menus but just the “All” list. If you use menus, you will first need to select the menu and then the output when you use the module that will have the Control Table linked to it (TSC, THI, SMS). If you only use the “All” list you can scroll through all the outputs directly without needing to go through the menus. When using Control Tables be careful to control the limit of menus and outputs depend on the different modules. For instance, in the THI module there is a limit of 10 menus with 10 outputs in each of them to ensure the proper functioning. This is explained deeper in the following point

HabiTEQ System Manager Programming Guide - Version 1
- 48 -
3.9 Infrared Samples
The infrared functions in the HabiTEQ system can be used in two ways:
1) By using one of your available remote controls (one for the TV / audio-system / air conditioner etc) you can control outputs in the HabiTEQ system (e.g. push a number on your remote control to turn off all lights). This is done via HabiTEQ switches with infrared ports (SWC04I/XX or THI01).
2) You can use HabiTEQ input devices (switches, touch screens, detectors…) to control devices that you usually control with a remote control (air conditioner, TV, audio… - e.g. automatically turn on your air conditioner when the temperature is more than 24 degrees Celsius). This is done via an Infrared Emitter (IRG04).
In any case, the first step will be to teach your HabiTEQ system the infrared codes from your remote control. You can do this by creating infrared samples as described below.
3.9.1 Creating Infrared Samples The Infrared Samples can be created by any one of the following methods 3.9.1.1 Through an SWC04I/XX
Step 1: If you use Bticino switches: press the two upper or lower buttons of the switch at the same time for about 5 seconds until all leds on the switch turn steady red. If you use Niko switches: press the two buttons on the left or the two buttons on the right at the same time for about 5 seconds until all leds on the switch turn steady red. Step 2: Press a random key on the remote control while pointing to the infrared button on the SWC04I/XX. The color of the leds will turn yellow. Step 3: Sampling the codes During the sampling sequence, you need to send to the switch the ir signals that represent channel 1-12 (in this order). On the universal remote control, you need to select a “device” button (SAT2, AUX, …) that you will dedicate to the control of your HabiTEQ system. You will need to go through all 12 channels when sampling even if you plan to use less than 12. After you have sampled the codes you can allocate each code to control a certain output (see below). Press the key on the remote twice per channel. The key will now be used to switch on and off the respective HabiTEQ output. Ex. Press “1” – leds will turn blue, press “1” again, leds will turn green. Press “2” – leds will turn blue, press “2” again, leds will turn green. Continue this until you did this for all twelve channels. At the end of the sampling the leds of the switch will blink for about 3 seconds.

HabiTEQ System Manager Programming Guide - Version 1
- 49 -
3.9.1.2 Through a THI01X/XX Start of Sampling
1. Make sure the THI01X/XX is in channel mode (press IR button) 2. Press the “+” and the “-“ button at the same time 3. On the screen of the THI01X/XX you will see “LEARN IR?”. To confirm press a random key on
the remote control while pointing to the infrared port of the THI01X/XX. Sampling sequence Follow the instructions of the THI01X/XX Explanation of the requested codes by the THI01X/XX:
• Press switch “+”: this will be the button on your remote control to turn an output on.
• Press switch “-“: this will be the button on your remote control to turn an output off
• Press Switch “>”:this will be the button on your remote control to go to the next output/menu (depending on the “mode” selected) in the THI01X/XX table
• Press Switch “<”:this will be the button on your remote control to go to the previous output/menu (depending on the “mode” selected) in the THI01X/XX table
• Press Switch “M”:this will be the button on your remote control to select the desired menu
• Press Switch 0-F: equals numbers 1-16. With these buttons on your remote control you can select the desired output.
End of sampling After sampling the last code (switch F) the bottom line on your THI01X/XX will be filled with stars. This marks the end of the sampling procedure.

HabiTEQ System Manager Programming Guide - Version 1
- 50 -
3.9.2 Check the Samples. After having the codes sampled, click on the samples icon in the System Manager In the left top box, you can select the type of equipment you want to check the samples (TV, CD, DVD, VCR, Tuner, Other).
• If you want to use predefined samples that are standard in the System Manager (Sony devices (SIRC code), Panasonic AV equipment, Telenet digibox, Medion TV, Magnum TV, Philips VCR (RC5 codes), and from PEHA PHC871IR and B&O Beolink 1000 universal remote controls), click on the required model and make in the middle box, and then on the green arrow on the left side.

HabiTEQ System Manager Programming Guide - Version 1
- 51 -
• If you want to check the samples that were sampled from a non-standard device, click on “Other” in the left top box. In the middle box where you can see types and brands, you will see a string of data containing the date and time when the samples were sampled. Click on this and you will see the structure of your samples. In the top right box you will see a list of codes (1-2-3,…); you can rename these codes with the name of the instructions you samples (volume up, channel 1, …).
Check the structure of the samples by looking at the graph in the Scope Field. If there are no clear up & down lines (e.g. flat line), this means the samples are not registered correctly – you need to sample again. Trouble-shooter:
• If the samples look good, but you have problems sending out these samples via the IRG04, make sure that the Wait Time in the Sample Screen is at least 4 times the product of the longest bit with the sample time. E.g in the screenshot above, the longest bit is 60 (first bit) and the Sample Time is 40 microseconds. 60*40 = 2400 microseconds or 2,4 mill-seconds. 4x2,4 milliseconds = 9,6 milliseconds: the times in field “Wait 1” and “Wait 2” have to be at 9,6 milliseconds minimum. In the screen-shot above the Wait Times are 20 milliseconds, which is OK.
• Make sure that the IR Sample Time-out in the THI (see item 4.4.1 in this manual) or on
the IR page of an SWC04I, is set at minimum 2 times the product of the longest bit with the sample time.
E.g in the screenshot above, the longest bit is 60 (first bit) and the Sample Time is 40 microseconds. 60*40 = 2400 microseconds or 2,4 milliseconds. 2 x 2,4 milliseconds = 4.8 milliseconds – this has to be the minimum IR Sample Timeout time.
• Normally, the IR samples are sent out multiple times via the IRG04 (to be set via the
repeat box in the Sample screen above). Certain IR controlled equipment however uses the same IR code for ON and for OFF commands – sending IR codes multiple times will cause the equipment to switch between on and off. In these cases, make sure that the “One Shot” option is activated (bottom right corner of the Sample Screen).

HabiTEQ System Manager Programming Guide - Version 1
- 52 -
3.9.3 Allocate outputs to the sampled Infrared codes
The sampled codes can be allocated to the different outputs by any one of the following methods
3.9.3.1 Through an SWC04I/XX When you select the infrared switch in the Modules menu of the System Manager, go to the IR page. On this page you will see 12 IR fields. In these fields you can select which output you want to activate with the respective IR code. The first 4 will automatically contain the 4 outputs of page one of the IR switch. Output 5-12 you can select. Now you need to link the outputs with the respective IR codes of the remote control you plan to use. You already entered the 12 infrared codes into the HabiTEQ system by following the steps explained above. On the IR page, click on the arrow pointing down to download these samples you already entered (see screenshot below).
You will see the date and time of the samples you created. By clicking on that date and time stamp you will see the 12 samples individually appearing in the box called “Sample” on the IR page. Double-clicking each sample will cause it to be allocated to the Output in the IR List that is highlighted in green.

HabiTEQ System Manager Programming Guide - Version 1
- 53 -
Upload these new settings to the controller and you can control your HabiTEQ system with your remote control. Remark: you can give a name to each sample (e.g. 1,2,3… FFW, Back…) and to the sample collection by going to the sample menu in the System Manager. When you downloaded the samples by clicking on the arrow in the IR page of your IR switch as explained above, you will see in the Sample Menu a sample collection called “ Other”. Double-click this “ Other” and you will be able to change the name of each sample. 3.9.3.2 Through a THI01X/XX In order to couple IR samples with outputs via a THI01 module, you first need to create a Control Table (see section 3.7). Make sure to add all the outputs you want to control with your remote control in this control table; the maximum number of outputs that can be controlled via your remote through a THI01 is 16. In the THI module screen, you need to select the respective control table you want to link to the THI.

HabiTEQ System Manager Programming Guide - Version 1
- 54 -
In the “ mode”-field in which you can select how you will control your THI:
- “ Menus like set up in the Control Table”: you can first select among 10 different menus and then one of the 10 outputs you can put in each menu. In this case Numbers 1 to 9 will control channels 1 to 9 from the last selected menu.
- “ No Menus max. 16 channels”: you can allocate 16 outputs directly to 16 channels on your remote control, and zap through any other outputs above the 16 directly linked ones using the up/down buttons of your remote control.
By clicking on the downward pointing arrow you can download the IR samples you entered into the THI as we described above in the section “ Creating Infrared Samples”. When you download this list you will see the date and time that you created these samples; clicking on that date and time in the Device Type Menu will give you the list of samples in the “ Sample”-screen below. Next, you need to allocate each sample to the IR list on the left (highlight the function in the IR list you want to allocate the sample to and double-click on the respective sample). Take the following in mind:
• “V+”: this will be the button on your remote control to turn an output on • “V-“: this will be the button on your remote control to turn an output off • “CH+”: this will be the button on your remote control to go to the next output /menu
(depending on the “mode” selected) in the THI01X/XX table. • “CH-”: this will be the button on your remote control to go to the previous output/menu menu
(depending on the “mode” selected) in the THI01X/XX table. • “R” or “M”: this will be the button on your remote control to select the desired menu
Once you allocated all the samples to the IR list, you need to allocate outputs to the samples. You can only choose certain outputs from your Control Tables for the “ menu” –button and for samples 001-016. The V+, V-, CH+, CH- commands can only be allocated to specific samples you generated.

HabiTEQ System Manager Programming Guide - Version 1
- 55 -
3.9.4 Emitting Infrared Code via the IRG04 When you are on the programming screen of an IRG, select “ Universal IR TX”. You can select how many ports of the IRG04 you will be using (you can use 1 port to send out 64 codes, 2 ports to send out 32 codes or 4 ports to send out 16 codes each). Then you need to create a new address – an IR list will appear corresponding to the number of ports you selected and will use (if 4 ports selected you will get an IR list with four times 16 codes – p.1/01 to p. 4/15).
Next, you need to select the Device Type you want to control (you will need to sample the infrared codes you want to use in to the HabiTEQ system first according to the instructions given under “ Sampling IR Codes”), and then double-click on the samples to link them to a specific port and code. You can enter a name in the IR Function. If you now want to send out these infrared ports via a HabiTEQ input device, you will find these allocated IR codes under the Scenes or Scheduling buttons in the System Manager – under “ Other” in the output selection screen. NOTE: Before doing this you need to assign an alarm address to the IRG04. See more information about alarms in point 3.11. In order to link these IR-codes to a button on a switch or a control table of a touch screen, you will need to first create a scene, select the respective code you want to use (play CD, next, volume up…) and on its turn link the required scene to a switch or control table.

HabiTEQ System Manager Programming Guide - Version 1
- 56 -
Remark: For more complex Infrared systems. See datasheet specifications.
3.10 Creating Logic Functions
You can create logic functions in the System Manager by clicking on the icon above in the command line. You first need to have outputs available before you can create logic functions. When clicking on the “+” button next to the logic drop-down box you will get a pop-up asking whether you want to create analog logic.
When you click on “Yes”, you will be able to work with Analog logic; clicking “No” will give you Boolean logic.
3.10.1 Boolean Logic (If – Then – Else) If you click on the logic function in the command line automatically, an “if – then – else” logic will appear randomly using a couple of the outputs you created.

HabiTEQ System Manager Programming Guide - Version 1
- 57 -
By double-clicking on the output list, you will enter that respective output in the line that is highlighted in the logic field.. You can add or delete lines by clicking the “Insert line” / “Delete Line” buttons. You can change the logic between AND and OR conditions by clicking on the AND / OR button when the AND / OR line that needs to be changed is highlighted. You can also change the desired status of the output by clicking on the On/Off button. Remark If you have a long list of outputs, you can use the “Filter” field in the output list. By putting a name in the filter, you will only get those outputs that start with that name (if you highlighted the “Start” button) or those have that name in the output (if you highlighted the “Part” button). You can also select whether the word you put in the filter is case sensitive or not.

HabiTEQ System Manager Programming Guide - Version 1
- 58 -
3.10.2 Analog Logic (X,/,+,-,<,>,=) Using analog logic gives the opportunity to activate outputs commands based on the status of one other outputs, multiple other outputs, a calculation whereby outputs are used as parameters or based on the time. For instance, it would be possible to turn on the heating in a specific room only if between two different times (e.g. 7:00 am and 9:00 am) the temperature in another room is < or = X degrees. By pushing the “+”-button next to the drop-down box in the Logic module, you can select to create Analog logic. Automatically, you will get an IF – THEN – ELSE logic pre-filled with certain outputs that already have been created. Note: in order to create logic functions, outputs have to be created.
Selecting Outputs In order to use different outputs in the logical expressions, click first on the output in the logic you want to change, and then click on the desired output in the Output list on the right. You can click on the outputs directly in the logical expression field, or in the box below where you will get a more structured overview of the different conditions and parameters used.

HabiTEQ System Manager Programming Guide - Version 1
- 59 -
Scenes can be used in the logic functions too, as a final action to be activated / disabled to fulfill specific conditions. (“THEN ON SC2 “). Select the calculation By highlighting the signs (<,>,=) in the logical expression you can change them by clicking on the desired sign on the right side of the logical expression box. You can change the value by pushing the up or down arrow on the right side of the logical expression box. Similarly, by highlighting a calculation (x,/,+,-) in the logical expression, you can change it by selecting the desired calculation on the right side of the box.
Notes:
• To define the level of an output in the IF use “>” and “<” instead of “=” except for ON/OFF outputs.
• Before you set up a TH as output, first assign a numerical constant and then the TH module, determining finally the desired program with the cursors.
New analog logic Assign conditions, delete Set up TH as output
operator (x2) and add constant
Select the conditions (“????”) and choose the desired program with the cursors

HabiTEQ System Manager Programming Guide - Version 1
- 60 -
Changing the conditions AND / OR conditions can be changed by highlighting the AND/OR condition in the logical expression, and clicking on the converse one on the right side. Also, AND/OR conditions can be deleted by clicking on the “Delete Line”, or conditions can be added by clicking on the “Insert AND/OR” button. Any condition can also be used as a parameter in a calculation; highlight the output you want to use in the calculation and then click on the Insert Calculation button. Using the clock Highlight an output in the logical expression, and then click on the “Time” button.
Highlight the value next to the Time, and select a combination of month / day / weekday / Hour / Minute or any single one of these. This way an output can be activate at a certain point in time. ATTENTION!!! Digital logic only can check on outputs up to address 63. If you use outputs of address 64 or higher you have to use only one type of logic. Boolean and Analog logic cannot work correctly on outputs up to address 63 at the same time.
3.11 Choosing an alarm
HabiTEQ gives you the opportunity to receive notifications for certain selected situations. This can be accomplished through the Alarm function. The type of notification can be virtual, e.g. through an LED switch notification, of either all or selected ones, or it could be written, through a text message to a mobile phone. Selecting the Alarm menu from the program the following screen will appear.

HabiTEQ System Manager Programming Guide - Version 1
- 61 -
Giving a name to an alarm in essence creates a new alarm. So the screen above takes the following form.
The selection used under the name is usually that which is displayed on the screen above. The “external output” option can accept a selection or not. The selections it can accept are either scene or timer. With this option, when the alarm is activated, if you press any switch whose LEDs are blinking the respective contact or scene will activate while at the same time the alarm is deactivated because the system understands that someone is aware of the event. The next option after “external output” provides the opportunity to define the frequency in which the LEDs will blink while the last option provides the opportunity to select the notification color change.

HabiTEQ System Manager Programming Guide - Version 1
- 62 -
Selecting either one switch or all of them and then pressing the green arrow, you can pass the setting to the selected switches. The alarm activation setting is done through logic. By logic, we mean that when one or two things happen at the same time then the corresponding alarm will be activated. Setting up the alarm for SMS, in order to receive also a text notification, is done as follows. Go to the SMS module through the modules option on the program command like and then choose the alarms tab; the following screen will appear.
In the screen above enter the sms text, i.e. the text that will be sent to your mobile phone; choose from the right side of the screen the phones for the people you want to receive the message from this specific alarm. If you make a second alarm you will have to select again the phone numbers of the people you want to receive the message because it might not be necessary for everyone to receive all the alarms. The options above the names let you set the repetition time, in case the alarm is not detected initially.

HabiTEQ System Manager Programming Guide - Version 1
- 63 -
4. Input Modules
The configuration principles are the same for all of the HabiTEQ modules. What differs is their operation which, per se, does not affect the program's logic. The system manager takes care of module configuration, rather than module programming. The HabiTEQ system has been developed to make the programming transparent for the user of the system; the user only needs to configure – select which input will activate which output – the system and adapt where needed to his or her specific demands. Note: it is recommended to create all outputs BEFORE configurating the modules, as this will make the configuration faster and easier. See section 3.0 on how to create the outputs. In order to configure modules, go to the HabiTEQ System Manager application and on the command line press the option modules. The following screen will appear; in the field under “Serial Number”, you need to write the serial number of the specific module you are configuring. Note: Each HabiTEQ module has a unique serial number, which you’ll find on a sticker on the module itself. A CTD also has a serial number, however the System Manager will automatically read out this one when there is a connection established between the System Manager and the Controller.
As soon as you write the component’s serial number in the Serial Number field, another screen will pop up at the right hand side of the programming screen showing this particular component.
4.1 Input Modules Configuration On the upper part of the module’s programming screen the location of the module can be entered (e.g. distribution panel 2, row 1).

HabiTEQ System Manager Programming Guide - Version 1
- 64 -
In each of the input fields, outputs can be selected by pushing on the drop-down box next to the “Name”-field. If outputs have been created beforehand, these will be listed in this drop-down list. If an existing output is selected, the “mode” option will be filled out automatically (as the mode has been selected when the output has been created – see section 3). If the “new output” field is selected in the drop-down list of the module, a mode has to be assigned; this will immediately display an indicative name for the related output, which you can change and rename at that point. Through the “properties” option, next to each output, you can check or assign the properties of the related output. Please refer to section 3 on how to create an output.
4.1.1 INP04 This module can be used for connecting a regular switch (one that does not contain a built-in HabiTEQ PCB) or for connecting external contacts such as solar/wind detector, movement detector, door switches, magnetic contacts for doors or windows, etc. There are 4 inputs switches to be connected, which must be potential-free. Each module has a unique serial number for programming. The following window will appear upon entering the serial number:
The input contacts can be selected and set using the system manager as shown below
- Push Button = when connecting a push button to the input (is normal open, only activates status shortly when being pushed)
- Normal open = contact that is open when inactive (for extended contacts – see below) - Normal closed = contact that is closed when inactive (for extended contacts – see below) - Switch = when connecting a switch to the input (2 settings – on & off).
ATTENTION: Always use Normal Open or Normal Closed when connecting inputs that give extended contacts (e.g. magnetic contact for window, motion detector, smoke detector,…) These inputs are in the same status for an extended period of time and only will activate the output when that status changes. If you use “push button” for these inputs, the bus will continuously send the status to the controller which will result in poor communication. Only use push buttons for short contacts (= regular pushbuttons).

HabiTEQ System Manager Programming Guide - Version 1
- 65 -
The outputs that should be activated by the switches connected to the INP04 can be selected from the “mode” field as shown in the following picture. The outputs that can be activated includes toggle, Dimmer 1B/Dimmer 2B,UP-DOWN 1B/UP-DOWN 2B, Timers, Scenes, sequence, Record simulation, simulation ON, Thermostat. One module can operate up to 4 outputs, 4 scenes or 4 x 16 scenes via the sequencer function. The outputs can also be activated from the system manager using the Test button in the programming window. Also the current status of the outputs can be known by pressing the Read values Button in the programming window of INP04 module.
4.1.2 INP08/INP16 There is not much difference in programming aspects between INP04, INP08 and INP16; the only difference is the number of potential-free switches that can be physically connected to the INPUT modules. INP04 can accept 4 potential free switches while INP08 can accept 8 and INP16 can accept up to 16 potential free switches.
The other difference in terms of the programming is INP16 contains 2 serial numbers. The first serial number concerns inputs 1 till 8. The second serial number concerns inputs 8 till 16.

HabiTEQ System Manager Programming Guide - Version 1
- 66 -
The input contacts can be selected and set using the system manager as shown below
- Push Button = when connecting a push button to the input (is normal open, only activates status shortly when being pushed)
- Normal open = contact that is open when inactive (for extended contacts – see below) - Normal closed = contact that is closed when inactive (for extended contacts – see below) - Switch = when connecting a switch to the input (2 settings – on & off).
ATTENTION: Always use Normal Open or Normal Closed when connecting inputs that give extended contacts (e.g. magnetic contact for window, motion detector, smoke detector,…) These inputs are in the same status for an extended period of time and only will activate the output when that status changes. If you use “push button” for these inputs, the bus will continuously send the status to the controller which will result in poor communication. Only use push buttons for short contacts (= regular pushbuttons). The same outputs that can be activated by INP04 in 4.1.1 are also applicable for INP08 and INP16 modules. Also the outputs can also be activated from the system manager by using the Test button and the current status can be known by pressing the Read Values button.
4.1.3 INP08/230 The INP08/230 is similar to the INP08 module. Again there is no difference between in terms of programming aspects. The only feature that differentiates this module with the rest of the Input modules is that INP08/230 can switch up to 230 volts. (It is not mandatory that the switches need to be potential free).
The same outputs that can be activated by INP04 in 4.1.1 are also applicable for INP08/230. Also the outputs can also be activated from the system manager by using the Test button and the current status can be known by pressing the Read Values button.

HabiTEQ System Manager Programming Guide - Version 1
- 67 -
NOTE: When defining the type in the drop down menu INP08/230 this may change to INP08. This won’t affect functionality but it is recommended to give different names in the location field to avoid confusion
5. Output Modules On the upper part of the module’s programming screen the location of the module can be entered (e.g. distribution panel 2, row 1). In each of the output fields, outputs can be selected by pushing on the drop-down box next to the “Name”-field. If outputs have been created beforehand, these will be listed in this drop-down list. If an existing output is selected, the “mode” option will be filled out automatically (as the mode has been selected when the output has been created – see section 3). If the “new output” field is selected in the drop-down list of the module, a mode has to be assigned; this will immediately display an indicative name for the related output, which you can change and rename at that point. Through the “properties” option, next to each output, you can check or assign the properties of the related output. Please refer to section 3 on how to create an output.
5.1 Relay Module Configuration (REL04/REL08) The REL04 and REL08 have 4 and 8 normally open contacts respectively, which can each connect max 16A at 230V (cosϕ=1). These are 4 independently working contacts that can each be allocated an individual function by means of the system manager. Both the REL04 and the REL08-module have 1 unique serial number through which the system manager recognizes the modules. Upon entering the serial number in the modules command the following window appears. The following figure shows the programming window of a REL04 module.

HabiTEQ System Manager Programming Guide - Version 1
- 68 -
As explained in the beginning of the section 3.5 the outputs can be created either in the “modules” section of the System Manager or in the “Output” section. The Mode here denotes the different type of outputs, toggle thermostat, timer etc. ATTENTION: a REL04 can NOT be used to control motors (for shutters, curtains, etc); a REL08 or ROL02(P) is needed to do so. On entering the serial number of the REL08 module the following window appears.

HabiTEQ System Manager Programming Guide - Version 1
- 69 -
The relay module does not have any specific function. It can handle all switching functions: monostable (bell), bistable (on/off), timer, interval, thermostat output, etc. Also the outputs can also be activated from the system manager by using the Test button and the current status can be known by pressing the Read Values button. See the corresponding sections on how to control the relay modules through different modules.
5.2 Shutter Module (ROL02) This is a special relay module available exclusively for controlling motors (shutters / blinds / curtains). The shutter module has 2X2 normally open contacts that can each connect 16A at 230V (cosϕ=1). Each module has a unique serial number enabling programming by the system manager.

HabiTEQ System Manager Programming Guide - Version 1
- 70 -
On entering the serial number in the modules window the following window appears.
The programming of the ROL02 is very similar to REL04/REL08 modules; however only assign Up/Down 1B, Up/Down 2B, Start-Stop (Start), Start-Stop (Stop). The outputs can be activated from the system manager by using the Test button and the current status can be known by pressing the Read Values button. See the corresponding sections on how to control the Relay modules through different modules.
5.3 Dimmer Module (DIM04) The Dimmer Module is used to control the Input power supplied to incandescent or halogen lamps. The dimmer can be programmed either as 1Button dimmer or 2Button dimmer. Set as a one-button dimmer it is possible to reduce the number of control buttons, however be aware that the cycle must always be completed: starting from zero to maximum and back to zero. Set as a two-button dimmer you need a “+” and “a” – button but you do not need to complete the full cycle. When you keep a button pressed in, the transit time from zero to maximum is 5.1secs. A short pulse (< 0.3secs.) will take the dimmer to zero or to the maximum value in 2.5secs. The minimum value can be adjusted from 0% to 100%, the maximum value can be adjusted from 5% to 100%. The maximum value needs to be 5% more than the minimum value – this will automatically be done when configuring minimum and maximum values. The lighting can also be dimmed automatically after a set time of 1 sec to 255 secs. If the dimmers are controlled by a sequence the rise time and fall time can be adjusted independently between 0.3secs and 20mins.

HabiTEQ System Manager Programming Guide - Version 1
- 71 -
On entering the serial number in the module window the following window appears
Mode: It can be either a 1B dimmer or 2B dimmer
Properties: On clicking the properties the following window appears.
• Both the minimum and maximum level can be set • Fade In / Fade Out: time it will take from 0% to maximum or from >0% to minimum when the
dimmer is executed via a scene or a TimeOff

HabiTEQ System Manager Programming Guide - Version 1
- 72 -
• TimeOff: after pressing the button shortly, it will take the number of seconds or minutes (click on the “Sec” button to change to minutes and vice versa) displayed next to TimeOff before the dimmer will fade out (according to the time set in Fade Out).
• For more details on the other properties, see section 3.5.9
The outputs can be activated from the system manager by using the Test button and the current status can be known by pressing the Read Values button. See the corresponding programming sections on how to control the Relay modules through different modules.
5.4 Analogue Dimmer Module (ANA04/ANR04) The Analogue dimmer modules are used to control any external dimmer with 0-10V /1-10V control inputs. The only difference between ANA04 and ANR04 is that the former doesn’t contains any relays while the later contains Relays through which the loads connected to the external dimmer can be completely isolated when the output is set to 0%, whereas in case of AN04 the lamp connected to the Dimmer may be still on depending on the minimum possible output of the dimmer. Both the ANA04 and ANR04 are recognised by the system manager by a unique serial number. The programming is similar to both. Both can be configured as either a 1B dimmer or a 2B dimmer. The following explanation related to programming and control is applicable to both the modules. On entering the serial number in the module window the following window appears.
Mode: It can be either a 1B dimmer or 2B dimmer Properties: Similar to the Dimmer module as explained in the previous section 5.3
The outputs can be activated from the system manager by using the Test button and the current status can be known by pressing the Read Values button. See the corresponding programming sections on how to control the Relay modules through different modules.

HabiTEQ System Manager Programming Guide - Version 1
- 73 -
6. Switch Programming The switch in essence is the system’s user interface. Its control is very simple like the one of a conventional switch. Each switch can execute 4 + 4, i.e. up to 8 operations. These operations can be simple startups (ON/OFF), dimming, scene recall, central commands and anything that the system can handle. In order to program a switch, follow this procedure: When you entered the serial number on a switch as mentioned above in this document under 3.3, you will see the following screen appearing:
The screen above is the programming screen for a switch where the 4 commands for the switch are displayed. These commands are placed in such a way that the upper left field on the screen (Button 1) will be the upper left side of the switch as you look at the switch, etc. Note: You can always tell the right position of the switch by making sure the serial number on the back of the switch is legible (so not upside-down). In order to program the switch, click on the drop-down box next to the first button; there you can select outputs that you already created or create a new output. On how to create outputs see item 3.4 in this document.

HabiTEQ System Manager Programming Guide - Version 1
- 74 -
In the drop-down box underneath the output selector you can select the mode of the new output that you want to create. In case you have selected an existing output the mode will already be mentioned in that box. See item 3.4 in this document for an explanation on the different types of output you can select.
Moreover, for each switch button, as can be seen from the screen below, you have the opportunity to choose the standby LED color (color off) for each button as well as the operational status color (color on) or even to deactivate completely all the color through the option given above each color. It is recommended to use different colors for different outputs – e.g. blue for on/off, yellow for dimmers, green for scenes, etc. This will enhance the user-friendliness of the system.
The UP/DOWN and TEST buttons on each key next to the startup gives the opportunity to test if the chosen startup is operational and if it's the one we want to light up on this particular key for this particular switch. The properties option takes you to the startup properties correlated for this particular key. See item 3.4 – Properties for further explanation on these properties.

HabiTEQ System Manager Programming Guide - Version 1
- 75 -
These switches as mentioned in the beginning have the capacity for 4 + 4 operations. The other 4 operations are found on page 2 on the upper side of the window. Selecting this page, an identical screen is displayed with the 4 keys where you follow exactly the same configuration method.
Attention: Toggling between pages is done by simultaneously pressing the switch and the 2 buttons. As soon as this is done all 4 keys of the startup’s 2nd page are controlled. This 2nd page selection lasts for 2-5 seconds and then the switch reverts back to the first page startups. You might want to use the second page of a switch for outputs you do not activate regularly (e.g. shutters). Additional Settings: This option will display the following screen.

HabiTEQ System Manager Programming Guide - Version 1
- 76 -
Default values for this SWC0x This option can set the standby and operation colors for all page 1 and 2 LEDs and by pressing the “make all this default on all SWC0x” they become the default for all the switches for this particular project. Low light This option can set the LED lights by moving the bar to the right – left (a good suggested lighting is approximately at 9 – 10). The “auto decrease LEDs” option is used so that when the switch is left a lot of time without being used then the LED lighting is decreased. The option “short flash on page 2” is used so that when you use the 2nd page of the switch’s commands, the LEDs blink in order to give indication that you are located on page 2. The option “TH status visible on LEDs” is used when you control the thermostat from the switch; this will make the LEDs change color depending on the temperature so that you can see the temperature level at the moment. The “color/program also on TH” option can let you select the thermostat's programs (night, comfort, etc) and to provide the respective LED color indication. Finally, you are given the option to select the colors of your choice and to use them for the LED colors. Thermostat switch Beyond the simple switches there are switches, which have an integrated sensor for temperature and which also, function as thermostat beyond the normal switch functions. Their difference is in the programming which is beyond the conventional startups of a simple switch and which also gives the option to program the thermostat. The following screen is a switch-programming screen.
Note that besides the two fields on the upper part of the screen, the switch location is mentioned along with the type and a third field that has to do with the thermostat. This way you can add a new thermostat or to use one of the ones already made. The thermostat settings are the same with those mentioned for the THI.

HabiTEQ System Manager Programming Guide - Version 1
- 77 -
7. HMI Modules
7.1 Thermostat Indicator Display- THI01
7.1.1 Configuring THI01 THI is a central control unit that includes an electronic thermostat. It can control a number of outputs or scenes. Moreover, it has an integrated infrared receiver, which can be tuned with any remote control. Its programming initially is done by entering in the HabiTEQ System Manager the THI serial number which is located at its back side. The following screen will appear.
On the first field (location) write the control unit’s location in the area. In the second field select the thermostat you want the THI to control. This can be a new thermostat controlled only by the THI but it could also be a thermostat that you already entered before (e.g. for a Switch or a touch screen with thermostat functionality). See above under the different output modes (3.4) on how to program thermostats. In the “control table” field you can select a control table you want to allocate to the THI. See above in item 3.7 on how to make a control table. After you select the relevant control table you want to control via your THI, the following screen will be displayed:

HabiTEQ System Manager Programming Guide - Version 1
- 78 -
By selecting the required Control Table, the outputs you selected in that control table have now been entered automatically in the THI. Keep in mind this list is meant to display the link between the outputs you can control through the THI via the buttons on the THI and the Infrared samples you have generated to control your HabiTEQ installation remotely via your remote control. This is why it seems that the first 4 fields on the list are empty and that you can only see 20 “samples”. The first 4 fields (number 000-003) are not empty - by clicking on these fields you will see that these have been allocated to Volume Up, Volume Down, Channel Up and Channel Down (which you will need in case you want to control remotely). From field 004 on you will see the outputs you selected in the Control Table. In this specific list you will only see the first 10 outputs from the control table (so till field 013), however in case the Control Table contains more than 10 outputs, the remaining outputs will also be entered automatically in the THI (up to 99 outputs) and you’ll be able to control them. The other fields in the THI screen (# Learn samples, IR Sample Time out, Mode…) are needed to use a remote control – see item 3.8 above to learn more.
7.1.2 Using THI01
The temperature displayed on the thermostat’s monitor during standby displays the area temperature at that moment and not the temperature that you have selected. The set point temperature of the active program can be changed manually in the THI directly with the buttons, but the system will not save this change (when going to other program) unless this is done through the Habiteq System Manager. Activate/check Outputs Status. Pushing the IR button you are able to browse through the outputs that have been allocated to your THI via the control table (see above).

HabiTEQ System Manager Programming Guide - Version 1
- 79 -
Once you pushed the IR button shortly, you can use both the IR button and the TH button to browse through the outputs from high to low (using IR button) or from low to high (using TH button). If you keep the “down” button (IR) or the “up” button (TH) pushed in, you will browse through the list 10 outputs at a time (from output 1 to 10 to 20...). When you get to an output you want to control, you can use the + or – buttons to activate or des-activate the respective output. If you control a dimmer, one push on the + button will bring the dimmer to 100%, one push on – button to 0%, keep the button pushed in if you want to dim to a certain percentage. When you have another thermostat in the control table, you can use the + or – buttons to control its programs (Manual, Freeze, Economy, Comfort or Night) and you can see the actual temperature that the thermostat is measuring and change the set point. On Channel 0 you will be able to check the status of the system (using + or -); this will display those outputs you selected to be shown on a screen in case they are activated (see under 3.4. Selecting Outputs – where we discuss the Properties of the different Output Modes). If you do not push the IR button anymore, the screen will go back to its standard setting (showing local temperature) after 5 seconds. In the THI standby status using the TH key select any of the Manual, Freeze, Economy, Comfort or Night programs.

HabiTEQ System Manager Programming Guide - Version 1
- 80 -
7.2 Touch Screen 5.8 – TSC5.8
7.2.1 Configuring TSC5.8 The TSC5.8 is a monochrome touch screen that can be connected directly on the bus (receiving all power from the bus). By entering the serial number of the TSC in the module programming field, you will get the following screen:
In the Location field, you can select how to name the TSC – mostly the location where it is installed. Similarly as with a THI, a control table needs to be selected. This control table will be the menu structure of your touch screen. See under 3.8. on how to make a control table. In the same screen, the language for the touch screen standard texts can be selected. As the TSC5.8 also has a temperature sensor, a thermostat to be linked to the touch screen can be selected. See under item 3.5.6 how to configure thermostats. In the Display Text, you can write the text you want to have displayed at the bottom of the TSC. The number of used menus can be adapted using the up and down arrows. If the field next to “Enable Setup” is highlighted, you will be able to perform following actions on the TSC: − Turn the beeper on/off (when touch screen is being operated can beep or not) − Change the colours from positive to negative − Adjust touch − Cleaning mode: during this cleaning mode the touch screen will be inactive for about 20 seconds during which it can be cleaned. If the field next to “Check Status” is highlighted, you will be able to check the status of certain outputs on the TSC. To select those outputs that can be checked, go to the properties of the output and click on the “Display Warning” button. “Screensaver to clock” means that after the defined number of seconds on the right, the TSC will go to screensaver mode (and hence use less energy by reducing the backlight intensity). In the “when resuming from sleep” field, you can select an output that will be activated when the touch screen resumes from sleep-mode (as soon as the screen is touched that output will be activated).

HabiTEQ System Manager Programming Guide - Version 1
- 81 -
7.2.2 Using TSC5.8 TSC5.8 is mainly used as a user interface to control a defined control table with menus set up as the user wants them. In standby mode it can display temperature and clock.
7.3 GSM Interface Programming - SMS01
7.3.1 Setting parameters Initially connect the 230V AC power supply unit and the bus communication cables (FTP CAT5).
7.3.2 Sim card installation
Install initially the sim card on a mobile phone and deactivate the PIN. If you are using a new SIM-card, place a call and send an SMS to test the SIM-card. Then place it in the SMS unit. MAKE SURE TO INSERT THE SMS CARD INTO THE SMS MODULE BEFORE YOU START PROGRAMMING. After installing the sim card, go to the device properties in the HabiTEQ program and check whether the device has signal by pressing the option “Read signal strength network, Error? “Displayed on the first option tab on the device properties and then enter the table you want to be controlled by the sms unit in the option "control table" as displayed below.
If everything is okay continue, otherwise check the previous steps for any erroneous actions.

HabiTEQ System Manager Programming Guide - Version 1
- 82 -
7.3.3 Telephone numbers configuration Afterwards by accessing the “phone numbers” tab, install the telephone number from which the HabiTEQ system can be checked. ONLY the numbers installed can give commands to the system. If any third party knows the communication number they CAN'T give a command because the system will not recognize the number. This is ensured by the option (v) next to the number names as displayed in the previous screen in the “sms commands” tab.
ATTENTION: Before each entered telephone number (only mobile phones), you should enter the country prefix with +. (Example: Spanish number: +34…)
7.3.4 Commands edition After you finish entering the telephone numbers and names, as you would want them displayed, go back to the first tab “SMS commands” and choose from the “control table” the outputs you want controlled through SMS. The output selection is done via double-clicking the required output in the control table. Before this, the message that the SMS unit has to be deactivated will be displayed for 30 seconds. Follow its instructions.

HabiTEQ System Manager Programming Guide - Version 1
- 83 -
Make sure to click those phone numbers who can get access to the system in the SMS Commands screen. If you do not select at least one phone number, everybody can get access to the system. Once at least one phone number has been selected, only the selected number can give commands to the system. In the “Who must also have Reply” boxes, you can select who – additionally to the sender – will receive a confirmation message from the SMS unit that a command has been executed. The sender of the message will always get reply if the command has been executed correctly. If you also want to receive debug messages (in case the command has not been executed because of wrong or non-existing commands), you need to activate the “Send a debug report if no match” field under the Alarms tab.

HabiTEQ System Manager Programming Guide - Version 1
- 84 -
NOTE: DO NOT USE SPECIAL CHARACTERS (é, ã, ç,…) IN ANY TEXTS ENTERED INTO THE SMS (E.G. THE NAMES BESIDES THE PHONE NUMERS, SMS COMMANDS,…)!!!!!! Finally, go to the “status interpreter” tab and press “Default” so that the commands will appear as in the following screen.
The commands shown above are defined as follows: If you want to turn on a relay contact (on/off) all you have to do is write the contact name as it was entered in the “sms command” tab then insert a space and write ON or 1 or YES as the following table shows. Similar procedures are used for dimmers, blinds, etc. Make sure to use the same commands as are mentioned in the Status interpreter tab. If you want to find out a current setting of an output, just send a message with the output name but without any status after it (e.g. Temp Living) – you will receive a reply with the status (e.g. Temp Living Comfort). Moreover, you can be notified if the system has a malfunction at the bus or if there is a power interruption. You can do this by going to the “ALARM” option tab and selecting “Check the external power” and “Check the bus” which respectively checks for the system’s supply as well as the bus signal operation as is displayed in the following screen. In the “Timeout” box you can define how many minutes there needs to be a malfunction of the external power or the bus before the SMS sends out a message. The message will always be sent to the first phone number in the list. Activating the through the “send a debug report” option, the SMS module will notify you when a command you sent to the SMS was not executed correctly.

HabiTEQ System Manager Programming Guide - Version 1
- 85 -
You can also use the SMS to send alarms to your phone. Setting up the alarm for SMS, in order to receive also a text notification, is done as follows. Go to the SMS module through the modules option on the program command like and then choose the alarms tab; the following screen will appear. In the screen above enter the sms text, i.e. the text that will be sent to your mobile phone; choose from the right side of the screen the phones for the people you want to receive the message from this specific alarm. If you make a second alarm you will have to select again the phone numbers of the people you want to receive the message because it might not be necessary for everyone to receive all the alarms. The options above the names let you set the repetition time, in case the alarm is not detected initially. Take into account that the SMS can only send out two alarms at the same time. To know more about how to configure and use alarms see point 3.11 DO NOT ACTIVATE ANY OUTPUT (DO NOT PUSH A BUTTON / TRIGGER A MOTION DETECTOR / COMMAND AN INFRARED PORT /....) WHILE UPLOADING THE SMS CONFIGURATION TO THE CONTROLLER. THE UPLOAD WILL TAKE ABOUT ONE MINUTE. IF YOU GET A TIME-OUT (MODULE NOT FOUND), JUST CLICK ON “RETRY”.

HabiTEQ System Manager Programming Guide - Version 1
- 86 -
8. Movement Detector Sensor Programming
8.1 Module specifications • It it’s a movement sensor with regulated angle and light sensor placed internally • The detection zone is up to 7m in a radius of 1100 • Possibility to recognize movement origin, i.e. if the movement is coming from the right to
from the left within the detection zone. • The MDI can be programmed in function of the ambient light level – only works if ambient
light is below or above a certain level.
8.2 Configurations parameters The following screen is displayed when the component properties are selected:
ATTENTION!! : Only Toggle type inputs can be controlled
8.2.1 Trigger The parameters of this field set the trigger sensitivity. First: It is the size of the movement required to activate the output. Keep: It is the size of the movement required to keep the output activated. It cannot tolerate values greater than the option first; only smaller or equal. Sensitivity: This is the required level of light in order for the light sensor output to be activated. The light sensor can be seen through the “Read values’ option and you CANNOT take the light level (lux) from the bus.
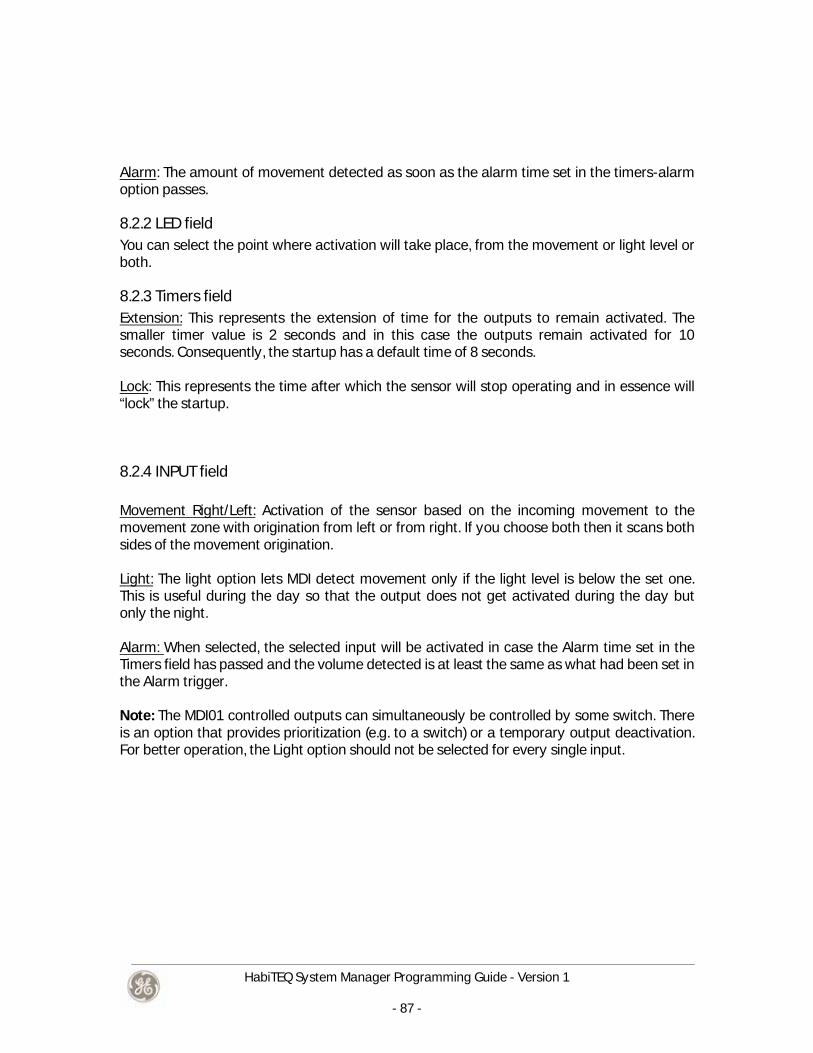
HabiTEQ System Manager Programming Guide - Version 1
- 87 -
Alarm: The amount of movement detected as soon as the alarm time set in the timers-alarm option passes.
8.2.2 LED field You can select the point where activation will take place, from the movement or light level or both.
8.2.3 Timers field Extension: This represents the extension of time for the outputs to remain activated. The smaller timer value is 2 seconds and in this case the outputs remain activated for 10 seconds. Consequently, the startup has a default time of 8 seconds. Lock: This represents the time after which the sensor will stop operating and in essence will “lock” the startup.
8.2.4 INPUT field Movement Right/Left: Activation of the sensor based on the incoming movement to the movement zone with origination from left or from right. If you choose both then it scans both sides of the movement origination. Light: The light option lets MDI detect movement only if the light level is below the set one. This is useful during the day so that the output does not get activated during the day but only the night. Alarm: When selected, the selected input will be activated in case the Alarm time set in the Timers field has passed and the volume detected is at least the same as what had been set in the Alarm trigger. Note: The MDI01 controlled outputs can simultaneously be controlled by some switch. There is an option that provides prioritization (e.g. to a switch) or a temporary output deactivation. For better operation, the Light option should not be selected for every single input.

HabiTEQ System Manager Programming Guide - Version 1
- 88 -
9. Configuration Notes
9.1 Advanced configuration This section contains the points that because of complexity need to have a deep knowledge of how the system works
9.1.1 Module Verify Error Address You can configure your CTD so it will scan the status of all HabiTEQ modules at a certain time. This way you would be notified if there would be an issue with any of your modules. For this you have the module verify error address in the set-up screen, that is an output you can select that will be turned on in case an error is detected in a module on the bus You first need to add an analog logic to set the time when you want the scan to be done. Go to the Logic button on the System Manager Command Line, click on the “+” sign next to the logic drop-down box and select “Yes” when the program asks if you want to create analog logic. Automatically you will have a couple of logic lines filled out with outputs you created. When you highlight the first output used (If XXXX), you can click on the “Clock” button to add a clock to the logic and hence to be able to set a specific time when the logic has to be executed.
Now you can select when you want the scanning to take place – obviously the best time to do so is somewhere during the night.

HabiTEQ System Manager Programming Guide - Version 1
- 89 -
Delete the “And XXX” condition by clicking on “Delete Line”, put the cursor on “THEN” and click in the output list on the “Other” Menu. There you can select the “Module Scan” action. Delete the “Else” Condition. Now you have programmed the controller to do a module scan each night at 03:00 am.
Next, you need to define which outputs you want to scan. In the Module button in the task bar, you can select next to each module if you want to scan it with the above-defined process. The default setting for each module is Yes (will be scanned) – if you want to exclude a module from being scanned you need to double-click on the module – you will see an “N” appearing next to the module.

HabiTEQ System Manager Programming Guide - Version 1
- 90 -
If you now selected a certain output in the Module Verify Error Address, that output will turn on in case a problem with one of the scanned modules has been detected. If you want to find out what the status of your scanned modules is, click on the download arrow in the serial manager, select the Module Scanning box and click on Receive.

HabiTEQ System Manager Programming Guide - Version 1
- 91 -
9.1.2 Swapping SD banks with analog logic As mentioned before in this document (2.5.2.3 SD Banks), different configuration files (.qdb files) can be loaded on different SD banks in the controller. For that you need to detail the SD bank where you want to upload the configuration when uploading and be careful you upload the right qdb file in the right SD bank.
Analogue logic can be used to automatically change between .qdb files in function of time. For instance, if you have a winter.qdb file (with heating controlled by clocktimes) and a summer.qdb file (without heating), you can automatically change from summer to winter and vice versa. Click on “Other” in the output list to be able to select SD banks.

HabiTEQ System Manager Programming Guide - Version 1
- 92 -
9.1.3 Timer 5 With this timer you can coordinate a manual input (a switch) and a detector input. A detector will only activate an output if it detects motion or if the light level falls below a defined level (see below in programming MDI/MDO). In the HabiTEQ system, a detector has priority over a switch. This means that if you plan to control an output that is controlled by a detector also by a switch, this output will not react on the command given by the switch if the parameters of the detector are not matching (e.g. no motion was detected or the light level is still too high – the detector will turn off your output immediately after you have given the command by the switch to turn it on). You can circumvent this issue by using a Timer 5. Here’s how you program a timer 5:
• Step 1: create new output (Timer 5 Manual) on the switch you want to use to control that out from. When you click “enter”, you will be asked to give a name to the output you want to control by the detector (you will have two names for the same output, one controlled manually, one controlled with the detector – add “manual” or “detector” behind the output so you can distinguish between both).
• Step 2: you need to link the Timer 5 Detector part to the detector you will use to control this output as well. If you program an SWC04M, you can link this Timer 5 Detector directly to a button. However if you will use an MDI or MDO as detector, you will need to make a virtual output as MDI or MDI only can control toggle outputs (not timers). In this case, first create a fictive toggle output, and link this virtual output via logic to Timer 5 Detector

HabiTEQ System Manager Programming Guide - Version 1
- 93 -
• Step 3: in the MDI or MDO, use the virtual output as one of the controlled output: now when the MDI will detect something, it will turn on the virtual output which will on its turn activate the Timer 5 Detector part (as both are linked through logic).
• Step 5: in order to determine the priority of the Manual control over the Detector control of the output, you need to allocate the Manual output to the relay to which the output is connected. Now your manual control will have the priority and will be able to overrule your detector.

HabiTEQ System Manager Programming Guide - Version 1
- 94 -
9.2 General recommendations
• When programming different configurations for different seasons for example, please follow the following steps: 1. Write the configuration with the settings you want to have in your system always, 2. Write the special settings you want for the different seasons saving them in different qdb files and uploading them in the different banks of the SD files, 3. program the modules with your present configuration
• If you are controlling your heating system and cooling system with one thermostat, it is
recommended to disable one of those depending on the season you are. This can be done directly with an analogue logic expression or programming the thermostat in different ways in the different season configurations
• With a simple switch you can control a switch, a dimmer, blinds, or even a thermostat.
Specifically for a thermostat, you can either have manual operation of +/- of the temperature or you can toggle between preselected thermostat programs like comfort, night, etc. By having each program startup a different LED on the switch, the user will recognize which program is in use.
• Disadvantage: During the manual operation of the thermostat via switch, you won't know the
temperature value, i.e. you will not know by how much you are raising or lowering the temperature and in this case you have to have either a monitor or a THI01 to be able to see the temperature values.
• It is advisable to use one table per screen. Even if you want the same table for 2 screens, then
copy the first to the second and use one screen for one and one for the other. This will help avoid getting stuck or getting confused giving commands.
• When you have more than one MDI and you want all of them to be controlled by the same
startup then do NOT set the same startup for all of them but create virtual startups individually for each MDI and create logic that will turn on the same thing.
• The sequence creation is for 3 scenes and up. For two scenes you can enter the first scene
and the second one you can link to the same button (in the switch programmation screen) by pressing a bit longer on the same switch button.
If you are using Infrared commands, be aware that an SWC02I (2-button-switch with Infrared port) can NOT be used to program the IR commands – you can only use this one to give the commands. You need an SWC04 or a THI to program IR com

HabiTEQ System Manager Programming Guide - Version 1
- 95 -
10. FAQs
1. My computer does not get connected through USB.
Normally when the SW is installed the USB driver is installed automatically, but if this is not the case your computer will tell you once you connect to the controller that it is having trouble installing the USB device. When this happens please click on that message and select to install the driver from a list or specific location. In the next screen select to include this location in the search: C:\Program Files\HabiTEQ\CTD USB driver if you have left the program to install in the default location and if not select the location were you have installed the program and this specific folder. This way the system should connect properly
2. My computer does not get connected through Ethernet when connecting through direct wire.
If you have a firewall installed directly in your computer this needs to be set up to allow all traffic. If your PC has an automatic IP address assignation you may need to change this to a fixed IP with the same fields as explained in point 2.5.1
3. What happens if I program 2 contradictory schedules the same day at the same hour?
The last one in the list of schedules will be the one used. Example: Schedule1 is “bedroom light ON at 7:00 a.m” and Schedule 2 is “bedroom light OFF at 7:00 a.m” , the light will remain OFF at 7:00 a.m
4. The program has closed because a failure. Have I lost the configuration that I was programming?
The program may close if it detects some abnormality instead of getting hanged. You just need to open it again and click on yes when you are asked to start where previous session was interrupted.
5. The REL04, REL08, ROL02, ANA04, ANR04 modules don’t respond to the system.
The output modules have a manual mode that once has been activated does not answer to the orders of the system. You can disconnect this directly in the module (see datasheets) or by uploading the configuration again taking care that you select the “all modules” option.