gypsy user manual - cricutcontent.cricut.com/c/downloads/gypsyusermanual.pdf · mat screen basic...
TRANSCRIPT

Design AnywhereDESIGN ANYWHERE
DESIGN ANYWHERE
DESIGN ANYWHERE
DESIGN ANYWHEREDESIGN ANYWHERE
Design Anywhere
Design AnywhereDESIGN ANYWHEREDesign Anywere
DESIGN ANYWHEREDesign Anywhere
Design Anywhere
DESIGN ANYWHEREDesign Anywhere
Design Anywhere
Design Anywhere
DESIGN ANYWHERE
Design Anywhere
DESIGN ANYWHEREDESIGN ANYWHERE
Design Anywhere
GYPSYUSER MANUAL

CAUTION—RISK OF EXPLOSION IF BATTERY IS REPLACED BY INCORRECT TYPE. DISPOSE OF USED BATTERIES ACCORDING TO THE INSTRUCTIONS.
Lithium Ion batteries are classified by the federal government as non-hazardous waste and are safe for disposal in the normal municipal waste stream. These batteries, however, do con-tain recyclable materials and are accepted for recycling by the Rechargeable Battery Recycling Corporation’s (RBRC) Battery Recycling Program. Please call 1-800-8-BATTERY for information on recycling your used Lithium Ion battery or go to the RBRC website at http://www.rbrc.org/ (http://www.call2recycle.org/) for additional information.
Perchlorate Material—special handling may apply. See www.dtsc.ca.gov/hazardouswaste/per-chlorate.
Gypsy Version 1.3
Manual revision 1.0
The trademarks Gypsy™, Cricut®, Cricut DesignStudio®, Cricut Create®, Cricut Expression®, and related logos and graphics are trademarks and copyrighted works of Provo Craft and Novelty, Inc., and may not be used or reproduced without permission. © 2005–2009 All rights reserved.
Copyright ©2009 Provo Craft and Novelty, Inc. Spanish Fork, UT 84660All Rights Reserved.

iii© 2009 Provo Craft
Introduction . . . . . . . . . . . . . . . . . . . . . . . . . 1
What Is the Gypsy? . . . . . . . . . . . . . . . . . 1
How Is the Gypsy Different from Designing on Your Cricut®? . . . . . . . . . 1
How Can I Share Files between Cricut DesignStudio® and the Gypsy? . . . . . . 2
Transfering Files to and from the Gypsy . . . . . . . . . . . . . . . . . . . . . . . 2
Converting Files . . . . . . . . . . . . . . . . 3
Section 1: Basic Operational Instructions . . 4
Charging the Gypsy. . . . . . . . . . . . . . . . . 4
Checking Battery Life . . . . . . . . . . . . 4
Charging the Battery . . . . . . . . . . . . 4
Powering the Gypsy . . . . . . . . . . . . . . . . 4
Application Launcher . . . . . . . . . . . . . . . 5
Cricut® App . . . . . . . . . . . . . . . . . . . . 5
Photo App . . . . . . . . . . . . . . . . . . . . . 5
Settings . . . . . . . . . . . . . . . . . . . . . . . 6
Linking Cartridges . . . . . . . . . . . . . . . . . . 6
Updating . . . . . . . . . . . . . . . . . . . . . . . . . 7
Updating Your Gypsy . . . . . . . . . . . . 7
Updating Your Cricut® . . . . . . . . . . . 8
Getting Help . . . . . . . . . . . . . . . . . . . . . . 8
Troubleshooting . . . . . . . . . . . . . . . . . . . 8
Gypsy Locks Up. . . . . . . . . . . . . . . . . 8
Section 2: Using the Screens and Menus . . 9
Main Menu . . . . . . . . . . . . . . . . . . . . . . . 9
Cricut® App Screen . . . . . . . . . . . . . . . . 10
Mat Screen . . . . . . . . . . . . . . . . . . . . . . 10
Mat Screen Basic Menu . . . . . . . . 11
Mat Screen Advanced Menu . . . . . 13
Keypad Screen . . . . . . . . . . . . . . . . . . . 14
Search Screen . . . . . . . . . . . . . . . . . . . . 15
Cut Screen . . . . . . . . . . . . . . . . . . . . . . . 16
Section 3: Getting Started . . . . . . . . . . . . . 18
Starting a New File . . . . . . . . . . . . . . . . 18
Opening a Saved File . . . . . . . . . . . . . . 18
Opening a Saved File as a Template . . 18
Saving Files . . . . . . . . . . . . . . . . . . . . . . 19
Deleting Files. . . . . . . . . . . . . . . . . . . . . 19
Section 4: Adding Images to the Mat . . . . 21
Choosing a Cartridge . . . . . . . . . . . . . . 21
Selecting Images from the Keypad Screen. . . . . . . . . . . . . . . . . . . . . . . . . 21
Keys . . . . . . . . . . . . . . . . . . . . . . . . . 22
Image Queue . . . . . . . . . . . . . . . . . 22
Searching for Images . . . . . . . . . . . . . . 23
Using the Keyword Window . . . . . 23
Using the Keyboard Window . . . . . 24
Search Results Window . . . . . . . . . 24
Contents

Gypsy User Manual
iv © 2009 Provo Craft
Keypad Results Window. . . . . . . . . 25
Cartridge Window . . . . . . . . . . . . . 25
Using Layers . . . . . . . . . . . . . . . . . . . . . 25
Creating Layers . . . . . . . . . . . . . . . . 25
Selecting Layers . . . . . . . . . . . . . . . 26
Removing Layers. . . . . . . . . . . . . . . 26
Section 5: Viewing and Arranging Images . . 27
Viewing Images . . . . . . . . . . . . . . . . . . . 27
Zoom . . . . . . . . . . . . . . . . . . . . . . . . 27
Pan. . . . . . . . . . . . . . . . . . . . . . . . . . 27
Arranging Images . . . . . . . . . . . . . . . . . 27
Stylus . . . . . . . . . . . . . . . . . . . . . . . . 27
X/Y . . . . . . . . . . . . . . . . . . . . . . . . . . 27
Nudges . . . . . . . . . . . . . . . . . . . . . . 28
Move Arrows . . . . . . . . . . . . . . . . . 28
Kerning . . . . . . . . . . . . . . . . . . . . . . 28
Duplicate . . . . . . . . . . . . . . . . . . . . . 28
Grouping Images. . . . . . . . . . . . . . . . . . 28
Adding Images to a Group . . . . . . . 28
Making Changes to Individual Images in a Group . . . . . . . . . . . . 29
Removing Individual Images from a Group . . . . . . . . . . . . . . . . 29
Ungrouping Images. . . . . . . . . . . . . . . . 30
Deleting Images . . . . . . . . . . . . . . . . . . 30
Section 6: Transforming Images. . . . . . . . . 31
Sizing Images . . . . . . . . . . . . . . . . . . . . . 31
Width/Height . . . . . . . . . . . . . . . . . 31
Aspect Ratio Link . . . . . . . . . . . . . . 31
Relative/True Size . . . . . . . . . . . . . . 31
Size Buttons . . . . . . . . . . . . . . . . . . 32
Cursor . . . . . . . . . . . . . . . . . . . . . . . 32
Manipulating Images . . . . . . . . . . . . . . 32
Rotate . . . . . . . . . . . . . . . . . . . . . . . 32
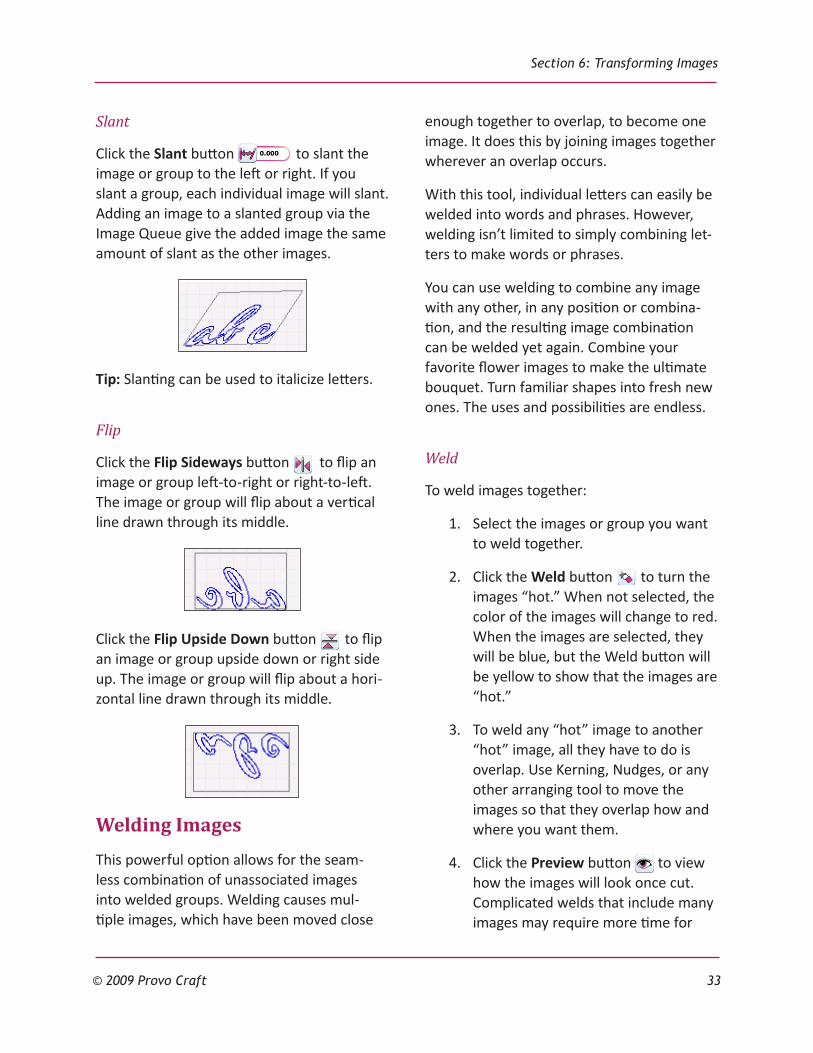
Slant. . . . . . . . . . . . . . . . . . . . . . . . . 33
Flip . . . . . . . . . . . . . . . . . . . . . . . . . . 33
Welding Images. . . . . . . . . . . . . . . . . . . 33
Weld . . . . . . . . . . . . . . . . . . . . . . . . 33
Mixed Weld. . . . . . . . . . . . . . . . . . . 34
Preview . . . . . . . . . . . . . . . . . . . . . . 34
Section 7: Cutting Images . . . . . . . . . . . . . . 35
Preparing to Cut . . . . . . . . . . . . . . . . . . 35
Connecting the Gypsy to Your Cricut® . . . . . . . . . . . . . . . . . . . . . 35
Load Mat . . . . . . . . . . . . . . . . . . . . . 35
Unload Mat . . . . . . . . . . . . . . . . . . . 35
Multi-Pass Cutting . . . . . . . . . . . . . 36
Cutting . . . . . . . . . . . . . . . . . . . . . . . . . . 36
Pause/Play. . . . . . . . . . . . . . . . . . . . 36
Stop . . . . . . . . . . . . . . . . . . . . . . . . . 36
Unload Mat . . . . . . . . . . . . . . . . . . . 36
Add to Design . . . . . . . . . . . . . . . . . 36
Return to Design. . . . . . . . . . . . . . . 37
Glossary . . . . . . . . . . . . . . . . . . . . . . . . . . . . 38

1© 2009 Provo Craft
Now that you own a Gypsy, the handheld design studio from Cricut®, prepare to enhance your creativity like never before. This manual will tell you everything you need to know—from turning it on to using the advanced design features—to maximize your usage of the Gypsy.
What Is the Gypsy?
The Gypsy is a portable personal design studio for use with your Cricut®. It allows you to store Cricut® cartridge content, design with that content, and then connect to your Cricut® to cut. It is expandable in functional-ity, and Provo Craft plans on releasing new software at a later date.
Here are just a few of the things you can do with the Gypsy:
Preview cartridge sets you don’t have •yet, and easily explore the cartridge sets you do have in various modes of organization. You can also use key-word descriptors to quickly locate just the right image.
Weld images together to make new •combinations; weld letters together to make words and phrases.
Change image properties, rotate, flip, •and weld.
Save your progress on the layouts •you’re creating, and reload them to pick up where you left off.
Create digital layouts of any and all •desired images before you cut them.
How Is the Gypsy Different from Designing on Your Cricut®?
The Gypsy allows you the freedom to design wherever you want. You can take your entire Cricut® cartridge library with you wherever you go. Design while you’re out at the doc-tor’s office, while you’re waiting in your car, or while you’re just sitting on the couch. When you have completed your design, con-nect the Gypsy to the Cricut® and cut.
The following is a list of some of the new fea-tures available with the Gypsy. Some of these can also be used with Cricut DesignStudio®.
See all your images without the use •of a manual or a keypad overlay. For example, when you click the Shift key the images on the keypad will change. No more flipping through the manual just to find the image you want.
Search images by keyword. All •cartridge images are viewable on the Gypsy, so you can even search and design with images you haven’t linked
Introduction
Gypsy User Manual
2 © 2009 Provo Craft
to your Gypsy because you haven’t purchased them yet.
Open existing saved designs as •templates that you can then use as a basis to create new designs.
How Can I Share Files between Cricut DesignStudio® and the Gypsy?
Have files saved with Cricut DesignStudio® (CDS) that you want to open on your Gyp-sy? No problem. The Gypsy can open files designed on CDS, and vise versa. The two products may not have the same features, but the files from both are compatible with each other.
Transfering Files to and from the Gypsy
When transferring files to and from the Gypsy, the file names should only contain the following characters: A–Z, 0–9, comma, period, hyphen, underscore, and space. You should also avoid file names that are over 64 characters in length.
Tip: You can transfer files while on any screen on the Gypsy, but we recommend that you only trasnfer files while on the Application Launcher screen to avoid problems.
PC:
Turn on the Gypsy and plug it into 1. your PC.
Launch Gypsy Sync Software.2.
After the software checks for 3. updates, you will see two windows and two buttons. In the folder win-dow, click on the “+” symbol next to the word Gypsy.
Click on 4. Designs. You will see all the designs that are currently on your Gypsy display in the file window on the right.
To transfer these files to your PC, 5. select a file(s) and click the Save Selected File(s) to PC button at the bottom of the screen. OR, to transfer files to your Gypsy, click the Upload File(s) to Gypsy button.
Tip: Any *.gypsy file with multiple layers that is transferred to a PC and opened in CDS will have all the layers combined into a single layer.
Mac:
Turn on the Gypsy and plug it into 1. your Mac.
Launch Gypsy Sync Software.2.
After the software checks for updates, 3. you will see a file list window.
To transfer these files to your Mac, 4. select a file(s) and drag it to the desktop. OR, to transfer files to your Gypsy, select the file(s) on your Mac and drag it to the file list window.

Introduction
3© 2009 Provo Craft
Converting Files
Conversion takes place in CDS. Files created in CDS are called *.cut files, and files created on the Gypsy are called *.gypsy files.
To convert file from *.gypsy to *.cut:
Open the *.gypsy file using a licensed 1. copy of CDS.
Click 2. File | Save As.
Change the file type to *.cut.3.
Change the file name.4.
Click 5. Save.
To convert file from*.cut to *.gypsy:
Open the *.cut file using a licensed 1. copy of CDS.
Click 2. File | Save As.
Change the file type to *.gypsy.3.
Change the file name.4.
Click 5. Save.
Tip: Any *.cut file containing images that have been slanted/skewed that is converted to a *.gypsy file will not cut properly on the Gypsy.

4 © 2009 Provo Craft
The Gypsy comes with everything you need to start designing and cutting immediately. Follow these instructions to learn about charging, using, and updating the Gypsy, as well as how to find more help if you need it.
Charging the Gypsy
Checking Battery Life
You can check how much battery life you have left by pushing the Menu button and viewing the battery life indicator in the top right corner of the Main Menu. You can also use the light on the right of the Gypsy near the power button as an indicator; it will flash red to alert you when the battery is low.
The battery will last about four hours with continuous use and up to eighteen hours with intermittent use. Battery life may vary depend-ing on how high the screen brightness is set.
Charging the Battery
To begin charging the Gypsy, plug the small end of the Charger Cable into the top of the Gypsy (next to the stylus) and the power supply into a wall outlet. For a description of each of the cables, check the glossary.
The battery will charge more quickly if the Gypsy is powered off while charging. The
battery should be about 90 percent charged within two and a half hours if the Gypsy is not powered on. If the Gypsy is running while the battery is charging, the charge time can take twice as long.
Tip: If your battery dies during use, your project will be saved automatically. Plug in your Gypsy and click Cricut® App | Open to recover your file.
Powering the Gypsy
Push and hold the button on the right side of the Gypsy to turn it on. You will see a blue light as the Gypsy turns on, and a loading screen will display.
The first time you turn on the Gypsy, the End User License Agreement will display. Use the scroll bar on the right to scroll through the entire document. Click the I Agree button to continue.
Next, the warranty will appear. After you have read the warranty, click OK.
Section 1: Basic Operational Instructions

Section 1: Basic Operational Instructions
5© 2009 Provo Craft
To turn off the Gypsy, push and hold the power button. You will be given the option of clicking the Stand-By or Turn Off button, or you can click the Cancel button to return to the previous screen without choosing either option.
If you are working on a design that has unsaved information, you will be asked if you want to save your design before exiting. You will be given the option of clicking the Save or Don’t Save button, or you can click the Cancel button to return to the previous screen without choosing either option.
Application Launcher
The Application Launcher is the first screen that will normally appear on the Gypsy. This screen gives you the option of navigating to the Cri-cut® App, the Photo App, or the Gypsy Settings.
Cricut® App
Click the Cricut® App button to view the Cricut® App Screen and begin designing.
Photo App
Click the Photo App button to go to the Photo Application. The Photo App allows you to store, view, and sort your photos. To load photos onto your Gypsy, you will need to use the Gypsy Sync Softare.
Once you have loaded your photos, you can choose to view them by list , thumbnail
, or full page using the buttons in the top right corner.
You can change the order in which your pho-tos appear by clicking the arrow next to the drop down box. To change the category by which your photos organized, click the drop down box and select a different category. To permanently delete a photo from the Gypsy, click Remove.
You can create a list of favorite photos by selecting a photo and clicking the Add to Favorites button. You will automatically be brought to the Favorites window where you can view the list of your favorite photos. To

Gypsy User Manual
6 © 2009 Provo Craft
remove a photo from your Favorites, click Remove while you are on the Favorites win-dow. Click All Photos to return to the com-plete list of photos.
Settings
Click the Settings button to change spe-cific Gypsy settings. The Settings menu will appear and allow you to make changes to the following settings:
Screen Brightness. Use the up and down arrows to adjust.
Screensaver Timeout. Use the up and down arrows to adjust.
Set Date and Time. You can set the date and time, toggle the Auto Adjust for Daylight Savings button on (yellow) or off (white), and toggle the time as am or pm.
Calibrate Screen. If your calibration becomes misaligned, click this button. A blue screen will appear with a crosshair (+). Use your sty-lus to touch the screen at the center of the crosshair. Repeat this action as the crosshair reappears in other locations on the screen. You will be automatically returned to the Set-tings menu when the calibration is complete.
Right-hand/Left-hand Mode. The Gypsy can be used in either right- or left-hand mode by toggling the circles next to those settings. The default is right-hand mode.
EULA. Click on this button to view the End User License Agreement (EULA). Click OK to exit this screen and return to the Settings menu.
Warranty. Click on this button to view the Gypsy’s warranty information. Click OK to exit this screen and return to the Settings menu.
Linking Cartridges
The Gypsy comes preloaded with previews of all Cricut® cartridges available at the time of production. Updates will be available from www.provocraft.com/gypsy as new cartridg-es are released. While the Gypsy will contain all cartridges and allow you to design with them, you will be able to cut with only those cartridges you have purchased and linked to your Gypsy.
The Gypsy comes with two cartridges (or art-work sets) already authorized to be cut using your Gypsy. These cartridges are Gypsy Font and Gypsy Wanderings. There are no physical cartridges included with your Gypsy. These two cartridges exist in electronic form only on the Gypsy. If you discover other cartridges you like, you can purchase them at www.Cri-cut.com. You will then be able to link those cartridges to the Gypsy and cut the designs that use them.
Before you can cut, you need to link the cartridges used in your design to the Gypsy.

Section 1: Basic Operational Instructions
7© 2009 Provo Craft
Linking is simple and needs to be done only once per cartridge. The Gypsy can store up to 7,000 cartridges (based on cartridge size of currently shipping cartridges) and up to 10,000 of your own custom projects (based on a files size of 350 KB), so you don’t need to worry about running out of space.
Using the Cartridge Link Cable that comes with Gypsy, connect your cartridges to the Gypsy one at a time and link them to the Gypsy. The act of linking allows you to cut all the artwork from linked cartridges from your Gypsy without having to connect the cartridge again to the Gypsy or your Cricut®. It also allows you to cut the cartridge’s con-tent on a Cricut® without the cartridge being present.
To link a cartridge to the Gypsy:
Plug the Cartridge Link Cable that 1. came with the Gypsy into both the Gypsy and the cartridge. For a description of each of the cables, check the glossary.
Turn on the Gypsy. 2.
From the Application Launcher, click 3. the Cricut® App button to get to the Cricut® App Screen, OR the push the Menu button (physical button to the right of the screen) from any screen to get to the Main Menu.
From either of these screens, click the 4. Link Cartridge button .
When the linking is complete, a mes-5. sage will display informing you that the link was successful. Click OK.
After linking, your cartridge will 6. continue to function as normal and should be stored as backup.
Cartridges can be linked to only one Gypsy. The unique serial number on your Gypsy is copied to the cartridge. This links your car-tridge to your Gypsy, preventing it from being linked to another Gypsy.
The cartridge will continue to work in all of your existing Cricut® products and should be stored for backup in case something were to happen to your Gypsy. Linking cartridges allows you to use the content on your Gypsy or Cricut® without your cartridge being present.
Updating
Updating is important for getting the most out of your Provo Craft products. Updating can give you access to new applications and cartridges, solutions to bugs in the system, and information about other improvements. To see the newest features, update often.
Updating Your Gypsy
Periodically, Provo Craft will release updates to the Gypsy. As you update the Gypsy, Provo Craft will automatically add this new content to your Gypsy cartridge library so you can preview it and design with it.
You will need a computer with an Internet connection to update the Gypsy. You can use either a Mac or PC.
To update the Gypsy:
Download the Gypsy Sync Software 1.

Gypsy User Manual
8 © 2009 Provo Craft
from www.provocraft.com/gypsy onto your computer.
Connect the Gypsy to your com-2. puter using the Computer Connector Cable. For a description of each of the cables, check the glossary.
Run the sync software that you down-3. loaded. Instruction for what to do next will be on the website.
Updating Your Cricut®
You can update your Cricut® by connecting it to your Gypsy.
Connect your Cricut® to your Gypsy 1. with the Cricut® Connector Cable.
Click the 2. Update your Cricut® button from the Cricut® App Screen or
the Main Menu.
You will then be asked some ques-3. tions about your Cricut® and guided through the update process.
Getting Help
For help information, you can click the Help button from the Cricut® App Screen or push the Menu button | Help button at any time.
The Help button will give you access to help information, such as explaining what each screen and button can do. The help information provided is specific to the screen you were viewing when you pressed the Help button. Help information is not available from some screens.
You can also check out our webpage, email us, and view frequently asked questions at www.provocraft.com/gypsy/. Or you can call our Customer Support line at 866-716-2260.
Troubleshooting
Gypsy Locks Up
If the Gypsy locks up during use, press the reset button on the back of the Gypsy. Unscrew the top of the stylus to use the tool inside designed to push the reset button.

9© 2009 Provo Craft
The Gypsy has a Main Menu that you can access from any screen by pushing the Menu button. The Main Menu will give you access to different features depending on what screen you were viewing when you pushed the Menu button.
The Gypsy also has five main screens: the Cricut® App Screen; the Mat Screen, which includes Basic and Advanced menus; the Key-pad Screen; the Search Screen; and the Cut Screen. This section gives a general descrip-tion of how to use each menu and screen.
Main Menu
Push the Menu button located to the right of the Gypsy’s screen at any time to open the Main Menu.
This menu will give you access to many fea-tures, allow you to check your battery level, and provide you with help information. Not
all features are available on all screens.
Many of the buttons found on the Main Menu are also found on the Cricut® App Screen. The following are unique to the Main Menu:
Save: Click this button to save your design.
Save As: Click this button to save your design with a new name.
Battery Life Indicator: This indicator lets you know how much approximate life is left on your battery. If the icon is yellow without any bars inside, you are almost out of battery power and should plug the Gypsy into a power supply to recharge it.
Settings: Click this button to change specific Gypsy settings.
Change Mat Size: Click this but-ton to change the mat size.
Click the Cancel button to exit the Main Menu and return to the screen you were previously on.
Section 2: Using the Screens and Menus

Gypsy User Manual
10 © 2009 Provo Craft
Cricut® App Screen
The Cricut® App Screen helps you get started every time you turn on the Gypsy. You will see the following buttons on this screen:
New: Click this button to start creating a design.
Open: Click this button to open a previously saved file.
Open as Template: Click this button to open a previously saved file as a template, which will make images in the saved file un-editable while allowing you to add new images to the design. Un-editable images can-not be deleted or cut.
Delete File: Click this button to select a file to delete.
Link Cartridge: Click this button to link a cartridge to your Gypsy. This allows you to cut the car-tridge’s content on a Cricut® with-out the cartridge being present.
Update Your Cricut®: Click this button to update your Cricut®.
Help: Click this button to access help information.
Exit Program: Click this button to exit the program.
Mat Screen
The Mat Screen is where you create your design. On the right-hand side of the Mat Screen, you can view either the Basic or Advanced menu. These menus contain the tools needed to make your design. You can click on the Basic or Advanced tab in the top right corner to switch between the two menus.

Section 2: Using the Screens and Menus
11© 2009 Provo Craft
Mat Screen Basic Menu
The Mat Screen Basic Menu includes the fol-lowing buttons and tools:
Zoom: Push and hold this button and tap anywhere on the mat to zoom in. To zoom out, push and release the Zoom button with-out touching the screen. You can hold down the Zoom button and tap a key on the Keypad Screen to view a full page preview of the image. And on screens where you are shown a verti-cal list of files or cartridges, you can use this button to scroll up through the list.
Pan: While zoomed in, push and hold the Pan button while dragging the stylus to move the mat view in any direction. You can also pan by simply dragging the stylus on an empty part of the zoomed in mat. On screens where you are shown a vertical list of files or cartridges, you can use this button to scroll down through the list.
Add Layer: Click this button to add a layer to your current design. To remove a layer, clear the layer of all shapes, and then save, close, and reopen the design.
Select Layer: This button is only visible if there is more than one layer in the design. The number shown inside this button is the currently active layer. Click this button to switch between the different layers in your design.
Inches/mm: Click on one of these two fields to dis-play all values in inches or in millimeters.
X/Y: Click on one of these two fields to change where the image, group, or cursor is located on the mat.
Width/Height: Click on one of these two fields to change the width or height of the image or group selected or the height of the cursor.
Aspect Ratio Link: Click this button to toggle it on (yellow) or off (white). When highlighted yellow, this feature ensures that your image doesn’t get stretched disproportionately. When you change the width of an image, the height is automat-ically changed, and vice versa.

Gypsy User Manual
12 © 2009 Provo Craft
Group: Click this button to tog-gle it on (yellow) or off (white). This feature allows you to take images or groups of images and join them into a single group.
Ungroup: Click this button to separate all images in a group into individual images.
Delete: Click this button to delete an image or group.
Undo: Click this button to undo your last command. If you click this button a second time, it will redo what was just undone.
Relative/True Size: Click this button to toggle on Relative Size mode (white), which allows you to control the size of images in relation to the size of the key height character, or True Size mode (yellow), which allows you to control the exact size of images without regard to the key height character.
Cut: Click this button when you are ready to cut. The display will zoom out to show the entire mat, and the Cut Screen will appear. When you click this button, all images from unlinked cartridges will change color to brown.
Navigation Arrows: Click on any one of these arrows to move a highlighted image or group in small increments. If nothing is highlighted, the cursor will move.
Size Buttons: Click either of these two circles to change the size of any highlighted image or group in small increments. If nothing is highlighted, the cur-sor will change size.
Keypad: Click this button to view the keypad. If an image or group is highlighted when you click this button, the highlighted image or group will be placed in the Image Queue on the Keypad Screen.
10 Key: Click this button to view a 10 key that will allow you to enter precise numeric values. This button is visible only if you have clicked on a field with a numeric value in it.
Small Nudge: Click this button to change the value of the selected field in small increments. This button is visible only when the 10 Key button is visible.

Section 2: Using the Screens and Menus
13© 2009 Provo Craft
Large Nudge: Click this button to change the value of the selected field in large increments. This button is visible only when the 10 Key button is visible.
Mat Screen Advanced Menu
Many of the buttons found on the Mat Screen Advanced Menu are also found on the Mat Screen Basic Menu.
The following buttons and tools are unique to the Advanced Menu:
Kerning: Click this button to change the spacing between images. A negative value will decrease the spacing between images, and a positive value will increase the spacing. Kerning works only on groups of images.Rotate: Click this button to rotate the image or group about its center point.
Slant: Click this button to slant the image or group to the left or right.
Duplicate. Click this button to duplicate the selected image or group.
Preview: Click this button to see how your welded images will look when cut. Anything shown in gray on a “hot” image will not be cut. The images turn gray as the preview nears completion.
Weld/Weld On/Mixed Weld: Click this button to join overlap-ping images so they cut as one single image. Select an image or group and then click the Weld button to turn it “hot.” When not selected, the color of the image or group will change to red. When the image or group is selected, it will be blue, but the Weld button will be yellow to show that this image or group is “hot.” To weld any “hot” image to another image, all they have to do is overlap.
Flip Sideways: Click this button to flip an image or group left-to-right or right-to-left. The image or group will flip about a vertical line drawn through its middle.
Flip Upside Down: Click this button to flip an image or group upside down or right side up. The image or group will flip about a horizontal line drawn through its middle.

Gypsy User Manual
14 © 2009 Provo Craft
Keypad Screen
To access the Keypad screen, you must be in the Mat Screen. Click the Keypad button
to get to the Keypad Screen. You can use this screen to view and add images to the mat.
The Keypad Screen includes the following buttons and keys:
Image Queue: When images are selected from the Image Keys (white keys) they appear in the Image Queue in the order in which they were entered. When the Mat button is selected, the image(s) in the queue will be transferred to the mat.
Image Keys: Click one of these white keys to select an image and place it in the Image Queue. The images shown on these keys will change if any of the purple Function Keys or the Shift Key are active (orange).
Function Keys: Click one of these six purple keys to change the images on the Image Keys to show different creative features (shadow, bold, etc.). Only one key can be active (orange) at a time.
Shift Key: Click this key to change the images on the Image Keys. For example, lower case letters on the Image Keys will change to upper case letters when the Shift Key is active (orange).
Space: Click this key to enter a space in the Image Queue.
Backspace: Click this key to delete an image from the Image Queue.
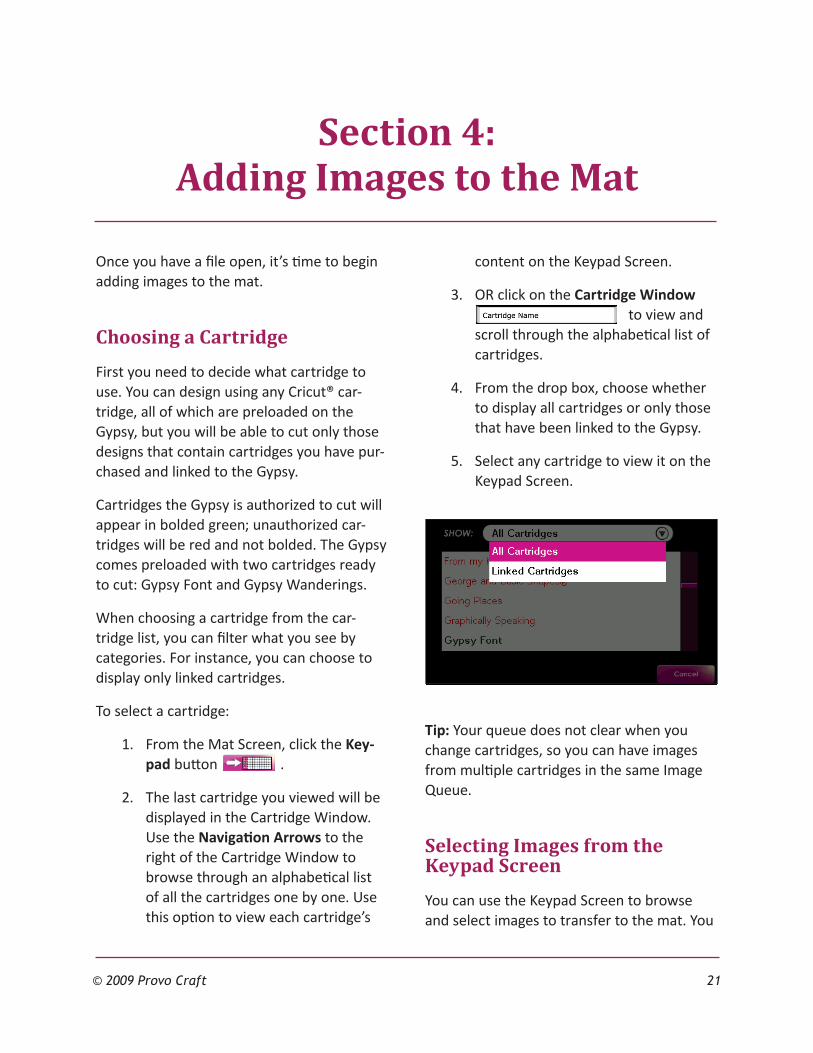
Cartridge Window: Click on this window to select any Cricut® cartridge and view it on the Keypad Screen. Cartridges the Gypsy is authorized to cut will appear in bolded green; unau-thorized cartridges will be red and not bolded. When selecting a cartridge from the list of avail-able cartridges, you can filter the cartridges that display by clicking the button at the top of the screen and selecting a filter category.

Section 2: Using the Screens and Menus
15© 2009 Provo Craft
Navigation Arrows: Click on these arrows to move alphabeti-cally through the entire list of cartridges.
Search: Click this button to search all images in the Cricut® cartridge library by keyword.
Mat Button: Click this button to move the images in your Image Queue to the Mat Screen.
Search Screen
Click the Search button , which is acces-sible through the Keypad Screen, to get to the Search Screen. You can use this screen to search for images. The Search Screen includes the following buttons and windows:
Keyword Window: While dis-playing “(keyword),” click on this window to select a letter from A–Z. While displaying a keyword, click on this window to see a list of all the keywords that matched the search term you entered previously.
Keyboard Button: Click this but-ton at any time to type a key-word instead of selecting one from a list.
Search Results Window: Click on an image to have it imme-diately added to your Image Queue. Click on a cartridge name to be taken to the Keypad Results Window.
Keypad Results Window: When you select a cartridge from the Search Results Window, that cartridge will appear in a dark-ened view of the Keypad Screen. The image that matches the keyword you searched for will appear in white, and all other images will be grayed out. Use the Navigation Arrows to scroll through the results. Only one match will be shown at a time.
Gypsy User Manual
16 © 2009 Provo Craft
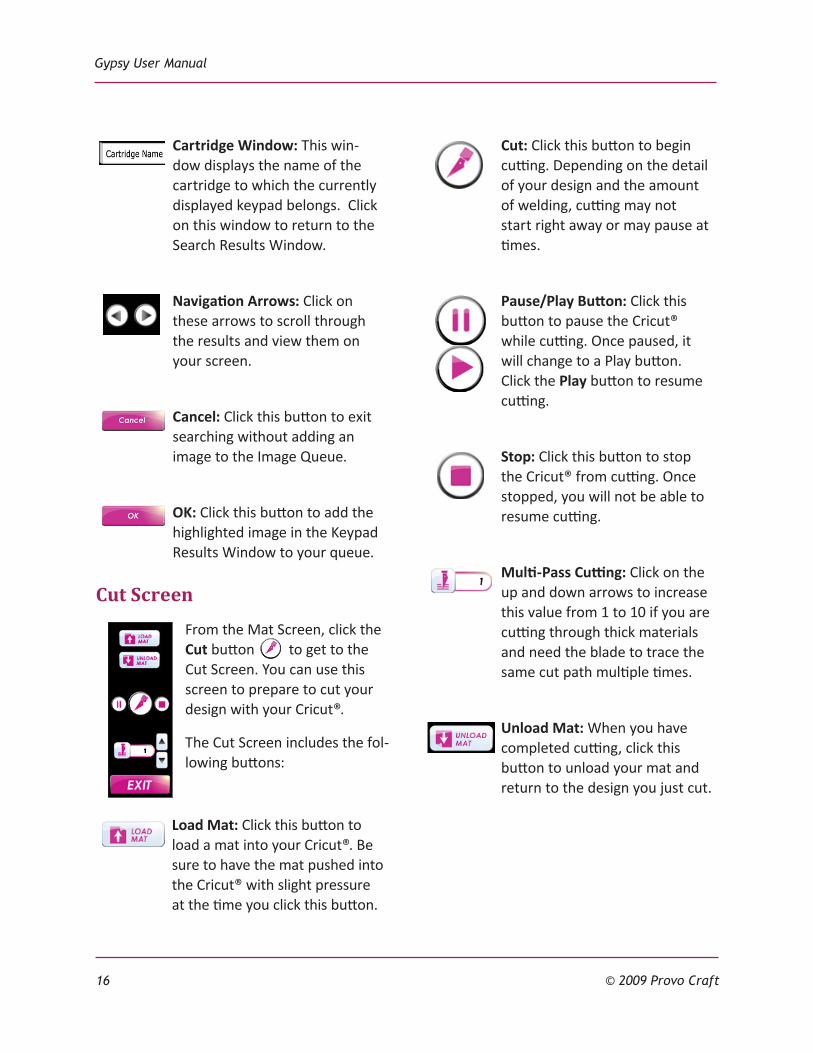
Cartridge Window: This win-dow displays the name of the cartridge to which the currently displayed keypad belongs. Click on this window to return to the Search Results Window.
Navigation Arrows: Click on these arrows to scroll through the results and view them on your screen.
Cancel: Click this button to exit searching without adding an image to the Image Queue.
OK: Click this button to add the highlighted image in the Keypad Results Window to your queue.
Cut Screen
From the Mat Screen, click the Cut button to get to the Cut Screen. You can use this screen to prepare to cut your design with your Cricut®.
The Cut Screen includes the fol-lowing buttons:
Load Mat: Click this button to load a mat into your Cricut®. Be sure to have the mat pushed into the Cricut® with slight pressure at the time you click this button.
Cut: Click this button to begin cutting. Depending on the detail of your design and the amount of welding, cutting may not start right away or may pause at times.
Pause/Play Button: Click this button to pause the Cricut® while cutting. Once paused, it will change to a Play button. Click the Play button to resume cutting.
Stop: Click this button to stop the Cricut® from cutting. Once stopped, you will not be able to resume cutting.
Multi-Pass Cutting: Click on the up and down arrows to increase this value from 1 to 10 if you are cutting through thick materials and need the blade to trace the same cut path multiple times.
Unload Mat: When you have completed cutting, click this button to unload your mat and return to the design you just cut.

Section 2: Using the Screens and Menus
17© 2009 Provo Craft
Add to Design: After cutting, click this button to leave the mat in the Cricut® and return to the design you just cut. You will not be able to change or re-cut the image(s) in the design you just completed cutting.
Return to Design: After cutting, click this button to leave the mat in the Cricut® and return you to the design you just cut. The design will be fully editable, and the entire design will be cut again.
Exit: Click this button to exit the Cut Screen.

18 © 2009 Provo Craft
After you have charged and turned on your Gypsy, click the Cricut® App button from the Application Launcher to begin working with your design.
Starting a New File
To start a new file:
From the Cricut® App Screen or the 1. Main Menu, click the New button to start creating a design.
The next screen will list three mat 2. sizes to choose from (12” x 6”, 12” x 12”, and 24” x 12”). Click one of the mat sizes to select it. You will auto-matically be brought to the Mat Screen with the size of mat you have selected displayed.
To return to the previous screen with-3. out selecting a mat size, click Cancel.
Tip: If at any time you want to change the size of your mat, push the Menu button | Change Mat Size, and then select a new mat size.
Opening a Saved File
To open a previously saved file:
From the Cricut® App Screen or the 1. Main Menu, click the Open button .
A list of your previously saved files 2. will display. Scroll through the list and select the file you wish to open; then click OK.
To return to the previous screen with-3. out opening a file, click Cancel.
Opening a Saved File as a Template
Opening a previously saved file as a template will make images in the saved file un-edit-able while allowing you to add new images to the design. Only the additional images will cut; the un-editable images cannot be deleted.
To open a previously saved file as a template:
From the Cricut® App Screen or the 1. Main Menu, click the Open as Tem-plate button .
Section 3: Getting Started

Section 3: Getting Started
19© 2009 Provo Craft
A list of your previously saved files 2. will display. Scroll through the list and select the file you wish to open. You can preview any file before making a selection.
Click 3. OK. Or to return to the previous screen without opening a file, click Cancel.
Saving Files
The Gypsy has plenty of space to save all your designs. You may want to save your design before turning off the Gypsy, save your design as you add to it or change it, or simply save different versions of your design with a new name. Remember to save your work often.
The first time you save your project, you can click Save or Save As, but both buttons will bring you to the Save As screen where you will be asked to name your project file. You can also use the Save As button to save dif-ferent versions of your file with a new name.
To save your design for the first time or under a new name:
Push the 1. Menu button.
Click the 2. Save As button . A key-board will appear.
Click the keys on this screen to give 3. your project a name.
Click 4. OK.
Once you have named and saved your file, you can click the Save button at any time to save any additional progress, updates, or adjustments you have made to your project.
Using the Save button overwrites your origi-nal project with the current, modified proj-ect. If you don’t want to lose the project in its original state, use Save As instead of Save and give the modified project a different file name.
Tip: If you press the power button to turn off the Gypsy while you are working on a design that has unsaved information, you will be asked if you want to save your design before exiting. You will be given the option of clicking the Save or Don’t Save buttons, or you can click the Cancel button to return to the previous screen without choosing either option.
Tip: If your battery dies during use, your proj-ect will be saved automatically. Simply plug in the Gypsy and click the Cricut® App button to resume working on the file.
Deleting Files
While the Gypsy has plenty of space to store all of your designs, you may want to delete a previously saved design. There is no way to recover deleted files.
If you have not yet saved your design and decide you do not want to keep it, you do not need to delete the file. You can simply move on to another project without saving the file.
To delete a file:
From the Cricut® App Screen or the 1. Main Menu, click the Delete button
.
A list of your previously saved files 2. will display. Scroll through the list and
Gypsy User Manual
20 © 2009 Provo Craft
select the file you want to delete. A preview of the file will display on the right so you can view the file before making a selection.
Click 3. Delete. Or to return to the previ-ous screen without deleting a file, click Exit.
Once you have clicked Delete, you will 4. be asked if you want to permanently delete this file. Click Yes to delete the file, or click No to return to the previ-ous screen.
21© 2009 Provo Craft
Once you have a file open, it’s time to begin adding images to the mat.
Choosing a Cartridge
First you need to decide what cartridge to use. You can design using any Cricut® car-tridge, all of which are preloaded on the Gypsy, but you will be able to cut only those designs that contain cartridges you have pur-chased and linked to the Gypsy.
Cartridges the Gypsy is authorized to cut will appear in bolded green; unauthorized car-tridges will be red and not bolded. The Gypsy comes preloaded with two cartridges ready to cut: Gypsy Font and Gypsy Wanderings.
When choosing a cartridge from the car-tridge list, you can filter what you see by categories. For instance, you can choose to display only linked cartridges.
To select a cartridge:
From the Mat Screen, click the 1. Key-pad button .
The last cartridge you viewed will be 2. displayed in the Cartridge Window. Use the Navigation Arrows to the right of the Cartridge Window to browse through an alphabetical list of all the cartridges one by one. Use this option to view each cartridge’s
content on the Keypad Screen.
OR click on the 3. Cartridge Window to view and
scroll through the alphabetical list of cartridges.
From the drop box, choose whether 4. to display all cartridges or only those that have been linked to the Gypsy.
Select any cartridge to view it on the 5. Keypad Screen.
Tip: Your queue does not clear when you change cartridges, so you can have images from multiple cartridges in the same Image Queue.
Selecting Images from the Keypad Screen
You can use the Keypad Screen to browse and select images to transfer to the mat. You
Section 4: Adding Images to the Mat

Gypsy User Manual
22 © 2009 Provo Craft
will not lose any of your design when you leave the Mat Screen, and you can return to the Mat Screen at any time.
When you enter the Keypad Screen, the last keypad that you used will be displayed. The Function Keys and Shift Key will also be displayed.
From the Mat Screen, click the 1. Key-pad button to view the keypad.
Click on any white 2. Image Key to add that image to the Image Queue. You can also use the purple Function Keys and the Shift Key to change what images appear on the Image Keys.
Once you have added the images you 3. want to the Image Queue, click the Mat button to transfer those images to the mat.
Keys
The Keypad Screen contains Image Keys, Function Keys and the Shift Key.
In some cartridges, not all the keys contain images. If a key does not contain an image, the key will be blacked out.
Image Keys . Click one of these white keys to select an image and place it in the Image Queue. The images shown on these keys will change if any of the purple Function Keys or Shift Key are active (orange).
If you are having trouble seeing the detail on an image, click and hold the key down to see an enlarged view of the image, or hold down the Zoom button and tap the key on the
Keypad Screen to view a full page preview of the image. You can also go to the Mat Screen and zoom in on the image or make the image larger.
Function Keys . Click one of these six purple keys to change the images on the Image Keys to show different creative fea-tures (shadow, bold, etc.). Only one key can be active (orange) at a time.
The functions on these keys will vary based on which cartridge is selected. The key’s function is written at the top of each key. Not all cartridges contain a full set of Function Keys.
Shift Key . Click this key to change the images on the Image Keys. For example, lower case letters on the Image Keys will change to upper case letters when the Shift Key is active (orange).
Image Queue
When images are selected from the Image Keys (white keys), they appear in the Image Queue in the order in which they were entered.
When you click the Mat button , the image(s) in the queue will be transferred to the mat. If there is more than one image in the queue, the images will be placed on the mat in a group.
Section 4: Adding Images to the Mat
23© 2009 Provo Craft
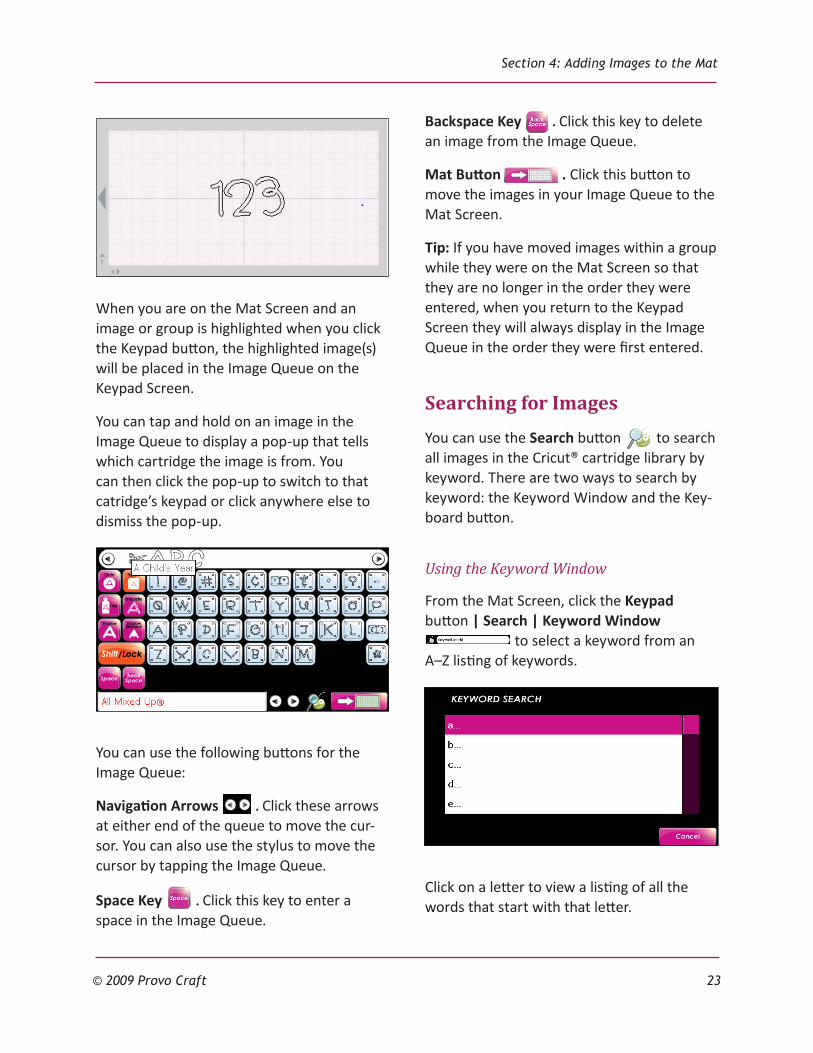
When you are on the Mat Screen and an image or group is highlighted when you click the Keypad button, the highlighted image(s) will be placed in the Image Queue on the Keypad Screen.
You can tap and hold on an image in the Image Queue to display a pop-up that tells which cartridge the image is from. You can then click the pop-up to switch to that catridge’s keypad or click anywhere else to dismiss the pop-up.
You can use the following buttons for the Image Queue:
Navigation Arrows . Click these arrows at either end of the queue to move the cur-sor. You can also use the stylus to move the cursor by tapping the Image Queue.
Space Key . Click this key to enter a space in the Image Queue.
Backspace Key . Click this key to delete an image from the Image Queue.
Mat Button . Click this button to move the images in your Image Queue to the Mat Screen.
Tip: If you have moved images within a group while they were on the Mat Screen so that they are no longer in the order they were entered, when you return to the Keypad Screen they will always display in the Image Queue in the order they were first entered.
Searching for Images
You can use the Search button to search all images in the Cricut® cartridge library by keyword. There are two ways to search by keyword: the Keyword Window and the Key-board button.
Using the Keyword Window
From the Mat Screen, click the Keypad button | Search | Keyword Window
to select a keyword from an A–Z listing of keywords.
Click on a letter to view a listing of all the words that start with that letter.

Gypsy User Manual
24 © 2009 Provo Craft
To return to an A–Z listing, scroll to the bot-tom of the list and click Index. To exit the A–Z list without selecting a keyword, click Cancel.
Using the Keyboard Window
From the Mat Screen, click the Keypad but-ton | Search | Keyboard button at any time to type a keyword instead of select-ing one from a list.
If an exact match is found, a list of the images that match the keyword you searched for will display on the Search Results Window, along with the name of the cartridge in which the image can be found. You can click on an image to add it directly to the Image Queue, or you can click on the cartridge name to view it in the Keypad Results Window.
If an exact match is not found, you will be shown a list of possible matches to choose from.
Tip: Searching is case sensitive. All keywords are currently lower case.
Search Results Window
The Search Results Window is the window that will appear to display the matching results to your image search.
You can click on an image in the Search Results Window to have it immediately added to your Image Queue. Or you can click on a cartridge name to be taken to the Key-pad Results Window, where you will be able to see the entire keypad to which the corre-sponding image belongs. Cartridges that you have not linked to the Gypsy will be grayed out, and cartridges that have been linked will appear bolded.

Section 4: Adding Images to the Mat
25© 2009 Provo Craft
Keypad Results Window
The Keypad Results Window will display when you select an image from the Search Results Window. A darkened view of that image’s cartridge will display on the keypad. The image that matches the keyword you searched for will appear in white, and all other images will be grayed out. Only one match will be shown at a time.
Click OK to add the highlighted image in the Keypad Results Window to the Image Queue and return to the Keypad Screen. The Keypad Screen will now display the keypad for which-ever cartridge was showing in the Keypad Results Window (with the appropriate Func-tion Keys and Shift Key active) at the time you clicked OK.
If you want to see more search results, simply click the Search button. The Search Screen will remember the last search you executed until you exit the Cricut® App, and you can resume scrolling through the results using the Navigation Arrows or by clicking on the Cartridge Window to return to the Search Results Window.
Click Cancel to exit searching without adding an image to the Image Queue.
Cartridge Window
This window displays the name of the car-tridge to which the currently displayed key-pad belongs. Click on the Cartridge Window
to return to the Search Results Window.
Click on the Navigation Arrows to scroll through the results and view them on your screen. Some cartridges may have multiple matches.
Using Layers
Layers can be useful for separating the colors of your design onto different mats. For exam-ple, if you are going to cut some red and blue shapes, put all the red shapes on one layer and all the blue shapes on another layer. This will allow you to see all the red and blue shapes in your design at the same time and easily cut the different colors.
Creating Layers
In the top left corner of the Mat Screen, you will see the Add Layer button . Click this button to add new layers to your design. You can have up to 10 layers, at which point the Add Layer button will no longer display.

Gypsy User Manual
26 © 2009 Provo Craft
Selecting Layers
Once you have clicked the Add Layer button, a number will appear in the top right corner of your screen. The number shown inside this button is the currently active layer. This button is only visible if there is more than one layer in the design. Click the Select Layer button to switch between different layers in your design.
You can only edit images when you are on the layer where that image is located. Images on a different layer will be grayed out.
When cutting, only the active layer will cut. Use the Layers feature to group colors of the
same shape onto a single layer so that they can easily be cut at the same time.
Tip: If you would like to duplicate a shape or group from one layer to a different layer, go to the layer with the shape or group you want to copy. Highlight the shape or group. Switch to the layer where you want to put the duplicated shape or group. Then click the Duplicate button.
Removing Layers
To remove a layer, clear the layer of all shapes, and then save, close, and reopen the design.

27© 2009 Provo Craft
Now that you have added images to the mat, it’s time to begin working on your design. Use the following tools and features to view, move, and group the images on the mat.
Viewing Images
To get a closer look at the image(s) you have placed on the mat, use the Zoom and Pan buttons.
Zoom
Push and hold the Zoom button and tap any-where on the mat to zoom in. The window will center the zoom to wherever you tap. To zoom out, push and release the Zoom button without touching the screen. You can also hold down the Zoom button and tap a key on the keypad screen view a full page preview of the image.
Tip: On screens where you are shown a verti-cal list of files or cartridges, you can use this button to scroll up through the list.
Pan
While zoomed in, you can drag the stylus on empty mat area to move the mat view in any direction. If you accidentally select and move images instead of panning, you can push and hold the Pan button (located to the left of
your screen beneath the Zoom button) while dragging the stylus to pan the mat.
Tip: On screens where you are shown a verti-cal list of files or cartridges, you can use this button to scroll down through the list.
Arranging Images
Placement of your images on the mat is impor-tant for both style and paper usage reasons. The Gypsy has several tools to allow you to place your image precisely where you want it.
Tip: Click the Undo button to undo your last command. If you click this button a sec-ond time, it will redo what was just undone. If you exit the Mat Screen, you will lose your ability to undo any commands.
Stylus
The simplest way to arrange images is to select an image or group with your stylus and then gently move the stylus to the new loca-tion with the stylus touching the screen the whole way there. When the stylus leaves the screen, the image or group will stop moving.
X/Y
When precision is important, click on the X or Y field to enter an exact location
Section 5: Viewing and Arranging Images

Gypsy User Manual
28 © 2009 Provo Craft
of the image, group, or cursor on the mat. The X field indicates the distance from the left side of the mat, and the Y field indicates the distance from the top of the mat. The location of an image is based on the bottom left of the image.
Tip: Click the 10 Key button to view a 10 key that will allow you to enter precise numer-ic values. This button is only visible if you have clicked on a field with a numeric value in it.
Tip: Click on the Inches or mm fields to display all values in either inches
or in millimeters.
Nudges
The Nudge buttons are visible only when the 10 Key button is visible.
Click the Small Nudge buttons to change the value of the selected field in small increments.
Click the Large Nudge buttons to change the value of the selected field in large increments.
Move Arrows
Click on any one of the Move Arrows to move a highlighted image or group in small increments. If nothing is highlighted, the cursor will move.
Tip: To move a highlighted image or group large distances, hold down these arrows. You can also move a highlighted image or group by dragging it across the mat using your stylus.
Kerning
Click the Kern button to change the spacing between images. A negative value will decrease the spacing between images, and a positive value will increase the spacing. Kerning works only on groups of images.
Tip: Kerning can also help you fit a few extra characters on the mat if you need to save space.
Duplicate
Click the Duplicate button to duplicate the selected image or group.
Grouping Images
The grouping feature allows you to take images or groups of images and join them into a single group. When images are grouped, they will be surrounded by a single bounding box for the entire group instead of separate boxes for each image.
Tip: Images entered from the keypad all at once are automatically assigned to the same group.
Adding Images to a Group
Grouping images can be useful for resizing and moving multiple images at one time instead of having to do the same thing for each individual image.

Section 5: Viewing and Arranging Images
29© 2009 Provo Craft
For instance, you can group all the letters in one word together and then increase the size of the whole word at once, or you can group all the images used together in a weld and move it to another location on the mat.
To group images:
Click the 1. Group button to toggle it on (yellow).
Select all the images or groups of 2. images you would like to join. Images will turn blue as you add them to the group.
Tip: Grouping can be very helpful when weld-ing images together.
Making Changes to Individual Images in a Group
The images in a group will stay together but remain separate images. This makes it easy to remove images from a group or make changes to an individual image in a group.
To select an individual image in a group:
Select the group in which you want to 1. make a change to one of the imag-es. The group will turn blue when selected.
Then select the individual image, 2. which will turn it pink, to make a change to only that image.
With the image colored pink, make 3. any changes you want to the indi-vidual image.
When you are done, click on another 4. part of the grouped image to return the individual image to part of the group.
Removing Individual Images from a Group
As you are adding images to make a group with the Group button toggled on (yellow), you can unselect images by selecting them a second time. If you select a group to be added and then decide you want to unselect it, you will need to remove the images from that group one image at a time.
To remove an image at any time:
Select the group. The group will be 1. colored blue.
Click the 2. Group button to toggle it on (yellow).
Select any image you want to remove 3. from the group. Removed images will turn black as you select them to show that they are no longer part of the group.

Gypsy User Manual
30 © 2009 Provo Craft
When you are done, toggle the group 4. button off (white) to continue work-ing with the group.
Ungrouping Images
Instead of removing individual images one at a time, you can also use the Ungroup button
to separate all images in a group into single images.
To ungroup all images:
Select the group you would like to 1. ungroup. The group will be colored blue.
Click the 2. Ungroup button . The images will turn black to show they are no longer grouped.
Tip: Images entered from the keypad all at once are automatically assigned to the same group. If you don’t want the images grouped, the Ungroup function is a quick way to sepa-rate all the images.
Deleting Images
You can use the Delete button to delete an image or group.
Select the image or group you want 1. to delete.
Then click the 2. Delete button .

31© 2009 Provo Craft
Once you have added images to the mat, you can begin transforming them to cre-ate your perfect design. You can change the size, shape, and orientation of your image or group to make it look exactly how you want it to.
Tip: Click the Undo button to undo your last command. If you click this button a sec-ond time, it will redo what was just undone. If you exit the Mat Screen, you will lose your ability to undo any commands.
Sizing Images
Changing the size of the images on the mat can be helpful in creating your design, view-ing your images, and maximizing paper usage.
You can use the following buttons and tools to size your images.
Width/Height
When precision is important, click on the Width/Height fields to enter an exact width or height of the image or group selected or the height of the cursor. The height of an image or group is based on either the extents of an image or the size of the image relative to the key height character in the cartridge set.
See Relative/True Size for more information on this. Use these fields to stretch an image or to make it taller or wider.
Tip: Click the 10 Key button to view a 10 key that will allow you to enter precise numeric values. This button is visible only if you have clicked on a field with a numeric value in it.
Tip: Click on the Inches or mm fields to display all values in either inches
or in millimeters.
Aspect Ratio Link
Click the Aspect Ratio link to toggle it on (yellow) or off (white). When highlighted yellow, this feature ensures that your image doesn’t get stretched disproportionately. When you change the width of an image, the height is automatically changed, and vice versa.
Relative/True Size
Click this button to toggle on Relative Size mode (white) or True Size mode (yellow). The bounding box that surrounds an image or group will display differently based on whether the image or group is in Relative or True Size mode.
When in Relative Size mode, you control the size of the selected image or group in relation
Section 6: Transforming Images

Gypsy User Manual
32 © 2009 Provo Craft
to the size of the key height character. For example, if you add the letters “A”, “a”, and “y” to a design in Relative Size mode, they will appear on your mat as shown here:
When in True Size mode you control the exact size of the images selected without regard to the key height character. For example, if you add the letters “A”, “a”, and “y” to a design in True Size mode, they will appear on your mat as shown here:
You can toggle between these two modes at any time to allow you to control the size of the image directly or relative to the key height character.
Tip: You can turn this mode on and off at any time, but doing so might change the display of the X/Y location or the width and height of the image or group.
Size Buttons
Click either of these two Size buttons to change the size of any highlighted image or group in small increments. If nothing is high-lighted, the cursor will change size.
Tip: To change the size of an image or group by a large amount, use the Width and Height fields.
Cursor
You can change the height of the cursor so that all images added to the mat will be the height of your cursor. This is useful if you will be adding several different images to the mat and you want them all the same size. Instead of changing the size of each image individu-ally or grouping images and then resizing, simply change the size of the cursor, and then add images to the mat.
You can change the height of the cursor using any of the sizing buttons. If no images are selected when you use the sizing buttons, then the cursor height will change.
Manipulating Images
There are several tools you can use to manip-ulate images on your mat.
Rotate
Click the Rotate button to rotate the image or group about its center point.
Tip: If you add an image to a rotated group via the Image Queue, the image will be added to the mat with the same amount of rotation.
Section 6: Transforming Images
33© 2009 Provo Craft
Slant
Click the Slant button to slant the image or group to the left or right. If you slant a group, each individual image will slant. Adding an image to a slanted group via the Image Queue give the added image the same amount of slant as the other images.
Tip: Slanting can be used to italicize letters.
Flip
Click the Flip Sideways button to flip an image or group left-to-right or right-to-left. The image or group will flip about a vertical line drawn through its middle.
Click the Flip Upside Down button to flip an image or group upside down or right side up. The image or group will flip about a hori-zontal line drawn through its middle.
Welding Images
This powerful option allows for the seam-less combination of unassociated images into welded groups. Welding causes mul-tiple images, which have been moved close
enough together to overlap, to become one image. It does this by joining images together wherever an overlap occurs.
With this tool, individual letters can easily be welded into words and phrases. However, welding isn’t limited to simply combining let-ters to make words or phrases.
You can use welding to combine any image with any other, in any position or combina-tion, and the resulting image combination can be welded yet again. Combine your favorite flower images to make the ultimate bouquet. Turn familiar shapes into fresh new ones. The uses and possibilities are endless.
Weld
To weld images together:
Select the images or group you want 1. to weld together.
Click the 2. Weld button to turn the images “hot.” When not selected, the color of the images will change to red. When the images are selected, they will be blue, but the Weld button will be yellow to show that the images are “hot.”
To weld any “hot” image to another 3. “hot” image, all they have to do is overlap. Use Kerning, Nudges, or any other arranging tool to move the images so that they overlap how and where you want them.
Click the 4. Preview button to view how the images will look once cut. Complicated welds that include many images may require more time for

Gypsy User Manual
34 © 2009 Provo Craft
the Gypsy to figure out all the weld connections.
Tip: Images do not have to belong to the same group to be welded. However, once you have overlapped your images just the way you want, you should consider grouping them so that you can move them around the mat as a single image.
Mixed Weld
If a group is selected where some of the images are “hot” and some are not, the Weld button will show half white and half yellow . One image in a group can have welding turned on and other images in that same group can have welding turned off. This group would be said to have Mixed Welding.
Preview
Click the Preview button to see how your welded images will look when cut. Anything shown in gray on a “hot” image will not be cut.
In Preview mode, all you can do is pan and zoom. Once the preview is fully drawn, click any button to exit. Because there are many thousands of calculations that have to hap-pen to weld images together, the preview can sometimes take a long time to draw. The images turn gray as the preview nears completion.
Tip: After previewing a design, as long as you don’t make any changes, you can zoom in to see details without having to wait for the preview to be redrawn.

35© 2009 Provo Craft
Preparing to Cut
Once you have finalized your image and viewed it in Preview mode to ensure that your design is exactly how you want it, you are ready to connect the Gypsy to your Cricut® and use the Cut Screen.
To prepare to cut:
Ensure that any cartridges used in 1. your design have been linked to your Gypsy.
Connect the Gypsy to the Cricut® 2. using the Cricut® Connector Cable that came with your Gypsy.
From the Mat Screen, click the 3. Cut button . The display will zoom out to show the entire mat, and the Cut Screen will appear. While the Cut Screen is displayed you will not be able to zoom, pan, or edit your design.
Tip: You can use kerning, sizing, rotation, and precise image placement to pack all your images close together, to fill gaps and holes, and to get the most out of that valu-able paper space. Some layouts can end up looking like dizzying puzzles, but a lot can be squeezed out of a little when you use the right tools.
Connecting the Gypsy to Your Cricut®
Before you can cut your design, you will need to connect the Gypsy to your Cricut®. The Gypsy is compatible with all Cricut® models.
Locate the Cricut® Connector Cable that came with the Gypsy. For a description of each of the cables, check the glossary. Plug the corresponding end of the cable into the USB port on the back of your Cricut® machine, next to the A/C adapter port.
Finish the connection by plugging the other end of the cable into the top of the Gypsy. Make sure that you plug the Cricut® Connec-tor Cable into both the Gypsy and the Cricut® before turning the Cricut® machine on.
Load Mat
Click the Load Mat button to load a mat into your Cricut®. Be sure to have the mat pushed into the Cricut® with slight pres-sure at the time you click this button.
Do not use the Load Mat button located on the Cricut®. The button on the Cricut® can only be used if a cartridge is in the Cricut®.
Unload Mat
Click the Unload Mat button to unload the mat out of your Cricut®.
Section 7: Cutting Images

Gypsy User Manual
36 © 2009 Provo Craft
Do not use the Unload Mat button located on the Cricut®. The button on the Cricut® can only be used if a cartridge is in the Cricut®.
Multi-Pass Cutting
Click on the up and down arrows of the Multi-Pass Cutting button to increase this value from 1 to 10 if you are cutting through thick materials and need the blade to trace the same cut path multiple times.
Cutting
Once you have linked the necessary cartridg-es to the Gypsy and linked the Gypsy to your Cricut®, you are ready to begin cutting.
To begin cutting your design:
From the Cut Screen, click the 1. Cut button to begin cutting. Depend-ing on the detail of your design and the amount of welding, cutting may not start right away or may pause at times.
Click the 2. Exit button to exit the Cut Screen and return to the Mat Screen.
Tip: Even though your Cricut® says there is no cartridge present, you will still be able to cut. The only settings controlled by the Cricut® and not the Gypsy are the blade pressure and the blade depth.
You can use the following tools while cutting your design.
Pause/Play
You can click the Pause button to pause the Cricut® while cutting. Once paused, it will change to a Play button . Click the Play button to resume cutting.
TIP: Pausing allows you to check the quality of the image being cut. Pausing may not stop immediately after being clicked.
Stop
You can click the Stop button to stop the Cricut® from cutting. Once stopped, you will not be able to resume cutting.
Unload Mat
When you have completed cutting, click the Unload Mat button to unload your mat and return to the design you just cut.
Add to Design
When you have completed cutting, click the Add to Design button to leave the mat in the Cricut and return to the design you just cut. You will not be able to change or re-cut the image(s) in the design you just completed cutting. When you click this button you will be prompted to save the design you just complet-ed cutting before returning to the mat screen.
Tip: Use this button if you finish cutting and then decide you want to cut something else from the same piece of paper. For example, if you completed cutting a square and you click this button, you can add a circle to the design and then click cut. The circle will cut without re-cutting the square.

Section 7: Cutting Images
37© 2009 Provo Craft
Return to Design
When you have completed cutting, click the Return to Design button to leave the mat in the Cricut and return you to the design you just cut. The design will be fully editable.
Tip: Use this button if you complete a cut and then decide you want to cut the entire
design again on the same piece of paper. For example, if you finish cutting and realize you didn’t have the pressure set high enough to cut all the way through the paper, click the Return to Design button, adjust the pressure, and then click Cut. The entire design will be cut again.

38 © 2009 Provo Craft
10 Key. This feature allows you to enter pre-cise numeric values.
Application Launcher. This is the first screen that will appear on the Gypsy. You can click the Cricut® App button to launch the Cricut® App Screen and begin working on a design, or you can click the Settings button to change specific Gypsy settings and view the EULA and warranty.
Aspect Ratio Link. When turned on, this feature ensures that your image doesn’t get stretched disproportionately. When you change the width of an image, the height is automatically changed, and vice versa. Toggle it on (yellow) or off (white).
Cables. You will receive four cables with the Gypsy:
Cricut® Connector Cable.1. A USB cable used to connect your Gypsy to your Cri-cut®. This cable has a standard USB Type B (square) connector on one end and a USB mini connector on the other end.
Computer Connector Cable.2. A USB cable used to connect your Gypsy to your computer. This cable has a standard USB Type A (rectangular) connector on one end and a USB mini connector on the other end.
Cartridge Link Cable. 3. A link cable used to connect your Gypsy to your
cartridges. This cable is short and has a cartridge connector on one end.
Charger Cable. 4. An AC power supply cable used to charge your Gypsy.
Cartridge. A cartridge holds images or fonts that can be transferred to and stored on the Gypsy by linking your cartridge to the Gypsy. This allows you to cut the cartridge’s content on a Cricut® without the cartridge being present. Cartridges can be linked to only one Gypsy. After linking, your cartridge will continue to function as normal and should be stored as backup.
Cartridge Window. This window allows you to access different cartridges. The cartridge you are currently viewing on the keypad will display in the window. The Cartridge Window can be used to view a complete listing of all cartridges, and also to display the cartridges that contain a result from your keyword search. Cartridges you own and have already linked to the Gypsy will appear in bold.
Cricut®. Cricut® machines cut designs and alphabets for card making, home decor, scrapbooking, paper crafting, and more.
Function Keys. These six purple keys change the images on the Image Keys to show dif-ferent creative features (shadow, bold, etc.). Only one key can be active (orange) at a time. In some cartridges, not all the keys contain
Glossary

Glossary
39© 2009 Provo Craft
images. If a key does not contain an image, the key will be blacked out.
Gypsy Sync Software. The Gypsy Sync Soft-ware is a program that you download onto your computer that will allow you to update your Gypsy and convert and transfer files between CDS and the Gypsy. You can down-load the software for either a Mac or PC at www.provocraft.com/gypsy.
Image Keys. These white keys display images from a cartridge. To select an image and place it in the Image Queue, simply click the key. The images shown on these keys will change if any of the purple Function Keys or Shift Key are active (orange). In some car-tridges, not all the keys contain images. If a key does not contain an image, the key will be blacked out.
Image Queue. When images are selected from the Image Keys, they appear in the Image Queue in the order in which they were entered. When the Mat button is selected, the image(s) in the queue will be transferred to the mat.
Kerning. This feature allows you to change the spacing between images. A negative val-ue will decrease the spacing between images, and a positive value will increase the spacing. Kerning works only on groups of images.
Keypad. The keypad allows you to view a cartridge’s images. The images will display on the Image Keys, and you can use the Func-tion Keys and Shift Key to view all of the cartridge’s content.
Link Cartridge. This feature allows you to link a cartridge to your Gypsy so you can cut the cartridge’s content on a Cricut® without the
cartridge being present. Cartridges can be linked to only one Gypsy.
Mat. The mat is your virtual design studio. You can add images to your mat and then arrange, resize, and manipulate them how-ever you want.
Mixed Weld. A group of images has Mixed Welding when some images in a group have welding turned on and other images in that same group have welding turned off.
Multi-Pass Cutting. This feature allows you to cut through thick materials by having the blade trace the same cut path multiple times. You can adjust this value from 1 to 10.
Relative/True Size. When highlighted white, this feature allows you to control the size of the images selected in relation to the size of the key height character. You can control the exact size of all images selected without regard to the key character by toggling the button to True Size mode (yellow).
Settings. This feature allows you to change specific settings on the Gypsy and view the EULA and warranty.
Stylus. The stylus is kept in a fitted slot on the top left of Gypsy. You can use the stylus instead of your finger to touch the Gypsy’s screen to keep the screen fingerprint-free and for better accuracy. You can purchase additional styluses separately if you would like another color or if you misplace yours.
Weld. This feature allows you to join overlap-ping images so they cut as one single image. This can be useful for joining letters into words or phrases, and much more.

Gypsy User Manual
40 © 2009 Provo Craft
X/Y. This feature allows you to change where the image, group, or cursor is located on the mat. You can view the location of an image by its X/Y coordinates and enter a precise location. The location is based on the bottom left of the image.