gum ball machine- 9 92336 gum ball machine...
TRANSCRIPT
3491 Mission Oaks Blvd., Camarillo, CA 93011
Visit our Web site at http://www.harborfreight.com
Copyright © 2004 by Harbor Freight Tools®. All rights reserved. No portion of thismanual or any artwork contained herein may be reproduced in any shape or formwithout the express written consent of Harbor Freight Tools.
For technical questions and replacement parts, please call 1-800-444-3353
ASSEMBLY INSTRUCTIONS
GUM BALL MACHINE w/STAND15”
92337
92336
GUM BALL MACHINE- 9”

SKU 92336-SKU92337 For technical questions, please call 1-800-444-3353. Page 2
Specifications for Gumball Machine - 9” SKU92336
Specifications for Gumball Machine w/Stand - 15” SKU92337
Safety Warnings and Precautions
WARNING: When using product, basic safety precautions should always befollowed to reduce the risk of personal injury and damage to equipment.
Read all instructions before using this product!
1. Keep work area clean. Cluttered areas invite injuries.
2. Locate in safe operating area. Position the Gumball Machine in anunobstructed area. The 9” Machine fits well on a desk or shelf. The 15” Machinefits well in a corner or out of the traffic area and must be located on a flat, levelfloor surface.
3. Check for damaged parts. Before using any product, any part that appearsdamaged should be carefully checked to determine that it will perform itsintended function. Check for any broken or damaged parts and any otherconditions that may affect its operation. Replace or repair damaged or wornparts immediately.
4. Replacement parts and accessories. When servicing, use only identicalreplacement parts. Use of any other parts will void the warranty.
5. Always check the assembled parts after assembling. All connections shouldbe tight and hardware tightened.
Construction
Overall Dimensions
Gum Capacity
Dim. of Glass Globe
Weight
Heavy Duty Cast Metal with a Glass Globe-Non Toxic Paint, Red
9” H x 4” W
8 oz. Gumballs (not included)
4-1/2” H Dia. x 4-1/4” H
1.4 Lbs
Construction
Stand
Stand Height
Gumball Overall Dim.
Gum Capacitiy
Dim. of Glass Globe
Weight
Heavy Duty Cast Metal with a Glass Globe-Non Toxic Paint, Red
Heavy Duty Cast Metal Antique Style -Non Toxic Paint, Black
23” H
27-1/2” H x 4” W
62 oz. Gumballs (not included)
7-1/2” H Dia. x 6-5/8” H
16.5 Lbs
Save This Manual
You will need the manual for the safety warnings and precautions, assemblyinstructions, operating and maintenance procedures, parts list and diagram. Keepyour invoice with this manual. Write the invoice number on the inside of the frontcover. Keep the manual and invoice in a safe and dry place for future reference.

SKU 92336-SKU92337 For technical questions, please call 1-800-444-3353. Page 3
6. Maintain products with care. Keep Gumballs filled in globe. Empty coinsout of lower portion when refilling to prevent over filling.
7. Children should be supervised. Letting a child operate the GumballMachine is fun for all but caution should be observed. Allowing the child todispense and chew more than one Gumball at one time could causechoking. Coins could be swallowed. Both the 9” and the 15” GumballMachine on the Stand could be pulled over by the child, causing personalinjury. It is best to supervise the operation of the Gumball Machine. Makesure children keep their hands clear of the dispensing area to avoid gettinghands or fingers caught. Harbor Freight Tools is not responsible for injuriescaused by this product.
8. Caution when refilling Gumballs. Avoid sharp edges on the inside of thecast metal base when disassembling and assembling this product. Caution:The Globe is made of glass. Set Carefully on the table or workbench andavoid accidently hitting the glass or letting it roll off the counter.
Unpacking
When unpacking the Gumball Machine, check to make sure that all partsare included as shown in the parts list. If any parts are missing or broken,please call Harbor Freight Tools at the number below. Thoughly clean allparts with anti-bacterial soap and water before using. Be sure to thoroughlydry all parts before reassembling.
Operating InstructionsFilling Machine:
1. Works with all coins, pennies, nickels, dimes and quarters. DispensesGumballs, Peanuts, Jelly Beans, and more. To add Gumballs or other smallobjects to the Gumball Machine, you must first unscrew the Plug (1) at thetop and remove the Cap (2). Pour Gumballs (not included) slowly into theGlass Globe (5). Reassemble the Cap (2) and Plug (1). See Figure 1.
Warning: The warnings, cautions, and instructions discussed in this instructionmanual cannot cover all possible conditions and situations that may occur. Itmust be understood by the operator that common sense and caution arefactors which cannot be built into this product, but must be supplied by theoperator.
Glass Globe (5)with Gumballs
Plug (1)
Cap (2)
Figure 1
SKU 92336-SKU92337 For technical questions, please call 1-800-444-3353. Page 4
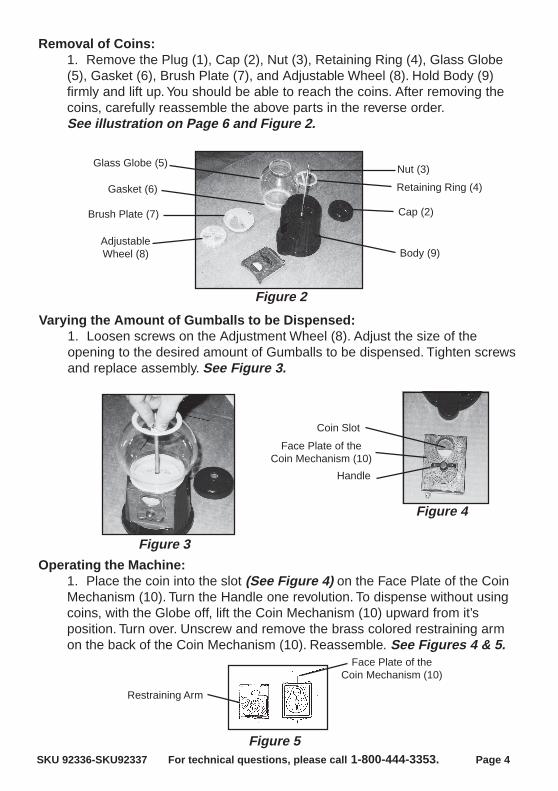
Removal of Coins:1. Remove the Plug (1), Cap (2), Nut (3), Retaining Ring (4), Glass Globe(5), Gasket (6), Brush Plate (7), and Adjustable Wheel (8). Hold Body (9)firmly and lift up. You should be able to reach the coins. After removing thecoins, carefully reassemble the above parts in the reverse order.See illustration on Page 6 and Figure 2.
Body (9)
Glass Globe (5)Nut (3)
AdjustableWheel (8)
Brush Plate (7) Cap (2)
Gasket (6) Retaining Ring (4)
Figure 2
Varying the Amount of Gumballs to be Dispensed:1. Loosen screws on the Adjustment Wheel (8). Adjust the size of theopening to the desired amount of Gumballs to be dispensed. Tighten screwsand replace assembly. See Figure 3.
Figure 3
Operating the Machine:1. Place the coin into the slot (See Figure 4) on the Face Plate of the CoinMechanism (10). Turn the Handle one revolution. To dispense without usingcoins, with the Globe off, lift the Coin Mechanism (10) upward from it’sposition. Turn over. Unscrew and remove the brass colored restraining armon the back of the Coin Mechanism (10). Reassemble. See Figures 4 & 5.
Figure 4
Face Plate of theCoin Mechanism (10)
Coin Slot
Handle
Face Plate of theCoin Mechanism (10)
Figure 5
Restraining Arm

SKU 92336-SKU92337 For technical questions, please call 1-800-444-3353. Page 5
1. To remove dust, use a damp cloth. To remove grease or oil, use a detergentbased cleaning solvent, rinse with damp cloth, and dry.
Maintenence
Attaching the Stand to SKU 92337:1. Attach the four Feet (12) to Center Disk (13) with four Screws (14) andNuts (15). See Figure 6.
2. Twist on Center Extension (16) to Center Disk (13). Twist Top Extension(17) to Center Extension (16) and then the top threaded end to the BasePlate (11) of the Gumball Machine. Tighten all hardware and connections.See Figures 7 & 8.
Figure 6
Figure 7
Figure 8
Feet (12)
Screw (14)Nut (15)
Center Disk(13)
Center Extension (16)
Top Extension (17)
Threadedarea to
attach toGumballMachine.
CenterExtension (16)
TopExtension (17)
Feet (12)
Gumball Machine
Base Plate (11)
The 15” Gumball Machine with Stand fits well in a corner or out of the traffic area,and must be located on a flat, level floor surface.

SKU 92336-SKU92337 For technical questions, please call 1-800-444-3353. Page 6
PLEASE READ THE FOLLOWING CAREFULLY
THE MANUFACTURER AND/OR DISTRIBUTOR HAS PROVIDED THE PARTS DIAGRAM IN THIS MANUALAS A REFERENCE TOOL ONLY. NEITHER THE MANUFACTURER NOR DISTRIBUTOR MAKES ANYREPRESENTATION OR WARRANTY OF ANY KIND TO THE BUYER THAT HE OR SHE IS QUALIFIED TOMAKE ANY REPAIRS TO THE PRODUCT OR THAT HE OR SHE IS QUALIFIED TO REPLACE ANY PARTSOF THE PRODUCT. IN FACT, THE MANUFACTURER AND/OR DISTRIBUTOR EXPRESSLY STATES THatALL REPAIRS AND PARTS REPLACEMENTS SHOULD BE UNDERTAKEN BY CERTIFIED AND LICENSEDTECHNICIANS AND NOT BY THE BUYER. THE BUYER ASSUMES ALL RISK AND LIABILITY ARISINGOUT OF HIS OR HER REPAIRS TO THE ORIGINAL PRODUCT OR REPLACEMENT PARTS THERETO,OR ARISING OUT OF HIS OR HER INSTALLATION OF REPLACEMENT PARTS THERETO.
NOTE: Some parts are listed and shown for illustration purposes only and are not available individually as replacement parts.
NOTE: Some parts are listed and shown for illustration purposes only and are notavailable individually as replacement parts.
Parts List
Parts Identification
Part # Description Qty.
PlugCapNutRetaining RingGlobeGasketBrush PlateAdjustable WheelBodyCoin MechanismBase Plate
123456789
1011
11111111111
Part # Description Qty.121314151617
414411
FeetCenter DiskScrewNutCenter ExtensionTop Extension
Part 1
Part 2
Part 3
Part 4
Part 5
Part 6
Part 7
Part 8
Part 11
Part 17
Part 16
Part 12
Part 15
Part 14
Part 13Part 9
Part 10