guidelines for hinged and bolted manway assembly · guidelines for hinged and bolted manway...
TRANSCRIPT
Copyright © 2014 Renewable Fuels Association. All Rights Reserved.
GUIDELINES FOR HINGED AND BOLTED MANWAY ASSEMBLY
Assembly Instructions for the Flammable Liquid Industry
Published by: Renewable Fuels Association Authored by: Watco Compliance Services, VSP Technologies, and Salco Products, Inc.
January 2014
This document was prepared by Watco Compliance Services, VSP Technologies, and Salco Products, Inc. for the Renewable Fuels Association (RFA). The information, though believed to be accurate at the time of publication, should not be considered as legal advice or as a substitute for developing specific company operating guidelines. Watco Compliance Services, VSP Technologies, and Salco Products, Inc. and the RFA do not make any warranty, expressed or implied, or assumes any legal liability or responsibility for the accuracy, completeness, or applicability of the information presented in this document.

Copyright © 2014 Renewable Fuels Association. All Rights Reserved.
2
THIS PAGE INTENTIONALLY LEFT BLANK

Copyright © 2014 Renewable Fuels Association. All Rights Reserved.
3
PREFACE
This guideline document is in response to an increased need for an engineering standard
for the inspection, maintenance, and securement of a hinged and bolted manway to ensure
leak-free performance. Eliminating leaks around a hinged and bolted manway protects
against the risks to life, property, and the environment in intrastate, interstate, and foreign
commerce. By following this document, an operator can achieve a consistent, high-level,
process of assembling a hinged and bolted manway.
This document is a result of a grant issued by the Federal Railroad Administration to the
Renewable Fuels Association to provide an educational tool for field personnel. The
Renewable Fuels Association greatly appreciates and recognizes the following
contributors: Watco Compliance Services, VSP Technologies, and Salco Products, Inc.
Copyright © 2014 Renewable Fuels Association. All Rights Reserved.
4
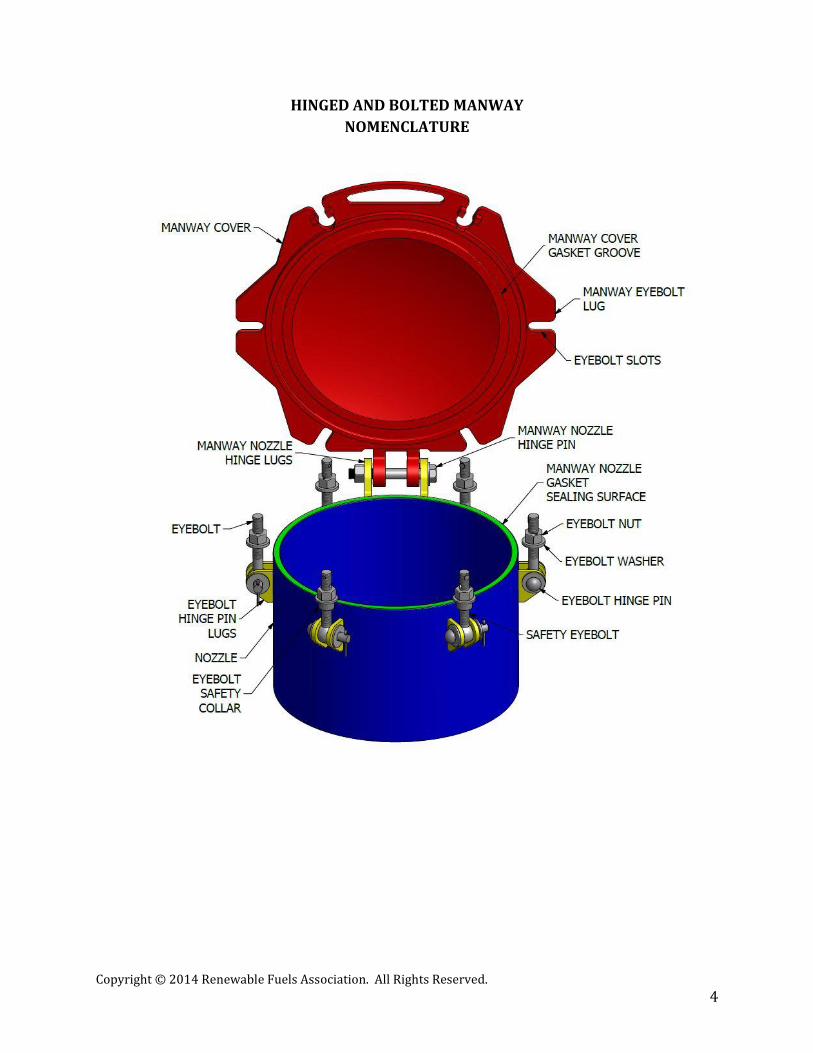
HINGED AND BOLTED MANWAY
NOMENCLATURE
Copyright © 2014 Renewable Fuels Association. All Rights Reserved.
5
GUIDELINES FOR HINGED AND BOLTED MANWAY ASSEMBLY
Assembly Instructions for the Flammable Liquid Industry
INTRODUCTION
Of the more than 1.7 million tank car shipments that contain a hazardous material each
year, the flammable liquid industry accounts for nearly 758,000 tank car shipments (based
on 2012 Association of American Railroads TRAIN II data). Although nearly all of these
shipments originate and arrive at their destination in a safe condition, Non-Accident
Releases (NARs) of flammable liquids occur. For example, during the period from 2007
through 2012, there were more than 1,733 NARs related to tank cars transporting
flammable liquid products. Of these, nearly 800 were associated with a hinged and bolted
manway.
The key to eliminating NARs around a hinged and bolted manway requires a high-level
process of assembly to ensure leak-free performance over a broad range of temperatures
and pressures. Common elements to consider when assembling a hinged and bolted
manway include:
Gasket-contact surface finish without unacceptable imperfections,
Suitable gasket,
Maintaining sufficient contact pressure on the manway cover, manway nozzle, and
gasket surfaces (i.e., gasket stress),
Condition of the eyebolts,
The maximum and minimum temperature range and the internal pressure the joint
may experience in service, must be considered in order to maintain sufficient
contact pressure,
Bolt stretch, or relaxation, or gasket relaxation, or flow may result because of
changes in temperature and pressure, and
Mechanical failure of an eyebolt may result from corrosion, fatigue, galling (i.e., a
cold welding process that results in an atomic bond between the male and female
threads from close contact), self-loosening, stress corrosion cracking, and wear.
This guideline document is in response to an increased need for the development of an
engineering recommended standard for the inspection, maintenance, and securement of a
hinged and bolted manway to ensure leak-free performance. Included within this
document are recommendations for pre—and post—inspection for the detection and
evaluation of imperfections, proper selection of eyebolts, installation of gaskets, lubrication
of working surfaces, fastener tightening sequence, and target torque value.
Copyright © 2014 Renewable Fuels Association. All Rights Reserved.
6
Figure 1: Representation of
an eyebolt as a stiff spring.
This document will aid load out operators at shipping locations in achieving a consistent,
high-level, process of assembling a bolted and hinged manway and ensuring leak-free
performance over a broad range of temperatures and pressures. Load out operators are
responsible for assembly of the tank car manway and securement prior to release. To
achieve this high-level of performance, assembly personnel require classroom and hands-
on training, joined with a practical demonstration the training material was understood
and can be applied in everyday situations. This document recommends qualification
testing of joint assembly personnel.
When an operator discovers an unacceptable condition on the tank car, the plant may not
offer the car into transportation until the condition is corrected. The operator may correct
certain conditions, such as replacing a worn or torn hinged and bolted manway cover
gasket. Other conditions, such as repairs to the manway nozzle, lugs, eyebolts, safety
eyebolts, and the hinged and bolted manway cover will require repair by a properly
certified tank car facility. This document describes how to handle most unacceptable
conditions.
MANWAY ASSEMBLY INSTRUCTIONS
BASIC BOLTED FLANGE DESIGN CONCEPT
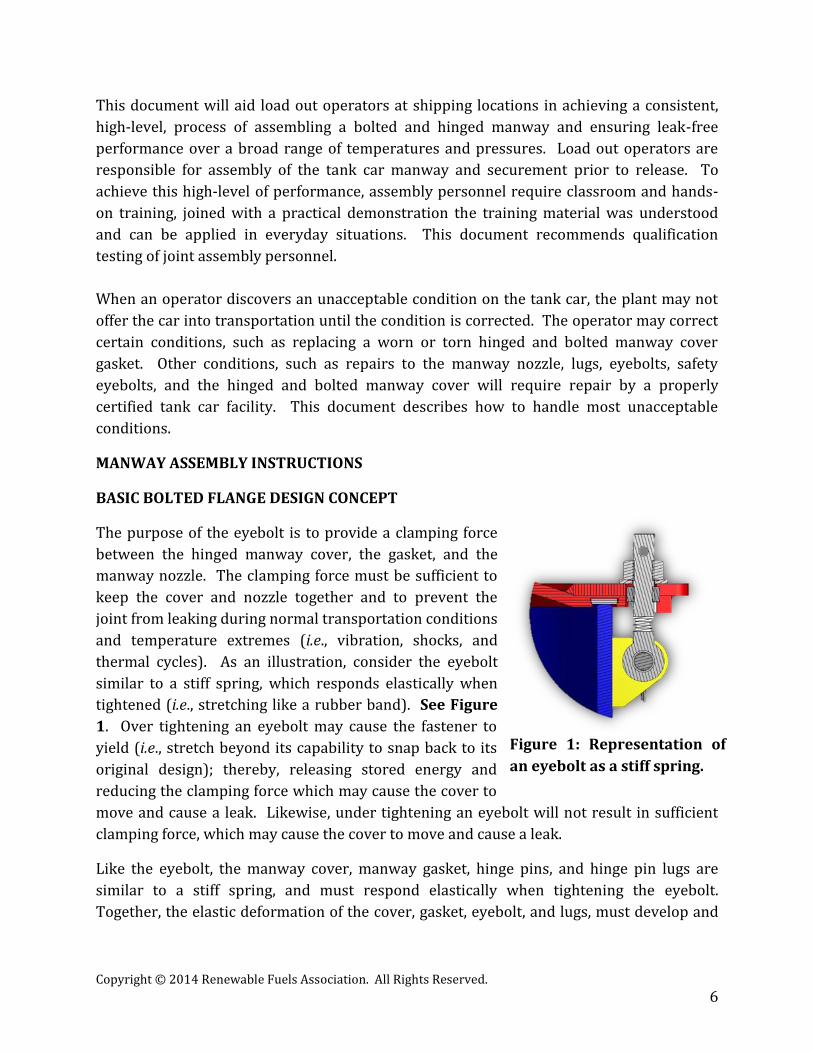
The purpose of the eyebolt is to provide a clamping force
between the hinged manway cover, the gasket, and the
manway nozzle. The clamping force must be sufficient to
keep the cover and nozzle together and to prevent the
joint from leaking during normal transportation conditions
and temperature extremes (i.e., vibration, shocks, and
thermal cycles). As an illustration, consider the eyebolt
similar to a stiff spring, which responds elastically when
tightened (i.e., stretching like a rubber band). See Figure
1. Over tightening an eyebolt may cause the fastener to
yield (i.e., stretch beyond its capability to snap back to its
original design); thereby, releasing stored energy and
reducing the clamping force which may cause the cover to
move and cause a leak. Likewise, under tightening an eyebolt will not result in sufficient
clamping force, which may cause the cover to move and cause a leak.
Like the eyebolt, the manway cover, manway gasket, hinge pins, and hinge pin lugs are
similar to a stiff spring, and must respond elastically when tightening the eyebolt.
Together, the elastic deformation of the cover, gasket, eyebolt, and lugs, must develop and

Copyright © 2014 Renewable Fuels Association. All Rights Reserved.
7
Figure 2: Check threads and hinge pin.
maintain sufficient clamping force on an assembled manway to ensure leak-free
performance.
FUNCTION-SPECIFIC TRAINING OF ASSEMBLY PERSONNEL
Each employer should develop a systematic training program for hinged and bolted
manway assembly personnel, such as, load out operators. The program should include
classroom training, on-the-job-training, and a practical demonstration that personnel
understood the training and can apply it in everyday situations. Assembly personnel who
successfully passed the classroom, hands-on-training, and the demonstration tests are
considered qualified to assemble a bolted manway assembly. The Department of
Transportation requires documentation of this function specific training requirement. See
49 CFR 172.704 (d).
EXAMINATION OF CONTACT SURFACES
Eyebolts
Prior to loading, clean and examine each
eyebolt, including the safety eyebolt(s) located
on the manway cover opposite the manway
cover hinge. See Figure 2. The safety eyebolts
must not rotate downward until an operator
lifts the cover by about 3/8-inch to 1-inch. Use
a wire brush if necessary to remove debris from
the eyebolt threads for a close inspection. The
eyebolt and safety eyebolt threads, particularly
the threads within one-inch of the manway cover, must be free of corrosion, show no signs
of fatigue (i.e., cracks), galling, or wear. Minor galling may appear as thread wear; whereas,
major galling may prevent turning the nut about the eyebolt. If necessary, replace eyebolts
with those specified on the manufacturer’s approved drawing (“approved” means,
approved by the Association of American Railroads).
Nut and Washer Engagement
Examine each of the nuts to ensure that the nuts are of the same design (e.g., square or hex
[i.e., 4 or 6 sides]). Replace nuts that are broken, cracked, missing, or rounded. Inspect the
washer for broken, cupped, cracked, or missing. The full face of the washer must seat
uniformly on the manway cover. See Figure 3.

Copyright © 2014 Renewable Fuels Association. All Rights Reserved.
8
Figure 3: Correct (L) and incorrect (R) washer assembly.
Bolted Manway Cover and Nozzle
Examine the bolted manway cover for imperfections, bent and broken lugs, damaged
manway gasket grooves, and detrimental residue on the gasket and sealing surfaces.
Inspect the manway nozzle for imperfections. See Figure 4.
Figure 4: Inspection items of a typical manway.

Copyright © 2014 Renewable Fuels Association. All Rights Reserved.
9
Figure 6: Inspect gasket contact
sealing surface.
Figure 5: Inspect hinge pin.
Bolted Manway Cover Hinge Pin
Examine the hinge pin on the manway cover.
Replace any pin bent more than 0.25-inch. A
bent hinge pin may prevent proper alignment of
the manway cover and the manway nozzle
gasket-contact surface. See Figure 5. If the bend
in the pin is upward, the manway cover may not
seat onto the manway nozzle gasket-contact
surface (i.e., resulting in flange rotation). When
tightening, the eyebolts may appear tight;
however, the hinge pin will prevent the manway
cover from contacting the gasket-contact surface;
thus, providing a false sense of securement.
Gasket Contact Surface
Imperfections
Clean and examine the manway nozzle gasket-
contact surface (area highlighted in green). See
Figure 6. The surface must not have large
imperfections that could result in a leak path.
Dents, gouges, pits, and scratches, and specifically
radial defects, those that run from the inside
diameter to the outside diameter of the nozzle are
detrimental. Soft gaskets (e.g., rubber and
expanded PTFE gaskets) will fill small
imperfections when compressed between the
manway cover and the tank nozzle. Hard gaskets
should not be relied upon to fill these same small
imperfections (e.g., filled PTFE and non-asbestos
fiber gaskets). A good practice is to repair imperfections deeper than 1/32-inch, and radial
defects that extend across the face of the gasket-sealing surface more than 25-percent. In
order to repair nozzle imperfections, repair companies must comply with the Association
of American Railroads’, Manual of Standards and Recommended Practices, Section C, Part III,
Specifications for Tank Cars.

Copyright © 2014 Renewable Fuels Association. All Rights Reserved.
10
Figure 7: Inspect for out-of-
round and flatness.
Figure 8: Inspect gasket for defects.
Flatness and Out-of-Round
The flatness of the nozzle will affect the sealing
capabilities of the joint; consequently, the gasket
material selected must be able to conform to the range
of out-of-flat conditions. See Figure 7. In addition, an
out-of-round nozzle will prevent the cover from seating
properly on the nozzle contact-seating surface.
Cleaning, Examination, and Installation of New
Gaskets
It is recommended for joint assembly personnel not
to reuse a gasket in a bolted joint. When assembly
personnel decide to reuse a gasket in a manway
cover, examine the contact face of the gasket. Clean
as necessary to observe imperfections. Replace
gaskets that have indications of abrasion, cuts,
tears, or other damage that may affect the fluid
sealing capability. See Figure 8.
When there is a need to replace a gasket, remove the
gasket from the manway cover. Inspect the gasket-contact sealing surface on the cover.
Repair imperfections deeper than 1/32-inch, and radial defects that extend across the face
of the gasket-sealing surface more than 25-percent. Repair companies must follow the
requirements in the Association of American Railroads’, Manual of Standards and
Recommended Practices, Section C, Part III, Specifications for Tank Cars.
For flammable liquid shipments, select a gasket material that is:
Within the permissible leak rate to control fugitive emissions;
Chemically compatible with the product, including compositional elements;
Mechanically compatible with the joint makeup (i.e., not over-compressed or under-
compressed [receives proper compression/stress] by assembly bolt load);
Thermally compatible with the temperature range (i.e., loading, off-loading, and
transportation).
When transporting a flammable liquid consisting of a mixture or solution
having different compositional elements, it is important to choose a gasket
material compatible with each element. Gasket selection should also consider cyclic service
conditions.
Copyright © 2014 Renewable Fuels Association. All Rights Reserved.
11
Figure 11: Lubricate the eyebolt.
Figure 10: Inspect manway cover
for alignment.
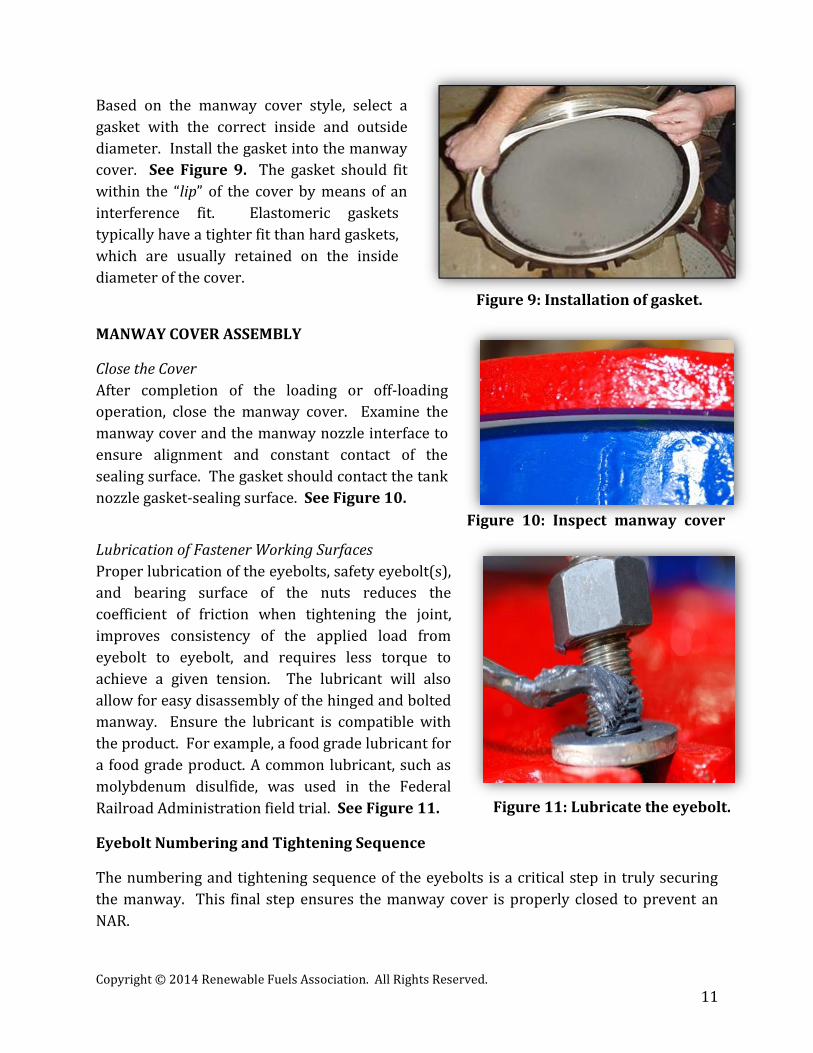
Based on the manway cover style, select a
gasket with the correct inside and outside
diameter. Install the gasket into the manway
cover. See Figure 9. The gasket should fit
within the “lip” of the cover by means of an
interference fit. Elastomeric gaskets
typically have a tighter fit than hard gaskets,
which are usually retained on the inside
diameter of the cover.
MANWAY COVER ASSEMBLY
Close the Cover
After completion of the loading or off-loading
operation, close the manway cover. Examine the
manway cover and the manway nozzle interface to
ensure alignment and constant contact of the
sealing surface. The gasket should contact the tank
nozzle gasket-sealing surface. See Figure 10.
Lubrication of Fastener Working Surfaces
Proper lubrication of the eyebolts, safety eyebolt(s),
and bearing surface of the nuts reduces the
coefficient of friction when tightening the joint,
improves consistency of the applied load from
eyebolt to eyebolt, and requires less torque to
achieve a given tension. The lubricant will also
allow for easy disassembly of the hinged and bolted
manway. Ensure the lubricant is compatible with
the product. For example, a food grade lubricant for
a food grade product. A common lubricant, such as
molybdenum disulfide, was used in the Federal
Railroad Administration field trial. See Figure 11.
Eyebolt Numbering and Tightening Sequence
The numbering and tightening sequence of the eyebolts is a critical step in truly securing
the manway. This final step ensures the manway cover is properly closed to prevent an
NAR.
Figure 9: Installation of gasket.
Figure 9: Installation of gasket.

Copyright © 2014 Renewable Fuels Association. All Rights Reserved.
12
Operators must recognize the importance of numbering the eyebolts beginning with the
safety eyebolt near the right side of the lifting handle and then following the numbered
sequence in a star pattern when tightening each eyebolt on to the manway.
The numbering system is noted in Figure 12 for a six (6) and eight (8) bolt manway cover.
The figure also shows the star pattern tightening sequence for the six (6) and eight (8) bolt
manway, and rotational pattern as well.
Figure 12: Common Numbering Patterns for Eyebolts
Following an optimized manway assembly procedure, as described in Appendix A of this
Guideline, will result in a successful securement of the manway and eliminate the
possibility of a Non-Accident Release during transit.
Copyright © 2014 Renewable Fuels Association. All Rights Reserved.
13
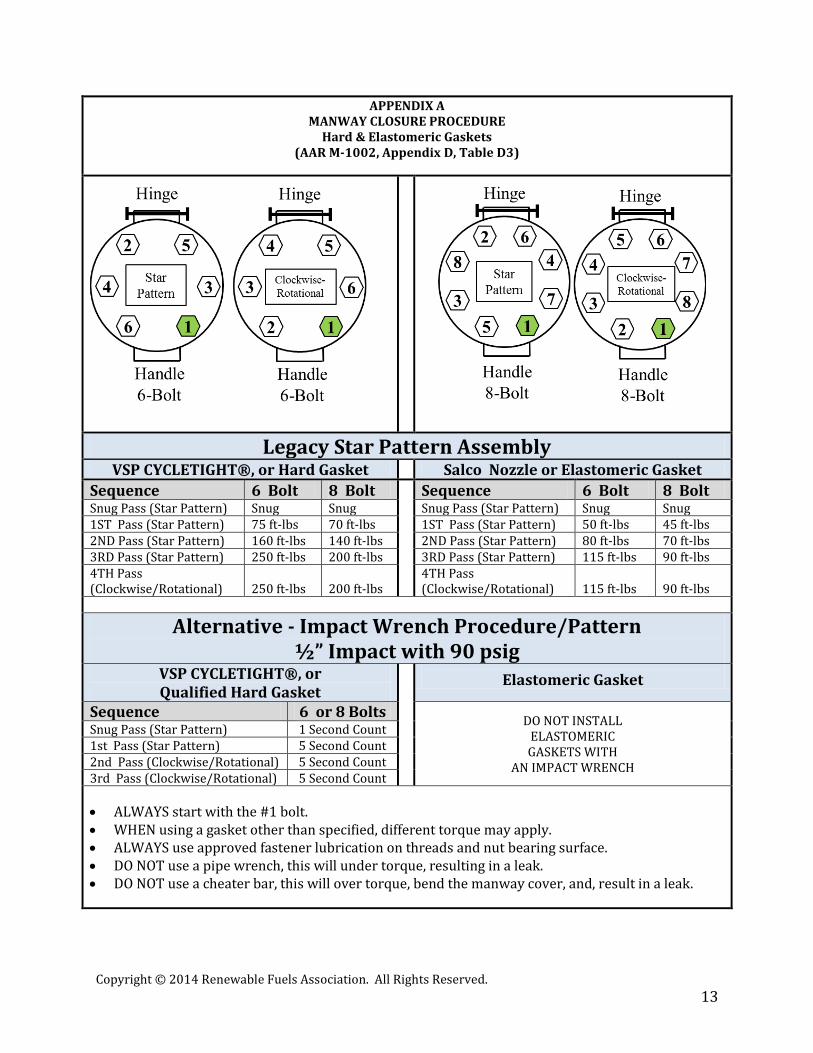
APPENDIX A MANWAY CLOSURE PROCEDURE
Hard & Elastomeric Gaskets (AAR M-1002, Appendix D, Table D3)
Legacy Star Pattern Assembly VSP CYCLETIGHT®, or Hard Gasket Salco Nozzle or Elastomeric Gasket
Sequence 6 Bolt 8 Bolt Sequence 6 Bolt 8 Bolt Snug Pass (Star Pattern) Snug Snug Snug Pass (Star Pattern) Snug Snug 1ST Pass (Star Pattern) 75 ft-lbs 70 ft-lbs 1ST Pass (Star Pattern) 50 ft-lbs 45 ft-lbs 2ND Pass (Star Pattern) 160 ft-lbs 140 ft-lbs 2ND Pass (Star Pattern) 80 ft-lbs 70 ft-lbs 3RD Pass (Star Pattern) 250 ft-lbs 200 ft-lbs 3RD Pass (Star Pattern) 115 ft-lbs 90 ft-lbs 4TH Pass (Clockwise/Rotational) 250 ft-lbs 200 ft-lbs
4TH Pass (Clockwise/Rotational) 115 ft-lbs 90 ft-lbs
Alternative - Impact Wrench Procedure/Pattern ½” Impact with 90 psig
VSP CYCLETIGHT®, or Qualified Hard Gasket
Elastomeric Gasket
Sequence 6 or 8 Bolts DO NOT INSTALL
ELASTOMERIC GASKETS WITH
AN IMPACT WRENCH
Snug Pass (Star Pattern) 1 Second Count 1st Pass (Star Pattern) 5 Second Count 2nd Pass (Clockwise/Rotational) 5 Second Count 3rd Pass (Clockwise/Rotational) 5 Second Count
ALWAYS start with the #1 bolt. WHEN using a gasket other than specified, different torque may apply. ALWAYS use approved fastener lubrication on threads and nut bearing surface. DO NOT use a pipe wrench, this will under torque, resulting in a leak. DO NOT use a cheater bar, this will over torque, bend the manway cover, and, result in a leak.