guidelines for filling up the online application form for...
TRANSCRIPT

Guidelines for filling up the Online Application Form for various posts
Applicants are required to keep the following things ready before applying:
1. A Mobile Number to receive Enrolment No, SMS based notifications/communicationsrelated till the recruitment process is over.
2. Access to facilities of computer with internet connectivity.3. A recent scanned passport sized colour photograph (for scanning and uploading in "jpeg"
format only. File size of scanned photograph should not be more than 100KB).4. Your scanned signature using Blue/Black pen on white sheet (for scanning and uploading in
"jpeg" format only. File size of scanned photograph should not be more than 100KB).5. If the applicant wants to submit the application fee online, access to an online payment
facility/service such asi. Net Bankingii. Credit cardiii. ATM-cum-Debit card
NOTE: If you do not have Net Banking facility/Credit Card or ATM-cum Debit Card, youcan pay the fee in cash at any branch of United Bank of India(UBI) through the Challandownloaded from the Public Service Commission Recruitment Application Portal. Youwill be able to download the duly filled up UBI challan from the Application Portal onlywhen you select the "Cash Payment through UBI Bank" option while filling theapplication form online.
Steps to be followed for filling the online application:
The entire process of filling online application form can be completed in below mentioned 9steps. The steps are:
1. Enrolment through PSC Application Portal (http://pscwbapplication.in/) for onlineapplication process.
2. Signing in with the Enrolment ID and password.3. Selection of the Examination Name and check eligibility.4. If the applicant confirms the eligibility criteria and continues, the next web page appears.
The applicant is required to click on “Application Details”. The application form will appearon the screen. The applicant is required to fill up the details in the application form.
5. In the next step, the applicant is required to upload scanned image file of his/her Photographand Signature one by one [as specified in Para 3 & 4 above].
6. In the next step, the applicant is required to fill the Qualification & Experience details.7. In the next step, the applicant is required to choose your Exam Centre preference (Applicable
for few posts/Exam).8. Once all the details are filled in, the candidate is required to Review the details entered and
Confirm. No edit will be allowed once the application is confirmed.9. Payment of fee (if applicable).

Enrolment process at the PSC Examination Portal (http://pscwbapplication.in/) forOnline Application Process:
Step 1: Please click on "Examination name" given at the left side of the home page of the website(http://pscwbapplication.in/)
Step 2: On clicking the link, the candidate will be redirected to a new page having an ‘ApplicantLogin’ section at the right side. The applicants are required to click on the link "ENROL YOURSELF".
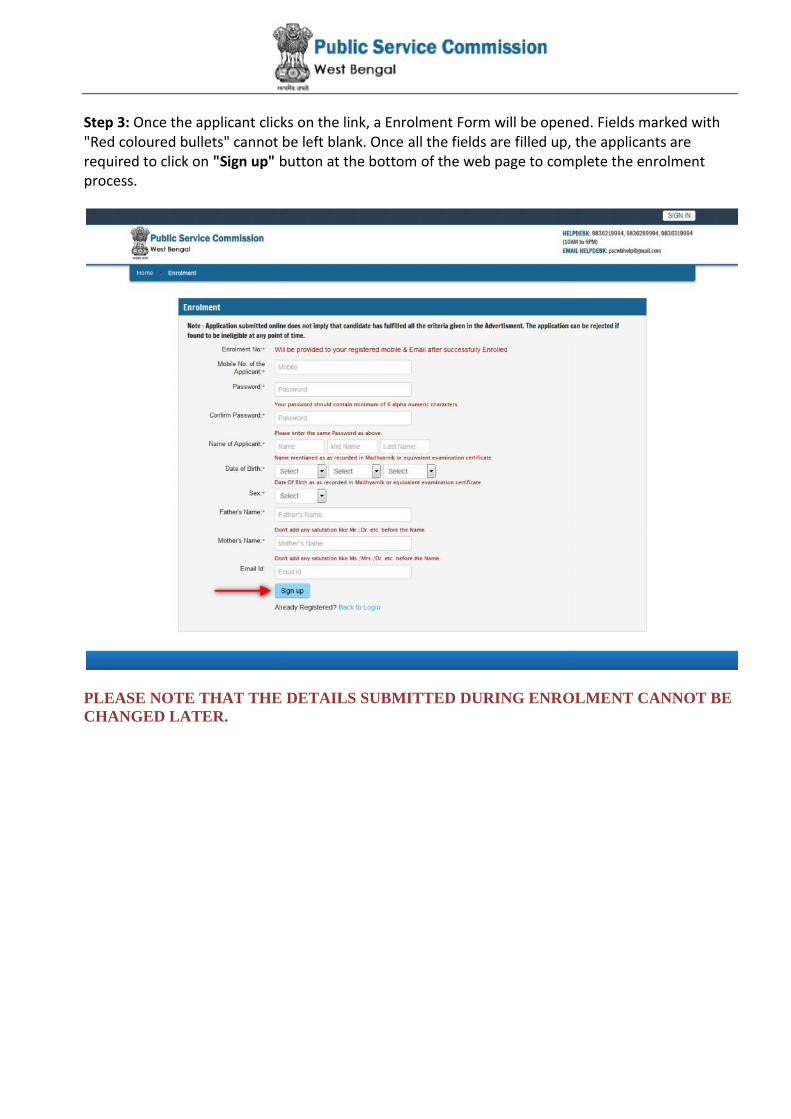
Step 3: Once the applicant clicks on the link, a Enrolment Form will be opened. Fields marked with"Red coloured bullets" cannot be left blank. Once all the fields are filled up, the applicants arerequired to click on "Sign up" button at the bottom of the web page to complete the enrolmentprocess.
PLEASE NOTE THAT THE DETAILS SUBMITTED DURING ENROLMENT CANNOT BECHANGED LATER.

Step 4: Activation and validation of Enrolment:
1. On successful submission of enrolment details, the applicant has to confirm the details. Theapplicant will also receive an OTP code at the registered mobile number. The OTP codeneeds to be entered and the applicant has to click the “Validate OTP” button in order tovalidate the OTP.

2. On successful validation, the applicant will be displayed the Enrolment Successful Messageon the Application Portal.
3. Now the applicants will be allowed to login with the Enrolment number and password.
2. On successful validation, the applicant will be displayed the Enrolment Successful Messageon the Application Portal.
3. Now the applicants will be allowed to login with the Enrolment number and password.
2. On successful validation, the applicant will be displayed the Enrolment Successful Messageon the Application Portal.
3. Now the applicants will be allowed to login with the Enrolment number and password.

Application Process:
Step 1: Applicants can sign in into the portal with the credentials as per the below screenshot.
After successfully signing in, the applicants will be redirected to the dashboard and they arerequired to click the “Application Form(s)”
Application Process:
Step 1: Applicants can sign in into the portal with the credentials as per the below screenshot.
After successfully signing in, the applicants will be redirected to the dashboard and they arerequired to click the “Application Form(s)”
Application Process:
Step 1: Applicants can sign in into the portal with the credentials as per the below screenshot.
After successfully signing in, the applicants will be redirected to the dashboard and they arerequired to click the “Application Form(s)”

Then the applicant will be able to see following page with the title "My Applications(s)".
Step 2: The applicants are required to select the Examination Name and Check the eligibility and incase the candidate fulfils the required eligibility criteria for the examination, he/she has to click the‘Continue’ button to proceed further for filling up the application form.

Step 3: The form will appear on the screen, once the applicant clicks on “Application Details”. Somefields would be pre-filled with the registration details. Other fields are required to be filled by thecandidate.
Note: Mandatory fields have been marked with red asterisk. They are to beessentially filled up before you will be allowed to 'Save' of the form.

Step 2: Once you have filled in all the required fields of the 'Applicant Details', Click on the 'Save& Continue' button given at the bottom of the page (as shown above).
How to Upload image file (in jpeg format; size limit 100kb) of my scanned photograph andsignature?
Step 1: To upload the image file of your scanned passport size colour photograph and signature, clickthe button 'Upload Photograph and Signature' button available on the left panel. On clicking, you willsee the following screen:
(Your scanned passport photo should be within 3.5 x 4.5 cm in size, scanning resolution should bewithin 100 dpi & file size should be less than 100 KB.)

If you are facing any problem to upload your photo orrejected by the system then we are requested you to resizeyour photo as per the sample images shown here.To Resize your scaned photo please follow the followingsteps:
1. Right click on the scaned photo file → Open with →Microsoft Office Picture Manager
2. Then look at the top menus, Click Picture → Resize3. Now look at the right pannel, Select the radio button
Custom width x height, And write width = 138px, height =177px. Then Click OK to complete.
4. If you are not able to do this properly, then you cantry 'Crop' feature for the 'Picture' menu
5. The save the file.
Step 4: Choose the image file (jpeg format; photo should be within 3.5 x 4.5 cm in size, scanningresolution should be within 100 dpi & file size not more than 100 kb) of your scanned passport sizephotograph and signature and click the button 'Upload Photo' and 'Upload Signature' button givenbelow the Box. After you have successfully uploaded the photograph and signature one by one, youwill see the following page:

Step 5: After filling up application click the 'Save and Continue' Button given at the bottomyou have filled up all the required fields of the 'Academic Details', here you add your passedexamination details and Click on the 'Save & Continue' button.
Step 5: After filling up application click the 'Save and Continue' Button given at the bottomyou have filled up all the required fields of the 'Academic Details', here you add your passedexamination details and Click on the 'Save & Continue' button.
Step 5: After filling up application click the 'Save and Continue' Button given at the bottomyou have filled up all the required fields of the 'Academic Details', here you add your passedexamination details and Click on the 'Save & Continue' button.

Step 6: After filling up application click the 'Save & Continue' Button given at the bottom you havechoose your preferable 'Centre', here you add your preferable examination centre and Click on the'Save & Continue' button. (NOT APPLICABLE FOR ALL POSTS)
Upto this stage, you have completed all stages of the Application Form. Now, click the ‘Save &Continue’ button given at the bottom of the page. This will help you see entries made in varioussections of the Application Form. In case you want to edit some details, you should do so beforeclicking ‘I agree that all the information provided here, are correct according to my knowledge’checkbox and clicking the 'Confirm & Submit' button because once you confirm and submit anapplication form, it cannot be edited further.
In Applicant Form View page, you can check all information which you have entered in yourapplication process. If everything is ok then click the button I agree that all the informationprovided here, are correct according to my knowledge’ and Click 'Back to My Application' buttonfor making the payment.

After that system will show you the Make Payment button to complete the payment.
How to pay the Application Fees?Step 1: In your application portal 'Make Payment' button will be visible, here you can get bothONLINE and OFFLINE Payment mode. You have to select the exam and click on any of thepayment available modes. On clicking you will see the following screen.

Step 2: You can select the applications for which you want to pay the PSC Examination PortalOnline Fee by clicking 'Continue for ONLINE Payment' the check box given in the bottom left.Now you will be shown the Final payment page. You have option of paying Online Fees [usingCredit Card/ Debit Card/Net Banking] through payment gateway available on the Portal [by clicking'Pay Now & Submit Application'].
Step 2: You can select the applications for which you want to pay the PSC Examination PortalOnline Fee by clicking 'Continue for ONLINE Payment' the check box given in the bottom left.Now you will be shown the Final payment page. You have option of paying Online Fees [usingCredit Card/ Debit Card/Net Banking] through payment gateway available on the Portal [by clicking'Pay Now & Submit Application'].
Step 2: You can select the applications for which you want to pay the PSC Examination PortalOnline Fee by clicking 'Continue for ONLINE Payment' the check box given in the bottom left.Now you will be shown the Final payment page. You have option of paying Online Fees [usingCredit Card/ Debit Card/Net Banking] through payment gateway available on the Portal [by clicking'Pay Now & Submit Application'].

After a successful payment you can take the Print of the form.
For Offline Payment through UBI Bank:
On clicking 'Cash Payment through UBI Bank' for offline payment.
Now you will click button 'Generate & Print Challan' for generate United Bank of India Challan,containing all details can be printed:
After a successful payment you can take the Print of the form.
For Offline Payment through UBI Bank:
On clicking 'Cash Payment through UBI Bank' for offline payment.
Now you will click button 'Generate & Print Challan' for generate United Bank of India Challan,containing all details can be printed:
After a successful payment you can take the Print of the form.
For Offline Payment through UBI Bank:
On clicking 'Cash Payment through UBI Bank' for offline payment.
Now you will click button 'Generate & Print Challan' for generate United Bank of India Challan,containing all details can be printed:

Online Support ServicesPSC Online Admission Portal.Online Support ServicesPSC Online Admission Portal.Online Support ServicesPSC Online Admission Portal.