guideline/catalog leak seal & water stop
TRANSCRIPT

Guideline/Catalog
45
LEAK SEAL & WATER STOP CRACK INJECTION SYSTEMS
USA 1+ 714-662-4445 sealboss.com
How to Choose Products, Packers, Pumps SealBoss ® 1-2-3 at 45 Degree Crack Injection ™ SealBoss ® Curtain & Bladder Injection SealBoss ® Pumps, Packers, Injection Tube

SealBoss Corp. USA [email protected] ph. 877-932-2293 intl. 1+ 714-662-4445
Sea
lBos
s®Le
ak S
eal &
Wat
er S
top
Cra
ck I
nje
ctio
n G
uid
elin
e
Choosing Your Products: Choosing the product with the correct properties for the job is the first step to a successful and long lasting leak seal and crack injection application. Material with the appropriate physical properties simplifies the application and provides for long term durability. SealBoss offers a wide selection of hydrophilic and hydrophobic products with varying degrees of properties such as viscosity, expansion rate, reaction time, flexibility, density and hardness. Please contact your SealBoss representative for more info.
Hydrophobic & Hydrophilic Product Groups
SealBoss 1510/1570/1570LV/1500 Water Stop Foam grouts are hydroactive hydrophobic products that share common properties. Water/moisture initiates the reaction only, but the cured product is insensitive to moisture and of a constant volume. Since water is not a component of the foam structure, the cured material is essentially not effected by water or dryness and does not shrink or swell. Products are not effected by freeze/thaw and wet/dry cycles. SealBoss 1640 Foam & SealBoss 1403 PUR Resin are hydrophobic products that do not require water to react.
SealBoss FlexGel & SealBoss 2400 Acrylate (Acrylic) Gel are hydrophilic products. Water/moisture initiates reaction and the product is capable of absorbing and incorporating water post cure, thereby swelling and forming a waterproofing flexible gel or foam. Hydrophilic products are recommended for applications in permanently moist environments, curtain/bladder injection, and capillary injection.
Viscosity
SealBoss 1510/1570/1500 Water Stop Foams & Flexgel are of low viscosity for good penetration into concrete cracks and joints. For hairline cracks, capillary fissures and tight cold joints we provide super low viscosity products such as SealBoss 1570LV Water Stop Foam, SealBoss 1403 PUR Resin, SealBoss 2400 Acrylate (Acrylic) Gel.
Accelerator Adjustable Hydro ActiveExpansion & Reaction Time
The reaction times and expansion rates of SealBoss 1510/1570/1570LV Water Stop Foams are adjustable
by adding a specific amount of SealBoss accelerator. The gel times of SealBoss 1403 PUR Resin & SealBoss 2400 Acrylate (Acrylic) Gel are also adjustable.
The reaction time and expansion rate of a foam determine the water stop and penetration properties of the product. Faster reaction times and expansion benefit water cut-off properties, slower reaction times enhance product penetration in the substrate.
Water-reactive polyurethane grouts expand on contact with water by the resulting CO2 gas. The foam expansion creates a compression seal which supports the sealing properties of the injection grout. Rapid expansion helps to cut-off high-volume active water leaks and benefits curtain/bladder grouting. The expansion rate of a foam determines material consumption, cell structure and density of the cured product. It should be considered that expanding foams can create a significant amount of pressures. Our best-selling, industry standard SealBoss 1510 Water Stop Foam, can rapidly expand between 5 to 50 times (50X) of free rise product volume when catalyzed accordingly.
Flexibility & Density
For most injections in joints, cracks and some curtain/bladder wall grouting that do not experience much movement, semi flexible standard products with high expansion rates and higher compressive strengths such as SealBoss 1510 Water Stop Foam, SealBoss 1500 2-Component Water Stop Foam are used. Structures exposed to thermal expansion and contraction or dynamic loading resulting in increased movement may require a flexible formulation grout such as SealBoss 1570/1570LV Water Stop Foam, SealBoss 1403 PUR Resin or SealBoss Flexgel. SealBoss 1403 PUR Resin is also recommended as follow-up and final seal injection in critical foam injection areas. Good product density, complete penetration and adequate product consumption make for a successful leak seal injection. Injection pressures must be high enough to provide for good material travel, proper penetration and density. We recommended to always monitor injection pressures and material flow closely. When done correctly, the high density injection material will form a compression seal and provide for a or a long lasting application.
SealBoss Corp. USA [email protected] ph. 877-932-2293 intl. 1+ 714-662-4445
Sea
lBos
s®Le
ak S
eal &
Wat
er S
top
Cra
ck I
nje
ctio
n G
uid
elin
e
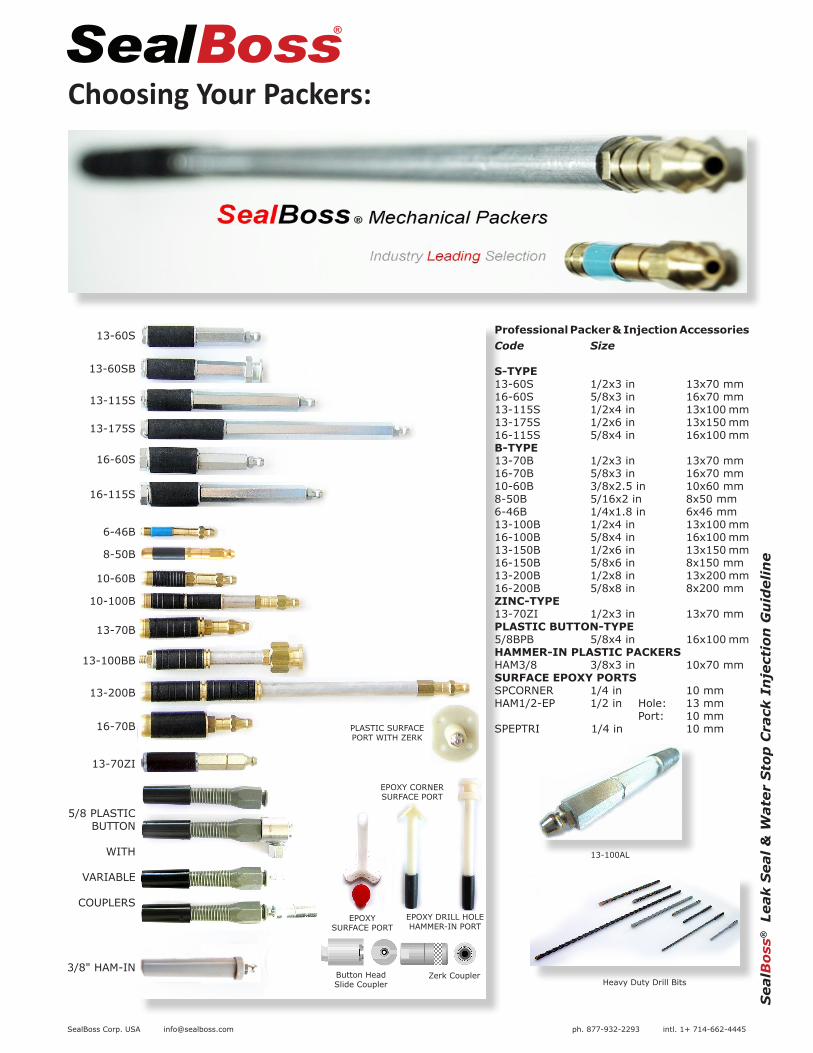
Choosing Your Packers:
13-60S
13-60SB
13-115S
13-175S
16-60S
16-115S
6-46B
8-50B
10-60B
10-100B
13-70B
13-100BB
13-200B
16-70B
13-70ZI
5/8 PLASTICBUTTON
WITH
VARIABLE
COUPLERS
3/8" HAM-IN
PLASTIC SURFACEPORT WITH ZERK
EPOXY SURFACE PORT
EPOXY CORNERSURFACE PORT
EPOXY DRILL HOLEHAMMER-IN PORT
Heavy Duty Drill BitsButton HeadSlide Coupler
Zerk Coupler
13-100AL
Professional Packer & Injection AccessoriesCode Size
S-TYPE13-60S 1/2x3 in 13x70 mm16-60S 5/8x3 in 16x70 mm13-115S 1/2x4 in 13x100 mm13-175S 1/2x6 in 13x150 mm16-115S 5/8x4 in 16x100 mmB-TYPE13-70B 1/2x3 in 13x70 mm16-70B 5/8x3 in 16x70 mm10-60B 3/8x2.5 in 10x60 mm8-50B 5/16x2 in 8x50 mm6-46B 1/4x1.8 in 6x46 mm13-100B 1/2x4 in 13x100 mm16-100B 5/8x4 in 16x100 mm13-150B 1/2x6 in 13x150 mm16-150B 5/8x6 in 8x150 mm13-200B 1/2x8 in 13x200 mm16-200B 5/8x8 in 8x200 mmZINC-TYPE13-70ZI 1/2x3 in 13x70 mmPLASTIC BUTTON-TYPE5/8BPB 5/8x4 in 16x100 mmHAMMER-IN PLASTIC PACKERSHAM3/8 3/8x3 in 10x70 mmSURFACE EPOXY PORTSSPCORNER 1/4 in 10 mmHAM1/2-EP 1/2 in Hole: 13 mm Port: 10 mmSPEPTRI 1/4 in 10 mm

SealBoss Corp. USA [email protected] ph. 877-932-2293 intl. 1+ 714-662-4445
Sea
lBos
s®Le
ak S
eal &
Wat
er S
top
Cra
ck I
nje
ctio
n G
uid
elin
e
SealBoss has been a leader in the injection packer technology since 1988.
Mechanical packers and injection ports are the gateway to successful injection. SealBoss supplies injection packers to customers worldwide. We offer mechanical packers varying in all key designs including Packer Material Type, Diameter, Length, and Ball & Valve Location.
Packer Material Type Mechanical Packer BodySealBoss mechanical packers are made from steel, brass, aluminum, zinc, various metal alloys and plastic. There are important differences in design and functionality for a variety of products, substrates and objectives. Contractor preferences and comfort levels are also a deciding factor. SteelSealBoss offers many heavy-duty steel packer variations. Steel offers the most strength and good resistance to oxidizing components found in acrylate/acrylic gels. SealBoss offers a wide variety of steel packers to suit all injection needs. Most packers are equipped with a rubber sleeve, some have a larger washer on the top of the packer to assist in the installation. Brass , Aluminum, ZincBrass, aluminum & zinc packers are economical alternatives to steel packers with similar functionality. The overall strength is lower than steel, brass, zinc and aluminum packers bodies are softer. In some designs, the shaft can be broken off by hammer after injection thus leaving a flush surface. This is an advantage if removal of packer prior to patching is not specified.
PlasticSealBoss Plastic packers come in many versions. Some permit low resistance, high volume product flow and very quick installation.
Button Head / Button TopThe SealBoss 5/8” (16mm) Button Head packer offers high volume flow with a button head (button top) coupler to minimize leakage. Insert the plastic sleeve in the drill hole and thread the plastic packer into the sleeve for a compression fit via the hex button head. Anti return valve: A steel ball placed in the shaft of the packer prevents product back-flow.
Hammer-In / Bang-InThe SealBoss Hammer-In port (Bang In Packer) is 3/8” (10mm) or 1/2” (13mm). The ports are inserted into the drill hole with the tap of a hammer. The plastic body of the packer creates a compression seal. The packers are set very quickly increasing productivity on the job site. Due to the lower friction fit, injection pressures are limited with this packer type.
Diameter, Length, Valves
DiameterAs a rule, and in addition to the packer material, a larger mechanical packer diameter permits higher injection pressures. 5/8” (16mm), ½” (13mm), 3/8” (10mm) and 1/4” (6mm) are most common diameters for man made structures, larger diameters are mostly utilized in rock and other natural structures. Caution: Packers and ports can exit the drill hole at high velocities under pressure. Correctly installed packers of the right dimensions will minimize this probability. In general, larger diameter packers prevent blow-out better than smaller packers.The size of the drill hole equals the diameter of the packer. We discuss diameters and drilling angles and techniques in detail in our 1-2-3 at 45 Degree Crack Injection TM Guideline. LengthThe shaft of the mechanical packer must be recessed into the drill hole deep enough to create an adequate compression seal in the substrate and to prevent spalling of the substrate during installation and injection. For a weak substrate and deteriorated concrete longer packers of 4” to 6” (10-15 cm)are recommended. During injection, the drill hole itself acts as a channel through which the product will travel. However, extended shaft length can be advantageous when the contractor is attempting to bridge a gap in the substrate. For such cases SealBoss provides special length packers to carry the material to a specific point within the substrate.

SealBoss Corp. USA [email protected] ph. 877-932-2293 intl. 1+ 714-662-4445
Sea
lBos
s®Le
ak S
eal &
Wat
er S
top
Cra
ck I
nje
ctio
n G
uid
elin
e
Low & High Pressure ValvesA ball valve is found in most packers to prevent material back flow on disconnecting the pressure line. In standard high pressure valves the ball is pressure loaded with a small spring. Low pressure valves omit the spring to permit lower injection pressures.
Top Mounted ValvesTop mounted valves include zerk-valves and button-head (button-top) valves. Button-head valves offer the most secure connection with minimal leakage. Some top-mounted zerks are supplied separately to observe port-to-port travel of injection grout during the injection process. Once material is leaking from the next packer(s), the contractor immediately installs the valve at that time.
Bottom Mounted ValvesBottom or stem installed valves allow removal of the top portion of the packer early after injection while keeping the drill holes sealed for patching of the hole with the remainder of the packer in the substrate.
As a rule packers should not be removed before the injected product has fully cured.
Surface PortsSurface ports are typically used for epoxy injection. These ports are glued to the surface or glued inside a drill hole. Many surface ports have an open/valve free design to work with quick release connectors with a multiple port injection option. They are typically supplied with caps to prevent epoxy back flow. There are also surface ports with a zerk fitting for a very secure fit at higher injection pressures. We also offer corner ports for placement in 90 degree construction corners.
SealBoss has been offering an industry leading selection of packers since 1988. Furthermore we provide all the hoses and connective equipment necessary. We carry a very large inventory and strive to supply you with the most suitable product. We also custom produce almost any design to meet our customers needs.
Choosing Your Pump:SealBoss offers a comprehensive selection of pro-fessional and proven injection and dispensing pumps to suit your needs. The right pump is determined by many factors including job size, product components and properties, injection volume and pressures, and your injection frequency.For injection grouts and gels, single and two component high-pressure pumps are utilized. Our gel pumps include a separate water flush pump. SealBoss offers various designs including piston and membrane pumps, with electric, pneumatic, drill-operated, or hand powered operation. Please contact your SealBoss technician for more info.

SealBoss Corp. USA [email protected] ph. 877-932-2293 intl. 1+ 714-662-4445
Sea
lBos
s®Le
ak S
eal &
Wat
er S
top
Cra
ck I
nje
ctio
n G
uid
elin
e
Injection Pump OverviewProduct Name Application Benefits Image
SL 1CSignature Line
High & Low Pressure Polyurethane Injection
• Top of the Line - Professional Use• Hopper Design (5 gal), Easy Cleaning• Electric Motor• Diaphragm System• 3000 psi - 1 Component
SLP 1CSignature Line
High & Low Pressure Polyurethane InjectionPneumatic
• Top of the Line • Pneumatic• 3200 psi • 1 Component
SLP 2C Signature Line
High & Low Pressure Polyurethane InjectionPneumatic
• Top of the Line • Pneumatic• 1500 psi • 2 Component
SLP 2C-5GSignature Line
High & Low Pressure Polyurethane InjectionSlab LiftingGeoTech Soil Stabilization
• Top of the Line - Professional Use• Economical Cold Foam Lifting, Injection• Electric Motor• Dual Piston System• 4000+ psi • 2 Component, Ratio: 1:1
SLP 3CGel Pump
High & Low Pressure Acrylate (Acrylic)Gel Injection
• Top of the Line - Stainless Steel • Pneumatic• 3200 psi • Superior 2 Component Gel Pump• Ratio: 1:1,1 Comp. Flush Pump
IP2CStainless SteelGel Injection
High & Low Pressure Acrylate (Acrylic)Gel Injection
• Top of the Line - Stainless Steel • Pneumatic• 2600 psi • Superior 2 Component Gel Pump• Ratio: 1:1 • 1 Component Water Flush Pump
PA3000
The Epoxy Standard
High & Low PressureEpoxy Injection& Polyurethane Resin Injection
• Top of the Line - Professional Use• Pumps EP and PU resin• Pneumatic• 850 psi• 2 Comp., Ratio: 2:1 Stand., 1:1 Custom
P3003-2C
PU & EP
High & Low Pressure Epoxy & Polyurethane InjectionPiston System
• Versatile, Pumps EP and PU Resin• Electric Drill Operated• Dual Piston System• 4000 psi• 2 Component, • Ratio: 2:1 standard, 1:1 custom
P2002 Injection Standard
High & Low Pressure Polyurethane Injection
• Light Weight, Modular Design• Electric Drill Operated• Single Piston System• 6000+ psi - 1 Component
IP495
High & Low PressurePolyurethane Injection
• Larger Project, Extended Injection • Electric Motor• Piston System• 2500 psi - 1 Component
HP100
High & Low Pressure Polyurethane Injection
• Hand Operated• Easy to operate• Single Piston System• 1800 psi - 1 Component

SealBoss Corp. USA [email protected] ph. 877-932-2293 intl. 1+ 714-662-4445
Sea
lBos
s®Le
ak S
eal &
Wat
er S
top
Cra
ck I
nje
ctio
n G
uid
elin
e
Gear
Wear adequate protective gear and goggles at all times and follow data sheet and SDS instructions.
Clean
If necessary, clean the face of the crack or joint by wire brush, pressure washing, or similar. A clean surface will help to identify cracks and problem areas more clearly. Spacing
Identify the drill hole spacing, pattern and depths. Depending on the width of the crack, space the packers at an approximate distance of 6”-12” (15cm-30cm). In hairline cracks the waterstop product won’t travel as far which results in tighter packer spacing, while wider cracks permit for easier flow and wider packer spacing. Stagger drill holes from one side of the crack to another.
45 Degree Angle Drilling
Remember the 1-2-3 at 45 Degree Crack In-jection ™ guideline! The number 45 represents the 45 degree drilling angle for drill holes. Based on 45-45-90 Right Triangle Geometry, SealBoss® recommends following the proven industry stan-dard of 45-degree drilling as the best approach to intersect the crack halfway through the structure. This is achieved by not drilling directly into the crack, but by dividing the substrate's thickness in half and then starting your drill holes that dis-tance to the left or right of the crack (in the case of a vertical crack) or above or below the crack (in the case of a horizontal crack). Drill back to-wards the crack with the goal of intersecting it at the half way point into the substrate. This tech-nique permits the "inside out" product flow from the middle of the substrate to the front and back of it, establishing a permanent compression seal within it.
For example, on a 10” thick concrete wall you'll move off the crack by 5” (8cm-10cm) and drill at a 45-degree angle towards the crack to hit your target. It helps to make an initial straight drill pilot hole and then tilt the drill to the desired angle. Typical drill spacing along the surface of the crack ranges from 6–12 inches (15cm-30cm) depending on the thickness of the crack. Hairline cracks require closer spacing than larger cracks because the material will not travel as far. Stagger the drill holes from one side of the crack to another in a stitch patter and intersect the crack while drilling. In structures thicker than 6 inches (10 cm) regular sized packers of 1/2" (13mm) and 5/8" (16 mm) are typically used. Thinner structures may require packers of lesser diameter (such as 5/16” (8mm) and 3/8” (10mm) packers) to prevent spalling of concrete during drilling and while setting and tightening the packers. In thin structures of less strength it may be advised to drill straight into the crack.
1-2-3 at Degree Crack Injection ™
Step 1: Mechanical Packer Hole Prep – Drill and Prep SealBoss® polyurethane and acrylate injection systems are designed for concrete crack, joint waterproofing and curtain, bladder injection applications as commonly found in concrete and masonry structures such as tunnels, dams, parking garages, basements, elevator shafts, pools and planters and many more.
Straight Drilling
Drilling into joints, such as concrete tunnel segments, is mostly performed in a straight fashion. Also, concrete structures of less than 6” thickness may not permit angle drilling as the concrete can spall. The same may occur with very tight cracks. In such conditions, it is advised to drill and install packers directly into the crack without penetrating the structure completely. Rebar
Most concrete structures are full of rebar steel reinforcement for structural strength. In a per-fect, crack free structure, concrete protects the rebar from corrosion by shielding it from moisture and air and providing a higher pH environment. However, as cracks develop the shield is compromised and air and water lead to carbonation and the rebar corrodes and expands while forming rust. The expansion of rusted rebar creates high forces against the concrete resulting in deterioration, more cracks and spalls. Chemical grout injection minimizes these processes. Rebar slows down the drilling process. As your drill bit makes contact with rebar the sound changes and the progression will slow down or may stop. Some drill bits permit drilling through rebar. This is generally not recommended and may even be prohibited. At this point moving the drill hole is the only option. If you hit rebar repeatedly, try drilling straight into the crack. Dead end drill holes need to be patched and sealed prior to injection to prevent leakage. Drill Dust & Flushing / Cleaning the Holes from Concrete Dust and Debris
While drilling deeper holes pull your drill bit out in repeatable motions, to remove the drilling dust and prevent your drill from binding up.
Debris from drilling can thicken the product during injection, resulting in higher injection pressures and reduced penetration. It is best practice to remove concrete dust and debris from the drill holes by flushing with a water hose until clean water is observed. Simply use a water hose to flush debris from the hole. Vacuuming out the dust can also be helpful if flushing is impossible. Blowing out the debris is another option, however, be aware that dust can be an inhalation hazard and appropriate gear is mandatory. Cleaning of holes won’t be necessary if water is actively running from your drill holes.
Foam, Resin, Gel Polyurethane & Acrylate Technology
45

SealBoss Corp. USA [email protected] ph. 877-932-2293 intl. 1+ 714-662-4445
Sea
lBos
s®Le
ak S
eal &
Wat
er S
top
Cra
ck I
nje
ctio
n G
uid
elin
e
Mechanical Packer Basics The packer and the drill holes must be of a quality that can withstand the injection pressures without leaking or moving inside the crack. Caution: Even the best packer may break loose or leak under pressure in some circumstances. SealBoss® Mechanical Packers are the recommended choice for pressure injection. They come in many sizes and designs to suit your job. Mechanical packers have a threaded shaft with a rubber base. Following insertion, tightening of the threaded shaft will compress the rubber inside the drill hole resulting in a compression seal. Typical diameters of these packers can range from 1/4–3/4 inches (6mm-19mm) with industry standards being 3/8–5/8 inches (10mm-16mm). In poured concrete substrates, the drill hole will act as a solid channel which will direct the resin to the crack which permits the usage of shorter length packers. In substrates which may exhibit voids such as block wall, stone and brick, SealBoss® recommends using longer packers which provide a definite grout delivery channel to the crack being sealed. Mechanical Packers Installation Mechanical packers are tightened to seal against the drill hole by expanding the rubber seal. You may pre-tighten the packer by hand to snugly seat the rubber all the way (approximately ¼”/6mm) inside the drill hole. Correct installation will prevent concrete from cracking around the outside of the drill hole. Depending on the packer design it is highly recommended to use a suitable ratchet/nut or wrench to tighten the packer. Electric drivers are also popular. Tighten packers securely to withstand injection pressures! But do not over tighten.
SealBoss Hammer-In Ports SealBoss Hammer-In Ports are also commonly used. Seat the ports with a hammer at moderate force. An electric driver or hand tool and suitable socket are used to screw the zerk fitting into the port. In most applications, hammer-in ports do not achieve the same injection pressures as mechanical packers and should only be used where maximum injection pressures are not necessary.
Packer Connectors Typically packers are equipped with a quick connect system which is either of a zerk type or button head / slide coupler type.
Step 2: Mechanical Packer Installation – Install and Flush
Zerk Type Connector The zerk type is most common. The applicator has to push the coupler over the zerk fitting and hold it in line with the packer. To disconnect the applicator “breaks” the connection by pushing the connector sideways. Button Head / Slide Coupler The button head type offers the most secure connection. The operator slides the coupler on and off the packer which makes the connection very secure, tight and less prone to unexpected disconnection and leakage. When done correctly the applicator does not have to hold the coupler in place. This is a big advantage in over-head injection and where large volume of product has to be pumped through one packer.
SealBoss® Packers SealBoss® supplies an industry leading selection of injection packers and ports for all situations and needs. Please contact a SealBoss® representative to recommend the right packer for your job.
Flushing the Cracks Prior to Injection It is recommended and very good practice to flush dry and not actively leaking cracks with water prior to injection. Flushing removes debris, indicates material flow, expected product penetration distance and provides moisture for the product to react with. If the crack is not accepting water, your hole may not be connected to the crack. In this case, drill from the opposite side of the crack and water test again. Flushing should be performed at lowest pressures possible to avoid damage to the concrete. Flushing is not always possible as the required equipment may not be available. In most cases, the injection will be successful without introducing extra water. Even if the product does not come in contact with water immediately, it will cure over time as natural moisture in concrete will stimulate a cure and hardening, possibly at a delayed pace. Water Pump for Flushing For flushing, it is recommended to have a dedicated water injection pump on site. Never water test with the same pump from which polyurethane resin will be dispensed. Polyurethanes are water activated and even small traces of moisture can cause pump failure.
Over Head Injection with
Button Head Packers

SealBoss Corp. USA [email protected] ph. 877-932-2293 intl. 1+ 714-662-4445
Sea
lBos
s®Le
ak S
eal &
Wat
er S
top
Cra
ck I
nje
ctio
n G
uid
elin
e
Most commonly used hydrophobic polyurethane foam grouts SealBoss® 1510 Water Stop Foam & 15x AcceleratorSealBoss® 1570 Water Stop Foam & 15x Accelerator Adjust reaction times based on flow rate and application variables by adding 15x accelerator accordingly in the range of 2-25%. Most common crack leaks are repaired with a 5% solution. This is roughly 7oz. of SealBoss® 15x Accelerator per 1 gallon of SealBoss® 1510 or SealBoss® 1570. For gushing leaks, 25% accelerator solution will provide quick results. Other hydrophobic PUR products SealBoss® 1570LV & 1500 Water Stop FoamSealBoss® 1500 & 1640 Hot Shot Cartridge SystemSealBoss® 1403 PUR SLV Injection Resin Hydrophilic injection products SealBoss® FlexGel and SealBoss® 2400 Acrylate Gel
Step 3: Injection Procedure with SealBoss® WaterStop Products
Important Prior to injection please read instructions on the product datasheet. Before preparing the SealBoss® WaterStop Product for injection make sure your pump is fully operational and completely free of any moisture. It is good practice to flush the pump out completely with SealBoss R70 prior to introducing any resin/foam grout. Contact your SealBoss rep with any question you may have.
Injection Procedure When your products are ready for injection have a cup handy to dispose of some resin to assure purity. Always start the pump at the lowest pressure setting. After coupling your grout injection hose to the secured and tightened packers, begin the injection process.
Starting from the bottom up, connect your injection line securely to the packer and begin with the lowest pressure that will move resin into the crack. Typically injection pressure will drop as soon as the material flows but pressure may have to be increased as products thicken and move into tighter cracks and fissures. Keep injecting at a slow rate as resin starts to show and flow from the crack. You may want to stop and restart the process for a minute to permit material to react and thicken. Monitor the consumption rate and stop injection when consumption equals leakage. A common observation will be the decrease of water flow from the face of the crack and/or reacting material exiting the face of the crack. This is a good indication of successful penetration and results. When the product does not move further along the crack disconnect and move to the next port. Utilize the shut-off valve at the end of your injection hose whenever the hose is moved. Depending on the equipment you may have to manually stop the pump first. The applicator must ensure that adaquate volume of material is injected into each crack to achieve good product density for a durable seal. It is advised is to inject 2-5 ports with observable penetration, and then go back to reinject those 2-5 ports once again to ensure adequate material consumption. Packers that still consume considerable amounts of product should be injected a third time or as much as necessary to create a permanent seal.
SealBoss® Oakum Technique If too much resin is flowing out, or washing out due to high water flow, you can use resin soaked SealBoss® Oakum to create a temporary plug to give the product time to react, expand, and seal.
Caution: Be prepared, product may shoot out from the structure or around the drill holes. Packers may blow out. Due to the use of high pressure injection equipment, product may travel further than expected and may show up many feet from the point of injection. Small cracks may show up that had been invisible prior to the injection process.
Quality Injection Job Often injection is a two man job – you need someone operating the valve and hose-and another manning the pump.Create a dense seal! It is quite possible to achieve differing results on the same injection application due to inadequate material consumption alone. If the crack is not accepting any product, you may not have drilled deep enough or the crack is directed in the opposite side. In this case, drill from the opposite side of the crack and ensure to intersect the crack. Packer Removal After allowing the material to fully cure, packers can be removed by loosening the shaft. Some applicators leave the rubber base in the wall and then patch the drill hole while others remove the entire packer prior to patch. In some injection applications packers even remain in place permanently. This is the applicator or owner's preference. A final cleanse of the face of the crack is necessary to remove cured product via wire brush, pressure washing, etc. The substrate is now ready for final finish.
SealBoss® R70 Pump Flush for Clean-up DO NOT CLEAN WITH WATER. If permitted on the job, flush all dispensing equipment initially with a small amount of solvent such as xylene to cut the product. Follow this step by flushing generously with SealBoss® R70 Pump Flush & Cleaner for protecting hoses and for pump lubrication purposes. Do not use solvent for the final flush as it will diminish the life of your equipment. Exception: Equipment for SealBoss® 2400 Acrylate is cleaned with water. See data sheet for details.
Hose set coupling to installed mechanical packer.
Staggered port placement on vertical crack.
Packer placement, staggered, at 45 degree angle.

SealBoss Corp. USA [email protected] ph. 877-932-2293 intl. 1+ 714-662-4445
Sea
lBos
s®Le
ak S
eal &
Wat
er S
top
Cra
ck I
nje
ctio
n G
uid
elin
e
Gear & Instructions Wear adequate protective gear and goggles at all times and follow data sheet and SDS instructions.
Procedure
Identify the water source and pattern of moisture intrusion. Most block, stone, and brick leaks are caused by failed positive side membranes. Block walls are often unfilled which also creates voids and pockets for water intrusion.
Drill Grid Pattern
Drill 3/8 or 1/2 inch holes along the water marks at 2 feet intervals. Moving up the wall, continue to space the holes at 2 feet intervals creating a grid pattern of injection holes as seen in the image. These drill holes are to penetrate the substrate at full depth creating a channel in the wall through which chemicals can be injected.
Packer Install
Once the grid pattern is created, mechanical packers may be inserted into each one. In the case of block walls that are not filled adequately, longer packers are recommended providing a full length channel which ensures that material reached the back side of the wall. it is not recommended to simply fill the blocks with materials – block wall curtain injections require material travel through the entire wall. In the case of older and disturbed stone or brick structures, however, it is also common to inject the structure itself as seen to the right.
Injection Products and Pumps
Based on the jobsite and application, SealBoss® may recommend using specific products such as hydrophobic SealBoss® 1510 Water Stop Foam, SealBoss® FlexGel hydrophilic polyurethanes or SealBoss® 2400 SLV Acrylates.
SealBoss® FlexGel can react with large amounts of water forming a hydrophilic foam or gel, providing a membrane like positive side shield. The expand and contract based on the surrounding water content. SealBoss® FlexGel can be injected through single component, high pressure equipment with the presence of moisture behind the substrate. Water can be fed prior or simultaneously if needed. Dual component and multi-ratio equipment can also be used. FlexGel will react in ratios of 1:2–1:15 (FlexGel: H₂O).
SealBoss® 2400 SLV Acrylate is a hydrophilic water thin injection material that offers specific characteristics.
The product must be pumped via a dual component stainless steel pump such as the SealBoss® IP2C or SealBoss® SL3C Gel Injection Pump. The uncured product can be cleaned off with water. The machines are equipped with a dedicated water flush pump unit.
Application
Because backfill and soil consolidation behind the structures are often unknown, applicators must monitor flow rates and material consumption closely. For example, a typical, estimated coverage for SealBoss® FlexGel hydrophilic polyurethane is 9 square feet/gallon. This equates to approximately ½ gallon injected into each drill hole. If large voids are expected behind the wall, expansive hydrophobic polyurethane such as SealBoss® 1510 WaterStopFoam can be injected initially in order to fill these voids and provide a solid mass against which the hydrophilic gel can be injected.
Inspection
Some time may be required to assess the coverage of the repair. Job site inspection following subsequent wet/dry cycles may require spot injections to the original grid pattern and/or to the migrating moisture pattern as the moisture intrusion is eliminated.
SealBoss ® Curtain & Bladder Injection
Injection of internal substrate, commonly found in deteriorated
brick and stone
Block wall curtain injection theory reinstating positive
side membrane
Grid pattern of injection sites, typical of curtain or bladder injection. Two feet
on center
Curtain or Bladder injections refers to chemical injection that is used on block, brick, stone and concrete substrates where the applicator observes large area below grade moisture intrusion and wetness through the entire substrate opposed to intrusion through a specific crack and/or joint.
Because of the immense costs associated with excavation and application of a new positive side membrane, the Curtain or Bladder injection method is an economically viable solution for repair. By drilling a grid pattern of holes the entire way through the substrate, applicators can repair the failed membrane from the inside of the structure.

SealBoss Corp. USA [email protected] ph. 877-932-2293 intl. 1+ 714-662-4445
Sea
lBos
s®Le
ak S
eal &
Wat
er S
top
Cra
ck I
nje
ctio
n G
uid
elin
e
System SolutionsSealBoss® offers complete system solutions and our Professional Starter Kits provide the applicator optimal probabilities for successful repairs. While the kits offer significant convenience and savings, all products and materials can be reordered individually for future projects. Professional Starter Kits include the products necessary for an industrial or commercial project including a high pressure, industrial grade pump.
SealBoss® Professional Starter Kits
• Affordable for beginning applicators on smaller and manageable projects• Low investment for high return repair system offering• Great way to familiarize yourself with SealBoss® Concrete Solutions• Additional revenue stream• Niche system solution creating company differentiation• Minimal investment for industrial grade system• Industrial grade pump for future applications• Adequate injection pressures and product flow equal better results• Support of established and valued SealBoss® brand• Significant amount of referral business
At this stage, you are now familiar with the SealBoss® Polyurethane Injection Systems, own an industrial grade pump, possibly through the purchase of a SealBoss® Professional Starter Kit, and may have repaired cracks and joints successfully and permanently! If you have found yourself at this stage in the repair industry, it is time to consider the SealBoss® Approved Applicator Program.
SealBoss® Approved Applicators Certificate
SealBoss® puts a considerable amount of resour-ces into engineer specification efforts and commercial architects and builders. It is quite common for engineers and architects to require an approved applicator for specialty repairs such as the chemical injection systems. In an effort to increase quality assurance and adhere to engineer specifications, SealBoss® offers a training program for contractors.
Enjoy Benefits of Approved Applicator Certificate
Professionalism, Competence and Knowledge
• Set your company up for success with an approved applicator certificate
• Qualify yourself in bid meetings with your certificate• Gain access to the SealBoss® lead generation system• Be included on SealBoss® applicator list for engineers• Join the proven SealBoss® Team
Please contact SealBoss® with all questions concerning our progression program to become an Approved Injection Applicator. Take the time to experience our commitment to service and knowledge by speaking with one of our experienced representatives. We look forward to hearing from you soon!
Starter Kit AdvantagesIt is important to note that the increased pressures and higher quality dispensing equipment of SealBoss® Professional Starter Kits achieve more favorable results for these repairs. As mentioned in the application guideline, the amount of material inside the crack or joint is paramount to the prolonged success of the repair. By pumping at higher pressures combined with re-injecting each packer one or two times, you will inevitably observe better material consumptions and travel, which creates a better density upon expansion, which creates a more closed cell structure which provides long-lasting results.
202001