guidance for detecting hedgehogs using footprint tracking ... · pdf fileguidance for...
TRANSCRIPT

Version 1 May 2015
1
Guidance for detecting hedgehogs using footprint tracking tunnels
By Henry Johnson, Hedgehog Officer PTES & Emily Thomas, Key Species Monitoring Officer PTES
All our hedgehog work is in partnership with the
British Hedgehog Preservation Society (BHPS)
Version 1 May 2015
2
Why survey for hedgehogs?
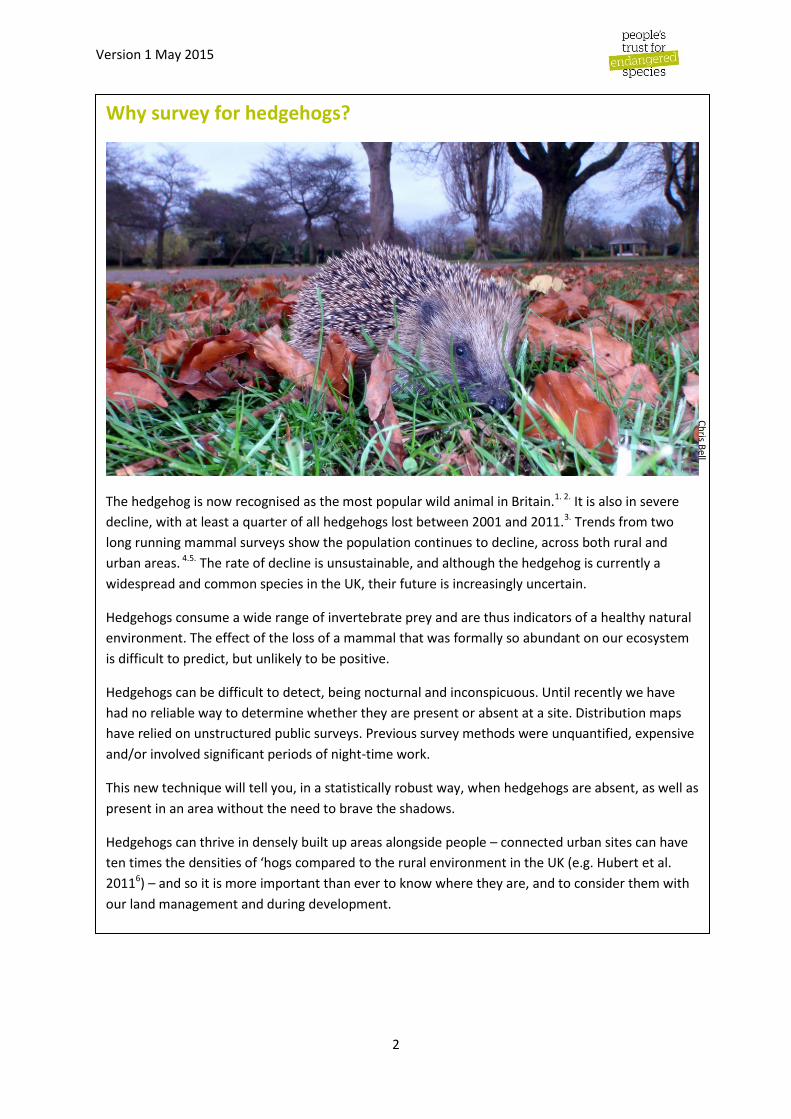
The hedgehog is now recognised as the most popular wild animal in Britain.1. 2. It is also in severe
decline, with at least a quarter of all hedgehogs lost between 2001 and 2011.3. Trends from two
long running mammal surveys show the population continues to decline, across both rural and
urban areas. 4.5. The rate of decline is unsustainable, and although the hedgehog is currently a
widespread and common species in the UK, their future is increasingly uncertain.
Hedgehogs consume a wide range of invertebrate prey and are thus indicators of a healthy natural
environment. The effect of the loss of a mammal that was formally so abundant on our ecosystem
is difficult to predict, but unlikely to be positive.
Hedgehogs can be difficult to detect, being nocturnal and inconspicuous. Until recently we have
had no reliable way to determine whether they are present or absent at a site. Distribution maps
have relied on unstructured public surveys. Previous survey methods were unquantified, expensive
and/or involved significant periods of night-time work.
This new technique will tell you, in a statistically robust way, when hedgehogs are absent, as well as
present in an area without the need to brave the shadows.
Hedgehogs can thrive in densely built up areas alongside people – connected urban sites can have
ten times the densities of ‘hogs compared to the rural environment in the UK (e.g. Hubert et al.
20116) – and so it is more important than ever to know where they are, and to consider them with
our land management and during development.
Ch
ris Bell

Version 1 May 2015
3
This technique was devised from research initially undertaken by Richard Yarnell, Phil Baker and The
Mammal Society, in a project funded by PTES and BHPS.7
Page 3 Introduction
Page 3 Figure 1: Hedgehog tacking tunnel diagram
Page 3 Buying & making tracking tunnels
Page 4 Methodology for surveying for hedgehogs with footprint tunnels
Page 4 Table 1: Timeline for surveying 1km2
Page 9 Troubleshooting
Page 9 Footprint identification guide
Page 29 References
Page 30 Appendix 1: Example recording sheet
Page 30 Appendix 2: Health and Safety
Page 32 Appendix 3: Recommended sinage
Page 32 Appendix 4: Instructions: make your own tracking tunnel
1. Introduction
The document is designed to help anyone who may want to tell whether hedgehogs are present in
an area of land, irrespective of the habitat. The tracking tunnel methodology is currently the only
statistically robust way of determining whether hedgehogs are present or absent in any given area.
The protocol has been verified in a large scale field trial.8
Tracking tunnels are simple, plastic triangular tunnels. The tunnels are usually constructed from
light, commercially available plastic (e.g. Correx™ ). They contain a removable tracking plate that
contains two ‘ink’ strips, an area for bait and two sheets of paper to record the footprints of the
target animal.
Figure 1. Hedgehog tracking tunnel diagram (adapted by Emily Thomas from Yarnell et al. 2014)
Version 1 May 2015
4
2. Buying or making tracking tunnels
You can currently buy tracking tunnels from Wildcare: http://www.wildcareshop.com/tracking-
tunnel-1.html.
Alternatively, it is cheaper to make them yourself, particularly if you are surveying more than one
site. Details for how to do this are in Appendix 4.
3. Methodology: Using tracking tunnels to determine hedgehog
presence or absence
Summary: If ten baited tunnels are set in up to 1km2 for 5 consecutive nights and NO hedgehog
footprints are detected, the surveyor can be 95% sure hedgehog are ABSENT from the area.
Positioning of the tunnels is critical, and they must be checked each day. The technique can not
currently be used to estimate abundance.
3.1 Timing
Hedgehogs can be surveyed for at any time during their active period, between April and October in
the UK. The survey requires 6.5 days to complete (for each 1km2): 1.5 days for preparing/dismantling
the equipment and five days for undertaking the survey. All fieldwork can be undertaken during
daylight hours.
For each 1km2, ten tunnels are required. Two 1km2 sites could feasibly be surveyed by two people in
6 days if the sites are close together. The logisitics of the methodology would make doing more than
this unfeasible without more time.
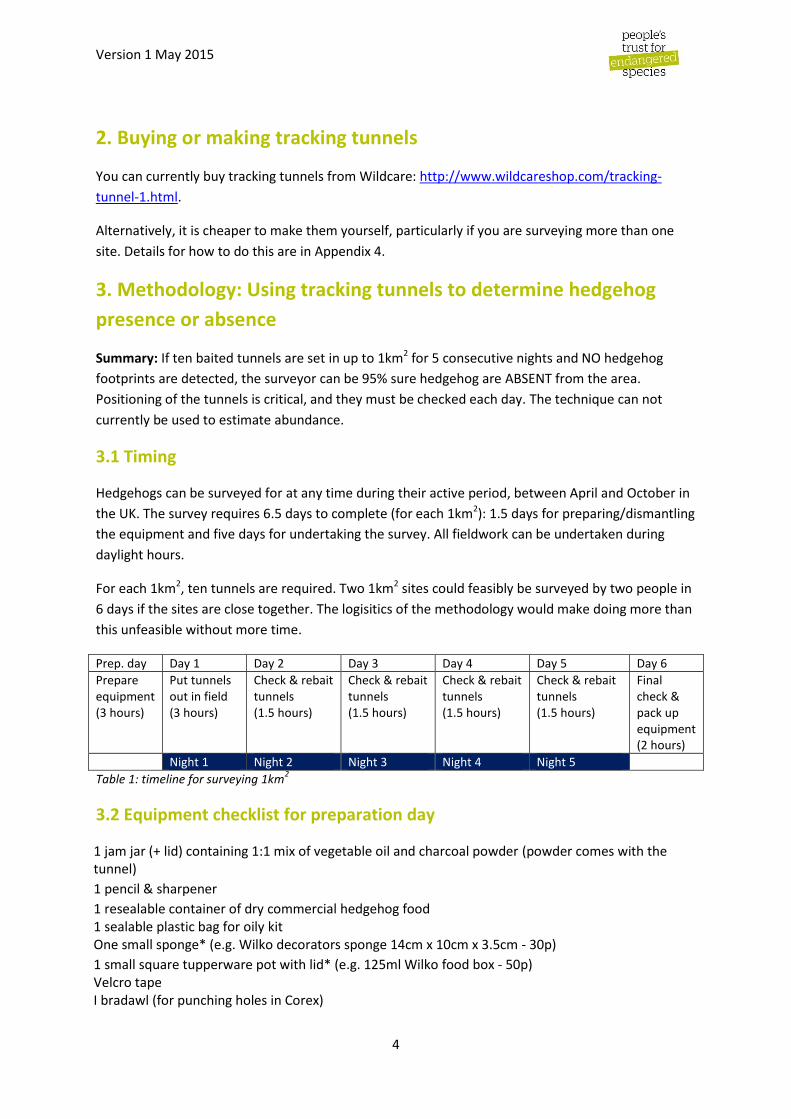
Prep. day Day 1 Day 2 Day 3 Day 4 Day 5 Day 6
Prepare equipment (3 hours)
Put tunnels out in field (3 hours)
Check & rebait tunnels (1.5 hours)
Check & rebait tunnels (1.5 hours)
Check & rebait tunnels (1.5 hours)
Check & rebait tunnels (1.5 hours)
Final check & pack up equipment (2 hours)
Night 1 Night 2 Night 3 Night 4 Night 5
Table 1: timeline for surveying 1km2
3.2 Equipment checklist for preparation day
1 jam jar (+ lid) containing 1:1 mix of vegetable oil and charcoal powder (powder comes with the tunnel)
1 pencil & sharpener
1 resealable container of dry commercial hedgehog food 1 sealable plastic bag for oily kit One small sponge* (e.g. Wilko decorators sponge 14cm x 10cm x 3.5cm - 30p)
1 small square tupperware pot with lid* (e.g. 125ml Wilko food box - 50p) Velcro tape I bradawl (for punching holes in Corex)
Version 1 May 2015
5
10 A4 laminated 'do not disturb' signs (see Appendix)
10 laminated labels, numbered for each tunnel
10 footprint tunnels (+ 10 tracking plates)
Recording sheet (plus spares) (see Appendix)
A4 paper for tracking plate (minimum 50 sheets plus spares)
50mm masking tape
Butterfly fasteners (80 + spares) – paperclips can be used
Clipboard
Plastic sleeves (to store marked footprint sheets)
Map of site (large scale, to mark tunnel locations on)
GPS (desirable for accurate mapping of tunnels)
Tent pegs (ideally 20 – to secure tunnels) 10 food tubs (= bottom cut from clear plastic picnic cups) or petri dishes Secateurs
* = or paintbrush
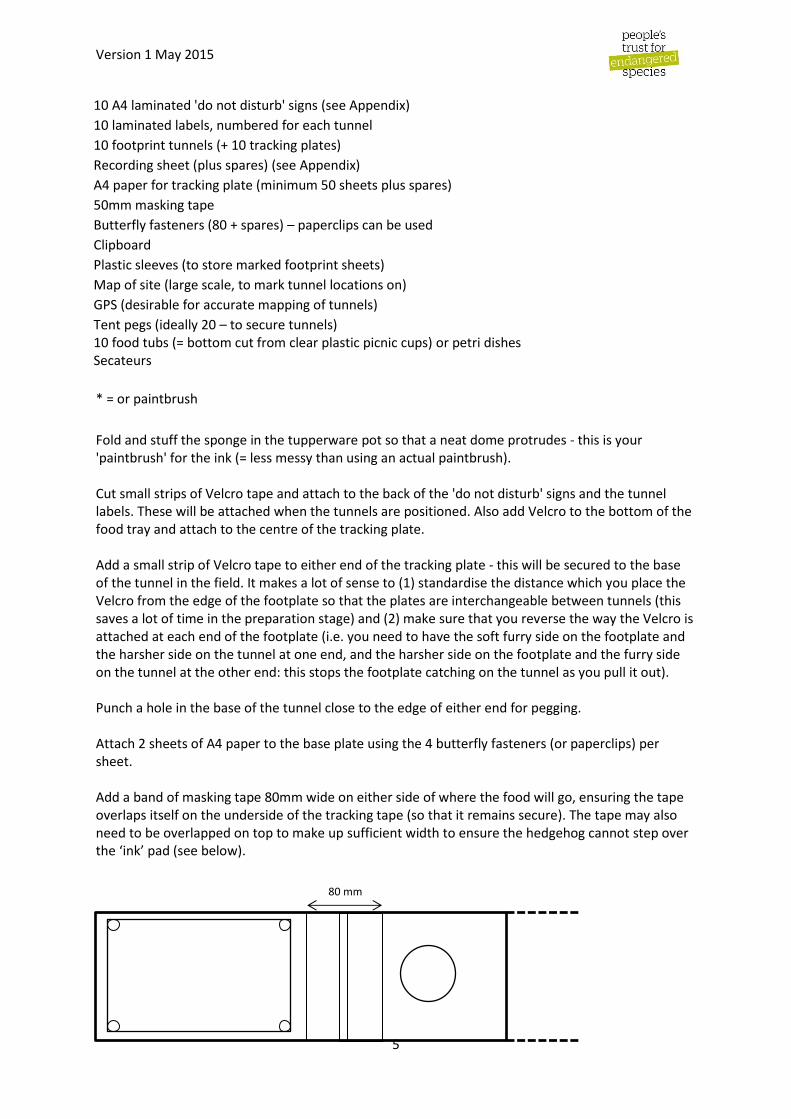
Fold and stuff the sponge in the tupperware pot so that a neat dome protrudes - this is your 'paintbrush' for the ink (= less messy than using an actual paintbrush). Cut small strips of Velcro tape and attach to the back of the 'do not disturb' signs and the tunnel labels. These will be attached when the tunnels are positioned. Also add Velcro to the bottom of the food tray and attach to the centre of the tracking plate. Add a small strip of Velcro tape to either end of the tracking plate - this will be secured to the base of the tunnel in the field. It makes a lot of sense to (1) standardise the distance which you place the Velcro from the edge of the footplate so that the plates are interchangeable between tunnels (this saves a lot of time in the preparation stage) and (2) make sure that you reverse the way the Velcro is attached at each end of the footplate (i.e. you need to have the soft furry side on the footplate and the harsher side on the tunnel at one end, and the harsher side on the footplate and the furry side on the tunnel at the other end: this stops the footplate catching on the tunnel as you pull it out). Punch a hole in the base of the tunnel close to the edge of either end for pegging. Attach 2 sheets of A4 paper to the base plate using the 4 butterfly fasteners (or paperclips) per sheet. Add a band of masking tape 80mm wide on either side of where the food will go, ensuring the tape overlaps itself on the underside of the tracking tape (so that it remains secure). The tape may also need to be overlapped on top to make up sufficient width to ensure the hedgehog cannot step over the ‘ink’ pad (see below).
80 mm
Version 1 May 2015
6
3.3 Putting out the tunnels (day 1)
Using the map as a guide, take the prepared tunnels into the field, along with all of the additional kit.
It’s easiest to carry the tunnels in flat-packed form as they are unwieldy.
Positioning
Radiotracking studies have shown that hedgehogs use linear features to navigate (e.g. Hof and Bright
20109), so it is important that you position the tunnels along these features wherever possible. A
linear feature can be a fence, wall or hedge line, the boundary between a cropped field and its
margin, or between two different vegetation types.
Fine tune the positioning of each tunnel using the following criteria.
Tunnels need to be
1. positioned along (i.e. in line with, lengthways) linear features (e.g. hedges, walls, fences,
boundaries between different vegetation types)
2. evenly distributed across the site, a minimum of 100m apart, with no more than two tunnels
per field
3. positioned in places where hedgehogs will preferentially walk: short grass>long grass>bare
soil>crop>ploughed field
4. positioned so that the entrance is flush with ground level at either end
5. located so as to minimise interference from livestock
6. located so as to minimise interference from the general public
Try to find an optimal position for each tunnel as close to the original map location as possible, so
you maintain an even distribution of tunnels across the site.
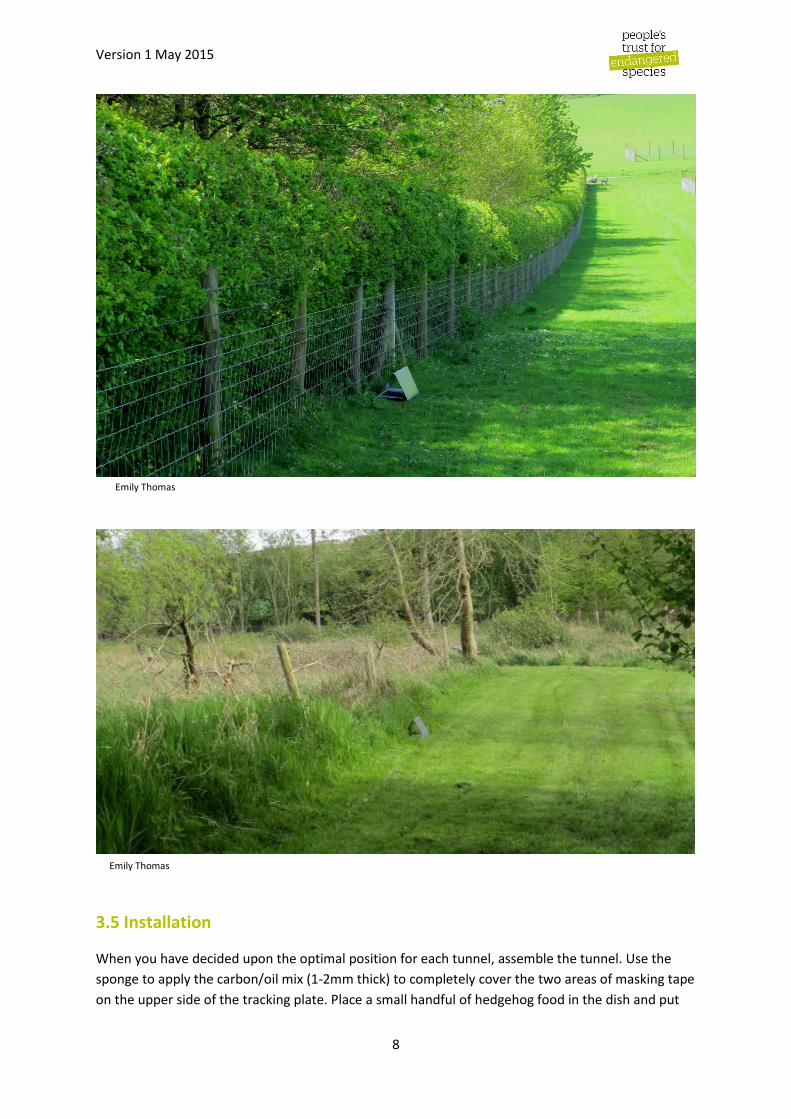
3.4 Examples of optimally positioned tunnels in the field

Version 1 May 2015
7
Henry Johnson
Henry Johnson
Version 1 May 2015
8
3.5 Installation
When you have decided upon the optimal position for each tunnel, assemble the tunnel. Use the
sponge to apply the carbon/oil mix (1-2mm thick) to completely cover the two areas of masking tape
on the upper side of the tracking plate. Place a small handful of hedgehog food in the dish and put
Emily Thomas
Emily Thomas

Version 1 May 2015
9
the tracking plate carefully back into the tunnel, so as not to spill any. Peel off the outer layer of the
Velcro and stick the ‘do not disturb’ sign and the label to the outside of the tunnel. Then carefully
position the tunnel, pegging it down if necessary. Remove any twigs or leaves (secateurs) obstructing
either end. Take a photo for your records if you wish and note down the GPS location.
Checking the tunnels (day 2- day 6)
Kit checklist: data recording sheet, clipboard, pencil, sharpener, A4 paper (min 20 sheets), hedgehog
food, oil/carbon mix in jar and applicator in bag, camera, map, masking tape, plastic sleeves.
This can be done at any time of day. Morning checks are likely to preserve the prints in best
condition (especially in wet weather), but evening checks may avoid the bait being tampered with
during the day (e.g. by dogs).
Check the tunnels for prints of all animals, ensuring they are labelled before storing in the plastic
sleeve. Ensure the food is replenished and replace any damaged sheets (e.g. rain, slugs). If you have
to remove the tracking plate then it’s worth reapplying the carbon/oil mix. If the masking tape has
come loose you may need to replace it. Make a record on the data sheet.
Pack up the kit whilst you do the final check (day 6).
4. Potential problems and how to deal with them
Potential problem Solution
Slugs eat the paper footprint sheets and damage the prints
In wet weather ensure the tunnels are checked early in the morning, and the paper sheets are refreshed.
Livestock eat or damage the tunnels Try to avoid surveying fields with livestock present – instead place tunnels on the other side of boundaries adjoining fields containing animals. If tunnels are moved record this information.
Tunnels blow away Use tent pegs to secure tunnel.
Tunnels are stolen or vandalised by people Signage is essential on sites that have public access (see Appendix). If a tunnel is lost mid-way through the survey it should be replaced immediately. If a tunnel is moved it should be moved back to the original position, or as close to this as possible if they need to be repositioned.
Tunnels are damaged by other animals e.g. dogs, badgers
No way of avoiding this, although it should be rare. Pegging down tunnels may help. In public areas tunnels can be located along linear features that are less accessible to dogs. If tunnels are moved record this information.
No liner features on the site Only infrequently will sites be completely lacking of boundaries of any type. Any transition between vegetation types can be used to site the tunnels. Hedgehogs prefer to walk on grass over ploughed soil. If the site is completely homogenous space the tunnels evenly throughout.

Version 1 May 2015
10
Forgetting location of tunnels Make a map, and ideally plot GPS locations.
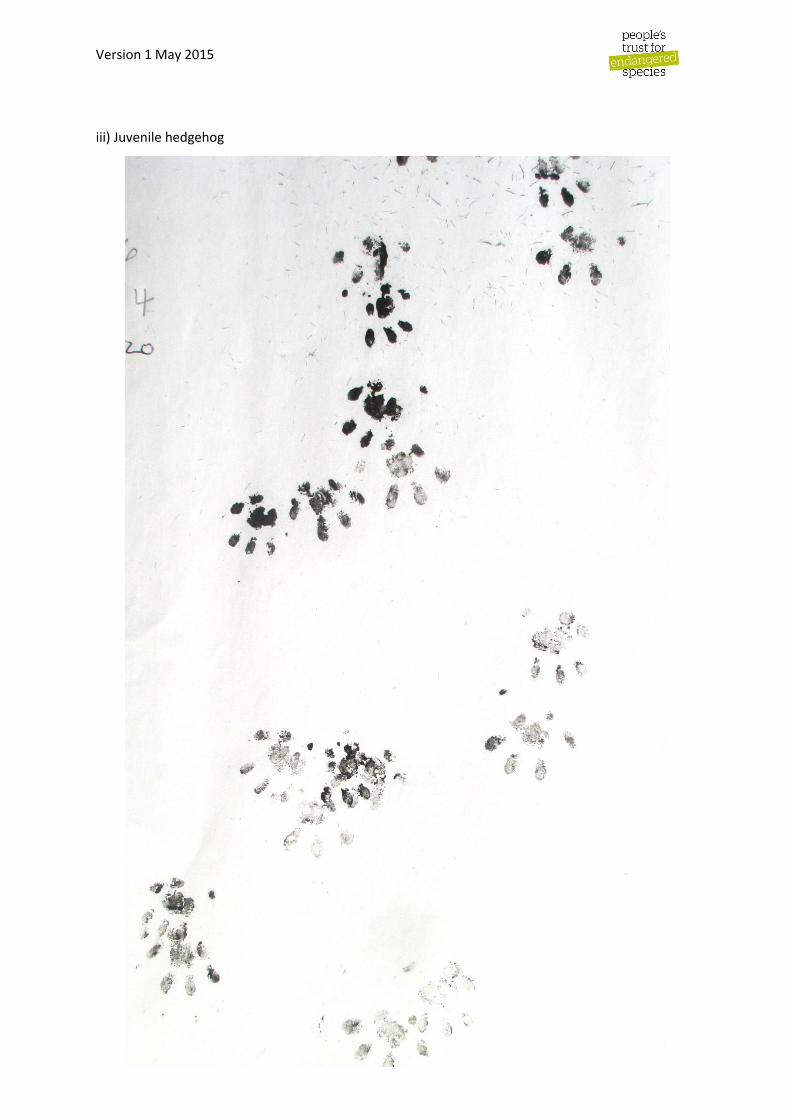
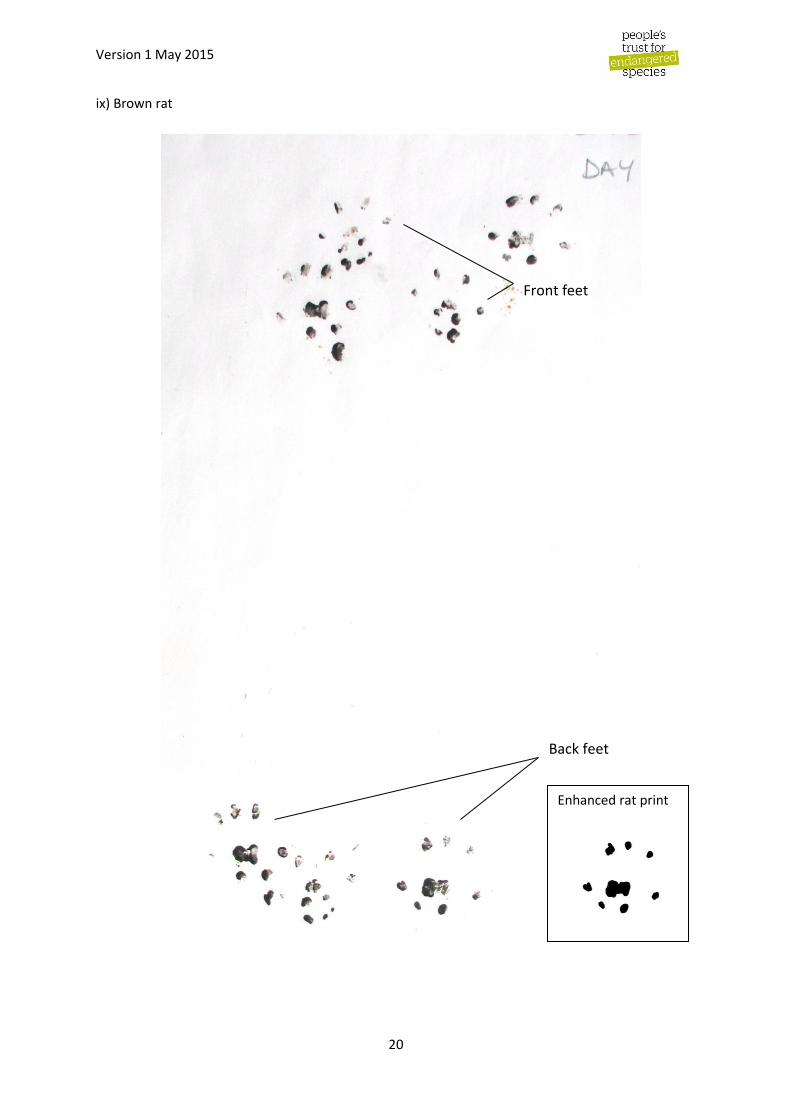
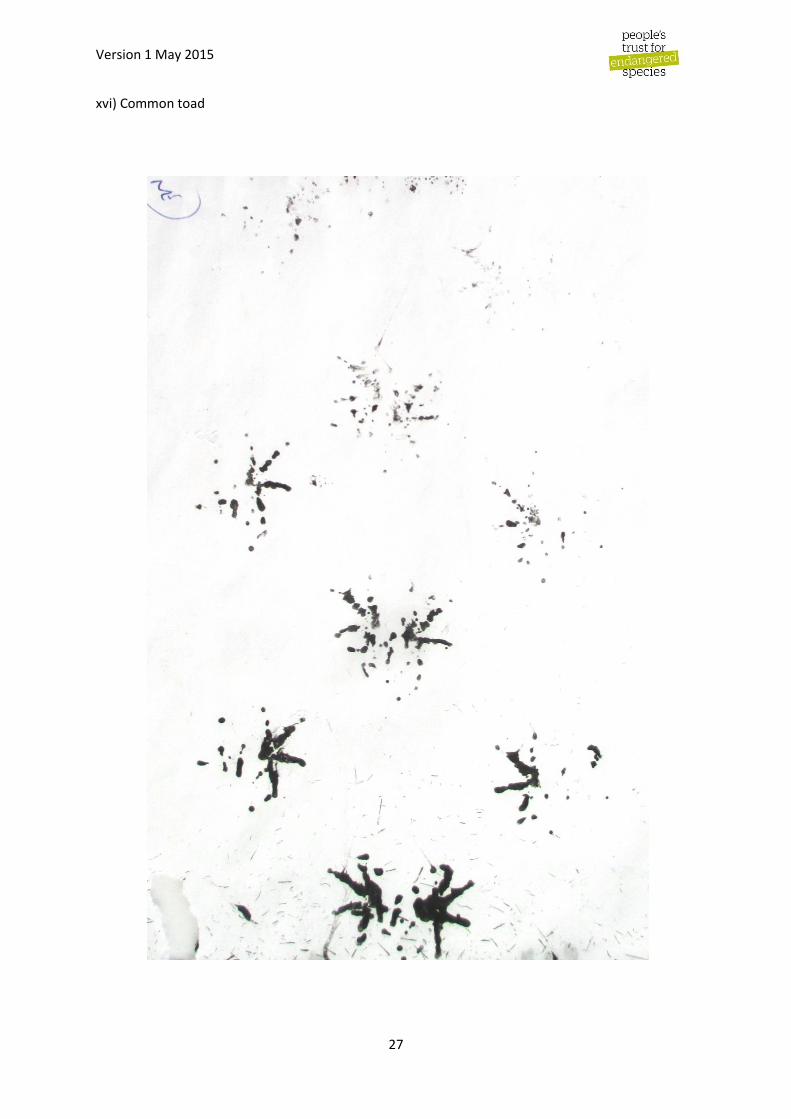
5. Footprint identification guide
All previous guidance on footprint identification has been based on prints from impressions in sediment, sand or snow. These will look quite different to prints made on paper by inky feet. As this is a new technique, the resources to help you identify mammals other than hedgehogs will be continually evolving. Visit www.ptes.org/hedgehogfootprintguide to download the latest version of this document.
Scale: all footprints are scaled to be life size if page is printed on A4 paper.

Version 1 May 2015
11
i) Adult hedgehog
Front feet
Back feet

Version 1 May 2015
12
ii) Several adult hedgehogs
Version 1 May 2015
13
iii) Juvenile hedgehog

Version 1 May 2015
14

Version 1 May 2015
15
iv) Adult hedgehogs

Version 1 May 2015
16
v) Hedgehog and domestic cat
Cat prints
cat

Version 1 May 2015
17
vi) Hedgehogs and small rodents

Version 1 May 2015
18
vii) Hedgehogs and small rodents

Version 1 May 2015
19
viii) Hedgehog and unidentified bird
Bird footprints
Version 1 May 2015
20
ix) Brown rat
Front feet
Back feet
Enhanced rat print

Version 1 May 2015
21
x) Brown rat and smaller rodents
rat front
foot

Version 1 May 2015
22
xi) Domestic cat

Version 1 May 2015
23
xii) Grey squirrel and small rodents
Squirrel prints

Version 1 May 2015
24
xiii) Weasel

Version 1 May 2015
25
xiv) Mink (Thanks to Wildwood for organising for a captive animal to produce this)
Mink front foot Mink rear foot

Version 1 May 2015
26
xv) Mink (Thanks to Wildwood for organising for a captive animal to produce this)
Version 1 May 2015
27
xvi) Common toad

Version 1 May 2015
28
xvii) Polecat (verified by Johnny Birks, Swift Ecology)

Version 1 May 2015
29
xviii) Unidentified bird
Bird footprints
from South Wales

Version 1 May 2015
30
6. References
1. BBC Wildlife magazine poll (2014) http://www.discoverwildlife.com/british-wildlife/britains-
national-species-revealed
2. Environment agency poll/Sky News (2007) http://news.sky.com/story/487033/meet-a-
national-hero-the-hedgehog
3. Roos, S., Johnston, A. and Noble, D. (2012) UK hedgehog datasets and their potential for long-
term monitoring. BTO Research Report No. 598.
http://www.ptes.org/files/1826_sobh_full_report.pdf
4. PTES Living with Mammals update 2014 http://ptes.org/wp-content/uploads/2014/11/LwM-
2014-update-high-res.pdf
5. PTES Mammals on Roads update 2014 http://ptes.org/wp-
content/uploads/2014/06/MoRsy14update.pdf
6. Hubert, P., Julliard, R., Biagianti, S. and Poulle, M-L (2011) Ecological factors driving the higher
hedgehog (Erinaceus europeaus) density in an urban area compared to the adjacent rural area.
Landscape and Urban Planning 103 (1), 34–43.
7. Yarnell, R. W., Pacheco, M., Williams, B., Neumann, J. L., Rymer, D. J. and Baker, P. J. (2014)
Using occupancy analysis to validate the use of footprint tunnels as a method for monitoring the
hedgehog Erinaceus europaeus. Mammal Review 44 (3-4), 234-238.
8. Yarnell, R. W., Pacheco, M., Williams, B., Neumann, J. L., Rymer, D. J. and Baker, P. J. (2014)
Using occupancy analysis to validate the use of footprint tunnels as a method for monitoring the
hedgehog Erinaceus europaeus. Mammal Review 44 (3-4), 234-238.
9. Hof, A. R. and Bright, P. W. (2010) The value of agri-environment schemes for macro-
invertebrate feeders: hedgehogs on arable farms in Britain. Animal Conservation 13 (5), 467-473.

Version 1 May 2015
31
7. Appendix
Appendix 1: Example recording table
Tunnel number
Day 1 Day 2 Day 3 Day 4 Day 5 Total number of days hedgehog prints detected
Footprints present?
Bait taken?
Footprints present?
Bait taken?
Footprints present?
Bait taken?
Footprints present?
Bait taken?
Footprints present?
Bait taken?
1
2
3
4
5
6
7
8
9
10
Total
Footprints Dash (-) = no prints; H = hedgehog; B= badger; C = cat; R= rodent; U = unknown; All other species written in full. Please note that the prints of more than one species may be present (e.g. H + R)
Bait taken If bait has NOT been taken please indicate with a cross (x); if bait has been taken please indicate with a tick (√) Tunnel lost or disturbed If the tunnel has been lost please write LOST in the footprint column for the respective day; replace the tunnel immediately and continue as normal. If the tunnel was disturbed write MOVED in the footprints column for the respective day; complete all subsequent cells as per normal. Total Please indicate the number of tunnels where hedgehog footprints were detected each day.
Appendix 2: Health and Safety
You are responsible for your own health and safety and should never put yourself or others in a position that could be dangerous. If at any point you have concerns about your own health and safety or that of others, you are strongly advised not to undertake/continue the activity.
Please take care with personal safety during the course of your survey. Field studies in the vicinity of water can be hazardous, especially if there are steep banks, so where possible it is best to work in pairs. We can take no responsibility for personal injury incurred by volunteers during the course of their surveys.
Access permission - Before commencing fieldwork you must obtain permission from the relevant landowner(s). Use this opportunity to ask landowners about the location of any potentially hazardous animals or natural features on their land. Heed any warning signs present on the land you are surveying. If access is granted but later revoked you must not continue with your fieldwork.
Park legally and sensibly, preferably off-road. Do not park in passing places. Take care to ensure entrances are not blocked and traffic is not obstructed.
Personal equipment - Wear appropriate clothing and footwear for the terrain and weather conditions you are working in. Remember that older boots and shoes may lack the grip necessary for working in and around water. The weather can be unpredictable so ensure that you have suitable clothing for all weather conditions. Carry a torch, spare batteries, a compass, whistle, first aid kit, a survival bag and high-energy food.
Be aware that it is likely you will get ink on your hands and this may transfer to your clothing and equipment. Try to use items you do not mind getting dirty as the ink may not wash off. If you are concerned please take extra care and you may want to consider using disposable gloves to protect your hands. You may want to put a plastic sheet or bin bags down in the car just in case any ink on the tunnels were to transfer to the upholstery.

Version 1 May 2015
32
We are unable to reimburse you for and damage the ink may cause to any clothing, possessions, equipment or belongings of any kind.
Contact - If possible avoid lone working. However, it is recognized that in some situations it will not always be possible to avoid lone working and in these situations particular care should be taken. Never go into the field without informing a responsible person of where you are going (for more remote areas a grid reference is particularly advised) and when you expect to return, how you intend to travel to (and access) your site and who to contact if you do not return when expected. Consider also leaving your vehicle registration details with a responsible person. Ensure that you have a well formed contingency plan if you do not return when expected. Always carry a fully charged mobile telephone with you. Mobile phones may not work in some remoter areas and it is advisable to locate the nearest public telephone box or nearest inhabited house to your survey site.
Weather - Be aware that hazards may increase in rain, strong winds and thunderstorms. If particularly bad weather is encountered do not commence your survey or cease it if already started. Surveying in heavy rain, strong winds, thunderstorms and temperatures of below 70C is not advised.
Assessing your site - All fieldworkers should consider the particular hazards that are associated with their site/s. Identify potential hazards before you commence your survey. Assess your individual circumstances and medical conditions in relation to the potential hazards on your site before choosing to undertake the survey.
Health and safety reporting - If volunteers are to be accompanied by other people in whatever capacity, the information provided in this document should be passed onto these other people. Any particular health and safety concerns that you have about your site/s or the safety methods should be reported to us.
Livestock - Care should be taken when entering areas with livestock, particularly cattle, rams and horses. Do not enter fields containing bulls and be especially careful around cows with young calves as they can be particularly protective of their young. If you have any concerns remove yourself from the situation. Rutting deer can also be aggressive in autumn. If you intend to take your dog while surveying ensure that you keep it on a lead and under control at all times. If possible leave it well cared for with family or friends.
Dogs – Be aware that many farms have working dogs on them and some may be aggressive. Check with the land owner before proceeding with any field work. If you are confronted with a dog and feel unsafe, stop the survey and remove yourself from the situation. Do not run as the dog is likely to chase you; instead walk slowly and calmly away. It is likely the dog is just curious and can smell the bait you are carrying.
Farm machinery - Farm machinery should not be touched at any point. Avoid fieldwork in close proximity to working agricultural machinery. Do not stand / walk where stones and other debris may be flung up e.g. behind a flail mower.
Terrain - Please take extra care when surveying along watercourses, cliff edges, areas of boggy ground, reed beds and loose rock. Wear appropriate footwear and never cross rivers unless via a bridge. Avoid hazardous areas such as quarries, railway lines and ravines and do not attempt to climb steep slopes, walls or fences. If fieldwork is being carried out along roadsides wear bright-coloured clothing and if walking along roads ensure that you walk facing on-coming traffic. Take particular care on blind bends in the road. Have somebody keeping watch for traffic.
Where possible avoid muddy or boggy areas. If moving through these areas is unavoidable test every footstep on the ground before putting your weight on your feet. Proceed slowly and push a stick into the mud to test its consistency and depth before proceeding.
Human confrontation - If you have any concerns about your personal safety at any point then cease surveying and remove yourself from the situation. Carry a personal alarm. Carry some identification to confirm the survey you are involved with. Avoid working alone. Consider the privacy of residents, particularly when working in and around residential areas.
Version 1 May 2015
33
Diseases - Volunteers may be exposed to disease during survey work.
Handling of faecal material from wild small mammals presents no danger of disease provided that reasonable precautions are taken to minimise any possible risks. Remember to wash your hands after collecting the tunnels from the sites and after extracting faeces, and especially before eating , drinking and smoking.
Cuts or abrasions on the hands should be covered by sticking plaster or rubber gloves. Take particular care with these simple precautions at sites where brown rats are common since here there may be a risk of Weil’s disease. 21
To reduce the risk of spreading disease, ensure footwear and outdoor clothing is cleaned before and after fieldwork. Follow any bio-security measures present on the land you are surveying, e.g. use disinfecting mats at gates etc.
If disease is expected or you feel unwell at any time after carrying out your survey then consult your doctor immediately explaining the type of fieldwork you have been involved in, including details of the mammal species that you have come into contact with. While not common, the following diseases can have severe effects and in rare cases can cause death:
1. Tetanus – This is caused by the bacterium Clostridium tetani, a common micro-organism found in soil. The infection of minor wounds and scratches can result in tetanus. All skin wounds should be covered before fieldwork is commenced and anti-tetanus treatments should be kept up to date. Always wash your hands after completing field work and before eating, drinking and smoking.
2. Leptospirosis (Weil’s disease) – This bacterium is carried by rodents, particularly rats, and is excreted by their urine. This disease is commonly found in water and as for tetanus ensure that all wounds are covered and avoid contact with water that may have been contaminated by rat or cow urine. The footprint tunnels are also possible reservoirs for Weil’s disease. Wash hands thoroughly before eating, drinking and smoking. If you suffer from flu-like symptoms following field work, contact your doctor immediately and mention Weil’s disease.
3. Lyme disease – The bacterium that causes Lyme disease is transmitted via the ticks of various species including deer, sheep and pheasants. When surveying in long grass or forested areas with thick undergrowth wear long trousers and long socks. On completing field work check exposed skin for ticks and if found remove. If a tick is found and you contract flu like symptoms contact your doctor and explain that you may have been exposed to Lyme disease.
4. Tick-borne encephalitis – This is a viral disease carried by animal ticks. There is a vaccine for this disease if prolonged exposure to tick-infested areas is a possibility. In Britain and Ireland a similar disease known as ‘Louping ill’ is also present. This is particularly associated with grouse and hares in moorland regions and has similar symptoms to tick-borne encephalitis ranging from flu-like symptoms to severe symptoms requiring hospitalisation.
5. Salmonellosis – This bacterial infection is common in rats and mice. If the bacterium is ingested as a result of poor hygiene, then mild to severe food poisoning will occur.
For further information on Health and Safety issues, visit the Health and Safety Executive website www.hse.gov.uk (tel.: 0845 345 0055). The following downloadable HSE guides are particularly relevant:
INDG163(rev2): Five steps to risk assessment INDG73: Working alone in safety

Version 1 May 2015
34
Appendix 3: Recommended signage for footprint tunnel (available as a pdf at www.ptes.org/hedgehogfootprintguide)
Appendix 4: Instructions: make your own tracking tunnel
Tunnel diagram:

Version 1 May 2015
35
Making the tunnels:
1. Buy black corrugated plastic sheets. 1230 x 1000mm (48 x 39 inch) 4mm “Short Flute"
option (e.g. http://www.mdpsupplies.co.uk/colouredcorrugatedplastic.asp). (“Short flute”
means that you will be able to fold the plastic along the flutes to make the tunnel.)
2. Use a Stanley knife and a straight edge (e.g. gaps between garden decking) to cut a piece off that
is 210mm x 1000mm. This will make the tracking plate.
210m
m
1000mm
1230mm
Version 1 May 2015
36
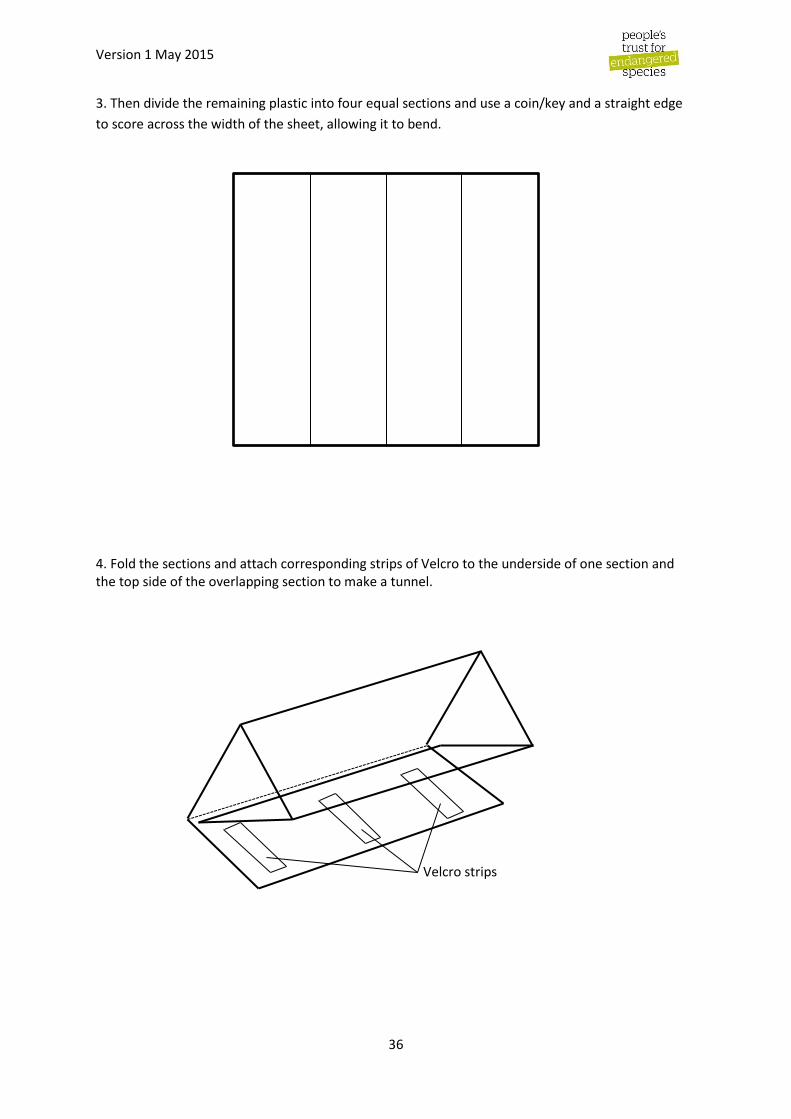
3. Then divide the remaining plastic into four equal sections and use a coin/key and a straight edge
to score across the width of the sheet, allowing it to bend.
4. Fold the sections and attach corresponding strips of Velcro to the underside of one section and the top side of the overlapping section to make a tunnel.
Velcro strips

Version 1 May 2015
37
5. Attach the paper and masking tape to the tracking plate; then use a small piece of Velcro to attach
the petri dish to the centre. If you plan to use butterfly fasteners, you will need to pierce the base
with a bradawl. Make sure the masking tape strips are 80mm wide, with a gap of around 60mm for
the food.
Add a strip of Velcro to either end of the underside of the insert so that it fixes to the bottom of the
tunnel but can still be removed. It makes a lot of sense to (1) standardise the distance which you
place the Velcro from the edge of the footplate so that the plates are interchangeable between
tunnels (this saves a lot of time in the preparation stage) and (2) make sure that you reverse the way
the Velcro is attached at each end of the footplate (i.e. you need to have the soft furry side on the
footplate and the harsher side on the tunnel at one end, and the harsher side on the footplate and
the furry side on the tunnel at the other end: this stops the footplate catching on the tunnel as you
pull it out).
Et voila.