gsa federal supply service usda advantage!
TRANSCRIPT

GSA Federal Supply Service
USDA Advantage!
www.usdaadvantage.gsa.gov

www.usdaadvantage.gsa.gov
This basic tutorial will take you step by step through a typical shopping session. The tutorial is divided into
5 lessons:
Section 1: Searching on USDA Advantage!Section 2: Understanding Search Results & Product DetailSection 3: Cart/ CheckoutSection 4: Login/ Registration/ ProfileSection 5: Order History/ Order Status

Section 1: Searching on USDA Advantage!
• Searching by Keyword• Searching by Category• Refining your Search• Advance Search

Welcome to the USDA Advantage! Home Page
USDA Advantage! without registering for a user ID and password.
Search Option #1. Search by Keyword
1. First, type a keyword into the search box. 2. Use the category dropdown to search in a
specific category. 3. Click Find it! to start searching!
To demonstrate, lets begin searching…..
There are 2 Ways to Search on USDA
Advantage!

Suggested Categories allows you to narrow your keyword search to a specific category. Clicking on a suggested
category will display filtered results based on the suggested category you selected.
Search Results Page

Search Option #2. Browse By Category
The USDA BPA categories include only those products and services found under USDA issued BPAs. The BPA pricing is only visible to
USDA Advantage! users.
Click on the category that best fits what item you
are searching for.
To find paper, click on “USDA BPA Office Supplies”.

The bread crumb trail, at the top of the page, keeps track of your searching
history and allows you to move backwards in the category search.
Look for services in each super category under
the “Additional” subcategory.
The blue bullets to the left are a list of the
categories under “USDA BPA Office Supplies” and examples of items that are in those categories.
Copier paper falls under “Paper Products”. Click on “Paper Products” to
continue narrowing down the search.

Continue to drill down through the category search and make the best
decision based on what item you are looking for. Categories are designed so that each level narrows your search results gets you closer to finding the
item you are searching for.
For this example, look under the subcategory “Printing
& writing paper”.

Here is the final level of categories under “Printing & writing paper”. Read
through the list and find the best fit for your product.
To view the search results for copier paper, click on
the “Printer or copier paper” category.

Here you can sort your results by price, part number, product name, manufacturer,
contractor, or contract number.
Search Results Page
You can narrow your results by searching within results. For example, if you only wanted to display 8.5 x 11 inch copier paper, type “8.5 x 11” into the text
box and click Refine.
Click on “More refine options” link to further filter your search results.

For example, to display only Recycled Content, mark the check box next to that filter.
The numbers next to the filters represent the number of items within your search which contain that filter. For example, there are 333 items which contain Recycled Content.
“Refine My Search Results” allows you to limit the search based on
environmental characteristics or socioeconomic business status.
Click Refine to display results.

The filter you checked on the previous pages is listed here.
If you wish to remove a filter, click on the gray X located next to that filter. For example, to no longer
restrict your search to just recycled items, click on the gray X located next to “Recycled Items”.

You can also view all manufacturers or contractors who supply copier paper by clicking on links located at
the bottom left.

The Manufacturers Filter option allows you to narrow your search results to just the
manufacturers that you select.

Click on Advanced Search for additional opportunities to narrow your search
results by searching for an exact phrase in a particular product field, restricting your search by category, price, or socioeconomic factors, and
limiting your display options.

Section 2: Understanding Search Results & Product Detail
• Search Results Page• Additional Sources

Business size indicators are listed next to the
contract number.
Search Results Page
Symbols represent the environmental, socioeconomic, and other factors
which apply to the item.
“SALE” indicates the contractor is offering a temporary price reduction off their normal
contract price.
Options/ Accessories gives you the ability to
customize your product.
To view additional sources, click on the “Additional Sources” link.

The “Product Detail” page displays important product information
including price, unit of issue, min/max order, warranty, F.O.B., etc. Review
this information thoroughly.
Be sure to review the minimum order purchase amount
before making a selection.If multiple vendors are
displayed, click the button from the one you wish to
purchase.
If you are ready to purchase, enter your quantity in the
box and click “Add to Cart”.

Section 3: Cart/ Checkout
• Shopping Cart• Park a Cart• Retrieve a Cart• Checkout• Order Confirmation

The shopping cart contains the items you have selected to purchase.
If you make any quantity changes to the cart, make sure you click on the
“Update Cart” button.
You may park the cart at any time by clicking on the “Park Cart” button. The cart can
later be retrieved by clicking on the “Parked Carts” link at the top of the page.

Remember, when you retrieve a cart, pricing is subject to change.
To park your current shopping cart, fill in a cart name and optional cart
password, and click “Park Cart”.
Parking a cart allows you to save your shopping list for a future purchase or
to forward it to another person.
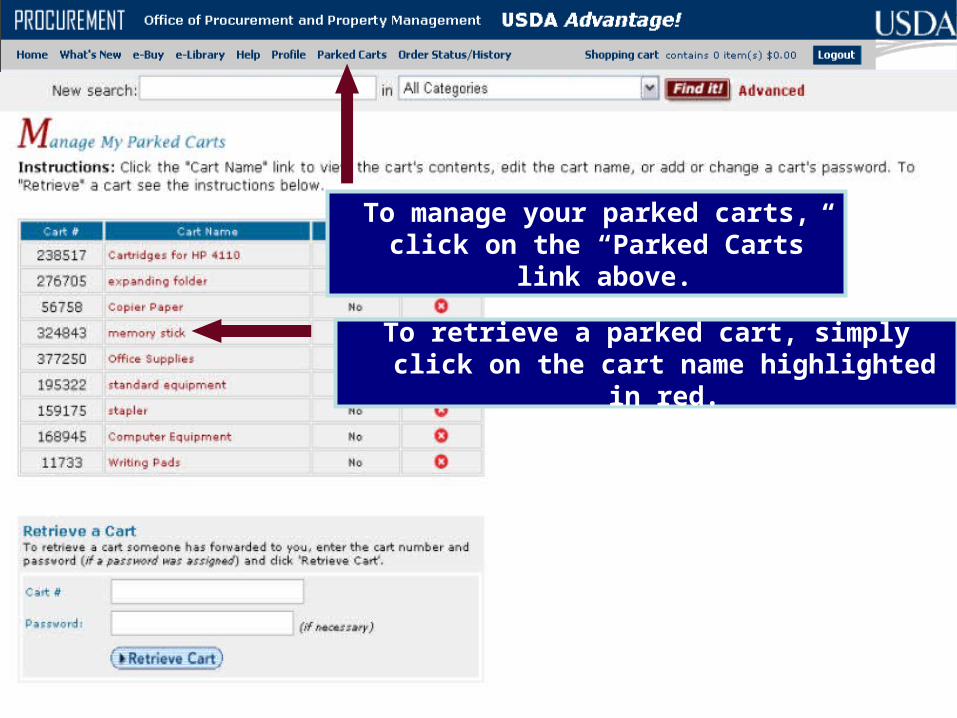
To retrieve a parked cart, simply click on the cart name highlighted in red.
To manage your parked carts, click on the “Parked Carts”
link above.
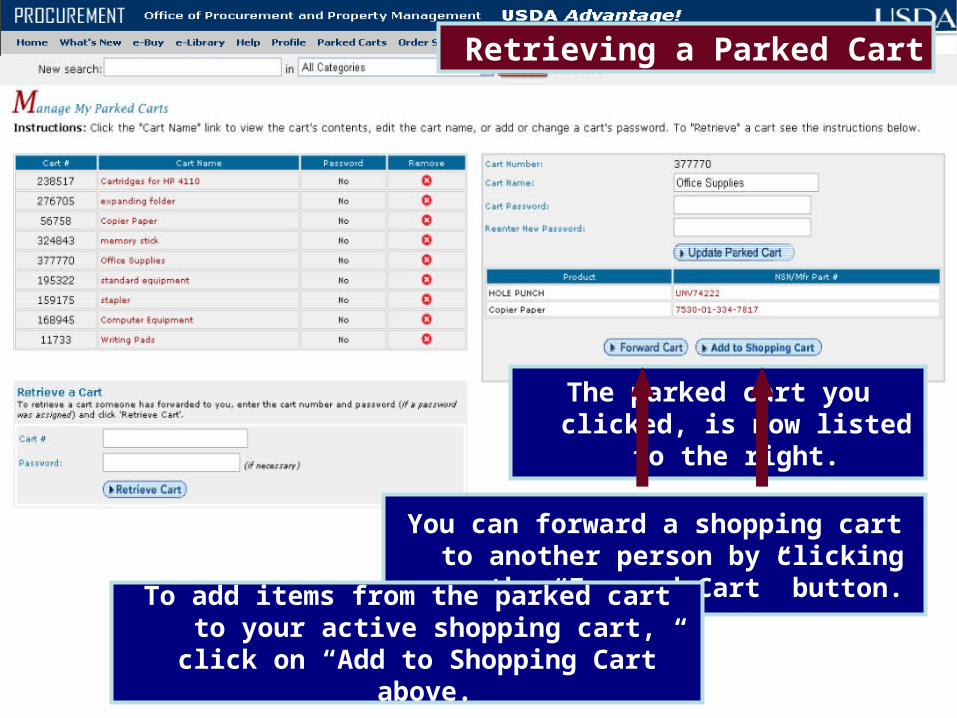
Retrieving a Parked Cart
The parked cart you clicked, is now listed to
the right.
You can forward a shopping cart to another person by clicking on
the “Forward Cart” button.To add items from the parked cart to
your active shopping cart, click on “Add to Shopping Cart” above.

To proceed to checkout, click on the “Checkout” button in your shopping cart.
Your Shopping Cart

Step 1: Select Method of Payment
Purchase card customers may select a card from the one(s) entered in their
“Profile”. Or, you may enter a new Purchase card in the boxes provided.
If you are ordering GSA items, you may select from two billing options. Choose “Line Item Billing” to see
each item listed on your Purchase card statement. Select “Consolidated Billing” to see only one line
with the total for your entire order.
If you are purchasing NSNs, you may pay with your
“AAC”.
Upon selecting your payment method, click one the “Submit-Continue” button to
submit your information.

Step 2: Select Shipping Address
The addresses listed on this page are the addresses stored in your profile. Please select which address you wish to ship to by selecting
the radio button next to the Address Name.
If you would like to Create a New Address, click on the “Create a
New Address” link.
The “Individual Receiving Shipment” information is required for each shipment.
Click “Submit-Continue” to continue.

Step 3: Checkout Review
Please review all information listed on this page. If you need to change any information, click on the link below the information. For example, to change your Payment Information, click on the
“Change Payment Information” link.
All GSA Requisitions will be displayed at the top. Purchase Orders going to Schedule vendors will
be displayed at the bottom.
If your GSA purchase is in support of an emergency (for example, hurricanes or wildland fires), please indicate that in the dropdown box.
The checkout review page gives you the option to view and select from multiple dealers if available.
Click “Process Order” to process your order.

Section 4: Login/ Registration/ Profile
• Logging In• Registration• Forgot Your Password?• Updating Your Profile

In order to make purchases, park carts and check order
history, you will need to login.
To register for a User ID and Password, click on “Register”.

To register, you must enter all required
information and click the “Register” button.
Make sure your User ID is at least 6 characters
long, and your password is at least 8 characters
long.
Registration

Forgot your password?
To retrieve a forgotten User ID or Password, simply click on the
“Forgot my User ID & Password” link.

To update your profile, click on the “Profile” link in the menu bar.
You can access your member information by clicking on “Member
Information”.
Member Information allows you to edit your personal
information including your name, phone,
agency, e-mail address, etc. This is the data you
entered during registration.
Click “Update” to update your information.
Updating Your Profile
Member Information
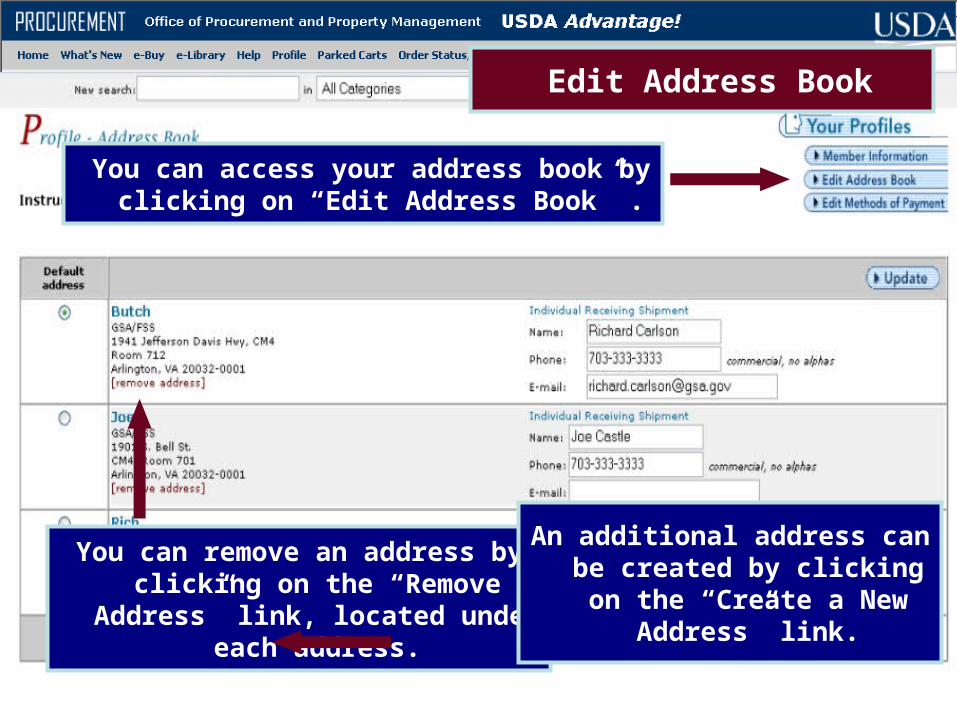
You can access your address book by clicking on “Edit Address Book” .
You can remove an address by clicking on the “Remove
Address” link, located under each address.
An additional address can be created by clicking on the “Create a New
Address” link.
Edit Address Book

You must enter an “Address Name” and fill out the necessary information.
Each address will require the name, phone number, and e-mail address of the
individual receiving shipment.
Edit Address Book

You can access your methods of payments by clicking on “Edit
Methods of Payment”.
Add additional purchase cards or AAC codes by entering the required information and
clicking “Update”.
To apply for an Activity Address Code (AAC) or AAC password click on “Apply for an AAC” or “Apply
for a Password”.
Edit Methods of Payment

Section 5: Order History/ Order Status
• Order History• Order Status

To view your order history or order status, click on the “Order Status/History” link above.

To search for a specific order, type the Purchase Order #, Requisition #, or Session #, then click “Go”.
You can also view your orders placed during a certain date range by
selecting the date range desired and clicking “Go”.
To view all of your USDA Advantage! Orders, click on the “Go” after “View all your USDA
Advantage! Orders”.

Click on the session number link to check the status or view
details of a specific order.

Order status is located under the Status column.
Check to see if the vendor has submitted shipping & tracking
information.
You may enter a cancellation request by checking the box under the Cancel column.
Remember, items with one (1) day delivery cannot be canceled.
Here are the details of Advantage! session #230534

Shipping addresses are located at the bottom of this page.
A user may also choose to View/Print Purchase Orders by clicking on the
“View/Print PO” button.
All new orders will contain symbols, such as the recycled symbol. The definition of these symbols will be located at the bottom right of the page.

If you have any additional questions, please call the GSA Advantage! Helpdesk at
(877) 472 – 3777 or email [email protected]
Thank you for your interest in USDA
Advantage!