growers' handbook 2014
DESCRIPTION
A Step by step guide to growing strong native seedlings for tough SA conditionsTRANSCRIPT

1 1
A step by step guideto growing strong native seedlings
Growers’ Handbook
Workshops & booklet printingproudly supported by:

Written by Jennifer Howe, based on the original Propagation Instructions by Maureen Redfern with the assistance of Trees For Life growers.
Illustrations by Simon Kneebone
Copyright © Trees For Life Inc 2014All copyright subsisting under the Copyright Act 1968 (Commonwealth) resides with Trees For Life Inc. Subject to the Copyright Act, the written consent of Trees For Life is to be obtained before reproduction, copying or transmission of the copyright material in any form or by any means. Such written consent may include a requirement for appropriate acknowledgment of Trees For Life Inc.
Trees For Life encourages community organisations to discuss not-for-profit use of this material for community environmental activities by phoning 08 8406 0500 or emailing [email protected]
Document Disclaimer
Trees For Life does not warrant the accuracy, adequacy, reliability or completeness of the information and materials contained in this
document and expressly disclaims liability for errors or omissions in such information and materials. Trees For Life does not make any
representation, warranty or endorsement of any of the products, services or information provided in this document. This disclaimer shall
take effect to the fullest extent permitted by law.
Printed on 100% post-consumer recycled paper.

1
ContentsIntroduction....................................................................................... 2
Key Growing Points.......................................................................... 4
Health & Safety................................................................................. 5
Step 1: Before you startA. Read this Handbook............................................... 6B. Check your supplies............................................... 7 C. Store your supplies hygienically............................. 8D. Organise your schedule.......................................... 8 E. Prepare a growing bench....................................... 9F. Decide where to position your seedlings............... 11
Step 2: Preparing firmly filled tubes........................... 12
Step 3: Sowing the seedA. Pre-treatment........................................................ 14 B. Sowing................................................................... 15
Step 4: Monitoring germination....................................... 18
Step 5: Thinning & transplantingA. Thinning................................................................. 20B. Transplanting......................................................... 21
Step 6: Ongoing care........................................................... 24
Step 7: Preparing for handover........................................ 26
Propagating from cuttings.............................................................. 29
Growing fundamentalsSunlight.................................................................................................. 31Watering................................................................................................ 32Growth rates.......................................................................................... 34Using fertiliser........................................................................................ 35
Growing problemsGeneral problems................................................................................... 36Pests....................................................................................................... 39Weeds.................................................................................................... 41
AppendicesI. Species Specification............................................................. 42II. Glossary................................................................................ 50

2
IntroductionThank you for growing native seedlings for South Australia.
You are now part of the Trees For Life Volunteer Growing team, which is made up of South Australians who are giving their time and energy to grow. The seedlings you grow will be planted out to provide environmental benefits such as windbreaks, erosion control and habitat for native birds and animals.
The unique thing about Trees For Life seedlings is that they are indigenous. This means that the seeds you receive have been collected in the area of South Australia where the seedlings will be planted. They are locals.
Because you have been allocated to a specific Revegetation Project or Landholder the outcome of your growing is important, and they eagerly await your growing results come.
Just follow the seven steps outlined in this Growers’ Handbook and you’ll be able to successfully present quality seedlings ready to thrive in the ground and know that you have made a significant contribution to the environmental health of South Australia.
We hope you enjoy this rewarding experience.
Remember we are here to help should you need it, so don’t be shy!Call us on 8406 0500.Email: [email protected] post your comments on Facebook/treesfor lifesaAnd look for Grower Resources on www.treesforlife.org.au.

2 3
Who are you growing for?
A Landholder:Landholders are Trees For Life members who have ordered native tubestock to revegetate their land; usually individuals or councils. The seedlings you grow will be planted on their property, and they will be busy throughout the year preparing for planting. If you are growing for a landholder you will communicate directly with them by phone, email or letter to discuss the progress of your seedlings and to organise pick up of seedlings when they are ready. Please contact your landholder early in the growing season to avoid potential difficulty later on (see page 28).
A Revegetation Project:A revegetation project is a large scale planting project managed by a company or government agency, engaging Trees For Life volunteers to be part of their program. An example is the Million Trees project. The seedlings you grow are designated to a specific regional project. If you are growing for a revegetation project, you will keep in contact with Trees For Life regarding your seedlings.
The Back-up Project:The Back-up project is the backbone of the entire Tree Scheme; underlying and supporting every single project involved in the scheme. Seedlings grown for the Back-up project are used to supplement Growers and projects that have been unable to produce the required number of seedlings due to unforeseen circumstances. If you are growing for the Back-up project your role is critical to the overall success of the Tree Scheme. You will keep in contact directly with Trees For Life regarding your seedlings.
4
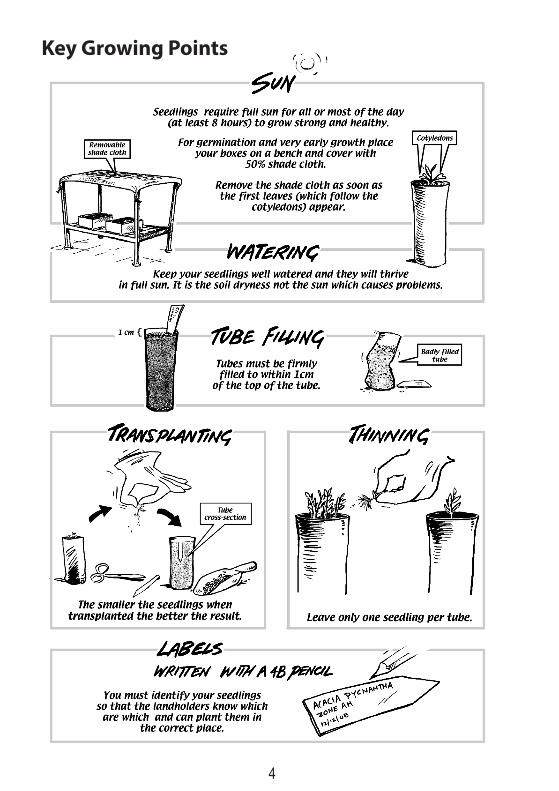
Key Growing Points

4 5
Health & SafetyPlease consider the following hazards while setting up and carrying out your growing tasks.
Potting Mix Legionella bacteria can occur in water bodies, potting mix & soil. If inhaled through airborne dust and water particles, Legionella can cause the respiratory infection Legionnaire’s Disease. To avoid the risk please:Dampen soil before handling itUse a dust maskWear glovesWash your hands thoroughly after handling soil
You are at a higher risk of contracting Legionnaire’s if you: are susceptible to respiratory infections; have a low immune system; are a smoker; are elderly. We strongly recommend that you use the protective measures listed above.
Lifting & BendingBoxes of soil and seedlings are heavy, especially when wet. When moving your boxes around please take care and consider the following:Keep your back straight, bending with your knees and lifting with your legs Keep the weight of the box close to your body Construct your growing bench at waist height to reduce lifting & bendingAsk for assistance from a relative, friend or neighbour.
SeedSeed is stored with the inert mineral magnesite to deter insects. It is not harmful to humans but remember to:Wash your hands thoroughly after handling seeds.
Chemical SpraysIf you need to use an insecticide or a fungicide: Consider using a chemical free alternative Carefully observe the safety directions on the chemical container.
SpidersSpiders may set up home inside or underneath your boxes. Most are harmless but red back spiders should be avoided. Wear gloves when lifting boxes or handling tubes

6
Step 1: Before you start A. Read this HandbookB. Check your suppliesC. Store your supplies hygienicallyD. Organise your schedule E. Prepare a growing benchF. Decide where to position your seedlings
A. Read this HandbookBefore you start read through this Handbook thoroughly so you have an understanding of what’s involved in growing and the types of problems that can occur. You will then be better equipped to prevent them before they happen. Revisit the Handbook as required and again when you reach each new step for specific details. If you can’t find what you’re looking for or you need specific help or just some reassurance, don’t hesitate to call us on 8406 0500.

6 7
B. Check your suppliesYou should have received:
• Boxes of soil - the same number as shown on the label of your Grower’s Bag Please Note: slow release fertiliser has been pre-mixed in to the potting soil• Tubes - one bundle of 60 for each box• Gravel mulch - one bag for each box • Dust masks, and• A Grower Bag
Your Grower Bag contains:• A Growing Order - this tells you who you are growing for, what species and
how many you are growing, and when to sow the seed• Packets of seed - one for each box listed on your Growing Order • Plastic labels - one for each box or half box• One Growers’ Handbook (extra copies are available from Trees For Life or you
can view it on our web site, www.treesforlife.org.au).
If any of your supplies are missing please contact your depot manager and if there are items missing or incorrect in your Grower Bag, contact Trees For Life.
Please Note: If you are growing with a group please ensure all members have a copy of this Handbook.

8
C. Store your supplies hygienically
AVOID CONTAMINATION!Keep your boxes of soil on a raised, clean surface and not on soil or grassPut them straight onto your bench if it is readyStore your seeds in a cool, dark and dry place
The soil mix you receive is disease and weed free. It is important to maintain soil hygiene now and throughout the growing period by following the steps below to avoid introducing pests and diseases:Before use, wash your bench top and all equipment that you might use ( e.g.
recycled tubes, trowels or other tube fillers) with disinfectant or bleach Grow your seedlings on a raised bench to avoid splash from garden soil and
to keep them away from ants, slugs, pets, millipedes, etc.
• Never allow your soil mix to contact ordinary soil and never add soil or other material to your mix because of the risk of soil borne pests and diseases. If you need more soil, ask your depot manager or Trees For Life.
• Don’t store boxes under trees where seeds and leaves can fall into your tubes.
D. Organise your scheduleTo raise seedlings of adequate planting size by May you need to make sure you are prepared and ready to start on time. We recommend you organise your time as follows:
Write the seed sowing dates in your calendar or diary so that you are prepared before the relevant dates arrive. The sowing dates (found on your Growing Order) have been set according to their differing growth rates, to

8 9
ensure each species is of sufficient size in time for planting.
Schedule ample time to fill your tubes with soil before your first sowing date. Tube filling is time consuming and requires particular attention; it can not be rushed or attempted half heartedly. We recommend you start tube filling 1-2 weeks prior to sowing. One box takes approximately 60 minutes. Allow plenty of time.
E. Prepare a growing bench Why do I need a raised growing bench?An adequate growing bench is a TFL seedling essential. A growing bench is important to maintain soil hygiene, prevent weed, fungal & pest problems and to encourage good airflow & free drainage. A good bench constructed at waist height will also help to reduce back strain by minimising unnecessary bending, twisting and lifting whilst working on your seedlings over the next few months.
Where do I get one from?You can buy a prefabricated bench from a nursery supplier, build one from scratch or you can construct an improvised bench from recycled materials lying around the house e.g. an old security door, weldmesh, trestle tables, BBQ frames, old tables & chairs etc. Whatever materials you decide to work with… Your bench design needs to incorporate the following:
Be raised to waist height
Have ample room to fit the number of boxes you are growing plus extra space for working, spare boxes and moving boxes around
Be sturdy and stable to withstand both the weight of the wet boxes and to not be easily knocked over. Many Trees For Life seedlings have been destroyed due to bench collapse disasters
Be free draining as this is important for plant health and to prevent fungal disease, bacteria and unwanted pests from gathering. Weldmesh works best, but if you don’t have a free draining surface raise the boxes up off your bench on bricks
Promote good airflow to help prevent fungus problems and to prevent build up of hot air
Safeguard against crawling pests e.g. ants, slugs & snails by placing containers of water under each bench leg.
Have an easily removable shadecloth cover as different stages of growth will require you to have your bench either wholly or partly covered in
10
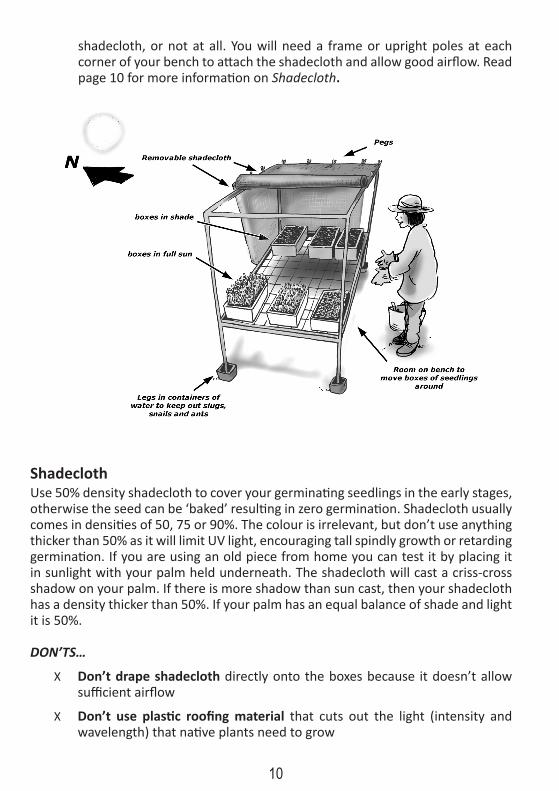
shadecloth, or not at all. You will need a frame or upright poles at each corner of your bench to attach the shadecloth and allow good airflow. Read page 10 for more information on Shadecloth.
Shadecloth Use 50% density shadecloth to cover your germinating seedlings in the early stages, otherwise the seed can be ‘baked’ resulting in zero germination. Shadecloth usually comes in densities of 50, 75 or 90%. The colour is irrelevant, but don’t use anything thicker than 50% as it will limit UV light, encouraging tall spindly growth or retarding germination. If you are using an old piece from home you can test it by placing it in sunlight with your palm held underneath. The shadecloth will cast a criss-cross shadow on your palm. If there is more shadow than sun cast, then your shadecloth has a density thicker than 50%. If your palm has an equal balance of shade and light it is 50%.
DON’TS…
X Don’t drape shadecloth directly onto the boxes because it doesn’t allow sufficient airflow
X Don’t use plastic roofing material that cuts out the light (intensity and wavelength) that native plants need to grow

10 11
X Don’t use a glass house or enclosed shade house because they are far too hot for native species in summer and produce spindly weak plants.
F. Decide where to position your seedlingsTo ensure growing success you must select the ideal location in your back yard for optimal growing conditions.
Your growing bench must be positioned somewhere with:
Direct, unobstructed sunlight for a minimum of 8 hours per day. Sunlight
is paramount to healthy growth
Protection from prevailing winds: Persistent hot or coastal winds will cause high evaporation, drying out the soil and damaging tiny seedlings
Good air flow, as this will prevent fungal problems from occurring.
Do not position your seedling boxes:
X On the ground, as this will create problems with pests, weeds & diseases and disrupt good airflow & drainage
X Against an iron fence or shed, which can radiate damaging extreme heat
X Under trees, as the shade is usually too deep or too unreliable, pests can migrate easily and seeds from the tree can fall into your tubes and grow as weeds
X Under gutters, which can overflow onto your boxes and make a nasty mess of your carefully filled tubes.
12
Step 2: Preparing tubesDuration: 60 mins per box
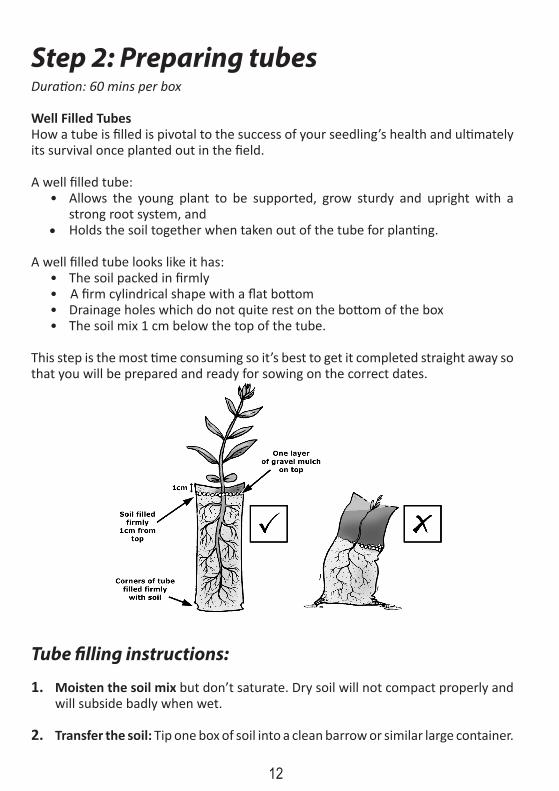
Well Filled Tubes How a tube is filled is pivotal to the success of your seedling’s health and ultimately its survival once planted out in the field.
A well filled tube:• Allows the young plant to be supported, grow sturdy and upright with a
strong root system, and • Holds the soil together when taken out of the tube for planting.
A well filled tube looks like it has:• The soil packed in firmly• A firm cylindrical shape with a flat bottom• Drainage holes which do not quite rest on the bottom of the box• The soil mix 1 cm below the top of the tube.
This step is the most time consuming so it’s best to get it completed straight away so that you will be prepared and ready for sowing on the correct dates.
Tube filling instructions:
1. Moisten the soil mix but don’t saturate. Dry soil will not compact properly and will subside badly when wet.
2. Transfer the soil: Tip one box of soil into a clean barrow or similar large container.
12 13
Slow release fertiliser has been pre-mixed in to the potting soil. Wear a dust mask to avoid breathing in any soil particles.
3. Clean the foam box: Discard the newspaper liner and brush or hose out the box to remove any loose soil and bits of newspaper. This will help to deter pests and problems later on in the bottom of your box.
4. Open the tubes: Use a trowel to open the tubes up ready for filling with soil. Ensure drainage holes are open. If you find any tubes without holes just snip off the bottom corners.
5. Fill the tubes: Use a narrow trowel or other filler to scoop the damp soil mix into the tube. After each scoop bump the tube bottom on a hard surface and firm down the soil with thumbs or a tamper. Be sure there are no air gaps and that soil is filled right out to the bottom corners of the tube. Firm the soil down to about 1 cm from the top of the tube. If you do not have enough soil ask your depot manager for more or phone Trees For Life. The filled tube should be firm to the touch indicating that the soil mix is packed down well. If water will not drain through the tubes the soil mix is packed too tightly.
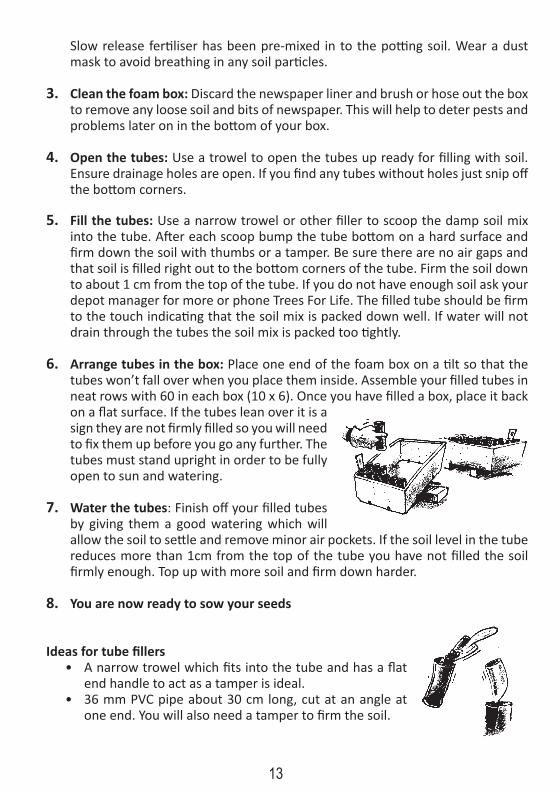
6. Arrange tubes in the box: Place one end of the foam box on a tilt so that the tubes won’t fall over when you place them inside. Assemble your filled tubes in neat rows with 60 in each box (10 x 6). Once you have filled a box, place it back on a flat surface. If the tubes lean over it is a sign they are not firmly filled so you will need to fix them up before you go any further. The tubes must stand upright in order to be fully open to sun and watering.
7. Water the tubes: Finish off your filled tubes by giving them a good watering which will allow the soil to settle and remove minor air pockets. If the soil level in the tube reduces more than 1cm from the top of the tube you have not filled the soil firmly enough. Top up with more soil and firm down harder.
8. You are now ready to sow your seeds
Ideas for tube fillers• A narrow trowel which fits into the tube and has a flat
end handle to act as a tamper is ideal.• 36 mm PVC pipe about 30 cm long, cut at an angle at
one end. You will also need a tamper to firm the soil.

14
Step 3: Sowing the seed Duration: 20 - 30 mins per box
Sowing Dates:The sowing dates are set to ensure all of your seedlings are ready to plant at the same time and are approximately 10 - 20cm tall by May. Sow the seed on or near the date on the seed packet. If circumstances prevent you sowing on the exact dates, don’t worry - just sow as near as you can to the date, up to two weeks later. If your seed has a sowing date beyond May, the seedlings will not be ready to plant until next season.
Pre-treatment:Some seed needs particular treatment prior to sowing, otherwise germination will not occur. The treatment penetrates the hard seed coat, breaking its dormancy. In nature, seed dormancy is broken through various environmental conditions, such as fire.
Weather on the day of sowing:The temperature on the day is not important; however choose a calm day or work out of the wind so the seed does not get blown away.
How many do I grow?Your Growing Order tells you how many boxes of each species are required. Sixty tubes fit in a box but you are only expected to grow 50 seedlings per box. The extra ten are a built in back-up or bonus.
A: Pre-treatment (NOTE: 24 hours prior to sowing)
Pre-treatment instructions:Duration: 10 - 15 mins
1. Check the Species Specifications, pages 42 - 49 to determine whether your seed requires pre-treatment before sowing.
2. Treat seed: Carry out the recommended treatment method described in the Species Specifications.
3. Prevent mix-ups and keep the seed packets/labels with the relevant seed.

14 15
B: SowingSowing instructions:Duration: 10 - 30 mins per species
1. Rinse the gravel in water to remove the clay grit using a sieve or similar. Allow gravel to dry and put it aside until Step 8. One bag of gravel covers one box of tubes.
2. Water the tubes: The soil must be moist when you sow the seed so water thoroughly beforehand. If you filled the tubes some time previously and the soil has dried out you will need to water several times before the soil will absorb enough moisture to wet all the way through to the bottom of the tube.

16
3. Assign labels: All boxes of seedlings require identification to ensure they are planted in the right locations. Use the white labels we issued in your Grower Bag (one label per box or half box) and the 4B pencil as this will not fade in sun or water (most ‘waterproof’ pens and textas will fade in sunlight). Please write the following on your labels:
i. The botanical name of the speciesii. The two letter Zone Code
iii. The sowing date.This information can be found on your Growing Order or on the seed packets. You may find it useful to write the common name on the back of the label if you wish. Once you have prepared your label, push the point of the label into the soil in one of the tubes near the edge of the box. Ensure it is held firmly upright and the species name is clearly visible.
4. Prevent mix-ups: If you are sowing half boxes divide the box clearly with a piece of plywood or similar material and avoid putting similar species in the same box so you don’t get them confused at a later date e.g. two Eucalyptus species.
5. Check the Species Specifications on pages 42 - 49 to determine what sowing method to use. Each species has a different method depending on the size and shape of the seed.
6. Divide the seed up: Empty the packet of seed onto a clean saucer and divide it up evenly. Some seed packets contain chaff as well as seed; mix the seed and chaff well before dividing it up on the saucer. Guideline of seed per tube: 2 - 3 for large seed, 4 - 5 for medium seed; a pinch or sprinkle for fine seed.

16 17
7. Keep seed packets until your seedlings are well established. Should there be a problem we can trace the batch and perhaps prevent future problems. The batch number is marked on the seed packet and is usually a code of up to 9 digits stamped in green.
8. Sow seed in soil using the correct sowing method. USE ALL THE SEED WE GIVE YOU; each packet contains enough seed for 60 plants per box with an allowance for unviable seed and losses. Spread the seed over the whole surface of the tube, not just in the centre. This will make thinning and transplanting much easier.
9. Cover with gravel: Place a layer of the washed gravel mulch on top of the sown seed. Gravel mulch is important because it holds the seed close to the moist soil; prevents the seed from being washed away; and acts as protective mulch during the heat of the day by keeping the soil mix moist. Too much gravel however will hinder the tiny seedlings making their way up to the surface. A layer 1 grain deep is enough. Keep any spare gravel for when you do your transplanting.
10. Water gently: Use a fine soft spray to settle the seed and gravel. Too strong a jet of water will disturb the gravel and wash the seed away.
11. Place under 50% shadecloth: Position boxes of sown seed on your grower bench under a 50% shadecloth cover. Ensure your bench is situated in full direct sunlight for no less than 8 hours a day.
Next Steps:
1. Wait for germination2. Keep soil moist (watering up to 2 - 3 times per day)3. Read General Growing Guidelines4. Read Monitor Germination

18
Step 4: Monitoring germinationDuration: 5 - 10 mins daily
Why is this important?• Maintaining soil moisture is paramount to germination success.• Once seedlings have germinated they need to be removed from under the
shadecloth and exposed to full direct sunlight.• If seed does not germinate within the expected time you will need to reassess
your methods, request Replacement Seed (see page 19), and try again.
What to look forFirst to appear will be the cotyledons or ‘seed leaves’ which are part of the embryo of the plant. These are quite different to the next pair of leaves which will appear, called ‘seedling leaves’. Each species has characteristic cotyledons which you will come to recognise as you get to know your seedlings. Colour photos of common species can be viewed on the ‘Grower Resources’ pages of our web site www.treesforlife.com.au
Germination timesTo germinate, the seed requires warmth from the sun and moisture. The air and soil temperature will affect the time it takes for seeds to germinate. They will be held back by cold weather, advanced by warm weather up to approximately 28 degrees and retarded by extremely hot weather. Germination is not always predictable, especially with native plants which have complex survival mechanisms, including staggered germination strategies. If your seed does not germinate within the expected time, refer to Growing Problems.
18 19
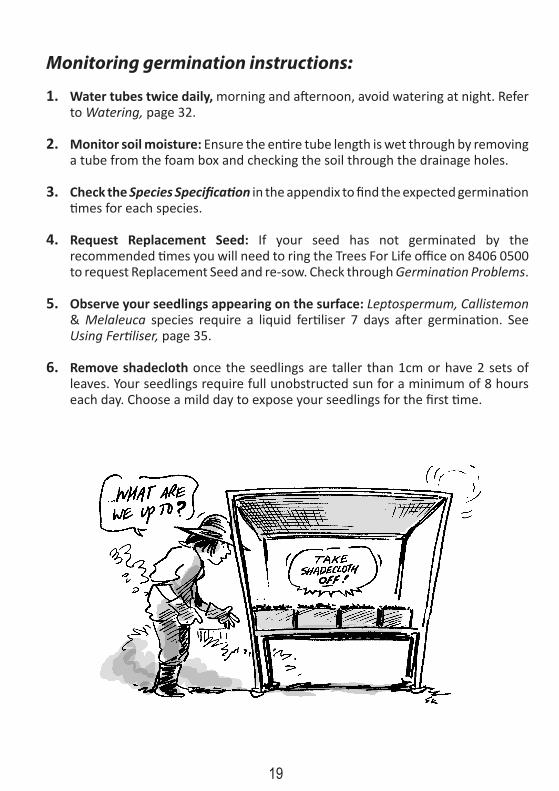
Monitoring germination instructions:
1. Water tubes twice daily, morning and afternoon, avoid watering at night. Refer to Watering, page 32.
2. Monitor soil moisture: Ensure the entire tube length is wet through by removing a tube from the foam box and checking the soil through the drainage holes.
3. Check the Species Specification in the appendix to find the expected germination times for each species.
4. Request Replacement Seed: If your seed has not germinated by the recommended times you will need to ring the Trees For Life office on 8406 0500 to request Replacement Seed and re-sow. Check through Germination Problems.
5. Observe your seedlings appearing on the surface: Leptospermum, Callistemon & Melaleuca species require a liquid fertiliser 7 days after germination. See Using Fertiliser, page 35.
6. Remove shadecloth once the seedlings are taller than 1cm or have 2 sets of leaves. Your seedlings require full unobstructed sun for a minimum of 8 hours each day. Choose a mild day to expose your seedlings for the first time.

20
Step 5: Thinning and transplantingDuration: 20 mins per box, as required
Your aim is to have only one good seedling in each tube.
Thinning and transplanting is necessary maintenance work to meet the order number requirements and to ensure strong, healthy seedlings with only one seedling in each tube.
A. ThinningThinning is the process of removing and discarding excess seedlings from a tube.
If germination is good you will have multiple seedlings in every tube, which means you won’t have to do any transplanting. However, you will need to thin out the seedlings so that they don’t crowd each other, compete for resources and ultimately produce weak seedlings.
DO NOTs…X Don’t thin and throw away
before you are sure you won’t need to transplant.
Thinning instructions: Duration: 5 – 10 mins per box
1. When your seedlings have four leaves or are large enough to handle with your fingers, remove all but the three strongest seedlings in each tube. Gently remove using a pair of tweezers or your fingers.
2. When they are about 3 - 5 cms tall, remove all except the strongest seedling (not necessarily the tallest).

20 21
B. TransplantingTransplanting is the process of carefully moving an excess seedling (including its roots) from one tube and transferring it to grow in a tube with no germination.
Transplanting is necessary if you don’t have germination in every tube and you need to fill your order requirements. Transplanting can also be useful to make up shortfalls of one species by substituting with extras of other species.
When to transplant:• About a month after the first germination when seedlings are still very small • When they have 1 - 2 leaf pairs, or are 1 - 3cms tall• Choose a mild day and work in the shade.
DO NOTs…X Don’t do any transplanting after February (except Eucalyptus camaldulensis).
They will not have time to grow to planting size and will be root bound by the following season
X Don’t transplant anything taller than 3 cms as it will not survive once planted out
X Don’t do more transplanting than is required unless you know your landholder can use them
X Don’t allow the sun to shine on the sides of the tubes in a partly filled box as it overheats them.

22
Transplanting instructions:Duration: 10 mins preparation, then 1 - 2 mins per seedling.
1. Water all the tubes: Those with seedlings to be transplanted and the empty tubes with no germination.
2. Select the empty tubes with nothing growing in them and put them into another box.
3. Tip off the gravel from these tubes into a container and save it to replace later.
4. Make a hole in the centre of the soil in each empty tube with a dibber e.g. a pencil or a small screwdriver (1 - 1.5 cm wide and 3 - 4 cm deep).
5. Make extra labels to identify your transplants.
6. Choose a seedling to transplant; the smaller the better. Choose a seedling which is smaller than 3 cms. Tip off the gravel from the tube and save for later.
7. Carefully lever the chosen seedling by using a dibber to loosen the soil and lever
underneath the root ball. Take care not to disturb the remaining seedling(s).
8. Gently ease out of the soil by using your fingers to carefully handle it by the leaves. Some of the roots may break off.

22 23
9. Trim the roots to 2 - 3 cm (if necessary), using a clean pair of scissors. Trim any roots which stick out sideways. Try to keep some soil on the roots if possible. Minimise the amount of time the roots are exposed to air.
10. Immediately transfer to the prepared hole from step 4. Holding the seedling by the leaves, place it against the side of the hole with roots pointing straight down into the hole. This is very important because kinked or curled roots will continue to grow curled and eventually cause the death of the young tree.
11. Gently firm down soil around the roots. Ensure the soil level at the stem is at the same level it was in its original tube.
12. Water immediately to settle the soil around the roots.
13. Replace the gravel on your transplanted tubes.
14. Fix up any seedlings you may have disturbed in the process by firming down soil, replacing gravel and watering.
15. Place transplants under shadecloth: Keep your transplants under 50% shadecloth for 10 - 14 days to recover. Keep well watered. Return them to full sun on a day when the temperature is below 30 degrees.

24
Step 6: Ongoing care Duration: 10 mins daily
Now all your seedlings require is continued daily care and ongoing monitoring. Inspect your seedlings carefully and thoroughly as part of your watering routine to avoid potential threats. If a problem appears, immediate action will prevent the problem from spreading and getting worse (see Growing Problems, page 36).
Ongoing care instructions:
1. Continue to monitor:
• Soil moisture: Check soil daily and adjust watering as necessary. See Watering, page 32.
• Sunlight: Re-calculate the hours of sunlight reaching your boxes. As autumn and winter approach the sun changes position in the sky casting different shadows to summer. If possible, move boxes to a better position to gain maximum sunlight to avoid fungal problems such as mildew.
• Growth rate: Aim to have your seedlings 10 – 20cm tall by May (see Growth Rates, page 34). If some seedlings look like not making it up to size you will need to give them a liquid fertiliser to give them a boost (please read Using Fertiliser, page 35).
2. Inspect carefully and regularly for:
• Pests & diseases can cause a lot of damage in a short amount of time. Each time you water check for signs of leaf deformities, leaves stuck together, fungal outbreaks, eaten leaves, etc.
• Weeds: A weed is an undesirable plant, so any plant that you were not intending to grow should be removed. Weeds can stunt the growth of your desired plant (see Weeds, page 41)
• Only one seedling growing in each tube: Continue thinning excess seedlings as you get late germinants. Inspect each tube carefully as you may find you have missed a second seedling disguised as one.

24 25
3. Grade your seedlings: Seedlings in a box will grow at different rates. When the taller ones in each box start to block the sunlight from the smaller ones, preventing good growth, it is time to start sorting your seedlings in order of height. This is called Grading.
Grading instructions:Duration: 10 mins per box, as required
1. Start with a clean empty box
2. Transfer the seedlings one at a time, placing the taller ones at one end and work your way down to the smaller ones
3. If you are growing several boxes of the same species, sort them into boxes of small, medium and tall
4. Face the end of the box with the smaller seedlings towards the direct sun
5. Now that your seedlings are graded you will be able to fertilise the smaller ones without affecting the taller ones (see Using Fertiliser, page 35).

26
Step 7: Preparing for handoverDuration: 10 mins per box
Handover of your seedlings will occur in March for Revegetation & Back-up projects, and around May for those growing for landholders. Prepare your seedlings ready for presentation as this reduces the risk of introducing weeds or bacteria to the intended planting site and minimises sorting time out in the field by the landholder or project coordinator.
Presentation instructions:
1. Start with a clean, empty foam box
2. Transfer your seedlings one by one into the clean box, inspecting and tending to each one as you go, following the points below:
• Grade seedlings by height: see Grading, page 25
• Discard empty tubes and distorted or sickly seedlings. Small but strong seedlings are okay
• Thin out: Carefully inspect each tube to ensure there is only one seedling in each
• Remove weeds & any stray plants: Anything growing amongst your seedlings that is not specified on your Growing Order should be removed, as we can not be sure what it is or where it came from.
• Remove pests: No slugs, snails or millipedes.

26 27
3. Label boxes: Ensure each box has a legible label showing the zone and botanical name of the plants. Use the labels issued.
• Fertilise (if necessary): Aim to have your seedlings between 10 and 20 cms tall in each tube. If some seedlings are below this height, treat them with a liquid fertiliser to catch them up (see Using Fertiliser, page 35)
4. Check the sun: By autumn the position of the sun will have changed dramatically so ensure your seedlings are still receiving maximum possible sunlight hours.
DO NOTs…X Don’t do any more transplanting at this stage as they will not survive once
planted out. If you are considerably short on your Growing Order, Trees For Life may be able to help out with back-up seedlings.
Back-up seedlingsBack-up seedling stock is usually available in April and details are published in our newsletter, ReLeaf in March. Back-up seedlings are available to those people who have fallen short of fulfilling their growing order for one reason or another. Trees For Life will give you what we can, but we may have to give you substitute species as only the more common species are available in each zone. Most landholders understand that it is not always possible to grow exactly what has been ordered and will accept substitutes instead. Please discuss with your landholder if substitutes are okay, prior to coming in for Back-up. If you are growing:
• For a landholder: It is your responsibility to collect Back-up seedlings (if required) to ensure you complete your order.
• For a revegetation project: You don’t need to get any Back-up seedlings, Trees For Life will do it for you.
• For yourself: Back-up supplies are available to you but Volunteer Growers have first priority.

28
NB: Do not rely on the Back-up stock as a fail safe. It is a limited supply only.Handing your seedlings overIf you are growing for a revegetation /Back-up project: You will receive a letter from Trees For Life in February asking you to deliver your seedlings to us in mid March.
If you are growing for a landholder: Landholders are given your contact details and are responsible for collecting their seedlings from you by the end of May. However, you may like to consider delivering them yourself to help plant the seedlings if it is appropriate. Some Growers travel halfway to meet their landholders for handover and lunch. Other landholders may ask you to send the seedlings by freight. This is at the landholder’s expense and they must make the arrangement.
Landholders receive information on preparation, planting and how to care for their seedlings before planting, but first timers may need you to remind them to keep their seedlings off the ground, in full sun and well watered, until planting time.
Communicating with your landholder: Regular contact is important to keep landholders up to date with the seedlings’ progress and it may avert any potential problems arising too late in the season. The landholders will have ordered their seedlings 12 months prior to receiving them, so any number of events might have taken place since then. Occasionally landholders no longer require their plants; in this instance TFL can always find a suitable home for the seedlings but only if we receive them early in the season.

28 29
Propagating From Cuttings
For landholders who are growing their own order
What is a cutting?A cutting is a short piece of stem, which can grow into a new plant. Some plants can be grown from cutting pieces just pushed into the ground. Some cuttings will form roots in a glass of water. But most cuttings require a little preparation and after-care to get good results.
Propagate cuttings in the warmer months after the spring growth has firmed, for best results.
Cuttings should be made as soon as possible after the plant material is collected. However, if kept cool, moist and free of fungus, some plant material can be stored for several days.
Why grow plants from cuttings?Many of the indigenous species which are difficult to grow from seed, or for which seed is hard to obtain, can easily be grown from cuttings.
The cutting grown plant is identical to its parent. Plants grown from seed are not always identical.
Some of the most beautiful indigenous plants can only be grown from cuttings.
What species can I grow from cuttings?Plants that are slightly fleshy or herbaceous rather than woody lend themselves more readily to cuttings. Plants that can be propagated from cuttings include:
• Myoporums• Goodenias• Correas• some Olearias
Not all species of plants can be propagated from cuttings. Cuttings taken from spe-cies of Eucalyptus do not readily form roots. This is also the case with many Acacia species and most monocotyledons, e.g. grasses.
What should I grow the cuttings in?3 parts Trees For Life potting soil mixed with 1 part perlite. Perlite is heat treated rock particles, with excellent aeration properties. It is available from nurseries, hardwares and produce stores.

30
How do I prepare the cuttings?1. Collect shoot tips 8-12 cm long, preferably in the
morning or evening. The plant material should be semi-mature, i.e. semi-hardwood. The best time, therefore, to take cuttings is late spring or early summer. Cuttings taken at other times will often root but may take much longer, although there are many exceptions.
2. Carefully remove the leaves (and leaf stalks) from the bottom half to two-thirds of the cutting and recut the base just below a node, as shown in the diagrams.
3. Treat the base of the cutting with a preparation of rooting hormone. Some plant species will form roots without being treated with a hormone.
4. Carefully place the cutting in a hole made with a dibble stick and gently firm the potting medium around it. Insert the cuttings with one or two per tube.
5. Place the box containing the cuttings in a warm, humid place which receives filtered sunlight. A small propagation box can be made, as shown below.
6. Cuttings take 4-10 weeks or longer to root, depending on the species. To help ensure the success of your cuttings, strict hygiene practices must be followed.Working surfaces and secateurs should be sterilised with a dilute solution of bleach or methylated spirits. Pots may be washed thoroughly in water with household detergent.
Propagation frame with timber base and roll-up heavy duty polythene cover. Source: Australian National Botanic Gardens, Canberra www.anbg.gov.au/
cutting ready to plant
cuttings taken just below a node

30 31
GROWING FUNDAMENTALS
SUNLIGHTTo grow strong and robust, your seedlings require full sun, SUN, SUN! Full sun is direct, unobstructed sunshine for least 8 hours each day, preferably more. The native seedlings you are growing are genetically coded to suit our harsh South Australian climate, including hot, dry conditions and low rainfall. If you mollycoddle them in shade they will grow weak and spindly, and will not be able to cope once exposed to real conditions. The sooner you expose your seedlings to the natural climatic elements, the greater their chances of survival once planted out in exposed paddocks.
Getting sufficient sunlight:1. Position your growing bench in full sun: Choose a spot which receives direct
sunshine for more than 8 hours a day; north facing is ideal.
2. Use shadecloth first: Place your seedling boxes on your growers bench under 50% shadecloth. Shadecloth is only necessary:
From the time you sow your seeds until signs of germination appear on the surface, and
For freshly transplanted seedlings – they require 10 - 14 days recovery before being returned to full sun.
3. Then full sun: When seedlings begin to show their first pair of leaves after their cotyledons it is time to remove the shadecloth and expose them to full sun. Do not delay this step. Make the change on a mild day if possible, or on a day when you are at home to keep an eye on them and give them an extra watering if necessary.
Managing your seedlings in a heat wave:It is the soil drying out, not the heat, which will damage or kill your seedlings.
Watering should be increased during these periods, although be careful not to scald plants with hot water from hoses lying in the sun. Monitor the soil moisture in your tubes and ensure they never dry out. In addition:
• If you have had your seedlings out in full sun for a week or more: Leave them there as long as you can keep them well watered. Strong seedlings will thrive with the heat and plenty of water.
• If you have only just put your seedlings out into the sun: Cover them with

32
shadecloth during the heat of the day, but make this only a temporary measure. Take it off as soon as you can to prevent your seedlings getting soft and lanky.
• If you have your seedlings under shadecloth: Keep them there because putting them out suddenly in extreme heat will damage them. As soon as the heat wave passes put them out in full sun to give them time to acclimatise before the next hot weather.
WATERING
Your seedlings require water every day. Good watering means that the soil mix is never allowed to dry out completely. This is particularly crucial during germination (which may fail if dried out) and with very young seedlings (which can perish in a very short time). Keep in mind that your seedlings are in small tubes and will therefore dry out a lot quicker in warm weather than your garden pot plants. If you go away on holidays make arrangements with a very reliable person to water for you.
How to waterUse a hand held hose fitted with a fine spray head on low pressure, or A watering can with a fine rose
X Avoid methods which disturb the gravel or fill the tubes to overflowing e.g. watering on an angle or using strong pressure. Seed may be washed away or fragile new roots disturbed or exposed.
When to waterMornings are best, but anytime during the day is fine. Don’t be concerned
about burning the leaves on hot days; watering takes priority and any leaf burn will be minimal if at all
Observe any water restrictions that may be in place. Check restrictions with SA Water.
X Avoid watering at night because it will encourage fungal disease and slugs and snails to graze on your seedlings.

32 33
How often to waterBefore and during germination (shadecloth on):Twice a day; in the morning and again in the afternoon, allowing time for
the top of the gravel to dry out before dark, plusAny time the seedlings appear to be wilted, stressed, or During extremely hot weather an extra watering is good insurance.
After germination (shadecloth off):Once a day; in the morning should be sufficient in normal summer weather,
howeverAny time the seedlings appear to be wilted or stressed, andDuring extremely hot weather an extra watering is good insurance.
How much water is enough?There is no magic figure. Every situation is different: differing temperatures, higher evaporation, longer exposure to heat, shade or sun. The only way to know how much water to use on your seedlings is to continually monitor the soil moisture and adjust watering as required.
To monitor soil moisture:Remove a tube from the box and check
the soil at the drainage holes on the bottom of the tube. Thorough watering means that water must drain right down through the soil mix in the tubes until it runs out of the bottom of the tubes.
When watering, also be aware of:
• Autumn: Even though the weather is cooler the seedlings are bigger and transpire more water, and thicker foliage can prevent enough water reaching the soil
• Rain: Don’t rely on showers to water sufficiently unless there is rainfall above 10 mm
• Over watering; is possible. If prior to watering, the soil is moist at the top of the tube and the drainage holes are soggy this is an indication that you do not need to water again at this time. Gravel turning green is another indicator of over watering.

34
Water qualityGenerally; if you can grow vegetable seedlings at your home you can grow native seedlings with the same water.
Hard water: Growers from all country areas of SA report acceptable results using hard water, however local knowledge is the best guide. An occasional flush with rain water could be helpful.
Mains water: Under normal conditions mains water is perfectly fine for raising seedlings. However, when River Murray water is fed into the system it can become increasingly salty. When this happens the solution is to use more water (to flush the salt out) rather than using less.
Bore water: Be wary of the salt content in your bore water. If you have salty water you could consider alternating with rain water.
Rain water: This is obviously the better option, however it is not necessary if you have other alternatives. Only use your precious rain water if you can spare it.
GROWTH RATESDifferent species will germinate and grow at different rates. For example, Melaleuca spp. are very slow growing compared to Eucalyptus spp. Growth rate can also be affected by how firmly the tube is filled, fertiliser distribution amongst the tubes, watering regime and amounts of sun and shade.
Well grown seedlings appear robust, have hardish leaves, of dark green or reddish colour and upright growth.
How tall should they be?The ideal height for planting out tubestock seedlings is between 10 and 20 cms. Aim to have your seedlings at this height by May, or less if you are handing over earlier. Growth up to 30 cm is acceptable as long as the plants are strong and robust. Seedlings which are too tall will not survive well in the ground as their roots won’t be established enough to support that much foliage. Smaller, tougher seedlings will outgrow them every time. Very tall growth is usually the result of unnecessary extra fertiliser and /or sowing seed earlier than the specified date.
Cutting backIf your seedlings are getting too tall they may benefit from being cut back to about 10 cms, which will result in bushy, more robust growth. However, cutting back must be discussed and agreed to by your Landholder as it may be inappropriate for their intended purpose.

34 35
USING FERTILISERUsing extra fertiliser should not be necessary as the slow release fertiliser pre-mixed in to the potting soil is sufficient to grow your seedlings to planting size. However seedlings of the same species can vary in size because of: genetic factors; uneven watering; or uneven distribution of fertiliser pellets.
When to use extra fertiliserLiquid fertilise if:
You are growing Melaleuca, Leptospermum or Callistemon species; they require a boost one week after they first appear on the surface as they have very small seed and tiny cotyledons
No growth is obvious two weeks after germination
Your seedlings have a brownish purple tinge on the leaves, indicating a nutrient deficiency
In April your seedlings have not reached the required height of at least 10 cms and they seem to have stopped growing
You need to even up growth on the smaller seedlings to achieve the required height. Fertilise once or twice during the growing season if necessary
X Don’t be over anxious to use extra fertiliser; tall, lush seedlings do not grow well when planted out.
What fertiliser to useWe suggest using Maxicrop, Thrive or Aquasol used at the recommended dose on the packet.
Be aware that:
• Only some commercial fertilisers are suitable for use with growing natives (always check the label)
• Seasol is not actually a fertiliser but a plant tonic. While it will not harm your native seedlings it will not do the job of supplying the required nutrients for adequate seedling growth.

36
GROWING PROBLEMS
GENERAL PROBLEMS
Germination problemsEach species has a different expected germination rate. Check the Species Specifications (pages 42 - 49) to determine whether your seed should be germinating yet. If seed has not germinated in the specified time, please phone Trees For Life and we will mail out replacement seed. Before re-sowing rectify any of the factors listed below. NB: Replacement seed will not be issued after early February (except Euc. camaldulensis and some saltbushes which are fast growing).
The following points may be contributing to your germination problems:
• Loosely filled tubes cannot support good root development. See Preparing tubes on page 12
• Excessive shade will prevent soil becoming warm enough to germinate seed. Ensure the density of your shadecloth is not greater than 50%, and that your Growing Bench is receiving adequate full sun. Verandas and see-through perspex will also prevent necessary UV rays
• Extreme heat can destroy germination, or seed may germinate and then die. Direct sun in summer is usually too hot. Use a 50% shadecloth cover
• Insufficient watering: Never allow the soil mix to dry out completely; see Watering, page 32
• Incorrect sowing depth: Each species has specific sowing requirements; see Species Specifications (pages 42 - 49)
• Lack of pre-treatment: Some seed require treatment before sowing to stimulate germination. See Species Specifications for details on each species
• Boxes on the ground can easily be invaded by seed collecting ants. Place the legs of your bench in water filled containers to prevent ants from collecting the seed

36 37
• Sparse germination: Did you sow all the seed in each packet? If not, sort the empty tubes from those with seedlings in them and sow the remainder of the seed into your empty tubes.
Post germination problems Damping off can occur in very young seedlings during warm moist weather. The symptoms are wilting (not due to dryness) and rotting caused by an overpopulation of harmful soil organisms. Immediately use a fungicide (e.g. Fongarid or sulphur spray) or you could lose them all. To prevent re-occurrence grow your seedlings in adequate sunlight and with good air flow around them. Do not water at night.
Seed coat attached: This is common in species with hard seed coats but it is not actually a problem. Do not pull the seed coat off as you can behead them. Allow the seedlings to work it off for themselves.
Miscellaneous problemsExcessive shade: If your seedlings are light green, soft and spindly you should move them to a sunnier position immediately. Native seedlings will not grow well in deep shade and they will be weak and susceptible to disease. They may grow tall attempting to reach sunlight, but height is not a good indicator of health, but quite the opposite. Their chances of survival after planting out are poor.
Fasciation is where the stems thicken and the plant produces bunches of very tiny distorted leaves instead of normal healthy ones. These seedlings should be discarded.
38
Mildew is a fungal disease recognised by grey powdery spots appearing on the leaves. Leaves become distorted and ultimately wither and die. Mildew is generally a problem of the cooler damper months of autumn, and Eucalyptus spp. are particularly susceptible. The fungus can go from a single infected leaf to an epidemic within 3-4 days and prevention is far more effective than treatment.
Mildew can be prevented by:Spacing your boxes to allow good air circulationKeeping the foliage dry in cool weather and at nightAvoiding watering at nightProviding as much direct sunlight as possible. As summer ends the sun is
lower in the sky so you might need to move your boxes to get more sunSpraying diluted milk on susceptible species (Euc. microcarpa and Euc.
leucoxylon) once or twice during the cooler months. See milk directions below
If you notice seedlings affected by mildew take the following immediate action:Remove and discard any seedlings which are completely covered in mildew
as they will not recover Quarantine any seedlings which have mildew affected leavesSpray affected seedlings with either:
• Sulphur: This element is available as a wettable powder which is effective as both a fungicide and an insecticide. Mancozeb will help prevent further spread, or
• Milk: There is increasing evidence that diluted milk will prevent and treat mildew. Spray the foliage at the first sign of mildew and again in 4 or 5 days. Repeat weekly if necessary. Use 1 part milk to 10 parts water and use low fat milk to avoid smell and excess residue.
Affected leaves will not recover from mildew, but new growth will be healthy if your treatment is successful.

38 39
PESTS
Using pesticidesIf you grow your seedlings as instructed and implement recommended preventative strategies, it is very unlikely you will need to spray them with anything at all. If you do need to spray, use a low toxic spray and follow the instructions on the pack.
Identify pests before taking any action as some can be beneficial in eating other harmful ones including; praying mantis, ladybirds, lacewings, assassin bugs, large ants, hover flies, and wasps. Also most spiders.
DON’TS…X Do not use Pyrethrum! Pyrethrum will
damage the foliage of native seedlingsX Don’t use any old stuff you find in the shed
or some exotic concoction you make up yourself (we have seen the sad results)
X Don’t use spray equipment previously used for weed killer as it can be fatal even if it has been well washed
X Do not use high concentrations. Even low toxic substances when too concentrated or used in strong sunlight can damage healthy young leaves
X Do not use herbicides on your seedlings. Be extremely cautious if using herbicide elsewhere in your garden.
Pests: A – ZAphids and thrips (white, green, brown and black) are small sap sucking insects which cluster on new growth. Wash off with the hose or use a low toxic general purpose spray e.g. Confidor. Do not use Pyrethrum.
Bees will not hurt the seedlings - they are just drinking the water.
Birds can nip off or pull up seedlings, especially new transplants. Cover your boxes with wire netting which will not entangle the birds’ wings.
Caterpillars: Signs include: holes in leaves, rolled up leaves or joined together, bare stems and skeletonised leaves. Check undersides of leaves and remove by hand. Use Dipel (pesticide for caterpillars) for severe cases.
Cockroaches are attracted to the humid conditions in
40
boxes of seedlings, especially if the boxes rest on an undrained surface or have dirt in the bottom. A low toxic spray and good box hygiene will discourage them.
Cutworms are grubs (of moths) that live in the soil and emerge at night to eat the stems of seedling. The seedling falls over and sometimes the cutworm pulls the seedling into its hole. Cutworms are brownish and can be up to 2.5 cms long. They affect more established seedlings so do not confuse them with damping off which affects very young seedlings. Control by dusting seedlings liberally with tomato dust.
Crusader bugs suck sap from tops of seedlings and the top of the plant dies. The remainder of the plant usually recovers and grows bushy. Use a low toxic spray.
Flying ants may arrive and wish to move into your boxes of soil. You can cover the boxes if you see a swarm hovering nearby or use a low toxic spray if they have landed, however, they won’t survive once the soil has been tubed.
Grasshoppers are hard to control due to their mobility but raised benches and vigilance are necessary. Holes in leaves and no caterpillars indicate grasshoppers.
Earwigs may eat new shoots and root tips but also eat cutworms. They are probably best left alone unless in huge numbers. They can be attracted to balls of rolled up newspaper where they seek shelter.
Millipedes won’t harm your seedlings but are very unwelcome, particularly in millipede free areas. Keep your boxes well away from garden soil or lawn.
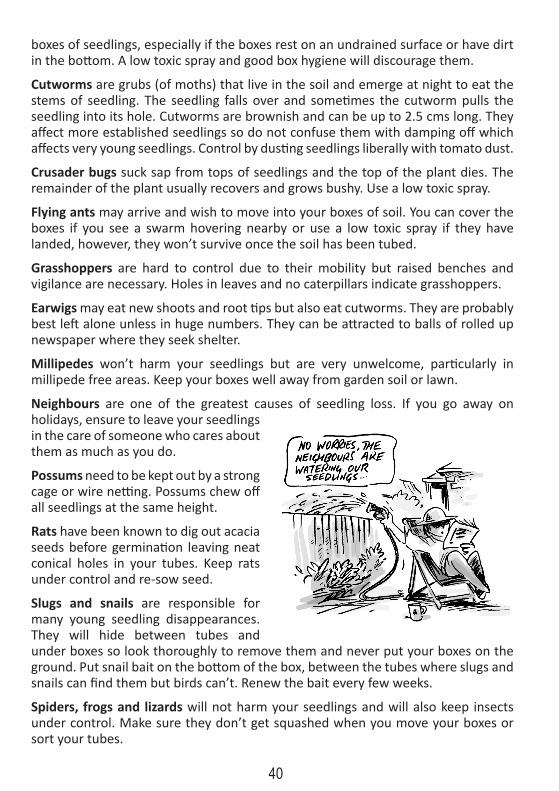
Neighbours are one of the greatest causes of seedling loss. If you go away on holidays, ensure to leave your seedlings in the care of someone who cares about them as much as you do.
Possums need to be kept out by a strong cage or wire netting. Possums chew off all seedlings at the same height.
Rats have been known to dig out acacia seeds before germination leaving neat conical holes in your tubes. Keep rats under control and re-sow seed.
Slugs and snails are responsible for many young seedling disappearances. They will hide between tubes and under boxes so look thoroughly to remove them and never put your boxes on the ground. Put snail bait on the bottom of the box, between the tubes where slugs and snails can find them but birds can’t. Renew the bait every few weeks.
Spiders, frogs and lizards will not harm your seedlings and will also keep insects under control. Make sure they don’t get squashed when you move your boxes or sort your tubes.

40 41
White flies suck sap from growing tips causing distortion. In small numbers they are not too serious, but if there is a cloud of them use a low toxic spray, e.g. Confidor (do not use Pyrethrum).
WEEDSRegarding Trees For Life seedlings, weeds pose two problems:
• If left unchecked they will compete with your seedlings for space, nutrients, sunlight, water, and
• Weeds are a serious agricultural problem. We don’t want to introduce or spread weeds from the tubestock to the intended planting areas. Weeds can contaminate crops, invade large areas and escape into nearby bushland.
Control weeds in your Trees For Life seedlings by:Regularly inspecting your seedlings Removing weeds by hand as soon as they appearFinding out what your desired seedlings should look like, and remove
anything else before it can get established (see What should my seedlings look like? on the Trees For Life web site)
Keeping your boxes on a clean surfaceUsing a raised bench, andKeeping weeds in the surrounding area under control.
X Don’t place your boxes under trees, andX Never use garden soil or compost. If you need more soil contact Trees For
Life.
Many weed seeds are airborne so don’t be surprised to find that despite all your preventative measures, you still get a few weeds in your tubes.
42
Species Sow Date
Seed Treatment Sowing Requirements Germination Rate
Special Conditions/Remarks
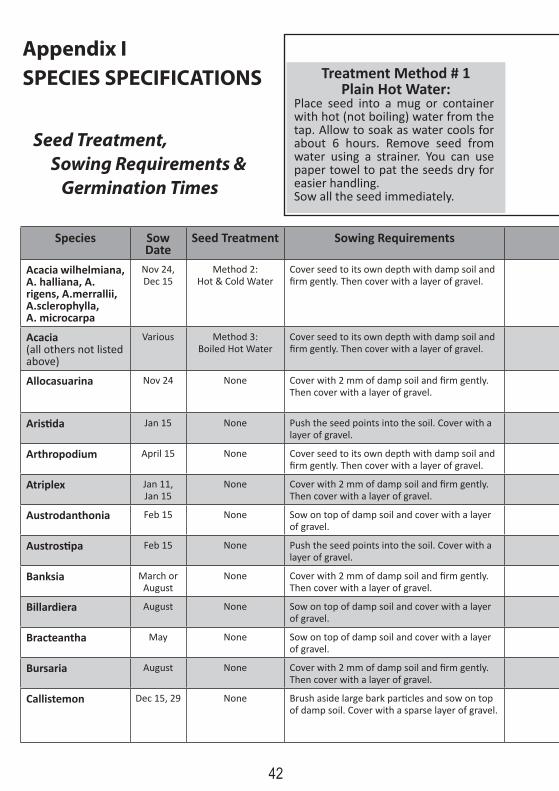
Acacia wilhelmiana, A. halliana, A. rigens, A.merrallii, A.sclerophylla, A. microcarpa
Nov 24, Dec 15
Method 2:Hot & Cold Water
Cover seed to its own depth with damp soil and firm gently. Then cover with a layer of gravel.
4 to 6 weeks A. microcarpa is susceptible to mildew. If you have limited sun towards autumn make sure this species gets all the sun you can give it.
Acacia (all others not listed above)
Various Method 3:Boiled Hot Water
Cover seed to its own depth with damp soil and firm gently. Then cover with a layer of gravel.
4 to 6 weeks
Allocasuarina Nov 24 None Cover with 2 mm of damp soil and firm gently. Then cover with a layer of gravel.
2 to 4 weeks Allocasuarina muelleriana and Al. paludosa need to be kept in dense shade to get them to germinate; eg under a veranda. As soon as the plants are 1 cm high, they should be transferred to full sun.
Aristida Jan 15 None Push the seed points into the soil. Cover with a layer of gravel.
3 to 6 weeks
Arthropodium April 15 None Cover seed to its own depth with damp soil and firm gently. Then cover with a layer of gravel.
2 to 6 weeks Sow in full sun, not under shadecloth.
Atriplex Jan 11, Jan 15
None Cover with 2 mm of damp soil and firm gently. Then cover with a layer of gravel.
2 to 4 weeks Matures rapidly and may flower and fruit in the tube before planting time arrives.
Austrodanthonia Feb 15 None Sow on top of damp soil and cover with a layer of gravel.
3 to 6 weeks Sow in full sun, not under shadecloth.
Austrostipa Feb 15 None Push the seed points into the soil. Cover with a layer of gravel.
2 to 4 weeks Austrostipa tends to grow in clumps. Do not thin out.
Banksia March or August
None Cover with 2 mm of damp soil and firm gently. Then cover with a layer of gravel.
4 – 24 weeks Sow in full sun, not under shadecloth. Sown in March they will be ready for planting in winter/spring of the same year. Sown in August they will be ready the following autumn.
Billardiera August None Sow on top of damp soil and cover with a layer of gravel.
4 to 8 weeks Sow in full sun, not under shadecloth.
Bracteantha May None Sow on top of damp soil and cover with a layer of gravel.
3 to 6 weeks Sow in full sun, not under shadecloth.
Bursaria August None Cover with 2 mm of damp soil and firm gently. Then cover with a layer of gravel.
4 to 6 weeks Sow in full sun, not under shadecloth.
Callistemon Dec 15, 29 None Brush aside large bark particles and sow on top of damp soil. Cover with a sparse layer of gravel.
3 to 4 weeks Seed is very small and seedlings tiny when they first germinate. They dry out easily so keep moist. They have little food reserves to get them going so use liquid fertiliser seven to ten days after they first appear to help them grow on. Use Maxicrop, Thrive or Aquasol.
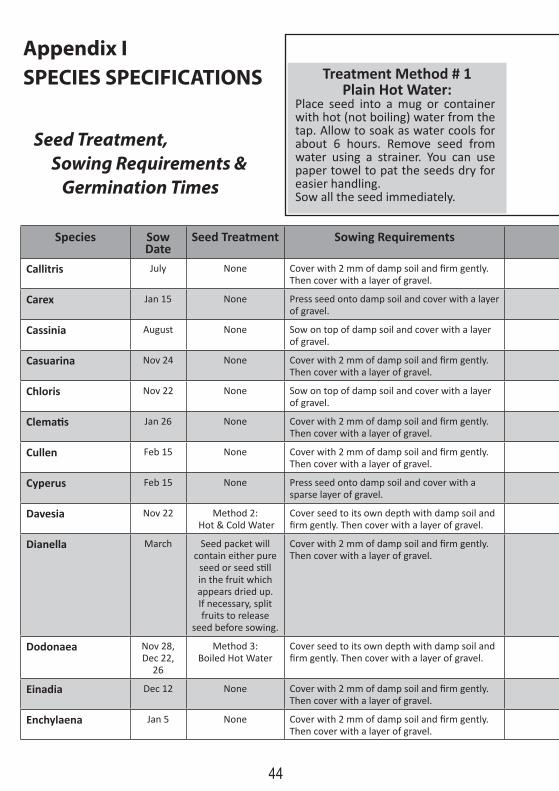
Appendix I SPECIES SPECIFICATIONS
Seed Treatment, Sowing Requirements & Germination Times
Treatment Method # 1 Plain Hot Water:
Place seed into a mug or container with hot (not boiling) water from the tap. Allow to soak as water cools for about 6 hours. Remove seed from water using a strainer. You can use paper towel to pat the seeds dry for easier handling.Sow all the seed immediately.

42 43
Species Sow Date
Seed Treatment Sowing Requirements Germination Rate
Special Conditions/Remarks
Acacia wilhelmiana, A. halliana, A. rigens, A.merrallii, A.sclerophylla, A. microcarpa
Nov 24, Dec 15
Method 2:Hot & Cold Water
Cover seed to its own depth with damp soil and firm gently. Then cover with a layer of gravel.
4 to 6 weeks A. microcarpa is susceptible to mildew. If you have limited sun towards autumn make sure this species gets all the sun you can give it.
Acacia (all others not listed above)
Various Method 3:Boiled Hot Water
Cover seed to its own depth with damp soil and firm gently. Then cover with a layer of gravel.
4 to 6 weeks
Allocasuarina Nov 24 None Cover with 2 mm of damp soil and firm gently. Then cover with a layer of gravel.
2 to 4 weeks Allocasuarina muelleriana and Al. paludosa need to be kept in dense shade to get them to germinate; eg under a veranda. As soon as the plants are 1 cm high, they should be transferred to full sun.
Aristida Jan 15 None Push the seed points into the soil. Cover with a layer of gravel.
3 to 6 weeks
Arthropodium April 15 None Cover seed to its own depth with damp soil and firm gently. Then cover with a layer of gravel.
2 to 6 weeks Sow in full sun, not under shadecloth.
Atriplex Jan 11, Jan 15
None Cover with 2 mm of damp soil and firm gently. Then cover with a layer of gravel.
2 to 4 weeks Matures rapidly and may flower and fruit in the tube before planting time arrives.
Austrodanthonia Feb 15 None Sow on top of damp soil and cover with a layer of gravel.
3 to 6 weeks Sow in full sun, not under shadecloth.
Austrostipa Feb 15 None Push the seed points into the soil. Cover with a layer of gravel.
2 to 4 weeks Austrostipa tends to grow in clumps. Do not thin out.
Banksia March or August
None Cover with 2 mm of damp soil and firm gently. Then cover with a layer of gravel.
4 – 24 weeks Sow in full sun, not under shadecloth. Sown in March they will be ready for planting in winter/spring of the same year. Sown in August they will be ready the following autumn.
Billardiera August None Sow on top of damp soil and cover with a layer of gravel.
4 to 8 weeks Sow in full sun, not under shadecloth.
Bracteantha May None Sow on top of damp soil and cover with a layer of gravel.
3 to 6 weeks Sow in full sun, not under shadecloth.
Bursaria August None Cover with 2 mm of damp soil and firm gently. Then cover with a layer of gravel.
4 to 6 weeks Sow in full sun, not under shadecloth.
Callistemon Dec 15, 29 None Brush aside large bark particles and sow on top of damp soil. Cover with a sparse layer of gravel.
3 to 4 weeks Seed is very small and seedlings tiny when they first germinate. They dry out easily so keep moist. They have little food reserves to get them going so use liquid fertiliser seven to ten days after they first appear to help them grow on. Use Maxicrop, Thrive or Aquasol.
Treatment Method # 2 Hot & Cold Water:
Place seed in a stocking or sieve and dip into hot (not boiling) water for 30 seconds. Immediately place seed into cold water and soak for 6 hours. Remove seed from water using a strainer. You can use paper towel to pat the seeds dry for easier handling.Sow all the seed immediately.
Treatment Method # 3 Boiled Hot Water:
Place seed into a mug or container and pour on water which has just boiled. Soak for 12 hours or overnight. Remove seed from water using a strainer. You can use paper towel to pat the seeds dry for easier handling.Sow all the seed immediately.
Seed Treatment Instructions:
44
Appendix I SPECIES SPECIFICATIONS
Seed Treatment, Sowing Requirements & Germination Times
Species Sow Date
Seed Treatment Sowing Requirements Germination Rate
Special Conditions/ Remarks
Callitris July None Cover with 2 mm of damp soil and firm gently. Then cover with a layer of gravel.
4 to 6 weeks Sow in full sun, not under shadecloth. Germinates naturally in the cooler months, grows slowly and is ready to plant the following year.
Carex Jan 15 None Press seed onto damp soil and cover with a layer of gravel.
4 to 12 weeks Sow in full sun, not under shadecloth. Grows in clumps. Do not thin out.
Cassinia August None Sow on top of damp soil and cover with a layer of gravel.
2 to 4 weeks Ants like this seed so keep them away.
Casuarina Nov 24 None Cover with 2 mm of damp soil and firm gently. Then cover with a layer of gravel.
3 to 6 weeks Start Casuarina pauper in full shade until 1 cm tall then give full sun. Germination may be delayed until there are some cool nights.
Chloris Nov 22 None Sow on top of damp soil and cover with a layer of gravel.
3 to 6 weeks Tends to grow in clumps. Do not thin out.
Clematis Jan 26 None Cover with 2 mm of damp soil and firm gently. Then cover with a layer of gravel.
5 to 8 weeks
Cullen Feb 15 None Cover with 2 mm of damp soil and firm gently. Then cover with a layer of gravel.
3 to 6 weeks
Cyperus Feb 15 None Press seed onto damp soil and cover with a sparse layer of gravel.
4 to 8 weeks Sow in full sun, not under shadecloth. Grows in clumps. Do not thin out.
Davesia Nov 22 Method 2: Hot & Cold Water
Cover seed to its own depth with damp soil and firm gently. Then cover with a layer of gravel.
4 to 8 weeks Sow in full sun, not under shadecloth.
Dianella March Seed packet will contain either pure
seed or seed still in the fruit which appears dried up. If necessary, split fruits to release
seed before sowing.
Cover with 2 mm of damp soil and firm gently. Then cover with a layer of gravel.
3 to 8 weeks Sow in full sun, not under shadecloth. Germination occurs over a long period.
Dodonaea Nov 28, Dec 22,
26
Method 3: Boiled Hot Water
Cover seed to its own depth with damp soil and firm gently. Then cover with a layer of gravel.
2 to 4 weeks
Einadia Dec 12 None Cover with 2 mm of damp soil and firm gently. Then cover with a layer of gravel.
2 to 4 weeks
Enchylaena Jan 5 None Cover with 2 mm of damp soil and firm gently. Then cover with a layer of gravel.
2 to 4 weeks
Treatment Method # 1 Plain Hot Water:
Place seed into a mug or container with hot (not boiling) water from the tap. Allow to soak as water cools for about 6 hours. Remove seed from water using a strainer. You can use paper towel to pat the seeds dry for easier handling.Sow all the seed immediately.

44 45
Species Sow Date
Seed Treatment Sowing Requirements Germination Rate
Special Conditions/ Remarks
Callitris July None Cover with 2 mm of damp soil and firm gently. Then cover with a layer of gravel.
4 to 6 weeks Sow in full sun, not under shadecloth. Germinates naturally in the cooler months, grows slowly and is ready to plant the following year.
Carex Jan 15 None Press seed onto damp soil and cover with a layer of gravel.
4 to 12 weeks Sow in full sun, not under shadecloth. Grows in clumps. Do not thin out.
Cassinia August None Sow on top of damp soil and cover with a layer of gravel.
2 to 4 weeks Ants like this seed so keep them away.
Casuarina Nov 24 None Cover with 2 mm of damp soil and firm gently. Then cover with a layer of gravel.
3 to 6 weeks Start Casuarina pauper in full shade until 1 cm tall then give full sun. Germination may be delayed until there are some cool nights.
Chloris Nov 22 None Sow on top of damp soil and cover with a layer of gravel.
3 to 6 weeks Tends to grow in clumps. Do not thin out.
Clematis Jan 26 None Cover with 2 mm of damp soil and firm gently. Then cover with a layer of gravel.
5 to 8 weeks
Cullen Feb 15 None Cover with 2 mm of damp soil and firm gently. Then cover with a layer of gravel.
3 to 6 weeks
Cyperus Feb 15 None Press seed onto damp soil and cover with a sparse layer of gravel.
4 to 8 weeks Sow in full sun, not under shadecloth. Grows in clumps. Do not thin out.
Davesia Nov 22 Method 2: Hot & Cold Water
Cover seed to its own depth with damp soil and firm gently. Then cover with a layer of gravel.
4 to 8 weeks Sow in full sun, not under shadecloth.
Dianella March Seed packet will contain either pure
seed or seed still in the fruit which appears dried up. If necessary, split fruits to release
seed before sowing.
Cover with 2 mm of damp soil and firm gently. Then cover with a layer of gravel.
3 to 8 weeks Sow in full sun, not under shadecloth. Germination occurs over a long period.
Dodonaea Nov 28, Dec 22,
26
Method 3: Boiled Hot Water
Cover seed to its own depth with damp soil and firm gently. Then cover with a layer of gravel.
2 to 4 weeks
Einadia Dec 12 None Cover with 2 mm of damp soil and firm gently. Then cover with a layer of gravel.
2 to 4 weeks
Enchylaena Jan 5 None Cover with 2 mm of damp soil and firm gently. Then cover with a layer of gravel.
2 to 4 weeks
Treatment Method # 2 Hot & Cold Water:
Place seed in a stocking or sieve and dip into hot (not boiling) water for 30 seconds. Immediately place seed into cold water and soak for 6 hours. Remove seed from water using a strainer. You can use paper towel to pat the seeds dry for easier handling.Sow all the seed immediately.
Treatment Method # 3 Boiled Hot Water:
Place seed into a mug or container and pour on water which has just boiled. Soak for 12 hours or overnight. Remove seed from water using a strainer. You can use paper towel to pat the seeds dry for easier handling.Sow all the seed immediately.
Seed Treatment Instructions:
46
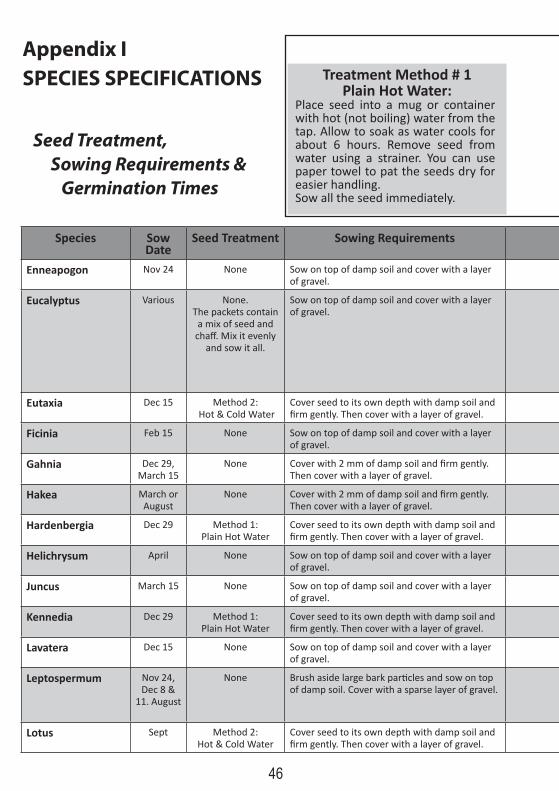
Appendix I SPECIES SPECIFICATIONS
Seed Treatment, Sowing Requirements & Germination Times
Species Sow Date
Seed Treatment Sowing Requirements Germination Rate
Special Conditions/ Remarks
Enneapogon Nov 24 None Sow on top of damp soil and cover with a layer of gravel.
3 to 6 weeks Tends to grow in clumps. Do not thin out.
Eucalyptus Various None. The packets contain
a mix of seed and chaff. Mix it evenly
and sow it all.
Sow on top of damp soil and cover with a layer of gravel.
2 to 4 weeks Eucalyptus are good indicator seedlings; they are first to show stress from lack of water and caterpillars appear on them early. Euc. leucoxylon sometimes grow along the ground before growing upwards - this is normal. Euc. incrassata should be put into full sun immediately after germination to prevent stems curling and twisting. Eucalyptus odorata, E. ovata, E. microcarpa, E. largiflorens and E. camaldulensis are most susceptible to mildew in the cooler months. Spray with diluted milk as a preventative measure (see Mildew, page 36). Euc. camaldulensis sometimes gets raised hard red spots on the leaves. These are galls caused by small insects but are not harmful.
Eutaxia Dec 15 Method 2: Hot & Cold Water
Cover seed to its own depth with damp soil and firm gently. Then cover with a layer of gravel.
4 to 6 weeks
Ficinia Feb 15 None Sow on top of damp soil and cover with a layer of gravel.
3 to 6 weeks Tends to grow in clumps. Do not thin out.
Gahnia Dec 29, March 15
None Cover with 2 mm of damp soil and firm gently. Then cover with a layer of gravel.
4 to 12 weeks
Hakea March or August
None Cover with 2 mm of damp soil and firm gently. Then cover with a layer of gravel.
4 to 8 weeks Sow in full sun, not under shadecloth. Sown in March they will be ready for planting in winter/spring of the same year. Sown in August they will be ready the following autumn.
Hardenbergia Dec 29 Method 1: Plain Hot Water
Cover seed to its own depth with damp soil and firm gently. Then cover with a layer of gravel.
4 to 6 weeks
Helichrysum April None Sow on top of damp soil and cover with a layer of gravel.
3 to 4 weeks Sow in full sun, not under shadecloth. Keep ants off.
Juncus March 15 None Sow on top of damp soil and cover with a layer of gravel.
3 to 4 weeks Sow in full sun, not under shadecloth. The seed has been mixed with fine sawdust to assist handling. When young, they resemble very fine grass. Do not thin out.
Kennedia Dec 29 Method 1: Plain Hot Water
Cover seed to its own depth with damp soil and firm gently. Then cover with a layer of gravel.
4 to 6 weeks
Lavatera Dec 15 None Sow on top of damp soil and cover with a layer of gravel.
2 to 4 weeks
Leptospermum Nov 24, Dec 8 &
11. August
None Brush aside large bark particles and sow on top of damp soil. Cover with a sparse layer of gravel.
3 to 4 weeks Seed is very small and seedlings tiny when they first germinate. They dry out easily so keep moist. They have little food reserves to get them going so use liquid fertiliser seven to ten days after they first appear to help them grow on. Use Maxicrop, Thrive or Aquasol.
Lotus Sept Method 2:Hot & Cold Water
Cover seed to its own depth with damp soil and firm gently. Then cover with a layer of gravel.
3 to 5 weeks Sow in full sun, not under shadecloth.
Treatment Method # 1 Plain Hot Water:
Place seed into a mug or container with hot (not boiling) water from the tap. Allow to soak as water cools for about 6 hours. Remove seed from water using a strainer. You can use paper towel to pat the seeds dry for easier handling.Sow all the seed immediately.

46 47
Species Sow Date
Seed Treatment Sowing Requirements Germination Rate
Special Conditions/ Remarks
Enneapogon Nov 24 None Sow on top of damp soil and cover with a layer of gravel.
3 to 6 weeks Tends to grow in clumps. Do not thin out.
Eucalyptus Various None. The packets contain
a mix of seed and chaff. Mix it evenly
and sow it all.
Sow on top of damp soil and cover with a layer of gravel.
2 to 4 weeks Eucalyptus are good indicator seedlings; they are first to show stress from lack of water and caterpillars appear on them early. Euc. leucoxylon sometimes grow along the ground before growing upwards - this is normal. Euc. incrassata should be put into full sun immediately after germination to prevent stems curling and twisting. Eucalyptus odorata, E. ovata, E. microcarpa, E. largiflorens and E. camaldulensis are most susceptible to mildew in the cooler months. Spray with diluted milk as a preventative measure (see Mildew, page 36). Euc. camaldulensis sometimes gets raised hard red spots on the leaves. These are galls caused by small insects but are not harmful.
Eutaxia Dec 15 Method 2: Hot & Cold Water
Cover seed to its own depth with damp soil and firm gently. Then cover with a layer of gravel.
4 to 6 weeks
Ficinia Feb 15 None Sow on top of damp soil and cover with a layer of gravel.
3 to 6 weeks Tends to grow in clumps. Do not thin out.
Gahnia Dec 29, March 15
None Cover with 2 mm of damp soil and firm gently. Then cover with a layer of gravel.
4 to 12 weeks
Hakea March or August
None Cover with 2 mm of damp soil and firm gently. Then cover with a layer of gravel.
4 to 8 weeks Sow in full sun, not under shadecloth. Sown in March they will be ready for planting in winter/spring of the same year. Sown in August they will be ready the following autumn.
Hardenbergia Dec 29 Method 1: Plain Hot Water
Cover seed to its own depth with damp soil and firm gently. Then cover with a layer of gravel.
4 to 6 weeks
Helichrysum April None Sow on top of damp soil and cover with a layer of gravel.
3 to 4 weeks Sow in full sun, not under shadecloth. Keep ants off.
Juncus March 15 None Sow on top of damp soil and cover with a layer of gravel.
3 to 4 weeks Sow in full sun, not under shadecloth. The seed has been mixed with fine sawdust to assist handling. When young, they resemble very fine grass. Do not thin out.
Kennedia Dec 29 Method 1: Plain Hot Water
Cover seed to its own depth with damp soil and firm gently. Then cover with a layer of gravel.
4 to 6 weeks
Lavatera Dec 15 None Sow on top of damp soil and cover with a layer of gravel.
2 to 4 weeks
Leptospermum Nov 24, Dec 8 &
11. August
None Brush aside large bark particles and sow on top of damp soil. Cover with a sparse layer of gravel.
3 to 4 weeks Seed is very small and seedlings tiny when they first germinate. They dry out easily so keep moist. They have little food reserves to get them going so use liquid fertiliser seven to ten days after they first appear to help them grow on. Use Maxicrop, Thrive or Aquasol.
Lotus Sept Method 2:Hot & Cold Water
Cover seed to its own depth with damp soil and firm gently. Then cover with a layer of gravel.
3 to 5 weeks Sow in full sun, not under shadecloth.
Treatment Method # 2 Hot & Cold Water:
Place seed in a stocking or sieve and dip into hot (not boiling) water for 30 seconds. Immediately place seed into cold water and soak for 6 hours. Remove seed from water using a strainer. You can use paper towel to pat the seeds dry for easier handling.Sow all the seed immediately.
Treatment Method # 3 Boiled Hot Water:
Place seed into a mug or container and pour on water which has just boiled. Soak for 12 hours or overnight. Remove seed from water using a strainer. You can use paper towel to pat the seeds dry for easier handling.Sow all the seed immediately.
Seed Treatment Instructions:

48
Appendix I SPECIES SPECIFICATIONS
Seed Treatment, Sowing Requirements & Germination Times
Species Sow Date
Seed Treatment Sowing Requirements Germination Rate
Special Conditions/ Remarks
Maireana Jan 5 None Cover with 2 mm of damp soil and firm gently. Then cover with a layer of gravel.
2 to 4 weeks
Melaleuca Nov 24,Dec 29
None Brush aside large bark particles and sow on top of damp soil. Cover with a sparse layer of gravel.
3 to 4 weeks Seed is very small and seedlings tiny when they first germinate. They dry out easily so keep moist. They have little food reserves to get them going so use liquid fertiliser seven to ten days after they first appear to help them grow on. Use Maxicrop, Thrive or Aquasol.
Microleana Feb 15 None Sow on top of damp soil and cover with a layer of gravel.
3 to 6 weeks Sow in full sun, not under shadecloth. Tends to grow in clumps. Do not thin out.
Olearia March 15 None Sow on top of damp soil and cover with a layer of gravel.
3 to 4 weeks Sow in full sun, not under shadecloth.
Poa Feb 15 None Sow on top of damp soil and cover with a layer of gravel
2 to 4 weeks
Pittosporum August None. If seed is sticky, add talcum powder for easy
handling.
Cover seed to its own depth with damp soil and firm gently. Then cover with a layer of gravel.
4 to 8 weeks. Sow in full sun, not under shadecloth. Don’t be tempted to remove the seed coat from the germinating seedlings - keep them moist enough and the seedlings will do it themselves.
Playtylobium Dec 1 Method 2:Hot & Cold Water
Cover seed to its own depth with damp soil and firm gently. Then cover with a layer of gravel.
2 to 4 weeks
Pultenaea Dec 15 Method 2: Hot & Cold Water
Cover seed to its own depth with damp soil and firm gently. Then cover with a layer of gravel.
3 to 8 weeks
Rhagodia Dec 1, 15 None. If seed is sticky, add talcum powder for easy
handling.
Cover seed to its own depth with damp soil and firm gently. Then cover with a layer of gravel.
3 to 4 weeks
Senna Dec 1 Method 1: Plain Hot Water
Cover seed to its own depth with damp soil and firm gently. Then cover with a layer of gravel.
2 to 4 weeks
Templetonia Dec 1 Method 1: Plain Hot Water
Cover seed to its own depth with damp soil and firm gently. Then cover with a layer of gravel.
3 to 4 weeks Templetonia egena has no obvious leaves.
Viminaria Dec 15 Method 3: Boiled Hot Water
Cover seed to its own depth with damp soil and firm gently. Then cover with a layer of gravel.
3 to 6 weeks
Vittadinia March 15 None Cover with 2 mm of damp soil and firm gently. Then cover with a layer of gravel.
3 to 6 weeks Sow in full sun, not under shadecloth.
Xanthorrhoea July None Cover with 2 mm of damp soil and firm gently. Then cover with a layer of gravel.
4 – 52 weeks Don’t give up and throw them out! Sow in full sun, not under shadecloth.
Treatment Method # 1 Plain Hot Water:
Place seed into a mug or container with hot (not boiling) water from the tap. Allow to soak as water cools for about 6 hours. Remove seed from water using a strainer. You can use paper towel to pat the seeds dry for easier handling.Sow all the seed immediately.

48 49
Species Sow Date
Seed Treatment Sowing Requirements Germination Rate
Special Conditions/ Remarks
Maireana Jan 5 None Cover with 2 mm of damp soil and firm gently. Then cover with a layer of gravel.
2 to 4 weeks
Melaleuca Nov 24,Dec 29
None Brush aside large bark particles and sow on top of damp soil. Cover with a sparse layer of gravel.
3 to 4 weeks Seed is very small and seedlings tiny when they first germinate. They dry out easily so keep moist. They have little food reserves to get them going so use liquid fertiliser seven to ten days after they first appear to help them grow on. Use Maxicrop, Thrive or Aquasol.
Microleana Feb 15 None Sow on top of damp soil and cover with a layer of gravel.
3 to 6 weeks Sow in full sun, not under shadecloth. Tends to grow in clumps. Do not thin out.
Olearia March 15 None Sow on top of damp soil and cover with a layer of gravel.
3 to 4 weeks Sow in full sun, not under shadecloth.
Poa Feb 15 None Sow on top of damp soil and cover with a layer of gravel
2 to 4 weeks
Pittosporum August None. If seed is sticky, add talcum powder for easy
handling.
Cover seed to its own depth with damp soil and firm gently. Then cover with a layer of gravel.
4 to 8 weeks. Sow in full sun, not under shadecloth. Don’t be tempted to remove the seed coat from the germinating seedlings - keep them moist enough and the seedlings will do it themselves.
Playtylobium Dec 1 Method 2:Hot & Cold Water
Cover seed to its own depth with damp soil and firm gently. Then cover with a layer of gravel.
2 to 4 weeks
Pultenaea Dec 15 Method 2: Hot & Cold Water
Cover seed to its own depth with damp soil and firm gently. Then cover with a layer of gravel.
3 to 8 weeks
Rhagodia Dec 1, 15 None. If seed is sticky, add talcum powder for easy
handling.
Cover seed to its own depth with damp soil and firm gently. Then cover with a layer of gravel.
3 to 4 weeks
Senna Dec 1 Method 1: Plain Hot Water
Cover seed to its own depth with damp soil and firm gently. Then cover with a layer of gravel.
2 to 4 weeks
Templetonia Dec 1 Method 1: Plain Hot Water
Cover seed to its own depth with damp soil and firm gently. Then cover with a layer of gravel.
3 to 4 weeks Templetonia egena has no obvious leaves.
Viminaria Dec 15 Method 3: Boiled Hot Water
Cover seed to its own depth with damp soil and firm gently. Then cover with a layer of gravel.
3 to 6 weeks
Vittadinia March 15 None Cover with 2 mm of damp soil and firm gently. Then cover with a layer of gravel.
3 to 6 weeks Sow in full sun, not under shadecloth.
Xanthorrhoea July None Cover with 2 mm of damp soil and firm gently. Then cover with a layer of gravel.
4 – 52 weeks Don’t give up and throw them out! Sow in full sun, not under shadecloth.
Treatment Method # 2 Hot & Cold Water:
Place seed in a stocking or sieve and dip into hot (not boiling) water for 30 seconds. Immediately place seed into cold water and soak for 6 hours. Remove seed from water using a strainer. You can use paper towel to pat the seeds dry for easier handling.Sow all the seed immediately.
Treatment Method # 3 Boiled Hot Water:
Place seed into a mug or container and pour on water which has just boiled. Soak for 12 hours or overnight. Remove seed from water using a strainer. You can use paper towel to pat the seeds dry for easier handling.Sow all the seed immediately.
Seed Treatment Instructions:

50
Appendix II - GLOSSARY
Back-up: seedling stock available from the Trees For Life Nursery in mid April. If you have been unable to meet your Landholder’s growing order, there may be some similar seedling stock available from Back-up. Details of Back-up week will be advertised in our March newsletter, ‘ReLeaf’.
Botanical name: a unique identifying name given to every living plant, and recognized universally. Also referred to as a “scientific name.” It is usually made up of two Latin derived words, a genus and a species. E.g. The botanical name for River Red Gum is Eucalyptus camaldulensis.
Common name: a name given to most plants which is easier to pronounce than the botanical name. However, common names are not unique and tend to change regionally e.g. Eucalyptus camaldulensis has many common names; River Red Gum, River Gum, Red Gum, Widow Maker.
Cotyledons: the first leaves to appear upon germination. Cotyledons are the “seed leaves” which emerge from the embryo (seed) and have a different appearance to the true leaves.
Dormancy: seed is inactive or will not germinate, and is awaiting certain environmental conditions to trigger the seed into action.
Distribution Day: the day you collect all your materials and supplies in order to start growing seedlings.
Fertiliser: any organic or inorganic material added to the soil (e.g. manure, nitrogen, phosphorus) to improve the supply of nutrients and promote plant growth. Only certain fertilisers are suitable for native seedlings.
Genus: a taxonomic category, which consists of a group of species. The genus is always the first word of a plants botanical name e.g. Eucalyptus is the genus for most gum trees.
Germination: the development of a seed to the birth of a new plant.
Grading: the process of sorting seedlings within each box by height. This is important so the smaller seedlings aren’t shaded out by the taller ones.
Grower Bag: the small sealed plastic bag you collect on Distribution Day which contains your Growing Order, seed and the information you need to grow.
Growing Order: the printed sheet of paper which catalogues who you are growing for and what you are growing. It describes how many of each species are required, when to sow them, and whether they require pre-treatment.
Handover: the exchange of the seedlings from the care of the Volunteer Grower to the Landholder or Project Coordinator.
Herbicide: a synthetic or organic material applied to plants or soil to resist or reduce infestation by weeds. Herbicides are not necessary to use on your seedlings.
Landholder: a Trees For Life member who has ordered seedlings for planting on their property.

50 51
Mildew: a fungal disease characterised by the appearance of grey powdery spots on leaves.
Mulch: a protective material covering the top of soil which helps to retain soil moisture.
Pesticide: a synthetic or organic material applied to plants or soil to remove or resist pests (e.g. insects, caterpillars) from damaging your plants.
Planting: your seedlings will be ready for planting in the ground in May. Do not confuse with sowing.
Pre-treatment: a treatment applied to seed prior to sowing, in order to stimulate germination.
Propagation: to cause an organism to breed; the deliberate reproduction of plants by using seed, or other methods.
Replacement seed: is available if your seed does not germinate within the time frame given in the Species Specifications. Request replacement seed by phoning TFL: 8406 0500.
Revegetation: the process of re-planting native species in degraded areas.
Robust: strong, healthy and vigorous. Seedlings are described as robust when they are able to withstand environmental variations with minimal damage.
Seed: the embryo of a new plant.
Seedling: a plant which has not yet reached maturity.
Sow/Sowing: the act of placing seed in damp soil for the purpose of germinating seedlings.
Species: a taxonomic classification grouping organisms with distinct common characteristics. The species is always the second word of a plants botanical name e.g. - camaldulensis is the species name for River Red Gum (Eucalyptus camaldulensis).
Species Specifications: are located in the Appendix section of this booklet. You will need to refer to the species specifications when you sow each species so that you can determine what special conditions are required and when to expect signs of germination.
Thinning: the process of removing excess seedlings to have one seedling remain in each tube.
Transplanting: the process of carefully transferring an excess seedling (including its roots) to grow on in another tube with no germination.
Tubes: the small plastic containers we give you to grow your individual seedlings in.
Tubestock: tubes containing seedlings appropriate for planting out e.g. The landholder ordered tubestock to revegetate her degraded paddock.
Zone code: a code used by Trees For Life to identify where seed was collected, so that appropriate seedlings will be returned to the right area. The zone code appears on your Growing Order and seed packets as a two letter code e.g. AP (Adelaide Plains).

52
5 May Terrace, Brooklyn Park SA 5032P 08 8406 0500 F 08 8406 0599
[email protected] www.treesforlife.org.au
Thank you for Growing
Facebook/treesforlifesa