grinding lathe tools on a belt sander – for the new guy _ machinistblog
TRANSCRIPT

Home Events Clubs Forum Table of Contents About
MachinistBlog.comPlans, projects and how-to's for home machinists
Log in
Popular Posts
ForumRestoring a Craftsman15″ Drill PressRebuilding an AlbrechtDrill ChuckDownload: AdvancedGunsmithing Book (PDF)Grinding Lathe Tools on aBelt Sander – For theNew GuyJan Ridders' New LTDStirling EngineMy Opinion About HarborFreight's Inside TrackClubModifying a Craftsman 2X 42-inch Belt SanderFor Tool GrindingFree Plans: DavidKerzel's Hit & MissEngineTubalcain's Lathe BitGrinding Videos
Categories
CAD/CAM (8)CNC (18)Contests (2)Engines (19)
Jan Ridders (5)Steam Engines (5)Stirling Construction(3)Stirling Engines (9)
Good Deals (6)How-To (19)Instructional (15)Mods (20)
Bandsaw Mods (1)Lathe Mods (8)Mini-Mill Mods (8)
Other (12)People (9)Plans (22)
Grinding Lathe Tools on a BeltSander – For the New Guy
misshapen, multi-faceted, overheated and just plain ugly lathetools I made back then. The amazing thing is that some ofthose tools actually worked as well as the pre-ground toolsthat came with my lathe. I started to believe those guys thattell you, “… just get it close and it will work.” Of course, I wastoo embarrassed to call myself a hobby machinist with thoseFranken-tools so I bought an expensive set of inserted tipcarbide tools that I thought would make a major difference butwas disappointed. They couldn’t rough as deep or finish aswell as my ugly high speed steel (HSS) tools, at least not onmy lathe, so then I believed those guys that tell you, “… stickwith HSS on a hobby lathe.” Hey, desperation can make youmighty receptive, you know.
Random Quote
“The early bird may get theworm, but it's the second
for the Best Machining,CNC, Welding andMetal FabricationVideos We Can
Featured Websites
David MorrowDean WillamsFrets.comJan Ridders
Search
Comments Posts
Grinding Lathe Tools on a Belt Sander – For the New Guy | MachinistBlo... http://www.machinistblog.com/grinding-lathe-tools-on-a-belt-sander/
1 of 13 2/6/2014 5:55 PMCreate PDF files without this message by purchasing novaPDF printer (http://www.novapdf.com)

Projects & Ideas (18)Resources (3)Reviews (5)Shows & Events (6)Software (6)Tips & Tricks (13)Tools (24)
Bandsaw (2)Belt Sander (1)DROs (1)Lathe (7)Mini Lathe (4)Mini-Mill (8)
Videos (23)Web Sites (4)Welding & Metal Fab (2)Workshops (7)
Fast forward 15 years and now I believe, after having groundmany experimental tools, that the best lathe tool for ahobby-class lathe is a HSS tool with its tip geometry modifiedto reduce the cutting forces it produces, ground on a beltsander.
Since standard tools are intended for use on industrial lathestheir geometry can produce cutting forces that are excessiveat times, especially when roughing but this can also affectsizing and finishing cuts. To be clear, cutting force is thatforce produced by the tip geometry of the tool that must beovercome to make a cut. We can look at it as a continuousresistance generated by the shape of the tool as it is pushedthrough the material during the cut. A standard HSS tool has abroad, wedge shape and creates a lot of resistance (carbide iseven worse), so we must dial down our control inputs (depthsof cut, feeds and speeds) to use them. If we alter the tool soit has a narrower included angle it cuts with less resistance,
achieve better accuracy in sizing and finishing cuts, and finishbetter with greater ease before running into the rigidity andpower limits of the lathe. And this is exactly what happens.
To demonstrate this I took a 0.050” deep cut in 12L14 mildsteel on my admittedly older hobby-class manual mini-latheusing a very good quality inserted tip carbide roughing tool witha new insert, a sharp freshly ground high speed steel (HSS)roughing tool with standard tip geometry ground for steel, andthe general purpose tool with modified tip geometry (notoptimized for steel) that was ground for this discussion.
Thecarbidetool madethe cut butchatterwasexcessive. Speedwas as
KnucklebusterMachinistVIDEOS.comMicro-Machine ShopStart Model Engineering
Grinding Lathe Tools on a Belt Sander – For the New Guy | MachinistBlo... http://www.machinistblog.com/grinding-lathe-tools-on-a-belt-sander/
2 of 13 2/6/2014 5:55 PMCreate PDF files without this message by purchasing novaPDF printer (http://www.novapdf.com)

chips aretiny andpowdery. Reducingthe depthof cut to0.010, theproperdepth ofcut for thisinsert,allowed itto cut as itshould.
The HSSroughingtool didfair butthere wasa lot ofchatter. Speedsand feedshad to beadjustedalmostconstantlyto make itthis far. Finish isrough butnotexcessivefor aroughingcut. Chipsare tightlycurled dueto thestandardside rake. Reducingthe cut to0.030”allowedthe tool towork muchbetter.
Grinding Lathe Tools on a Belt Sander – For the New Guy | MachinistBlo... http://www.machinistblog.com/grinding-lathe-tools-on-a-belt-sander/
3 of 13 2/6/2014 5:55 PMCreate PDF files without this message by purchasing novaPDF printer (http://www.novapdf.com)

Themodifiedtool cuteasily,speed wasabout 100RPMhigher thanwith theother toolsand therewas nochatter atall. Finishis muchbettercomparedto theothertools. Thechips lookmore likelooseshavingsdue to thesharperincludedangle atthe tip.
Chips fromthecarbidetool, HSSrougingtool and
Grinding Lathe Tools on a Belt Sander – For the New Guy | MachinistBlo... http://www.machinistblog.com/grinding-lathe-tools-on-a-belt-sander/
4 of 13 2/6/2014 5:55 PMCreate PDF files without this message by purchasing novaPDF printer (http://www.novapdf.com)

going on atthe tip ofthe tool.
As you can see the modified tool performs favorably comparedto the standard HSS and carbide tools, and I assure you theysize and finish better as well. The trade off for this enhancedperformance is a reduction in tip strength but most small lathesare not rigid or powerful enough to break a tip off, even withpretty aggressive cuts so it’s an acceptable trade off.
These modifications are not some deep dark secret. Theyare simply an alteration to the standard angles in ways that arealready known to reduce cutting forces. You just need to knowwhat to change, when and how to change it, and by howmuch. Grinding these changes into the tool then becomes verysimple and will allow you to tailor the tool to your specific latheand needs.
If this interests you then follow along as we go over basic tipgeometry, at least enough to grind a tool with, and discusshow these modifications can be made. I’ll talk you through thethought process used to alter the tool we grind so you get afeel for what you’ll be doing in your shop. Then we’ll grind thattool on a belt sander, pretty much step-by-step, to solidify theconcepts. We’ll finish off by showing you the Knife Tool, afacing tool I can highly recommend. Due to the length of thisdiscussion I will break it up into three parts.
Please understand that tip geometry and cutting forces areextremely complex subjects. Entire books are written aboutthis stuff by folks far more knowledgeable than me. I am notan expert on this subject; my goal is to give you only enoughinformation to get you started and I consider this discussion tobe a supplement to your reading. Therefore, any opinions,inaccuracies or errors are my own. The angle modifications Iam sharing here were derived from experimentation in my shopand work for me and my lathe; your results will vary. Thesechanges are NOT necessary; you can grind standard tools justas easily.
Finally, I am not a technical writer, engineer or pro machinist –just a guy like you – so I will write this in a style and languagethat I am comfortable with.
Experienced guy warning: Having been a new guy myself Irecall the early grinding days well enough to know where theconfusion points are. Accordingly, I am going to repeat andre-emphasize some points frequently, in several different ways,so that it clicks for the new guy. This will also be very detailedand necessarily longer because new guys need detail in orderto succeed. For you more experienced guys, my apologies forthe nausea this creates. Please ignore me and move on.
As always, working with machines and sharp stuff can result ininjury or worse. Please be careful and proceed at your ownrisk.
First, the grinderThe bench grinder is the most commonly recommended toolfor grinding lathe tools. This machine tends to cut slow, cuthot and cut facets. It may work in more experienced hands butfor the new guy … maybe not the best tool to learn on.
A far better option for grinding lathe tools is a simple beltsander, preferably one that uses 2” wide belts. Thesemachines are cheap, widely available and surprisingly capable
Grinding Lathe Tools on a Belt Sander – For the New Guy | MachinistBlo... http://www.machinistblog.com/grinding-lathe-tools-on-a-belt-sander/
5 of 13 2/6/2014 5:55 PMCreate PDF files without this message by purchasing novaPDF printer (http://www.novapdf.com)
for home shop use. The smaller machines with 1” wide beltsdon’t have enough width to grind a tool evenly, the platen is tooflexible, the belts wear too quickly, and coarser belts areharder to find.
As a tool grinder the belt sander is almost ideal:
Belt sanders cut very fast and very cool when you use theright belt and a wax stick lubricant. Average grinding timefor a 3/8” HSS tool is under 4 minutes and less than 2minutes for a ¼” HSS tool.
With their wide flat platens they allow for simple toolalignment so facets are easy to avoid. This is far, far, farbetter than trying to realign a tool to a narrow round wheelthat requires frequent dressing.
Belts are widely available, cheap, and do not requiredressing, balancing, or conditioning. They also have a verygood service life if used with wax lube.
Changing grits takes seconds and going from shaping to amirror finish by stepping up through the grits takes a fewminutes. Honing to a final polish is less than a minuteaway.
Belts will snap at the splice occasionally, especially if theyare old. This will scare the crap out of you the first time ithappens but I find that preferable to an exploding wheel. Know also that touching a finger to the edge of a runningbelt is very, very bad for you.
Most common belt sanders are not perfect in stock form. TheOEM table is typically inadequate and needs to be upgradedto a solid table that can be quickly set to precise angles. Thetable should be made of steel to avoid sharp edges fromcatching and dragging as you move the tool across the belt.
The stock mild steel platen on these machines typically won’tlast long with any serious grinding done on it. I suggest buyinga ceramic glass liner you can epoxy onto a flat (preferablyground steel) platen to greatly resist wear from grindingoperations. Better known as Pyroceram, these liners arereadily available from knife making suppliers for about $20.00as of this writing. The key thing is that the platen remains flatand does not flex at all. Once the table and platen are handleda belt sander makes a fine tool grinder and will also handlemost other grinding jobs in the typical home shop.
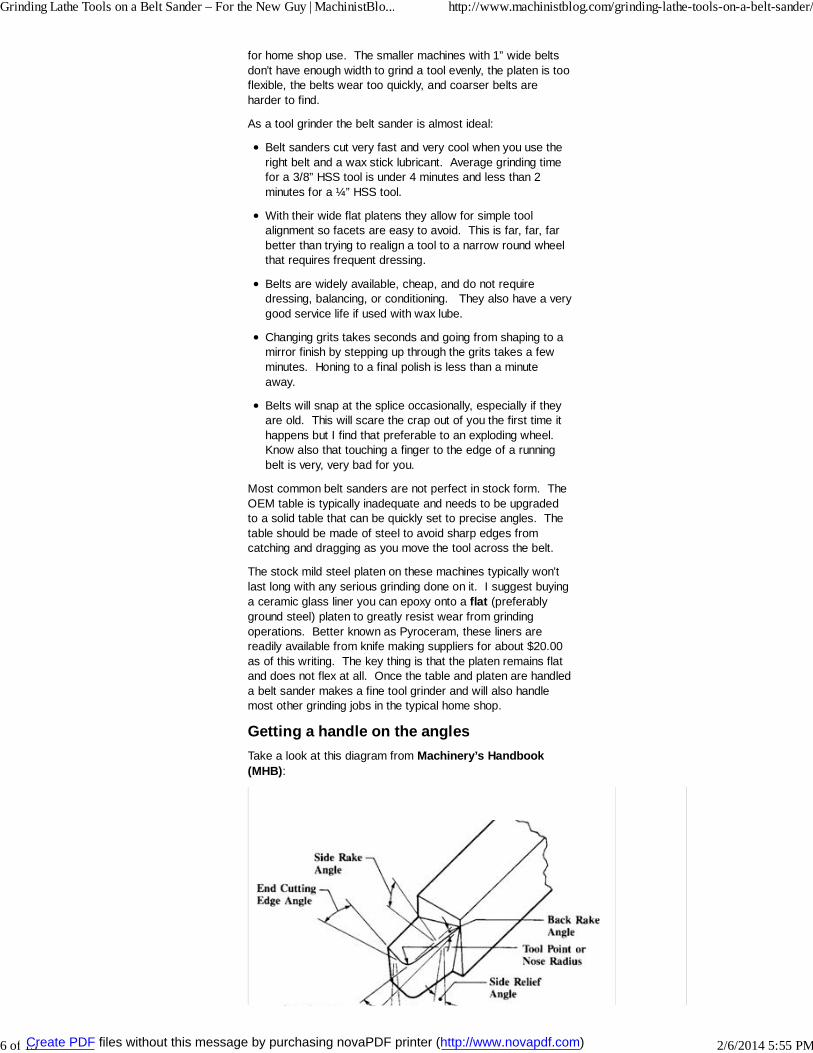
Getting a handle on the anglesTake a look at this diagram from Machinery’s Handbook(MHB):
Grinding Lathe Tools on a Belt Sander – For the New Guy | MachinistBlo... http://www.machinistblog.com/grinding-lathe-tools-on-a-belt-sander/
6 of 13 2/6/2014 5:55 PMCreate PDF files without this message by purchasing novaPDF printer (http://www.novapdf.com)

Fresh offthe beltsander, allthe anglesin thediagramabovehave beengroundinto thisroughingtool forsteel. Despitethecomplexityof thediagramthoseangles areactuallysimple togrind, asyou willsee.
Lathe tools cut at a single point of contact so they arecommonly called single point tools. This point is the interfacebetween three surfaces – the side, the end and the top. Eachof these surfaces is usually angled in two planes.
The words relief angle in the diagram above refers only tothe vertical angle of the side and end faces of the tool tip. The words rake angle refers only to the horizontal angles ofthe top surface of the tool. The words edge angle have todo with how the tool is shaped; due to the wide range ofshapes a tool can take these edge angles are not found inthe typical angle table.
Relief angles are primarily clearance angles that allow thetool to cut at the tip and upper edges of the tool without thearea immediately below rubbing against the work when thetip is set to center height. They are critical angles in thatthey form one half of the main cutting edge, the other halfbeing the top rake angles. Relief angles affect finish, toollife, cutting forces and cutting temperatures. For a smalllathe we want to use the largest relief angles we can getaway with without weakening the tool. This is especiallytrue with finishing tools where larger relief angles prevent
Grinding Lathe Tools on a Belt Sander – For the New Guy | MachinistBlo... http://www.machinistblog.com/grinding-lathe-tools-on-a-belt-sander/
7 of 13 2/6/2014 5:55 PMCreate PDF files without this message by purchasing novaPDF printer (http://www.novapdf.com)

rubbing and greatly improve finishes. Larger angles alsoenhance penetration of the tool into the work for all cuts, agood thing for a small lathe.
Rake angles direct chips away from the working area ofthe tool. Note that there are two kinds of rake: side rakeand back rake . Of the two, side rake is far more importantfor a turning tool, while back rake angles are less critical(except on parting tools where back rake assumes theimportance of side rake on a turning tool). Differentmaterials require different amounts of side rake for efficientchip clearance. In general, cutting forces will runperpendicular to the side cutting edge and as the tool cutsthe chips will follow the path of least resistance. Rake,particularly side rake, provides this path. Much of the heatin a cutting operation is carried off by the chip so clearingthose chips efficiently will reduce cutting temperatures. Being the other critical half of the cutting edge side rake,and to a lesser degree back rake, has much to do withreducing cutting forces. Cutting forces and cuttingtemperatures decrease, and tool life increases as siderake and back rake become more positive up to anoptimal point (MHB). Therefore, for a given set of rakevalues in a cutting tool table you want to go for the highervalue for use on a small lathe to improve chip clearanceand reduce cutting forces.
Youmayseetheterms
positive rake, negative rake or zero rake. Remember thatthe top of the tool has two kinds of rake – side and back –both can be positive, negative or zero. Just look at the toolfrom the tip: if the top surface angles away from the pointof the tool then it has positive rake. If it angles toward thetip it has negative rake. If the top is flat the rake is zero. For a small lathe you should avoid a negative rake tool –the cutting forces are too high.
Edge angles define the tool’s shape as seen from the topof the tool. They vary with the purpose of the tool and alsoby how much strength is needed at the tip. Tools meant forheavy cuts, like a rougher, will have more mass at the tip tohandle higher cutting loads, while a finishing tool will have amore delicate tip appropriate to the lighter cuts it is meantto take. These angles are less critical than the otherparameters and are really dictated by your needs for tipstrength, finishing potential and access to corners.
The nose radius at the tip of the tool varies with the generalpurpose of the tool. Roughing tools will typically have asmaller nose radius, while finishing tools generally have alarger nose radius. Note that a large nose radius greatlyincreases cutting forces because it is constantly beingpushed out of the cut. For tools up to 3/8” square it is bestto limit the nose radius to a maximum of 1/64”. You cango up to a 1/32” radius on a finishing tool but lighter cutsare necessary. When forming or grinding it you do not
Grinding Lathe Tools on a Belt Sander – For the New Guy | MachinistBlo... http://www.machinistblog.com/grinding-lathe-tools-on-a-belt-sander/
8 of 13 2/6/2014 5:55 PMCreate PDF files without this message by purchasing novaPDF printer (http://www.novapdf.com)

need to measure the nose radius with a gage – justestimate it.
Honing a tool after it is ground is a controversial thing. Manyexperienced machinists say they don’t bother. However, anyedge defects that occur during the grinding process willtransfer to the work; we may not care too much about it for arougher but for a finishing tool this is not a good thing. Sincehoning also extends tool life and reduces the need to re-grind atool I can’t see a reason not to hone a tool.
Honing is best done with a fine or extra-fine diamond stone. Iprefer the solid surface stones on a steel base, not the plasticbase with dots. If I need to do a lot of stoning I use a 2” X 6”stone . If I am honing after grinding a tool on the belt sanderthen I use the credit card size; they are cheaper and easier tohandle. I use the fine stone to get off most grind marks andthe extra-fine to obtain a nice homogenous surface. Maintaining your tools after this will take only a few strokes perface.
Hold the stone in one hand and the tool in the other. Focusyour pressure over the center of the face and stroke in onedirection lightly, preferably under a running stream of water. Keep your wrists locked to avoid changing angles and creatingfacets. I suggest honing the side and end first, leaving the topof the tool for last; this removes any burrs and leaves a veryclean edge. Your goal is to remove all evidence of grindingmarks. Be sure to catch the nose radius when honing. If youneed the finest finish possible for your work hone the tool, thenpolish it on a translucent Arkansas stone and your tool will cutlike a razor.
Now that we have a better idea of what all those confusingangles are and what they do, we need to see how they areused to make a lathe tool. Part 2 will look at the Angle Table,how we can modify the angles to reduce cutting forces, andwe’ll discuss the different shapes lathe tools can take.
In Part 2, we’ll put it all together and grind a tool on a beltsander.
Related posts:
Modifying a Craftsman 2 X 42-inch Belt Sander For ToolGrindingTubalcain’s Lathe Bit Grinding VideosHarbor Freight 1×30 Belt Sander ReviewPamper Your Tools
Posted in How-To, Instructional, Lathe | 19 Comments »
19 comments to Grinding Lathe Tools on aBelt Sander – For the New Guy
BillSeptember 5, 2011 at 10:00 AM | ReplyHelloWhat type of tool post are you using?
MikeySeptember 5, 2011 at 3:50 PM | ReplyHey Bill,The tool post is the wedge-style tool post from TS
Engineering. Its far more stable than the piston-style postcommonly sold for small lathes. Too bad TS Engineering left themarket; they made good stuff.
Grinding Lathe Tools on a Belt Sander – For the New Guy | MachinistBlo... http://www.machinistblog.com/grinding-lathe-tools-on-a-belt-sander/
9 of 13 2/6/2014 5:55 PMCreate PDF files without this message by purchasing novaPDF printer (http://www.novapdf.com)

Mikey
Web design hullSeptember 11, 2011 at 3:14 PM | ReplyThanks Mikey, your guide has given me an insightinto what mistakes I’ve possibly been making. I’ve
been using a vintage grayson lathe to make a bell mouth out of60mm mild steel bar. I’ve only managed to remove 5mm metalin 3 hours I now believe the cutting tools are wrong.
MikeySeptember 11, 2011 at 4:15 PM | ReplyChris, you’re welcome – hope it helps.
Mikey
JorgeSeptember 18, 2011 at 5:27 AM | ReplyThe first few weeks in the shop in the ‘lathe section’when I went to trade school were spent on grinding
HSS tool blanks on pedestal grinders. Sure most people therewere in their early twenties but it didn’t take more than that timefor people to be able to do the hand motion to make a flatsurface without facets with the round wheel.
With a pail of cold water in front of the grinder you can rapidlyrough out the cutter and finish grind it with the fine grit wheelwhile quenching to preserve the temper. It’s really not a big dealto use the grinder this way.
In the job shop where I work some people sharpen tools withthe belt sander but the round wheel type, not the flat type toshortcut and avoid facets.
For a home shop the only reason I can see to use a belt sanderover a grinder would be that replacing the belts is easier andyou are right about explosions, particularly near the end of lifespan when you get cheap about using bald belts/tiny wheels. Ifyou can afford it I would grind my tools with a grinder then touchup with a belt or hone when they get dull.
All the rest of your information about geometry is very good andwhat I remember from school. After a while it becomes veryintuitive and you basically know what a tool should look like for agiven depth of cut/material ect.
MikeySeptember 18, 2011 at 7:11 AM | ReplyThanks for your comments, Jorge. A bench grinderworks – no doubt about it. As I said, for an
experienced machinist a bench grinder is fine, especially if hewas trained with it and does it often enough to maintain his skill.I can freehand a good tool on a bench grinder, too, but I muchprefer the cool cutting flat platen belt sander. Either way, aslong as we can get the tool we need then that’s what counts.My intention is to help the new guy get started and it remains tobe seen if that is the result. I threw a lot of info out there andI’m worried it was too much. We’ll see.
Mikey
jackyOctober 21, 2011 at 1:56 AM | Reply
Grinding Lathe Tools on a Belt Sander – For the New Guy | MachinistBlo... http://www.machinistblog.com/grinding-lathe-tools-on-a-belt-sander/
10 of 13 2/6/2014 5:55 PMCreate PDF files without this message by purchasing novaPDF printer (http://www.novapdf.com)

Have you ever use a lathe tool grinder.We are thesupplier of lathe tool grinder in China.
MikeyOctober 21, 2011 at 6:11 AM | ReplyI’m not sure what you consider a lathe tool grinder,Jacky. Are you referring to a tool and cutter grinder
or a bench grinder? I have a lot of experience with a benchgrinder and none with a tool and cutter grinder (mostly becausethey are very expensive).
For shaping lathe tools the belt sander serves the home shopguy well but if your company makes a tool grinder that isaffordable I think we would welcome a video showing how itworks. I would, anyway.
Welcome to MachinistsBlog, by the way.
Mikey
Max GAugust 6, 2012 at 5:18 PM | ReplyReally need to give this a try.
MikeyAugust 6, 2012 at 11:13 PM | ReplyI would be interested to hear how it works out, Max.
Mikey
Max GAugust 13, 2012 at 6:18 PM | ReplyWell I gave it a go over the weekend. My disk /beltsander only have a 25mm (1″)belt on it. Used for
sanding balsa and ply wood only. It worked great. Much bettercontrol on the sander than the bench grinder. I did have toalternate between the disk and belt to get the shape I needed,due to the belt support a few mm wider than the belt. Now I’mthinking of modifying my old little bench grinder into a twin50mm belt sander. One fine and one coarse belt. That will giveme a good excuse to upgrade to a better bench grinder too.
WallyAugust 17, 2012 at 11:02 AM | ReplyWhat happened to part 2 of this very interesting post
MikeyAugust 17, 2012 at 3:41 PM | ReplyHi Wally,Check the How To section under Categories in the
left menu bar.
Mikey
WallyAugust 18, 2012 at 4:10 AM | ReplyMany thanks Mike,this is excellent.Congratulations!I only found this site a week ago and I now see how
to navigate around. As a knife maker I have good belt grinderswith belt width of both 30 and 50 mm. I am going to make thisinto a project and hopefully I’ll get to somewhere close to yourproficiency.
Grinding Lathe Tools on a Belt Sander – For the New Guy | MachinistBlo... http://www.machinistblog.com/grinding-lathe-tools-on-a-belt-sander/
11 of 13 2/6/2014 5:55 PMCreate PDF files without this message by purchasing novaPDF printer (http://www.novapdf.com)

Wally
MikeyAugust 18, 2012 at 6:20 AM | ReplyThanks for the compliment, Wally. I do hope it helpsyou. Grinding tools gets easier with a good grinder
and it sounds like you have that already – you’ll be very good atit in no time.
Let me know if you have any questions.
Mikey
AnonymousAugust 2, 2013 at 8:56 PM | Replycan you dip the tool in water as you grind the tool toits shape
MikeyAugust 2, 2013 at 9:36 PM | ReplyYes, you can dip the tool.
AnonymousNovember 12, 2013 at 4:52 PM | Replywhere is part 2?
MikeyNovember 12, 2013 at 9:42 PM | ReplyHere you go:http://www.machinistblog.com/category/how-to/
Leave a ReplyYou can use these HTML tags:
<a href="" title=""> <abbr title=""> <acronymtitle=""> <b> <blockquote cite=""> <cite><code> <del datetime=""> <em> <i> <q cite=""><strike> <strong>
Author
Website
three + = 6
Grinding Lathe Tools on a Belt Sander – For the New Guy | MachinistBlo... http://www.machinistblog.com/grinding-lathe-tools-on-a-belt-sander/
12 of 13 2/6/2014 5:55 PMCreate PDF files without this message by purchasing novaPDF printer (http://www.novapdf.com)

Copyright © 2012 MachinistBlog.com and its Contributors - All Rights Reserved
Grinding Lathe Tools on a Belt Sander – For the New Guy | MachinistBlo... http://www.machinistblog.com/grinding-lathe-tools-on-a-belt-sander/
13 of 13 2/6/2014 5:55 PMCreate PDF files without this message by purchasing novaPDF printer (http://www.novapdf.com)