gradia plus · pdf file · 2018-01-18please make sure you thoroughly clean...
TRANSCRIPT

Intended Use & Introduction
Components
Color Chart
Characteristics
Clinicial Procedures
Composite Build-up
Procedure
Step-by-Step
Studies Physical
Properties
Case Presentations
Questions & Answers
Related Products
Item List
1
GRADIA® PLUSfrom GC
Modular composite system
for indirect restorations
Case Presentations

2
The clinical cases presented hereafter will give you a good idea of how easy it is to get a convincing aesthetic result with minimum effort, and highlight the excellent
features of this light-cured composite for indirect techniques. Before using the material, please carefully read the instructions for use.
TABLE OF CONTENTS
Case presentations
IMPLANT SUPPORTED HYBRID RESTORATION WITH THIMBLE CROWNS by Bill Marais, USA p. 3
TEMPORARY RESTORATIONS WITH GC GRADIA® PLUS by Stephen Lusty, UK p. 9
CLINICAL STEP-BY-STEP WITH GC GRADIA® PLUS COMPOSITE, LUTED WITH G-CEM LINKFORCE™by Dr. Rafał Mędzin, Poland p. 14
FIRST IMPRESSIONSby Mark Bladen, UK p. 19
RESTORATIONS WITH COMPOSITE IN CERAMIC REHABILITATIONby Francisco Troyano, Spain p. 26

3
IMPLANT SUPPORTED HYBRID RESTORATION WITH THIMBLE CROWNSThis case presentation describes the step by step manufacturing of an implant supported hybrid bridge using the thimble crown technique. On a PEKK framework multiple GC Initial LiSi Press copings will cemented and GC GRADIA® PLUS Gum will be used for gingiva reproduction.
Framework preparation
BY BILL MARAIS, USA
Bill Marais Born in Johannesburg, South Africa, Bill moved to Cape Town at the start of his high school years. In 1993, he graduated as a Registered Dental Technician, after 4 years of study in Dental Technology (recognized Bachelors Degree in Prosthetic Sciences in the USA), from Cape Peninsula University of Technology.After working in a dental lab in South Africa for 3 years, Bill immigrated to the USA in 1996. In 1999, Bill opened his own lab, Disa Dental Studio, in Santa Monica, California. Bill moved his family and Disa Dental Studio to Portland, Oregon, in January 2011. Disa Dental Studio is a one-man lab focusing on high-end, complex, combination cases.
Sandblast framework with Al2O3 (50µm, 0.2MPa)
In order to avoid contamination it is advisable to wear rubber gloves.Steam clean and air dry.
Easy mixture of O-Base with OA (cfr. Opaque Mixing Ratio)
Application of a thin wash opaque layer. Light-cure.
Application of a second opaque layer. Light-cure. Proceed until the complete framework is masked.

4
Result of acid etch on LiSi Press units. Apply CERAMIC PRIMER II or G-Multi PRIMER and allow to dry.
Cementing of LiSi Press units using G-CEM LinkForce™.
Removal and cleaning of G-CEM LinkForce™ access. Please make sure you thoroughly clean approximal spaces.
Etching process
Sandblast LiSi Press units with Al2O3 (50µm, 0.2MPa) to remove all possible contaminations.
Remove glaze layer on the edges of the LiSi Press units to optimize etching procedure in a later stage.
Apply hydrofluoric acid gel (5-9%) for 60 seconds to the inner surfaces of the restoration. Clean with water.

5
Step 1 – Bone tissue simulation
Application of GC GRADIA® PLUS Heavy Body Dentin A3 to simulate the bone structure.
Light-cure.
Step 2 – Application of different GC GRADIA® PLUS Gum Shades
MODULAR COMPOSITE SYSTEM FOR INDIRECT RESTORATIONS
GRADIA® PLUS – One Body
DENTIN1.0 mm
LB-A LB-B LB-C LB-D
BLEACH1.0 mm
LB-W
GRADIA® PLUS – Gum
GUM OPAQUE0.5 mm
GO-1 GO-2
GUM LIGHT BODYGUM HEAVY BODY1.0 mm GLB-1
GHB-1 GLB-2GHB-2
GLB-3GHB-3
GLB-CLGHB-CL
http://www.gceurope.comz L CC 8 79 06/16 Image by S. Maffei
GRADIA® PLUS – Lustre Paint
LP-A LP-B LP-C LP-D
LP-Cream LP-Grey LP-Lavender LP-Blue LP-CLF
GLP-Violet GLP-Bright red LP-CL
GLASSCLEAR
GLASSCLEAR
This
cha
rt is
inte
nded
as
a re
fere
nce
guid
e on
ly
Application of GC GRADIA® PLUS Heavy Body Gum GHB-2.Goal is to achieve with this step 95% of the final shape & texture.Do not work with an extreme light source to avoid a pre-curing of the gum base material.Selection of different heavy body
gum shades.
5

6
Step 3 – Characterization of the gum base material
MODULAR COMPOSITE SYSTEM FOR INDIRECT RESTORATIONS
GRADIA® PLUS – One Body
DENTIN1.0 mm
LB-A LB-B LB-C LB-D
BLEACH1.0 mm
LB-W
GRADIA® PLUS – Gum
GUM OPAQUE0.5 mm
GO-1 GO-2
GUM LIGHT BODYGUM HEAVY BODY1.0 mm GLB-1
GHB-1 GLB-2GHB-2
GLB-3GHB-3
GLB-CLGHB-CL
http://www.gceurope.comz L CC 8 79 06/16 Image by S. Maffei
GRADIA® PLUS – Lustre Paint
LP-A LP-B LP-C LP-D
LP-Cream LP-Grey LP-Lavender LP-Blue LP-CLF
GLP-Violet GLP-Bright red LP-CL
GLASSCLEAR
GLASSCLEAR
This
cha
rt is
inte
nded
as
a re
fere
nce
guid
e on
ly
Push the GLP-Bright red into the soft gum base material with a hard brush.
Use LP-Cream to paint onto the gum base material with a round brush. Afterwards push LP-Cream into the soft gum base.
LP-B is used to create warmth at the junction of the tissue and the cervical part of the tooth.Alternatively OPTIGLAZE color Orange can be used.
To create veins and blood vessels, use LP-Blue. Result before light-curing.Light-cure.
Next step is characterization with GC GRADIA® PLUS Lustre Paint into and onto the gum paste material.

7
Step 4 – Final shaping of the dento-gingival junction
Apply GHB-3, as final layer to seal the lustre paint and to achieve 100% of the final shape and texture, trying to avoid any grinding.
Step-cure.
Full light-cure with AIR BARRIER.
Apply G-Multi PRIMER onto the cervical part of the teeth.
Alternatively CERAMIC PRIMER II can be used.
Use LP-CL to seal the margins.Consistency can be adapted using diluting liquid. Alternatively also OPTIGLAZE color can be used.

8
Final Result
9
TEMPORARY RESTORATIONS WITH GC GRADIA® PLUS
Temporary restorations are far too often neglected due to cost and time restraints, but I believe that there is a method for every budget and time scale when working with a complete system like GC GRADIA® PLUS .
When taking on cases for temporary restorations, I asses the needs and budget available to decide what method I will use to produce the prototype restorations. How long must they last?
Are they being made prior to preparation or post preparation? is a digital solution viable? Is a reinforcement substructure necessary? Once these questions are answered I then decide which method to use. I separate these methods into 5 groups which are, the simple technique, the complex technique, the combined technique, the simple digital technique and the complex digital technique.
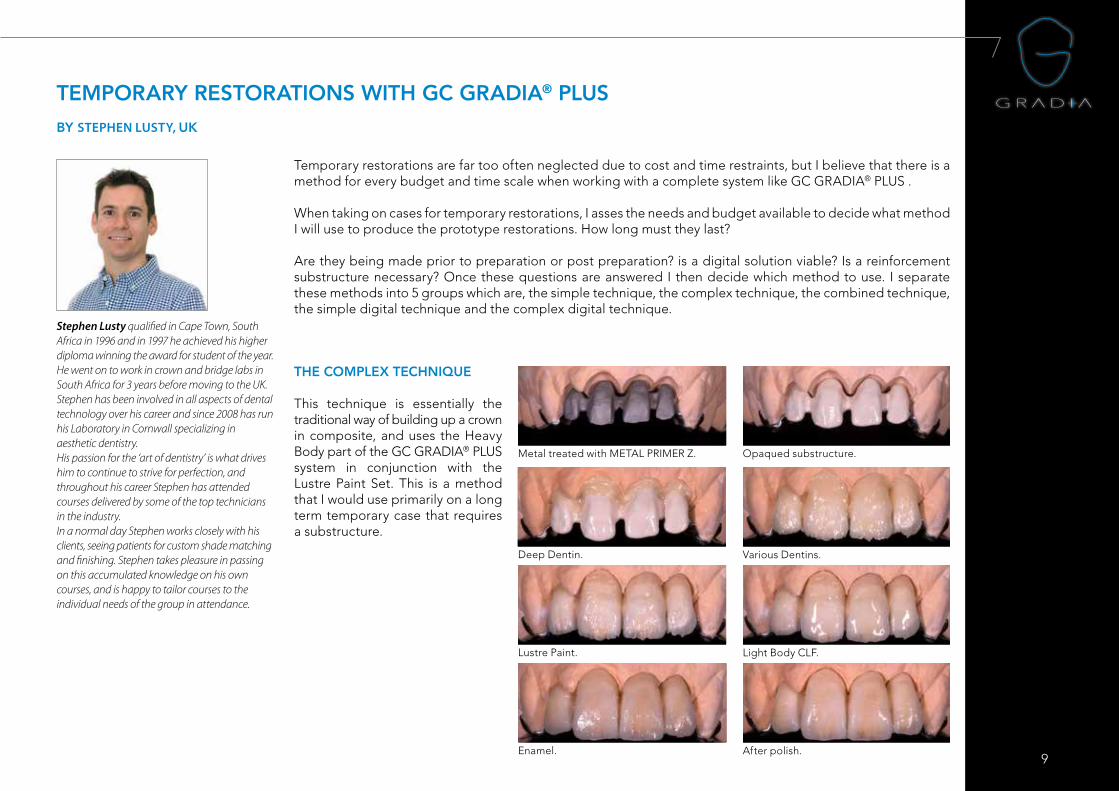
Metal treated with METAL PRIMER Z. Opaqued substructure.
Deep Dentin. Various Dentins.
Lustre Paint. Light Body CLF.
Enamel. After polish.
THE COMPLEX TECHNIQUE
This technique is essentially the traditional way of building up a crown in composite, and uses the Heavy Body part of the GC GRADIA® PLUS system in conjunction with the Lustre Paint Set. This is a method that I would use primarily on a long term temporary case that requires a substructure.
BY STEPHEN LUSTY, UK
Stephen Lusty qualified in Cape Town, South Africa in 1996 and in 1997 he achieved his higher diploma winning the award for student of the year. He went on to work in crown and bridge labs in South Africa for 3 years before moving to the UK. Stephen has been involved in all aspects of dental technology over his career and since 2008 has run his Laboratory in Cornwall specializing in aesthetic dentistry. His passion for the ‘art of dentistry’ is what drives him to continue to strive for perfection, and throughout his career Stephen has attended courses delivered by some of the top technicians in the industry. In a normal day Stephen works closely with his clients, seeing patients for custom shade matching and finishing. Stephen takes pleasure in passing on this accumulated knowledge on his own courses, and is happy to tailor courses to the individual needs of the group in attendance.
10
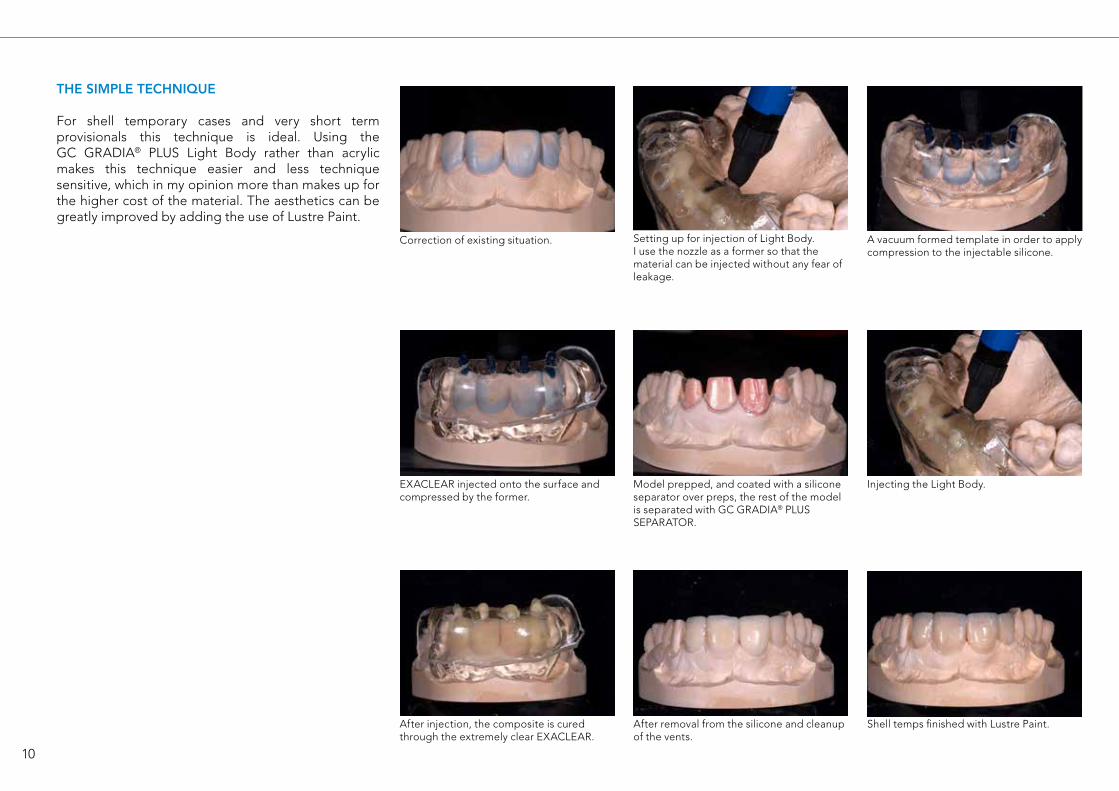
THE SIMPLE TECHNIQUE
For shell temporary cases and very short term provisionals this technique is ideal. Using the GC GRADIA® PLUS Light Body rather than acrylic makes this technique easier and less technique sensitive, which in my opinion more than makes up for the higher cost of the material. The aesthetics can be greatly improved by adding the use of Lustre Paint.
Correction of existing situation. Setting up for injection of Light Body.I use the nozzle as a former so that the material can be injected without any fear of leakage.
A vacuum formed template in order to applycompression to the injectable silicone.
EXACLEAR injected onto the surface andcompressed by the former.
Model prepped, and coated with a silicone separator over preps, the rest of the model is separated with GC GRADIA® PLUS SEPARATOR.
Injecting the Light Body.
After removal from the silicone and cleanup of the vents.
Shell temps finished with Lustre Paint.After injection, the composite is cured through the extremely clear EXACLEAR.
11
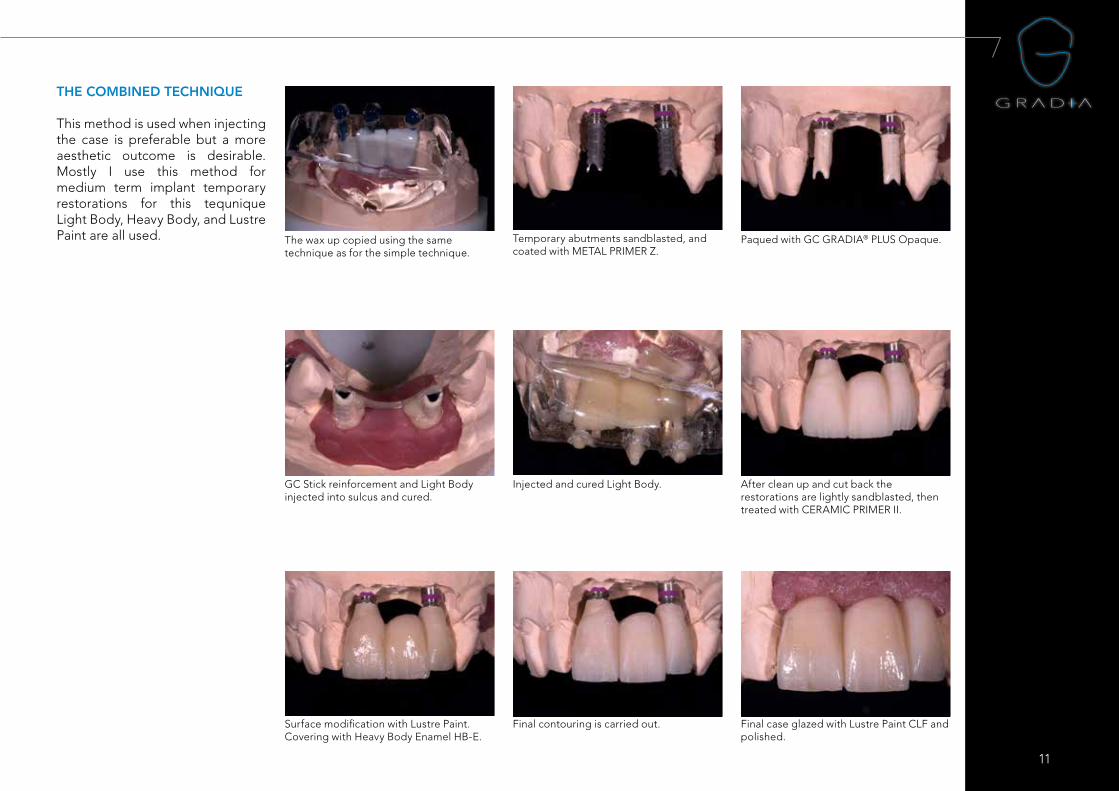
THE COMBINED TECHNIQUE
This method is used when injecting the case is preferable but a more aesthetic outcome is desirable. Mostly I use this method for medium term implant temporary restorations for this tequnique Light Body, Heavy Body, and Lustre Paint are all used. The wax up copied using the same
technique as for the simple technique.Temporary abutments sandblasted, and coated with METAL PRIMER Z.
Paqued with GC GRADIA® PLUS Opaque.
GC Stick reinforcement and Light Body injected into sulcus and cured.
Injected and cured Light Body. After clean up and cut back the restorations are lightly sandblasted, then treated with CERAMIC PRIMER II.
Surface modification with Lustre Paint.Covering with Heavy Body Enamel HB-E.
Final contouring is carried out. Final case glazed with Lustre Paint CLF and polished.

12
Wax up for copy scanning. The copy milled hybrid ceramic structure.
Trimmed and separated into desired unit sizes. After sandblasting and treating with CERAMIC PRIMER II, the contact areas are corrected using Heavy Body.
Ready for delivery with a temporary denture to spread the occlusal force.
Finished using Lustre Paint.
THE SIMPLE DIGITAL TECHNIQUE
Both the simple and combined techniques can be carried out using digital methods, for this either acrylic, or composite can be milled and modified using GC GRADIA® PLUS, when using Acrylic milled structure must be sandblasted and treated with acrylic primer prior to adding composite, and for milled blocks such as CERASMART™, CERAMIC PRIMER II should be applied after sandblasting.
13
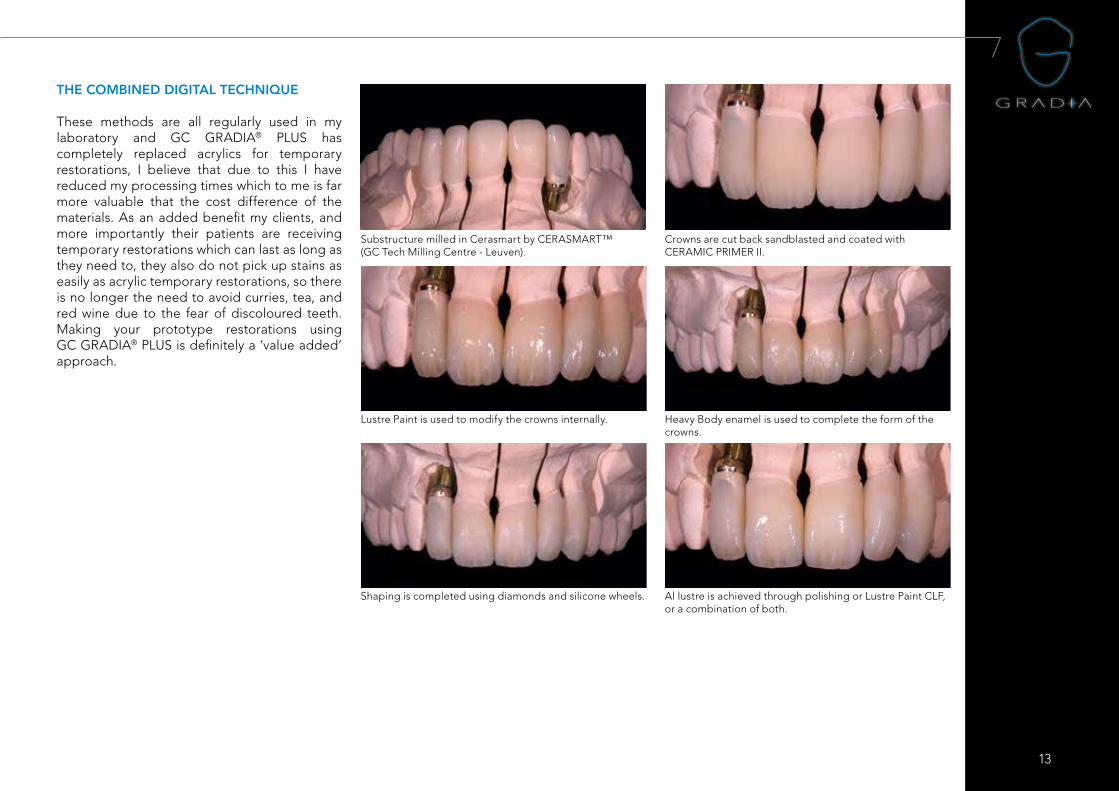
THE COMBINED DIGITAL TECHNIQUE
These methods are all regularly used in my laboratory and GC GRADIA® PLUS has completely replaced acrylics for temporary restorations, I believe that due to this I have reduced my processing times which to me is far more valuable that the cost difference of the materials. As an added benefit my clients, and more importantly their patients are receiving temporary restorations which can last as long as they need to, they also do not pick up stains as easily as acrylic temporary restorations, so there is no longer the need to avoid curries, tea, and red wine due to the fear of discoloured teeth. Making your prototype restorations using GC GRADIA® PLUS is definitely a ‘value added’ approach.
Substructure milled in Cerasmart by CERASMART™ (GC Tech Milling Centre - Leuven).
Crowns are cut back sandblasted and coated with CERAMIC PRIMER II.
Lustre Paint is used to modify the crowns internally. Heavy Body enamel is used to complete the form of the crowns.
Al lustre is achieved through polishing or Lustre Paint CLF, or a combination of both.
Shaping is completed using diamonds and silicone wheels.
14
Clinical step-by-step with GC GRADIA® PLUS composite, luted with G-CEM LinkForce™BY DR. RAFAŁ MĘDZIN, POLAND
Indirect composite restorations in the posterior zone: probably one of the best options
In spite of the many advantages that ceramic restorations have to offer, they have some drawbacks as well, such as wear of the antagonist and brittle catastrophic failures. That is why, for some particular cases, indirect composite restorations are preferred. High-strength indirect composites have the advantage of inducing less marginal chipping of the enamel around the margins of the restoration and they have better long-term stability on margins. According to available studies, indirect overlay composite restorations also exhibit better fatigue resistance and fracture propagation of posterior endodontically treated teeth1,2.
With indirect composite restorations, the enamel wear rate and total wear rate are more favourable than with ceramic restorations3. Moreover, composite restorations on implants present similar dynamic responses to load (damping behaviour) when compared to natural teeth using a simulated periodontal ligament4 and they showed significant higher survival rate when compared to ceramic onlays and crowns in clinical trials5. We have been using composites for those cases more than 10 years long with really satisfactory results.
The following article describes the use of a new indirect composite, GC GRADIA® PLUS and the intra-oral luting procedure.
Case Report
A 38-year-old female who had received no significant dental health care for approximately five years was referred to our practice. She complained of unsatisfactory tooth function caused by missing teeth and defective restorations in the posterior area. She had no significant medical problems and claimed she did not use alcohol or tobacco. After a detailed examination we prepared a treatment plan, placing high importance on achieving good periodontal health and the active treatment of carious disease. Due to insufficient endodontics, our next step was non-surgical root canal treatment (NSRCT) revision of tooth 46, while the missing tooth 47 was replaced by an implant following cone beam computed tomography (CBCT) planning.
Successful osseointegration was achieved after three months, at which time we started restorative procedures. Using the GC GRADIA® PLUS, a nano-hybrid light-cured composite system from GC in both cases, we prepared a composite overlay for tooth 46 and a screw-retained restoration for implant 47. To optimize the long-term stability of the material, we advise to carry out an additional thermal polymerisation of the restorations in a nitrogen atmosphere in the furnace to increase the conversion level up to 90-95 %6.
A first implant reconstruction was placed and the access hole was closed with laboratory-prepared composite “cork” cemented with G-CEM LinkForce™ luting cement. We recommend to sandblast the restoration freshly just before the cementation. The same material was used for the final adhesive cementation of the 46 overlay.
Dr. Rafał Mędzin is a lecturer and trainer in cosmetic dentistry, aesthetic restorative techniques and dental photography, as well as a consultant in product development and clinical research. He obtained his dental degree in 1996 at the Pomeranian Medical Academy, Faculty of Dentistry, in Szczecin, Poland. In 1999 he earned Postgraduate Specialisation in General Dentistry and in 2012 graduated Postgraduate Curriculum of Oral Implantology at the JW Goethe University in Frankfurt, Germany.
Together with his wife and father, Dr Mędzin runs the Dentura Clinic and Lab in the city of Gryfino, Poland.
Dr Medzin specialises in aesthetics and prosthetic rehabilitation on natural teeth and implants, as well minimally invasive dentistry, CAD/CAM technologies and dental macro photography. In 2011 he achieved a world first when he gave a dental presentation in real 3D in Warsaw, on the biggest 3D 4K cinema screen in Europe.
His main interests outside of dentistry are martial arts and shooting. He holds a 1st dan black belt in aikido and is a certified ISSF sport-shooting instructor.
15
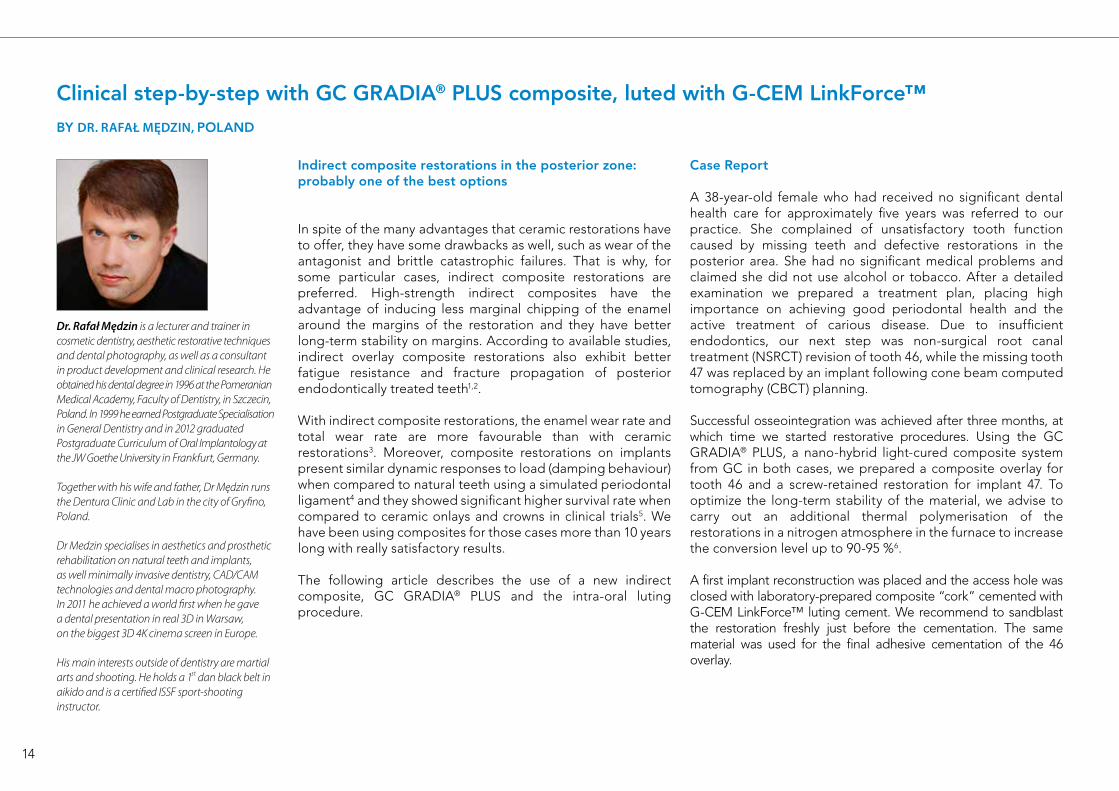
Figure 1: Working model with gingival mask and straight abutment
Figure 2: Straight abutment mounted on the lab analog
Figure 3: Sandblasted abutment treated with GC METAL PRIMER II. A universal primer like G-Multi PRIMER can also be used. Functional phosphate-based monomers (MDP) will promote a strong bond between the metal surface and the composite luting
Figure 4: Isolation was placed on the onlay preparation
Figure 5: The abutment covered with GC GRADIA® PLUS Opaque (A3 combination). A first layer of GC GRADIA® PLUS was placed on the onlay
Figure 6: Final restorations on the model - screw access hole visible
Figure 7: Final restorations on the model - screw access hole visible
Figure 8: Composite “cork” within the implant access hole
Figure 9: Final restorations with gingival mask - lateral view
Figure 10: Final restorations with gingival mask - occlusal view
Figure 11: Final restorations with the access hole “cork” and clinical screw

16
Figure 12: Onlay prep and the healing screw Figure 13: Soft tissue contour - close-up view Figure 14: The hybrid (titanium-resin) implant restoration was screwed directly onto the implant. Rubber dam isolation with the clamp covered with plumber’s tape to preserve the restoration surface
Figure 15: Refreshing of the sandblasted surface of the access hole. Screw head was protected earlier with hot gutta percha
Figure 16: G-Multi PRIMER application Figure 17: G-Premio BOND was applied
Figure 18: G-CEM LinkForce™ was delivered directly into the access hole and composite “cork” was bonded
Figure 19: Light-curing - 20s
17
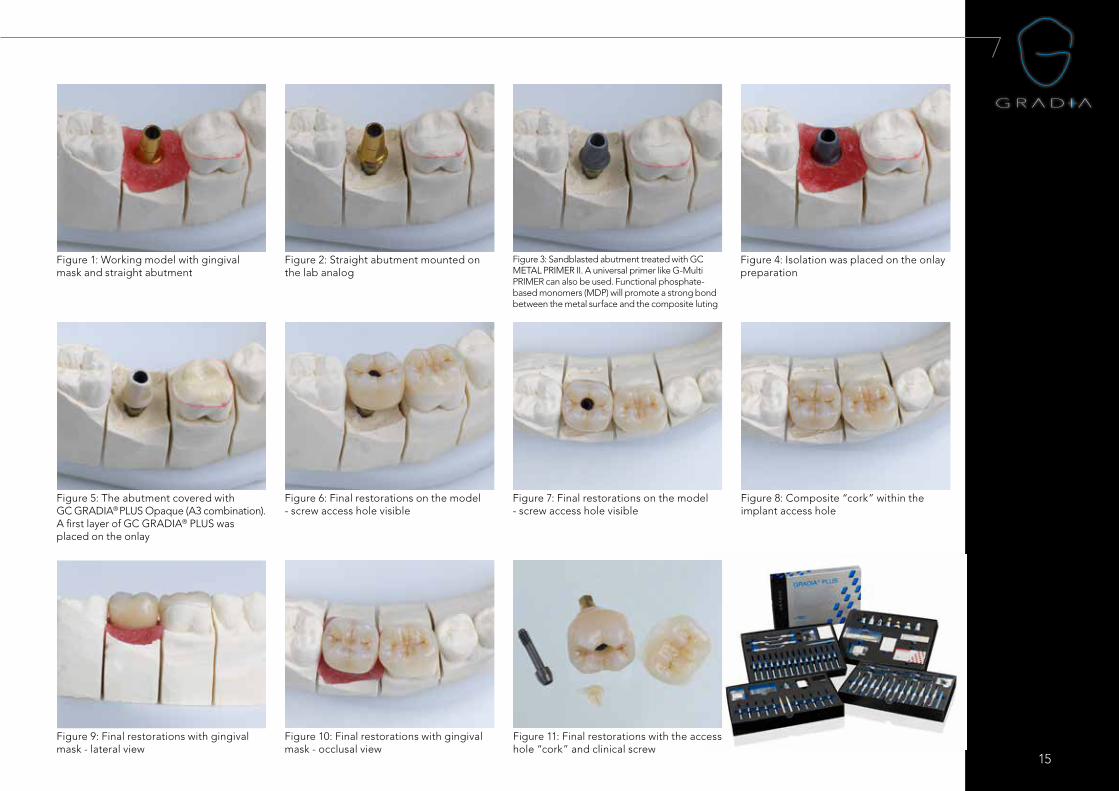
Figure 20: Selective etching of the enamel - 15s
Figure 21: G-Premio BOND application Figure 22: Air drying of the bonding agent Figure 23: Pick-up stick for onlay
Figure 24: Sandblasted composite surface covered with G-Multi PRIMER
Figure 25: Application of the G-Premio BOND Figure 26: G-CEM LinkForce™ applied directly onto the onlay surface from automix syringe
Figure 27: G-CEM LinkForce™ applied directly onto the onlay surface from automix syringe
18
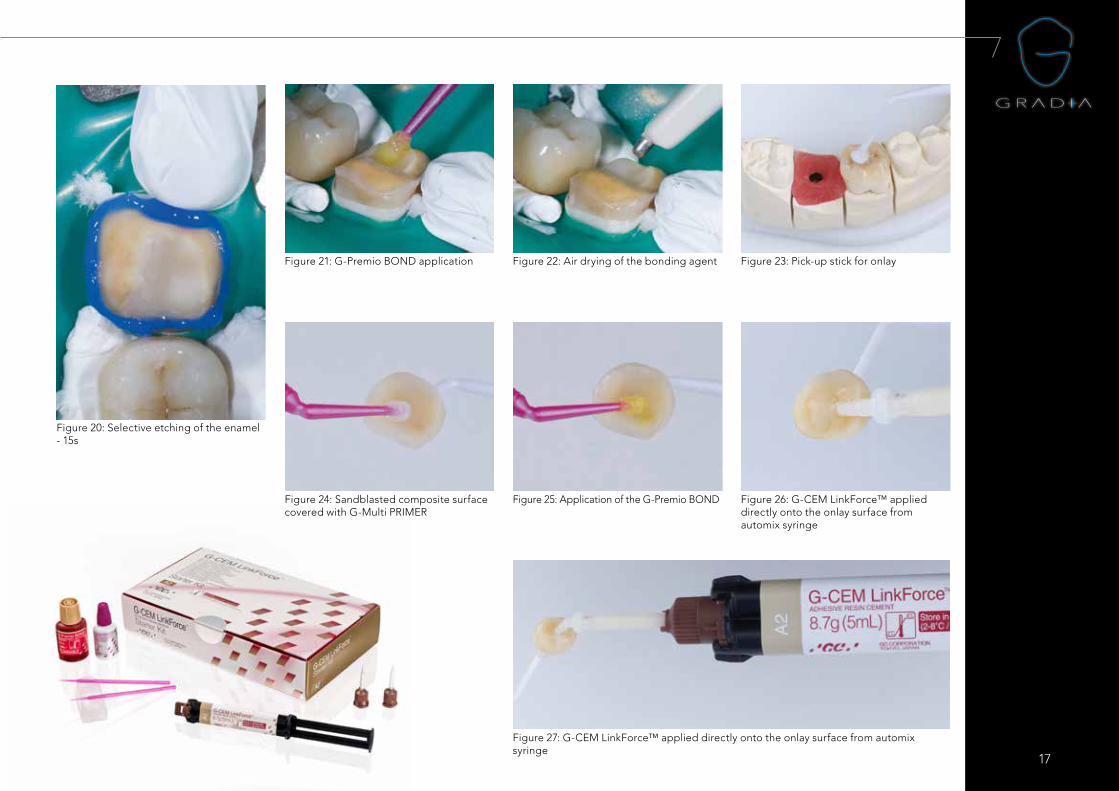
Figure 28: Onlay stabilized by an instrument, cement excess visible
Figure 29: G-Cem LinkForce™ excess was removed before polymerization
Figure 31: Restoration after the initial light-curingFigure 30: GC GRADIA® PLUS AIR BARRIER was applied on the margins for the final polymerization
Figure 32: Final result - occlusal viewFigure 33: Natural effect of the final restorations compared to the existing dentition
1. P Magne, A Knezevic. Influence of overlay restorative materials and load on the fatigue resistance of endodontically treated molars. Quintessence Int. 2009 Oct;40(9):729-37. 2. P Magne. Virtual prototyping of adhesively restored, endodontically treated molars. J Prosthet Dent. 2010 Jun;103(6):343-51. 3. KH Kunzelmann, B Jelen, A Mehl, R Hickel. Wear evaluation of MZ100 compared to ceramic CAD/CAM materials. Int J Comput Dent. 2001 Jul;4(3):171-84.4. P Magne, M Silva, E Oderich, LL Boff, R Enciso. Damping behavior of implant-supported restorations. Clin Oral Implants Res. 2013 Feb;24(2):143-8. 5. E Oderich, LL Boff, AA Cardoso, P Magne. Fatigue resistance and failure mode of adhesively restored custom implant zirconia abutments. Clin Oral Implants
Res. 2012 Dec;23(12):1360-8. 6. GH Lombardo, CF Carvalho, G Galhano, RO Souza, CA Panavelli. Influence of additional polymerization in the microhardness of direct composite resins. Cienc Odontol Bras. 2007 Apr; 10 (2): 10-15.

19
Intended Use & Introduction
Components
Color Chart
Characteristics
Clinicial Procedures
Composite Build-up
Procedure
Step-by-Step
Studies Physical
Properties
Case Presentations
Questions & Answers
Related Products
Item List
FIRST IMPRESSIONS
Fig. 1: Original Gradia larger particles less compacted.
Fig. 3: GC GRADIA® PLUS Light body material.
BY MARK BLADEN, UK
Mark Bladen is a dental technician with over 30 years experience in many aspects of dental technology. He runs his own laboratory in Worcester specialising in ceramics and implant work. He has demonstrated all over the world, has run numerous courses and has had articles published in many of the major dental publications.
INTRODUCTION
Gradia Composite has been on the market for over 15 years with great success but now new on the market we have GC GRADIA® PLUS utilizing the latest Nano technology. I am showing in this article my first full arch implant restoration - like any new material it will take time to fully master the potential of the new concept. There are aspects of my approach and technique I would refine, the overall results were pleasing to the Patient, clinician and myself and we all remarked that the restoration looked like a sintered ceramic. Having made many provisional units I quickly found this material and system very easy to work with and studying these temporaries after 3 months they looked like the day they were fitted which gives me assurance this will be a long lasting alternative to ceramic with the added benefits of shock absorbency of a composite.
THE SCIENCE
GC GRADIA® PLUS is a Nano- Hybrid Laboratory composite with high physical properties for both heavy body and light body choices and has a modular concept utilising a refined number of components to reproduce all shades and effects needed. It’s very easy to polish due to its high compacted surface. It has a flexural strength of 160 MPA and surface hardness of 60HV and is radio opaque. I have found the material has a brightness, translucency and chroma that compares to ceramic, fitting into the Initial family colour concept.
Images 2 and 3 show the microscopic surface of this high density and homogeneously dispersed ultra fine filler into the matrix material and only needs light-curing.
Fig. 2: GC GRADIA® PLUS Heavy Body material.

20
Fig. 4 Fig. 5
THE CASE
I started the case at the point where the patient had a full upper denture which she was very pleased with in appearance and teeth position and wanted this replicated in the final screw retained bridge. The denture was seated on viscogel on earlier placed 4 Straumann regular tissue level implants. Bite registration was recorded and I mounted the models on the Articulator and set up stock teeth and added wax to the areas lacking contour around long contact areas. On the first try in I created gum work to reproduce lost tissue but the patient did not like this and preferred the lengthened tooth situation with small tissue reproduction. The try in was seated using 4 bite registration aids and the occlusion was checked and I refined and tooth positions. I adjusted the soft tissue on the model to give appropriate shape to apply slight pressure for final work and very importantly cleaning spaces either side of implant heads (Fig. 4, 5, 6).
Fig. 6
Fig. 7 Fig. 8
THE FRAME
As this was a Straumann implant case I sent the try in and model with soft tissue to Createch where implant positions and outline for final positions are scanned and reduced in the software by between 1.5 mm and 1mm. This reduction supports the composite and also allows space for any aesthetic requirement. In this case we could use straight screw channels on all 4 implant positions, but this is not always the case and with Createch you can have an option to angulate these screw channels utilizing their special screw driver.After a week the Cobalt Chrome framework arrived, the fit was perfectly passive with a precision that would
21
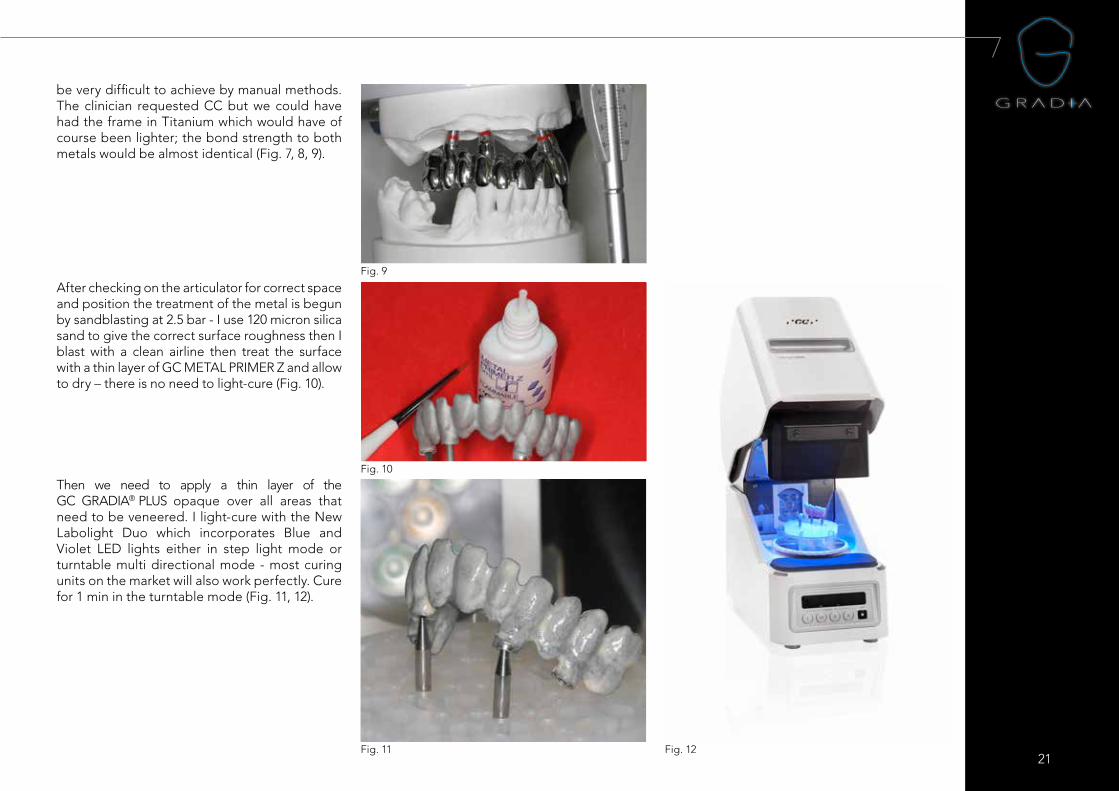
be very difficult to achieve by manual methods. The clinician requested CC but we could have had the frame in Titanium which would have of course been lighter; the bond strength to both metals would be almost identical (Fig. 7, 8, 9).
Fig. 9
After checking on the articulator for correct space and position the treatment of the metal is begun by sandblasting at 2.5 bar - I use 120 micron silica sand to give the correct surface roughness then I blast with a clean airline then treat the surface with a thin layer of GC METAL PRIMER Z and allow to dry – there is no need to light-cure (Fig. 10).
Fig. 10
Then we need to apply a thin layer of the GC GRADIA® PLUS opaque over all areas that need to be veneered. I light-cure with the New Labolight Duo which incorporates Blue and Violet LED lights either in step light mode or turntable multi directional mode - most curing units on the market will also work perfectly. Cure for 1 min in the turntable mode (Fig. 11, 12).
Fig. 11 Fig. 12

22
Fig. 13
Fig. 14
After curing, apply one or two more layers until the metal cannot be seen. This is easily achieved as the opaque paints on very easily, covers very well and produces a bond areas and use lighter shades towards the incisal areas and pink opaque underneath gum areas. Cure at each layer for at least 1 min. (Fig. 13, 14).
Fig. 15 Fig. 16
INJECTION OF THE ONE BODY
Included in the system are light bodied ABC and D shaded One Body materials with the same physical properties throughout. These can be injected into a clear silicone mould and cured to produce a finished shape quickly and accurately so for this case I have chosen to use the A One Body which is a combination of Dentine and Enamel as my base position. After fixing the model with the diagnostic wax up on it and attaching 4 x 2mm sprues, block out access holes with wax then fill the mould (in this case using the Anaxdent clear silicone) and allow to set. Carefully remove diagnostic set up and screw down the opaqued framework on the model on at least 3 screws. Clamp down the mould and inject from a posterior sprue channel the A One Body - you can inject most of the bridge with the first sprue but to perfectly complete attach syringe to an anterior channel and inject until all areas are filled through to the sprues.
Fig. 17
Before curing, put the flask in a dark area e.g a drawer then wait 5 mins. You will be able to see the composite flow from the sprues - this is trimmed and put back in the dark and the process is repeated until the composite stops flowing. If this part is not performed before curing an inaccurate reproduction of the diagnostic will occur and the occlusion will be high and dimensions will be distorted. Now cure in full mode for at least 5 mins, in a conventional curing unit. It is best to cure in two sessions to reduce heat but in the LED unit no heat is produced. Once cured remove from flask, cut off sprues, open out the access holes and screw down to the model. In this case when checked on the articulator there was absolutely no dimensional changes, occlusion did not open the vertical post and it even held shimstock so was an exact reproduction of the try in (Fig. 15, 16, 17).

23
Fig. 18 Fig. 19
To customise the bridge I cut back the buccal faces of all the units by about 0.5mm and formed the heavy body dentine which in this case was A2, the dentine materials possess enough chroma to match the Vita shade guide even when formed in very thin layers (Fig. 18, 19).
Fig. 20 Fig. 21
The dentine is thinned towards the incisal to allow chosen translucent layering to be placed. There are many different choices within the system for translucent effects but in this case I used the clear florescent light body but you can also use the CLF in the heavy body. Light-cure to fix for 30 seconds is ok but I cured for 1 minute. After, I finalised the shape by using a combination of the Enamel Light more towards the mesial faces and Enamel Dark over distal areas of the teeth and light-cured for 1 min. (Fig. 20, 21).
Fig. 22 Fig. 23
The LB Gum colours can be used with a brush and for example the darker shade can be run through the light one to produce a veining effect then cured to fix. When modeling is complete I give a long cure of 5 mins to make sure everything has been fully cured (Fig. 22, 23).
For the tissue areas we have some very nice choices to copy natural gum in both LB and HB. In this case I used the Light body 1 and 2, although you can also customise before using these with the lustre paint intense colours or mix them in.

24
Fig. 24
Surface contouring is easily achieved as the surface is similar to trimming ceramic. I use diamonds and tungsten burs and complete the final surface details using green stones and silicones, pumicing on the lathe also helps to produce a great pre polished surface. GC GRADIA® PLUS easily polishes using composite polish and for the final lustre I use a cream acrylic polish with Robinson brushes and soft mops as I feel it is still best to manually polish (Fig. 24, 25, 26,27).
Fig. 26 Fig. 27: Finished screw retained bridge
Fig. 25
25
Fig. 28 – Checking that patient can clean through the implant shoulders.
Fig. 30
CONCLUSION
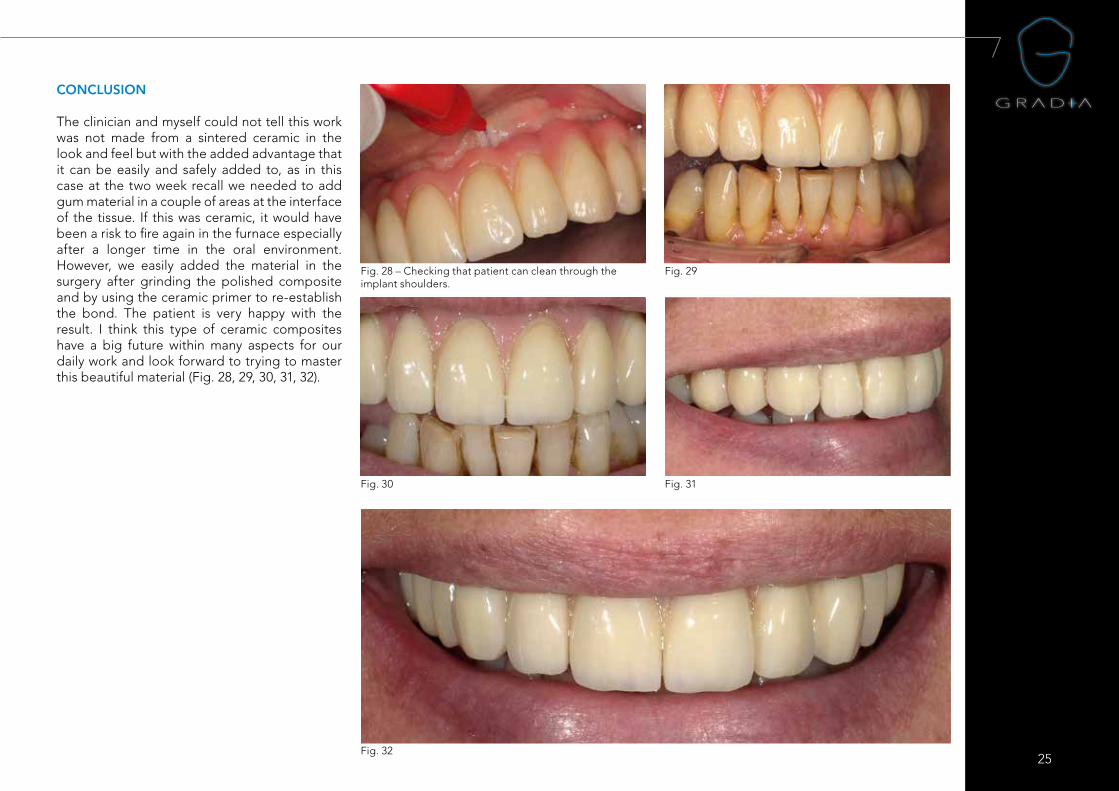
The clinician and myself could not tell this work was not made from a sintered ceramic in the look and feel but with the added advantage that it can be easily and safely added to, as in this case at the two week recall we needed to add gum material in a couple of areas at the interface of the tissue. If this was ceramic, it would have been a risk to fire again in the furnace especially after a longer time in the oral environment. However, we easily added the material in the surgery after grinding the polished composite and by using the ceramic primer to re-establish the bond. The patient is very happy with the result. I think this type of ceramic composites have a big future within many aspects for our daily work and look forward to trying to master this beautiful material (Fig. 28, 29, 30, 31, 32).
Fig. 29
Fig. 31
Fig. 32
26
Fig. 1 & 2: Initial situation, fracture of piece 11.
RESTORATIONS WITH COMPOSITE IN CERAMIC REHABILITATION
Fig. 3 & 4: Scruping and sandblasting of the surface to be repaired. Vestibular and palatine view.
BY FRANCISCO TROYANO, SPAIN
Francisco Troyano AllerTechnical specialist in prosthetic dentistry since 1979.Founder of MAPIDENT, S.L. laboratory in 1987Honorary member of ACADENFounding member of Dental Technological ClubFounding member of Gerber Meeting Internacional.Courses of balanced complete prostheses since 1997.Specialist in complete prostheses, according Dr. Gerber’s philosophy.Courses of aesthetic prostheses and gum customization, since 2001Lecturer in the conferences of Spanish Aesthetic Dentistry Association, October 2000.Lecturer in the 8th Scientific Workshop of ACADEN, March, 2002 and November, 2007.Lecturer in Mediterranean Dental Forum, January 2003.Lecturer in Andalusian Prosthetic College (Sevilla, Granada and Jaén)Contributor for GC in aesthetic coatings with Gradia (laboratory) and Gradia Direct Author of many scientific articles, national and international.
INTRODUCTION
For many years, many professionals, both technician and clinicians, found it stressful to deal with a case of a ceramic fracture which had been in mouth for a long period.
It is well known that when a fracture occurs in any ceramic rehabilitation in mouth, it is reckless to put the restoration back in the furnace. The most probable consequence is the crash of the ceramic, with the subsequent inconvenience of having to repair it, plus the cost.
Nowadays, these fractures can be repaired in an easy and quick way, without the high cost of doing the restoration all over again from the start.
INITIAL SITUATION
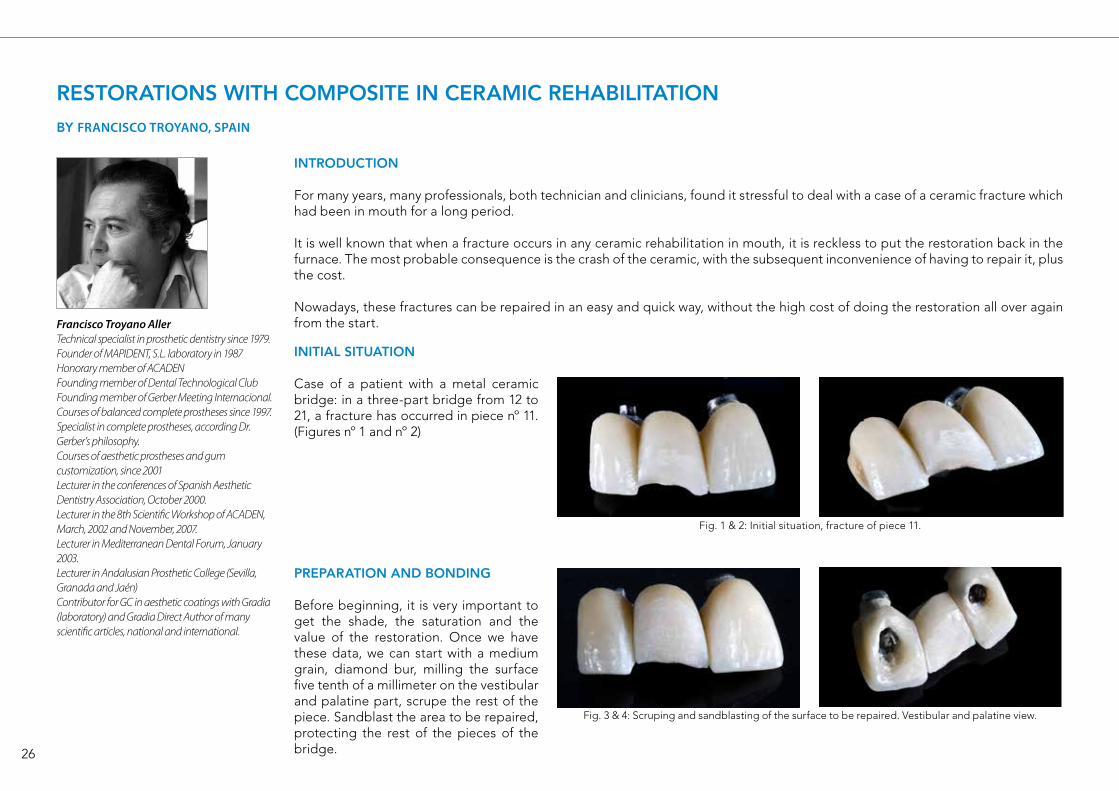
Case of a patient with a metal ceramic bridge: in a three-part bridge from 12 to 21, a fracture has occurred in piece nº 11. (Figures nº 1 and nº 2)
PREPARATION AND BONDING
Before beginning, it is very important to get the shade, the saturation and the value of the restoration. Once we have these data, we can start with a medium grain, diamond bur, milling the surface five tenth of a millimeter on the vestibular and palatine part, scrupe the rest of the piece. Sandblast the area to be repaired, protecting the rest of the pieces of the bridge.
27
Fig. 5: Etching with hydrofluoric acid. Fig. 6: Application of CERAMIC PRIMER II from GC.
Fig. 7: Application of opaque dentin HB-ODA.
LAYERING
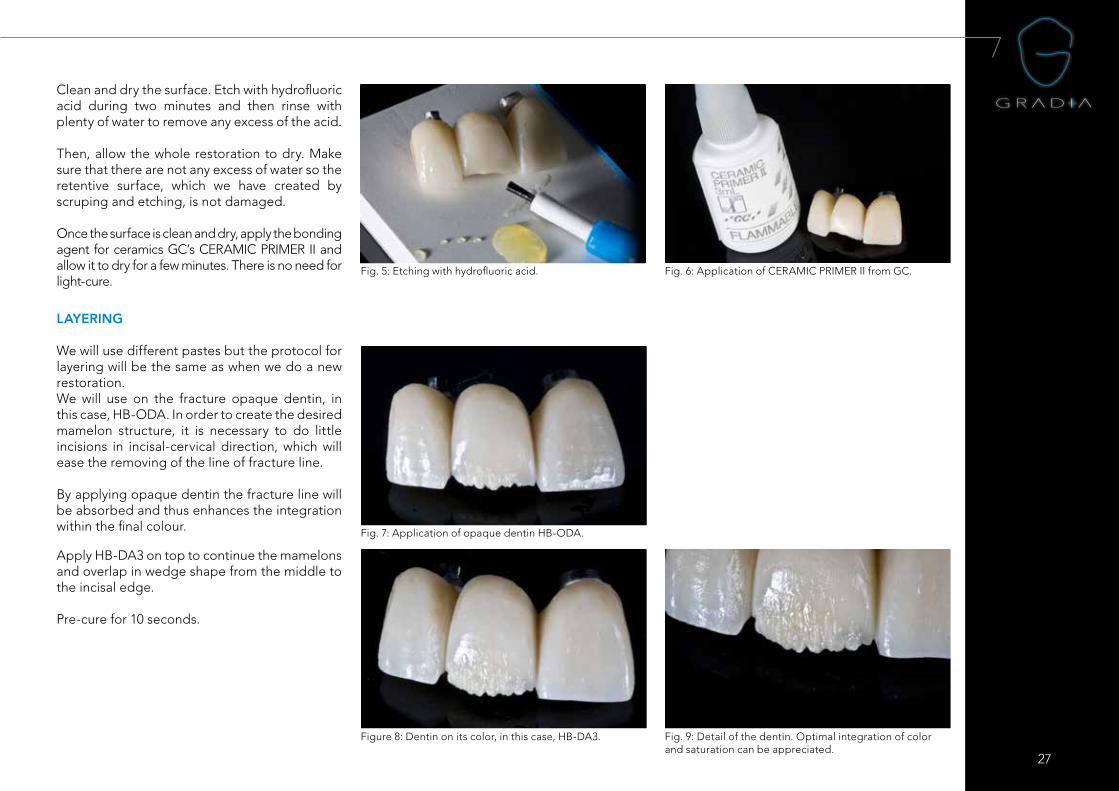
We will use different pastes but the protocol for layering will be the same as when we do a new restoration. We will use on the fracture opaque dentin, in this case, HB-ODA. In order to create the desired mamelon structure, it is necessary to do little incisions in incisal-cervical direction, which will ease the removing of the line of fracture line.
By applying opaque dentin the fracture line will be absorbed and thus enhances the integration within the final colour.
Clean and dry the surface. Etch with hydrofluoric acid during two minutes and then rinse with plenty of water to remove any excess of the acid.
Then, allow the whole restoration to dry. Make sure that there are not any excess of water so the retentive surface, which we have created by scruping and etching, is not damaged.
Once the surface is clean and dry, apply the bonding agent for ceramics GC’s CERAMIC PRIMER II and allow it to dry for a few minutes. There is no need for light-cure.
Apply HB-DA3 on top to continue the mamelons and overlap in wedge shape from the middle to the incisal edge.
Pre-cure for 10 seconds.
Figure 8: Dentin on its color, in this case, HB-DA3. Fig. 9: Detail of the dentin. Optimal integration of color and saturation can be appreciated.
28
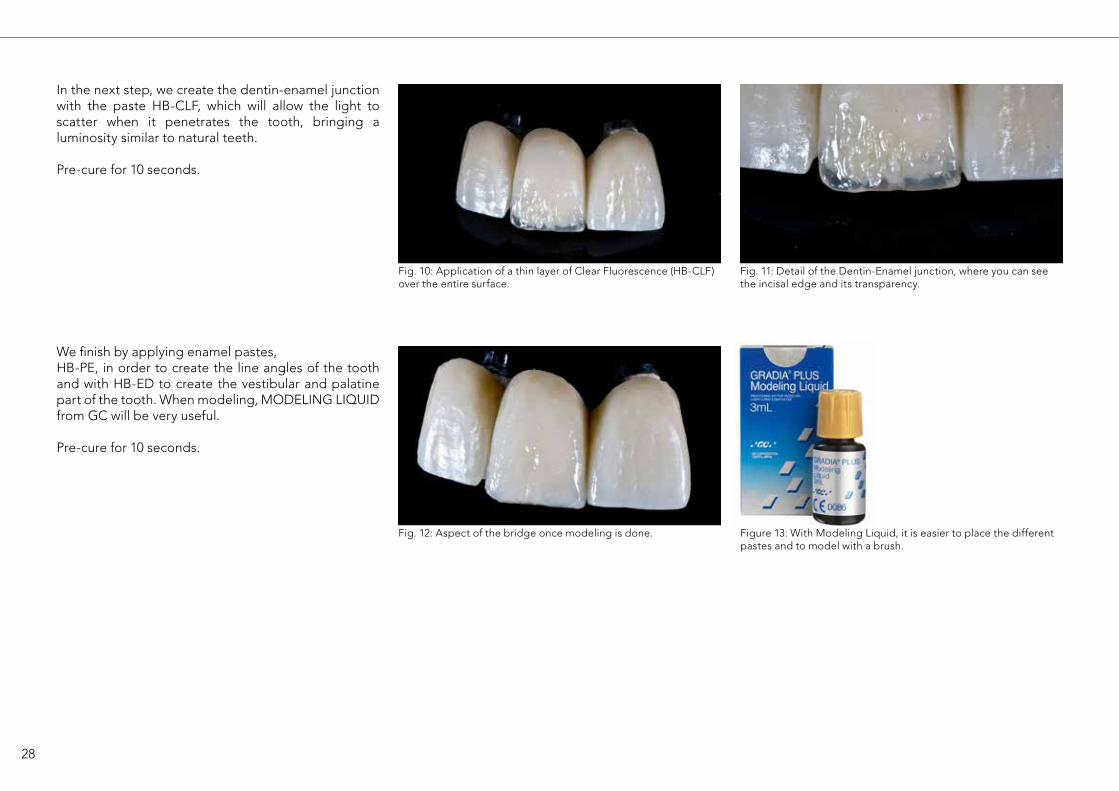
Fig. 10: Application of a thin layer of Clear Fluorescence (HB-CLF) over the entire surface.
Fig. 11: Detail of the Dentin-Enamel junction, where you can see the incisal edge and its transparency.
In the next step, we create the dentin-enamel junction with the paste HB-CLF, which will allow the light to scatter when it penetrates the tooth, bringing a luminosity similar to natural teeth.
Pre-cure for 10 seconds.
Fig. 12: Aspect of the bridge once modeling is done.
We finish by applying enamel pastes, HB-PE, in order to create the line angles of the tooth and with HB-ED to create the vestibular and palatine part of the tooth. When modeling, MODELING LIQUIDfrom GC will be very useful.
Pre-cure for 10 seconds.
Figure 13: With Modeling Liquid, it is easier to place the different pastes and to model with a brush.

29
Fig. 14: Application of GC GRADIA® PLUS AIR BARRIER. Fig. 15: Complete cover with GC GRADIA® PLUS AIR BARRIER, making sure that it has no contact with oxygen.
Fig. 16: Aspect of the finished restoration.
FINISH AND POLISHING
Once modeling is done, we must light-cure the restoration and remove the inhibition layer. Cover the composite crown with GC GRADIA® PLUS AIR BARRIER and light-cure with Labolight DUO for 3 minutes (Fig. nº 14 and nº 15). It is very important to cover all the restoration in order not to allow it to make contact with oxygen during the light-curing. At the end, take out of the device and rinse with cold water (do not use steam) and mill with a tungsten carbide bur at low speed.
Once you get the anatomy of the tooth, polish with GC’s DIAPOLISHER PASTE, using dedicated polishing tools, finish with a mop in order to brighten it.
Fig. 17: Application of DIAPOLISHER PASTE.
Fig. 18 & 19: Final result.
Final result: Restoration of a fracture in piece 22 in a metal-ceramic rehabilitation. Similar case protocol.

30
31
32
11/17
GC EUROPE N.V. Head Office
Researchpark Haasrode-Leuven 1240Interleuvenlaan 33B-3001 LeuvenTel. +32.16.74.10.00Fax. [email protected]://www.gceurope.com
GC AMERICA INC. 3737 West 127th Street USA-Alsip, ILL. 60803 Tel. +1.708.597.0900 Fax. +1.708.3771.5103 [email protected] www.gcamerica.com
GC GERMANY GmbHSeifgrundstraße 2D-61348 Bad HomburgTel. +49.61.72.99.59.60Fax. [email protected]://germany.gceurope.com
GC ITALIA S.r.l.Via Calabria 1I-20098 San Giuliano MilaneseTel. +39.02.98.28.20.68Fax. [email protected]://italy.gceurope.com
GC UNITED KINGDOM Ltd.16-23, Coopers CourtNewport PagnellUK-Bucks. MK16 8JSTel. +44.1908.218.999Fax. [email protected]://uk.gceurope.com
GC FRANCE s.a.s.8 rue Benjamin FranklinF-94370 Sucy en Brie CedexTel. +33.1.49.80.37.91Fax. [email protected]://france.gceurope.com
GC IBÉRICA Dental Products, S.L. Edificio Codesa 2 Playa de las Américas 2, 1°, Of. 4ES-8290 Las Rozas, MadridTel. +34.916.364.340Fax. [email protected]://spain.gceurope.com
GC AUSTRIA GmbHTallak 124A-8103 Gratwein-StrassengelTel. +43.3124.54020Fax. [email protected]://austria.gceurope.com
GC BENELUX B.V.Edisonbaan 12NL-3439 MN NieuwegeinTel. +31.30.630.85.00Fax. [email protected]://benelux.gceurope.com
GC EUROPE N.V.East European OfficeSiget 19BHR-10020 ZagrebTel. +385.1.46.78.474Fax. [email protected]://eeo.gceurope.com
GC NORDIC ABFinnish BranchVanha Hommaksentie 11BFIN-02430 MasalaTel. & Fax. [email protected]://finland.gceurope.com
GC NORDIC AB Danish Branch Harbour House Sundkrogsgade 21 DK-2100 Københamn Tel. +45 23 26 03 [email protected]://denmark.gceurope.com
GC NORDIC ABVaruvägen 9S-125 30 ÄlvsjöTel. +46 8 410 344 90 Fax. +46 8 555 788 05 [email protected]://nordic.gceurope.com
GC AUSTRIA GmbHSwiss OfficeBergstrasse 31cCH-8890 FlumsTel. +41.81.734.02.70Fax. [email protected]://switzerland.gceurope.com
GC AUSTRALASIA DENTAL PTY LTD1753 Botany RdBanksmeadowSydney, NSW 2019AustraliaTel. +61.2.9301.8200Fax. +61.2.9316.4196www.gcaustralasia.com
GC SOUTH AMERICARua Heliodora, 399, Santana - São Paulo, SP,BrasilCEP: 02022-051Tel. +55-11-2925-0965CNPJ: 08.279.999/0001-61Resp. Téc: Mayara de Santis RibeiroCRO/SP 105.982