grade 8 science 9 laboratory manual
DESCRIPTION
sasaTRANSCRIPT

1 Grade 8 Science Laboratory Manual
Grade 8 Science Laboratory Manual
Prepared by: Ms. Angela I. Serapio
Higher Level Laboratory Facilitator
2 Grade 8 Science Laboratory Manual
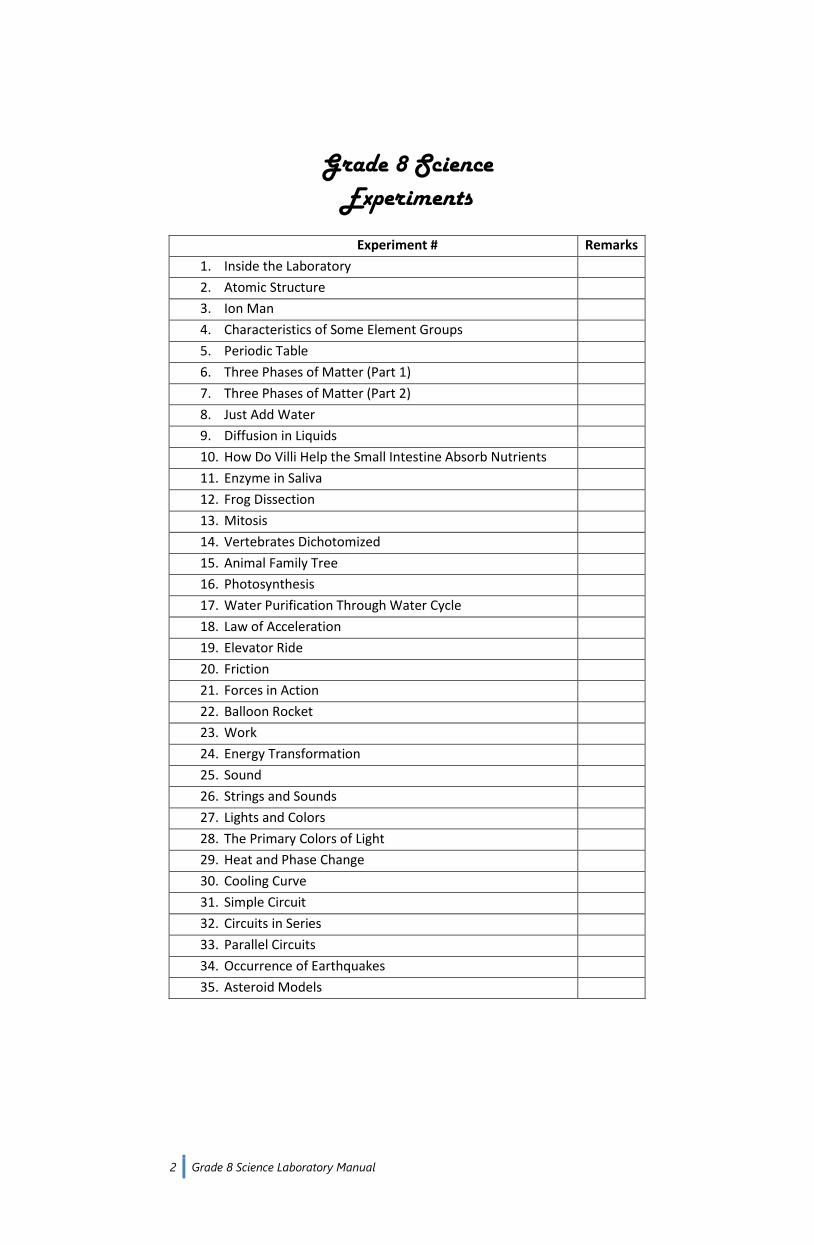
Grade 8 Science Experiments
Experiment # Remarks
1. Inside the Laboratory
2. Atomic Structure
3. Ion Man
4. Characteristics of Some Element Groups
5. Periodic Table
6. Three Phases of Matter (Part 1)
7. Three Phases of Matter (Part 2)
8. Just Add Water
9. Diffusion in Liquids
10. How Do Villi Help the Small Intestine Absorb Nutrients
11. Enzyme in Saliva
12. Frog Dissection
13. Mitosis
14. Vertebrates Dichotomized
15. Animal Family Tree
16. Photosynthesis
17. Water Purification Through Water Cycle
18. Law of Acceleration
19. Elevator Ride
20. Friction
21. Forces in Action
22. Balloon Rocket
23. Work
24. Energy Transformation
25. Sound
26. Strings and Sounds
27. Lights and Colors
28. The Primary Colors of Light
29. Heat and Phase Change
30. Cooling Curve
31. Simple Circuit
32. Circuits in Series
33. Parallel Circuits
34. Occurrence of Earthquakes
35. Asteroid Models

3 Grade 8 Science Laboratory Manual
Grade 8 Science
Name: Date:
Moderator: Cluster/Group:
Experiment # _____
Inside the Laboratory OBJECTIVES:
To become acquainted with the use of common glassware and equipment in the laboratory
To follow safety measures in the laboratory MATERIALS: Sodium bicarbonate thermometer evaporating dish Jar hot plate dropper Vinegar test tube graduated cylinder Beaker test-tube rack test-tube holder Stirring rod Bunsen burner/ alcohol lamp balance Spatula/ microspatula tripod/iron stand and iron ring PROCEDURES: A. Perform the given task. In each task enumerate the equipment and glassware used and write them in the table below. 1. Dissolve 2.80g sodium bicarbonate (store in a jar) in about 50 mL water. 2. Heat 200 ml water in a beaker and get the temperature of the water every 2 minutes until the water boils. 3. Separate the water from the mixture in procedure No. 1 through evaporation. 4. Count the number of drops present in 1 ml of vinegar and pour the 1ml vinegar in a test tube. Heat the test tube until the vinegar boils.
TASK EQUIPMENT AND GLASSWARE
1
2
3
4
B. Enumerate the safety measures that must be considered in doing each procedure in part A.
TASK SAFETY MEASURES
1
2
3
4
GUIDE QUESTIONS: 1. What glass wares are used in measuring liquids? _______________________________________________________________________________________________________________________________________________________________________________________________________________________________________________________________

4 Grade 8 Science Laboratory Manual
2. What glass wares are used as containers of chemicals during heating? _______________________________________________________________________________________________________________________________________________________________________________________________________________________________________________________________ 3. What are the sources of heat for the different activities in the laboratory? _______________________________________________________________________________________________________________________________________________________________________________________________________________________________________________________________ 4. Give the materials and equipment needed in an evaporation setup. _______________________________________________________________________________________________________________________________________________________________________________________________________________________________________________________________ APPLICATION: Aside from the safety measures mentioned in this activity, list other precautions that you should remember every time you perform experiments.
5 Grade 8 Science Laboratory Manual
Grade 8 Science
Name: Date:
Moderator: Cluster/Group:
Experiment # _____
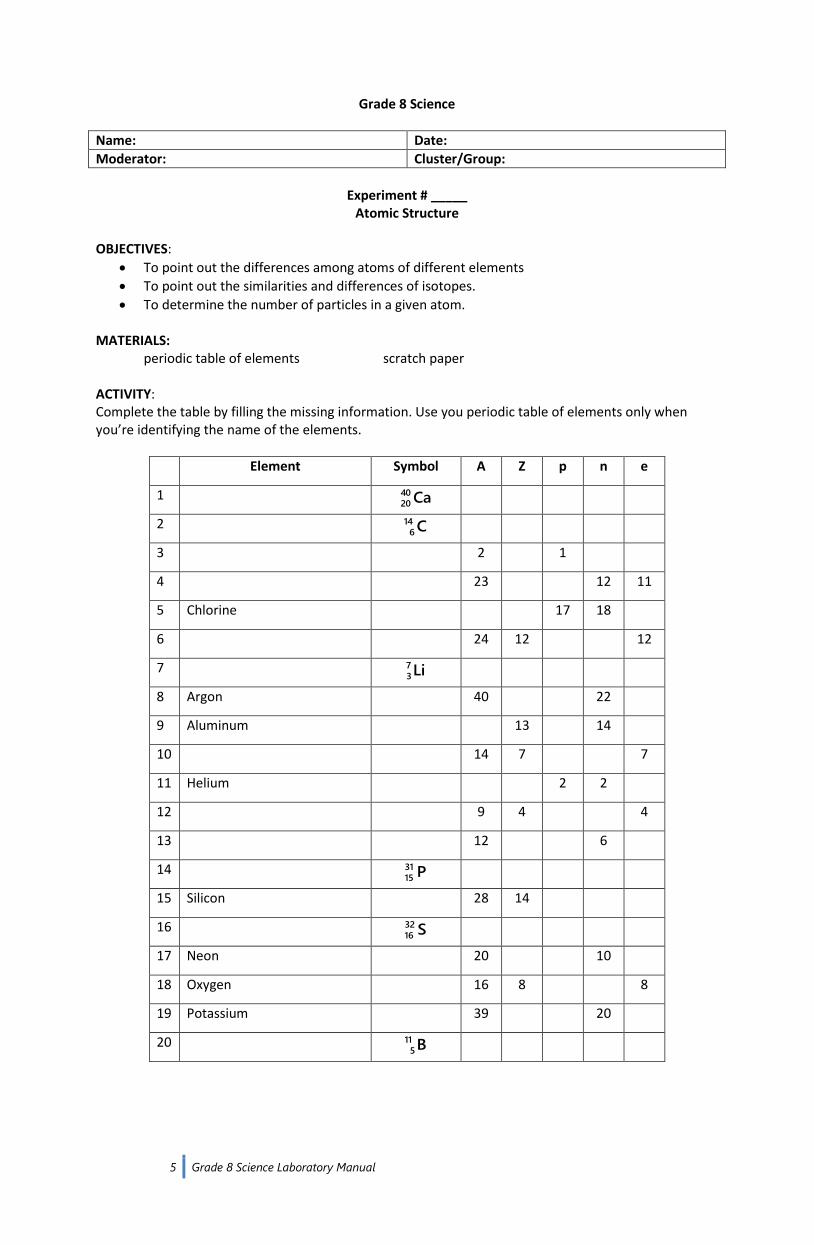
Atomic Structure OBJECTIVES:
To point out the differences among atoms of different elements
To point out the similarities and differences of isotopes.
To determine the number of particles in a given atom. MATERIALS:
periodic table of elements scratch paper ACTIVITY: Complete the table by filling the missing information. Use you periodic table of elements only when you’re identifying the name of the elements.
Element Symbol A Z p n e
1 Ca40
20
2 C14
6
3 2 1
4 23 12 11
5 Chlorine 17 18
6 24 12 12
7 Li7
3
8 Argon 40 22
9 Aluminum 13 14
10 14 7 7
11 Helium 2 2
12 9 4 4
13 12 6
14 P31
15
15 Silicon 28 14
16 S32
16
17 Neon 20 10
18 Oxygen 16 8 8
19 Potassium 39 20
20 B11
5

6 Grade 8 Science Laboratory Manual
GUIDE QUESTIONS: 1. In an element, which numbers are constant for every atom? Give an example. _______________________________________________________________________________________________________________________________________________________________________________________________________________________________________________________________ 2. Which numbers may vary for an element? Give an example. _______________________________________________________________________________________________________________________________________________________________________________________________________________________________________________________________ 3. What is the relationship between the atomic mass, protons, and neutrons? _______________________________________________________________________________________________________________________________________________________________________________________________________________________________________________________________ 4. Which of the sub-atomic particles can be found in the nucleus? _______________________________________________________________________________________________________________________________________________________________________________________________________________________________________________________________ 5. Carbon 12 and Carbon 14 are isotopes. What are the differences between the two carbons? _______________________________________________________________________________________________________________________________________________________________________________________________________________________________________________________________ CONCLUSION: ____________________________________________________________________________________________________________________________________________________________________________________________________________________________________________________________________________________________________________________________________________________

7 Grade 8 Science Laboratory Manual
Grade 8 Science
Name: Date:
Moderator: Cluster/Group:
Experiment # _____
Ion Man OBJECTIVES:
To determine the nuclear charge of an ion
To explain how ions are formed MATERIALS: Periodic table of elements scratch paper ACTIVITY: Complete the table by finding the missing information about an atom. Use the periodic table of elements only when you're naming elements.
Element Symbol A Z p n e
1 9 10 10
2 16 8 10
3 15 16 18
4 Cl35
17
5 3147N
6 12 12 10
7 39 19 18
8 9 5 2
9 32713 Al
10 H21
GUIDE QUESTIONS: 1. How do atoms become ions? How do they become charged? __________________________________________________________________________________________________________________________________________________________________________ 2. What are the sub-atomic particles responsible for the formation of ions? __________________________________________________________________________________________________________________________________________________________________________ 3. When do atoms become anions (negatively charged)? __________________________________________________________________________________________________________________________________________________________________________ 4. When do atoms become cations (positively charged)? __________________________________________________________________________________________________________________________________________________________________________ CONCLUSION: _______________________________________________________________________________________________________________________________________________________________________________________________________________________________________________________________

8 Grade 8 Science Laboratory Manual
Grade 8 Science
Name: Date:
Moderator: Cluster/Group:
Experiment # _____
Characteristics of Some Element Groups OBJECTIVES:
To determine the common characteristics of elements within a group
To determine the differences of elements in different groups MATERIALS: Module 2B Other reference materials ACTIVITY: In your activity sheet, write the characteristics of the following groups of elements:
Alkali Metals
Alkaline Earth Metals
Halogen
Noble Gases GUIDE QUESTIONS: 1. Which group has highly reactive elements? __________________________________________________________________________________________________________________________________________________________________________ 2. Which group has non-reactive elements? __________________________________________________________________________________________________________________________________________________________________________ 3. If an element is rarely found in its elemental form (on its own), do you think that element is highly reactive or not? __________________________________________________________________________________________________________________________________________________________________________ 4. Which group are you most familiar with? _______________________________________________________________________________________________________________________________________________________________________________________________________________________________________________________________ CONCLUSION: _______________________________________________________________________________________________________________________________________________________________________________________________________________________________________________________________

9 Grade 8 Science Laboratory Manual
Grade 8 Science
Name: Date:
Moderator: Cluster/Group:
Experiment # _____
Periodic Table of Elements OBJECTIVES:
To identify the location of an unknown element based from its characteristics
To display mastery in using the periodic table of elements MATERIALS: Periodic table of elements Blank PTE ACTIVITY: Below are descriptions of unknown elements. Use their descriptions to locate the elements in the periodic table and give their identities. Write your answers on the blank periodic table.
A is the lightest known element.
D is the first element in the fourth period.
E has similar properties with element T but has higher atomic number.
F is the third element in the lanthanide series.
G is the lightest transition metal.
J is one of the most reactive elements and has a valence of 7 electrons. It is the lightest in its group.
L is the least reactive element in period 3.
M is an inert gas and has one more proton than A.
N has similar properties with R and is the heaviest in the group.
O is the heaviest among alkali metals.
Q has two more protons than J.
R has the lowest atomic number among the alkaline earth metals.
T has one less proton than L.
X has the highest atomic number in the actinide series.
Y is the first transition metal in period 5.
Z is the last element in the noble gas group.

10 Grade 8 Science Laboratory Manual

11 Grade 8 Science Laboratory Manual
Grade 8 Science
Name: Date:
Moderator: Cluster/Group:
Experiment # _____
Three Phases of Matter (Part 1) OBJECTIVES:
To illustrate matter as particles
To illustrate the particles of matter as it changes its phase
To state the relationship of heat to the arrangement of the particles of matter MATERIALS:
Ice cubes Beaker Hot plate/ Alcohol lamp, tripod, wire gauze PROCEDURES: I. a. Put an ice cube in a beaker and heat it on a hotplate or alcohol lamp. b. Set aside while waiting for it to melt. Write your observations. GUIDE QUESTIONS: 1. How will you illustrate the particles of ice before melting and as it melts? Illustrate a before and after arrangement of particles.
Before
After
2. Which has a more ordered arrangement? ______________________________ 3. Which state has higher kinetic energy? ________________________________ 4. Melting is an endothermic process, meaning it absorbs energy. Based from your illustration and from that concept, explain how applying heat affects the arrangement of the particles in a solid substance. _______________________________________________________________________________________________________________________________________________________________________________________________________________________________________________________________ CONCLUSION: _______________________________________________________________________________________________________________________________________________________________________________________________________________________________________________________________ APPLICATION: After the ice completely melts, what will happen to the arrangement of the particles if you put the flask inside a freezer and liquid water turns back to ice? Support your answer with illustrations. _______________________________________________________________________________________________________________________________________________________________________________________________________________________________________________________________

12 Grade 8 Science Laboratory Manual
Grade 8 Science
Name: Date:
Moderator: Cluster/Group:
Experiment # _____
Three Phases of Matter (Part 2) OBJECTIVES:
To illustrate matter as particles
To illustrate the particles of matter as it changes its phase
To state the relationship of heat to the arrangement of the particles of matter MATERIALS:
Water Beaker Hot plate Watch glass PROCEDURES: I. a. Put 100 mL of water in a beaker.
b. Cover it with a watch glass with its convex side facing upward. c. Place it on a hot plate and wait for it to boil. Write your observations. d. Remove it from the hot plate and let it cool. GUIDE QUESTIONS: 1. What are the changes in phase that you've observed from the activity? _____________________________________________________________________________________ 2. Changing liquid to vapor is an endothermic process (absorbs heat). How will you illustrate the changes in the arrangement of the particles as it changes in phase?
Before
After
3. Changing water vapor to liquid water is an exothermic process (releases heat). How will you illustrate the changes in the arrangement of the particles as it changes in phase?
Before
After
4. Explain how the addition and removal of heat affects the arrangement and the movements of the particles in a substance. __________________________________________________________________________________________________________________________________________________________________________ CONCLUSION: _______________________________________________________________________________________________________________________________________________________________________________________________________________________________________________________________ EXPLORING FURTHER: Explain how gases cannot be seen with our naked eye. __________________________________________________________________________________________________________________________________________________________________________

13 Grade 8 Science Laboratory Manual
Grade 8 Science
Name: Date:
Moderator: Cluster/Group:
Experiment # _____
Just Add Water OBJECTIVES:
To illustrate matter as particles
To illustrate the changes in the size of the particles
To infer how solid particles change when added to a liquid substance MATERIALS: KMnO4 crystals Water Stirring rod Iron stand Iron ring 2 Beakers Funnel Filter paper PROCEDURES: A. Prepare the gravity filtration as illustrated below.
B. 1. Using a spatula, obtain a small amount of potassium permanganate crystals. Observe the appearance of the compound (state, color, size, uniformity, etc.).
2. Using the gravity filtration set-up, try to filter the crystals to determine if they will pass through the openings of the filter paper. Note your observations. GUIDE QUESTIONS: 1. Describe the appearance of the potassium permanganate crystals. __________________________________________________________________________________________________________________________________________________________________________ 2. Were the particles of the crystals small enough to pass through the pores of the filter paper? Support your answer with your observations. _______________________________________________________________________________________________________________________________________________________________________________________________________________________________________________________________ C. 1. Get the beaker half filled with water and put the KMnO4 crystals into it. Observe it for a while and record what you've seen. 2. Stir the substances using a stirring rod. Note your observations. 3. Filter the mixture using the gravity filtration set-up and note your observations.

14 Grade 8 Science Laboratory Manual
GUIDE QUESTIONS: 3. What is your initial observation after you put potassium permanganate crystals into the beaker with water? __________________________________________________________________________________________________________________________________________________________________________ 4. Describe the mixture after you stir. _______________________________________________________________________________________________________________________________________________________________________________________________________________________________________________________________ 5. Were you able to filter the solution and separate the crystals from water? ______________________ 6. Based from your observations, were the crystals small enough to pass through the pores of the filter paper? _______________________________________________________________________________________________________________________________________________________________________________________________________________________________________________________________ 7. The Kinetic Particle Theory states that matter is made up of tiny moving particles. Use this theory to explain the difference between potassium permanganate crystals, and potassium permanganate solution. ____________________________________________________________________________________________________________________________________________________________________________________________________________________________________________________________________________________________________________________________________________________ CONCLUSION: ____________________________________________________________________________________________________________________________________________________________________________________________________________________________________________________________________________________________________________________________________________________ APPLICATION: Give other instances wherein movement of particles can be observed. ____________________________________________________________________________________________________________________________________________________________________________________________________________________________________________________________________________________________________________________________________________________

15 Grade 8 Science Laboratory Manual
Grade 8 Science
Name: Date:
Moderator: Cluster/Group:
Experiment # _____ Diffusion in Liquids
OBJECTIVES:
To describe what happens to the particles of two substances combined
To display objectivity in recording and interpreting observations MATERIALS: 1 glass bottle (Gatorade or any similar bottle) 250 mL of water Potassium permanganate crystals masking tape and marker for labeling PROCEDURES: Note: This activity will take a few days to complete. 1. Observe the substances to be used. Write your observations on your activity sheet. Include the state, size, color, and any physical characteristics that you can observe. 2. Place a few crystals of potassium permanganate at the bottom of a beaker of water. Leave the setup to stand and observe it from time to time without disturbing the substance. 3. Assign one member per group to check their set-up every day to draw and record their observations. GUIDE QUESTIONS: 1. How will you describe the two substances before they were combined? ____________________________________________________________________________________________________________________________________________________________________________________________________________ 2. What is your initial observation after you placed the potassium permanganate crystals into the container with water? Draw and describe your observations.
________________________________________________________________________________________________________________________________________________________________________________________________________________
3. Draw and record your observations and indicate the date and time.
4. Based from your observations, describe what happens to the particles of the substances as time passes. _______________________________________________________________________________________________________________________________________________________________________________________________________________________________________________________________

16 Grade 8 Science Laboratory Manual
5. Based from your experiment, define "diffusion". _______________________________________________________________________________________________________________________________________________________________________________________________________________________________________________________________ CONCLUSION: ____________________________________________________________________________________________________________________________________________________________________________________________________________________________________________________________________________________________________________________________________________________

17 Grade 8 Science Laboratory Manual
Grade 8 Science
Name: Date:
Moderator: Cluster/Group:
Experiment # _____
How Do Villi Help the Small Intestine Absorb Nutrients?
INTRODUCTION: The lining of the small intestine consists of folds that are covered with tiny finger – like projections called villi. Within each villus there is a network of blood capillaries and lymph vessels that absorb and carry nutrients. OBJECTIVE:
To be able to describe how surface area affects the ability to absorb substances. MATERIALS: 2 pcs paper towels Scissors 2 cardboard tubes Ruler 100 ml graduated cylinder 2 plastic cups 2 pcs 100 ml beaker Marker
Water PROCEDURES:
1. CAUTION: Scissors are sharp. Cut and roll up a single sheet of paper towel so that it fits in a cardboard tube without overlapping itself. Label this as set up A. The tube represents the small intestine and the paper towel represents the intestinal lining without the villi.
2. Spread the paper towel out flat and use the ruler to determine the area of the towel (area = width x length). Put the paper towel back in the tube. Write down the measurement on the data table.
3. Using the second paper towel, fold it back and forth on itself in a zigzag pattern as if you are making a fan. Then, roll up the crinkled paper to fit in the second tube without overlapping itself. Cut off excess. Label this as set up B. The fold represents an intestinal lining with villi.
4. Repeat procedure number 2 for the second towel. Predict which model will absorb more water. 5. Put each tube in a plastic cup. Slowly pour 30 ml water down the inside of each tube. Remove
the tubes. Then measure the quantity of water in each cup. DATA AND OBSERVATIONS:
A. Determining the Surface Area of Intestinal Lining Using Paper Towel
Length (cm) Width (cm) Surface Area (cm2)
Flat Paper towel on Set up A
Crinkled Paper towel on Set up B
B. Measuring the Absorptive Property of Intestinal Lining Using Paper Towel
Volume of water (mL)
Absorbed quantity of water by Set up A
Absorbed quantity of water by Set up B
GUIDE QUESTIONS:
1. Which model had more surface area? How does surface area affect the ability to absorb substances?
_______________________________________________________________________________________________________________________________________________________________________________________________________________________________________________________________

18 Grade 8 Science Laboratory Manual
2. How do folds and finger – like projections affect the area of an absorbing surface? _______________________________________________________________________________________________________________________________________________________________________________________________________________________________________________________________
3. How do villi help the intestine absorb nutrients? ____________________________________________________________________________________________________________________________________________________________________________________________________________________________________________________________________________________________________________________________________________________ CONCLUSION/GENERALIZATION: _____________________________________________________________________________________
_____________________________________________________________________________________
_____________________________________________________________________________________
_____________________________________________________________________________________

19 Grade 8 Science Laboratory Manual
Grade 8 Science
Name: Date:
Moderator: Cluster/Group:
Experiment # _____
Enzyme in Saliva INTRODUCTION: Enzymes are protein catalysts and speeds up reaction. Human saliva contains salivary amylase which breaks down starch (a complex carbohydrate) to simple sugars. Lugol’s solution is used to test for the presence of starch while Benedict’s solution is used to test for glucose. OBJECTIVES:
To observe enzyme action
To give the importance of enzymes in our digestive system MATERIALS: Saltines/ crackers (Skyflakes, etc.) Water Medicine droppers Waxed paper Test tubes and test tube rack Plastic spoons Lugol’s solution Small plastic cup Benedict’s solution Disposable surgical gloves PROCEDURES: This is an individual work but the group must be divided into two. If you have cough or colds, consult your lab facilitator. 1. Label your things using a marker. Take note that you will work on your own saliva therefore you should observe cleanliness. Do not share your things with your classmates and make sure that you wear your gloves. 2. Spit into a cup. You must be able to collect at least a spoonful of saliva. 3. Break off a piece of cracker – about the size of a small pea. Fold it in a waxed paper and crush it into powder. 4. Place the powdered cracker into a test tube. Add saliva. 5. Mix them thoroughly by swirling and allow it to sit for at least 5 minutes. Wash and dry your hands thoroughly while waiting. Throw the waxed paper in the bin and clear your area of unnecessary objects. 6. Add one drop of Lugol’s solution and Benedict’s solution for the other half of the group. Write your observations. 7. Clean the materials that you used before throwing them in the bins. DATA:
Set-up Lugol’s solution (Positive/Negative)
Benedict’s solution (Positive/Negative)
Control (crackers + water)
Experimental (crackers + saliva)
GUIDE QUESTIONS: 1. What is the purpose of adding saliva to your set-up? __________________________________________________________________________________________________________________________________________________________________________ 2. What did you observe when you added Lugol’s solution into your test tube/cup? Interpret your results. _______________________________________________________________________________________________________________________________________________________________________________________________________________________________________________________________

20 Grade 8 Science Laboratory Manual
3. What did you observe when you added Benedict’s solution into your test tube/cup? Interpret your results. _______________________________________________________________________________________________________________________________________________________________________________________________________________________________________________________________ 4. Was there a chemical change during digestion? Support your answer with your observations. _______________________________________________________________________________________________________________________________________________________________________________________________________________________________________________________________ CONCLUSION: ____________________________________________________________________________________________________________________________________________________________________________________________________________________________________________________________________________________________________________________________________________________

21 Grade 8 Science Laboratory Manual
Grade 8 Science
Name: Date:
Moderator: Cluster/Group:
Experiment # _____
Frog Dissection BACKGROUND: As members of the class Amphibia, frogs may live some of their adult lives on land, but they must return to water to reproduce. Eggs are laid and fertilized in water. On the outside of the frog’s head are two external nares, or nostrils; two tympani, or eardrums; and two eyes, each of which has three lids. The third lid, called the nictitating membrane, is transparent. Inside the mouth are two internal nares, or openings into the nostrils; two vomerine teeth in the middle of the roof of the mouth; and two maxillary teeth at the sides of the mouth. Also inside the mouth behind the tongue is the pharynx, or throat. In the pharynx, there are several openings: one into the esophagus, the tube into which food is swallowed; one into the glottis, through which air enters the larynx, or voice box; and two into the Eustachian tubes, which connect the pharynx to the ear. The digestive system consists of the organs of the digestive tract, or food tube, and the digestive glands. From the esophagus, swallowed food moves into the stomach and then into the small intestine. Bile is a digestive juice made by the liver and stored in the gallbladder. Bile flows into a tube called the common bile duct, into which pancreatic juice, a digestive juice from the pancreas, also flows. The contents of the common bile duct flow into the small intestine, where most of the digestion and absorption of food into the bloodstream takes place. Indigestible materials pass through the large intestine and then into the cloaca, the common exit chamber of the digestive, excretory, and reproductive systems. OBJECTIVES:
To describe the appearance of various organs found in the frog
To name the organs that make up the digestive system of the frog MATERIALS:
safety goggles, gloves, and a lab apron
forceps
preserved frog
dissecting pins (6–10)
dissecting tray and paper towels
plastic storage bag and twist tie
scissors
marking pen
dissecting needle
PROCEDURES:
1. Put on safety goggles, gloves, and a lab apron.
2. Place a frog on a dissection tray. To determine the frog’s sex, look at the hand digits, or fingers, on its forelegs. A male frog usually has thick pads on its "thumbs," which is one external difference between the sexes, as shown in the diagram below. Male frogs are also usually smaller than female frogs. Observe several frogs to see the difference between males and females.

22 Grade 8 Science Laboratory Manual
3. Use the diagram below to locate and identify the external features of the head. Find the mouth, external nares, tympani, eyes, and nictitating membranes.
4. Turn the frog on its back and pin down the legs. Cut the hinges of the mouth and open it wide.
Use the diagram below to locate and identify the structures inside the mouth. Use a probe to help find each part: the vomerine teeth, the maxillary teeth, the internal nares, the tongue, the openings to the Eustachian tubes, the esophagus, the pharynx, and the slit-like glottis.
5. Look for the opening to the frog’s cloaca, located between the hind legs. Use forceps to lift the skin and use scissors to cut along the center of the body from the cloaca to the lip. Turn back the skin, cut toward the side at each leg, and pin the skin flat. The diagram above shows how to make these cuts
6. Lift and cut through the muscles and breast bone to open up the body cavity. If your frog is a female, the abdominal cavity may be filled with dark-colored eggs. If so, remove the eggs on one side so you can see the organs underlying them.
7. Use the diagram below to locate and identify the organs of the digestive system: esophagus, stomach, small intestine, large intestine, cloaca, liver, gallbladder, and pancreas.

23 Grade 8 Science Laboratory Manual
GUIDE QUESTIONS:
1. A frog does not chew its food. What do the positions of its teeth suggest about how the frog uses them? _____________________________________________________________________________________________________________________________________________________________________________________________________________________________________________
2. Trace the path of food through the digestive tract. _____________________________________________________________________________________________________________________________________________________________________________________________________________________________________________
CONCLUSION: ____________________________________________________________________________________________________________________________________________________________________________________________________________________________________________________________________________________________________________________________________________________

24 Grade 8 Science Laboratory Manual
Grade 8 Science
Name: Date:
Moderator: Cluster/Group:
Experiment # _____
Mitosis OBJECTIVES:
To identify the stage of mitosis a plant cell is in
To determine the time spent by a cell in a phase of mitosis MATERIALS: Prepared slide of the longitudinal section of onion root tip Compound microscope PROCEDURES: 1. Focus the prepared slide of the onion root tip under the LPO. Move the slide such that the meristematic region is in view. 2. Shift to the HPO. Draw the portion of the meristematic region that you see. Label at least one cell for each stage of mitosis. Label also the cell parts you see. 3. Make a count of the cells in each phase of mitosis in a single field of view. Record your data. 4. The time a cell spends in a phase of mitosis is a function of the number of cells in the phase at a given time. Using the formula below, calculate the time in hours and minutes that each phase lasts. Assume that the total time required for a single mitosis is 17 hours or 1020 minutes.
Time spent in a phase = number of cells in the phase x 1020 min total number of cells DATA AND OBSERVATIONS: Meristematic Prophase Region of onion HPO _____x Root Metaphase Anaphase HPO _______x HPO ______x

25 Grade 8 Science Laboratory Manual
Telophase HPO ______X
2. Cell counts and time spent in each phase of mitosis
Phases of mitosis Total
Prophase Metaphase Anaphase Telophase
No of cells
% of the cells
Time spent in the phase
GUIDE QUESTIONS: 1. In which part of the meristematic region would you expect to find the youngest cells? Why? _______________________________________________________________________________________________________________________________________________________________________________________________________________________________________________________________ 2. Do all the cells appear to have nucleus? Why? _______________________________________________________________________________________________________________________________________________________________________________________________________________________________________________________________ CONCLUSION: ____________________________________________________________________________________________________________________________________________________________________________________________________________________________________________________________________________________________________________________________________________________ EXPLORING FURTHER: 1. Why do you think it is important for the DNA to replicate before the cell divides? _______________________________________________________________________________________________________________________________________________________________________________________________________________________________________________________________ 2. What would happen if the centrosomes did not split and the chromosomes did not separate during anaphase? _______________________________________________________________________________________________________________________________________________________________________________________________________________________________________________________________

26 Grade 8 Science Laboratory Manual
Grade 8 Science
Name: Date:
Moderator: Cluster/Group:
Experiment # _____
Vertebrates Dichotomized OBJECTIVE:
To use a dichotomous key to identify the genera of some vertebrates MATERIALS: Textbook and other reference materials PROCEDURES:
1. Use the reference materials and following illustrations to fill in the table in Data and observations. Use a check () to indicate the presence of the characteristics in the vertebrate.
2. Use the following dichotomous key to identify the genus name of each vertebrate.
1 I Can produce heat within the body Go to 2
II Absorbs heat from the environment Go to 6
2 I Has feathers Go to 3
II Has hair or fur Go to 4
3 I Has narrow, straight beak Columba
II Has large, crooked beak Penolipides
4 I Has horns Go to 5
II Has no horns Tarsius
5 I Has Branched horns Cervus
II Has unbranched horns Bubalus
6 I Breathes with gills Go to 7
II Breathes with lungs Go to 8
7 I Has large, fan-shaped fins just behind the head Cypselurus
II Has small fins behind the head Chanos
8 I Has scaly skin Go to 9
II Has smooth skin Rana
9 I Has front and hind legs Siebenrockiella
II Has no legs Hydrohis
A B C
E D F

27 Grade 8 Science Laboratory Manual
G. H. I. J. DATA AND OBSERVATIONS:
1. Checklist of vertebrate characteristics
2. Genus names of the vertebrates
A. _______________________________ E. _______________________________ B. _______________________________ F. _______________________________ C. _______________________________ G. _______________________________ D. _______________________________ H. ______________________________
QUESTIONS FOR ANALYSIS:
1. Columba and Penelopides belong to a group of vertebrates called Class Aves. Based on the dichotomous key, what are the general characteristics of animals belonging to Class Aves?
____________________________________________________________________________________________________________________________________________________________________________________________________________________________________________________________________________________________________________________________________________________
Vertebrate Appendages Body covering Breathing organ
Temperature control
fin
s
Win
gs, 2
legs
fore
legs
s
Hin
dle
gs
Ho
rns
Smo
oth
ski
n
scal
es
Feat
her
s
Hai
r/fu
r
Gill
s
Lun
gs
Ab
sorb
s h
eat
fro
m
envi
ron
men
t
Can
Pro
du
ce h
eat
wit
hin
th
e
bo
dy
A
B
C
D
E
F
G
H

28 Grade 8 Science Laboratory Manual
2. Chanos and Cypselurus belong to Class Osteichthyes. Based on the dichotomous key, what is the difference between Class Aves and Class Osteichthyes?
____________________________________________________________________________________________________________________________________________________________________________________________________________________________________________________________________________________________________________________________________________________
3. Among the vertebrates you have just classified, to which one are humans most related? Why do you think so?
____________________________________________________________________________________________________________________________________________________________________________________________________________________________________________________________________________________________________________________________________________________ CONCLUSION: ____________________________________________________________________________________________________________________________________________________________________________________________________________________________________________________________________________________________________________________________________________________

29 Grade 8 Science Laboratory Manual
Grade 8 Science
Name: Date:
Moderator: Cluster/Group:
Experiment # _____ Animal Family Tree
OBJECTIVES:
To construct cladograms showing relationships among representative invertebrates and among representative chordates
To interpret cladograms MATERIALS: Textbook and other reference materials PROCEDURES: 1. The following table lists the representative organisms of some invertebrate phyla. Referring to your textbook and other reference materials, determine if each organism possess the traits listed in the table. Write 1 if the trait is present and 0 if it is absent.
Invertebrate (group)
Traits
Multicellular True Coelom
Coelom formed by splitting of mesoderm
Coelom formed by folding of
mesoderm
Develops ciliated free – swimming
larva
True tissues
Venus flower (sponge)
Earthworm (annelid)
Grasshopper (arthropod)
Sea urchin (Echinoderm)
Oyster (mollusc)
Planaria (flatworm)
Lancelet (chordate)
1. Determine which characteristic listed in the table is primitive and which are derived. A trait is
considered primitive if possessed by all organisms in a clade. In cladistic analysis, a primitive trait that appears in only a subgroup of a clade is a derived characteristic. A derived trait appeared later than the primitive characteristics.
PRIMITIVE CHARACTERISTIC DERIVED CHARACTERISTIC
30 Grade 8 Science Laboratory Manual
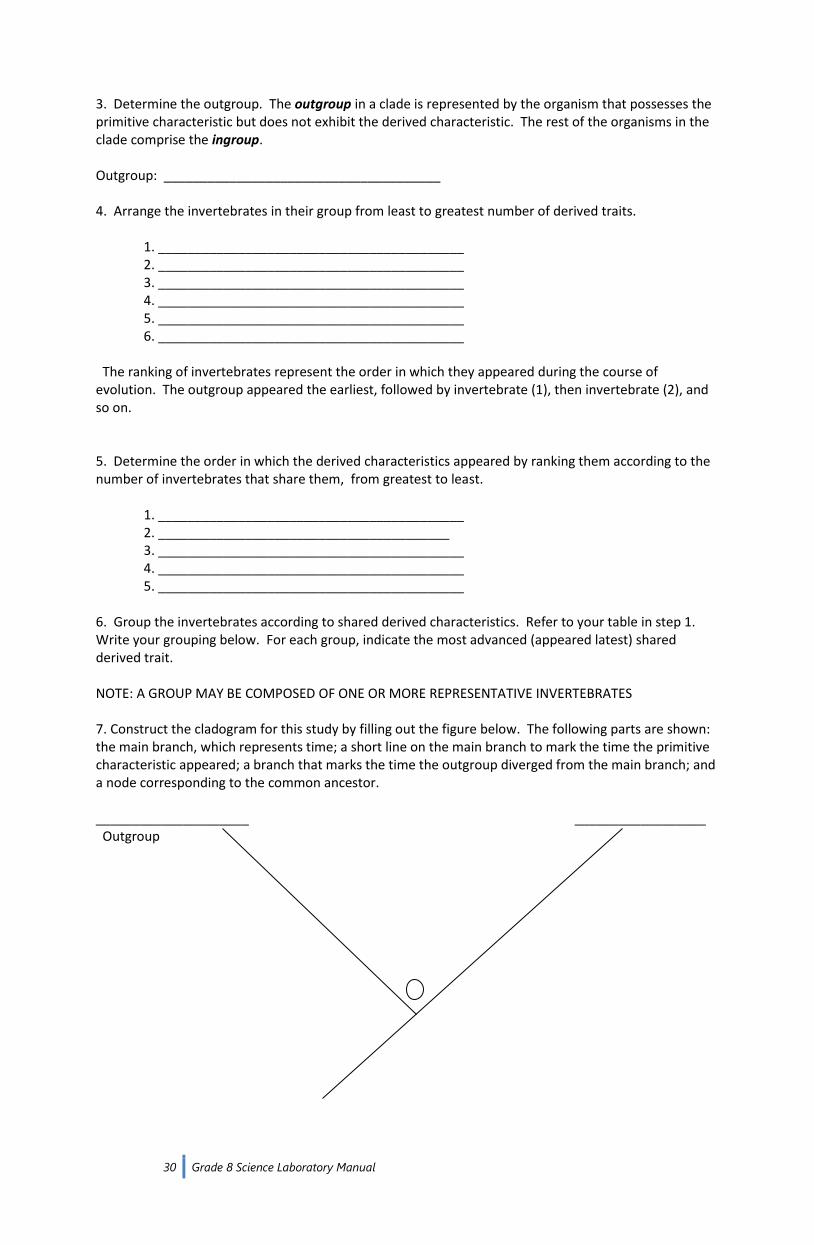
3. Determine the outgroup. The outgroup in a clade is represented by the organism that possesses the primitive characteristic but does not exhibit the derived characteristic. The rest of the organisms in the clade comprise the ingroup. Outgroup: ______________________________________ 4. Arrange the invertebrates in their group from least to greatest number of derived traits. 1. __________________________________________ 2. __________________________________________ 3. __________________________________________ 4. __________________________________________ 5. __________________________________________ 6. __________________________________________ The ranking of invertebrates represent the order in which they appeared during the course of evolution. The outgroup appeared the earliest, followed by invertebrate (1), then invertebrate (2), and so on. 5. Determine the order in which the derived characteristics appeared by ranking them according to the number of invertebrates that share them, from greatest to least. 1. __________________________________________ 2. ________________________________________ 3. __________________________________________ 4. __________________________________________ 5. __________________________________________ 6. Group the invertebrates according to shared derived characteristics. Refer to your table in step 1. Write your grouping below. For each group, indicate the most advanced (appeared latest) shared derived trait. NOTE: A GROUP MAY BE COMPOSED OF ONE OR MORE REPRESENTATIVE INVERTEBRATES 7. Construct the cladogram for this study by filling out the figure below. The following parts are shown: the main branch, which represents time; a short line on the main branch to mark the time the primitive characteristic appeared; a branch that marks the time the outgroup diverged from the main branch; and a node corresponding to the common ancestor. _____________________ __________________ Outgroup

31 Grade 8 Science Laboratory Manual
Now complete the cladogram by doing the following: a. Specify the outgroup and the primitive characteristic. b. Draw short lines on the main branch to mark the order in which the derived characteristics appeared. Label the lines. c. Draw a branch from the main branch to represent each group you listed in step 6. Place the branch after the line corresponding to the most advanced characteristic shared by the group. Write the names of the invertebrates in the group at the tip of the branch. NOTE: A BRANCH IS SUBDIVIDED IF TWO OR MORE ORGANISMS ARE IN THE BRANCH 8. Copy your completed cladogram in Data and Observations. B. Making a cladogram for chordates Create a cladogram for the chordates listed in the table below. Employ the same procedure used in A. Construct your cladogram in Data and Observations.
Some Derived Characteristics of Several Representative Chordates
Chordate Derived Characteristics
Jaws Terrestial eggs Hair Feather Lungs
Lancelet
Philippine cockatoo
Duckbilled platypus
Bayawak (monitor lizard)
Milkfish
Negros cave frog
DATA AND OBSERVATIONS: 1. Cladogram showing evolutionary relationships among representative invertebrates. 2. Cladogram showing evolutionary relationships among representative chordates. QUESTIONS FOR ANALYSIS: A. 1. Which two groups of invertebrates are most closely related? _______________________________________________________________________________________________________________________________________________________________________________________________________________________________________________________________ 2. Are sea urchins more closely related to lancelets or to grasshoppers? __________________________________________________________________________________________________________________________________________________________________________ 3. Which of the following organisms is most distantly related to planaria: earthworms, sea urchins or lancelets? _______________________________________________________________________________________________________________________________________________________________________________________________________________________________________________________________

32 Grade 8 Science Laboratory Manual
4. What are the four traits that would have been present in the common ancestor of oysters, earthworms, and grasshoppers? _______________________________________________________________________________________________________________________________________________________________________________________________________________________________________________________________ B. 1. Which chordate represents the outgroup? ________________________ 2. Which organisms comprise the ingroup? _________________________ 3. Which derived trait is most ancestral? __________________________ 4. Which derived trait is most advanced? __________________________
1. How would you describe the evolutionary relationship between the bayawak and the Philippines cockatoo?____________________________________________________
CONCLUSION:

33 Grade 8 Science Laboratory Manual
Grade 8 Science
Name: Date:
Moderator: Cluster/Group:
Experiment # _____
Water Purification through Water Cycle OBJECTIVES:
To explain how materials cycle in an ecosystem
To be able to create a model of water cycle MATERIALS: cups of dirt or sand stones water food coloring
large glass bowl short glass clean plastic wrap string PROCEDURES: 1. Mix the dirt/ sand, stones, food coloring, and water in a large glass bowl. 2. Place the short glass at the center of the bowl. 3. Place the bowl outside, under the sun and cover it with clean plastic wrap. Tie a string around it secure the wrap. 4. Place a rock directly above the glass. 5. Leave it under the sun for a few hours. ILLUSTRATION: Draw your set-up and your observations. GUIDE QUESTIONS: 1. What are the processes responsible for purifying water? Support your answers with your observations. _______________________________________________________________________________________________________________________________________________________________________________________________________________________________________________________________ 2. What does the plastic wrap represent? __________________________________________________________________________________________________________________________________________________________________________ 3. What do you think would happen if the plastic wrap you used was dirty, with sand and dust? _______________________________________________________________________________________________________________________________________________________________________________________________________________________________________________________________ CONCLUSION: Source: Environmental Protection Agency and FreeDrinkingWater.com

34 Grade 8 Science Laboratory Manual
Grade 8 Science
Name: Date:
Moderator: Cluster/Group:
Experiment # _____
Photosynthesis OBJECTIVES:
To observe the gas produced during photosynthesis
To display attentiveness in observing the experiment MATERIALS:
Elodea cutter test tube sodium bicarbonate distilled water light source (sunlight or lamp)
PROCEDURES: 1. Obtain a green sprig of Elodea. Remove several leaves from around the cut end of the stem. Slice off a portion of the stem at an angle and lightly crush the cut end of the stem. 2. Place a small pinch of sodium bicarbonate into a test tube. 3. Place the plant into the test tube (stem end up). 4. Fill the test tube with distilled water until the stem is completely submerged. 5. Place a source of light about 5 cm from the plant. Observe what happens. ILLUSTRATION: Draw your set-up and label the parts. GUIDE QUESTIONS: 1. What happens after you expose your set-up to a light source? Write your observations. __________________________________________________________________________________________________________________________________________________________________________ 2. Did you observe bubbles? Based from your knowledge on photosynthesis, what gas was produced? __________________________________________________________________________________________________________________________________________________________________________ 3. What do you think is the use of adding sodium bicarbonate? __________________________________________________________________________________________________________________________________________________________________________ 4. Write the equation for photosynthesis. _______________________________________________________________________________________________________________________________________________________________________________________________________________________________________________________________ CONCLUSION: _______________________________________________________________________________________________________________________________________________________________________________________________________________________________________________________________ EXPLORING FURTHER: How can you test the identity of the gaseous product? Add something to the set-up and procedure and explain how it will help you. Source: kenpitts.net

35 Grade 8 Science Laboratory Manual
Grade 8 Science
Name: Date:
Moderator: Cluster/Group:
Experiment # _____ Law of Acceleration
OBJECTIVE:
To investigate the relationship between the amount of force applied and the mass of the object to the amount of change in the object's motion
MATERIALS: Pulley with clamp platform balance wooden blocks String set of weights DRAWING: PROCEDURES: 1. Determine the mass of the block of wood. 2. Set up the apparatus in the same manner as shown in figure. Suspend a weight on one end of the string just enough to let the block move. This weight is the force that will pull the wooden block in the horizontal direction. 3. Determine the acceleration of the wooden block. 4. Double the force applied on the block in Step 2. How does the wooden block move compared with the results in step 2? Determine the acceleration of the wooden block. Compare this with the acceleration in step 3. 5. Repeat step 3 but place a 100-g weight on the block of wood. Did the block move at the same rate as in step 3? Compute the acceleration of the wooden block and the 100-g load. DATA:
CONDITIONS FORCE F (N)
MASS OF BLOCK m (kg)
ACCELERATION (m/s2)
Weight just enough to make the block move
Double the Previous weight
Wooden block plus a 100 g load with a single set of weight
GUIDE QUESTIONS: 1. What is the acceleration of the system given the values of F and m? Write them on the table. 2. What happened to the acceleration when you doubled the value of your force applied with the same mass used? _______________________________________________________________________________________________________________________________________________________________________________________________________________________________________________________________

36 Grade 8 Science Laboratory Manual
3. What happened to the acceleration when you added 100-g weight on the block of wood with the same force applied in procedure no. 3? _______________________________________________________________________________________________________________________________________________________________________________________________________________________________________________________________ 4. How are forces applied and mass of the body related to acceleration? _______________________________________________________________________________________________________________________________________________________________________________________________________________________________________________________________ CONCLUSION: ____________________________________________________________________________________________________________________________________________________________________________________________________________________________________________________________________________________________________________________________________________________ APPLICATION: Give 3 ways on how you can apply or observe the law of acceleration.

37 Grade 8 Science Laboratory Manual
Grade 8 Science
Name: Date:
Moderator: Cluster/Group:
Experiment # _____
Elevator Ride OBJECTIVE:
To determine why you feel heavier or lighter when riding in an elevator MATERIALS: 1kg mass 20N spring balance 10 cm masking tape PROCEDURES: 1. Imagine you take an upward elevator ride. Write a few sentences describing when you feel normal, heavier than normal, and lighter than normal. 2. Imagine you take a downward elevator ride. Write a few sentences describing when you feel normal, heavier than normal and lighter than normal. 3. Hold the 1 kg mass in your hand and give it a downward elevator ride. Describe when the mass feels normal, heavier than normal, and lighter than normal. 4. Hold the mass in your hand and give it downward elevator ride. Describe when the mass feels normal, heavier than normal, and lighter than normal. 5. Securely tape the mass to the hook on the spring balance. Warning: a falling mass can cause serious damage to the foot or toe. 6. Start with the mass just above the floor and take it on an upward and downward elevator ride. OBSERVATIONS AND DATA: 1. Carefully watch the spring balance and notice how the readings change for different parts of the ride. Record your observations. GUIDE QUESTIONS: 1. Identify those places in the ride when the spring balance reads a normal value for the mass. Describe the motion of the mass. Are the forces balanced or unbalanced? __________________________________________________________________________________________________________________________________________________________________________ 2. Identify those places in the ride when the spring balance reads a “heavier” value. What is the direction of your weight? Which direction is the acceleration? __________________________________________________________________________________________________________________________________________________________________________ 3. Identify those places in the ride when the spring balance reads a “lighter” value. What is the direction of your weight? Which direction is the acceleration? __________________________________________________________________________________________________________________________________________________________________________ CONCLUSION: _______________________________________________________________________________________________________________________________________________________________________________________________________________________________________________________________ APPLICATIONS: 1. Do you feel heavier or lighter when you are riding on an escalator? Explain your answers in terms of the motion and the forces. 2. Identify the places on the roller coaster ride where you feel heavier or lighter. Explain your answer in terms of the motion and forces.

38 Grade 8 Science Laboratory Manual
Grade 8 Science
Name: Date:
Moderator: Cluster/Group:
Experiment # _____
Friction OBJECTIVE:
To demonstrate the effects of friction on a moving body MATERIALS:
Marbles Sand paper Masking tape Rubber shoes Leather shoes Old rubber slippers Spring balance
PROCEDURES: A. Marble race 1. Look for a flat rectangular surface big enough to conduct a race. 2. Mark the surfaces using the masking tape and place the marbles along the starting position. 3. Using a ruler, or any object long enough to cover both, push the marbles forward. Write your observations. 4. Using the same flat surface, place a sand paper along the path of one of the marbles. Secure the sand paper with masking tape. Ensure that the surface with sand paper is flat. 5. Repeat step 3. GUIDE QUESTIONS: 1. Which surface allows the marble to move farther? __________________________________________________________________________________________________________________________________________________________________________ 2. What factor made the change in motion of the marbles? __________________________________________________________________________________________________________________________________________________________________________ 3. Based from your observations, how can you define friction? _______________________________________________________________________________________________________________________________________________________________________________________________________________________________________________________________ B. Shoe friction 1. Attach the leather shoe to one of the spring balance. 2. Place the shoe and the spring balance along a flat surface. The spring balance should be parallel to the surface. 3. While taking note of the force, gently pull the spring balance until the shoe is moving at a constant speed. 4. Repeat steps 1 to 3 for the rubber shoe and the rubber slippers. GUIDE QUESTIONS: 4. Which footwear can cause the greatest amount of friction? Support your answer with the measurement obtained from the spring balance. _______________________________________________________________________________________________________________________________________________________________________________________________________________________________________________________________

39 Grade 8 Science Laboratory Manual
CONCLUSION: ____________________________________________________________________________________________________________________________________________________________________________________________________________________________________________________________________________________________________________________________________________________ APPLICATION: 1. Is friction a nuisance or a necessity? Give three situations for each.
Friction as Nuisance Friction as Necessity
2. Among the footwear that you've tested, which do you prefer and why? ____________________________________________________________________________________________________________________________________________________________________________________________________________________________________________________________________________________________________________________________________________________

40 Grade 8 Science Laboratory Manual
Grade 8 Science
Name: Date:
Moderator: Cluster/Group:
Experiment # _____
Forces in Action OBJECTIVE:
To explain how forces affect the motion of an object MATERIALS: Rope Handkerchief PROCEDURE/OBSERVATION:
Ask two teams to play tug-of-war.
Observe what happens when both sides pull with equal force. Observe what happens when one team exerts a large force. Fill up the Table in recording your observations.
TABLE:
Condition Observation
1. Pull with equal force
2. One team exerts a larger force
GUIDE QUESTIONS: 1. What happens when both sides pull with equal force? _______________________________________________________________________________________________________________________________________________________________________________________________________________________________________________________________ 2. What happens when one team exerts a larger force? _______________________________________________________________________________________________________________________________________________________________________________________________________________________________________________________________ 3. What are the forces exerted by each team? Describe the effect of each of these forces. _______________________________________________________________________________________________________________________________________________________________________________________________________________________________________________________________ CONCLUSION: How do forces affect the motion of an object? _______________________________________________________________________________________________________________________________________________________________________________________________________________________________________________________________

41 Grade 8 Science Laboratory Manual
Grade 8 Science
Name: Date:
Moderator: Cluster/Group:
Experiment # _____
Balloon Rocket OBJECTIVES:
To show that action-reaction forces act n two different bodies
To demonstrate teamwork and friendly competition MATERIALS: Rocket balloon string Drinking straw masking tape PROCEDURES: 1. Inflate the balloon and tape a piece of drinking straw as shown in the picture below. 2. Insert the string into the drinking straw and position the balloon in the middle of the string. 3. Tie the ends of the string at the back of two chairs. 4. Release the air from the balloon, and observe carefully what happens.
GUIDE QUESTIONS: 1. What happens as you release the air from the balloon? _______________________________________________________________________________________________________________________________________________________________________________________________________________________________________________________________ 2. Compare the direction of the escaping air and the moving balloon. _______________________________________________________________________________________________________________________________________________________________________________________________________________________________________________________________ 3. Did the escaping air have to hit anything to make the balloon move? _______________________________________________________________________________________________________________________________________________________________________________________________________________________________________________________________ CONCLUSION: How do action-reaction forces act on two different bodies to produce motion? _______________________________________________________________________________________________________________________________________________________________________________________________________________________________________________________________

42 Grade 8 Science Laboratory Manual
Grade 8 Science
Name: Date:
Moderator: Cluster/Group:
Experiment # _____
Work OBJECTIVE:
To measure and compare the amount of work done in various activities MATERIALS: Spring balance meter stick 1-kg object Book 5-kg object PROCEDURES: 1. Weigh a textbook using a spring balance. Record the weight. Place the book on the floor next to your chair. 2. Measure the height of your chair in meter. Record this height. 3. Lift the book to the height of your chair. Determine the amount of work done. 4. Weigh a 1-kg object. Record the weight. Place the object on the floor next to your desk. 5. Lift the 1-kg object 2-m. Determine the amount of work done. Repeat steps 4 – 5 using 5 kg object. DATA SHEET:
MATERIALS FORCE (N) DISTANCE (m) WORK DONE (Nm)
Textbook
1-kg object
5-kg object
GUIDE QUESTIONS: 1. How much work is done when a force of 12-N moves an object a distance of 5-m? 2. Mary lifts two books from floor and balances them in her hand. Is she doing work? Why? _______________________________________________________________________________________________________________________________________________________________________________________________________________________________________________________________ 3. If Mary now walks across the room with the books on her head, is she doing work? Why? _______________________________________________________________________________________________________________________________________________________________________________________________________________________________________________________________

43 Grade 8 Science Laboratory Manual
Grade 8 Science
Name: Date:
Moderator: Cluster/Group:
Experiment # _____
Energy Transformation OBJECTIVE:
To determine the energy transformation for each situation MATERIALS:
Battery Aluminum foil Pieces of paper Matches Beaker Flashlight Guitar/ string instrument Rubber band Paper
PRODURES: A. Assign one member to attach a strip of aluminum foil to the negative and positive terminals of the battery. Wait until you observed something. B. Put the pieces of paper in a beaker and burn it using match sticks. Observe proper precautions in burning materials. C. Put batteries in the flashlight and turn it on. D. Strum the guitar and observe. E. Make a "paper bullet" and make a sling using a rubber band. Pull the rubber band and release it facing the wall. DATA:
Objects Energy Transformation
1. battery + aluminum foil
2. burning paper
3. flashlight
4. guitar string
5. rubber band sling
GUIDE QUESTIONS: A. 1. What did you notice when you let the aluminum foil connect the two terminals of the battery? __________________________________________________________________________________________________________________________________________________________________________ 2. What is the outcome of burning paper? __________________________________________________________________________________________________________________________________________________________________________ B. 1. What happens after all the pieces of papers (which serve as fuel) turn to ashes? Will you be able to create fire using it? __________________________________________________________________________________________________________________________________________________________________________ C. 1. What will happen if you used a discharged battery for the flashlight? __________________________________________________________________________________________________________________________________________________________________________ D. 1. What did you observe when you strum the guitar? Will it produce a sound without strumming? __________________________________________________________________________________________________________________________________________________________________________

44 Grade 8 Science Laboratory Manual
E. 1. What happens after you release the bullet along with the rubber band? __________________________________________________________________________________________________________________________________________________________________________ 2. If you used a string that is not elastic, will the bullet move as far? __________________________________________________________________________________________________________________________________________________________________________ CONCLUSION: ____________________________________________________________________________________________________________________________________________________________________________________________________________________________________________________________________________________________________________________________________________________

45 Grade 8 Science Laboratory Manual
Grade 8 Science
Name: Date:
Moderator: Cluster/Group:
Experiment # _____
Sound OBJECTIVE:
To determine the different factors that affect our perception of sound MATERIALS: Guitar 4 Identical glass bottles Tap water
Tuning forks Oscilloscope application Rod Objects that produce sound
PROCEDURES: A. Oscilloscope 1. Prepare the objects that you will use: oscilloscope (app), and things that produce sound. 2. Make a sound using the objects and observe the reading in the oscilloscope. Note your observations. B. Pitch of Sound 1. Using a rod, strike the tuning forks and observe the sound produced. C. Sound in a Bottle 1. Fill the bottles with different amounts of water. 2. Using a metal rod, tap the bottles and observe the sound produced. GUIDE QUESTIONS: A. 1. What did you observe on the oscilloscope whenever you make a sound? __________________________________________________________________________________________________________________________________________________________________________ 2. How do the readings differ with the sound created? Support your answers with your observations. __________________________________________________________________________________________________________________________________________________________________________ B. 1. Which tuning fork produced the highest pitch? __________________________________________________________________________________________________________________________________________________________________________ 2. What is the relationship between the length of the tuning fork and the pitch of sound? __________________________________________________________________________________________________________________________________________________________________________ C. 1. How can you describe the pitch produced by the bottle with the least amount of water? How about the one with the most amount of water? __________________________________________________________________________________________________________________________________________________________________________ CONCLUSION: _________________________________________________________________________________________________________________________________________________________________________________________________________________________________________________________________________________________________________________________________________________________________________________________________________________________________________

46 Grade 8 Science Laboratory Manual
Grade 8 Science
Name: Date:
Moderator: Cluster/Group:
Experiment # _____ Strings and Sound
OBJECTIVE:
To investigate the factors that affect the pitch of sound MATERIALS: Guitar or other similar string instruments PROCEDURES: A. With same amount of force or effort, strum the thinnest wire and then the thickest wire. B. Choose only one string (Refer to then illustration). 1. Hold the string against the part of the guitar labeled A then strum the string. 2. Using the same string, hold it against the part of the guitar labeled B then strum the string with the same amount of force as you did in procedure B.1. C. Choose only one string. 1. Strum your chosen string and listen carefully. 2. Adjust the tuning peg of the corresponding string to make it tight then strum. ILLUSTRATION: GUIDE QUESTIONS: A. 1. Which string has the higher pitch, the thinnest or the thickest? _____________________________________________________________________________________ 2. Which fret allows you to vibrate a longer part of the string, A or B? _____________________________________________________________________________________ 3. Which fret gave you the higher pitch, A or B? _____________________________________________________________________________________ 4. Since higher frequency gives you higher pitch, how can you relate the length of string and the frequency of sound waves? __________________________________________________________________________________________________________________________________________________________________________ 5. What happened to the pitch of the sound when you tightened the string? _____________________________________________________________________________________ CONCLUSION: Give the relationship between pitch and diameter, length, and tension of the string.
A
B

47 Grade 8 Science Laboratory Manual
Grade 8 Science
Name: Date:
Moderator: Cluster/Group:
Experiment # _____
Light and Colors OBJECTIVES:
To demonstrate the existence of the color components of visible light
To relate energy the angle made by the colors
To demonstrate physical skills in throwing a ball using different amounts of force MATERIALS: prism flashlight table tennis ball or any small ball that bounces manila paper bond paper marker (rainbow colors) dark room masking tape PROCEDURES: A. 1. Focus the flashlight on a prism and observe. You may turn the prism in different ways to get a better observation. 2. Record your detailed observations on your activity sheet. Indicate how bent the colors are. B. 1. From procedure A, take note of the colors observed and their order. 2. Look for an area where you and your group members can play ball. You should be facing a wall. 3. Post your manila paper on the wall. Make sure that your manila paper is thick enough to avoid markings on the wall and it should reach the floor. 4. Use a masking tape to mark a point three feet from the wall. This is where your ball should bounce. 5. Make the ball bounce towards the wall. Assign a member to draw a mark where the ball hits the wall. GUIDE QUESTIONS: 1. Give the colors in order from bottom to top. 2. Look at your manila paper and compare it to your observations in questions #1. What did you do to obtain the lowest mark on your manila paper? __________________________________________________________________________________________________________________________________________________________________________ 3. What did you do to obtain the highest mark on your manila paper? __________________________________________________________________________________________________________________________________________________________________________ CONCLUSION: Based from your observations, give a conclusion about the energy of the colors and relate it to how much they were bent.

48 Grade 8 Science Laboratory Manual
Grade 8 Science
Name: Date:
Moderator: Cluster/Group:
Experiment # _____
The Primary Colors of Light OBJECTIVES:
To demonstrate color addition of light
To give the difference between colors of light and colors of pigments MATERIALS: flash light with white light bulb red, green, and blue cellophane red, green, and blue light bulbs (optional) PROCEDURES: 1. Predict the color that will be produced by adding the colors found on the table and write your answers under “Prediction”. 2. Use the flashlight and the cellophanes to add colors and record their results under “Actual Color”. DATA:
Colors Prediction Actual Color
Red only
Green only
Blue only
Red + blue
Red + green
Blue + green
Red + green + blue
GUIDE QUESTIONS: 1. Were your predictions the same as the actual colors? _____________________________________________________________________________________ 2. What are the three primary colors of light? _______________________________________________________________________________________________________________________________________________________________________________________________________________________________________________________________ 3. Give the difference between the colors of light and the colors of pigments. _______________________________________________________________________________________________________________________________________________________________________________________________________________________________________________________________ CONCLUSION: APPLICATION: Based from what you’ve learned in the colors of light, how many colors of light bulb would you buy if you decide to build your own stage? Explain your answer.

49 Grade 8 Science Laboratory Manual
Grade 8 Science
Name: Date:
Moderator: Cluster/Group:
Experiment # _____
Heat and Phase Change OBJECTIVES:
To determine the changes in temperature of materials undergoing phase change
To make a temperature vs. time graph of a material undergoing phase change MATERIALS: Beaker or evaporating dish Iced distilled water Liquid distilled water Hot plate Thermometer Graphing paper PROCEDURES: 1. Place one ice cube in a beaker/ dish and measure its temperature. Record your answer in a table. Note: In measuring the temperature, make sure that the tip touches the substance and not the container. 2. Place the beaker/ dish on a hot plate and heat it. Take note of the time started. Wait until the ice starts melting then measure its temperature. Constantly check the temperature of the substance. 3. Wait until the liquid reach its boiling point and starts boiling. Take note of the time. DATA:
Time (min) Temperature (°C) Phase
0 Solid
(Add more rows if necessary.) GUIDE QUESTIONS: 1. What happens to the temperature of the substance as you heat it? __________________________________________________________________________________________________________________________________________________________________________ 2. What did you observe about the temperature as the substance changes its phase? __________________________________________________________________________________________________________________________________________________________________________ 3. Once phase change is complete, what happens if you continue heating the substance? __________________________________________________________________________________________________________________________________________________________________________ 4. Make a temperature vs. time graph of the substance as it changes its phase. CONCLUSION: ____________________________________________________________________________________________________________________________________________________________________________________________________________________________________________________________________________________________________________________________________________________

50 Grade 8 Science Laboratory Manual
Grade 8 Science
Name: Date:
Moderator: Cluster/Group:
Experiment # _____
Cooling Curve OBJECTIVES:
To plot a cooling curve for water
To determine how temperature difference affects the rate of cooling MATERIALS: Thermometer hot water (above 95 °C) 100 mL beaker Stirrer stopwatch alcohol lamp PROCEDURE: 1. Read and record the room temperature. 2. Half-fill the small beaker with hot water. Place the thermometer in the water. 3. Read the temperature of the hot water. 4. Allow the beaker of water to cool. 5. Starting at 90 °C, read and record the temperature every minute until the temperature drops to 50 °C. 6. The hot water in the beaker should be carefully stirred throughout the experiment. 7. Plot the graph of temperature against time. DATA:
Time (min) Temperature (°C)
0 90
(Add more rows if necessary.) GUIDE QUESTIONS: 1. What is the time taken for the temperature to drop from 90 °C to 80 °C? ____________________ 2. What is the time taken for the temperature to drop from 80 °C to 70 °C? ____________________ 3. What is the time taken for the temperature to drop from 70 °C to 60 °C? ____________________ CONCLUSION: Based from your answers in the guide questions, what conclusion can you draw regarding the rate of cooling? ____________________________________________________________________________________________________________________________________________________________________________________________________________________________________________________________________________________________________________________________________________________ Source: Chew, C. 2007. GCE `O` Level PHYSICS Matters. Marshall Cavendish International.

51 Grade 8 Science Laboratory Manual
Grade 8 Science
Name: Date:
Moderator: Cluster/Group:
Experiment # _____
Simple Circuit OBJECTIVES:
To make a simple circuit
To classify the materials that can be used to create a circuit MATERIALS: Copper wire Rubber band Batteries Light bulbs Coin Alligator clips Electrical tape Strips of paper Aluminum foil strips Wooden stick Plastic spoon ILLUSTRATION:
PROCEDURES: 1. Construct a circuit by using the materials given. Connect the positive terminal of the battery to the light bulb by using a copper wire and secure them using an electrical tape. 2. Try using the rest of the materials by using them to connect the light bulb and the negative terminal of the battery. Use electrical tape to secure your circuit. DATA: Complete the table by drawing a check mark on the box beside the material that allows the conduction of charges.
Material Conduction
Copper wire
Rubber band
Coin
Alligator clip
Wooden stick
Strips of paper
Aluminum foil strips
Plastic spoon
GUIDE QUESTIONS: 1. What are the requirements in order to make a successful circuit? _______________________________________________________________________________________________________________________________________________________________________________________________________________________________________________________________

52 Grade 8 Science Laboratory Manual
2. Have you done a circuit that failed to work? If so, write the reasons why your circuit failed. _______________________________________________________________________________________________________________________________________________________________________________________________________________________________________________________________ 3. Which material allows the conduction of charges? _______________________________________________________________________________________________________________________________________________________________________________________________________________________________________________________________ 4. How can you tell if the material allows conduction? _______________________________________________________________________________________________________________________________________________________________________________________________________________________________________________________________ 5. What are the similarities of the materials that can conduct charges? _______________________________________________________________________________________________________________________________________________________________________________________________________________________________________________________________ 6. What happens if one of the materials is not connected properly? _______________________________________________________________________________________________________________________________________________________________________________________________________________________________________________________________ CONCLUSION: ____________________________________________________________________________________________________________________________________________________________________________________________________________________________________________________________________________________________________________________________________________________ APPLICATION: Explain how current through our body lessens with protective boots and gloves.
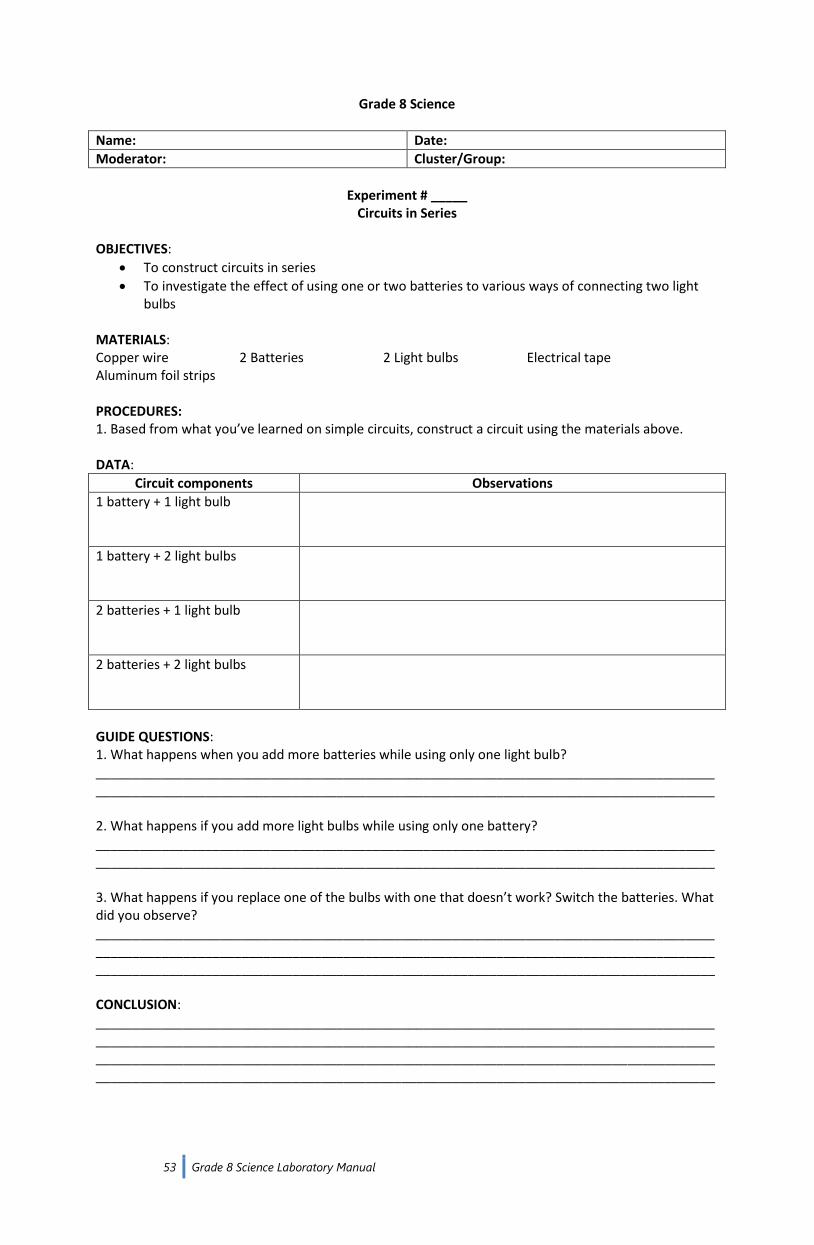
53 Grade 8 Science Laboratory Manual
Grade 8 Science
Name: Date:
Moderator: Cluster/Group:
Experiment # _____
Circuits in Series OBJECTIVES:
To construct circuits in series
To investigate the effect of using one or two batteries to various ways of connecting two light bulbs
MATERIALS: Copper wire 2 Batteries 2 Light bulbs Electrical tape Aluminum foil strips PROCEDURES: 1. Based from what you’ve learned on simple circuits, construct a circuit using the materials above. DATA:
Circuit components Observations
1 battery + 1 light bulb
1 battery + 2 light bulbs
2 batteries + 1 light bulb
2 batteries + 2 light bulbs
GUIDE QUESTIONS: 1. What happens when you add more batteries while using only one light bulb? __________________________________________________________________________________________________________________________________________________________________________ 2. What happens if you add more light bulbs while using only one battery? __________________________________________________________________________________________________________________________________________________________________________ 3. What happens if you replace one of the bulbs with one that doesn’t work? Switch the batteries. What did you observe? _______________________________________________________________________________________________________________________________________________________________________________________________________________________________________________________________ CONCLUSION: ____________________________________________________________________________________________________________________________________________________________________________________________________________________________________________________________________________________________________________________________________________________

54 Grade 8 Science Laboratory Manual
Grade 8 Science
Name: Date:
Moderator: Cluster/Group:
Experiment # _____
Parallel Circuits OBJECTIVES:
To construct parallel circuits
To investigate the advantage of using parallel wiring at home MATERIALS: Copper wire 2 Batteries 2 Light bulbs Electrical tape Aluminum foil strips PROCEDURES: 1. Based from what you’ve learned on simple circuits, construct a parallel circuit using the materials above. Try different ways on constructing a circuit by rearranging the materials, or adding/removing some materials. You do not have to use everything. DATA: Take note of the successful trials and draw them in the box below.
GUIDE QUESTIONS: 1. What are the differences between a series and parallel circuits? _______________________________________________________________________________________________________________________________________________________________________________________________________________________________________________________________ 2. Try replacing one light bulb with a bulb that doesn’t work. Try switching their places. What did you observe? __________________________________________________________________________________________________________________________________________________________________________ 3. What is the advantage of using a parallel circuit? __________________________________________________________________________________________________________________________________________________________________________ CONCLUSION: _______________________________________________________________________________________________________________________________________________________________________________________________________________________________________________________________ APPLICATION: Discuss what will happen if the wirings in houses and establishments are in series. _______________________________________________________________________________________________________________________________________________________________________________________________________________________________________________________________

55 Grade 8 Science Laboratory Manual
Grade 8 Science
Name: Date:
Moderator: Cluster/Group:
Experiment # _____
Occurrence of Earthquakes OBJECTIVE:
To determine the places where most earthquakes frequently occur MATERIALS: World map Bond paper Pencil
Coloring pencil or any coloring materials PROCEDURES: 1. Make a blank world map (showing only the outlines of the continents). 2. Identify the places considered weak areas of the earth’s crust. 3. With a coloring pencil shade the places in the world map which you identified. GUIDE QUESTIONS: 1. Name the places near the Pacific where large earthquakes often occur. _______________________________________________________________________________________________________________________________________________________________________________________________________________________________________________________________ 2. Name the two belts on the globe where earthquakes occur most frequently. _______________________________________________________________________________________________________________________________________________________________________________________________________________________________________________________________ 3. Name the places in the Atlantic which comprise the second belt. _______________________________________________________________________________________________________________________________________________________________________________________________________________________________________________________________ 4. Explain the occurrence of frequent earthquakes in the Philippines. _______________________________________________________________________________________________________________________________________________________________________________________________________________________________________________________________ 5. Do earthquakes also occur outside the earthquake belts? Why? Why not? _______________________________________________________________________________________________________________________________________________________________________________________________________________________________________________________________ CONCLUSION:

56 Grade 8 Science Laboratory Manual
Grade 8 Science
Name: Date:
Moderator: Cluster/Group:
Experiment # _____
Asteroid Models OBJECTIVES:
To make asteroid models
To differentiate asteroids from meteors and comets
To display creativity and team work MATERIALS: Astronomy books old newspapers or scrap papers Scrap nails and stones dye or paint Water glue PROCEDURES: 1. From astronomy books, find out the relative sizes of the following asteroids: Ceres, Pallas, Vesta, Juno, Icarus, Chiron, Eros, and Hidalgo. 2. Scale their values, in terms of centimeters. These values will serve as the size of the asteroid nucleus. 3. Select among the scrap nails or stones the more suitable material to represent the nucleus of the asteroid model. 4. Get the scrap papers and soak them up in water for a few minutes. 5. Wrap the nucleus with the soaked papers and mold the paper maché model. 6. Let the models stand for 2 days to dry before painting them up according to the color type. GUIDE QUESTIONS: 1. What makes asteroids different from comets and meteors? _______________________________________________________________________________________________________________________________________________________________________________________________________________________________________________________________ 2. What is the importance of creating an asteroid model? _______________________________________________________________________________________________________________________________________________________________________________________________________________________________________________________________ CONCLUSION: