good vibrations - phoenix symphony
TRANSCRIPT

[1]
GOODVIBRATIONS

[2]
TABLE OF CONTENTSAcademic Content Connections.............................................................3
Vibration = Sound...........................................................................................4
Amplitude = Dynamics.................................................................................5
Frequency = Pitch...........................................................................................6
Amplification: 101...........................................................................................7
Families of the Symphony Orchestra..................................................8
Review Quiz........................................................................................................10
Lesson Plans......................................................................................................11
“Sound = Vibration”..............................................................................11
“Engineering Musical Instruments”...........................................12
“Understanding Music Through Scientific Inquiry”........14
STUDY GUIDE DEVELOPED BY:JARRAD BITTNER, EDUCATION ASSISTANTJORDAN DRUM, INTERM DIRECTOR OF EDUCATION AND COMMUNITY ENGAGEMENTERICA LOW, OPERATIONS INTERN

[3]
AZ Music Standards:MU-ST1-CO1: Singing, alone and with others, music from various genres and diverse culturesMU-ST2-CO1: Understanding the relationships between music and other disciplines outside the artsMU-ST2-CO2: Understanding music in relation to history and cultureMU-ST3-CO1: Listening to, analyzing, and describing music
AZ Science Standards:SC-ST1-CO1: Observations, Questions and Hypotheses: Observe, ask questions, and make predictionsSC-ST1-CO2: Scientific Testing: Participate in planning and conducting investigations and recording dataSC-ST5-CO1: Properties of Objects and Materials: Classify objects by their observable propertiesSC-ST5-CO3: Energy and Magnetism: Investigate different forms of energy
ACADEMIC CONTENT
CONNECTIONS
Humans tend to divide their learning into subjects labeled “math” or “literature.” In school, we rarely explore the connections between those subjects, but when we mix them together, we can get interesting and fruitful results. In this guide, we will study the connections between music and science, how they’re related and how they can explain one another.
The topics explored in this guide are only a small sample of those involving music and science. As scientific frontiers are crossed and further horizons identified, brand new possibilities for musical applications are discovered.
Albert Einstein once said, “The greatest scientists are musicians as well.” The connections between the two subjects are too interesting not to explore. And with that in mind, let’s start examining the science behind our program, Good Vibrations.
Neuroscientists are delving into our brains to explore how music and sounds affect us, while
electronics and computers are constantly changing the way
we produce and consume music.

[4]
In the third movement of his fourth symphony, Tchaikovsky wanted a very distinctive sound from the string section. This distinct sound, know as pizzicato, is created when a string player plucks the strings on their instrument. The plucking action causes the string to vibrate and create sound. All sound, from a baby’s cry to an airplane engine, is produced through vibration.
HOW DOES THIS WORK?
Once the string is plucked, it vibrates and causes tiny particles in the air, known as air molecules, to move around and bump into each other. As this motion continues, a ripple pattern of compacted air molecules develops.
The compacted air molecules are known as compressions, whereas the space between them is known as a rarefaction. The compressions and rarefactions are often visualized by drawing a diagram of waves. The high peaks are the compressions, and the low valleys are the rarefactions.
TCHAIKOVSKY1840-1893
Piotr Ilyich Tchaikovsky started taking piano lessons in his youth, but he was never considered to have any special musical talents. His parents pushed him to pursue a career outside of music, but his passion for music was too strong. At the age of 23, Tchaikovsky decided to quit his day job as a civil servant and dedicate the remainder of his life to music. After he completed his musical studies at the St. Petersburg Conservatory as a student of Anton Rubenstein, Tchaikovsky accepted a teaching position at the Moscow Conservatory. Tchaikovsky went on to write over 70 works and is now considered to be one of the most influential composers of the 19th Century.
A cycle is one compression and one rarefaction.
VIBRATION = SOUND
Vibration can be defined simply
as the back-and-forth movement of an
object.
Compression
Rarefaction

[5]
In the diagram above, notice how the waves on the left are much taller than the waves on the right. The difference is due to an increase of energy in the left diagram. If you imagine these waves as rubber balls bouncing, the left would bounce much higher than the right because it has more energy. If these were sound waves, the taller wave on the left would
have higher amplitude and would sound louder than the shorter one to the right.
In music, we use the term dynamics to express how soft or loud music is performed. The dynamic range of an orchestra can be from pianissimo (pp), which is very soft and has low
amplitude (short wave), to fortissimo (ff), which is very loud and has high amplitude
(tall wave).
VOLUME IS MEASURED IN DECIBELS
(db)
Diagram 2
Am
plitu
de
pp (very soft) (very loud) ff
Am
plitu
de
Am
plitu
de
Diagram 1
AMPLITUDE = DYNAMICS
DYNAMICS = VOLUME OF THE
ORCHESTRA
DID YOU KNOW?A SOUND WAVE CAN BEND
AROUND CORNERS; THIS IS KNOWN AS
DIFFRACTION.

[6]
FREQUENCY= PITCH
Diagram 3
Am
plitu
de
LOW PITCH HIGH PITCH
Take a look at Diagram 1 again. Notice how the wave on the right has more peaks and valleys in the same amount of space as the one on the left? If we were to move across each wave horizontally at the same speed, the one with more motion (right) would cause vibrations that are much faster than the one with less (left). Since waves repeat more frequently, we would say the wave on the right has a higher frequency. The frequency of a sound wave determines its pitch, which is how high or low a sound is. The wave on the left would make a lower pitch than the one on the right. We measure frequency by determining how many waves pass by a point in one second. Frequency is measured in cycles (compressions paired with rarefactions) per second.
Am
plitu
de
Am
plitu
de
Diagram 1
Antonio Vivaldi was a prolific composer, writing over 350 concertos for solo instruments in his lifetime. He garnered the nickname “Red Priest” due to his ordained status and his bright red hair (hidden by a wig in the picture above). Vivaldi worked for many years at the hospice of Compassion, an orphanage for girls in Venice, Italy. He did achieve some fame in his life and even became a favorite of the Holy Roman Emperor Charles VI, who gave him a gold medal and knighted him after hearing Vivaldi’s Concerto La Cetra.
Although he lost some prestige later in life, Vivaldi is now one of the most well-
know Baroque composers. The Four
Seasons remains his most popular work.
Hertz =
cycles per
second
5.5 Cycles3 Cycles

[7]
AMPLIFICATION: 101
Imagine you’re at a rock concert. Thousands of people are in attendance and everyone is talking, yelling, cheering and clapping. Despite all that noise, you can clearly hear the music coming from the stage. Have you ever wondered how this occurs? The reason that you can hear the instruments and singers above all the noise is because they have been amplified. In other words, something has increased the amplitude, or energy, in the sound waves coming from the instruments and singers so you can hear them further away.
Like the electric guitar of the rock band, an electric violin is also amplified. A machine called an amplifier takes the waves from the electric violin and increases the amplitude of the waves by adding electricity (energy) to the wave. Unlike the regular violin, an electric violin has a very sensitive device called a pick-up that converts the strings vibrations into an electrical wave and sends it to the amplifier.
A speaker takes the electrical waves from the amplifier and translates them into waves that we can hear by vibrating the air. The center of each speaker moves back and forth. If you were to put your hand on one, you could feel the vibrations. The big speakers make slower vibrations, resulting in low sounds with low frequencies, and the smaller speakers move much faster, creating higher-pitched sounds.
If you look at a big speaker up close,
you may be surprised at how slowly it moves.
(Be sure to wear your earplugs!)
Smoke on the Water was released by the British rock band, Deep Purple, in 1972. The title and lyrics have an interesting story behind them. During a Frank Zappa concert at the Montreux Jazz Festival in Switzerland, someone fired a flare gun and caught a building on fire. The smoke spread out over Lake Geneva, and the band was inspired to write a song about it. This song is now considered to be one the greatest songs of the rock genre.
Violin String
Amplifier
Pick-up
Speaker
[8]
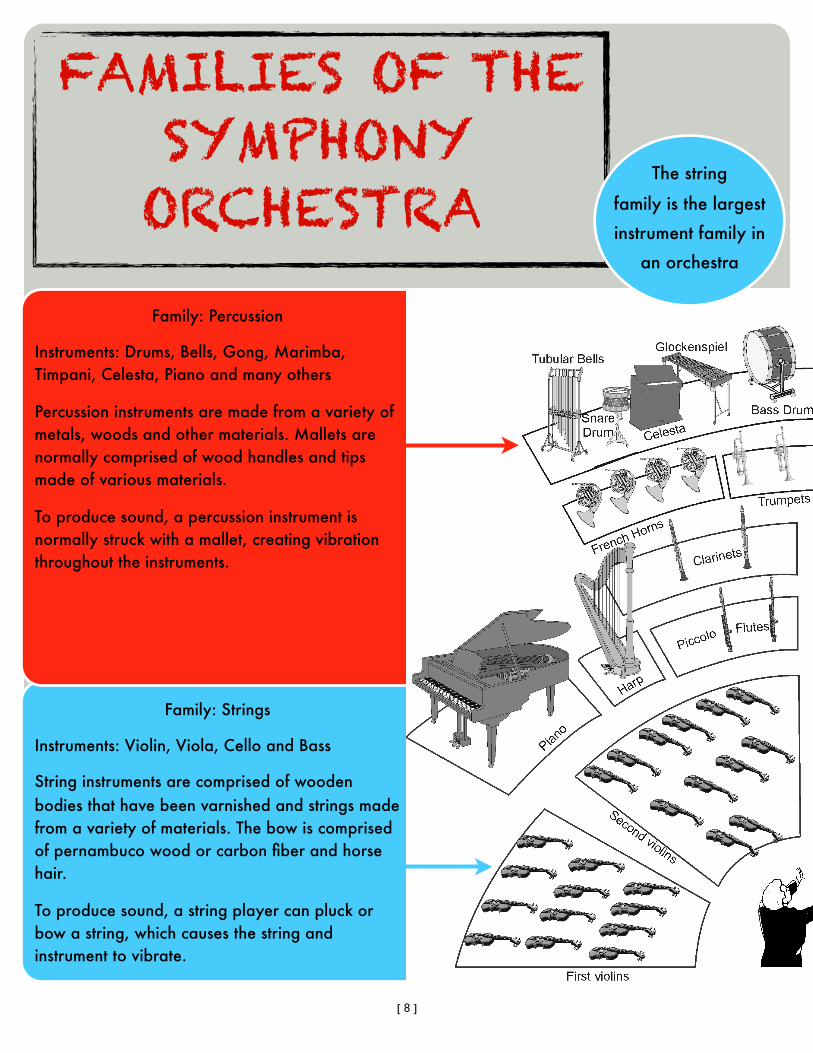
Family: Percussion
Instruments: Drums, Bells, Gong, Marimba, Timpani, Celesta, Piano and many others
Percussion instruments are made from a variety of metals, woods and other materials. Mallets are normally comprised of wood handles and tips made of various materials.
To produce sound, a percussion instrument is normally struck with a mallet, creating vibration throughout the instruments.
Family: Strings
Instruments: Violin, Viola, Cello and Bass
String instruments are comprised of wooden bodies that have been varnished and strings made from a variety of materials. The bow is comprised of pernambuco wood or carbon fiber and horse hair.
To produce sound, a string player can pluck or bow a string, which causes the string and instrument to vibrate.
FAMILIES OF THE SYMPHONY ORCHESTRA
The string
family is the largest
instrument family in
an orchestra

[9]
The Brass Family
Instruments: Trumpet, French Horn, Trombone and Tuba
Brass instrument are comprised of brass bodies, often plated with lacquer, gold or silver.
To produce sound, musicians must vibrate their lips by blowing air into a cup or funnel shaped mouthpiece. The vibration in the mouthpiece sends vibrating air throughout the instrument.
Family: Woodwinds
Instruments: Flute, Oboe, Clarinet, and Bassoon
Flutes are made of silver-plated brass, and produce sound by blowing air over an opening.
Clarinets are made of wood with metal keys and are classified as single reed instruments. To produce sound, air is blown into a mouthpiece made of plastic and a single reed. The air causes the reed to vibrate and send vibrating air through the instrument.
Oboes and Bassoons are comprised of wood with metal keys and are classified as a double reed instruments. To produce sound, air is blown into two reeds tied together. The air causes the reeds to vibrate and send vibrating air through the instrument.
Benjamin Britten was an Englishman who could compose, play piano and viola by age 10. He attending the Royal College of Music, where he won many awards. His first professional venture was to write film music for the General Post Office. Britten traveled to the United States just before World War II, and stayed there until the war was over. After returning to Europe, he toured in Germany to perform for concentration camp victims, which deeply affected him. He composed The Young Person’s Guide to the Orchestra shortly after this, as well as the majority of his operas. Only Puccini and Strauss composed more operas than Britten in the twentieth century.

[10]
GOOD VIBRATIONSREVIEW
1. What is a cello made of?a. Brassb. Silverc. Woodd. Horse Hair
2. In music, we refer to amplitude as:
a.Pitchb.Dynamicsc. Frequencyd.Pick-up
3. What does an electric violin have that a standard violin doesn’t?
a.Varnishb.Bowc. Stringsd.Pick-up
4. A violin can create vibrations by?
a. Plucking a stringb. Buzzing into a
mouthpiecec. Blowing air between two
reedsd. Increasing frequency
5. A tuba is in what family of instruments?
a. Stringsb. Brassc. Percussiond. Woodwind
6. A pitch that sounds higher would have?
a. Tall wavesb. Many wavesc. High amplituded. Short waves
7. In music, we refer to frequency as:
a. Dynamicsb. Pitchc. Cyclesd. Amplitude
8. What is the largest family of instruments in an orchestra?
a. Brassb. Woodwindc. Stringd. Percussion
9. What would be soft dynamic level?
a. A sound wave with a low amplitude
b. A sound wave with with a high amplitude
c. A sound wave with many compressions
d. A sound wave with few rarefactions
10. What college did Benjamin Britten attend?
a. Juilliardb. Arizona State Universityc. The Royal College of Musicd. The Guildhall School
ANSWERS c, b, d, a, b, b, b, c, a, c

[11]
Grades: 1-6
Time: one class period
Arizona Music Standards:ST1, CO2, PO2, Grade 1: playing sounds that are loud/soft, fast/slow, high/low.ST1, CO5, PO1, Grade 1: recognizing melodic movement as up and down.ST2, CO1, PO1, Grade 6: identify & describe ways in which the principles and subject matter of other disciplines are related to music.ST2, CO1, PO2, Grade 5: Explain the nature of sound as vibration. Arizona Science Standards:ST5, CO3, PO3, Grade 3: Demonstrate that vibrating objects produce sound.ST5, CO3, PO4, Grade 3: Demonstrate that the pitch of a sound depends on the rate of vibration. Objective:Demonstrate that all sound is created through vibrationIdentify a sound wave and be able to understand the concepts of amplitude and frequency. Materials:-slinky(s) Procedure:Begin by asking the students how sound is created. Have all of the students hum a unison pitch (middle C on the piano might be a good note to use). While they are humming, have them place their hands on their throat. Explain that the sound they are making is being created through vibration. Next, have the students hum both higher/lower and softer/louder and ask them what they are observing. Faster vibrations make higher sounds, while slower vibrations make lower sounds. High-energy vibrations are louder than low-energy vibrations. (could give them a page of visuals for this: four pictures, on with high-frequency, high amplitude; high-frequency, low amplitude; low-frequency, high amplitude; low frequency, low amplitude.) Have two students hold the slinky, one on each end. Have one student move their end up and down until a wave form begins to take shape (some assistance may be required). This is a visual representation of asound wave. Point out different parts of the wave, including tall peaks and low valleys. Lastly, have the students stretch and compact the slinky while continuing to make a wave. Ask what they are noticing. Are the waves larger or smaller? Are there more waves occurring along the slinky? Compare thevariations in the slinky movement to what the students observed while humming. Culminating activity:Have each student come in front of the class and create different waves on the slinky. Have the students in class hum what is being displayed in the slinky.
Vocabulary to include for advanced students or higher grade levels:-Compressions, Rarefactions, Amplitude, Frequency, Cycles and Hertz
SOUND = VIBRATIONLESSON PLAN

[12]
Time: one to four class periods
Grades: 2-6
Arizona Music Standards:ST1, CO2, PO2, Grade 1: Playing sounds that are loud/soft, fast/slow, high/lowST1, CO2, PO3, Grade 2: Playing with correct rhythmic duration including quarter notes, either notes and quarter restsST2, CO1, PO2, Grade 6: Describing the effect an instrument’s physical properties will have upon its soundST2, CO1, PO2, Grade 5: Explain the nature of sound as vibration
Arizona Science Standards:ST5, CO3, PO3, Grade 3: Demonstrate that vibrating objects produce soundST5, CO3, PO4, Grade 3: Demonstrate that the pitch of a sound depends on the rate of vibrationST5, CO2, PO2, Grade 5: Describe effects forces can have on an objectST5, CO2, PO3, Grade 5: Examine forces and motion through investigations using simple machinesST5, CO3, PO3, Grade 5: Demonstrate effects of variables on an object’s motion
Objective:Demonstrate that all sound is created through vibration.Identify the different families of musical of instrument and understand how each instrument creates vibrations (sound).Engineer instruments from each of the musical families.
Materials:
Brass instrument-large plastic soda bottle-12” garden hose-Tape
Woodwind instrument -plastic soda bottles in varying sizes-water
String instrument -empty tissue box-rubber bands in varying size/length-paper-towel tube-tape
Percussion instrument-empty aluminum cans-balloon-rubber-bands
Activity One, The Brass Instrument:
Before class, take the soda bottles and cut the top off below the threading and the bottom base. The top end will become the mouthpiece of the instrument and the remainder (minus the base) will become the bell.
If you have instruments or pictures available, begin by showing the students the different parts of a brass instrument. Ask you students to predict how sound is made. Reinforce the concept that sound is created by vibration (see page 4).
Once the discussion on brass instruments has been completed, pass out the materials to the students. To create the instruments, take the top of the bottle, which was previously separated from the bottle, and tape it to one end of the hose. At this point, explain that the bottle top will serve as the instruments mouthpiece. If possible, have a few real mouthpieces to demonstrate and pass out to the students.
Next, attach the bottom portion of the bottle to the hose with tape. This will serve as a the bell of the instrument. For advanced students, introduce the concept of amplification (see page 5 and 7). Have a few pictures of brass instruments, show them the varying bell size of each instrument. Ask the students why they think one is larger than the other.
Before the students play on their instruments, have them buzz their lips - this is how brass instruments produce sound. Practice off the instrument first, buzzing low then high. After a few minutes, have the students play the instrument they just created. Allow each student to play a few notes by themselves or in front of the class.
ENGINEERING MUSICAL INSTRUMENTS LESSON PLAN

[13]
Activity Two, The Woodwind Instrument:
If you have instruments or pictures available, begin by showing the students the different parts of a woodwind instrument. Ask you students to predict how sound is made in flutes, single reed and double reed instruments. Reinforce the concept that sound is created by vibration (see page 4).
Once the discussion on woodwind instruments has been completed, pass out the materials to the students. Each student should receive two bottles and a glass of water.
Demonstrate to the students how blowing air across the top of the bottle will create sound. Compare this to how a flute makes sound. Then have the students fill the second bottle with one inch of water. Ask them to predict what will happen to the pitch, then have them blow air across the top of each bottle - discuss what they observed.
Near the end of the activity, play a pitch on a piano and have the students try and match the pitch on their bottle by adjusting the water levels.
Activity Three, The Percussion Instrument:
Before class, make sure that there are no sharp edges on the aluminum cans.
If you have instruments or pictures available, begin by showing the students a few different instruments in the percussion family. Ask you students to predict how sound is made on each. Reinforce the concept that sound is created by vibration (see page 4).
Once the discussion on percussion instruments has been completed, pass out the materials to the students. To create the instrument, have each student place the balloon over the top of the aluminum can. Be sure it has been stretched tight (if any students have latex allergies, plastic wrap may substitute a balloon). If some students are having difficulty, assist them. Once the balloon has been stretched, use the rubber band to secure the balloon to the can, making sure it is very tight.
At this point, ask you student what percussion instrument this resembles. Will the size of the can affect the vibration? What about the tension of the balloon?
After this discussion has been completed, have the students use their fingers to tap the top of the drum. Pencils can also serve as mallets. Have your students copy rhythms that you demonstrate. At the end of class, have each student come to the front of class to play a rhythm they created.
Activity Three, The String Instrument:
If you have instruments or pictures available, begin by showing the students a few different instruments in the string family. Ask the students to predict different ways that sound can be made on a string instrument. Reinforce the concept that sound is created by vibration (see page 4).Once the discussion on percussion instruments has been completed, pass out the materials to the students. Next, tape the paper-towel roll to the base (long end) of the tissue box. The tissue box represents the neck of a string instrument. Ask the students what they think the neck does.
Finish the instrument by stretching several rubber bands over the tissue box opening. Ask the students why they think they think each instrument has an opening where the strings are plucked or bowed.
Have the students pluck the bands. Ask what they are observing. Which bands sound higher/lower and why? Then, have them rearrange the rubber bands so the top band is the highest sounding and the bottom is the lowest.
Allow all the students to spend some time playing and adjusting their instrument. Near the end of class, have each student present their instruments and name the different parts of a string instrument. If possible, have an instruments available so the students can compare their instruments to a real string instrument.
Note:If multiple actives are used by a single class, be sure that students are able to discuss the similarities and differences in the way each instrument creates sound and the components of each instrument family.

[14]
Time: 5-7 class periods Grades: 3-6
Arizona Music Standards:ST2, CO2, PO1, Grade 6: Identify and describe different ways in which the principles and subject matter of other disciplines are related to musicST2, CO2, PO3, Grade 4: identify the origins and development of instrumentsST, CO1, PO2, Grade 5: Explain the nature of sound as vibrationST2, CO1, PO2, Grade 6: Describing the effect an instrument’s physical properties will have upon its sound. Arizona Science Standards:ST2, CO1, PO2, Grade 5: Explain the nature of sound as vibrationST1, CO1, PO2, Grade 5: Formulate predictions in the realm of science based on observed cause and effect relationshipsST1, CO2, PO2, Grade 3: Plan a simple investigation based on the formulated questions Objective:Use the scientific inquiry process to enhance students understanding of music and science. Materials:-A variety of musical instruments-A/V equipment-Computer-Crafts for final project (for suggestions, see the Engineering Musical Instruments lesson plan)-Several rubber bands Procedure:Day One - Present a variety of different musical instruments to the class. If you created instruments in the engineering lesson, those instruments will work well. If not, talk to your music teacher about gathering several instruments. Have a class discussion to review the scientific inquiry process: observing, communicating, comparing, classifying, measuring, predicting, inferring, modeling and investigating. Compare and contrast instrument traits. Introduce the terms pitch, wavelength, frequency, vibration and range into this discussion. Day Two - Have students observe instruments of different musical families (string, brass, woodwind and percussion). Have them use their senses to classify the instruments into different musical families. Identify how each instrument family produces sound and how traits like size, color and shape affect or don’t affect the instrument’s sound. Day Three - Listen to different instruments and predict and infer what they are without looking. Compare and contrast the string length of a string instrument and how it affects the kind of sound made. A series of rubber bands looped together can serve as a large model of a string. Day Four - Have students make an instrument of their choice. They are to use information gained from previous lessons to design and create their instruments. Have student make an instrument diagram and record how they made their instrument Day Five - Have each student present and play their instrument to the class.
Understanding Music Through Scientific Inquiry