golden circle necklace requests…img2.tapuz.co.il/communafiles/46411734.pdfi’ve had a few...
TRANSCRIPT

Golden Circle Necklace Requests…
Posted on 10/29/2010 by Tina
I’ve had a few requests to send directions for my Golden Circle Necklace that Marcia
DeCoster so generously added to her gallery in her book Beaded Opulence, so I decided to
place them here.
This necklace is done in the right angle weave beading stitch. I step you through the
instructions but you mar find better instructions on the web.
Materials you’ll need:
10 lb Fireline in Smoke
Beading needles – Size 11, 12, 13 (depending on you/the size of the beads).
A - 510 4 mm Swarovski bicones in 1st color (gold aurum).
E – 100 3 mm Swarovski bicones in a 2nd color (mocha ab).
B - 8 mm hex
C - 11 mm triangle
D - 11 mm round
F - delicas
G - 15 mm round
Step 1 – Add four beads onto the needle (three bicones, one hex).

Step 2 – Tie the four beads into a circle and bring the needle out of the top middle A.
Step 3 – Go through the A on the side, then go through B.
Step 4 – Coming out of B (above) add B, C, B.
Step 5 – Take the needle through B, B, C.
Step 6 – Coming ouf of C (above) add C, D, C.

Step 7 – Coming out of C (above) go through 1st C, C, D.
Step 8 – Coming out of D (above) add D, F, D.
Step 9 – Coming out of D (above) go through 1st D, then D, then F.

Step 10 – Coming out of F (above) add F, G, F.
Step 11 – Coming out of F (above) go through top F, F, G.

Step 12 – Coming out of G (above) add G, G, G.
Step 13 – Coming out of G (above) go through top G and next 4 Gs.

Step 14 – Coming out of G (above) add 3 Gs.
Step 15 -Coming out of G (above) go through G on the side of first row and then through top
G, and add two Fs.

Step 16 – Coming out of F (above) go through side F on row 1, then through G, then through
F, F, and come out of D.
Step 17 – Coming out of D (above) add two Ds.
Step 18 – Coming out of D (above) go through F, D, and D.

Step 19 – Coming out of D (above) add two Cs.
Step 20 – Coming out of C (above) go down through C, D, and C.
Step 21 – Coming out of C (above) go through C and B, then add two Bs.

Step 22 – Coming out of B (above) go through C, B, and B, and add two As.
Step 23 – Coming out of A (above) go down A, through B, up A, and add two As and one B.

Step 24 – Coming out of B (above) go up A, and through two As, and then through two Bs.
Step 25 – Coming out of B (above) add C and B.
Step 26 – Coming out of B (above) go through two Bs, one C and add one C and one D.
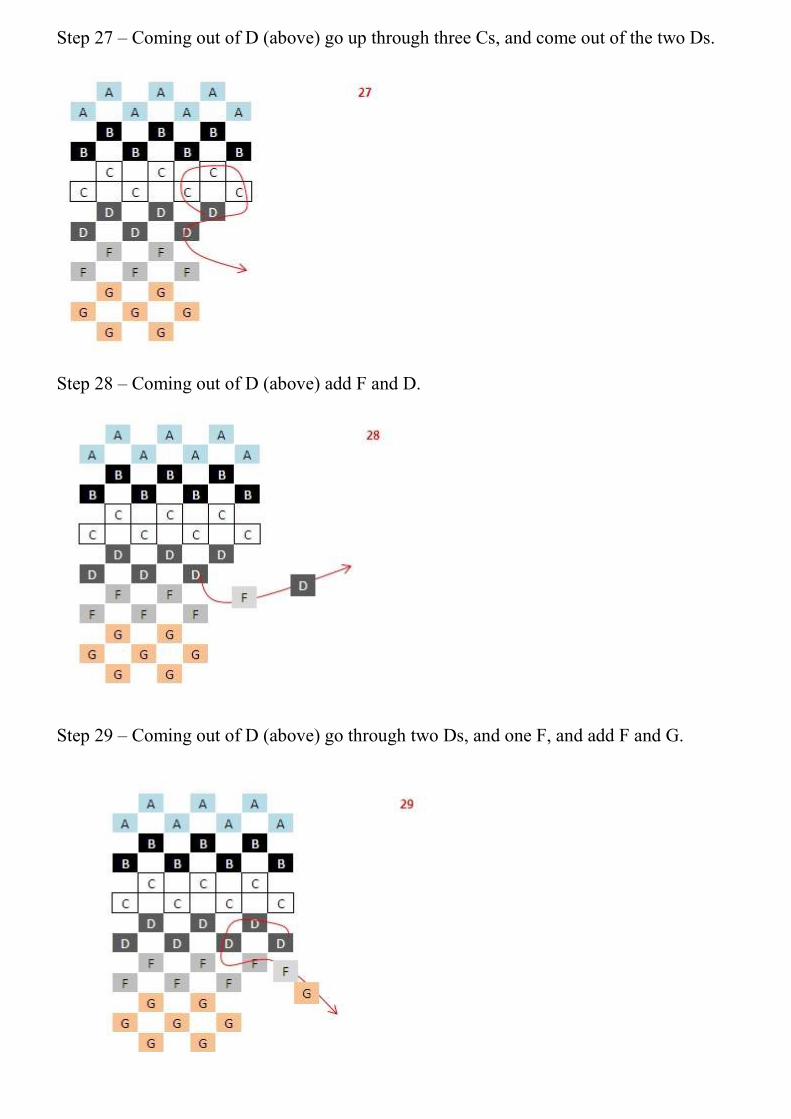
Step 27 – Coming out of D (above) go up through three Cs, and come out of the two Ds.
Step 28 – Coming out of D (above) add F and D.
Step 29 – Coming out of D (above) go through two Ds, and one F, and add F and G.

Step 30 – Coming out of G (above) go through three Fs, then through two Gs.
Step 31 – Coming out of G (above) add two Gs.

Step 32 – Coming out of G (above) go through top G and the next four Gs.
Step 33 – Coming out of G repeat steps 14 through 32 until you have 44 rows. The picture
below shows how because of the size of the beads a circle develops

Step 34 – Closing the circle…
Step 35 – Now make another circle. When you have two that are exactly alike place them
together like a sandwich aligning same bicones. The picture below shows both pieces aligned
and connected by the middle (dark) bicone . This is the only bead you’ll be adding using to
zip the two pieces together. It can be a different color or not.
Step 36 – Attaching one piece to the other piece by adding one bicone to connect a bicone
from one piece to the other piece. In the diagram below (top view of the two pieces together)
note bicone E (the new/other color), this is the one you will be adding.

Step 37 – Add bicone E and follow the needle/thread direction. Go through A, add E, go
through A, add E, go through A, go through E again, go through A.
Step 38 – when you have about one half of the circle done, get out some plastic wrap, it’s
hard to say how much I used so you have to fiddle with it and maybe cut some off as you fit
it to the inside of the circle. I think I used 5 layers and how ever many inches the circle turns
out to be. Stuff it in there and go back to adding bicones and shaping it into a nice even circle
each time you add a couple bicones. If lumpy try to smash it down, or you may have to cut
some off if you have too much stuffed in there. Continue until it’s all zipped up.
The Chain – I used all bicones in one with no clasp so it fits right over your head, the other I
used a graduated strand using the same beads as I used for the circle, this is the Golden
Circle at the top of this post.

RAW -הסבר מצוין ל
:מהאתר הזה
http://www.aroundthebeadingtable.com/Tutorials/RightAngleWeave.html
RIGHT-ANGLE WEAVE (RAW)
(copyright 2005 Deborah Roberti)
Right-angle weave, also called RAW, is one of the easiest stitches to
learn. When two needles are used, it is often called cross-weaving (because the threads cross in opposite directions through the beads) and
is the basic stitch used for Japanese-style beadwork where it is often
referred to as “Hachinoji-ami” or “Kousa-ami.”
Right-angle weave is so-named because of the way the beads lie at right
angles to one another. It is a very versatile weave and you can use any
types or sizes of beads, as well as combinations of beads of different
sizes and shapes to create different effects. If you want to learn more
about right-angle weave, get a copy of Christine Prussing’s Beading with Right Angle Weave.
To make it easier to explain right-angle weave, I’ve used green and
purple beads for this tutorial but you can use whatever colors you want.
Step 1: String a purple bead, a green bead, a purple bead and a green
bead.
Tie them together with a double knot, creating a four bead unit, which
could look like a circle or square, depending on what shape beads you
used:
Step 2: Continue back through a purple bead and exit out of a green bead (in either direction—it doesn’t matter):

Step 3: String a purple bead, a green bead and a purple bead.
Go around and back through the green bead you exited at the end of
Step 2 as in the diagram below:
This is the basic premise of right-angle weave—you always come back
around from where you last exited. If only life were that simple...
Step 4: Continue back on through the purple bead and exit out of the
green bead as in the diagram below:
Step 5: Continue on in this fashion (repeat Steps 3 and 4) until your
bracelet or necklace is the length you want it.
Step 6: To add additional rows, go through the top purple bead as in the
diagram below:

Step 7: String a green bead, a purple bead and a green bead.
Go around and back through the purple bead you exited in the last step:
This is the start of Row 2.
Step 8: Go up through the green bead on Row 2 as in the diagram
below:
Step 9: Here, I’m afraid, it gets tricky. String a purple bead and a green
bead.
Go down and through the purple bead on Row 1, and then up through the
green bead on Row 2 that you exited at the end of the last step:
Step 10: Continue on through the purple bead and the green bead on Row 2 that you strung in the last step, and then through the purple bead
on Row 1:

Step 11: String a green bead and a purple bead.
Go around and through the green bead on Row 2 that you exited from at the end of the last step. Continue on through the purple bead on Row 1:
Step 12: Continue on through the green bead on Row 2:
Repeat Steps 9 to 12 until you have completed the Row 2.
To add a third row, repeat Steps 6 to 12.
Once you get the hang of it, you can easily create different bracelets by using different colored beads: