godex label printer user guide...godex label printer user guide page 5 5. make sure the option to...
TRANSCRIPT

Updated: 1/30/2012 ©2012 Shelby Systems, Inc. All Rights Reserved
Other brand and product names are trademarks or registered trademarks of the respective holders.
User Guide

Godex Label Printer User Guide
Page 2
Table of Contents ............................................................................................ 2
Installing the Godex EZ-DT Printer .................................................................. 3
Unpacking the Printer ....................................................................................... 3
Connecting the Printer to a Workstation with the USB Cable ................................... 3
Loading the Printer Driver ................................................................................. 4
Loading the Label Paper Stock ........................................................................... 8
Installing the Godex HD90 Printer with Wireless Networking .......................... 9
Unpacking the Printer ....................................................................................... 9
Connecting the Printer to Your Network ............................................................... 9
Loading the Printer Driver ............................................................................... 14
Loading the Label Paper Stock ......................................................................... 21
Printing a Test and Calibrating the Printer ..................................................... 22
Configuring the Printer Driver ....................................................................... 23
Adjusting the Tear Position .............................................................................. 23
Adjusting the Stop Position for Operation with the Cutter Module .......................... 25
Configuring the Printer Driver to Print over the Network (Network Installation Only) 27
Configuring the Check In Receipt Design ....................................................... 30
Installing the Cutter Module (EZ-DT model only) ........................................... 36
Installing the Ethernet Networking Module (EZ-DT model only) ..................... 37
Installing the Control Center Software (for Network Installation Only) ......... 40
Godex Label Printer User Guide
Page 3
The Godex EZ-DT Printer comes with the following materials:
Quick Guide for unpacking, connecting, and loading paper into the printer.
Products Guide CD
USB cable
Power cables (2) – one is for international outlets and one for American outlets
Power adapter
Starter roll of 4” x 4” labels
Thermal printer
If you purchased the printer with the optional network adapter already installed, skip to the steps for Loading
the Printer Driver on the next page.
1. Remove all the packing tape from the thermal printer.
2. Make sure the printer power switch is in the off position.
3. Plug the power adapter into the printer.
4. Plug the power cable into the outlet and connect it to the power adapter.
5. Plug the USB cable into the printer.
6. Plug the other end of the USB cable into the workstation PC.
7. Turn on the Godex printer. Windows will detect the device but may not recognize it as a printer. Just
continue with the installation process to load the required driver.

Godex Label Printer User Guide
Page 4
1. Insert the Products Guide CD into the workstation PC. If you do not have the CD handy, the driver is
also available at http://godexintl.com/downloads.aspx?cid=14.
2. If the index.htm file opens automatically, click the Install Printer Driver link. All of the printers use the
same driver, so it does not matter which printer is visible on the web page when you click the link. If
the index.htm file does not open automatically, browse the CD to \Windows
Drivers\GodexWindowsPrinterDrivers.exe and run that program.
3. Accept the terms in the license agreement and click Next.
4. Accept the default directory or choose another location and then click Next.
Godex Label Printer User Guide
Page 5
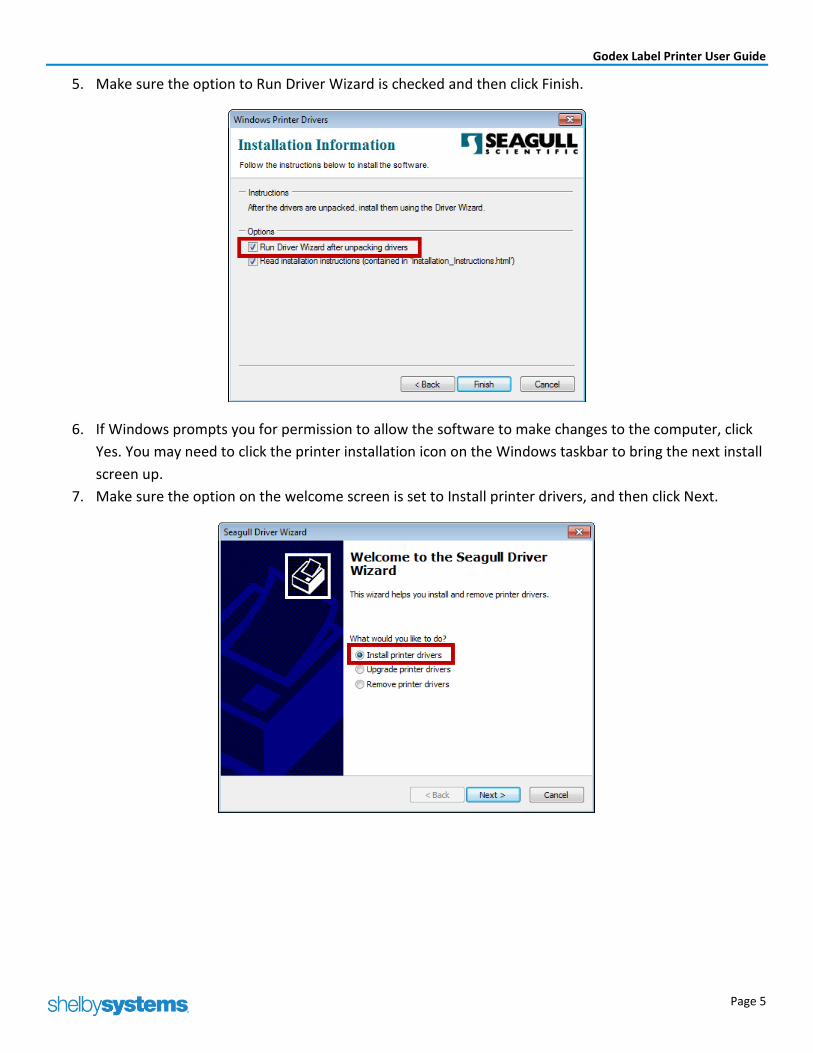
5. Make sure the option to Run Driver Wizard is checked and then click Finish.
6. If Windows prompts you for permission to allow the software to make changes to the computer, click
Yes. You may need to click the printer installation icon on the Windows taskbar to bring the next install
screen up.
7. Make sure the option on the welcome screen is set to Install printer drivers, and then click Next.
Godex Label Printer User Guide
Page 6
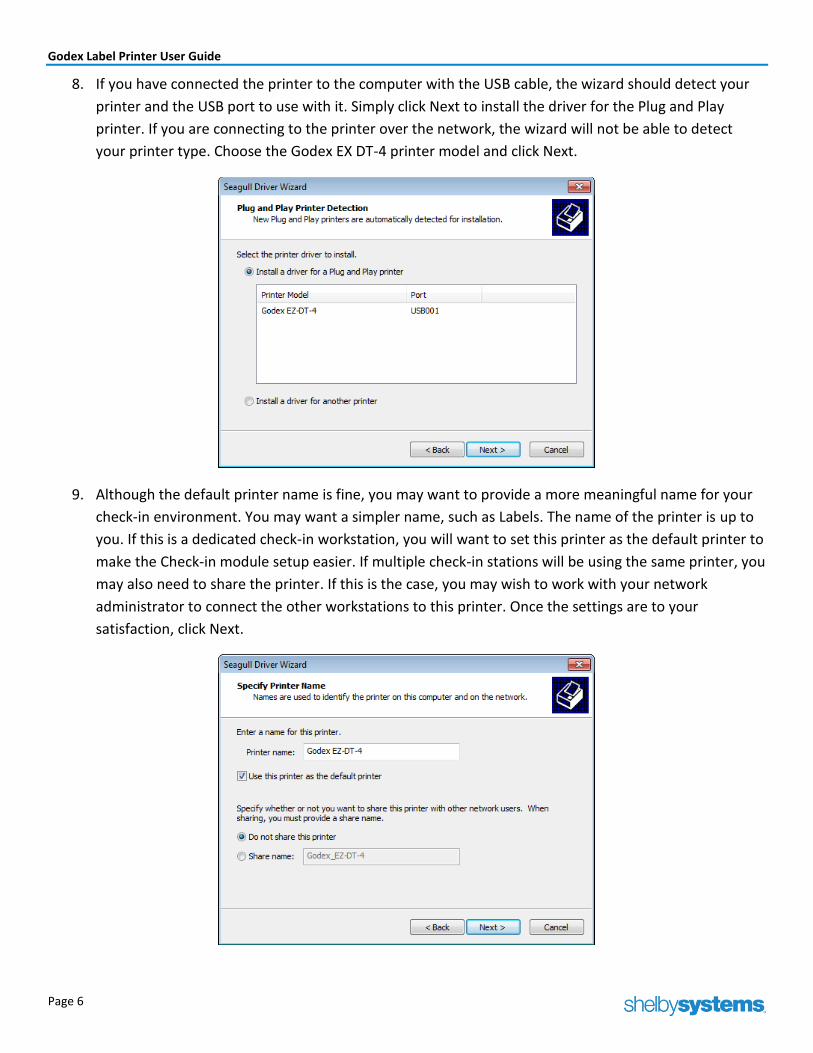
8. If you have connected the printer to the computer with the USB cable, the wizard should detect your
printer and the USB port to use with it. Simply click Next to install the driver for the Plug and Play
printer. If you are connecting to the printer over the network, the wizard will not be able to detect
your printer type. Choose the Godex EX DT-4 printer model and click Next.
9. Although the default printer name is fine, you may want to provide a more meaningful name for your
check-in environment. You may want a simpler name, such as Labels. The name of the printer is up to
you. If this is a dedicated check-in workstation, you will want to set this printer as the default printer to
make the Check-in module setup easier. If multiple check-in stations will be using the same printer, you
may also need to share the printer. If this is the case, you may wish to work with your network
administrator to connect the other workstations to this printer. Once the settings are to your
satisfaction, click Next.

Godex Label Printer User Guide
Page 7
10. Click Finish to allow the printer drivers to install.
11. Click Close to acknowledge that the drivers were installed.

Godex Label Printer User Guide
Page 8
1. Pull forward on the lower portion of the two tabs on either side of the cover to open the printer.
2. Pull up on the spool axle to release it from the latch.
3. The axle is set originally for a 1” core spool. It can also be switched to accommodate a 1.5” core spool
by flipping over the axle and turning it back to the original orientation across the printer. The sample
spool of labels that came with the printer is a 1” core spool.
4. Place the spool of labels on the axle so that the labels will feed forward toward the front of the printer.
5. Pull the two label guides apart and then feed the first label between them.
6. Once the first label has been fed between the guides, push them gently together until they are snug
with the label, but not pinching.
7. Close the lid of the printer so that it snaps back into place.
8. Press the yellow feed button on the top of the printer to set the printer for the next label to print.
There is a video illustrating how to load the label paper stock at
http://www.youtube.com/user/GodexInternational#p/u/3/I1PGZf4Rd_0.

Godex Label Printer User Guide
Page 9
The Godex HD90 printer comes with the following materials:
Quick Guide for unpacking, connecting, and loading paper into the printer.
Products Guide CD
USB cable (unused when you purchase the printer with wireless capability pre-installed)
Power cable
Power adapter
Starter roll of 4” x 4” labels
Thermal printer
Wireless antenna
Before you can configure the wireless LAN settings, you must connect the printer with a patch cable to your
network.
1. Install the Control Center software package, as described on page 40. The Control Center software will
enable you to configure the printer easily.
2. Remove all the packing tape from the thermal printer.
3. Make sure the printer power switch is in the off position.
4. Screw the wireless antenna into the antenna port on the lefthand side of the rear of the printer just
above the power switch.
5. Plug the power adapter into the printer.
6. Plug the power cable into the outlet and connect it to the power adapter.
7. Plug a network cable into the RJ-45 port on the printer.
8. Plug the other end of the network cable into a networking port for your LAN.
9. By default the printer is set to use DHCP, so it should receive an IP address assignment from your
DHCP server.
10. If it is not already open, open the Control Center software.

Godex Label Printer User Guide
Page 10
11. Your printer will appear as a “server” in the upper pane of the window. The default name of the printer
is GodexLAN.
12. .Click on the printer item in the upper pane to select it. This will automatically populate the lower pane
with details about the printer’s current network settings.
13. Click the Configure Server button on the toolbar to open the configuration window.
Godex Label Printer User Guide
Page 11
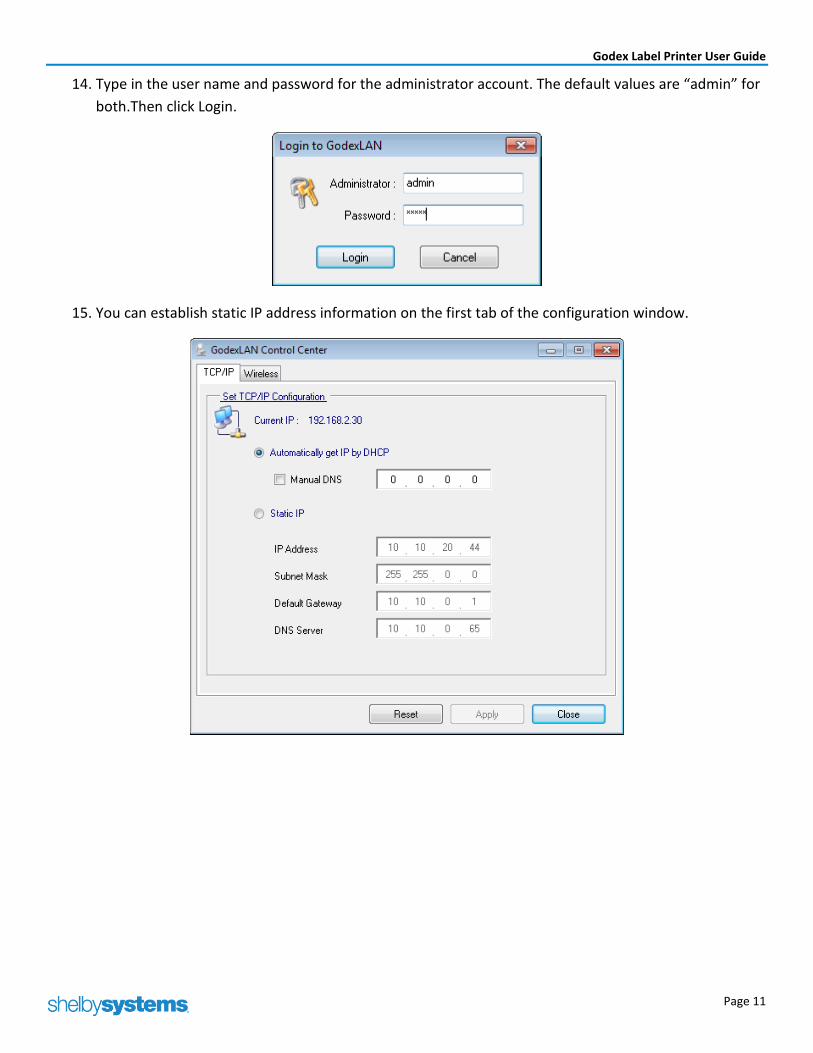
14. Type in the user name and password for the administrator account. The default values are “admin” for
both.Then click Login.
15. You can establish static IP address information on the first tab of the configuration window.

Godex Label Printer User Guide
Page 12
16. On the second tab of the configuration window you can establish wireless networking settings.
17. After entering your wireless networking information, click Apply.
18. Click OK on the warning that the server will reset.

Godex Label Printer User Guide
Page 13
19. Wait a few moments while the printer resets. You will first see this message:
And then you will see this message when the printer is back online:
20. Click Close to return to the Control Center main window.
21. Turn off the printer.
22. Unplug the network cable from the printer.
23. Turn the printer on.
24. Click Refresh Server List in the Control Center software. The printer should still be listed. If it is not,
reconnect the network cable and check your wireless networking settings and IP settings to be sure
they are correct.
25. Before you close the Control Center software, be sure you know the IP address of the printer. You
will need this information to configure the printer driver.
26. When you are able to see the printer through the wireless connection, close the Control Center
software.

Godex Label Printer User Guide
Page 14
1. Insert the Products Guide CD into the workstation PC. If you do not have the CD handy, the driver is
also available at http://godexintl.com/downloads.aspx?cid=14. Download the Seagull Scientific
Windows Driver that is specifically for the HD90 printer.
2. If the index.htm file opens automatically, click the Install Printer Driver link. If the index.htm file does
not open automatically, browse the CD to \Windows Drivers\GodexWindowsPrinterDrivers.exe and
run that program.
3. Accept the terms in the license agreement and click Next.
4. Accept the default directory or choose another location and then click Next.

Godex Label Printer User Guide
Page 15
5. Make sure the option to Run Driver Wizard is checked and then click Finish.
6. If Windows prompts you for permission to allow the software to make changes to the computer, click
Yes. You may need to click the printer installation icon on the Windows taskbar to bring the next install
screen up.
7. Make sure the option on the welcome screen is set to Install printer drivers, and then click Next.

Godex Label Printer User Guide
Page 16
8. Choose the Godex HD90 printer model and click Next.
9. Click Create Port…

Godex Label Printer User Guide
Page 17
10. Click on Standard TCP/IP Port to select it, and then click New Port…
11. A wizard begins to walk you through the process of adding the TCP/IP port. Click Next on the opening
screen of the wizard.
12. Type in the IP address of the Godex HD90 printer. The Port Name value will automatically become the
IP address, but you can change the port name if you wish. Then click Next.

Godex Label Printer User Guide
Page 18
13. Click Next to confirm the standard device type of Generic Network Card.
14. Click Finish to allow the printer drivers to install.

Godex Label Printer User Guide
Page 19
15. Click Close on the Create Port window.
16. Make sure the new port you just created is the selected port in the Seagull Driver Wizard window and
click Next.

Godex Label Printer User Guide
Page 20
17. Customize the name of the printer if you wish. Set the printer as the default printer if this is a check-in
workstation that should normally print to the Godex HD90. As a network-based printer, you should not
need to share the printer from the workstation. Once these settings are set the way you want them to
be, click Next.
18. Click Finish to complete the process.

Godex Label Printer User Guide
Page 21
19. Click Close to end the install process.
1. Push in the two buttons on either side of the cover and lift up to open the printer.
2. Push in the two green buttons on the front of the black printhead assembly to release it. Then lift it up
out of the way of the paper path.
3. Pull up on the spool axle to release it from the latch.
4. The axle is set originally for a 1” core spool. It can also be switched to accommodate a 1.5” core spool
by flipping over the axle and turning it back to the original orientation across the printer. The sample
spool of labels that came with the printer is a 1” core spool.
5. Place the spool of labels on the axle so that the labels will feed forward toward the front of the printer.
6. Pull the two label guides apart and then feed the first label between them.
7. Once the first label has been fed between the guides, push them gently together until they are snug
with the label, but not pinching.
8. Return the black printhead assembly to its original position. It will snap into place.
9. Close the lid of the printer so that it snaps back into place.
10. Press the yellow feed button on the top of the printer to set the printer for the next label to print.
There is a video illustrating how to load the label paper stock at
http://www.youtube.com/user/GodexInternational#p/u/4/stdg2kWgi0c

Godex Label Printer User Guide
Page 22
1. Power off the printer.
2. Hold down the yellow feed button on the top of the printer.
3. Turn on the printer. Keep holding the feed button until the printer beeps three times.
4. Release the button and a self-test label will print. There will be a couple of blank labels fed prior to the
printed test label. The printer uses these labels to calibrate itself to the size of the label.
If you ever experience trouble with the printer not feeding the label paper through properly, performing a
calibration through the steps above should resolve the problem.
There is a video illustrating how to calibrate the printer at
EZ-DT :http://www.youtube.com/user/GodexInternational#p/u/16/-QsZwDXHBFQ.
HD90: http://www.youtube.com/user/GodexInternational#p/u/10/nWlEUey-VCw

Godex Label Printer User Guide
Page 23
1. From the Windows Start menu open the Devices and Printers window.
2. Right-click on the Godex printer and select Printing Preferences.

Godex Label Printer User Guide
Page 24
3. Make sure the Stock drop-down option matches the size label stock you are using. If it does not match,
select the correct size from the drop-down menu or click the New button to add a new size. The
screenshot below shows a typical setup for a 3 x 4 label.
4. Once the correct stock size appears in the Page Setup tab drop-down, click onto the Stock tab.
5. Uncheck the Use Current Settings for the Position Adjustments section and enter .66 as the Stop
Position. This is the setting for an upward tearing motion. A downward tearing motion is facilitated by
a setting of .51.
6. Click OK to accept the new settings as the default preferences for the Godex label printer.

Godex Label Printer User Guide
Page 25
The optional cutter module will cut the labels for you instead of requiring a tearing motion either up or down.
The cutter works well with the 3” x 2” label stock and with most labels. With normal operation using label
stock up to 120g/m2, the cutter will make approximately one million cuts before needing to be serviced or
replaced. However, it does not work well with self-adhesive labels. Cutting through adhesive will pollute the
rotary knife and impair its operation.
If you purchased the optional cutter module, follow the steps below to adjust the cutting position.
1. Open the Printer Properties of the Godex Windows printer driver.
2. On the General tab, click the Preferences button.
3. Change to the Stock tab.
4. Change the Post-Print Action to Cut.
5. Change the Occurrence option to match your desired behavior for the cutter. You may choose to
activate the cutter After Every Label, After Identical Copies, After Interval (i.e. after every 2nd label), or
After Job (i.e. after each check-in procedure, no matter how many labels are printed at one time). If
you choose After Interval, you would also specify the Interval value.
6. Under Position Adjustments, uncheck the Use Current Printer Settings box.

Godex Label Printer User Guide
Page 26
7. Enter a Stop Position value of 1.20 in. This is a guideline only. You may need to adjust it as high as 1.26
in. or adjust it to be slightly lower. If the cutter is cutting the label and not between the labels, adjust
as needed.
8. Click OK to accept the position adjustment change.
9. Click OK to accept the overall printer driver change.
Adjusting the stop position can influence the top margin positioning. If you change the stop position after
configuring the receipt design, you may need to test the label again and adjust the form’s top margin setting.

Godex Label Printer User Guide
Page 27
For the following steps you will need to know the IP address of the printer, which should appear on the
network with a device name of GODEXLAN. If you cannot identify the IP address of the printer using your
server or router administration tools, install the GodexLAN Control Center software from the Products Guide
CD as described in the last section of this document. Once you know the IP address of the printer, follow the
steps below.
1. Click onto the Ports tab.
2. Click Add Port…
3. Select Standard TCP/IP Port and click New Port…
4. Click Next on the welcome message for the Add Printer Port wizard.

Godex Label Printer User Guide
Page 28
5. Enter the IP address for the printer as the Printer Name or IP Address value. The same value will
appear as the Port Name. You can leave the Port Name value alone or edit the Port Name if you wish.
Click Next.
6. Verify that the Device Type is Standard – Generic Network Card. Then click Next.
7. Click Finish to complete the wizard steps.
8. Click to Close the Add Printer Ports window.

Godex Label Printer User Guide
Page 29
9. Make sure that the new port has a checkmark beside it and click Apply. The name of the printer will
move to the right of the port description.
10. Click OK to accept the changes.

Godex Label Printer User Guide
Page 30
1. Open the Check In Home Base.
2. Choose Utility > Room Printer Information.
3. Make sure that at least one room has been assigned to print to the Godex printer. The (Default) option
will work if the Godex printer is the Windows default printer. If it is not the default printer, change the
drop-down so that it explicitly references the Godex printer.
4. Click OK to confirm any changes and close the Room Printer Information utility.
5. Choose Utility > Receipt Design.
6. Click Add Format.
7. Type the label design into the now-blank drop-down box option. Instead of the generic term “Godex
Label” used in the illustrations in this document, you will want to use a name that describes how or
when this label will be used; for example, Children’s Check In.
8. Change the Form Height and the Form Width to match the height and width of the label stock. The
sample labels included with the printer are 4” x 4” labels, so the Form Height and the Form Width
should both be 4.00 to work with that type of label. If you are using 3” x 2” or 4” x 3”, change the
settings appropriately.
9. Check the box for Laser Form. Even though this is a thermal printer and not a laser printer, it still uses
printer codes that are similar to those of a laser printer.

Godex Label Printer User Guide
Page 31
10. Choose whether you want 6 lines per inch or 8 lines per inch. On a 4” high label this is the choice
between a total of 24 lines of larger text or 32 lines of smaller text.
11. Choose the number of copies of identical labels that should print together. A one indicates that the
printer should print only one label and no duplicates.
12. Set the Comments Word Wrap Multiplier. The number here is multiplied by the width of the label in
inches to determine the number of characters to print in a single line before wrapping to the next line
down. For example, the default of 15 for a 4” wide label would mean that 60 characters would print
before the line begins wrapping. If you have long comments that are truncated and not wrapping to
the next line properly, lower this number.
13. Select your Heading and Footing preferences to determine what will print on the label. Bear in mind
that you have only as many lines as the height of the label and your choice of the number of lines per
inch will allow. The chart below will assist in determining the maximum print line number:
Label Height 6 lines/inch 8 lines/inch
2” 12 16
3” 18 24
4” 24 32

Godex Label Printer User Guide
Page 32
For more details on how to set up your receipt designs, see the Check In Quick Reference Guide at
http://www.shelbyinc.com/Documents/pdfs/v5/CheckIn_Guide.pdf.
14. Make sure the Room # at the bottom of the screen matches one that is set to print to the Godex
printer, as you determined in Step 3 above. Then click the Print Test button. You will be notified that a
new label definition has been added to the ShelbyFORMS utility. Click OK on the notification.

Godex Label Printer User Guide
Page 33
15. After you click OK on the notification, click to choose View on Screen. A print preview of the receipt
design will appear.
16. Close the print preview without printing the receipt yet. The top and left margin needs to be adjusted
before the printout will reflect the final settings.
17. Click OK to accept the receipt design so far. You may return to the Receipt Design utility at a later step
to make final edits.
18. From the Shelby v.5 Dashboard, load the Utilities module.

Godex Label Printer User Guide
Page 34
19. Click the ShelbyFORMS link.
20. Scroll down in the list of forms until you find the form name that matches the name of the label design
in Check In. It could be either a Label type or a Special type.
21. Double-click the form to open it for editing.

Godex Label Printer User Guide
Page 35
22. Change the Top Margin to .10 and the Left Margin to .10. These settings will account for the non-
printable edges around the label.
23. Click OK.
24. Press F3 to return to the Utilities Home Base.
25. Press F3 and click Yes to close the Utilities module.
26. Return to the Check In module and choose Utility > Receipt Design.
27. Click Print Test and choose Print Direct for a sample output of the label.
28. Now that the label form has been set, you may continue to adjust the Header and Footer settings as
needed to achieve your desired label design.
29. If the top and left margins need further adjustment, you may return to the ShelbyFORMS utility to
tweak those settings.

Godex Label Printer User Guide
Page 36
If you are installing both the optional network module and the cutter module, install the network module first.
The installation process requires a Phillips screwdriver.
The cutter comes with an illustrated installation guide. Refer to that guide for a visual reference to the steps
below.
1. If the printer has been in use, remove the label stock and unplug the label printer’s power adapter and
USB cable or network cable.
2. Place the printer on a horizontal surface and open the top cover.
3. Remove the front cover. The easiest technique to do this is to press your thumbs against the cover just
below the metal tear guide and pull outward first and then up.
4. Feed the loose end of the cutter’s control cable through the hole at the lower right corner.
5. Place the cutter into the opening, making sure not to crimp the control cable. The metal lip of the
cutter module must be below the metal lip on the main printer assembly.
6. Holding the cutter in place, gently turn the printer on its side so that the bottom is facing you.
7. Place the two screws provided into the deep screw holes just behind the existing screws. Tighten the
screws to secure the cutter mechanism to the printer.
8. Open the panel on the bottom of the printer to see the main circuit board of the printer.
9. Fish out the loose end of the control cable and insert it into the receptacle of the same size on the
main board. Do not force the connector. When it is aligned properly, it will slide smoothly into the
receptacle and .snap into place.
10. Replace the panel on the bottom of the printer.
11. Turn the printer back over onto its bottom.
12. Plug the USB or network cable back into the printer and re-load the label stock, feeding it through the
cutter.
13. Follow the instructions for Adjusting the Stop Position for Operation with the Cutter Module.

Godex Label Printer User Guide
Page 37
The installation requires a Phillips screwdriver.
The Ethernet module comes with an illustrated installation guide. Refer to that guide for a visual reference to
the steps below.
1. If the printer has been in use, remove the label stock, and unplug the power adapter and USB cable.
2. Turn the printer upside down and remove the four screws from the base.
3. Return the printer to the upright position.
4. Remove the front cover from the printer. The easiest technique to do this is to press your thumbs
against the cover just below the metal tear guide and pull outward first and then up.
5. Lift the middle compartment and top cover to separate them from the base. Do not pull too firmly.
There are several cables connecting the main board to the middle section.
6. Set the printer on its side so that you can reach the outer back section and the inner section with the
main circuit board.
7. Loosen and then remove the hex nuts on either side of the RS-232 port.
8. Push the main circuit board gently back to release the back panel and then remove the panel from the
printer.
9. Install the Ethernet back panel into the printer in the place of the original panel. The module ships with
several back panels to accommodate different printer models. Make sure you use the back panel for
the DT-4 printer.
10. Push the main circuit board gently back into place and secure it with the hex nuts you removed earlier.
11. Align the Ethernet module so that the receptacle lines up with the opening in the back pane.
12. Secure the Ethernet module to the main circuit board using the securing screw provided.
13. Plug one end of the provided cable connector into the Ethernet module and the other end into the
main circuit board. There is only one place that the cable will fit properly for each side.
14. Replace the middle compartment into the bottom of the printer.
15. Replace and tighten the bottom case crews to attach the middle compartment to the printer.
If you are installing the cutter also, stop and follow the instructions for that installation at this point. Then
return to Step 17 below. If you are not installing the cutter, replace the front cover plate and continue.
If the printer was not in use prior to this installation, stop and follow the instructions for Connecting the
Printer to a Workstation. Then continue with the steps on the next page.
16. Make sure the printer is connected to a computer using the USB connection. The computer must have
the Godex printer driver installed. The printer must be on.
17. Open the Printer Properties of the Godex Windows printer driver.

Godex Label Printer User Guide
Page 38
18. On the General tab, click the Preferences button.
19. On the Page Setup tab, click the Advanced Options button.
20. Click onto the User Commands tab.

Godex Label Printer User Guide
Page 39
21. Change the Function Character to None.
22. Click OK to close the Advanced Options and then click OK again to close the Printing Preferences.
23. Click onto the Tools tab.
24. On the Tools tab, click Action > Send Printer Command…
25. Type the following text into the Printer Command box. The carat symbol is Shift+6. Press the Enter key
after the command in order to send a Carriage Return/Line Feed character at the end of the command.
^XSET,USBETHERNET,1
26. Click Send. You should hear a faint click inside the printer, and the status light on the printer will blink
for a few seconds.
27. Click Close.
28. Follow the instructions in the section on Configuring the Printer Driver to Print over the Network.

Godex Label Printer User Guide
Page 40
If you are connecting to your Godex printer over the network, you will need to discover the IP address of the
printer before you can complete the configuration of the printer driver. The Control Center software can help
you do that.
1. Insert the Products Guide CD into the computer. If you do not have the Products Guide CD handy, the
software may also be downloaded at http://www.godexintl.com/us/downloads.aspx?cid=4.
2. Navigate to the \Ethernet and WLAN\Control Center folder.
3. Double-click the Setup Control Center icon.
4. Choose the desired installation language and click OK.
5. Click Next on the welcome to the install wizard.
6. Enter your user name and organization name and click Next.
7. Verify the path for the installation and click Next.
8. Click Install to begin the installation.
9. Verify that the option to Launch GodexLAN Control Center is checked and click Finish.
10. Each Godex printer on the network will appear with its IP address beside it.
11. Note the IP address of the printer.
12. Choose System > Exit to close the GodexLAN Control Center.